
3D Escape Room Detective Story provides a variety of mind-boggling puzzles that point-and-click mystery game fans like myself will enjoy. Some of the puzzles can be very complex, so I've provided solutions to all of them in this 3D Escape Room Detective Story Chapter 3 walkthrough to help you enjoy the game to its fullest.
This guide has been split into five parts, one for each chapter of the game. If you need help with a puzzle in one of the other chapters, I've linked them all below.
Chapter 3 begins with a 3 am phone call from Sheriff Claude regarding Pete, who used to work under you. He was involved in a shooting but escaped onto a boat. Upon further inspection, a stranger's body was found on the ship while Pete was nowhere to be found. This chapter sends you off to the boat to investigate the truth of what happened.
3D Escape Room Detective Story Chapter 3 guide
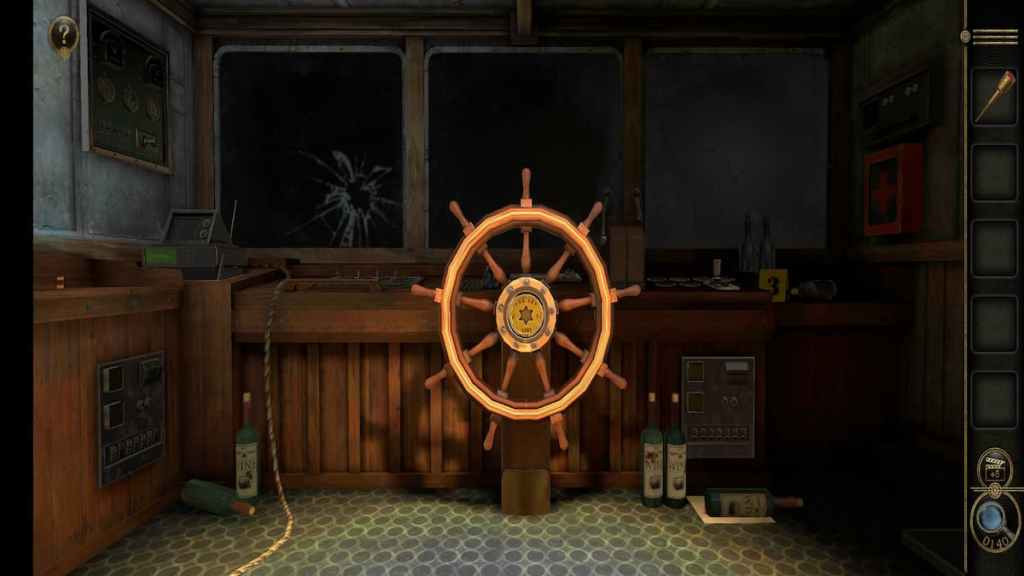
On the boat, the first things you see are a steering wheel with a uniquely shaped hole and lots of wine bottles scattered about.
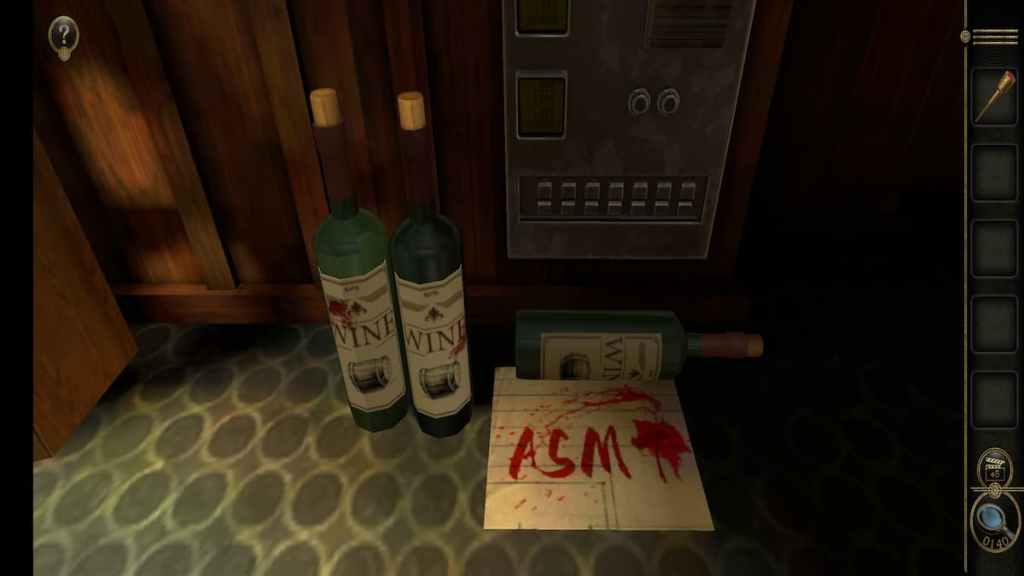
Tap on the group of wine bottles to the right of the wheel. Touching the bottle on the floor will cause it to roll away, revealing the code "ASMT". Write this down for a future puzzle.
White box puzzle
Turn your attention to the white box in the back right corner of the room.

Press the top right and middle left blue triangles to remove the four center bars and reveal a puzzle at the top.

To solve this puzzle, you need to spin the rings to create an image of an anchor. The easiest way to do so is by positioning the outer ring first, then the inner ring, and finishing the puzzle with the center ring.

Completing the anchor gives you a Small Handle and unlocks a bird puzzle. Leave the bird alone for now and head into the back room.

Upon entering the navigation room, you'll first notice the globe.

Focus on the top of the globe. Take the metal bird feather from the left side and move down to look at the leg.

The leg has a gear with a set of green dots on either side.

Rotate the gear until the green dots on the gear align with the green dots on the leg to get the Globe Fragment C.

Shift from the globe to the bookcase on the left.

Focus on the pottery on the lower two shelves.

Rotate them to reveal a 5-digit code. Keep in mind that the numbers on the pots are backward, so the code will be "37597".

With the basic clues out of the way, turn toward the desk on the left.

The drawer at the center can be pulled out immediately.

The puzzle cannot be completed yet, but the bird's second feather piece can be grabbed.

Move to the next drawer over, which has a keyhole reminiscent of an old-school gear shift.

Small Handle puzzle
Insert the small handle into the center of the hole.

Moving the handle between the different sections will rotate the outer ring either clockwise or counterclockwise. To complete the puzzle, the outer rim needs to cover the green diamond at the top.

Slider puzzle
Completing this puzzle reveals a second puzzle containing two sliders. Each slider needs to be placed between the green lights in their column.

Push both sliders to the top and then side one of them down two spaces to complete this puzzle.

This will give you a key.

Hidden book puzzle
Head over to the top of the desk. Lift the third book from the left to reveal a keyhole.

Inserting the key from the previous puzzle opens up a puzzle with a four-letter sequence.

Input the four-letter sequence from the wine spill in the first room.

This will unlock a 5-digit number lock.

Put the 5-digit code from the pottery shelf into the lock to gain a Strange Locked Core.

Set of drawers puzzle
Head to the set of drawers on the right side of the desk. You'll notice that the set of books beside it has an interesting diamond pattern. To solve the puzzle, you'll need to use the books as a guide for pulling each drawer out.

The placement of the filled-in diamond depicts which drawer the book represents, while the book's order in the series represents how far each drawer needs to be pulled out.
- The first drawer is book 2.
- The second drawer is book 5.
- The third drawer is book 3.
- The fourth drawer is book 4.

Ordering the drawers properly will unlock the lower right desk drawer, which contains a Double-Layer Gear.

Gold box puzzle
This gold box can be found to the left of the desk. To solve the puzzle, you need to connect the gaps in the red, green, and blue layers to make a clear path from the gold center to the top.

Use the right switch to move the circles so that the opening in the blue is at the top, and the red and green openings align on the right side.

Rotate the red and green circles to allow the lever to fall. Spinning it will open the box, giving you Globe Fragment B.

Bird puzzle
Before returning to the bird puzzle, you'll want to take note of the poster in the first room. Save the image to refer back to it during the puzzle.

Now head over to the bird. There are two missing slots, one on the left wing and one on the right. Insert the two pieces from the navigation room to start the puzzle.

Once the wing pieces are added, the top six pieces from each wing will spin around until they're randomly facing forward, backward, and horizontally. Rotating the clock in any way will cause three of the feathers on each wing to move. The poster explains four movements that move different sets of feathers, so keep it close while rotating the feathers to make them all face forward.

Once all of the feathers are facing forward, a puzzle featuring the bird's head will begin.

Bird's head puzzle
You'll need to tilt the bird's head either left or right to complete a multi-part sequence. When you choose the correct direction, a feather will rise on the head. Choosing the wrong direction will restart the sequence. The sequence in my game was right, left, left, left, right, right.

Completing the head puzzle will give you a Ruby and start the final bird puzzle. Take note of the fact that both clock hands are pointing to the "12" before the puzzle begins.

4-Digit bird clock puzzle
To solve this, you'll need to count how many minutes away each hand is from its original starting position. The blue hand is 10 minutes away from the 12 while the yellow hand is 25 minutes away.

Inputting the code "1025" gives you a Bookend Metal Piece.

Steering wheel
Before solving the first steering wheel puzzle, click on the Strange Lock Core in your inventory to view it.

Rotate the gear on its side to turn it into a Deformed Lock Core.

Now head over to the steering wheel. The end of the Deformed Lock Core matches the hole at the center of the wheel.

Insert the Deformed Lock Core and rotate it to obtain a Circular Badge. There is a keyhole in the wheel, but that will be saved for later.

Circular Badge
Open up the Circular Badge in your inventory.
The goal of this puzzle is to extend points out from each button on the circle. Only elevated buttons can be pressed, and pressing a button will affect the elevation of the adjacent buttons as well as the points coming out of them. Solving will transform the Circular Badge into a Star-Shaped Badge.

Locked drawer
To complete the desk, head over to the locked drawer on the left.

Place the Metal Bookend Piece into the slot like a key. Unlocking the drawer gives you the Globe Fragment A.

Globe puzzle
Return to the globe to place the three fragments. This hole is for the fragment labeled "A".

Place Globe Fragment A into the hole to fill in the space.

This hole is for the fragment labeled "B".

Place Globe Fragment B into the hole.

This hole is for the fragment labeled "C".

Place Globe Fragment C into the hole to finish patching up the globe.

Take a moment away from the globe to look at the map above it.

The first red blob on the right represents the button on the globe that you'll need to press first. Afterward, you'll press the next closest button as you travel to the west across the globe.

Once every button is pressed in the correct order, a new portion of the globe will extend from the top.

Star-Shaped Badge puzzle
Look over to the bottom of the new portion of the globe. Take the Key out of the bottom, leaving just a star-shaped gap.

Place the Star-Shaped Badge into the gap.

Placing the Star-Shaped Badge will create a cage on the bottom, which we'll return to shortly.

Steering wheel keyhole
Return to the steering wheel and insert the Key from the globe. Rotate the wheel to unlock the ruby puzzle.

Ruby puzzles
This puzzle consists of multiple rotating gears, although only one will be active during the ruby section.

Place the Ruby into the center of the machine.

Use the mechanism on the bottom to move the center ring left and right, and the mechanisms on the right and left to rotate the Ruby.

Once the Ruby is complete, the rings will retract and it can be taken.

You will also get Clue Paper A.

Ruby path puzzle
Return to the metal cage on the globe stand and place the Ruby on top of it. You'll need to recreate the path on Clue Paper A by rotating the cage and sliding the Ruby up and down.

Rotate the cage until it looks like this.

Drag the Ruby down to the bottom of the cage.

Turn the cage clockwise twice.

Slide the Ruby up two spaces.

Rotate the cage clockwise two more times.

Slide the Ruby down once.

Slide the cage clockwise two more times.

Slide the Ruby up one space to complete the path.

Ruby coordinates puzzle
Completing the pathway causes a number to appear on the small digital screen above.

To move the rings, you'll need to first flip the needle from horizontal to vertical to fit in the gap it rests on.

The gold piece will slide to the front, allowing the rings to be spun.

To complete the first number, spin the first ring to "VI" and the second ring to "III". This will cause a new number to appear to the left of the previous one.

To complete the second number, turn the first ring to "II" and the second ring to "IX". You'll be rewarded with a Key after completing it.

Oxygen tank model
Look over to the oxygen tank model on the bookshelf.

Flip the circular piece at its base to reveal a keyhole.

Insert the Key to get a Submarine Model.

Submarine Model
Open the Submarine Model from your inventory.

Slide the top fin to the opposite side to reveal a four-digit lock on each side of the model.

To crack the code, you need to count the number of triangles in the shapes above each digit. When the submarine is facing the left, the code is "3185".

When the submarine faced the right, the code is "5268".

Solving the locks releases the propeller, which can be spun to reveal an Emerald hidden in the front of the submarine.

Related: Cube Escape Seasons walkthrough
Emerald puzzles
This puzzle is like the ruby puzzle, but with added difficulty. The left ring rotates the four left parts of the Emerald, the right ring rotates the four right parts, and the center ring rotates the bottom four parts. Place the Emerald into the center to begin.

When the Emerald is completed, the rings will retract and it will be left floating in the center of the machine.

Paper Clue B
The paper clue for this puzzle can be found in the central dial on this panel.

Moving the sliders will open up the dial, giving the player Paper Clue B.

Emerald path puzzle
Head back to the cage and place the Emerald on top.

Rotate the cage so that you begin with this layout.

Slide the Emerald down once.

Rotate the cage clockwise once.

Move the Emerald down once.

Rotate the cage clockwise once.

Slide the Emerald down once.

Rotate the cage clockwise three times.

Move the Emerald slider up two times to activate the second part of the puzzle.

Emerald coordinates
To complete the first coordinate, spin the first ring to "III" and the second ring to "I".

For the second coordinate, adjust the rings so that the first reads "XI" and the second reads "VIII" to get the Special Key A.

Levers and meters puzzle
Go to the ink bottle on the left corner of the bookshelf.

Push the Special Key A into the ink bottle.

This will allow you to push the book with the label onto the shelf, revealing a Wooden Piece and a Metal Frame.

Go to the middle drawer and place the Wooden Piece in the hole.

Then add the Metal Frame on top.

Look at the calendar to determine the placement of the Metal Frame. The circled "5" is two numbers right and three numbers above the corner.

Using the calendar as a guideline, line the frame up with the 3 on the vertical row and the 2 on the horizontal row.

Apply the layout depicted in the drawer to the three-by-four grid of levers in the first room. This will give you the Strange Key B.

Medieval archway puzzle
Return to the ink bottle and place the Strange Key B on top of it.

This will reveal a model of an archway with several colored lights.

Count the number of squares of each color and move the respective sliders down that amount. The base position of the sliders is 1, with the bottom of the slider being 5. There are five 5 red lights, so the red slider goes to the bottom. There are 3 yellow lights, placing the yellow slider in the center.

Green has 4 lights and blue has 2, leaving their sliders at the first and third quarters of the column. Putting all four sliders into position will grant you a Sapphire.

Sapphire puzzles
The Sapphire can be placed into the same machine as the Ruby and Emerald.

The goal of the puzzle is to rotate the squares around the Sapphire using the gears until they all fit in a particular position. You'll be able to tell when a square is in the right position because a bright blue line matching its placement will appear on the Sapphire.

Unlocking Paper Clue C
The puzzle to unlock the paper clue is more difficult for this one. It contains eight sections which must be added together to create a cube in the center.

Each of the pieces must be attached in a particular order.
- Bottom center
- Bottom right
- Bottom left
- Upper right
- Right
- Left
- Upper Left
- Top

Unlocking this dial will give you Paper Clue C.

Sapphire path puzzle
Head to the cage for the final time and place the Sapphire on top.

Rotate the cage to look like this.

Slide the Sapphire down one space.

Move the cage clockwise two spaces.

Move the Sapphire down one space.

Move the cage clockwise one time.

Slide the Sapphire down one space.

Move the cage counterclockwise one space.

Slide the Sapphire down one space.

Move the Sapphire clockwise three spaces.

Slide the sapphire up two spaces.

Move the Sapphire clockwise one space.

Move the Sapphire down one space to complete the path and unlock the first coordinate, N15.

Sapphire coordinate puzzle
Slide the first ring to "I" and the second ring to "V" to complete this coordinate.

Solve the coordinate W92 by turning the first ring to "IX" and the second ring to "II".

The last puzzle left to solve is the navigation table.

Place the Double-Layer Gear on the left peg to activate a handle to spin.

Spinning the handle will unlock a slider at the bottom, which moves the larger central gear to the left and right.

Add the second gear to the right peg.

The navigation table will change to have three sliders, two spinning pegs, and a rotating puzzle at the top.

The sliders change which parts of the puzzle the gears change when spun.

To solve the puzzle, line up the pieces of the puzzle so that there is an empty square at the top.

This will reveal a note reading "Memory is an eternal life".

Looking for a more cartoonish escape room game? Check out our Must Escape Dinosaur Land walkthrough here on Pro Game Guides.