- You have to complete at least 6 Challenges in Megabonk to unlock Characters, Weapons, Tomes, and Items in Megabonk.
- AFK Gaming, Weird Controls, Sticks & Stones, and The Floor is Lava are some of the easiest challenges in Megabonk. Other Forest Tier 1 challenges are also relatively easy, except for the ones with stronger enemies.
- Read on to find the best strategies, including the best characters and builds, for completing the ARK Gaming Challenge, Fragile Challenge, Pacifist Challenge, and more.
Updated: October 28, 2025.
Added strategies for more Megabonk Challenges.
Challenges in Megabonk are more than just extra playable content for players who have completed all stages and tiers of both maps. These interlock directly with the main game because a few characters are locked behind their completion. So, we’ve put together a Megabonk all Challenges guide that will help you get those unlocks and complete the other Challenges as well. Let’s dive right in!
Megabonk Challenge System Overview
Each Tier of each map has different challenges that players can try to complete. These challenges are not just extra playable content for players who have cleared all Tiers of both stages. They connect to the main game because completing a specific number of challenges is required to unlock certain Characters, Weapons, and Tomes in Megabonk.
You can unlock the Challenges of a specific tier by completing it. So, for example, to unlock the Challenges of Forest Tier 1, you have to spawn and defeat the boss. Do the same for the other tiers of the Forest and the Desert to unlock their Challenges. Higher tier = high difficulty challenges.
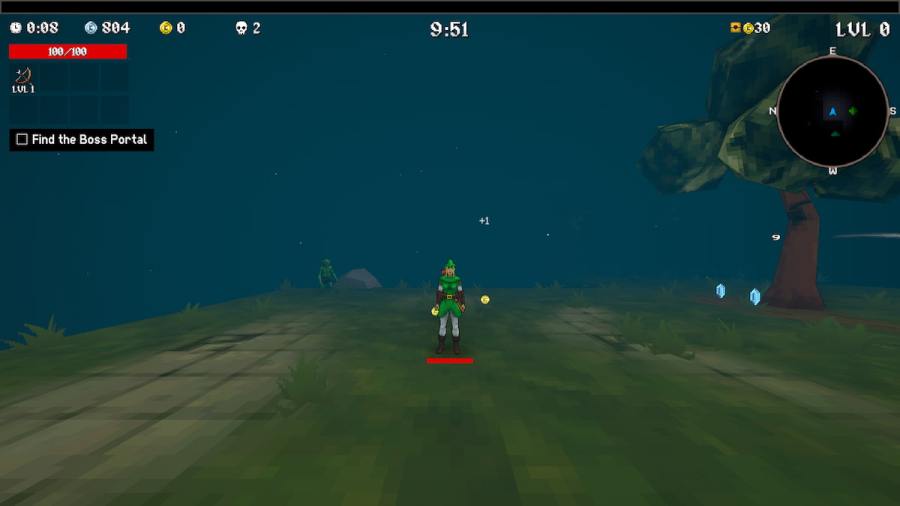
Challenges range from Survival (AFK Gaming Challenge, Fragile) to Time Trials (Speedrunning) to Strategy (Pacifist Challenge, Sticks and Stones).
All Challenges in Megabonk
All tiers of both the Forest and Desert have similar challenges, but with slightly different requirements. You’ll find separate tables for each tier below, with all the Challenges, their objective, and the conditions.
All Forest Challenges in Megabonk
Forest Tier 1 Challenges
| Challenge | Objective | Modifiers |
|---|---|---|
| Fragile | Kill all the bosses. | Die upon taking any damage (including fall damage) or touching an enemy. |
| Turbo Mode | Kill all the bosses. | 5x enemy scaling. -96% chest price. |
| Smol Boi | Kill all the bosses. | 0.8x Damage. 0.8x Movement Speed. 0.8x Size. |
| AFK Gaming | Reach the Final Swarm. | No moving or jumping allowed. |
| Blind | Kill all the bosses. | The fog becomes too thick and you can’t see anything. |
| Sticks and Stones | Kill all the bosses. | No items allowed. Rely on your Weapons and Tomes. 0x Chest Multiplier. |
| Weird Controls | Kill all the bosses. | All controls are reversed. |
| Speedrunner | Kill all the bosses. | You only have 6 minutes to win. |
| Speedrunner+ | Kill all the bosses. | You only have 4 minutes and 15 seconds to win. |
| Pacifist | Kill all the bosses. | No weapons allowed. |
| Oh no | Kill all the bosses. | 1.25x Enemy HP. 1.25x Enemy Damage. 1.25x Enemy Speed. |
| Oh s*** | Kill all the bosses. | 1.5x Enemy HP. 1.5x Enemy Damage. 1.5x Enemy Speed. |
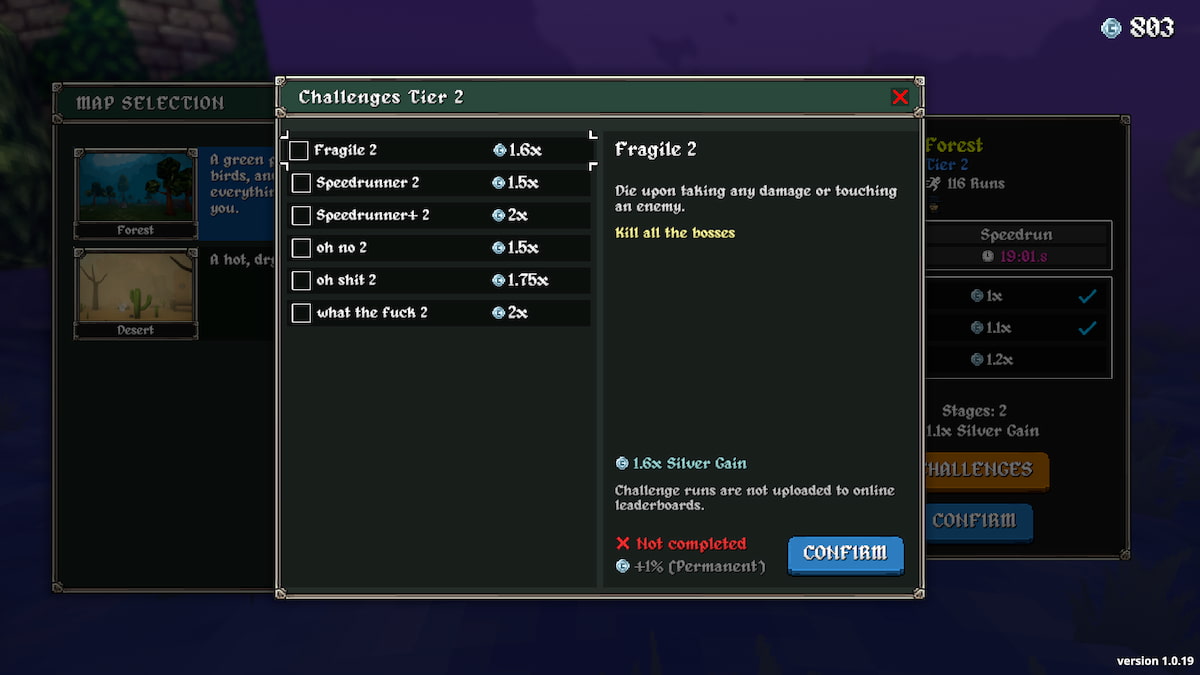
Forest Tier 2 Challenges
| Challenge | Objective | Modifiers |
|---|---|---|
| Fragile 2 | Kill all the bosses. | Die upon taking any damage (including fall damage) or touching an enemy. |
| Speedrunner 2 | Kill all the bosses | You only have 14 minutes to win. |
| Speedrunner+ 2 | Kill all the bosses. | You only have 12 minutes to win. |
| Oh no 2 | Kill all the bosses. | 1.25x Enemy HP. 1.25x Enemy Damage. 1.25x Enemy Speed. |
| Oh s*** 2 | Kill all the bosses. | 1.5x Enemy HP. 1.5x Enemy Damage. 1.5x Enemy Speed. |
| What the **** 2 | Kill all the bosses. | 2x Enemy HP. 2x Enemy Damage. 2x Enemy Speed. |
Forest Tier 3 Challenges
| Challenge | Objective | Modifiers |
|---|---|---|
| TBA | TBA | TBA |
All Desert Challenges in Megabonk
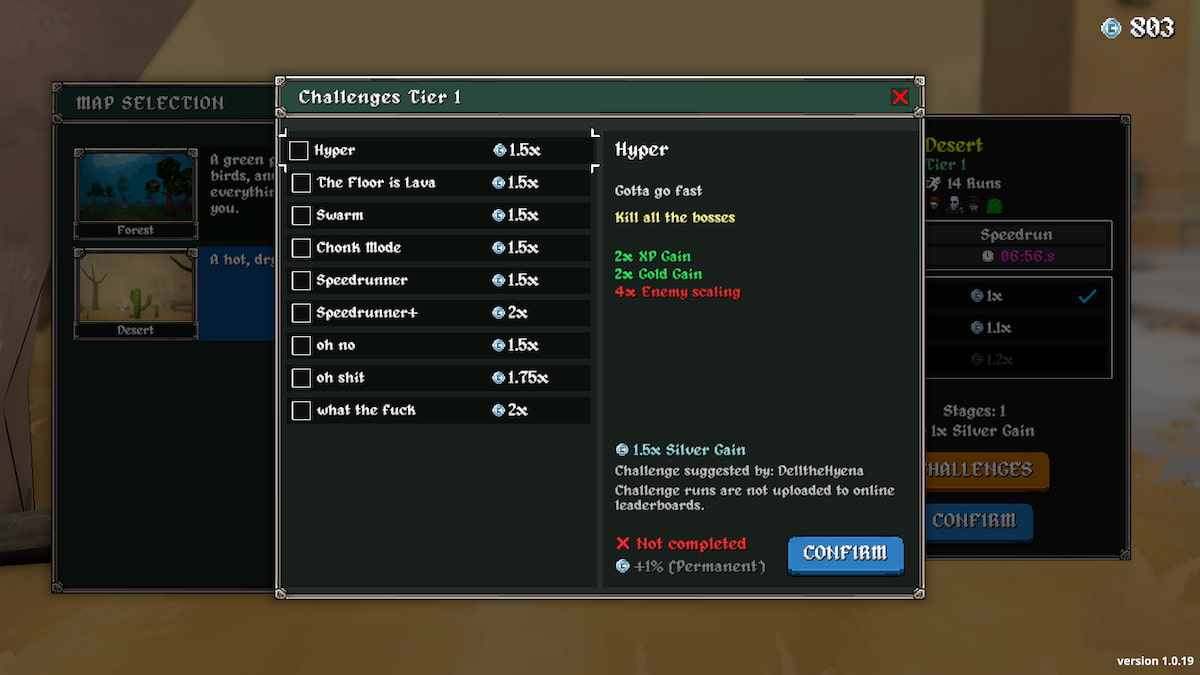
Desert Tier 1 Challenges
| Challenge | Objective | Modifiers |
|---|---|---|
| Hyper | Kill all the bosses. | Gotta go fast. 2x XP Gain. 2x Gold Gain. 4x Enemy Scaling. |
| The Floor is lava | Kill all the bosses. | Lava will periodically cover most of the map. |
| Swarm | Kill all the bosses. | Lots of enemies. 2x Enemy amount. 0.75x XP Gain. 1.5x Enemy Speed. |
| Chonk Mode | Kill all the bosses. | Enemies are bigger but slower. 0.85x Enemy speed. 2x Enemy Size. 2x Enemy HP. 1.5x Enemy Damage. |
| Speedrunner | Kill all the bosses. | You only have 6 minutes to win. |
| Speedrunner+ | Kill all the bosses. | You only have 4 minutes and 15 seconds to win. |
| Oh no | Kill all the bosses. | 1.25x Enemy HP. 1.25x Enemy Damage. 1.25x Enemy Speed. |
| Oh s*** | Kill all the bosses. | 1.5x Enemy HP. 1.5x Enemy Damage. 1.5x Enemy Speed. |
| What the *** | Kill all the bosses. | 2x Enemy HP. 2x Enemy Damage. 2x Enemy Speed. |
Desert Tier 2 Challenges
| Challenge | Objective | Modifiers |
|---|---|---|
| Speedrunner 2 | Kill all the bosses. | You only have 14 minutes to win. |
| Speedrunner+ 2 | Kill all the bosses. | You only have 12 minutes to win. |
| Oh no 2 | Kill all the bosses. | 1.25x Enemy HP.1.25x Enemy Damage.1.25x Enemy Speed |
| Oh s*** 2 | Kill all the bosses. | 1.5x Enemy HP.1.5x Enemy Damage.1.5x Enemy Speed. |
| What the **** 2 | Kill all the bosses. | 2x Enemy HP.2x Enemy Damage.2x Enemy Speed. |
Desert Tier 3 Challenges
| Challenge | Objective | Modifiers |
|---|---|---|
| TBA | TBA | TBA |
Megabonk Challenges to Complete First
Once you’ve unlocked all challenges by clearing the tiers, you can take on any challenge you want. However, if you want to unlock characters like Tony McZoom and Spaceman (locked behind Challenges), you’ll have to complete at least SIX challenges.
Luckily, some of the Megabonk Challenges are easier to complete than others. Complete those to get your unlocks before trying the difficult ones.
- AFK Gaming Challenge: Even though it sounds tough, the AFK Gaming Challenge is one of Megabonk’s easiest challenges, mainly because you don’t have to fight the boss. All you have to do is survive until the final swarm.
- Smol Boi: You’ll be slower, smaller, and deal less damage when you start with this, but all these things go to normal after a few upgrades. Focus on surviving early, and you’ll eventually turn into a Big Boi. Run the Size and Damage Tome, which is a very good combo to run with all the best weapons in Megabonk like Aura, Bananrang, Katana, Dexecutioner, and more. Items like Turbo Socks and Feathers will take care of the movement, and you’ll be all set for completing this challenge well before the second swarm hits.
- Sticks and Stones: During the Sticks and Stones challenge, you won’t get any items. You’ll have to rely completely on your Weapons and Tomes to kill all the bosses. Since it’s a Tier 1 challenge, you can make do without items, provided you use the right Weapons and Tomes.
- Speedrunner: The Speedrunner challenge for Forest Tier 1 is very easy, thanks to the boss’s low HP. As soon as you spawn, start looking for the boss portal and focus on upgrading only two weapons to kill the boss as quickly as possible. If you get the Moldy Cheese early, things become even easier.
- Pacifist: Once you have unlocked Athena, you're all set for attempting and completing the Pacifist challenge. Her passive, gain +2 Thorns per level, scales as a weapon with the Thorns Tome. Scroll down to read the full strategy and the build to run with Athena to complete the Pacifist challenge in Megabonk.
- The Floor is Lava: This is the easiest Megabonk challenge of the Desert stage. Everything plays out normally, but the entire map gets covered in lava periodically. If you touch lava, you'll take damage. You can climb up the buildings or charge shrines to escape the lava.
- Weird Controls: Practice a few times and let your brain do the rest of the work. The controls are completely reversed. So, if you're playing with a mouse and a keyboard, everything will happen in reverse. W will take you back and S will take you forward. Press A to go right and D to go left. The mouse will be inverted, too. You'll die a few times, but once you get the hang of it, it'll all come naturally to you. Go for any character you prefer and build them any way you like to complete the challenge.
Forest Tier 1 challenges are Megabonk’s easiest challenge and should be cleared first. After that, you can move on to Forest Tier 2 and Desert Tier 1, but aim for the Speedrunner challenges and the Hyper Challenge.
The Fragile challenges are some of the hardest in Megabonk. Challenges of the Oh no and Oh s*** series would be a piece of cake for players who regularly run the Holy Trinity combo. But if you are a beginner, leave those for last. Instead, clear the challenges listed above to unlock Tony McZoom and Spaceman and the mighty Anvil.
Best Strategies to Complete Megabonk Challenges
If you’re having a hard time completing Challenges in Megabonk, see the table below to find the best strategies for certain challenges in Megabonk.
| Challenge | Explanation & Strategy |
|---|---|
| AFK Gaming Challenge | To complete the AFK Challenge in Megabonk, you can go two different routes. You either become an absolute tank to survive the onslaught or turn into a pure DPS to melt enemies. Run Aura and Aegis with the Lightning Staff and Bananarang for a tank build. Knockback Tome will also ensure safety. If you’re going the DPS route, use Aura with a mix of ranged (Revolver, Bone, Bananarang) or AoE (Lightning Staff, Firestaff, Flamewalker) with the Damage and Cooldown Tomes. Megachad, Sir Oofie, and Athena are the best characters for completing this challenge. |
| Pacifist Challenge | This is one of the toughest challenges in Megabonk because you cannot use any weapons, but you still have to kill the same number of enemies, elites, mini-bosses, and the final boss. The best strategy for this challenge is to use Athena and double down on her Thorns passive. Since you won’t be killing too many enemies early, open as many pots as you can to gain XP and get the Thorns Tome and the Shield Tome as soon as possible. The Thorns Tome will scale pretty much the only weapon to your build, and the Shield Tome will ensure survivability. Apart from these two, you can add the Regen Tome or Armor Tome. The goal is to ensure survival. |
| Speedrunner | The Speedrunner challenges across all the tiers have the same objective with different time limits. You can complete them by following a straightforward strategy- find the boss spawn portal as soon as possible, farm XP around that area, and focus on your DPS more than anything else. Use high-mobility characters like Tony McZoom or Calcium so you can easily and quickly traverse the map. Ranged weapons with Poison or Lifesteal will make killing the boss easier. Run projectile-based weapons with Damage, Quantity, and Cooldown Tome to max DPS before spawning the boss. |
| Blind | In the Blind challenge, the map is covered in thick fog. The mini-map in the top right corner becomes almost useless, and you have to rely on your own memory. To complete the challenge, you have to kill the boss, and finding the boss portal is the toughest part. You can use pretty much any character since you’re playing the game in similar conditions as usual, and there is no character with extra visibility who could give you an advantage. That said, high-mobility characters will help you traverse the map quickly to find the boss portal. The best strategy is to hug the walls and check all four corners of the map. If you can’t find the boss portal in the corners, move inside and search the center. |
| Sticks and Stones | In this challenge, you can’t get any items because no treasure chests, shady vendors, or Moai heads will appear on the map. You have to rely solely on your Weapons and Tomes to kill all bosses. There are quite a few different characters and strategies that you can use for this challenge, but Robinette is the best choice because of her “damage scaling with gold” passive. Since you can’t spend any gold, your damage will scale very quickly, paired with the Damage Tome. Use any of the Robinette Builds, and you should be able to complete this challenge pretty easily. If you’re looking to complete the Hero Sword unlock quest, run the Sticks and Stones challenge to make it slightly easier, as you’ll only have to avoid power-up drops from the pots. |
| The Floor is Lava | The lava spreads fairly slowly, and you can avoid it completely if you play with high-agility characters like Calcium, Tony McZoom, Birdo, or Monke. Monke's wall-climbing abilities and Birdo's flight make these two characters the better choices. Build your character with ranged weapons like Bananarang, Revolver, Bone, and Wireless Dagger because you'll be on the move almost all the time. Also, remember to either pick up the Shield Tome or add Shield through the Charge Shrines. This will save you from the lava if you end up in tricky situations. Boss battles can be tricky during this challenge, especially when the floor is covered in lava. You can't see the floor attacks of the Stone Golem or the Scorpionussy. Moldy Cheese will make the boss battles short and quick, but ensure survival by keeping your distance. |
| Fragile | The Fragile challenge is one of the hardest challenges in Megabonk because you'll die instantly if you take any damage at all or let an enemy hit you. That said, there are multiple strategies that you can follow to take on and complete the Fragile challenge in Megabonk. You can go for a pure DPS build with a ranged character like CL4NK to kill enemies well before they can reach anywhere near you. The other option is to go for kitting characters like Birdo, Monke, and Calcium to keep your distance from the enemies. However, you will have to be extra careful to avoid fall damage if you go for the second option. Whichever style you follow, make sure you invest heavily in damage. Running the Damage x Quantity x Cooldown Tome trio is necessary to clear enemies before they can land a hit. Pro Tip: Avoid hugging the walls when or getting cornered below cliffs because enemies can randomly fall on your head and kill you. |
Note: This section is a work-in-progress. We’ll update it with more challenges as we find the best strategies for them. If you don’t find what you’re after, make sure to check back later.
Best Characters for Megabonk Challenges
While you can use any character you want to complete a majority of Megabonk challenges, certain challenges become a lot easier when you play them with specific characters. See the table below to find the best character for Megabonk challenges like AFK Gaming, Pacifist, and more.
| Challenge | Best Character |
|---|---|
| AFK Gaming | Megachad, Sir Oofie, Athena |
| Pacifist | Athena |
| Sticks and Stones | Robinette |
| Speedrunner | Calcium, Tony McZoom, Monke |
| Blind | Monke, Tony McZoom, Birdo |
| The Floor is Lava | Birdo, Monke, Tony McZoom, Calcium |
| Fragile | CL4NK, Birdo, Megachad |
Note: This section is a work-in-progress. We’ll update it with more challenges as we find the best characters for them. If you don’t find what you’re after, make sure to check back later.
Megabonk FAQs
There are over 40 challenges in Megabonk across all tiers of both Megabonk stages (Forest and Desert). Some of the challenges are unique, while some are similar to each other with slightly different conditions/multipliers.
The easiest challenges in Megabonk are the Forest Tier 1 challenges like AFK Gaming Challenge, Blind, Sticks and Stones, Speedrunner, and Smol Boi. The Floor is Lava challenge on Desert Tier 1 is also fairly easy when using tanky characters or characters with Shield.
The Floor is Lava challenge can only be played on Desert Tier 1. So, if you want to play the Floor is Lava challenge, you must complete the Forest Tier 2 first to unlock the Desert Tier 1. After that, you have to complete the Desert Tier 1 to unlock the Floor is Lava and the other challenges.
That concludes our Megabonk all challenges guide. If you've defeated all the main bosses and are looking to try something different, these challenges are the way to go. For those looking to complete the challenges required for character and weapon unlock, try the challenges listed in the Megabonk Challenges to Complete First section.
While you're here, make sure you check out our Megabonk Beginner's Guide, Megabonk Character Tier List, and the Ultimate Megabonk Weapons Tier List.