
Hidden Ruins is a classic puzzle adventure game in the Adventure Escape Mysteries series that was only added to the AE Mysteries Steam app in June 2024. If you’re currently enjoying this classic Professor Burns adventure, read on for my full walkthrough and puzzle guide.
How to beat AE Mysteries Hidden Ruins - Full walkthrough
Our adventure begins as Professor Burns, Tawa, Rachel, and Peter are trying to find the hidden ruins of the ancient Kumari Civilization. To play the game on Steam, you must download Adventure Escape Mysteries and select Hidden Ruins once you've opened its app.
The game has eight chapters, which you can easily navigate via the contents list above. You’re looking for the Elixir of Life, but it won’t be easy! Note that the chapters in this guide match the Steam version of Hidden Ruins. If you're playing another version, which has 7 chapters (instead of 8), note that chapters 3 and 4 here are combined as chapter 3 in old versions, so all later chapter numbers for you will be one out (but all the information you need is here).
Hidden Ruins Chapter 1 walkthrough
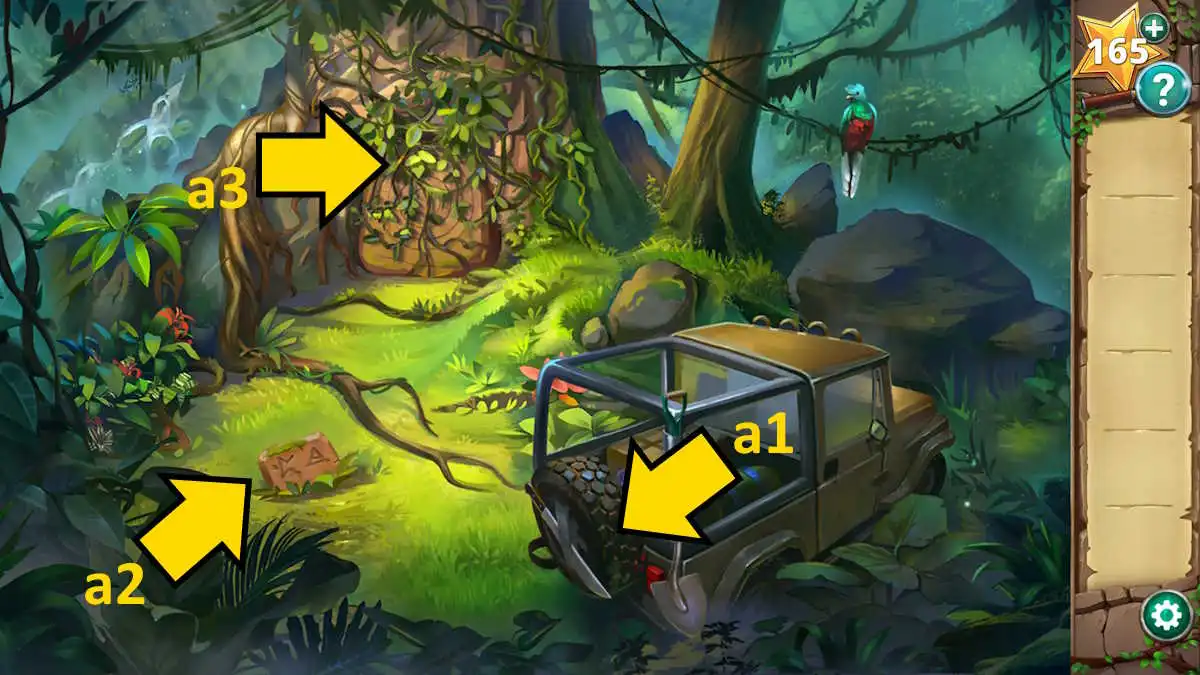
Take the Machete and the Shovel from the back of the jeep (a1), then use the shovel to dig around the stone tablet (a2) to reveal another two symbols (you can click the stone to get a better look).
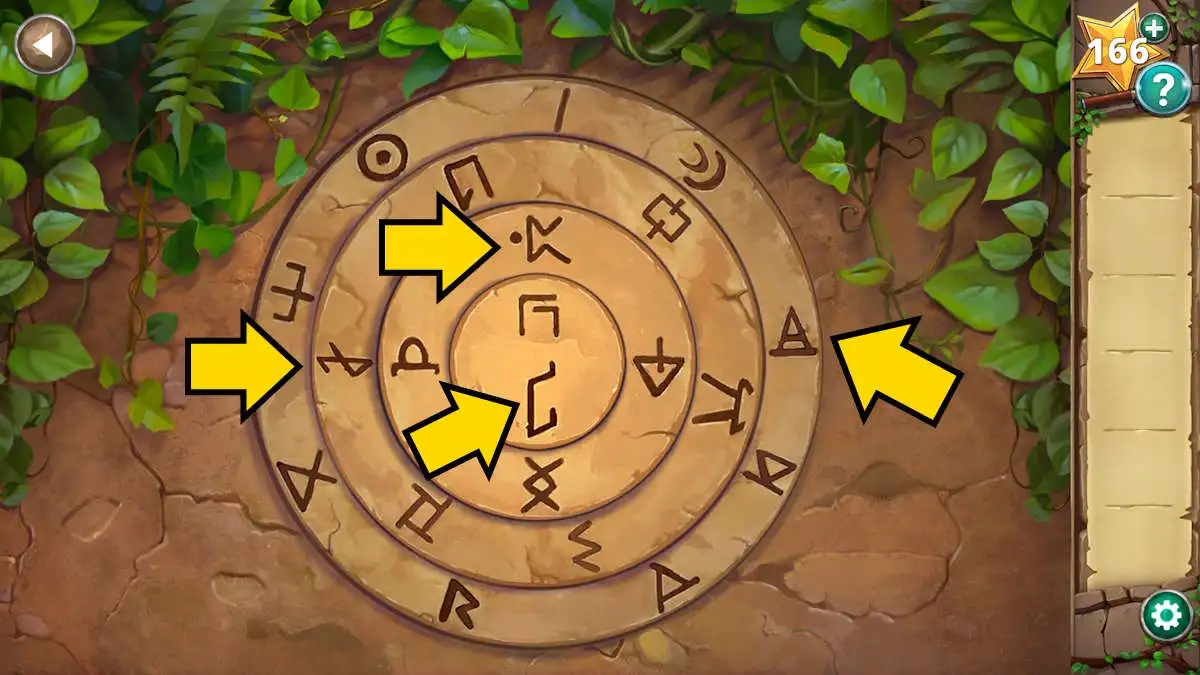
Use the machete to remove the vines from the door (a3) and then click the door for a close-up. You need to align the rings (by dragging them) so that each of the four symbols on the tablet is at the same angle it is at on the stone tablet (see the image above). Once you do, the door will open. Click it to head inside.
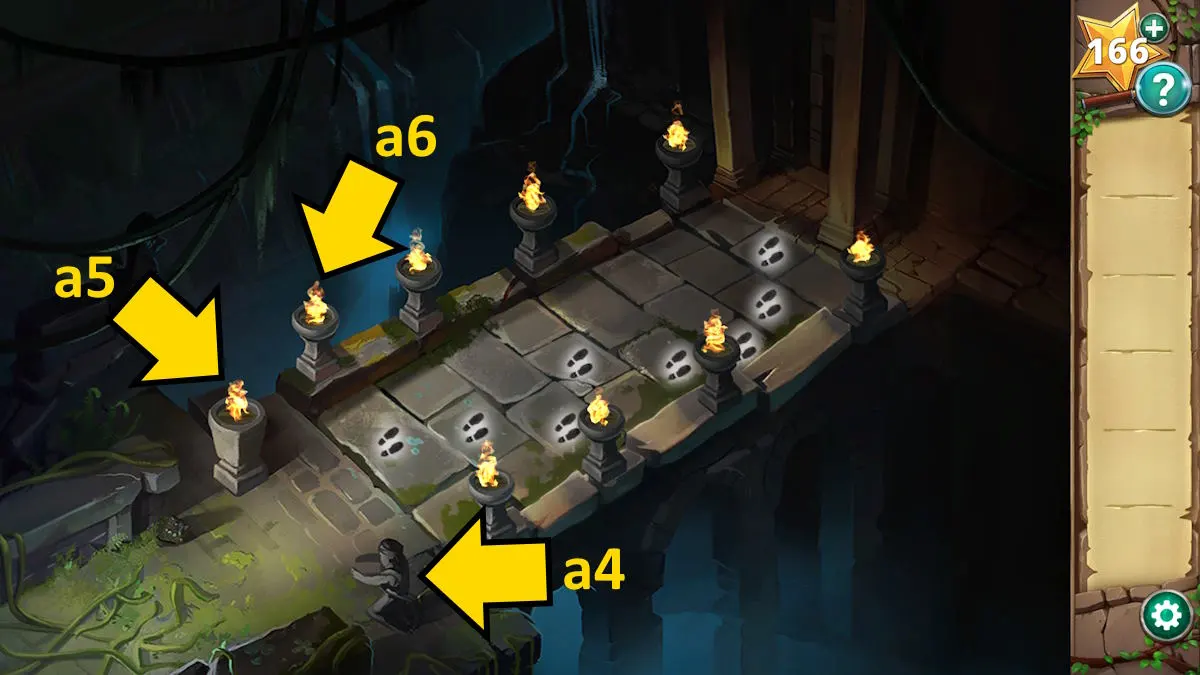
Take the Torch from the figure on the right of the path (a4) and light it with the brazier on the left (a5). Now use the lit torch to light the first unlit brazier (a6), and the whole bridge will be lit up. Now click the paving slabs of the bridge that I’ve marked above to advance to the next room (it was trial and error for me!).
Inside the ruins
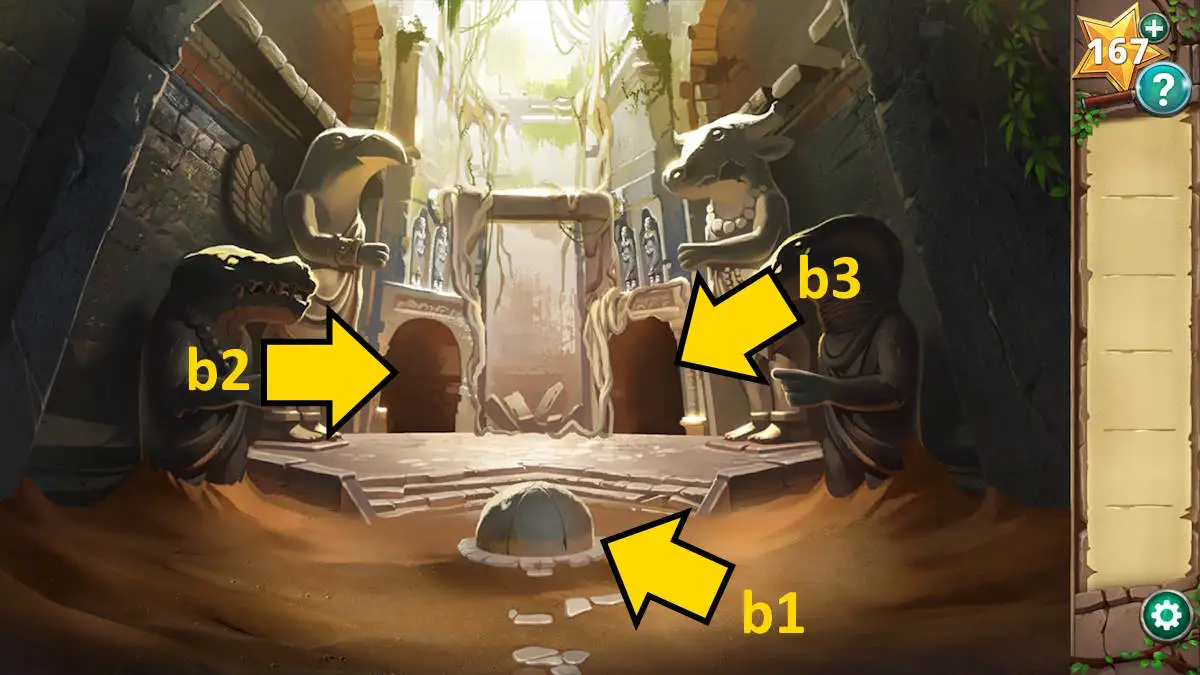
In the next room, you’ll see a smooth stone doom in the center (b1) and two exits (b2 and b3). Move into the left room (b2).
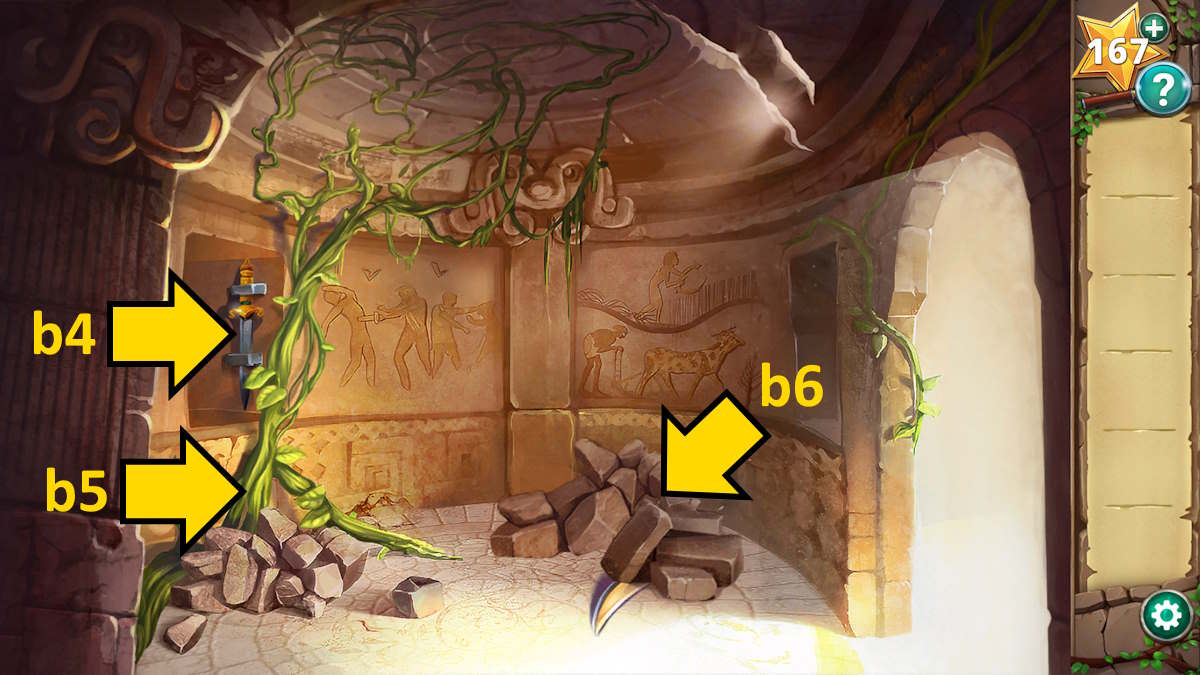
Take the Dagger from the wall (b4), and use it on the foliage (b5) to get a Vine. Now move the rocks on the floor (b6) and keep moving the two piles to reveal two broken pieces of a tool. Select the vine in your inventory and click the broken tool to get a Dull Scythe.
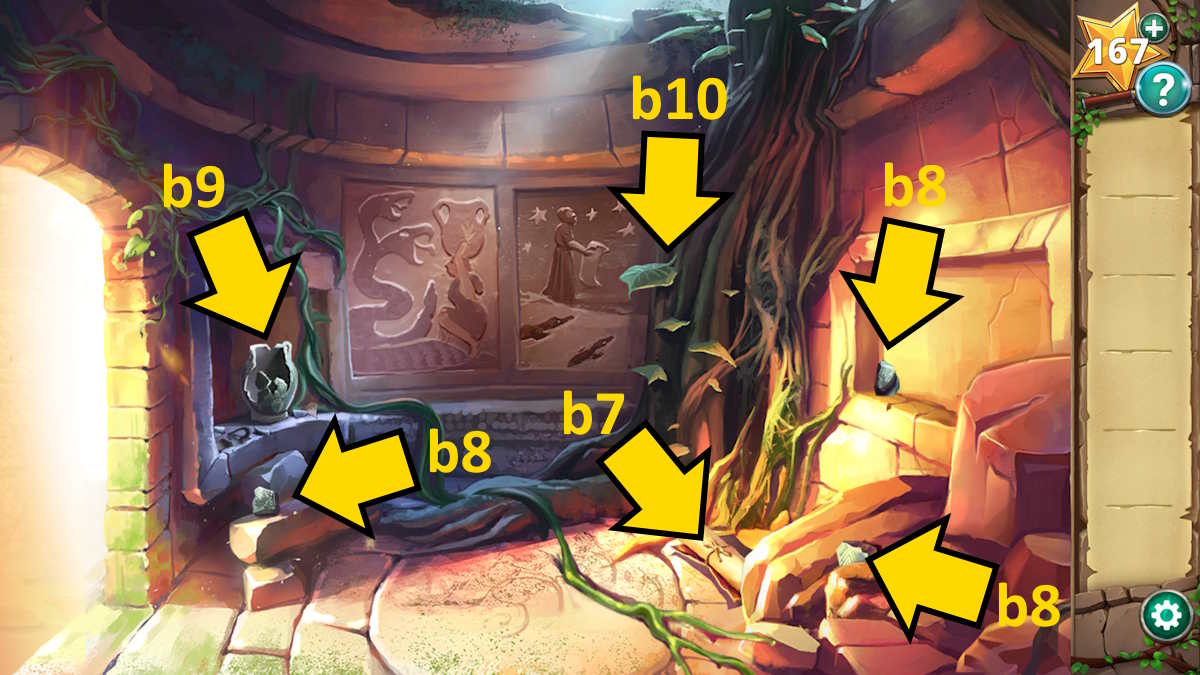
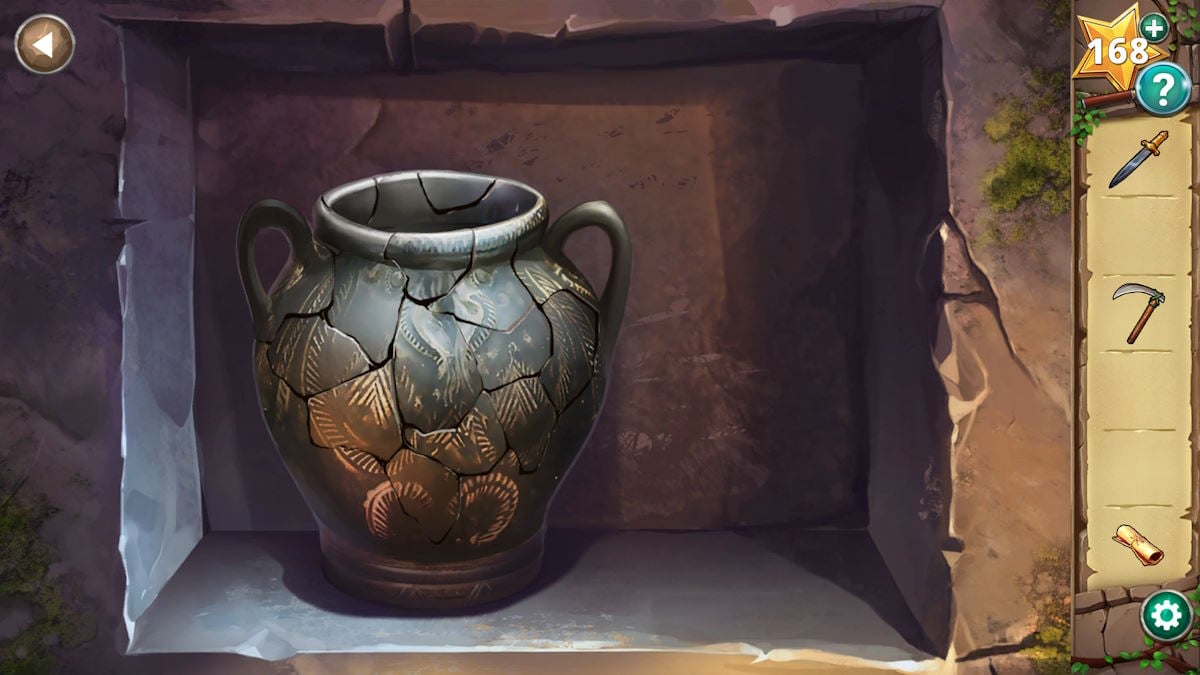
Now leave there and move into the right room (b3); take the Scroll (b7), and three Pottery Shards (b8), and then add them to the broken pot (b9) to begin a puzzle. Drag the pot pieces onto the pot to recreate it, which is relatively straightforward as all the pieces are already at the correct angle. They also pop into place when you get them right, so you know a piece is correct. The completed pot is pictured below.
Take a Leaf from the tree (b10) and use the dagger to cut the tree (b10) to reveal some sap. Use the leaf on the sap to get a Leaf With Sticky Sap and use it on the pot (b9) to complete the repairs. You’ll now receive the Ancient Pot.
You now have four items in your inventory. Look at the four paintings on the walls of the two rooms and match the four items to the statues in the main central room. You’ll get:
- Crocodile: Scroll
- Hawk: Dagger
- Ox: Scythe
- Snake: Pot
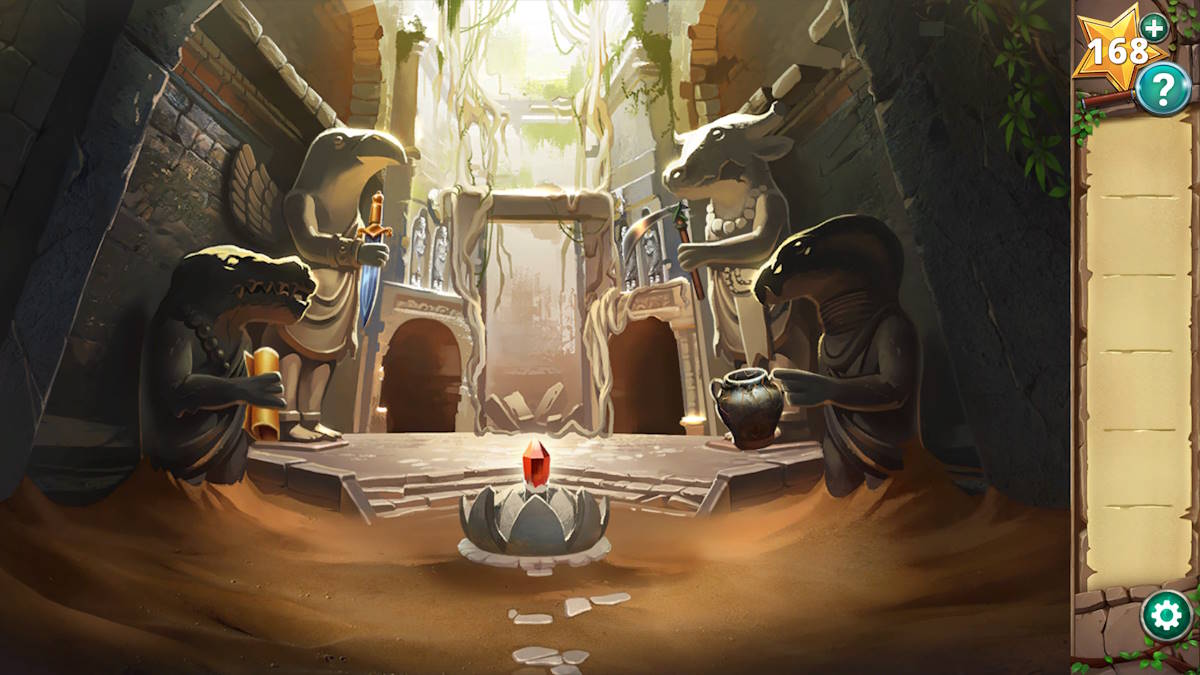
Place these items onto the hands of each statue and the central dome (b1) will open to reveal the Key of Ages. However, when you take it, you’re ambushed by Larissa and her armed goons! This concludes Chapter 1.
Hidden Ruins Chapter 2 walkthrough - Below the bridge
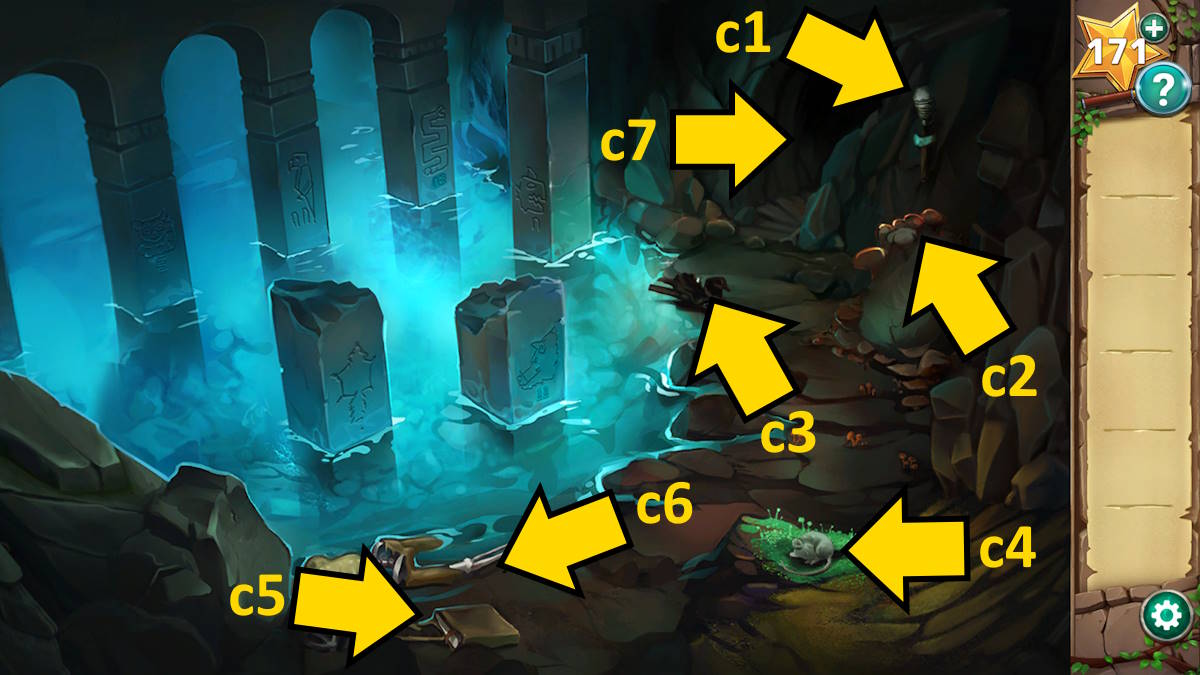
This time we’re playing as Tawa, who fell from the bridge after the explosion. Take the Torch from the wall (c1), grab some Mushrooms (c2) and some Driftwood (c3), and then give the mushrooms to the mouse (c4) to tempt it away from the moss.
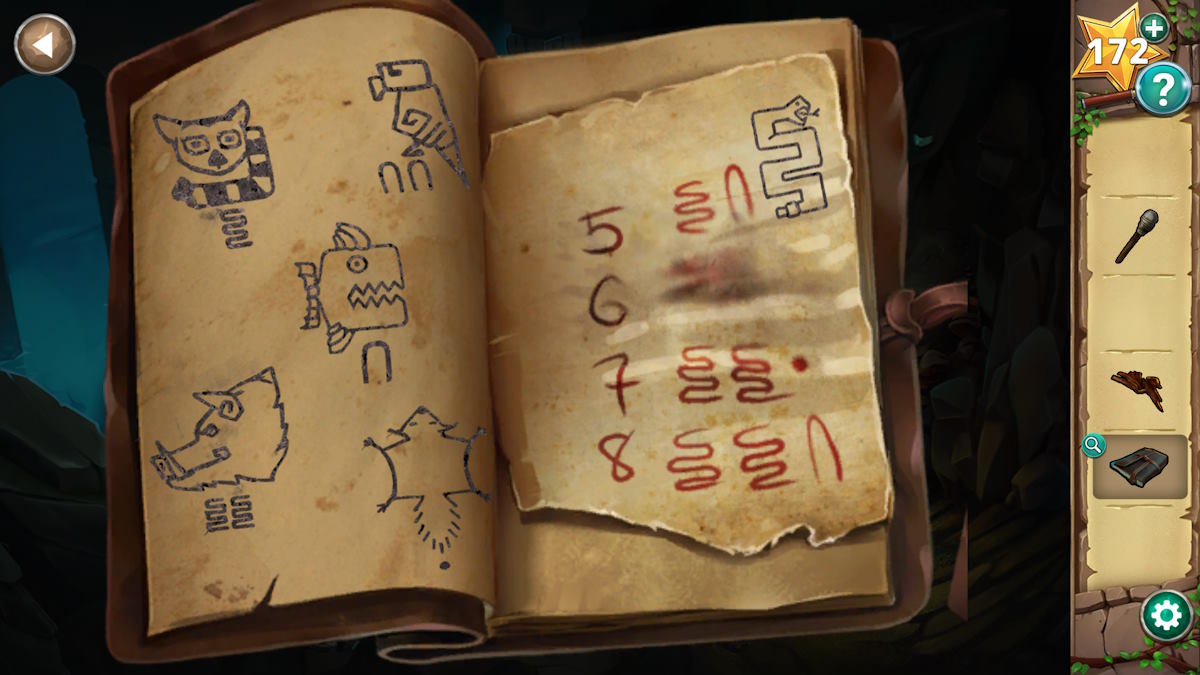
Take the Journal from the skeleton (c5) and then click each of the six pillars in the water. Each gives you a bit more knowledge about the Kumari numbering system and you’ll add it all to your journal automatically (see above).
Grab the Flint Rocks that come loose when you move the skeleton (c6), add the driftwood to the moss (c4), and then use the flint rocks to light it. Use the torch on the resulting fire to get a Lit Torch, and then click the doorway (c7) to move forward.
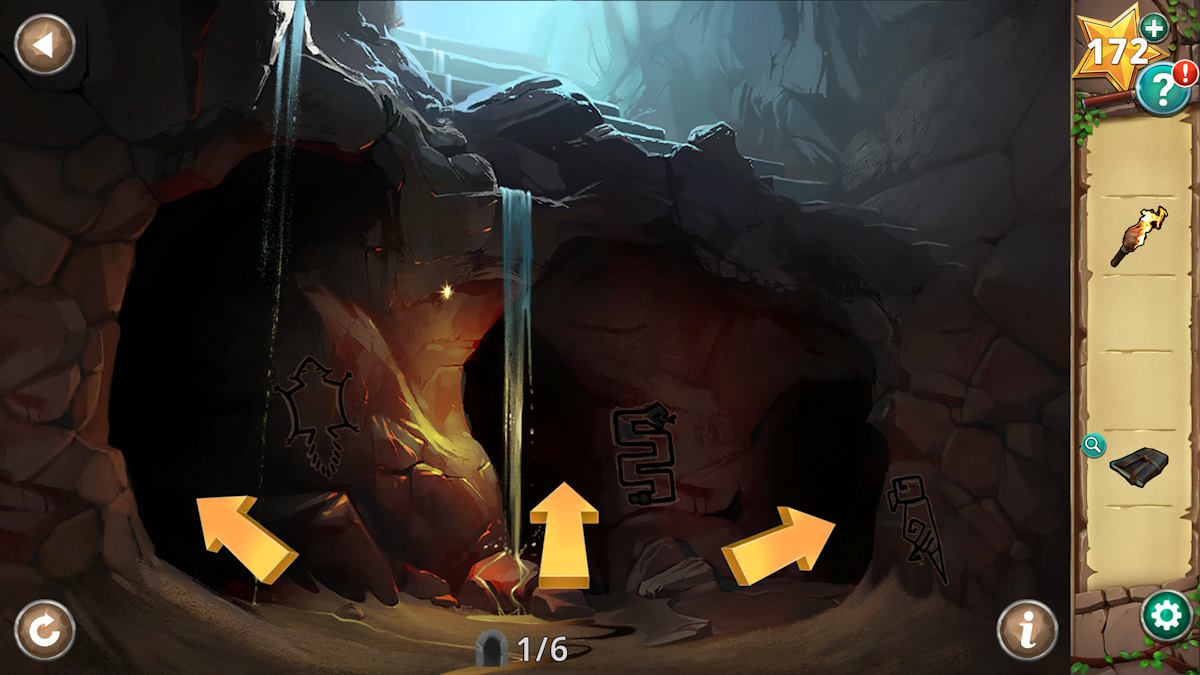
You now enter a six-step maze where you need to take the correct tunnel on each screen to advance. You can use your journal to work out the route (dots represent a 1, while a wavy line is a 3), but the sequence is as follows (in the example of room 1 above, you’d go left where the image of the squirrel is painted on the wall):
- Squirrel (left)
- Fish (right)
- Lemur (right)
- Parrot (middle)
- Snake (left)
- Boar (right)
The sluice gate room
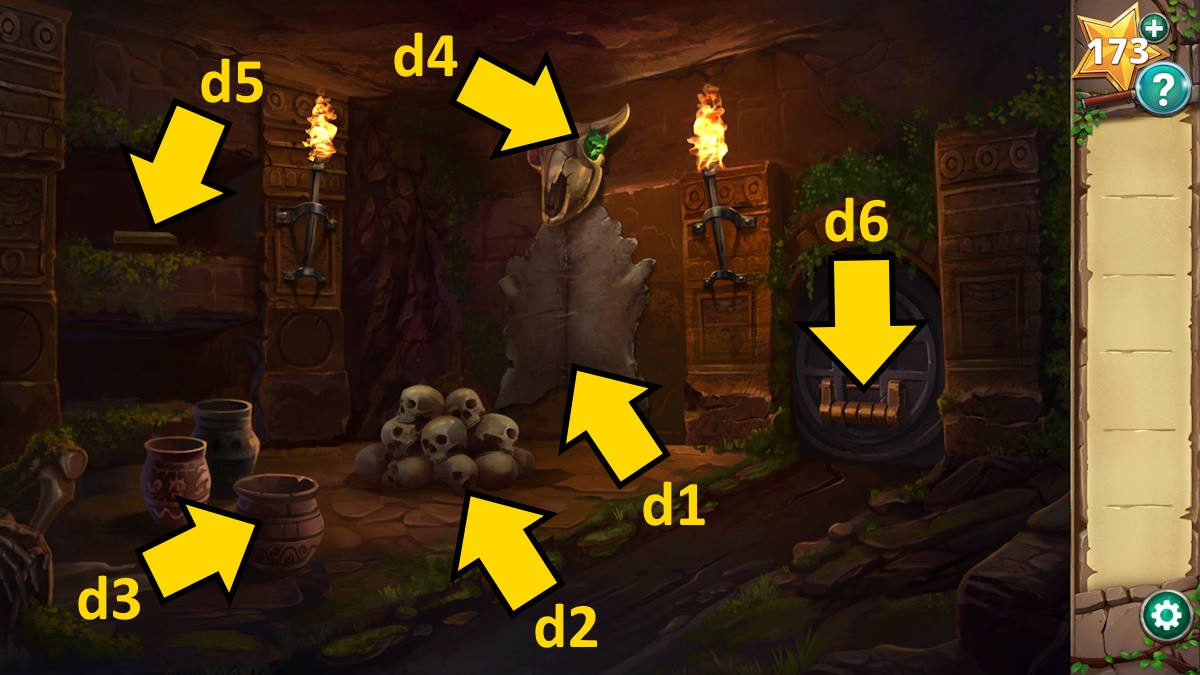
This leads you to a dark cave, so move your lit torch over the two torches on the wall to illuminate the room. Take the Animal Skin (d1) and then click the pile of skulls (d2) to uncover and take a Bone. Dip the skin in the fish oil (d3) to get a Greasy Animal Skin, and then use it to loosen the gem in the skull (d4) and collect the Jade Fox. Now you can use the bone to reach the box at the back of the room (d5), add the fox, and begin a puzzle.
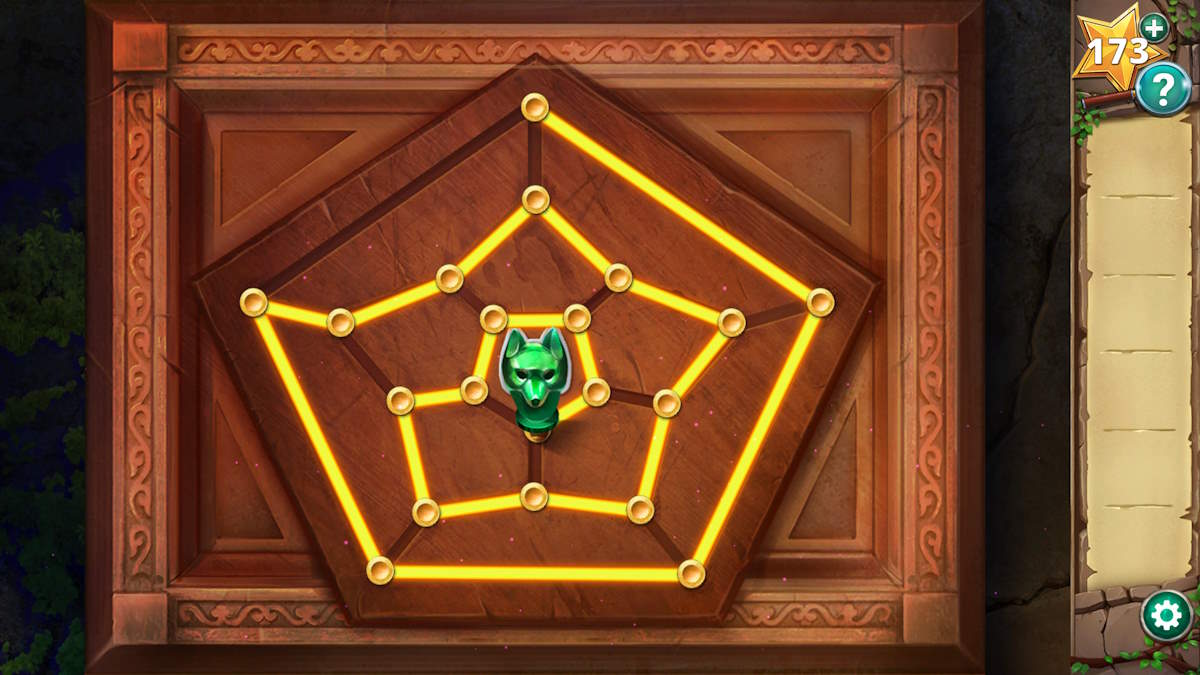
You need to drag the fox head around the pattern, going through every gold circle exactly once, before arriving in the center. This is done by creating a simple spiral pattern, going clockwise around the outside until you’ve touched all of those rings, then doing the same with the central circle, and finally the inner one. You can see the path in the image above.
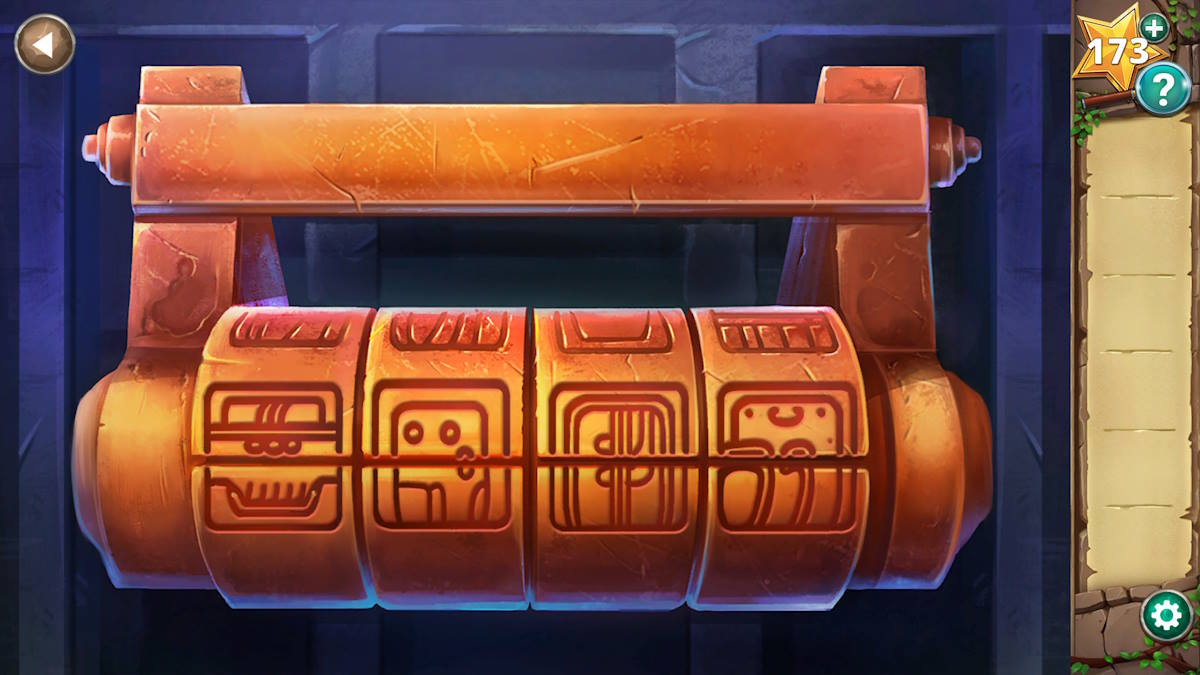
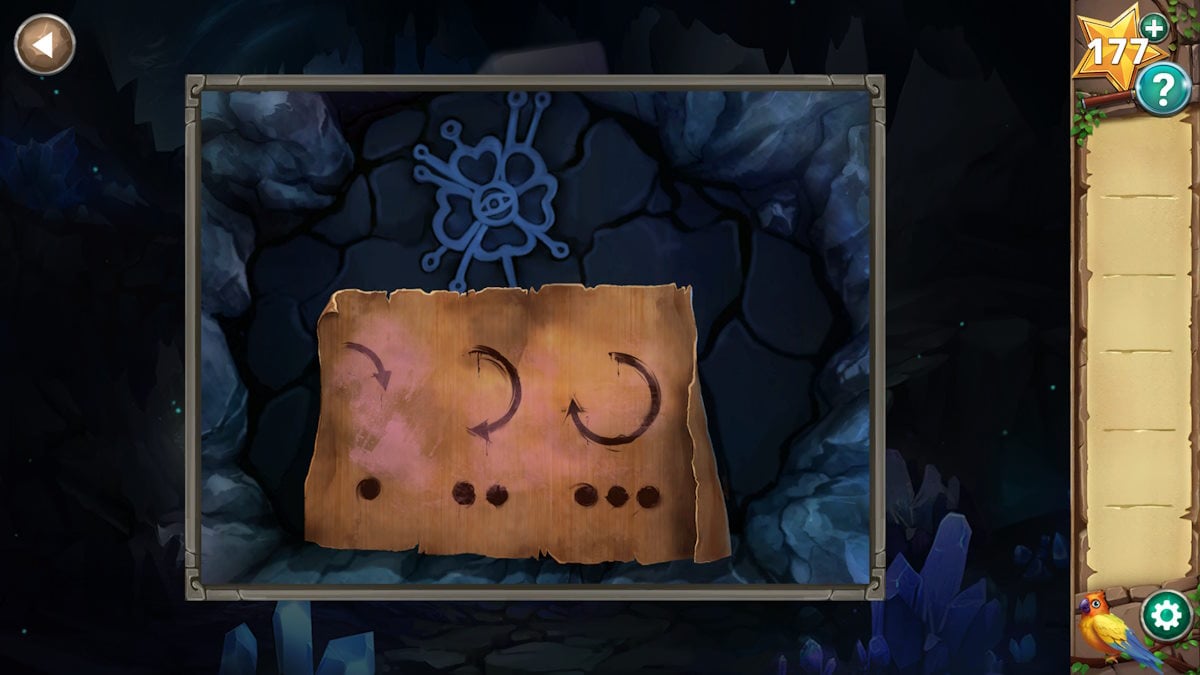
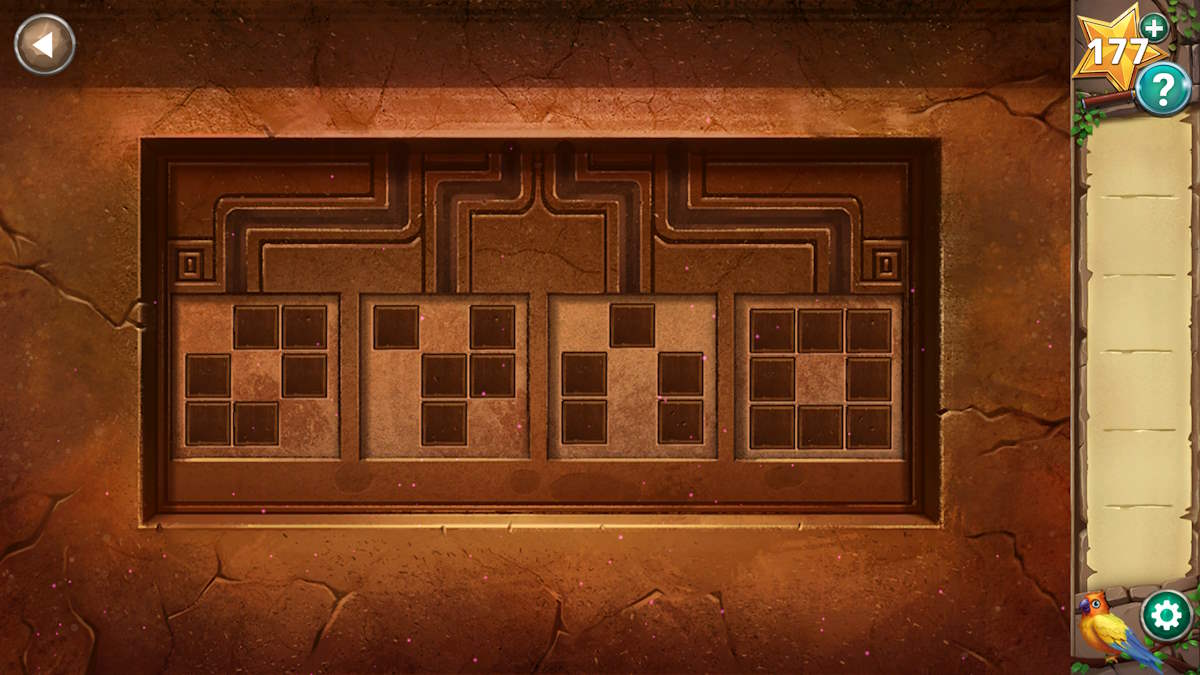
This opens the box, so click the scroll inside it and memorize the four symbols. Now select the door mechanism (d6) for a close-up, move the eight pieces so that they match the scroll (see above), and the sluice gate will open. Click it to go through.
The well puzzle
When you arrive at the bottom of the well, click anywhere inside to trigger a puzzle to escape back to the surface. Each move will use up energy, but each mushroom will fully replenish it, so use your moves wisely! I’ve marked out the correct paths below for both the first and second screens of this puzzle. For the first section:
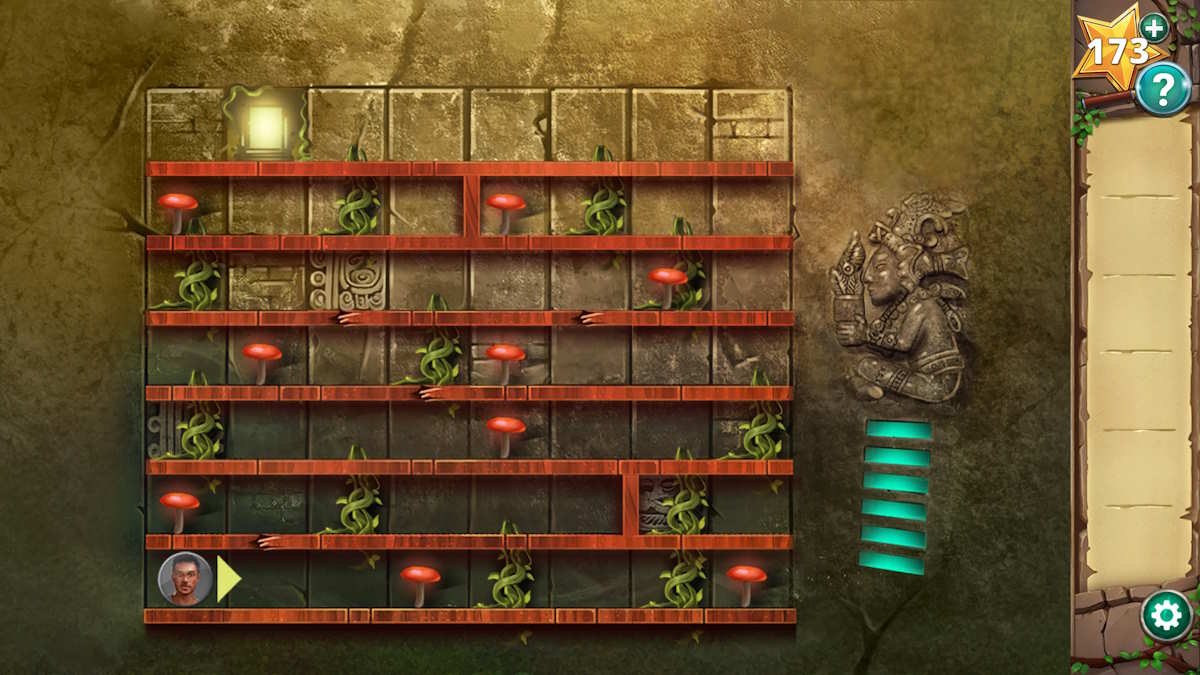
- Move all the way to the right, collecting both mushrooms, and then go up the vine on the right.
- Move all the way to the left and go up the vine there.
- Move right to the vine in the middle of the screen and go up (you don’t need to get the mushroom that’s just beyond the vine)
- Go right and then up the vine that has the mushroom at its base
- Go left to get the mushroom, then up the vine next to it
- Go left to the exit
For the second section:
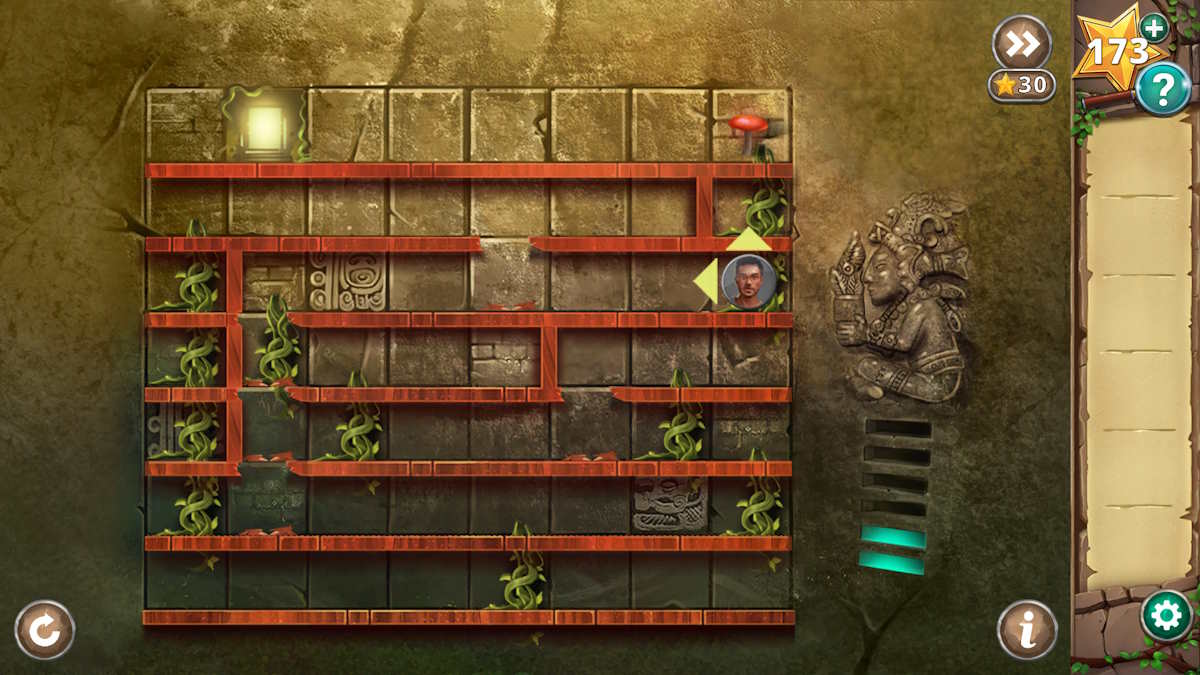
- Move right until you eat the mushroom, then come back one space and go up the vine
- Go right to the vine there and go up
- Go left to the mushroom, step one space right, then go left again to where you ate the mushroom. You’ll drop through the floor.
- Go left until you get to the vine and go up to get the mushroom
- Go back down the same vine, go left to break the floor, then right and back up the same vine
- Go right twice to eat the mushroom, all the way left, and up the vine
- Go right one space to eat the mushroom, then drop all the way to your left (down three levels)
- Go left and then up the vine (to the top) to eat the mushroom there
- Go right and eat the mushroom, then come back one space to drop down a level
- Go right to the end, u to the top level, and get the mushroom there
- Now you can simply go left to the exit and escape.
Once you exit from the top of the well, you’ve completed Chapter 2!
Hidden Ruins Chapter 3 walkthrough - Burns and Rachel
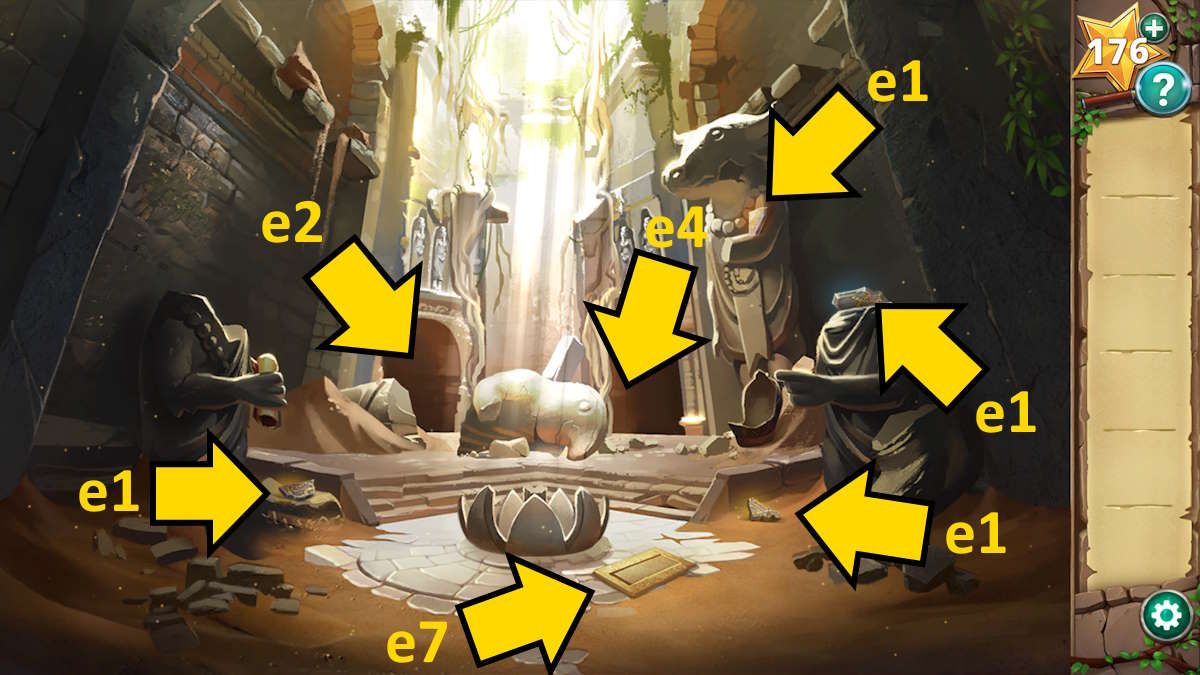
Next, we discover that Professor Burns and Rachel are stuck inside the temple and need to find a way out. Grab the four Fragments (e1) and then enter the room on the left (e2).
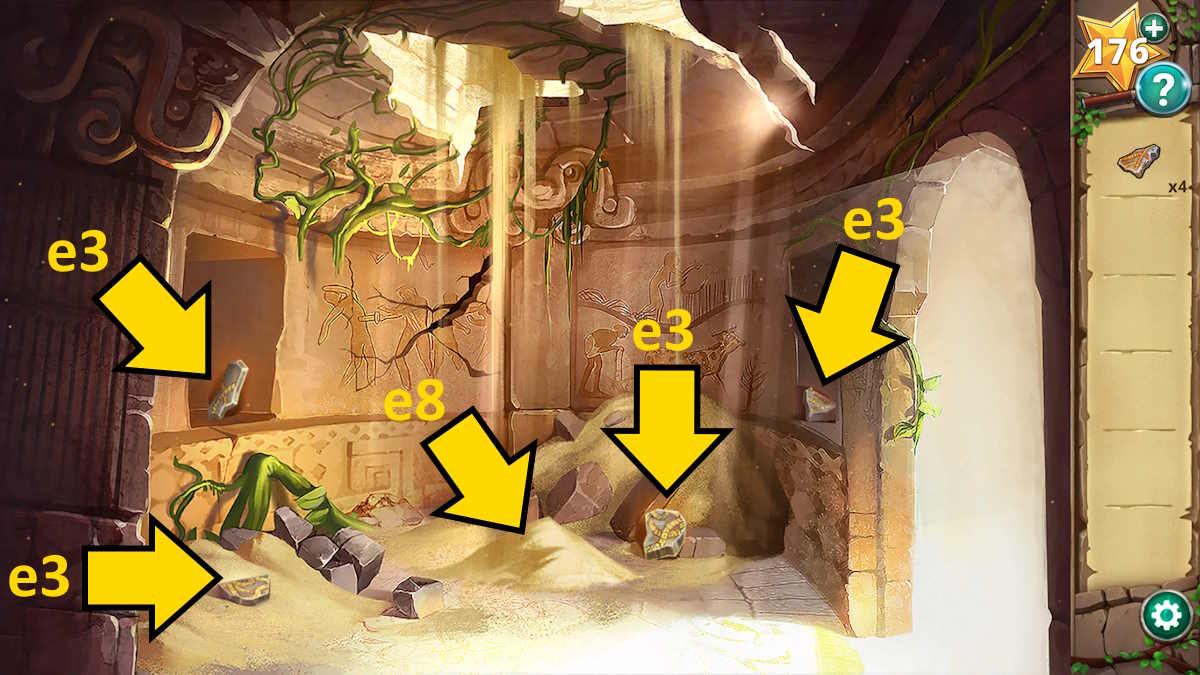
You’ll find four more Fragments (e3) here, but nothing more for now, so head into the other room (e4).
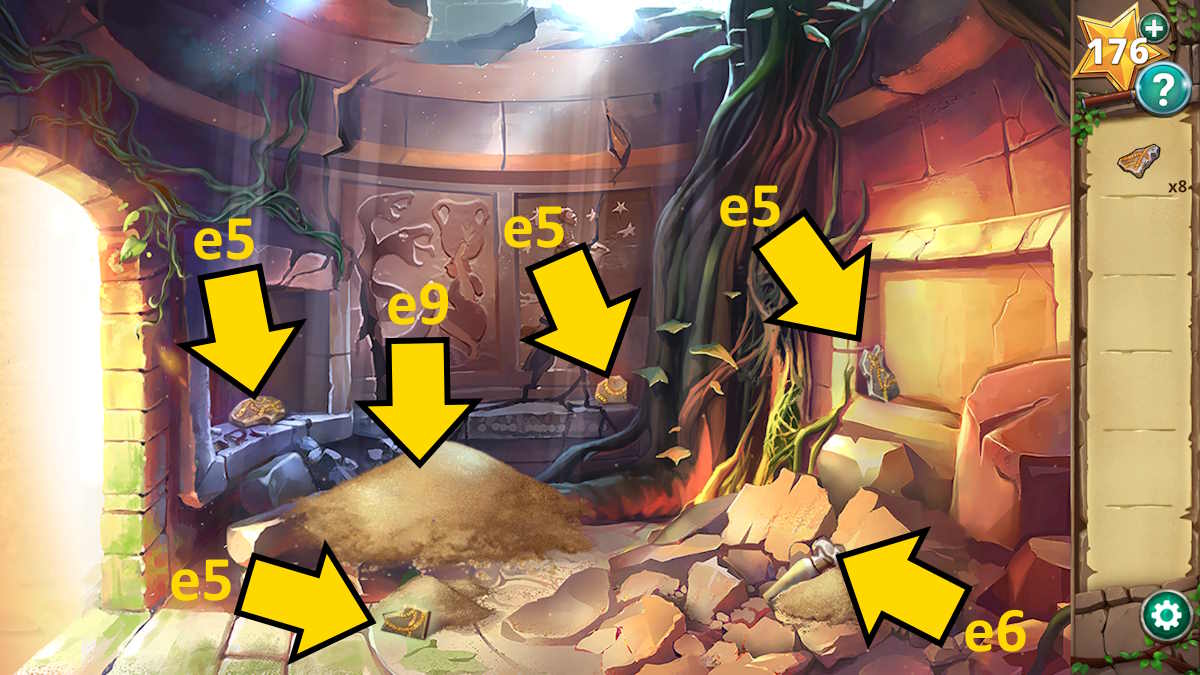
Here you’ll find four more Fragments (e5) as well as a Hawk Figure (e6). Head back to the main room and click the stone tablet (e7). Once Burns has examined it, add the 12 fragments to the tablet to begin a puzzle. Now piece it together as I’ve shown below.

This is a little trickier than the earlier one, as you can rotate these pieces by right-clicking them. However, the different shades of grey act as a good guide to where each piece goes, as do the corners; and once a piece is in the correct place, it can no longer be moved. Once complete, head down the stairs that appear next to the tablet.
The rooms below the ruins
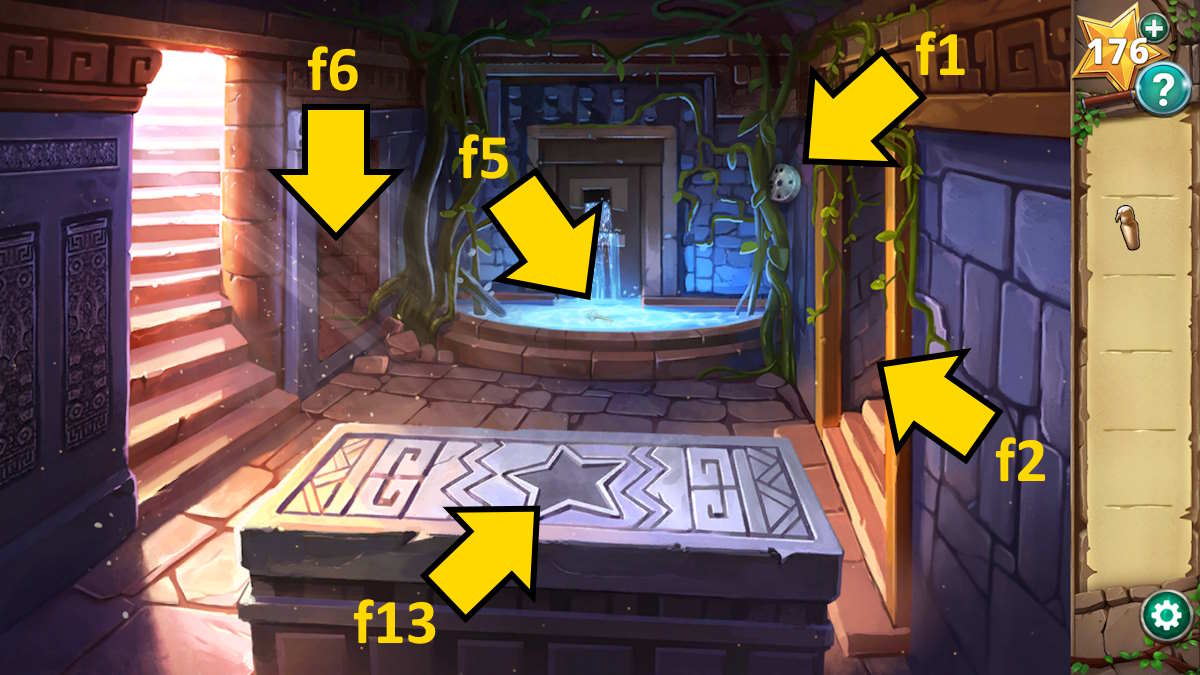
Grab the Gear from the wall (f1) and then click the door on the right (f2).
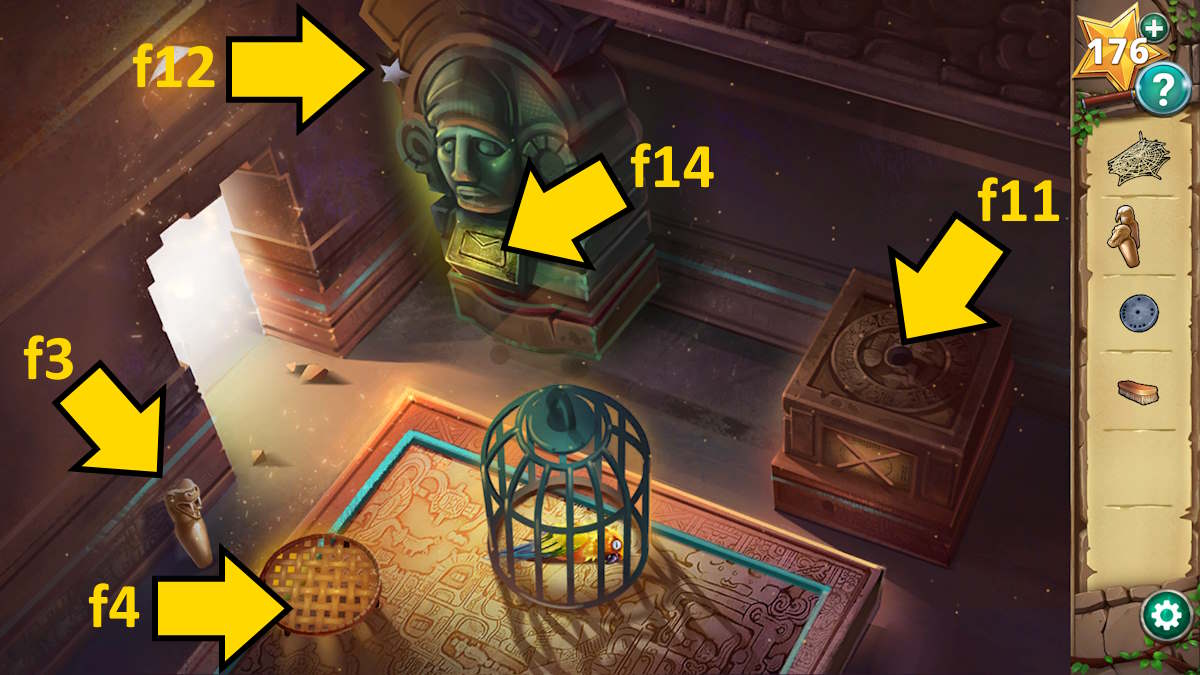
Take the Snake Figurine (f3), and the Sieve (f4), and then head back to the first room. Use the sieve in the pool (f5) to collect the Key before moving through the door on the left (f6).

After Rachel’s selfie disaster, find the 12 items that are wrong from the original image (marked above) and then take the Cobweb (f7), Crocodile Figurine (by the door on the floor), and Brush (f8). Finally, open the chest (f9) with the key and take the Rope.
You now need to head right back up the stairs to the room on the left and use the brush to remove the sand in the left room (e8) to uncover a second Gear; then do the same on the sand in the right room (e9) to get a third Gear.
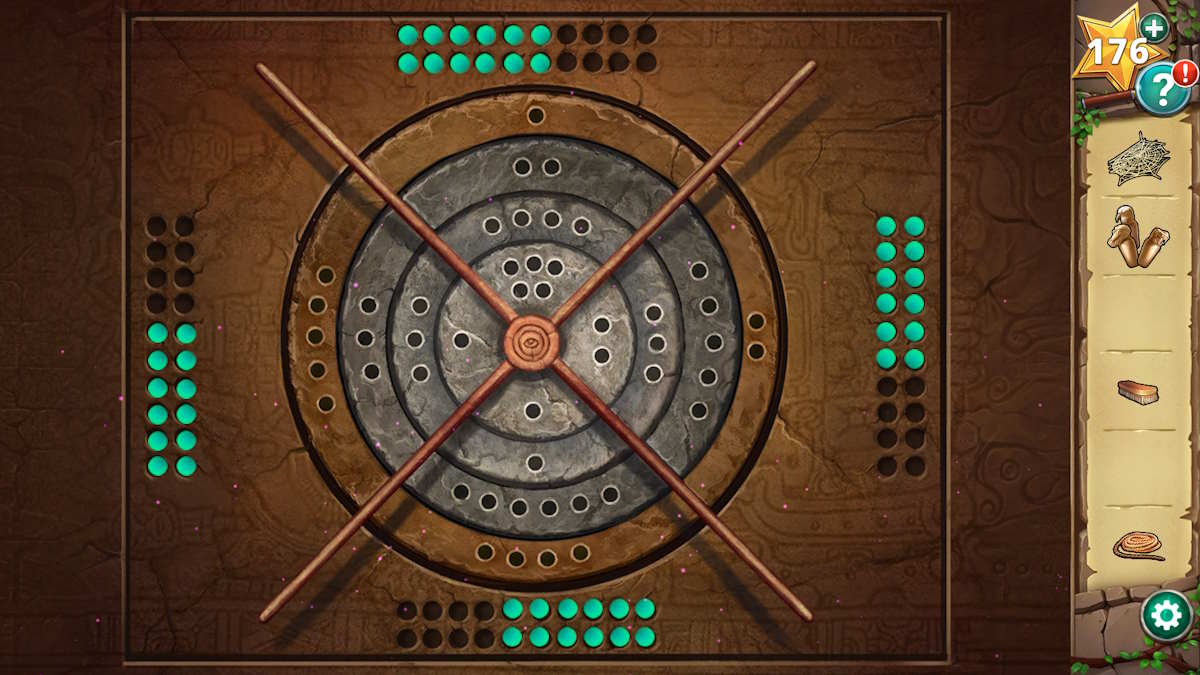
Go back downstairs and add the three gears to the box in the right-side room (f11). Rotate the gears until the same number of blue lights (12) are lit up in each section. Once you do (see above), a pulley will appear above the cage. Attach the rope to it to free the bird, and then use the cobweb on the bird to help its injury. Click the bird (Bert) to collect it and then use Bert (he appears just below your inventory and can be used like any other item) to get the Stone Star (f12).
Return to the central room and use the stone star on the tomb (f13) to open it and find an Ox Figure. Take the four figures into Bert’s room, click the envelope on the green statue (f14), and add the four figurines to it in the close-up. For this puzzle, you need to look at the tablet you made earlier and follow the lines that connect the four animals to different parts of the body. You’ll find the following:
- Snake: Eye
- Crocodile: Brain
- Ox: Lungs
- Hawk: Heart
Place the four figurines on the matching boy parts to complete the puzzle, using the central space to allow you to change the order of the pieces. Once done, the green statue will slide aside and a door will appear in the corner. Head through it to complete Chapter 3.
Hidden Ruins Chapter 4 walkthrough - Fixing the drone
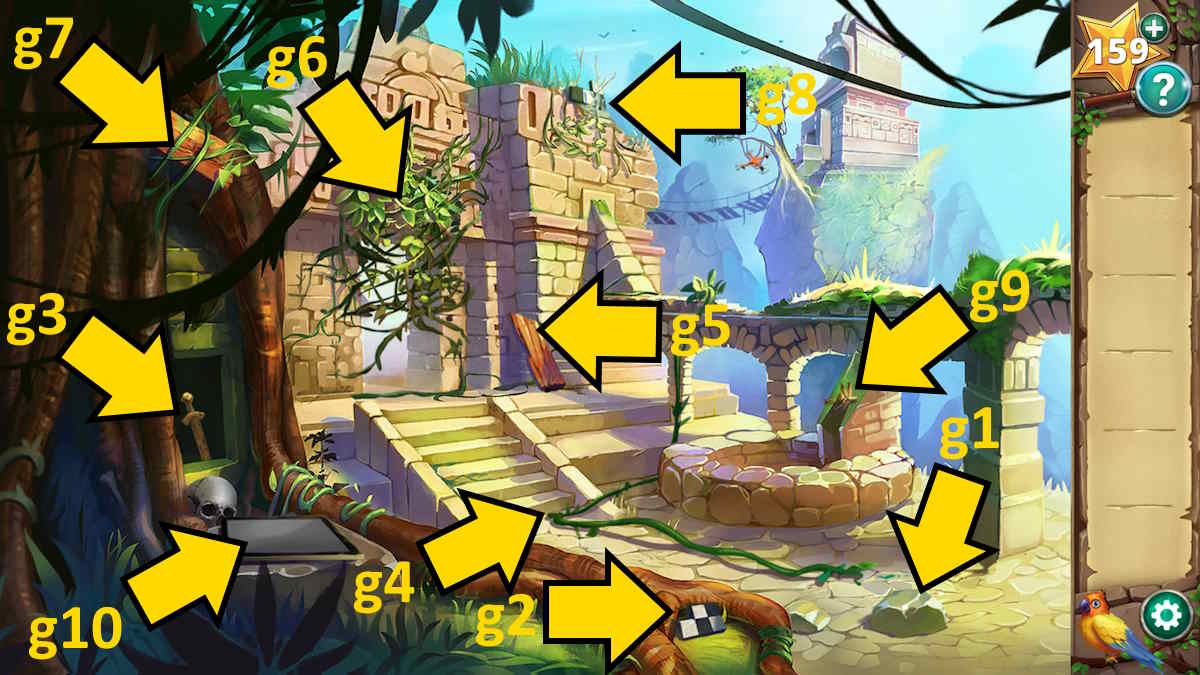
The team now needs to get back on the trail of Larissa but to do so they’ll first have to fix their drone and tablet. Move the stone (g1) to get a Checkered Piece, and grab a second Checkered Piece from the tree roots (g2).
Take the Sword from the wall (g3), use it to collect a Vine (g4), take the Plank (g5), then use the sword to get a second Vine from the doorway (g6) and a third Vine from the tree above where you got the sword (g7). There’s now also a second Plank next to the stairs that drops from the tree. You can also use Bert to fly up and grab a third Checkered Piece (g8)
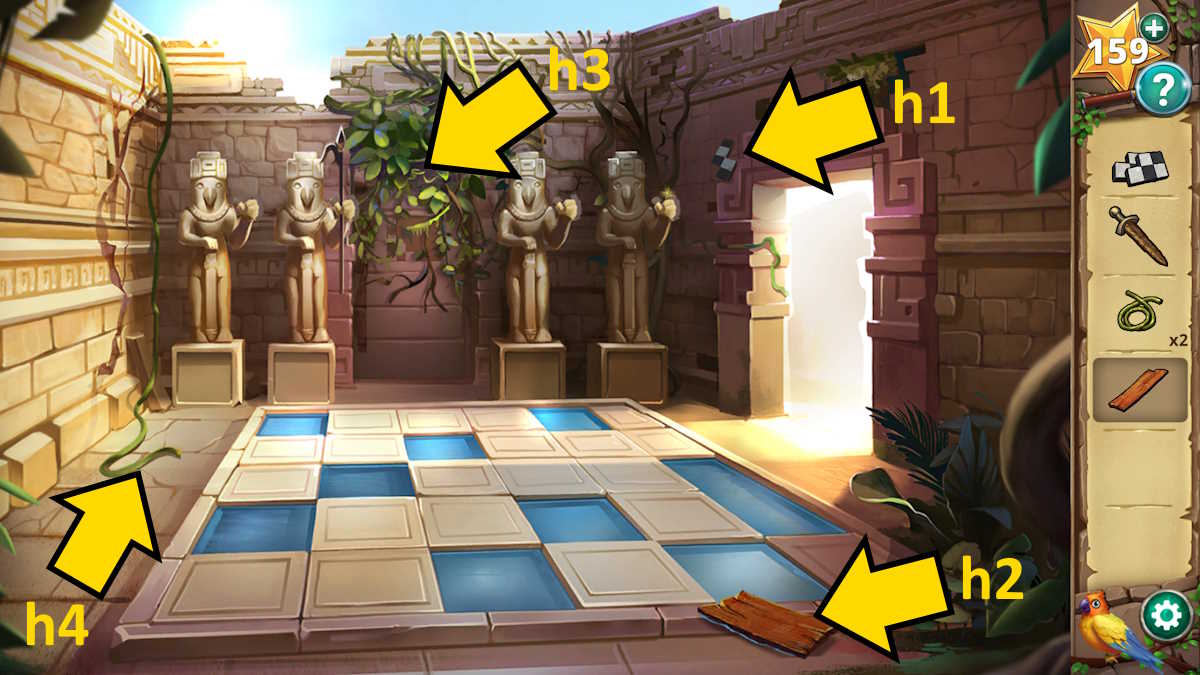
Move through the doorway to the next room and grab a fourth Checkered Piece (h1), a third Plank (h2), and then use the sword to get a fourth Vine (h3) and a fifth Vine (h4). When you get this last vine, a fifth Checkered Piece will drop to the ground, so grab this too.
Repairing the bridge to the shrine
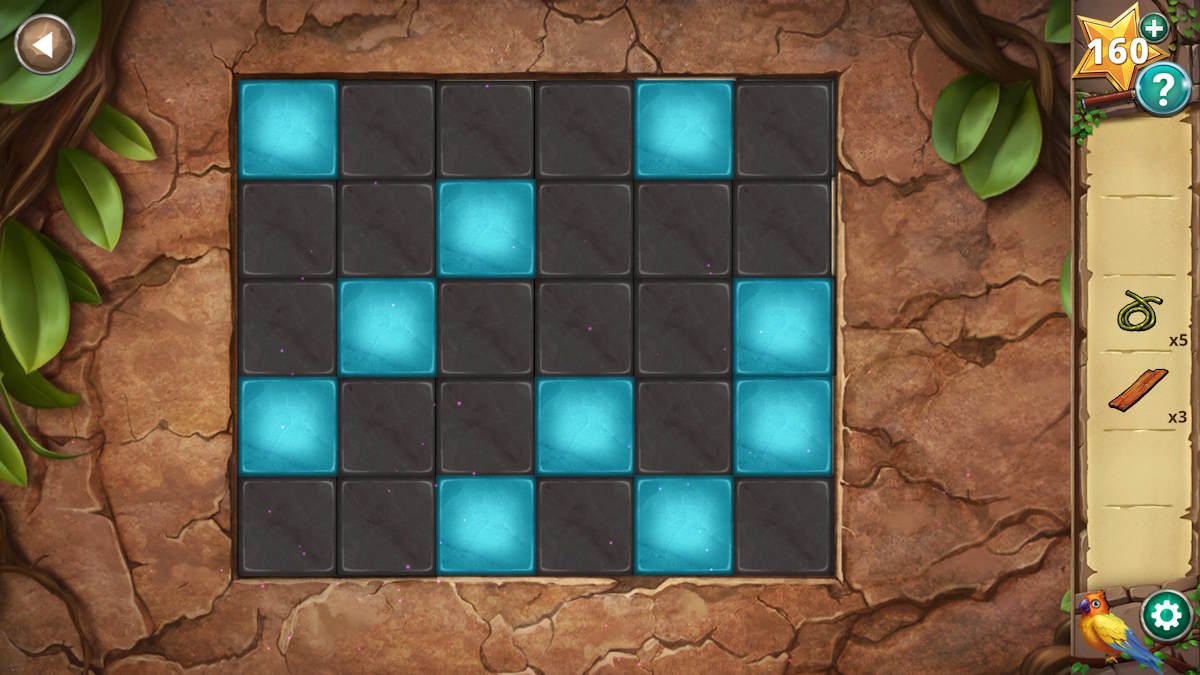
You can now click the wall behind where you cut the vines (h3), add the checkered pieces, and use them to create a chessboard pattern. Once complete, all the spaces will turn black. Note the board has the same amount of spaces as the pools outside, so copy that pattern to complete the puzzle (see above). Before heading through the door, note the symbols that appear at the bottom of the four statues here.
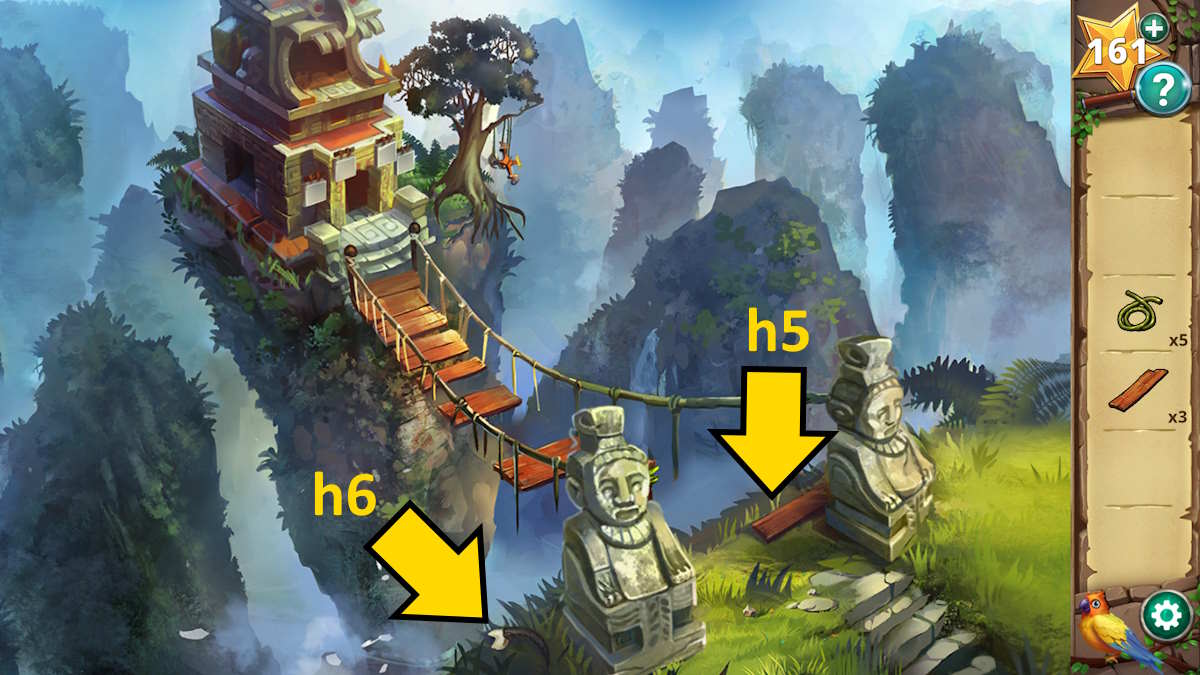
Take a fourth Plank from the start of the bridge (h5), along with a Bird Talon (h6). Return to the original area and use the talon to free the blockage on the water pipe (g9), which flushes out a fifth Plank for you to pick up. Go back to the bridge and repair it, adding one vine followed by one plank, until all five are secured. Click the far side of the bridge to go across to the shrine.
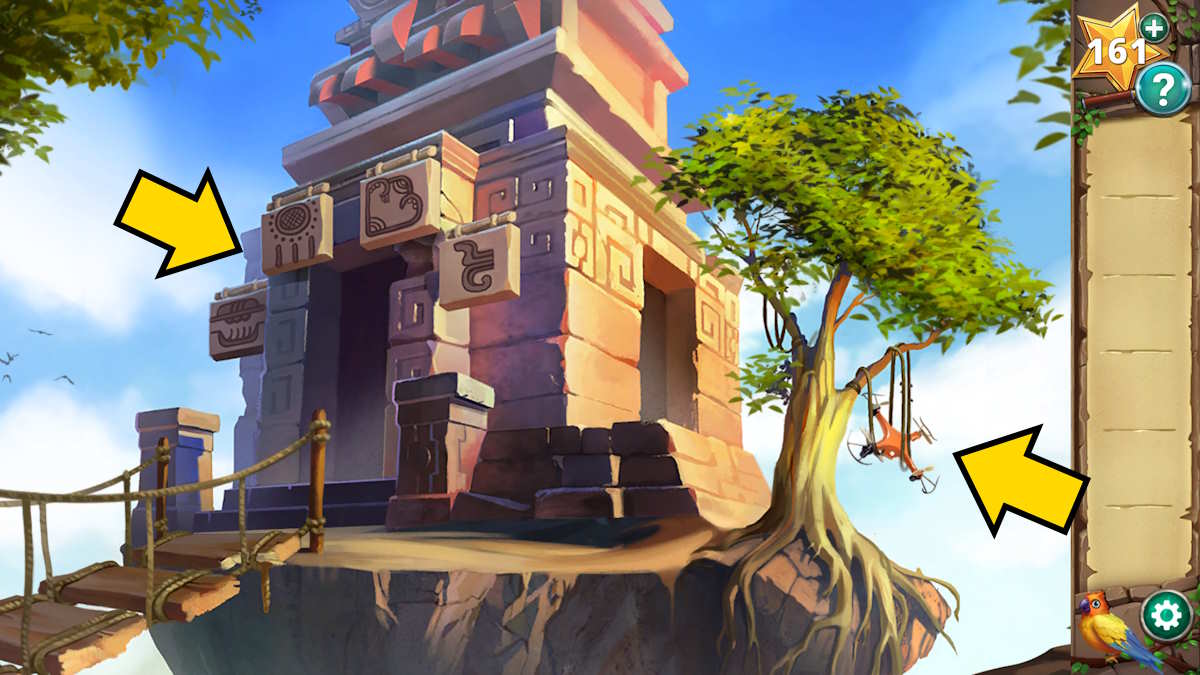
Note the four symbols hanging above the shrine (marked above), and then head back to the room with the pools of water. Click the patterns below the statues to match those on the shrine, left to right, and the second statue from the left will drop the Spear (h7). Pick it up, head back across to the shrine, and use the spear to recover the Computer Chips and the Drone from the tree.
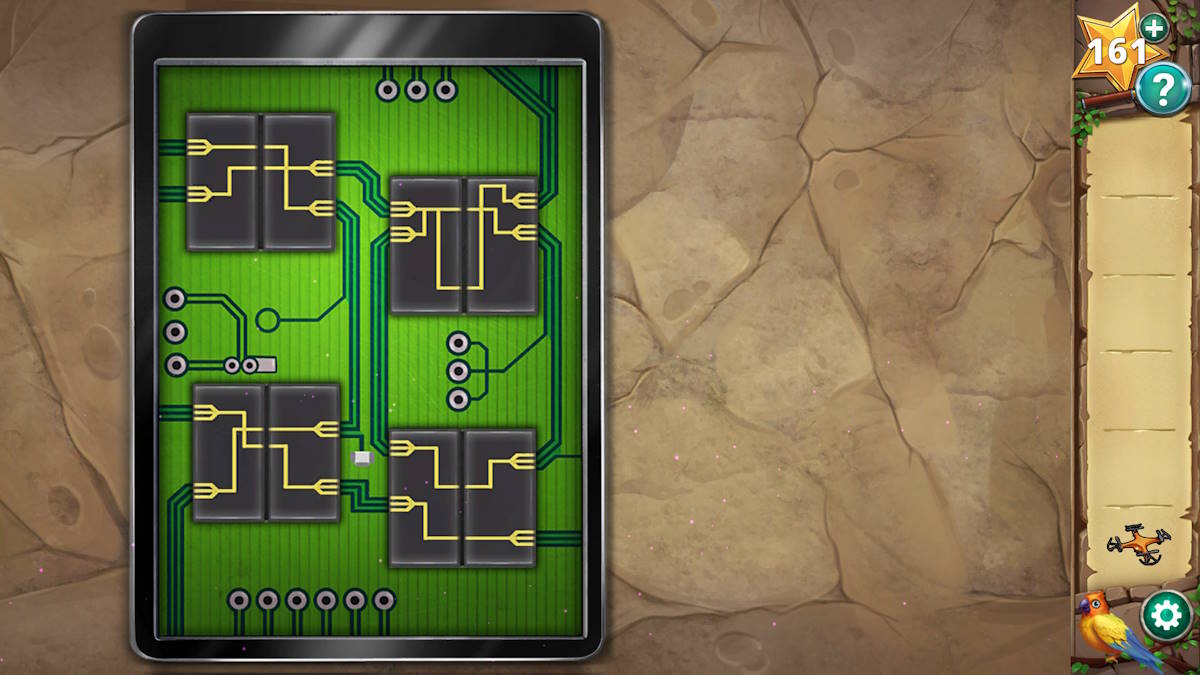
Select the tablet (g10) and add the computer chips to begin your next puzzle. Place the eight chips into the correct spaces (note you can switch them end-on-end, see above for the solution), and you’ll have control of the drone! Return to the room with the pools, select the drone in your inventory, click the weak section of the wall (h8), and click the gap it creates to complete Chapter 4.
Hidden Ruins Chapter 5 walkthrough - The river
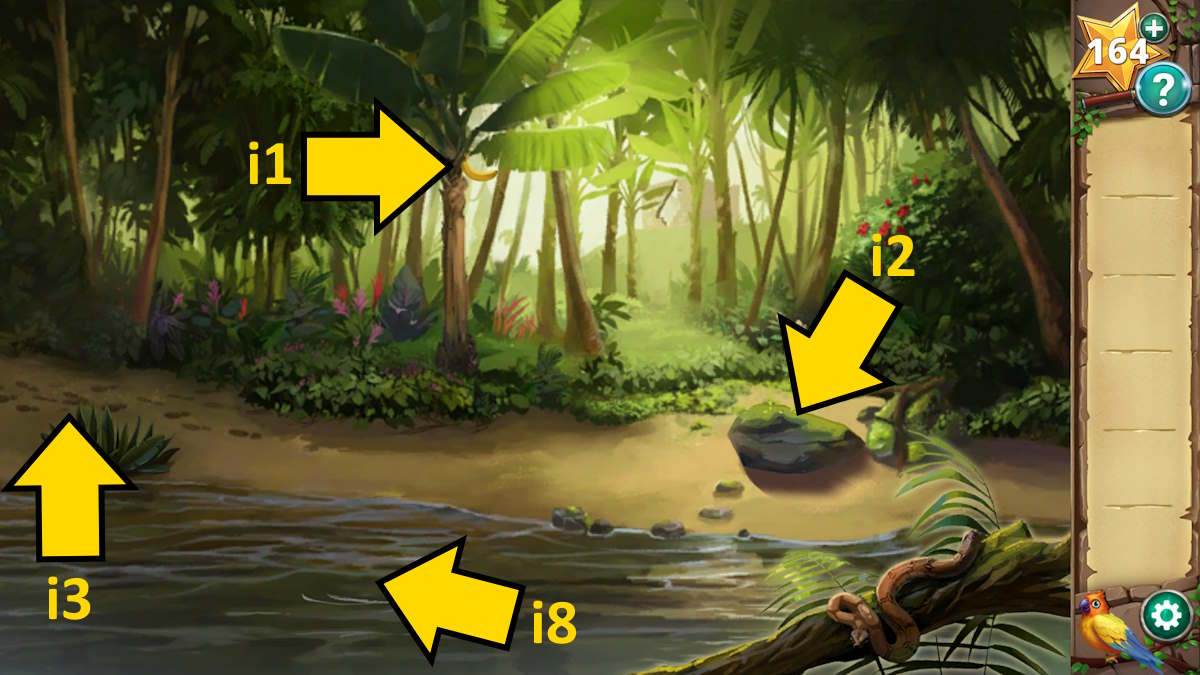
Next, you need to get across the river. Grab the Banana (i1) and the Heavy Rock (i2), and then click the footprints (i3) to move down the river.
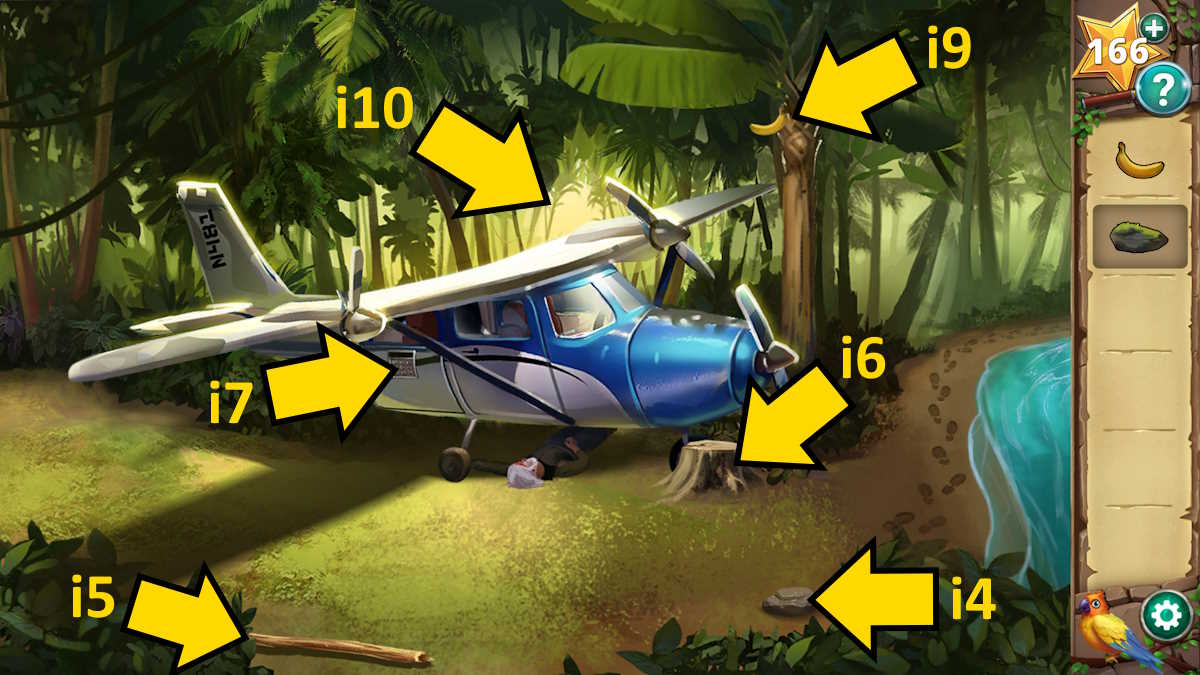
Pick up a second Heavy Rock (i4), the Tree Branch (i5), and place the branch on the tree stump (i6). Open the plane’s compartment (i7) using the code 481 (the number on the plane’s tail), take the Cargo Net and the Fishing Pole from inside, and then add the net to the branch on the tree stump. Add the two heavy rocks to the net and you’ll be able to rescue the man from under the plane.
After speaking to the survivor, head back to the first screen. Use the fishing rod on the worms (which were under the heavy rock at i2) and then use the rod in the water (i8) to catch a Fish. Return to the survivor and he’ll trade you the fish for a second Banana. Send Bert up to get a third Banana (i9) and then click the background (i10) to move on to the logging camp.
The logging camp
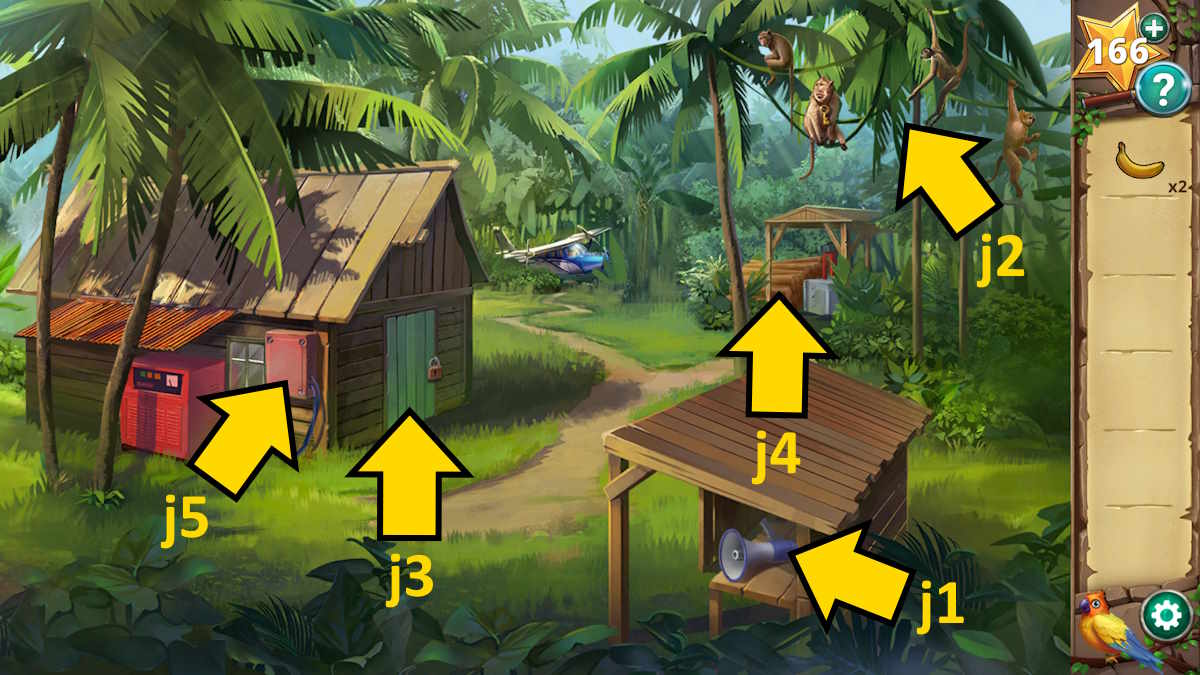
Take the Bullhorn (j1), and then click the monkeys (j2) for a close-up.
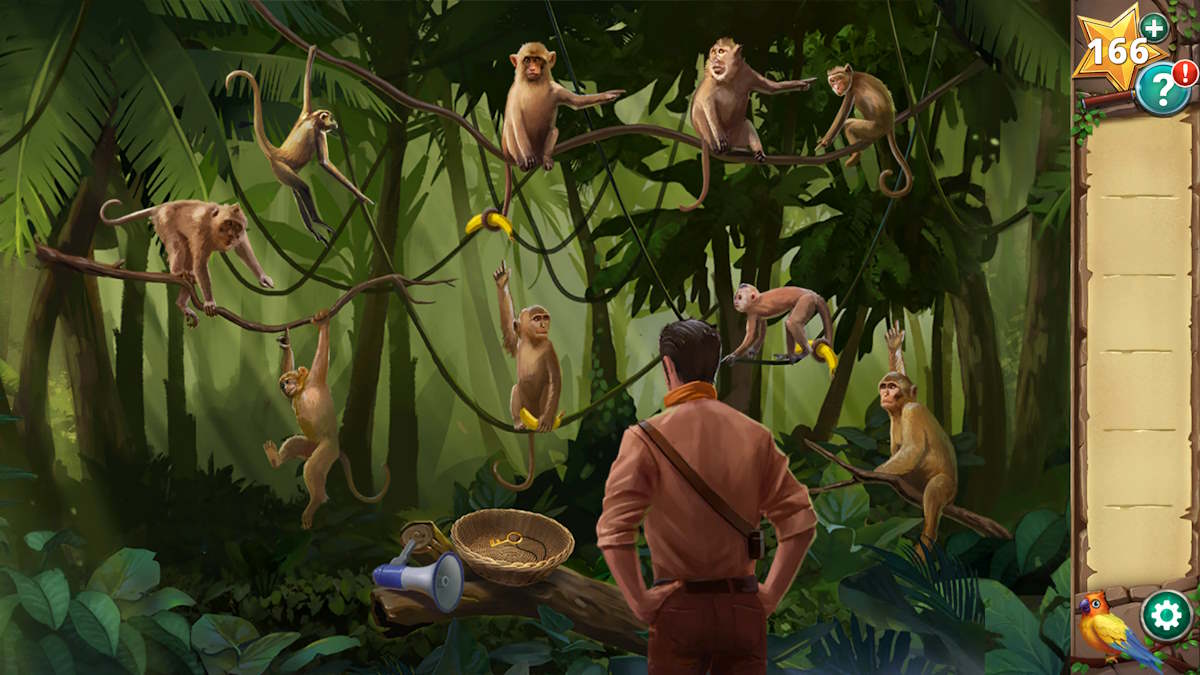
Put the three bananas in the bowl and add the bullhorn. Now give bananas to the indicated monkeys (see above) and then use the bullhorn to startle the monkeys. As long as you’ve given bananas to the correct monkeys, the final one will drop the key into the bowl. Take the Key. Use the key to open the shed (j3) and head inside.
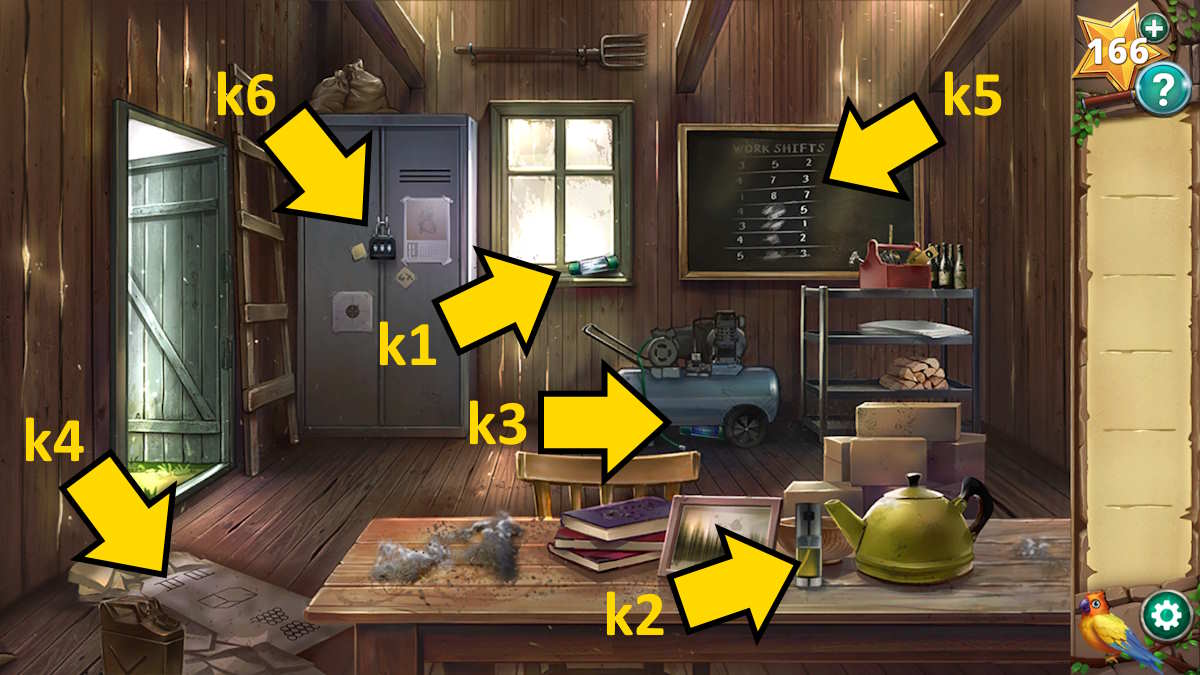
Grab the Fuse from the windowsill (k1), the Oil Spray from the table (k2), and a second Fuse from underneath the air generator (k3). Also, click the piece of paper on the ground (k4) and the work shift board (k5) for some clues. If you examined what’s missing from the diagram to make the three images complete, you’ll see that the lines you’d draw to fix them would spell out 478. Use this code to open the locker (k6) and take some Shears, a Saw Blade, and a third Fuse.
Looking at the work shift board, you’ll notice that on the lines you can completely see, that if you subtract the first number from the second, you get the third. By this reasoning, you can work out that the four missing numbers (top to bottom) are 9468.
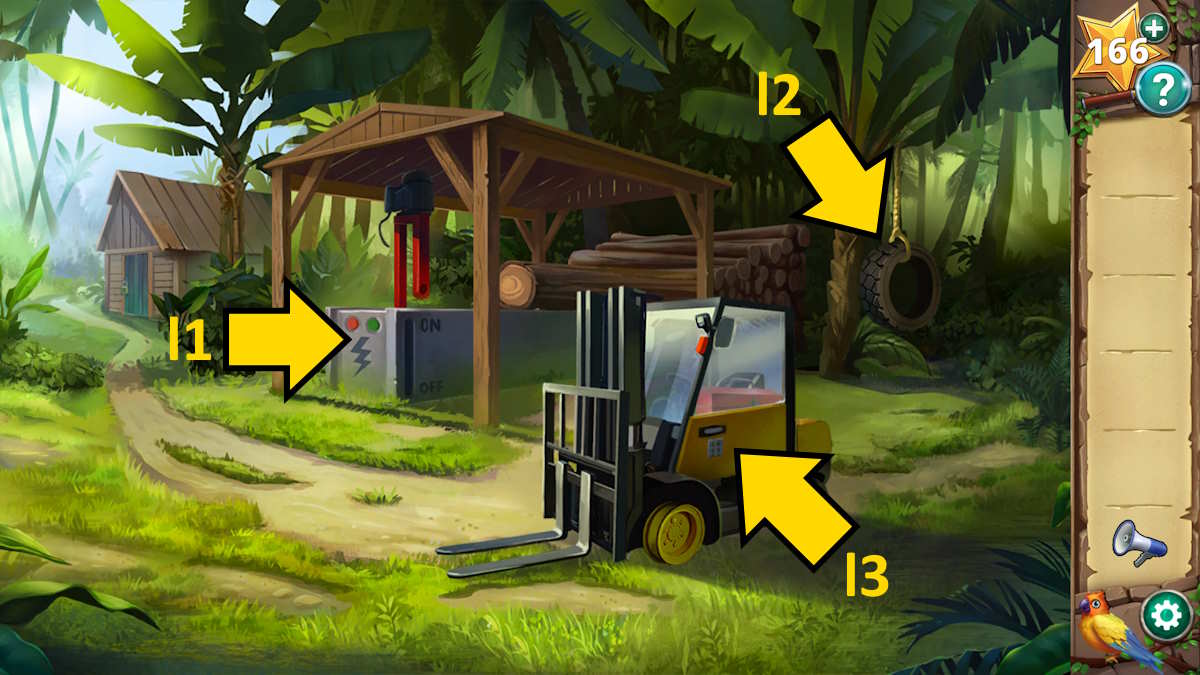
Go back outside and select the woodpile (j4) to move to the next area. Add the saw blade to the sawmill (l1) and use the shears to chop down the tire (l2), picking up the Flat Tire and a Rope. Use the code 9468 to open the door of the forklift truck (l3), and then use the oil on the rusted toolbox inside to find a Screwdriver inside it.
Repairing the forklift truck
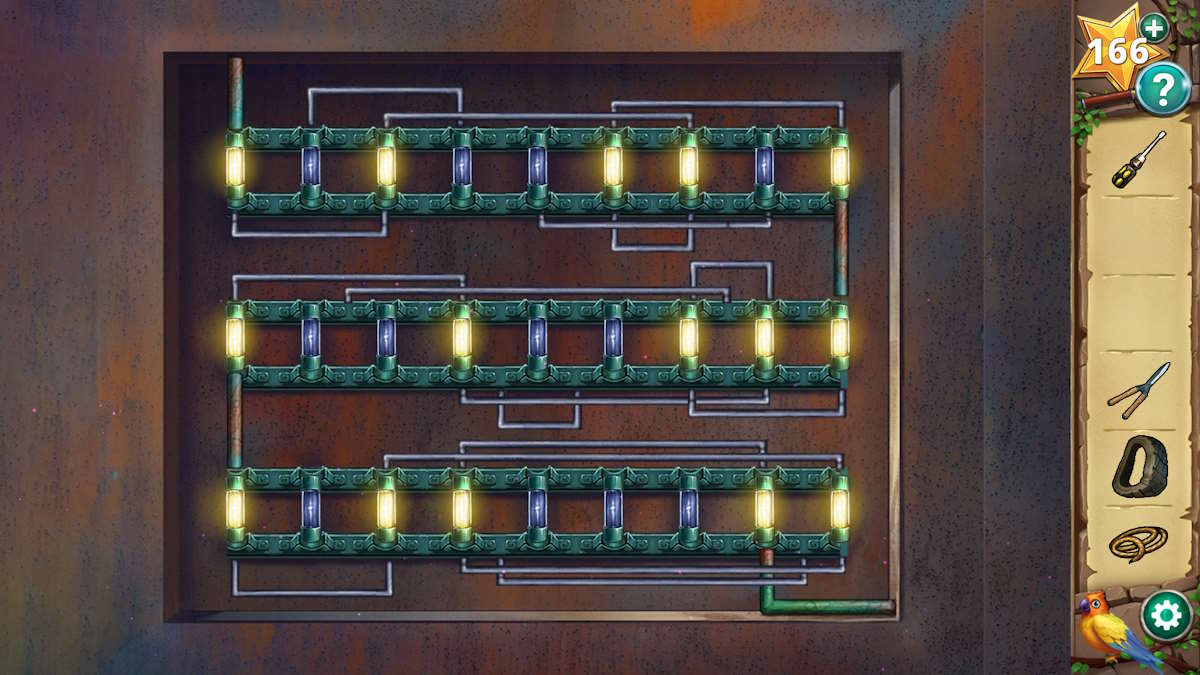
Move back to the shed, use the screwdriver to remove the front of the fusebox case on the wall outside (j5), then click the fusebox for a close-up and insert your three fuse to start a puzzle. You need to slide the metal connectors above and below each row of fuses to make a connection from the top left of the circuit board to the bottom right. See the completed circuit above.
With the power restored, you can go back into the shed and use the air generator (k3) to blow up the flat tire and take the Tire. You can now add the tire to the forklift truck (l3) to make it fully operational. Use the screwdriver as a makeshift handle to operate the sawmill (l1), add the rope to the logs it chops to make a raft, but you need another piece of rope to secure the other side.

Return to the plane and use the shears to cut down the net you used to store the rocks (i6). Remove the rocks from the cut net and you’ll collect another Rope. Return to the forklift, use the rope to complete the raft, and that’s that for Chapter 5!
Hidden Ruins Chapter 6 walkthrough - Entering the pyramid
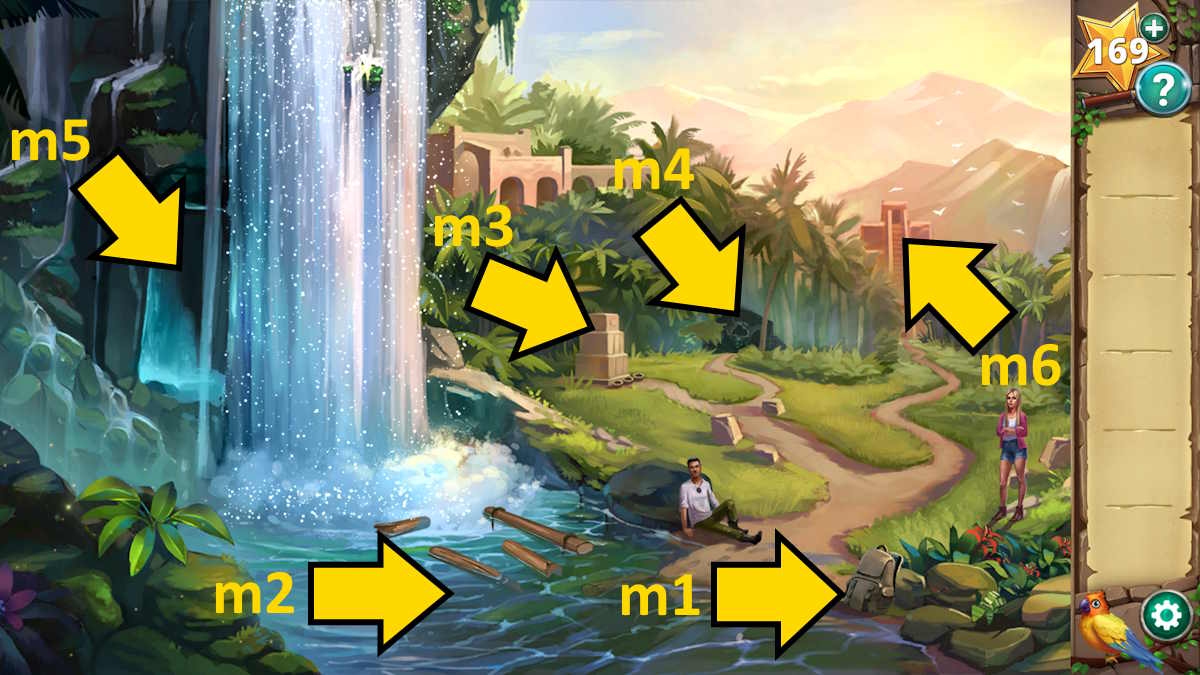
As you recover from the plunge down the waterfall, open the backpack (m1) to find a Diving Mask and Slingshot, then use the mask and select the water (m2) to bring up a focus puzzle.
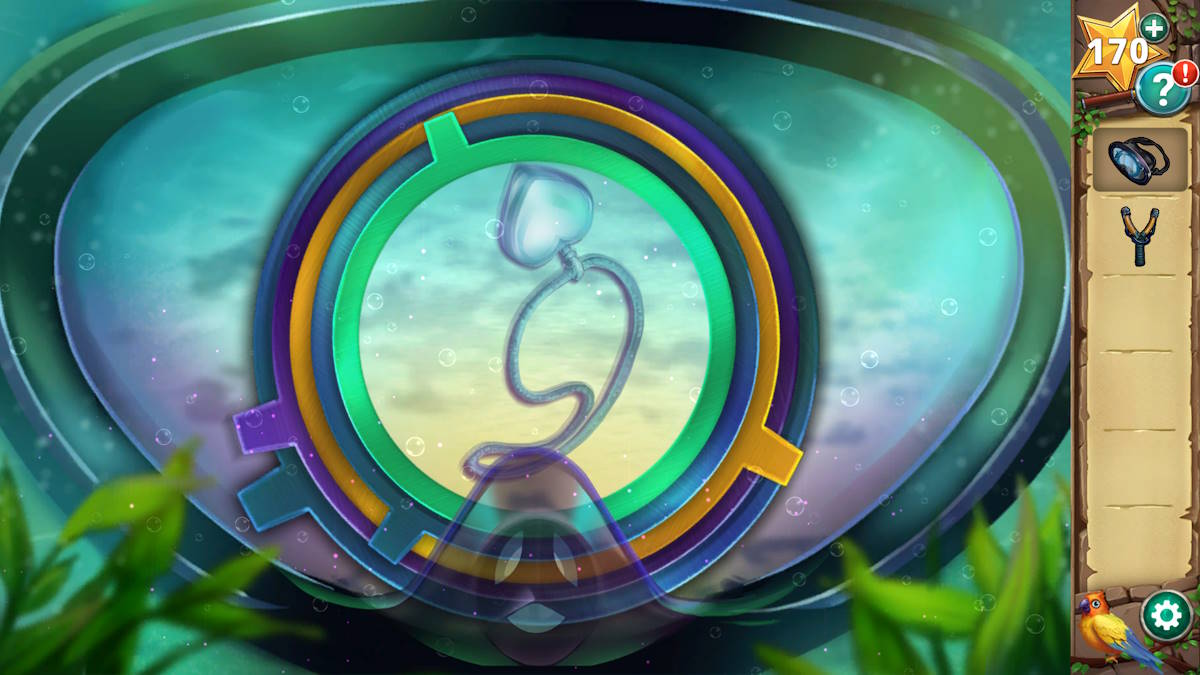
Turn the dials to find three items: a boot, a bottle, and finally a Necklace (see above). The angle of the items doesn’t matter as you rotate the dials; they just need to align, and it is pretty obvious what the objects are. Also, you can’t go wrong here as you can just keep turning them until you’re done.
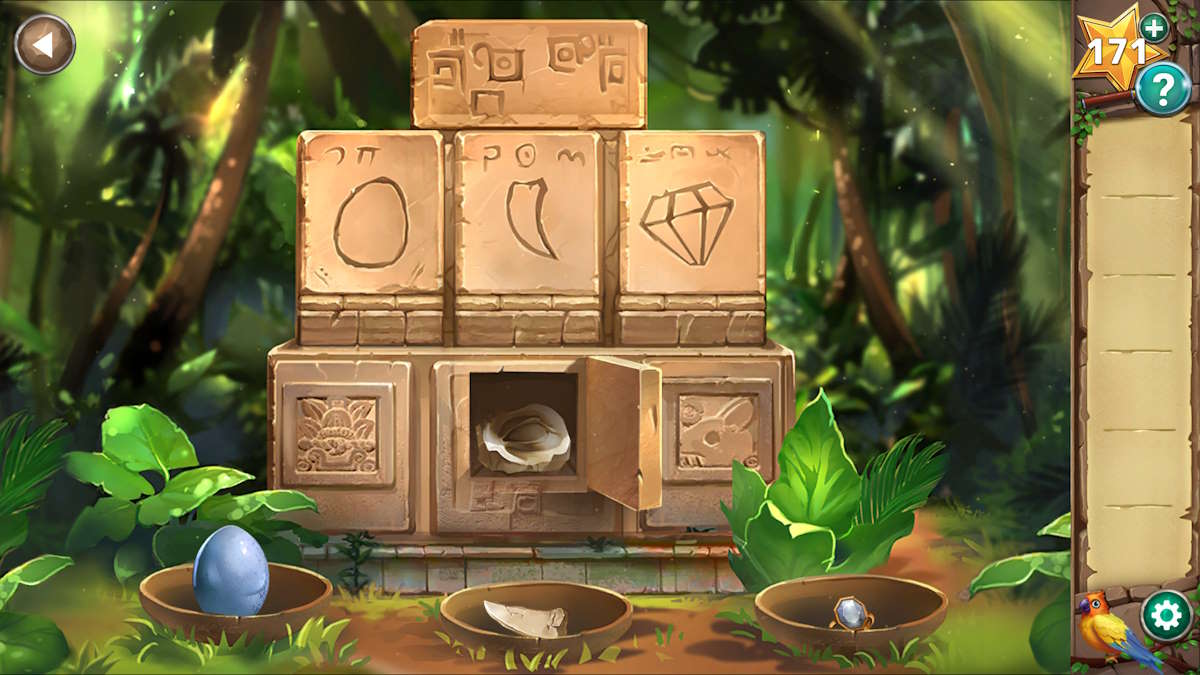
Now select the monument (m3) to find you need to make three offerings: an egg, a tooth, and a gem. Afterward, Rachel will say there’s a diamond in her necklace that she lost on the waterfall. Give her the necklace, and in return, she’ll open it and give you a Diamond Ring. One offering down, two to go.
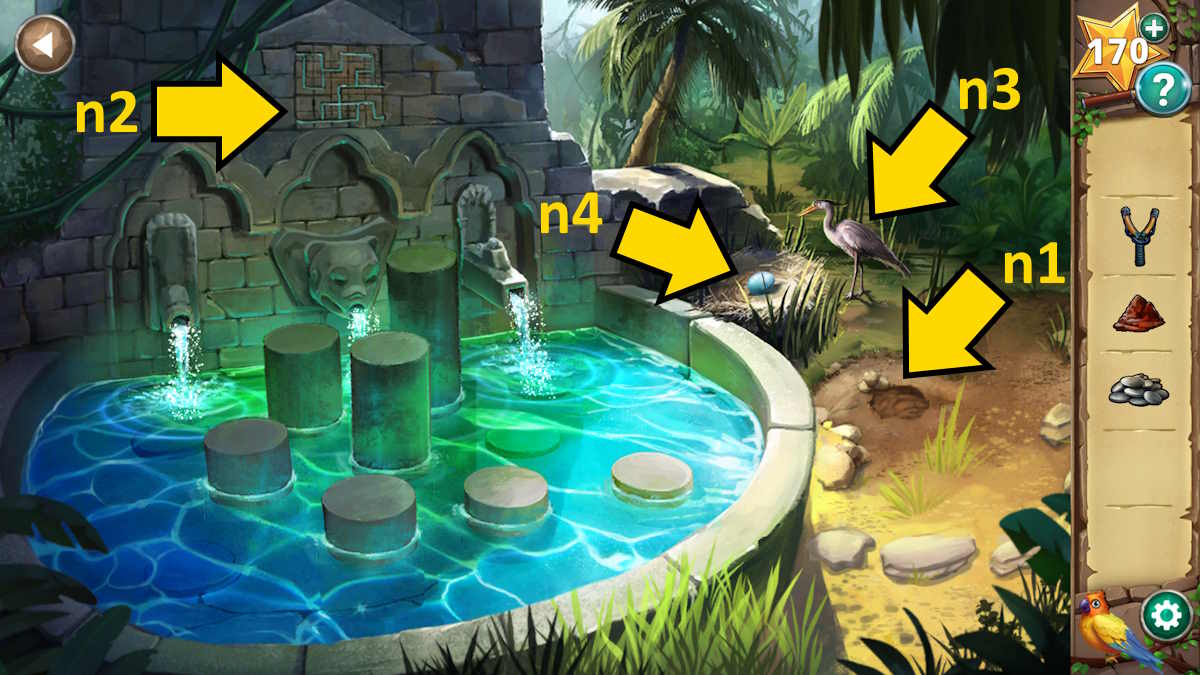
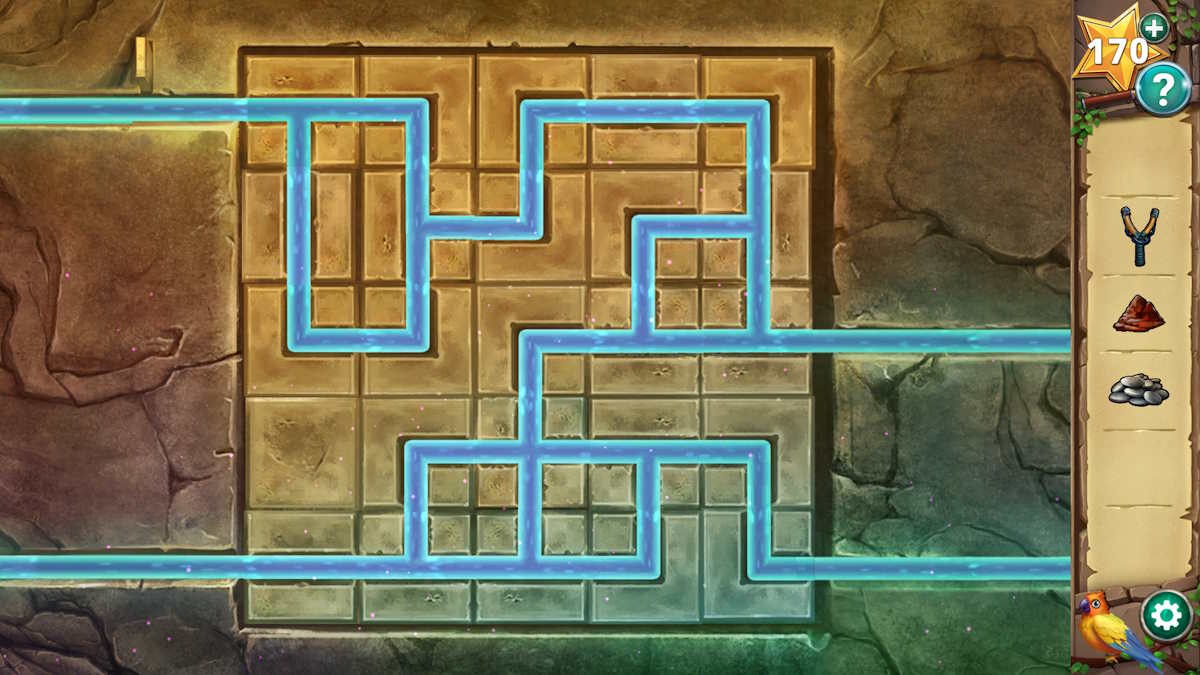
Select the fountain next (m4). Pick up some Mud (n1), and then click the pattern on the top of the fountain (n2) to begin a puzzle. Turn the pipes by clicking them so that water flows from the two inlets on the left to the two on the right (see the solution below). Once complete, water will flow into the fountain.
Note the heights of the pillars that have risen in the fountain, counting the lowest as 1 and the tallest as 7. Remember these positions, and then head into the cave next to the waterfall (m5).
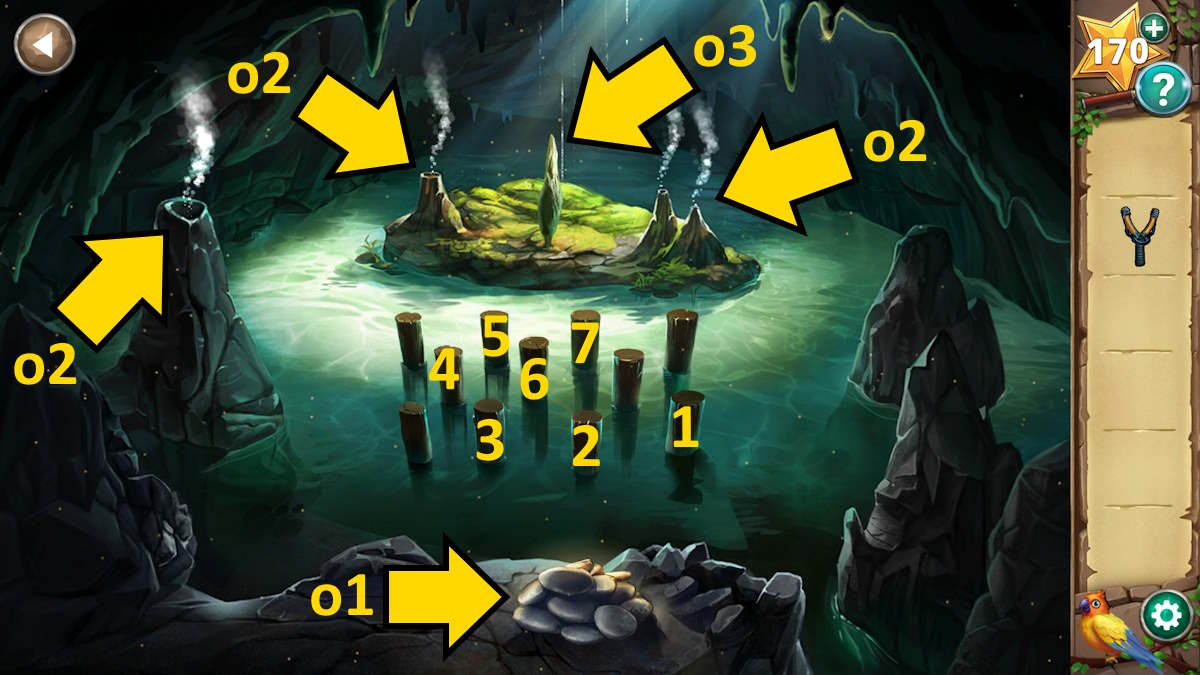
Pick up the Pebbles (o1) and then press the logs in the water in the same order as you noted in the fountain (I’ve marked them above). You can now use the mud you picked up to block the four holes pumping out steam (o2). This will help the flower on the island (o3) to bloom.
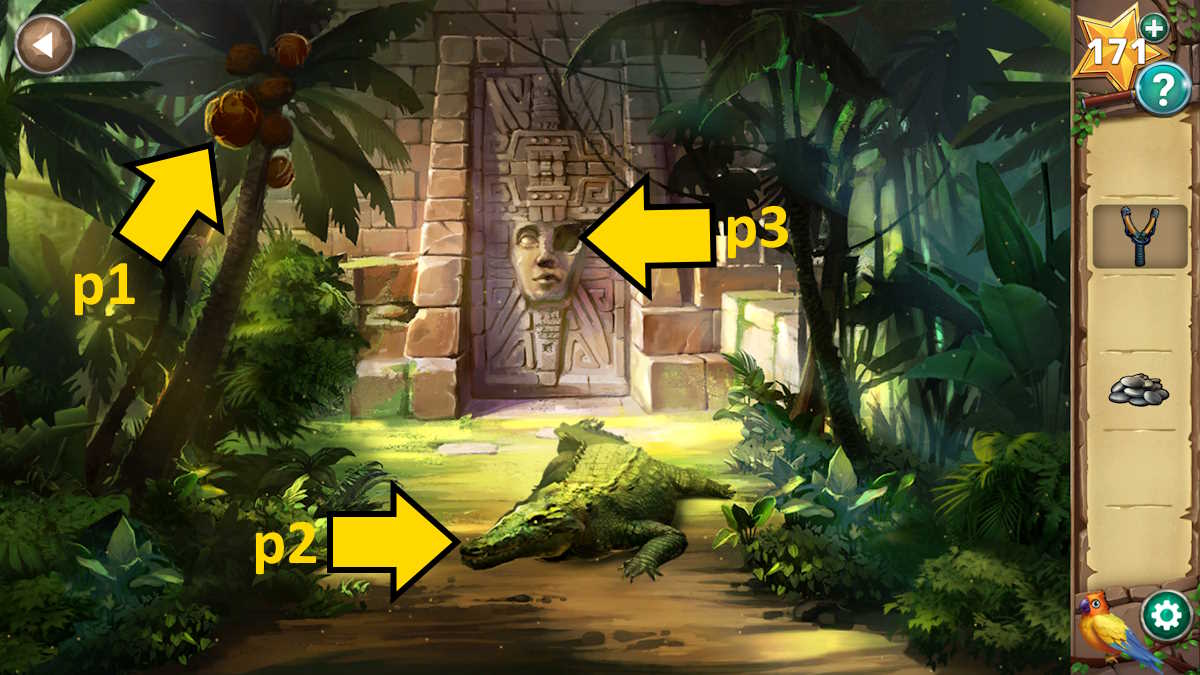
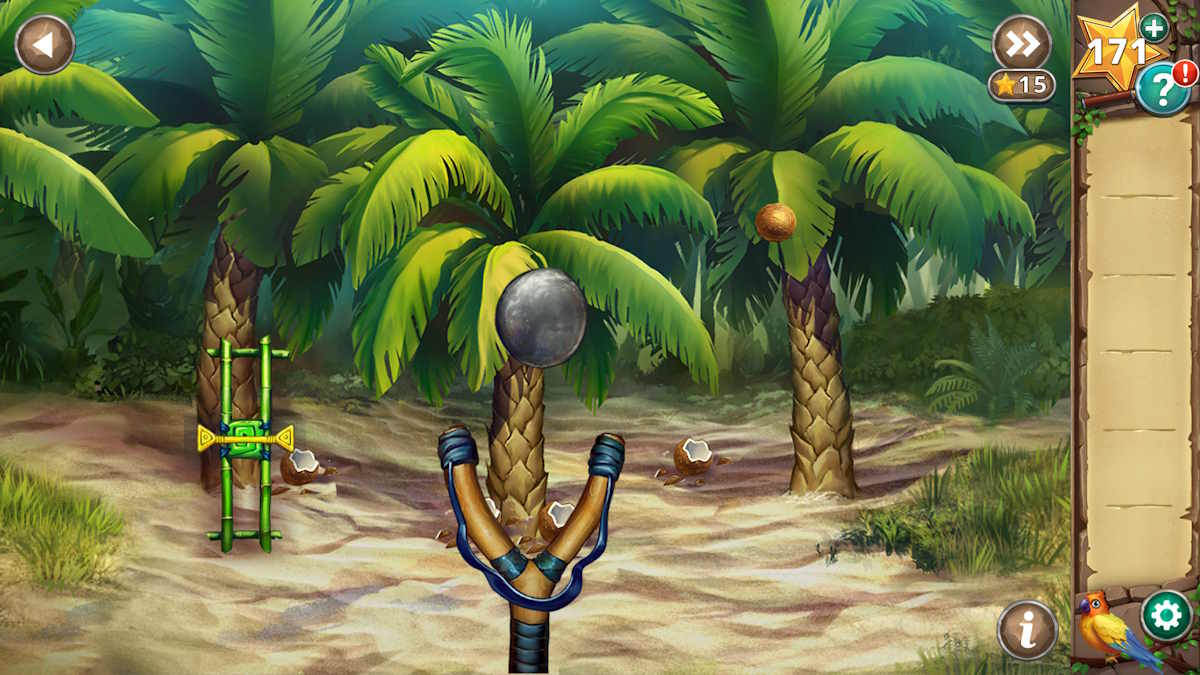
Go back outside and head to the distant pyramid (m6). Select the slingshot in your inventory and then click the coconuts (p1) for a close-up. Once you’re in slingshot aim mode, add the peddles to the picture to start a slingshot mini-game. Once you’ve knocked down all five coconuts, take the one Coconut that didn’t break and head back into the cave. Use the coconut on the flower (o3) to get a Meaty Smelling Coconut.
Return to the temple and give the meaty coconut to the crocodile (p2), which will slink away - but not before dropping a Crocodile Tooth! Now you just need an egg. Return to the fountain and use Bert to attract the bird (n3), allowing you to take its Egg (n4) while Bert is singing. Return to the altar, place the three offerings in the baskets, and take the Stone Eye (see below).
Head to the pyramid next, and place the eye in the door (p3) to open it. Select the door to enter, and you’ll have completed Chapter 6!
Hidden Ruins Chapter 7 walkthrough - The inner sanctum
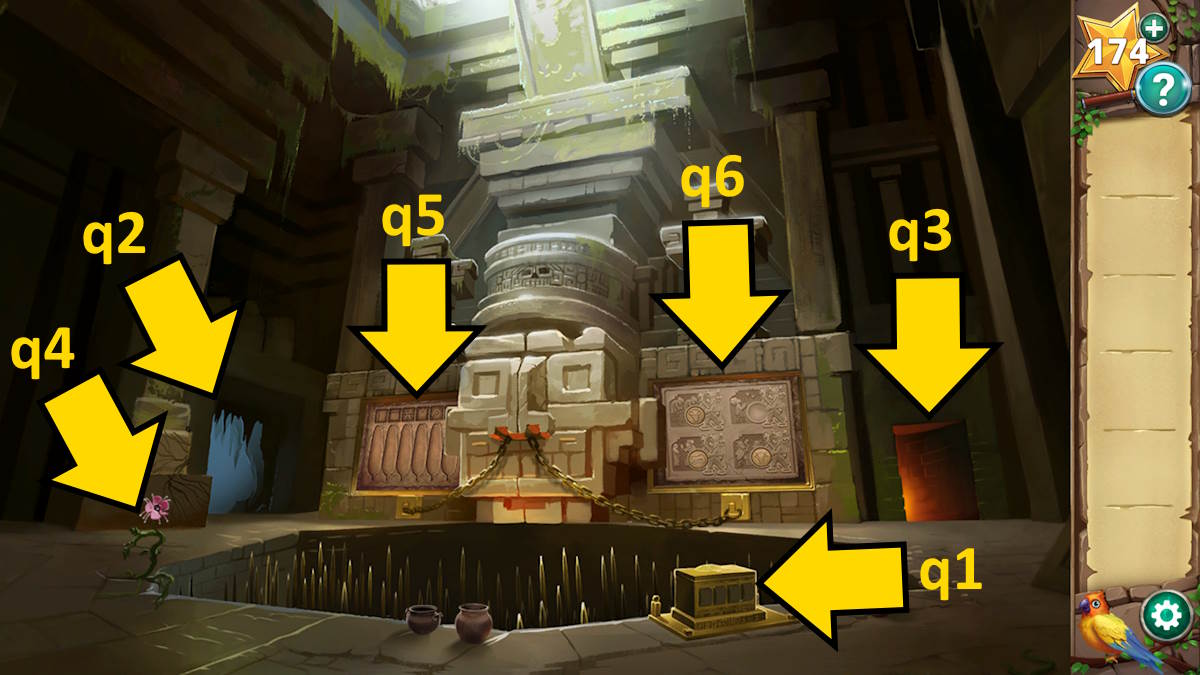
The next step in the adventure is to explore the inner sanctum of the pyramid. You’re faced with three puzzles (one on each side of the central door, plus a gold code box). Look at the code box (q1) and note the positions of the colored gems in relation to each section (red, yellow, green, and then blue and purple together on the fourth digit). There’s nothing more you can do here for now.
The mechanical maze
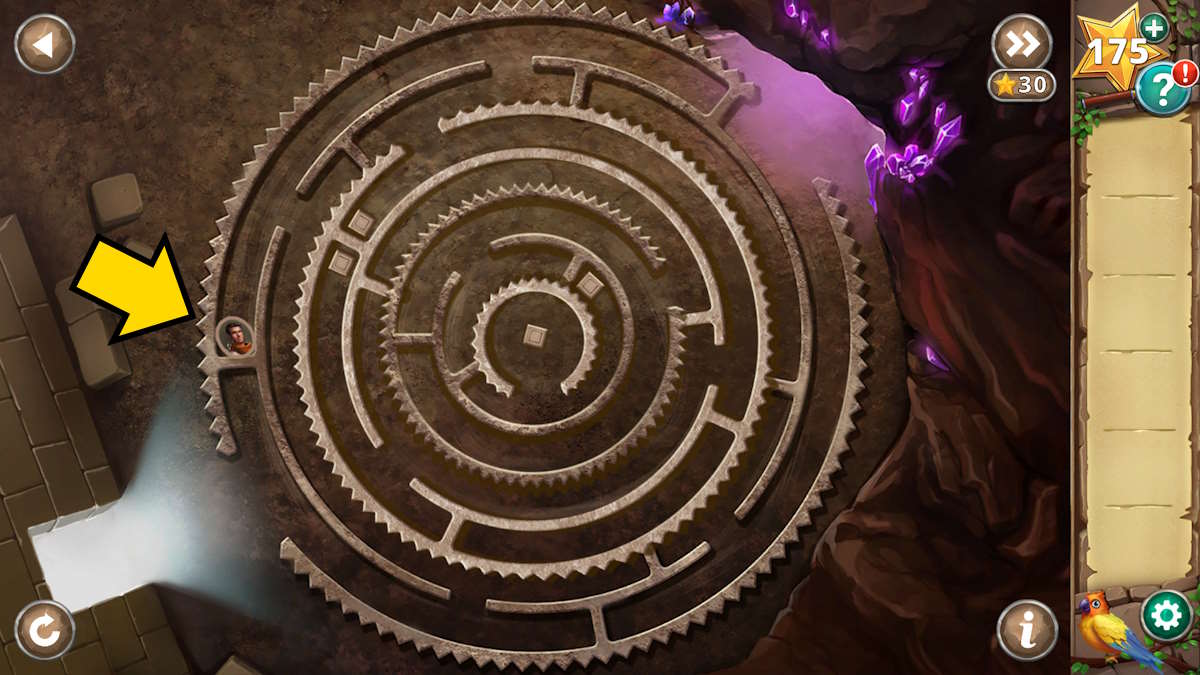
Head through the door on the left (q2) to be faced with a mechanical maze. Each time you drag your character over one of the square dots, a section of the maze will change. Start by going right, left, and then left again to the square on the far left of the maze to begin with (marked above). The maze only changes when you move onto one of the squares.
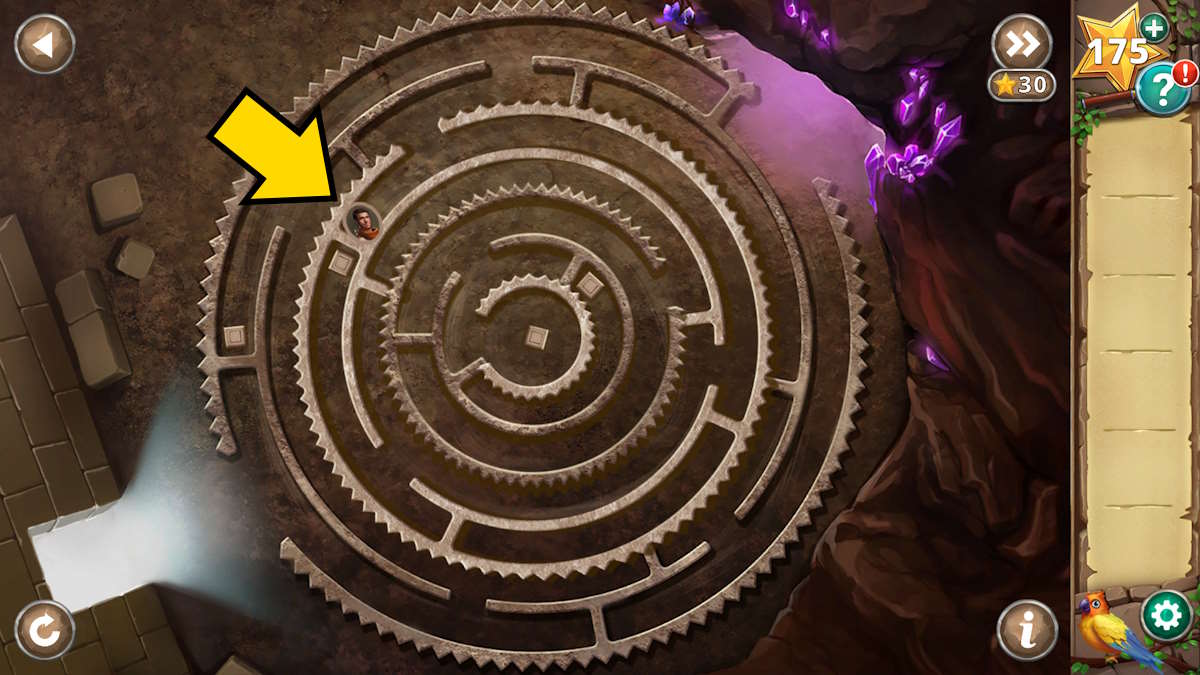
Now move to around 12-o-clock on the outer ring, drop down, and move to around 10-o-clock for the second square (see above).
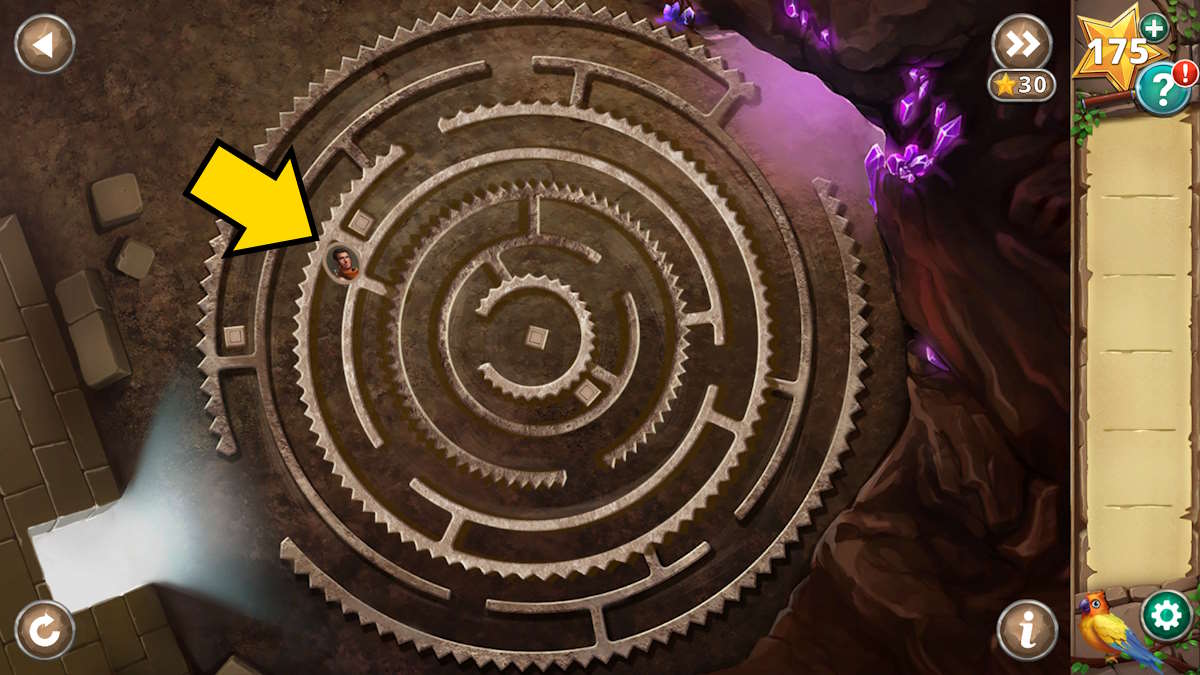
From here, move all the way around the circle to the square that is just through the wall you’re at when you begin (see above).
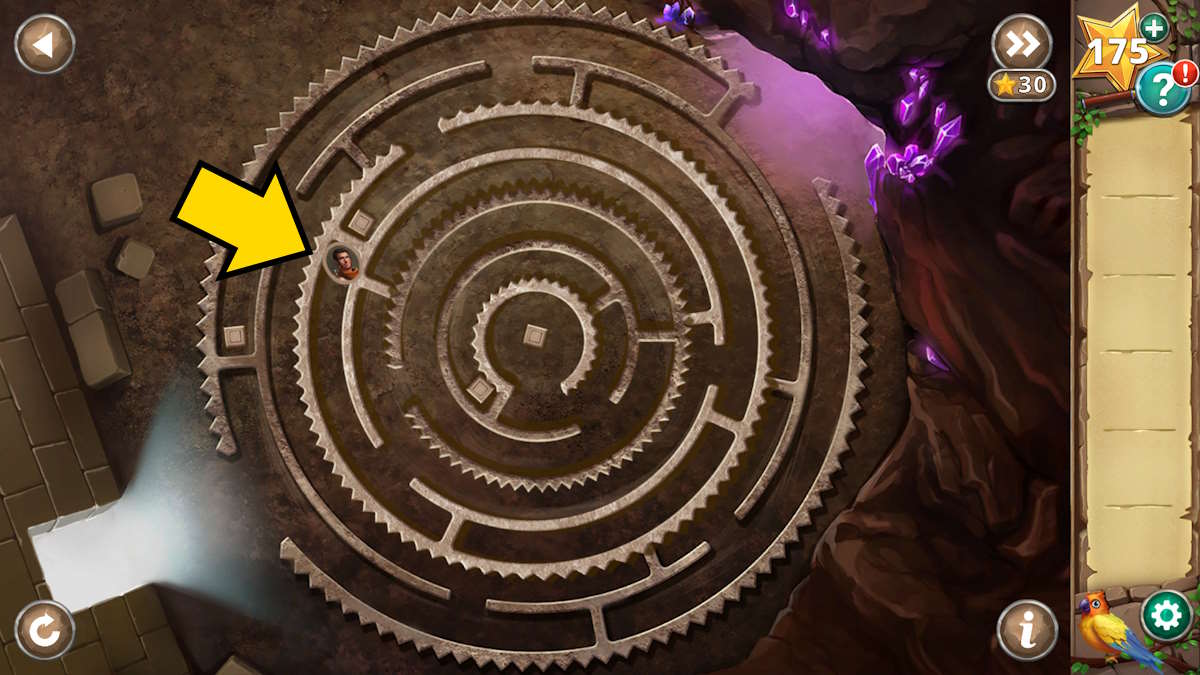
Afterward, retrace your steps to the square you were just at (see above)! Note you can also step off a square and back onto it to trigger it again. Trigger these two squares until you have the image pictured above.
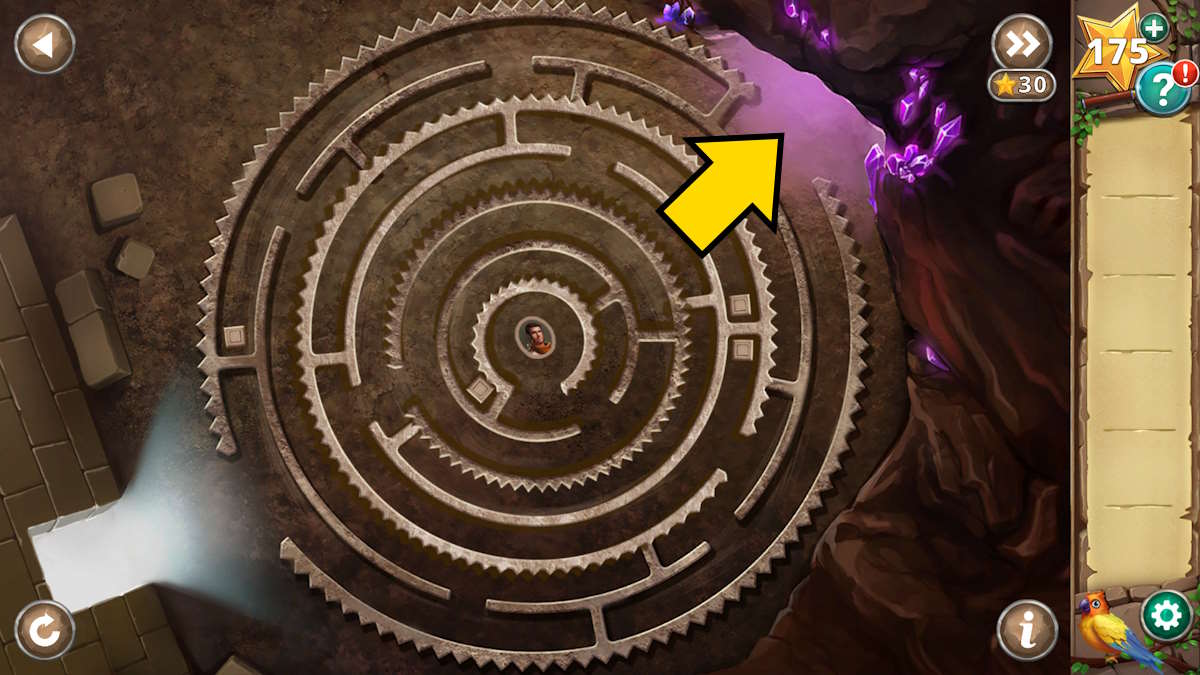
Now move into the central position and use the square there, which then allows you to step out and move over the square just outside the center. Do so, then do the middle again, to be left with the maze above. You can now walk all the way out and through the north-east exit without going over any more squares, and through to the next room.
Passing the wall of flame
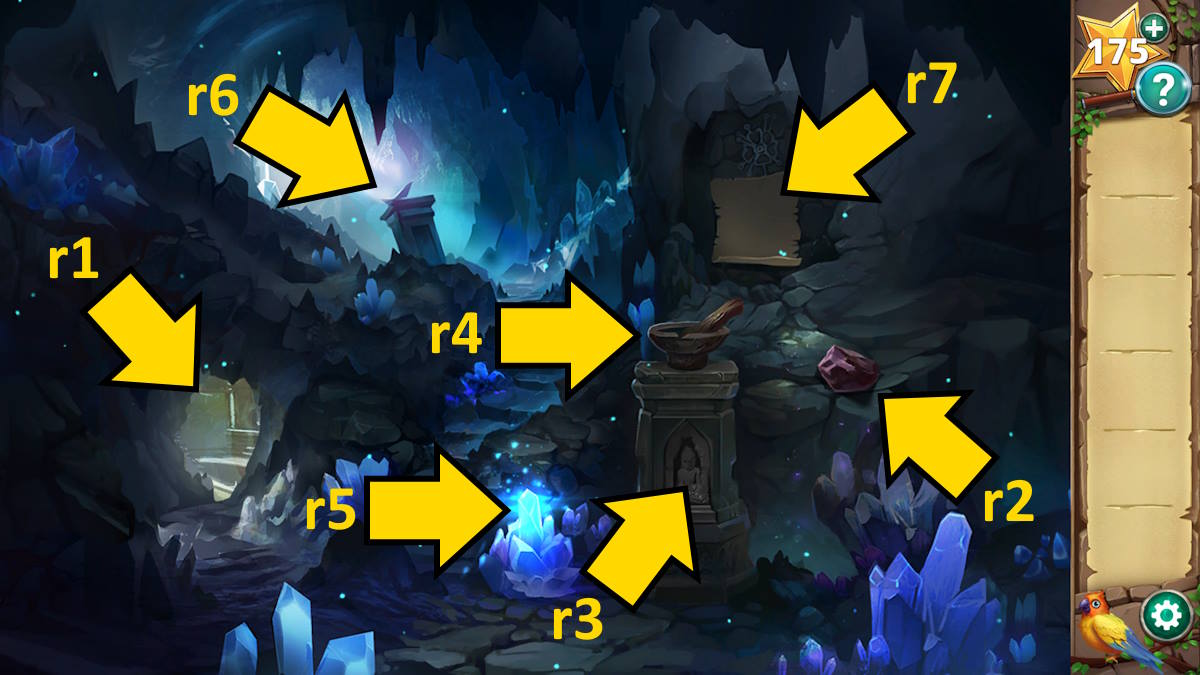
You no longer have to navigate the maze, so you can return to the main door room anytime via the exit (r1). Grab the Chunk of Obsidian (r2), open the pedestal (r3) to find some Ore, and head back to the door room. Now go through the right-hand door (q3) to be faced with a flame wall.
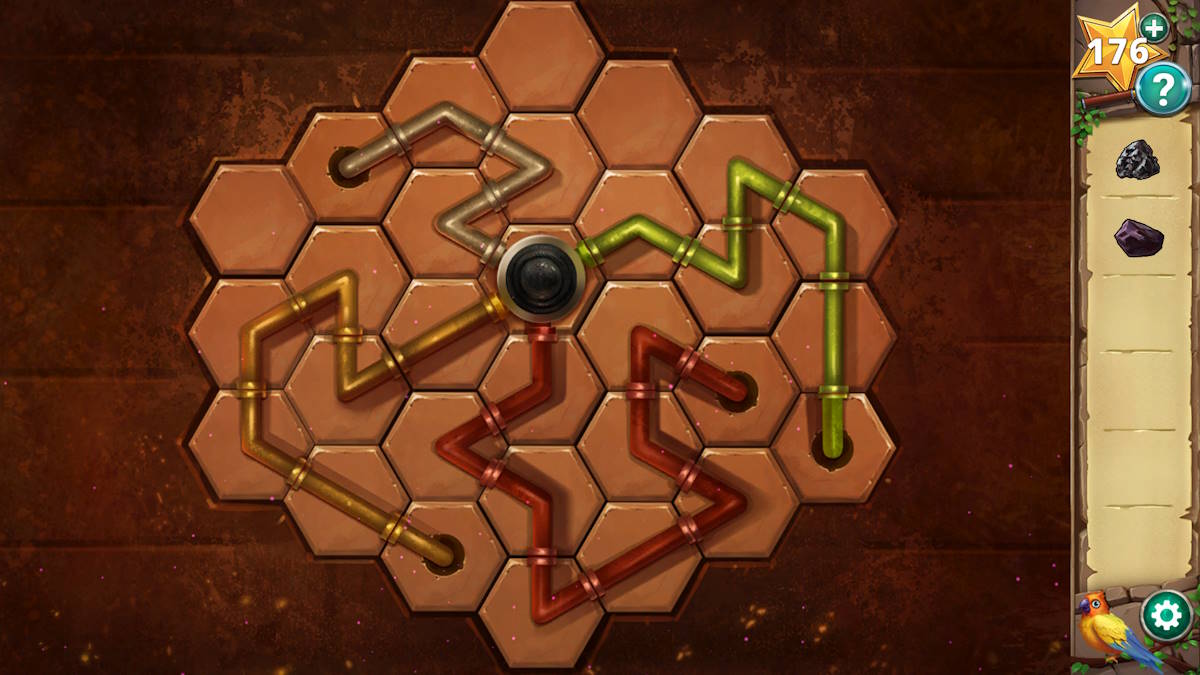
Click the device on the righthand wall to begin a pipe puzzle. The trick is to connect each of the four colored pipes to the central space. Once complete (I’ve included a solution above), the flame wall will drop.
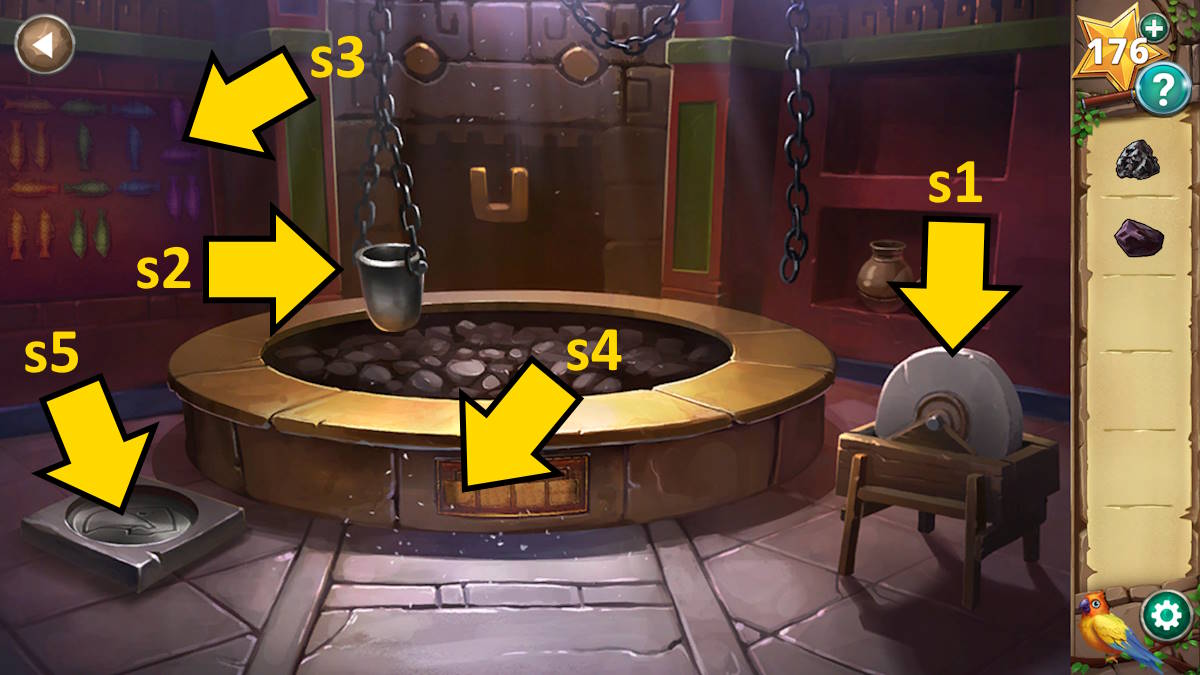
Use the obsidian on the grinding stone (s1) to get Sharpened Obsidian, and place the ore in the smelting bucket (s2). Look at the fish art on the wall (s3) and note the colors match those on the lock on the door room. For each color, mentally draw a line following the direction each fish is facing. Each color (with blue and purple working together) gives you a number, which gets you the code (red 5, yellow 0, green 9, and blue/purple 8). Put these together in the correct order and you have 5098.
Go back to the door room, enter 5098 into the code lock (q1), take the Stone Feathers, and then use the sharpened obsidian to collect the Flower (q4). You can add the feathers to the lock on the left (q5), but you don’t know how to solve that puzzle yet.
Return to the cave beyond the mechanical maze (q2), and add the flower to the mortar and pestle (r4) to receive some Flower Dye. Use the sharpened obsidian to collect a piece of Crystal (r5), put it on the pedestal at the top of the steps (r6) to shine a light on a clue on the wall, and then use the flower dye on the parchment (r7) to reveal another clue (see above).
Return to the smelter room, click the pattern at the base of the firepit (s4), and enter the code you just displayed on the wall to light the fire (see above). The trick here is that you’re looking to make the images in white (so in the spaces), not in brown. You can now click the smelting bucket once more (s2) to collect some Melted Ore, which you can use on the mold (s5) to then collect a Shield from it.
Passing the pit of spikes
Return to the door room and look at the feathers puzzle (q5). If you look at the parchment instructions, they tell you how many times clockwise each symbol needs to be switched to make the image above it correct. So, it's not about how many times you turn each image, but what the lower images would look like if you turned each one 90 degrees the number of times the dots represent. If you’re struggling, the solution is above.
With the bridge half extended, you just need to solve the shields puzzle. Select the puzzle (q6), add your shield, and then click each of the four images to get a feel for what they represent. Match the animals as they best represent the sentences about the Kumsari lifestyle, and you’ll have solved the puzzle - and completed Chapter 7.
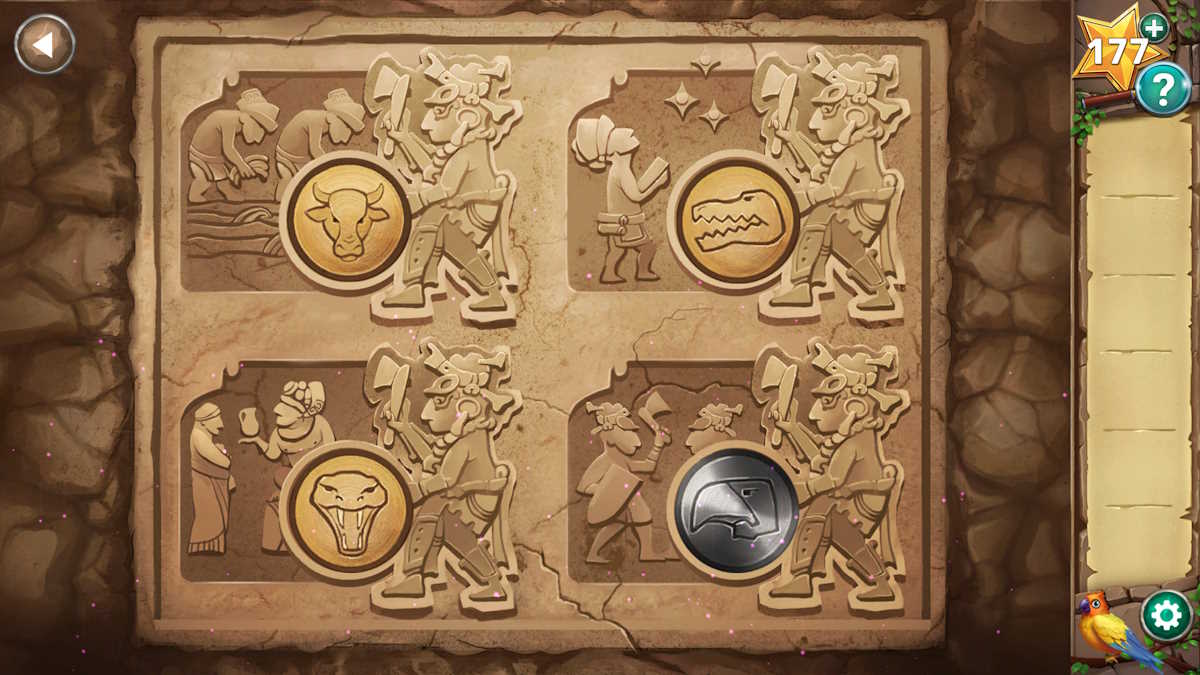
- Top-left: Ox (The Kumari did backbreaking work in the fields)
- Top-right: Crocodile (They believed the cunning water beasts were descended from the gods)
- Bottom-left: Snake (The Kumari were known as sly and slippery traders)
- Bottom-right: Hawk (The Kumari often fought from higher ground)
Hidden Ruins Chapter 8 walkthrough - The race for the elixir
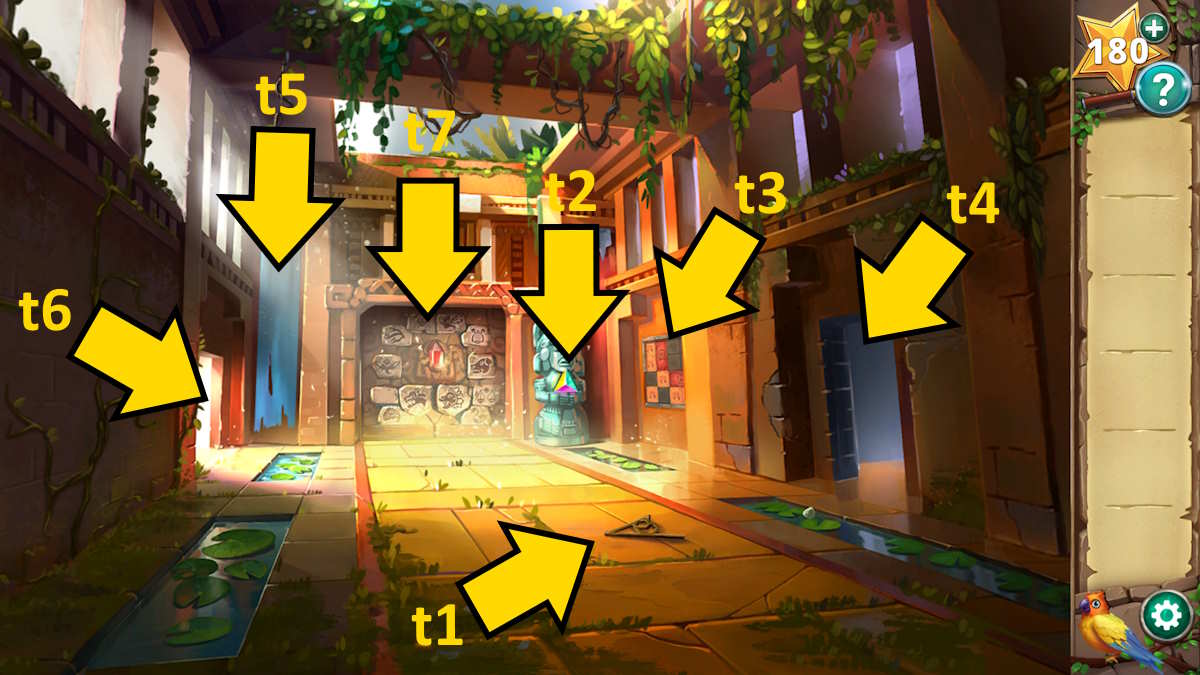
The story is now nearing its end! Pick up the Dial (t1) and the Prism (t2), and then click the wall art (t3) to begin a sliding puzzle.
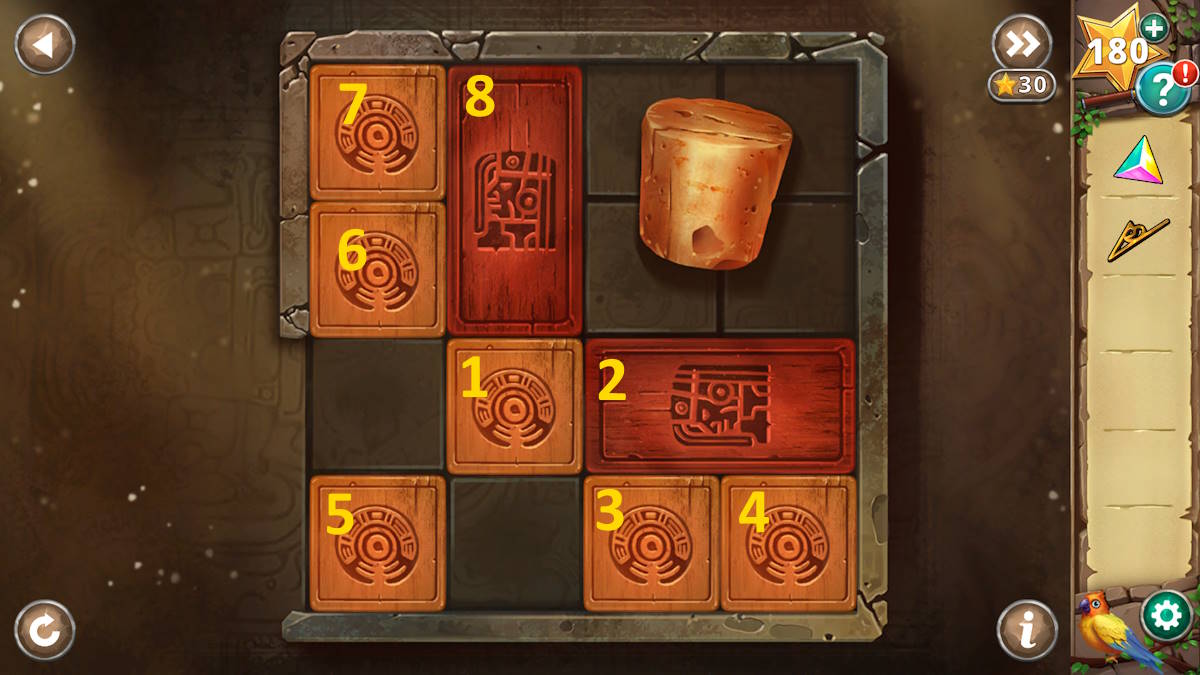
You need to get the cork out of the hole on the bottom left. To do so, follow these instructions (using the image above):
- Move 1 down
- Move 2 all the way left
- Move 3 and 4 up
- Move 1 and 5 into the spaces vacated by 3 and 4(in the bottom right corner)
- Move 2 down
- Move 6 and 7 down to be next to each other above 2
- Move 8 left
- Move 7, 1, and 5 so that they surround 8, allowing you to move the cork down
- Move the two pieces to the right of 8 into the top right corner, then move 8 right
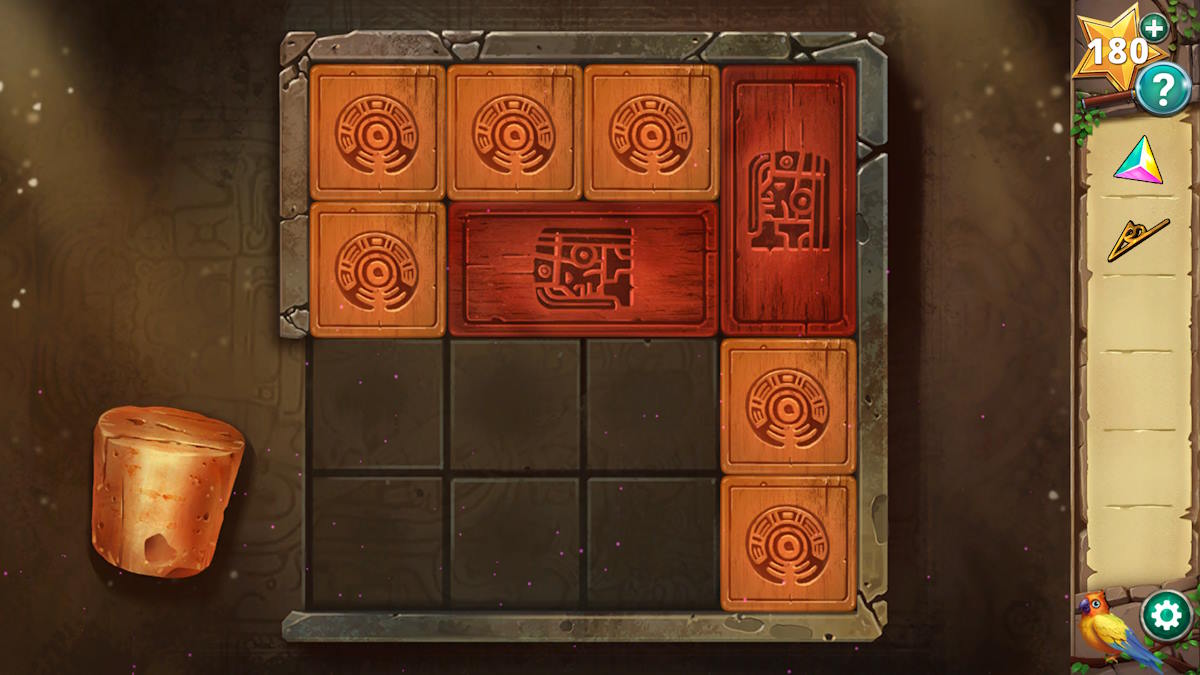
You can now continue to shuffle pieces clockwise, allowing you to move the stopper clockwise until you can remove it. Once you do, you’ll get the Cork Plug.
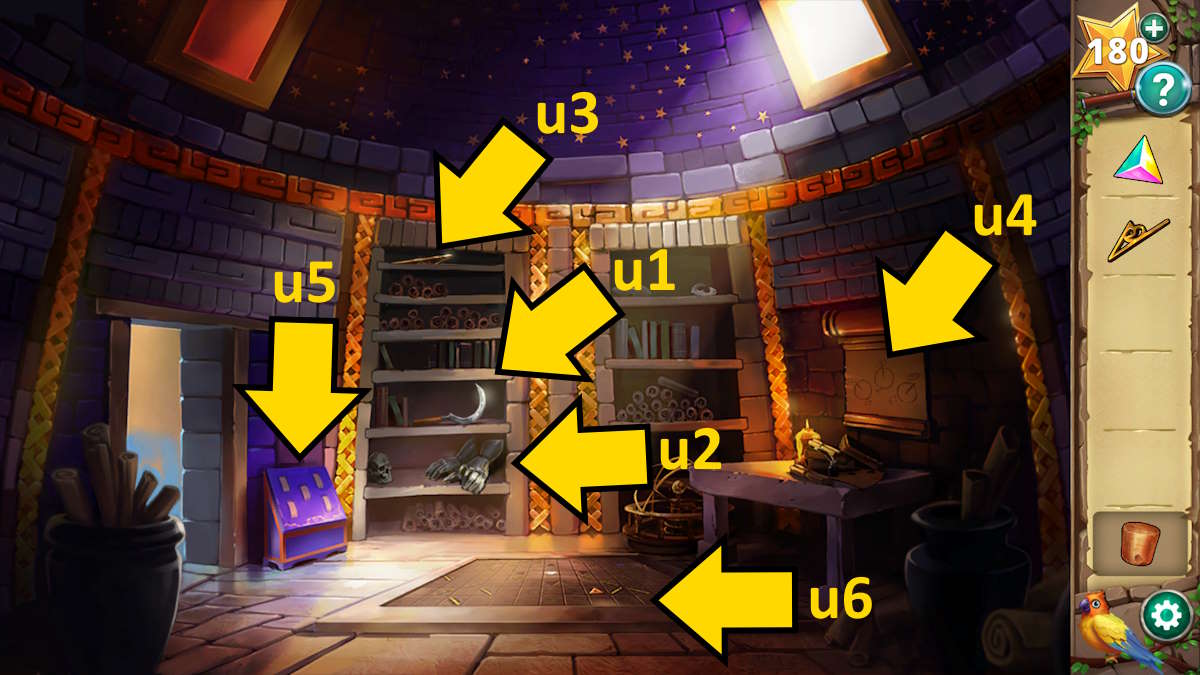
Head through the door on the right (t4) and take a Sickle (u1) and Gloves (u2) from the shelves; then send Bert up to the top of the same shelves to get you a second Dial (u3). Also note the positions of the dials on the scroll to the right of the room (u4) which are marked 3 (pointing north), 1 (northwest), and 5 (northeast).
The fountain puzzles
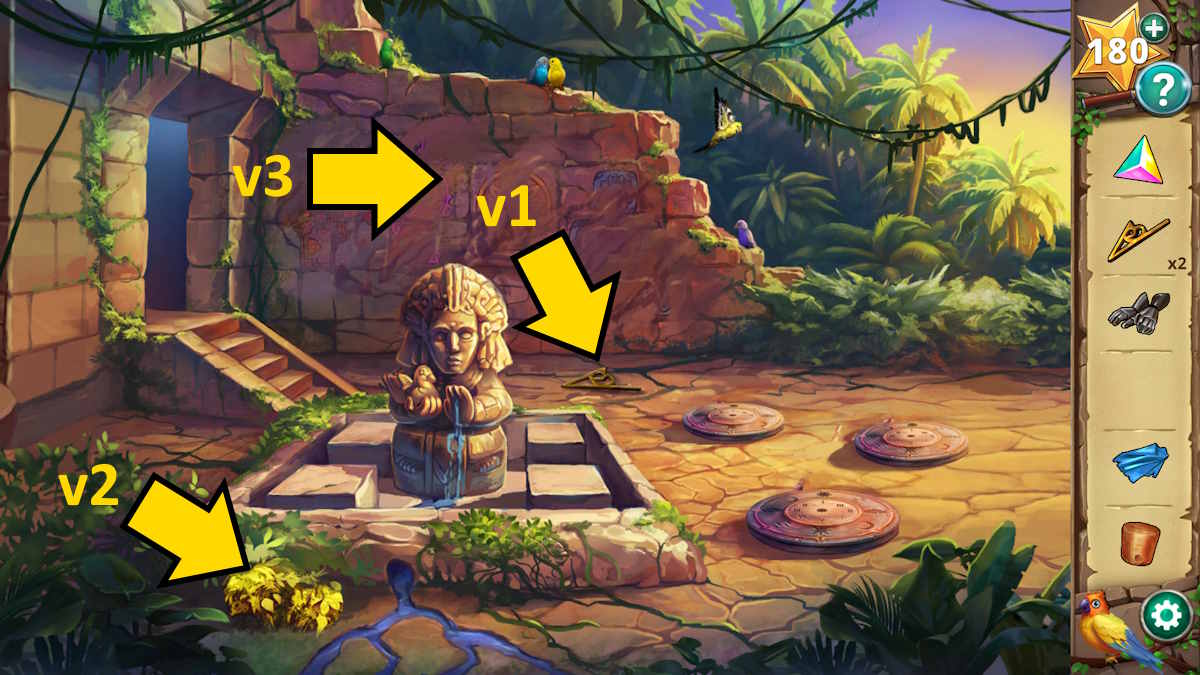
Return to the main room and use the sickle to chop down and collect a piece of Cloth (t5) before heading through the left door (t6). Pick up your third Dial (v1), and use the gloves to remove the thorns (v2) to find a second Prism underneath. You’ll also uncover a hole in the fountain here, so use the cork plug to fill it and the fountain will fill with water.
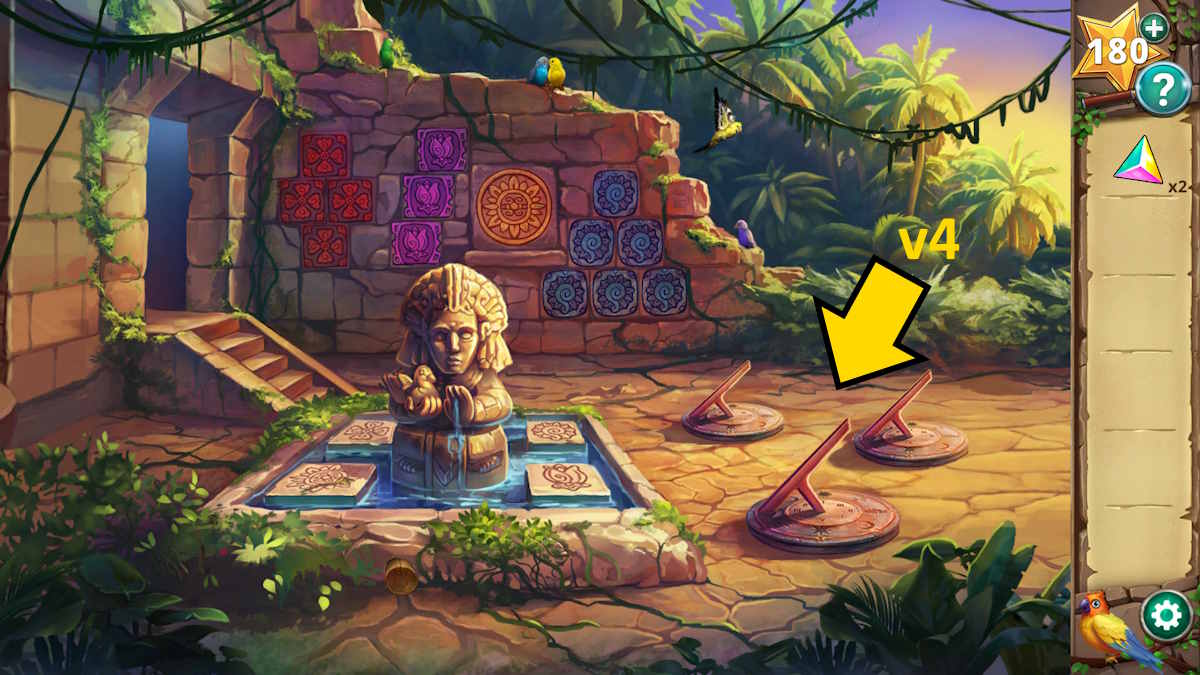
Use the cloth in the water in the fountain and then use the Wet Cloth to clean the wall behind the fountain (v3) to reveal a pattern (see below). You’ll see the patterns on the wall match the images on the stones in the fountain, so adding the wall patterns up you get 4 (top left), 6 (top right), 1 (bottom left), and 3 (bottom right).
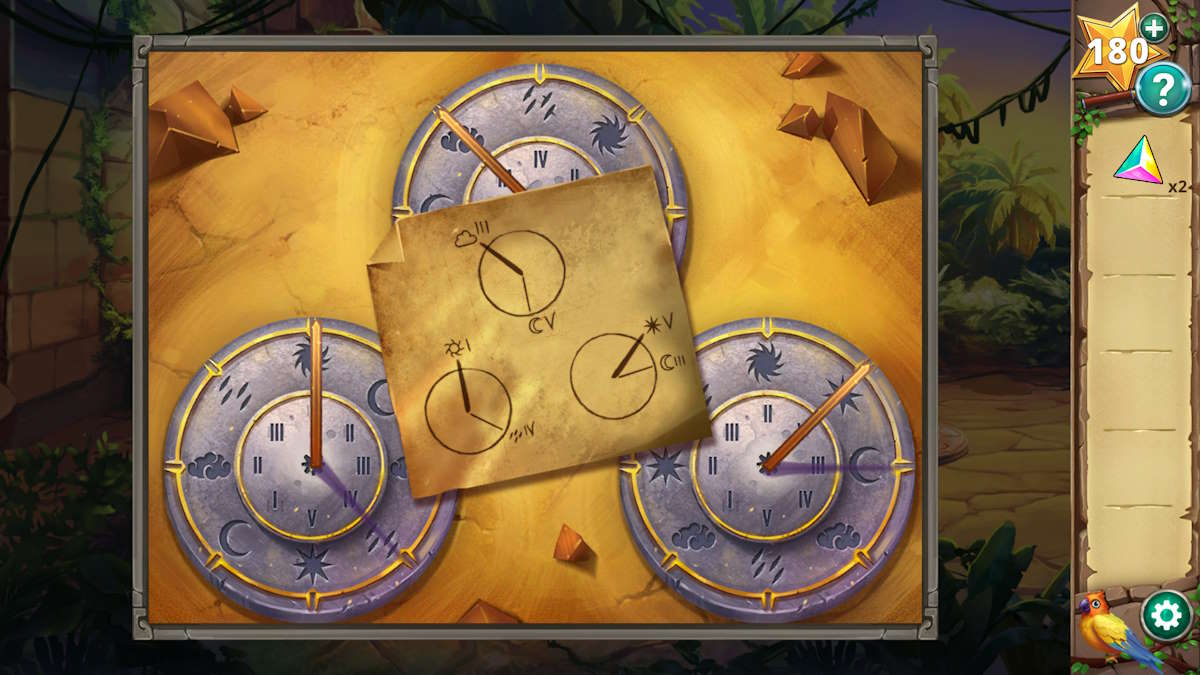
Also note that the figure in the middle of the fountain is holding a bird, and that there are 5 birds in the picture (including the one in its hand). Add the three dials to the weather discs on the ground (v4) to begin a dials puzzle. You’re looking for a Roman numeral on each disc that matches the compass point you got from the clue earlier. Once done (see below) you’ll receive the Sundial Note.
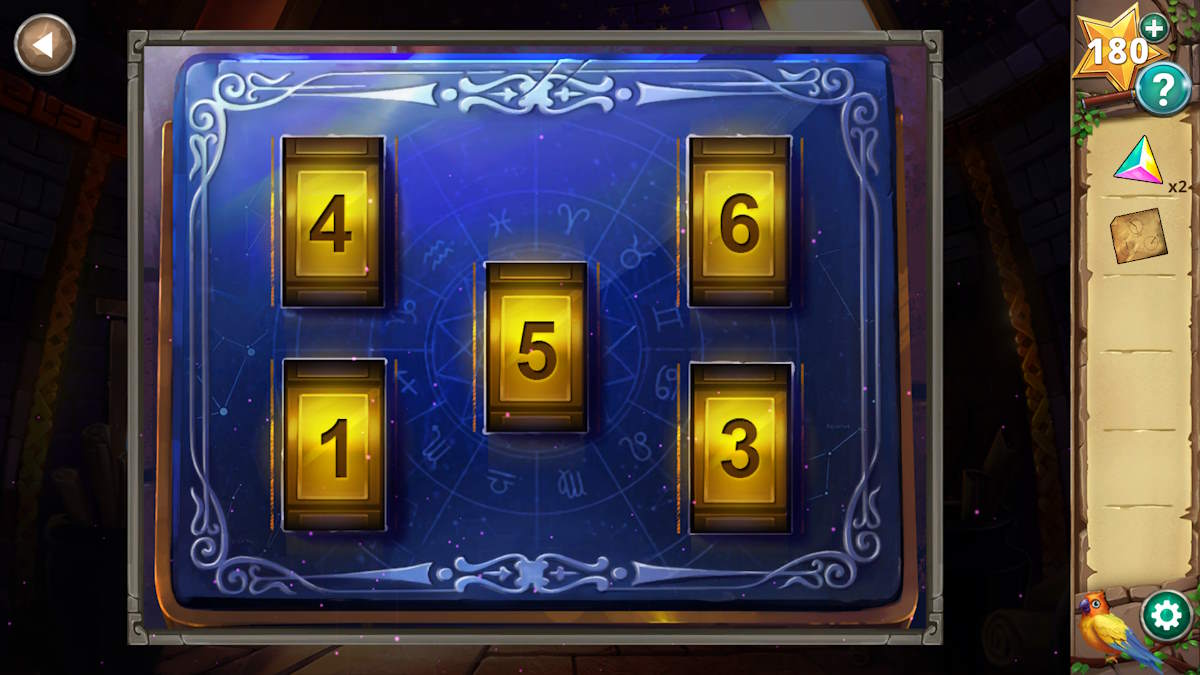
Go back to the room on the right of the main room and select the purple box (u5) for a close-up. Input the five numbers you discovered in the garden (four from the plates, with the number of birds in the middle) and the box will open, allowing you to take a third Prism (see below if you’re unsure).
The light beams puzzle
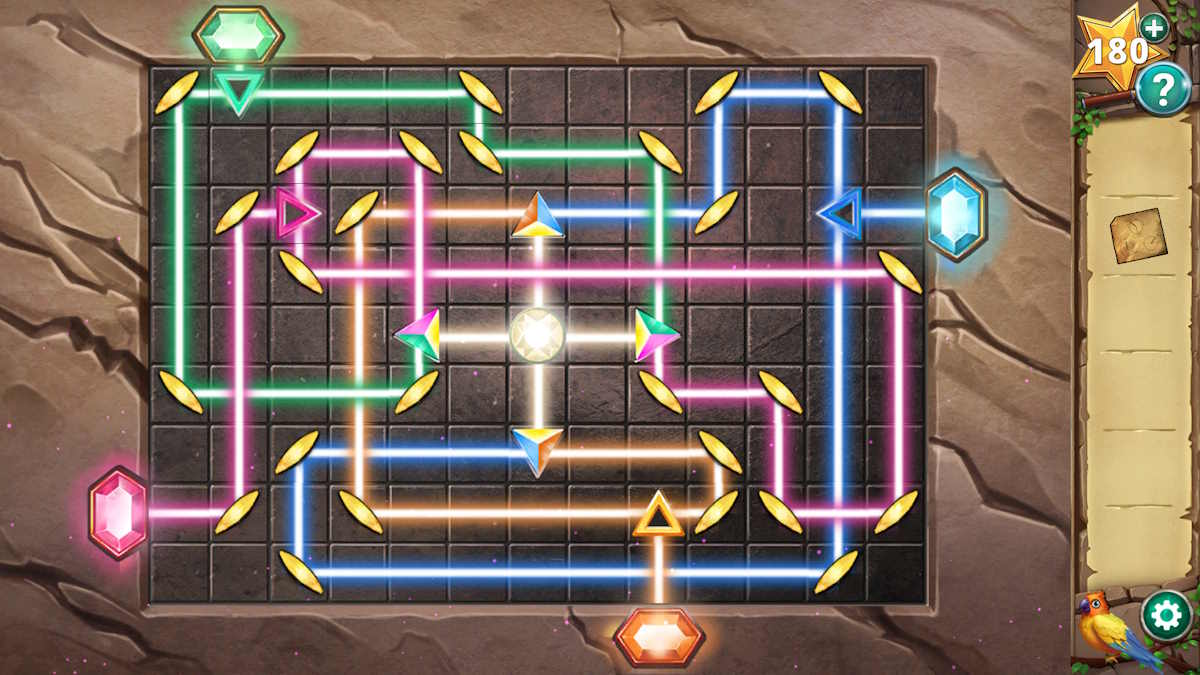
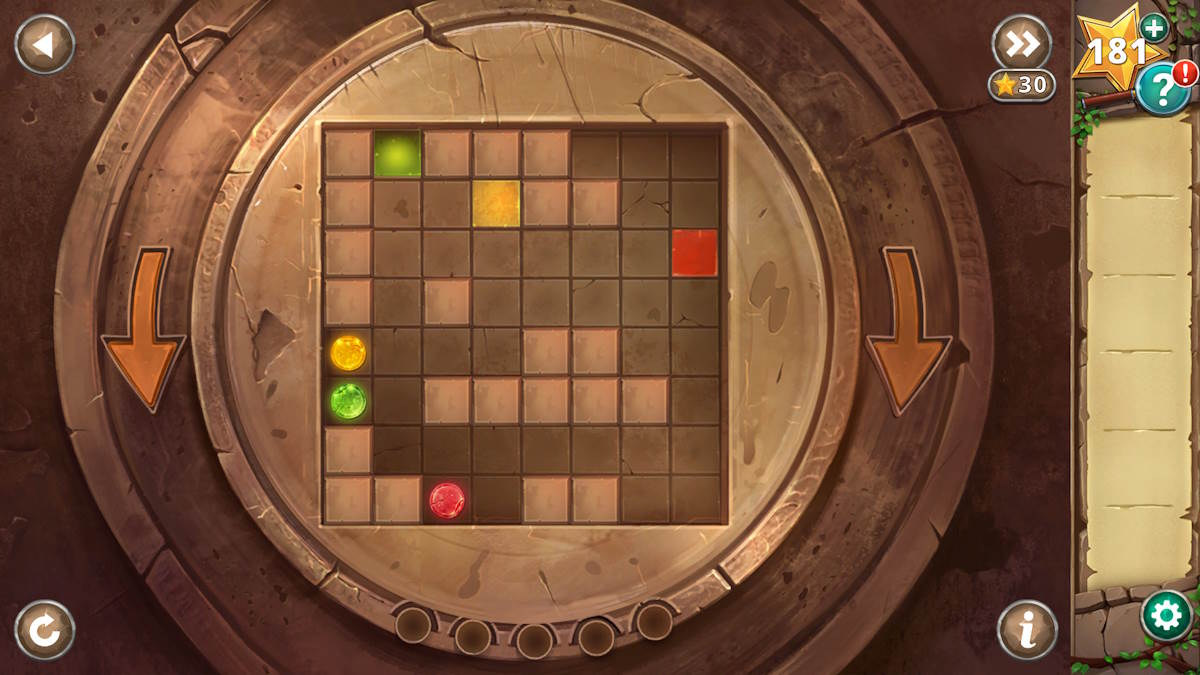
Now you can click the floor here (u6) and add the three prisms to begin a light beams puzzle. Alter the direction each mirror faces so that each colored gem is lit by a beam of the same color. The answer is above. Once done, the floor will open and a telescope will appear from the ground.
Click the telescope and then add the sundial note in the close-up. You now need to align six number-and-weather combos, in the correct order, pressing the green button after each. When all six constellations are lit, the box the telescope is on will open and allow you to take a Stone Tile. If you’re stuck on this one, the number-weather combos are as follows:
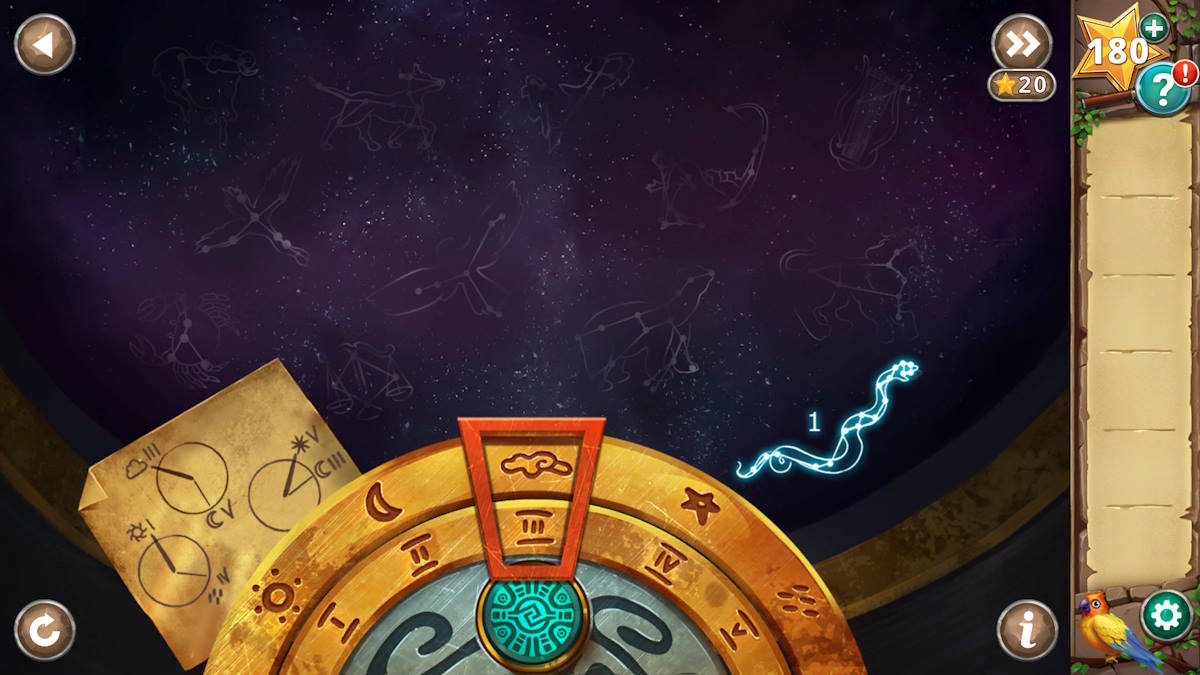
- Cloud and 3 (pictured above)
- Moon and 5
- Sun and 1
- Rain and 4
- Star and 5
Return to the central room, select the back wall (t7), and then add the stone tile. Note that the tiles represent the same symbols you saw in the constellations, so press the tiles in the same order: snake (top left), lyre (top right), dragon (right top middle), swan (bottom right), ox (above bottom left), and then dog (middle right). The wall will slide up, opening the way forward to the elixir!
The singing bowls
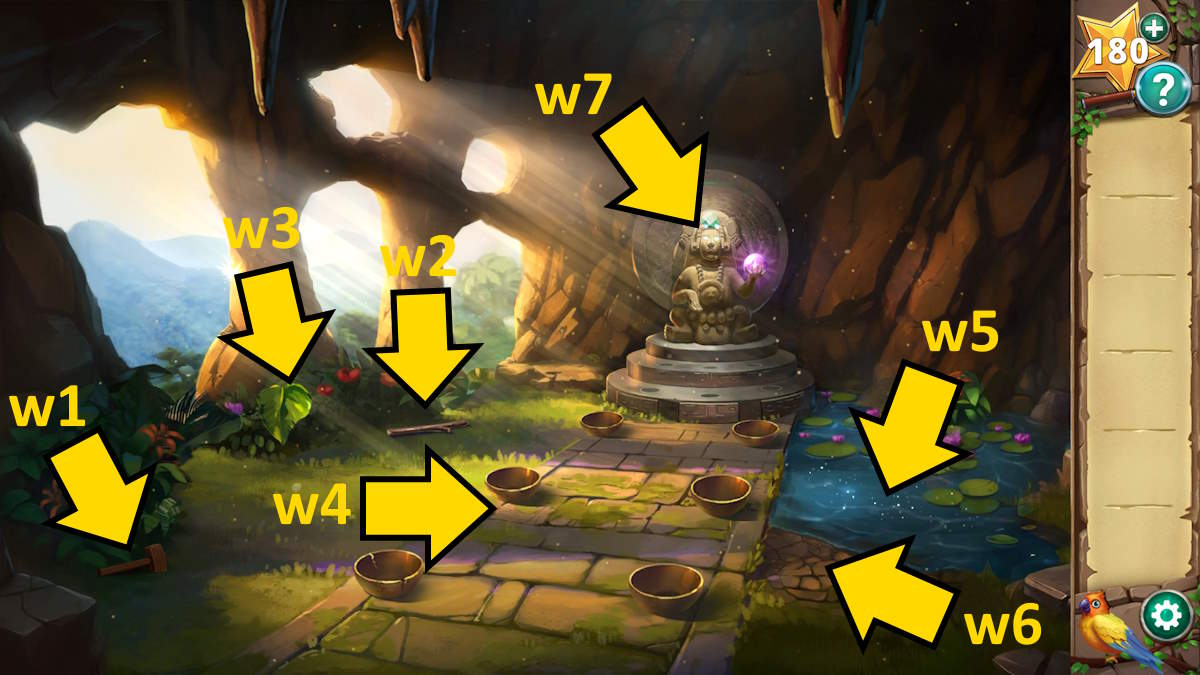
But of course, it isn’t that simple. Collect the Mallet (w1), Twig (w2), Leaf (w3), and five Bowls (w4). However, when you try to take the final bowl, it breaks. Use one of the bowls in the pool (w5) to get a Bowl With Water, then use it on the dried mud (w6). Now use the stick on the wet mud and use the leaf to collect it and receive a Leaf With Clay. Use the leaf with clay to repair the broken bowl, and then take the Patched Bowl.
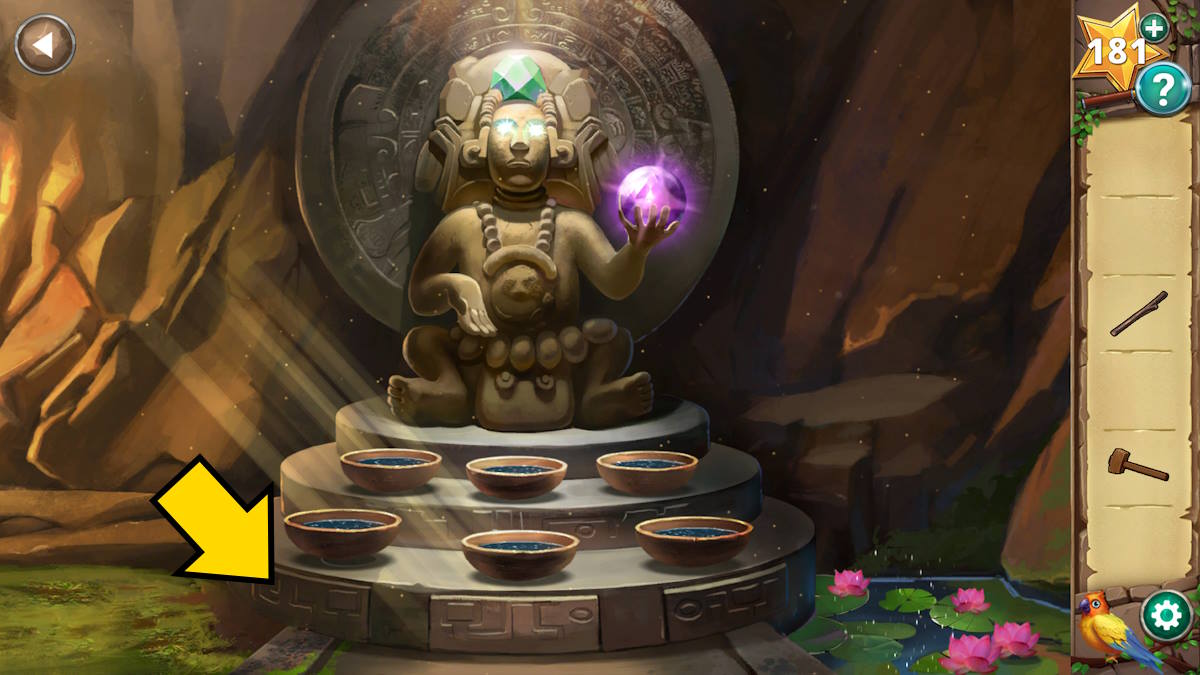
Next, fill all of the bowls up so that you have six Bowls With Water. Get a close-up of the statue (w7) and add the six bowls to the six spaces (see above). Once placed, click the bowls for a close-up and Tawa will tell you they’re singing bowls. Add the mallet to the close-up for another update, where you find you need to play a special tune.
Select Bert and your friendly bird pal will sing the tune you need. Now you just need to use the mallet on the bowls in the correct order, which is as follows:
- Top right
- Middle bottom
- Middle top
- Bottom left
- Bottom right
- Top left
When the bottom-left panel gets stuck afterward (marked above), use the stick to open it properly and click the disc inside to trigger another puzzle. You need to rotate the board by clicking the left and right arrows, making the colored balls drop through their matching holes. The correct sequence of presses is: Right, Right, Right, Left, Left.
Unfortunately, that only opens two fingers on the idol’s hand! You’re going to have to do slightly harder versions of both puzzles two more times to open the hand completely (the music part works the same way, but the middle and then bottom panels below the idol open up to reveal the two remaining rotation puzzles). The solutions are as follows:
- Music bowls 2: Top middle, bottom left, bottom middle, middle top, top right, top left
- Board rotation 2: Right, Right, Right, Right, Right, Left
- Music bowls 3: Bottom right, top left, bottom left, top middle, bottom middle, top middle, top right
- Board rotation 3: Left, Right, Right, Right, Left
With all the fingers of the idol’s hands released, you can finally grab the Elixir of Life! But, surprise surprise, Larissa is back to spoil the party. However, your bird pal Bert has the last laugh before you escape the scene and complete the Hidden Ruins (congrats)!
For more Adventure Escape Mysteries walkthroughs, check out AE Mysteries Picture Perfect walkthrough and Puzzle Lovers Walkthrough – Adventure Escape Mysteries right here at Pro Game Guides!