
Boxes Lost Fragments is a point-and-click escape room game with unique puzzles of varying themes and difficulties. In this guide, I'll walk you through solving the puzzles in the first two levels of Chapter 3 of Boxes Lost Fragments.
Boxes Lost Fragments Chapter 3 Cognito part 1 walkthrough
This guide covers the first and second rooms of Chapter 3.If you're looking for help with the third or fourth rooms, or just any of the other chapters, I've linked the rest of the guides below.
- Chapter 1 part 1
- Chapter 1 part 2
- Chapter 2 part 1
- Chapter 2 part 2
- Chapter 3 part 1
- Chapter 3 part 2
- Chapter 4 part 1
- Chapter 4 part 2
- Chapter 5 part 1
- Chapter 5 part 2
Room 1 puzzles
A looming door with golden stairs leads towards the first room of Chapter 3.

The first room has a book-shaped box in the center, plus a smaller one on the left.

It has a small green drawer with a golden handle on the front.

Pull it to get a Gear.

There is also a compartment on the left side.

Pull the latch at the top to open it and get a Mechanical Container.

Open the Mechanical Container in your inventory. Rotate the small gear at the bottom left to open the container and get a Small Handle.

Small lockbox puzzle
With the Gear in your inventory, focus on the small lock box to the left of the larger chest.

Use the sliders on the side to rotate each half of the door until a gold circle is formed.

Place the Gear on the space within the circle to unlock the box. Lift the lid to get a Screwdriver.

Rotating gears puzzle
Face the puzzle on the right side of the box.

Use the screwdriver to loosen the screws on either end and slide them to the opposite side.

This will unlock the rotating gear puzzle.

To solve it, rotate the gear so that the lock on the inside is not touching the golden lock on the outside. Here, we moved the gear so that this happened on the top lock.

Moving the inner lock away allows you to pull the golden outer lock to the right.

Repeat this process on the bottom lock to open the case, which contains a second Small Handle.

Small Handle puzzle
The puzzle on the back has one Small Handle in the center with an empty slot on the left and the right. Place the two Small Handles in your inventory into these two slots.

Now rotate each handle 360 degrees.

Rotate the left handle another 360 degrees.

Rotate the right handle once to complete the puzzle and get an Intricate Key.

Left rotating puzzle hint
Before starting the Intricate Key puzzle, you need to solve the puzzle on the left side of the box.

Press the button to make the two panels in the center rotate. As they move, they'll reveal five symbols for the next puzzle.

The button can be tapped repeatedly to swap the direction they rotate. Once you know all five symbols, continue to the next puzzle.

Intricate Key puzzle
First, open the Intricate Key in your inventory.

Move the pieces so that the "L" shaped key branches off to the right while the other three segments point downward.
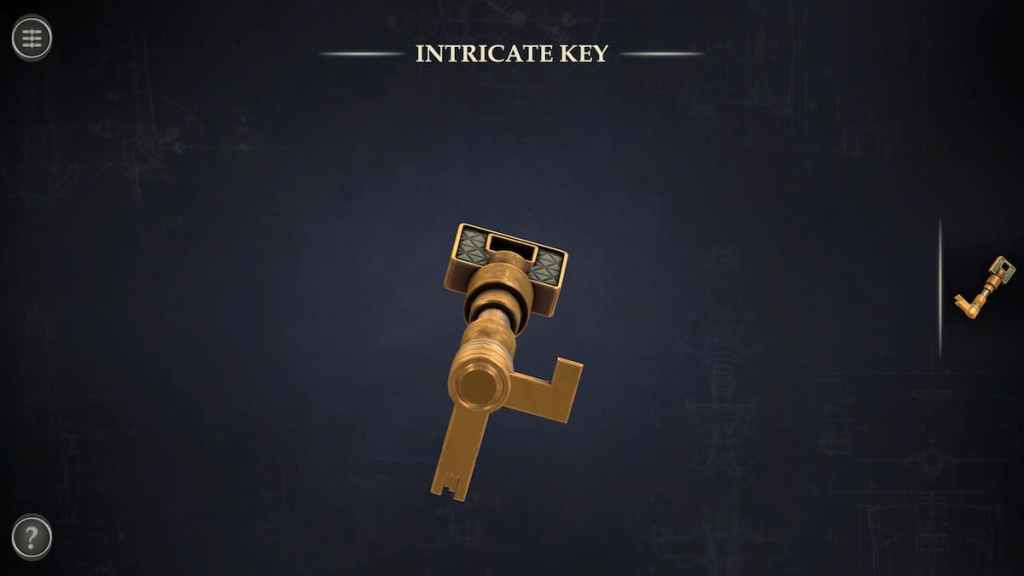
Rotating the key places symbols in each of the five circles. Tap the circles to change the symbols within them.

When all of the symbols match those in the previous puzzle, the puzzle will turn into a wheel. Spin it to open the box.

Piggy bank and unlocking symbol puzzles
The box contains a piggy bank. Tap it to place it in your inventory.

To get the item inside the piggy bank, we need to solve the puzzle at the top of the box.

The three rows can be slid around and the red button can be pressed to rotate all six segments in the center. To turn all of the symbols to the unlocked version, all of the symbols on the side need to be the unlocked version while all six in the center need to be the locked version.

The center row can be pressed one time to complete the puzzle.

This opens up the top to reveal a crushing machine. Place the piggy bank in the center.

Pull the lever to crush the piggy bank and get the Intricate Mechanism.

Grabbing the Intricate Mechanism removes you from the first room while opening up the second room to explore.

Room 2 puzzles
The second room of Chapter 2 has a jukebox as the central box.

Begin with the puzzle at the top of the right side of the box.

Rotate the puzzle until a golden piece appears at the top. Rotate this piece to unlock the puzzle.

The unlocked compartment contains an Antenna.

Place the Antenna into the hole in front of the jukebox to unlock the stereo puzzle.

Stereo puzzle
This puzzle consists of two dials and a knob controlling the pointer in the center.

Move the pointer to the right and twist the left and right knobs so that red numbers are in the center.

Turn the knob so that the pointer is pointing upwards to complete the puzzle.

Slot machine puzzle
Before beginning the jukebox puzzle, a hint can be found on the left side of the box.

Push the slider to the left to unlock the solution for the jukebox puzzle.

Now return to the jukebox puzzle. Pressing any of the buttons on the left side will change all of the symbols in their row while pressing any of the buttons on the bottom will change all of the symbols in their column.

Completing the puzzle will extend a bar on the right side of the machine.

Pull it to unlock a new puzzle on either side of the machine.

Flower puzzle
To the left of the machine is a flower-shaped puzzle.

Rotate the two rows of petals until all of the lights are on.

Then rotate the new part of the path to connect the paths on either side of it.

Finally, press the green button to unlock a compartment holding a Musical Cylinder.

Light petal puzzle
Now turn to the puzzle on the right side of the jukebox.

Move the petals around until all of the lights in the center are turned on.

Rotate the pathway until it connects the two paths on either end of it.

Press the green button to uncover a compartment containing a Mechanical Flower.

Mechanical Flower puzzle
Place the Mechanical Flower into the top slot at the back of the jukebox.

Each petal must be pulled out in a certain way to unlock the next puzzle. The order is as follows:
- Top petal
- lower right petal
- lower left petal
- upper right petal
- upper left petal
- bottom petal

Musical Cylinder puzzle
Rotate the Musical Cylinder box in your inventory to find a hidden gear.

Spin the gear to fully open the Musical Cylinder.

After extending it, the Musical Cylinder can be placed between the two mechanisms. This will open it up for a second puzzle.

The goal of this puzzle is to place all of the green notes in the sections with the matching golden notes. There are two slots on the side where notes can be placed and each of the three columns can be rotated up and down.

Once every note is in the right place, the puzzle will click and open the top of the box.

The Piano Keys can be grabbed from the top of the box to return you to the main room.

This will unlock the third room of the chapter.

For more story-based escape room games, check out our Echo Bay Murders – Chapter 2 Walkthrough here on Pro Game Guides.