In the previous section of this guide, we covered how to start the Tall Tale and find and use the Spyglass
. In this section, we will explain how to navigate with the Spyglass to the Jewels' locations. Further down, we will tell you the end locations for each story. If you don't mind spoilers, you can skip to Option Two to get the answers directly.
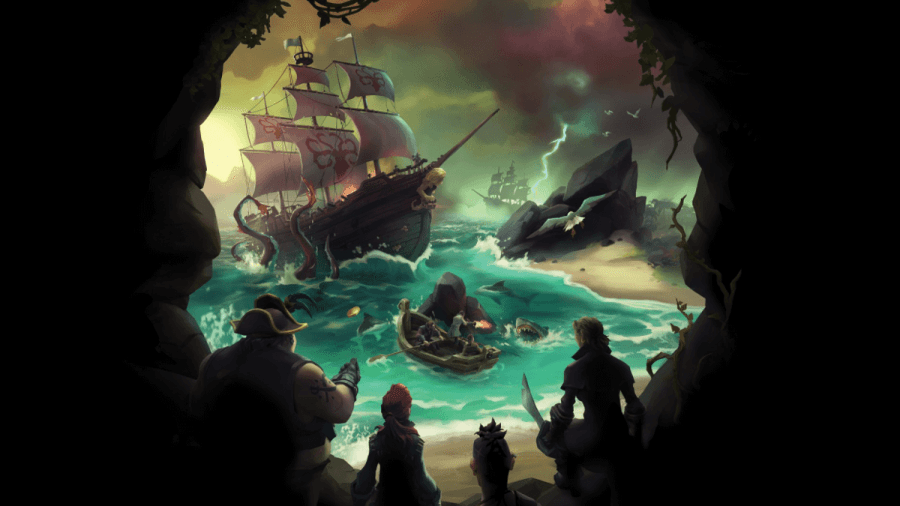
Sea of Thieves | Stars of a Thief Tall Tale | Jewel Stories Guide
If you haven't started this story or still need to find Sudds's Spyglass, you will need to do that by using the guide linked below. Alternatively, if you've already found the two Jewels and need the locations of the Vault or the Hidden Journals, you can find those links below as well.
- Sea of Thieves | Stars of a Thief Tall Tale | How to Find and Use the Spyglass
- Sea of Thieves | Stars of a Thief Tall Tale | How to Find the Vault Locations
- Sea of Thieves | Stars of a Thief Tall Tale | Vault Puzzle Guide and Solutions
- Sea of Thieves | Stars of a Thief Tall Tale | Hidden Journal Locations
In the Quest Book for this Tall Tale, you'll notice that Sudds has written two short stories. These stories act as clues for you to find the two Jewels you need in this quest. They are both randomly selected from a list of nine stories, so you will generally get a different playthrough every time you run this adventure.
We have provided you with two options to solve these stories. Option One is spoiler-free and simply explains how to use the Spyglass to navigate. Option Two shows you the exact locations for these stories and tells you where to dig to find the Jewels.
Step One: How to Use the Spyglass (Part II)
In the last section of this guide, we explained that to use the Spyglass, you simply need to point it to the sky at a cluster of bright stars to reveal Constellations. We also mentioned that each Constellation has a name, description, and compass direction. This is true and remains a crucial element to navigating with this thing. However, now that you have randomized stories added to the book, there is a bit more to uncover.
You've undoubtedly also noticed another section of Sudds's book: all the names and descriptions of these Constellations he calls his friends.
When you are going through the stories, you will notice that he steers you in the right direction by using these Constellations, either by their name, shape, or descriptions. Generally speaking, it will tell you that you need to sail/follow these star Constellations to reach your destination. However, there will also be subtle suggestions to align these Constellations with landmarks on specific islands.
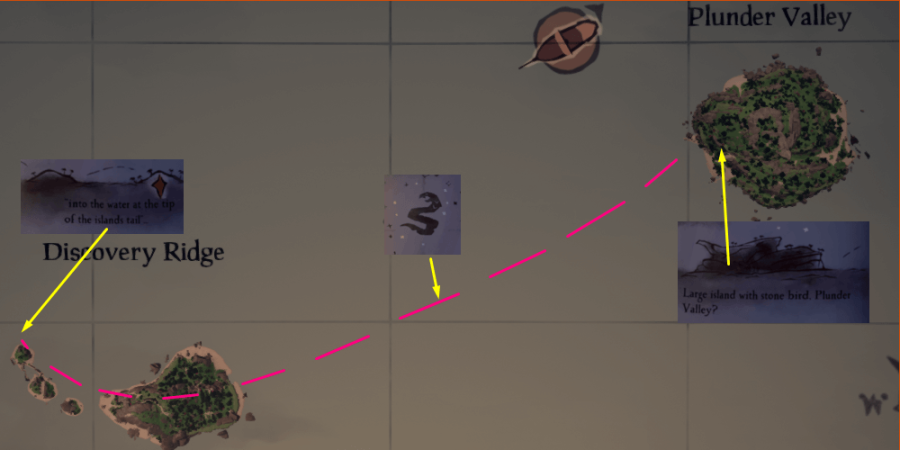
The important thing is that you need to use the Constellations he references to solve the riddles. Most often, you need to sail or walk in the compass direction of the Constellation. With this information, you don't even need to sail to each island; you can instead just look at the Ship's Map once you have the direction you need and determine which island you're headed. An example of this is shown in the image below.
Constellation Directions: This is a list of all the Constellations and the compass direction they point. We have included this list as a tool to help navigate.
- Arrow: South West
- Bear: South-Southwest
- Boar: Northeast
- Boat: West
- Crab: East-Southeast
- Eagle: Northwest
- Feather: South-Southeast
- Fish: East-Northeast
- Flame: West- Southwest
- Kraken: North
- Queen: North-Northeast
- Scarab: Southeast
- Shark: South
- Snake: West-Northwest
- Turtle: North-Northwest
- Warrior: East
Knowing all this, if you're still struggling to navigate, you can simply follow the instructions below to see where you need to go.
Option Two: Story Solutions and Locations
Each story is listed below in alphabetical order. With each one are the islands they lead to and the Jewel's location on the island.
A Hunt
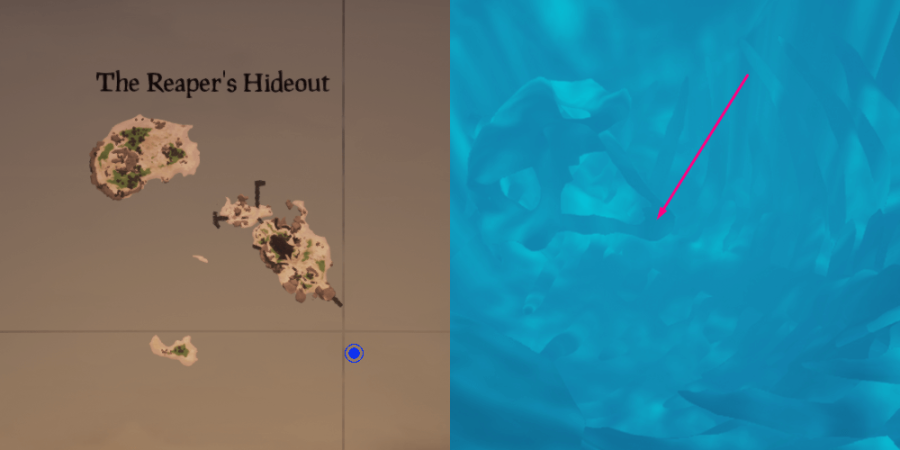
You'll have to take a deep dive for this one. The island you're headed to is Reaper's Hideout. Off the southeastern shore of the main island, dive deep down into the water to the ravine below. Follow the ravine to the skeleton of a Kraken. Inside the Kraken's mouth is the Jewel.
Battle in the Heavens
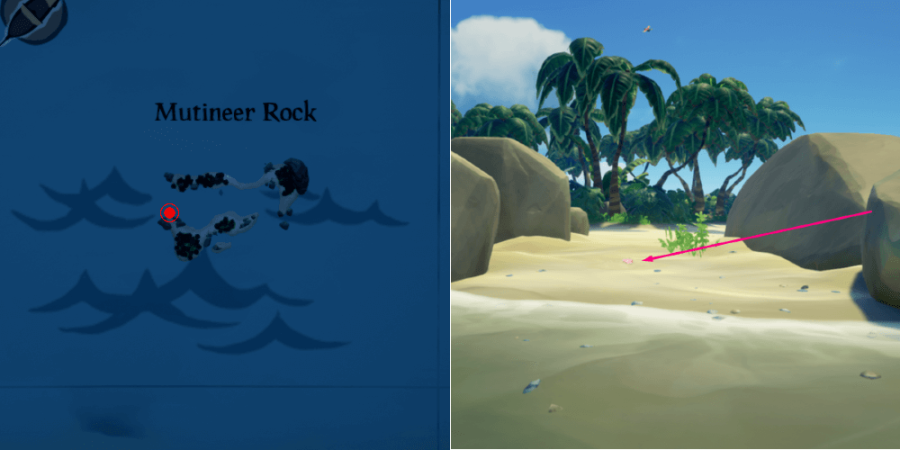
You are headed to Mutineer Rock for this Jewel. On the western side of the island, you will find four large rocks, split by a patch of sand. Dig in the center of these rocks, and you will find the Jewel.
Great Eagle Landing
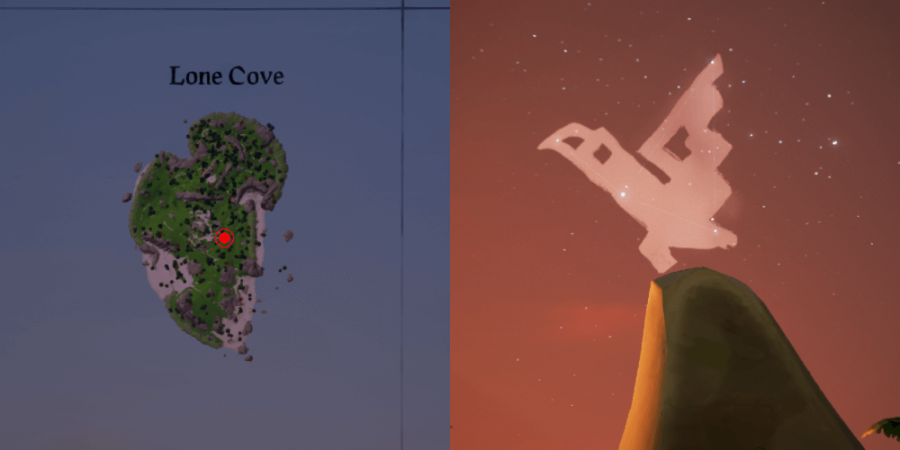
This one is one of our favorites. First, you are headed to Lone Cove. The quest book hints that the eagle that never lands perched here, which is a hint that you need to align the Eagle Constellation with the large, pointed rock in the middle of the island. Align the Constellation with the rock (as in the image) and dig at this exact spot for the Jewel.
Lost an Eye
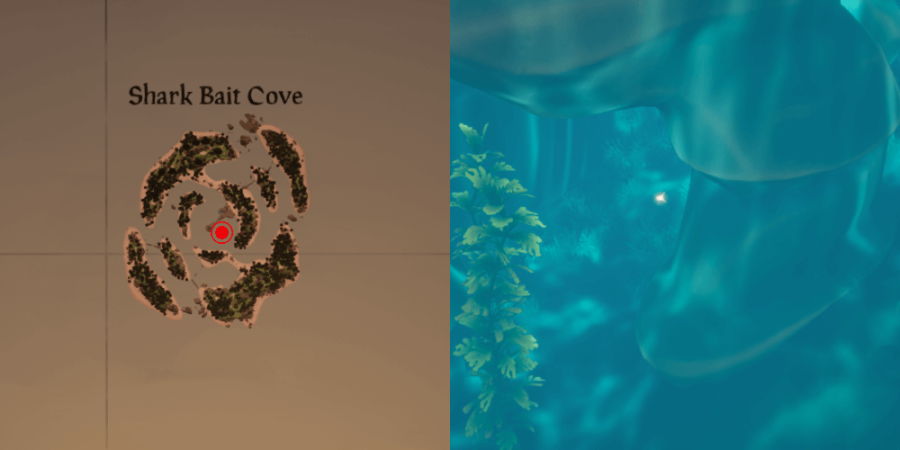
Head to Shark Bait Cove and go to the island's center, next to the Shark Statue. Dive under the statue, and you will see a small hole at the bottom. Just inside this hole is the Star Jewel.
Sea Queen's Promise
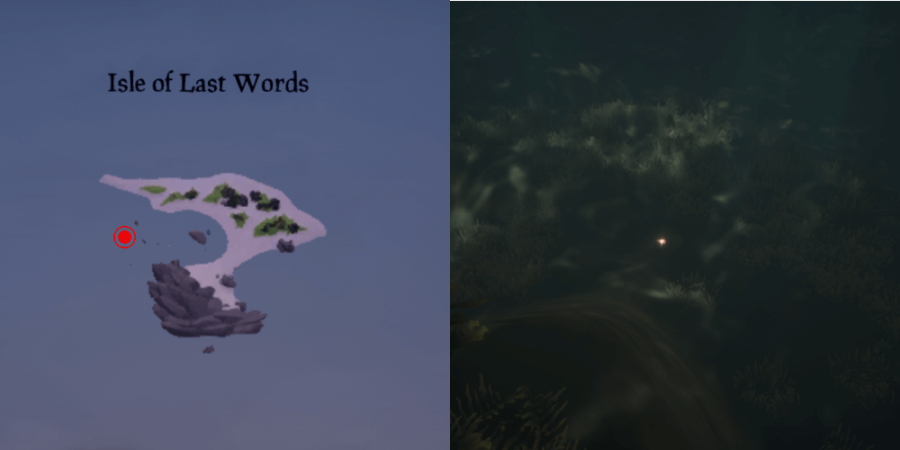
This one is one of the most straightforward and least-hidden jewels. First, you need to head to the Isle of Last Words. The western side of the island points out into the sea a bit. Walk off this point and dive below the water when you can. The Jewel will be in the sand, barely disguised by underwater plants.
Related: Sea of Thieves | The Cursed Rogue Tall Tale Guide | Hidden Journal Locations - Pro Game Guides
Snake's Deception
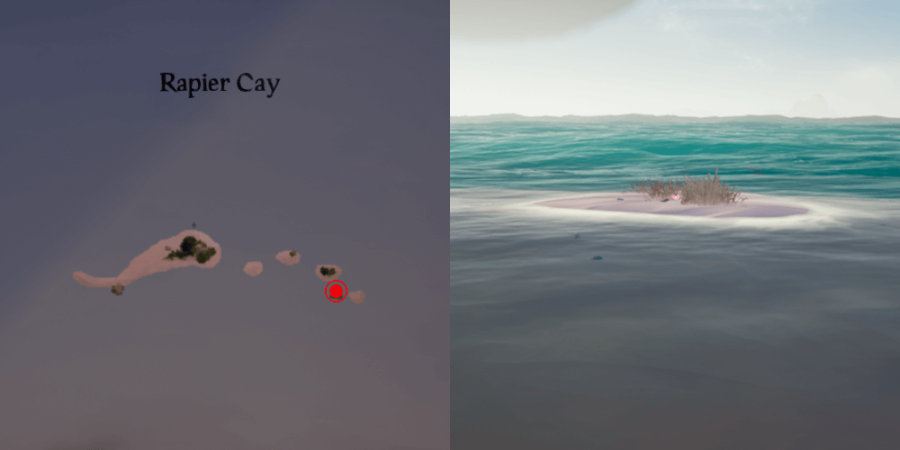
You are headed to Rapier Cay for this Jewel. This is a small island, so finding the Jewel is simple. On the Southeast side of the island is a small patch of grass an isolated patch of sand. Dig in the grass to find the Jewel.
Related: Sea of Thieves Fish Guide: Fish Prices, Cooking Time, & Locations - Pro Game Guides
The Man Who Lost His Gem
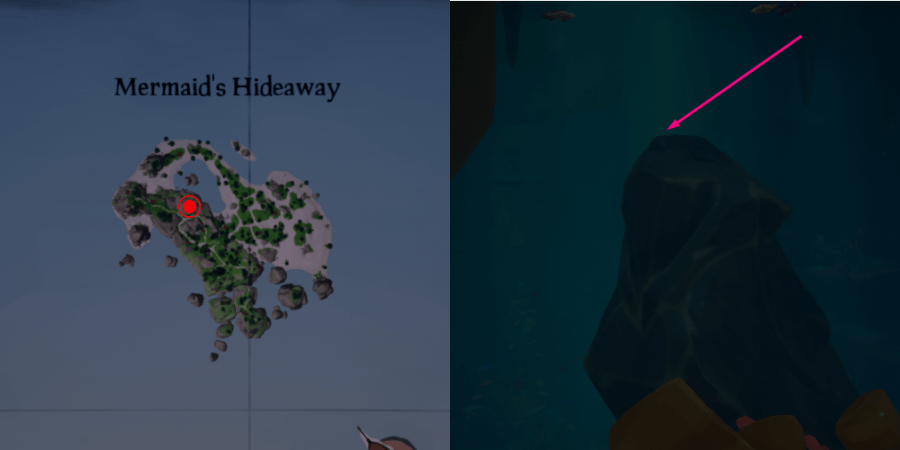
This one requires you to dive for the Jewel. First, head to Mermaid's Hideaway. We recommend finding the tunnel in the pond, then coming back up for air as this is a bit of a long swim. In the pond on the northern half of the island is a tunnel. Swim through this tunnel and take the first left to find a Jewel hanging out of a statue.
The Patient One
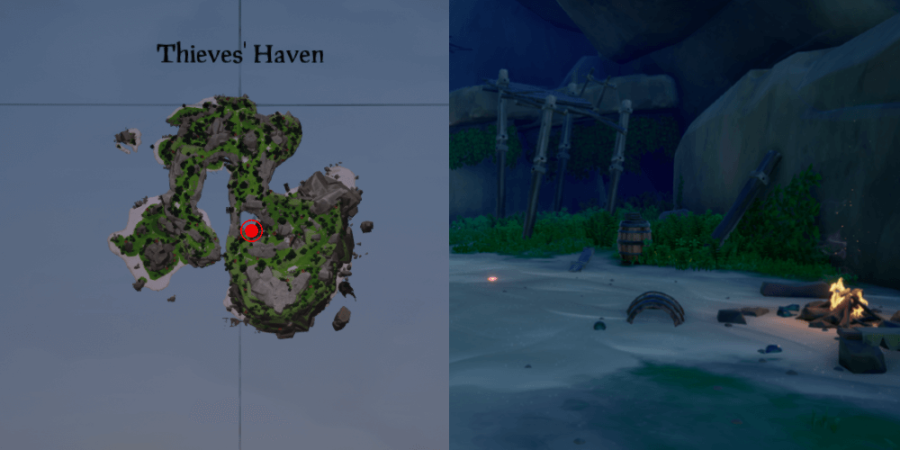
This Jewel is located at Thieves' Haven. In the center of the island is a massive shipwreck, and under its backside is a campfire. A few paces away from this campfire is the dig spot for the Jewel.
They Were Voyagers
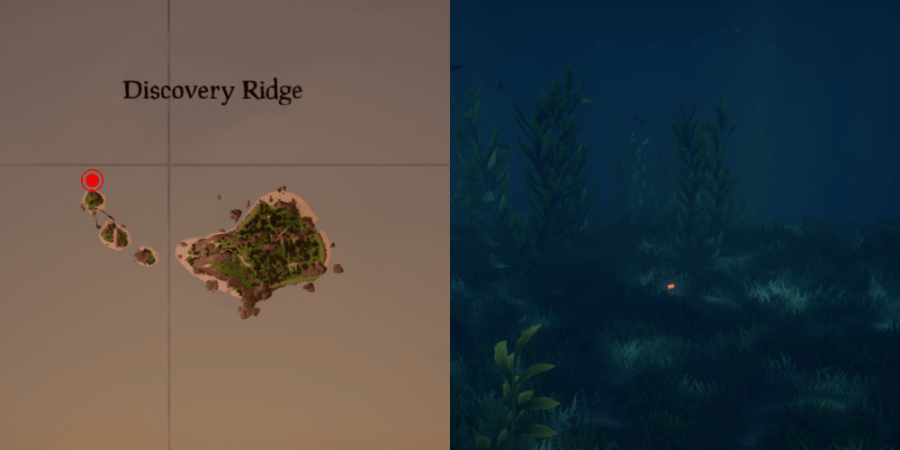
To find this Jewel, you need to go to Discovery Ridge. On the western side of this island, you'll see a chain of small islets. Swim about 50-100 feet Northwest of the large rock on these small islets and dive down to find the Jewel.
What's Next
Now that you've found the Jewels, you're going to take them to a temple. We cover that in the guide's next section, along with the Vault Locations and Puzzle Solutions.
Have you found all the Hidden Journals for the Shroudbreaker? If not, use our guide to find them!