
Updated November 1st, 2025
We added a section on how to build all nine stations in your base, as well as the role of each one. We’ve also included some new and essential survival tips and tricks for the early game, including the best backpack in the early game, and more.
A little bit of guidance can make a world of difference, and to that end, we have prepared the Escape from Duckov beginner's guide with useful tips and tricks. Learn everything you need to know about inventory management, best skills to unlock first, NPC locations, crafting stations, and survival tactics to dominate your early runs.
Quick Summary
- Complete the first Jeff quest in your Hideout
- Find and equip a backpack (increases carrying capacity)
- Unlock Backpack Expert I skill (mandatory first unlock)
- Locate the Mysterious Merchant on the hill in Ground Zero
- Build the Workbench (requires 2x Wood)
- Avoid nighttime raids until you're better equipped
Escape From Duckov Tips & Tricks for Beginners
Escape from Duckov tips and tricks you'll find in this beginner's guide will help you improve your survival skills, avoid common beginner mistakes, and set you up for successful extraction runs from day one. Be careful, as one wrong move in your first few runs, and you'll respawn empty-handed.
Related: Solo ARC Raiders Beginner’s Guide – Early Game Tips & Tricks
How to Successfully Manage Inventory
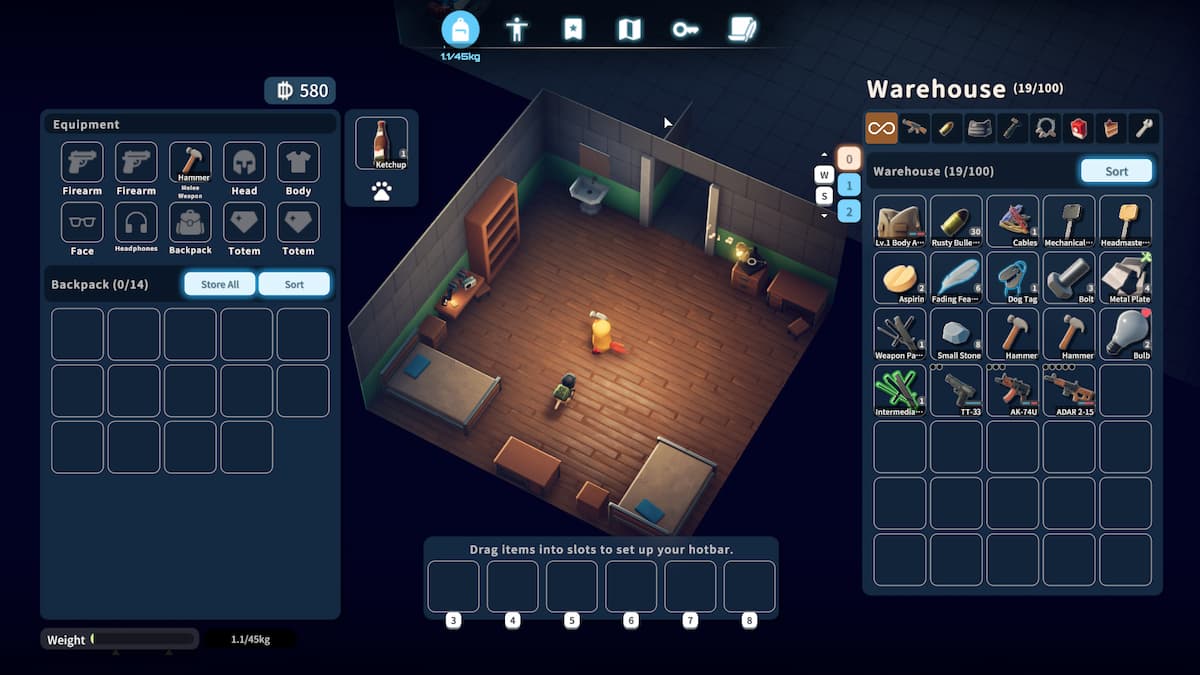
Escape from Duckov is, at its core, a survival game with a dose of extraction shooter elements sprinkled in. Managing your inventory is going to be crucial for survival, even more so when you consider the fact that inventory space is rather limited to begin with. You start with 10 slots in your Backpack, which can hold 10 items, with a maximum carrying weight of 45 Kg.
Equipment Slots
Excess items can be stored in the Stash, and specific items can be locked to prevent them from being accidentally shuffled around. This doesn't take into account your equipment, which consists of the following categories as well:
- Firearms: x2 weapon slots.
- Melee Weapon: Can be used to store one melee weapon.
- Head/Body/Face: Protective gear and accessories. They provide armor, but can be heavy, thus limiting your carrying capacity.
- Headphones: Let you detect enemy direction by sound.
- Backpack: Backpacks increase your inventory’s carrying capacity, and are highly recommended to grab first.
- Totem: x2 slots for stat-boosting items.
The key to good inventory management is not being stingy with your resources. Use them whenever necessary, and don’t hesitate to drop a few items in exchange for something more useful. Send crafting materials to your Stash when appropriate, and use consumables to boost your stats and restore health between fights. Your top priority should be finding a Travel Bag as soon as possible, it adds +17 inventory slots and 15 kg of extra weight capacity.
Priority Items
Remember, never hoard items as they're meant to keep you going forward. Don't risk dying just so that you can spare a healing item.
- Medical supplies - Always keep at least x2 healing items. A Bandage will help you not to bleed to death, and the First Aid Kit is the best when it comes to healing.
- Ammunition - For your primary weapon only. Don't hoard every caliber on you, but keep it in a stash, as you'll later need it for some upgrades.
- High-value loot - Rare crafting materials (Circuit Boards, Metal Plates), materials necessary for base building, upgrades, and research.
- Quest items - Duck Eggs, Soda Crackers, Cigarettes, anything that's important for a quest you're currently working on. The general rule is - if something looks oddly specific, it means it's probably a quest item.
- Food and drinks - Depending on the difficulty level you're playing on, your character will get thirsty and hungry outside rather quickly. Make sure to hydrate and eat often.
How to Get Items Back After Dying
Dying will entirely rid you of your inventory (including items in your slots), forcing you to start a fresh run with no items, except for those you've stored in the Storage. That being said, it is possible to reclaim this loot by heading over to the place you died - and grabbing the items from a mural-like structure nearby. Dying twice in a row will permanently remove these items, so be careful!
Our advice is to keep some good weapons and ammo in your storage, so if you accidentally die, you’ll have something solid to start your next run with. Sell most of the weapons you don’t use, but always keep a reliable gun or two as your Plan B, just in case.
Locking Items Often
You can lock items in your inventory to prevent accidentally dropping or shuffling them while in action. I learned this the hard way after accidentally dropping my best weapon during a firefight.
Related: 10 Best Survival Games
Best Skills to Get/Unlock in Escape From Duckov
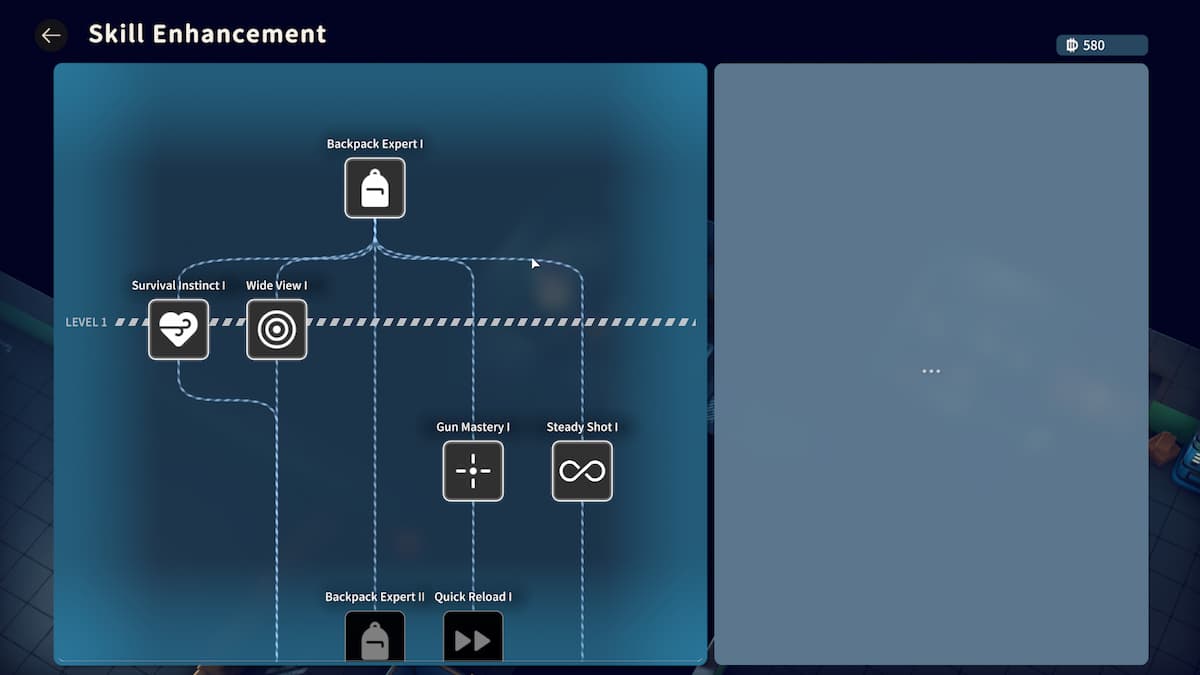
Escape from Duckov has 25 tiers of skills to unlock, with each skill being a fair bit more expensive than the previous one. As a beginner, you really won’t be able to unlock everything under the sun, so it’s best to prioritize a few skills over the others, in the following order:
- Backpack Expert I: This is the first skill you unlock in the game, and cannot be skipped. This boosts your backpack capacity by 4.
- Survival Instinct I: Boosts HP by 5 points, making it essential for surviving longer.
- Gun Mastery I: Another necessary upgrade; boosts gun damage by 3%. Given how most of the early game combat revolves around ranged weapons, this can be a lifesaver.
- Quick Reload I: Boosts reload speed by 5%, which is especially useful in the case of weapons with limited magazine counts (such as Shotguns).
- Steady Shot I: Dampens recoil by 5%, helping you sneak in more accurate shots.
Keep grinding through the game to accumulate both Credits and special items such as Cold Core Fragments to unlock these nodes progressively, and thereby make your character a lot stronger in the process.
Important: Cash is limited early on, so prioritize healing items and quest objectives. Don't overspend on weapons as you'll find them in missions.
All Weather Effects in Duckov
Duckov also features weather effects, each with differing implications during combat. These effects are completely randomized and appear after set intervals.
Fog Strategy
Foggy weather, for example, can greatly reduce visibility, making it harder to spot enemies. This also makes it harder for enemies to spot you, which can often be advantageous.
| Fog Strategic Advantages | Fog Disadvantages |
|---|---|
| Easier to avoid detection Perfect for stealth approaches Enemy AI is less accurate | You can't spot threats from a distance Easy to get ambushed Navigation becomes challenging |
Best Fog Strategy in Duckov: Move slowly, use sound to detect enemies (headphones are CRUCIAL), and stick to cover-to-cover movement. Fog is actually one of my favorite conditions for loot runs.
Nighttime Strategy
Nighttime reduces visibility and spawns Spider-Bots, dangerous enemies with a ton of HP, who hit hard. For now, it’s better to skip nighttime activities entirely and sleep it off using the Bed in your Hideout.
Until you have better gear and more experience, sleep through nights using the Bed in your Hideout. Spider-Bots can easily end your run, and the reduced visibility makes navigation treacherous.
How to Prepare For Night Runs:
- Bring extra healing supplies
- Equip your best weapons
- Move very cautiously
- The loot can be better, but the risk is substantially higher
All NPC Locations in Escape From Duckov - Services & Quests
Currently, there are three NPCs in Escape from Duckov. Here's everything you need to know about each.
| NPC | Location | What to Do |
|---|---|---|
| Mysterious Merchant Sells various items for Cash | Small hill at the top of the Ground Zero map | * Medical supplies when you're low * Quest items (Duck Eggs, Soda Crackers, Cigarettes for Mud's quests) * Ammunition for your primary weapons * Backpacks if you find one |
| Mud the Gym Coach Quest NPC | House in the middle of the Ground Zero map | * Purchase quest items from the Mysterious Merchant * Buy from the Vending Machine in your Hideout * Get items via enemy loot drops (Once completed, Mud joins your Hideout's Gym, which provides permanent stat upgrades) |
| Jeff Quest NPC | Your Hideout | * Complete quests for story progression |
All Crafting Station Locations and How to Unlock Them
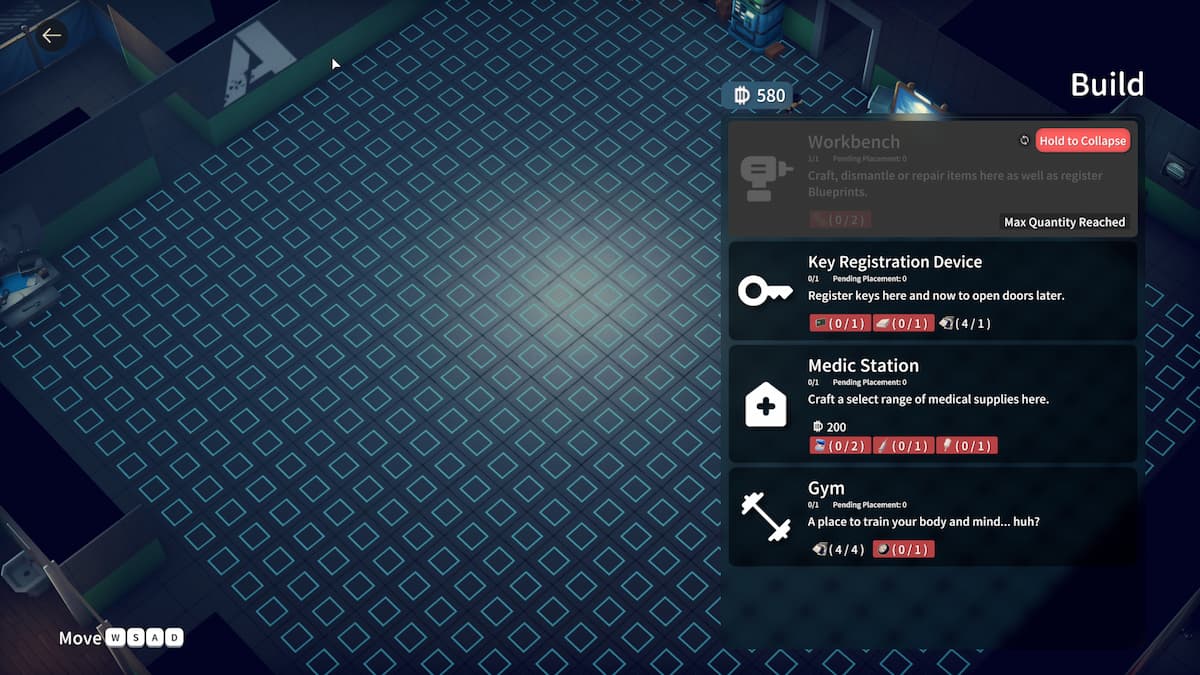
Building and strengthening the facilities in your Hideout will, in turn, help you craft specific weapons and gear that can be used to aid your progression. In total, nine facilities can be built and further upgraded, each offering unique services.
In these stations, you will find new NPCs with unique quest lines, new ways to improve your skills via upgrades and research, unique items to buy, the ability to craft specific gear, and much more. You will want to unlock all of this building as soon as possible. Luckily, the game will naturally guide you towards this by giving you quests that ask you to build those elements in your base.
All Facilities in Escape from Duckov
Here is a list of all facilities in the game, along with their respective construction costs/material counts:
| Build Order | Facility Description | Materials Required |
|---|---|---|
| Workbench | Used to register blueprints, craft/dismantle/repair items | 2x Wood |
| Weapon Shop | Use to purchase weapons, complete unique quests. | 2x Bolt, 2x Screw, 1x Knife |
| Armor Shop | Use to purcahse armor, complete unique quests. | 2 x Bolt, 2x Metal Plate, 1x Lightbulb |
| Medic Station | Can be used to craft medical supplies | 2x Pile of Medicine, 1x Syringe, 1x IV Medicine and 200 Credits |
| Gym | Used to craft the Gym, a place to boost physical prowess and gain some permanent upgrades | 4x Metal Plate, 1x Tire |
| Key Registration Device | Used to register keys and access doors later. | 1x Circuit Board, 1x CD Drive, 1x Metal Plate |
| Tech Center | Craft tech items, complete unique quests, upgrade skills. | 2x Bolt, 2x Screw, 2. Metal Plateaaaad |
| Kitchen | Used to buy food, upgrade survival skills, and complete quests. | 1x Cup, 1x Pan, 2x Wood |
| Teleporter | Used to telpoert to specific locations in the world. | 1x Cables, 2x Cold Core Fragment, 2x Electronic Components |
All items can be found while scavenging the game world, either from looting fallen enemies or by unlocking random chests.
How to Unlock the Gym in Escape from Duckov
Unlocking the Gym is not easy and will require you to invite Mud the Gym Coach to your Hideout first. Getting him to agree to do the same involves completing a total of 3 quests:
- Once you meet Mud, he will ask for your help in procuring some items for his physical well-being.
- The first quest has you deliver one Duck Egg to him.
- Once that's done, bring in a singular Soda Cracker next.
- Your final task will be delivering a pack of Cigarettes to him, a strange choice.
- All items can be bought from the Mysterious Merchant or by interacting with the Vending Machine in your Hideout. These can also randomly spawn as enemy loot.
Once all three items have been delivered, Mud will accompany you to the Gym, which must be built first. Once built, the Gym becomes a permanent facility for Physical Training. Physical training at the Gym can permanently boost your stats (such as HP), making it a very worthwhile investment.
Escape from Duckov FAQ
Escape from Duckov is intentionally difficult. Your first several runs will likely end in failure, and that's completely normal. Each death teaches you something—enemy locations, item values, strategic mistakes. For more quick answers and pieces of advice, check out the Escape from Duckov FAQ below.
To change the difficulty, simply head to the Hideout. Once you spawn in your room, interact with the table to change your difficulty settings.
You respawn in the Hideout without any equipment. However, you can recover lost items by returning to your death location and looting the mural-like structure nearby. Warning: Dying a second time before recovery permanently deletes those items.
There are three main ways to expand carrying capacity and storage :
1. Equip larger backpacks - Found as loot or purchased from merchants
2. Invest in Backpack Expert skills - Each tier increases capacity
3. Expand your storage - The storage in your base can also be expanded via upgrades.
Unlike traditional shooters, every item you carry has weight. Every decision about what to pick up or drop matters. And when you die, you'll need to risk everything to recover your gear—or lose it forever on your second death. Also, the learning curve is steep, but that's exactly what makes mastering it so rewarding.
You can play solo or be part of the team. But if you're just starting, consider teaming up. Experienced players can teach you the ropes, help with recovery runs, and share resources. Solo play is viable but more challenging.
Focus on reliable, regular-ammo weapons. Shotguns are forgiving due to their spread, while assault rifles offer versatility. Avoid rare-ammo weapons until you have enough resources to use them regularly.
To register keys, build the Key Registration Device at your Hideout (requires 1x Circuit Board, 1x CD Drive, 1x Metal Plate). Once built, use it to register found keys, which grants permanent access to locked doors without carrying the physical key.
To dismantle items, you have to unlock the ability to do so in your Workbench. Build a Workbench if you haven’t already, and enter its Upgrade menu. Within this menu, unlock the ‘Disassemble Station’ perk in the tree.
This perk costs 1000 credits, 1x Scissor, and 1x Wrench to unlock. Once unlocked, you can freely disassemble equipment and gear using the Workbench.
For Escape from Duckov, check out our complete Duckov Weapons Guide and Escape from Duckov Fish Locations Guide on Pro Game Guides.