Legend of the Sacred Stones is one of the most popular titles in the Adventure Escape Mysteries series. If you’re trying to save the people of Tempus from the mysterious growing sickness, read on for my full walkthrough and puzzle guide.
The AE Mysteries series of games are point-and-click adventures where you must find and combine items, and then complete puzzles and mini-games to advance through the story. If you want to play the updated versions on Steam, you simply need to download the free Adventure Escape Mysteries app and select Legend of the Sacred Stones once it is installed. You can play the whole game for free, as long as you're willing to wait for new free chapter keys to become available (you get one every two hours).
Legend of the Sacred Stones Walkthrough - All Puzzle Solutions

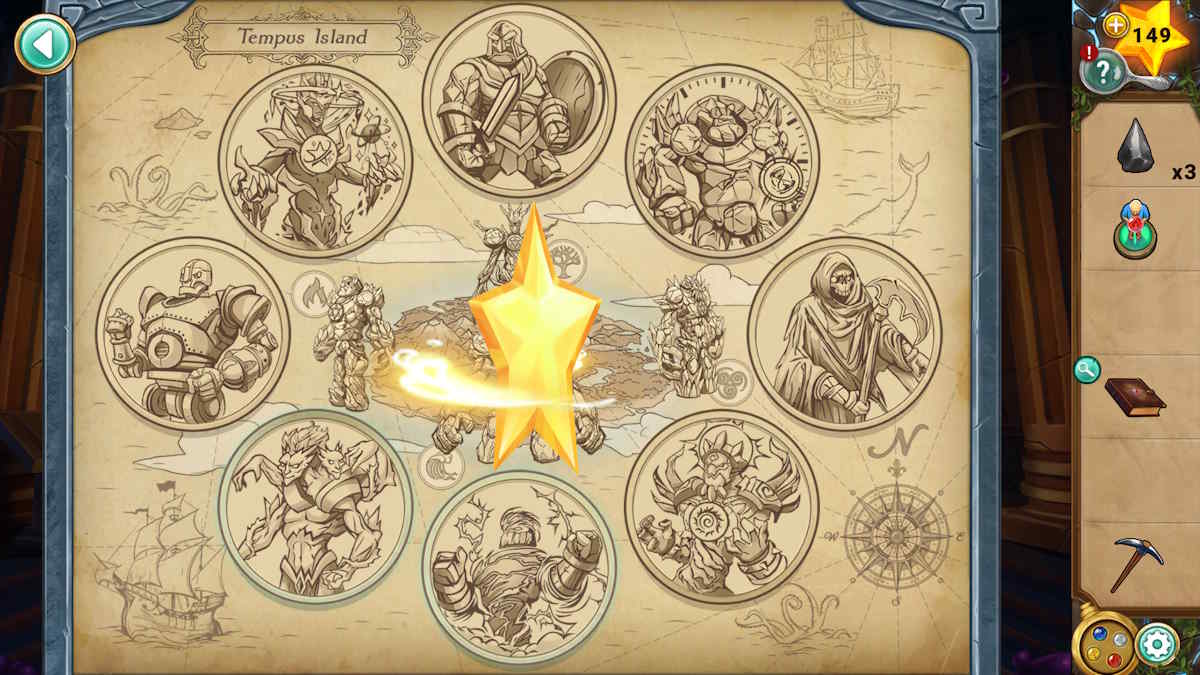
The adventure begins on Tempus Island, where four ancient temples have been sealed for centuries. Each houses a sacred stone, to stop one person possessing all four and gaining immense power. Playing as Alia, you must try to stop Milo from breaking into the temples.
Note you can also skip any puzzles you want to by using the stars you collect during your plays (you'll see them in the top-right corner of the screen at all times). These stars transfer between AE Mysteries games, so try to save them for when you need them. You'll find solutions to all the puzzles below, but a few are randomized or require speed, so we can't guarantee you won't need an extra hand!
Legend of the Sacred Stones Chapter 1 walkthrough
After Arthur leaves to try and stop Milo, you must make your mother a healing tonic. Click the book on the shelf (a1) for a close-up and once again to open it and learn about the stones. Note that the order of the elements in the book is wind, water, earth, and fire.
Select the chest at the end of the bed (a2) and use that code to open it. You need to turn the dial to each symbol in the order pictured above (up to position 'x'). Take the Rune Block and Spell Book from inside.
Take the Knife (a3) from the cabinet and use it from your inventory to cut some Leaves from the plant on the windowsill (a4). Open the cabinet (a5), take the Step Ladder, and use that to get some Toadstools (a6).
How to complete the hut chest puzzles
Now select the other chest (a7), below the window, and add the rune block to begin another puzzle. Each block must be in its correct position in the column to complete it, which requires you to use the slot in the middle and the slide area across the bottom to help you rearrange the blocks. When you move a block into the central mechanism it will deposit it into the space on the other axis; so from the side to the bottom, or vice versa. However, it will only do so if there is an empty gap in the space it would place it.
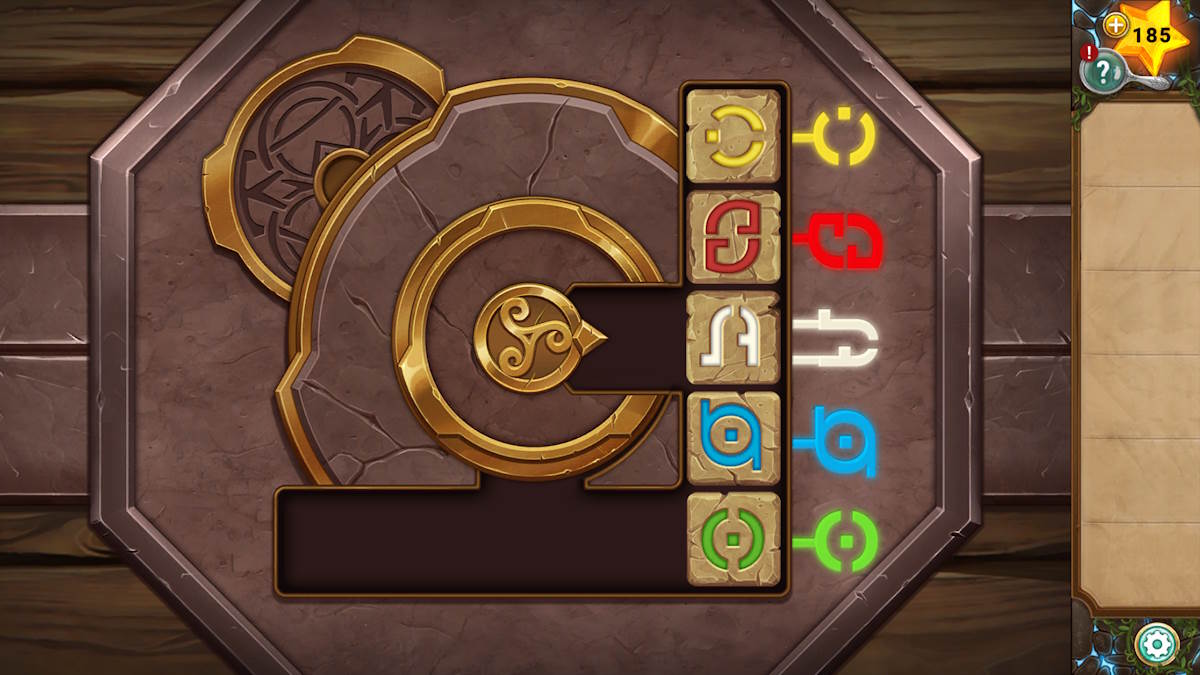
You can’t fail here; it is just trial and error and once you’re done you’ll be able to collect the Moon Elixir. However, if you want a complete solution, do the following:
- Use the center to move red to the bottom row and into the far left corner
- Move yellow below the central mechanism and move white, green, and blue down into the corner.
- This allows you to use the mechanism in the middle to flip yellow into the right column and move it into its correct top spot.
- You can now move red in the same way as you did yellow, into its correct spot below yellow.
- Do the same with white, and you’re done.
Select the table (a8), and place the spell book on it, along with the leaves, moon elixir, and the toadstools. You need to use the code in the book (left page) to reproduce its five recipe lines (right page). The top symbol represents the toadstool, the second symbol leaves, the third represents the spoon (already on the table), and the fourth is the moon elixir. You need to drag each ingredient over the central beaker in the order you can now work out from the book. This order is:
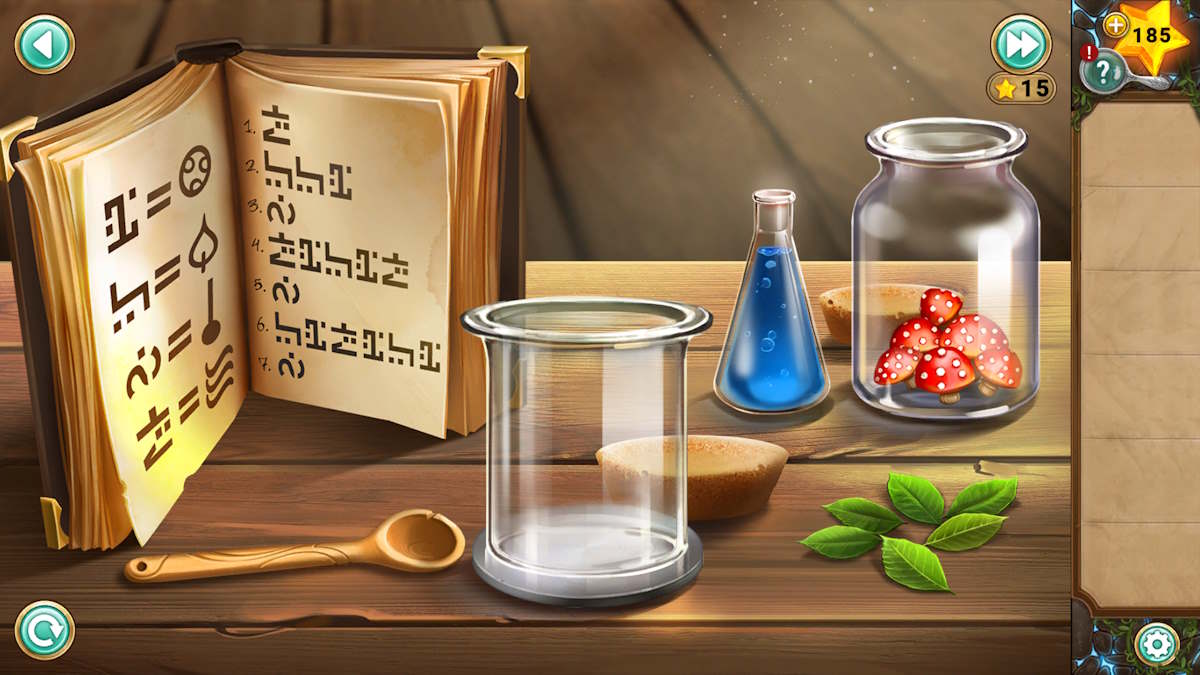
- Moon elixir
- Leaf, leaf, toadstool
- Spoon (liquid turns green)
- Moon elixir, toadstool, leaf, toadstool, moon elixir
- Spoon (liquid turns red)
- Leaf, toadstool, moon elixir, toadstool, leaf, toadstool (note this will leave one leaf on the table)
- Spoon (liquid turns purple)
Once done, you’ll receive the Healing Tonic. Give it to your mother (Selma), tell her Arthur has gone to the Spring Temple, and she’ll give you the Earth Pendant. Click the door (a9) to head outside.
Digging outside the hut
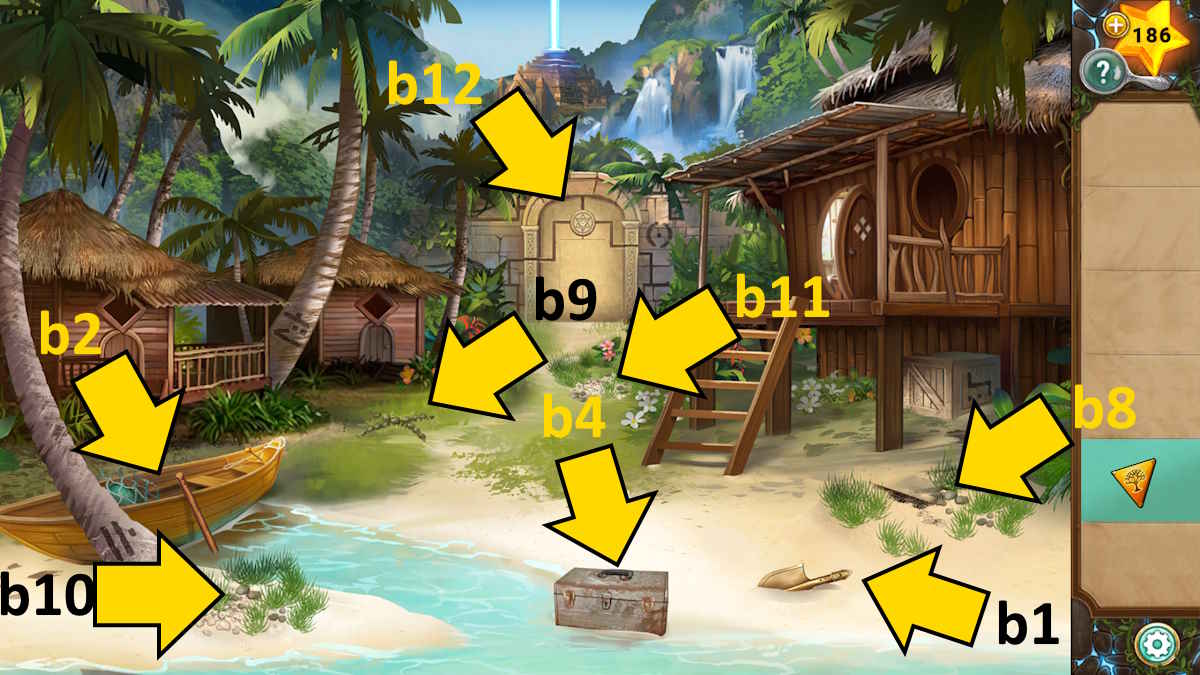
Take the Shovel Blade (b1) and then click the boat (b2) for a close-up.
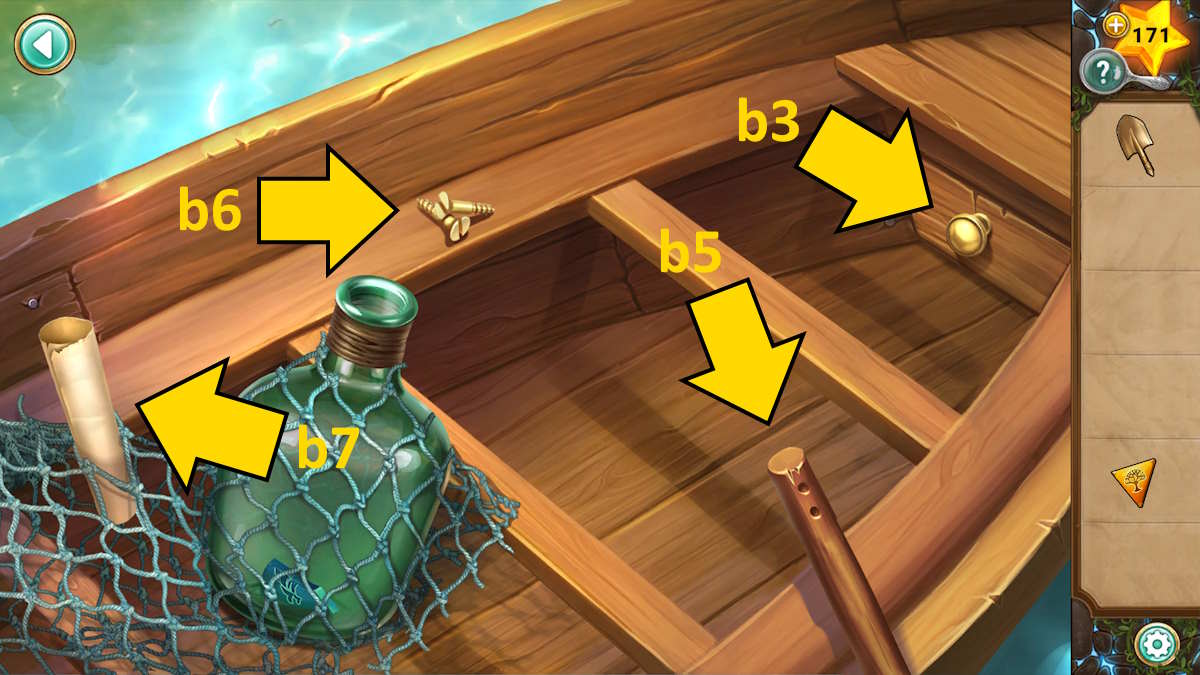
Click the drawer (b3) to open it and take the Key, and then use the key to open the box (b4) to find a Screwdriver. Add the shovel blade to the handle (b5) in the boat close-up, click the Screws (b6) to pick them up, add them to the shovel, and use the screwdriver on the shovel to finally be able to take the Shovel. Also read the note (b7) to find it is from Milo, confessing that he will try and take the stones.
Use the shovel on the loose sand (b8) to uncover a wooden box, and then click it to find some pieces are missing. Ollie will appear, telling you Milo is trying to cure the curse that’s making everyone sick. Now use the shovel on the X (b9) to find and take a Bucket and use it in the sea to get a Bucket of Water.
Now use the bucket on the bottle in the boat (next to b7) to flush out and take the Water Pendant Half. Head back into the house and add this half to the turtle picture on the wall (a10) which gets you the Water Pendant.
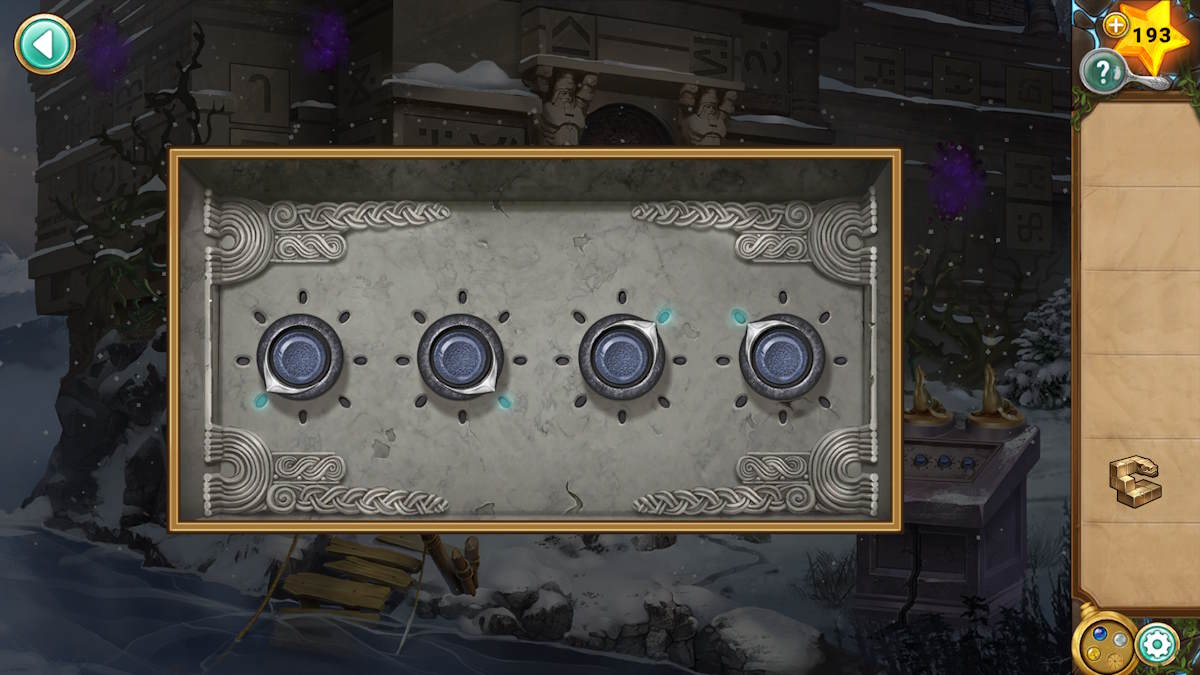
Now use the shovel on the left-side area of sand (b10) to find a Wind Pendant, and then on the central back area (b11) to uncover a locked box. The answer to the order in which you need to press the four buttons is about finding the four images in the main picture:
- Bottom left: The tree by the boat
- Top left: The tree between the left huts
- Top right: On the wall to the right of the door
- Bottom right: On the box underneath your hut
Click the buttons on the box until the symbols match their relative positions in the scene. Once done the box will open, allowing you to take the Fire Pendant.
How to complete the four-pendant puzzle

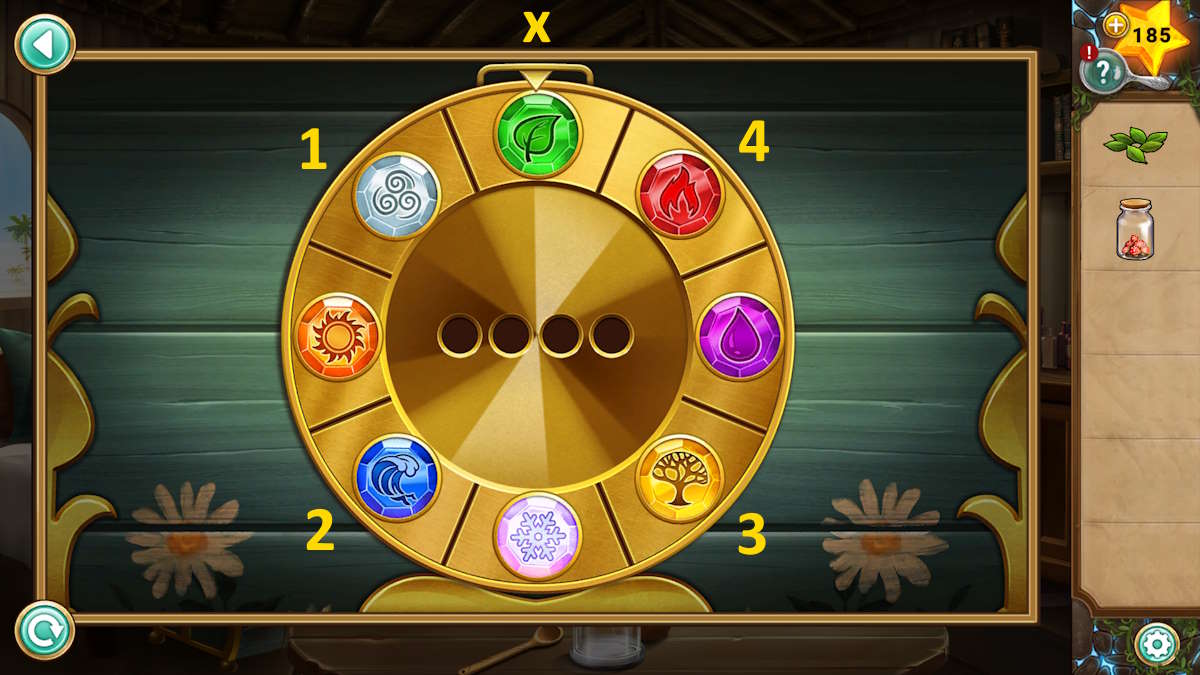
Now that you have the four pendants, add them to the box (b8) to start a symbol rearrangement puzzle. Once each pendant is surrounded by the four stones matching its color, you can take the Locket from inside.
This can be tricky, but you can’t fail, as you just need to keep clicking the green button in the middle to switch the four central stones onto the correct outer discs. If you do want a complete solution, click the bottom right symbol to reset the puzzle and turn the following discs:
- Red once (then green button three times)
- Red twice, white once, yellow once, blue once (green button twice)
- Blue twice, white twice, red once, yellow twice (green once)
Head back into your hut, give the locket to your mother, and she’ll reveal the secret of your past. She’ll return the locket to you (note that it’s now in the bottom right of the screen, below your inventory).
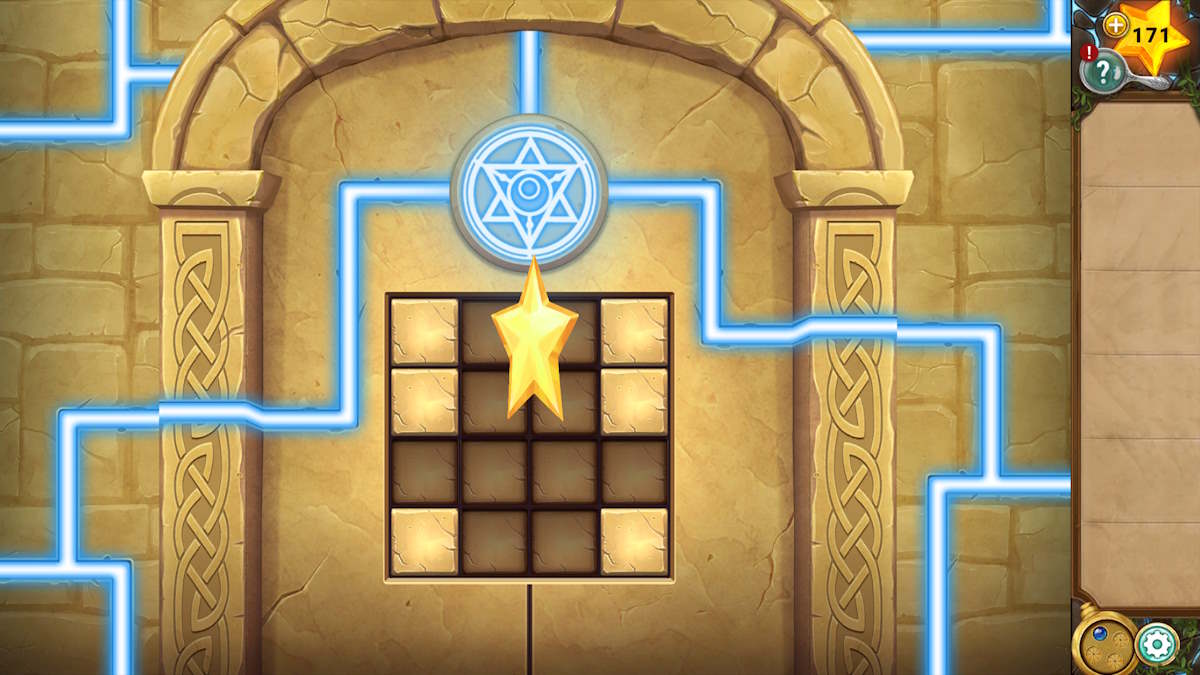
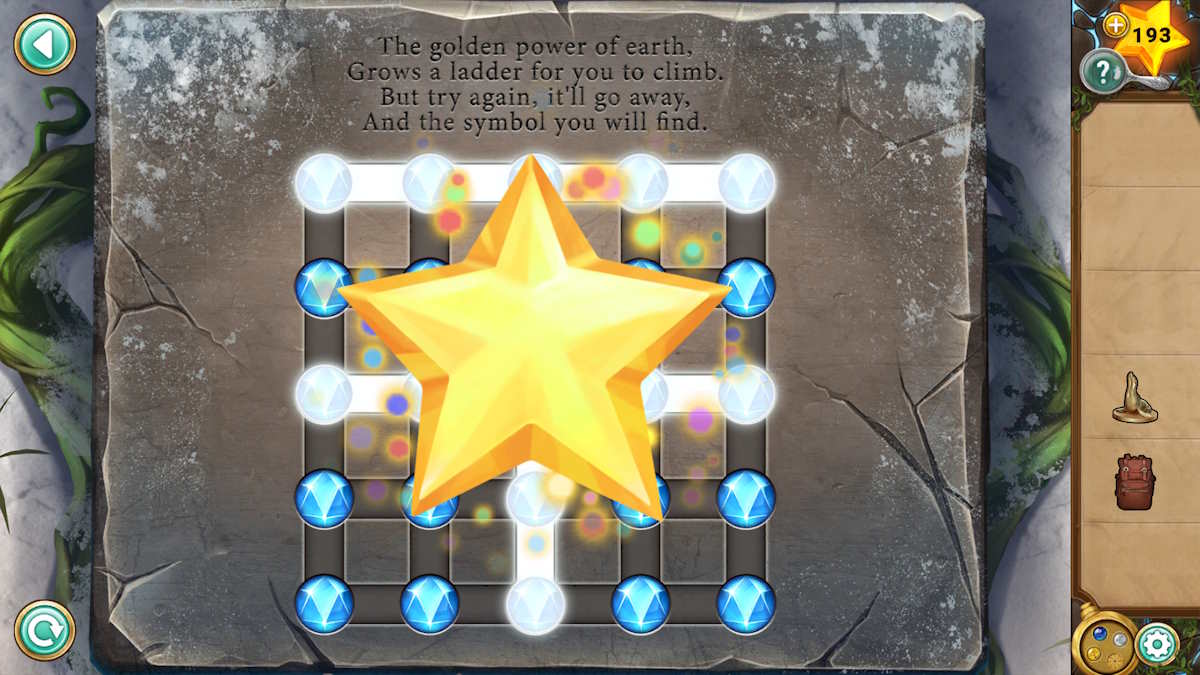
Go back outside and the temple will trigger the locket, so click the door to the temple (b12) and then click the locket in the close-up to trigger a puzzle. This is simply a case of copying the pattern on the front of the book you originally looked at in the hut (see above). Click the same squares to copy the pattern and the door will open, allowing you to go through the door and complete Chapter 1.
Legend of the Sacred Stones Chapter 2 walkthrough
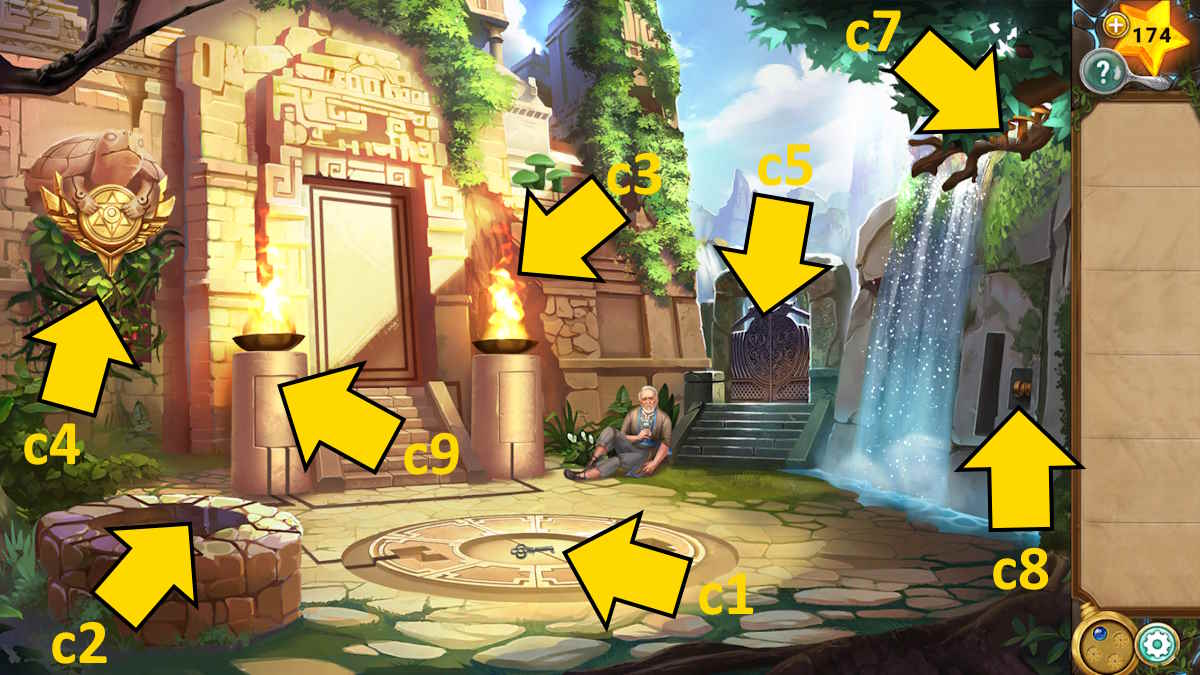
When you find your father injured outside the temple, he tells you Milo has stolen the Book of Tempus, allowing him to enter each temple. Take the Gate Key from the central floor pattern (c1) and then select the well (c2) for a close-up (noting the blue mushroom inside). Click its pendant symbol, and then your pendant, to fill the well with water and take the Torch.
Use the torch in a brazier (c3) to get a Lit Torch and use it to light vines underneath the turtle statue (c4). Once lit, click the pendant symbol in the turtle’s paws and click the pendant in your inventory to trigger a waterfall that puts out the fire. You can now collect a Wheel from the space the vines were covering.
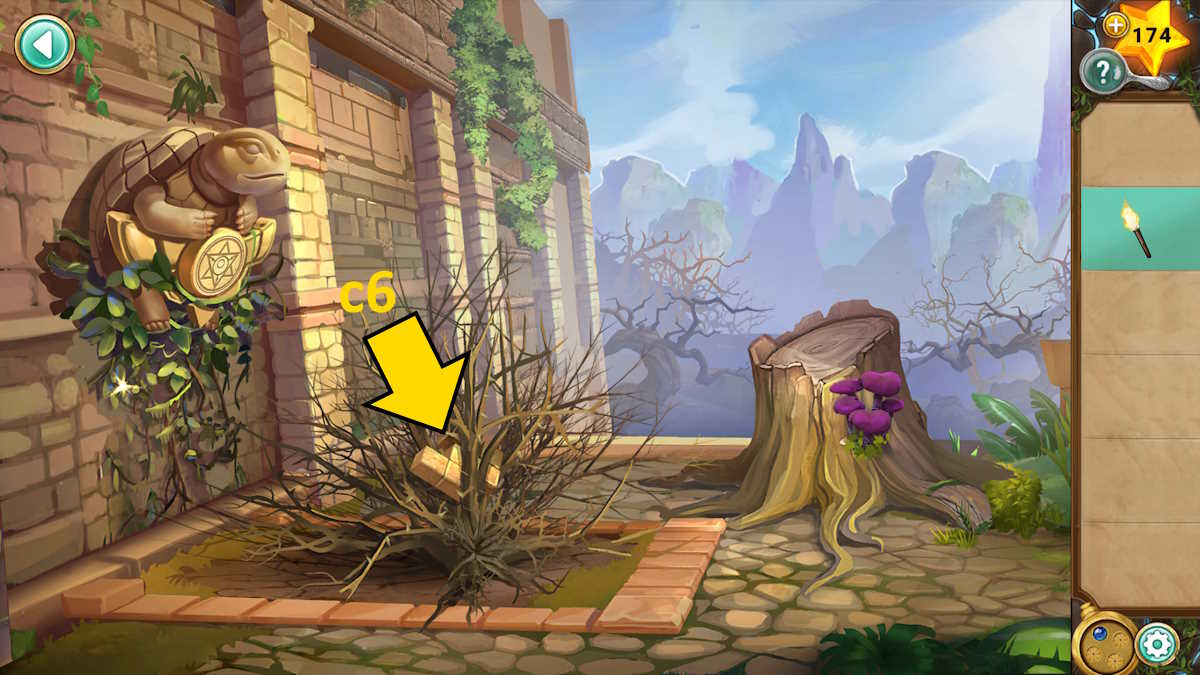
Select the gate (c5), use the key to open it, and go through. Do the same trick with the lit torch, setting the twigs (c6) on fire and then using the pendant with the turtle statue (just to the left) to put it out and take the Stone Key. Head back to your father and click the tree branches in the top-right of the scene (c7) to count four orange mushrooms.
How to open the color-coded chest

Add the wheel to the mechanism next to the waterfall (c8) and then turn it to stop the flow of water here and reveal a chest. If you look around the main scene, you’ll note the colors on the chest lock match those of the various mushrooms you’ve found here. The mushroom colors are:
- 2 red mushrooms (below the turtle)
- 3 blue mushrooms (in the well)
- 3 green mushrooms (above the right brazier)
- 4 orange mushrooms (on top of the wall)
- 5 purple mushrooms (on the treestump through the gate)
Click the buttons on the chest so that the amount of pips of each color matches these numbers and the chest will open, allowing you to take the second Stone Key. Place both keys into the floor pattern (c1) to reveal another pendant symbol. Click it, and then your pendant, to unlock the pillar below the left brazier (c9). Note that you need the well to be full for this to work.


Click it for a close-up and then turn the sections of the pillar so that you can drag the blue jewel from one side to the other. This is trickier than it sounds, because you have to move backwards and forwards to complete the puzzle. I’ve included the steps in the gallery above (they're numbered in the top-left corner).


Once complete, the second brazier pillar will open to reveal a similar puzzle, this time with three gems to move. Note that each must go into the space on the far side that has its matching shape but you can do it one at a time, so it's not as daunting as it may appear. Again, the gallery above will walk you through the steps if you’re stuck. The door will now open, so click it to go inside.
Inside the temple

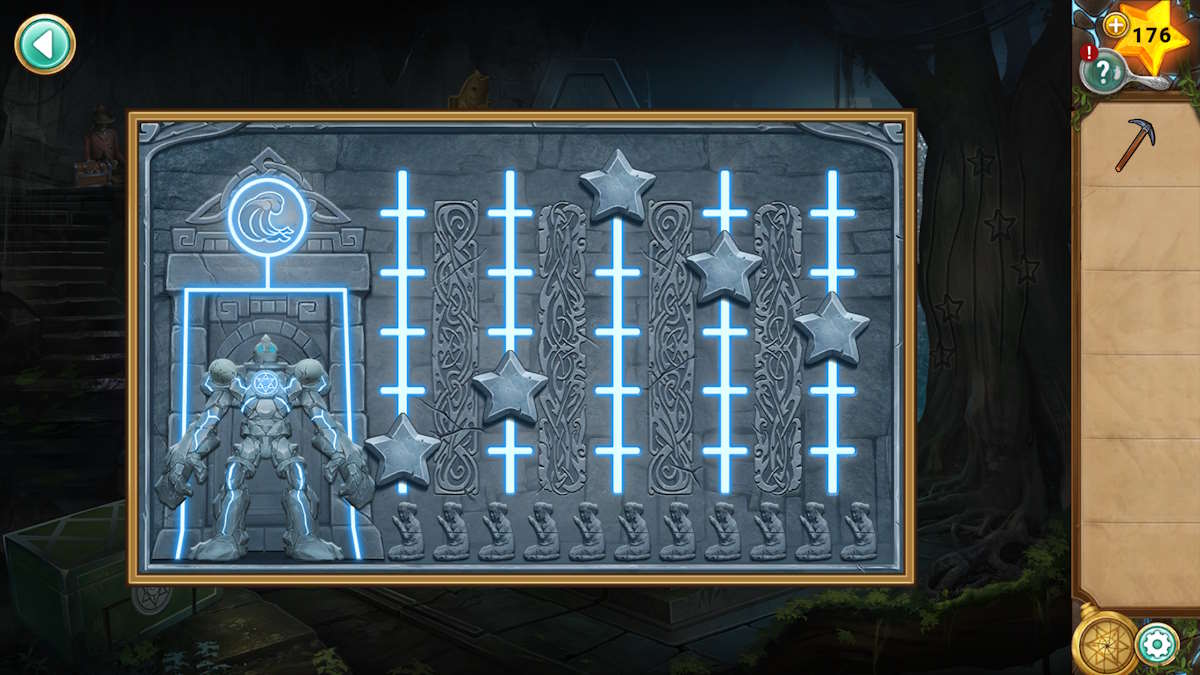
Take the Pickaxe from the tree (d1), noting the pattern (specifically the heights) of the stars carved into its trunk. Use this pattern on the plaque next to the stone turtle (d1) and you’ll open the door on the right (d3).
Use the pickaxe to collect some Pink Crystal (d4) and then get a close-up of the skeleton (d5) and take the Lantern from its backpack. Now select the doorway you opened (d3) and head through.
Get some Orange Crystal (e1) by using the pickaxe, then select the wall with the missing brick (e2) for a close-up. Click the brick that’s jutting out, which will go in and push another out. Keep clicking the jutting-out bricks until you can take the Pyramid from the hole in the wall.
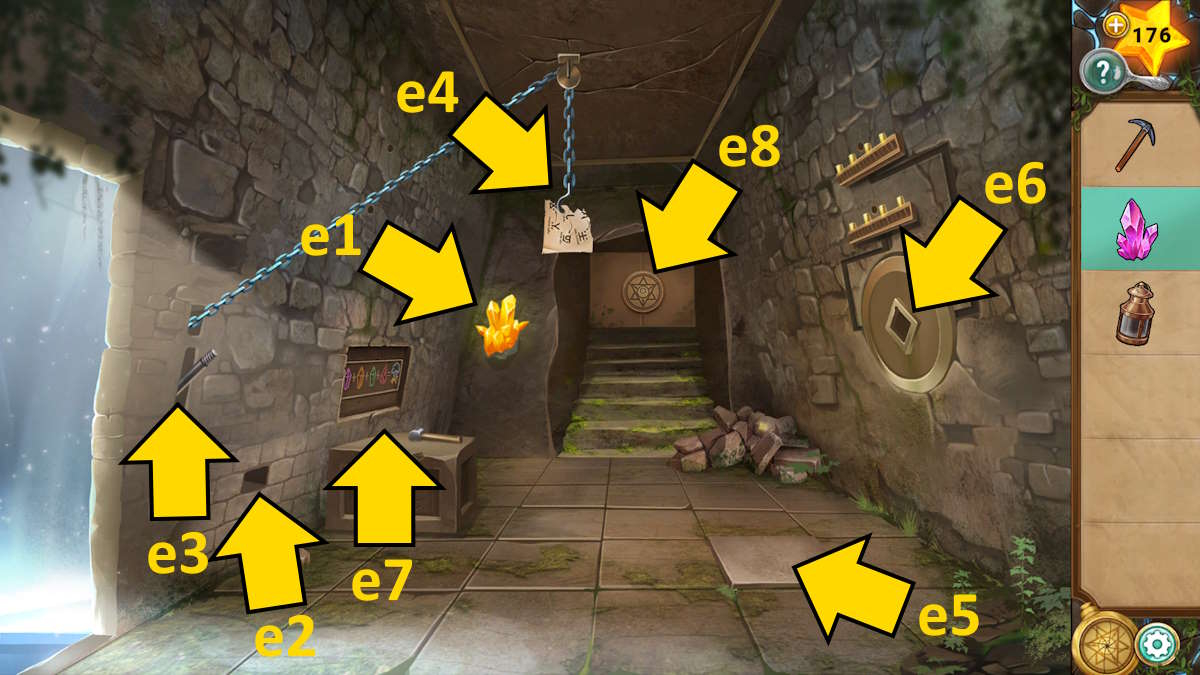
Return to the skeleton (d5) and use the pyramid to open the box it’s holding, taking the Puzzle Block and Lever Handle from inside. Return to the room, add the handle to the lever (e3), and then pull it to take the Torn Page from the chain hook (e4). You can now add the Puzzle Block to the chain the page was hanging from. Raise the puzzle box by pulling the lever once more, and then click the raised floor stone (e5). This shoots arrows from the wall, hitting and lighting up the block (see above). Lower it once more and take the now Glowing Block.
Add the glowing block to the hole in the wall here (e6) and it will light the candles above, revealing a Green Crystal you can use your pickaxe to collect. You can now add the three crystals, along with the lamp, to the table which already has a mallet on it (e7). Smash the crystals in the order shown on the wall (pink then orange then green), add them to the lantern in this order, and you’ll receive the Explosive.
Add the explosive to the chain hook (e4) and raise it with the lever once more. Use the floor panel (e5) to fire arrows at the explosives and, after the explosion, you’ll find your pendant is working once more! Select the pendant image on the back wall here (e8), use the pendant to open the door, and then click the revealed scene for a close-up.
Board game puzzle solutions
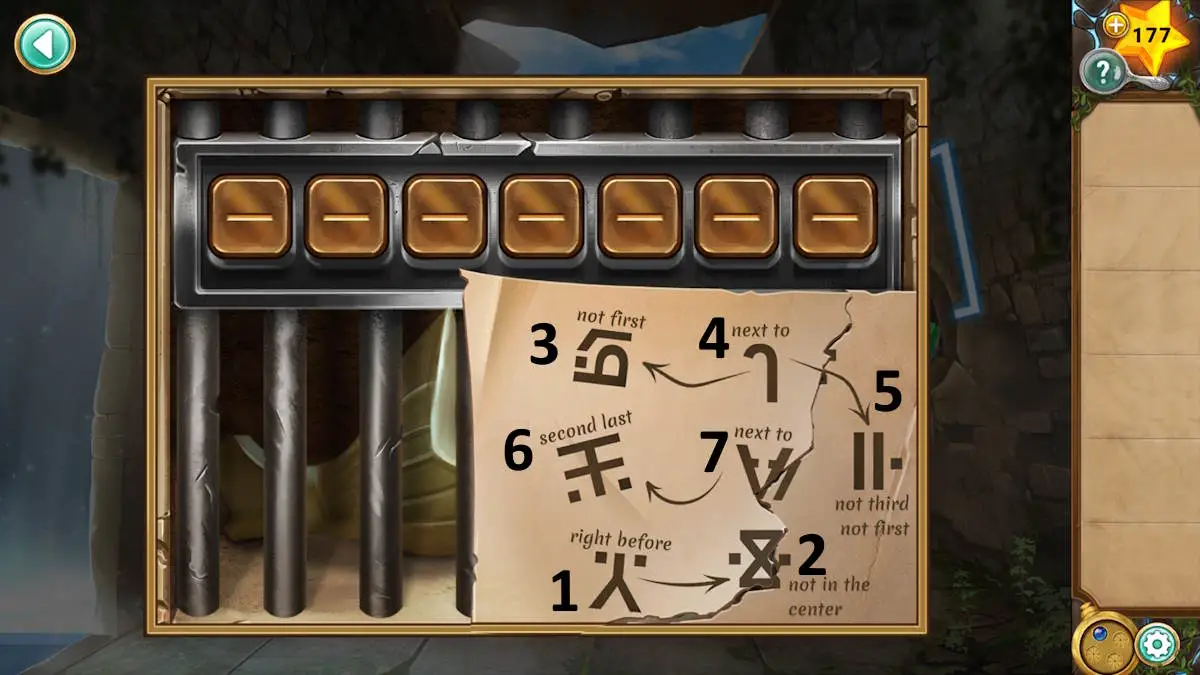
Add the torn note to reveal a code that will help you solve this puzzle. Each of the seven symbols on the page need to be put in the right order to create the correct code. I’ve numbered them (left to right) in the image above. Once done, you can collect the Fish Tail and the Villager Figurine.
Move back into the main area, add the fishtail to the fish (d6), and the panel above it will open to let in the sunlight. You can now use your pendant here too! Use the pendant to open the green box (d7), take the Aquarius Figurine, and then add the two figurines to the game board (d8) to start another puzzle.
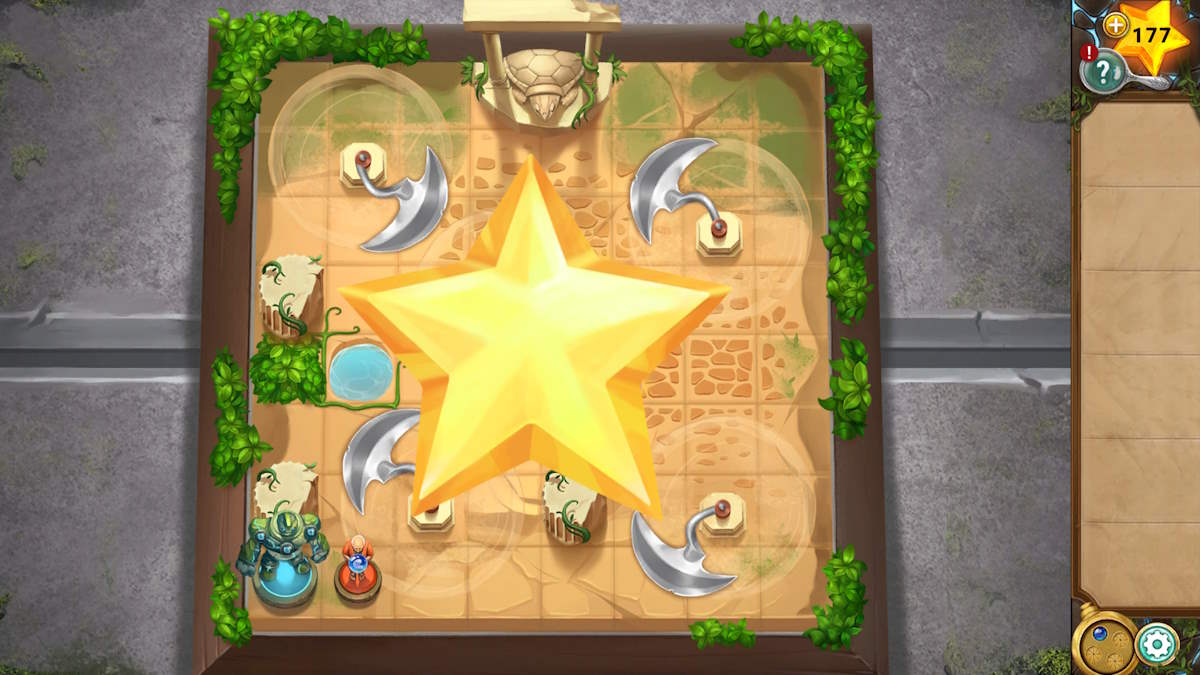
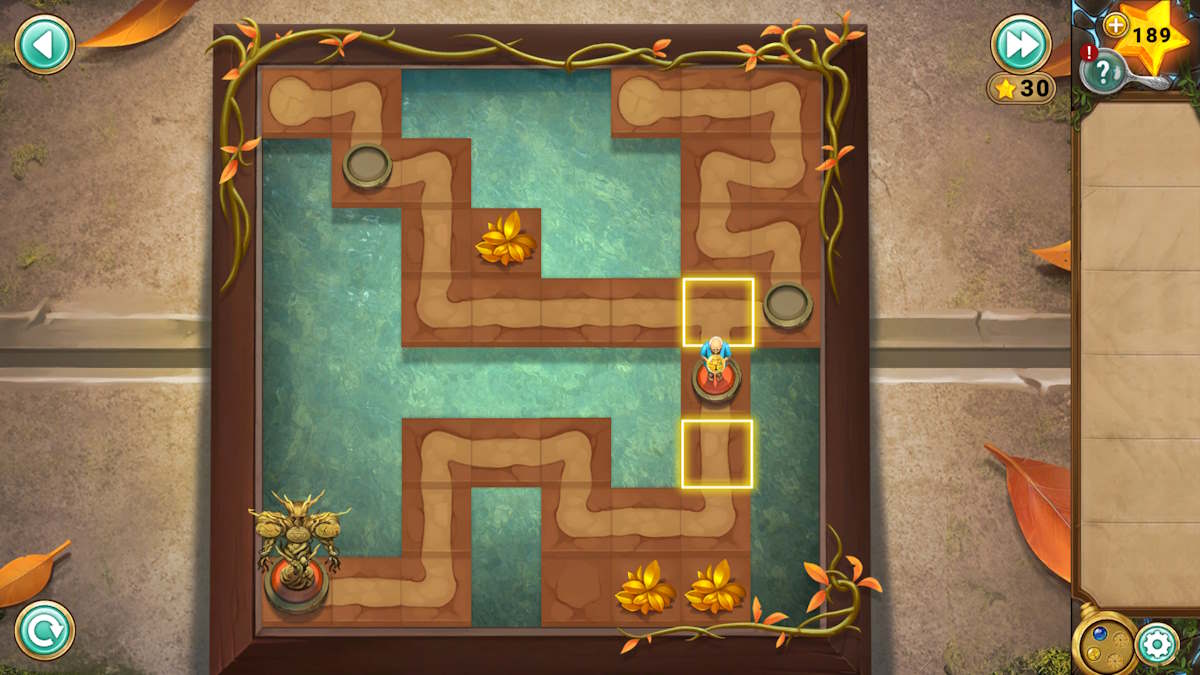
You need to move the villager (top right) to Aquarius (bottom left) by clicking squares while avoiding the swinging blades. Each time you move the blades also move, so you need to time your route perfectly to avoid them. If you’re stuck here, there’s a solution below:
- Left, left, right, left, down, down, down, down, down
- Left, left, left, down, down
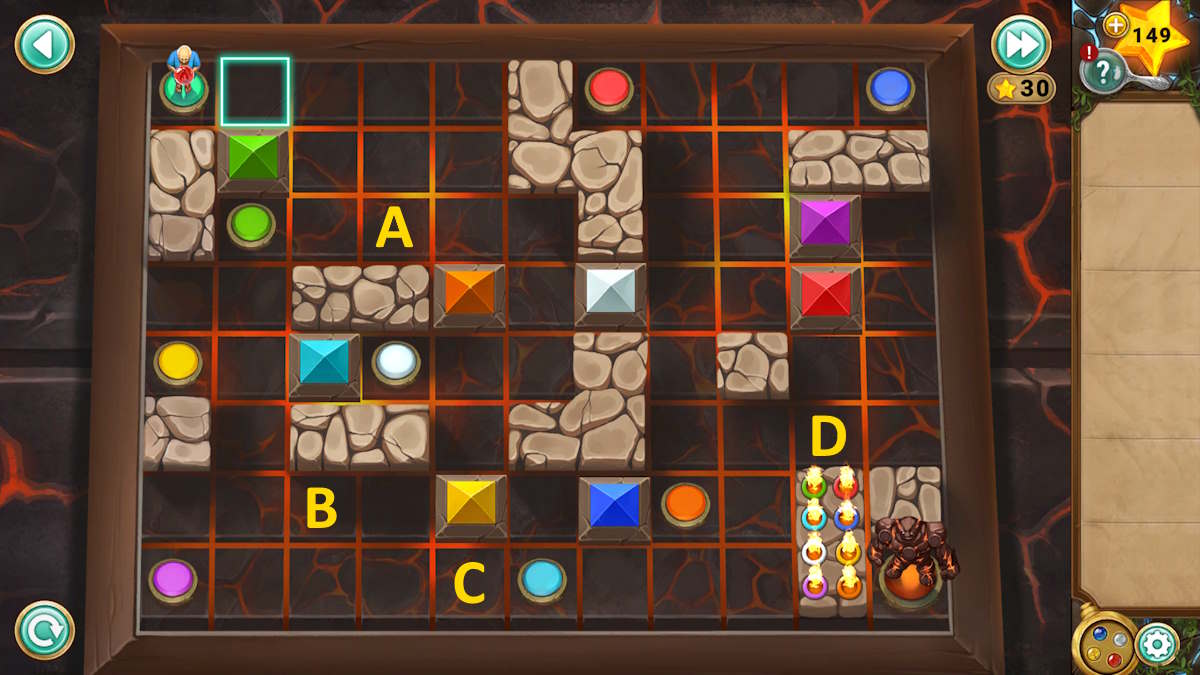
This reveals a pendant design on the base of the game board, so use your pendant to trigger it. This lights up the turtle, opening a door in its mouth. Click the door and head through to find Milo activating the golem! Click him to talk to him, When he activates the golem, click the pendant image on its chest and use your pendant to begin another puzzle.
Defeating the golem
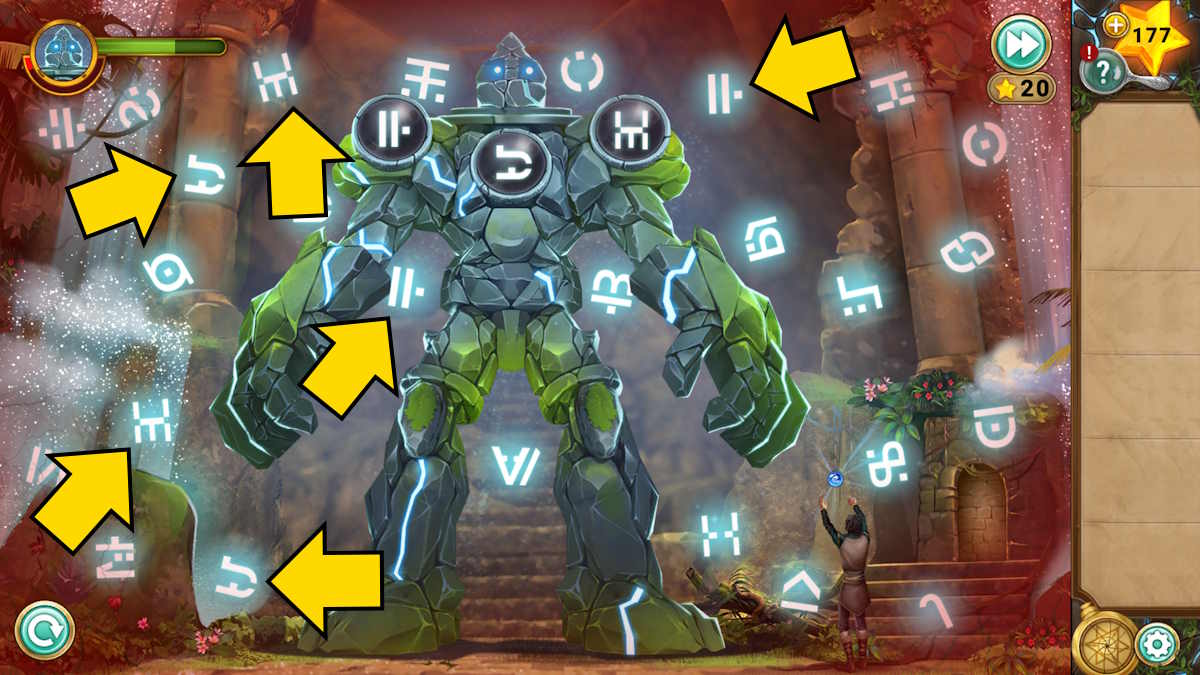
This one is a speed trial in which you need to find two of each of the three symbols that appear on the golem’s chest. Do this three times (so a total of 18 symbols) and the golem will be defeated. Clicking an incorrect symbol or taking too long will cause it to strike you, and if it strikes you three times, you’ll have to start all over again. I’ve included an example of the six symbols that would complete one of the levels above.
Note that the timing part is only active when you can see a screen full of symbols, so you can rest in between levels. The symbols are randomly generated and also move when you take damage, so I can’t post a solution, but if you’re stuck here remember you can use your stars (top-right) to skip the puzzle if you have enough.
Once you’ve defeated the golem, Milo will escape and you’ll have completed Chapter 2.
Legend of the Sacred Stones Chapter 3 walkthrough
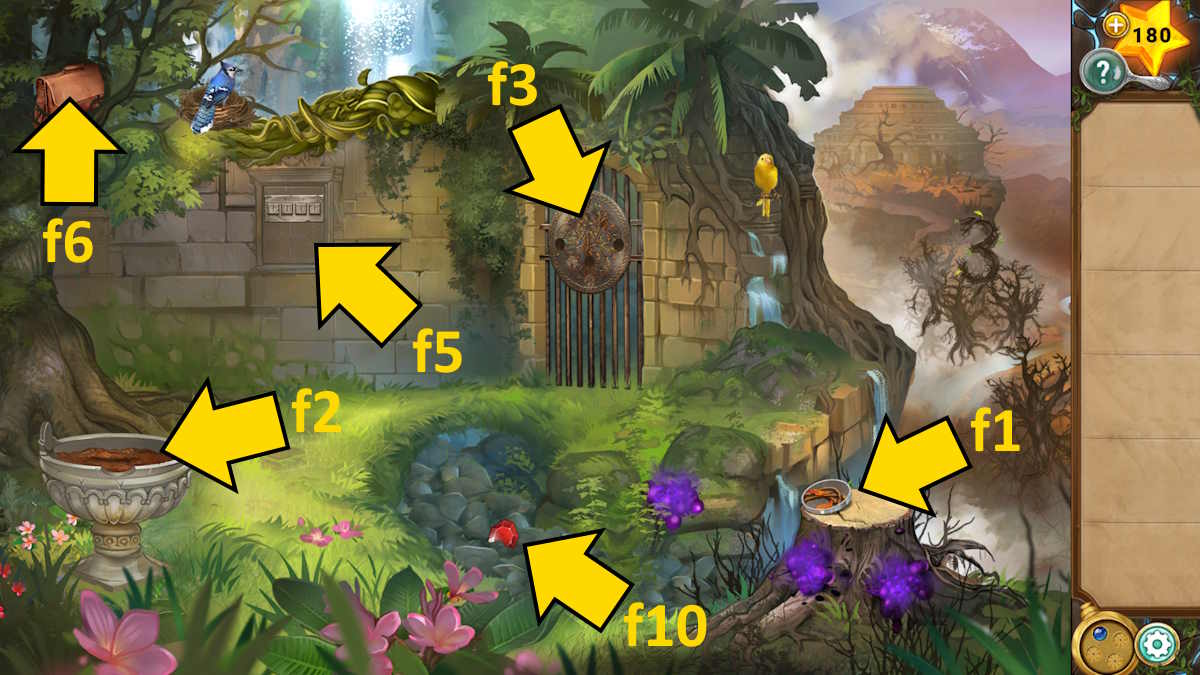
You’ll find yourself outside the Fall Temple with your father. When he leaves, take the Gate Piece (f1), and a second Gate Piece from the plant pot (f2), and then add them to the gate (f3) to begin a puzzle.

To complete this puzzle, you simply need to drag the pieces around until they’re all in the correct spots. You can’t fail and I’ve included the completed picture above. Once done the gate (f3) will swing open, so head through.

Note the bird on the left flaps its wings twice, while one on the right knocks five times. Also note that the branches in the trees on the left make two numbers: 2 and 8.
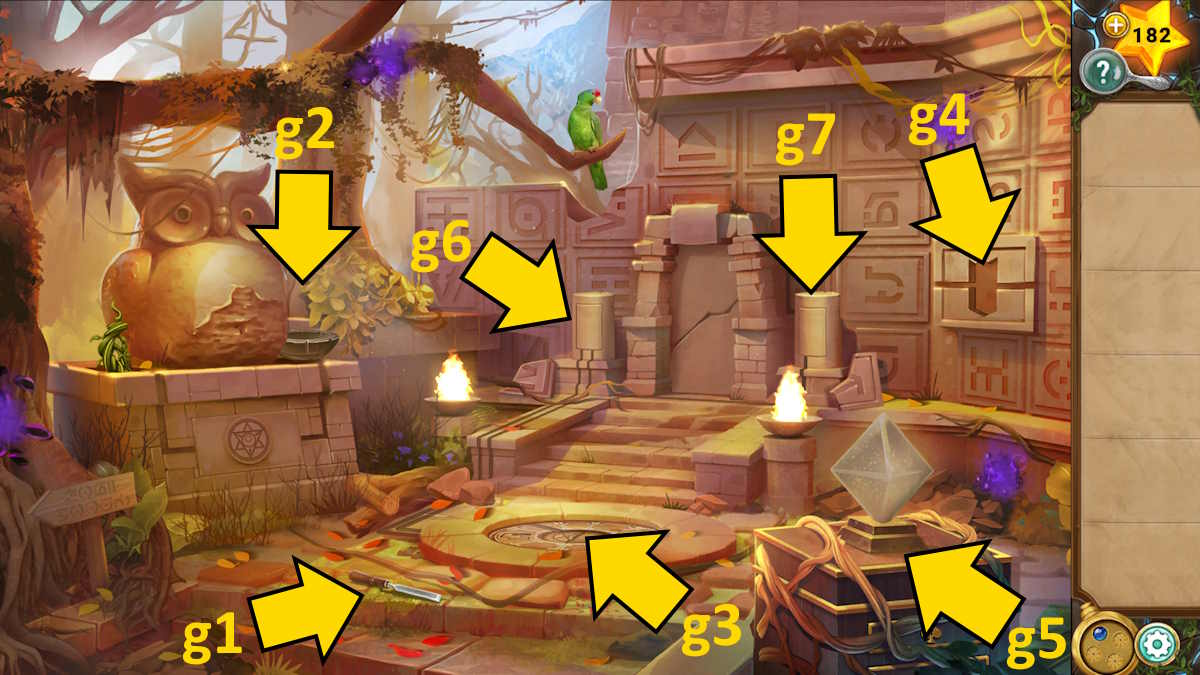
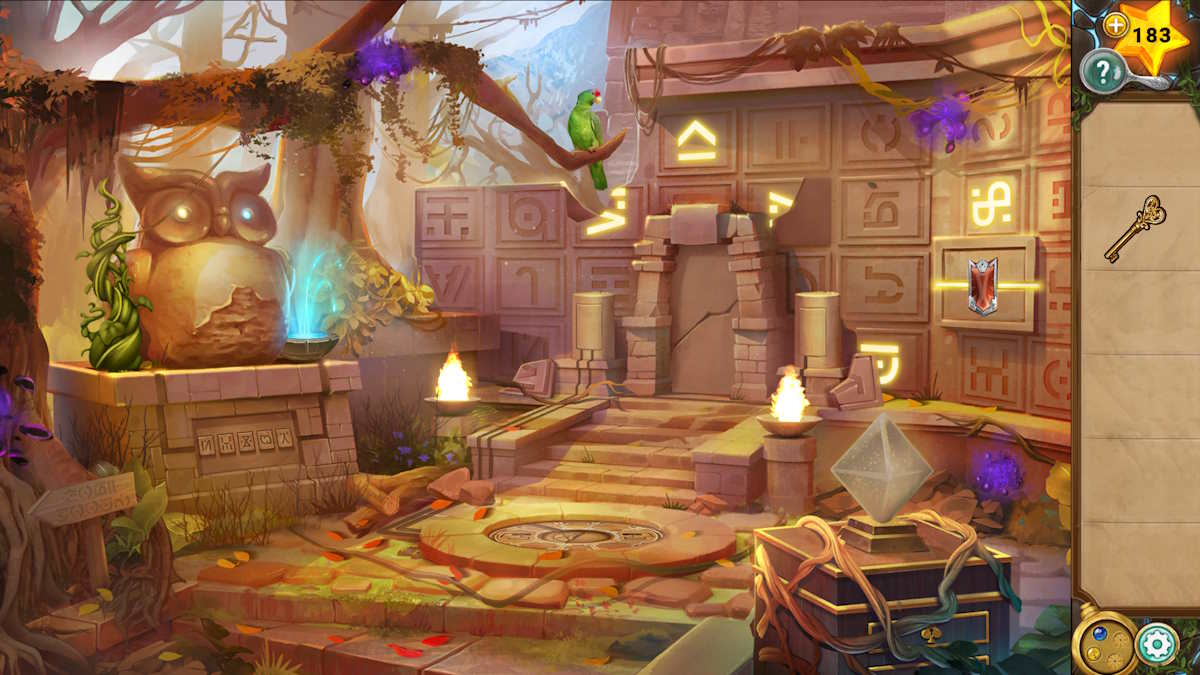
Click the path to the right and you’ll face Milo once more. After a brief conversation, he disappears into the temple. Pick up the Chisel (g1), note the number 4 in the branches, use your pendant to activate the fountain next to the owl (g2), and that the green parrot squawks twice. Also, take a Red Gem from the floor design (g3)
Return to the previous scene and use the chisel on the wall (f4) to reveal a pendant pattern. Now go to the first scene, note the number 3 in the branches to the right, and use the combined branches code (3284) to open the hatch on the wall (f5). This fires up the temple in the background, adding the earth symbol to your pendant. Use the yellow pendant power on the wall you just uncovered behind the code (f5) and you’ll release several waterfalls.
Gaining the earth pendant power
Go back to where you used the chisel (f4) and activate the yellow power of the pendant. The vines grow through, allowing you to take a Seedling. Place the seedling into the plant pot (f2) and click it again to cover it in the dirt, unveiling two silver discs. Click both, and another pendant image will be revealed (see above). Use the blue pendant power on this to fill the bowl with water, and then the yellow power to grow vines from the pot. You can now use these vines to get the Satchel (f6). Inside you’ll find a Shield Emblem and a Heart Key.
Use the yellow power of the pendant on the wall again to stop the water flow. Now, when you move forward, you’ll find the Red Gem (f10) was washed to just beneath the quiver (f7). Pick it up, add the two red gems to the hawk eyes (f8), and reveal a puzzle at the base of this statue.
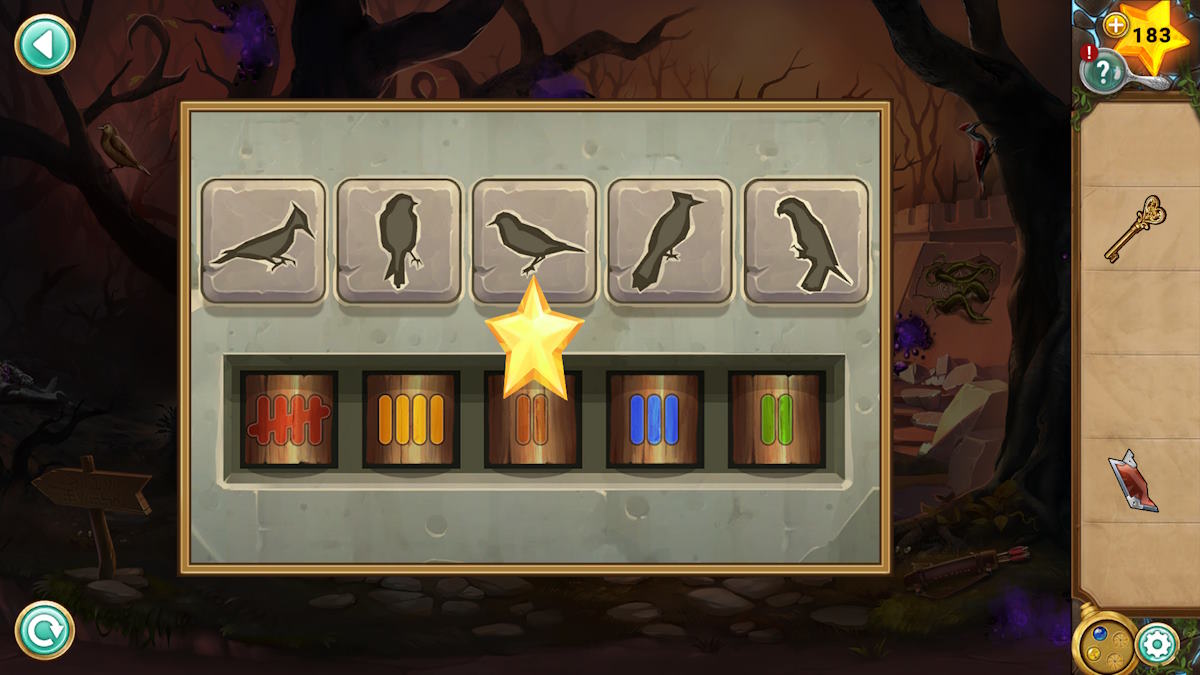
You need to put together the numbers that match the birds by looking at the images here and adding the numbers that match the sounds they make, while also matching their colors to the images. From left to right, the answer is 54232 (see above). Once complete, you can take the Bow. Click the quiver (f7) for a close-up, add the bow, then click them again to pick them up and receive the Bow and Arrow. Use it on the Shield Emblem (f9) to knock it out of the tree and then pick it up.
Opening the draws and finding the pendants
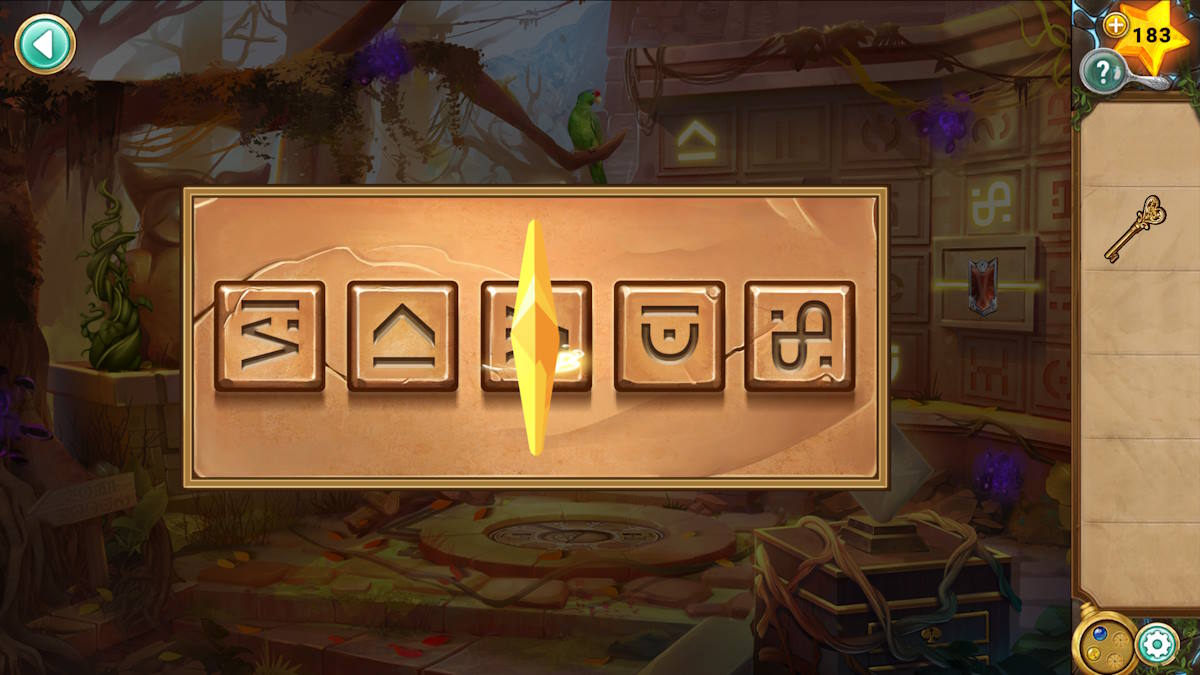
You can now move forward and use the yellow power of the pendant on the symbol next to the owl (g2), opening a puzzle code below it. Add the two shield emblem pieces to the wall (g4) and five symbols will light up on the wall. Use this code below the owl and the vines around the pedestal (g5) will disappear.
You can now use the key here to open the heart draw and take the Club Pendant. Use this on the box in the bottom drawer to open it and find the Diamond Key.

Close all the drawers to find the Spade Pendant on the floor. You can use the diamond key to open the diamond drawer and use the spade pendant to open the box inside, gaining you the Club Key. Use this to open the top drawer, take the Diamond Pendant, and use that to open the box in the heart drawer, giving you the Heart Pendant. Finally, use this to open the heart box in the top drawer and take the Stone Slab.
The door puzzles
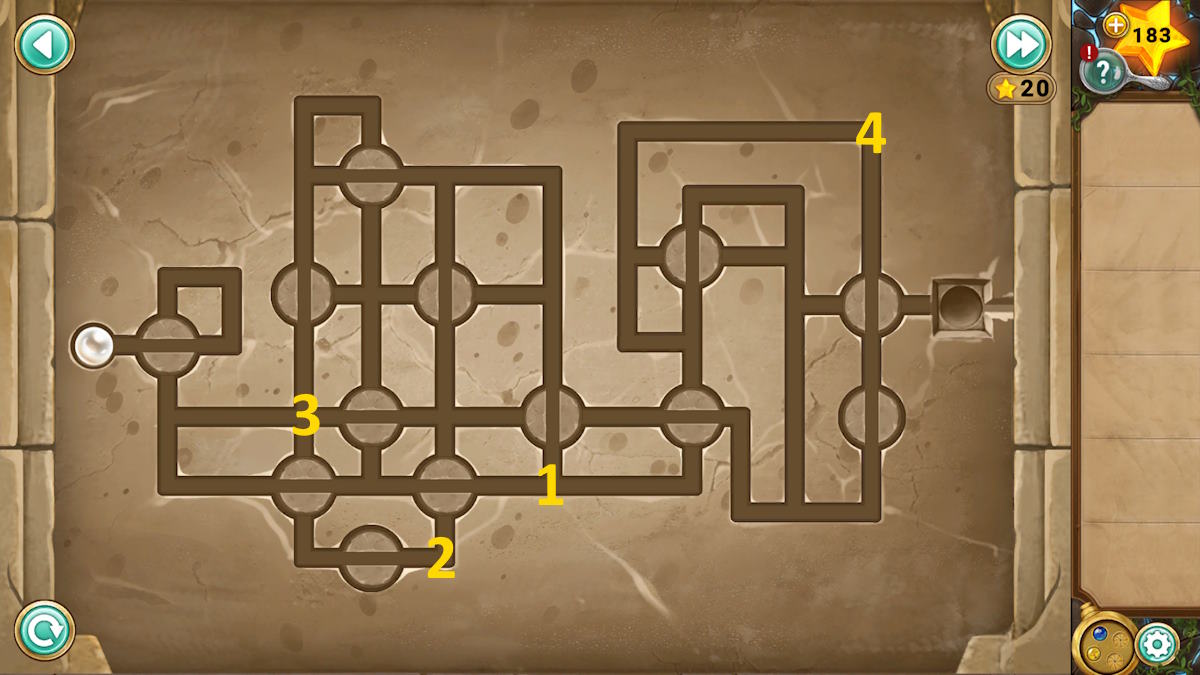
Add the stone slab to the floor design (g3), then use both the yellow and blue pendant powers to open the puzzle in the left-side pillar by the door (g6). Click the puzzle to begin, and drag the ball from left to right and through the hole on the other side. The trick is that, as you move, the circles in the pattern rotate. To complete the puzzle, do the following:
- Right, up, left, down, right through two circles (to 1)
- Up (to the top), left but then down (to the bottom, marked 2) before you hit the next circle
- Left, and then up through just one circle (to 3)
- Right to the end, down, right, and up to the top right corner (4)
- Left, down, first right, down, and first right to escape
This opens the right-side pillar (g7) for a similar puzzle:
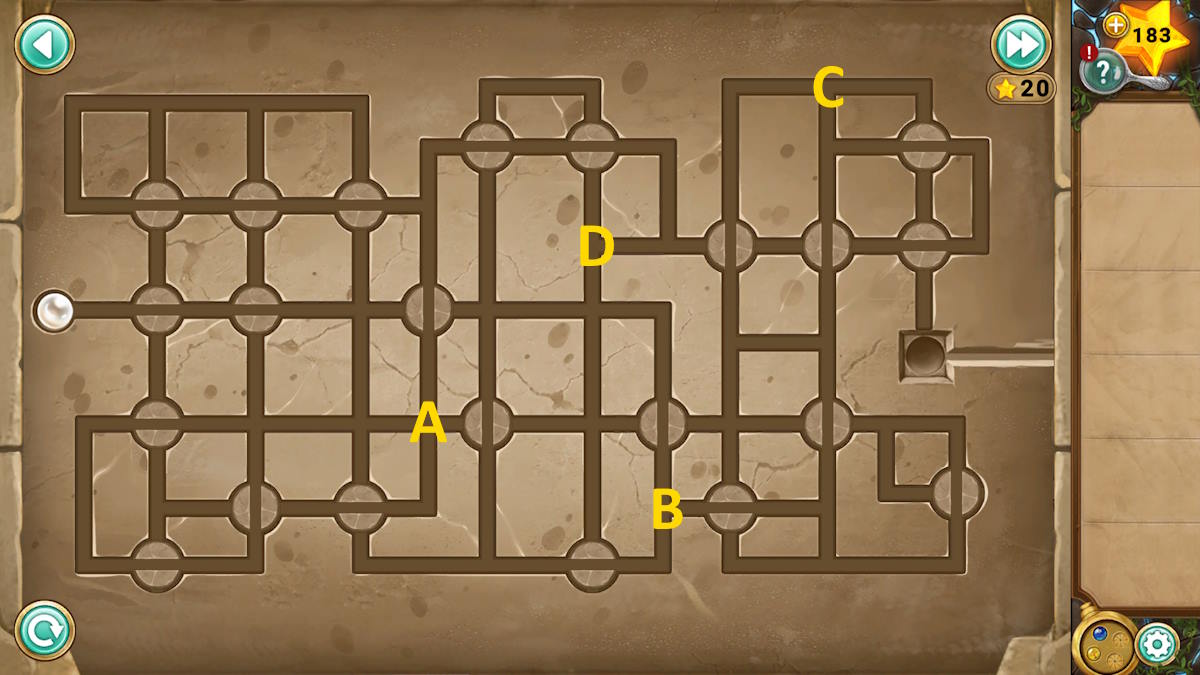
- Right through two circles, then down, and right before you go through a circle (to A)
- Up to the top, right through two circles, down, left, down, right, down, and stop just before the bottom (at B)
- Right, up through one circle, left, up through one circle, and then right (to point C)
- Down to between the two circles, left, down, left through the circle, then up to D
- Right to the end, up, left, up, right, down, and done.
The temple door will now be open, allowing you to enter and complete Chapter 3.
Legend of the Sacred Stones Chapter 4 walkthrough
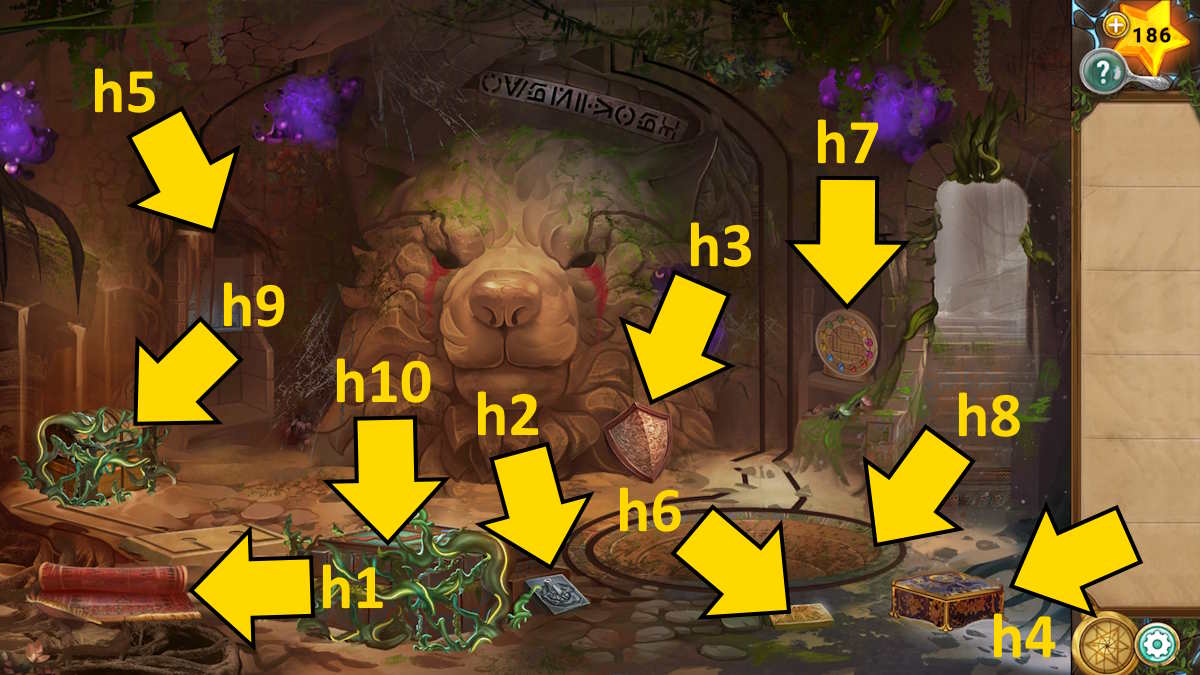
Once you’re inside the temple open the rug (h1) to find an Owl Emblem, grab the Stone Carving (h2) and the Shield (h3), and open the box (h4) to get a Square Key. Add the stone carving to the mural at the back of the room (h5), and then move through the door on the right (you’ll need to find three more to finish it).
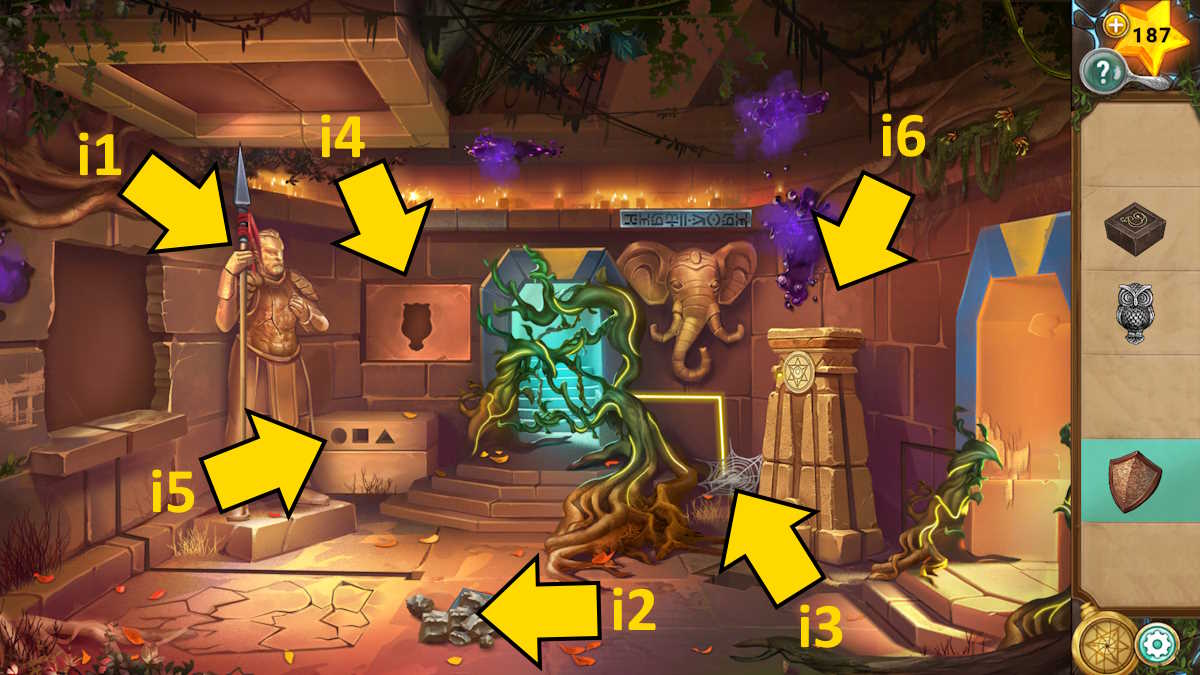
Add the shield to the statue of the warrior (i1) and it will release its Spear, allowing you to take it. Move the rubble (i2) to find a second Stone Carving, and the cobweb (i3) to grab a Triangle Key, before adding the owl figurine to the space on the back wall (i4). This opens a hatch where a code is required, consisting of four colored leaves (we’ll come back to this later).
Return to the previous room and use the spear to move the gold floor tile (h6) and pick up the Circle Key. Head out back again and add the three keys to the box (i5), which opens. Take the third Stone Carving and a Book Page from inside. Back in the first room, add the book page to the circular object by the stairs (h7) to begin a puzzle.
Completing the mural
The idea is to switch gems until they match the pattern on the page. I’ve included the completed puzzle above. This gives you the final Stone Carving, so add them all to the mural (h5). Once done, this opens a window in the other room, allowing you to use your locket there (by clicking the pedestal at i6).
Head there and use the blue locket power before heading back downstairs. You’ll find the pool (h8) has filled with water, allowing you to take the Autumus Figure. Go back up and use the locket once more, this time on yellow. This blocks your path back down but opens the way up the stairs ahead (don’t worry, you can use the yellow power here to switch which door is available at any time).
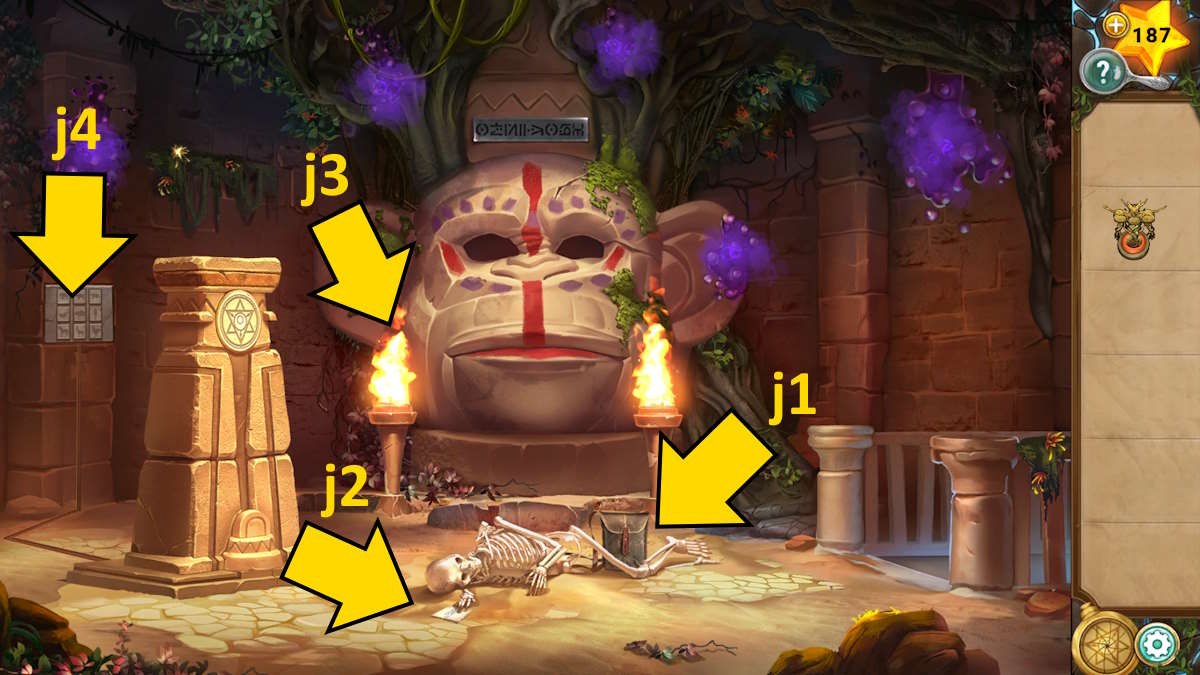
You find yourself in a room with a large monkey statue. Open the satchel (j1), take the Empty Canteen, and then read the note in the skeleton’s hand (j2). Each line gives you a color, helpfully color-coded by highlighting the word in orange on the note. This gives you yellow, green, orange, and red. Return to the previous room and change the leaf colors on the panel above the box (i4) to these colors (left to right) and the panel will open, so take the Villager Figurine behind it.
Solving the animal wall puzzle
Use the yellow locket power so you can head back downstairs and use the canteen in the pool to get a Canteen of Water. Now go right back to the top and use the full canteen to put out the torches in front of the monkey statue (j3). Its mouth will open, revealing a jigsaw-style puzzle. It’s quite straightforward, as you can’t rotate the pieces (but they do re-angle once you pick them up). In the image above, I only have one piece left to add. Once complete, you can take the Pillar Block.
Click the animal wall puzzle next (j4). Note that the statue in each room has a sign above it, describing the animal in terms of its diet:
- Top floor: Monkey (Omnivore)
- Middle floor: Elephant (Herbivore)
- Bottom floor: Dog (Carnivore)
You now need to order these animals so that the correct diet matches these levels. So one solution would be (in any order):
- Top: Person, ape, bear
- Middle: Horse, cow, rabbit
- Bottom: Shark, crocodile, lion
Once done, the pillar will drop all the way to the ground floor. Follow it down it lands just in front of the rug (h1); add the pillar block, and then use the yellow and blue lantern abilities. This removes the vines from the chest (h9), and unlocks it, allowing you to take the Rope.
Go upstairs and attach the rope to your new hole in the ground. This allows you to use the yellow lantern ability here, open the way to the monkey room, but still have access to the downstairs. Do this, and then head down on the rope to find the vines have been removed from the game board (h10). Add the two figurines to begin a puzzle.
Defeating the yellow golem
Once again you must move the villager to the god, but this time you need to rearrange the floor pieces to make it a followable path. The direction you drag a tile moves all the colored tiles in that row or column. However, with a bit of patience, it's a simple task to plot the route (see the image above). You’ll only see the purple space once you’ve unlocked the door there with the key at the top.
Once done, select the symbol below the game board that appears, use the yellow locket ability, and click the now-open mouth of the dog to move forward. Once again, you’re too late, as Milo is already here.
The game is very similar to before, except a little harder. This time the symbols you need to find rotate, making them a little trickier to identify, but the principle is the same; so either complete the random matching game (you get unlimited tries) or use your stars to skip it and complete Chapter 4.
Legend of the Sacred Stones Chapter 5 walkthrough
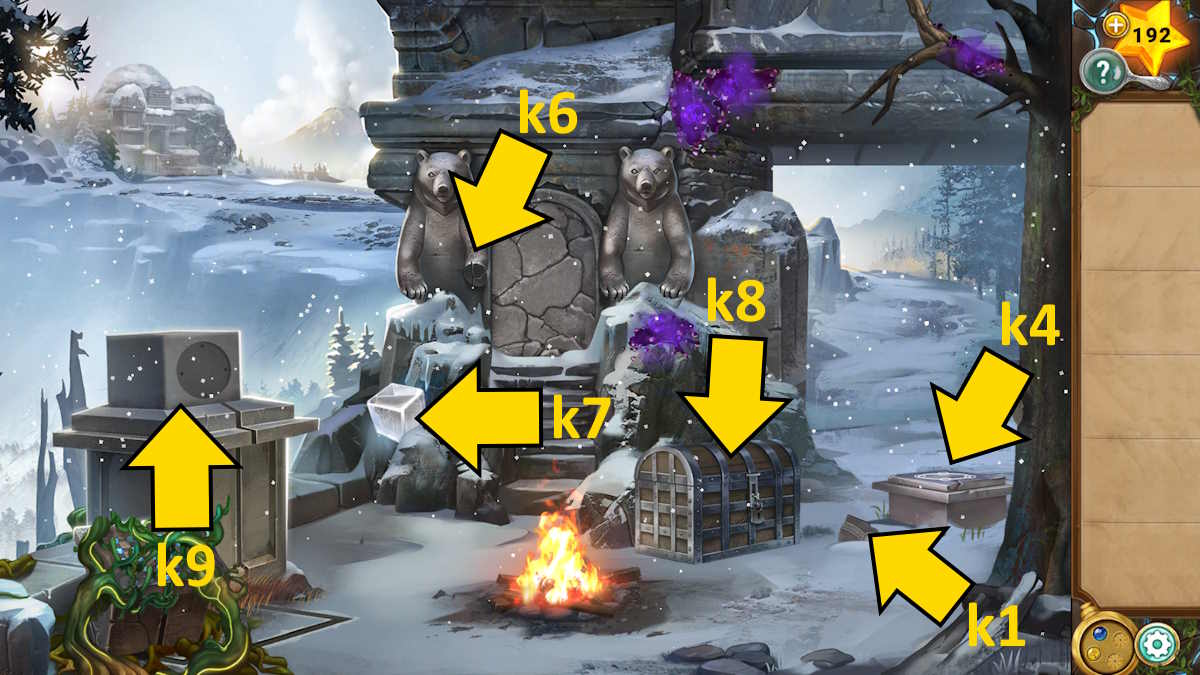
After speaking to Siegfried, pick up the Stone Plate (k1) and then click the arch to move forward and catch up with him.
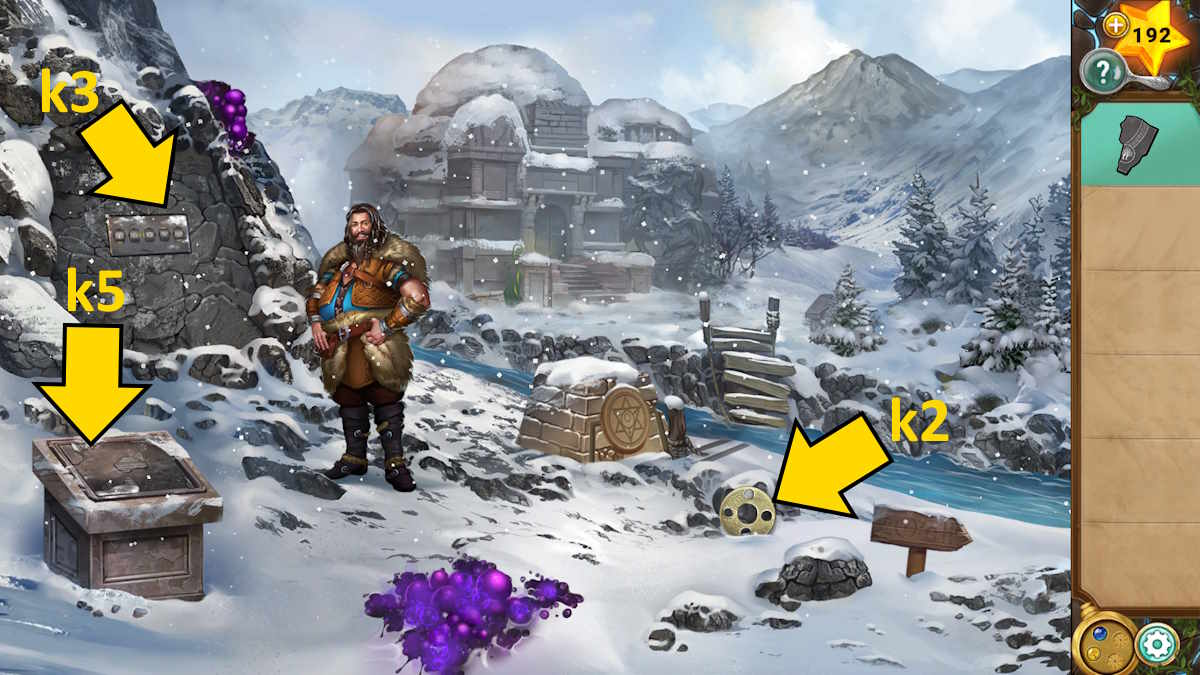
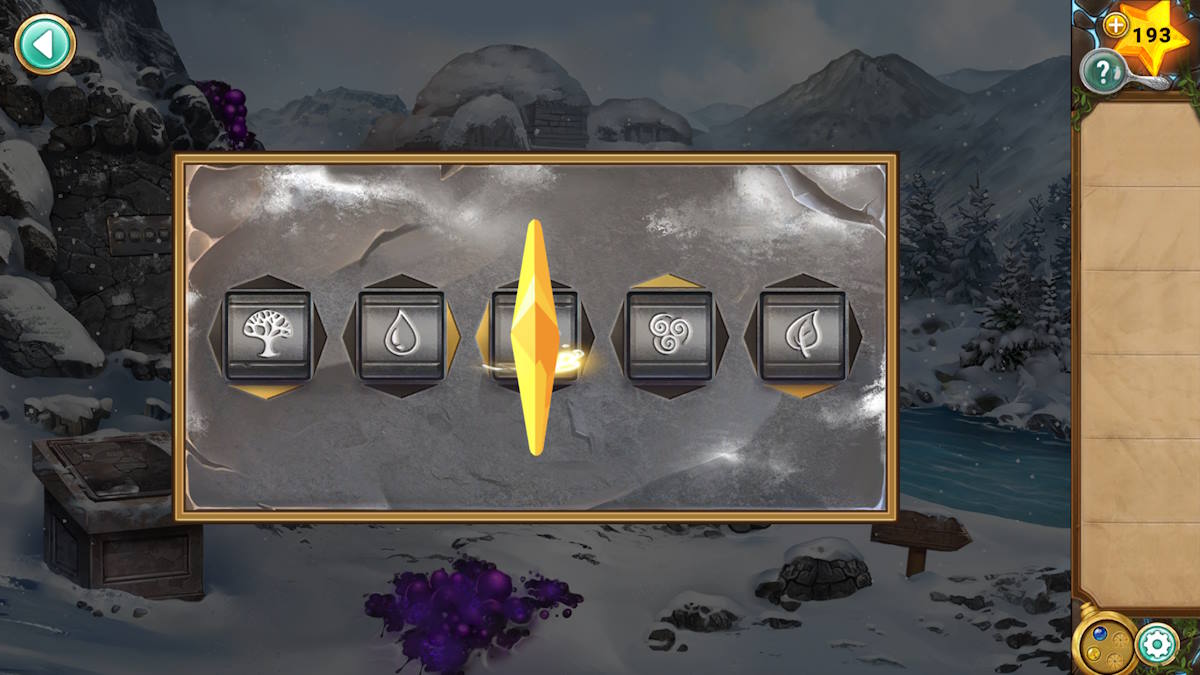
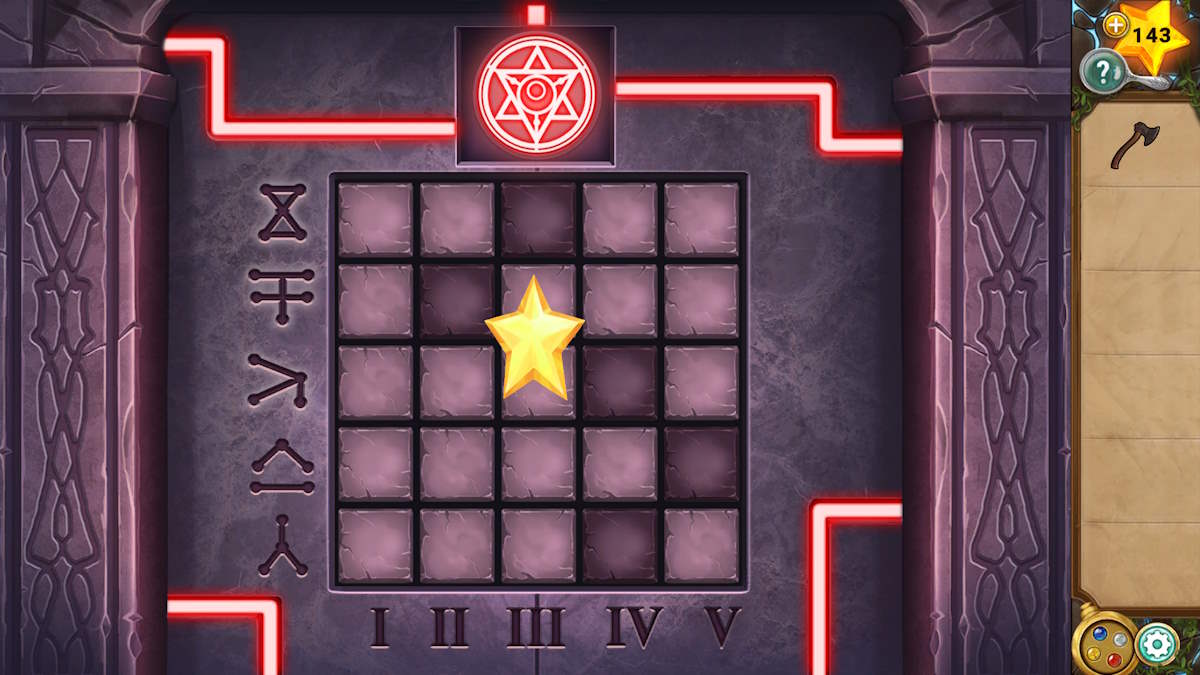
Take the Moon Disc (k2), use the blue locket ability to raise the level of the river, Select the code lock on the wall next (k3), and note that each of the five spaces has one of its direction arrows lit (see below).
Using this, head back to the first scene and add the moon disc to the low pedestal (k4). Working from left to right using the Roman numerals on the image on the pillar, work out which weather condition lines up with the direction on the lock. For example, placing the lower (down) hole of the disc on the one (I) gives us a tree. The complete answer (left to right) is:
- Tree, water, sun, wind, leaf
When you’re done the panel will open, allowing you to take the second Stone Plate and a Bear Paw. You can add the two stone plates to the plaque here (k5), but you still need a few more. Move back to the first scene and add the paw to the bear statue (k6), which reveals another puzzle.
Solving the color rows puzzle

Here you need to align the colors in the correct rows (red top, green middle, blue bottom). Dropping a row up or down (using the buttons at the bottom of each column) leaves the ones at the top or bottom ‘safe’; while using the arrows at the sides moves the rows. Once complete, take another Stone Plate. Plus, even better, the wind (white) section of your locket is now activated!
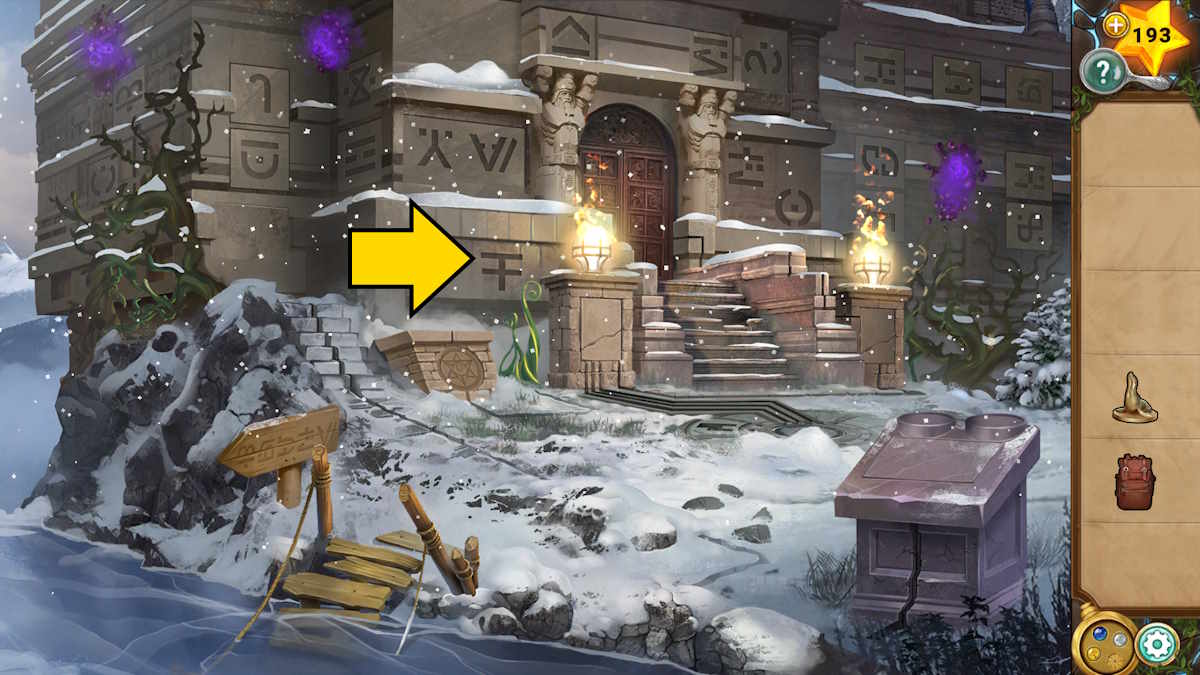
When you move forward to the bridge once more, you’ll find Sigfried has been buried in a landslide. Use the white locket ability here and you’ll freeze the river, allowing you to move forward toward the temple.
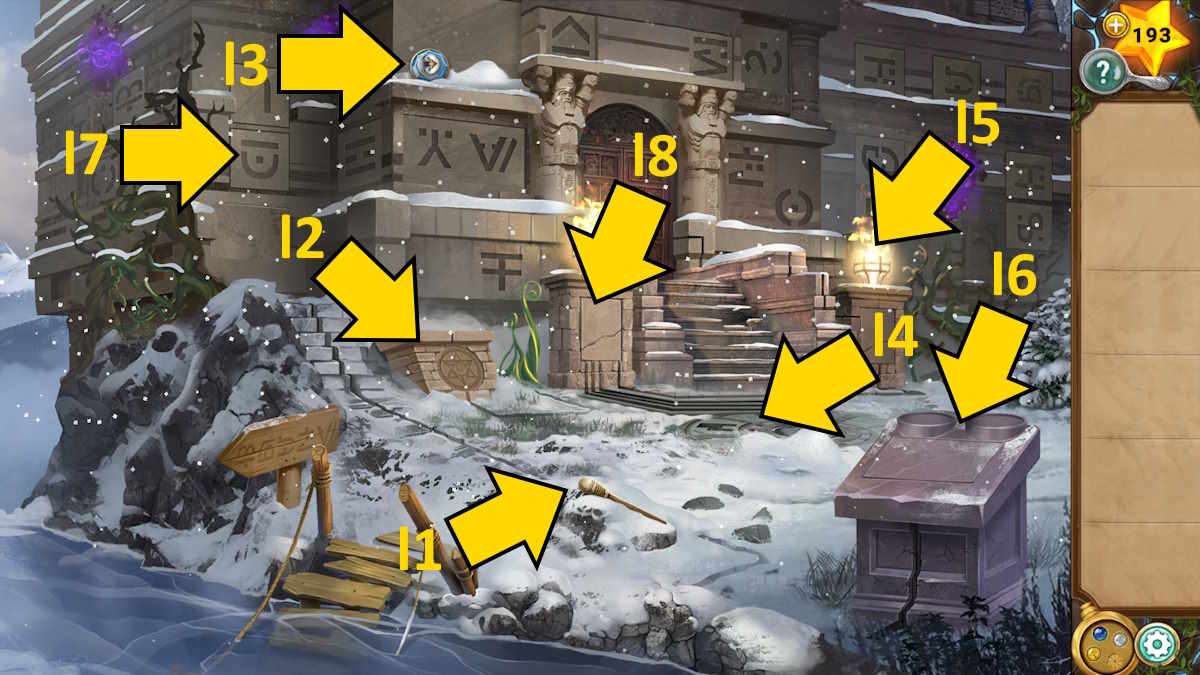
Take the Torch (l1) and then use the yellow locket ability (l2) to raise the vine, allowing you to collect the Penguin Gem (l3). Grab another Stone Plate from the floor design in front of the temple doors (l4), light your torch in the braziers here (l5) to get a Lit Torch, and then head back to Siegfried.
Saving Siegfried
You can use the torch to melt the ice that’s fallen on him, after which he’ll give you the Key to his chest. Head back to the first scene and use the torch to melt the ice cube (k7), which gets you another Stone Plate. Use the key to open the chest (k8) and find a Seal Figurine and a Backpack. Now use the penguin on the pedestal (k9) to reveal a locket symbol. Using the yellow locket power here will remove the vines on the block next to the pedestal, revealing a lines puzzle.
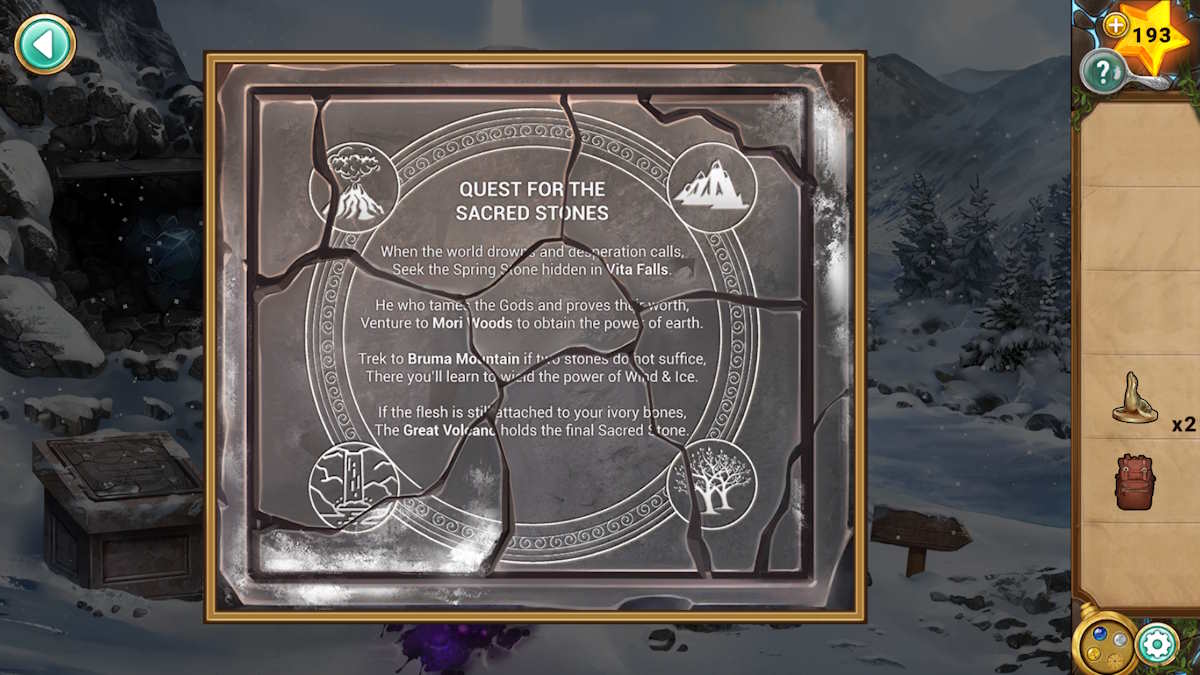
Head forward and add any remaining stone plates to complete the plaque (k5). The revealed poem, Quest for the Sacred Stones, has four highlighted locations. You need to remember the direction the pictured locations are in relation to the words. For example, the waterfall image is southwest of the words Vita Falls. This gives you the following compass directions:
- SW, SE, NE, NW
If you read the inscription above the puzzle, it will remind you of growing the vine up to find the penguin Gem. Return there and use the yellow locket ability once more to remove the vines. Behind where they were you’ll now see a symbol (marked above). Go back to the lights puzzle, create this symbol in the lights, and you’ll find a second Seal Figurine.
While you’re here, give the backpack to Siegfried. In return, he’ll give you a Stone Key. Move up to the temple, add the two figurines to the plinth (l6), and set the revealed dials to the compass directions above (and pictured below).
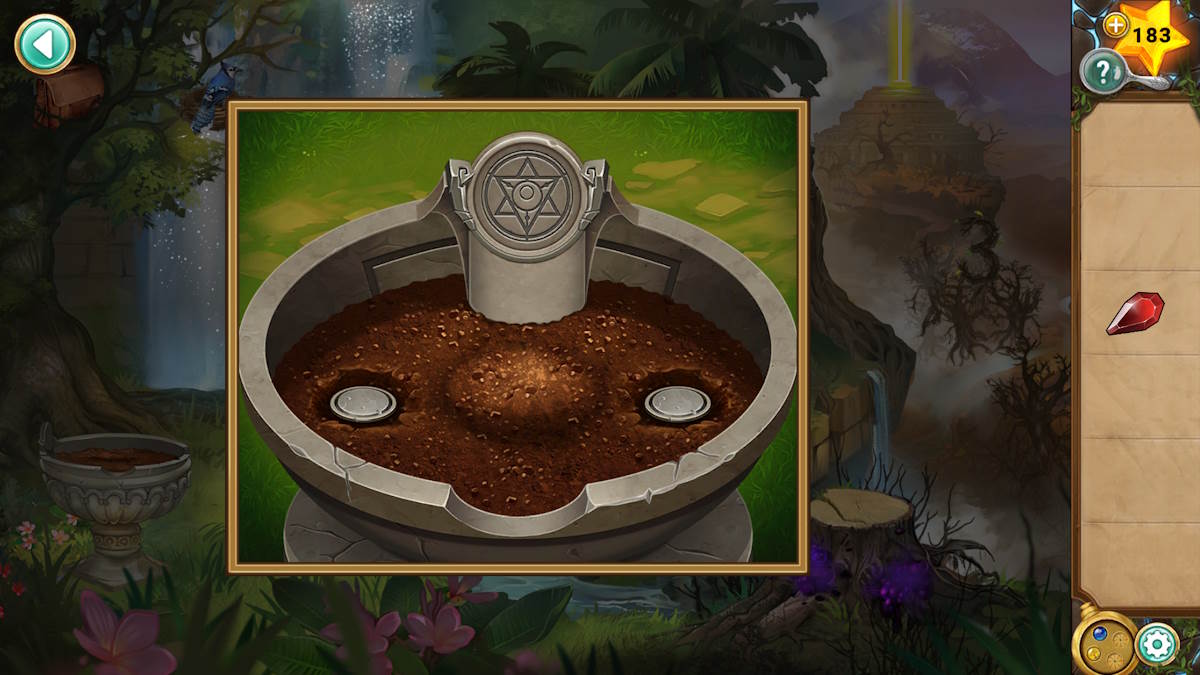
This unveils a stone bowl filled with soil (at l7), so use the yellow locket power to add a vine; the blue to then water it; the white to turn it to ice; and finally yellow again to remove the vines, gaining you the Ice Key.
Solving the temple pillar puzzles
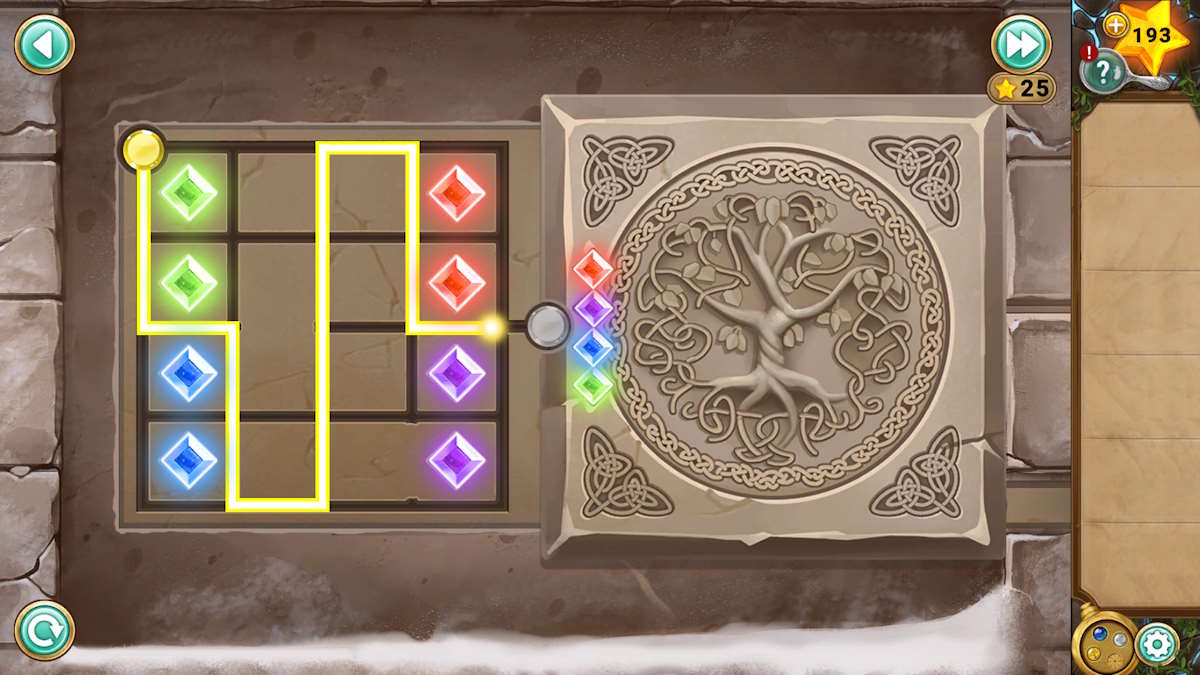
Add the two keys to the floor pattern (l4) and then do all three locket powers (in any order) to open a now familiar left door pillar puzzle (l8). Here you must use the yellow gem to separate each set of colored gems by tracing lines between them.
The slightly trickier right side is revealed when the left side is done.
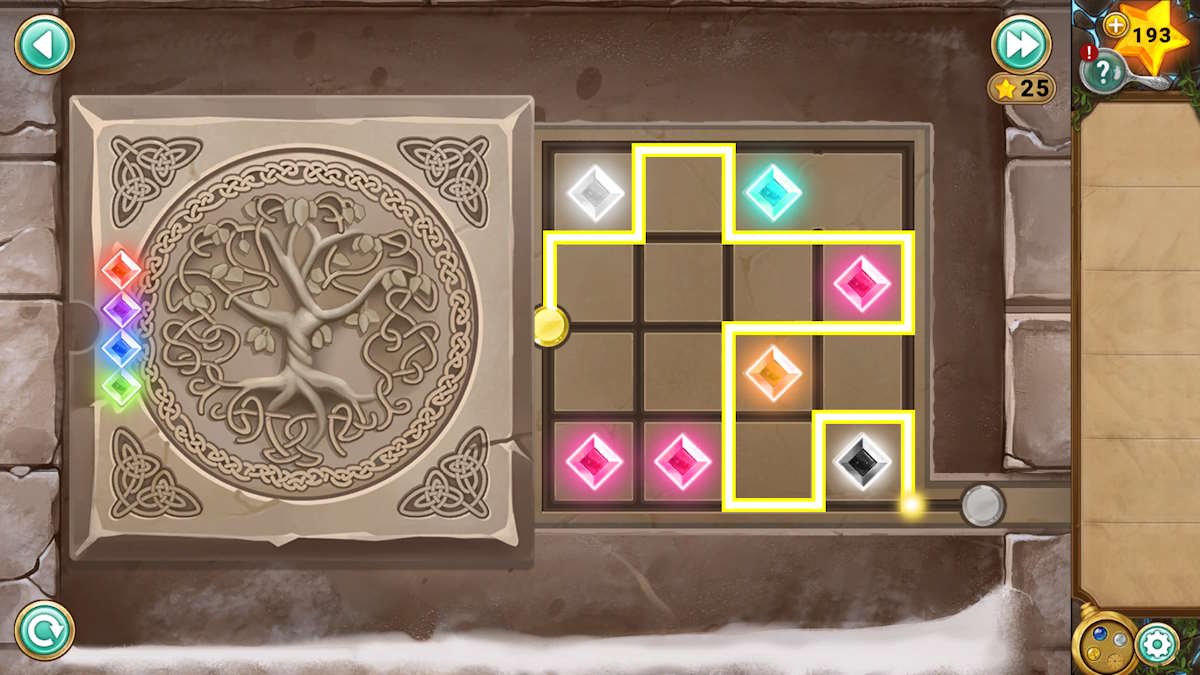
Once this is complete, the right-side pillar puzzle will be revealed. The principle here is the same, but the board is larger, making it trickier. Once complete, you can click the open temple door to conclude Chapter 5.
Legend of the Sacred Stones Chapter 6 walkthrough
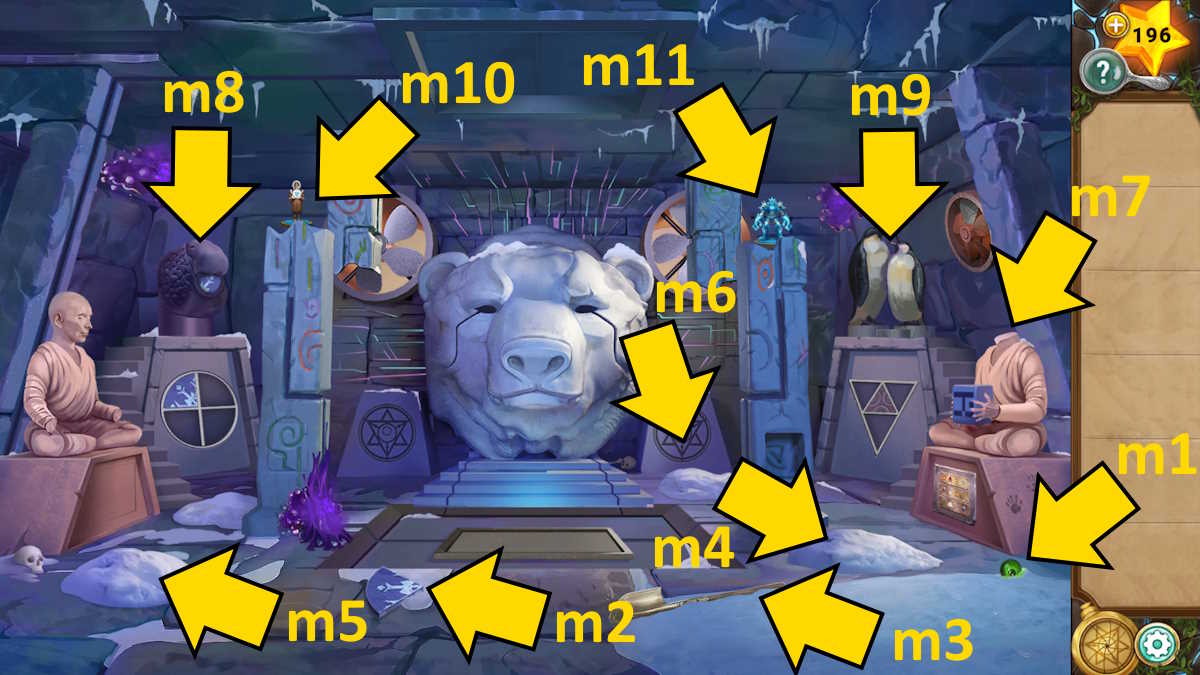
Pick up the Emerald Eye (m1), Ice Emblem (m2), and the Shovel (m3). Use the shovel on the snow in front of the right pillar (m4) to find a Tusk, on the left (m5) to dig up a second Ice Emblem and (just behind that) a Statue Head; and then finally at the back-right (m6) to get a Fan Blade.
Add the head to the statue on the right (m7), which allows you to take the Rune Block (also note the clue on the plaque below it, shown above). Add the block to the right pillar ( above m4) and a slot will open on the left pillar, allowing you to take a second Tusk. Now you can add the two tusks to the walrus head (m8), making it drop a third Ice Emblem. Add the emblems to the design below the walrus and you’ll reveal a door. Head on through it.
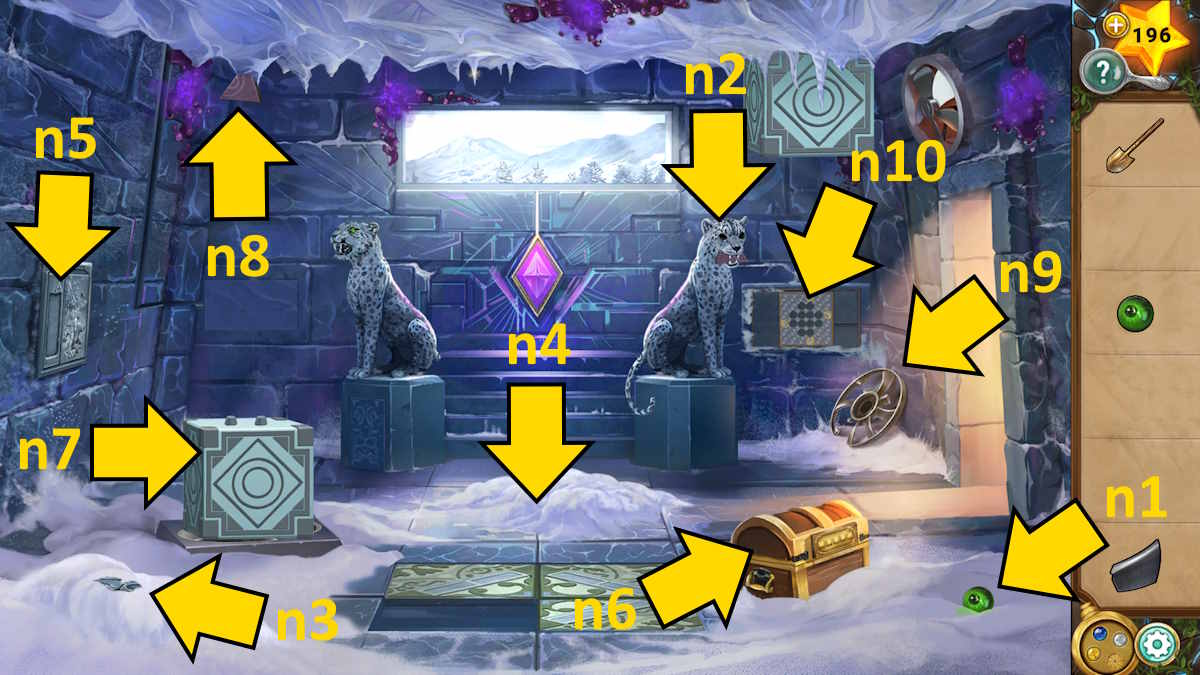
Take a second Emerald Eye (n1) and add both to the right leopard statue (n2), making it drop a Wind Emblem. Now use the shovel on the left (n3) to find a Mural Brick, and the center (n4) to gain a Tile.
Finding the code in the mural
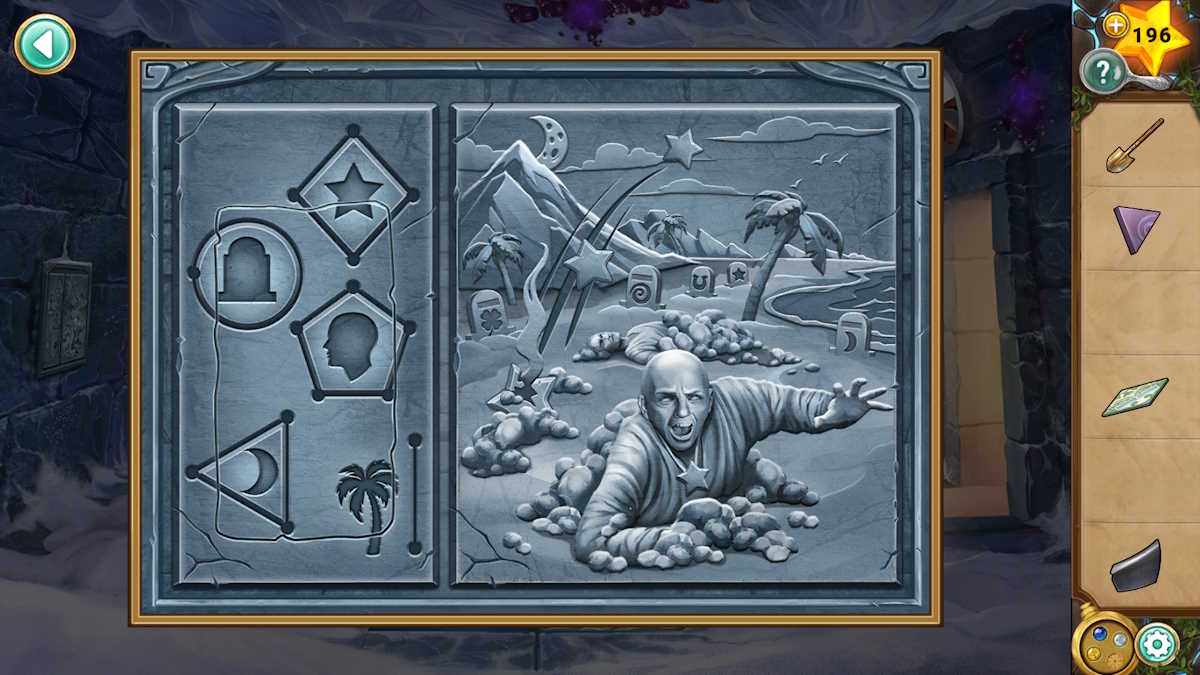
Add the mural brick to the mural (n5) to reveal the image above, noting the information it reveals (see above). Each object on the left has a number of points on the line around or next to it, while there is a varied number of each object pictured in the image to the right. Count the amount of each item, using the number of points to get the number order (graves, trees, moons, stars, people) to get the code 53252. Use this to open the chest (n6) to take a second Wind Emblem.
Add the floor tile to the rest on the floor (n4) to complete the pattern, raising the plinth on the left (n7). Use the white locket power to send it skyward, which knocks down a third Wind Emblem (n8) for you to collect. Head back to the first room, add the wind emblems to the door beneath the penguins (m9), and head through.
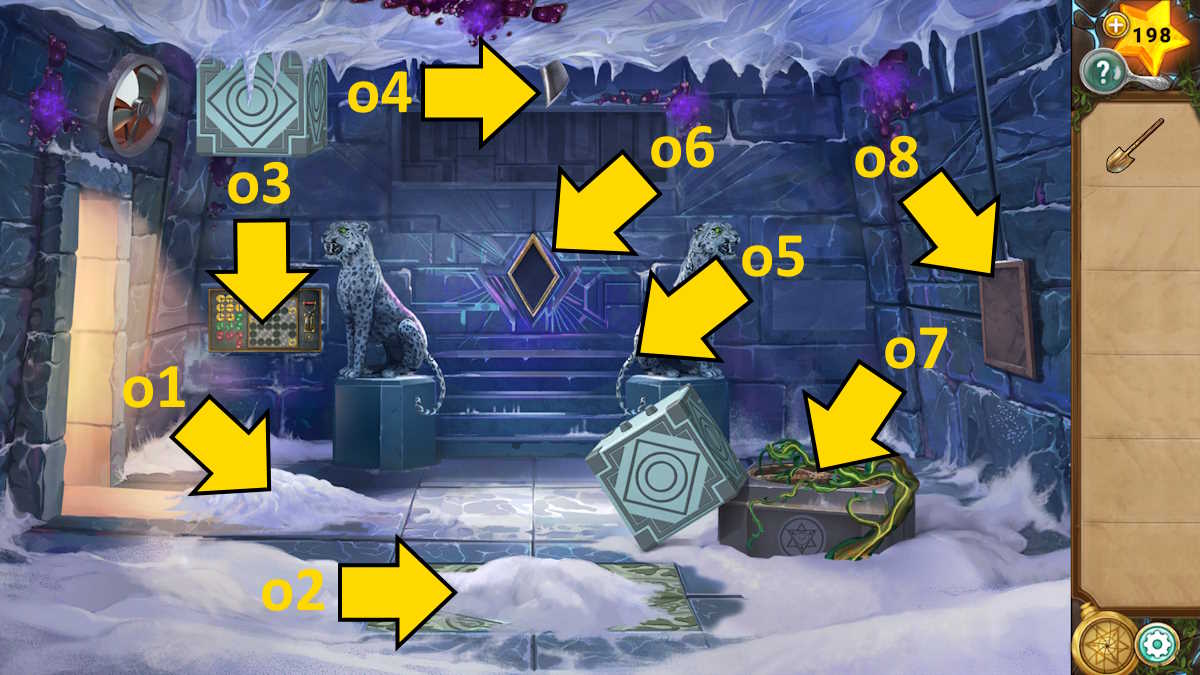
Use the shovel to find a Gaunltet on the left (o1) and a Mallet in the middle (o2) of the room. Now select the fusebox on the wall (o3) to start a power meter puzzle. You need to add tiles and then use the switch on the right to see if you’ve correctly filled the meter to the blue line. Once you do (see below), the cube on the ceiling will move across to the right, knocking down a Fan Blade (o4) for you to collect.

Use the mallet on the right leopard (o5) and you’ll collect a Leopard Tail. Head to the room on the left and add this tail to the leopard on the left, which opens a slot below it from where you can collect a Diamond. Take this to the room on the right, add it to the back wall (o6), and the window will open, allowing you to use the locket. The yellow power will get rid of the vines (o7), and then the blue locket power will cause a Penguin Statue will rise up in the water inside the fan.
Head back to the central room, add the penguin to those above the door (m9), and the fan above will work long enough to drop a third Fan Blade. Also, use the gauntlet on the purple curse by the left pillar to get a Sticky Curse. Add the three blades to the fan in the corner of the room on the left (n9), use the sticky curse to bind them in place, and pick up the Repaired Fan.
Solving the animal heights puzzle
Return to the room on the right and use the repaired fan to replace the broken one on the ground (o7). Click the block next to it to place it on the fan, and then use the while locket ability to fire it up. This opens a hatch to the right (o8), which has a bunch of animal figurines inside. The clue to solving this one is the height of the icicles in the window of this room. From left to right, you need:
- Top row: Deer, walrus, bear, wolf, penguin, seal
- Bottom row: Seal, penguin, wolf, walrus, bear, deer
Once you’ve moved the animals into the correct spots, you can take an Ancient Curcuit. Take this to the room on the left, add it to the wall (n10), and the block on the ceiling will move left to its original position. Use the white locket power to send the lower block up to the top one, revealing a panel where you can take a Stone Hand. Now use the blue locket power to run the water through this fan, taking a second Stone Hand when it rises to the top.
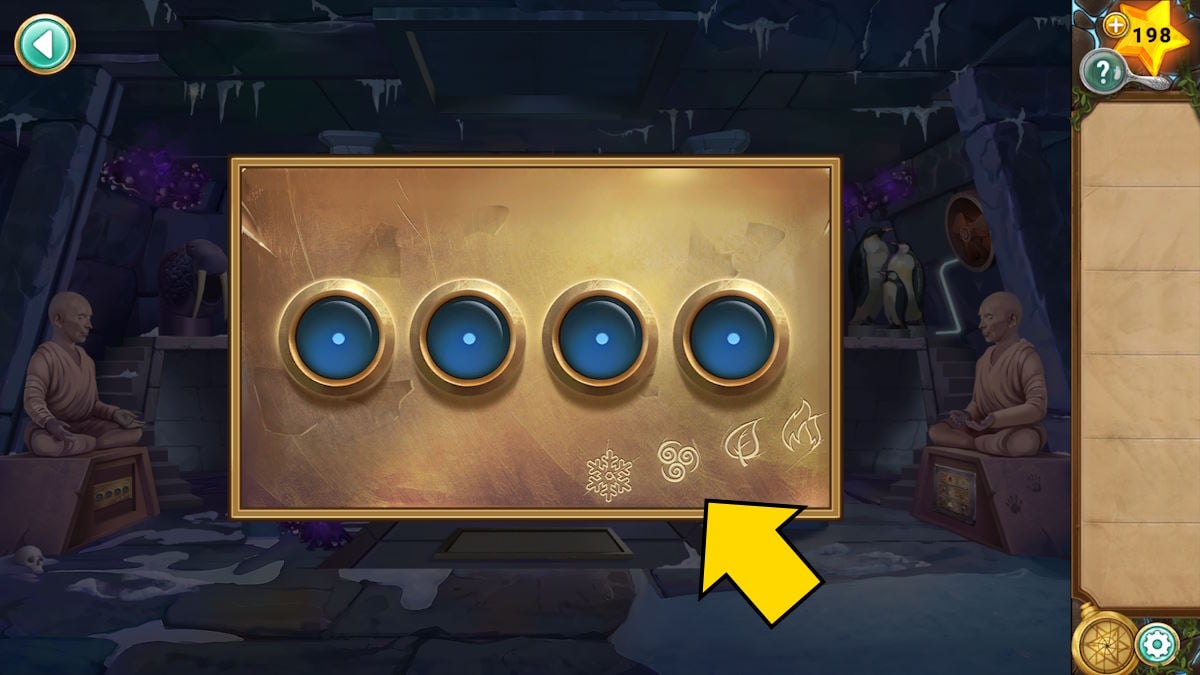
Back in the central room, you can add the two hands to the left statue, revealing a combination lock underneath. Note it has symbols for (from left) snow, wind, earth, and fire on it.
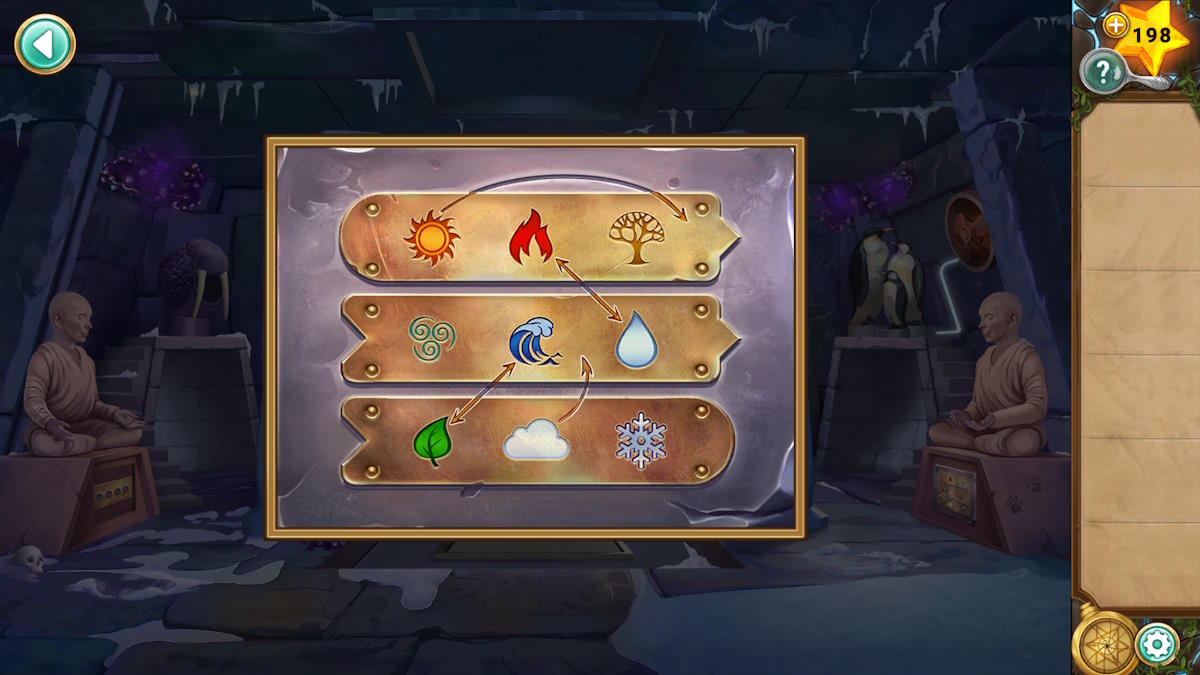
Now look back at the panel below the right statue, which will give you the clues you need to solve this puzzle. Snow is in the ‘9’ position, wind in ‘4’, earth should be in ‘5’ (if you follow the arrow), while fire should be at ‘7’ (it switches to 6 with water, but then is pushed ahead one by wind). This gives you the code 9457, so enter it below the left statue.
Entering the temple
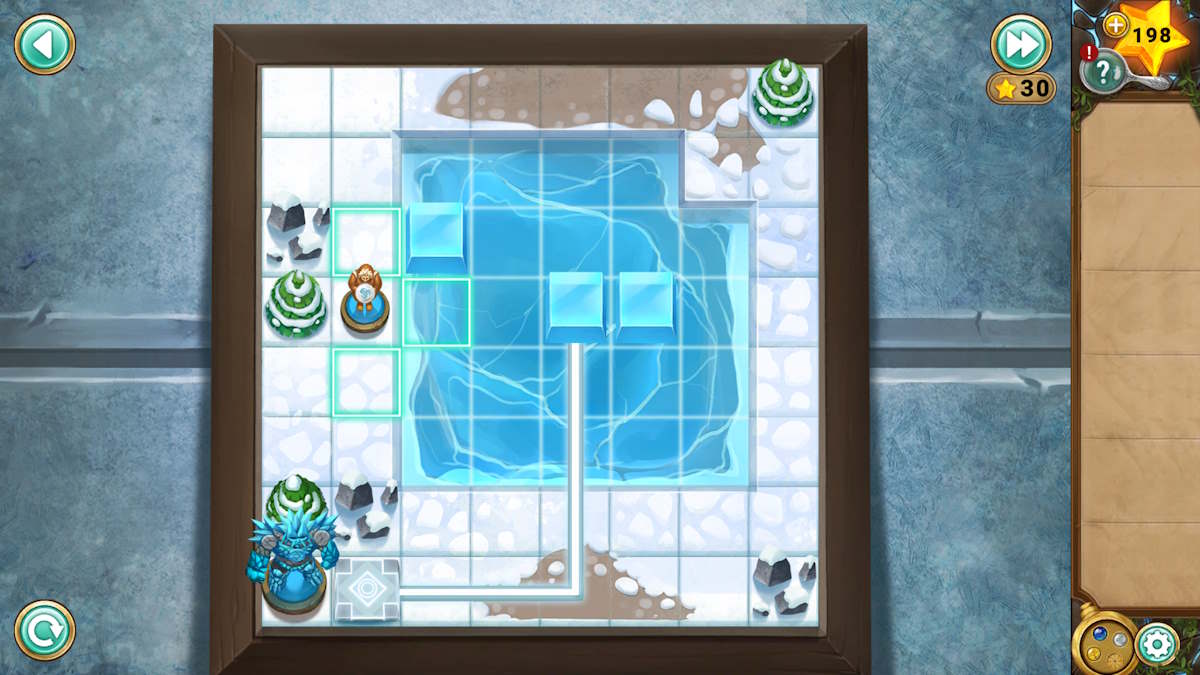
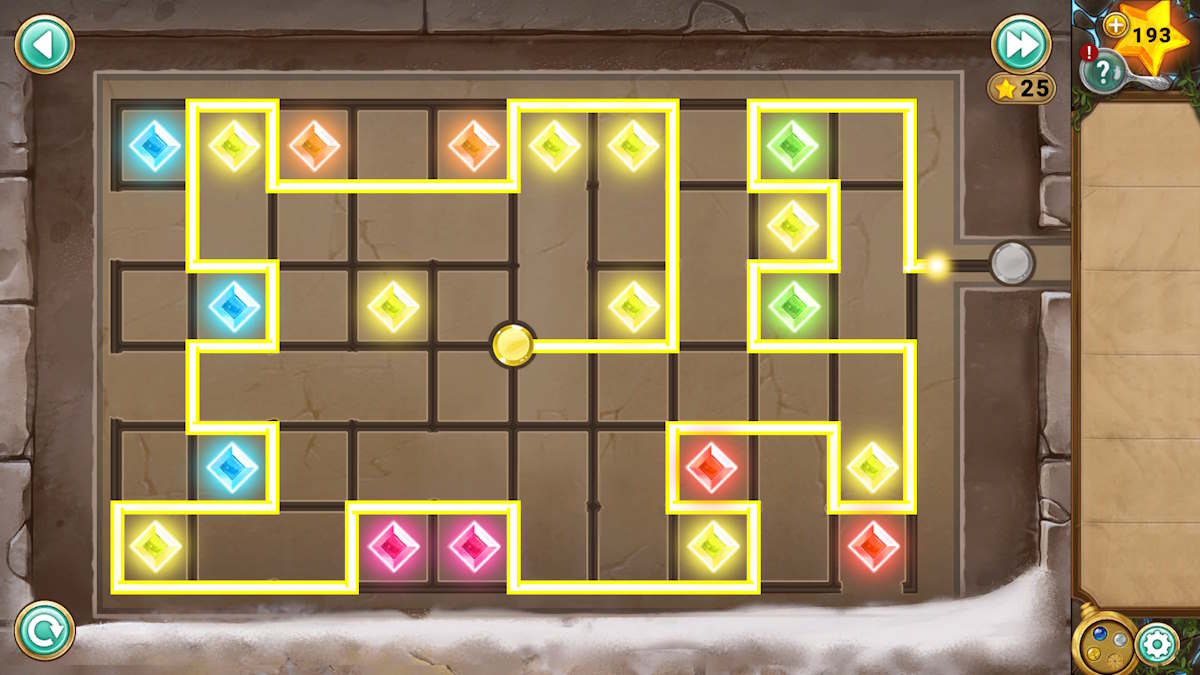
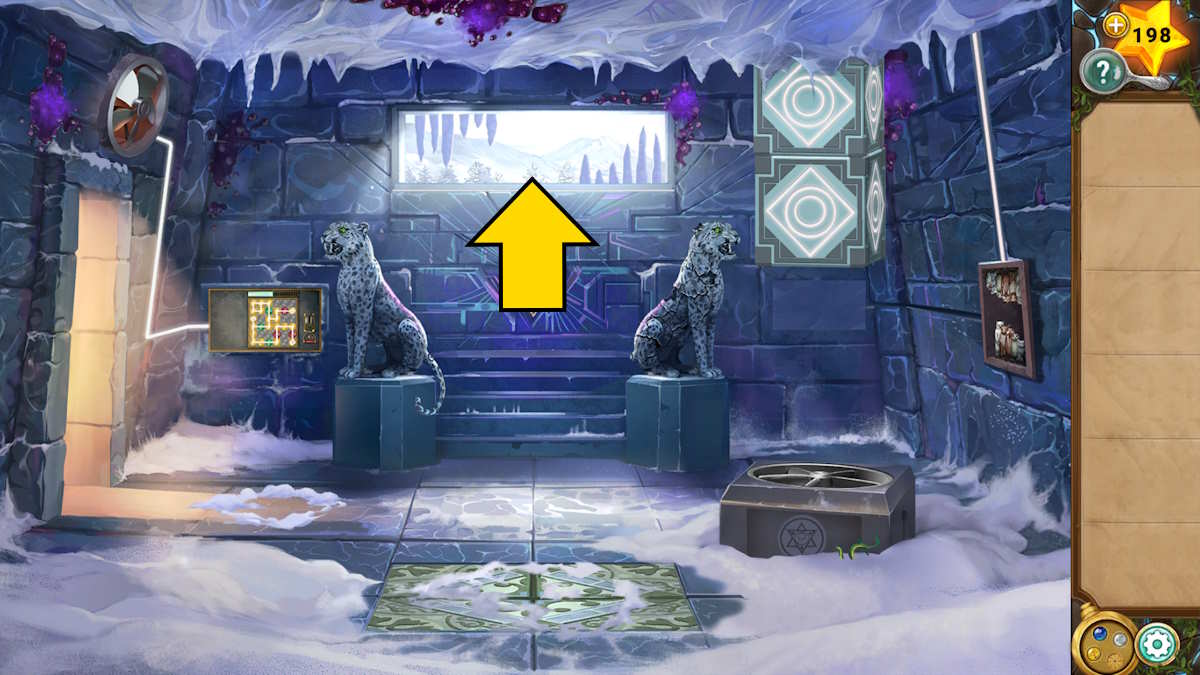
You can now use the locket in the central room of the temple. Use the white locket power on both sides to knock down and then collect the Villager and Glacius Figurines (m10 and m11). Add these to the game board that now rises in front of the central bear statue to begin the next board game puzzle. To get the villager to Glacius you need to get an ice block to the red spot in the center. To do so, do the following:
- Move the middle ice block to the bottom, then to the right, and then to the top-right
- Move the other two blocks to the bottom
- Of those two, move the one on the right to underneath the first block you moved (so there are two in the top-right corner on top of one another)
- Move the top-right block to the left, and then the bottom-left block up underneath it
- Now knock that block right, so it is next to the block on the right
- Knock the far right block down, left, up, and then right onto the red dot.
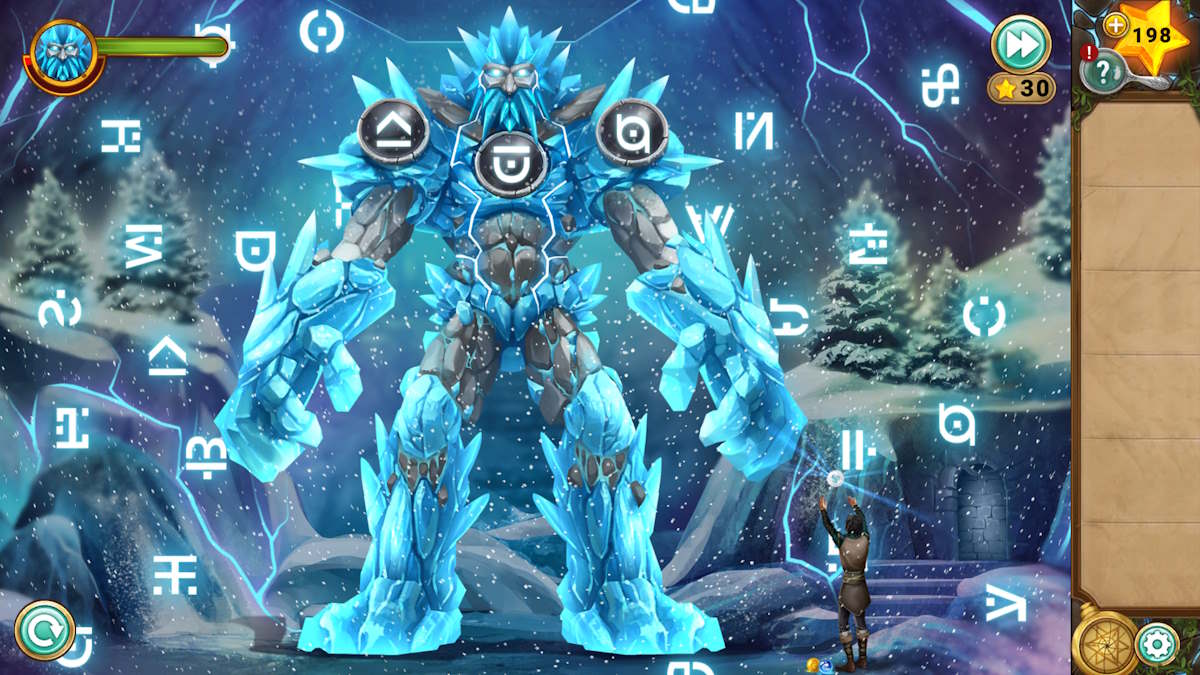
With that, you can move the villager to Gladius and complete the game. Use the white locket ability and the door will open, allowing you to move through to the golem and, of course, Milo. Once again the puzzle is largely the same but with the difficulty slightly raised, this time by having the symbols you’re trying to find also moving around. Once complete, you’ll be done with Chapter 6, despite passing out!
Legend of the Sacred Stones Chapter 7 walkthrough
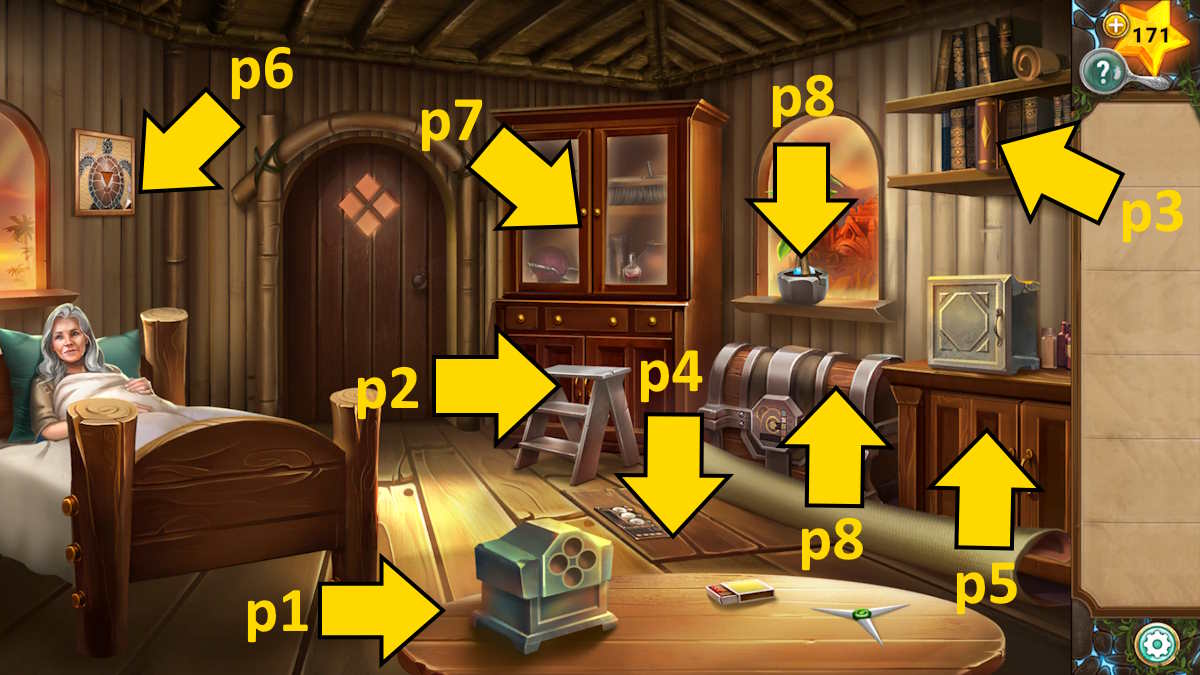
When you come to, you find yourself back at home with your parents. After speaking to your mother, pull back the rug to reveal the trapdoor entrance. Grab the Compass Hand and Matches from the table (p1), take the Step Ladder (p2), and open the book you looked at earlier (p3) to find a second Compass Hand.
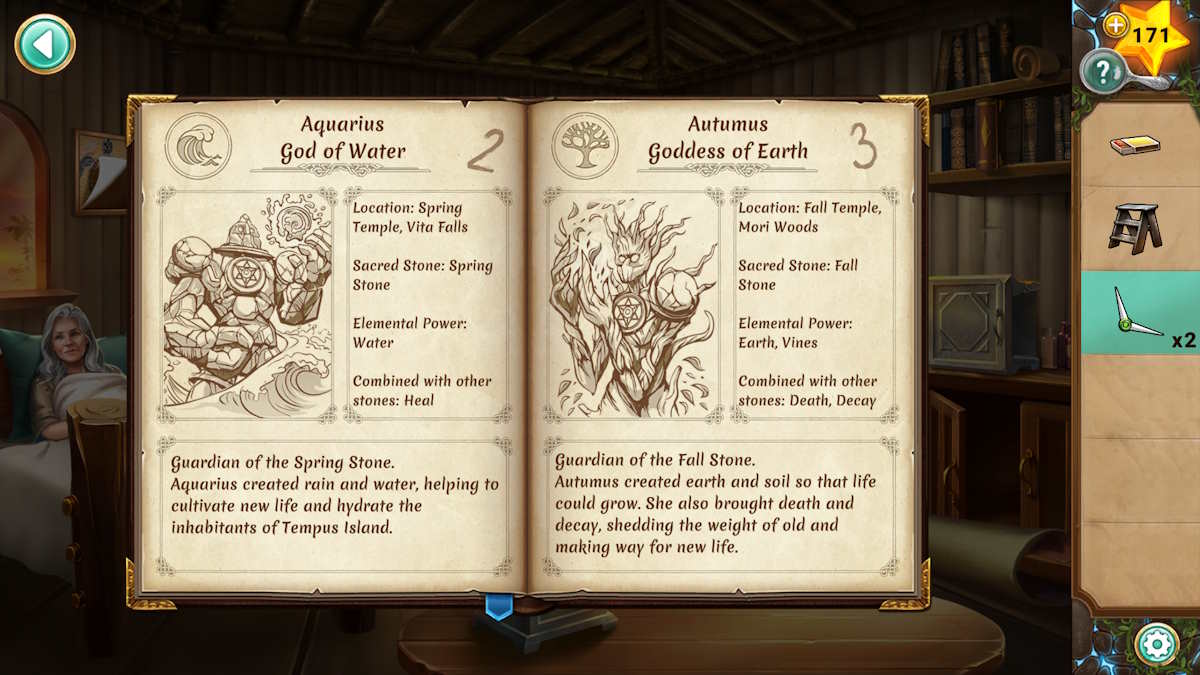
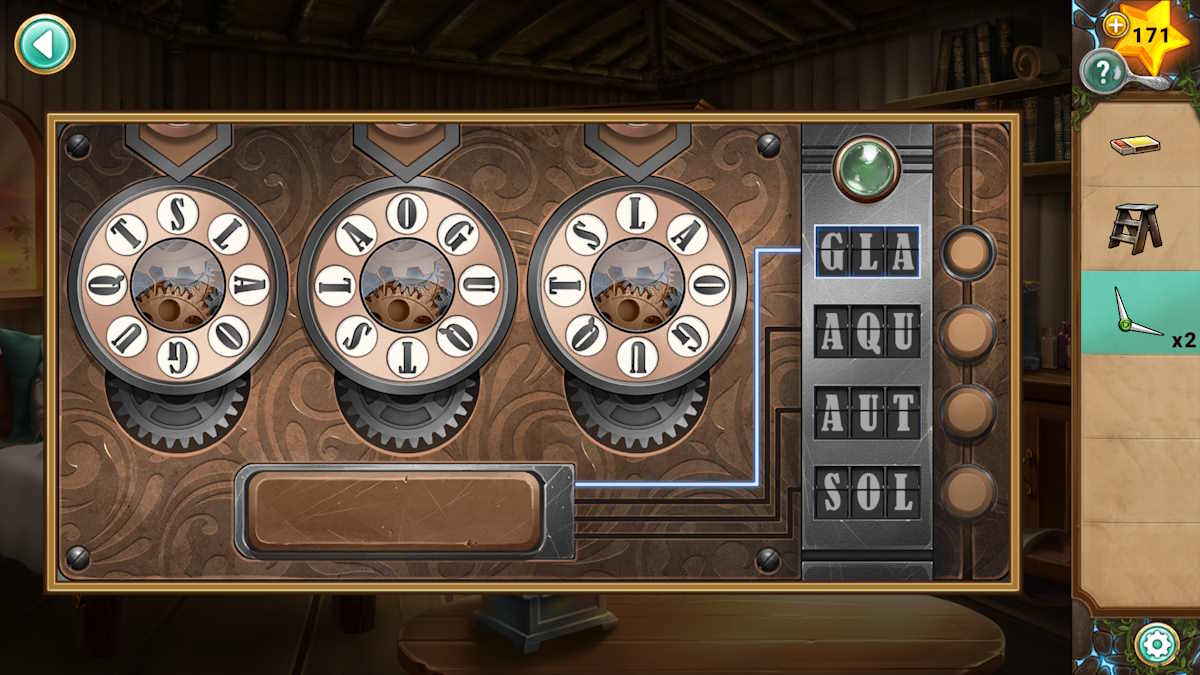
Look in the book and note down the first three letters of each of the gods: GLA (Glacius), AQU (Aquarius), AUT (Autumus), and SOL (Solaris). Select the trapdoor lock (p4) and enter these three-digit codes into the lock to open it and gain access to the basement.
Before grading down, take the Pry Bar from the cupboard (p5) and use it to open the box above it, taking the Tweezers and a Gemstone from inside. Use the tweezers to pull back the edge of the turtle painting (p6) to find a second Gemstone. You can add them to the remaining item on the table (p1), but you still need to find two more.
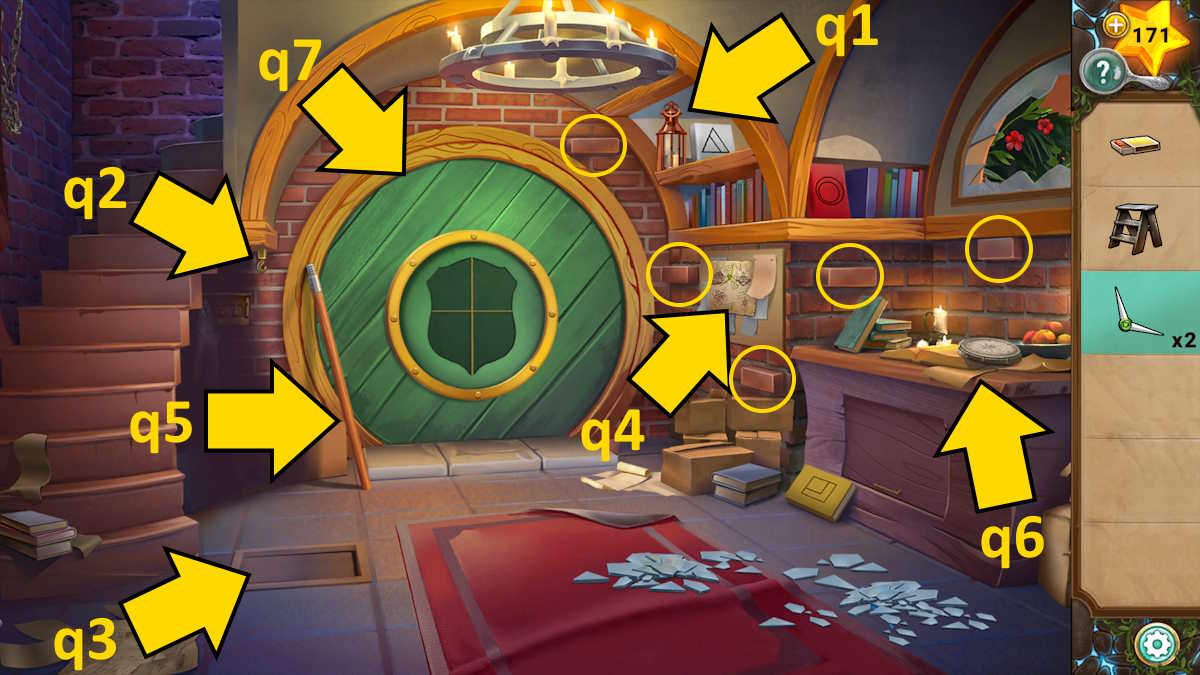
Go down into the basement and use the stepladder to get the Lantern (q1). Hang the lantern in the dark corner (q2) and use the matches to light it, taking the Family Crest and Journal you can now see there. You’ll also note that five bricks are pushed out a little from the wall (marked above), Push each in and a panel in the floor will open (q3), allowing you to take a third Gemstone.
Select the noticeboard next (q4) to find a third Compass Hand, while reading the note it is stuck to. Also, note that now the room is fully lit, you can see four colored books with shapes on the front (blue hexagons, white triangles, red circles, yellow squares).
Head back upstairs and give your mother the journal. After a long cut scene your father will give you the Cabinet Key, so use it to open the cabinet (p7) and take the Trowel and a Brush. Use the trowel on the pot plant (p8) to find a fourth Gemstone, and then add them all to the small chest on the table (p1) to find a second Family Crest inside.
Solving the compass puzzle

Add the brush to the pole leaning against the door (q5), and take the Broom. Now use it to clear up the debris on the red carpet hear, revealing a fourth Compass Hand and your third Family Crest. Add the hands to the compass on the desk (q6) and the door below it will open, revealing a combination lock.
Note the symbols match those of the books in the room, while the available combination numbers are I, V, and X. Look back at the completed compass (see above) on the table and match the hand colors with the book colors. For your starting point, use the green mark around the edge of the compass. So, for the top (triangle) line, you want the white hands (as it is a white book). Looking to start near the green line and go clockwise, the white hands are pointing to II, VI, and X. This gives you IIVIX for the top line. The rest are:
- Hexagon: VIIIX
- Square: IVVII
- Circle: IVXII

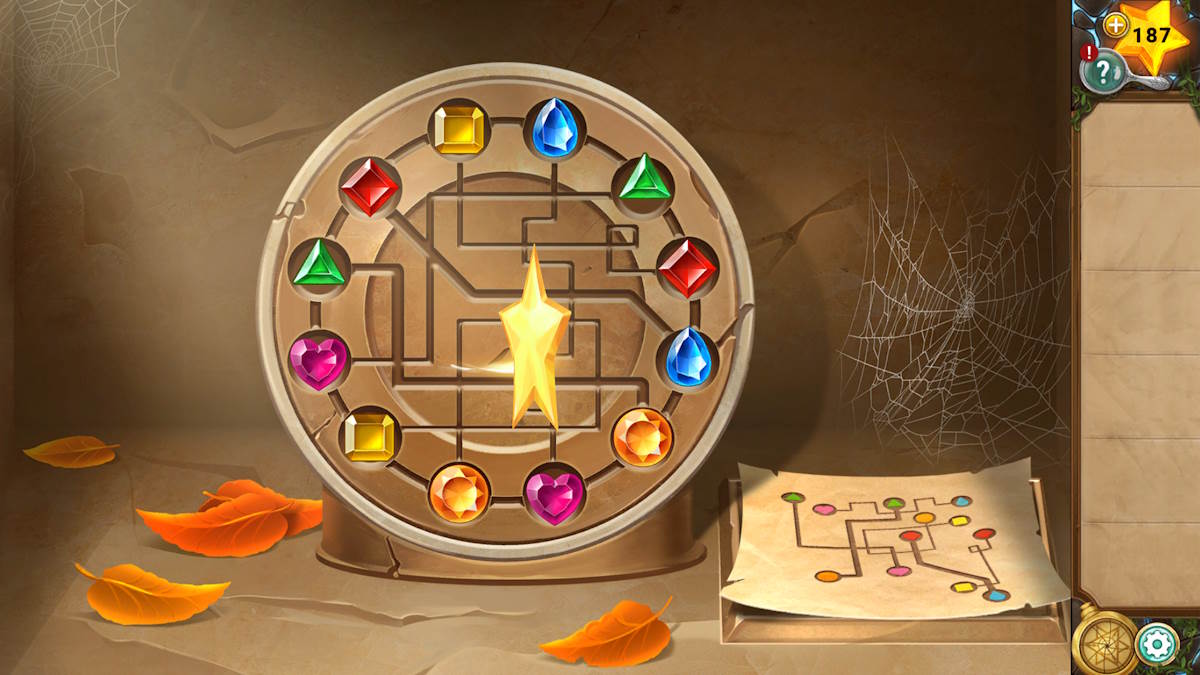
Once complete you can take the fourth and final Family Crest. Add these to the door here (q7) to reveal your next movement puzzle. Each of the colored balls needs to end up in a space of its own color and they can be switched sideways by using the empty space on the central dial (which can be turned with the green button in the middle). Once complete the door will open, allowing you entry to the secret passage.
The way to the temple
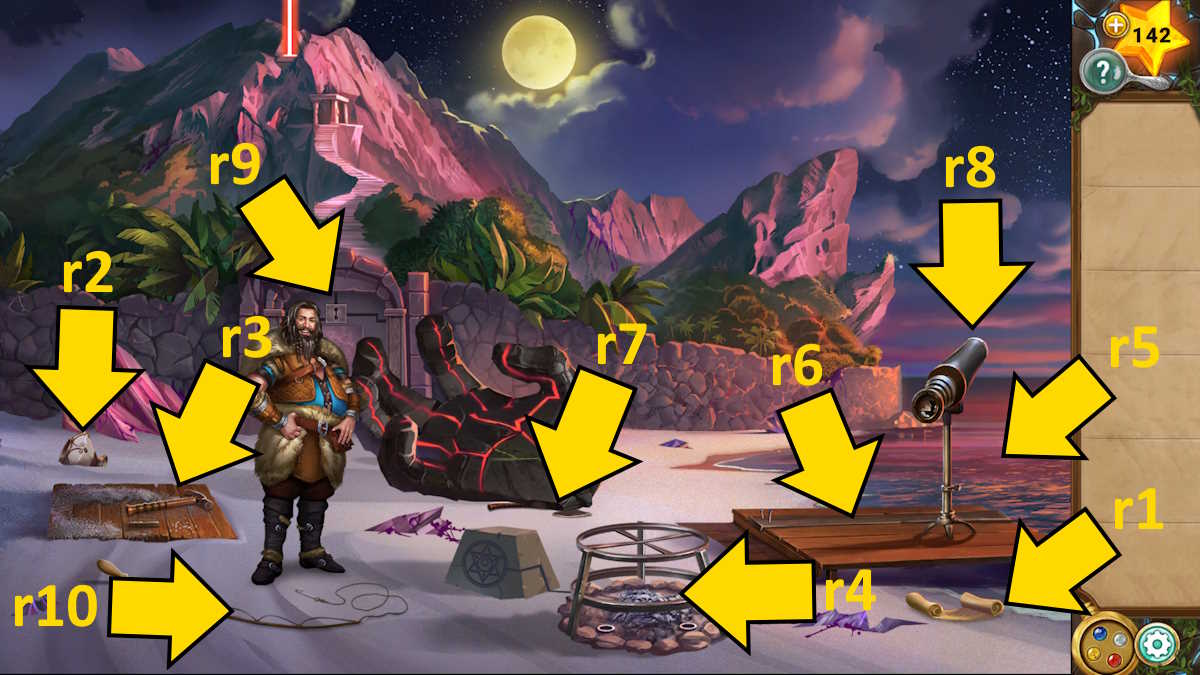
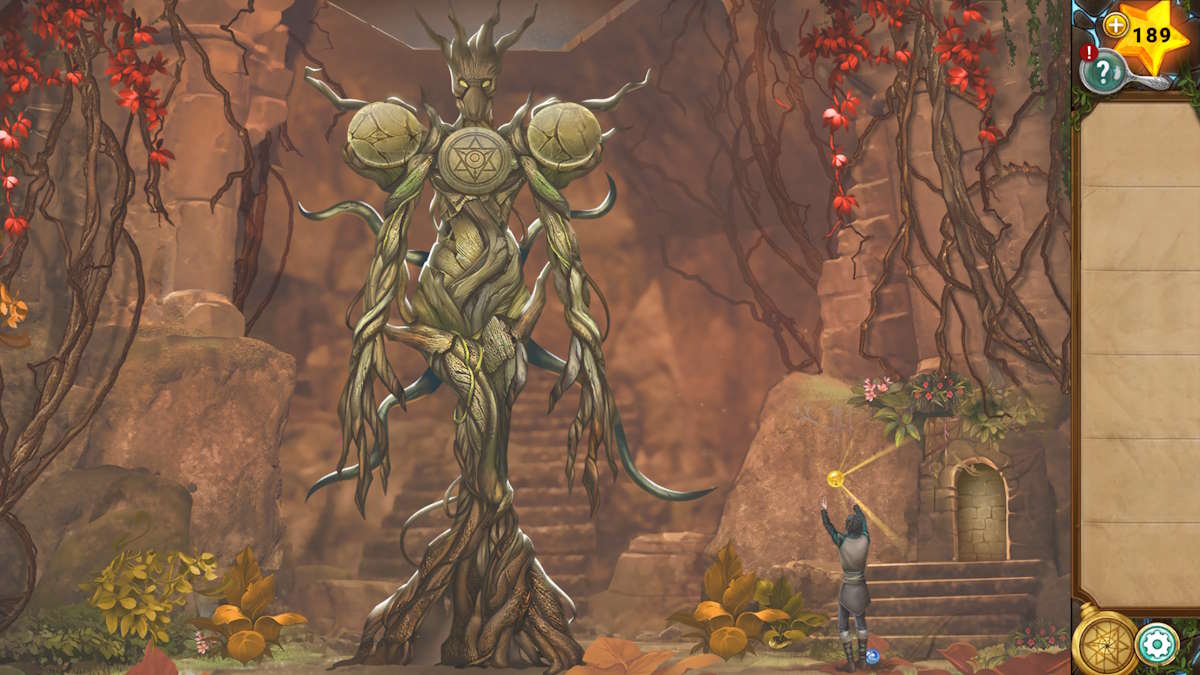
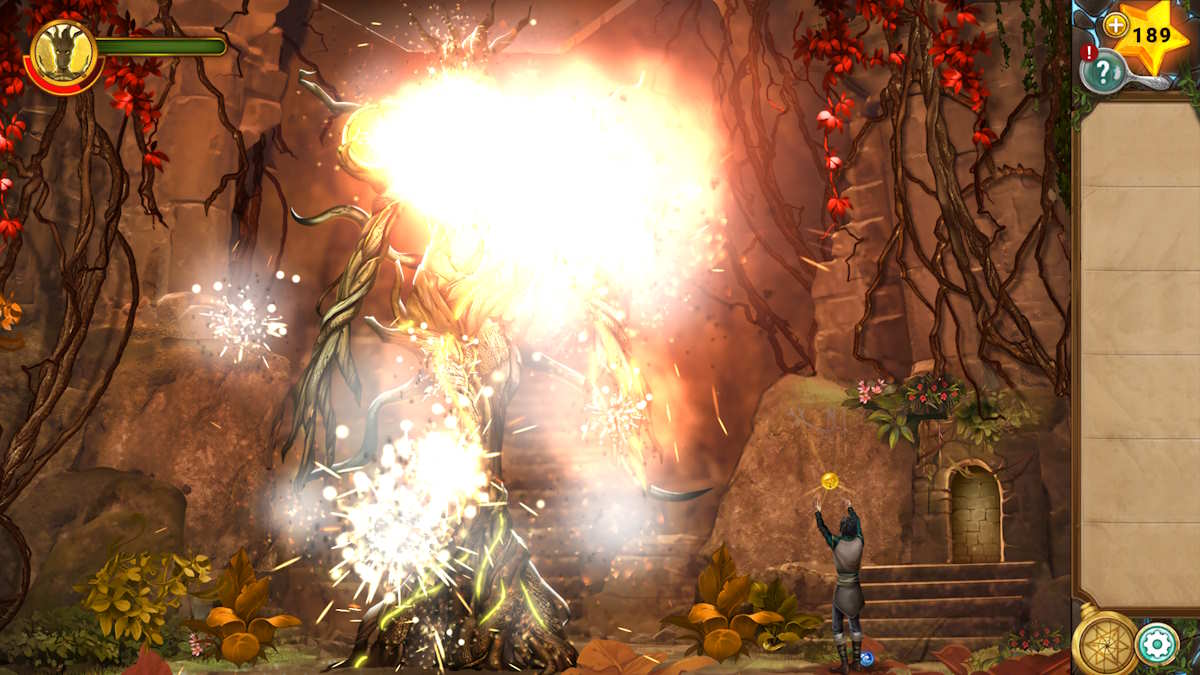
Once Siegfried has given you back the locket, you’ll also have access to its final (red) ability. Check out the scroll (r1, see below), grab the Crystal Bowl (r2) and the Hammer (r3), and then use the yellow power, followed by the red, to start a fire (r4).
Fill the bowl with water from the sea (r5) and then place it on top of the fire. When the water changes color, use the blue ability to put out the fire and take the Water Bowl.
Use the hammer to remove a Wooden Plank (r6), place it under the edge of the giant hand (r7), and then ask Siegried to help you get the Axe from underneath it. Use the axe to smash the hatch open (r3) to find the Sun Key and a Lens. Add the lens to the telescope (r8) and then use it to begin a magnification puzzle (see the focused image below).
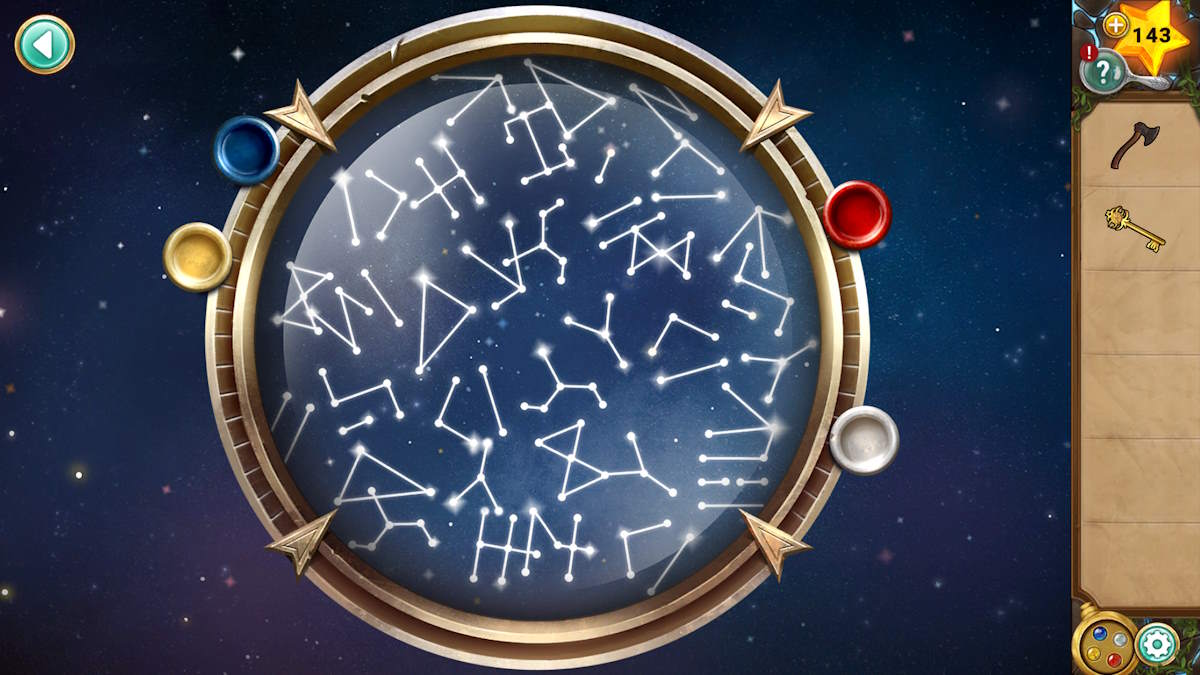
Now select the temple door (r9) for a close-up, use the sun key on it to reveal a locket symbol, and activate it with your red locket ability. You can now complete the scroll you saw earlier by finding those constellations by looking through the telescope and noting the number of times each space is visible.
You’ll find it is 32454, so click that button (left to right, see above) on each line to complete the puzzle. Click the doorway to head through.
The temple entrance offerings
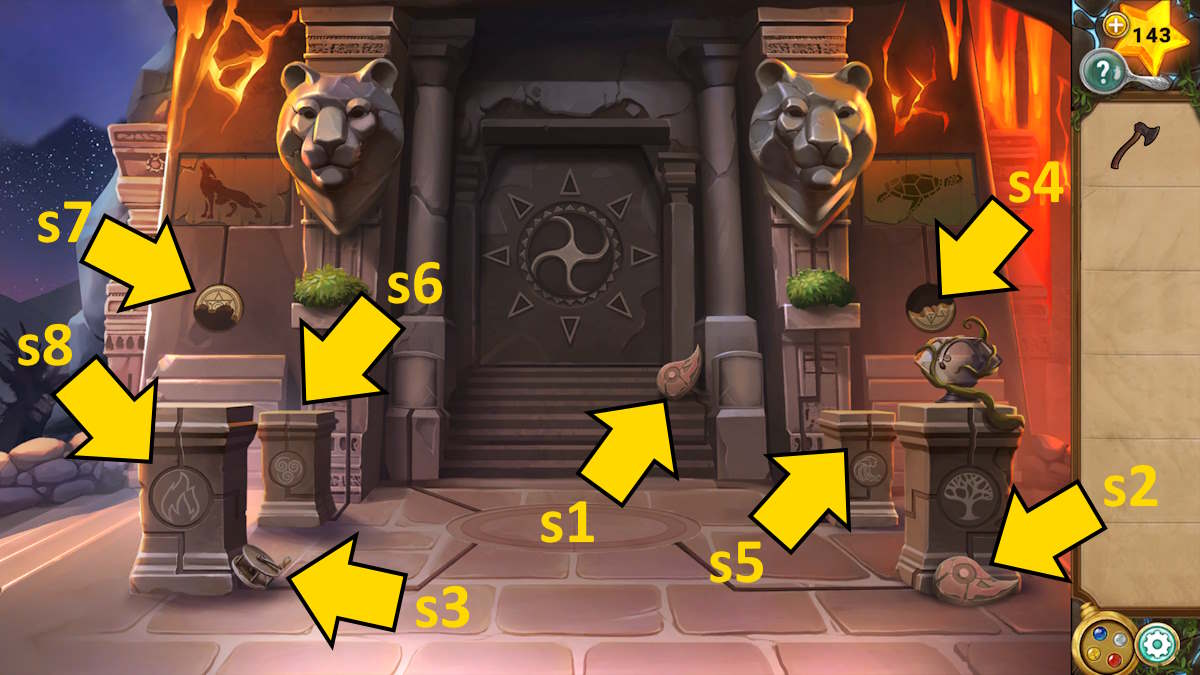
Pick up the two Summer Pendants (s1 and s2) and the Fishing Reel (s3) before heading back to the beach. Use the reel on the rod (r10) to get a Fishing Rod and then use it in the sea (r5) to ‘catch’ a Stone Slab. You can now move back upstairs and fix the slab on the right (s4), after which you can use the locket’s blue ability to open the turtle picture above it to find a third Summer Pendant.
If you click the text where you found the third pendant, it says you need to offer water untainted by the sea’s minerals. Place the water bowl on the water pedestal (s5) and it will trigger the right lion’s head, allowing you to take a second Crystal Bowl from where the bush was below it previously.
Repeat the trick with the bowl on the but this time additionally use the white power after you’ve put the fire out with the blue power, taking an Ice Bowl instead. Place this on the wind pedestal (s6) and you’ll light up the left lion, allowing you to grab a third Crystal Bowl.
This time when you return to the beach, Ollie is waiting for you. After a brief chat, he gives you a Stone Slab. Using it allows you to complete the image to the left of the temple doors (s7). Once you do, use the yellow locket ability to open it up and take some Gloves. This time the message asks for ashes from the tree of life. Now use your bowl on the urn here to get a Bowl of Ashes.
Place the bowl of ashes on the fire on the beach and this time, while the fire still burns, use the gloves to take the Fire Bowl. Take this up to the temple entrance, place it on the fire pedestal (s8), and the ground will open up in the middle of the path.
Solving the pilar puzzles
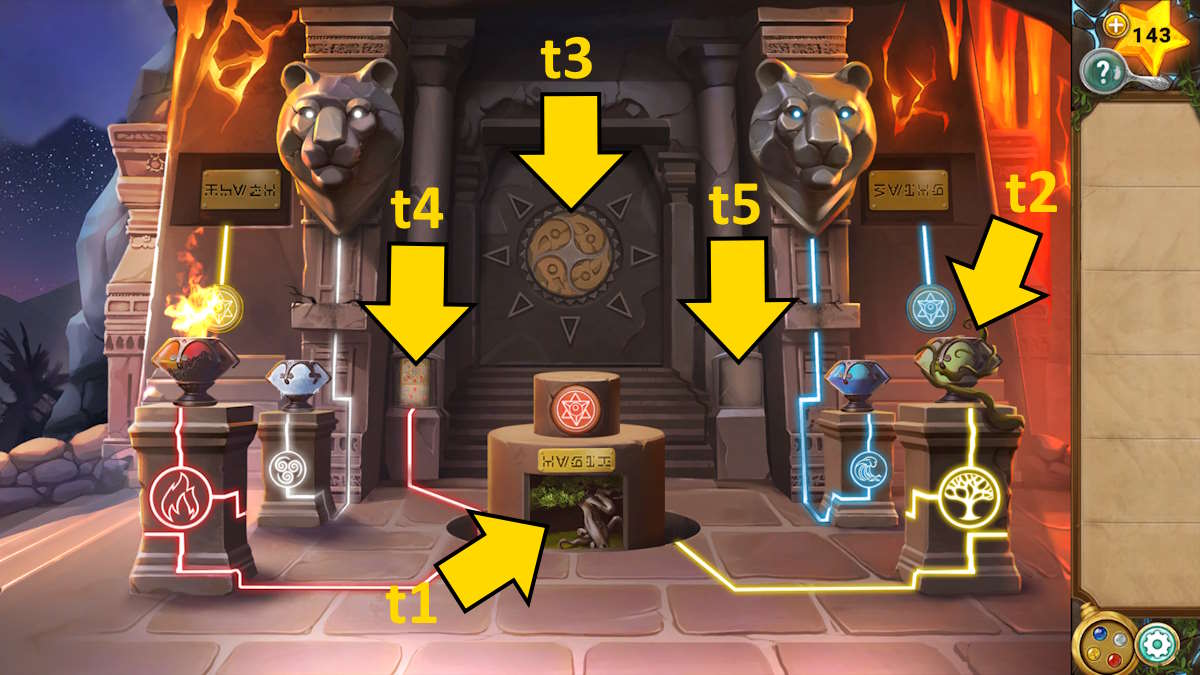
Take the fourth Summer Pendant (t1) and use the axe to chop the root inside to gain a Sacred Root. The plaque here says to offer the root as a sacrifice, so place it in the earth bowl (t2) to complete the sacrifices.
You can now add the four pendant pieces to the door (t3) and use the fire ability on the central symbol to open - you guessed it - the left-side pillar (t4). This is a light beam puzzle, where you need to angle each object to light all the crystals. When you have finished red, the white, blue, and yellow beams will become available.
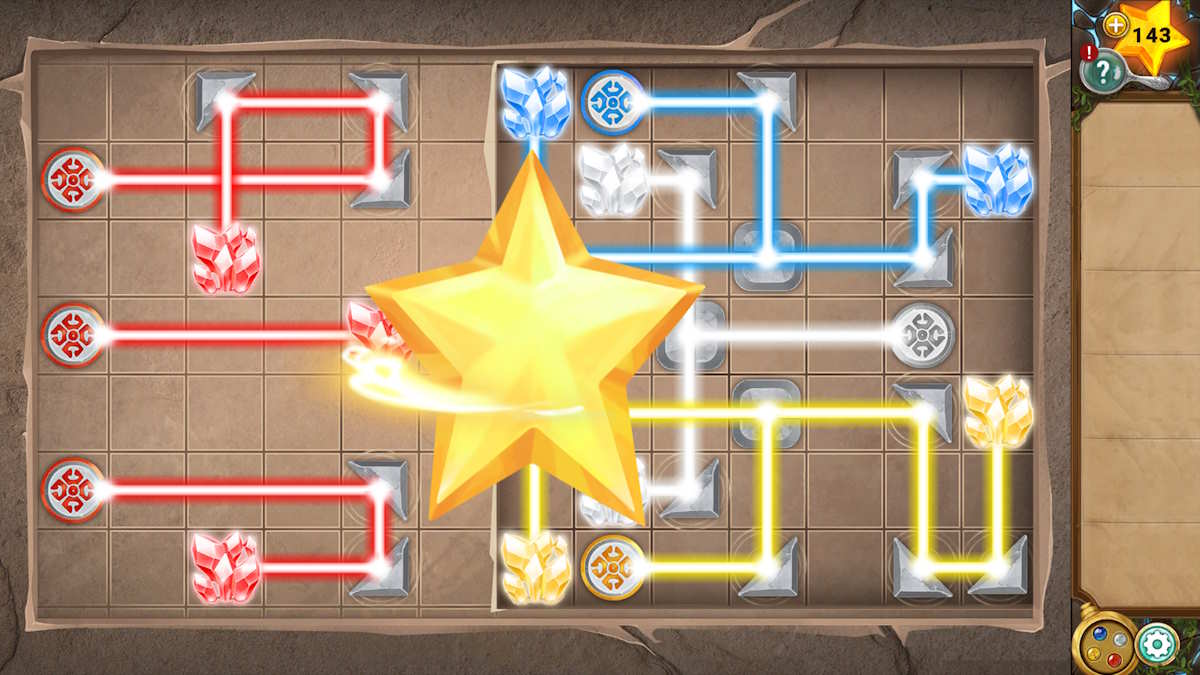
Once those are complete, the right-side pillar puzzle (t5) offers a similar but more complex challenge. It’s not bad though; just concentrate on one color at a time and you’ll soon be done. If you’re stuck, the solution is below. I found it easier to complete red last, as it's the brightest color and its lines run over the others, making it easier to see.
Once you’re done, your father will give you one final pep talk before you head into the final temple, towards the final chapter, and complete Chapter 7.
Legend of the Sacred Stones Chapter 8 walkthrough
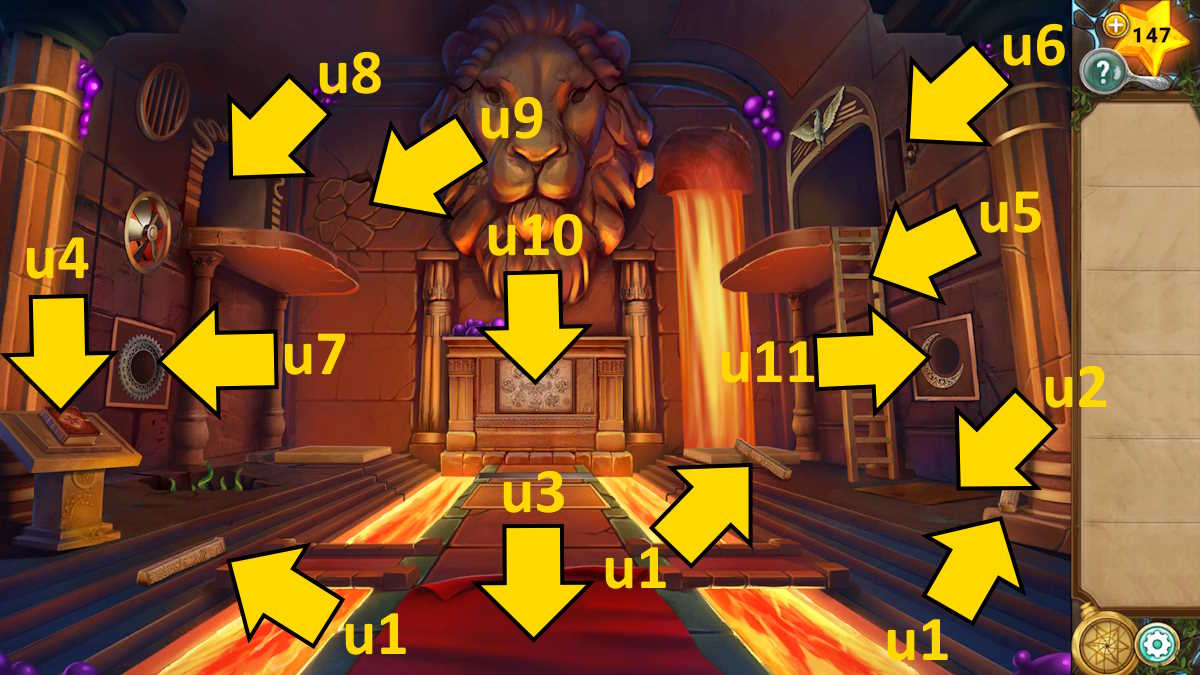
Once Milo retreats into the temple, pick up the three Ladder Steps (u1) and open the hatch (u2) to find a Star Shard. Pull back the rug (u3) to find a fourth Ladder Step, take the Phoenix Key from the book (u4), and then add the steps to the ladder (u5) and climb up to the room above.
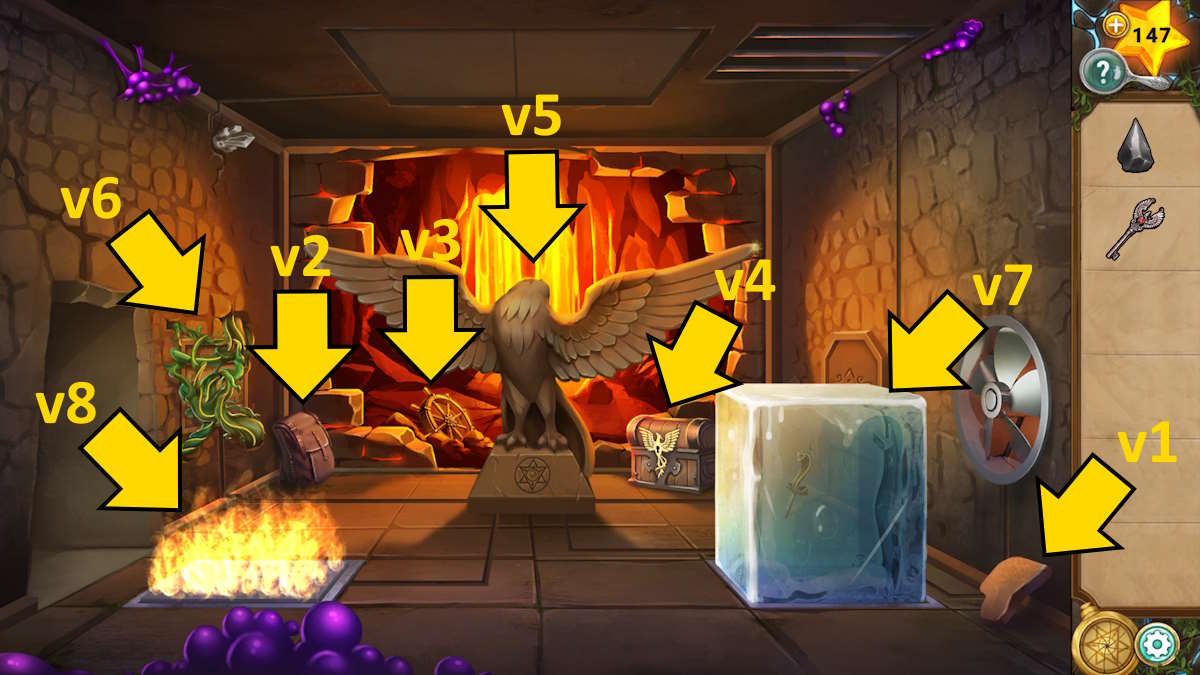
Pick up the Stone Scale (v1), take a Star Shard from the backpack (v2), grab the Wheel (v3), and use the key to open the chest (v4) to find a Sun Stone. Head downstairs, add the wheel to the right wall (u6) to open the ceiling, and then use the sunstone on the hole in the left wall (u7) to reveal a locket pattern. You can now use the yellow locket power to make the roots grow up to the left balcony (u8), gaining you access to another room.

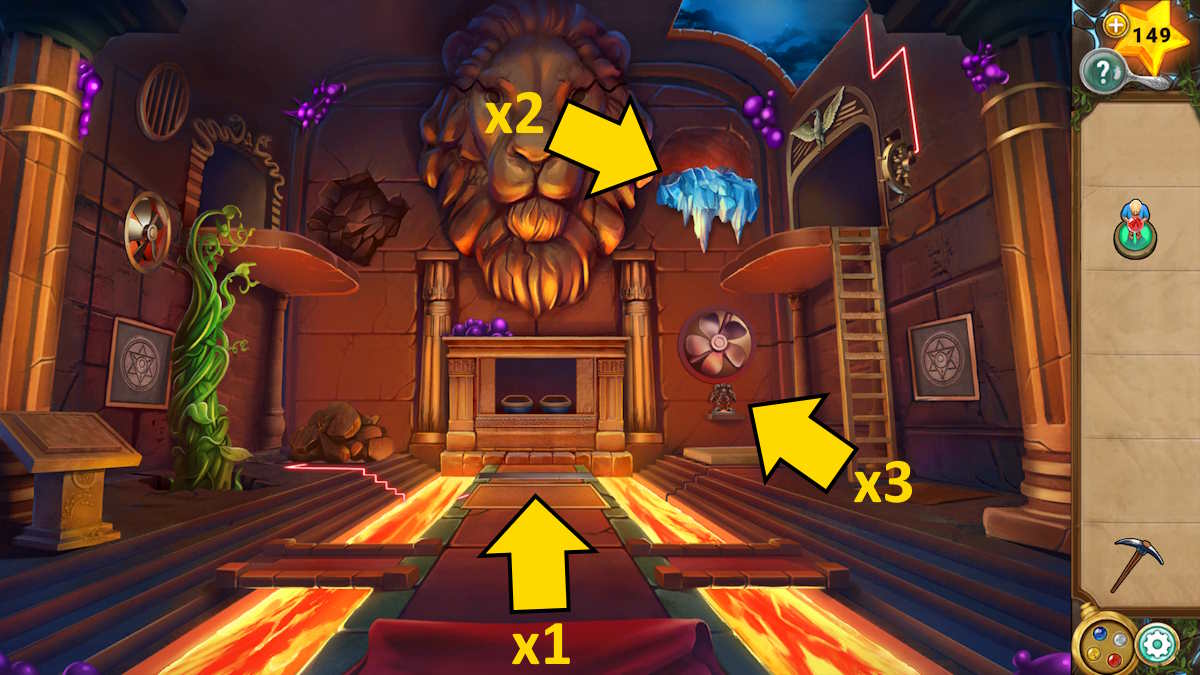
Climb the vines and head into the snake room. Use the blue locket power on the left trigger (w1) to put the fire out, allowing you to take the Phoenix Head from the chest (w2). Use the earth power on the right marker; growing a vine up past the door so you can take the Villager Figurine (w3). Now use the red ability on both sides, stopping the lava flow and allowing you to take a third Star Shard and a second Stone Scale from the revealed niches. You’ll need to trigger the yellow ability again to destroy the vine so you can leave the room.
Return to the phoenix room on the right side and add the head to the phoenix statue (v5), opening the ceiling here too so you can use the locket. Use the yellow ability to remove the vines from the wall (v6), revealing a puzzle; then use the white ability to blow the ice cube (v7) across to the fire (v8), melting it. Now use the red ability to put out the fire by the door (v7), revealing a solid plate underneath, and taking the Snake Key.
How to use the sun lens
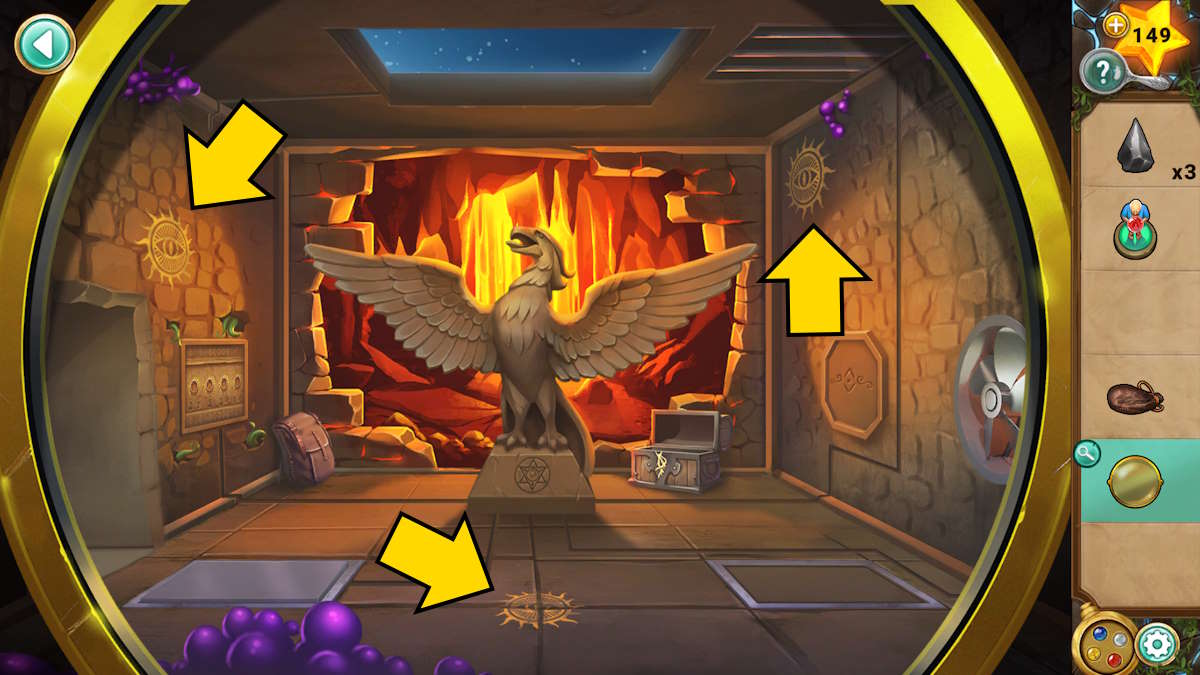
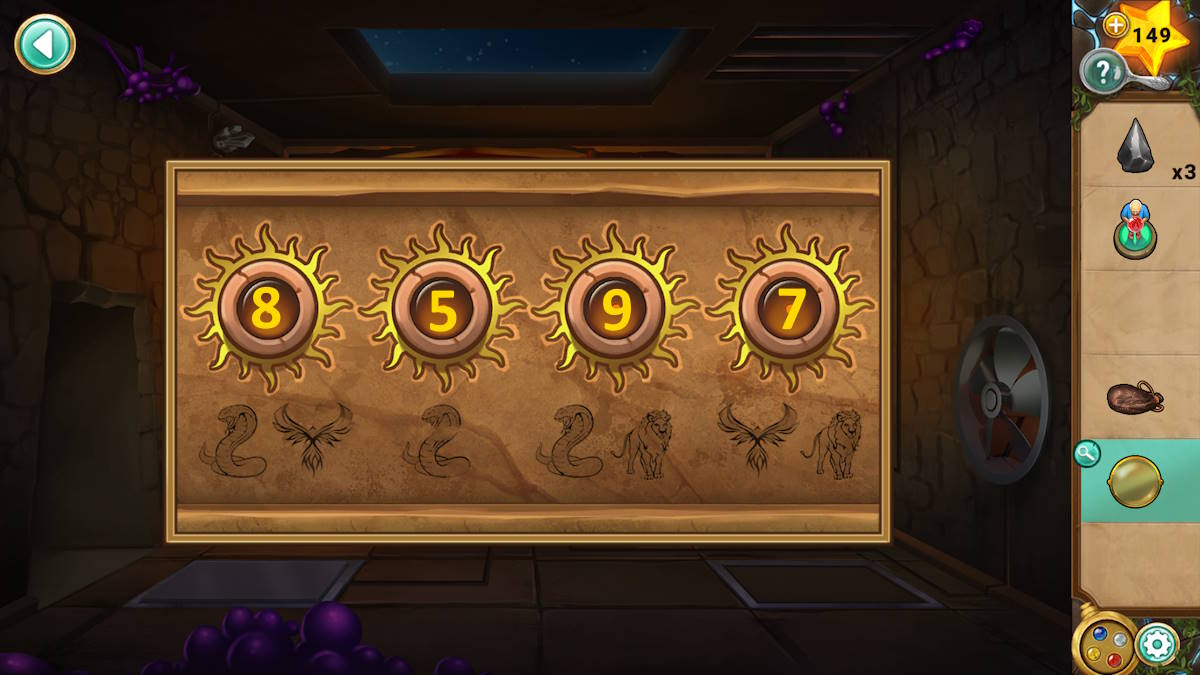
Head into the snake room and use the key to open the snake chest (w4) to get the Sun Lens and some Gunpowder. Activate the sun lens in your inventory to note that five suns become visible that you couldn’t see before. Go down into the lion room and use the lens again, noting there are four suns, and then again in the phoenix room where you’ll find three suns (see the example above).
Select the panel on the puzzle wall here (v6) and note the images below each circle. Add the number of suns for each animal to get the code 8597. The hatch opens to reveal a level, so pull it. A box appears where the ice cube used to be. You now need to use the locket once more:
- Use the blue power: Fill the box with water
- Use the white power: Fill the box with ice
- Pull the lever again to remove the box, leaving a new ice cube
- Make sure there’s no fire on the left panel
- Use the white power to blow the ice cube across, which this time triggers the floor panel.
This opens the hatch on the right wall (v7), allowing you to take some Shears. You can also click the barrel here and add your explosives, but you need more components. Return to the snake room and use the shears to cut the Rope (w5). Go back and add the rope and gunpowder to the barrel close-up; click the gunpowder again to place it in the barrel; add the lid; then add the rope to get an Explosive.

Place the explosive on the left balcony of the lion room, next to the weak wall (u9), and then activate the red locket ability to burn the vine and blow a hole in the wall. You’ll then need to activate the blue ability to put out the fire and grow a new vine with the yellow ability before you can collect the Pickaxe and the Star Pendant.
Use the star pendant to open the book (u4) and open it to find a God Tile. Also, note that the book details positional details of where and how the gods acted, which will act as a clue in a little while (luckily you can take the Book with you now).
Add the god tile to the mural beneath the lion’s head (u10) and arrange the god tiles in the correct order using the book clues (see above. Once done, take the fourth Star Shard and final Stone Scale from behind the mural.
Completing the star shard puzzle
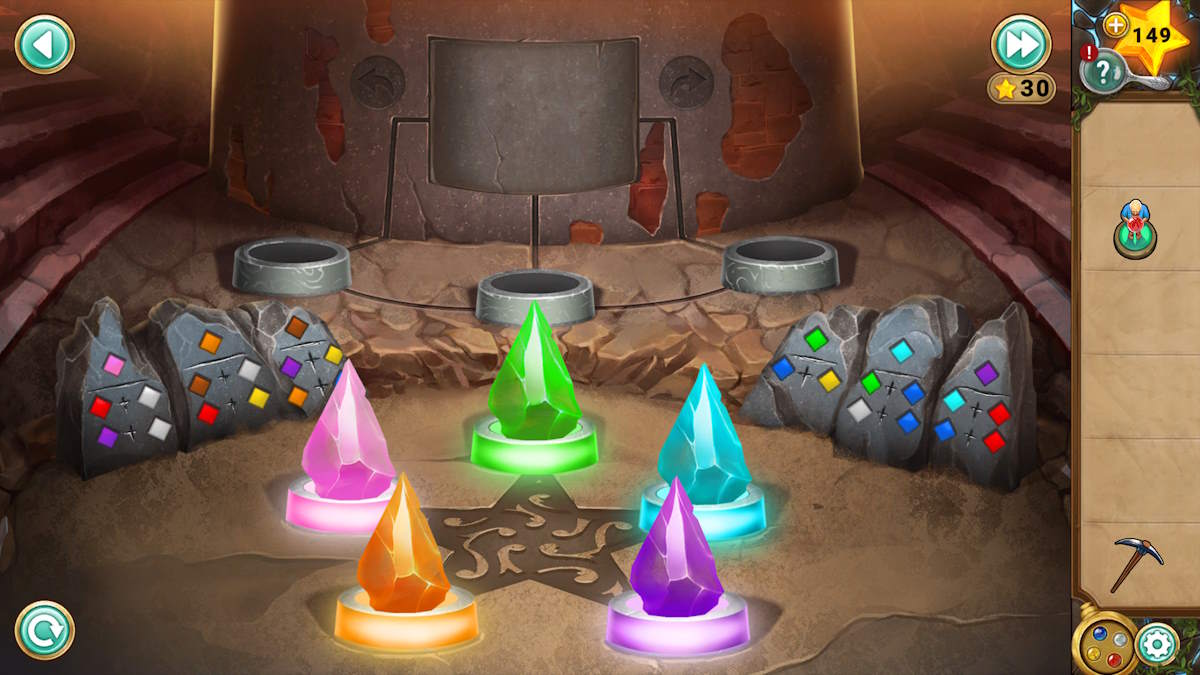
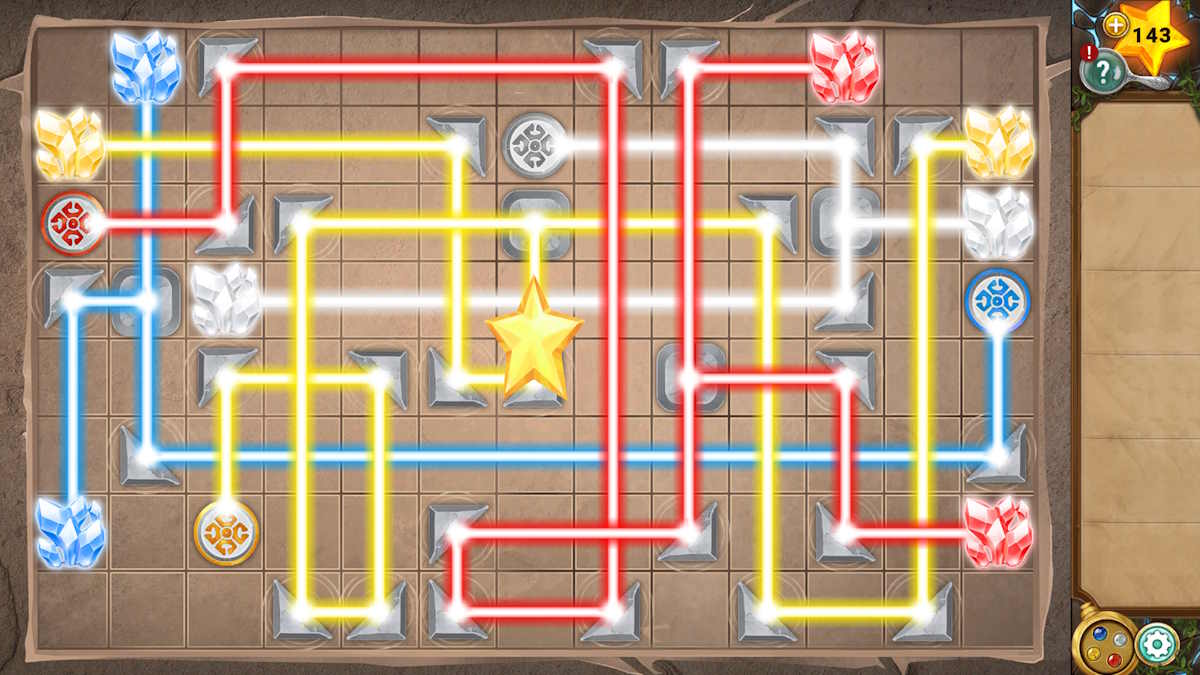
Add the stone scales to the snake (w6) and a moat will appear around it. Click it to reveal another puzzle and add the five star shards to it to begin. You need to move two or three of the shards into the pots at the back to open the panel, revealing a locket pattern. You can then use the locket to change the color of the shards, with the aim being to change the shards to the colors they’re sitting in (orange, pink, green, pale blue, and purple).
The stones around the edge show how to create each of the colors, as each shows what color the shard needs to be and which locket power will combine with it to make the color at the top. If a shard is in its original grey, it will turn to the color of the power you use. So, if you put a grey and a blue shard up and use the white locket ability, you’ll end up with a white shard (from the grey) and a light blue shard (from the blue one).
It’s a clever puzzle, if a bit fiddly, so if you want a simple solution follow this pattern (shards numbered 1-5 from bottom left clockwise to bottom right):
- Shards 1,4 and 5: blue ability
- Shards 2,3, and 5: red ability (five complete as purple)
- Shards 2 and 4: yellow ability (this makes orange and green, so place them back on 1 and 3 to complete them)
- Shards 1 and 3 (which were red and blue): white ability
Once complete, the snake statue will drop the Moon Stone. Place this in the righthand wall of the lion room (u11) and then use the locket trigger that appears to use your white ability. This freezes the lava, allowing you to collect the Solaris Figure (x1). Finally, you can use the pickaxe on the ice you’ve just created (x2) to knock it down, triggering the floor pad below and revealing the final board game (at x3).
Completing the Solaris board game
Add the Solaris and villager figures to the board game to begin. This time you need to push the colored blocks onto their matching buttons to create a path from the villager to Solaris. This time blocks pushed only move one space, but you need to be careful not to block yourself in, or leave a block against a wall where you can’t get the right side to push it. If you’re stuck, follow these instructions:
- Move the orange block to point A
- Move the yellow block to point B
- Push the red block onto its button
- Push the purple block onto its button
- Push the light blue block to point C
- Push the yellow block onto its button
- Push the white block to point D
- Push the dark blue block onto its button
- Push the light blue block onto its button
- Push the white block onto its button (through its initial start point)
- Push the orange block onto its button
- Push the green block onto its button
Use the red locket ability on the trigger that appears beneath the board game and the lion’s mouth will open, giving you access to the final confrontation with Milo! Unfortunately, he isn’t listening to reason, so you’ll have to take on Solaris. I thought that this time was actually a little easier than the previous one. The symbols blink in and out of sight, but at least they don’t move around!
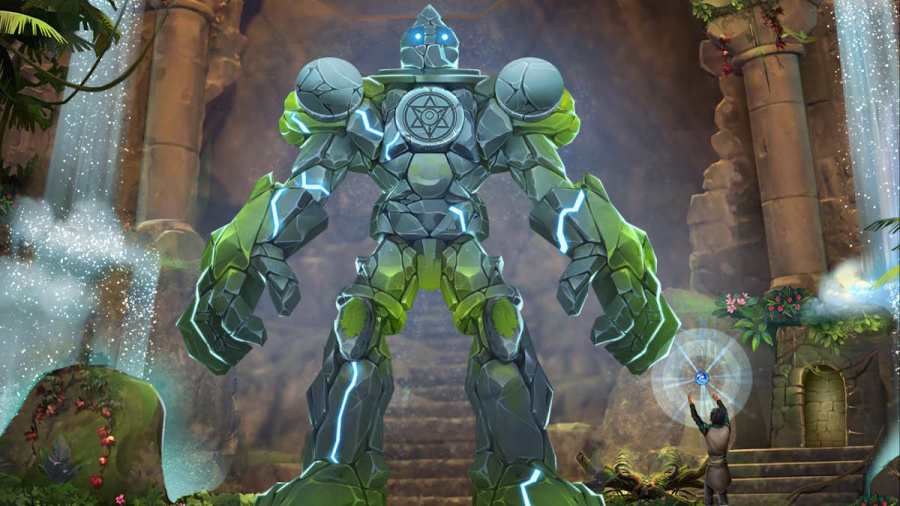
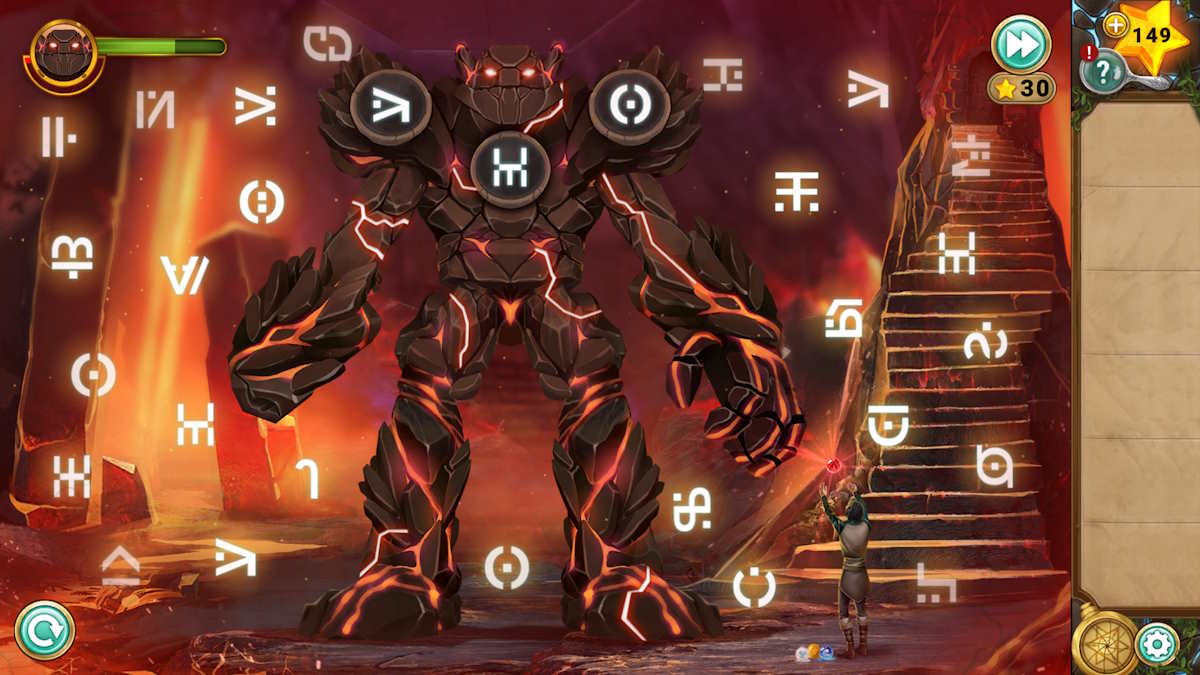
However, Milo isn’t giving up that easily! Once you’ve spoken to Solaris the battle now moves outside and is once again timed; but it doesn’t begin until you pick up the book (marked above).
You must use the book to watch his pattern of spells and select the right one to counter within the book. If you get this right five times you’ll be victorious, but if you take too long to make a decision, he’ll damage you. As always, you can keep trying until you defeat him, or use stars to skip the battle.
However, from my experience, it seems as if Milo’s attack follows the same pattern each time: water, fire, earth, wind, and then earth again (so blue, red, yellow, white, yellow).
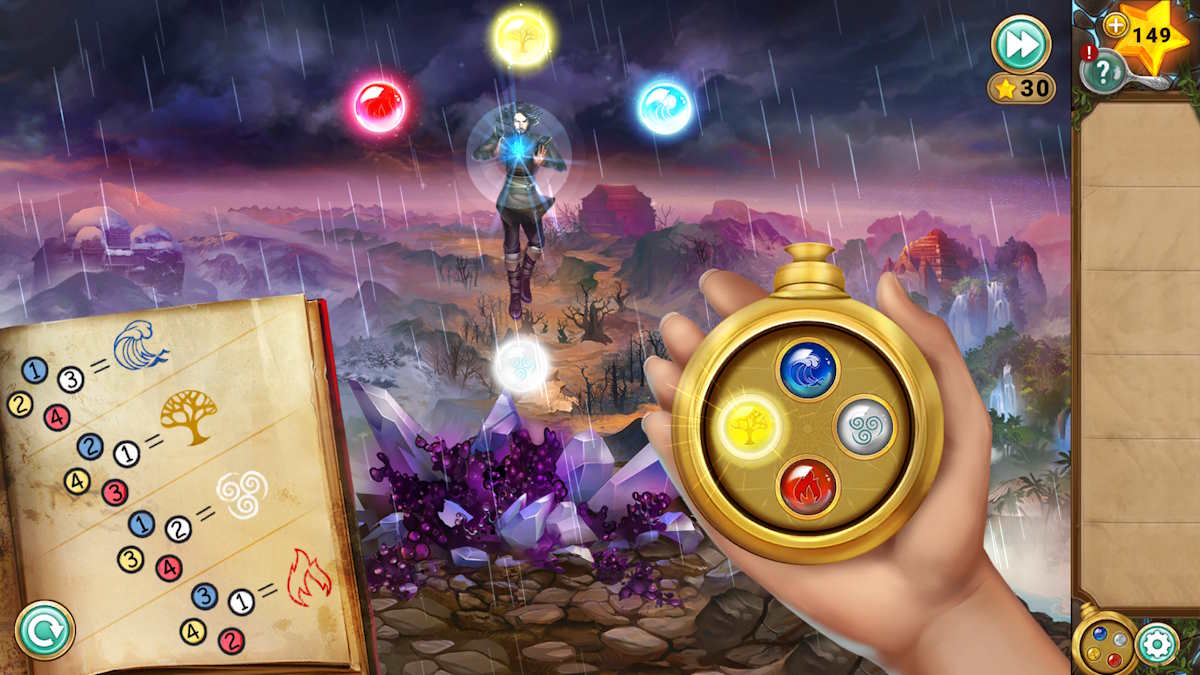
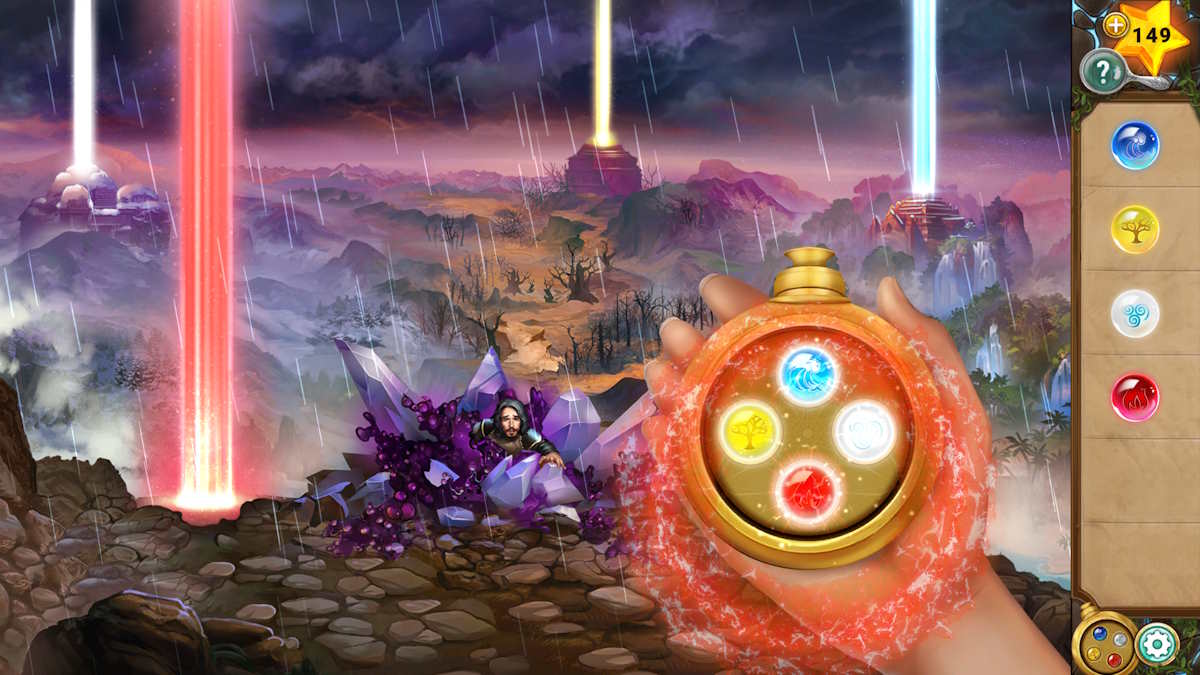
After the battle, click each of the stones as they begin to glow. Once the artifact appears in your hand, click each of the colors and the curse will be lifted! Unfortunately, it's too late to save Milo, but you tried your best. And with that, congratulations! You’ve completed Legend of the Sacred Stones.
Looking for more Adventure Escape Mysteries here at Pro Game Guides? We've got you covered! Check out Haunted Hunt Walkthrough (Adventure Escape Mysteries), The Squire’s Tale Walkthrough – Chapters 1-8, and more!