
Just when you think you’re finally free of the bearded man with the axe, AILA throws you right back into the same experience, this time fine-tuned to be even more terrifying. Since this is the same Impossible House scenario as before, you should already be well-equipped with the knowledge needed to get through it. However, if you’re having trouble with the second part of the first experience, this step-by-step guide will help you out.
IMPORTANT NOTE: This is a guide for the second part of the first experience, which takes place after you complete The Impossible House for the first time. If you’re looking for a full guide to the first part, check out our dedicated AILA First Experience Walkthrough.
AILA The Impossible House Part 2 Step-by-Step Guide
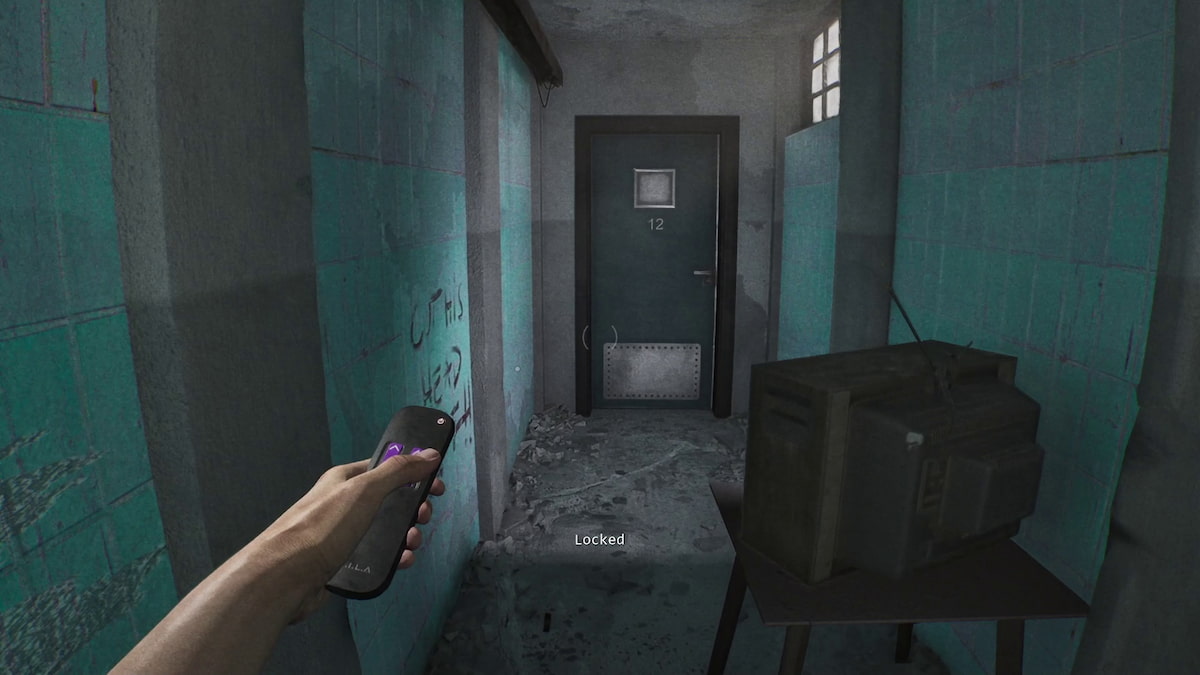
After you complete your first game within the game, AILA (the AI girl) will ask you a few questions about your experience. She’ll then adjust the next scenario to match your state of mind and send you back in for another test. Once the game loads, you’ll find yourself in a small hallway leading to the TV room again. One thing you’ll immediately notice is a newspaper from your apartment, the one about The Eyes Killer. This is only there for atmosphere and doesn’t have any impact on gameplay.
You’ll also notice a white couch in the room, and on it, the TV Remote, which once again plays a crucial role in solving the puzzle. Pick it up and change the channel. This will shift reality into its flooded version. You’ll then see a fingertip scanner next to the door. This time, it recognizes your fingerprint, so interact with it to unlock the long hallway door.
The Blue Retina Scanner Door - Cut His Head Off!

When you first enter the flooded hallway, you’ll notice a few creepy messages on the walls, like the one saying, “Cut his head off!” Don’t overthink them. Head toward the other end of the hallway, and you’ll see that it’s significantly shorter than it used to be. If you try opening any of the three doors at the end (the blue retina scanner door or the two regular ones) you’ll find that they’re all locked.
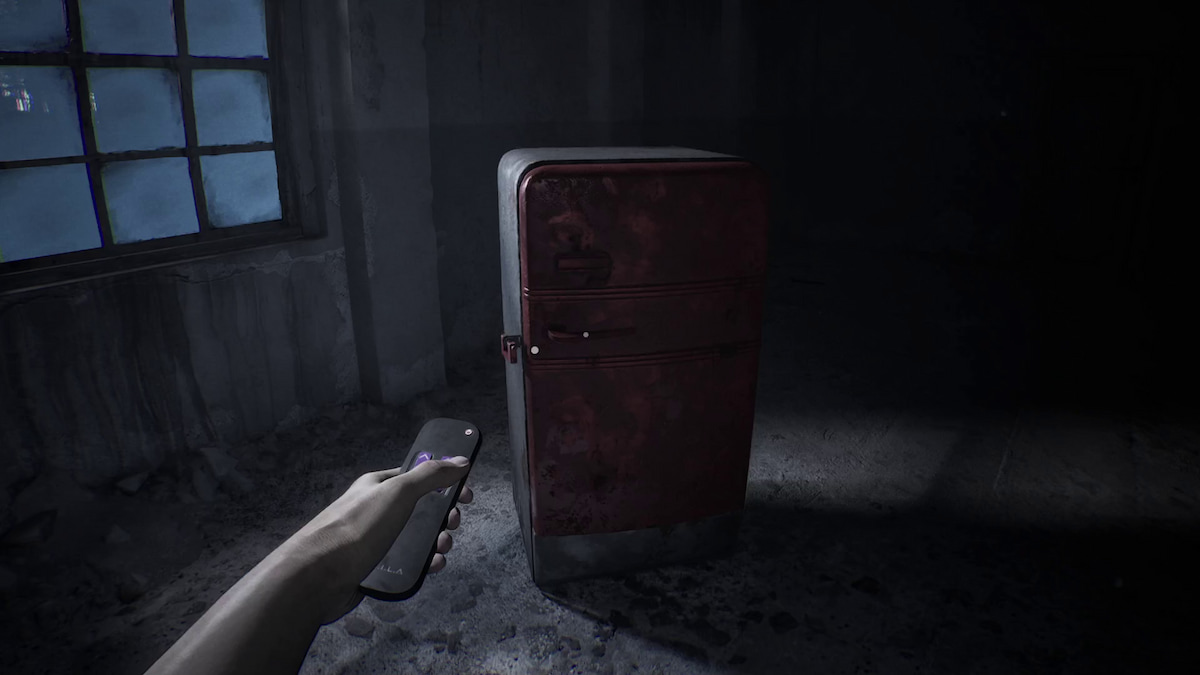
The trick here is to walk back to the TV room door (which will also be locked) and then turn around. The hallway will now appear in its standard, full-length form again. Head to the fridge room. You’ll find the fridge tipped over and wide open, with a newspaper article on top of it - the same story about the Eyes Killer, just in a much more worn and deteriorated state. You’ll also notice that the TV is now in the fridge room. Change the channel.
Door Number 12 Key
The fridge will now stand upright, and inside you'll find a note from Cesar: "Don’t Let It Take My Name. Cesar. I’m Cesar." Again, this is just here for the atmosphere; it is not any kind of puzzle or anything gameplay-related. Head back to the hallway, which will now be plastered with cyan tiles. You'll see that the TV is now outside the TV room, which is now called Room 12.
It will be locked, and you don't have the Room 12 Key right now, so you need to change the TV channel. Change the channel, and enter the TV room. A spooky guy will try to jump scare you; just ignore him. Inside the TV room, check out the table where the newspapers are. You'll now see an open box with the Door Number 12 Key inside. Grab it.
Red Door Fridge Lock
While still in the reality where you found the Room 12 Key, head back down the hallway to the fridge room once again. You’ll now notice that the fridge has a red door and is secured with a red padlock. Keep that in mind, then return to the TV room. From there, go into the smaller hallway where the TV is currently located. Change the channel, and then go back to the TV room.
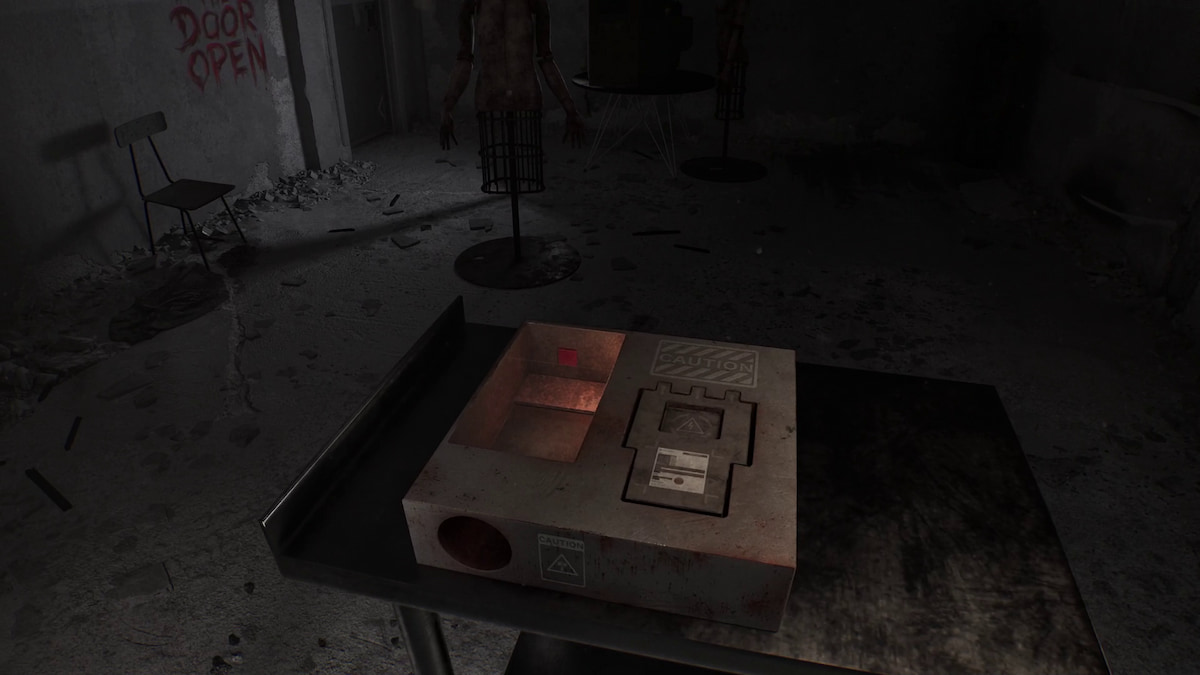
Inside, you’ll find a strange contraption and a message that reads: “This little piggy went WEE WEE all the way home.” Again, it’s mostly there for atmosphere in the AILA Impossible House experience, but it does foreshadow what you’ll need to do next. If you try interacting with the device on the table, you’ll be told that it requires a Battery to function.
Keep the Door Open
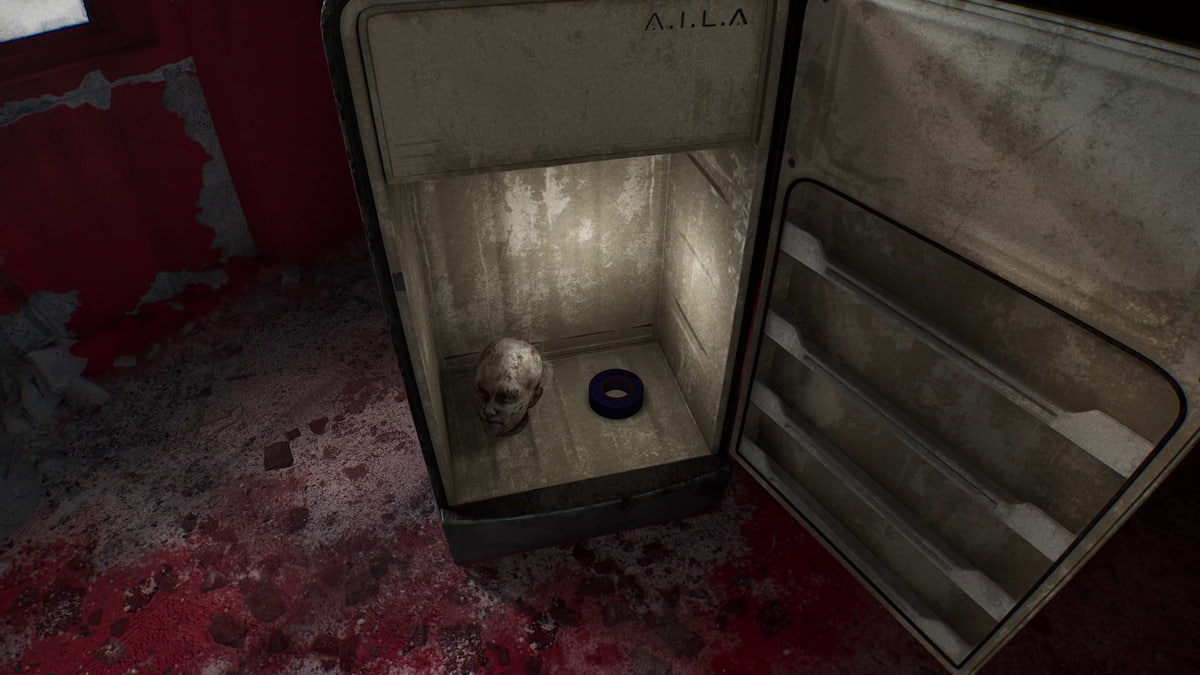
Use your fingerprint to open the door and enter the hallway. You’ll now see a red door on the other side - go through it. The fridge room will be painted red, but the fridge itself will look normal (as normal as anything does in this game). Open it, and you’ll find two items inside: a Mannequin Head and Adhesive Tape. Take both. Head back to the TV room and then switch the TV channel until you’re back in the flooded reality.
Stay Inside On Channel Switching
Once you’re back in the flooded version of the world, return to the fridge room and change the channel there. Then head back into the hallway - the antagonist will appear again. Let him attack you, and you’ll be able to overcome him this time. He’ll drop his Axe, which you can pick up afterward. The Axe doesn’t have any effect on gameplay, but you will take it anyway, purely for immersion.
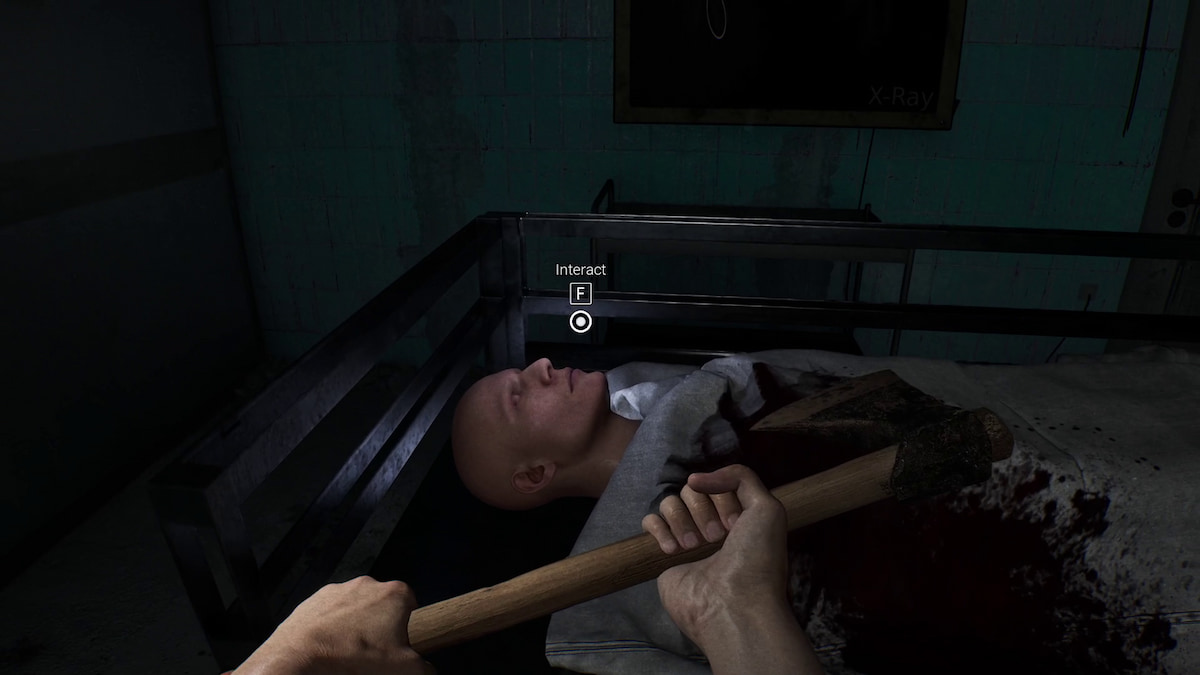
You’re now back in the turquoise hallway, where you can use the Room 12 Key to unlock the door. Inside, you’ll find two bodies, an X-ray on the wall, and a pair of Pliers on the table beneath it. Grab the pliers, inspect the autopsy report on one of the bodies, and then interact with the mouth of the bald body on the table. His mouth will open, allowing you to use the pliers to pull out the keys hidden inside. You only need the Red Key, but you can collect the others as well if you want (I did, just in case).
Open the Red Fridge - Find the Battery
Once you’ve collected the keys from inside the bald man’s mouth, switch the TV channel once. You’re now very close to the end of the AILA Impossible House experience. Head to the fridge room, where you’ll find a version of the fridge secured with a red padlock. Use the Red Key to unlock it. Inside, you’ll find the Battery - the one you’ll need for the machine where you have to place your hand inside.
Take the Battery and head back toward the TV room. The TV will now be in the small hallway on the other side - go there and switch the channel. You should now be in the version of the TV room with the strange device that requires a battery. Insert the Battery into its slot, then place your hand inside the device and press the red button. A cutscene will play, resulting in the loss of your index finger.
AILA The Impossible House Ending
Remember the "Keep the Door Open" message? You will now do this by combining your Severed Finger and Adhesive Tape in your inventory. This will create a new item, called Taped Finger. Use the Tapped Finger on the fingertip scanner, which allows the finger to stay there, keeping the door open in the process. Now head through the hallway all the way down to the red fridge room.
From the red fridge room, look down the hallway. You’ll see that the TV is active in the other room. This is where the “Stay Inside on Channel Switching” message comes into play. Switch the channel without leaving the fridge room. The room will change into a version with a headless mannequin standing in the middle. Interact with its neck and place the Mannequin Head from your inventory onto it.
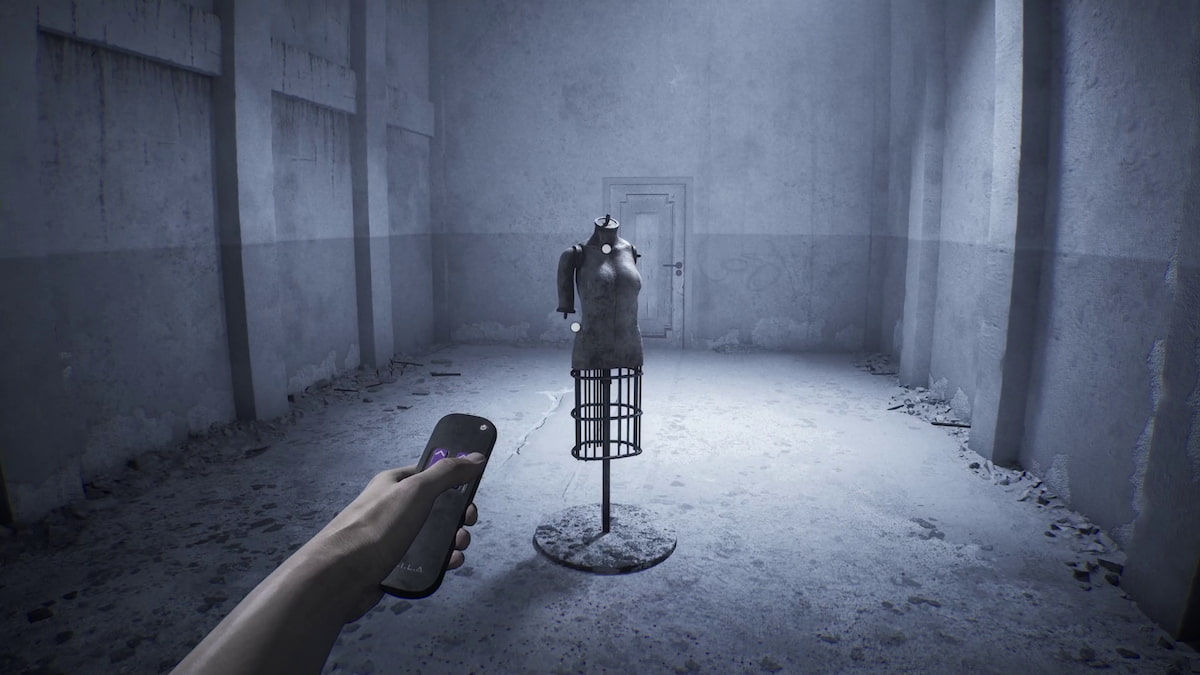
A Mannequin Right Arm will appear on the table. Take it and attach it to the mannequin. As you move around, the Mannequin Left Arm will appear as well (the mannequin will shift positions when you’re not looking). Attach the second arm too. From this point on, a sequence begins in which an increasing number of mannequins appear in the room. Just keep moving around and try interacting with the locked doors. The sequence will eventually play itself out.
Eventually, the screen will fade to black. When the image returns, a mannequin in a dress will appear and give you a Human Eye. Take the eye and head toward the hallway door. Be prepared, as a large jump scare is coming up. Use the eye on the retina scanner on the blue door and enter the room behind it, which turns out to be the place where you’ve been playing the game from all along. A final cutscene will play, bringing the Impossible House experience to an end.
AILA The Impossible House FAQ
No, he's just a virtual character designed by AILA
Spoiler alert: You will only use it at the end of the experience... on yourself.
Nothing. You can turn it on and off, but it doesn’t serve any purpose.