
Our Minecraft Redstone Guide to Farming will teach you how to construct contraptions that will help you easily gather food and material. We feature some Redstone Farm Ideas with step-by-step tutorials that should help you with your own Redstone creations!
Best Minecraft Redstone Farm Ideas Guide
Minecraft is all about building, exploration, and survival, but a big part of the survival is grinding for food and material. Most settle for a block of water surrounded by tilled soil and slow crop growth. This is great and all, but most of the time we end up going out to “tip” some cows. However, a slept-on feature (and one most people shy away from) is Redstone. Redstone can be intimidating to both new and experienced players, but it opens up a world of opportunity and automation.
In this guide, I will be teaching you ways to automate some of your farms through Redstone Contraptions. I will try my best to explain how they are built and how they function throughout the guide. My goal is for you to gain the tools needed to incorporate Redstone in all of your builds rather than carbon-copying builds from Youtube. This guide is intended for Redstone beginners and intermediates, but you may find some use from this regardless of your skill level.
Tiny Crop Farm
- Works with: Wheat, Potatoes, Carrots, Beets
- What you need: Any non-transparent solid block x18, Dirt x1, Lever x1, Sticky Piston x2, Redstone Dust x6, Redstone Torch x1, Redstone Repeater x1, Redstone Comparator x1, Observer x1, Hopper x2, Dispensers x4, Water Bucket x1, Bonemeal x(A Lot)
- Block space needed: 3x4x5.
Investing large block-space in a farm to your well-decorated home can be both an eyesore and a time-waster. Thanks to RedStone Expert MumboJumbo’s sleek and not-so-simple design, we can maximize our crop output while minimizing the visual impact it has on your base. The only downside to this design is its reliance on bone meal, but we will offset this in a later article when it’s time to build a Spooky, Scary Skeleton Grinder.
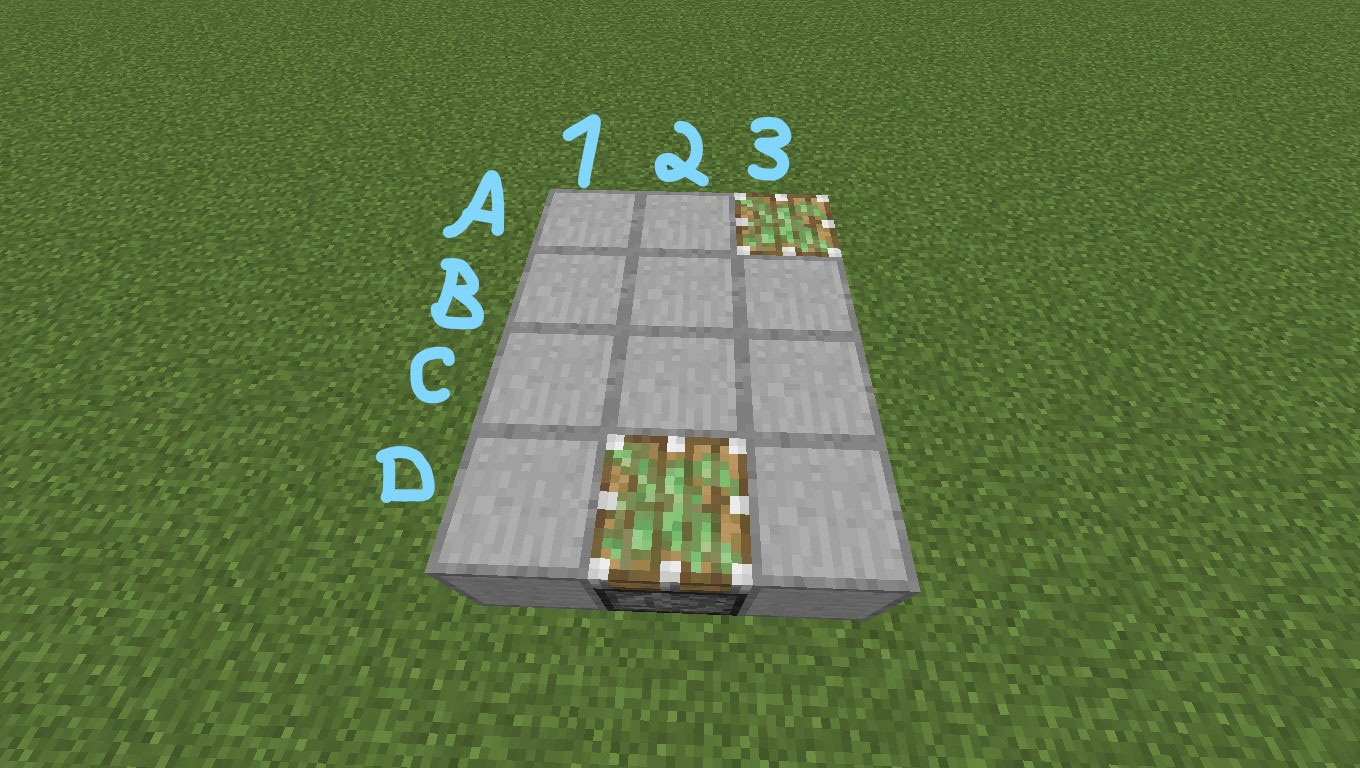
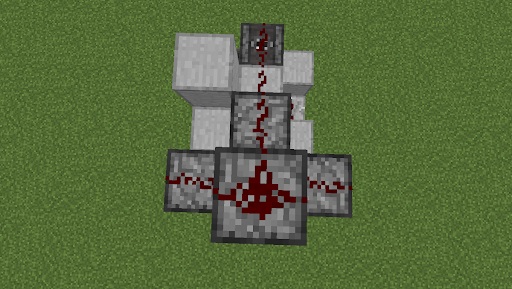
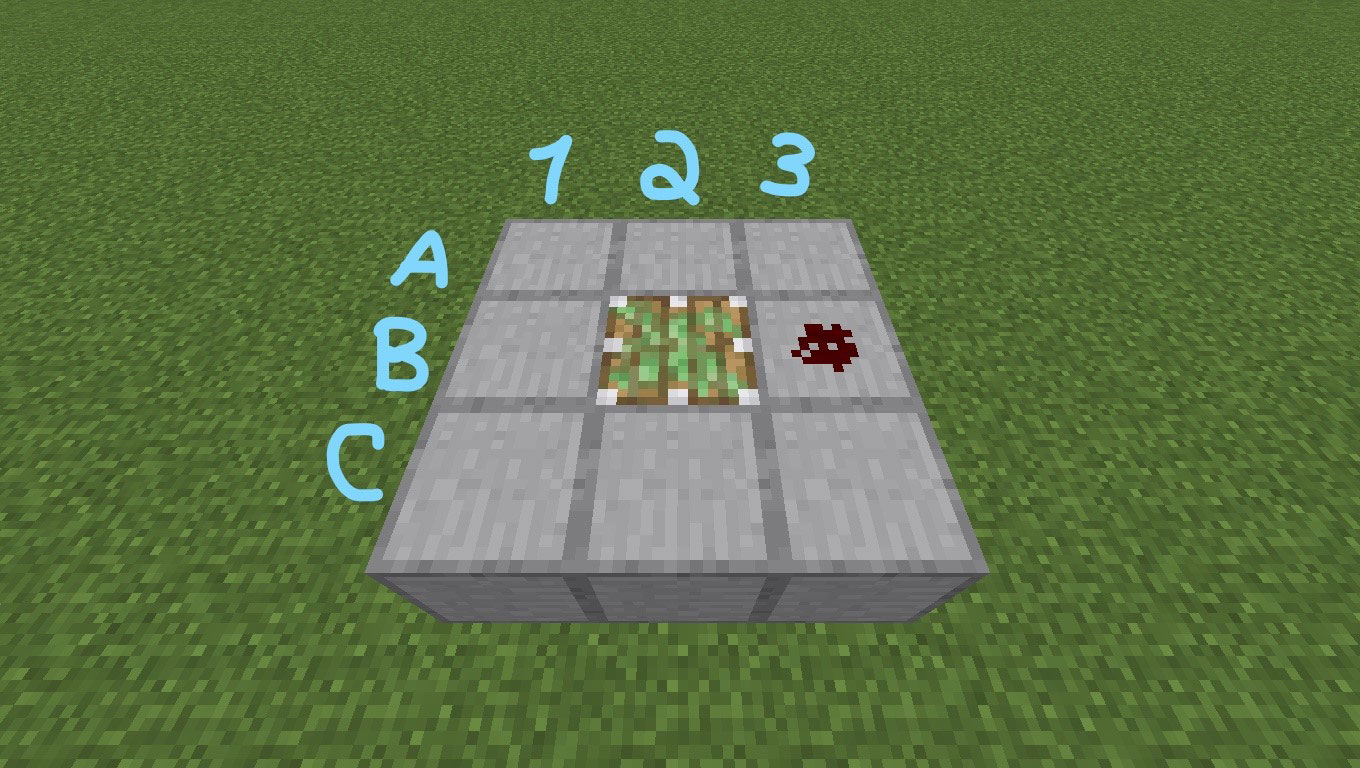
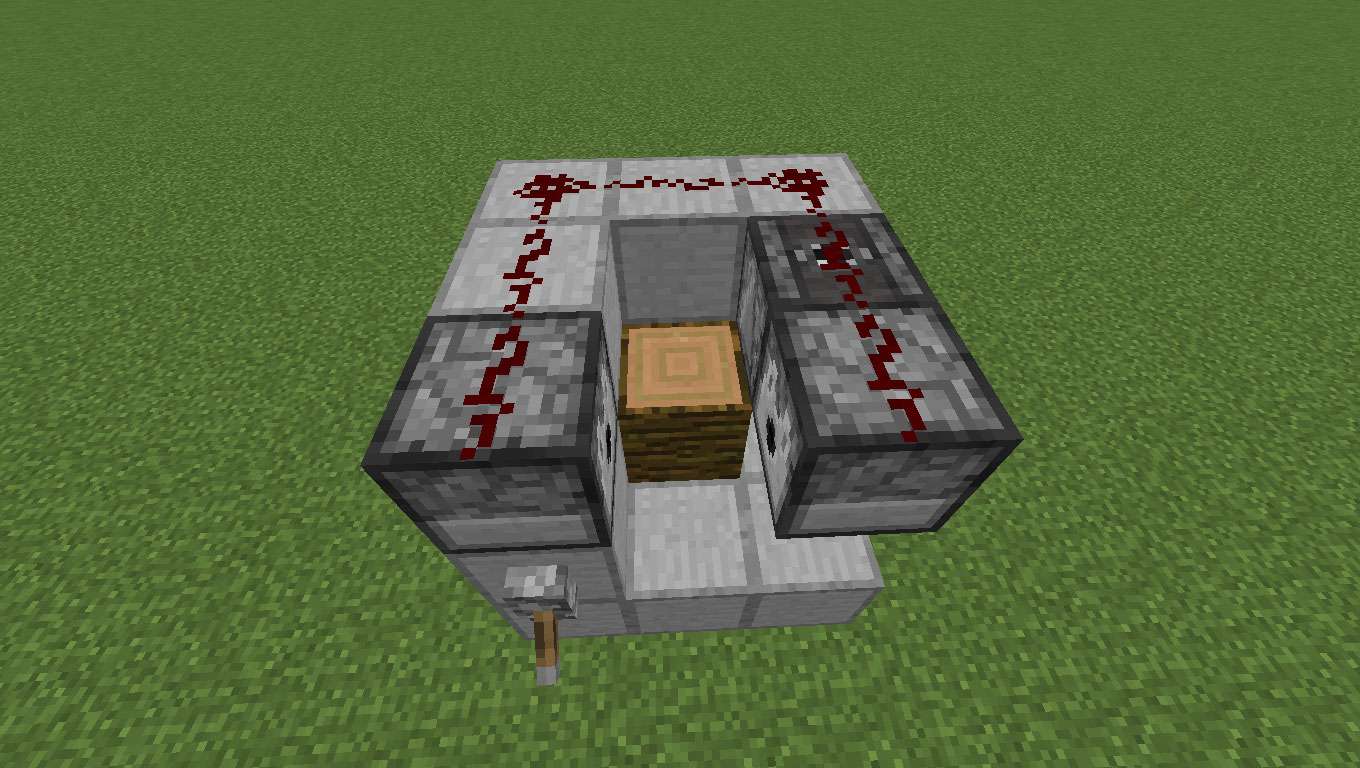
Step 1: Create a 3x4 area with sticky pistons (A1 to D3). The Sticky piston at D2 will be pushing and pulling the farmland you will use.
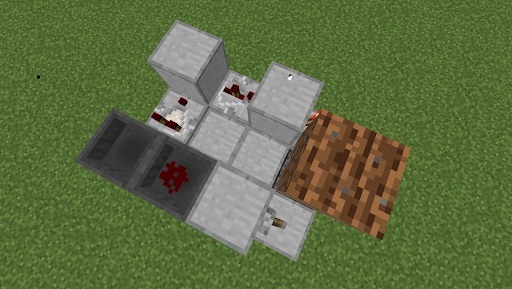

Step 2: Place dirt on D2. Then place two hoppers facing each other on A2 and B2. Place any object inside and you will notice the object switch between the two hoppers. The hoppers should look how they do in the fourth screenshot. This is what is known as a Redstone Clock, which outputs a signal of one redstone tick per transfer (or approximately 0.1 second intervals). Place any solid block on C1 and attach a lever to it to stop the Redstone Clock from ticking. Then, place a Redstone Comparator on A2 facing another solid block on A3. The comparator pulls the signal from the clock and transfers it into the solid block. Place a Redstone Repeater, set to two ticks (right click it once after placing) which delays the signal by 1 redstone tick. This is important to keep the machine running at the proper speed. If it’s too fast or too slow, your Pistons won’t work properly. Place another solid block on C3 and attach a Redstone Torch on the opposite side of the repeater, facing D3. This torch is what ensures that the Sticky Piston on D2 gets powered. You’ll notice Redstone Dust on the one of the hoppers, but this only makes stacking a block above it easier and serves no functional purpose for this contraption.
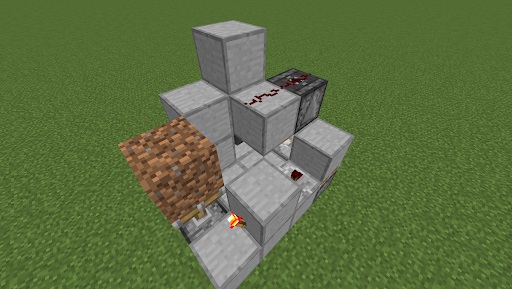
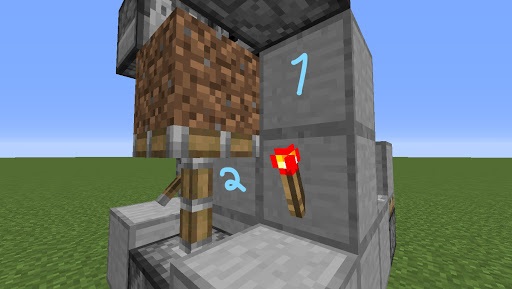
Step 3: Place an Observer facing the Redstone Repeater (small face should be toward the repeater while the weird teethy hole faces away) on A2. Place solid blocks on the same level as the Observer at C1 and B2. Place another solid block over the Redstone Dust at B1. Place Redstone Dust over the Observer at A2 and the solid block on B2.

Step 4: Place Dispensers at C2, D1, D2, and D3, all facing the extended dirt block. This is where you will place all of the Bone Meal that will make all the instant crop magic happen. Place Redstone Dust on top of each of the Dispensers at C2, D1, D2, and D3. It should automatically be connected to the observer at this point.

Final Step: Place two solid blocks on the area marked in the screenshot. This will contain the water we will be placing as our finishing touch. Till the soil if you have not already done so and you will notice a tiny slit between the Dispenser and the soil. Carefully aim your cursor in that slit and place the water. And that’s it. You’re done!
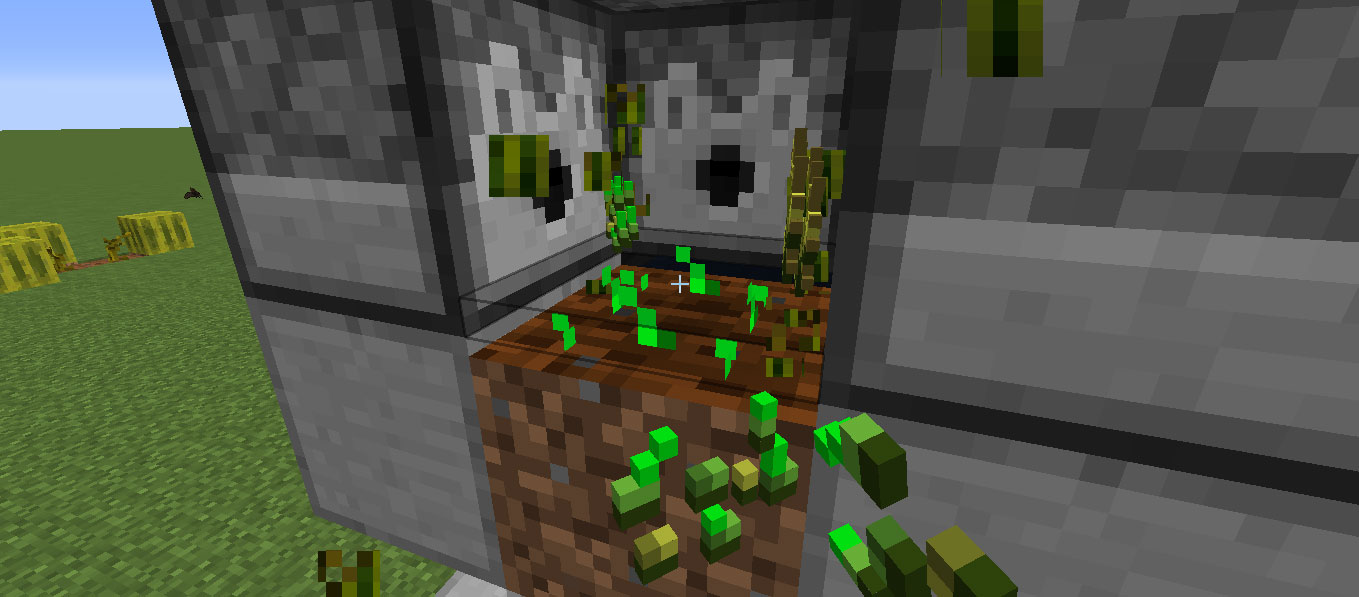
How it works: Once you fill the dispensers with bone meal and you have the seed you want to automate, switch the Redstone Clock back on with the lever and you will notice the soil rapidly being lifted and lowered by the Sticky Piston. The Observer block notices a change of state in the block it is observing (the Redstone Repeater) and will output a signal through its crack and to the Dispensers via Redstone Dust. The Redstone Repeater takes the signal from the block that is powered by the Redstone Comparator to power the block attached to the Redstone Torch, disabling and re-enabling the torch for each tick. That redstone torch powers the Sticky Piston next to it. When the Dirt is pulled and pushed, the water breaks whatever crop it touches. Since the Dispensers are instantly growing the plant while the water simultaneously breaks it, your crop output is limitless. All you need to do is hold right click over the dirt to plant the seeds automatically. Just turn the machine back off with the lever when you are done.
Tiny Cocoa Bean Farm

- What you need: Solid non-transparent block x10, Lever x1, Jungle Log x1, Sticky Piston x1, Hopper x2, Redstone Dust x8, Redstone Comparator x1, Observer x1, Dispenser x2
- Block space needed: 3x3x3
A very similar build to the Tiny Crop Farm, the Tiny Cocoa Bean Farm will serve all your instant cocoa needs. Whether you can make a huge profit on a server by mass-producing cocoa, want to dye things brown to hide those mysterious stains, or you are a connoisseur of baked goods, cocoa can bring you great joy in-game as much as a hot cup of cocoa would in the middle of a harsh winter in real life. Credit goes to MumboJumbo again for making this the simplest design possible. Here’s how to make it happen:
Step 1: Start with a 3x3 area, placing 8 solid blocks surrounding a Sticky Piston. Place Redstone Dust to the right of the Sticky Piston (B3).
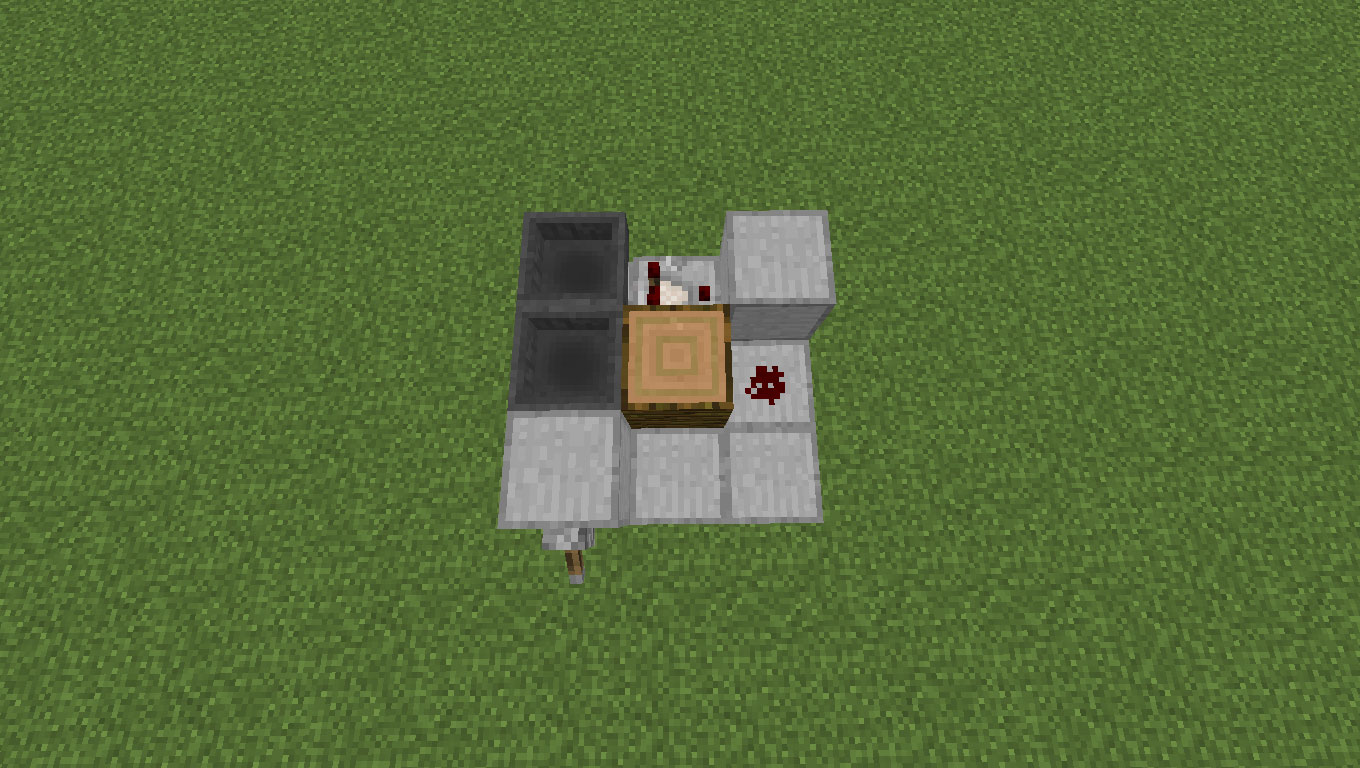
Step 2: Place a Jungle Log in the center (B2) and two solid blocks on A3 and B1. Then, place two hoppers facing each other as previously illustrated with an item inside to form another Redstone Clock. Place a lever on the solid block at C1 to stop the clock while you work on the rest of the build. Place a Redstone Comparator on A2 facing toward D3.
Final Step: Place an Observer on B3 facing the Redstone Dust (face down, crack up as some would say). Place solid blocks on A1, A2, A3, and B1. Then, place Dispensers on C1 and C3 facing each other. These will be dispensing bone meal similarly to the previous build. Lastly, place Redstone Dust around the top of each block on A1, A2, A3, B1, B3, C1, and C3.
That’s it! This one’s a fairly simple build.
How it works: When you switch the lever back on, the Redstone Comparator receives a small signal from the Redstone Clock, which soft powers the block in front, hard-powering the Redstone Dust, which powers the Sticky Piston. The observer picks up the change of state in the Redstone Dust and outputs a signal through its crack to power the Dispensers. It all works simultaneously, and all you have to do is hold right click on the log with cocoa seeds in your hand.
Medium Crop Farm
A must-have for any casual or hardcore player, this efficient and simple design is both easy to build and incredibly efficient. It capitalizes on automated harvesting and collection. The only downside to this is replanting, which you won’t be investing too much time into each cycle. This is a very simple build that may be familiar with veteran players. Here’s how to build it:
- Works with: Wheat, Carrots, Potatoes, Beats, Nether Wart (replace Dirt with Soul Sand)
- What you need: Solid non-transparent block x68, Dirt x120, Lever/Button x1, Signs x2, Chest x4, Hopper x2, Redstone Dust x26, Redstone Repeater x10, Water Buckets x9
- Block space needed: 11x21x5
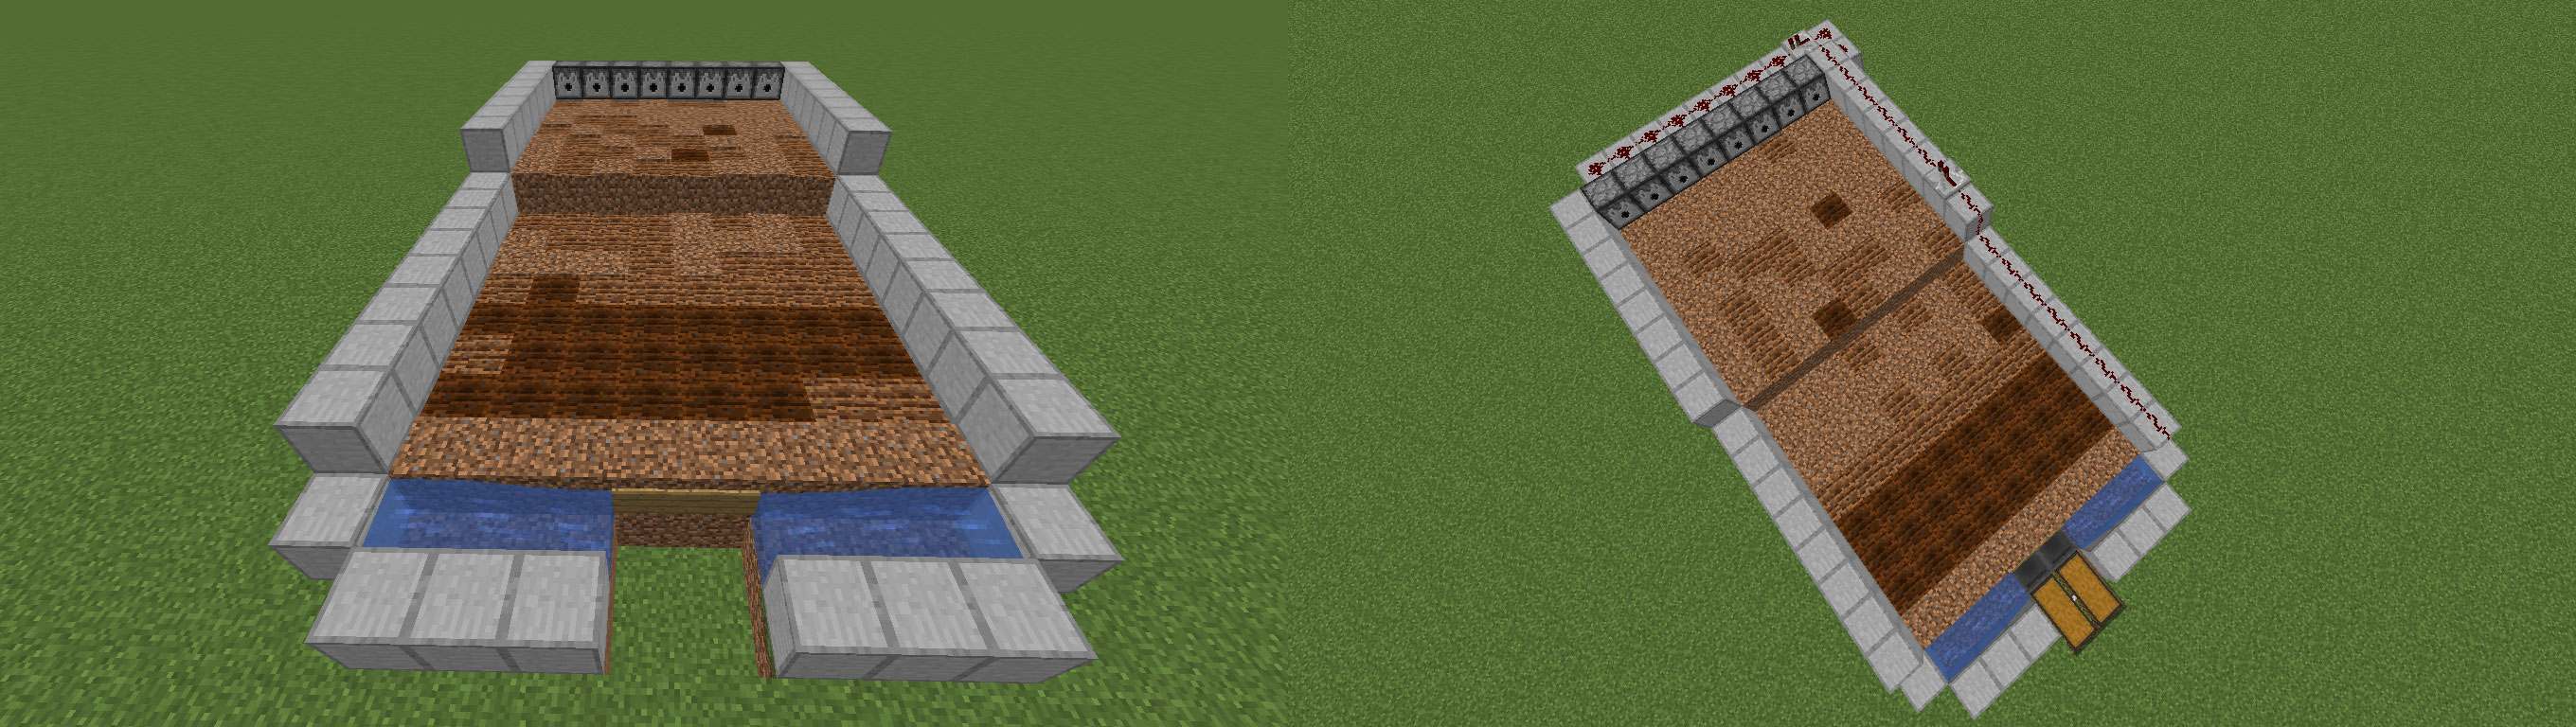
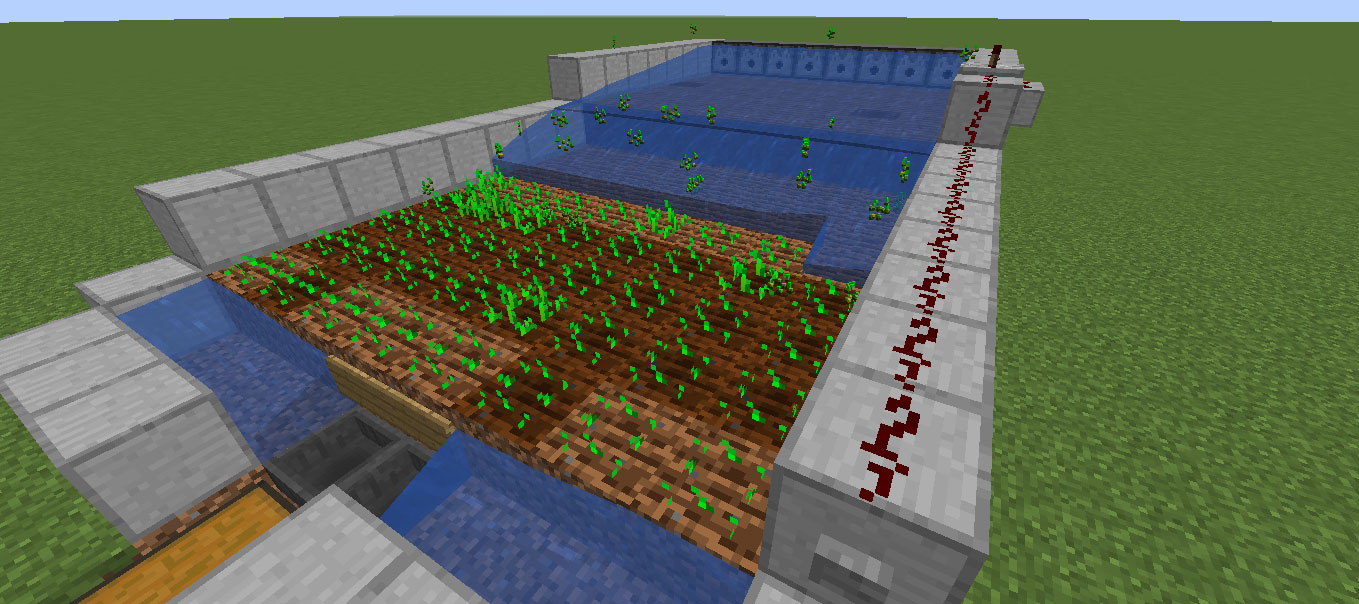
Step 1: Make sure you have plenty of room to start with. Place dirt in an 8x8 formation and surround it with building blocks to keep the water we will be using from spreading. Making it any smaller will cause overflow since water travels down 8 spaces from the source. You can add another 8x7 for each layer you want to add to make the farm as long as you want. You can also spread the farm as wide as 18 blocks, but doing so will take up a lot of space.
Step 2: Free row in front of all the dirt and place two signs in the middle. Then, place a bucket of water on each side as illustrated in the screenshot. Dig a 2x3 hole underneath and in front of the signs, one block below the water level, so that the crops will be carried the hoppers you are about to place. Then, place two large chests as illustrated in the second screenshot and attach hoppers to them.
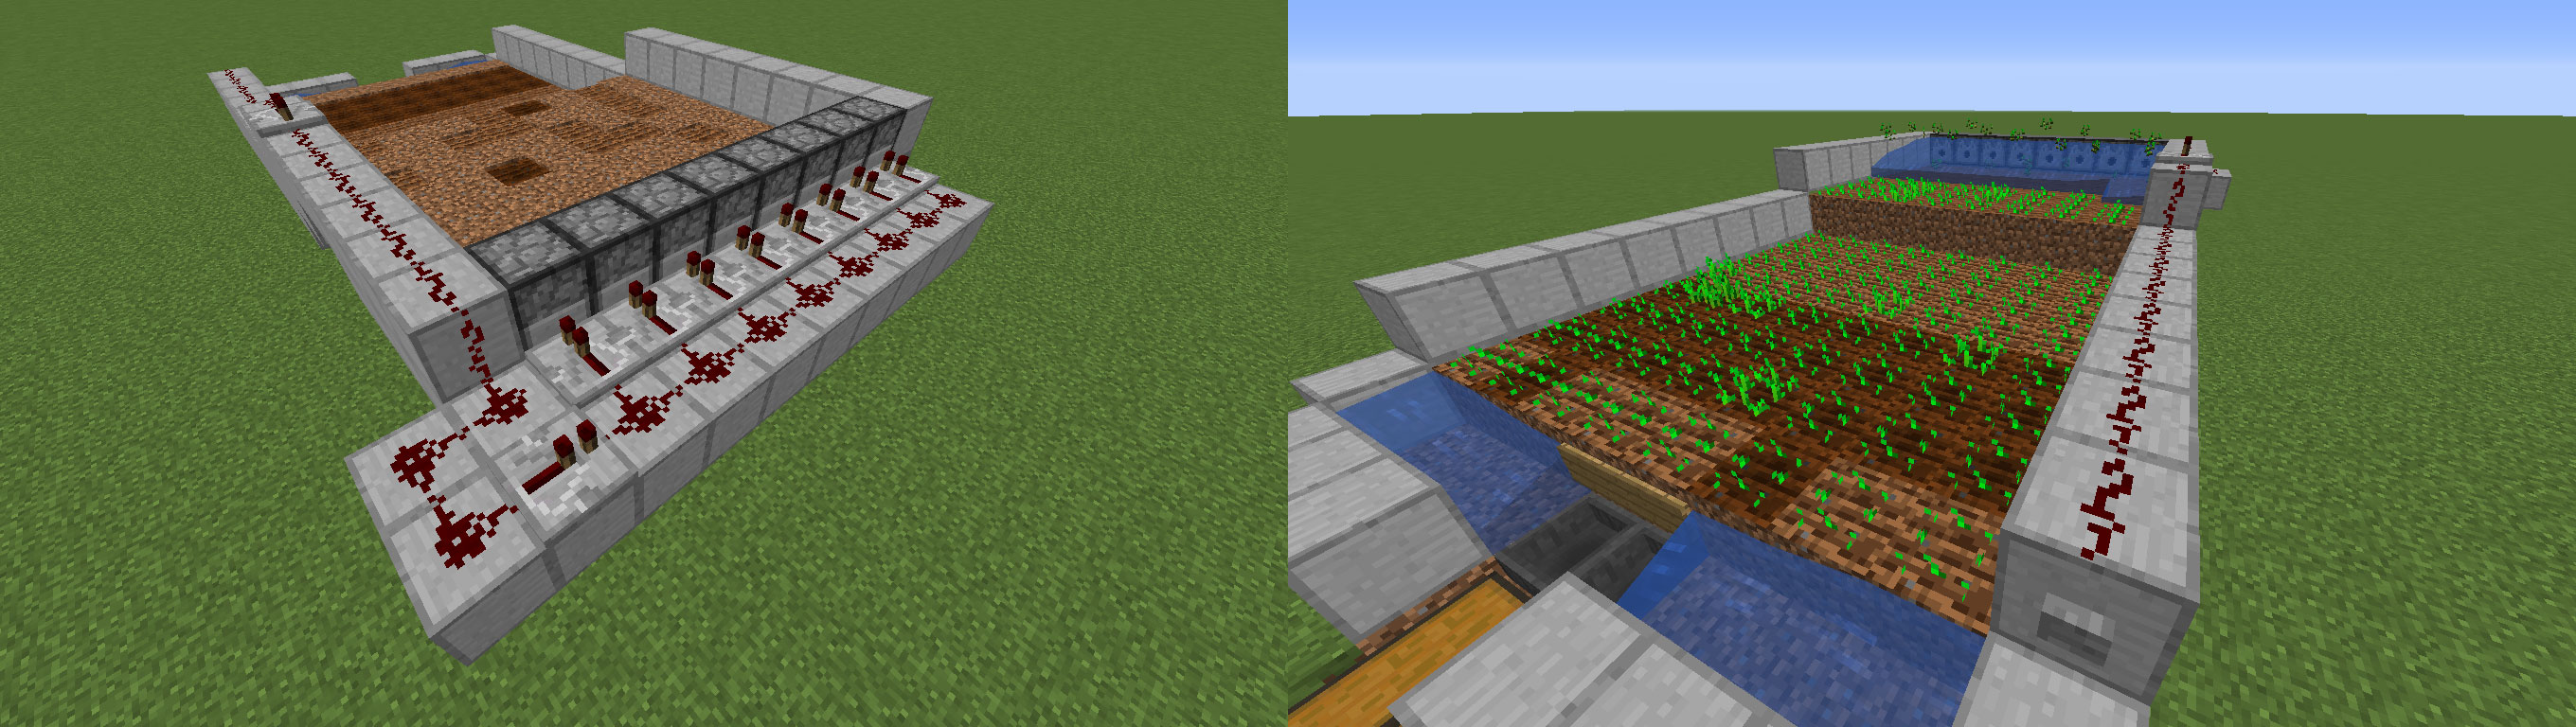
Final Step: Place 8 Dispensers on top of building blocks a level above the dirt and place a bucket of water in each. Run Redstone Dust along the side of the build, adding a Redstone Repeater about halfway through (9 blocks away is pretty safe). Place Redstone repeaters behind each of the Dispensers and run Redstone Dust behind each of those. Then, connect a Redstone Repeater to the Redstone wire as depicted in the third screenshot. Finally, place a button or lever (whichever you prefer), plant some seeds, and watch those beautiful crops come straight to you.
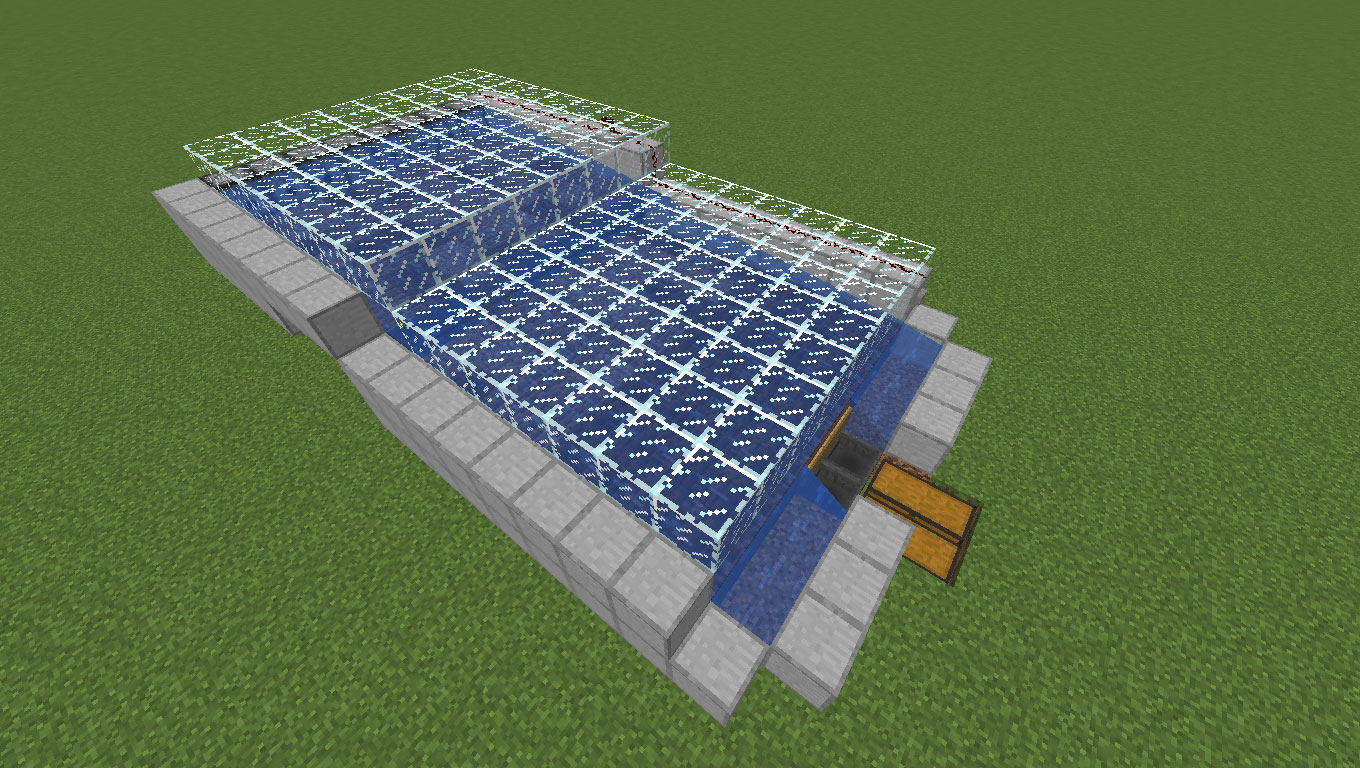
Bonus: Put glass over the structure for a stylish way to keep those stray crops from landing on the sides, or just build the walls higher. This is your build and you have the creative freedom to make it your own!
How it works: This build is very simple. Once the button is pushed, a signal is sent to each repeater, which repeats the base signal strength of 15 each time. This, in turn, powers the dispensers to push water over the crops and into your small storage system.
Bonus: Tiny Mob Farm

If you’re stressing about skeletons, I have a very simple solution. Yet another small and unobtrusive build, you can pretty much spawn most hostile mobs with this. I will be covering a fully automated mob farm for each passive and hostile mob in the future. This tiny build is meant to serve you in a pinch in case you don’t want to invest room for a massive mob farm.
What you need: Solid building block x26, Slab x6
Block Space Needed: 5x3x5 (Must be 24 blocks away from the player to spawn mobs)
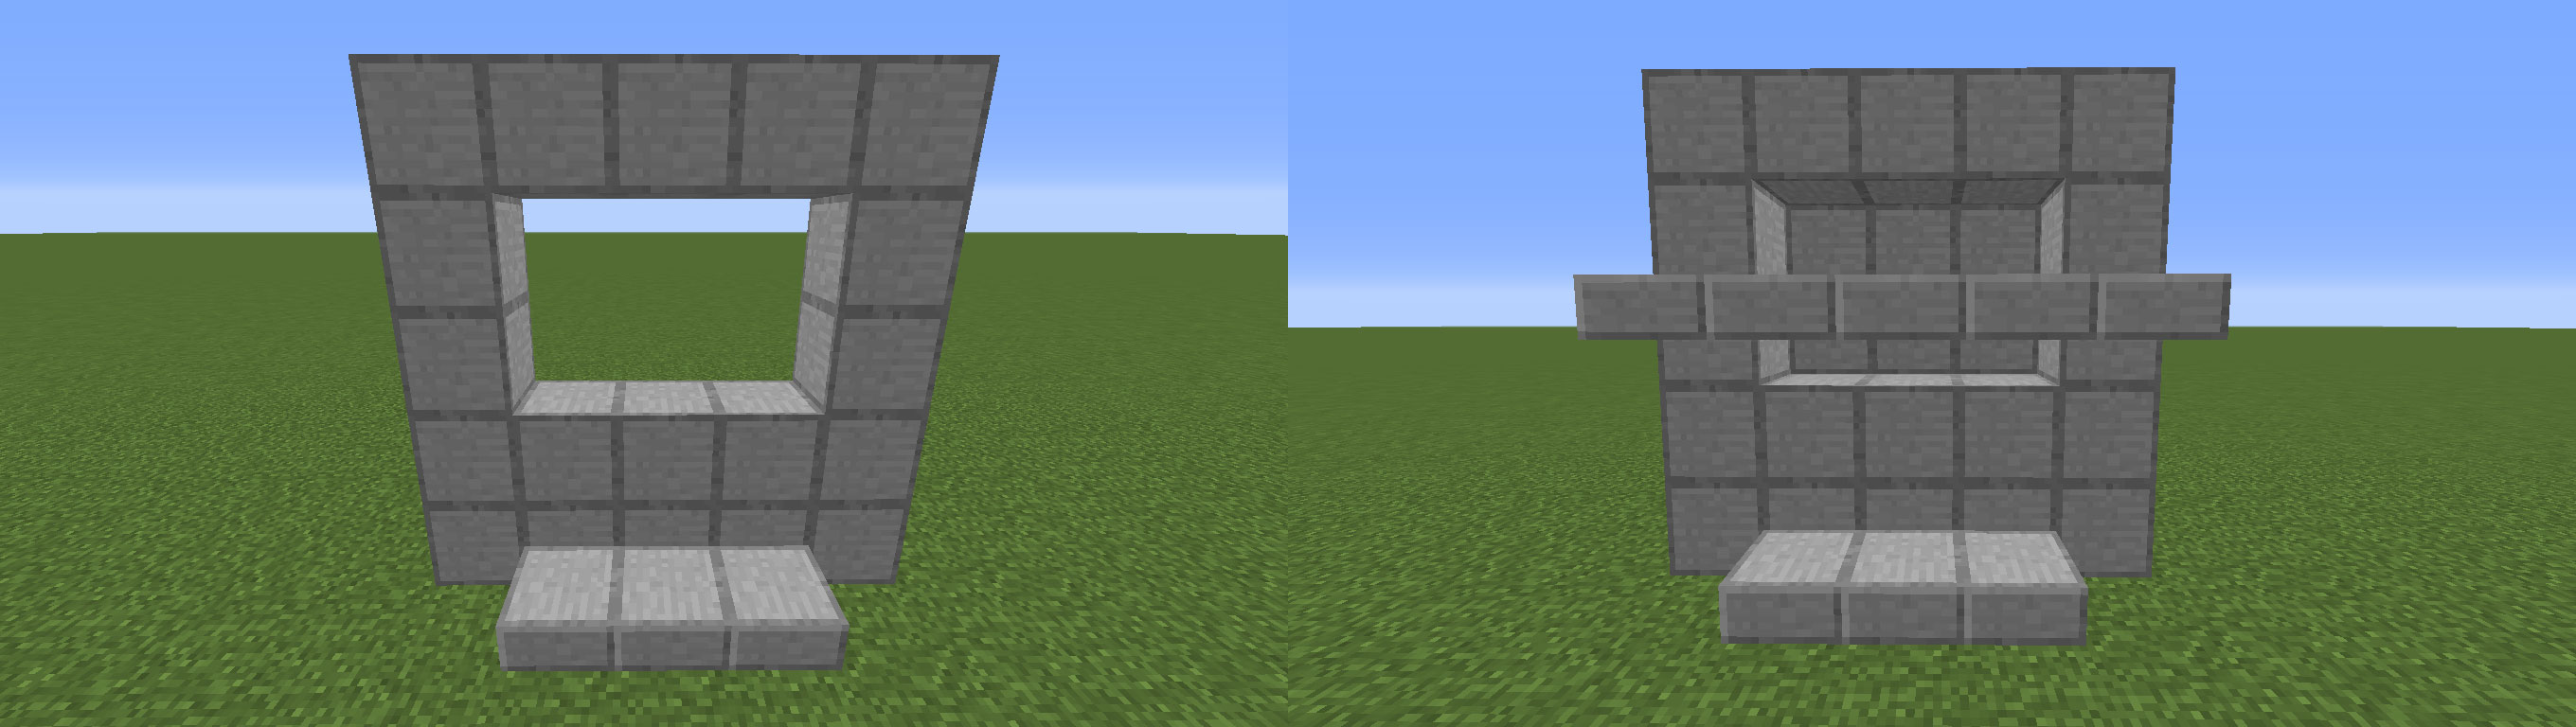
Step 1: Build a vertical 5x5 structure with a six block hole as depicted in the first screenshot. Place three slabs at the bottom to stand on and wack the Skelley-boys as they spawn.
Step 2: Cover the back of the hole with solid building blocks and place slabs on the top half of the third block from the ground.
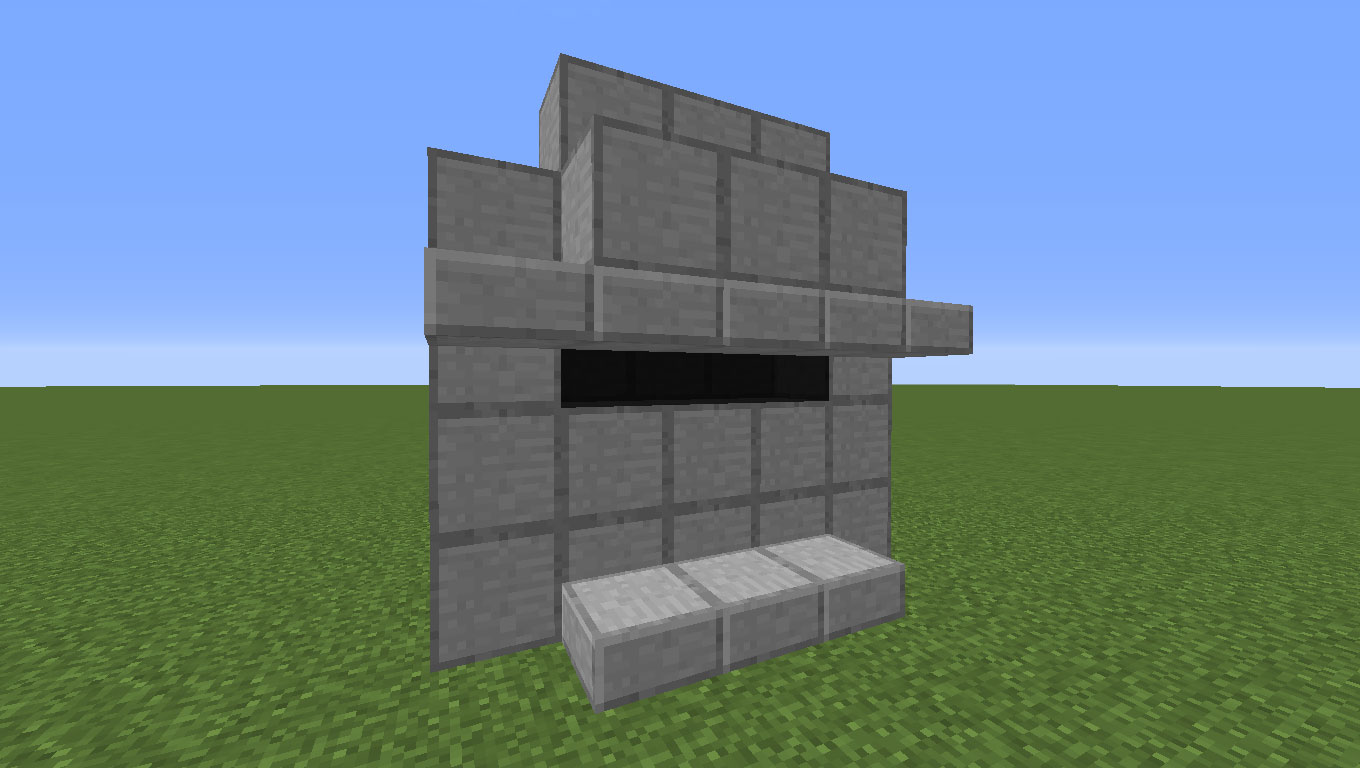
Final Step: Cover the top of the slabs with any solid building block you like and the result should be a pitch black interior.
As long as you are at least 24 blocks away, mobs will spawn. This structure can be made as wide as you want and can be made to enter from both sides. This is ideal for Skyblock worlds or areas that are well lit up.