
There are few more popular detectives than Nancy Drew, so it's great to play as her in this series of puzzle adventure games! If you’re playing through Sea of Darkness, read on for all the help you may need in my complete Nancy Drew walkthrough guide.
Nancy Drew Sea of Darkness complete walkthrough guide
Nancy must travel to Iceland to track down a missing treasure hunter in another excellent Nancy Drew adventure, with all the puzzles and intrigue we've come to expect. The walkthrough below has been done in amateur mode, so note some of the puzzle solutions will be slightly different if playing as a master sleuth.
Also, note that, unlike some puzzle adventures, Nancy Drew: Sea of Darkness is in no way linear. You can do a lot of the tasks in a different order than me, but some events will need to happen for certain other events to become available. I may have done puzzles in a different order, so you may need to skip around this guide to find the answers you need. But they're all here!
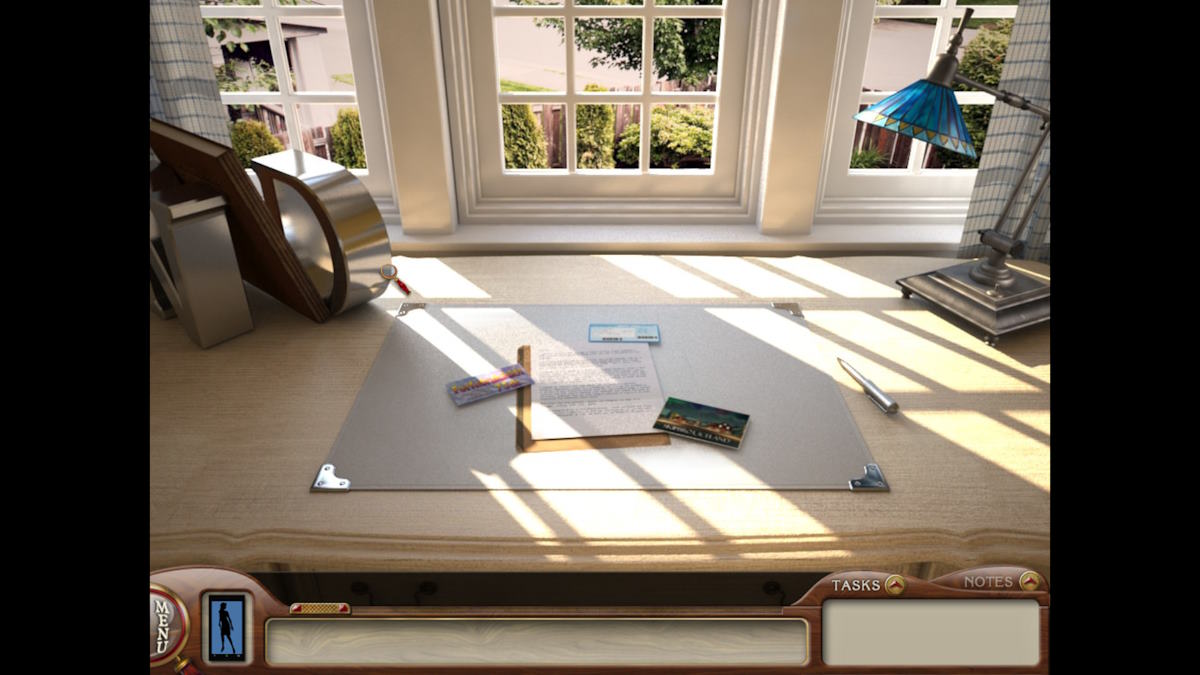
A letter from Dagny
Select the desk pad, click the letter, and read it through. It’s from a friend of Moira Chisholm, called Dagny Silva. She claims to be a treasure hunter, finding and returning lost items to their owners. She thinks something shady is happening with her business partner, Magnus, in a small town called Skipbrot in Iceland. So off you head to Iceland!
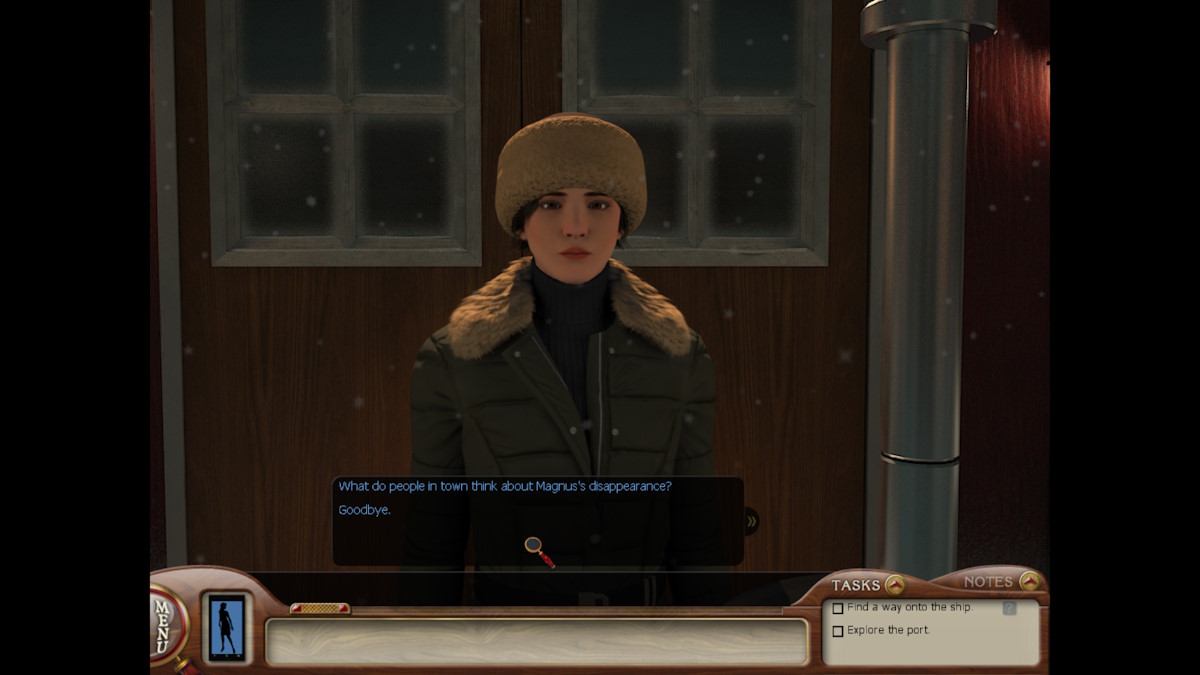
When you arrive, Dagny is there to meet you. She wants you to find Magnus, who has disappeared. There was meant to be millions of dollars in treasure on the ship but now there is nothing. Could this fact be tied to the disappearance of Magnus?
Magnus disappeared when he sailed the restored ship. It crashed into the harbor but when searched, no one was aboard. The official line is he probably drowned, but Dagny is not convinced. He wanted to buy a ship, so the extra cash would’ve certainly helped. You need to get onto that ship.
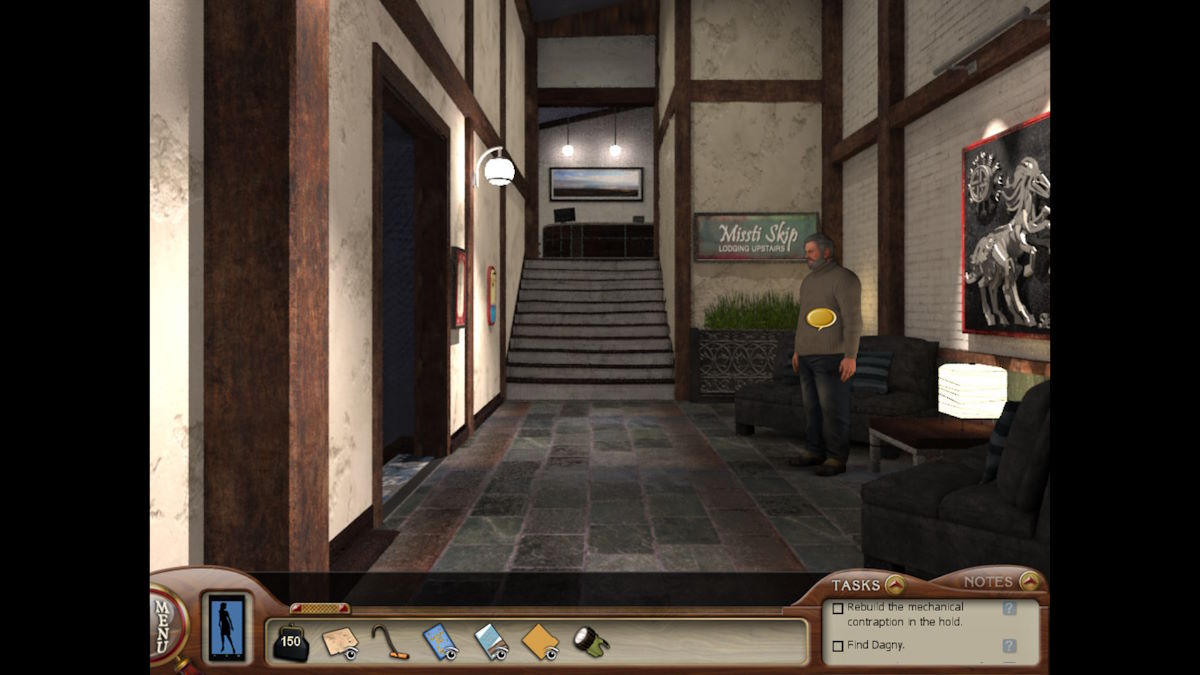
Talking to Dagny and Soren
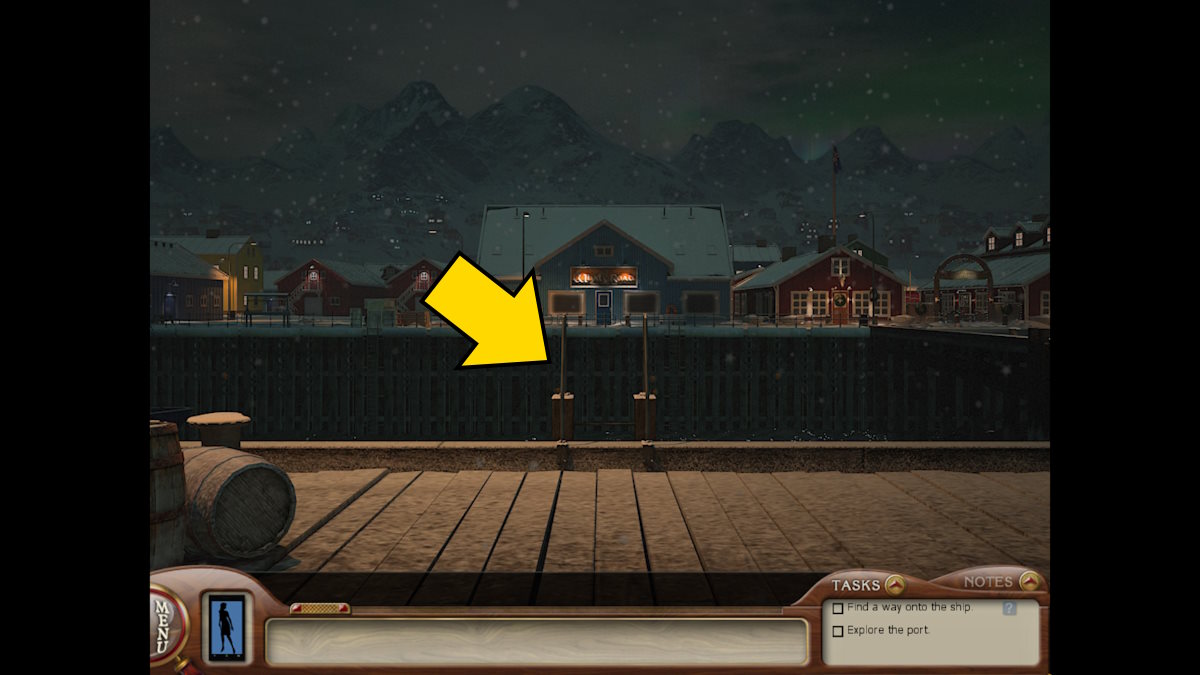
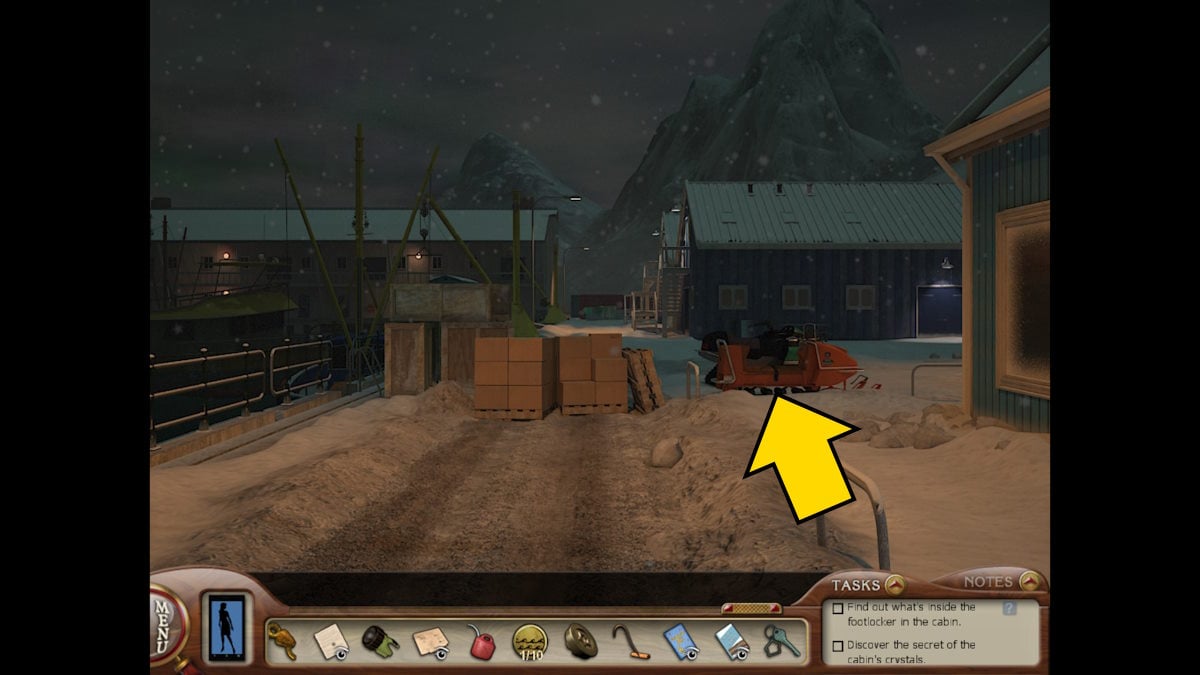
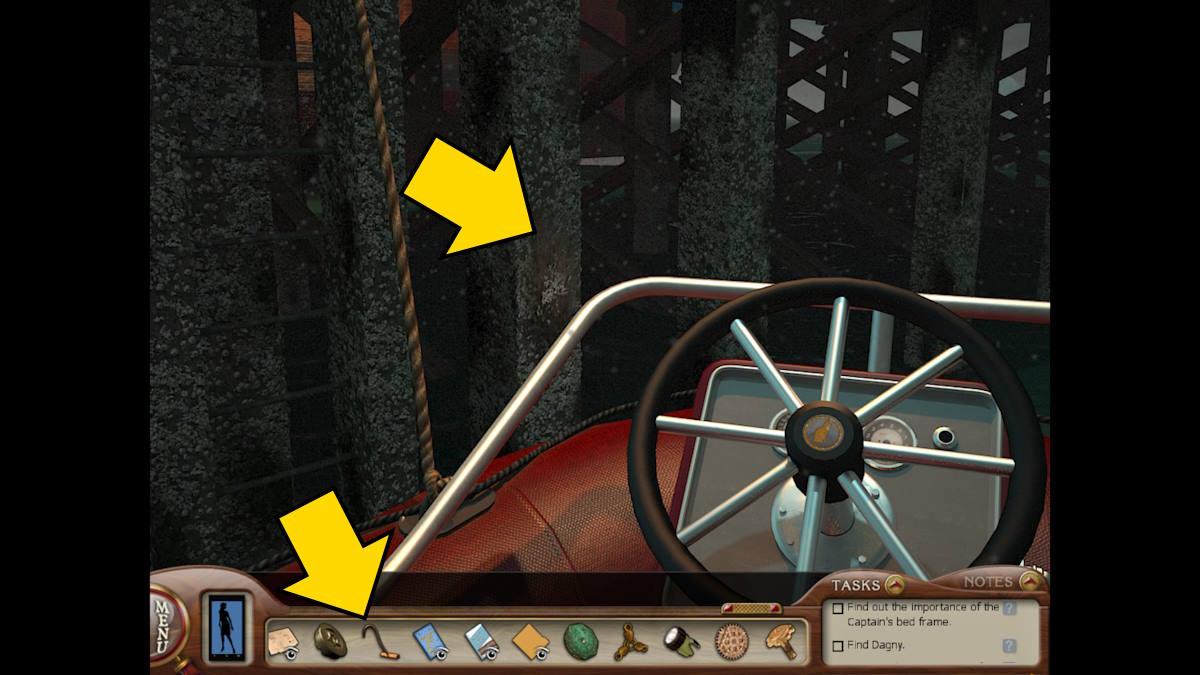
Your initial tasks are to explore the port and find a way onto the ship. Walk to the pier (above) and use the ladder to find a dinghy below. Go down the ladder to get into the dinghy. Remove the motor case (by clicking it) to find it isn’t working. You'll need to come back later.

Unfortunately, you'll also find there is no gangplank to get onto the ship. Turn around and move towards the port. Click the poster (a1) to find out about hiring skidoos. It seems they’re hired out by Elisabet, who you also need to speak to about the ship. Now head into the Culture Center (a2).
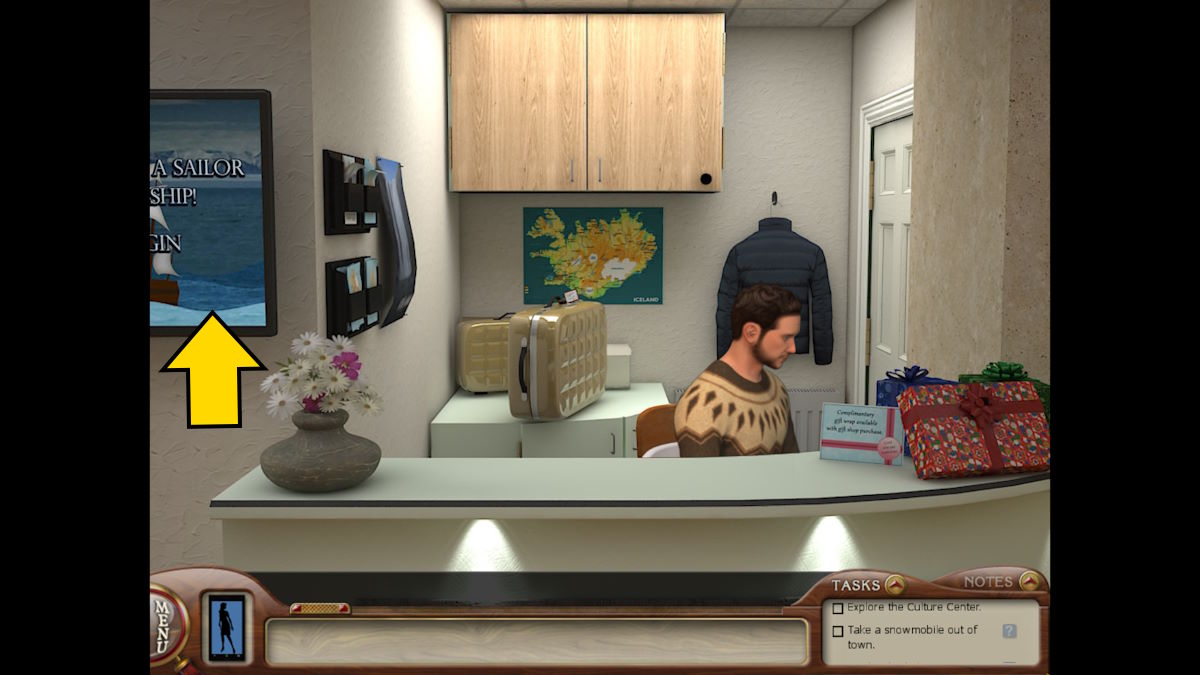
Walk up to the counter and speak to Soren. He’ll tell you he will get the gangplank to the ship back in place. Run through all his dialogue options to find out Soren thinks he is unliked and that Magnus is a man of few words. He’ll also give you the Dinged Dinghies pamphlet so you can fix the dinghy.
Click the poster next to the desk (see above) to start a matching puzzle. Once complete, you’ll get a glossary covering all the language you need to identify the different parts of a ship. If you’re stuck, here’s the full solution:
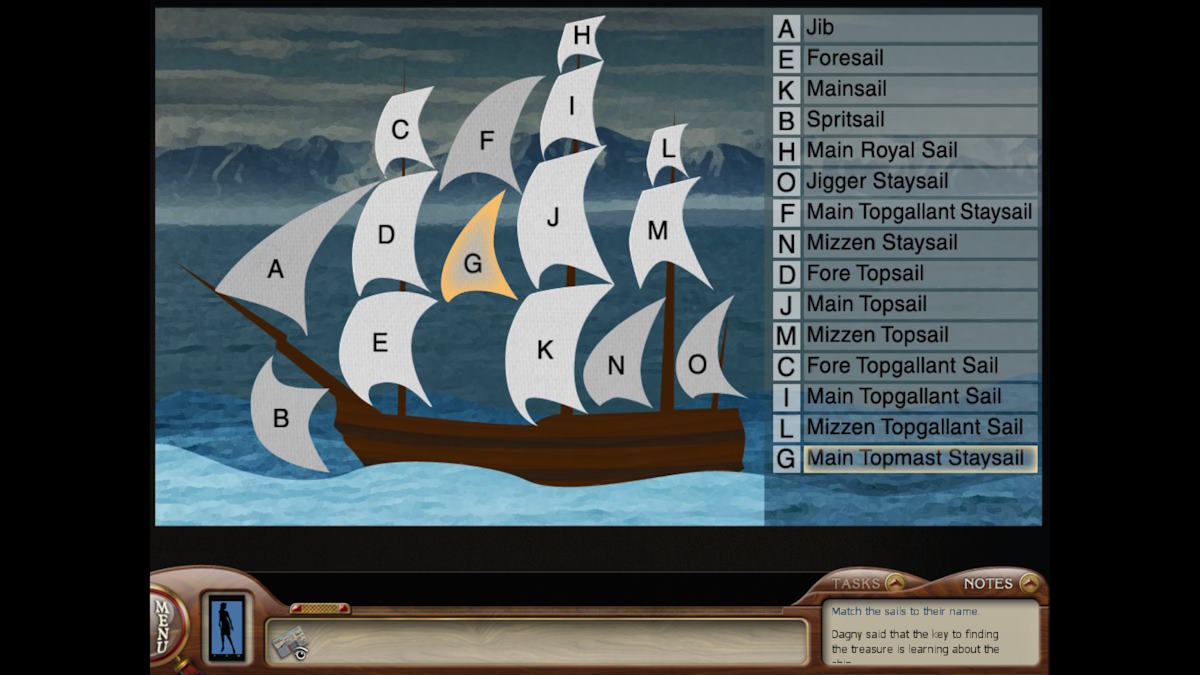
- A – Jib
- E – Foresail
- K – Mainsail
- B – Spritsail
- H – Main Royal Sail
- O – Jigger Staysail
- F – Main Topgallant Staysail
- N – Mizzen Staysail
- D – Fore Topsail
- J – Main Topsail
- M – Mizzen Topsail
- C – Fore Topgallant Sail
- I – Main Topgallant Sail
- L – Mizzen Topgallant Sail
- G – Main Topmast Staysail
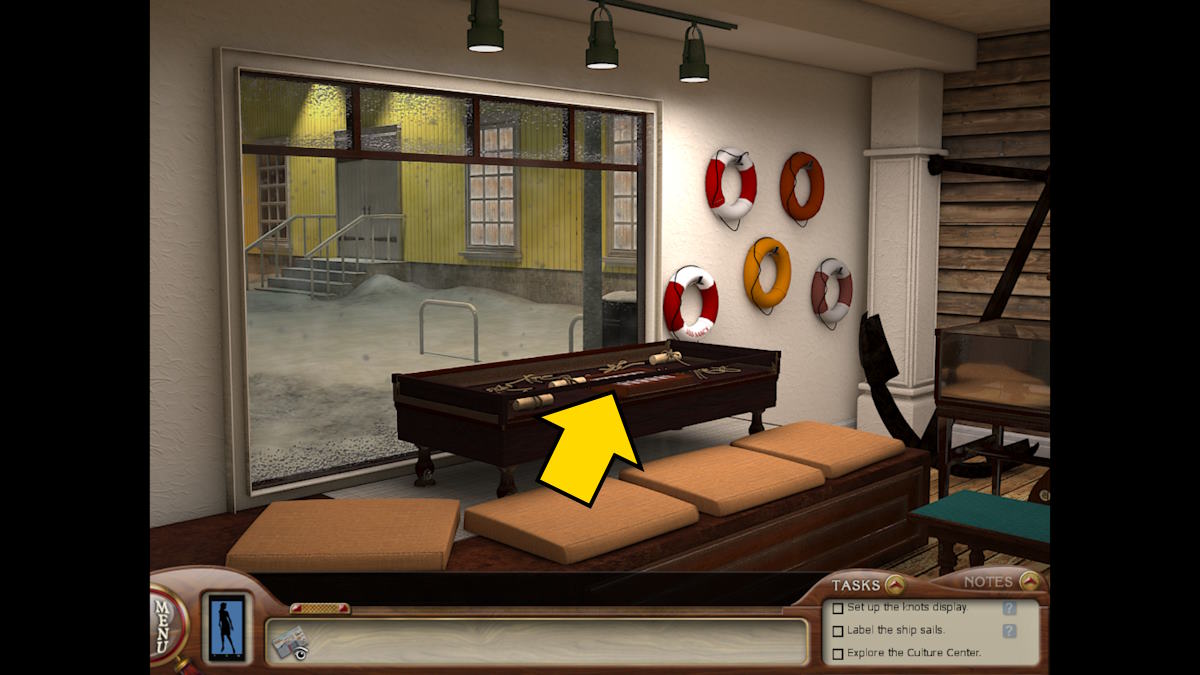
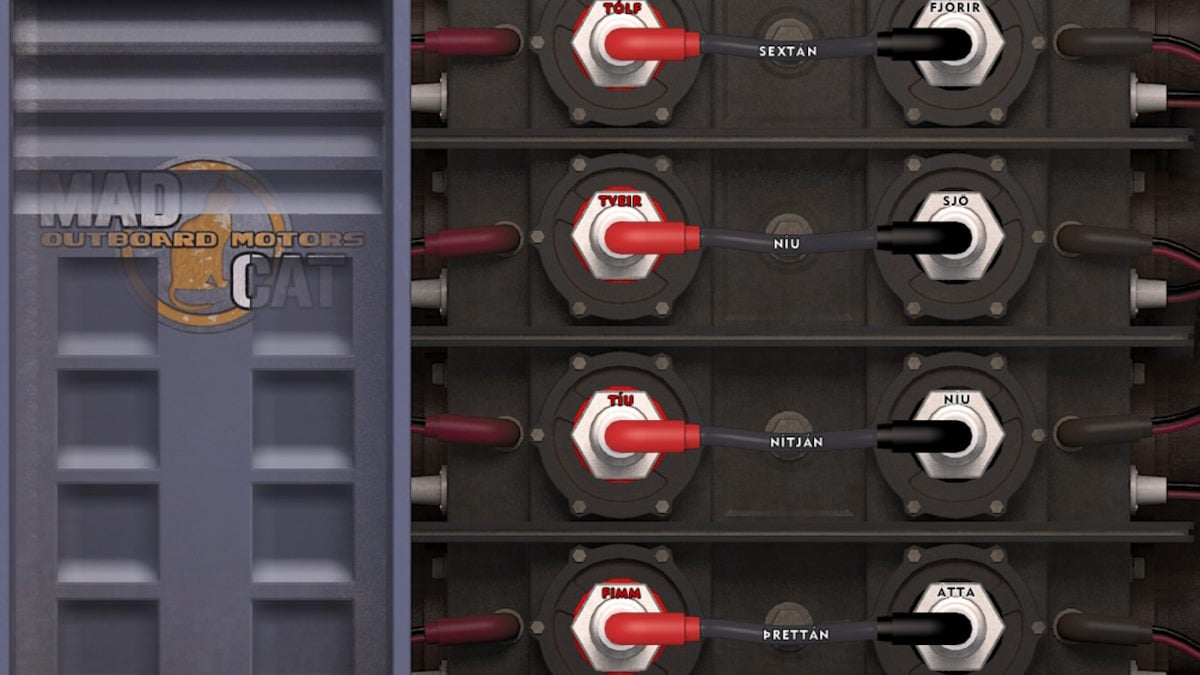
Turn to the right until you see the knot display (bbove). Click on it for a close-up and Soren will ask you to complete the display for him. The solution is below.
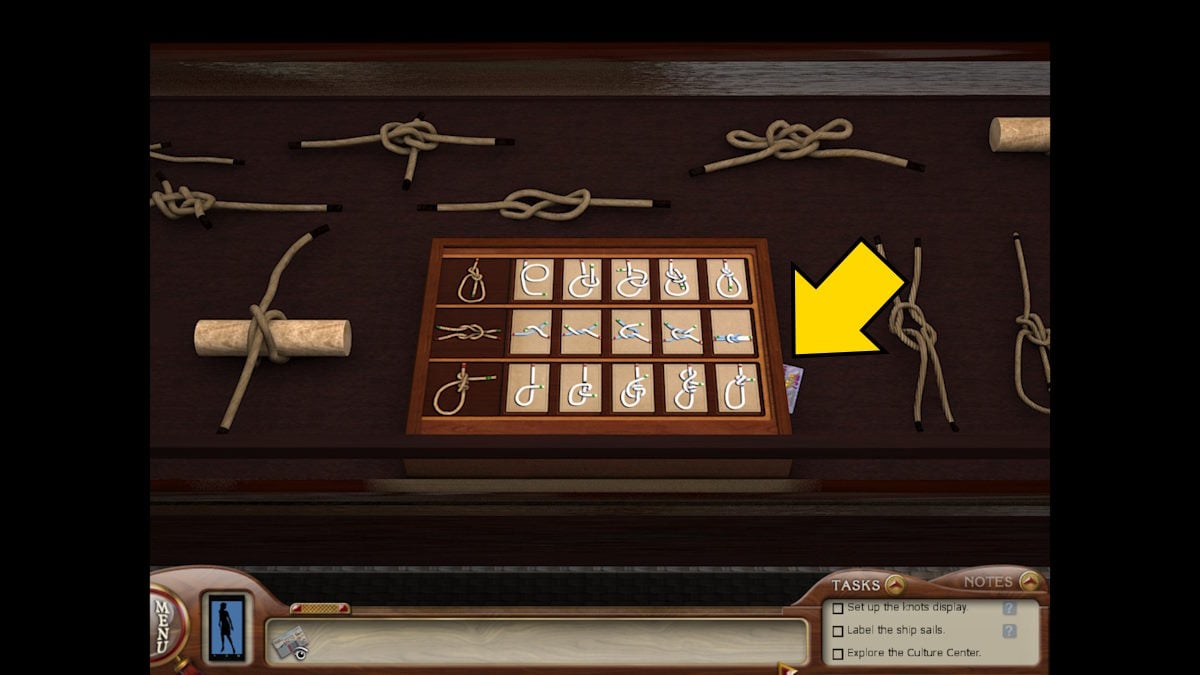
Once you complete it, you’ll uncover a card for the Ancestor’s Festival with the word GUNPOWDER written on the back (see the card's location marked above).
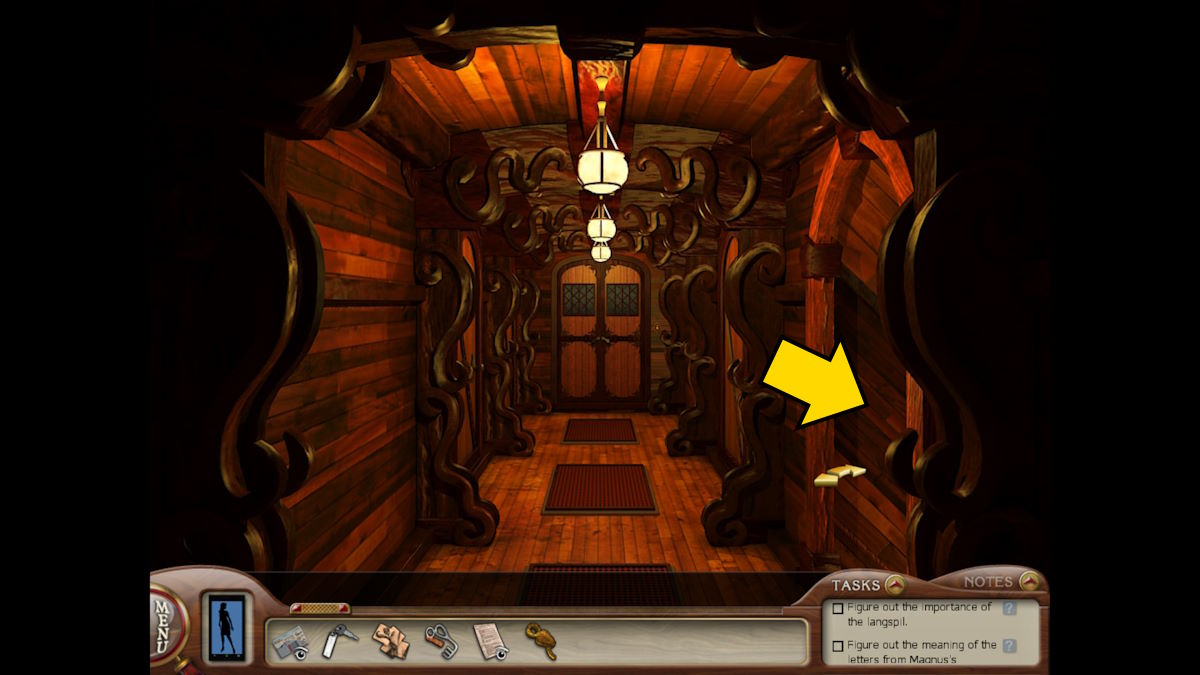
Searching the ship
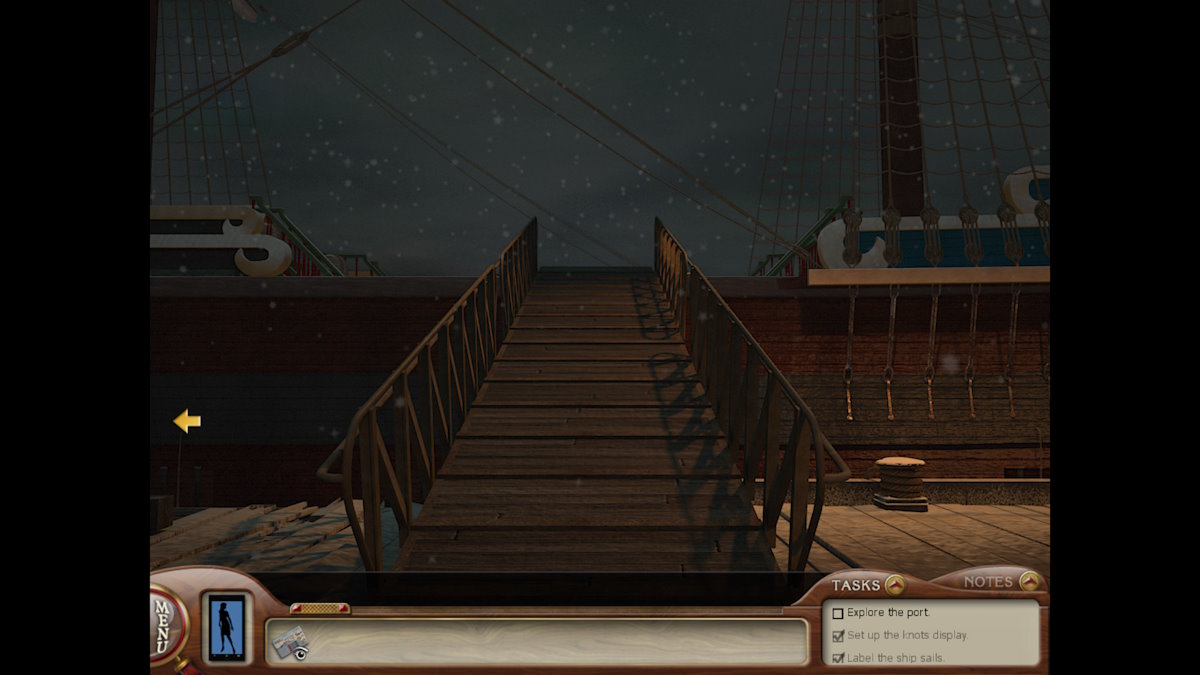
Head back outside and back to the ship to find the gangplank is back in place. As you get on board The Heerlijkheid you’ll meet Elisabet. Run through her chat choices to find she apparently wanted nothing to do with Magnus and didn’t like him. You find out Magnus lived in a cabin in the mountains. You also get a Snowmobile Key from her.
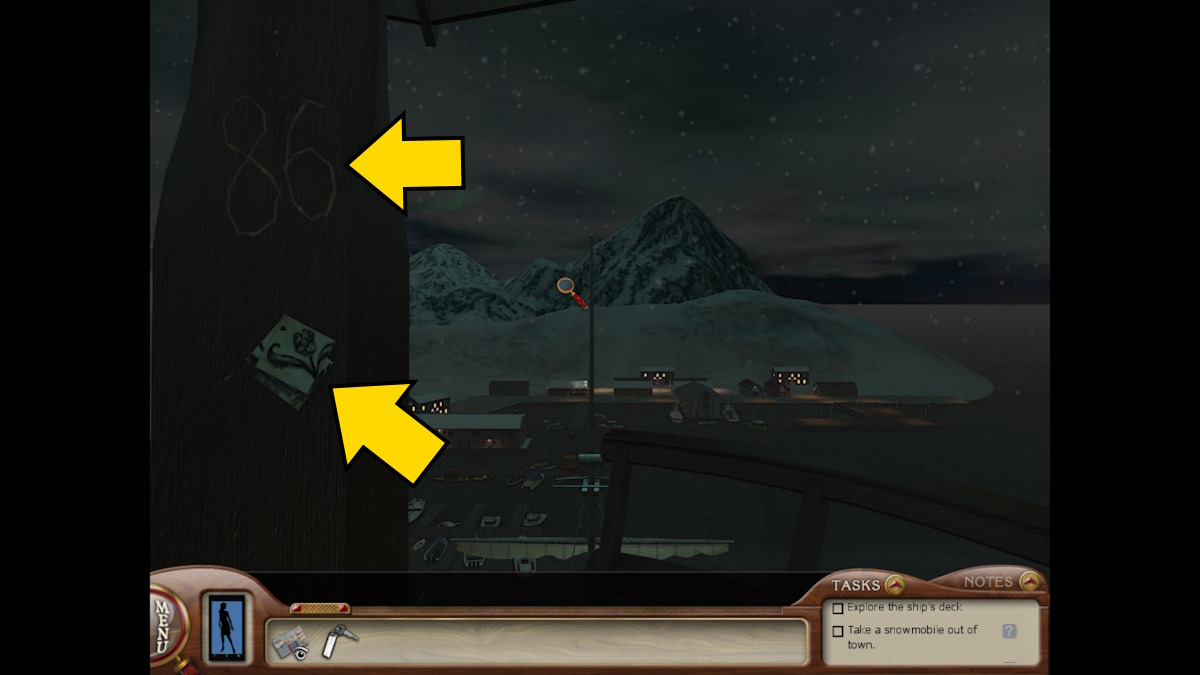
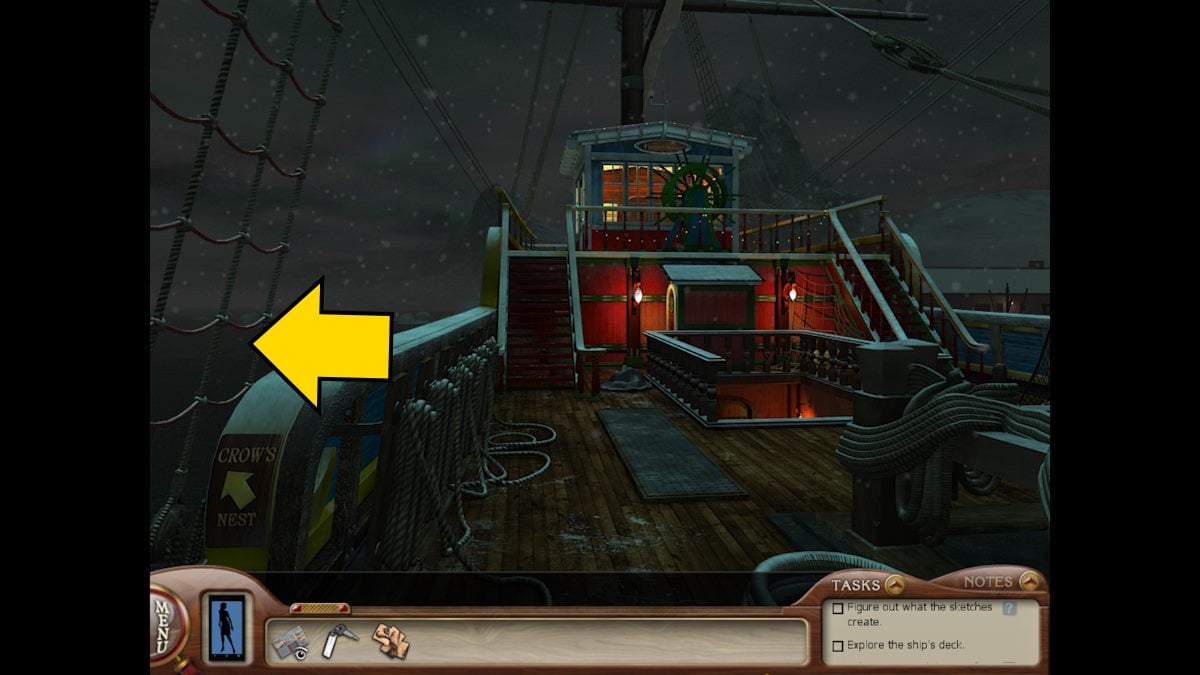
Continue to explore the ship’s deck after speaking with Elisabet. Climb into the crow’s nest to find the number 86 scratched into the wood and pick up the Sketch Piece you’ll find next to the number.
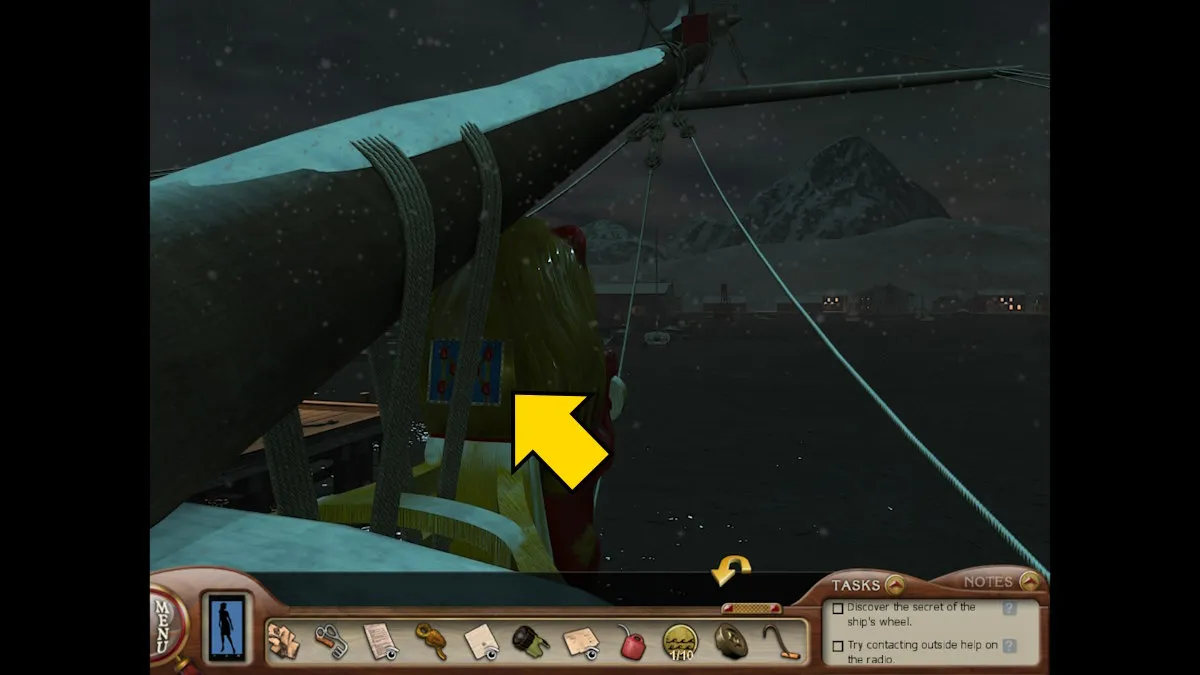
You can also go to the front of the ship and examine the figurehead (above) to find a puzzle, but you don’t have what you need to solve it yet.
The captain’s quarters
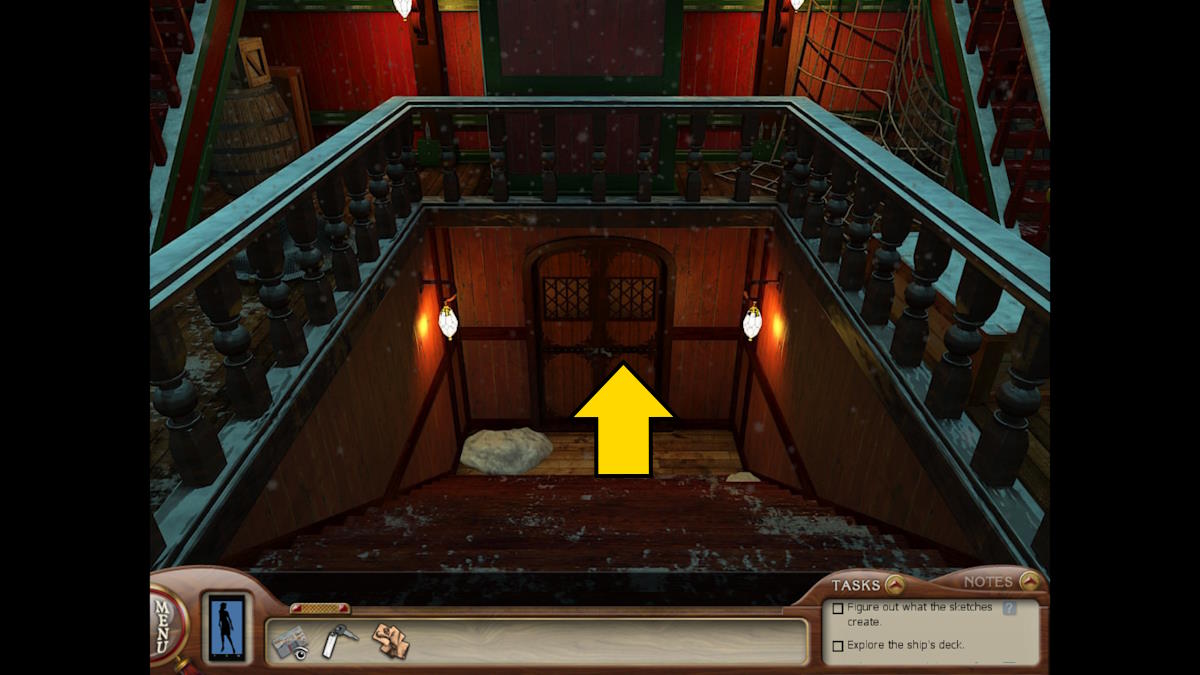
Head below deck through the door (above), move to the end of the corridor, and into the Captain’s Quarters.
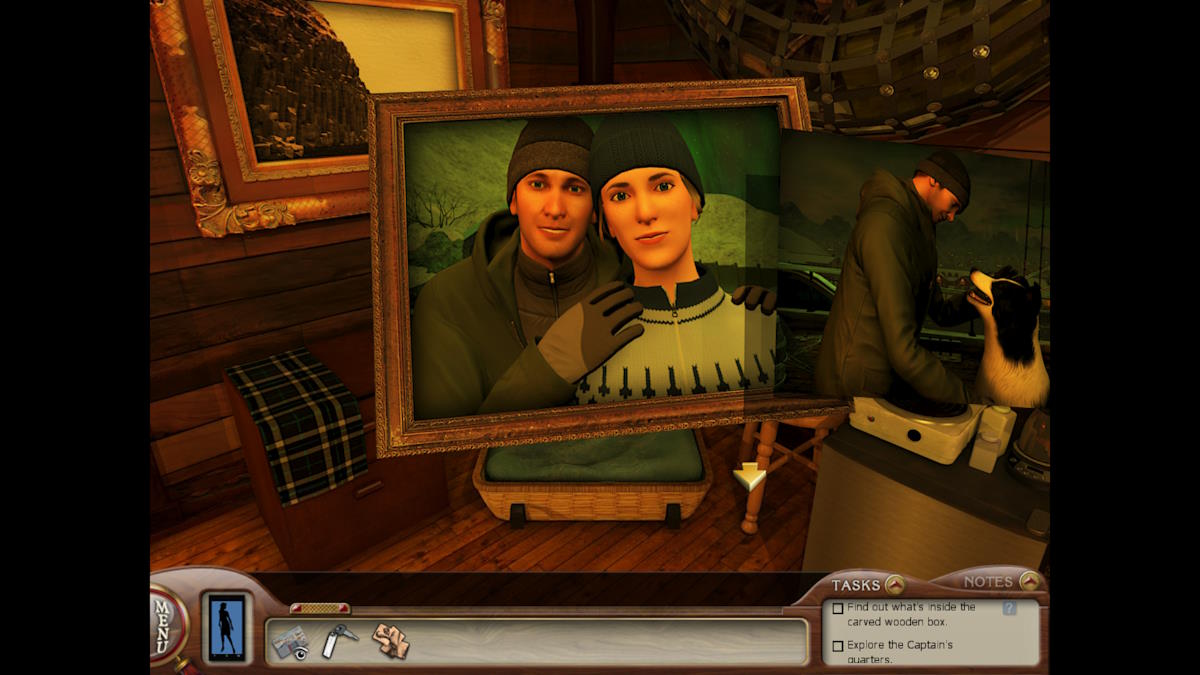
Look at the photo frame and move the dog photo to see a picture of a happy couple underneath. It’s Elisabet with someone.
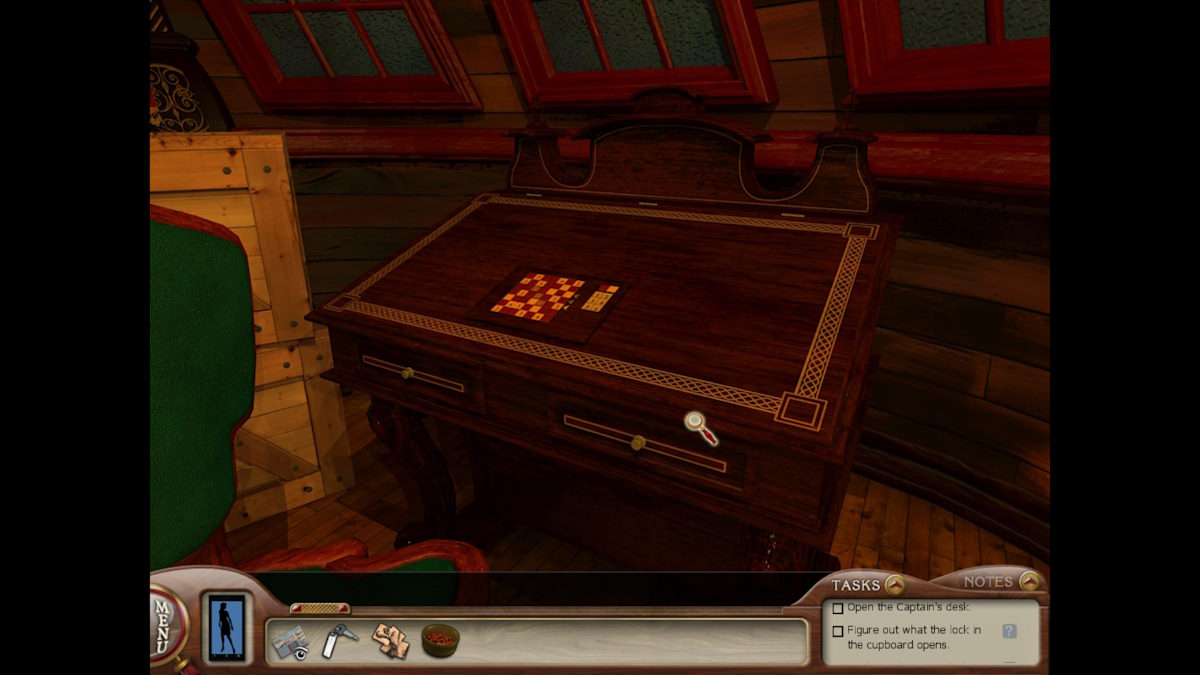
Look at the antique desk next. To solve the numbers puzzle, you need to observe the following rules:
- Each row must have 4 red squares and 3 yellow squares
- The numbers in each row must equal 9

You need to complete the three empty squares. So, the first must be a Yellow 1, the second a Yellow 3, and the third a Red 1. This opens the desk, allowing you to read the journal inside. The writer thought they were being followed as they tried to discover where the treasure was. It also becomes clear Magnus and Elisabet were in a relationship.
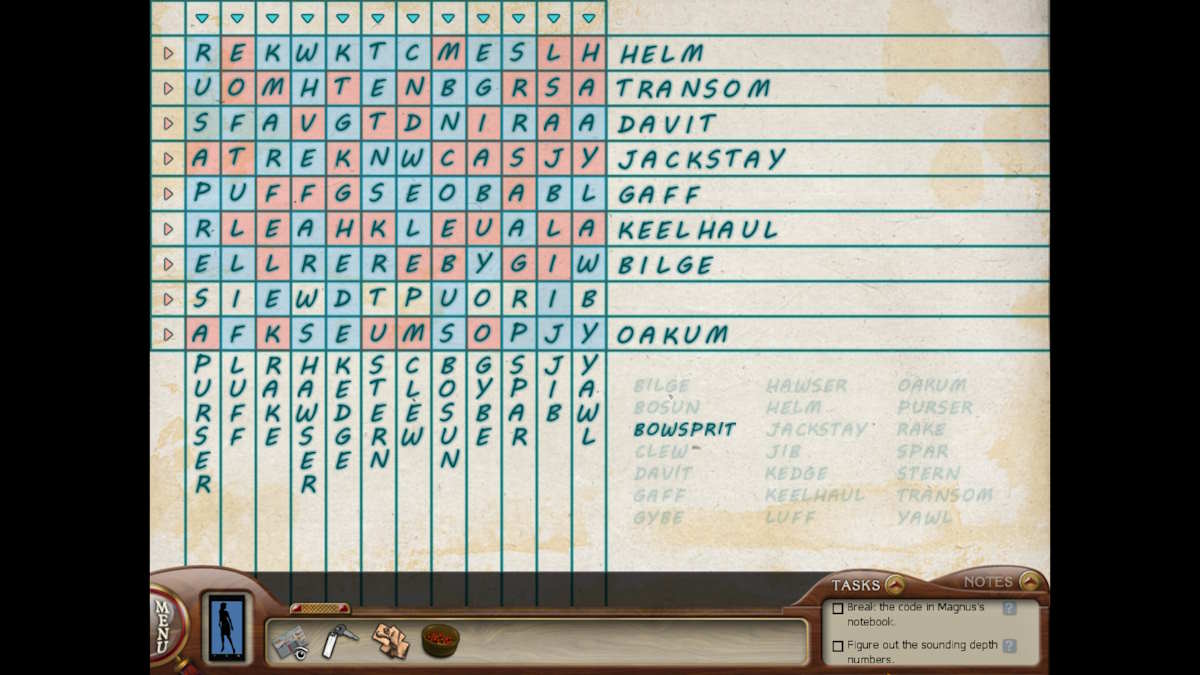
Click through the pages to find clues about the treasure and, at the back, a word search puzzle. All letters for each word are in a single row and column, with every letter in the puzzle being used once. Once solved, you’ll place the decoder over the puzzle (see below). The solution is above, with just the final word to add.
Take the Lighthouse Key from the desk, and click the newspaper to find that someone leaked a story to the press about the fact they might be close to finding the treasure.

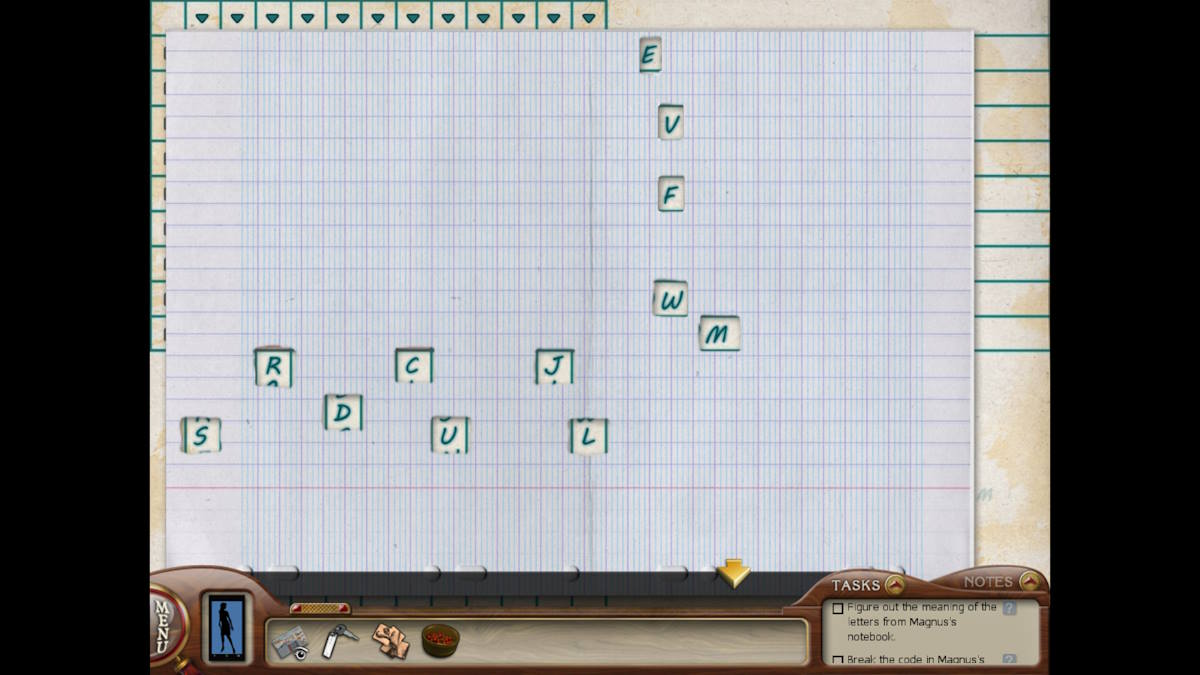
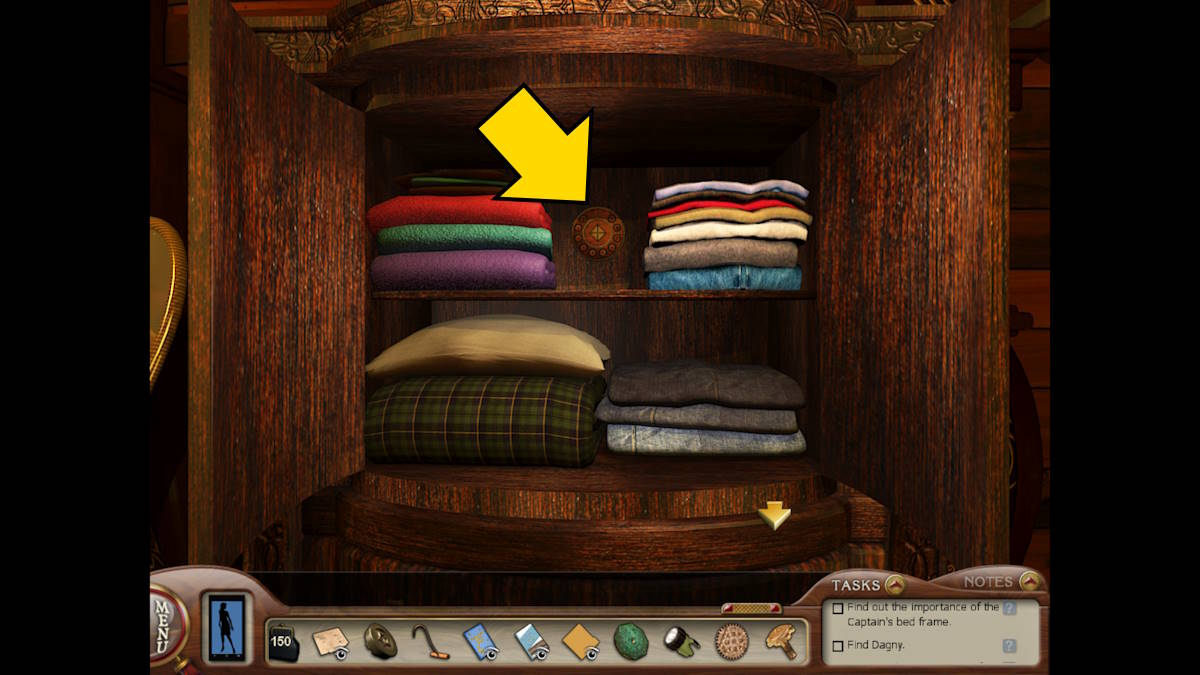
Open the cupboard and take the Pins.
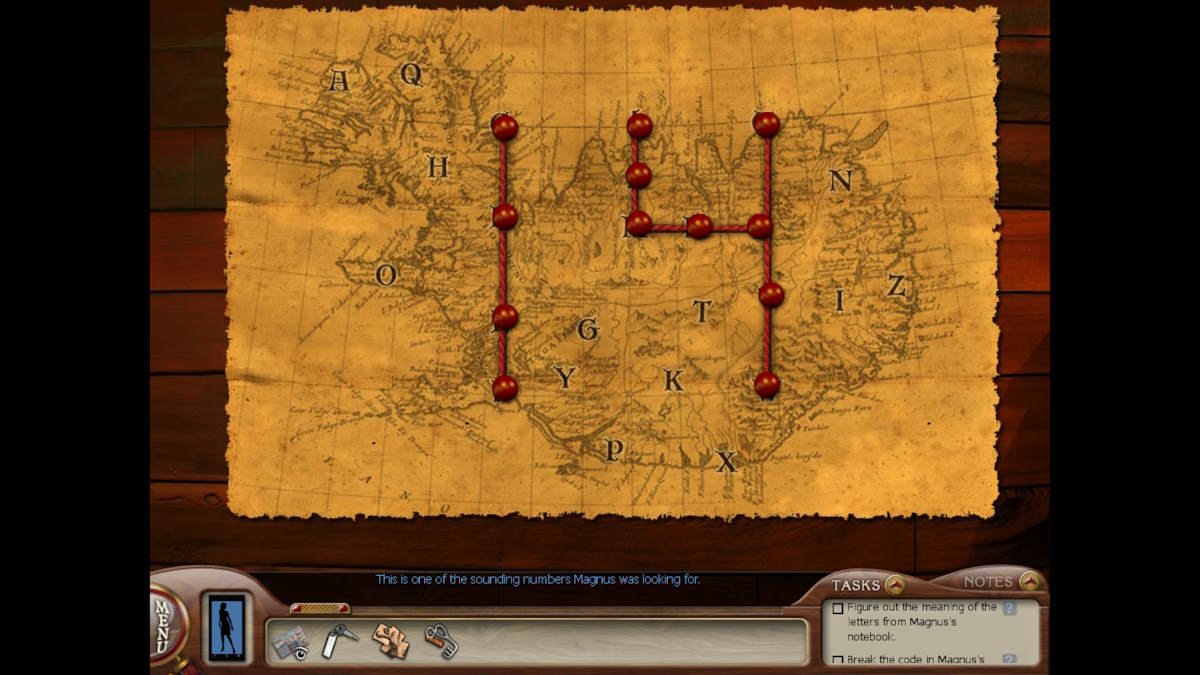
Select the map on the wall in the cabin (above) and the pins you picked up will be added to the side of the image. Use pins to pick out each letter you just found from the word search puzzle, which will get you the number 14.
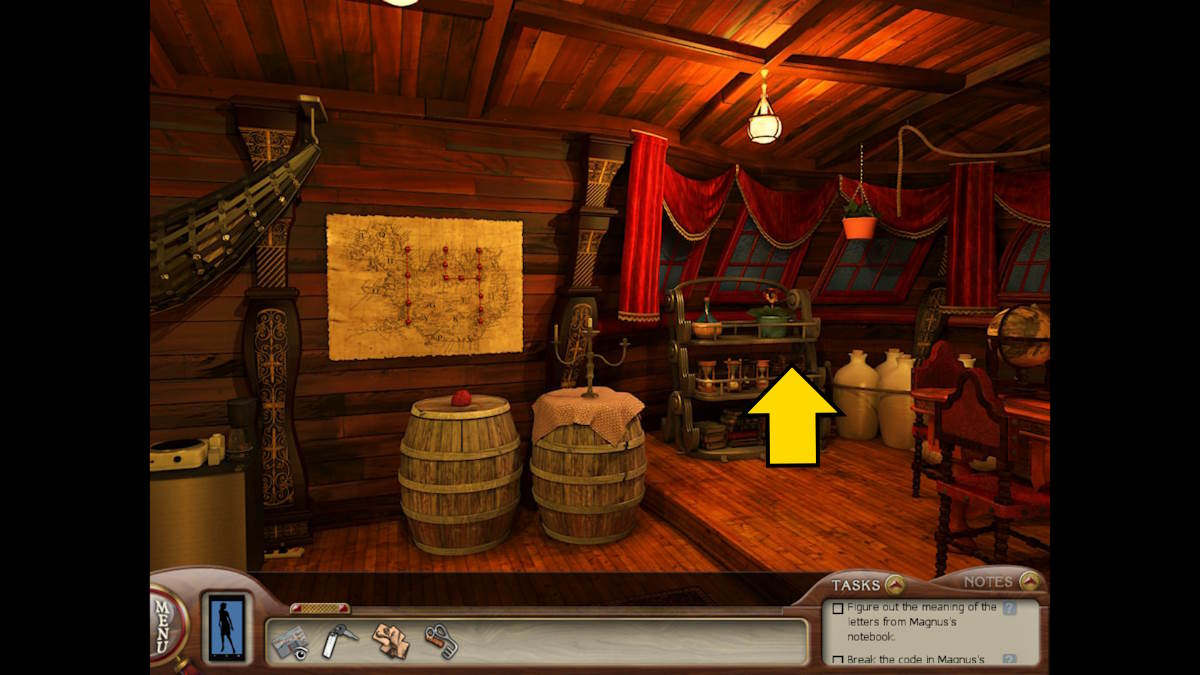
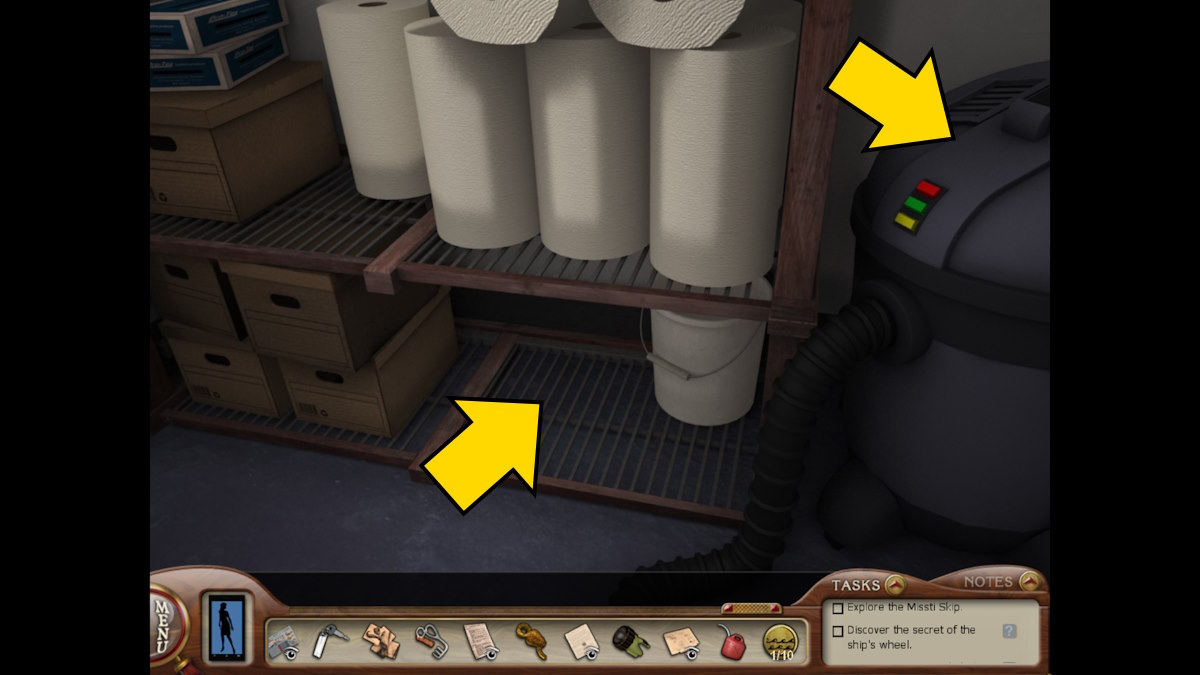
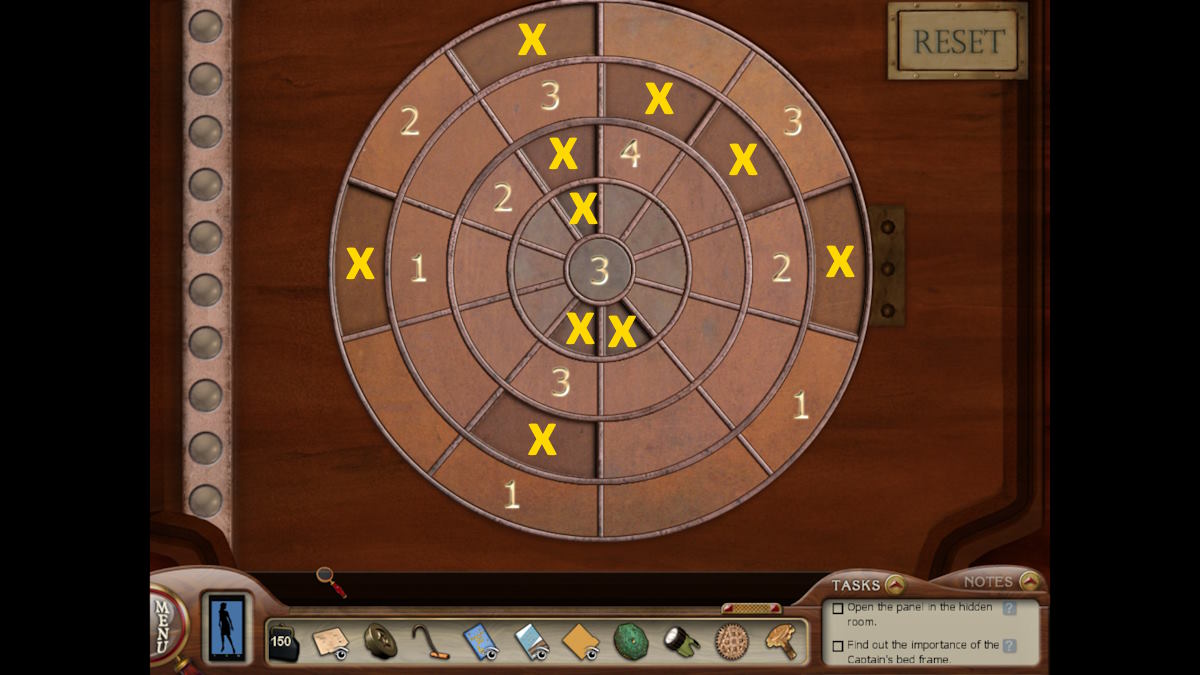
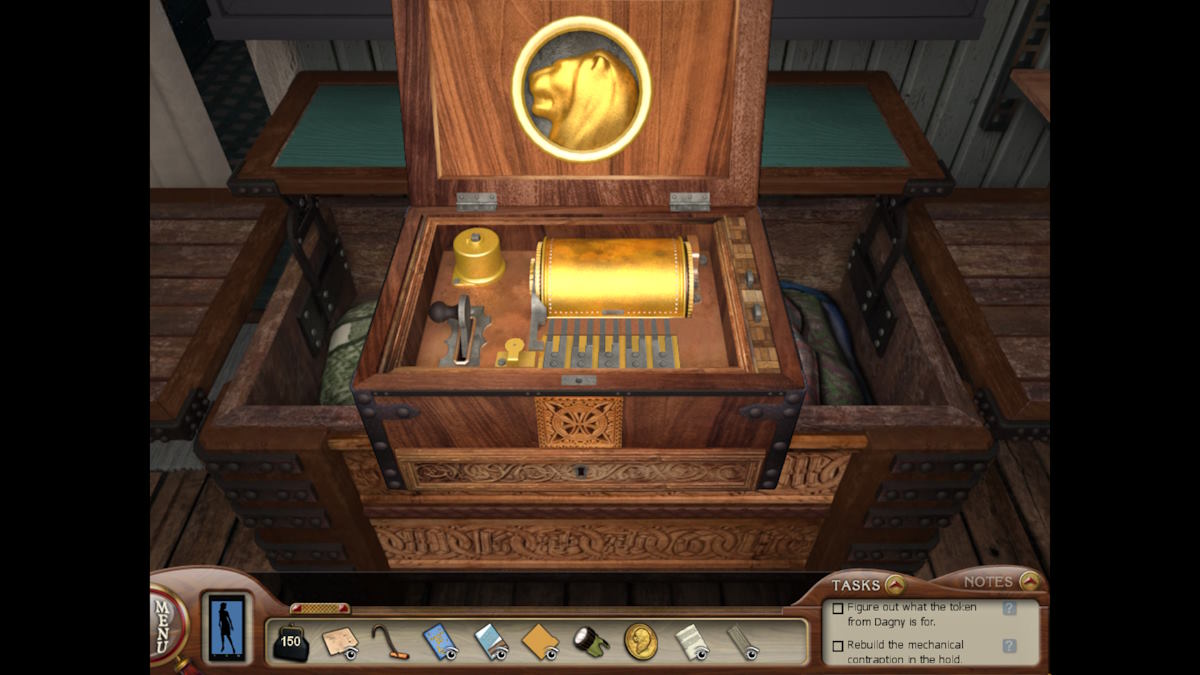
Select the shelves next (above), click the box for a close-up, and to start a puzzle. You must ensure all of the sections are pressed down at the same time to open it.
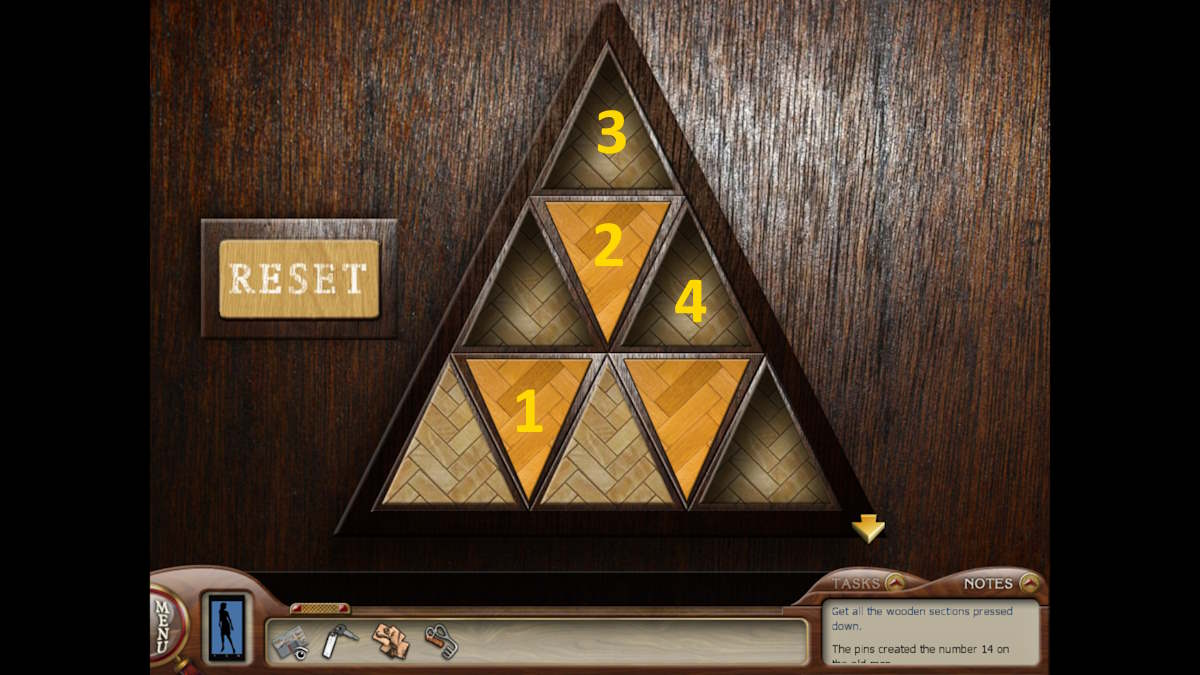
See the solution above. Once open, examine the notes inside to find Magnus was desperate to get Elisabet’s grandmother’s langspil from the pub, despite her protests.
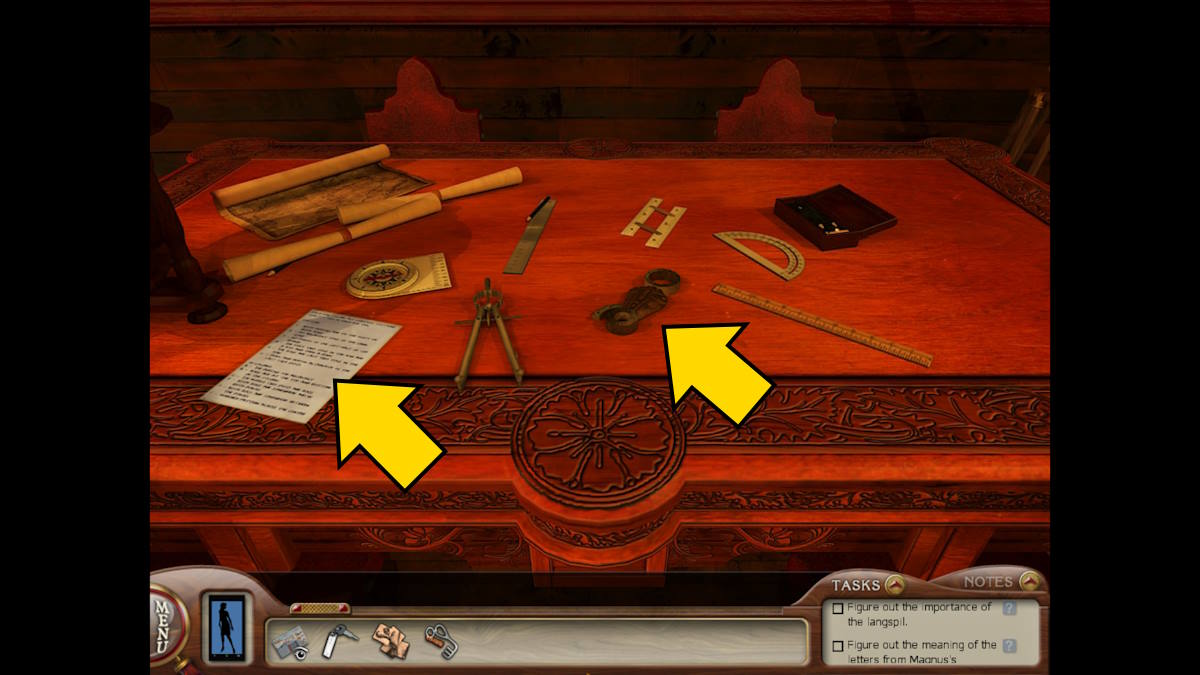
Get a close-up of the desk now (above). Read and pick up the Toy Instructions, and take the Locator.
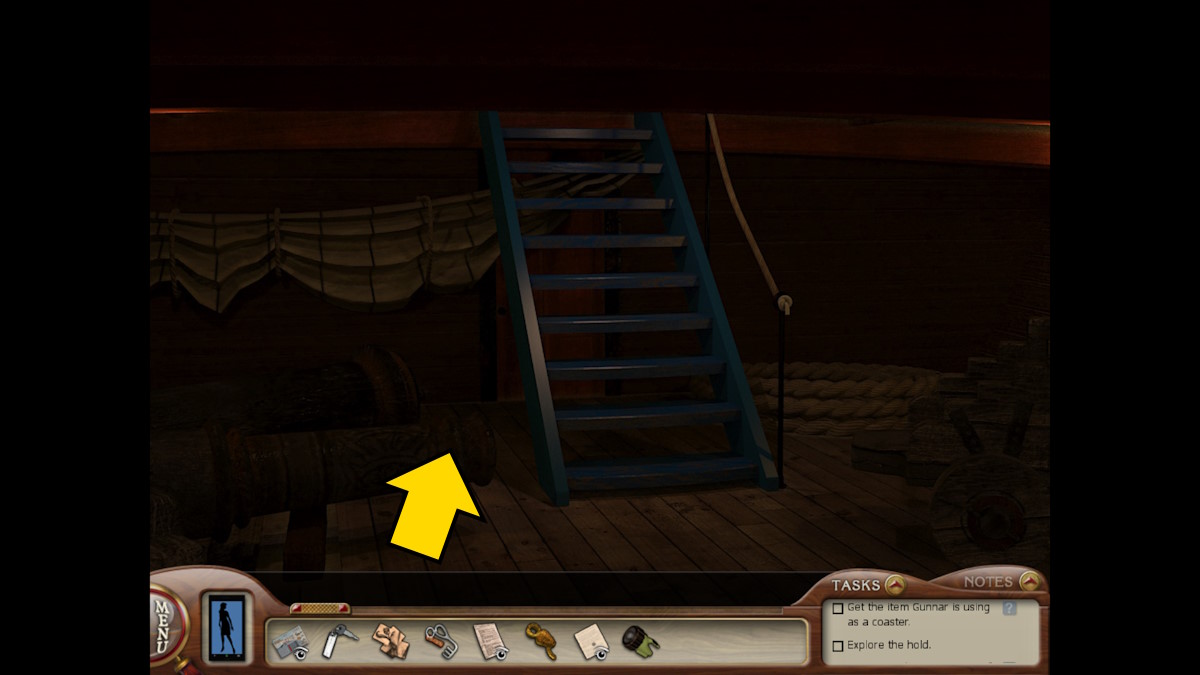
Exploring the hold
Head back through the door and take an immediate right (see above), down the stairs, and into the hold.
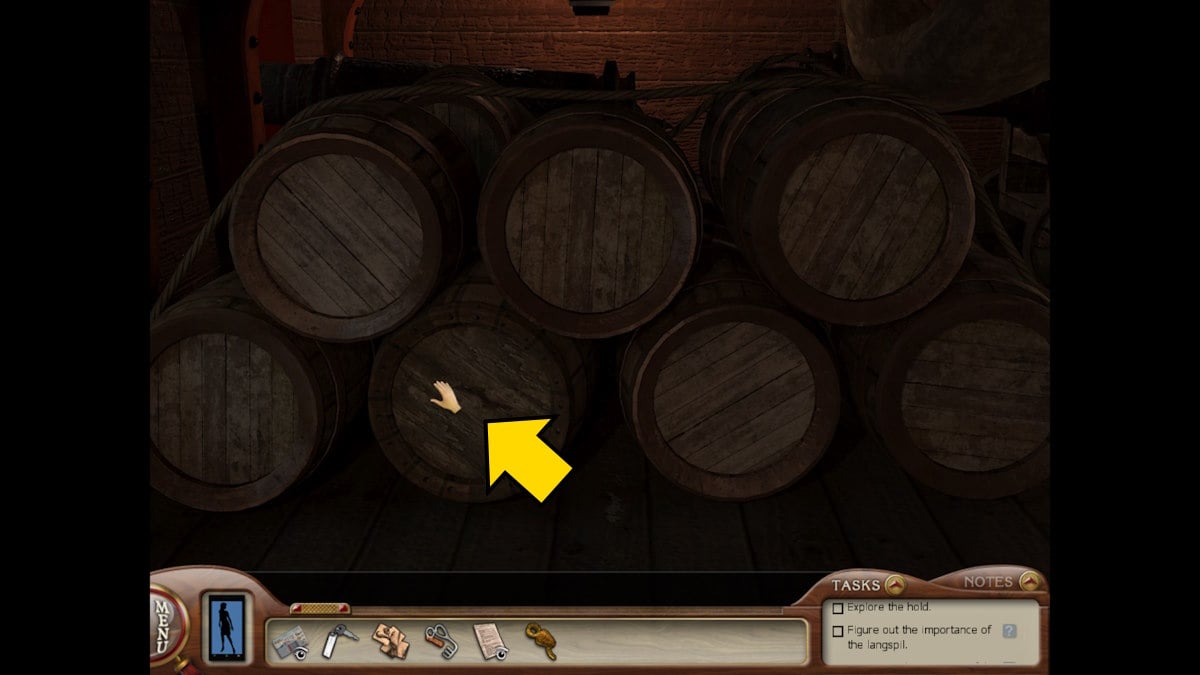
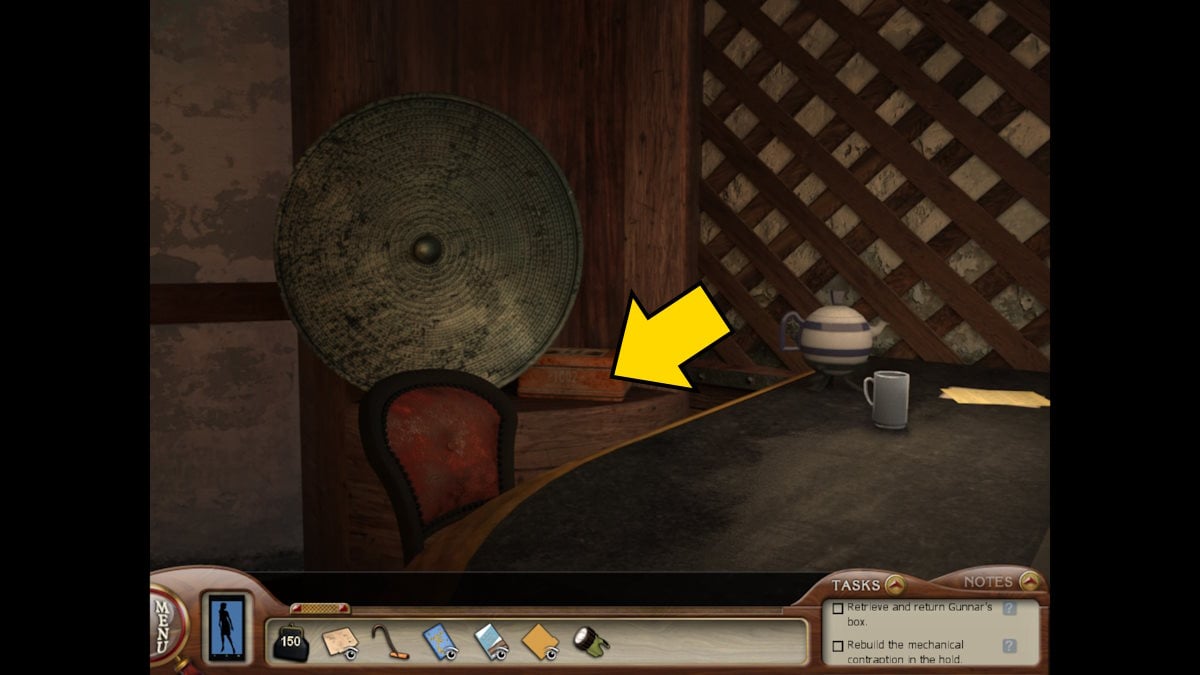
Open the barrel (above) to find a note seemingly written by Dagny. It has her phone passcode (Scuttlebutt), explains her luggage is with Soren in the center, and that Gunnar has something interesting that he’s using as a coaster. You also find out Gunnar refers to her as Minke.
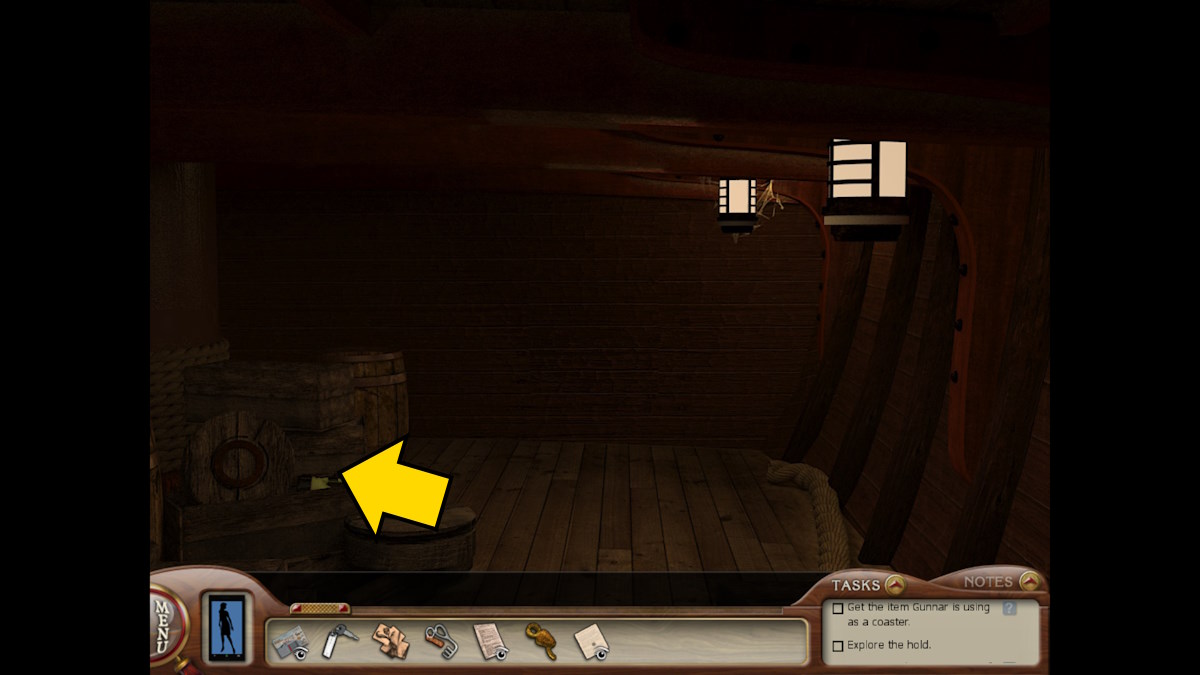
Continue further down into the hold to find an Unpowered Flashlight.
As you turn back you’ll find some kidnapping materials hidden in a cannon (above).
The skipper’s cabin
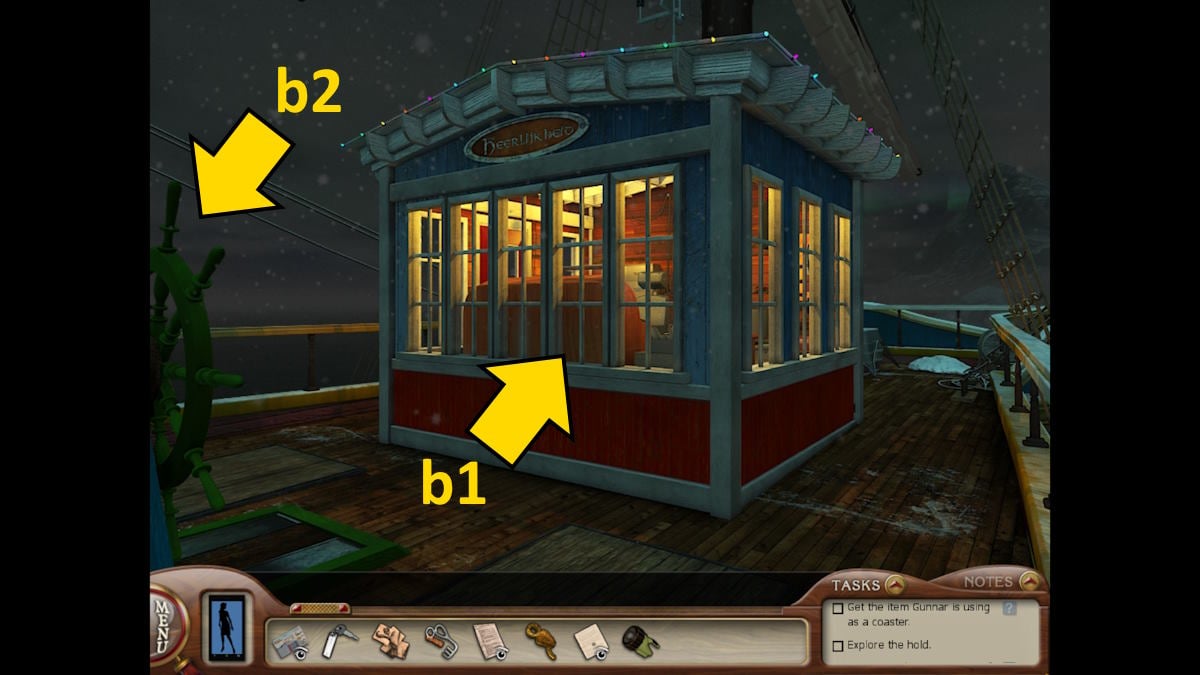
Head onto the deck and up into the skipper’s cabin (b1). Note the ship’s wheel (b2) is missing 10 decorations.
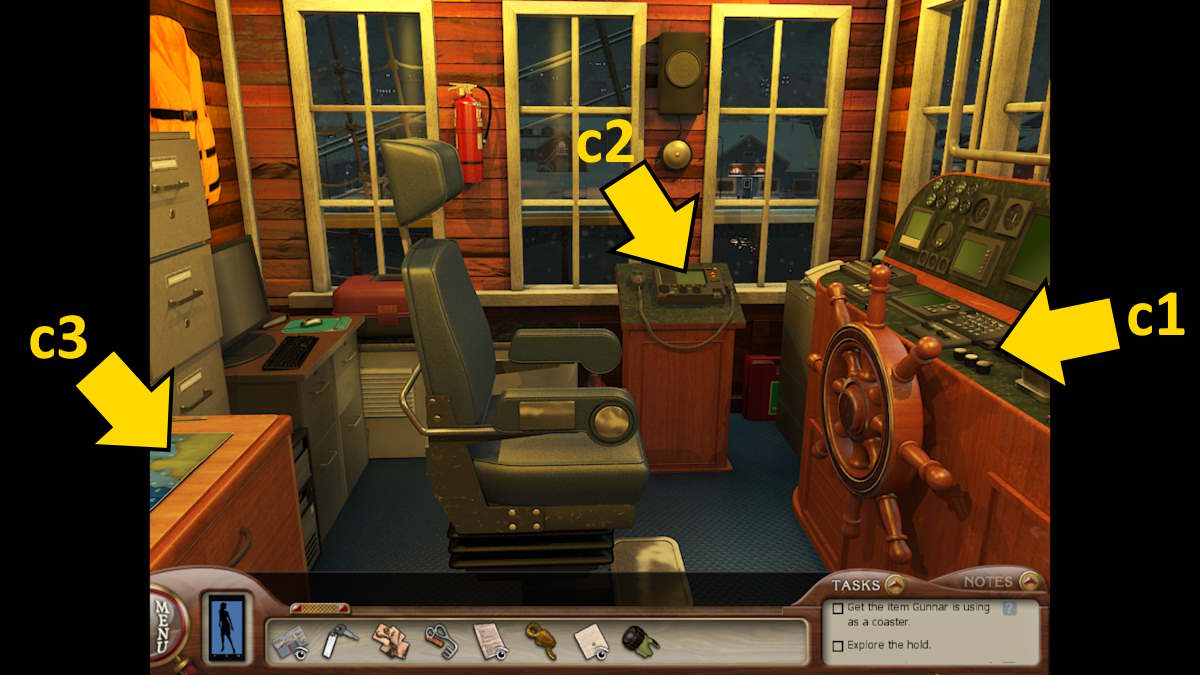
Read the Captain’s Log (c1) to discover only Magnus and Dagny had wheelhouse turnkeys, which are required to contact the harbor radio operator in case of emergency. Examine the radio (c2) to find that the key is missing, and then select the depth maps (c3) to find you need the depth numbers and a compass to explore them further.
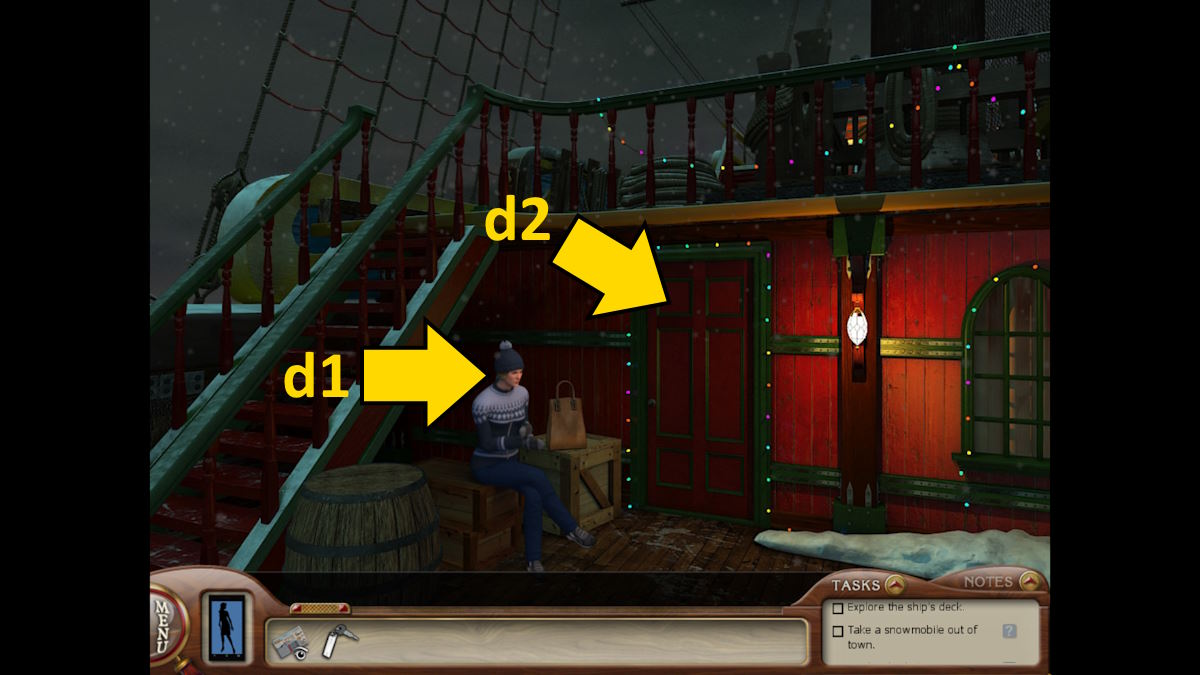
Go back onto the deck and speak with Elisabet (d1) once more to find the door behind her (d2) is apparently ‘an old broom closet’. Also, quiz her more about Magnus. She’ll give you a written key to opening a box, which appears in your inventory as Magnus’ Notes.
The Missti Skip
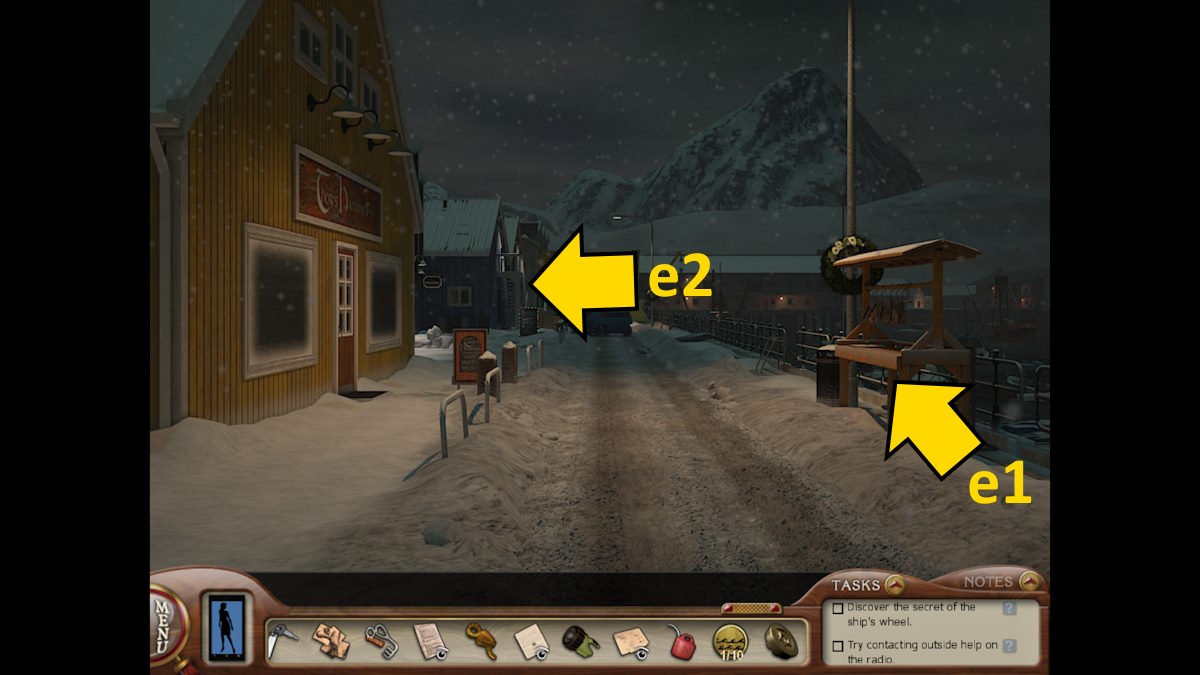
Head back into town and turn right. Examine the fish rack (e1) to find and take a Hook, and read a local newspaper. The paper’s lead story is about Gunnar disrupting a town meeting because he doesn’t think the Ancestor’s Festival should happen. Now go into the Missti Skip pub (e2).
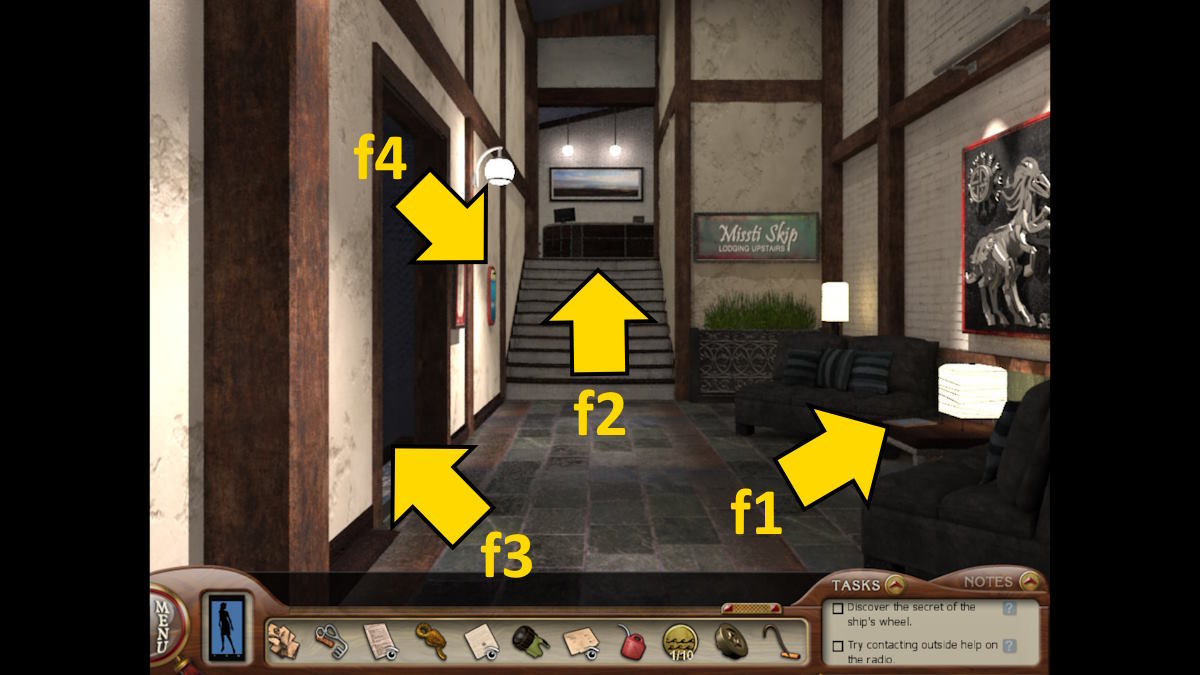
Head in Take a look at the book in the entrance hall (f1), called Customize Your Gear. This explains how to alter a music box to play the tune you want. Add it to your inventory. Also, note you can go upstairs from here (f2) to your room to rest. Doing so passes time, and will alter the tides, which you may need to do later (you can see whether it is currently low or high tide by looking at the sign marked on the wall above i.e. f4). For now, go downstairs to the bar (f3).
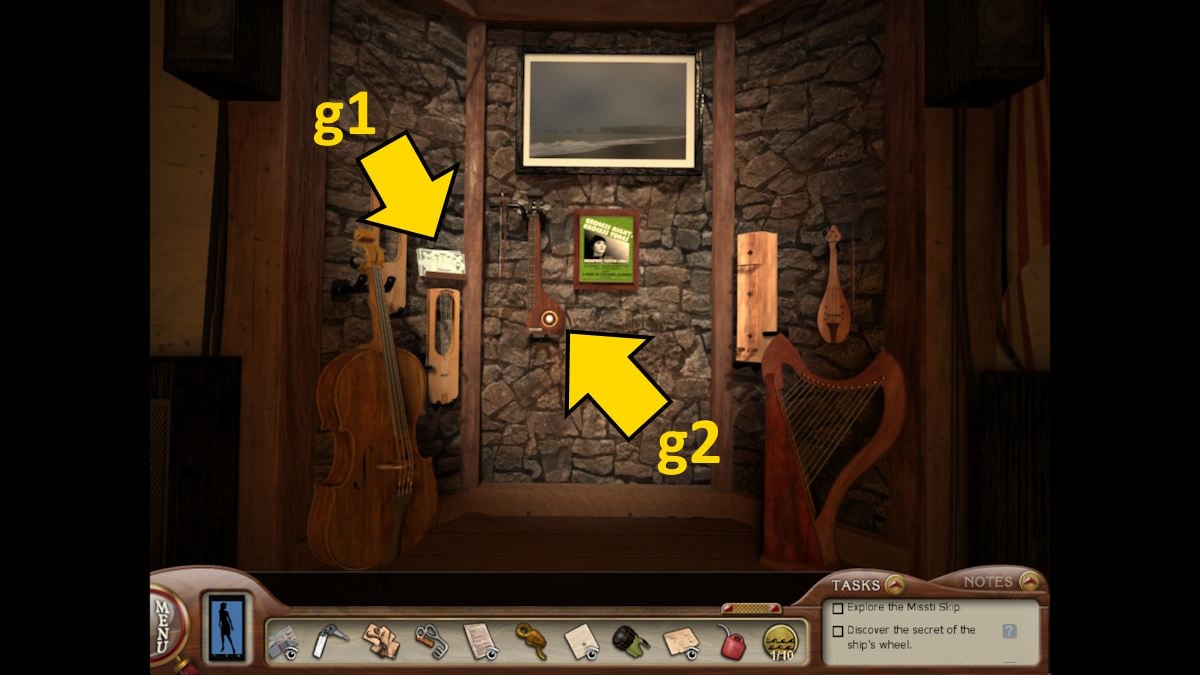
As you go in, you’ll be greeted by Gunnar. He doesn’t like Magnus, the festival, or the sea, but does seem to like Dagny. After the conversation, select the stage (above) and use the card (g1) to identify the langspil (g2).
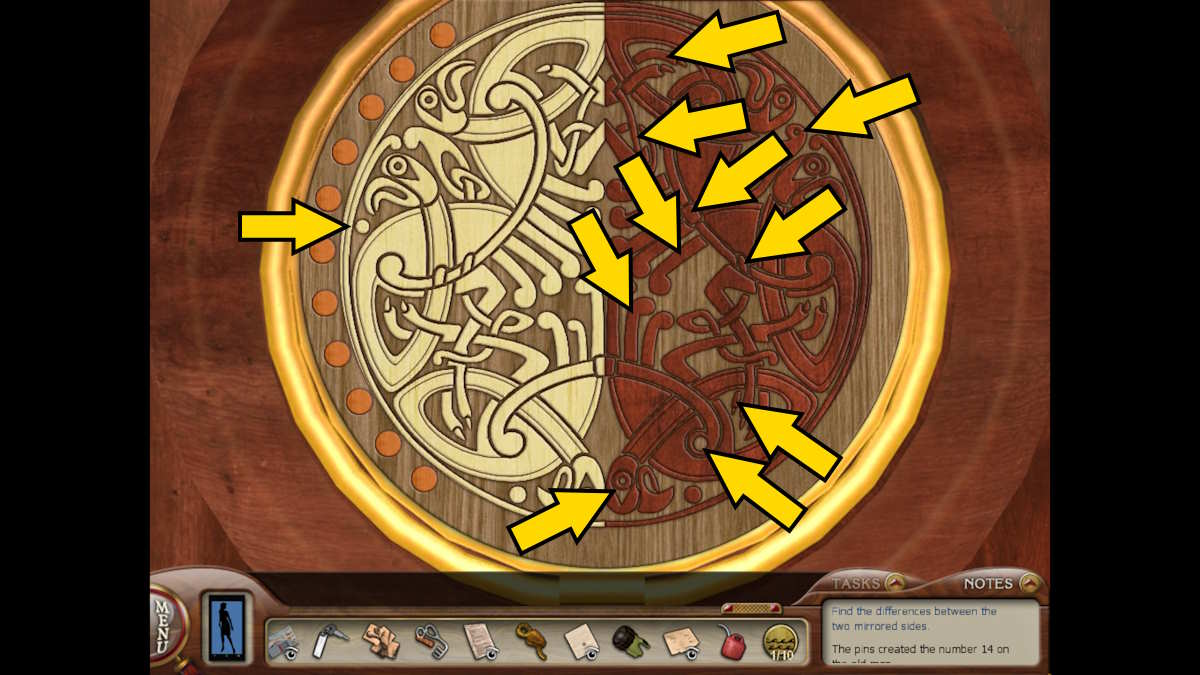
Select it for a close-up and click the white button to open a small hatch. You now need to identify all 11 differences between the two sides of the pattern. I've marked all three differences in the image above. Once done, you’ll get the Carved Star.
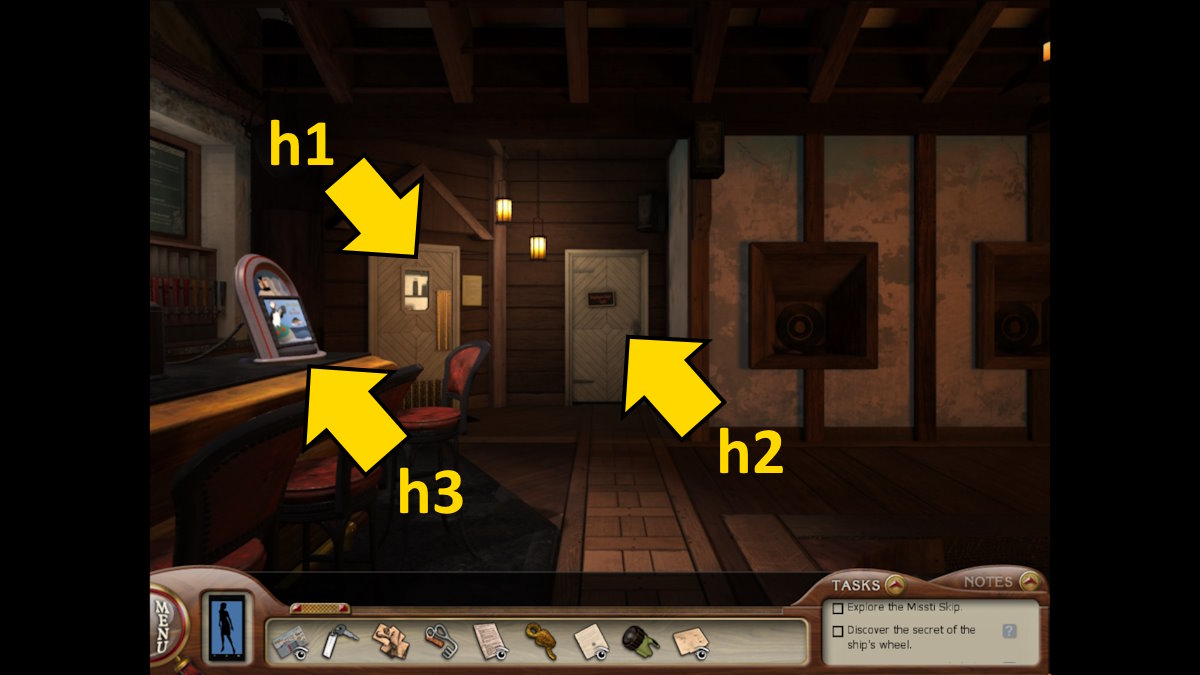
Read the note to Gunnar by the kitchen door (h1), then head through the staff-only door (h2) and take the Gas Canister and a Decoration (below).
While you’re in there, Elisabet and Gunnar will argue. She wants him to cover the bar tonight, but he refuses.
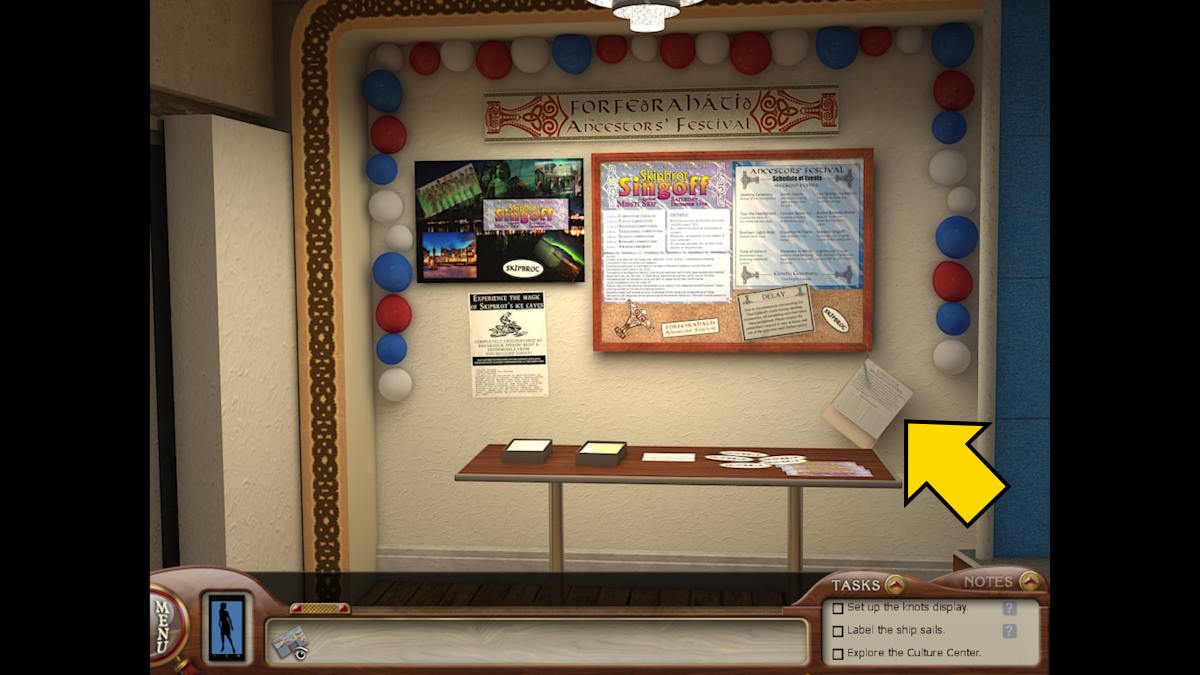
When you head back outside the pub, you’ll get a call from Ned, telling you you’ve forgotten it's your anniversary! Return to the Culture Centre, look at the Ancestor’s Festival display (above), and sign the petition using the pen attached to the clipboard.
Food orders mini-game
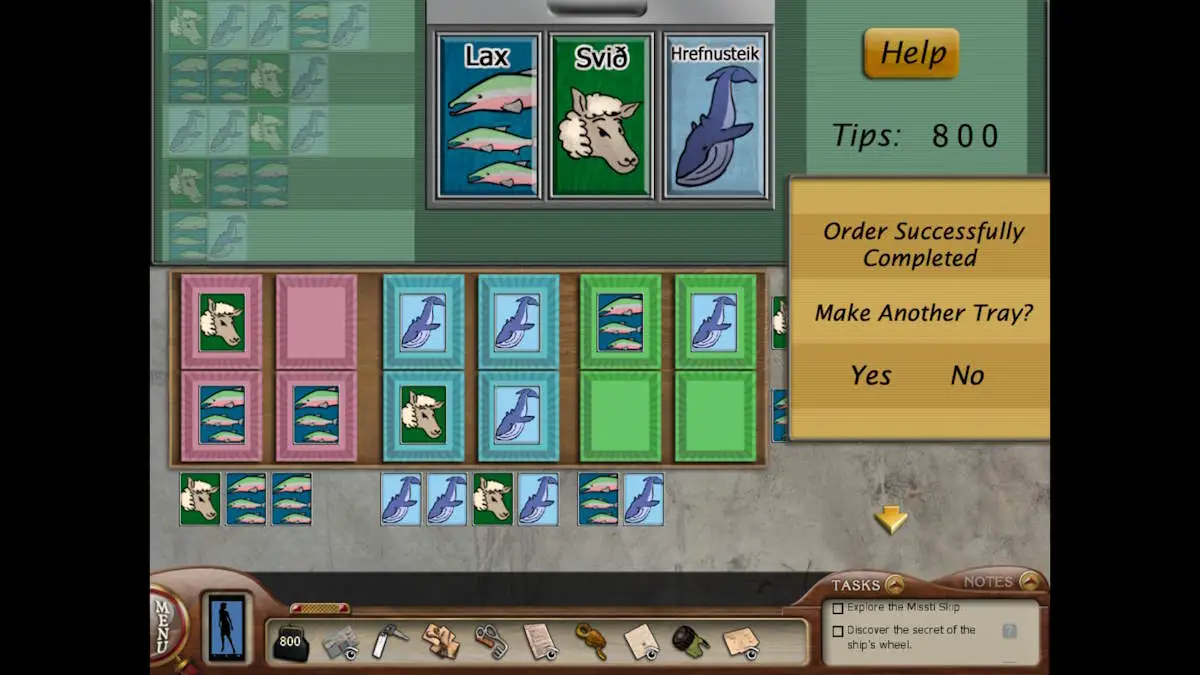
Return to the Missti Skip and Gunnar will request that you go and help in the kitchen. Go through the kitchen door (h1 - you’ll be in front of it after speaking to Gunnar this time) to start a mini-game. This is a speed game, where the faster you complete the orders the more money you will earn.
This is randomized each time you try and you can keep trying to earn more money as required, so don’t worry if it takes you a while to figure it out. I’ve pictured a completer above as an example. There are five orders each time and the round ends when you have completed all five in the single screen.
Two orders run left to right in the rows, with the other three being one each in the three colored boxes. Both rows and boxes ignore any blank spaces you leave. So, each row order will also need to match the order in each of its corresponding boxes.
Icelandic language mini-game
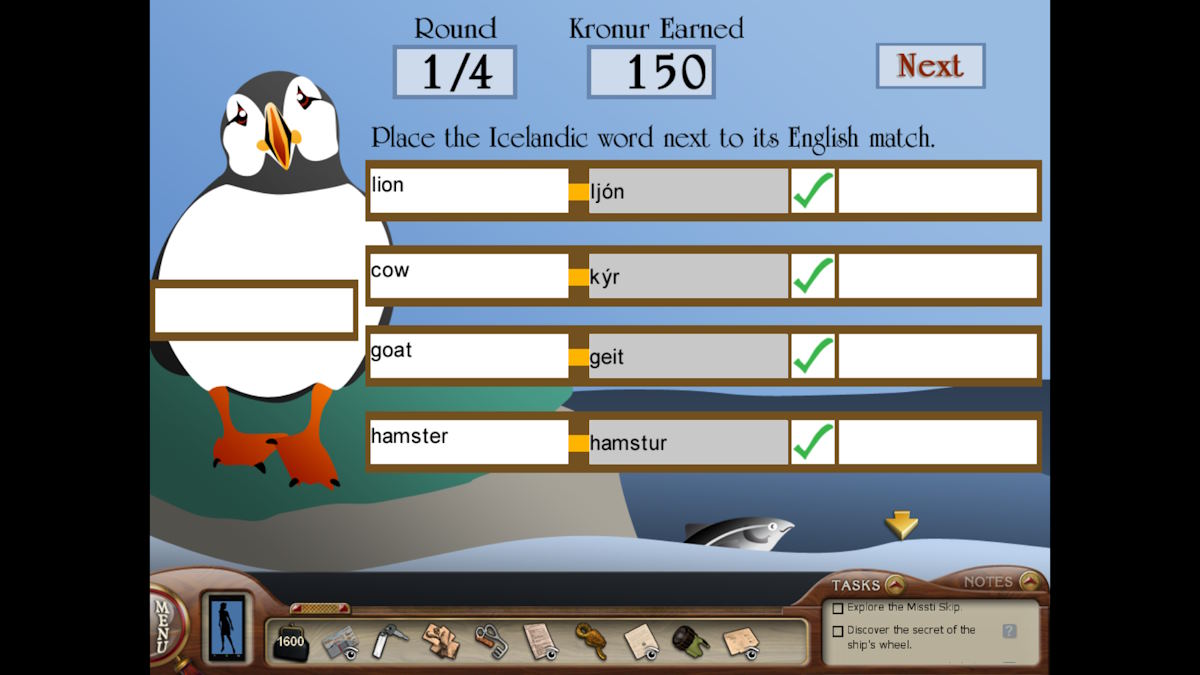
You can also earn Kronur by completing rounds of the quiz on the bar (h3). This is a simple matching game where you need to take a snapshot of the words page and then place them into the correct slots during the quiz (see a completed round above). You’ll earn 600 Kronur for completing four rounds correctly and the quiz is repeatable. The questions are randomized each time.
Reporting back to Dagny
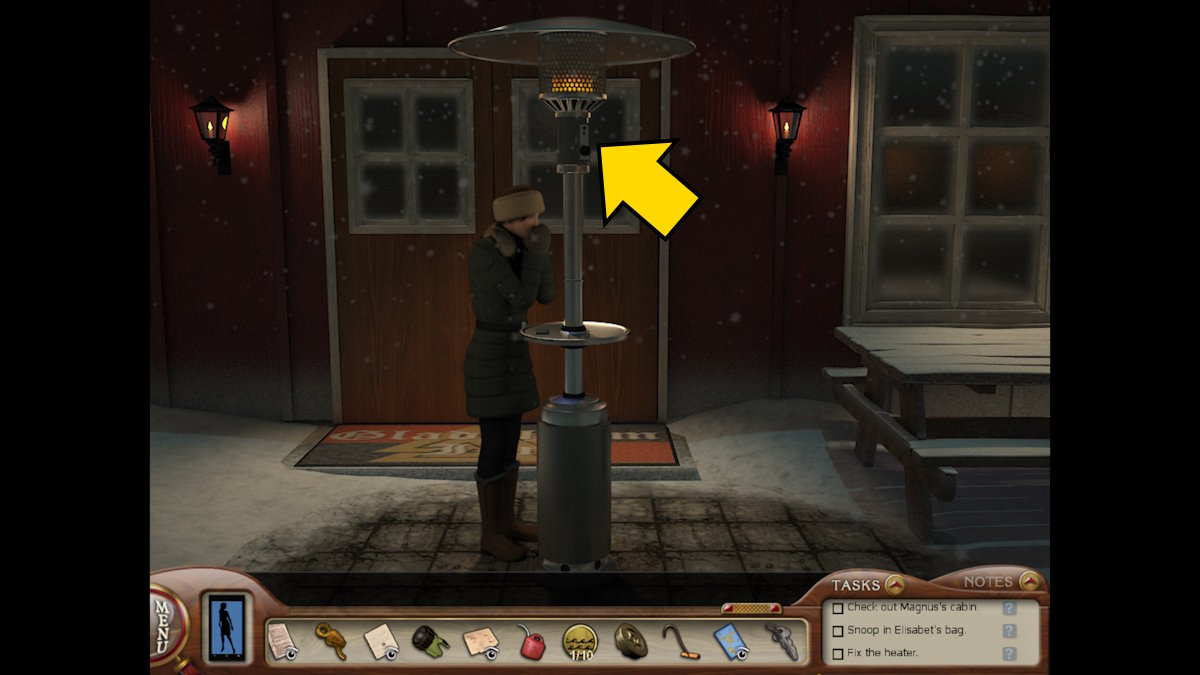
Speak to Dagny again to find her still freezing in the cold because the outside heater is broken. Click the heater to begin a puzzle.
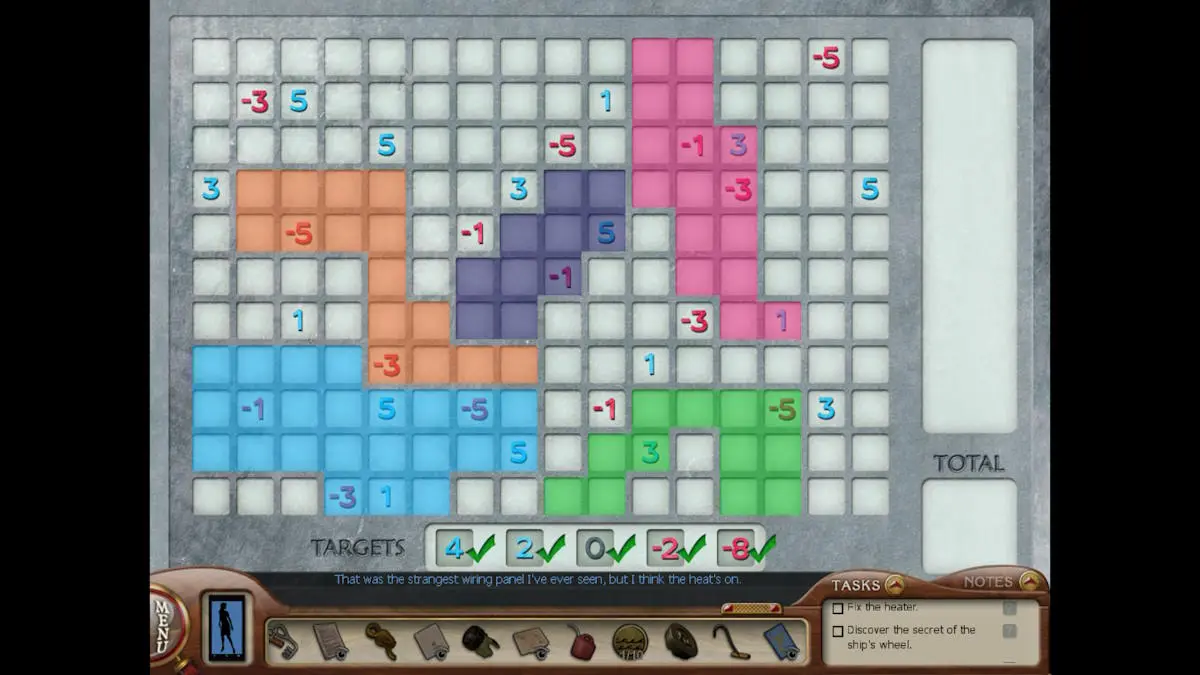
You need to place the five shapes onto the map so they cover spaces equating to the five target numbers at the bottom of the screen. I’ve included the solution above. Dagny says Elisabet has a key to Magnus’ cabin, but you’re going to need to get her off the ship so you can access the ‘broom closet’ to get it. She also gives you her Radio Key.
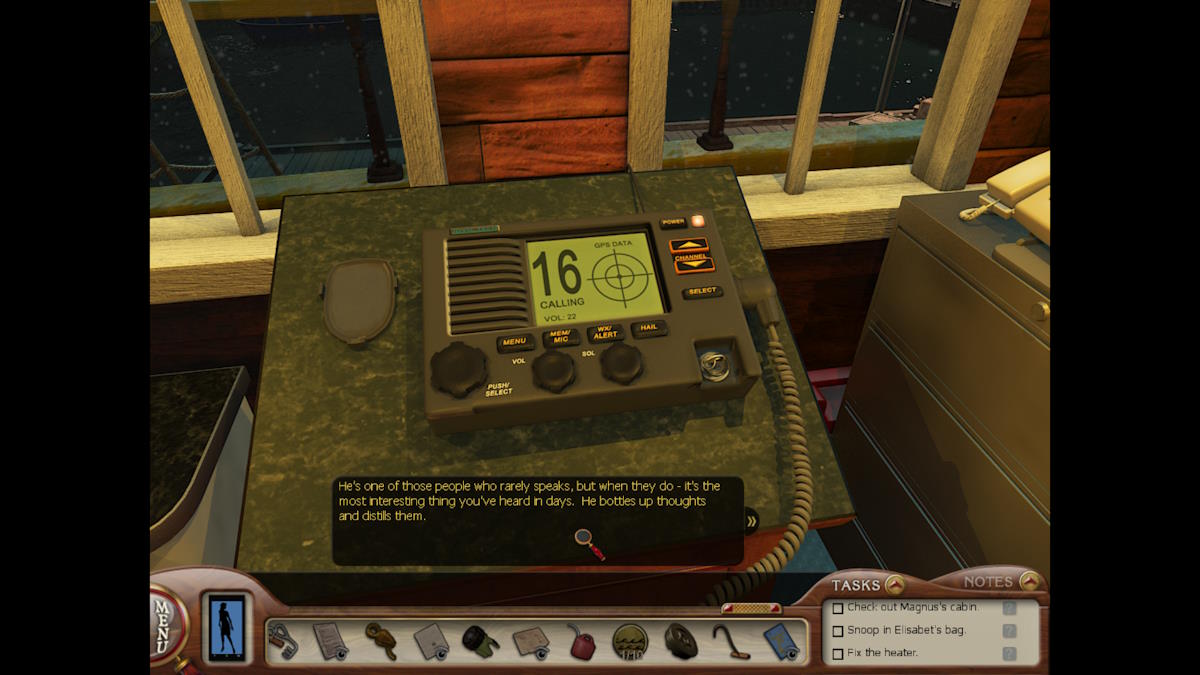
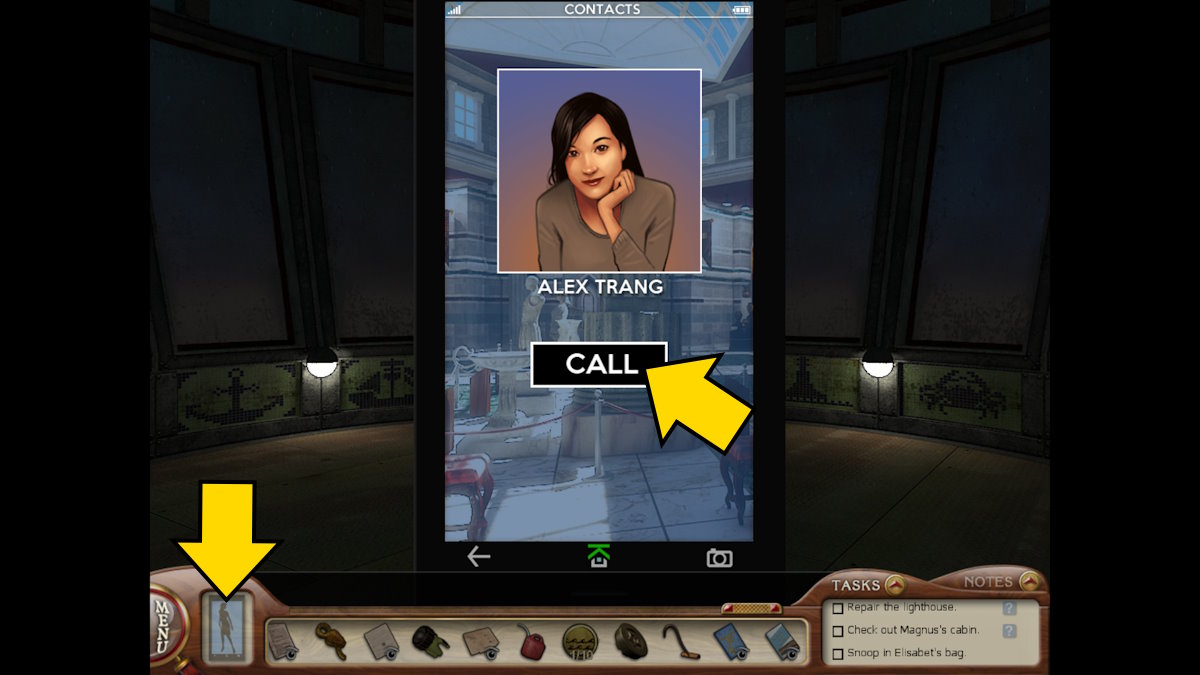
Go back into the captain’s cabin on the ship (b1) and use the radio key you got from Dagny on the radio (c2). You’ll speak to a radio control tower intern called Alex and explain to her that you’re looking for Magnus. She is convinced someone took Magnus, as she overheard a fight on the boat on the radio.
She also says she can help you distract Elisabet but wants a favor first. She wants you to fix a light at the nearby lighthouse and gives you her phone number. All you need to do is go to the lighthouse and then call her for instructions. Alex also tells you Dagny is a wanted criminal in the US, while she thinks Soren may be angrier than he may appear.
Heading to the lighthouse
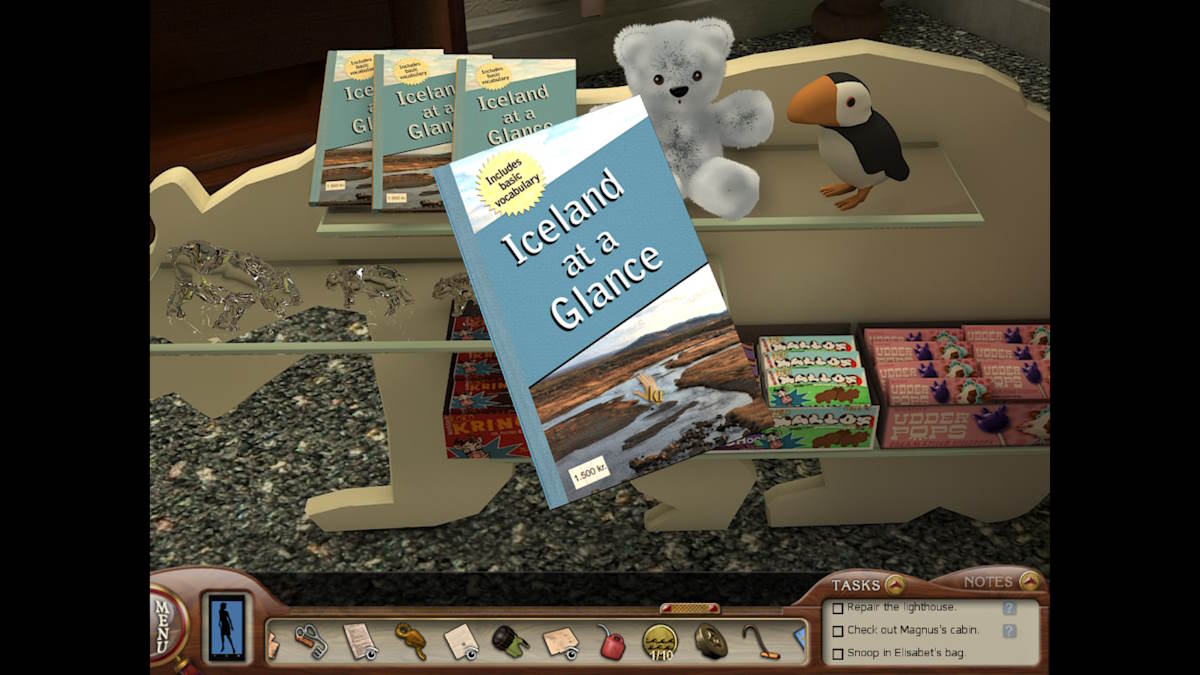
Head back to the docks from the ship, go to the Culture Center, and use the shop there to buy the Iceland at a Glance booklet. If you don’t have enough money right now, play either of the games listed above until you have the 1,500 Kronur required to buy the book.
Once you have it in your inventory go back to the dock, use the steps to go down to the dinghy and get onboard. When you take the cover off the outboard motor this time, you’ll start a mini-game (as long as you have both the Guidebook and Dinged Dinghies pamphlet from the Culture Center). The completed puzzle is shown above. All you need to do now is click the steering wheel of the dinghy to arrive at the lighthouse.
Inside the lighthouse
There is only one route up to the lighthouse and nothing to collect or see on the way. Once you’re at the door, use the Lighthouse Key to get inside. It’s the same story once you’re inside the lighthouse, so keep clicking the yellow arrows until you’re at the top. Once there, call Alex.
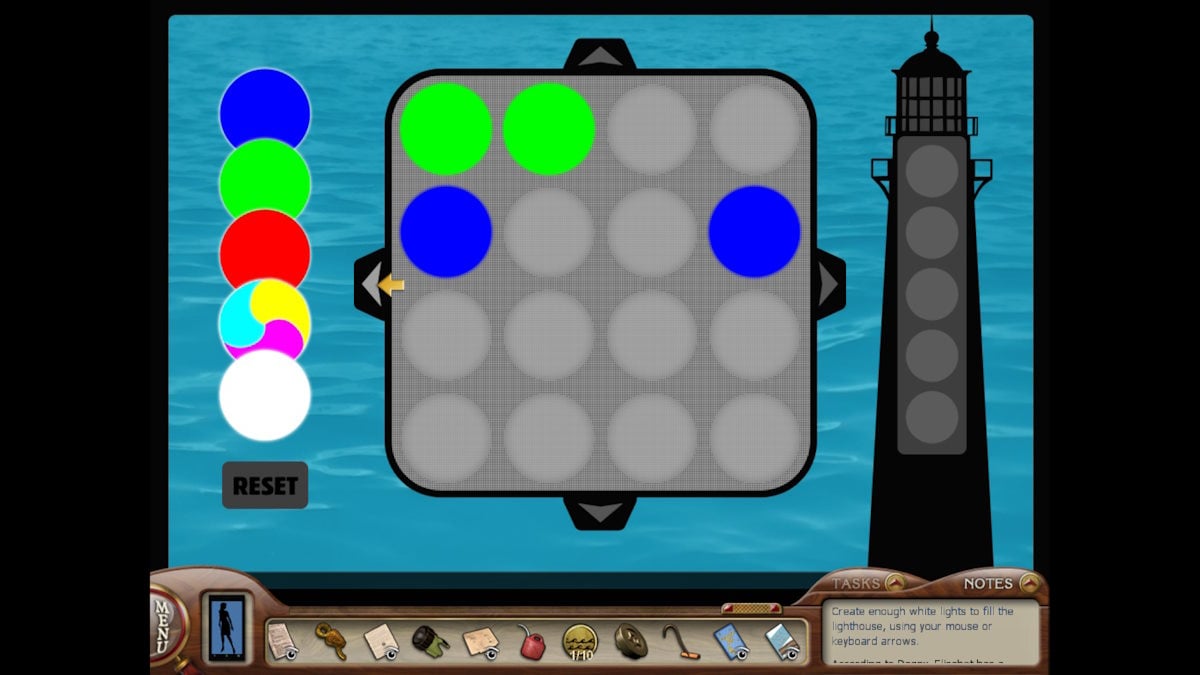
Once you’ve spoken to her, click the blue panel on the central desk to start a light puzzle. You need to create five white lights by combining colored dots. The color key is on the right of the screen and shows the ascending order of colors (so two blues make a green, two greens make a red, etc). For example, in the image above, when I click the left arrow it will merge the two greens into a red and the two blues into a green. There's a randomness to the lights appearing, so I can't show an exact solution.
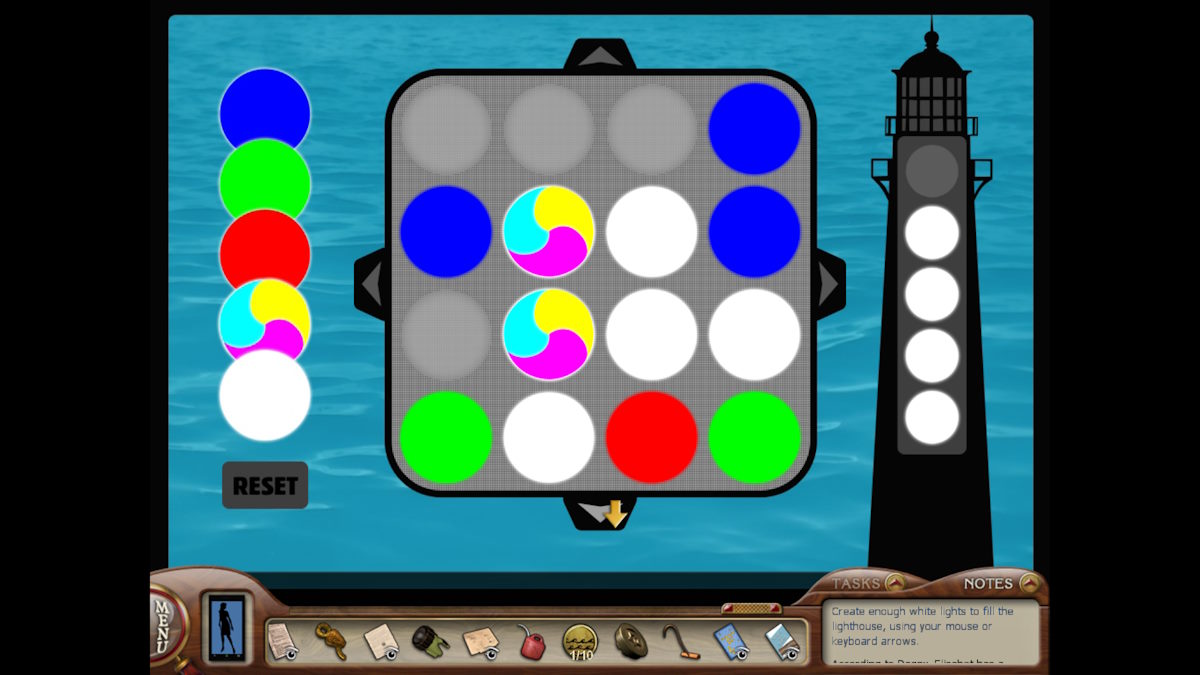
Move the dots into each other to merge them using the arrows at the side of the central screen. A new blue dot will appear every round, so you need to merge efficiently or the grid will fill before you have five whites. If this happens, you'll need to try again. Multiple merges can happen, so look out for them. The example above shows me about to complete the puzzle.
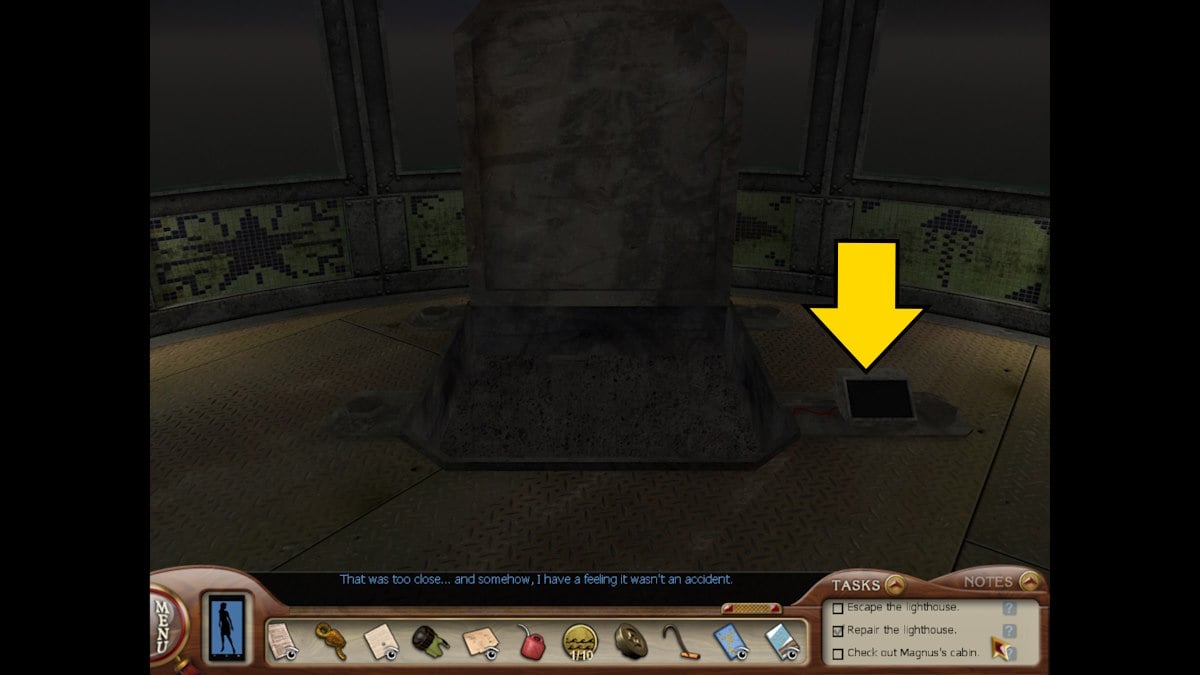
Once fixed, call Alex again. She’ll tell you there’s an alarm in the captain’s chair on the ship you can use for the distraction. Before you leave, note the pattern on the walls (anchor, ship, lighthouse, crab). As you try to leave the hatch locks shut. Click the box next to the hatch (see above) to unveil a number pyramid puzzle.
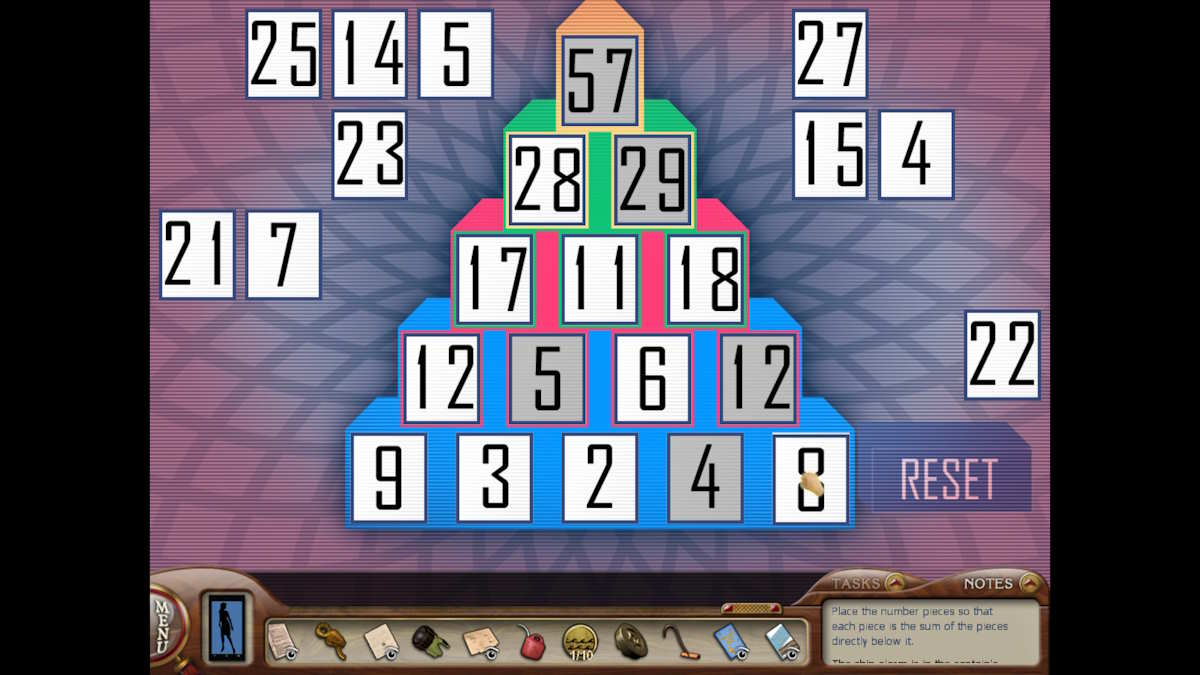
To complete it each pair of numbers must equal the number above them. I’ve shown the answer above. Now you can head back to the dinghy and back to the dock.
Distracting Elisabet
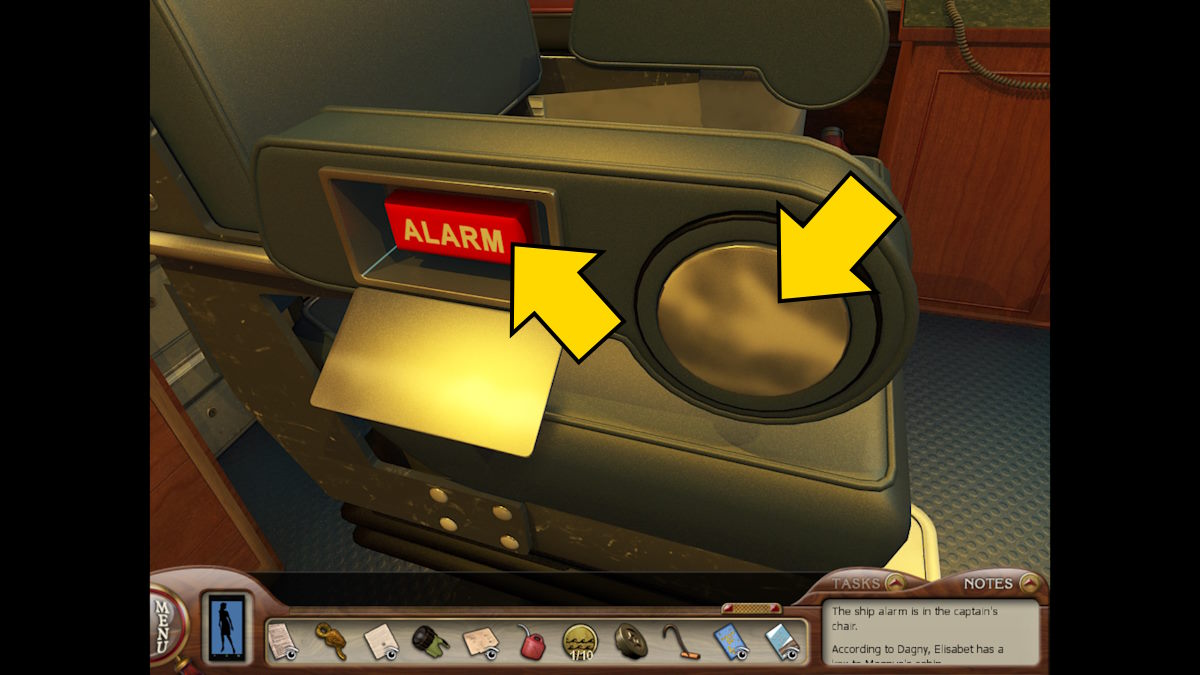
Once back at the docks head straight onto the ship and into the captain’s cabin (b1). Get a close-up of the chair, click the round silver button, and a panel will open revealing the alarm. Click the big red button to sound the alarm.
While there isn’t a super tight time constraint here, you must move fast. Elisabet will return after about five minutes and if you’re not done snooping before she returns, you’ll get caught. This will force you to try again from the point when you trigger the alarm.
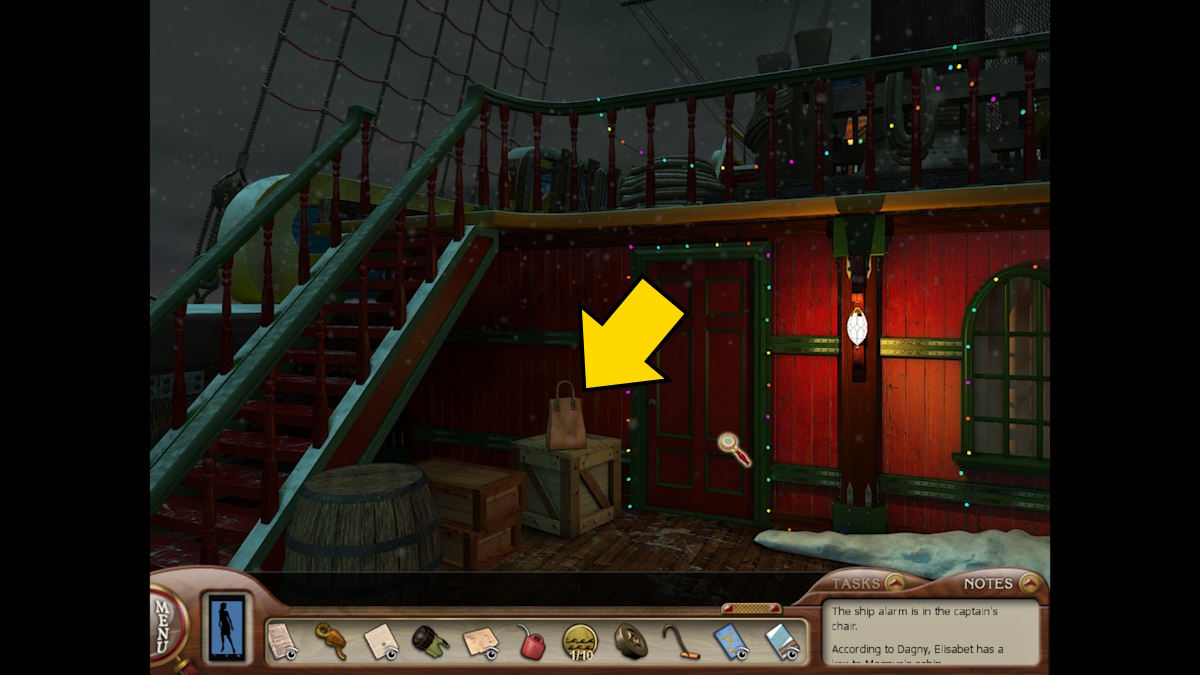
As you leave the cabin again you’ll hear footsteps. Head down onto the deck and Elisabet will have gone. Go to where she had been sitting and go through her bag to find a note from Magnus. It seems he left her a gift hidden within his crystal collection in his room. You’ll also find the key to Magnus’ Cabin in her bag. Unfortunately, you can’t get into the room she seems to be guarding, as it is locked.
Now is the perfect time to visit Magnus’ cabin. Head back towards town and turn left, in the opposite direction from the Missti Skip.
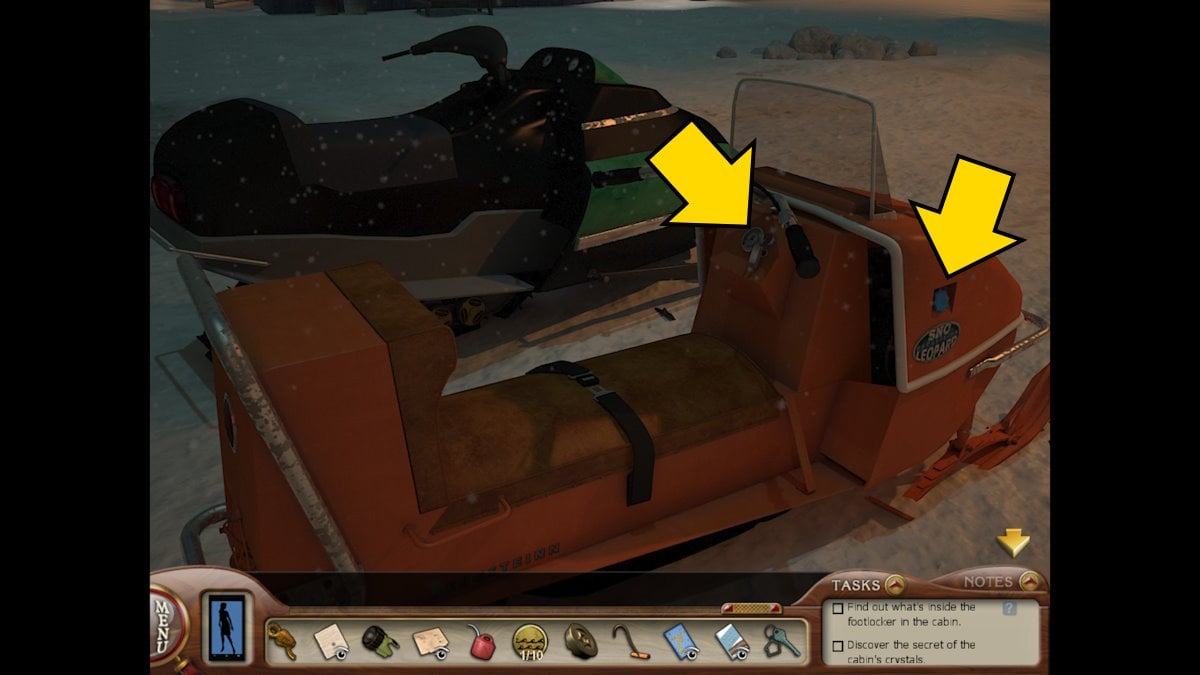
When you find the snowmobile, use the snowmobile key in the lock and try to turn it on. It’s out of gas. Use the gas canister you found in the Missti Skip on the fuel tank, click the snowmobile’s seat, and away you go.
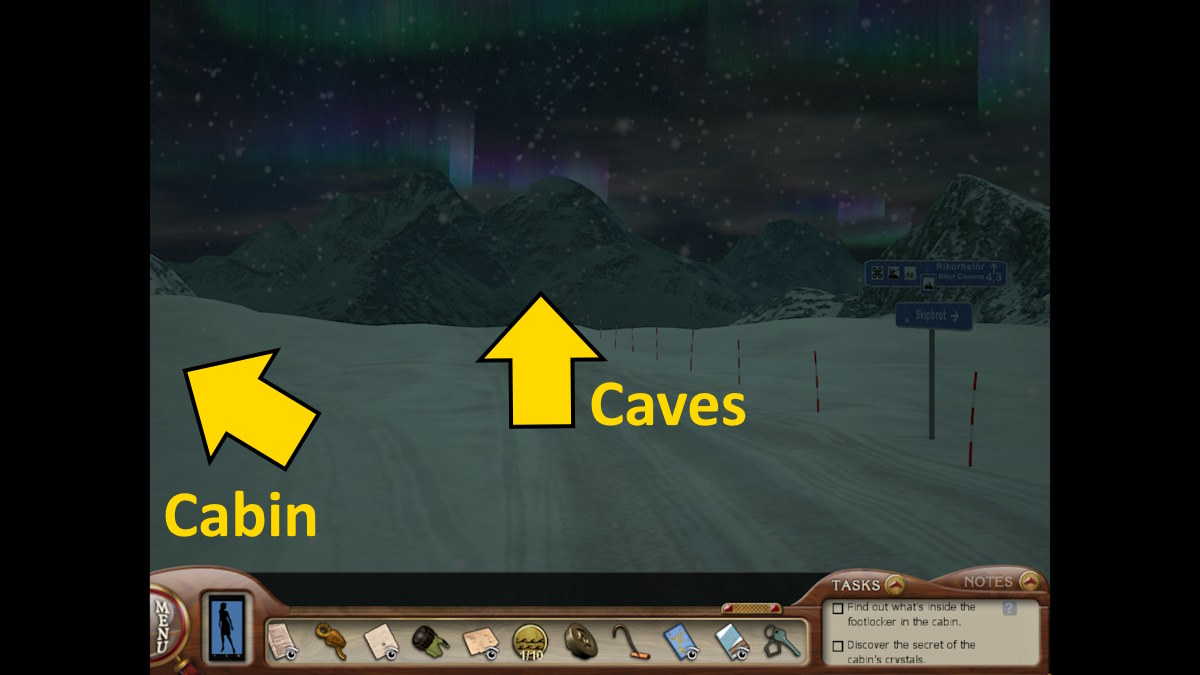
Take the left turn to head to the cabin. Ned will call as you arrive. He doesn’t make much sense and then hangs up. You can call back but you will only go to his answering machine.
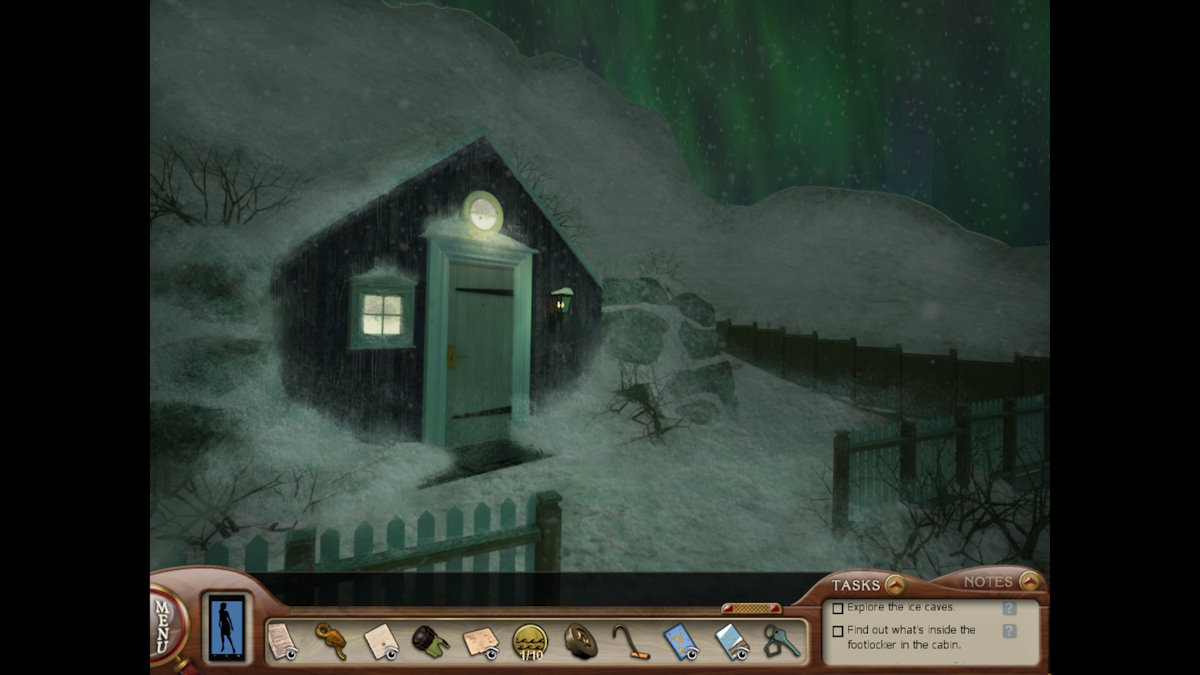
Click the cabin door, use the key to open it, and go inside.
Inside Magnus’ cabin
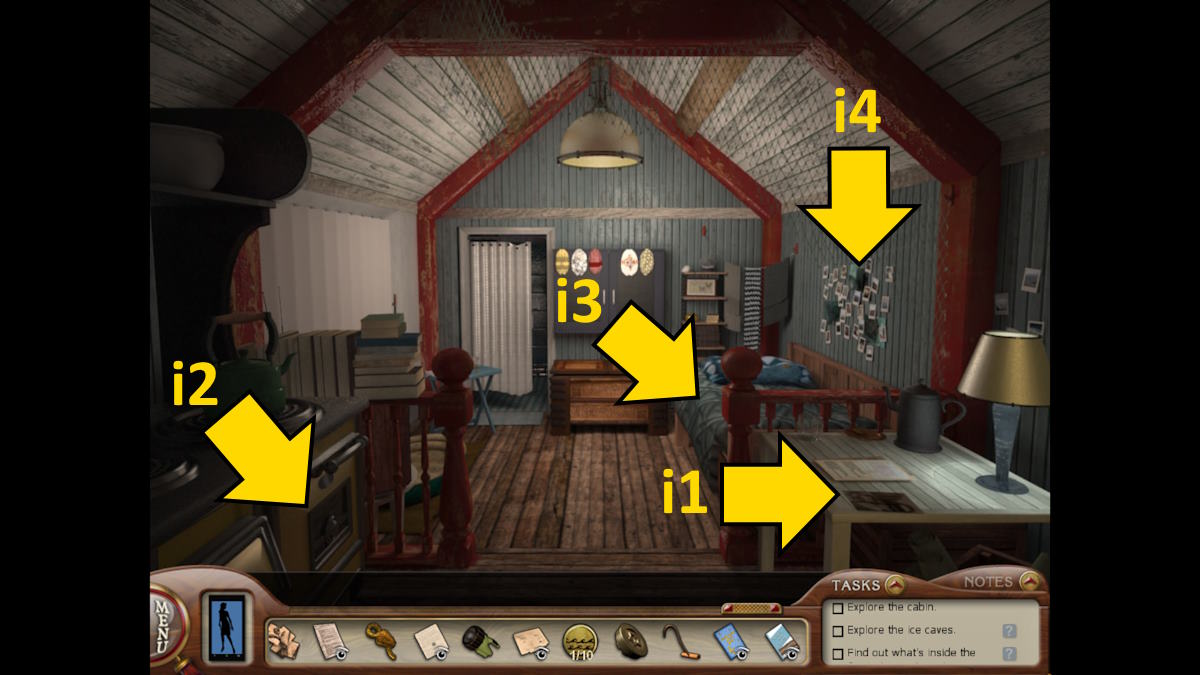
Take two decorations from the table (i1), two decorations from inside the oven (i2), and two decorations from the bed (i3), also noting the ice cave photos on the wall (i4).
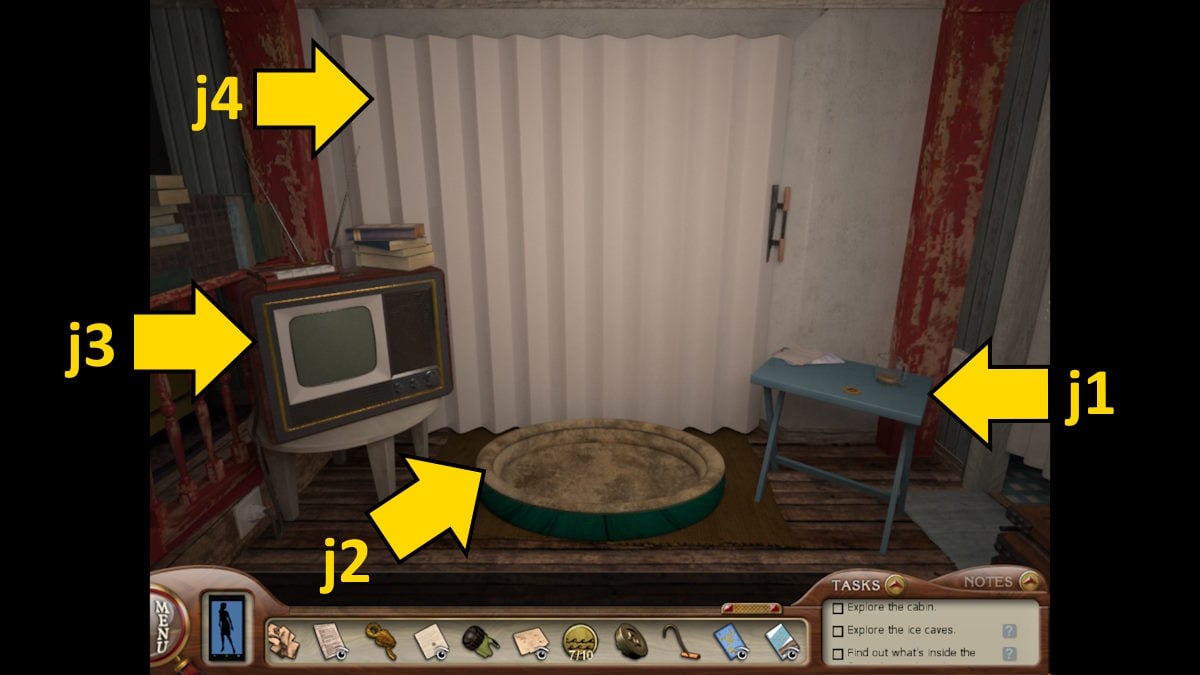
You’ll find another decoration on the blue table (j1), plus a note from Dagny saying Magus’s dog seems to have her spare luggage key. Click the dog bed (j2) for a close-up, and then click it again to lift the corner and find the Luggage Key.
Select the TV for a close-up (j3) and take another decoration from the top. Click the book and open it to find a note about the ship’s original crow’s nest being a crucial part of the puzzle Magnus was determined to solve. Take the History Book. Also, click the answering machine to listen to Magnus’ messages from Elisabet and Dagny. The messages seem to point to Elisabet as the key suspect while suggesting Dagny is in the dark about his disappearance.
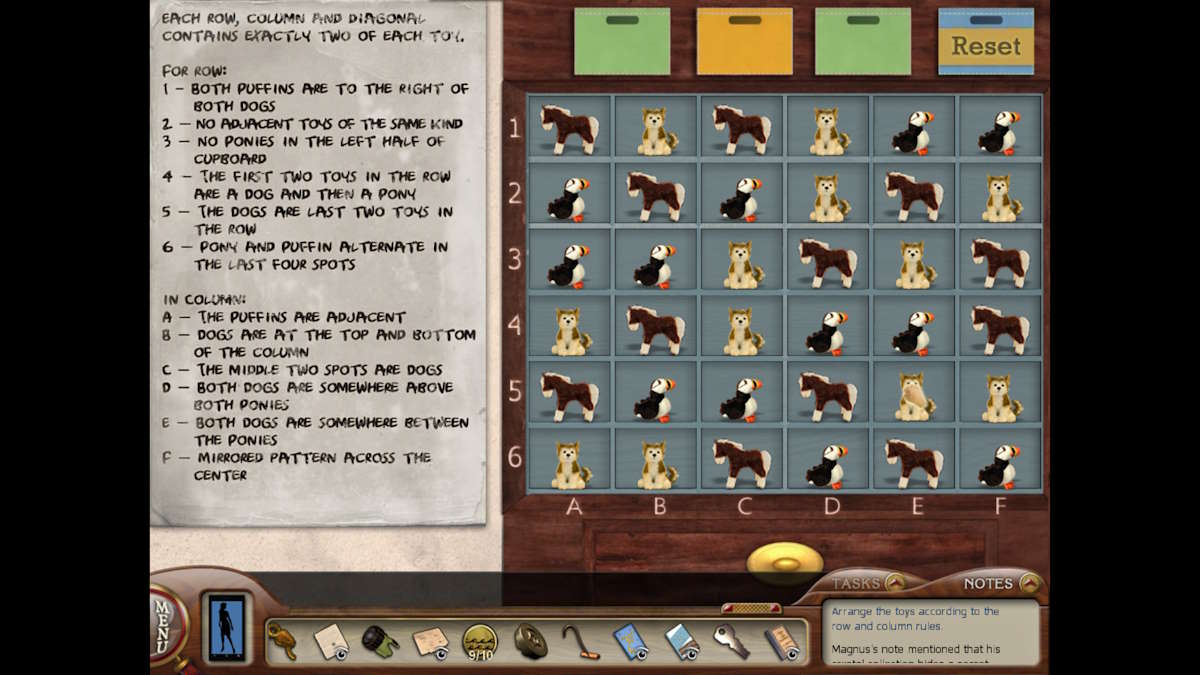
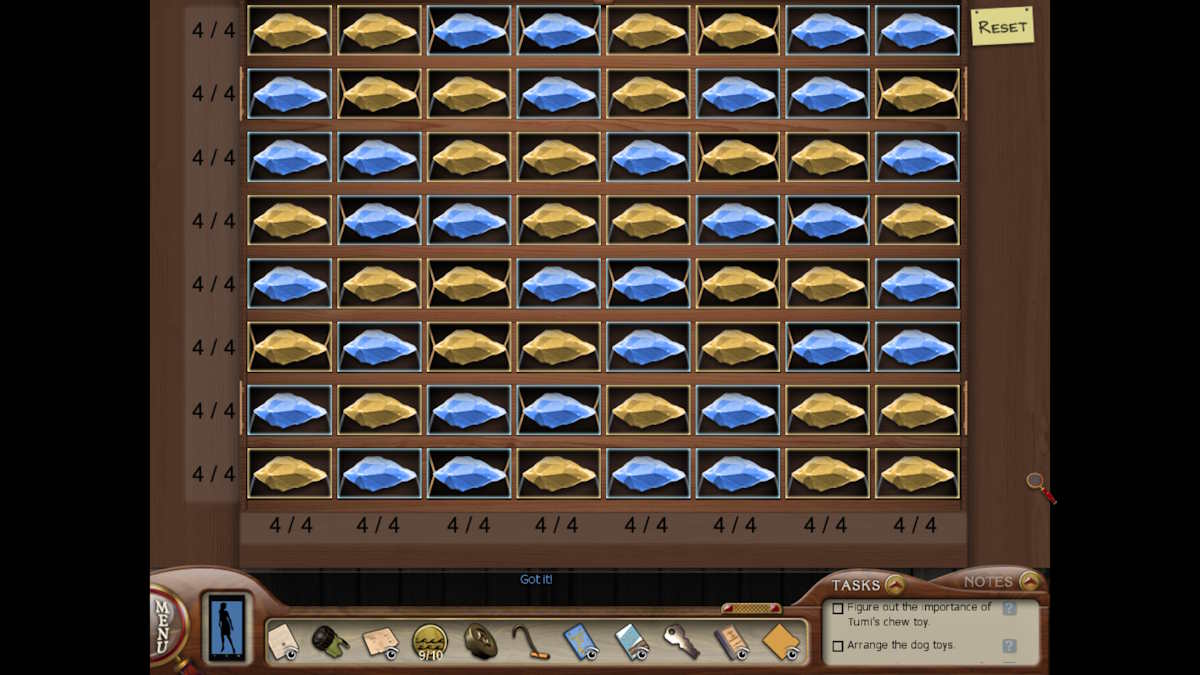
Click the sliding door (j4) to reveal the toys puzzle mentioned earlier in Magnus’ notes. Follow the instructions on the left to complete the puzzle by dragging the animals from the top into their appropriate spaces. I’ve pictured the completed puzzle above. Once complete, a secret drawer will open, allowing you to find a journal between Magnus and Dagny. Does this put Dagny back in the picture? Take the Threatening Note.
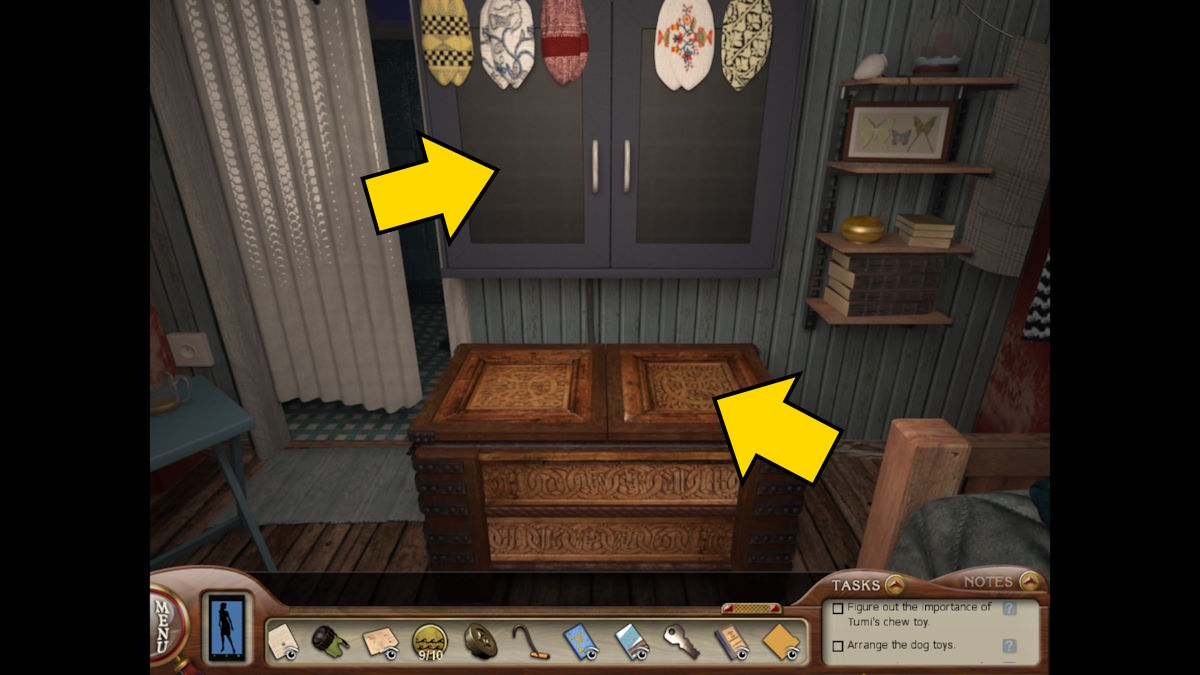
Turn toward the footlocker (above) and click the doors above it to find the crystals puzzle. You need to use the notes you found from Magnus to solve the puzzle but if you’re struggling with it, I’ve included the solution below.
Click each crystal until it matches the colors above. Once complete, click the footlocker and it will pop open. You’ll find a piece of the sketch you found another piece of earlier, but you need more pieces. There’s also a music box in the trunk, but you have no idea what it is for yet.
On the way out of Magnus’ cabin, you’ll find the tenth and final decoration above the door. Head back into town.
The ship’s wheel puzzle
After a comedic encounter with Gunnar, go to the bar to find him in his usual seat. If you then head back to the docs you’ll see Gunnar again, this time heading out to sea. So much for him never going to sea again! Now you can go back into the bar, over to Gunnar’s table, and take the coaster which turns out to be a Metal Disk with a hole in the center.
A note on the table to Elisabet from Asa mentions a death that may explain Magnus’ temperament. It also hints at problems between Elisabet and Soren.
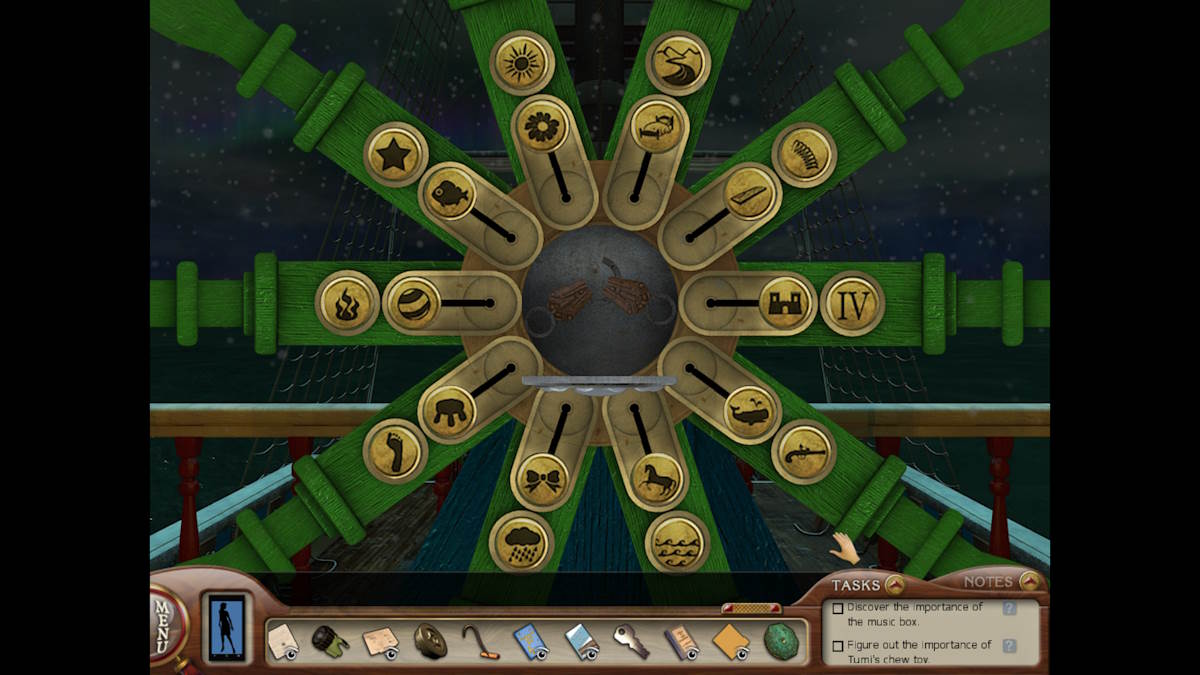
Go back onto the ship and add the decorations to the ship’s wheel (b2). Simply twist the wheel until two matching symbols create a whole word, and drag the symbol from the inside to the outside. The words you need are:
- Fireball
- Footstool
- Forecastle
- Gunwale
- Rainbow
- Seahorse
- Riverbed
- Springboard
- Starfish
- Sunflower
Once they’re all complete, take the second locator piece. These will fuse together in your inventory, giving you the completed Locator.
The trials of Soren

Return to the Culture Center and buy some batteries from the store (again, if you're short of funds, play the mini-games in the pub). These will be used in your inventory automatically, giving you a working Flashlight. Now run through all the dialogue options with Soren. You’ll be able to trick him into running off to find a store thief, allowing you to sneak behind the counter.
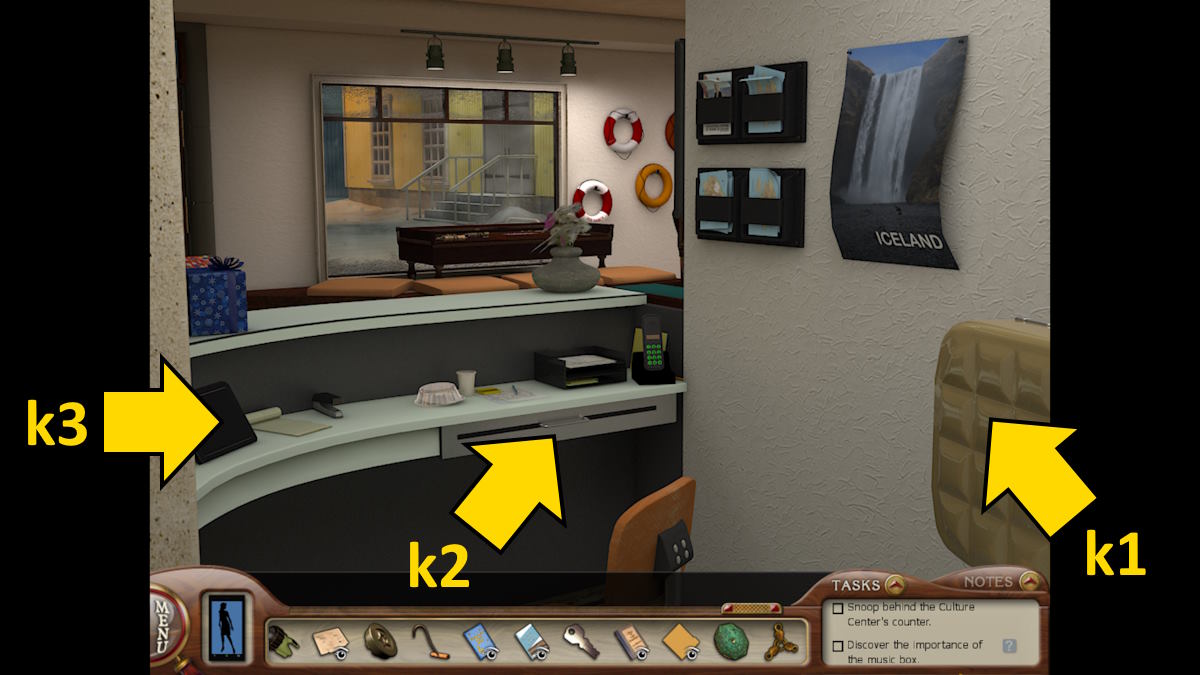
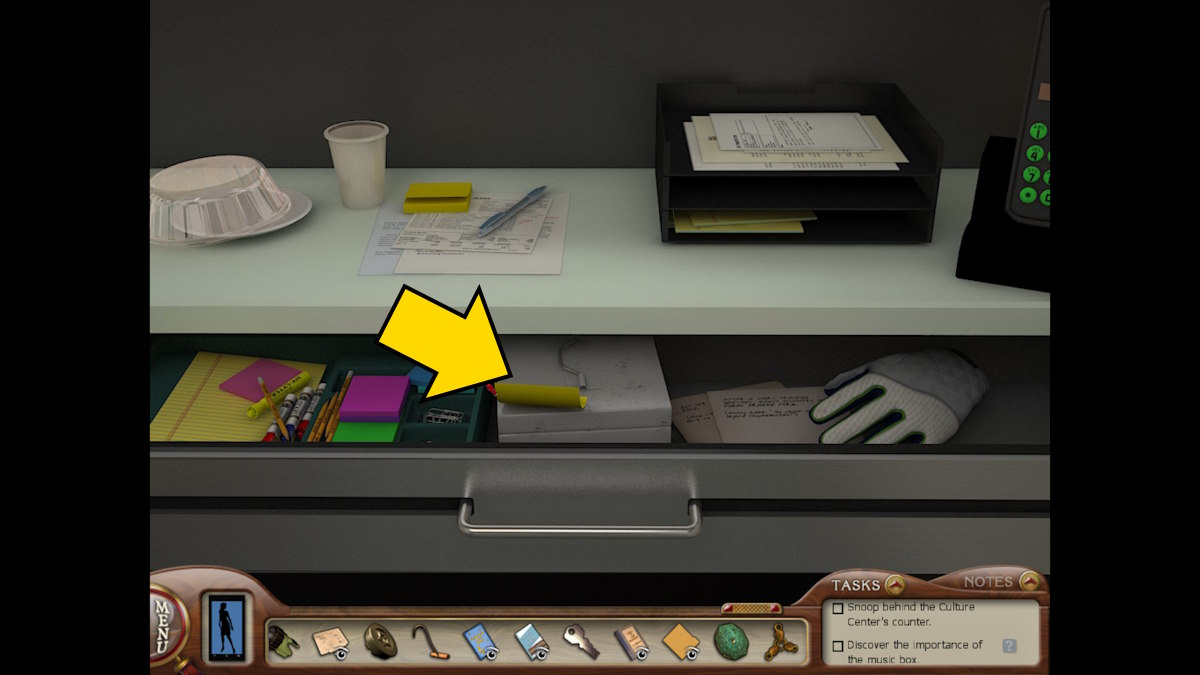
You can use the luggage key to open the suitcase (k1) and find more sketch pieces, as well as a book with a note to Dagny mentioning she had been facing some tough times of late (but there are no details). Click the drawer (k2) to find a note saying Create Volcanic Winter, then click the tablet (k3) to start a puzzle. You have to be quick and solve it before Soren returns.
Soren’s table puzzle
You can create the following elements using the first column:
- Earth and water = Glacier
- Earth and fire = Lava
- Water and fire = Steam
- Air and Water = Cyclone
- Earth and air = Desert
- Fire and air = Energy
Now you can create the following in the second column:
- Energy and desert = Dust Cloud
- Lava and desert = Rock
- Lava and energy = Eruption
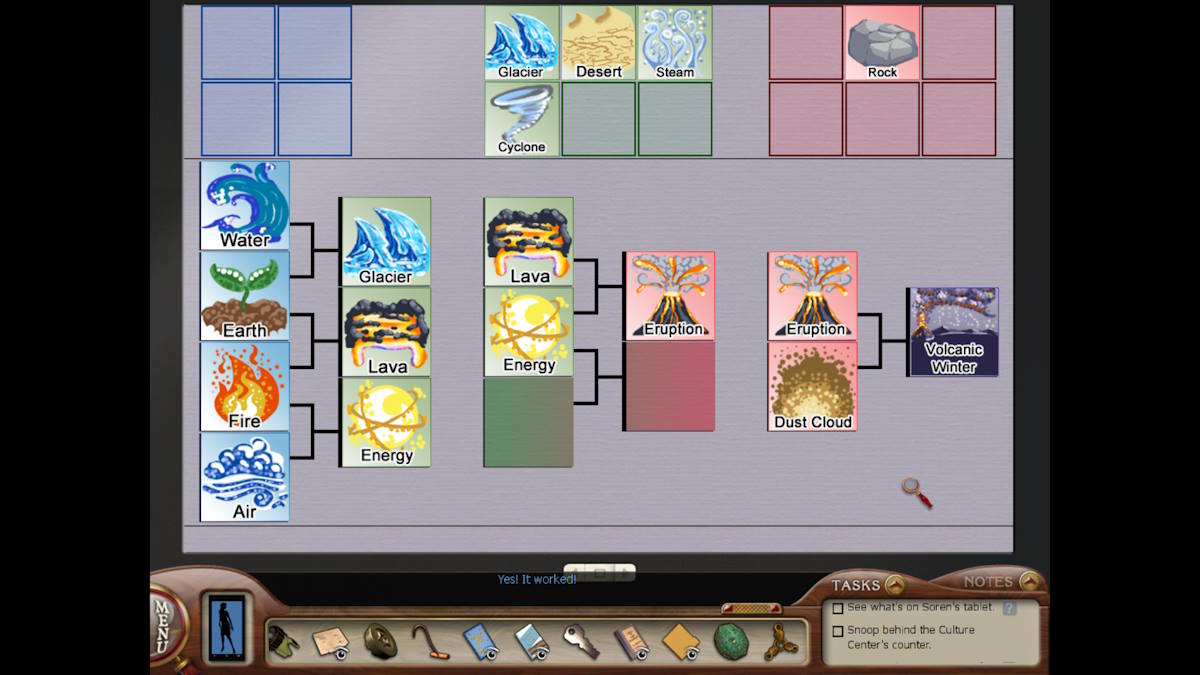
Put eruption and dust cloud together in the final slots to get Volcanic Winter, which unlocks the tablet. Read through all the messages to find one detailing something found etched on the ship before being painted over. Soren thinks it may have something to do with the ship's bow:
- Five gears crank the wall of empty wood; behold the curls in the prod lion’s mane, facing upward towards the sky.
Speak to Soren again afterward to confirm the town was in financial trouble (you may need to go outside to get him to return).
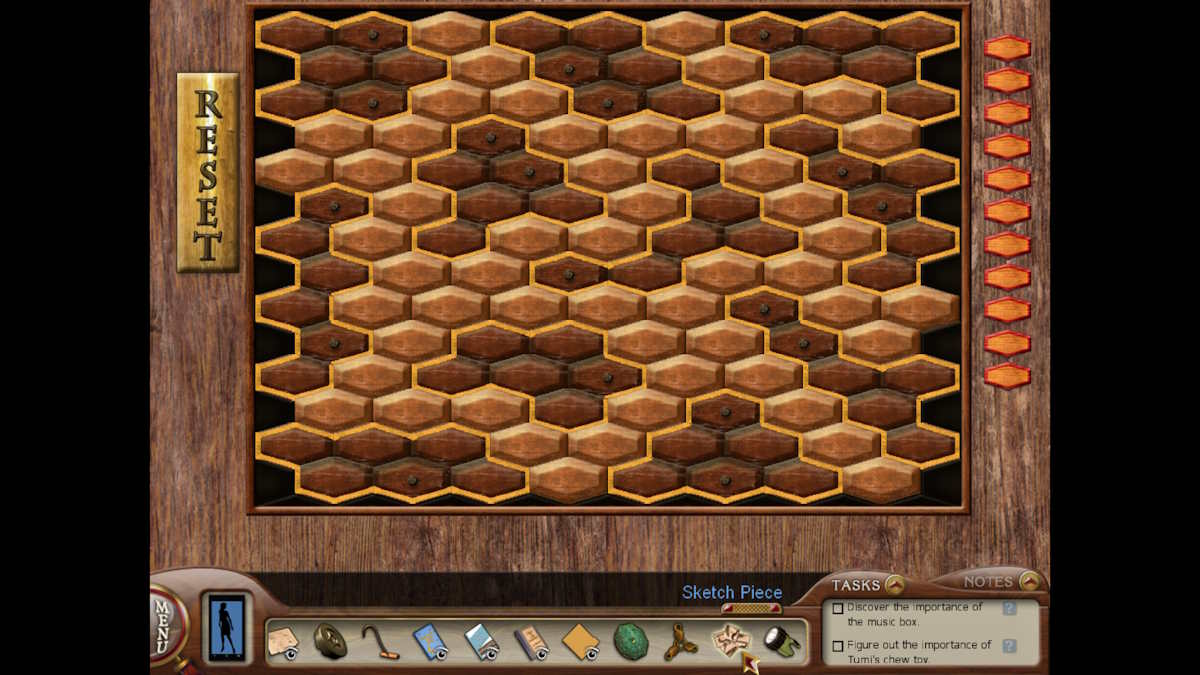
The crow’s nest puzzle

Head outside and up into the crow’s nest and click the rail (marked above) to start a grouping puzzle. You need to create 11 areas of exactly six tiles each by clicking them from their light sides to dark. I’ve pictured the finished puzzle below. Once done, you’ll see Soren walk past with what looks like a head injury. You can also collect a Wooden Gear from the railing.
Return to Soren and ask what happened to his face. He tells you Gunnar attacked him.
Dagny’s disappearance
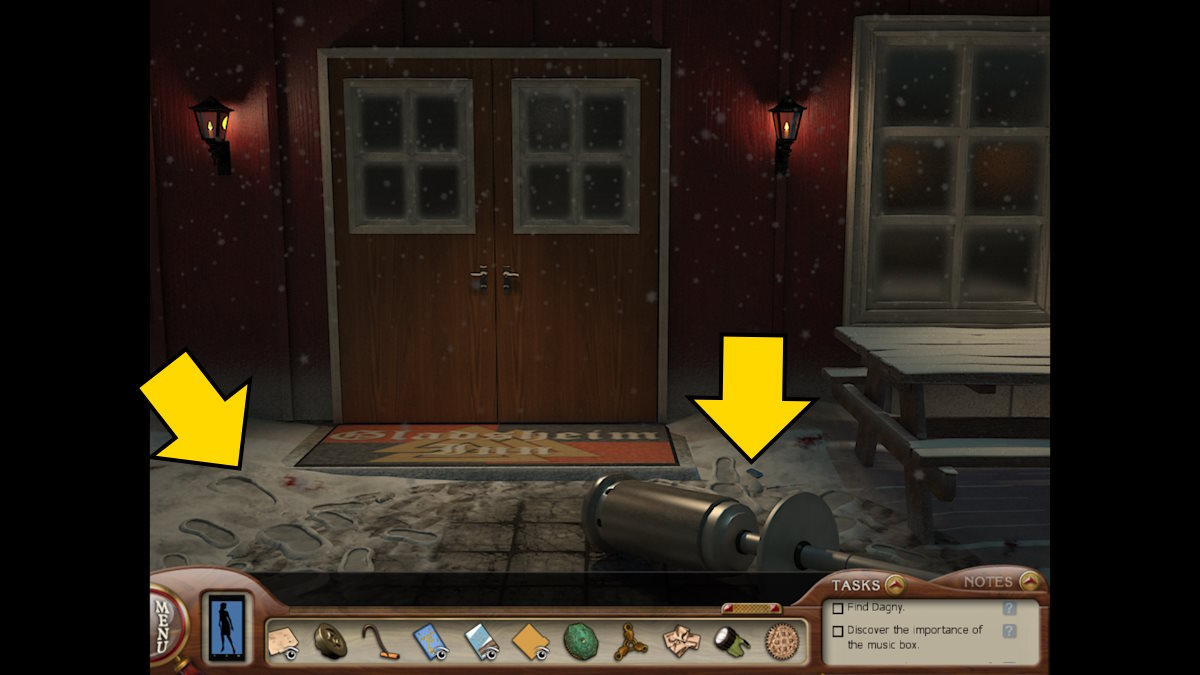
Head back towards the docks to find there has been a struggle. The outside heater is now on the ground and Dagny is nowhere to be seen. Pick up Dagny's phone, which is next to the fallen heater (marked above), and use the password Skuttlebutt to get into it.
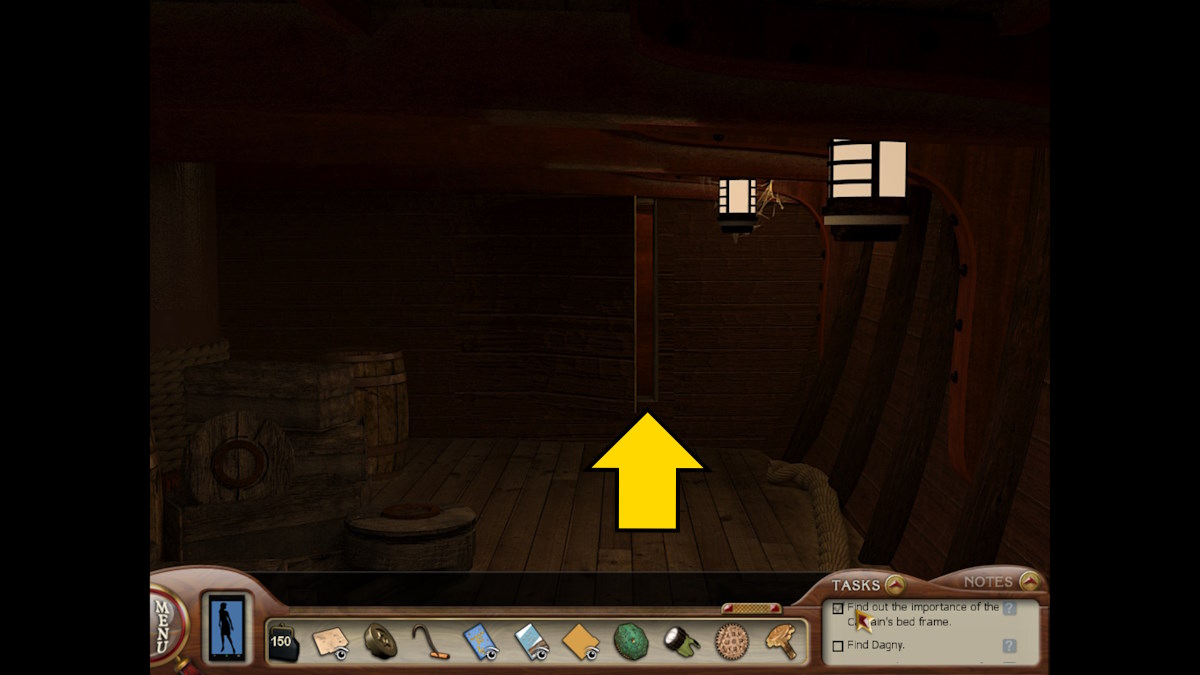
Look at her photos to find one unusual one: a picture of a blank wall in the ship’s hold. Also, check her messages to find that Magnus knew he was being followed. It also talks about something being hidden within the bed frame on the ship.
While you’re here, check the footprints. They’re huge, suggesting that Gunnar has been here recently. Go to the pub next, and confront Gunnar. He denies attacking Soren this time, denies taking Dagny, and claims his trip on the boat was to look for treasure (after first denying it).
The volcanic caves
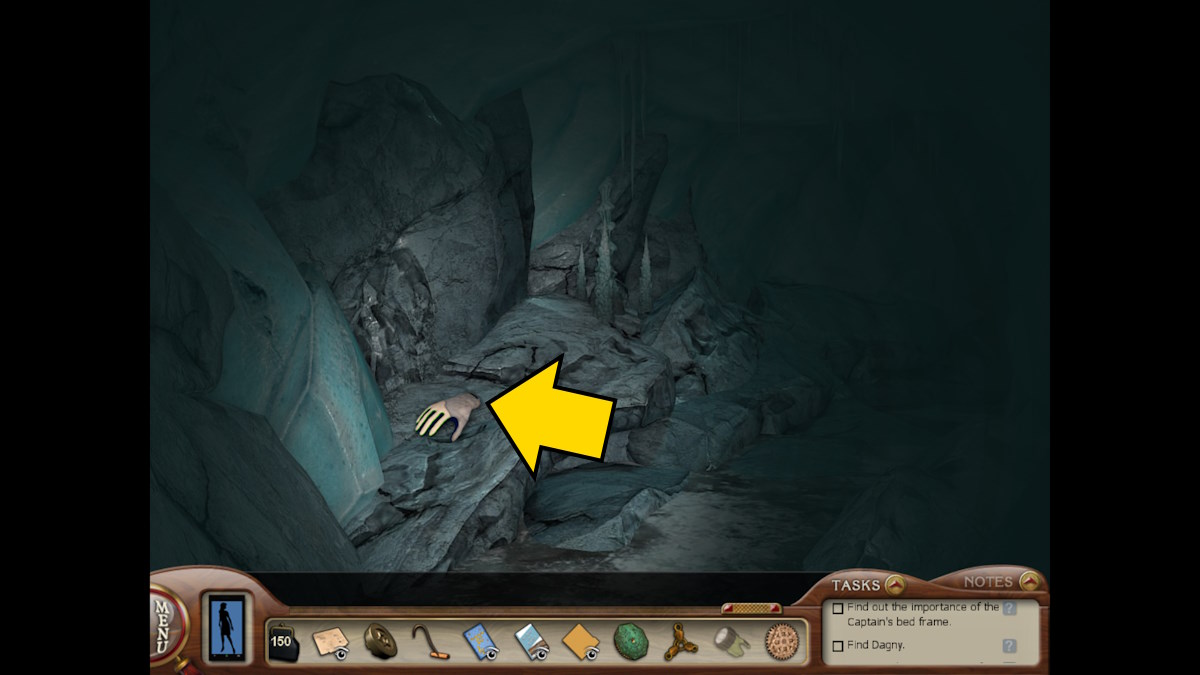
Use the snowmobile to go to the caves (go straight ahead rather than left). Once there, head inside and follow the linear path until you find the glove (above). It seems to be Soren’s, as you’ve seen the other one behind his desk.
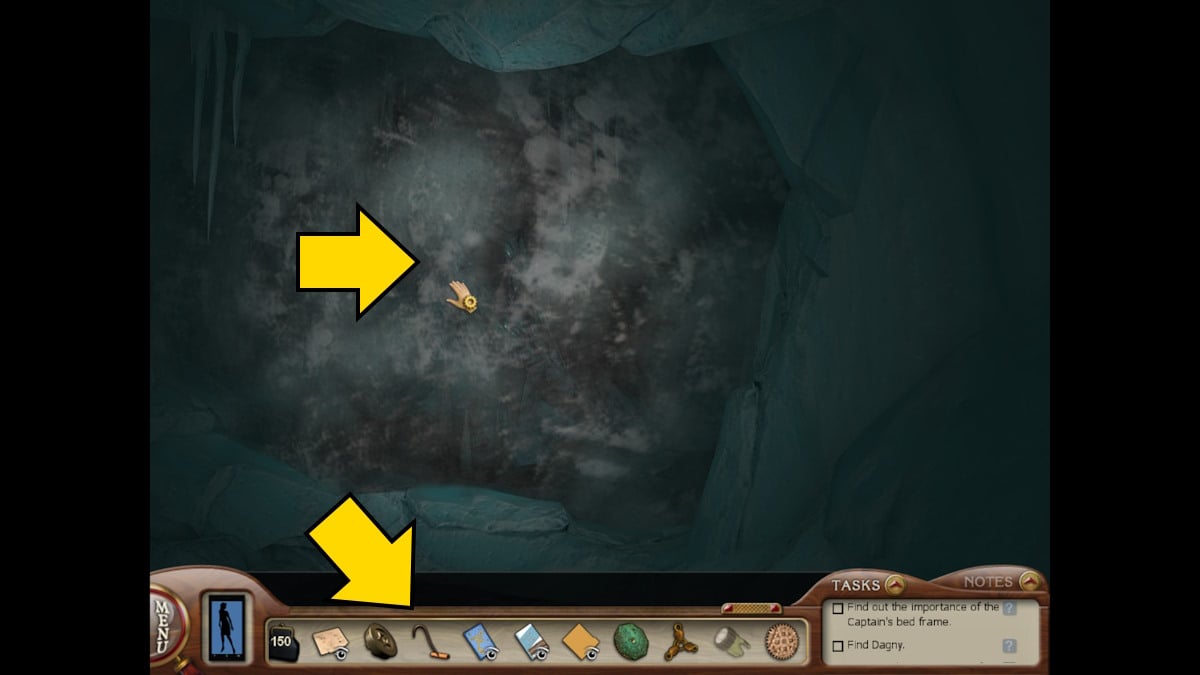
When you get to the ice blockage, use the hook to break through. Keep following the linear path through the caves until you come to a ladder that goes both up and down.
Go up and take the right passageway. Keep moving forward and when you get to another t-junction, take the right fork. This takes you into a large cavern. Search here and you’ll find some more sketch pieces.
Head back into town and confront Soren about the glove and he’ll tell you an unconvincing story, but you can’t get anything more from him right now.
The bilge room attack
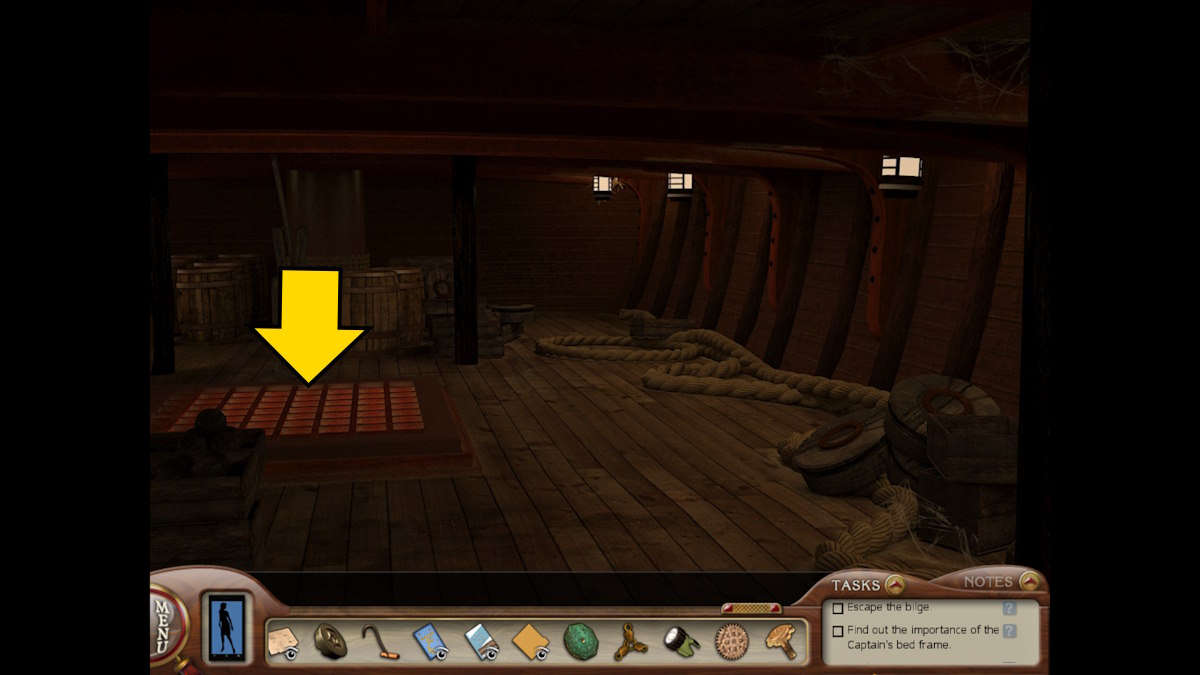
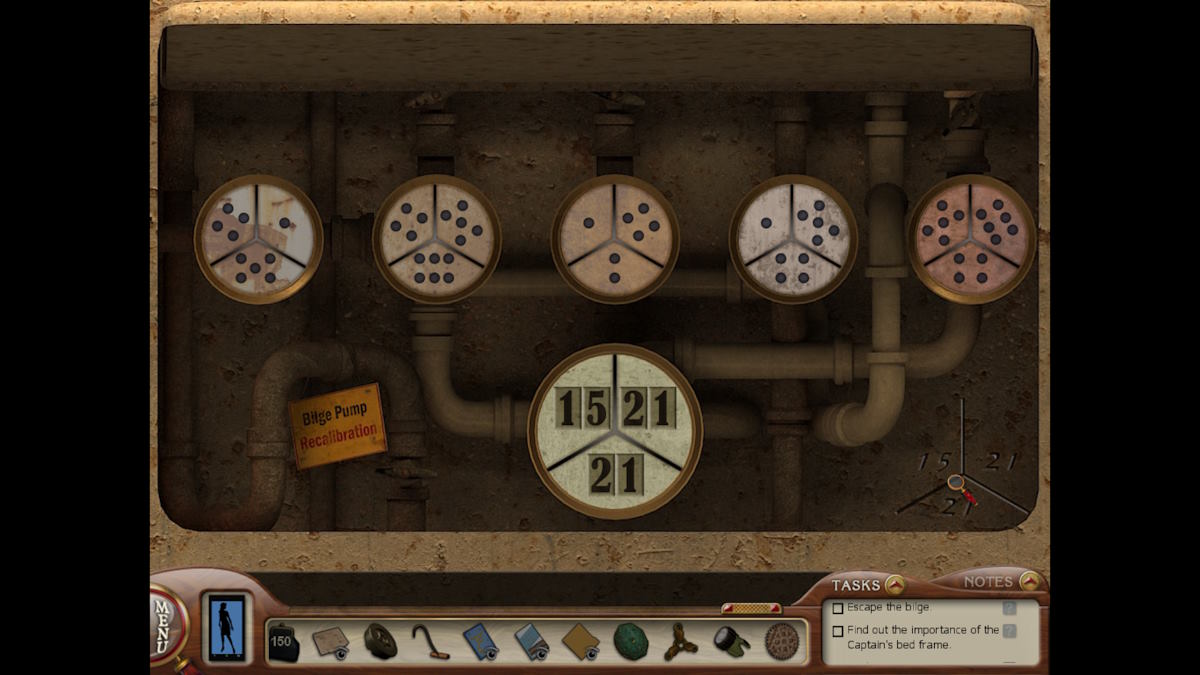
Go down into the hold of the ship next to find the bilge has been opened. As you go to investigate, someone pushes you in! You’ll need to act fast to complete the puzzle and shut off the water. To do so, you need to turn the dials so that the total number of dots in each segment matches the totals written on the bottom-right of the screen (from the top left going clockwise, 15, 21,21). Once done (see below), the water will stop.
When you shout for help, Elisabet comes and rescues you. She heard a motor leaving the ship but didn’t see who it was. However, whoever it was dropped a Metal Crank, which Elisabet will now give to you. Run through all the dialogue options with Elisabet. She’ll refute Soren’s story that he had been doing sound at the festival.
Go back to the pub to see Gunnar’s being thrown out by Elisabet. Go inside, and go upstairs to rest. This will change the tide level. Return to the dinghy and you’ll notice you’re now lower in the water than when you used the dinghy before. Use the hook to scrape away the barnacles and reveal the number 26. This gives you all the numbers you’ve been searching for.
The depth chart puzzle
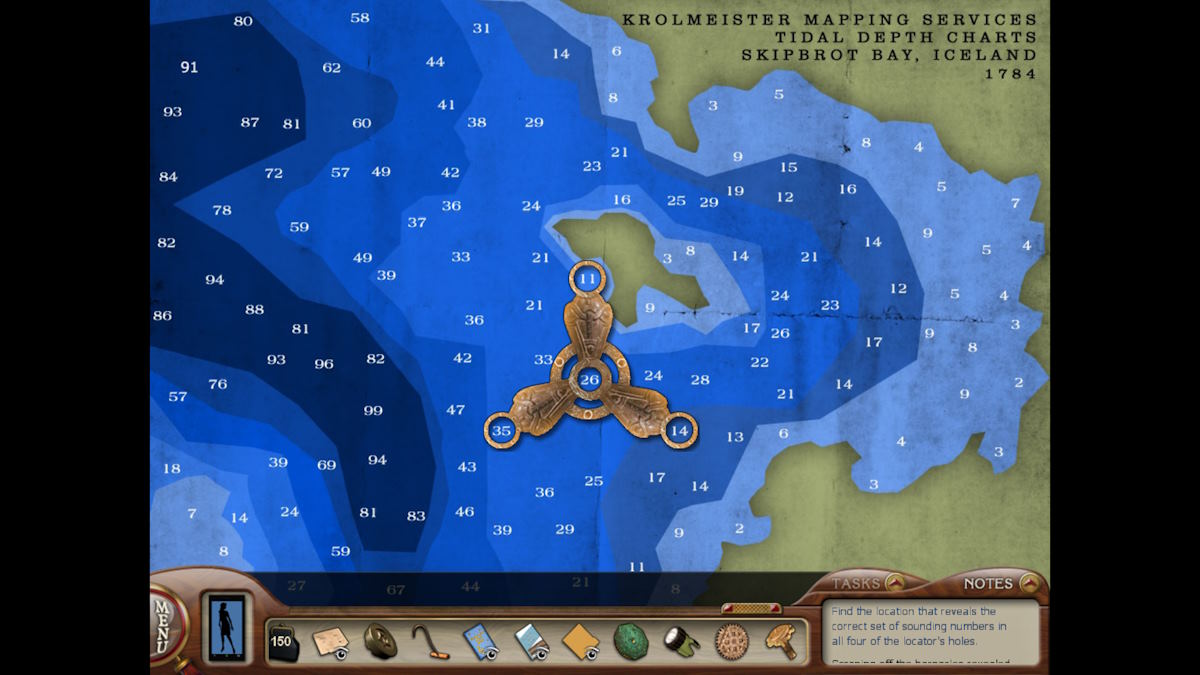
Head to the captain’s cabin and use the depth charts. Center the locator on a 26 on the map which then circles three numbers that add up to 86 (shown above). This gives you 11, 14, and 35 - the numbers you need to open the lock downstairs in Markus’s room.
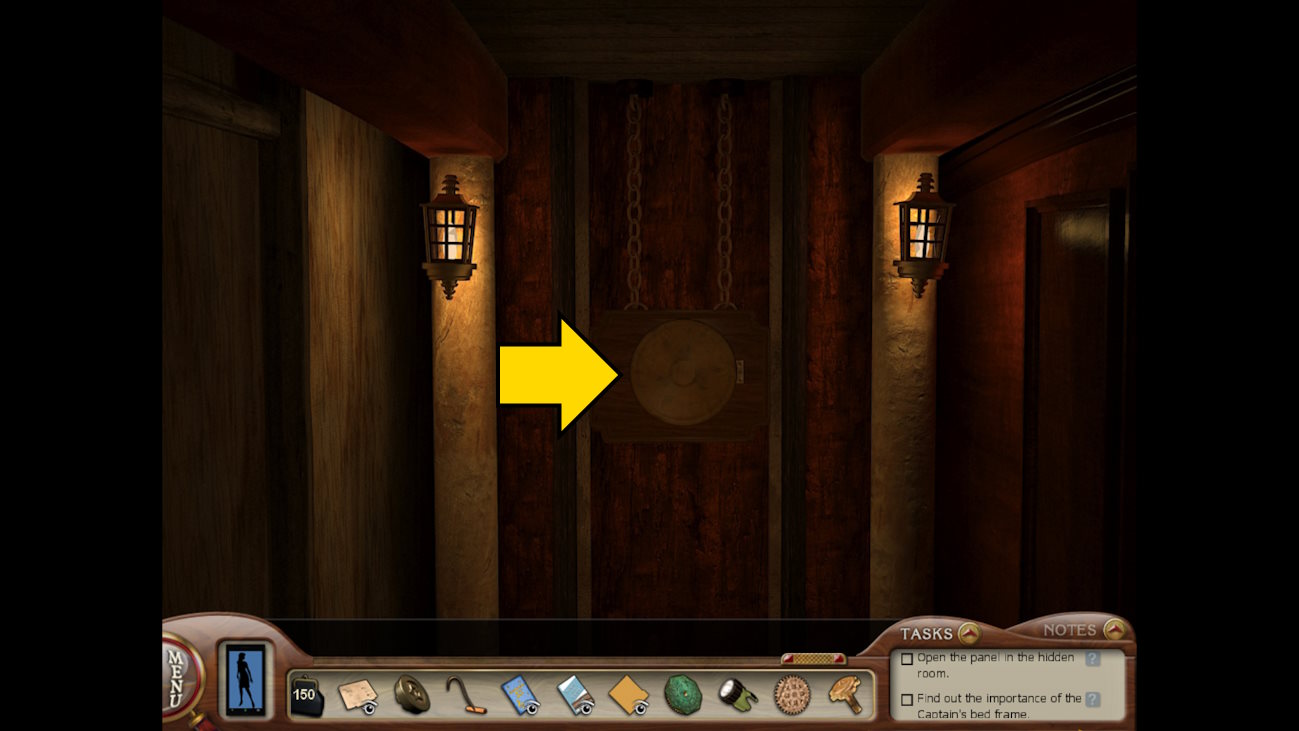
Head there now, open the cupboard, select the lock, and enter 11, 14, 26, and 35 (in that order) into the lock. You’ll hear mechanical noises elsewhere on the ship. You can explore these later.
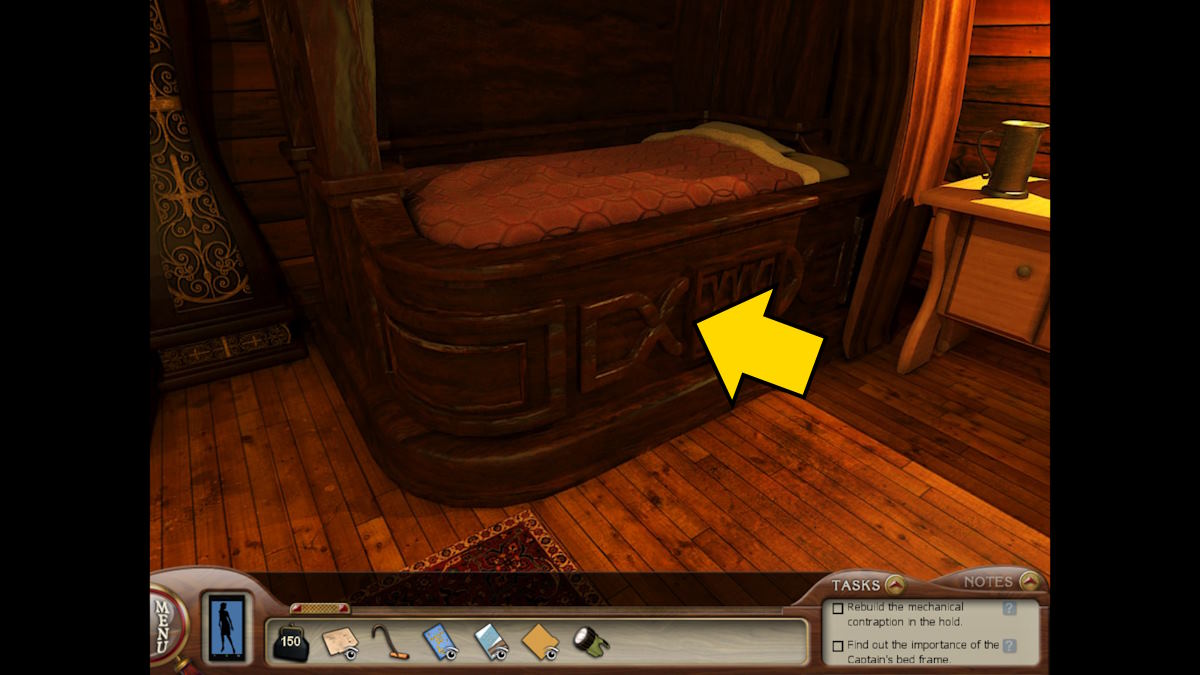
While you’re here, examine the captain’s bed (above). Click the panel to reveal an overlapping circles math puzzle.
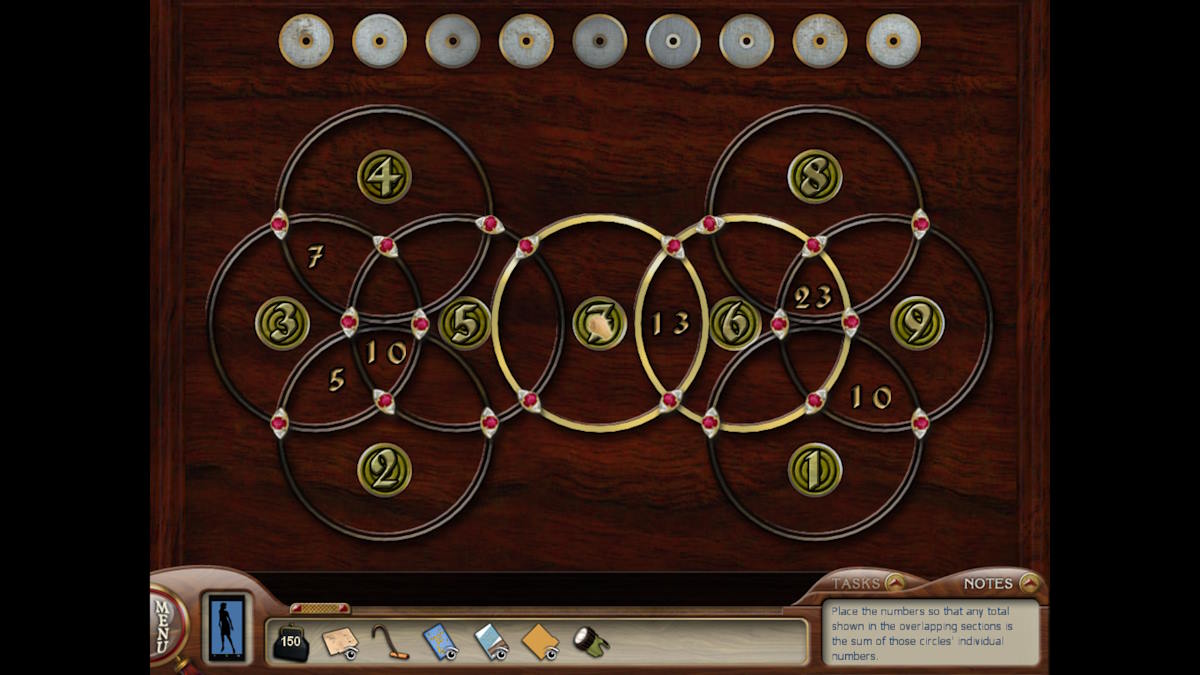
The secret room in the ship's hold
Each printed number is in a certain amount of circles. The numbers you place in those circles need to add up to those numbers. I’ve put the solution above. Once done, you’ll find some more sketch pieces.
When you now go back down into the hold, sure enough, the wall from Dagny’s photo has moved to reveal a room. Head inside and follow the corridor.
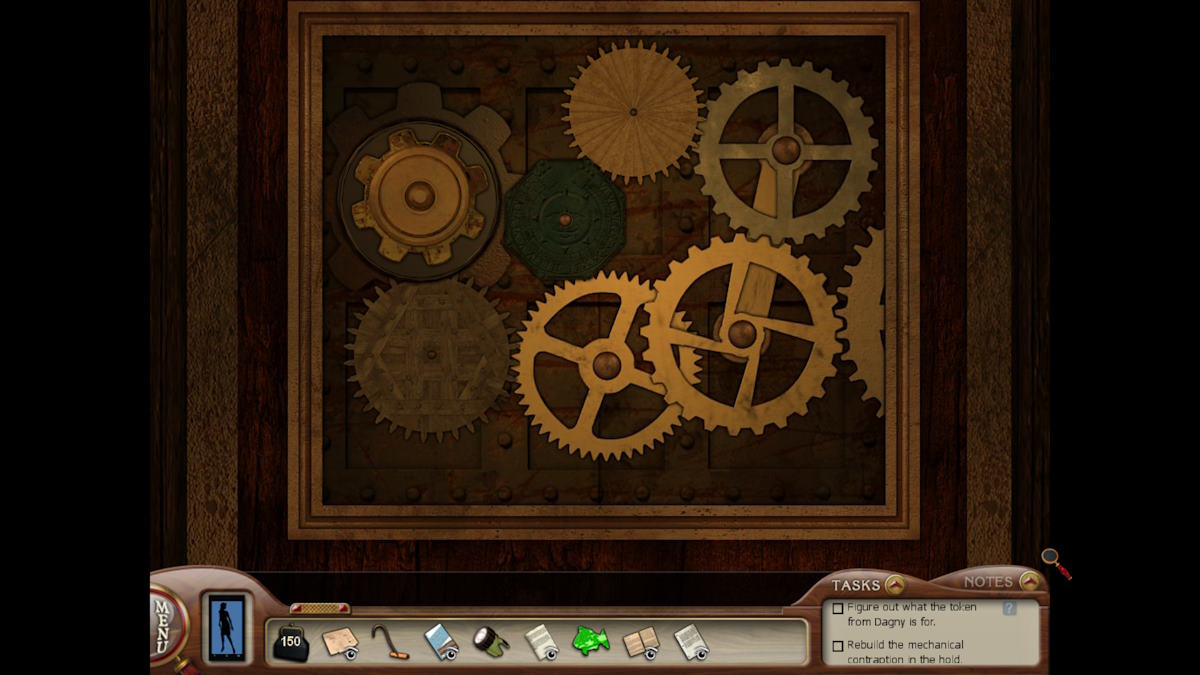
At the end of the corridor, you’ll find a circular device on the wall. Click it to open up yet another puzzle. You need to light up all the numbered sections to complete it. The order you press them doesn’t matter, but you can see all the pieces you need to press marked on the completed puzzle below.
Once done, you’ll reveal a mechanism with several pieces missing. You can add the wooden gear and metal disk from your inventory, plus the metal crank and the carved star, but one piece is still missing.
Gunnar’s past
When you next return to the Missti Skip, Gunnar is standing in the hallway outside. If you speak to him you’ll find Elisabet has banned him from the pub. He asks you to go inside and get a box he didn’t have time to collect. If you do, he promises to give you a clue to help solve the case.
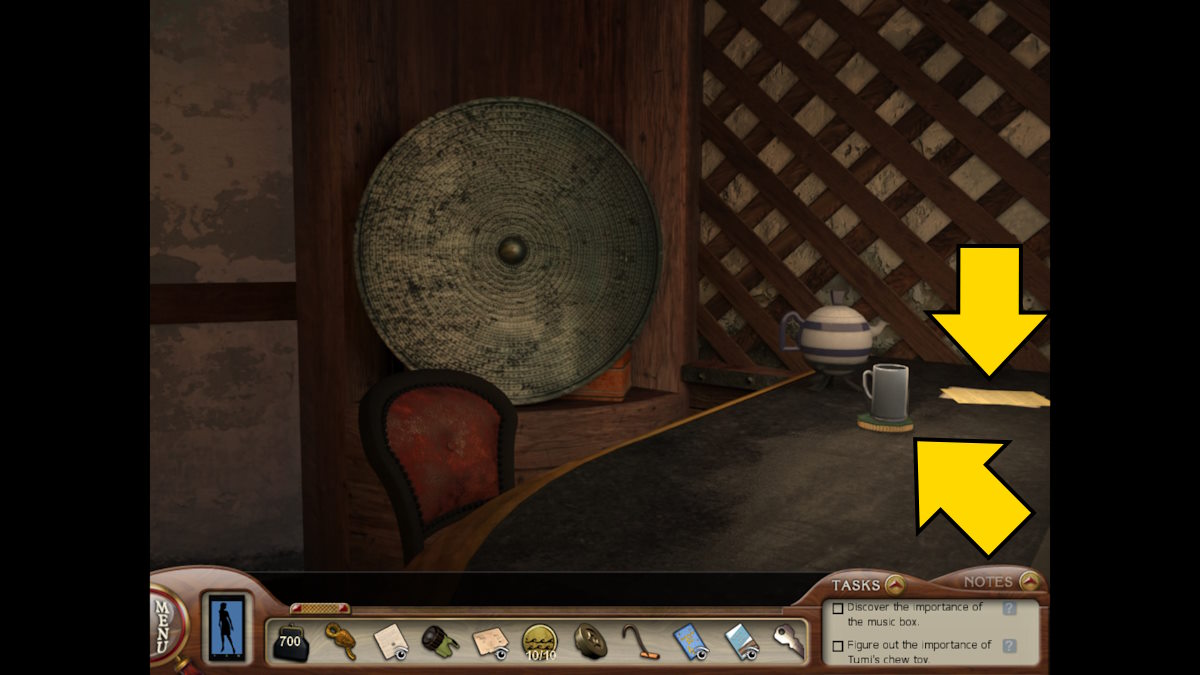
Head to his corner, move the shield (see above), and take the box. Open it up to find a new article about two women, a mother and her daughter, who drowned in Skipbrot. There’s also a birthday card from someone matching the name of one of the dead women.
Take the box and give it to Gunnar. He apologizes, saying he’ll also apologize to Elisabet, and asks you to meet him in the pub later when the tides change again. Go upstairs to rest once more, then return to the Missti Skip. Gunnar will give you some more puzzle pieces.
You now have all the sketch pieces you need, so return to Marcus’s Cabin and complete the sketch inside the trunk. It’s quite fiddly as the pieces overlap, but just start from the middle and work your way outward. You’ll know when a piece can be placed because the cursor will change to a hand. I’ve put the completed image above for guidance.
You’ve seen the image in the lighthouse so decide to go back there. However, as you leave, you see Elisabet go past with something hidden under a tarp. What could it be?
Return to the lighthouse
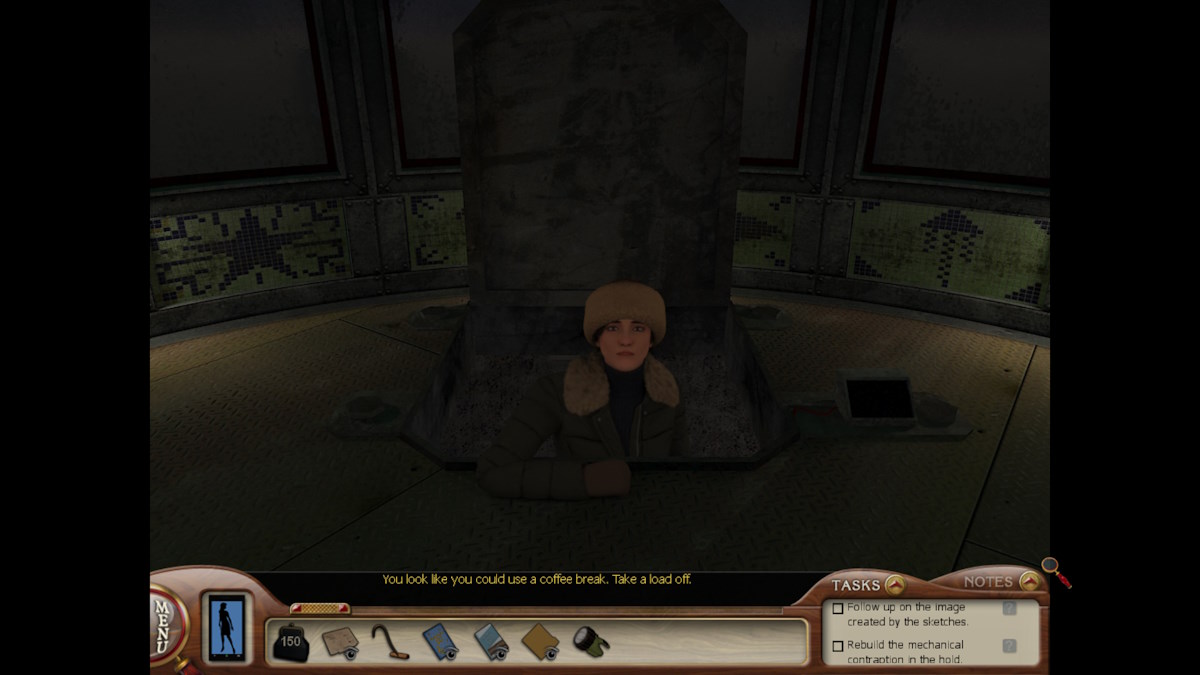
Go back to port, jump in the dinghy, and head to the lighthouse. Climb up to the top but, when you get there, you’ll be met by Dagny. She asks you to go back to town with her for a chat about what happened when she ‘disappeared’. After a chat, in which she admits she has been doing her own investigating on the sly, she gives you a Lion Token.
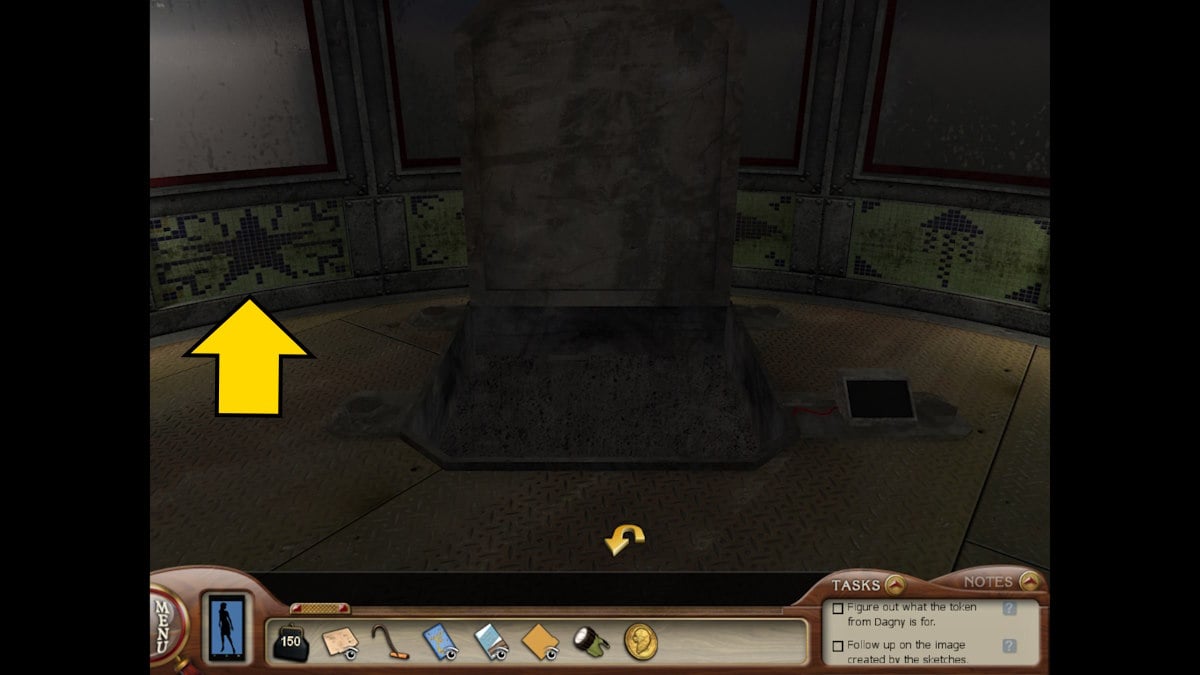
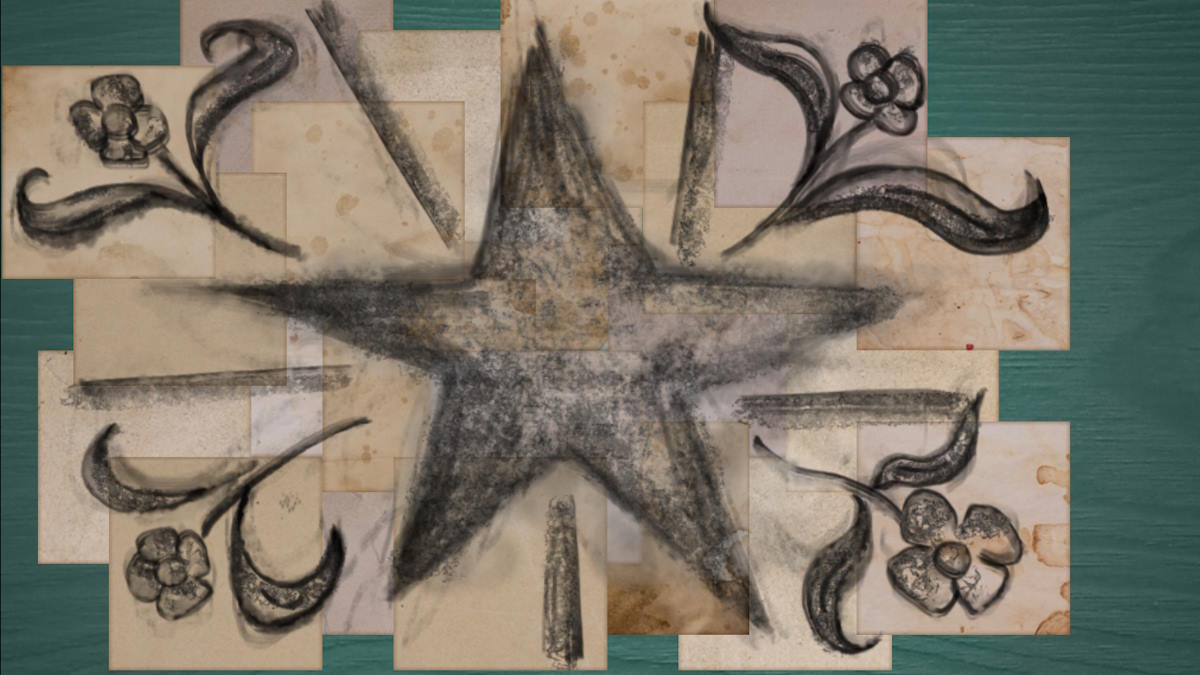
Once you’ve exhausted all the conversation options with Dagny (you may need to speak to her a second time to get some of them), head back to the lighthouse. Go to the top, then turn around and select the star image on the wall (above). Click it to get a close-up, and then again to find a puzzle underneath it.
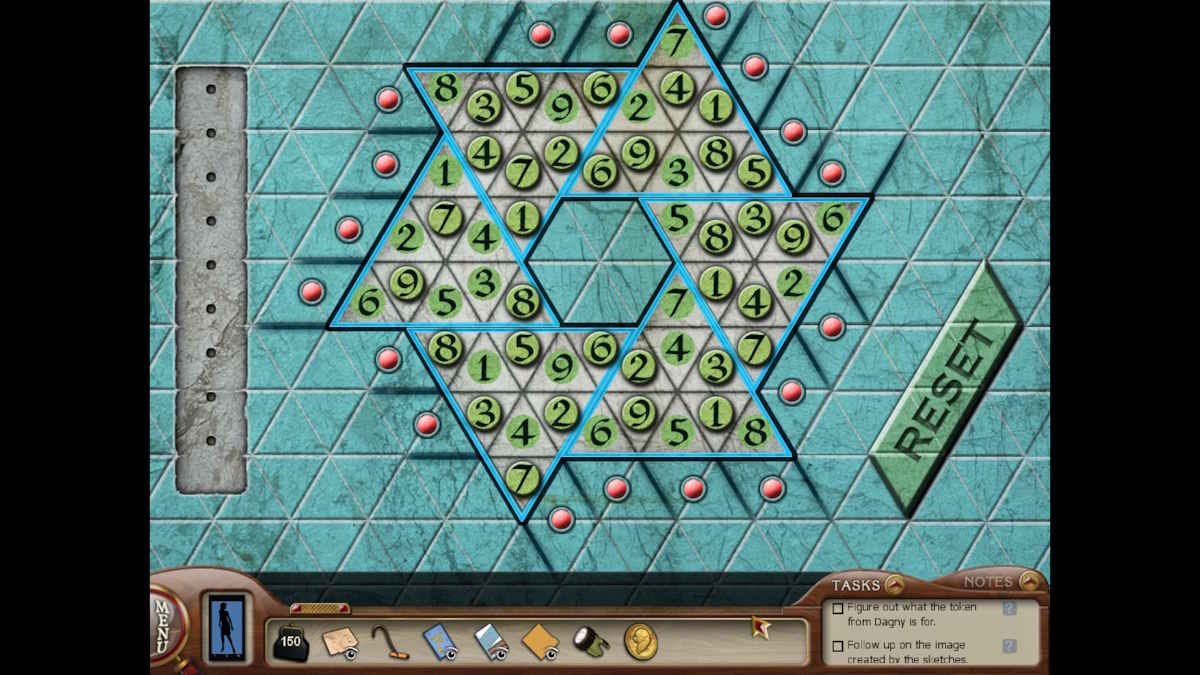
This is a Sudoku-style puzzle, where each number from one to nine must be on each horizontal line and in each triangle. I’ve put an image of the completed puzzle above. Note that if you make a mistake, you can grab the right number and click the error to switch it, rather than having to reset it. Once complete, the puzzle will move aside and reveal a page of instructions to where treasures are hidden in the caves, but you’ll need words to a song to make this make sense.
Confronting Elisabet
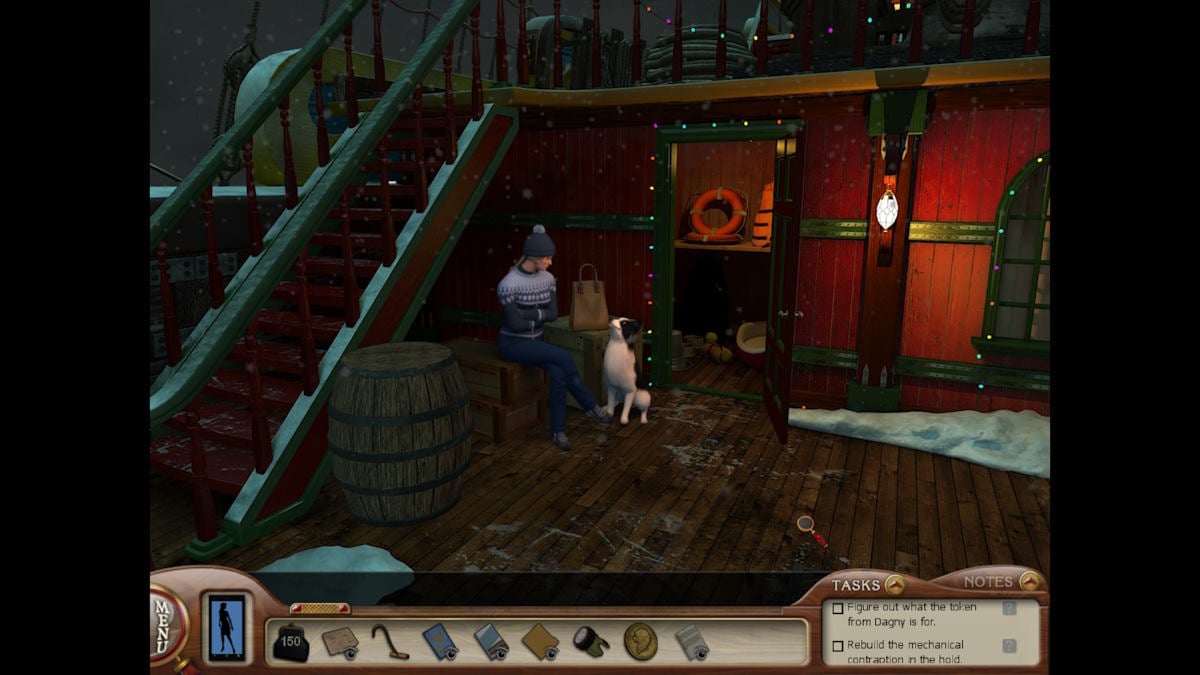
You need to know what’s going on with Elisabet. Go to her usual spot on the ship and try the door once more. This time you’ll push the issue and force the door open, only to find Magnus’ dog Tumi hidden behind. It turns out Elisabet was using the dog to try and tempt Magnus out of hiding. After speaking to her, she’ll give you a piece of sheet music.
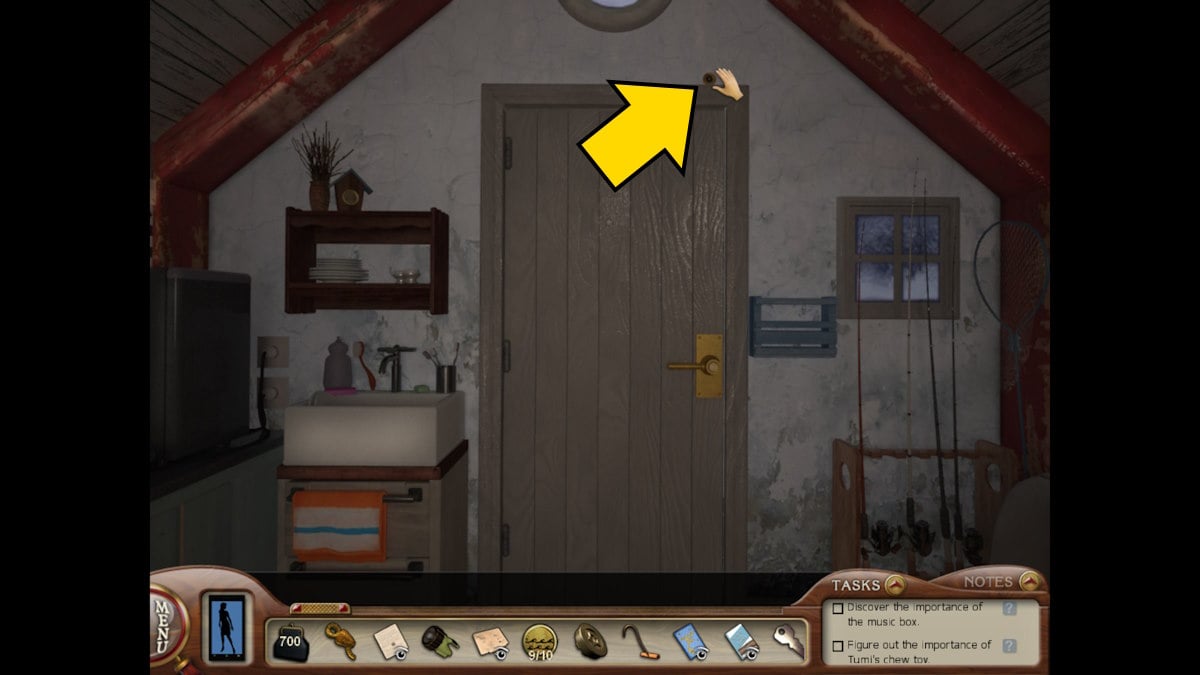
Speak to her again and ask why she was on the snowmobile. It turns out she wanted to collect Tumi’s toys. You also talk to her about Gunnar. Once you’re finished, open the door to the broom closet and you’ll find Tumi’s chew toy. Unfortunately, it has a lock and you don’t have a key.
The music box puzzle
Now that you have the music you can return to Magnus’ cabin and use the music box in the trunk. You must rearrange the metal pieces so that the music box will play the correct tune. I’ve put the proper order in the image below.
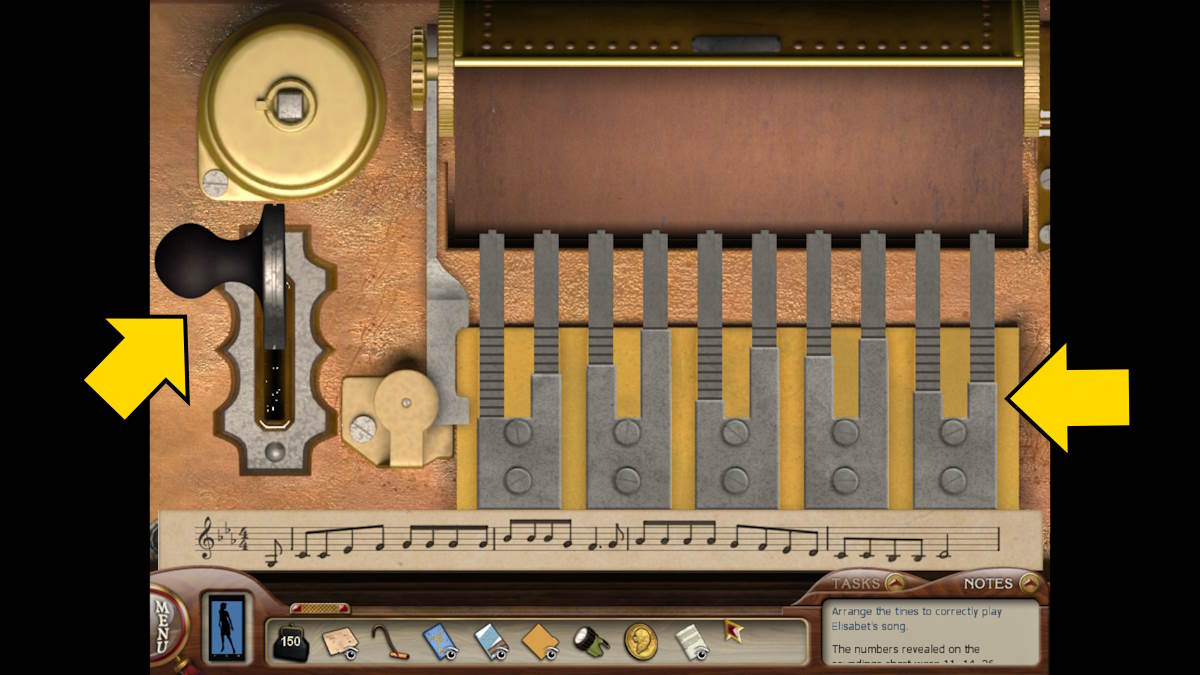
Now click the black handle (marked above) to play the tune. Once finished, the music box will open and you can take a wooden tile and Lawrence’s journal. It says the treasure was behind the false wall in the hold, but they moved the treasure to the ice caves. Also, note that the lion token Dagny gave you matches the image inside the music box.
As you leave the cabin you’ll get a call from Dagny. She knows you went through her luggage.
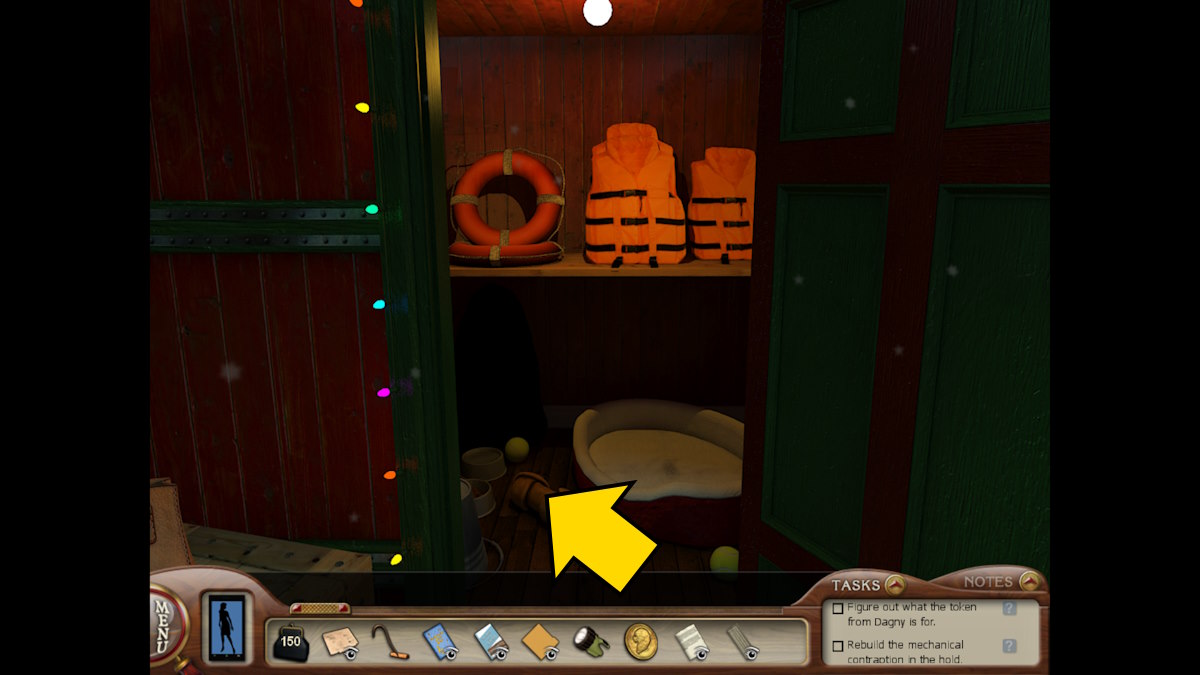
The ship’s secret room
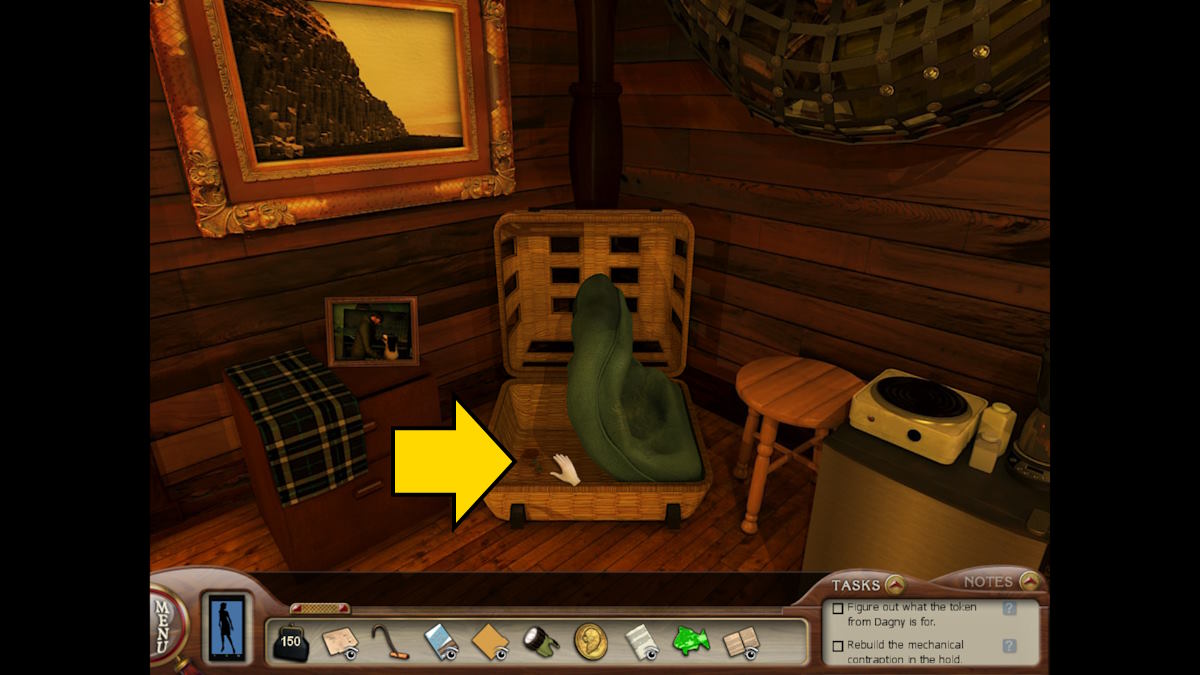
Return to the ship to find the alarm going off, and Elisabet gone. Go down to Magnus’ room. You’ll note that the photo of Magnus and Elisabet has been moved. Search the dog basket here to find a Tiny Key. Return upstairs and use the key to open Tumi’s chew toy. Inside, you’ll find more instructions on how to find the treasure in the caves.
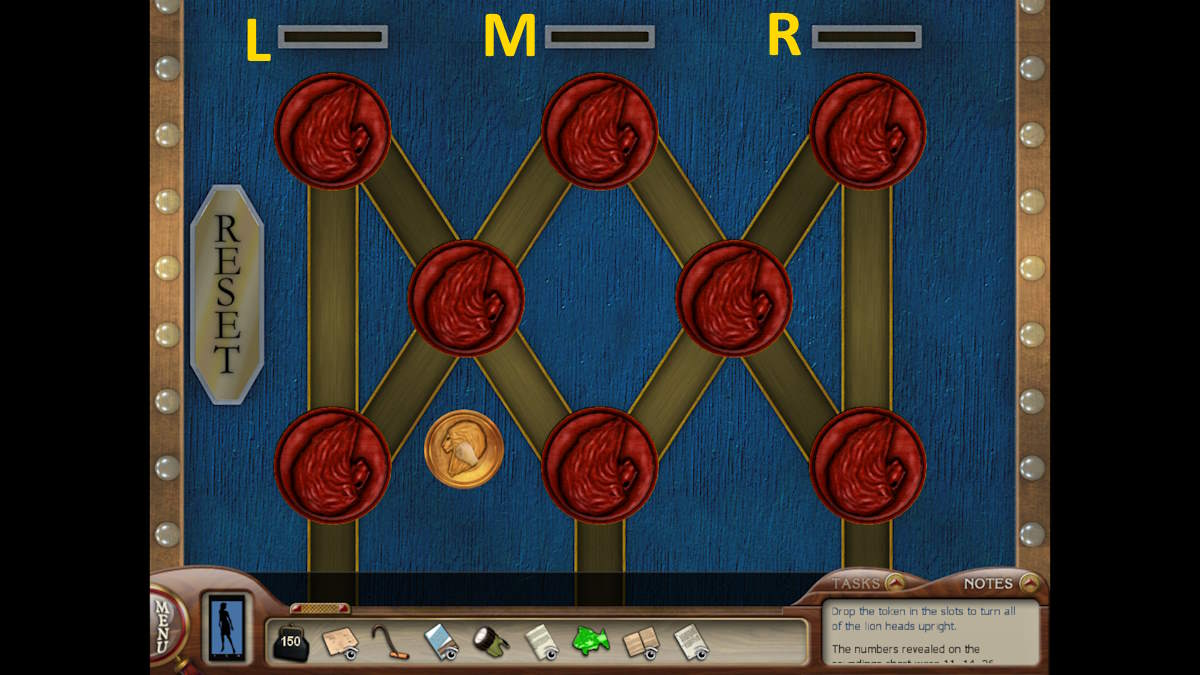
Now go to the bow of the ship, select the lion figurehead, and use the lion token in the slots at the top of the machine to turn all the lion heads the right way up at the same time. To do this, drop the coin in the following slots in this order:
- Left
- Middle
- Middle
- Right
- Middle
- Middle
- Middle
This opens the lion’s head, allowing you to take the wooden wheel from inside. Take this down to the secret corridor in the hold, add it to the mechanism on the door, and the door will open. A panel behind it will move, revealing a box. This box has a puzzle on each side.
The left side of the captain’s box
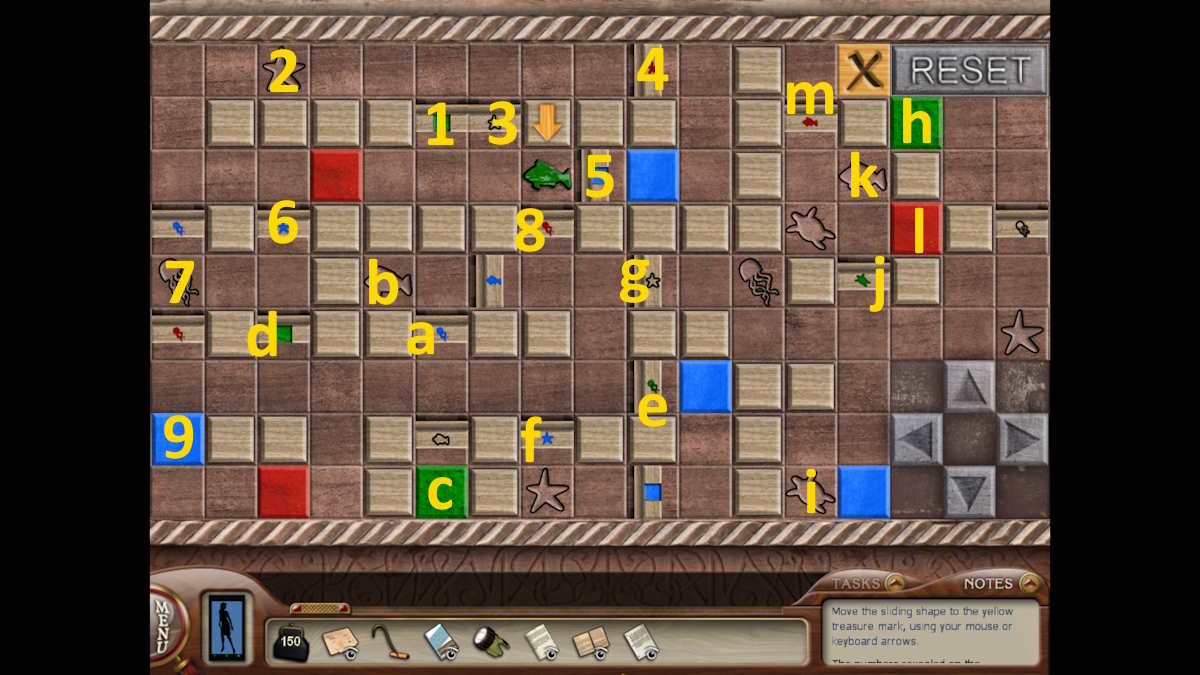
You need to move the wooden tile you got earlier (it will be added to the puzzle automatically) to the yellow ‘X marks the spot’ to get to the treasure. I’ve detailed the path to take below:
- Left twice (which opens the green door, 1)
- Up twice
- Left to the end (becoming a star, 2)
- Down two and then right (turning red) to the star door (3)
- Up twice, and then right (through the red star door, 4)
- Down and left (turning blue) and going through the blue door (5)
- Go back up through the star door (3), left to the end, down, right, and down again through the blue star door (6)
- Go left to become an octopus (7)
- Go up and right to become a red octopus and then down through the red octopus door (8)
- Follow the path down, then all the way left, and then down to become a blue octopus (9)
- Go up, right, and up again through the blue octopus door (a) and left to become a blue fish (b)
- Head right through the blue fish door, down, left, and down to turn green (c)
- Go through the green door to your left (d) and turn back into an octopus (7)
- Come back through the green door (d), right, and through the green octopus door (e)
- Follow the path right (turning blue), down, left (becoming a star, and go up through the blue star door (f)
- Go up, right, up, and right again through the star door (g), and then become an octopus by continuing right
- Move up into the top-right corner (avoiding the star) and become green (h)
- Go down (avoiding the blue space) and become a green turtle (i)
- Go up through the green turtle door (j), become a red fish (k and l), and go up through the final door (m) to the yellow X
You’ll receive another section of Lawrence’s journal.
The right side of the captain’s box
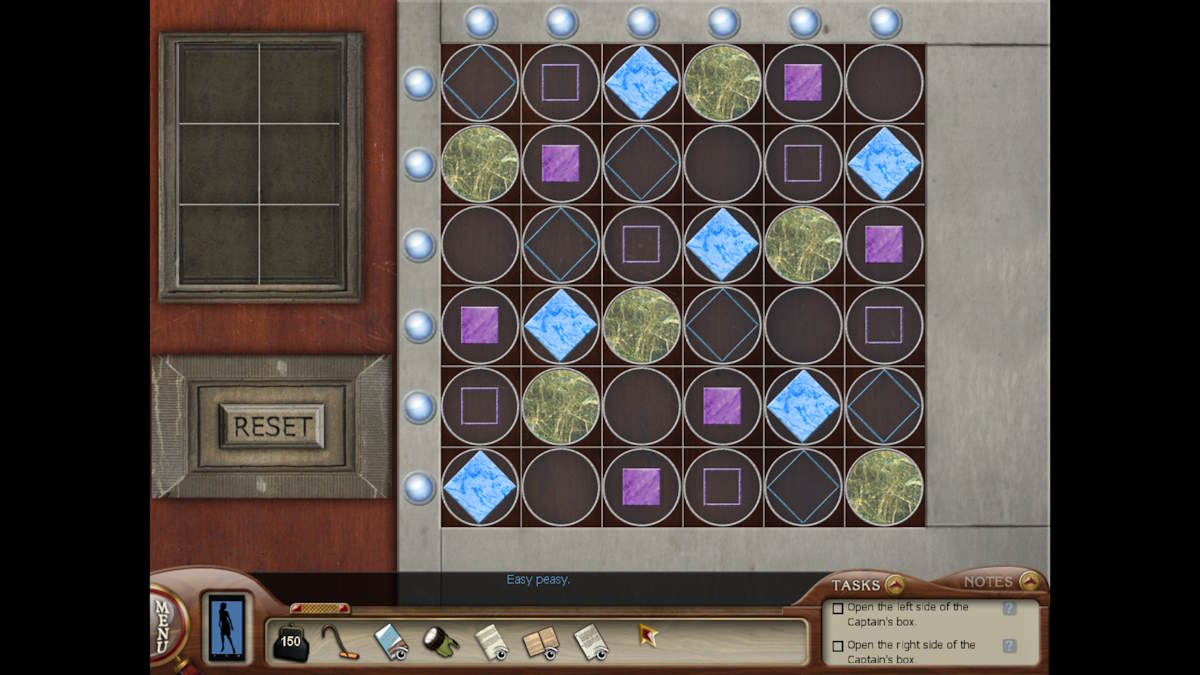
Now click the right side of the box for another puzzle. This time you need to ensure each design is in each row and column. The puzzle solution is above. With that, you’ll have the complete journal. All that’s left to do is find Magnus and track down the treasure!
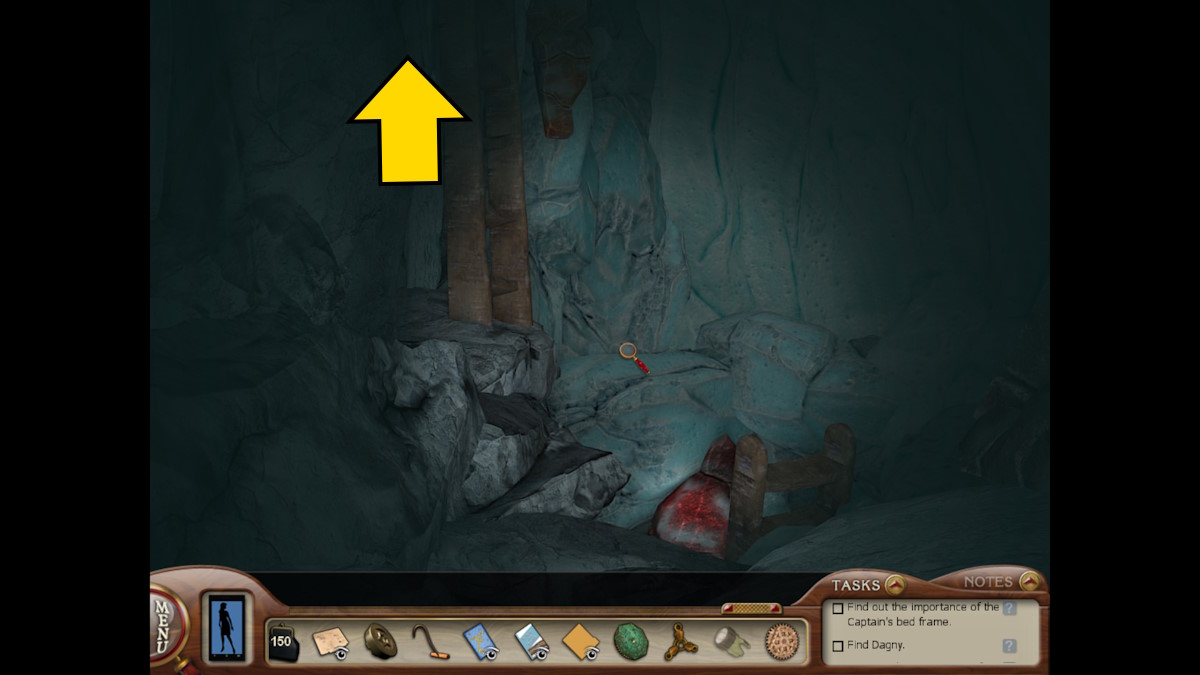
Finding the treasure in the caves
You now have all the instructions you need to find the treasure in the caves. Jump onto the snowmobile and head there now. Follow these instructions:
- Turn right at the red pumice stones
- Walk to the high ledge with red stone and climb up it
- Go down and past the yellow pumice stones
- Move forward until the tunnel splits levels, and go up
- Turn right at the cluster of five stalagmites
- Go forward into a large cavern
- Head into the right tunnel and go forward two steps
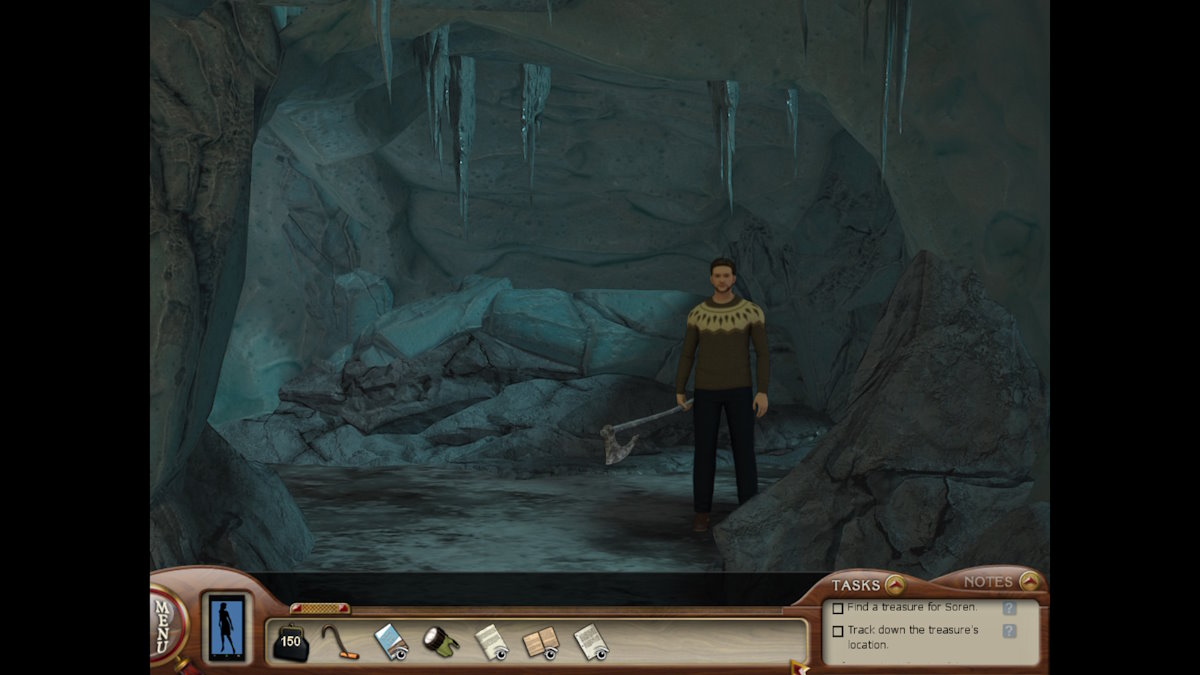
Break through the wall here with the hook and you’ll find Magnus. He’ll explain Soren is the man responsible, and who has left him here. He still thinks you may be in danger but also thinks Soren can be reasoned with. You’ll call Alex, who says she’ll dispatch someone to help, but Soren appears - with an axe! He demands you help him find the treasure.
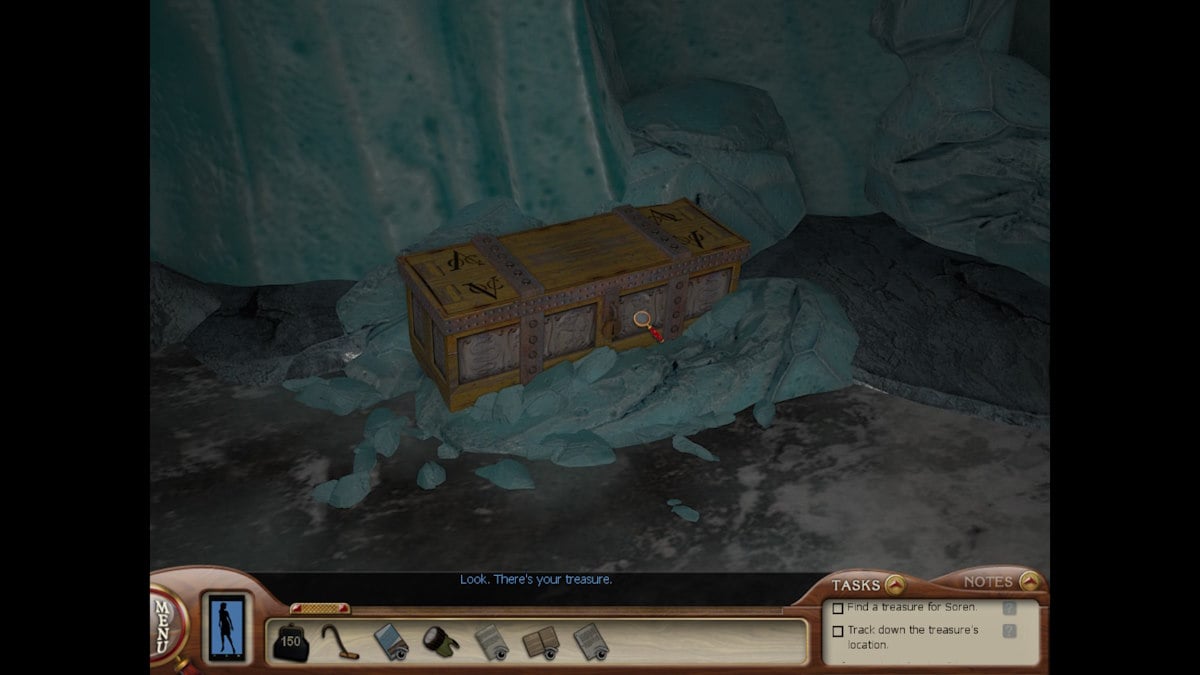
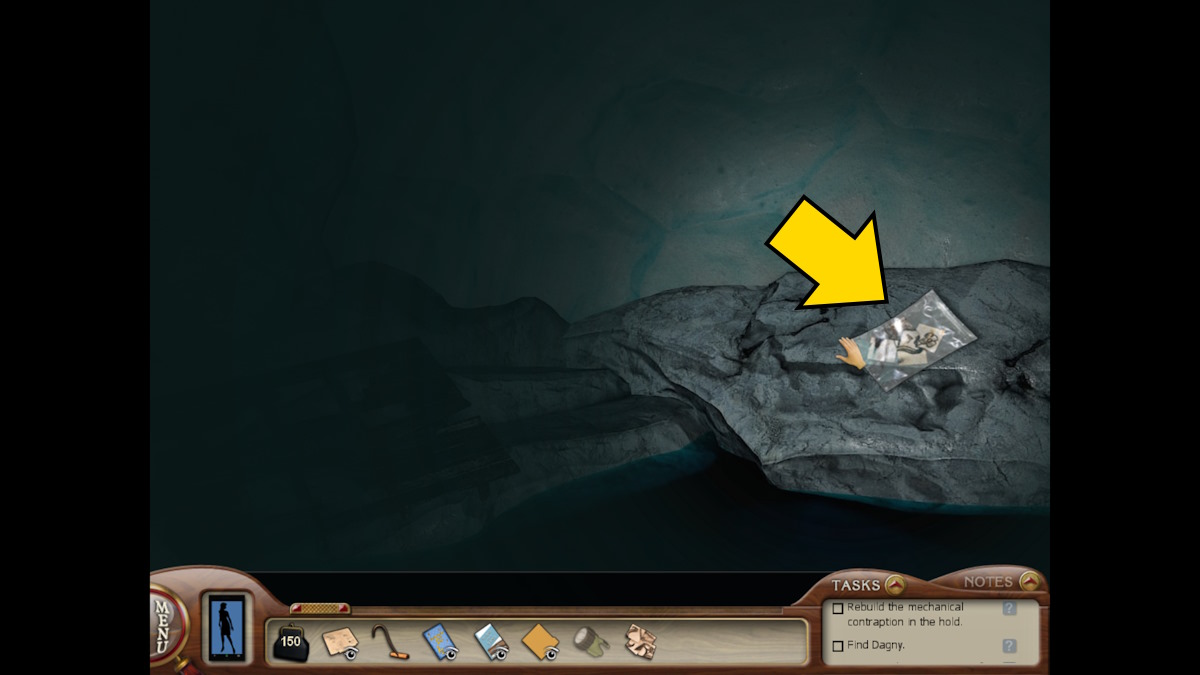
Go left and one step forward. Examine the left side of this dead-end and use the hook once more to uncover the decoy treasure (above). Soren will fall for it, and then leave you for dead, blocking the tunnel.
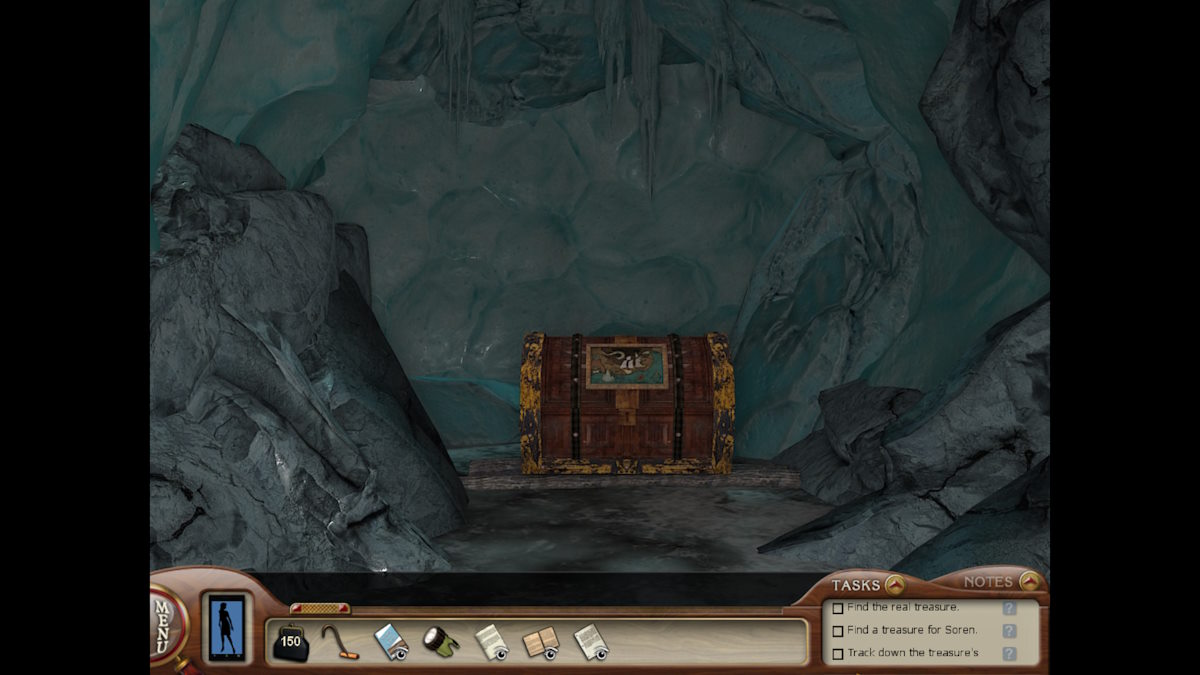
Turn around and use the hook to break through the ice, revealing a new tunnel. Go up and follow the passage until you find the real treasure (below).
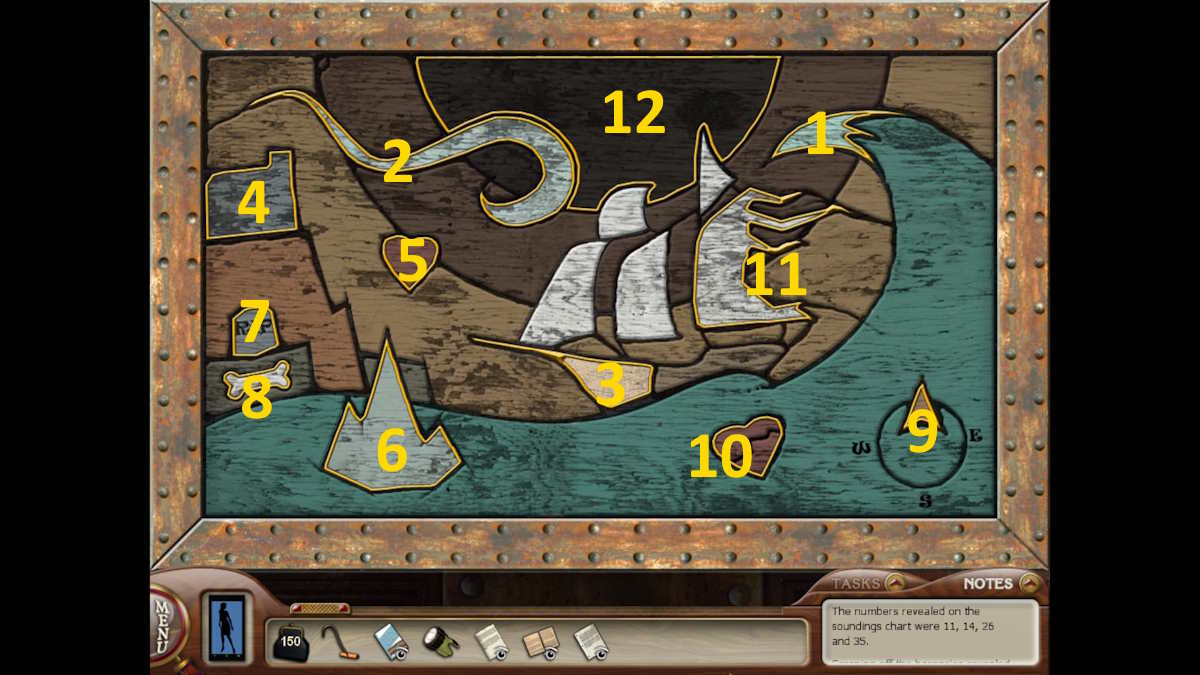
You need to press the images in the order they appear in the song, which is in Lawrence’s journal. I’ve marked the correct order on the image below. You’ll open the treasure and then Magnus will break through the ice to find you. Alex will call and say they’ve found Soren. Soren confesses to his crimes, and the case is complete. Congratulations! You’ve completed Nancy Drew: Sea of Darkness!
If you're looking for more information on Nancy Drew's adventures here at Pro Game Guides, check out my Nancy Drew Mystery of the Seven Keys Walkthrough here at Pro Game Guides!