
Updated on March 17, 2026: Our Slay the Spire 2 Regent Guide covers both core build archetypes for The Regent in Early Access. We will continue updating this guide with new tips, relic recommendations, and build refinements as Mega Crit Games patches the game throughout Early Access.
This Slay the Spire 2 Regent guide covers everything you need to master this roguelike deck builder's most complex character: his core mechanics, both primary build archetypes, the best cards, the best relics, and an act-by-act breakdown to help you stop dying in Act 2 and start crushing the Spire. If you want a broader picture of how he stacks up against the rest of the cast, check out our Slay the Spire 2 Character Tier List.
NOTE: STS2 is in active Early Access development, and Mega Crit Games is pushing patches regularly. That means card values, relic interactions, and meta rankings can shift between updates. Everything in this guide reflects the current state of the game.
The Regent Guide - Stats & Starting Relic
The Regent is arguably the most powerful character in the current Slay the Spire 2 meta, but also the most confusing to play. The main reason is that his resource system is unlike anything else in the roster, and his best cards only work if you find a nice balance between Energy and Stars. Here is the fast reference for The Regent before we get into the details:
| Character | Stats, Relic & Signature Mechanics |
|---|---|
 The Regent 75 HP S Tier The Regent 75 HP S Tier |  Starting Relic Divine Right — Gain 3 Stars at the start of every combat. Unlock RequirementPlay a run as The Silent DifficultyHard (High Skill Ceiling) Recommended ForExperienced players Archetype Count2 primary builds Signature Mechanics Stars (2nd Energy Pool) Forge & Enchantment Sovereign Blade Colorless Cards |
The Regent has two mechanics that do not exist on any other character in this roguelike deck builder: Stars and Forge.
- Stars are a secondary resource that works independently from your regular Energy. Unlike Energy, you don't get them automatically each turn, and they carry over to the next turns until you use them.
- Forge creates and buffs a huge sword called Sovereign Blade. The more you Forge it, the more damage it deals. The idea is to buff it enough to deal a killing blow. Forge charges that accumulate beyond a threshold also convert into Enchantments, permanent card improvements that persist beyond the current combat.
Understanding both is the entire foundation of playing the Regent well. You need a steady influx of Stars, which you get via your card draw engine. That means you need a deck balance with cards that give you Stars, Forge, Block, and Damage. Easy, right?
RELATED: Slay the Spire 2 Relics Tier List
Best Way to Use the Stars in Slay the Spire 2
The best way to use Stars is to use them in early rounds for cards that alleviate pressure without spending too much Energy (for example, Cloak of Stars gives you 7 Block and costs 0 Energy and 1 Star). Thanks to the 3-Star combat-start bonus from Divine Right, you can use potent cards like Astral Pulse (14 Damage to all enemies, which costs 0 Energy and 3 Stars) and still have enough Energy to play your regular cards.
At later stages of combat, you can play very useful cards like Guiding Star (Deal 12 damage and draw 2 cards next turn for 1E/2S), while still being able to play Forge-focused cards or Block cards.
What's the Difference Between Stars and Energy?
Stars are a secondary resource that works independently from your regular Energy. Here is what makes them different:
- Stars do not reset at the start of your turn.
- Stars carry over to the next turn.
- There's no limit on the number of Stars you can have.
- Stars are a separate pool from Energy, but some cards require both.

You start every combat with the 3-Star combat-start bonus from Divine Right, which is good enough for a starting round. But as you progress and get more expensive cards, you'll need a steady stream of Stars from your card draw engine.
Related: Slay the Spire 2 Beginner's Guide
How to Get More Stars
The goal of your deck is to build Star income through generator cards like Venerate, Hidden Cache, and Convergence, spend those Stars on powerful cards, and finally deal a finishing blow with your Sovereign Blade.
The tricky part is maintaining a steady Stars income while always having enough Block and offensive options that don't require this special resource. Sometimes you simply can't wait for a perfect card combo, as you have to defend. It's always better to have more Block than Stars cards - what's the point of the perfect combo if you're dead?
Best Way to Use the Forge Cards
Forge is most effective against a single enemy, since you still need the Sovereign Blade to deal accumulated damage. Against multiple enemies, the Forge mechanic gets less effective, as each time you use it, you must pull the Blade again from the deck. While you wait to draw it, your sword is useless. That's why Forge should be primarily used as a finishing move. Therefore, use offensive cards to defeat lesser enemies and block their attacks while pumping up your blade with Forge cards.
- Sovereign Blade has 10 basic damage and costs 2 Energy to play.
- It has Retain, meaning it stays in your hand until you use it.
- Its damage increases permanently for the duration of combat every time you play a Forge card.
- Once enough Forge charges accumulate on a card, they convert into Enchantments — permanent stat improvements that carry over beyond the current fight.
Having a steady Forge action is important if you want to quickly build Blade strength. One of the best ways to use the Forge keyword while still attacking or defending is to have cards with multiple functions. For example, Wrought in War deals 7 damage but also Forges 5, letting you deal with enemies while improving the sword's power at the same time.
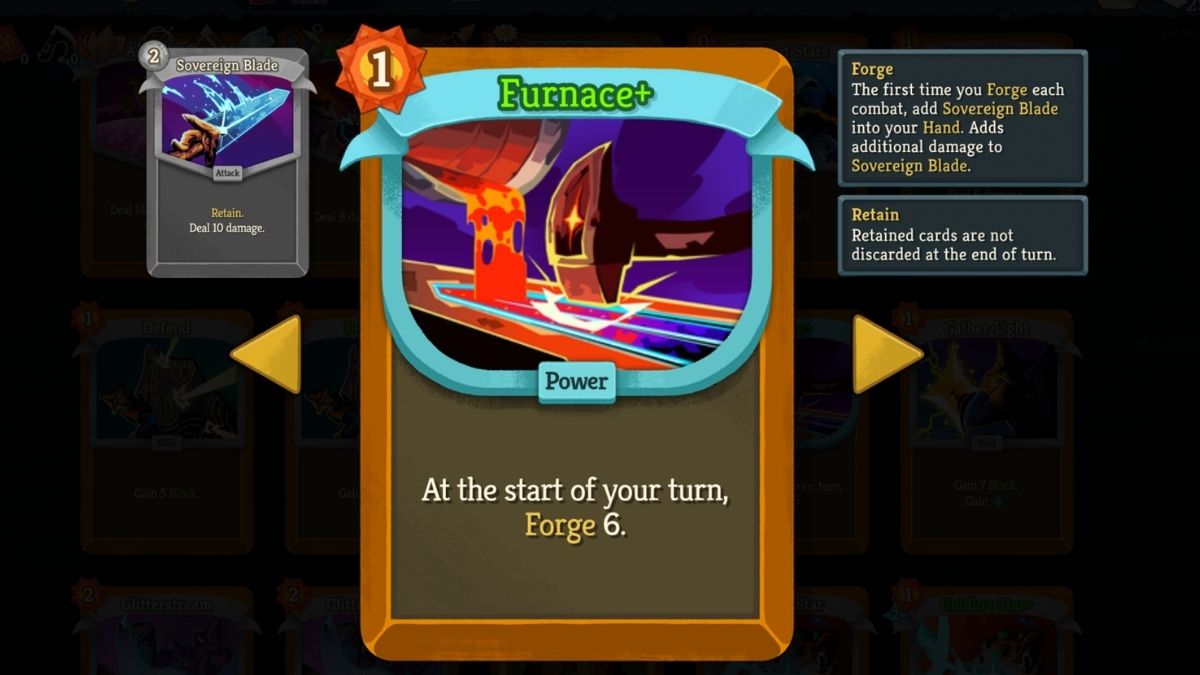
Another useful card is Furnace — it costs 1 Energy and Forges 4 at the start of every turn automatically, so the Sovereign Blade's damage increases every turn. Again, don't be greedy, and always maintain balance between Attack, Stars, Forge, and Block cards. That is, unless you decide to go with Stars or Forge-focused builds, which, although risky, can be very efficient and fun!
Slay the Spire 2 Regent Best Builds
The Regent has two primary deck archetypes in the current Early Access meta. Most runs end up leaning toward one while borrowing a few cards from the other. Do not try to build both simultaneously — that is the most common reason Regent runs fall apart in Act 2.
Best The Regent Stars Builds
The Stars Engine is the most common Regent build and the one you will default to on most runs where Forge payoffs do not appear early. The game plan is straightforward: build a reliable card draw engine that generates Stars through low-cost generator cards, then spend those Stars on high-impact payoff cards to close out fights.
There are two ways to play a Stars deck, and the card rewards you find in Act 1 usually push you toward one or the other:
- Fast Stars Play (Spend Immediately): Generate Stars and cash them out on the same turn. The goal is a steady loop of generation and spending rather than one massive burst. Black Hole is perfect for this style since every Star transaction passively deals AoE damage.
- Slow Stars Play (Save for Strong Cards): Spend your early turns generating Stars while defending with Block cards, then unload everything on a finisher like Comet for a one-turn kill. Hidden Cache is the best generator for this style because it delivers a large number of Stars across two turns from a single card play.
The best Stars decks in Slay the Spire 2 keep their card count tight, around 15 to 18 cards, and strip out Strike and Defend cards as fast as possible through campfire upgrades, merchant removal, and event rewards. For these builds, you want every card you draw to either generate Stars, protect you while doing it, or cash out the Stars you have built up.
| Key Stars generators | Genesis, Glow, Hidden Cache, Gather Light, Shining Strike, Solar Strike, Venerate |
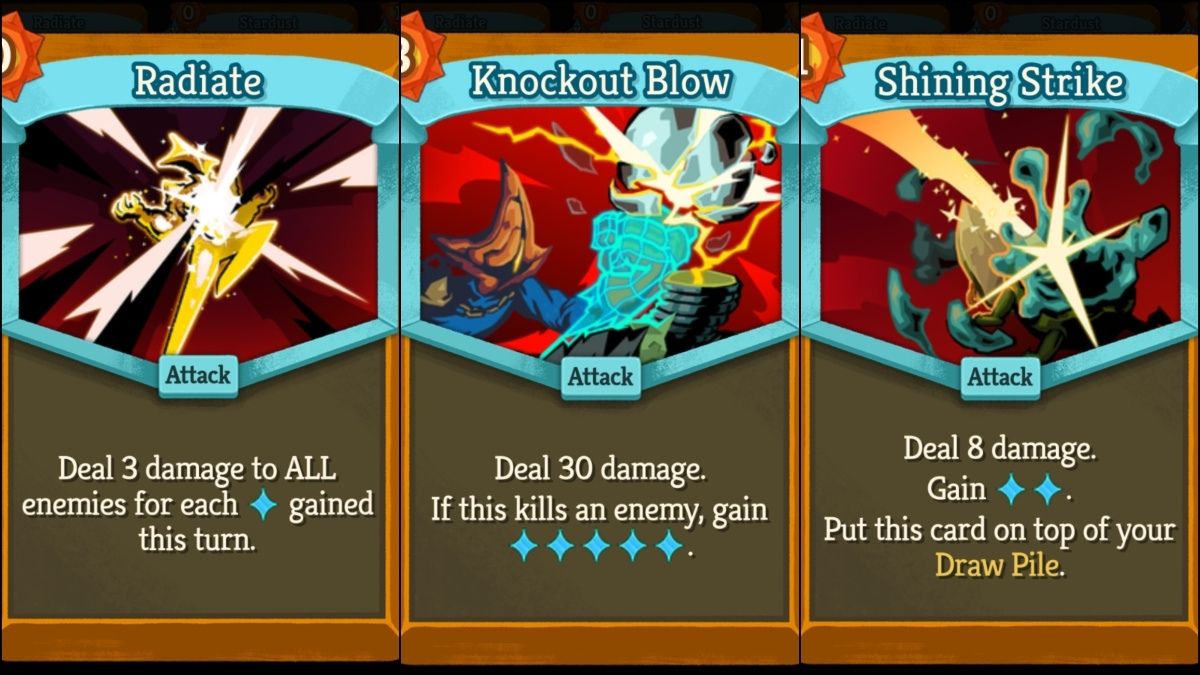
| Key Attack cards | Comet, Gamma Blast, Black Hole, Seven Stars, Astral Pulse, Radiate |
Note: The Stars builds are more versatile than Forge and function better when card rewards are inconsistent. That said, having a couple of Forge cards will make your deck even stronger.
Best Forge Builds (Sovereign Blade)

The Forge build is played with the goal of ending the enemy with one blow. You need to concentrate every Forge keyword card's value onto a single Sovereign Blade that you intend to swing once for a huge number. You just need to Forge enough times, maintain your health, and hit the enemy with a powerful blow.
The build requires Furnace or another early Forge source to get going, but having Hidden Cache or Attack cards like Solar Strike can do the trick. Focusing on Forge sometimes requires seemingly illogical moves, like taking a lesser Forge card instead of a strong Stars-focused one. Try having mostly Block and Forge cards so you can hit the enemy with the Blade as often as possible. You'll still want some Stars cards for flexibility, though.
| Key Forge cards | Furnace, Bulwark, Wrought in War, Spoils of Battle, Refine Blade, Sword Sage |
| Key Block/Attack cards | Glitterstream, Celestial Might, Knockout Blow, Hegemony, Kingly Punch |
Note: Getting the Furnace card early will make your life easier. The Enchantment keyword it generates on the Sovereign Blade compounds over time, giving you permanent stat improvements that carry forward beyond individual fights. Don't forget to always have enough Block cards!
Best Cards for The Regent in Slay the Spire 2

| Card | Description | Comment |
|---|---|---|
| ⭐ S Tier — Stars Build | ||
| BombardmentRare3 Energy | Deal 18 damage. At the start of your turn, plays from the Exhaust Pile. Exhaust. | Pay 3 Energy once, then collect 18 free damage from the exhaust pile every subsequent turn. Works equally well in Forge builds. Pick it whenever it appears regardless of your archetype. |
| The Sealed ThroneRare1 Energy | Whenever you play a card, gain 1 Star. | Every card play banks a Star automatically. A five-card turn generates five Stars on top of whatever your card draw engine produces. The fastest way to reach critical Stars mass in a Stars Engine deck. |
| GenesisRare2 Energy | At the start of your turn, gain 2 Stars. | Passive 2 Stars every single turn for the rest of combat after you play it once. The closest thing to an auto-win condition in a Stars build. Activate it as early in the fight as possible. |
| Black HoleUncommon1 Energy | Whenever you spend or gain a Star, deal 3 damage to ALL enemies. | In a deck that generates and spends Stars constantly, every transaction becomes passive AoE. Makes multi-enemy rooms feel trivial and slowly chips boss health while your card draw engine builds up. |
| Child of the StarsUncommon1 Energy | Whenever you spend a Star, gain 2 Block for each Star spent. | Converts your offensive resource into simultaneous defense. Spend 5 Stars on a payoff card and gain 10 Block for free in the same action. This single card largely solves the Regent's early survivability problem. |
| StardustCommon0 Energy | Deal 5 damage for each Star you spend. (7 damage per Star when upgraded.) | The Regent's primary finisher in the stockpile Stars variant. Costs 0 Energy and scales with every Star you have banked. With 10 to 15 Stars in reserve, a single Stardust ends most non-boss fights instantly. Make this a campfire upgrade priority. |
| A Tier — Stars Build | ||
| Void FormRare3 Energy | End your turn. The first 2 cards you play each turn are free. | Steep upfront cost but every subsequent turn operates on effectively 5 Energy. Transforms the value of your first two plays permanently. Best taken mid-Act 2 when your deck is already functional. |
| ConvergenceUncommon1 Energy | Next turn, gain 1 Energy and 1 Star. Retain your Hand this turn. | Three effects for one Energy: hold your best hand, bank a Star, and get an extra Energy next turn. Extremely strong going into boss fights where you want to set up a perfect opening hand. |
| Seven StarsUncommon2 Energy | Deal 7 damage to ALL enemies 7 times. | 49 total AoE damage for 2 Energy with no Stars cost. One of the highest raw damage outputs in the Regent's pool and exceptional for clearing multi-enemy rooms in Acts 2 and 3. |
| Hidden CacheUncommon1 Energy | Gain 1 Star. Next turn, gain 3 Stars. | The best generator for the slow Stars (stockpile) playstyle. A single play delivers four Stars across two turns, making it the most efficient Stars-per-Energy card in the deck. Take it early and use campfire upgrades on it when possible. |
| Shining StrikeCommon1 Energy | Deal 8 damage. Gain 2 Stars. Put this card on top of your Draw Pile. | Damage, Star generation, and self-recycling in one slot. Every time you draw it, it cycles right back to the top. A single copy contributes 2 Stars per deck cycle indefinitely. |
| Solar StrikeCommon1 Energy | Deal 8 damage. Gain 1 Star. | Clean, no-condition generator that fits every Regent build. The offensive equivalent of Gather Light. Take two or three early in the run, replace them later when better generators appear. |
| Gather LightCommon1 Energy | Gain 7 Block. Gain 1 Star. | The defensive equivalent of Solar Strike. Solves your Act 1 survivability problem while contributing to your Stars income at the same time. A core early pickup in any Stars deck — it does two jobs in one card slot and never feels like a dead draw. |
| GlowCommon1 Energy | Gain 1 Star. Draw 2 cards. | Star generation plus card draw in one slot — it accelerates your card draw engine while banking a Star. One of the best early pickups for any Stars deck. The upgraded version gives additional Stars. |
| ⭐ S Tier — Forge Build | ||
| FurnaceUncommon0 Energy | At the start of your turn, Forge 4. | The core of the Forge build. Play it once and it accumulates Forge charges on your Sovereign Blade automatically every turn for free. Even in Stars builds, passive Forging compounds the Enchantment keyword over time. Take this almost every time it appears. |
| BulwarkUncommon1 Energy | Gain 13 Block. Forge 10. | Handles both your defense and your Forge accumulation in one card. 13 Block keeps you alive while 10 Forge charges push the Sovereign Blade toward execute territory. The backbone of the Forge build's survivability. |
| Wrought in WarUncommon1 Energy | Deal damage and Forge 5. | A direct Forge contributor that also deals damage, making it a functional replacement for your starter Strikes early in the run. High campfire upgrade priority since both the damage and Forge value increase. |
| Big BangCommon0 Energy | Gain 1 Star, 1 Energy, and Forge 5. Draw 1 card. | Four effects for zero Energy. Creates the Sovereign Blade immediately, Forges it 5 times, gives you an extra Energy, banks a Star, and replaces itself with a draw. There is no bad time to play this. |
| A Tier — Works in Both Builds | ||
| ArsenalUncommon1 Energy | Whenever you play a Colorless card, gain 1 Strength. | In builds that lean into Colorless cards through Orange Dough or Spectrum Shift, Arsenal generates passive Strength scaling every time you play one. Worth picking up when Colorless card generation is already part of your deck direction. |
Best Relics for The Regent
Regent-specific relics skew heavily toward Stars generation and Forge acceleration. Universal boss relics and shop relics that give extra Energy or improve your card draw engine are also strong since his deck is energy-efficient but benefits from the extra room to cycle. The list below covers both.
| Relic | Effect | Why It Matters |
|---|---|---|
| ⭐ Priority Relics | ||
| Divine Right Starting | Gain 3 Stars at the start of every combat. | Your starting relic. The 3-Star combat-start bonus is a modest but essential baseline that ensures the Stars engine has something to work with from turn one. |
| Lunar Pastry Rare | At the end of your turn, gain 1 Star. | Passive Stars income every single turn. Over a five-turn fight that is 5 free Stars on top of everything your card draw engine produces. One of the best Regent-specific relics available. |
| Mini Regent Rare | The first time you spend 1 Star each turn, gain 1 Strength. | Converts your Stars economy into passive Strength scaling. Every fight where you spend at least one Star permanently increases all your attack damage. Stacks quickly across a full run. |
| Kifuda Uncommon | Choose 3 cards to enchant with Adroit, granting them 3 Block when played. | Adds passive Block generation to your three most-played cards via the Enchantment keyword. In the Stars Engine, enchanting your core generator cards means you accumulate defense automatically while building your Stars economy. |
| Fencing Manual Common | At the start of each combat, Forge 10. | For the Forge build specifically, this is transformative. 10 free Forge charges at combat start means the Sovereign Blade enters every fight already scaled, and Furnace compounds this from turn one. |
| Strong Secondary Relics | ||
| Touch of Orobas Ancient | Replaces Divine Right with Divine Destiny, granting 6 Stars at combat start. | Doubles your combat-start bonus from 3 to 6 Stars. Considered by many players to be the single best Regent relic in the game when you can get it. This essentially halves the number of generator cards your deck needs to function. |
| Ice Cream Universal | Unspent Energy carries over to your next turn. | Because many Regent Stars cards cost Stars rather than Energy, you often end turns with leftover Energy. Ice Cream converts that waste into banked turns where you can burst on a key play. |
| Dolly's Mirror Universal | Choose a card to duplicate. | Doubles your best card. Genesis becomes two passive Stars-per-turn generators. Bombardment becomes two free damage sources replaying from the exhaust pile every turn. Pick whatever your current win condition is. |
Regent Progression Guide (For Each Act)
The Regent's run progression is more structured than most characters because his early card picks determine which build path is viable. Here is how to approach each act in this roguelike deck builder.
Act 1: Establish Your Engine
Act 1 with the Regent is the most uncomfortable part of any run. You will have too few Star generators, your Sovereign Blade (if you trigger Forge at all) will have low damage, and your deck will still be clogged with starter Strikes and Defends. This is normal. Your Act 1 goals are:
- Pick a lane early. If your first two card reward screens show strong generator cards like Glow, Genesis, or Shining Strike, you are going Stars. If you see Furnace or Bulwark, lean into Forge. Trying to build both wastes picks.
- Take 2 to 3 generator cards. You need a minimum of two or three reliable Star generators by the time you hit Act 1's boss. Solar Strike and Gather Light are your most common early options and both are worth taking — they each do double duty (offense or defense plus Stars), keeping your card draw engine moving without adding dead weight.
- Prioritize card removal. Merchant card removal is one of the most impactful gold spends for the Regent. Getting rid of a starter Strike or Defend early tightens your deck faster than almost any card pick.
- Do not over-commit to Star spenders yet. You do not have enough Stars income to support Stardust or Seven Stars in Act 1. Pick generators first, payoffs later.
Act 2: Complete the Core and Add Payoffs
Act 2 is where the Regent run either clicks or falls apart. By the end of Act 2 you should have:
- A core of 3 to 5 reliable Star generators cycling consistently through your card draw engine
- At least one major payoff card (Bombardment, Stardust, or Radiant for Stars; Sovereign Blade with 20 or more Forge charges for Forge)
- A Block solution (Child of the Stars, Bulwark, Gather Light, or Convergence)
- A deck size of 15 to 18 cards with most starting Strikes removed
Act 2 is also when Genesis becomes the most valuable card reward you can find. If it shows up in a reward screen, take it. A passive 2 Stars per turn at the start of Act 2 means you enter Act 3 bosses with a fully loaded economy. Use campfire upgrades on Hidden Cache or your key Block generators before upgrading attack cards.
Elite fights in Act 2 are where the Regent's early fragility is most punishing. If you are not comfortable with your Block generation yet, do not fight every Elite you see. The extra card reward is not worth a death when your deck is not ready to sustain it.
Act 3: Execute Your Win Condition
By Act 3, a well-built Regent deck should feel dominant. Your card draw engine is cycling, your payoffs are upgraded, and your Block solution is keeping you alive through enemy turns while the engine loads. Act 3 priorities:
- Use campfire upgrades on Stardust or Bombardment first if you have not already. Upgraded Stardust raises its output from 5 to 7 damage per Star, and an upgraded Bombardment generates 18 free damage from the exhaust pile per turn for the entire boss fight.
- Watch for Void Form. If it appears in Act 3, it is worth the 3 Energy upfront cost. Two free card plays every turn for the rest of the run is game-changing when you are playing 8 to 10 cards per turn at peak.
- Do not add new generator cards. At this point more generators just dilute your hand when you want to be drawing payoffs. If Stars income is insufficient, use campfire upgrades on existing generators rather than adding new ones.
Common Regent Mistakes to Avoid
Most failed Regent runs share the same handful of mistakes. Here is what to watch for:
- Building both archetypes at once. This is the most common reason Regent runs die in Act 2. Stars cards and Forge cards contest each other for hand space and energy. Commit to one lane early and stay there.
- Taking too many pure Star generators. Generators with no secondary effect (cards that only give Stars and do nothing else) clog your hand during fights where you need damage or Block immediately. Prioritize generators that also deal damage or draw cards, like Shining Strike and Glow. Gather Light is the Block-focused equivalent — it covers your survivability while adding to your Stars income.
- Ignoring Block in Act 1. The Regent is not a tank. 75 HP feels reasonable until an Act 1 Elite hits you three times in a row and you realize you have no Block source in your deck. Gather Light and Child of the Stars both cover this without slowing your engine.
- Spending Stars too aggressively in the early game. Stars carry over between turns. If you are not in danger of dying, hold your Stars rather than spending them on a suboptimal play. The payoff when you finally do cash them out — especially with Stardust — is worth the patience.
- Not removing starter cards. The Regent's starter Strikes and Defends are weaker than those on other characters relative to his card pool, because his best cards do so much more per slot. Every starter card you remove is a meaningful improvement in deck quality. Prioritize merchant removal over most other gold spends.
- Skipping Bombardment. Some players see the 3 Energy cost and pass. Do not. You only pay that cost once. After the first turn, it exhausts and replays from the exhaust pile for free every subsequent turn. It is one of the best value cards in the entire game, regardless of Ascension level.
- Misusing campfire upgrades. Many players upgrade attack cards first out of habit. With the Regent, prioritize upgrading Stardust (5 to 7 damage per Star), Hidden Cache (increases Stars delivered), and your key Block generator. The wrong campfire upgrade order is one of the most common Ascension-level mistakes.
Slay the Spire 2 Regent FAQs
The Regent is considered the strongest character in the current Early Access meta alongside The Silent, with the highest damage ceiling in the game when built correctly. His Stars secondary resource lets him generate turns that are simply not possible on other characters in this roguelike deck builder. That said, he is the hardest character to learn, and his power ceiling requires correct drafting to reach. New players will have a much easier time starting with The Ironclad and coming to The Regent later.
The Regent unlocks after you complete any run as The Silent. You do not need to win the run. Selecting Give Up from the pause menu counts as a completed run for unlock purposes, so you can unlock The Regent in just a few minutes if you want immediate access. The full unlock chain is: Ironclad (default) > Silent (run as Ironclad) > Regent (run as Silent).
Stars are a secondary resource unique to The Regent that works completely independently from regular Energy. Stars do not reset at the start of your turn, carry over between combat rounds, and have no cap on how many you can hold. You start every combat with 3 Stars from your Divine Right starting relic as a combat-start bonus. Generator cards like Genesis, Glow, Gather Light, and Hidden Cache increase your Stars income through your card draw engine, while payoff cards like Stardust and Bombardment convert those Stars into damage. The key insight is that Stars are not just a damage resource — cards like Convergence convert them back into Energy, letting the Regent extend turns beyond what is normally possible.
Forge is a keyword that adds charges to a special weapon called the Sovereign Blade whenever you play a card that contains it. The Sovereign Blade has the Retain keyword, meaning it stays in your hand across turns until you choose to play it. Its damage permanently increases for the duration of combat every time you play a Forge card. The goal of a Forge build is to stack enough Forge charges through cards like Furnace, Bulwark, and Big Bang that a single Sovereign Blade swing deletes enemies. The Enchantment keyword is also related: once enough Forge charges accumulate on a card, they convert into Enchantments that permanently improve that card's stats beyond the current combat.
The Stars Engine is the most consistent Regent build across most runs, focusing on generating Stars through cards like Genesis, Glow, Shining Strike, Gather Light, and Hidden Cache, then spending them on finishers like Stardust or Bombardment. The Forge or Sovereign Blade build is the alternative, stacking Forge charges through Furnace and Bulwark until a single Sovereign Blade swing can one-shot Act 3 bosses. The Stars Engine performs better when card rewards are inconsistent, while the Forge build has a higher ceiling in runs where you find Furnace early. Most experienced players commit to whichever lane their Act 1 rewards point toward rather than trying to build both.
The Regent starts with Divine Right, which grants a 3-Star combat-start bonus at the beginning of every combat. This is a solid baseline relic for any Stars build. The best relic upgrade available is Touch of Orobas, an Ancient relic from the Orobas encounter that replaces Divine Right with Divine Destiny, doubling your combat-start bonus from 3 to 6 Stars. Many players consider Touch of Orobas the single most impactful Regent-specific relic in the game. Among regular relics, Lunar Pastry (1 Star at the end of the turn) and Mini Regent (1 Strength passive Strength scaling per turn when you spend Stars) are the strongest Regent-specific pickups.
No. The Regent is the hardest character in the current roster to learn and is not recommended for players new to STS2. His two-resource economy requires understanding both when to generate Stars and when to spend them; his best cards only make sense once you understand the underlying engine, and his Act 1 is the most awkward of any character when you are unfamiliar with his tools. Start with The Ironclad, who heals after every combat and has a straightforward playstyle. Come back to The Regent after you are comfortable with the core game systems.
Yes. STS2's co-op multiplayer supports up to four players, and The Regent pairs especially well with The Silent in co-op. The Regent's Black Hole passive AoE synergizes with The Silent's poison stacking since the chip damage from every Star transaction compounds the poison ticks applied by the Silent. The Regent can also handle boss threats more reliably in co-op thanks to having other players generate Block or apply debuffs while his card draw engine builds up. Duplicate characters are allowed in co-op, so you can run two Regents if you prefer.
The Regent unlocks after you complete any run as The Silent. You won't need to invest much time, since you don't need to win. All you need to do is start a run and select Give Up from the pause menu; this counts as a completed run. The Regent starts with 75 HP, which puts him in the middle of the roster, and his Divine Right starting relic gives you a 3-Star combat-start bonus at the beginning of every fight.
That covers everything you need to get started with The Regent in Slay the Spire 2. For a full look at how he compares to the rest of the cast, see our Slay the Spire 2 Character Tier List, and check out our Relics Tier List for a full breakdown of every relic worth taking across all five characters.