
Updated on March 11, 2026: Slay the Spire 2 launched on Steam Early Access on March 5, 2026. This relics tier list covers the best universal relics, all character-specific picks, and a full Shop Relics ranking based on current Early Access meta data. Rankings will be updated as Mega Crit patches the game.
Slay the Spire 2 is the highly anticipated sequel to the genre-defining roguelike deckbuilder, and it launched into Early Access with over 250 relics across Starter, Common, Uncommon, Rare, Shop, Ancient, and Event rarities — and knowing which relics to take, which to skip, and which will silently ruin a run is one of the most important skills in the game. The wrong relic can brick an otherwise strong deck; the right one can turn a mediocre draft into a run-winner.
This Slay the Spire 2 relics tier list breaks down the best universal picks, every character's best starting relic, new mechanics like Durability, Wax Relics, Corrosion, and Pierce that change how you evaluate relics in STS2, and a full shop relic ranking from S to C so you always know whether a purchase is worth your gold. If you're still deciding which character to run, check out our Slay the Spire 2 Character Tier List first.
Best Relics in Slay the Spire 2
With over 250 relics in the current Early Access build, spanning Starter, Common, Uncommon, Rare, Shop, Ancient, and Event rarities, picking the right ones can make or break a run. Below, I've broken down the universal top picks you should prioritize regardless of character, followed by the standout character-specific relics for each class.
Note on the Durability mechanic: Several relics in STS2 now have limited uses per combat (Durability), meaning they can't fire indefinitely in a single fight. Always factor this in when evaluating relics that look powerful on paper. A relic with 1 or 2 Durability may do much less work against a boss than it did against hallway enemies.
Note on Wax Relics: STS2 introduces a new type of temporary relic called Wax Relics, obtained from Tezcatara's Toy Box in Act 2. They function like normal relics but degrade over time: every 3 combats, the leftmost Wax Relic melts away permanently. When choosing from the Toy Box, pick your weakest desired relic first — it will melt soonest, so save your best pick for the rightmost slot where it will last the longest. Never build your deck around card synergies that depend on a Wax Relic surviving into Act 3.
New STS2 Mechanics That Change How You Value Relics
Slay the Spire 2 introduces four mechanics that directly affect which relics are worth picking up — and which ones that looked strong in STS1 are now traps. If you're coming from the original game, understanding these before you evaluate any relic is essential.
| Mechanic | What It Does | Relic Impact |
|---|---|---|
| Durability | A relic with Durability can only trigger a limited number of times per combat. Once that limit is reached, it goes dormant for the rest of the fight. | A relic with 1–2 Durability may do far less work in a boss fight than it did against hallway enemies. Never overrate a relic without checking its Durability count. |
| Wax Relics | Temporary relics from Tezcatara's Toy Box. The leftmost Wax Relic melts permanently every 3 combats. | Strong early-run value but unreliable late. Don't build deck synergies that depend on a Wax Relic still being there in Act 3. |
| Corrosion | Reduces your maximum HP at the end of each turn and cannot be blocked. Fights against Corrosion enemies need to end quickly. | Relics that generate extra energy, free damage, or speed up cycling become significantly more valuable. Pure block-amplifying relics lose value against Corrosion enemies since HP loss can't be blocked anyway. |
| Pierce | Pierce attacks bypass Block entirely and deal damage directly to HP regardless of how much Block you have. | Relics that apply Weak to enemies or grant Intangible are more valuable in Acts where Pierce-heavy enemies appear. Stacking pure Block relics against Pierce enemies achieves nothing — your defense needs to come from killing them faster, not blocking harder. |
Best Universal Relics (Any Character)
These relics are strong picks regardless of your character or deck direction. When you see them, you should be taking them almost every time:
| Relic | Evaluation |
|---|---|
 Ice Cream Rare Ice Cream Rare | Unspent energy carries over to the next turn. One of the most powerful relics in the game, enabling huge combo turns and forgiving misplays in energy-tight fights. |
 Mummified Hand Rare Mummified Hand Rare | Whenever you play a Power card, a random card in your hand costs 0 that turn. Makes Power-heavy builds dramatically more explosive. |
 Anchor Common Anchor Common | Start each combat with 10 Block. A deceptively strong universal defensive relic that smooths out early turns across every character. |
 Bag of Preparation Common Bag of Preparation Common | Draw 2 additional cards at the start of each combat. Increases opening hand consistency. It's almost always good regardless of archetype. |
 Ornamental Fan Uncommon Ornamental Fan Uncommon | After playing 3 Attacks in a turn, gain 4 Block. Rewards attack-heavy turns with passive defense, and most decks naturally trigger it. |
 Membership Card Shop Membership Card Shop | Shop items cost 50% less. One of the best shop relics in the game. Buying it early pays for itself in gold savings multiple times over. |
 Gambling Chip Rare Gambling Chip Rare | At the start of each combat, discard any number of cards then draw that many. Effectively gives you a free mulligan every fight. It's one of the most consistently powerful relics in the game, regardless of character or archetype, because a bad opening hand is often all that separates a clean fight from a messy one. |
Relic Trap Picks to Avoid
Not every relic that sounds powerful is worth picking up. These are the relics that end promising runs or create problems, their upside doesn't justify:
Velvet Choker — Caps you at 6 card plays per turn. Completely bricks combo-heavy decks and Silent discard builds. Almost never worth it unless your deck is 90% Powers.
Brimstone — You gain 2 Strength per turn, but every enemy also gains 1 Strength. Only safe if you can end fights fast. Skip it entirely on Necrobinder, whose 66 HP can't survive the accelerating enemy damage output.
Calling Bell — Gives 3 relics alongside a unique Curse. Only worth picking if you're specifically building around curse synergies. Otherwise you're carrying a liability into every fight. When in doubt, a bad relic is worse than no relic.
Starting Relics for Every Character
Every character begins each run with a unique starting relic that defines their early-game identity and tells you exactly how to draft in Act 1. Understanding what your starting relic does and doesn't do is the foundation of every run. Below you'll find the best relics for each character in STS2, but let's first explain starting relics.
| Character | Starting Relic | What It Does & Draft Implication |
|---|---|---|
 The Ironclad The Ironclad |  Burning Blood Burning Blood | Heals 6 HP at the end of every combat. The most forgiving starting relic in the game — it smooths out bad drafts and lets you arrive at boss fights healthy. Ironclad can afford to take risks other characters can't. Prioritize Strength-scaling cards and Exhaust synergies to make full use of his kit. |
 The Silent The Silent |  Ring of the Snake Ring of the Snake | Draw 2 extra cards at the start of each combat. Silent starts with only 70 HP, so that extra draw needs to translate into faster kill speed. Aggressively thin your deck early so those bonus draws consistently hit your best cards. |
 The Defect The Defect |  Cracked Core Cracked Core | Channels 1 Lightning Orb at the start of every combat, giving you a free head start on Evoke setups. Defect is the most draft-dependent character in Early Access — without enough Focus or Orb slot upgrades, output falls off hard in later Acts. Prioritize Focus relics aggressively. |
 The Regent The Regent |  Divine Right Divine Right | Grants 3 Stars at the start of every combat. The Regent's Star energy doesn't reset between turns, so accumulated Stars fuel explosive late-combat turns. Sequencing mistakes are punished hard — mismanaging Stars stalls your entire damage output for the fight. |
 The Necrobinder The Necrobinder |  Bound Phylactery Bound Phylactery | Summons 1 unit at the start of each turn. The Necrobinder's entire identity revolves around graveyard loops and Soul resource management. Starting with a free summon every turn gives early board presence while you assemble the Soul Cycle engine. With only 66 HP — that early presence is critical for surviving Act 1. |
The Ironclad Best Relics
| Relic | Evaluation |
|---|---|
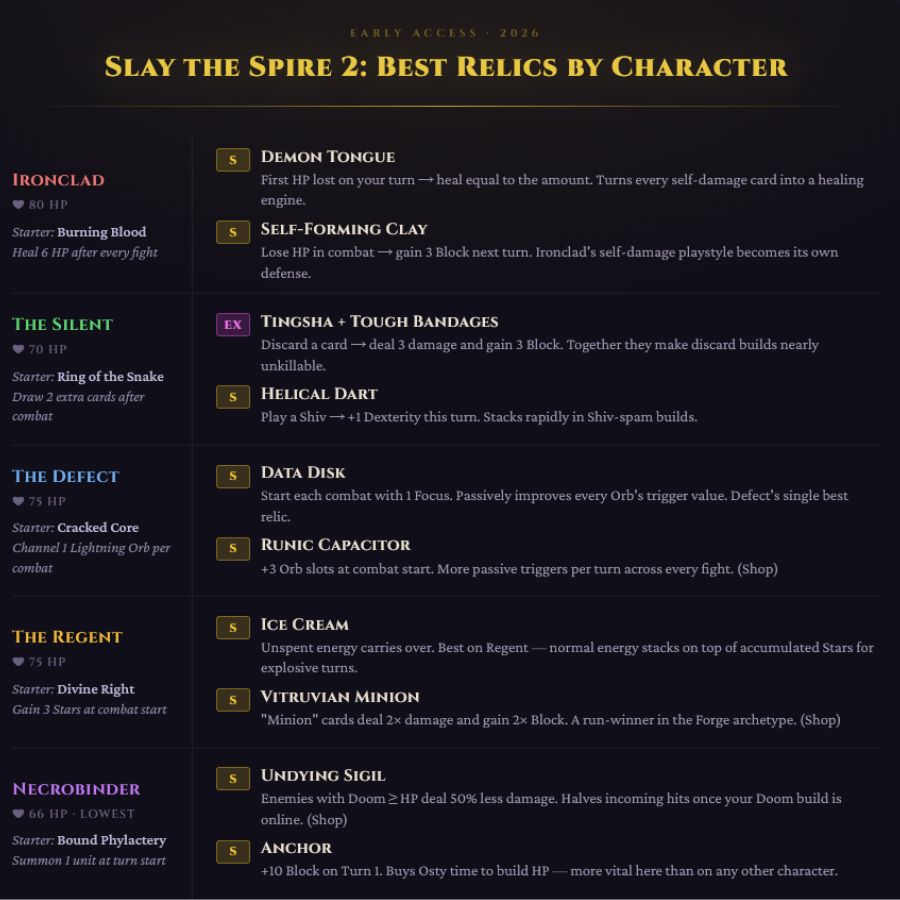
 Demon Tongue Rare Demon Tongue Rare | Tier: S – The first time you lose HP on your turn, heal HP equal to the amount lost. Synergizes perfectly with Ironclad's self-damage cards (Hemokinesis, Breakthrough), turning a weakness into a healing engine. |
 Self-Forming Clay Uncommon Self-Forming Clay Uncommon | Tier: S – Whenever you lose HP in combat, gain 3 Block next turn. Ironclad's self-damage playstyle makes this excellent. Every HP loss becomes a defensive buffer. |
 Ruined Helmet Rare Ruined Helmet Rare | Tier: A – The first time you gain Strength each combat, double the amount gained. Multiplicatively strong with Inflame and the Strength-scaling archetype. |
 Charon's Ashes Rare Charon's Ashes Rare | Tier: B – Whenever you Exhaust a card, deal 3 damage to all enemies. Defines the Exhaust build archetype and turns deck-thinning into a legitimate damage source. |
 Paper Phrog Uncommon Paper Phrog Uncommon | Tier: B – Enemies with Vulnerable take 75% more damage instead of 50%. A significant damage multiplier if you're consistently applying Vulnerable through Uppercut or Taunt. |
The Silent Best Relics
| Relic | Evaluation |
|---|---|
 Tingsha Uncommon Tingsha Uncommon | Tier: EX – Whenever you discard a card during your turn, deal 3 damage to a random enemy per card discarded. In a discard-heavy Silent deck, this is one of the most broken relics in Early Access. It turns every discard into a damage proc. |
 Tough Bandages Rare Tough Bandages Rare | Tier: EX – Whenever you discard a card during your turn, gain 3 Block. Pairs with Tingsha to make discard builds essentially unkillable while also dealing damage. The relic synergy between these two is among the best in the game. |
 Helical Dart Rare Helical Dart Rare | Tier: S – Whenever you play a Shiv, gain 1 Dexterity this turn. Stacks rapidly in Shiv-spam decks and turns Blade Dance and Hidden Daggers into defensive powerhouses. |
 Snecko Skull Common Snecko Skull Common | Tier: A – Whenever you apply Poison, apply 1 additional Poison. Straightforward Poison amplifier that doubles your Poison stacking rate effectively. |
 Twisted Funnel Uncommon Twisted Funnel Uncommon | Tier: B – Apply 4 Poison to all enemies at the start of each combat. Free Poison before you even play a card. Excellent in Poison builds, mediocre otherwise. |
The Defect Best Relics
| Relic | Evaluation |
|---|---|
 Data Disk Common Data Disk Common | Tier: S – Start each combat with 1 Focus. Passively improves every Orb's trigger value without requiring any setup. Arguably the Defect's single most impactful relic. |
 Runic Capacitor Shop Runic Capacitor Shop | Tier: S – Start each combat with 3 additional Orb slots. More Orbs means more passive triggers per turn and dramatically widens the Defect's action economy. |
 Metronome Rare Metronome Rare | Tier: A – The first time you Channel 7 Orbs in a combat, deal 30 damage to all enemies. A milestone bonus that rewards the Orb-heavy playstyle and can swing boss fights. |
 Symbiotic Virus Uncommon Symbiotic Virus Uncommon | Tier: A – Start each combat by channeling 1 Dark. Free Dark Orb every fight. Dark scales its execute damage with each trigger, so a free starting Orb compounds throughout long fights. |
 Gold-Plated Cables Uncommon Gold-Plated Cables Uncommon | Tier: B – Your rightmost Orb triggers its passive an additional time. Doubles the value of whichever Orb is in your rightmost slot. Position your strongest Orb type accordingly. |
The Regent Best Relics
The Regent's best relics either accelerate his Stars economy, amplify his Forge/Minion archetypes, or extend his survivability through Act 1 before his deck comes online:
| Relic | Evaluation |
|---|---|
 Lunar Pastry Rare Lunar Pastry Rare | Tier: S – At the end of your turn, gain 1 Star. Passive Stars generation every single turn without spending energy or cards is exactly what the Regent wants. Over a long fight this stacks into a devastating late-turn payoff. |
 Mini Regent Rare Mini Regent Rare | Tier: S – The first time you spend a Star each turn, gain 1 Strength. Free Strength every turn you activate your Stars economy is as strong as it sounds. Pairs with Lunar Pastry to turn the Regent into a scaling powerhouse. |
 Vitruvian Minion Shop Vitruvian Minion Shop | Tier: S (Forge builds only) – Cards containing "Minion" deal double damage and gain double Block. If you're building a Forge archetype, this relic is a run-winner. Doubles the value of the entire card synergy chain the Regent's Minion deck is built around. Narrow but potentially broken in a dedicated Minion-creation build. |
| Ice Cream Rare | Tier: S – Unspent energy carries over to the next turn. Exceptional on the Regent specifically because he already operates on a secondary resource pool. Carrying over normal energy on top of accumulating Stars means his snowball turns arrive faster and hit harder than with any other character. |
 Fencing Manual Common Fencing Manual Common | Tier: A – At the start of each combat, Forge 10. Free enchantment value on your cards before you've even played one. Forge ensures your attack cards are permanently improved throughout the run. |
 Ringing Triangle Shop Ringing Triangle Shop | Tier: A – Retain your entire hand on the first turn of combat. Strong for the Regent because his Act 1 turns are often awkward setup turns. Knowing exactly what you'll draw on Turn 1 lets you pre-plan your Stars spend and avoid wasted card plays. |
| Gambling Chip Rare | Tier: A – Free mulligan at the start of each combat. Particularly valuable in the Regent's early Acts before his deck is shaped, where a bad opening hand can completely stall his Stars accumulation for the entire fight. |
 Galactic Dust Uncommon Galactic Dust Uncommon | Tier: A – For every 10 Stars spent, gain 10 Block. Turns the Regent's core spending mechanic into a parallel defensive engine. In a well-built Stars deck, this solves the Regent's main weakness of being fragile. |
 Regalite Uncommon Regalite Uncommon | Tier: B – Whenever you create a Colorless card, gain 2 Block. Solid passive Block generation if you're running Orange Dough or a Forge-heavy build that regularly produces Colorless cards. |
 Orange Dough Rare Orange Dough Rare | Tier: B – At the start of each combat, add 2 random Colorless cards into your Hand. Randomness holds this back, but it adds immediate pressure. Best combined with Regalite to guarantee passive Block. |
The Necrobinder Best Relics
The Necrobinder's best relics either amplify Osty's companion scaling, support the Doom execution win condition, or shore up her critical HP vulnerability. Here are the confirmed standouts:
| Relic | Evaluation |
|---|---|
 Undying Sigil Shop Undying Sigil Shop | Tier: S – Enemies with at least as much Doom as their current HP deal 50% less damage. For a character with only 66 base HP, cutting incoming damage in half from condemned enemies is enormous. A must-buy whenever you see it in the shop as Necrobinder. |
 Funerary Mask Uncommon Funerary Mask Uncommon | Tier: S – At the start of each combat, add 3 Souls into your Draw Pile. Souls are the Necrobinder's secondary resource; a consistent free supply removes the setup variance that makes early acts awkward. |
| Anchor Common | Tier: S (Necrobinder) – Start each combat with 10 Block. Universally strong, but particularly valuable here because that free Block on turn 1 buys time for Osty to build HP before taking his first hit. Smooths out the Necrobinder's fragile opening turns more than it does for any other character. |
 Book Repair Knife Uncommon Book Repair Knife Uncommon | Tier: A – Whenever a non-Minion enemy dies to Doom, heal 3 HP. The Necrobinder needs healing wherever she can find it, and this triggers constantly to offset chip damage. |
 Bone Flute Common Bone Flute Common | Tier: A – Whenever Osty attacks, gain 2 Block. Osty attacks every turn he's alive, providing free Block without spending energy. This rewards keeping your companion active. |
| Bag of Preparation Common | Tier: A – Draw 2 extra cards at combat start. The Necrobinder's action economy lives and dies by seeing her 0-cost and Soul-reducing cards early. Extra card draw at combat start dramatically improves how often she can chain her opening plays. |
 Ivory Tile Rare Ivory Tile Rare | Tier: B – Whenever you play a card that costs a Soul or more, gain 1 Soul. Creates a self-sustaining Soul economy that rewards higher-cost plays rather than depleting resources. |
 Bookmark Rare Bookmark Rare | Tier: B – At the end of each turn, lower the cost of a random Retained card by 1 until played. Strong in Retain-heavy builds, though randomness limits its reliability in most standard runs. |
 Lee's Waffle Shop Lee's Waffle Shop | Tier: B – Upon pickup, raise Max HP by 7 and heal to full. More impactful on Necrobinder than almost any other character due to her 66 HP floor. A full heal plus a permanent HP increase is significant when every hit matters. |
 Big Hat Rare Big Hat Rare | Tier: C – At the start of each combat, add 2 random Ethereal cards into your Hand. Too inconsistent for a low-HP character; you risk cluttering your opening hand with cards that may not be useful. |
Best Event Relics in Slay the Spire 2
Event relics come from specific map encounters rather than combat drops or shops. Because you can't reliably route for them the way you can for a shop visit, their value is often underestimated. The confirmed Event relics in the current Early Access build are listed below — note that many relics players associate with specific characters (Bone Flute, Funerary Mask, Galactic Dust, Lunar Pastry, and others) are actually obtainable as regular Common, Uncommon, or Rare drops, not Event-locked.
| Relic | Best For | Why It Matters |
|---|---|---|
| Big Mushroom | Any (HP-starved runs) | On pickup, raises Max HP by 20 permanently — but you draw 2 fewer cards at the start of every combat. A significant tradeoff: 20 Max HP is enormous on Necrobinder or Silent, but losing 2 opening cards per fight hurts decks that rely on seeing specific cards on Turn 1. Only take it if the HP floor matters more to your survival than draw consistency. |
| Darkstone Periapt | Any (Curse builds) | Whenever you obtain a Curse, raise your Max HP by 6. Inverts the cost of every curse-based event across the whole run. Extremely high value if you've already taken Calling Bell or accumulated Curses through events — each liability becomes a permanent HP bonus instead. |
| Bing Bong | Any (Synergy decks) | Whenever you add a card to your Deck, add one additional copy. Dramatically accelerates synergy decks, but also doubles the dilution from every weak pick going forward. Only take it once your deck has clear direction and you're confident in your card choices for the rest of the run. |
| Sword of Stone | Any (Elite-heavy routes) | Transforms into Jade Sword (+3 Strength permanently) after 5 elite kills. A long-term investment that pays off in Act 3 if your route includes elite-heavy pathing. Don't take it if you're routing around elites — 5 kills is a hard requirement and the relic does nothing until then. |
All Shop Relics Tier List in Slay the Spire 2
⇓ MUST-PICK RELICS ⇓

Membership Card

Orrery

Ringing Triangle

Runic Capacitor
⇓ STRONG RELICS ⇓

Chemical X

Miniature Tent

Dolly's Mirror

Dragon Fruit

Gnarled Hammer

Lava Lamp

The Abacus

Brimstone
⇓ SITUATIONAL RELICS ⇓

Burning Sticks

Kifuda

Royal Stamp

Lee's Waffle

Cauldron

Ghost Seed

Sling of Courage

Ninja Scroll

Wing Charm

Punch Dagger

Mystic Lighter
⇓ AVOID / NICHE RELICS ⇓

Bread

Belt Buckle

Screaming Flagon

Dingy Rug

Toolbox

Undying Sigil

Vitruvian Minion
Shop relics are the only relics you can reliably plan for. You know a shop is coming, and you know you'll have gold to spend. That makes evaluating them differently from combat drops important: a shop relic needs to justify its gold cost in addition to being strong in a vacuum. Some are universally worth buying the moment you see them; others only make sense if your deck is already pointing in a specific direction. Here's how every current shop relic ranks.
S Tier Shop Relics
These are near-auto-buys regardless of deck archetype. The gold cost pays off across the rest of the run, often multiple times over.
| Relic | Description | Pros & Cons |
|---|---|---|
| Membership Card | 50% discount on all shop products. |
|
 Orrery Orrery | Upon pickup, gain 5 card rewards to choose from. |
|
| Ringing Triangle | Retain your entire hand on the first turn of combat. |
|
| Runic Capacitor | Start each combat with 3 additional Orb slots. (Defect only) |
|
A Tier Shop Relics
Strong pickups that provide sustained value across a run, though some require your deck to be pointing in a specific direction to get full mileage.
| Relic | Description | Pros & Cons |
|---|---|---|
 Chemical X Chemical X | The effects of your X-cost cards are increased by 2. |
|
 Miniature Tent Miniature Tent | You may choose any number of options at Rest Sites. |
|
 Dolly's Mirror Dolly's Mirror | Upon pickup, obtain an additional copy of a card in your Deck. |
|
 Dragon Fruit Dragon Fruit | Whenever you gain Gold, raise your Max HP by 1. |
|
 Gnarled Hammer Gnarled Hammer | Upon pickup, Enchant up to 3 Attacks with Sharp 3 (+3 damage permanently). |
|
 Lava Lamp Lava Lamp | At the end of combat, Upgrade all card rewards if you took no damage. |
|
 The Abacus The Abacus | Whenever you shuffle your Draw Pile, gain 6 Block. |
|
 Brimstone Brimstone | At the start of your turn, gain 2 Strength. ALL enemies also gain 1 Strength. |
|
RELATED: Slay the Spire 2 Character Tier List – Best Characters Ranked
B Tier Shop Relics
Situationally useful relics that can be excellent in the right deck but don't belong in every shopping cart. Evaluate these based on your current build direction.
| Relic | Description | Pros & Cons |
|---|---|---|
 Burning Sticks Burning Sticks | The first time each combat you Exhaust a Skill, add a copy of it to your Hand. |
|
 Kifuda Kifuda | Upon pickup, Enchant up to 3 cards with Adroit (draw an extra card when played). |
|
 Royal Stamp Royal Stamp | Upon pickup, Enchant one Attack or Skill in your Deck with Royally Approved. |
|
| Lee's Waffle | Upon pickup, raise your Max HP by 7 and heal to full HP. |
|
 Cauldron Cauldron | Upon pickup, brew 5 random potions. |
|
 Ghost Seed Ghost Seed | Strikes and Defends gain Ethereal (disappear after being drawn if not played). |
|
 Sling of Courage Sling of Courage | Start each Elite combat with 2 Strength. |
|
 Ninja Scroll Ninja Scroll | At the start of each combat, add 3 Shivs into your Hand. |
|
 Wing Charm Wing Charm | A random card in each card reward is Enchanted with Swift 1 (costs 1 less Energy once). |
|
 Punch Dagger Punch Dagger | Upon pickup, Enchant one Attack in your Deck with Momentum 5. |
|
 Mystic Lighter Mystic Lighter | Enchanted Attacks deal 9 additional damage. |
|
C Tier Shop Relics
These relics have narrow use cases, high conditional requirements, or are so character-specific that they're only worth considering in very specific run states.
| Relic | Description | Pro / Con |
|---|---|---|
 Bread Bread | Lose 2 Energy on your first turn. Gain 1 Colorless Energy at the start of all other turns. |
|
 Belt Buckle Belt Buckle | While you have no potions, you have 2 additional Dexterity. |
|
 Screaming Flagon Screaming Flagon | If you end your turn with no cards in your Hand, deal 20 damage to ALL enemies. |
|
 Dingy Rug Dingy Rug | Card rewards can now contain Colorless cards. |
|
 Toolbox Toolbox | At the start of each combat, add 1 of 3 random Colorless cards into your Hand. |
|
| Undying Sigil | Enemies with at least as much Doom as HP deal 50% less damage. |
|
| Vitruvian Minion | Cards containing "Minion" deal double damage and gain double Block. |
|
Slay the Spire 2 Relics Tier List FAQ
Among universal relics, Ices Cream (unspent energy carries over to the next turn) and Gambling Chip (free mulligan at the start of each combat) are widely considered two of the strongest picks in the game, regardless of character. For character-specific relics, Tingsha and Tough Bandages are arguably the strongest in the current build for The Silent, while Data Disk and Runic Capacitor are transformative for The Defect. Demon Tongue and Self-Forming Clay are the top Ironclad-specific picks. Undying Sigil is a near-mandatory buy for Necrobinder in the Shop.
Wax Relics are a new type of temporary relic introduced in STS2, obtained from Tezcatara's Toy Box in Act 2. They function like normal relics but degrade over time: every 3 combats, the leftmost Wax Relic in your collection melts away permanently. They can provide strong value early in a run, but you should never build your deck around card synergies that depend on a Wax Relic lasting into Act 3.
Durability is a new mechanic applied to select relics in STS2. A relic with Durability can only trigger a limited number of times per combat — once that limit is reached, the relic goes dormant for the rest of the fight. Always factor Durability into your evaluation: a relic with 1 or 2 Durability may perform significantly worse against bosses and long elite fights than it appears to on paper.
Yes. Mega Crit shipped STS2 with more content at the Early Access launch than the original had at its own Early Access debut. All five characters are playable, the major new systems — Alternate Acts, Enchantments, Ancients, Wax Relics, and co-op multiplayer — are in, and the core game loop is polished. There are still balance issues being patched, but if you enjoyed the original roguelike deckbuilder, STS2 is already a compelling experience.
Not sure which character to run with these relics? Our Slay the Spire 2 Character Tier List covers all five characters, their deck archetypes, best cards, and full unlock order.