
Does the big metal beast scare you? Are all those valves, pipes, levers, pull-cords, and other controls staring at you menacingly while you have no idea what the heck you’re supposed to do? Don’t worry, we’re here to help! This Iron Nest Beginner’s Guide will help you learn your way around this colossal war machine. Buckle up and read on.
Iron Nest Beginner’s Guide: Basics & Controls
Before we jump into more details, let’s first clarify what exactly Iron Nest is. As the subtitle — Heavy Turret Simulator — suggests, the game is all about you operating an absolute monstrosity of a war machine. You are the sole operator of a massive, dieselpunk-inspired piece of heavy artillery — a literal moving fortress, complete with living quarters and various other compartments.
The game is played from a first-person perspective, with you moving around the Iron Nest using the good old WASD key setup. For a relatively complex game, there actually aren’t that many controls you need to learn, as most actions are handled through just a few interaction buttons. To kick things off in my Iron Nest Beginner’s Guide, here are all the basic controls:
- WASD - First-person movement.
- SPACE - Jump
- Left Shift - Sprint
- CTRL - Crouch
- E - Pressing E initiates interaction with key components of the Iron Mest (the game will always tell you to press E to start interaction with a part of the Turret).
- Left Click - To interact with the environment, hold down the left mouse button to move objects, pull levers, rotate valves, draw lines, and perform other actions.
- Right Click - Primarily used to remove or delete items, such as notes in your clipboard or lines drawn on the war table.
- Caps Lock - Pressing Caps Lock will toggle Clipboard visibility.
- TAB - Holding down the TAB key will bring the Clipboard into full focus across the screen. This feature is particularly useful when you want to remove an item from the Clipboard, as it also switches to a movable cursor. You can then delete an item from the Clipboard by right-clicking.
- G - Equip or unequip the Gasmask
- Escape - It either opens the menu or stops current interaction with a specific element (the opposite of pressing E).
PRO TIP: My general advice for this Iron Nest Beginner’s Guide is to always keep the Clipboard visible (Caps Lock). Even though it takes up a hefty chunk of the screen, it’s useful to always have important information right in front of you.
The Core Gameplay Loop
Iron Nest’s core gameplay loop is relatively straightforward: you are the operator of a heavy-duty artillery machine, a one-man army responsible for doing everything necessary to ensure your devastating bombs reach their designated targets and cause as much damage as required. Here’s what that looks like in the most basic terms:
- Step 1: You receive your orders, data, and instructions from the High Command via a telegraph-like machine. Additional data and filed reports are avilable on the adjacent typewriter. Read the data carefully in order to understand your goal and how to achieve it.
- Step 2: Utilize the available data and take measurements using the war table. Sometimes finding your target is straightforward; other times, you’ll need to perform advanced measurements or even rely on rough estimates and trial-and-error if the available data is insufficient or incomplete.
- Step 3: Once you have your target locked in, it's time to feed the data to your war machinery. In this step, you'll need to calculate the number of Gunpowder Charges you need, as well as Gun Elevation. This is done via the Balistic Calculator machine.
- Step 4: Load the ammo! Depending on the type of target, the distance, and the level of devastation you want to achieve, you’ll need to select the appropriate ammo type and then load it into the gun.
- Step 5: Once the live ammo is locked and loaded, it’s time to put your calculations into practice. You’ll need to rotate the gun into the required position and then adjust its elevation angle.
- Step 6: Fire away! Finally, when everything is set and ready, it’s time for a BIG BOOM! Use the central console and turn every knob to confirm the procedure is complete. Then pull the lever to arm the firing mechanism. Once everything is ready, pull the central handle and fire!
So, that's the basics. Sound simple, right? Now let's get over each of the individual stations and consoles, to see how they operate and what you can do on them.
Iron Nest's Clipboard Is Your Best Friend - How to Use It
I cannot emphasize enough just how important the Clipboard is in Iron Nest. Using it, you can copy any line of text from the High Command mission brief or typewritten field reports. When reading High Command directives or field reports, simply click on any line of text, and it will automatically be added to your Clipboard.
This makes map measurements significantly easier, as you won’t need to constantly go back and forth every time you need specific numbers or try to memorize everything at once. As the saying goes, “A fool tries to remember; a wise man writes things down.”
Once you no longer need a particular line (for example, after finishing the necessary measurements), simply right-click on it, and it will disappear from the Clipboard.
Iron Nest High Command - Get Your Orders and Intel
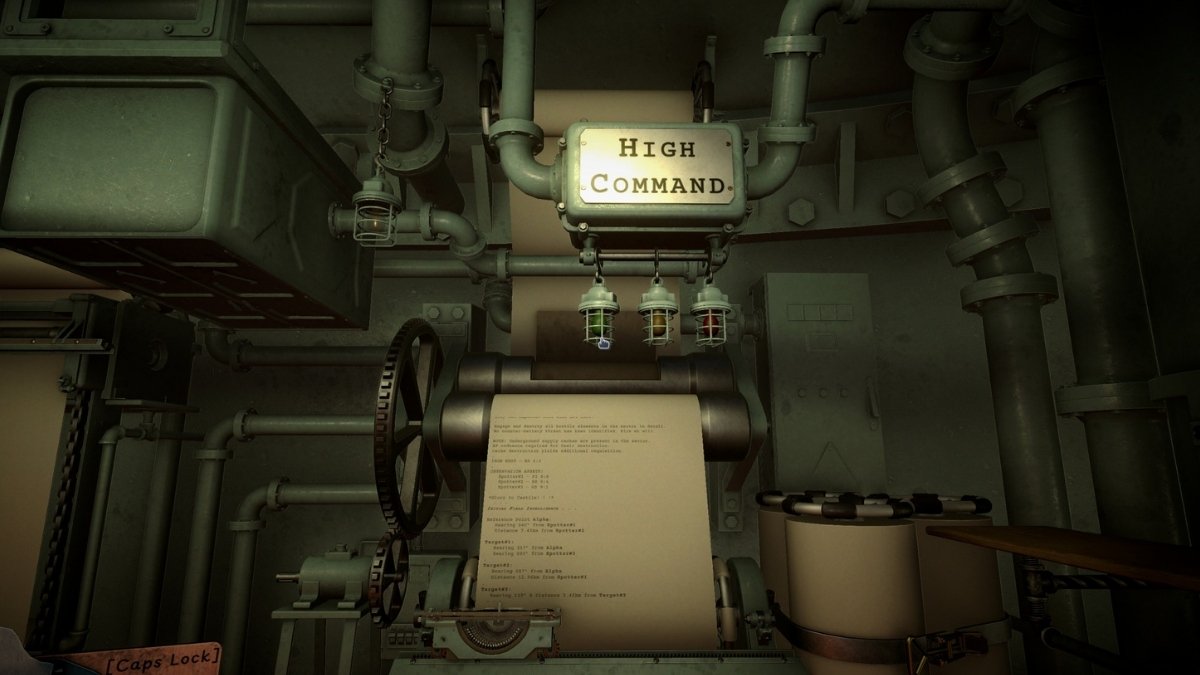
The first step in every mission is to read the mission brief from the High Command. That’s the typewriter-like communication machine (the one with “High Command” written above it) with the massive rolling sheet of paper. When a mission starts, the machine activates and begins typing out the directive. You can either read it as it’s being written or wait for it to complete the transmission. There, you will receive the following info:
- A bit of lore in the form of orders, to give your mission some flavor.
- The objective of the mission.
- The type of ordnance you’ll be using.
- Information about the target.
- The current location of the Iron Nest (your position).
- Relevant map data (such as observation assets and similar intel).
- Additional notes, if there are any.
Read the information carefully and start writing down relevant details in your Clipboard. This usually includes things like Spotter coordinates, Iron Nest’s location, and any other quantitative data you’ll need to use for map measurements.
Field Reports
Aside from the main mission brief, arguably even more important is the accompanying Field Intelligence typewriter, where you’ll receive crucial data from recon teams and spotters. This is the typewriter machine located just to the left of the High Command console. Here, you’ll receive crucial information about your targets, such as:
- The type of target (infantry, armored vehicles, bunkers, etc.).
- Bearing or distance measurements provided by specific spotters.
- Additional reconnaissance information.
This information is essential for helping you pinpoint the exact positions of your targets. There will usually be multiple targets per mission, so you’ll want to focus on one at a time. Jot down the details for a single target in your Clipboard and complete the entire procedure for that target before switching to the next one.
Iron Nest Tactical Map - It's Time to Find Your Target
For me personally, this is one of the most fun parts of the game, and the real highlight in terms of challenges. The success of the mission depends on your ability to accurately locate your targets using the available data and the tools you have to conduct measurements and calculations on the map. It's almost like playing a board game, or a very elaborate game of Battleships.
RELATED: Iron Nest Map and Measurements Guide – How to Find Targets
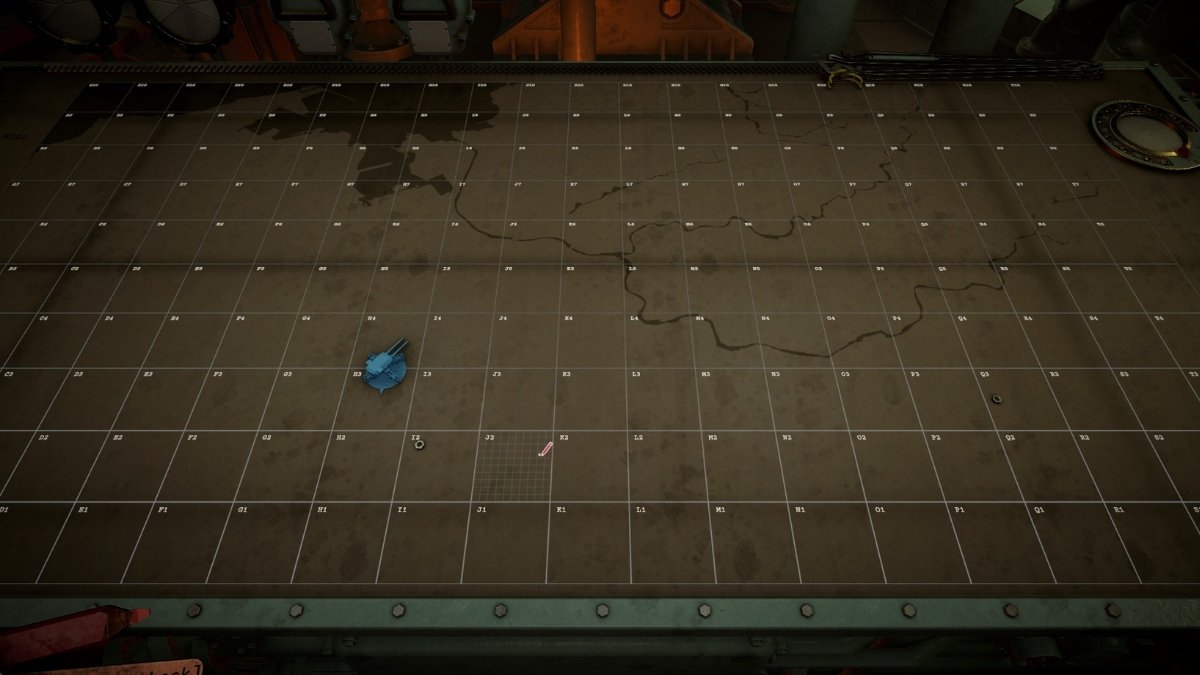
The Grid
This massive map is divided into a 20x10 grid, with 20 columns labeled with letters from A to T (left to right) and 10 rows labeled with numbers from 1 to 10 (with the bottom row being 1). Each individual cell is therefore identified by its column letter and row number, just like in Excel (for example, K5 or R8).
Furthermore, each of these cells is subdivided into its own 10x10 grid. Every sub-cell within that grid is labeled using coordinates corresponding to its column and row. However, it’s important to note that these labels start from 0 rather than 1. As a result, sub-cells are labeled like this: 0:4, 9:0, and so on.
With all that in mind, observation asset locations and other known points provided in field reports will be marked using both cell and sub-cell coordinates (for example, “F10 8:0” or “I7 2:4”).
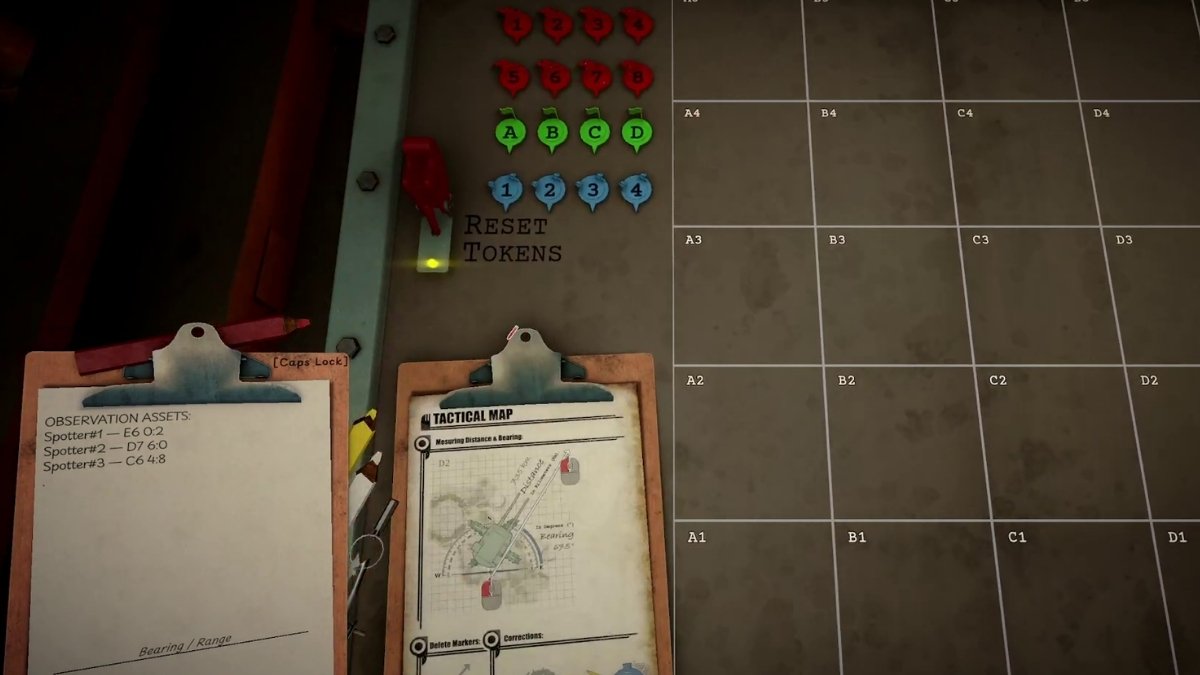
Map Tokens
A map is nothing without tools to pinpoint your targets and understand where each target is in relation to other known factors on the map. In order to mark all relevant points of interest on the map, you will use a selection of tokens avilable at your disposal. In the current build of the game, there are three basic types of tokens:
| Token type | What to use it for |
|---|---|
| Iron Nest Token | Use this massive token to mark your (Iron Nest's) position on the map. |
| Blue Number Tokens (1-4) | Use these to mark locations of your observation assets (Spotters) |
| Green Letter Tokens (A-C) | Use these to mark locations of reference points. |
| Red Number Tokens (1-8) | Use these to mark your targets once you locate them. |
The tokens listed above are the primary markers you’ll use for most actions in the game. In addition to these, there are also red and blue Skull tokens that appear above target locations to confirm kills. If a red Skull token appears, your target has been eliminated. If a blue Skull token appears, it means you have also taken out a friendly unit with your fire.
Finally, there are various nuts and bolts (quite literally) scattered around the map, which you can also move around and place wherever you want. I'm not yet sure if they serve any specific purpose, but you can use them as auxiliary tools to mark anything you find interesting or important that doesn’t fall within the categories listed above.
How to Take Measurements in Iron Nest
Now that you’re familiar with the basic elements of the Tactical Map in Iron Nest, thanks to my Iron Nest Beginner’s Guide, it’s time to put that knowledge to use and start conducting measurements to locate your targets. It may look daunting or even confusing at first, but once you get the hang of it, you’ll feel right at home. Here’s how to conduct measurements and pinpoint your targets.
Step 1: Known Facts
Start by marking everything you already know based on the information gathered from the High Command brief and Field Reports. I usually begin in the following order:
- Place the Iron Nest token at your current position (the High Command brief will provide your starting location).
- Place the spotters at their designated locations. You will usually receive full coordinates for your observation assets, for example: Spotter 1 — N5 4:0.
- Once you have placed the Iron Nest and the spotters, check whether the brief includes any Reference Points. If it does, locate them and mark them on the map.
These three factors are usually the starting point for any further measurements, so they should always be your top priority (in this exact order) when beginning a mission. Now that we have the known factors in place, it’s time to start searching for your targets.
Step 2: Collect the Avilable Data
With the starting pieces in place, it's time to prepare for measurements. What you now need to do is open your Clipboard (delete any previous notes if you had any), and head to the High Command and Field Reports typewriters. Look for all the information shared there that will help you find your targets. As of right now, there are two main data types you'll use to find the location of your target on the map:
| Data Type | What it Does |
|---|---|
| Bearing | The direction in which the target is located relative to the spotter, reference point, or Iron Nest |
| Distance | Target's distance from the reference point, spotter, or Iron Nest. |
In most cases, information about your targets would look something like this:
Target #1
Bearing 186° from Spotter#1Bearing 111° from Spotter#2
Target #2
Distance 7.45km from Spotter#3Distance 3.56km from Spotter#1
In some cases, information will be more descriptive, and you will need to use incomplete information to estimate your targets' locations. For example, "across the river" or close to a specific object, or "somewhere around".
PRO TOP: Unless your targets are artillery units, I recommend marking enemy locations and engaging them one at a time, as the map can quickly become cluttered and chaotic. If your targets are artillery units, however, make sure to identify and mark all of them before launching your attack. Once the first shell lands, the counter-battery timer will begin, leaving you with less time to locate additional artillery positions.
Step 3: Find Your Targets
Now that all the data is available, you’ll need to locate your targets by drawing lines and circles — quite literally. When you interact with the map and open your Clipboard, you’ll notice a set of three colored wooden pencils (red, yellow, and white), along with a drawing compass attached to it. These are your measurement tools. The wooden pencils serve the same purpose, but are just different colors for the sake of visibility.
For the purpose of this Iron Nest Beginner’s Guide, if Target #1 is "Bearing 186° from Spotter#1" and "Bearing 111° from Spotter#2", in order to find it, do as follows:
- Draw a line (by left-clicking) from the sub-cell where Spotter #1 is located at a bearing of 186°
- The game will automatically display both the bearing and the distance as you draw the line, so don’t worry about calculating them manually.
- When working with bearings, draw the line as far as possible in the correct direction, and match the exact bearing. The distance itself is not important here — what matters is finding the intersection point.
- Repeat the process for "Bearing 111° from Spotter#2."
- Find the point where these two lines intersect — that's your target!
- Place the Red Token (optional) on the intersection sub-cell to mark your target.
Now that you know where your target is, draw a direct line from the sub-cell occupied by the Iron Nest to the sub-cell containing the target you want to hit. The two values displayed are the Bearing and Range, and they will automatically be added to your Clipboard.
The only Bearing and Range values you actually need are those between the Iron Nest and your target, so feel free to delete any others that the game adds automatically, as they may cause confusion.
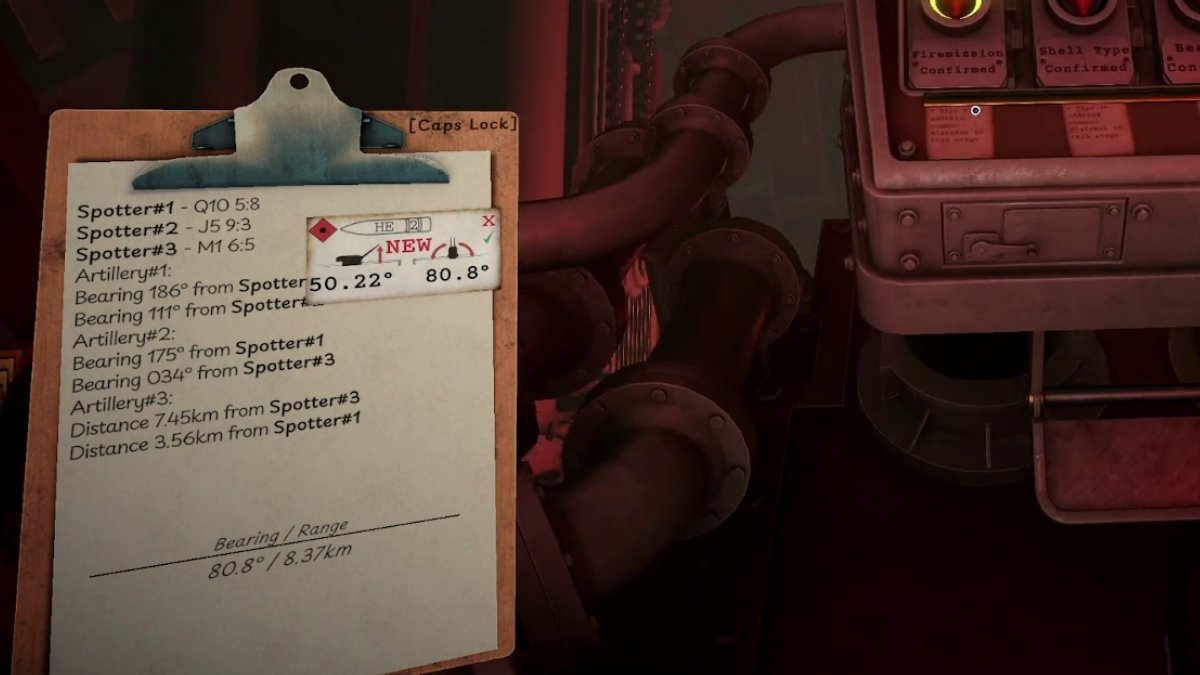
Ballistic Calculator - Let's Do the Math
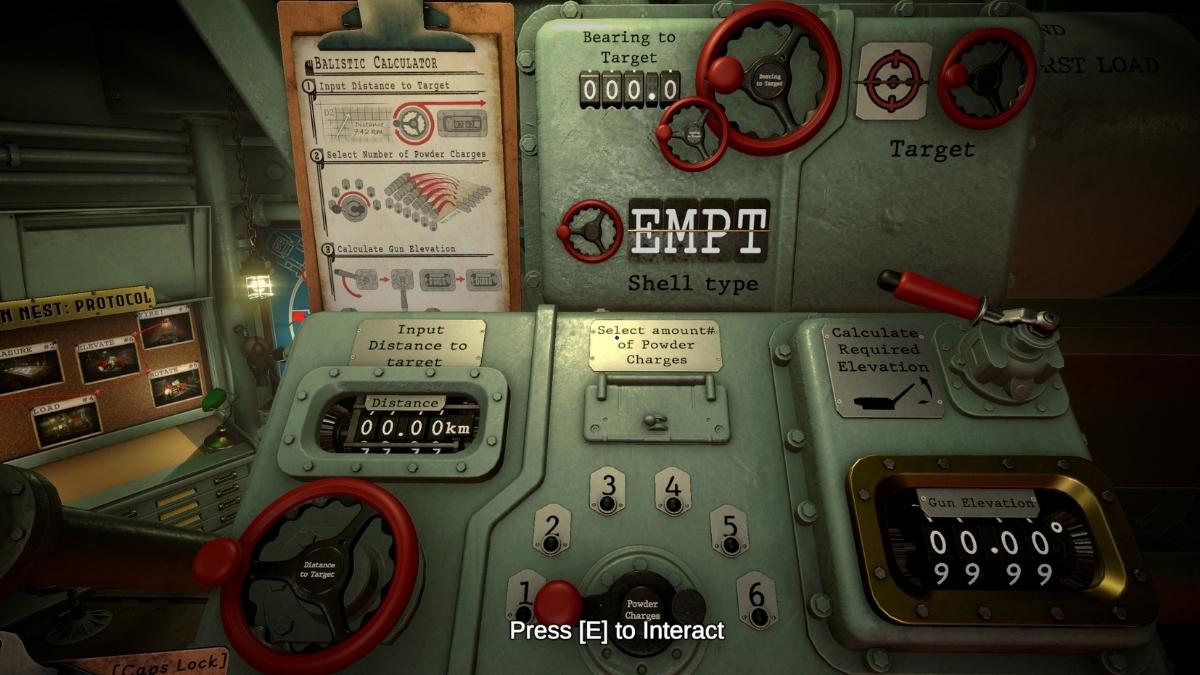
We have our target’s location; now it’s time to calculate how to position the gun. For this, you’ll use the Ballistic Calculator console. The process is quite straightforward, but just in case you need some help, here’s what you need to do:
- Input Distance to Target: Rotate the Distance to Target wheel until the Distance counter displays the exact range from the Iron Nest to the target (this is the Range value stored in your Clipboard).
- Bearing to Target: Enter the bearing from your Clipboard (the bearing value you obtained by drawing a line from the Iron Nest to the target). Use the large wheel for coarse adjustments and the small wheel for fine-tuning the counter. Make sure you enter the exact bearing value.
- Shell type: Choose the ammo type you’ll use for this attack. Sometimes the High Command will specify which shell type you need to use; other times, you’ll need to make that decision based on your target and the mission requirements.
- Powder Charges: Choose the number of charges you’ll use for this attack. Select the exact number required for the target’s distance (you can refer to the chart that shows how many Charges are needed for specific ranges).
- Target: If you know the target’s classification (based on its icon on the map or information received from Field Reports), select the appropriate target type. Available options include Infantry, Recon, Artillery, Mechanized, Fire Director, and Supply Cache.
- Calculate Required Elevation: The final step, once you have entered all the required parameters, is to calculate the gun elevation. The angle provided by the Ballistic Calculator is the exact elevation angle you’ll use when positioning the gun.
RELATED: Iron Nest Counter-Battery Fire Guide – How to Stop Enemy Artillery
When you complete the procedure, you’ll receive a ticket attached to your Clipboard containing all the information you need to prepare the gun for firing. The first step in the process is to load the shelf, which is the next section of our Iron Nest Beginner’s Guide.
How to Load the Shell in Iron Nest
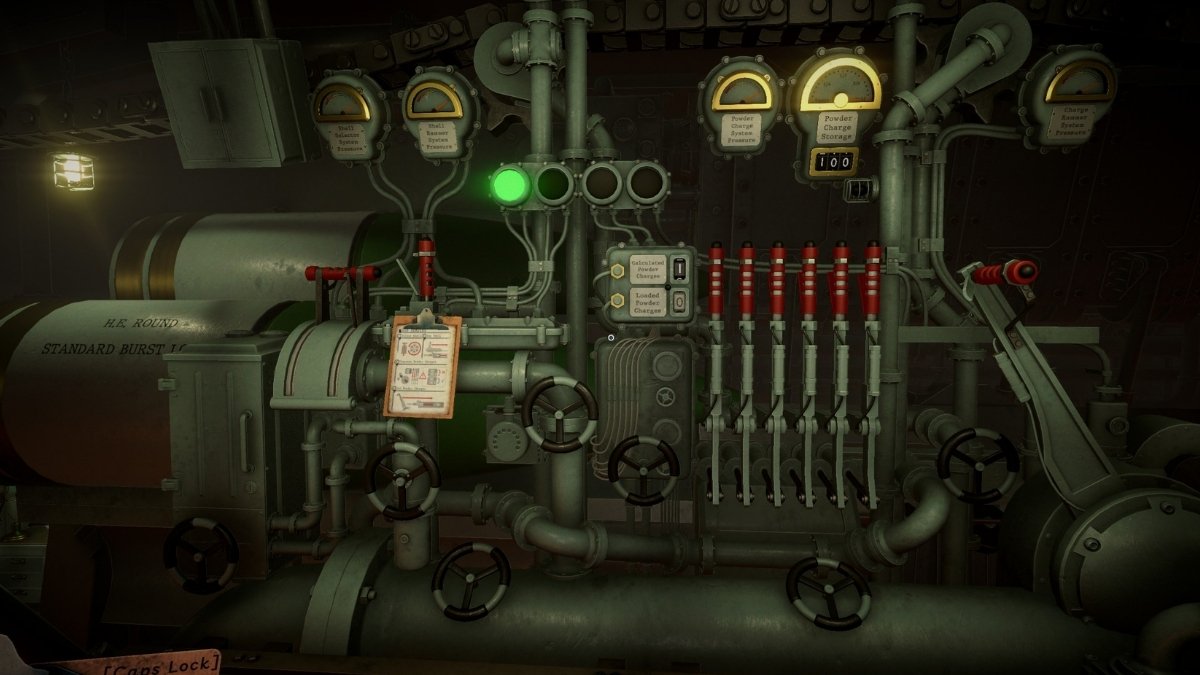
Still reading our Iron Nest Beginner’s Guide? It’s almost time for the big BOOM. Just to the right of the Ballistic Calculator console is the Gun Loading Platform, where you’ll prepare the ammunition for firing. This is arguably the easiest part of the entire process. Simply work your way from left to right and do the following:
- Select Shell - Pull down the lever beneath the Shell Selector System Pressure gauge until the appropriate shell is positioned at the front.
- Ram Shell - Once you have selected the correct shell type, pull the next handle (located below the Shell Rammer System Pressure gauge) to the right. This will ram the shell into the gun-loading chamber.
- Dispense Powder Charges - Add the required number of Powder Charges by pulling down the lever beneath the Powder Charges System Pressure/Storage gauges. Each of the six levers represents a single charge, and the total number of Charges loaded must match the value you previously calculated.
- Ram Powder Charges - Finally, pull the last handle to the right to ram the Powder Charges and fully load the gun.
PRO TIP: While you’re waiting for the gun to load, you can start rotating it into position. The elevation console remains locked until the shell has been fully loaded, which usually takes some time.
Gun Elevation and Rotation - All Eyes on Target
Two final steps in this Iron Nest Beginner’s Guide remain before pulling the trigger (or, in this case, yanking a massive pull-cord): setting the gun’s rotation and elevation to the exact values needed to hit your target.
When you completed the ballistic calculations, you received a small note attached to your Clipboard containing all the information needed for this shot. In the lower-left corner, you’ll find the gun elevation value, while the upper-right corner contains the gun rotation value. Your task is simply to match these numbers on the appropriate consoles.
Iron Nest Turret Rotation
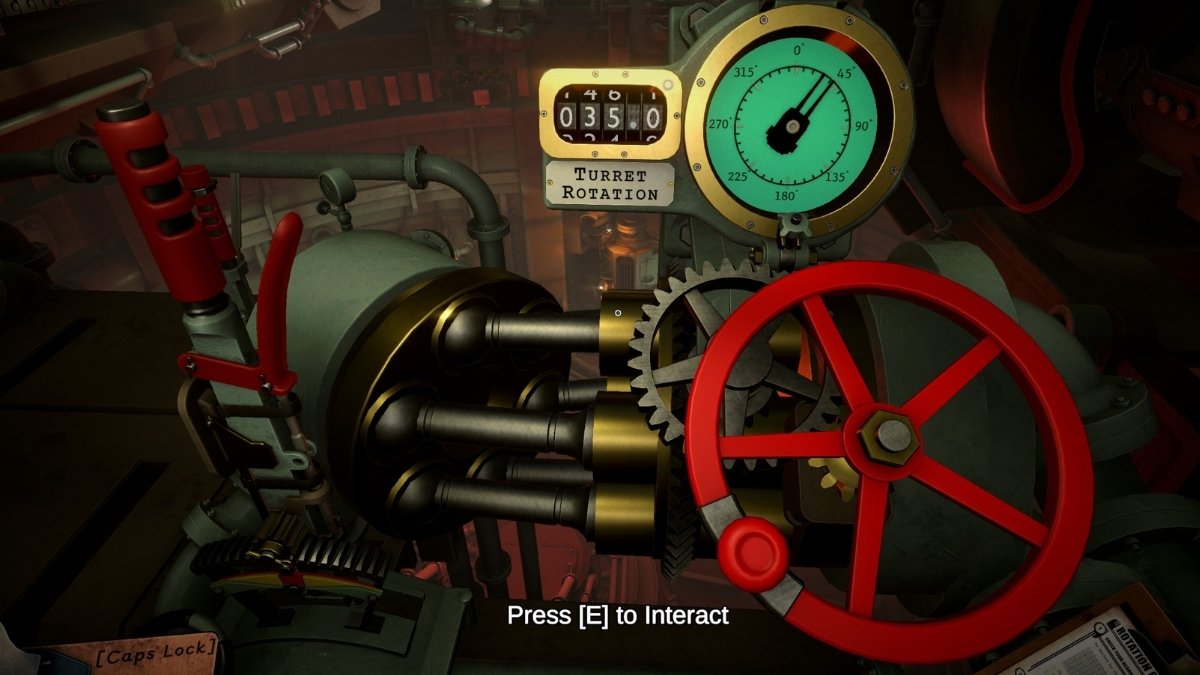
For this Iron Nest Beginner’s Guide, I recommend using this console first, as it can take some time for the gun to rotate into the exact position. Depending on the direction of your target relative to the Iron Nest, the gun may need to traverse a significant portion of its full 360-degree rotation.
The trick here is that you can yank the pull-cord in the direction you want the gun to rotate and then let the mechanism do the work. Reaching the desired bearing can take a while, especially when large adjustments are required. You can finish something else in the meantime to be efficient with your time.
- The Heavy Lever - Drag the heavy lever in the desired direction (left or right) and feel the entire structure shudder beneath your feet as it begins to rotate the gun. Once you reach the approximate position, slowly return the lever to its central position to stop the Iron Nest's rotation.
- The Wheel - Once you have reached the approximate position using the heavy lever, use the wheel to fine-tune the gun’s rotation. The Turret Rotation value shown on the console must exactly match the bearing value from your Clipboard (the one obtained by drawing a line from the Iron Nest to the target). This is the same rotation value displayed on the note you received after completing the ballistic calculations.
PRO TIPS:
- Rotating the gun can take some time, and if you want to be time-efficient (which you’ll absolutely need to be on harder missions), use that time to work on something else, such as setting the gun elevation.
- Be gentle with the Heavy Lever when stopping the rotation. You need to return it smoothly and avoid sudden movements, as the machinery is delicate and can be damaged. If that happens, you’ll need to perform repairs (usually by turning a few valves) before proceeding
Iron Nest Gun Elevation
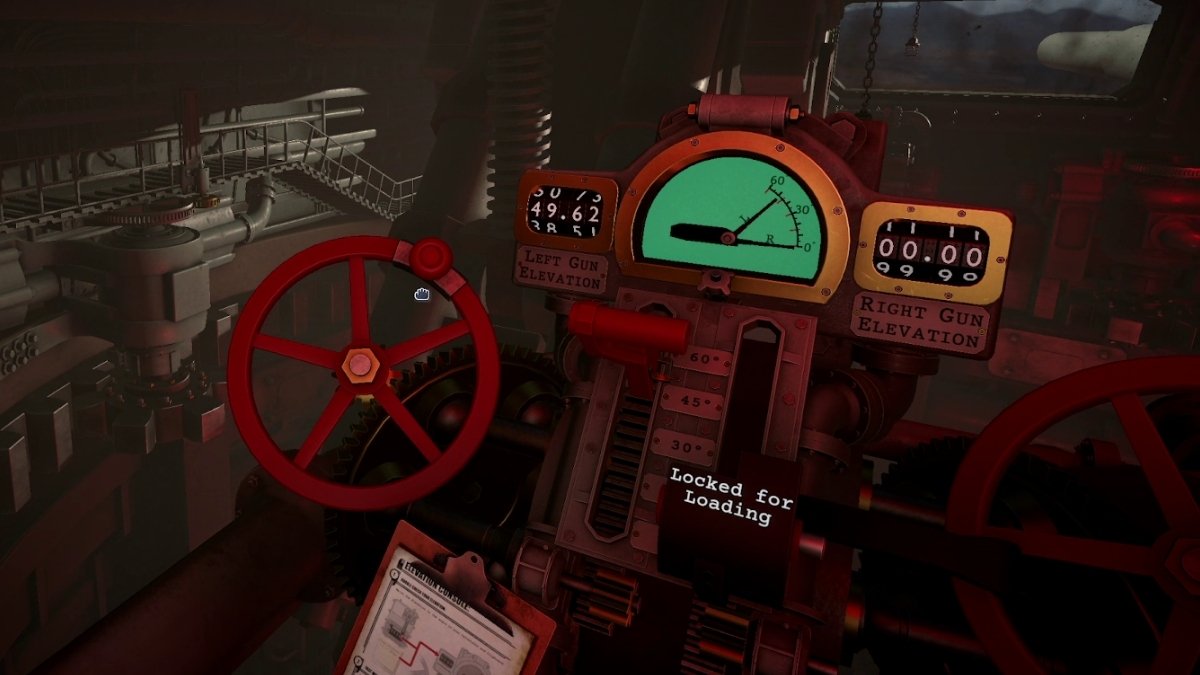
The Gun Elevation Console is located next to the left gun. It features two wheels, two levers, and two counters - one complete set for each gun. In most early-game missions, you’ll only be using the left gun, which means you’ll only need to adjust the Left Gun Elevation. The gun elevation value is obtained after completing the ballistic calculations. You can find it in the lower-left corner of the note attached to your Clipboard once the calculations are complete.
NOTE: The Elevation Console remains locked until the gun-loading procedure has been completed. Only then will you be able to use the console and set the gun elevation. The elevation always starts at zero degrees (as the gun must be in that position for loading), and it will reset to zero and lock again after each shot.
- Move the lever to the approximate elevation and wait for the gun to reach that position. Important: Do not touch the wheel while the gun is moving toward the angle set by the lever, as doing so can jam the machinery and force you to perform repairs before continuing.
- Fine-Tune Elevation: Once the gun has stopped moving, use the wheel to fine-tune the elevation until the counter exactly matches the elevation value shown on the note you received from the ballistic calculations.
The Final Step - Fire the Gun
The best part of our Iron Nest Beginner’s Guide, now that everything is finally set and ready, is the time to fire the guns. Approach the Trigger Station, confirm that all systems are ready, flip all five switches, and pull the massive pull-cord in the center to fire.
Before doing so, however, make sure to arm the gun by pulling the lever on the left side of the station. In the early game, this will arm the left gun only. As the game progresses and additional guns become available, you’ll need to arm each one separately before firing.
Shot Fired - What Now?
Immediately after firing, head back to the Tactical Map (if the game doesn’t automatically take you there) and watch the shell travel from the Iron Nest toward its target. Once the shell lands, you’ll be informed of the results - whether it was a hit or a miss, and whether the strike was lethal. Confirmed kills are indicated by the Skull Tokens mentioned earlier in the guide.
New Orders
When the shell lands, the first thing you should do is check whether there is a new message from High Command. They may inform you that the strike was successful, provide additional intelligence, assign new objectives, or issue further instructions. If nothing happens on the High Command console, you can continue with your mission as normal and move to the next target.
Requisition Console
The Requisition Console is where you can request additional shells to be delivered to the loading dock, as well as special support actions such as Scout Planes, Forward Observers, Emergency Moves, and more. These actions require Requisition Credits.
You begin each mission with a set number of credits, but you can earn additional credits by eliminating high-value targets and completing mission objectives. Spend your credits wisely, using them to replenish the ammunition you need or to perform special actions that help you locate targets and avoid enemy artillery fire.
RELATED: Iron Nest First Impressions – Inside the Belly of War
Iron Nest FAQs
Use spotter data, bearings, and map tools, including tokens, pencils, and a drawing compass.
It's a place where you can copy data received from field reports and high command, allowing you to use that data for calculations.
It means locating yout target by using the avilable data from Field Reports and identifying the cross-points among Spotters.
They confirm kills (Red Skulls) and friendly-fire hits (Blue Skulls).
If there is enemy artillery on the map, the moment you fire your first shell, they will be notified of your presence. This will start the Counter-Battery Timer, meaning you have that much time to act before being hit by the enemy. Time can be added to this time by destroying artillery units or performing other actions to stop it from reaching zero.
Yes, the game uses these two terms interchangeably.
Yes, the bearing value you get by drawing a direct line from the Iron Nest's subcell to the subcell where the target is located is the same value you'll use to rotate the gun.
And there you have it, now you know everything there is to know about Iron Nest, and you're ready to go! While you're here, don't forget to check out our dedicated Iron Nest: Heavy Turret Simulator section for more guides, tips, tricks, walkthroughs, and everything else Iron Nest-related. Thanks for reading my Iron Nest Beginner’s Guide!