Isoland 4 is a point-and-click space adventure with a nostalgic art style and plenty of puzzles to explore. In this guide, I'll cover all of the content that is only available in your second playthrough of Isoland 4.
This guide covers the puzzles and achievements that can only be seen in the second playthrough of Isoland 4. The two guides below can be used for all of the puzzles and achievements in the regular version of the game.
Isoland 4 Second Playthrough puzzles and achievements
'Listen Attentively' achievement
Before beginning the second playthrough of the game, take a moment to go to the settings screen.

Click on the elder to begin his story. Click him again after reading his bubbles to listen to the next part.

Once the elder has finished his story, you'll obtain the "Listen Attentively" achievement.

Briefcase puzzle
After giving the musician the group photo, the flowers will grow in a new arrangement. The code here is "32123".

When the code is identical to the image below, the briefcase will open.

The briefcase now contains a key instead of a photograph. We'll return here later, so take the key and leave for now.

Spaceship door puzzle
The puzzle on the spaceship door is solved in the same way as the original. All you need to do is flip the solution since the mechanisms have been flipped to be in the same positions on the opposite sides of the door.

Ouroboros puzzle
The Ouroboros room now has a window on the back wall as well as a cloudy platform in the center.

Place the red pearl into the red-eyed head's mouth.

This will disperse the clouds to unlock the puzzle in the center.

This puzzle is similar to the previous one, with the exception of two platforms that can be flipped while the ball is actively rolling.

Start the game by setting up the platforms to look like the image below.

After the ball has returned to its starting position and begun coming back, rotate the moveable platform on the top to face left.

Let the ball bounce back again, and flip the top handle again to complete the puzzle.

The head on the right will drop a blue pearl after the puzzle is completed.

Related: 3D Escape Room Detective Story Chapter 1 walkthrough
Film room
The room past the laboratory contains photography equipment and a locked window.

Select the key obtained from the briefcase and use it on the window to unlock it.

This opens a room with a projector and a robot toy.

Placing the film in the projector unlocks the "Everything in its Place" achievement.

When projected onto the screen, the film reveals where the objects need to be placed in the monk's room.

Add the spring from the previous room to the robot to make it drop a match.

Secret chamber door
In this playthrough, there are more hexagons on the door inside the secret chamber.

When the hexagons are placed like in the image below, the puzzle will be completed.

Red car puzzle
Entering the passenger window of the front car reveals the same puzzle as before. However, the hint at the bottom now has changed to show a blue drawing of a butterfly.

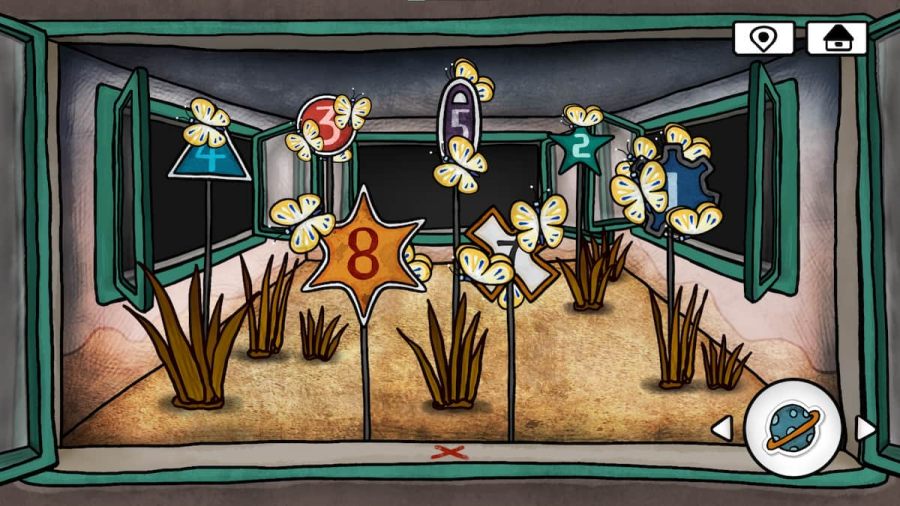
In the sign room, the solution to the puzzle is found by counting the number of butterflies on each sign.

From left to right, the numbers of dots inputted into the puzzle are 3, 2, 1, 1, 4, 3, and 2.

TV puzzle
When visiting the radio tower outside, you'll see a set of clues on the left indicating the positions of a set of four dials.

Once the radio tower is on and the antennae are attached to the TV, a green light will glow around the antennae.

Clicking on the TV will show a black screen and a set of four dials matching those drawn on the stone.

Turning the dials to match the carved diagrams will turn on the TV. The red slider at the bottom can be used to rewind and skip ahead in the program.

Nirvana puzzle
For the man to attain enlightenment, the items must be placed as depicted in the film room. This means that the lotus flower is on the back left circle, the ivory is on the front left circle, the axe is on the back right circle, and the prayer beads are on the front right circle.

Sticker puzzle
The back wall in the film room contains the placements for all of the stickers in the sticker puzzle.

Click on the paper in front of the boy to view the sticker puzzle.

Rearrange the stickers on the board so that the bird is in the top left corner, the triangle is in the center of the top row, the hand is in the fourth box of the middle row, and the "x" is in the second box of the bottom row.

Next, add the hourglass sticker beneath the triangle and the planet sticker in the top right corner to complete the puzzle and get a mini pyramid.

Spaceship wooden puzzle
Before heading to the spaceship, give the pyramid to the boy in the lunchroom to get the knife. Use this to open the apple, which has a new pattern inside.

This variation of the puzzle is a slight bit more difficult. When pressing one of the buttons on the outside, the button opposite it will also change color.

When pressing one of the buttons on the inside, the two outside buttons next to it will also color.

Completing the puzzle will once again release a bird from the container nearby.

Cabin bedroom puzzle
Unlike the first playthrough of the game, there is now a set of six paintings on the wall around the bed.

To solve this puzzle, you'll need to return to the room behind the laboratory. It contains a photograph of each of the paintings with a number beneath them.

Click on the paintings in the order of lowest number to highest to unlock the cabinet, which holds a record.

This record can be placed into the briefcase to unlock the "Seaside Sonata" achievement and bring a ship toward the beach.

Ship picture puzzle
Hand the camera to the man holding the ship's ticket.

He'll take a photo of the boat, which will float down onto the bed he sits on.

This photo can be taken to the campfire at the top of the stairs and burned for the bidirectional ring.

It can then be placed into the book to complete the game, allowing you to obtain the final achievement "The Secret of the Cabin.r"

For more point-and-click fun, check out our Escape from Castle Claymount walkthrough here on Pro Game Guides.