
If you're looking to maximize your earnings on Roblox and reach players around the world, then this new feature is for you. Roblox has launched Regional Pricing, a powerful feature that automatically adjusts the prices of your passes based on different economic regions. This game-changing tool can help you reach more players globally, optimizing your income while also making the prices affordable to everyone. Let's go through how to enable Regional Pricing and why you have to use it.
What is Regional Pricing?
Regional Pricing is a Robloxmonetization feature that automatically adjusts the prices of your game passes based on a player's location. That means that if based on where, Roblox will give you cheaper/more expensive gamepasses. So far, it's been the same price for all, but not every country has the same economy, which means that not everyone has as much extra money to to spend on Robux passes.
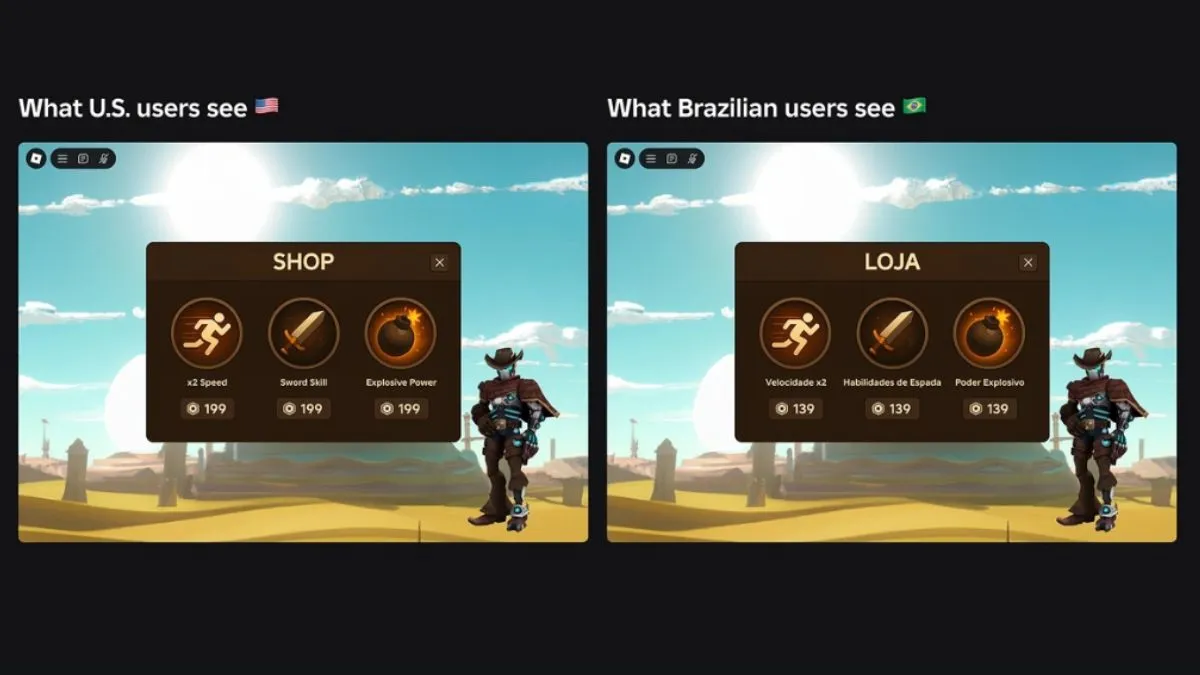
For example, the price that you set for the US market won't be the same as in Brazil, as you can see in the image above. From early testing in select popular games, Roblox has concluded that this change in price has lead to an increase in revenue.
How to Enable Regional Pricing
If you are a Roblox Creator, then you'll want to know how to enable Regional Pricing. It's pretty simple, so just follow these steps:
- Go to Creations and select the experience you want to adjust the pricing for.
- Go to Passes under the Monetization tab.
- Select a Pass or create a new one.
- Once you do that, go to Sales.
- Here you can Enable Regional Pricing.
- Save Changes
You'll be able to see the adjustments in the Top Countries/Regions list. However, if you want to see what the prices would look like for all countries, just simply go to View All. If there are any economic changes, then the prices will further adjust accordingly.
Dynamic Price Check - Make Sure Your Prices Update Correctly
It's important to keep track of which prices have been hard-coded in your experience UI. While these prices will change with Regional Pricing, visually they will remain the same in your game. That means your players won't be aware that something is potentially cheaper for them, and you will most likely lose out on sales. If you aren't sure which prices are hard coded, you can use the Dynamic Price Check tool:
- Under Monetization go to Passes.
- Click the three dots and the Dynamic Price Check.
- In the Add test accounts section select five Roblox users to test.
- If you go for Price pinned, the accounts will see the Robux amount which you set. If you go for Location pinned, they will see the prices adjusted according to Regional Pricing.
- Enable, wait for a few minutes, then check.
Price Optimization - Find Your Ideal Price Points
First, keep in mind that you can only use the Price Optimization test if you have enough transactions going through your experience (at least 60k over the last 30 days). This tool helps you find the best price for your products (excluding subscriptions) through A/B testing.
This feature lets you test different price points to find which ones generate the most revenue by showing different prices to different groups of people. Here's how to use Price Optimization:
- Under Monetization go to Price Optimization.
- Select products you want to test for. Roblox suggests including everything for best results.
- Start Test which will last for around two weeks. You'll receive an e-mail notification once it's done. On the page, you'll see all optimized prices for your products.
- If you like the results, then you can Review & Apply prices to all products.
If you want to stay up to date with the best Roblox games, then check out our list on Pro Game Guides or check our guide on How to Buy Robux.