If you’re new to the Adventure Escape Mysteries series, it’s a series of free-to-play puzzle and hidden object games each with an on-running storyline across several chapters. Read on for my full walkthrough for Haunted Hunt, a horror-themed tale of shapeshifting shenanigans.
A group called the Hunters find them and destroy them. They have met for one of the hunters to show off their latest catch, a Shapeshifter. If you’re stuck on any of the puzzles, read on for our Haunted Hunt walkthrough for this Adventure Escape Mysteries game.

Haunted Hunt Chapter 1 Walkthrough
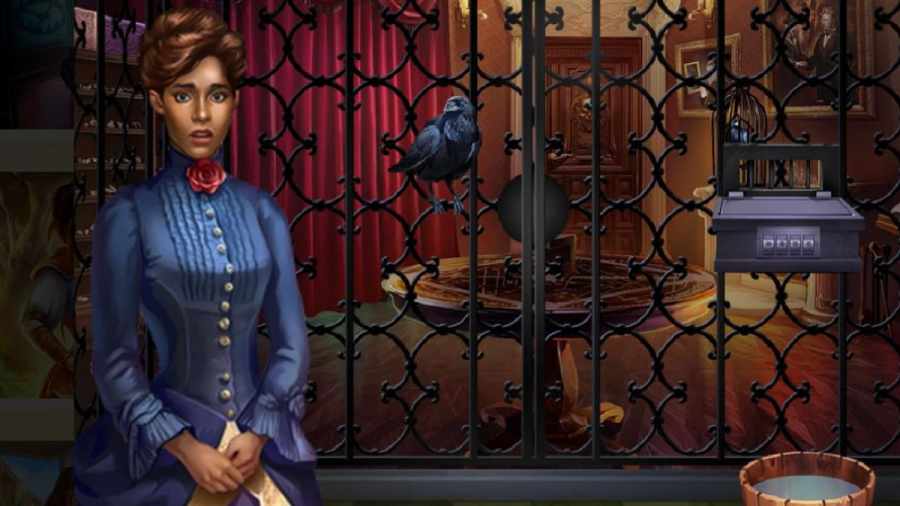
At the beginning of the game in Chapter 1, you find that you yourself are the shapeshifter, captured by the hunters and placed in a cage. You have finally been left alone, but one of the party guests seems to be on your side. They let a raven free in the room. All you need to do is touch it to transform and begin your escape.
How to escape the cage

Click the bowl on the floor to get the Napkin (1a), then also pick up the Empty Cup. Use the Napkin on the bowl of water (1b) to get a Wet Napkin, then use it to clean the floor and reveal a strange pattern. The paths join the symbols in a pattern that goes heart, sun, eye, and moon. Use this as the combination to open the box (1c), then take the Bread. Use the cup to tap on the bars (1d), which attracts the Raven. Use the bread on the raven, which allows you to transform and escape the cell.
How to get the Vampire Teeth

In human form, click the book of butterflies (2a) and use the book’s hints to put them in ascending order on the pins (Green at the top, then Red, Blue, Pink, Yellow, and Orange). This gets you the Orange Fairy Wings. Click the curtain (2b) to pull it back, then take the Poker (2c) and use it on the mermaid case lid (2d) to remove it, then on the box (2e) to knock it to the floor. Pick up the Jeweled Skull from inside the box.

In raven form, talk to the other raven (3a) and then pick up the Letter Opener (3b). Click the mirror behind the curtain (4a below), which will drop it to the floor. You can now return to human form and pick up the Mirror (2f).

Use the Letter Opener on the curtain (2b) to get a Cloth, then click the stand (2g) and put the mirror on it to start a vampire teeth puzzle. Simply click each set of teeth that doesn’t have a reflection to receive the Vampire Teeth.
How to break out of the room

Become a Raven, take the Net from the mermaid case (4b), and use it on the case. Click the net while it is on the case to get the Mermaid Scales. Also note the pattern scratched into the top of the teeth case’s top, which shows the items now you have in a NESW configuration.

In human form, click the table in the center of the room (2h) and place the four objects on the table, then move the objects into the correct positions using the center spot to help you move the others (skull at the top, wings on the right, mermaid scales at the bottom, and teeth on the right). This opens the table up, so go back into human form and take and use the cloth on the polish in the middle of the table to get a Greasy Cloth.
Select the right-hand picture frame (2i) and use the greasy cloth on the silver name tag at the bottom to reveal the code 1841. Click the door (2j), enter the code, and congratulations! You’ve completed Chapter One.
Haunted Hunt Chapter 2 Walkthrough
At the end of Chapter 1, Moira has escaped her cell and used Raven's form to break herself out of the room she was in. Still trapped in the house, she stumbles upon some séance equipment. Perhaps she can summon a ghost to help her escape in our Haunted Hunt Chapter 2 walkthrough.

In human form, look at the painting on the wall (1a), which shows the steps for summoning a ghost. There are six candles here, four of which are lit. Note the objects on the plinths (the Ouija Board and planchette, plus the reflections of the moon on the table).
How to enter the secret room

Now get a close-up of the bookshelf (1b). You’ll note five of the books have stripes on them:
- 1 stripe: UK
- 2 stripes: Egypt
- 3 stripes: France
- 4 stripes: Spain
- 5 stripes: Italy

Go into Raven form and pick up the Planchette Half (2a) and Candle (2b). Click the painting (2c) to move it aside and take a second Candle from inside. Click each of the window shutters (2d) until they recreate the pattern of moonlight on the table as it is in the photo (see below). Then select the Globe (2e) for a close-up. Click the five countries in the order above, which will open the bookcase and reveal a secret room.

Now back in human form, click the new entrance to go into the secret room. Go straight back to Raven form and take your third Candle (3a), the second half of the Planchette (3b), and the Dowsing Rod (3c). Then click the clothes (3d), which moves them to reveal a fourth Candle (4a).

Click the moths on the pocket of the blue jacket (4b) to reveal a Broken Pocket Watch, with its one remaining hand pointing to 43. Also, open the left drawer to get a fifth Candle (4c).

How to use the Ouija Board
As a human, open the bottom left cupboard (5a) to get a sixth Candle, then open the top of the desk and take the Ouija Board (5b). Click the broken picture frame (5c) to get a Glass Pane, then open the box (5d) and get the Pendulum from inside.

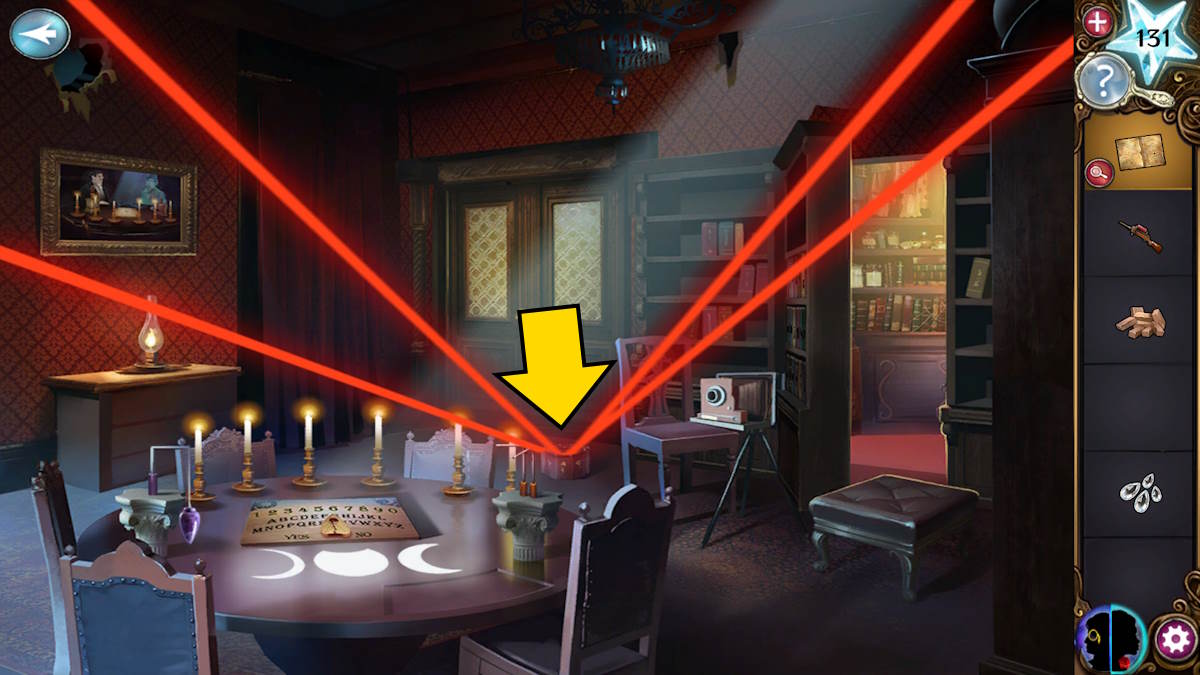
Back in the first room, add the glass pane to the Camera to fix it, then click it again to reveal a blurry captured image you need to bring into focus. You do this by moving the tabs on the right into the correct positions (see the image above if you're struggling, as it can be quite tricky). Once you do, a ghost appears, pointing to the number 20 in the bottom left of the photo.
When you come back out of the photo, a second Dowsing Rod will fall from the camera, so pick it from the floor under the camera. Add the six candles to the candlesticks, put the Ouija Board on the table, and place the two dowsing rods on the right pedestal. Next, place the two Planchette halves onto the board and add the pendulum to the left pedestal.

Once done, a compartment opens (6a) to reveal a Tinder Box in a secret compartment. Take it and use it to light (from left) the first, second, fifth, and sixth candles. If you’ve correctly opened the shutters in Raven form, you’ll get a cut scene, because the board is ready to use!
How to escape the room
Click on the board and you’ll be asked for the ghost’s time of death. Move the Planchette to 2, 0, 4, then 3, at which time Baxter will appear. He’ll ask you to move the box by the door, but a trap is triggered before you get a chance. Return to Raven form and fly up through a gap that has appeared in the hole behind where you moved the picture (2c). This begins a pipe connection puzzle.

The exit you need is marked in the image above. Switch the pipes as you move to follow this path, move onto the crack, and you’ll have completed Chapter 2 of the Haunted Hunt.
Haunted Hunt Chapter 3 Walkthrough
In this third part of our Haunted Hunt Walkthrough, Chapter 3 finds our shape-shifting hero Moira in an armory having just escaped a deadly trap by flying through the pipes in the form of a raven. What will befall her next?

Immediately switch to raven form and collect the two sets of Wood Chips from the cabinet (1a) and the shelf (1b), plus two Cobwebs (1c and 1d). Click the hole in the wall (1e) to find a third set of Wood Chips and another Cobweb, then open the drawers (1f) to get a Screwdriver and a fourth pile of Wood Chips.

Back in human form, take another Cobweb (2a) then click the door back-left (2b) and enter the kitchen.

Switch to raven form and collect two more sets of Wood Chips (3a and 3b), and another Cobweb (3c), then use the screwdriver to get the Screw (3d).

As a human, collect the Cobweb (4a), then go back to the armory. Become a raven and fly through the hole once more, adding all the wood chips and then the cobwebs to the nest (5a) to complete it. Pick up the Nest, and also the Salt you’ll find underneath it afterward. While here, click the beam at the back (5b) and note the pattern in the circles.

How to beat the Magic Barrier

Back in the kitchen in human form, look at the pattern in the book (4b). Go to the armory, take raven form, and click the magical pattern (1g). Use the salt on the symbols, copying the two sets of symbols you have for the circles and the triangles. This will take the magic barrier down.

You now have access to the cabinet’s lock, but you need the combination. You’ll find the four answers in raven form, at locations marked on the images above:
- Top left: (3d)
- Top right: (1h)
- Bottom left: (5c)
- Bottom right: (3e)

With the cabinet doors open, you can take the gauntlets from the armor suit (6a). Return to raven form, fly up into the hole, and use the gauntlets to retrieve the Silver Musket Ball (5d).

Click the musket on the table in the armory (6b) and add the silver musket ball, then rearrange the instruction cards until they make sense. Once complete, you’ll receive the Loaded Musket.
How to give the Hellhound some water

Go into the kitchen as a human and use the musket on the water pipe (4c). Click the mess now in the sink to get the Cork, then return to the armory and add the cork to the Hunter’s Kit (6c). You can now move the items in the kit around by dragging them. Once everything is perfectly organized, you’ll get the Broken Knife Handle.
Go into the kitchen and put the bird’s nest in the sink, then use the handle on the tap to get running water and take the Nest Filled with Water. Give that to the Hellhound who will immediately perk up, but still needs to be set free.
Completing the Map Puzzle

Back in raven form in the kitchen, you’ll find a pin that landed on the top shelf (7a) when the musket exploded. Pick it up, then click the board on the back wall (7b) and use the pin on it to start a map puzzle. Once complete, you’ll need to do it another two times to open a secret compartment in the wall. Still in Raven form, collect the Whetstone from the compartment.

Return to human form, go to the armory, and open the right side of the cabinet (6d). Use the screw to fix the sabre and the whetstone to sharpen it, then use the gauntlets to pick it up. Go back to the kitchen, and use the sabre on the chain to free the now happy hellhound (Beezle). When it stands, you’ll see a hole where it was laying. Click the hole and you’ll complete Chapter 3 of Haunted Hunt!
Haunted Hunt Chapter 4 Walkthrough
Haunted Hunt is an advance-level puzzle game in the Adventure Escape Mysteries series. At the conclusion of Chapter 3, shape-shifter Moira freed Bezzle the hellhound and discovered a hole in the ground to escape the armory and kitchen. Now she needs to sneak into Otto’s private rooms to find out his plans. If you’re stuck in Haunted Hunt Chapter 4, you’ll find all the clues you need in our walkthrough below.

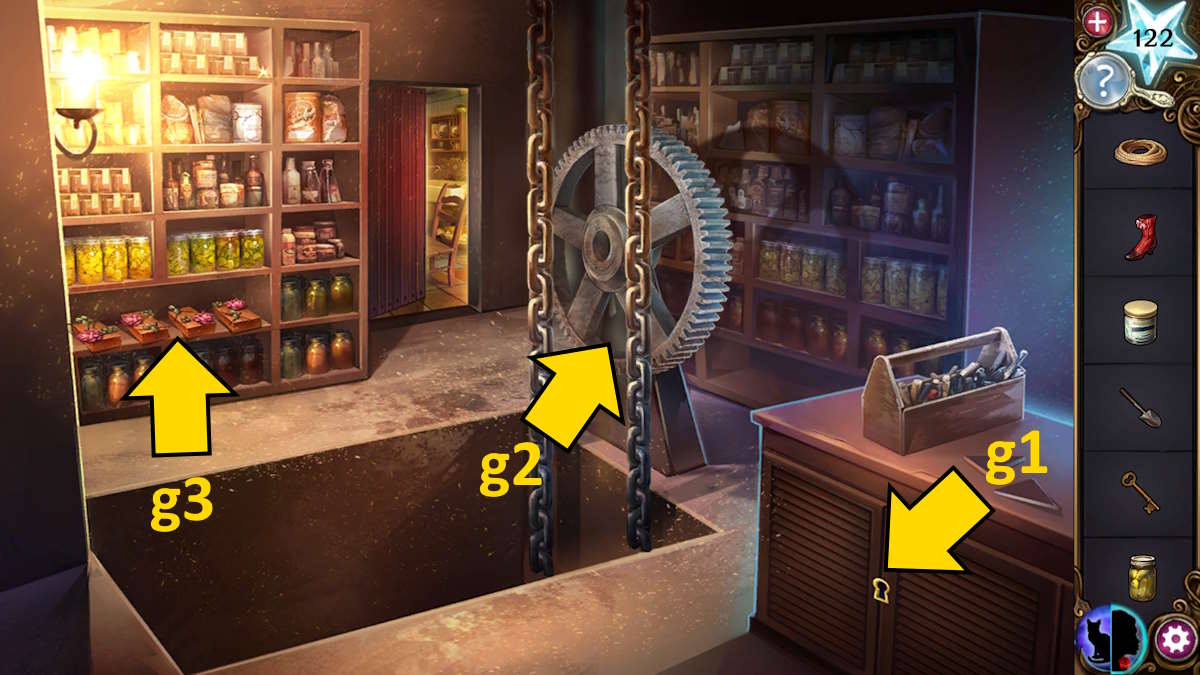
Begin by clicking the dust in the middle of the room three times to reveal and collect the Jar of Fish (1a) and the Bell Ringer (1b). Use the ringer on the Bell (1c) and then use the Bell (once affixed) to attract a cat.
Put the Jar of Fish on the box (1d), then click it to knock it off. Once smashed, the cat will eat the fish, and while it does, you can touch it to be able to shapeshift into a cat!

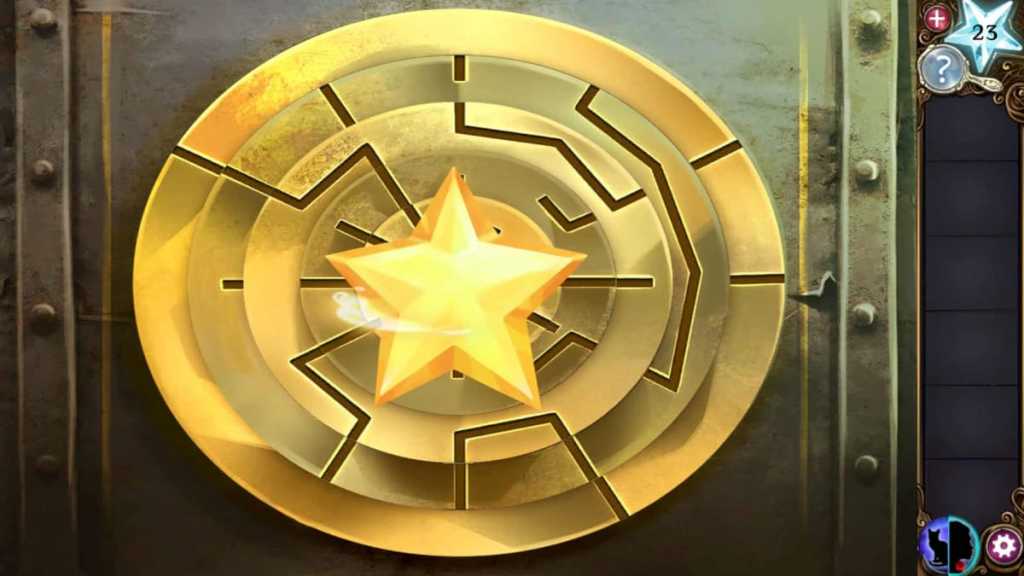
Maze Puzzle Solution
Click the end of the cat footprints (2a) to start a maze puzzle. At the turning choices, go: left, left, right, right, right, left, right, up at the crossroads, right, and then out. It’s hard to describe in words, but you can’t fail, so you may just need to keep trying.

Otto's Private Chambers & Library Puzzles
Once you’re in Otto’s Private Chambers, revert to human form and take the Ghost Book (3a), then go downstairs (3b) to the library.

Click the rug (4a) and the curtain (4b) to reveal more of the room and take the Cord (4c). Move into the bedroom (4d).

Pick up the Chair Leg (5a), take the Wheel from the middle drawer (5b), then go back into the library and use the wheel on the hole at the bottom of the steps (4e), and the chair leg on the step (4f) to fix the steps. You can now place the Ghost Book in the gap on the shelves (4g) to reveal the crank (6a).

Back in the bedroom, use the cord on the cauldron (5c) to empty it onto the floor. Take the Brass Piece from the toppled cauldron, and collect a Vault Door Ring from in the fireplace itself.
Otto's Room Combination Puzzle Solution
Go back to the first of Otto’s rooms and use the Brass Piece on the desk draw (3c) to start a combination puzzle. In cat form, look at the route the cat takes and wherever it stops, there’s a clue (yellow circles, below):

- A: The second book is missing
- B: The fifth vase is broken
- C: The first butterfly is scratched
- D: The second bedpost is scratched
- E: The fifth pillow has fallen
Set the Brass Pieces to position 25125 and the cupboard will open, from which you can take another Vault Door Ring. Now go into cat form and you’ll see there is also a Ghost Key in the cupboard. Take it to the bedroom and (still in cat form) use it to open the jewelry box (5d). Take the Diamond Ring and Turning Key from inside.
Use the diamond ring to cut the glass on the bookshelf in the library (6b) and take the Oil Can. Use the oil on the crank (6a), then click the crank to lower the chandelier. Click the lowered chandelier to get a third Vault Door Ring.
Piano and Music Box Puzzle Solution

Go back up to Otto’s first room and use the turning key on the Music Box (3d). You can do this multiple times to hear a five-note tune. Now click the piano (3e) and reproduce the tune. Luckily you can see the notes in cat form, both coming from the music box and on the piano keys, so you just need to play them in the right order. The music box is then opened (3d) and you can take the next Vault Door Ring from it.
Now click on the device that was underneath the rug in the library (6c) to find it needs a combination. In cat form in each room, you’ll notice some cat scratch marks, each of which is on an item with a description pertaining to a season (red circles on the cat image above):
- (3e) Snowy Winter Forest (5 marks)
- (3d) Spring Nympth (3 marks)
- (5d) Hot Summer day (1 mark)
- (4a) Rug with Autumn leaves (7 marks)
So, use code 5317 to open the lock and take the final Vault Door Ring from the safe beneath.
Otto's Room Wall Mount Ring Puzzle and Animal Puzzle Solutions
Go up to the first of Otto’s rooms and place the five rings on the Wall Mount (3f) to begin a ring puzzle. Once solved (see below) the vault will open and you can go inside.
Turn into a cat to see the full details of the animal puzzle on the wall. Each panel can be switched between two animals, one flying and one land-based, in cat form. While in human form, you can switch each panel between blue (sky) and green (ground). The panels need to alternate blue and green and have matching animals in cat form for the panel to open.

Once open, you will find Otto’s secret inside. And behind his secret ledger, a Key. You can now go back to the library and use the key to open the locked door (6d) and complete Chapter 4!
Haunted Hunt Chapter 5 Walkthrough

The locked door leads to Otto’s parlor room. Note the picture on the table (above, and below as b1), which looks like parts of four separate images made into one.

Change to cat vision and pick up the two Ghostly Gears (a1), then change the symbols on the cupboard (a2) to match those in the drawing. The top image is already correct. Click the second image down three times, the third image down once, and the bottom image twice.
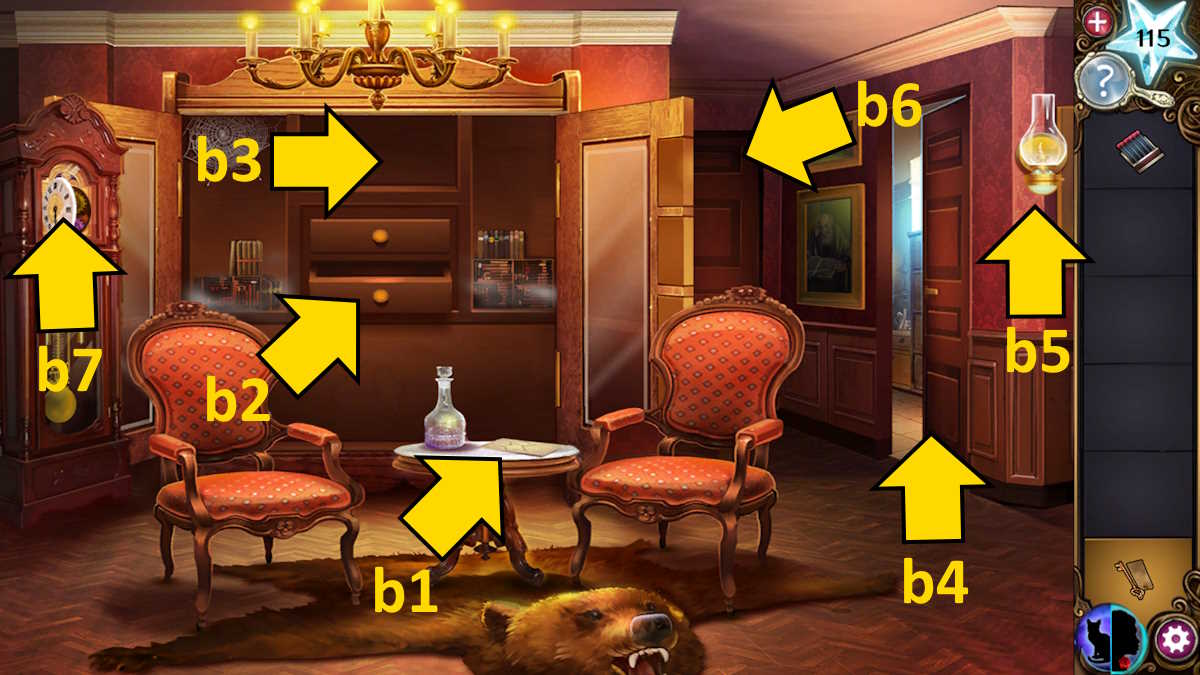
Once complete, the cupboard will swing open. Return to human form now so that you can brush away the cobwebs inside to find some Matches in the bottom drawer (b2) and take a Key from the top shelf (b3).
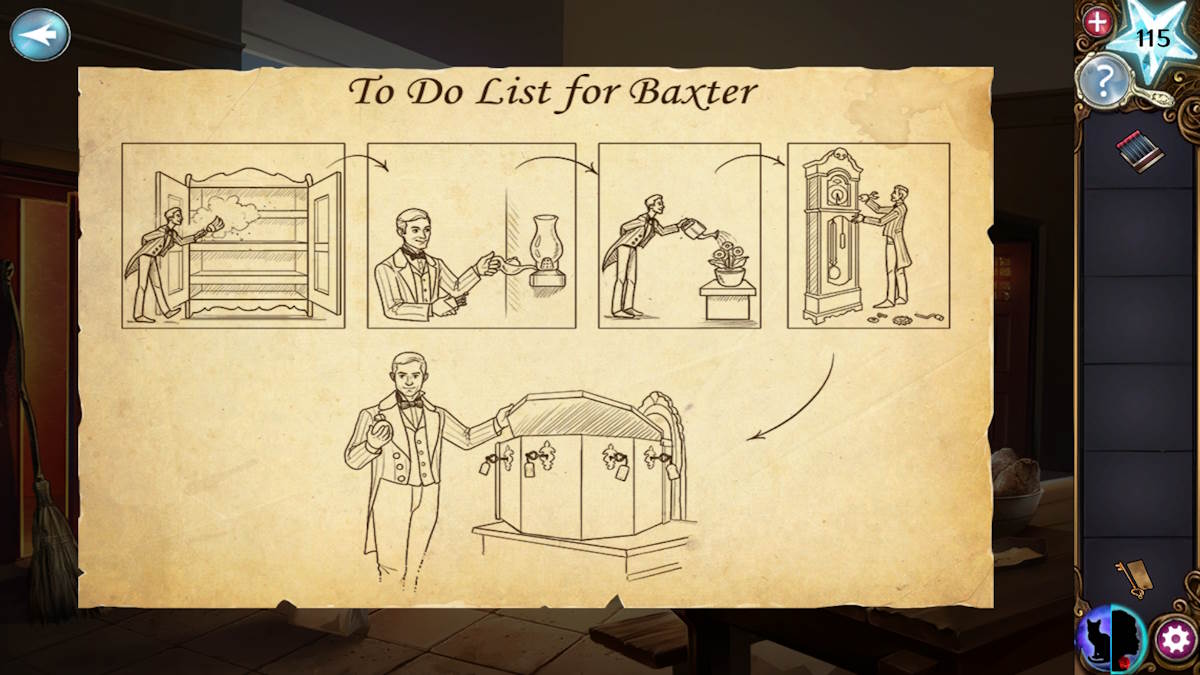
Move through the door on the right (b4) to go into the kitchen. Check out the paper on the table to read Baxter’s to-do list (above, and below as c1). It lists Baxter’s daily chores, which is a clue to what you need to do next. You’ve already dusted the shelves, so there are four chores to go.
The lamps puzzle solution
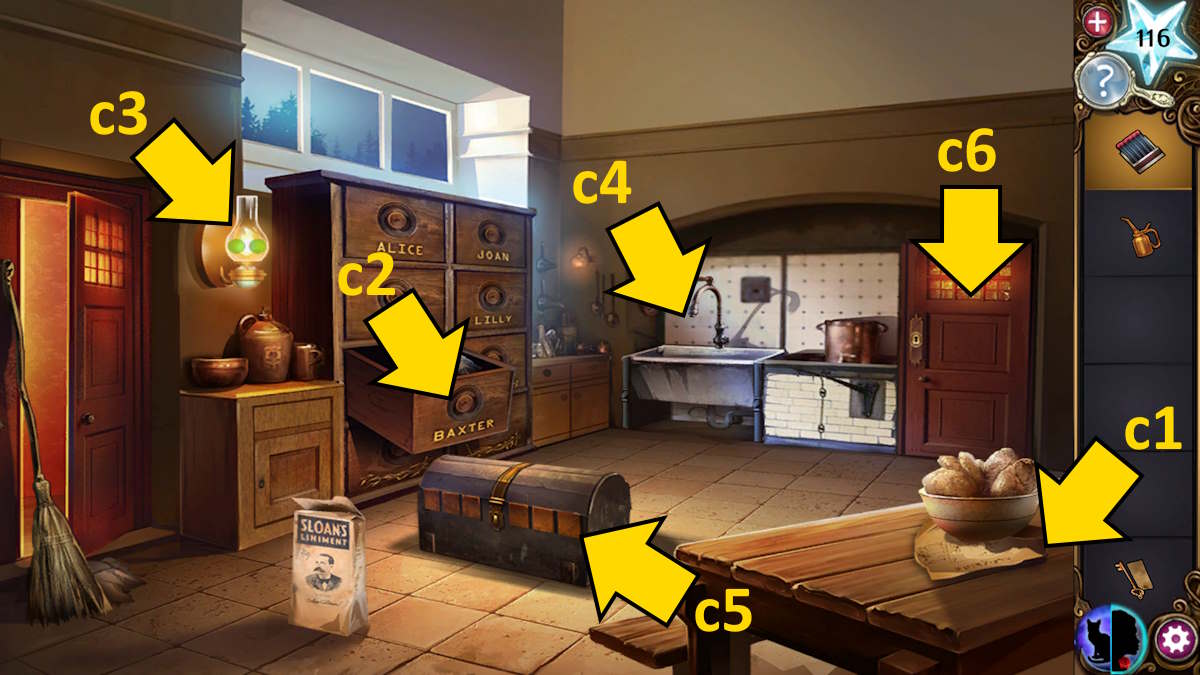
Open Baxter’s box (c2) to find some Kerosene Fuel. If you use the fuel on the lamp here, and then use the matches to light it, you’ll see two green dots appear on the lamp, but they’ll quickly disappear.
If you move back into the parlor and do the same with the lamp there (b5), you’ll only see one green dot, but it will stay on. Return and light the previous lamp (c3) now, and it will stay lit. Return to the parlor and use the other door (b6) to enter a sitting room.

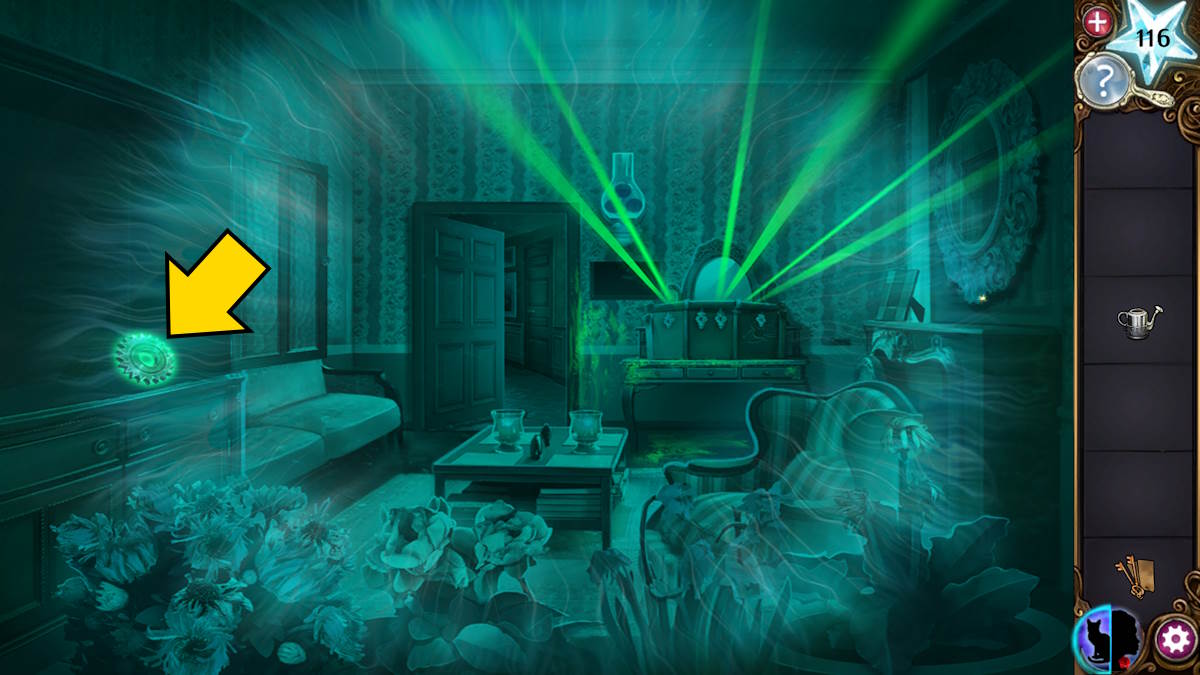
Light the kerosene lamp here (d1), which lights up with three green dots. This completes this puzzle and opens a hatch below the lamp (d2), from which you can take a second Key. Take the Watering Can from the sofa (d3), open the cupboard (d4), and then switch to cat vision to find a third Ghostly Gear (below).
Move to the kitchen and fill the watering can in the sink (c4) to get a Full Watering Can. Use the can to water the flowers in the sitting room, after which you can take a third Key (d5) and a Contract (d6). Read it to find that Baxter had signed it with Otto to keep his secrets when he began working for him.
The clock gears puzzle solution

Still in the kitchen, look at the box (c5) but through the eyes of the cat to see each of the six pads has a fingerprint that’s used on it. The third one matches the fingerprint on the contract, so change all the others on the case to match it by clicking them (see above). The box will open, allowing you to take your fourth Ghostly Gear from inside.
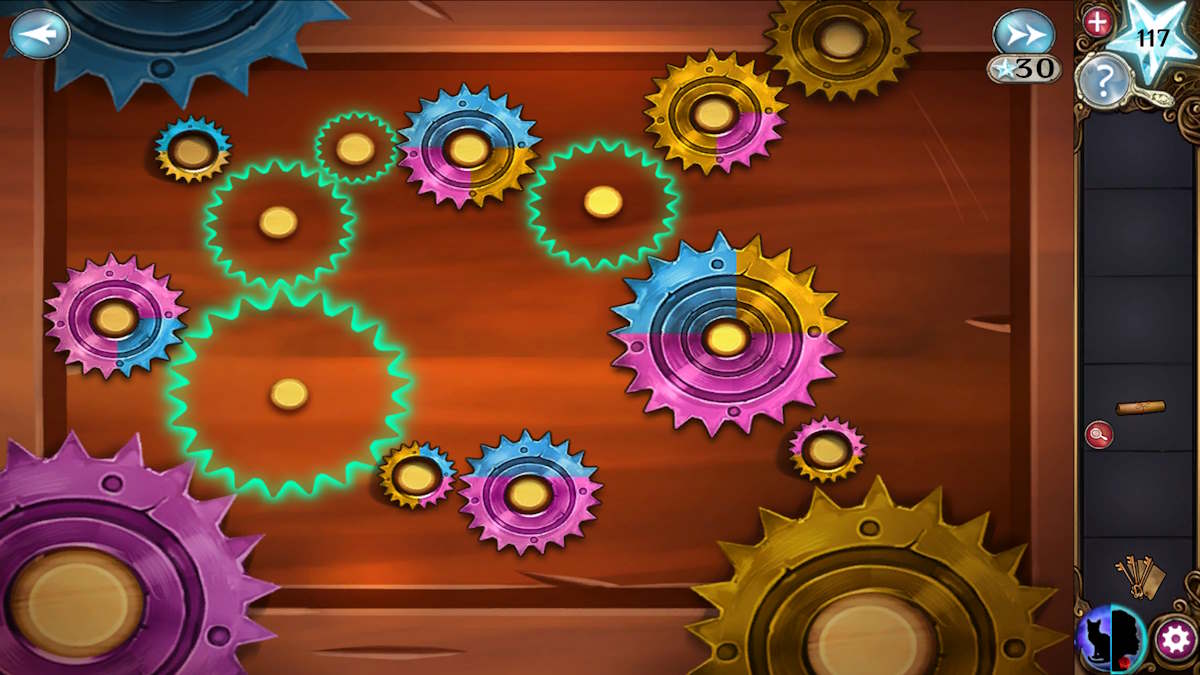
Move back to human form and go into the parlor. Open the clock (b7) and add the four gears to begin a color-matching puzzle. You’ll need to flit into cat form to see the colors on the ghostly gears and complete the puzzle, making sure all colors match. The answer to the puzzle is pictured above. Once complete, you can take a fourth Key from the base of the clock.
The purple box puzzles

Go into the sitting room and place the four keys in the large purple box (d7). The order of the keys is pictured above (it's the same as the chores list). When the box opens, you’ll need to get the story straight by placing the timeline images in the correct order (see below).
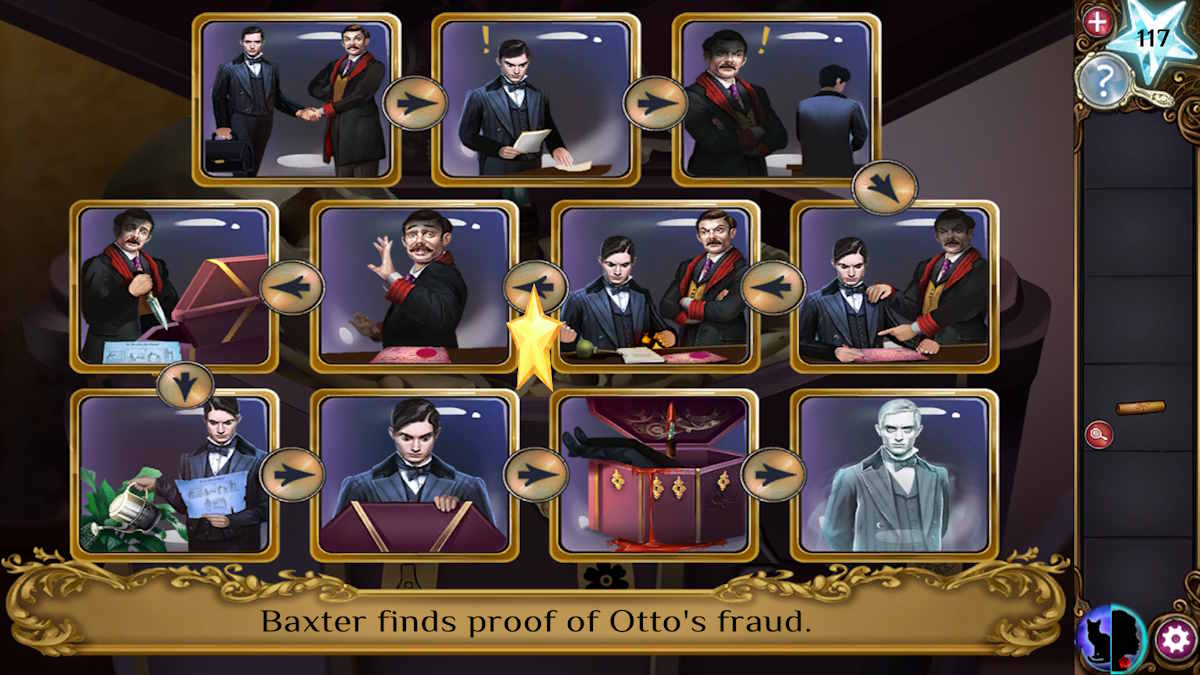
It would seem Baxter is unable to help you as he is still bound by the contract. When you move the skull after working out the story, take Baxter’s Key from the box. Move back into the kitchen, use the key to open the back door (c6), and you’ll have completed Chapter 5.
Haunted Hunt Chapter 6 Walkthrough
You find yourself in another kitchen area, still needing to get upstairs. There’s a dumbwaiter here but you’ll need to fix it first. Go into cat form to see a ghost pointing at the table.
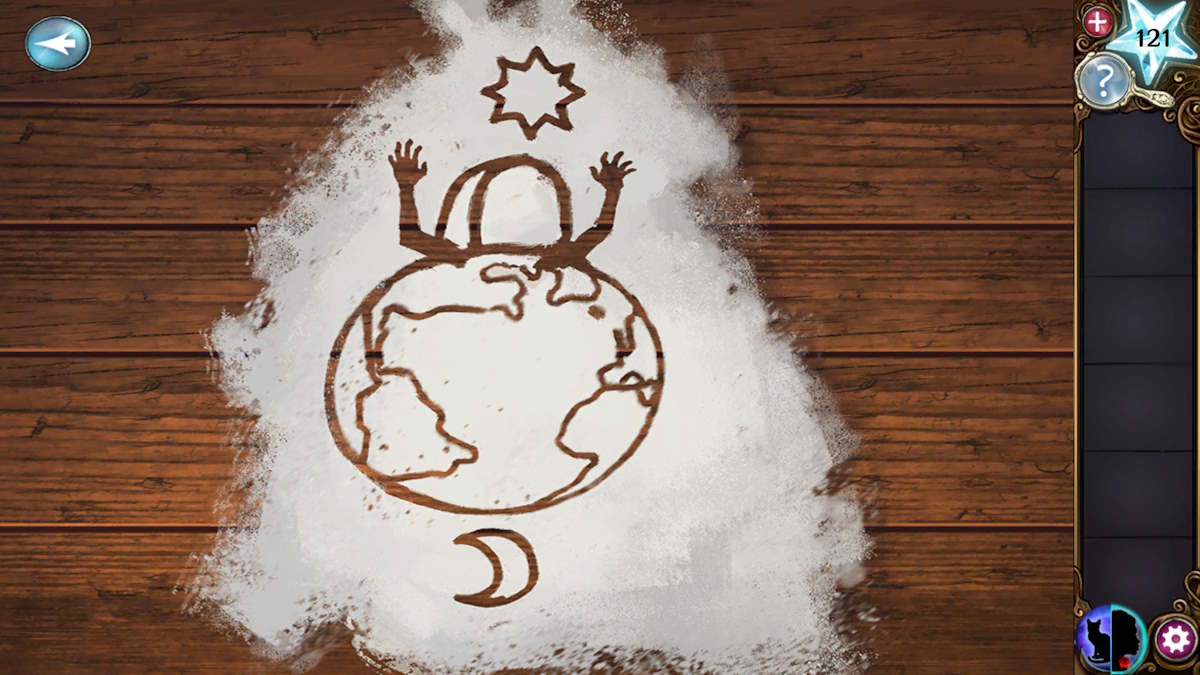
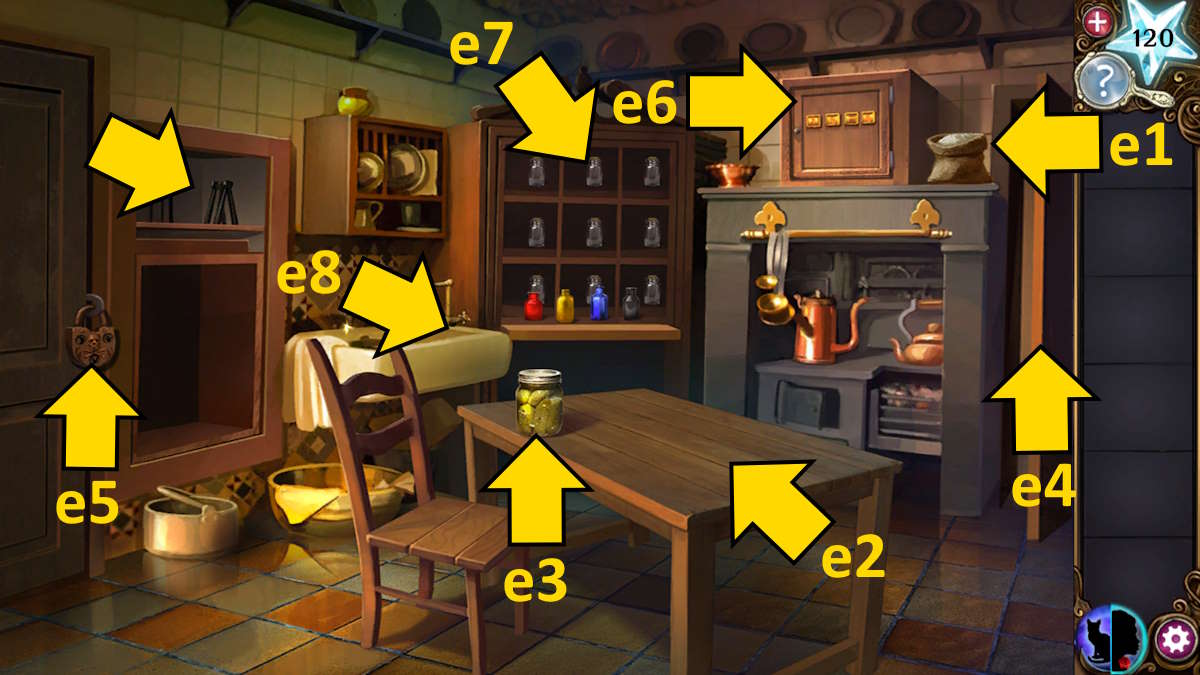
Return to human form to take the Flour from the shelf (e1), change back to a cat to pour it onto the table (e2), check out the image, and then take the Pickle Jar (e3).
The bells puzzle solution
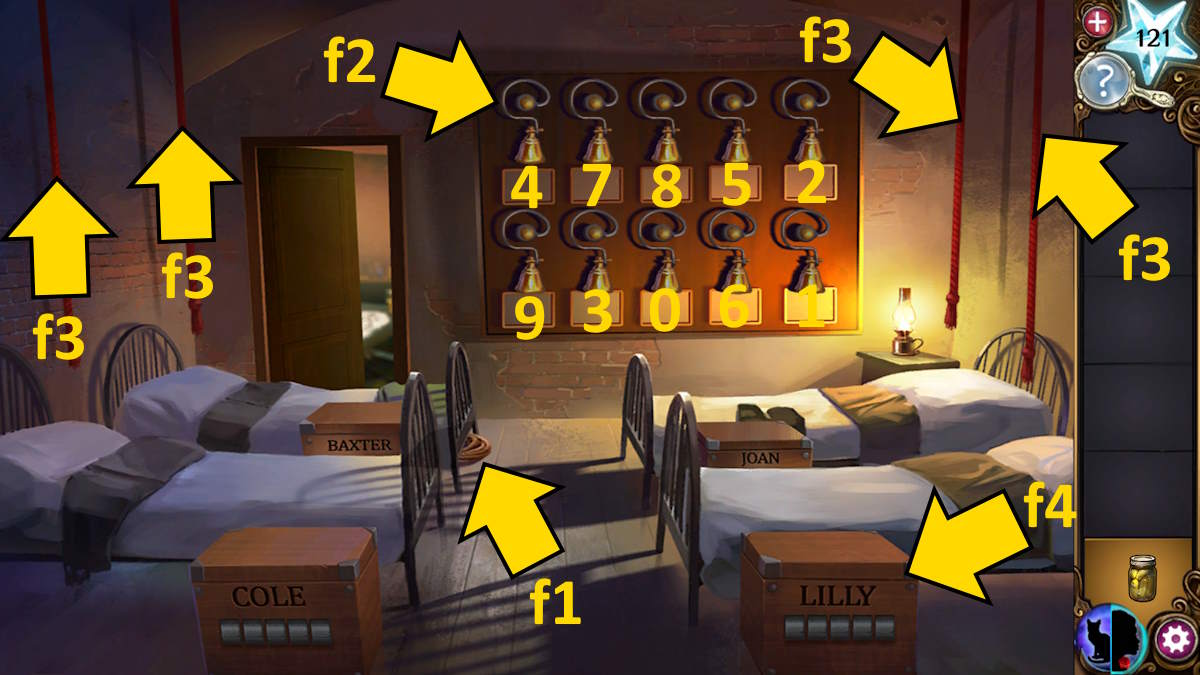
Move through the door on the right (e4) into a dormitory and pick up the Rope (f1). Change to cat form to see the numbers on the bells (f2, I’ve marked them on the human image above). Now you need to ring each resident’s bell (f3) and note the pattern of numbers the bells ring. This gives you the four codes to open their boxes (f4):
- Baxter is 12749: It contains horse riding equipment
- Cole is 74517: It has gardening supplies (take the Garden Spade)
- Joan is 24613: Here you’ll find mechanical and repair gear (take Joan’s Key and a Red Shoe)
- Lilly is 86889: You’ll find cooking gear (take the Vegetable Shortening)
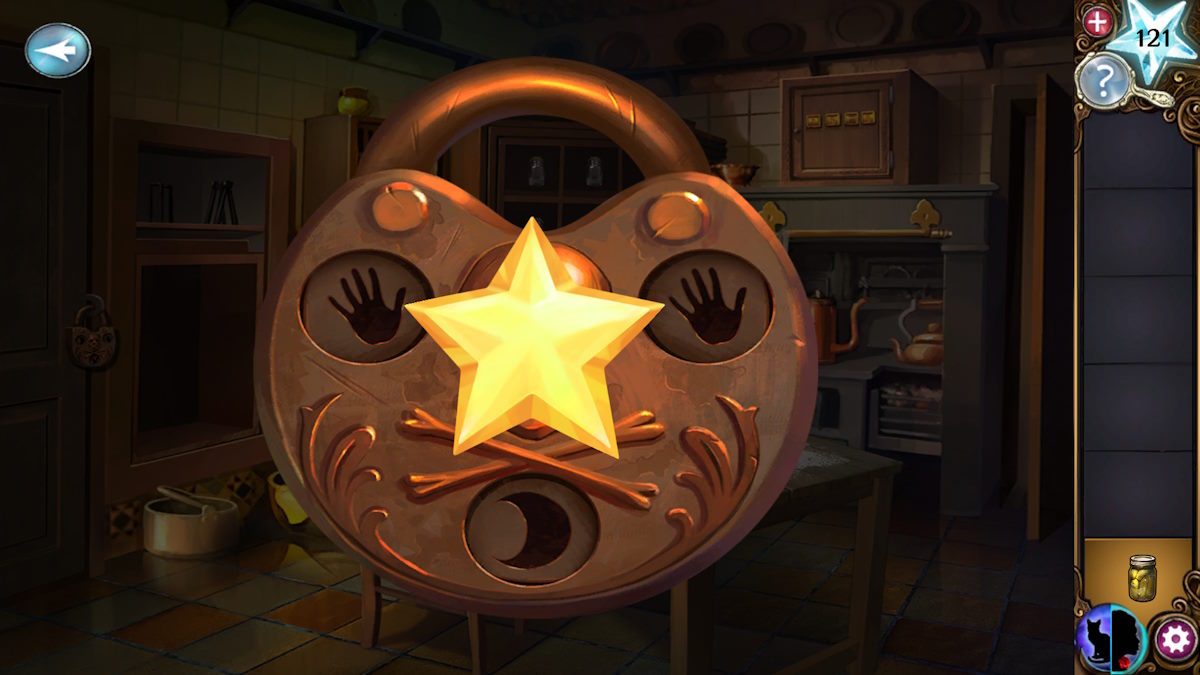
Go back to the kitchen, select the padlock on the door (e5) for a close-up, and set the two top symbols to hands and the bottom one to a moon (to match the image in the flour).
The lasers and lens puzzles
You’ll find yourself in a storage area. Use the key to open the cupboard (g1) and click on the magic trap inside to start a lens and light puzzle. To win this one, you need the light to shine on every spider you can see in human form. However, you need to be in cat form to complete it as otherwise, you can’t see the lasers. I’ve put the solution below. Once complete, take the Wrench from the box.
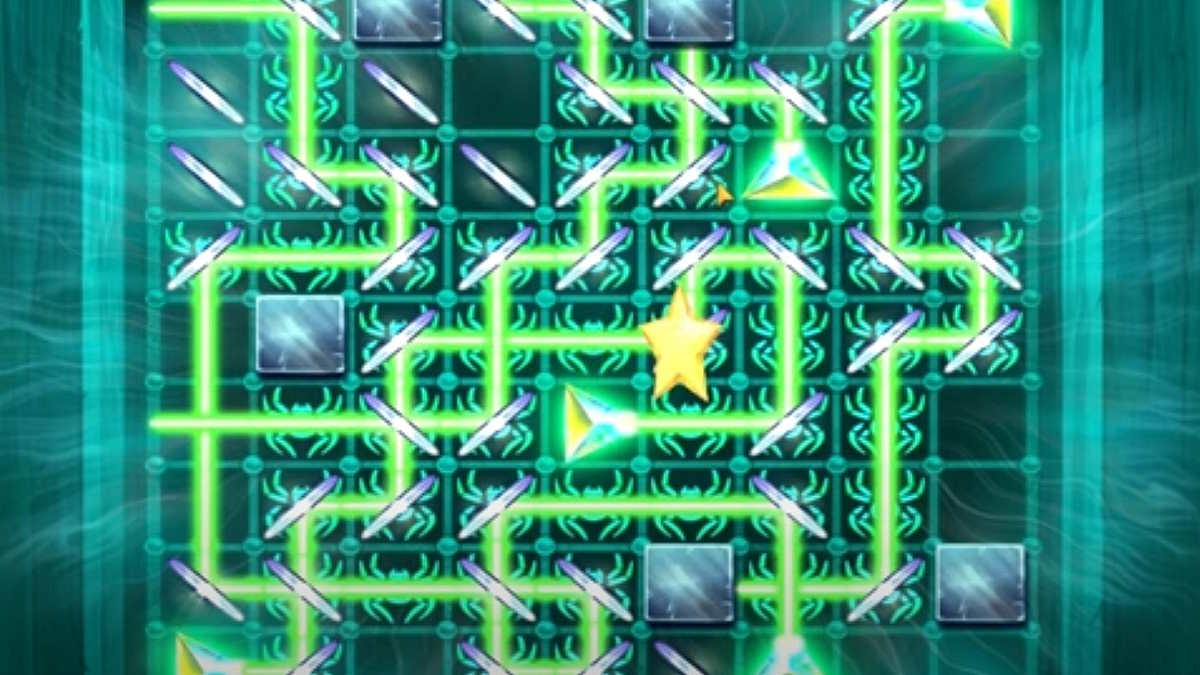
Use the vegetable shortening on the wheel (g2) to grease it and then the wrench to turn it, and the platform below will rise. Take the second Red Shoe from its grizzly contents, along with a Horseshoe and some more Rope. Also, pick up the Large Rusty Wheel that has fallen off the pulley system.
The shrines puzzle
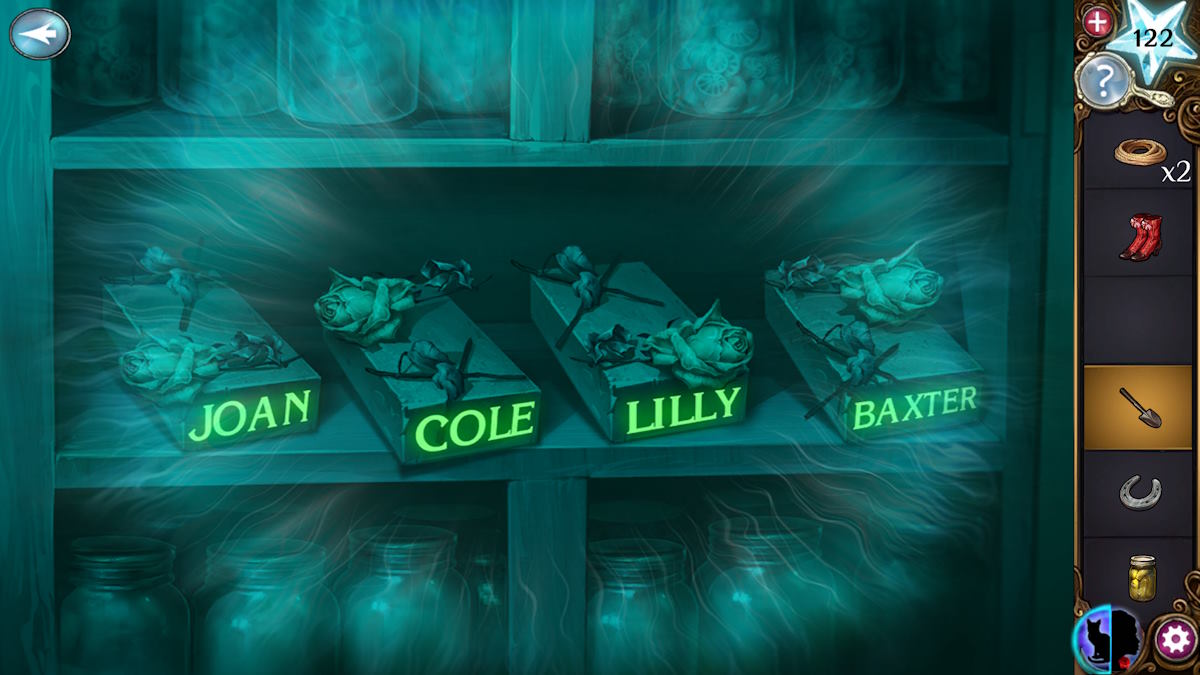
Select the shrines next (g3) for a close-up. Look at them in cat form and each has a name matching those you saw earlier. Place a matching item on each:
- Baxter: The horseshoe
- Cole: The shovel
- Joan: The red shoes
- Lilly: The pickle jar
Once complete (and still in cat form) the ghost will offer you a Rusty Small Wheel. A code, 4727, will also appear on the floor.
The bottles puzzle solution
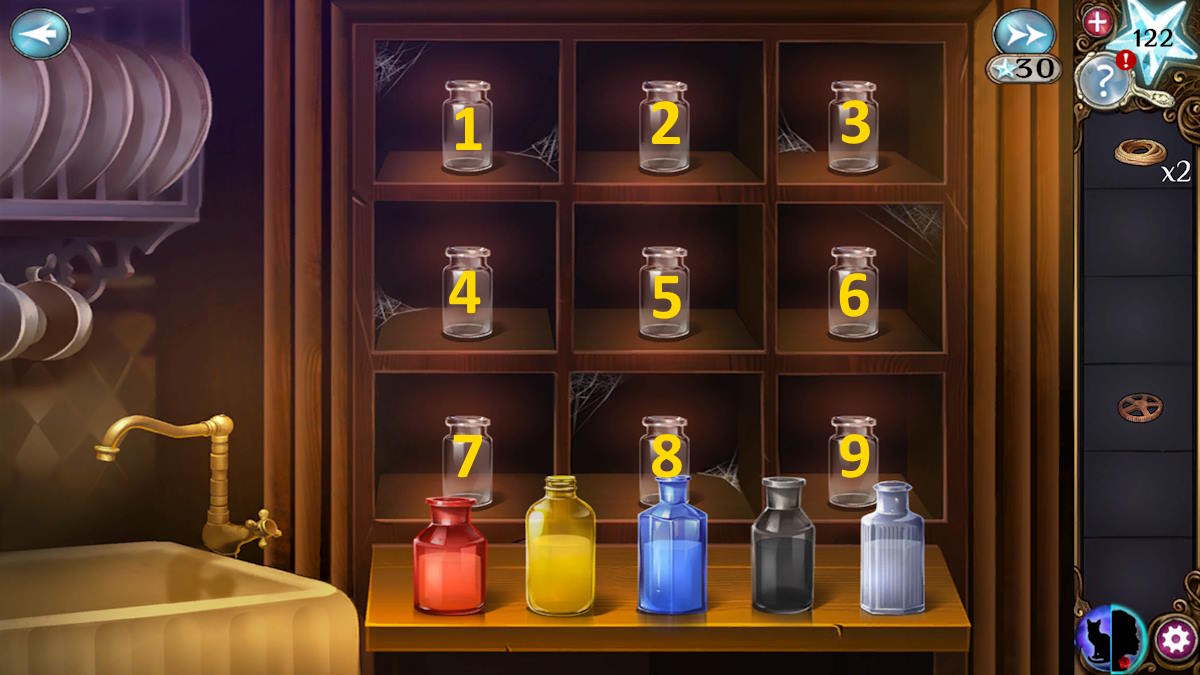
Use the code in the kitchen to open the box (e6) and take the Alcohol. Click the sideboard full of bottles (e7) for a close-up, add the alcohol, and you’ll begin a color-mixing puzzle. Go into cat form and note down all the colors on the jars. With that done, go back to human form and pour the correct colors into each jar. The solution is below:
- Purple: Red + Blue
- Light blue: Blue + White
- Gray: Black + White
- Brown: Red + Yellow
- Pink: Red + White
- Green: Blue + Yellow
- Orange: Red + Yellow + White
- Dark blue: Black + Blue
- Light purple: Red + Blue + White
Take the Ammonia Cleaner from the edge of the sink (e8) once the puzzle is complete. Now add the two wheels and the tow ropes to the dumbwaiter (e9), use the ammonia to clean the wheels, and you’ll head up in the dumbwaiter. At the top, you’ll meet Euphemia, which concludes Chapter 6.
Haunted Hunt Chapter 7 Walkthrough
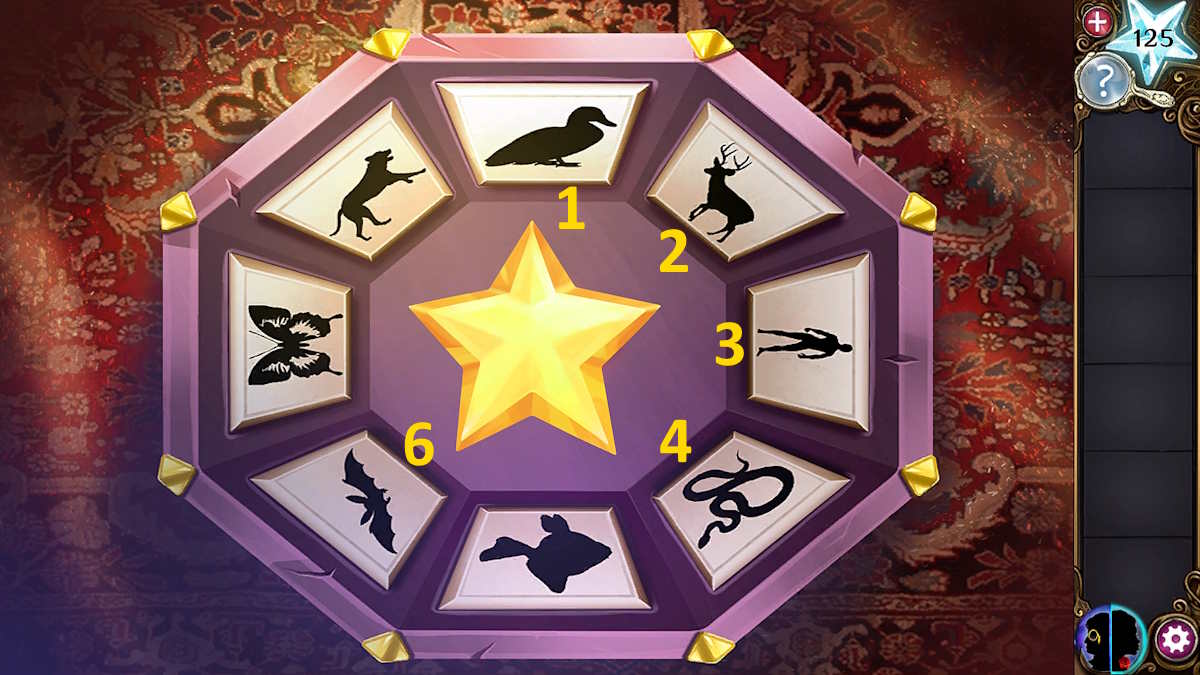
Just when you think Euphemia may be there to help you, she captures you once more! She’s a much more skilled hunter than Otto and needs to be taken seriously. She leaves you trapped, so you need to escape. Click the images marked above and listed below (once each) to solve the first puzzle:
- 1, 2, 3, 4, 6
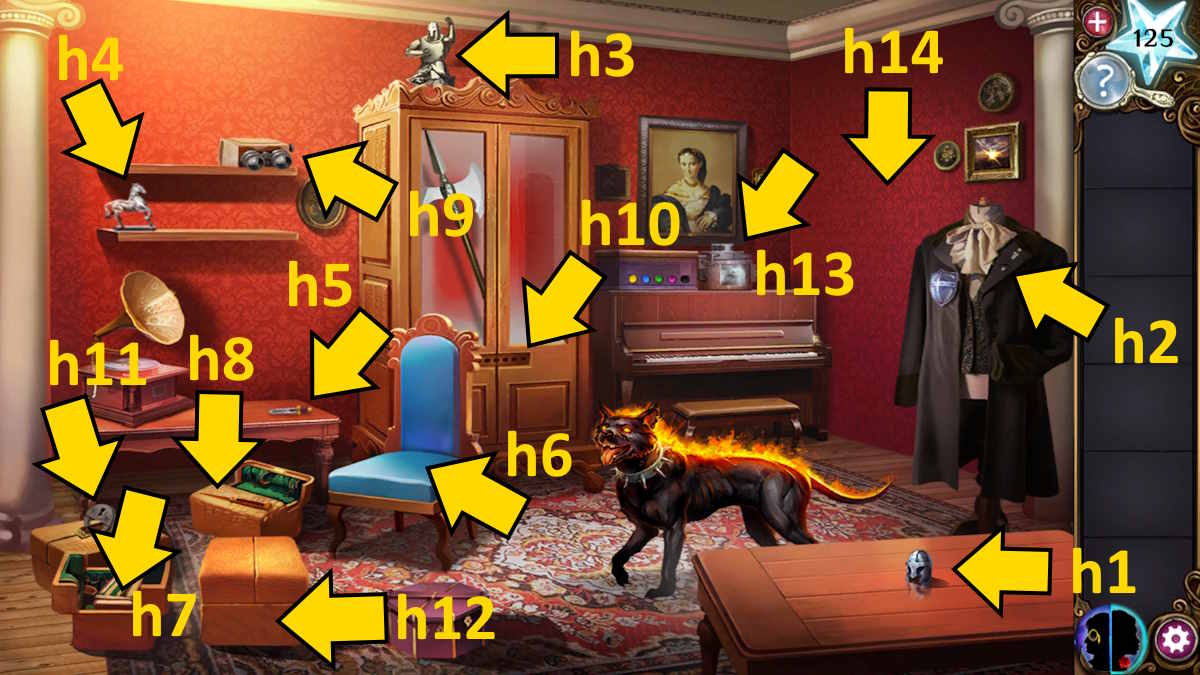
This traps Euphemia in the box, so you can explore the room. Take the Miniature Helmet (h1) from the table, the Miniature Shield and separate Sword from the jacket (h2), a second Miniature Helmet from the top of the cupboard (h3), a Miniature Horse from the shelf (h4), and a second Miniature Sword from the gramophone table (h5). Also, click the top of the chair (h6) to remove it and find a second Miniature Shield.
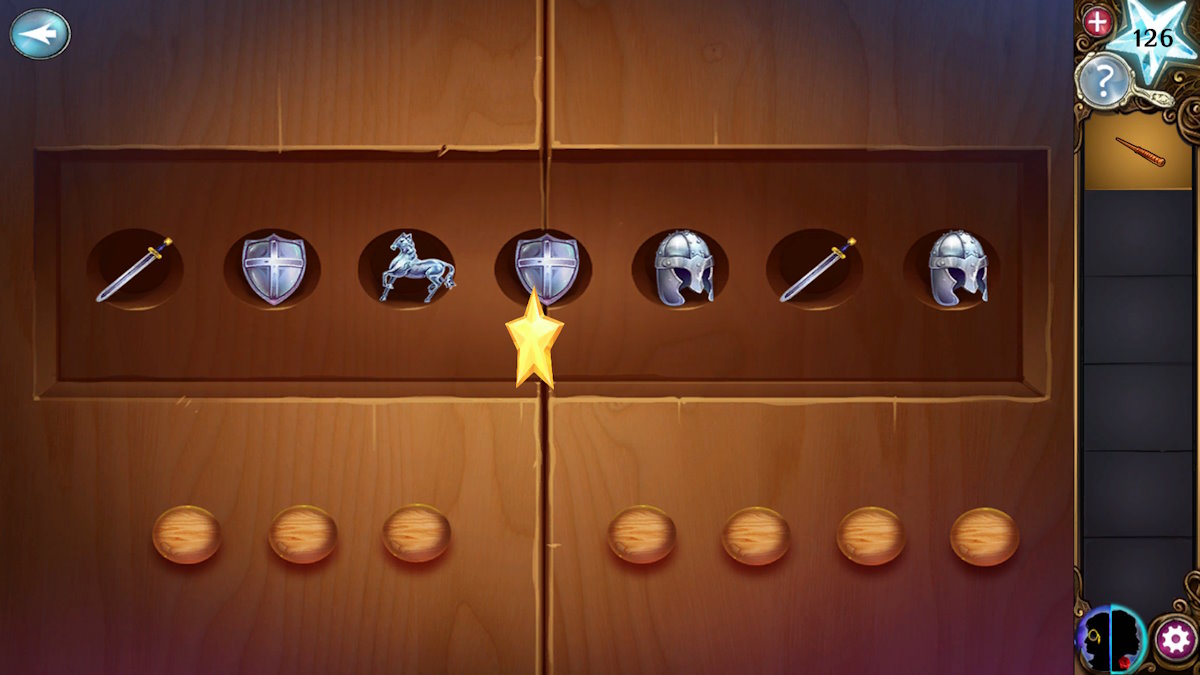
Select the case in the bottom left corner of the room (h7) for a close-up and switch to the monocle view (where you previously changed into a cat). You’ll see a series of shapes:
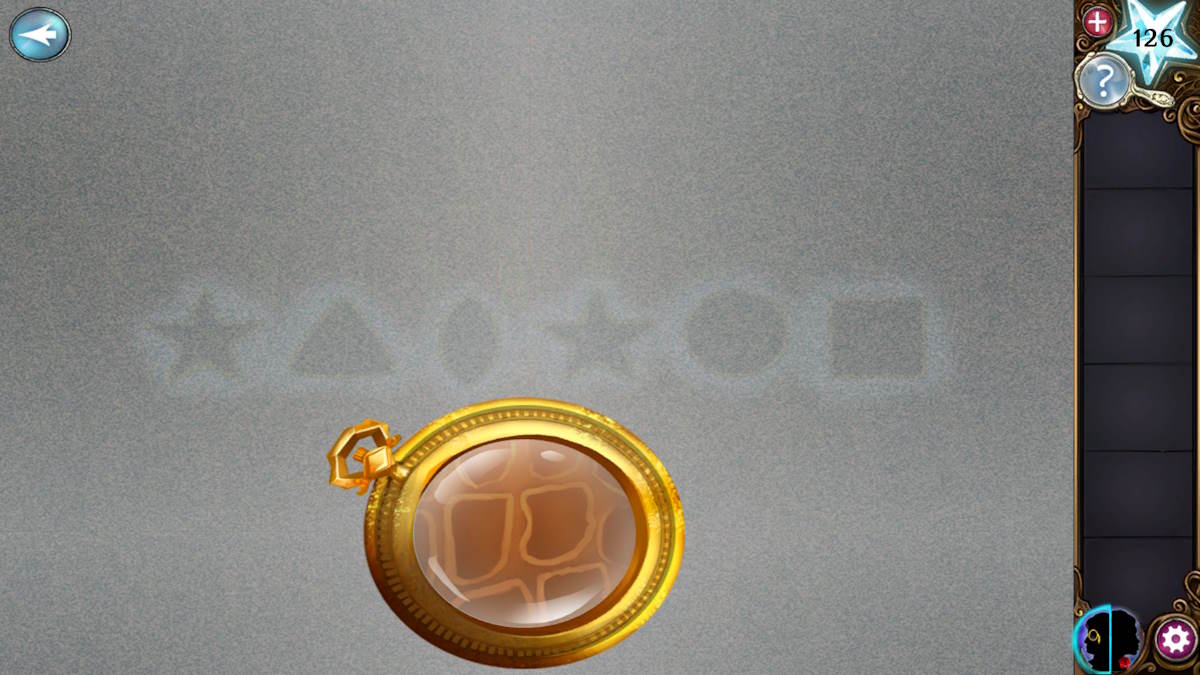
- Star, Triangle, Oval, Star, Circle, Square
Solving the miniatures puzzle
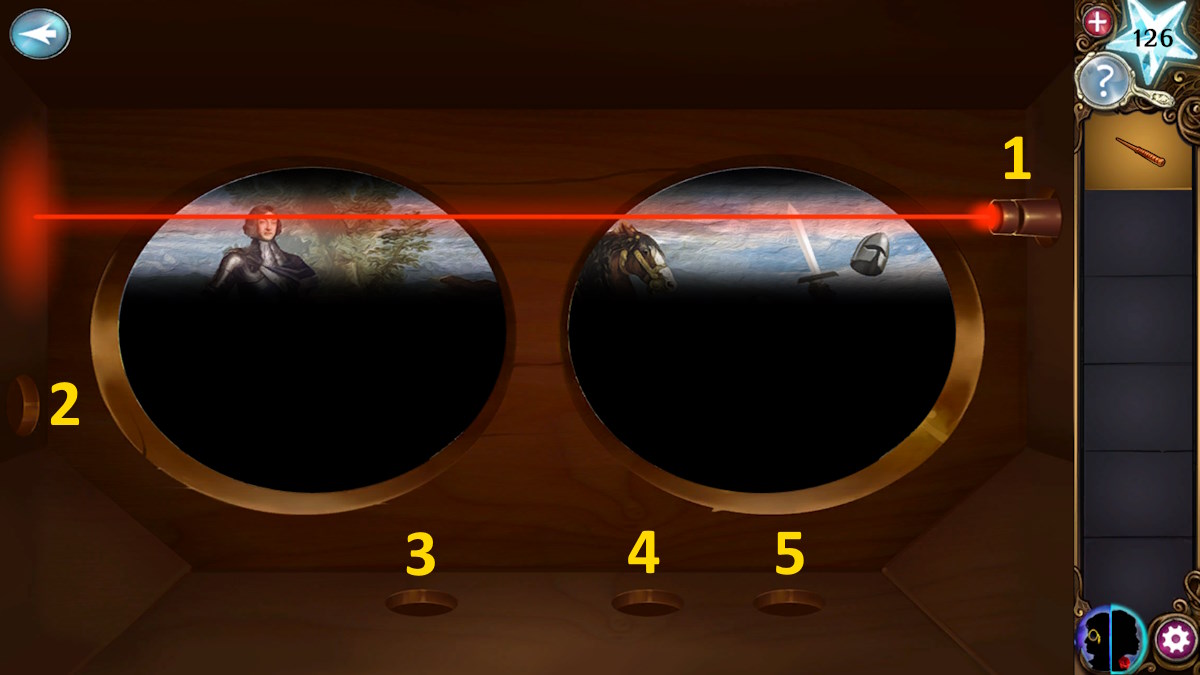
Now look at the wand box (h8), also in monocle mode, and drag those shapes from the top row into the middle to fix and then take the Beam Wand. Get a close-up of the viewing box (h9) and examine the image by using the wand through each of the five holes in the sides. Note the order the battle items appear that match the miniature versions you’ve collected. The order is:
- Sword, Shield, Horse, Shield, Helmet, Sword, Helmet
Now select the cupboard door mechanism (h10) and add all seven miniature pieces to the wooden knobs. Drag them onto the holes above in the order you’ve just discovered and the cupboard will open, allowing you to take the Halberd.
Use the halberd to break the lock on the box below the gramophone (h11) and take Euphemia’s Key from inside. Use monocle mode to examine the remaining box on the floor (h12) and note the colored stars on the side:
- Yellow, Black, Yellow, Blue, Purple
Euphemia’s machine puzzle solved
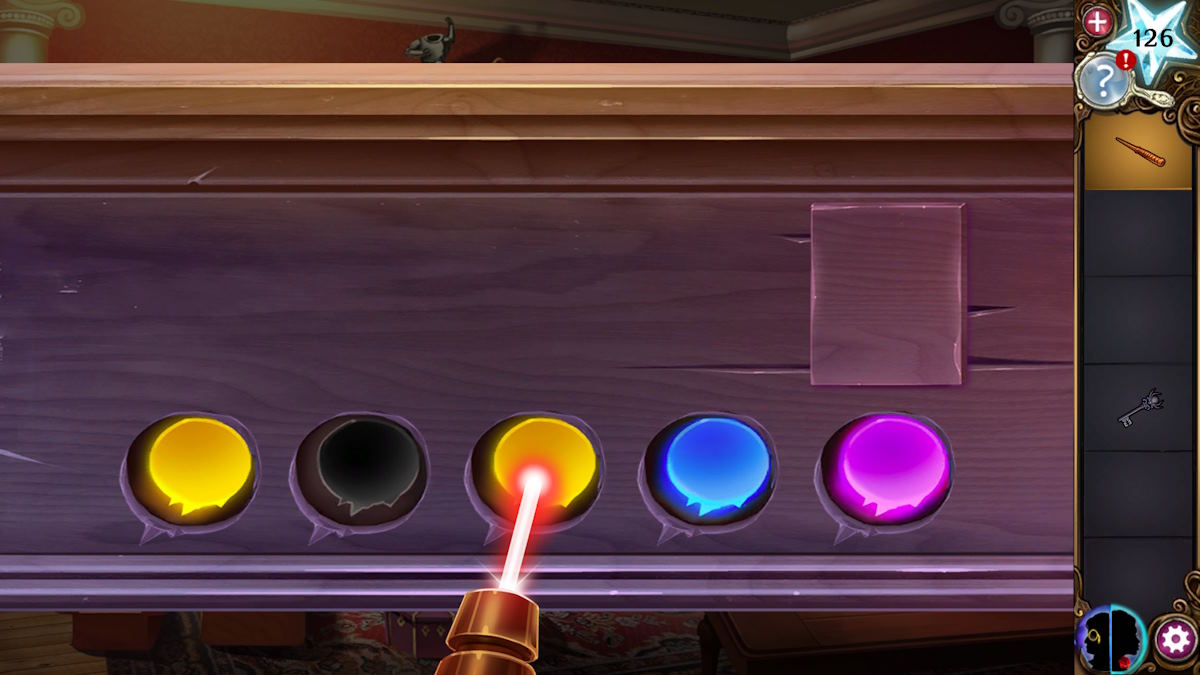
Use the wand on Euphemia’s machine (h13) to change the color in the holes to match this pattern. This is tricky as you can only change a hole’s color by moving onto it, and then moving on to another circle. Do the following to make it work (with the colored circles above being 1 through 5 from left to right):
- Switch between 1 and 2 until 1 is Yellow
- Switch between 2 and 3 until 2 is Black
- Move to 5 and make it Purple
- Move between 3 and 4 until they’re Yellow and Blue respectively
This opens a keyhole on the side. Use her key to open it and a door will appear (h14), allowing you to move on to the showdown with Otto and complete Chapter 7.
Haunted Hunt Chapter 8 Walkthrough
You now need to find a way to gather all of Otto’s victims together for the confrontation. Pick up the Bust of Otto (i1) and take a Diamond Ring from the jacket pocket (i2).
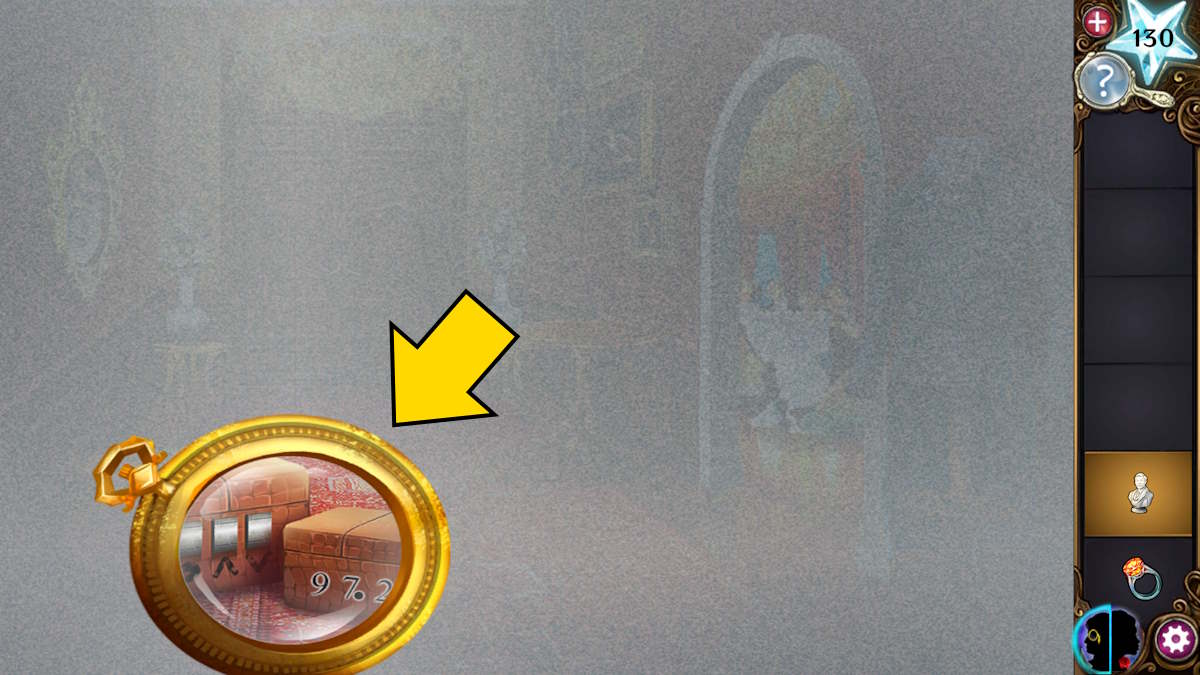
Switch to the monocle view to note the number on the right of the two cases (i3), which is 9, 7 (with a dot after it), and 2. The case to its left has three spaces for a code that has a dot, a 'higher' symbol, and a 'lower' symbol respectively. Use the code 792 (7 has the dot, 9 is higher, and then 2 is lower) to open this case and take Euphemia’s Diagrams for a flamethrower, as well as devices for summoning ghosts.
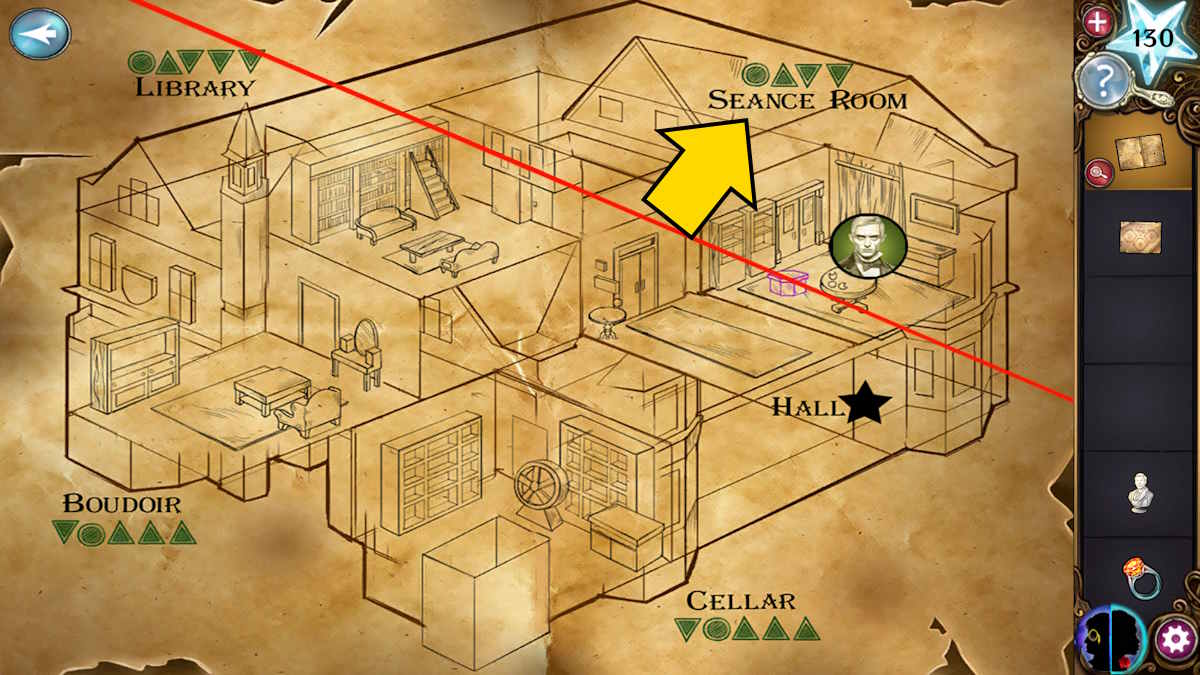
You also take Euphemia’s Map, showing the locations of her traps, which you can use in your inventory as a fast-travel device. Also note that, if you look at the map with the monocle, the numbers 8, 4, 3, and 7 (with a dot) are written on it in red. The four rooms marked on the map each has a code above it also made up of dots and up or down arrows. Only the Seance Room has four numbers so we can deduce the code needed there is 7843 (using the same system as before). However, we’ll need to make the flamethrower before we can deactivate the boxes.
Making the flamethrower
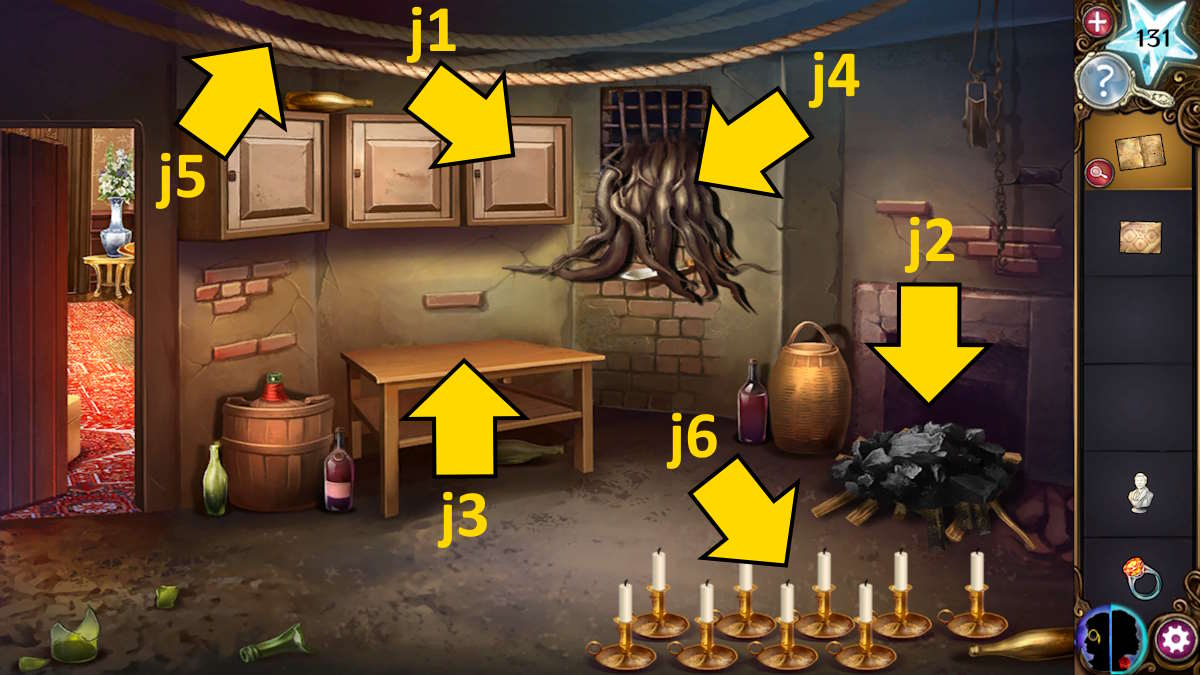
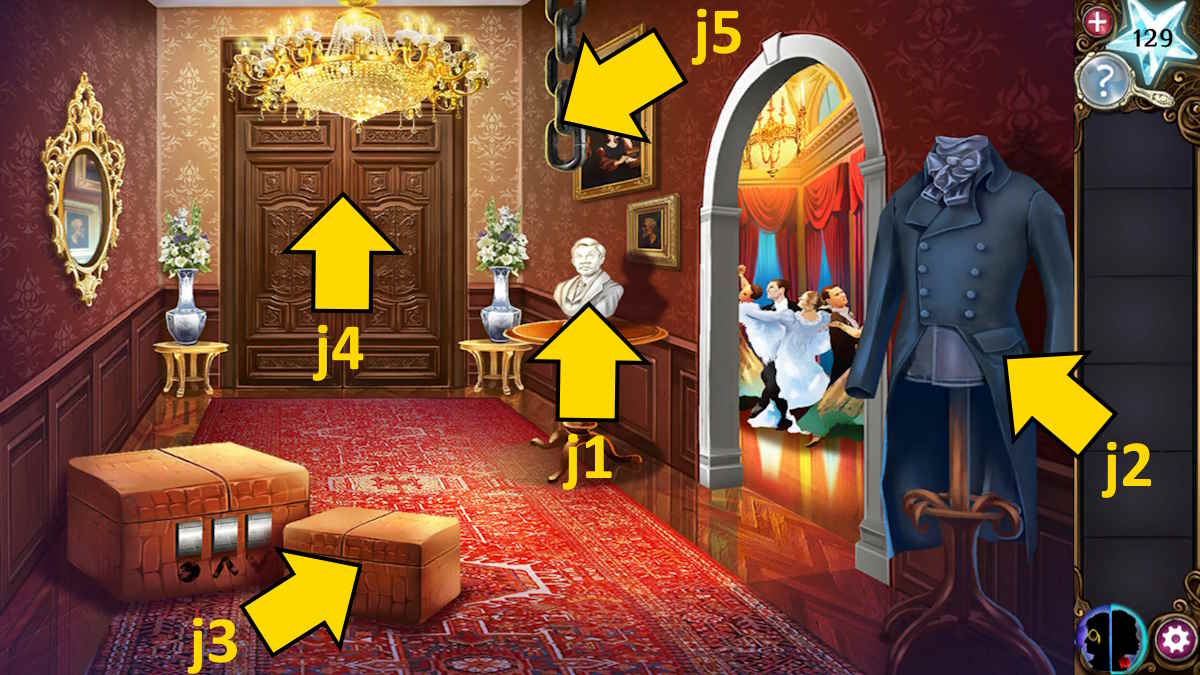
Move into the storeroom (i4) and take a Flint from the right cupboard (j1), Coals and Wood from the fire (j2), then place Euphemia’s diagram on the table (j3). Click the diagram for a close-up once it’s on the table and add the flint, diamond ring, coals, and wood onto it to start a color-matching puzzle.

You need to place the three main items on the central spaces, and then surround them with planks that match each other end-to-end (like dominoes) but also the colors on the items. I’ve included a picture of the completed puzzle above.
Pick up the Flamethrower from the table and use it on the roots (j4). This frees the Knife from them, which you can pick up from the floor. Also, click the bricks that were exposed by burning the roots to collect some Stones. Finally, use the knife to cut and collect some Rope (j5).
Return to the hall, add the rope to the chain (i5), and tie the bust of Otto to it. This swings and breaks the bust, allowing you to pick up the Crystals that fall to the floor.
The seance room and the map codes
Open the map and click the seance room to go there. Use the flamethrower on the box to immobilize it, click it for a close-up, and use the code 7843 to open the box and free Baxter. He tells you all the traps must be removed before they can join you in taking revenge on Otto.
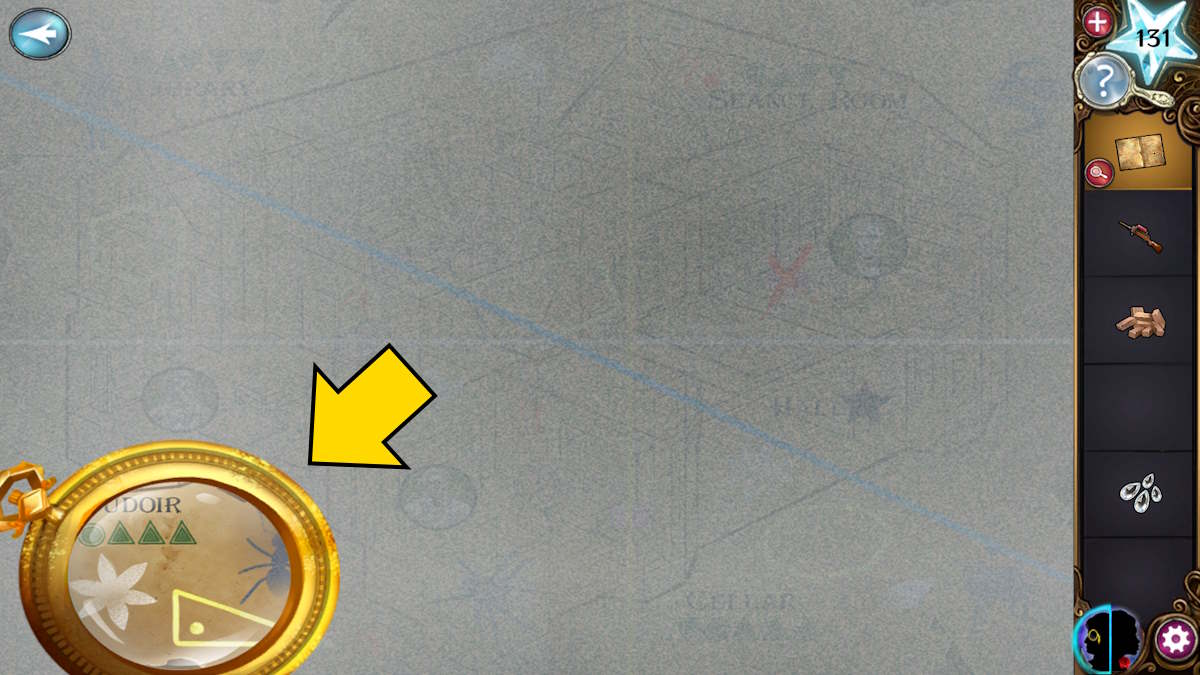
You’ll note that the map has been upgraded (see above) to show three more traps in the remaining rooms. There are also lots more images on it in monocle mode, but not a fifth number. However, one color goes through each room, blocking the ghost from passing it and getting to the top-central area of the map, and these colors match the images you see in monocle mode. The key is the dots, as before, and the number of legs, sides, etc the images have. From this we can get the following codes:
- Boudoir (white): 12368 (box is at d7)
- Cellar (yellow): 13568 (box is at g1)
- Library (blue): 48620 (box is to the right of 6c on the floor)
Move to each room and use the code to disarm the box there, after first damaging the box with the flamethrower. The ghosts are now free to roam! However, you still need to find a way to summon them so that Otto can see them.
Making and charging the summoning devices
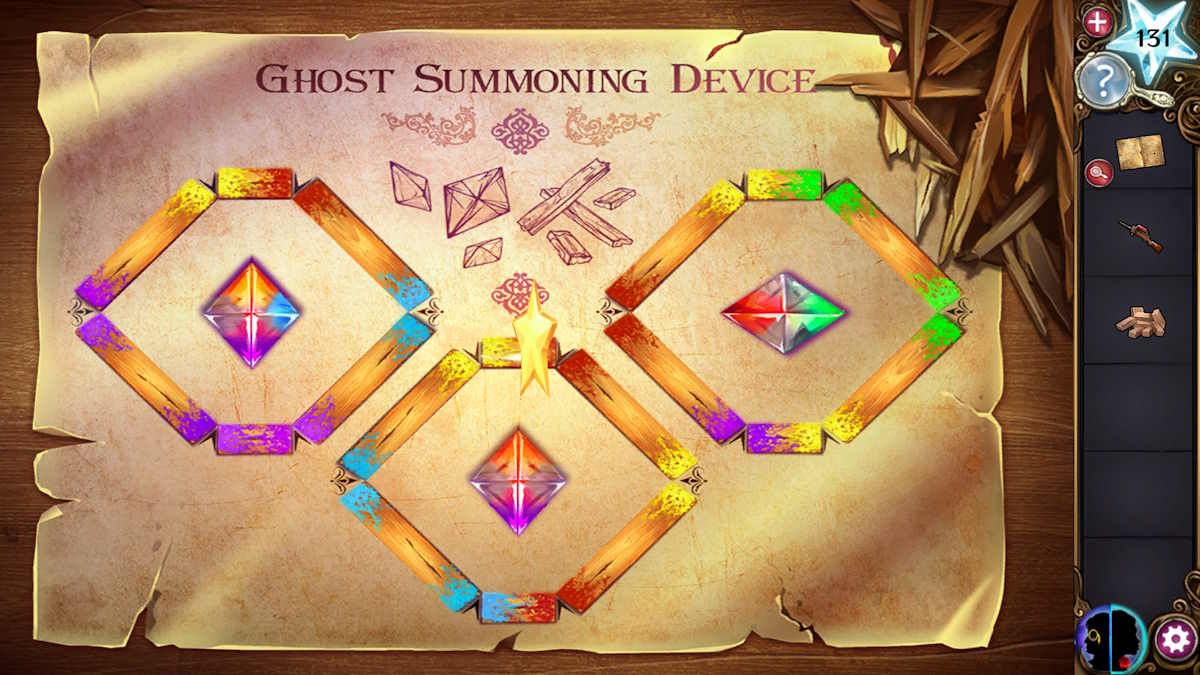
Return to the storeroom, click the map on the table (j3), and add the crystals to the diagram. This works in the same way as the flamethrower diagram and I’ve included the solution above. Once complete, take the Inert Ghost Summoning Devices from the table and then click the table to get the instructions on how to use them.
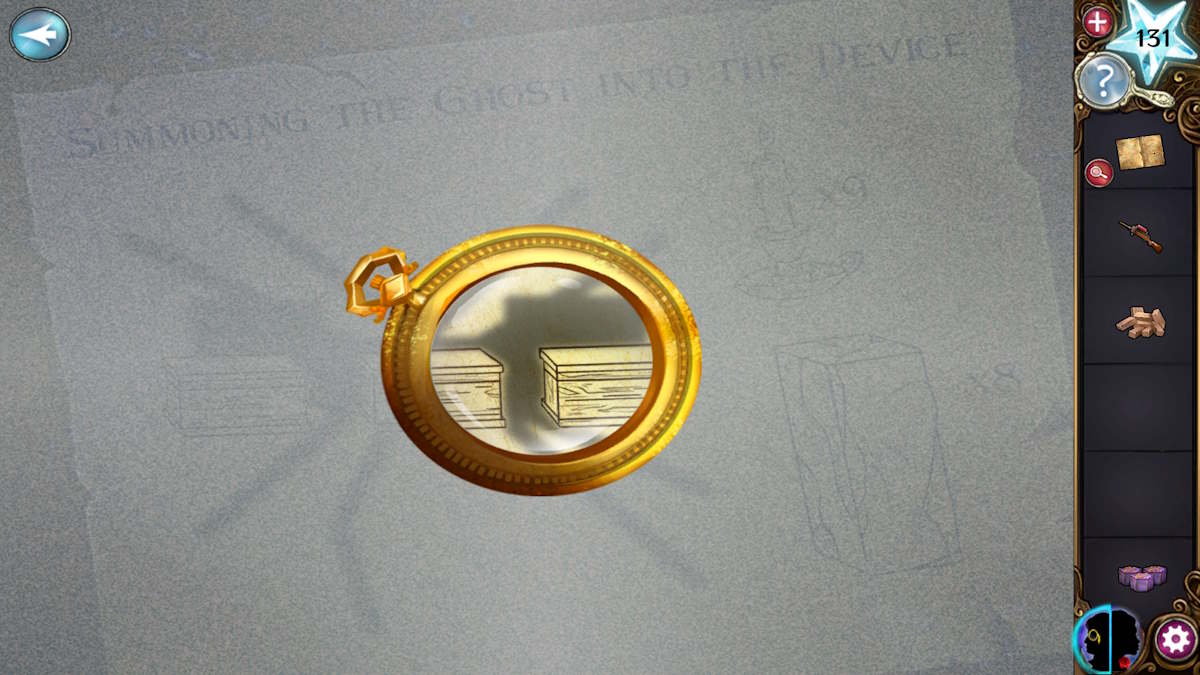
To find the shape you need to cast in the shadows, use the monocle mode. Surprise surprise, you need to cast the shadow of a spider. Select the candles (j6) for a close-up and use the flamethrower to light them.
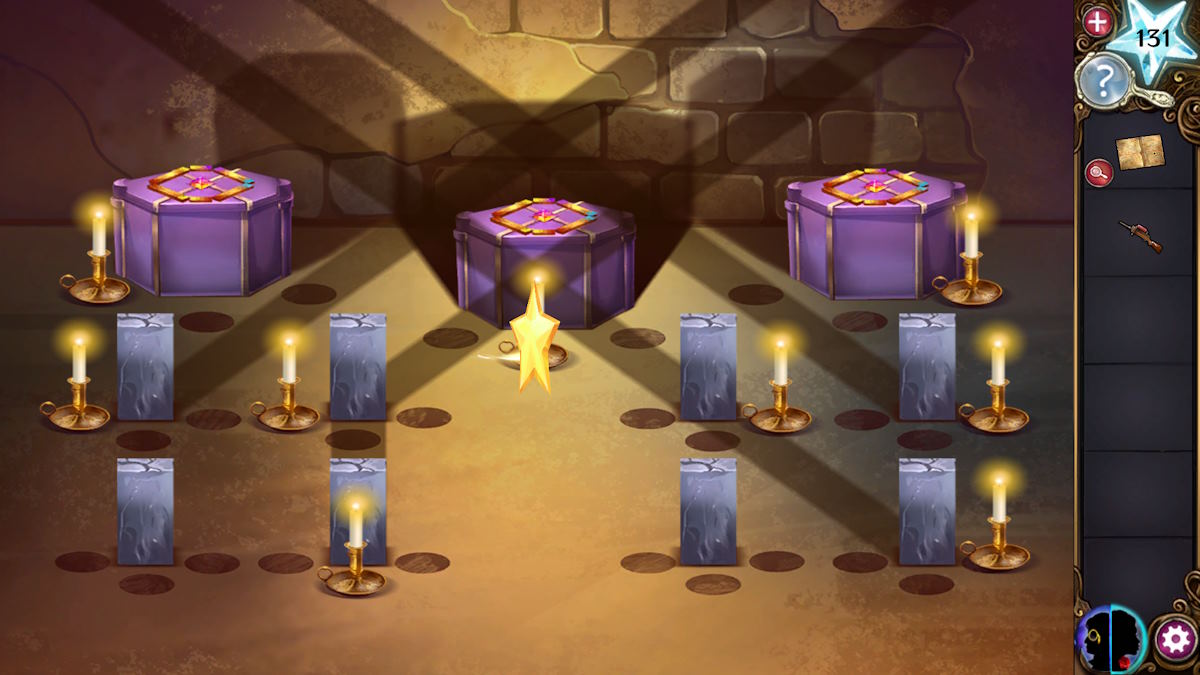
Now add the bricks and the inert devices, then move the candles to cast the shadow you saw on the diagrams. I’ve pictured the candle positions above (you may find it hard to see the final candle, as it is behind the star in the center).
Capturing Otto - The final puzzle

As you move in to confront Otto, the other guests naturally panic! You need to isolate Otto (top left, above) until the other guests have fled the room (through the door in the middle at the bottom, but you only have limited time between moves (see the timer on the right, above). It should be relatively easy to trap Otto in the top-left corner, and then in the bottom-right corner later if need be.
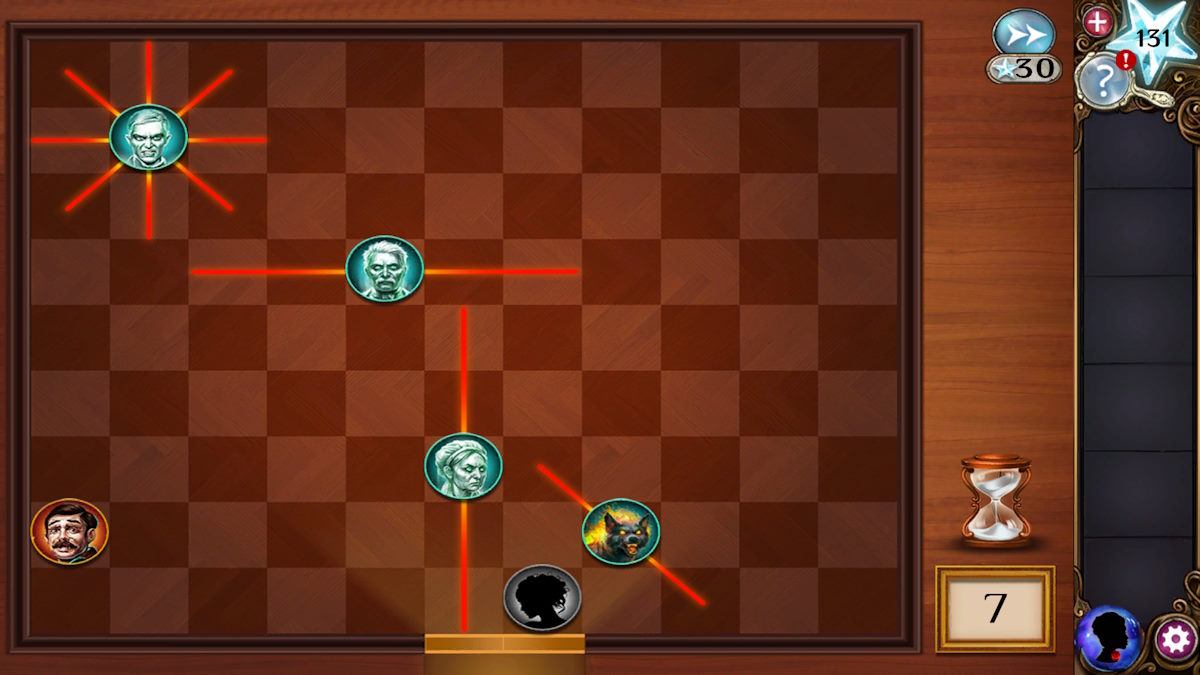
The most important thing to remember is that while there is a timer, there is no limit to the number of moves. Keeping Otto in the room is priority number one; you can work on the other guests one at a time.
Once it’s done, you’ll have the choice to burn down Otto’s house. Doing so will give you a few extra minutes of play, as you have to point the flamethrower, but Euphemia will escape either way (to be continued?). Do whichever makes you feel better, as ultimately the ending remains the same. Congratulations! You’ve completed Haunted Hunt.
Looking for more walkthroughs for free puzzle games? Check out How to beat Trace Escape Room - Full Walkthrough and Lost Lands 3 Full Walkthrough (Golden Curse) here at Pro Game Guides!