AI Limit is Soulslike, with plenty of in-game tutorials, but they are not that in-depth, and in the end, you'll have to figure out most of the stuff yourself. However, you can avoid a few mistakes we've made already. So, scroll down, and let's jump into our ultimate AI Limit beginner's guide!
Best Stats to Upgrade in the Early Game in AI Limit
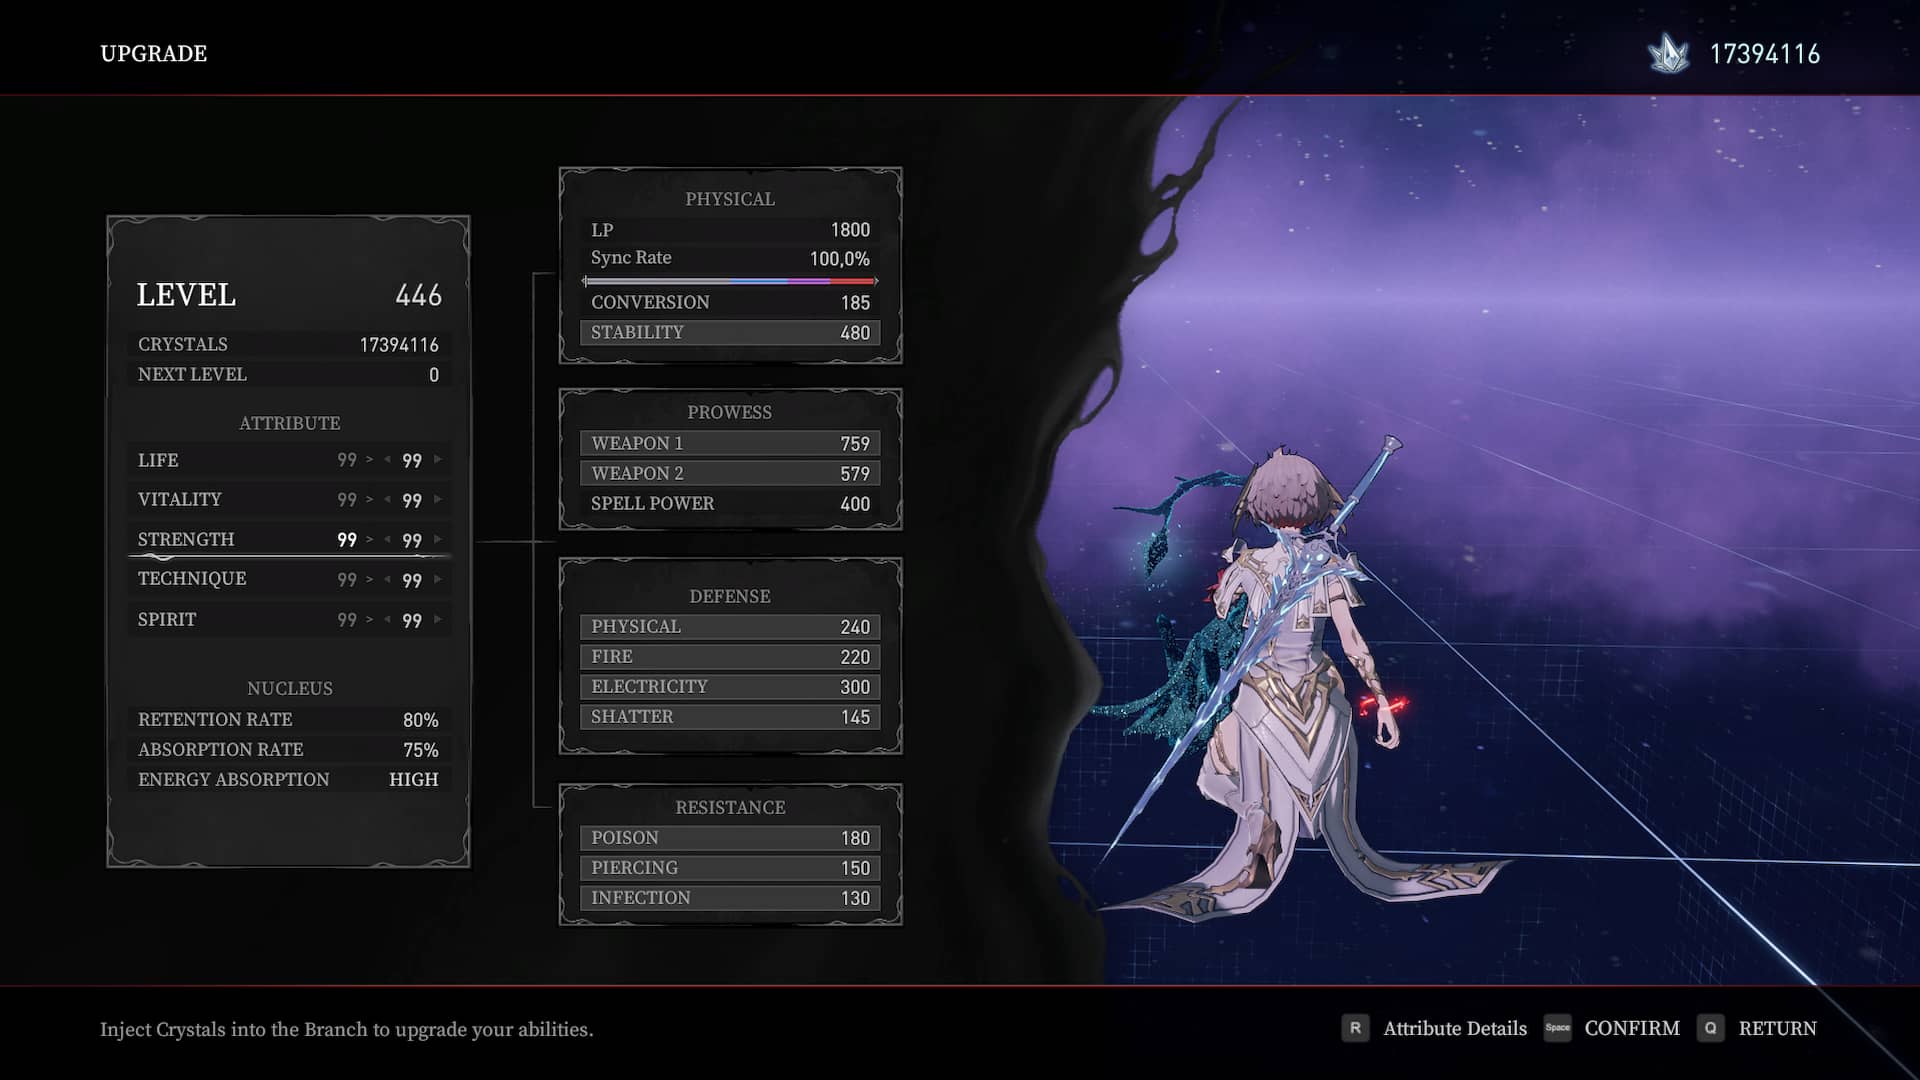
The best stats to get in the early game in AI Limit are Life and Strength. Life is generally OP, as more HP means more forgiving gameplay (you can't DPS if you're dead). On the other hand, Strength is what most good early-game weapons scale with, so investing in it should be your priority, after Life, of course. Other stats are more or less irrelevant unless you need to hit some requirements for certain weapons/spells.
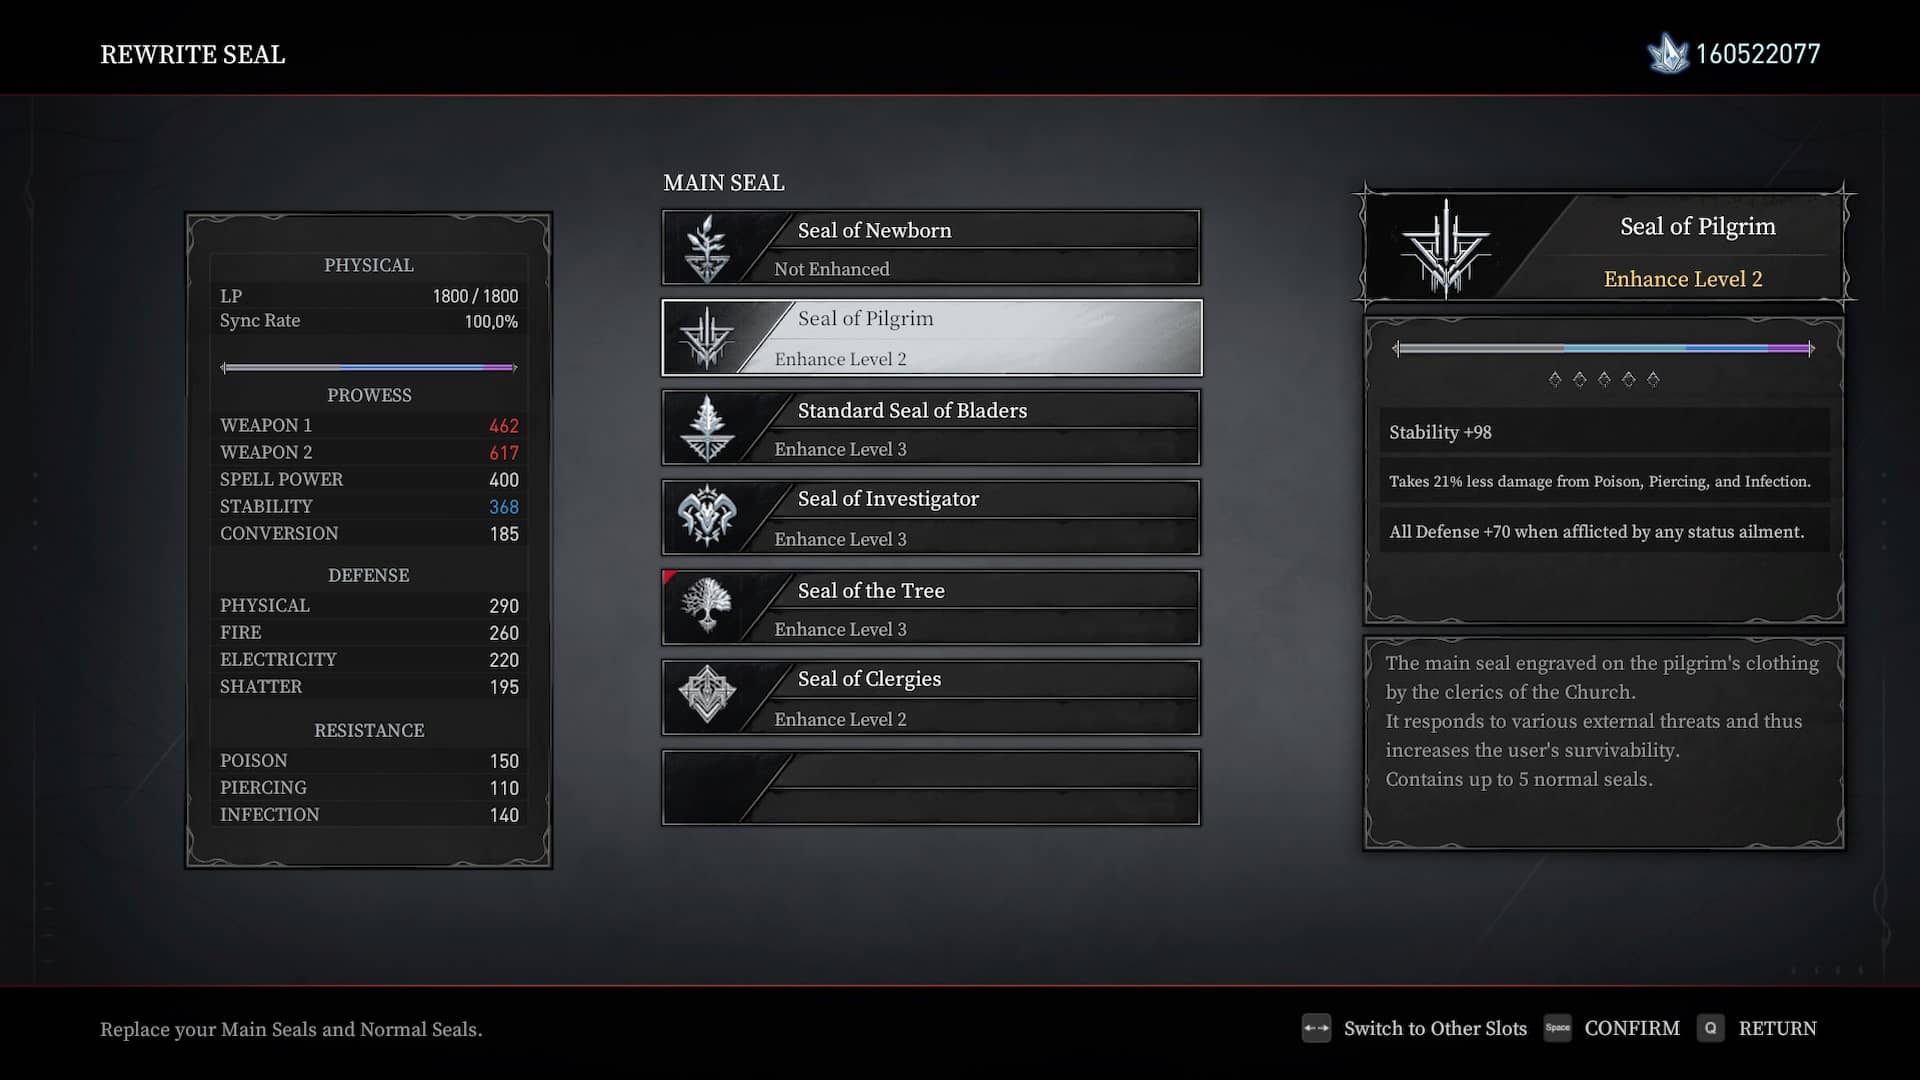
How to Get & Change Seals
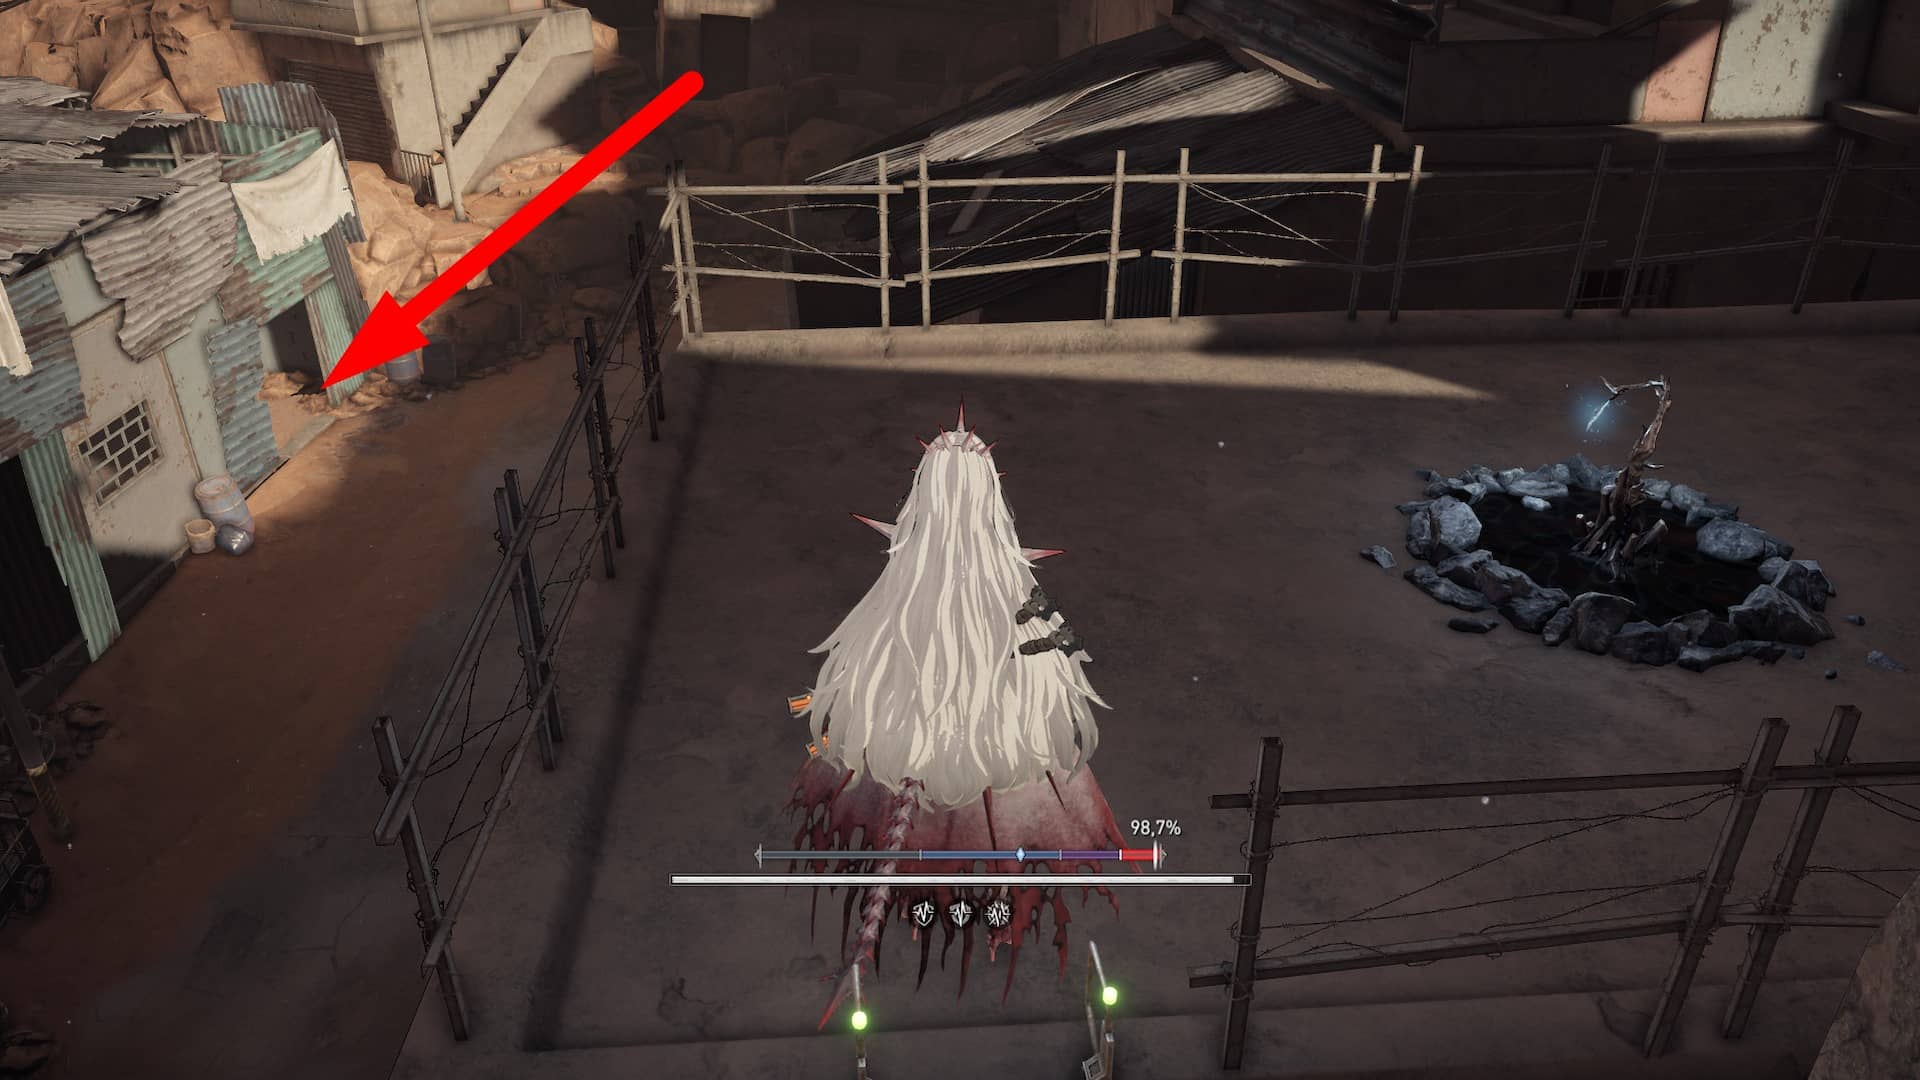
To change your Seal in AI Limit, you'll first need to find the Seal Needle. This item is located within an abandoned building just below the Abandoned Houses Branch within the Outer-Wall Ruins. You can see the exact location of the building in the image above. Once you have the Seal Needle, interact with a Branch and choose Rewrite Seal.
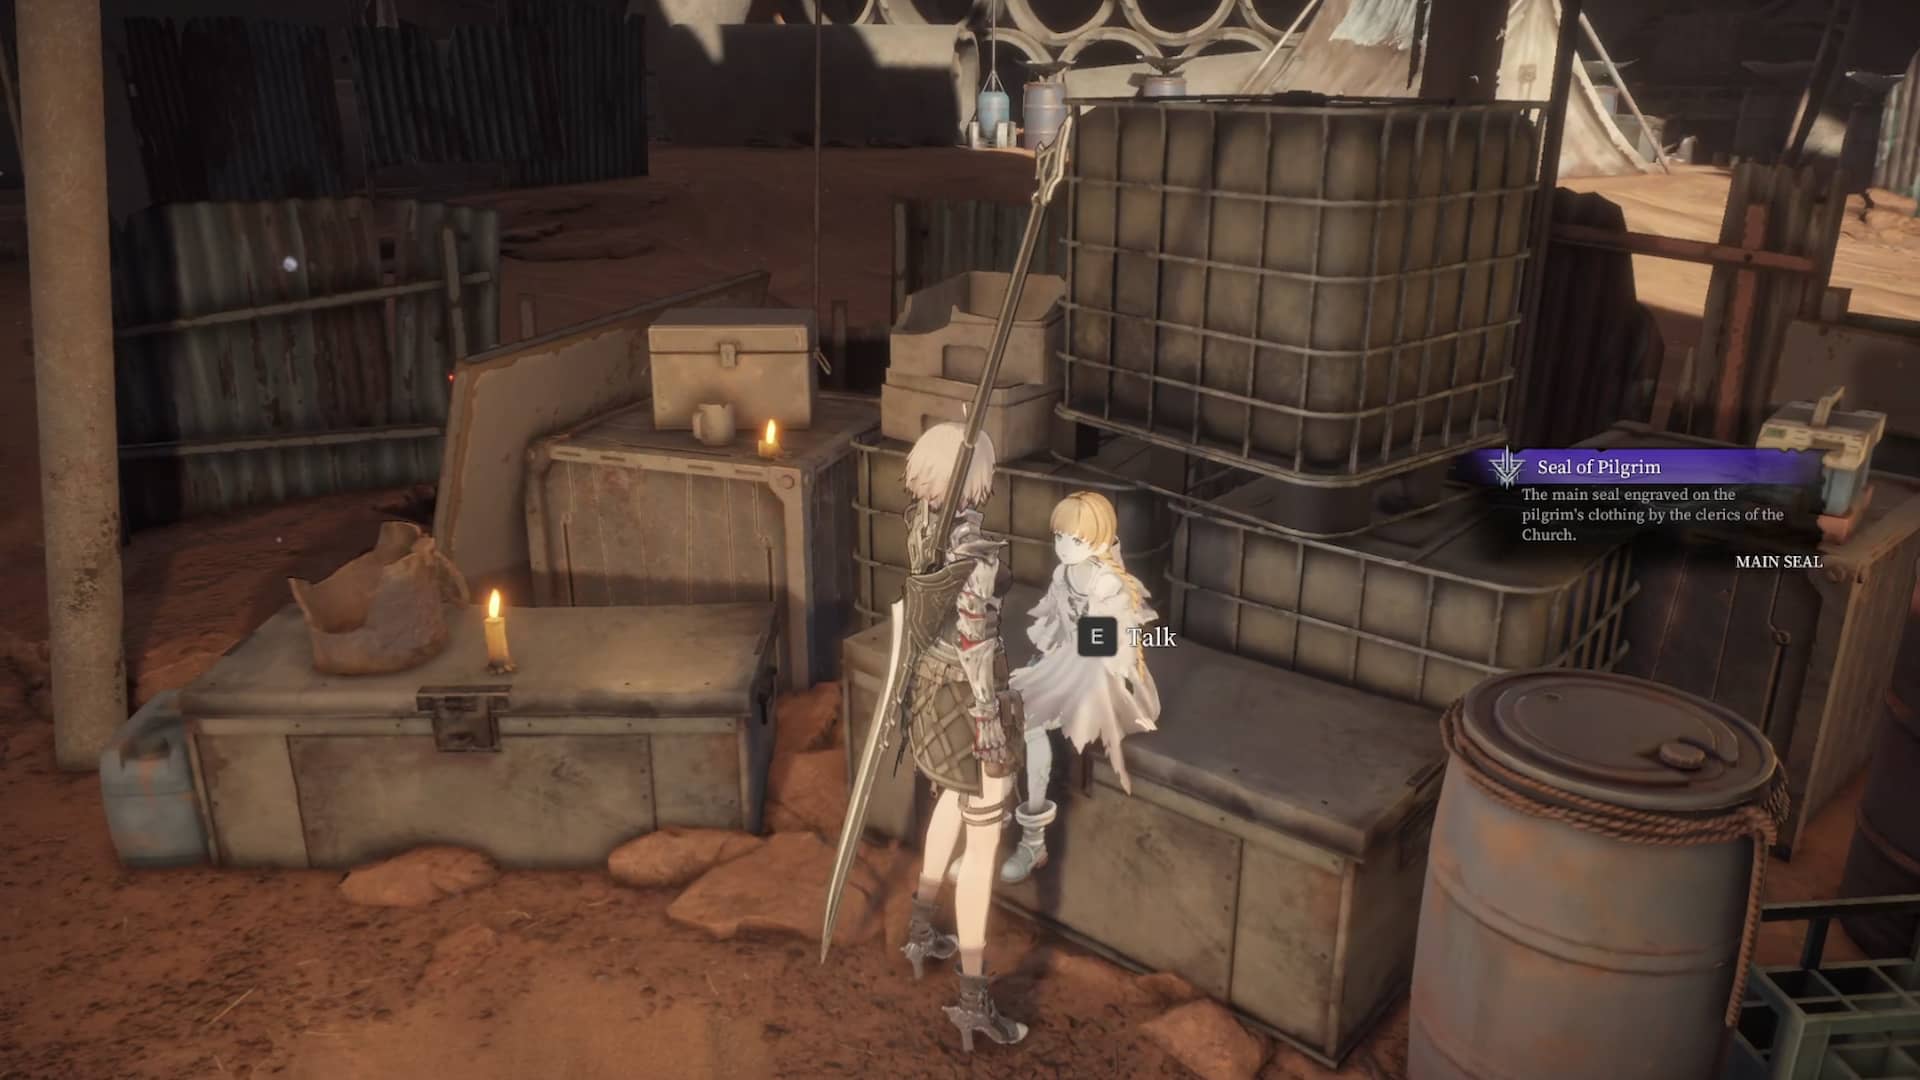
To get new Seals, you'll have to defeat powerful enemies, talk with NPCs (keep talking to them until they start spamming the same generic line), interact with memories, or just find them as collectibles around the map. The first Main Seal you can get is via talking with Shirley (keep pressing Talk until you get the Seal of Pilgrim) at the Temporary Campsite.
Best Early Game Weapons, Armor, & Seals in AI Limit
In the table below, you can find the best early-game weapons, armor, and Seals in AI Limit, including their stats and instructions on how to find them. Consider all the items you encounter during the early game but can't find on the list as simply suboptimal choices. Of course, if you've already upgraded a weapon and have no enhancement resources left, it will be better to use that one, even if it's not meta.
| Item | Stats | How to Get |
|---|---|---|
 Blader Greatsword [Weapon] | Physical: 160 Strength: C Technique: E Requirements: • 12 Strength • 10 Technique | You can choose it as one of the starter weapons at the beginning of the game. |
 Corrupted Blader Greatsword [Weapon] | Physical: 142 Piercing: 17 Strength: C Technique: E Requirements: • 15 Strength • 10 Technique | Defeat a corrupted Blader on the road between the Abandoned Houses and the Cemetery. The extra DPS and stagger from Piercing when it procs is invaluable. |
 Metastability [Normal Seal] | Stability +50 | Relive the memory next to the Before Upward Elevator Branch within the Sewer Town. |
 Hardened Skin [Normal Seal] | Physical Defense +50 | Collect it next to a massive tree on the path between the Abandoned Houses and Cemetery Branches within the Outer-Wall Ruins area. |
Seal of Pilgrim [Main Seal] | 5 Normal Seal slots Stability +70 Takes 15% less damage from Poison, Piercing, and Infection. All Defense +50 when afflicted by any status ailment. | Talk with Shirley 3 times inside the Temporary Campsite when given the chance. |
 Iron Pot [Headwear] | Physical: 50 Fire: 40 Electricity: 0 Shatter: 20 Poison: 10 Piercing: 30 Infection: 20 | Get it from a pile of tin cans on a rooftop right next to the Abandoned Houses Branch. There is a ladder you can kick down leading to that rooftop. It has very good Physical and Piercing defensive stats, which is all you need early on. |
 Blader Armor [Armor] | Physical: 90 Fire: 70 Electricity: 70 Shatter: 30 Poison: 40 Piercing: 40 Infection: 30 | Open a safe and collect it. The safe is in a room next to the Maintenance Access Branch. Has a great balance of all defensive stats. |
 Blader Visor [Headwear] | Physical: 40 Fire: 30 Electricity: 30 Shatter: 20 Poison: 20 Piercing: 20 Infection: 20 | Open a safe and collect it. The safe is in a room next to the Maintenance Access Branch. Has a great balance of all defensive stats. |
How to Farm Early Game Upgrade Materials
There are four upgrade resources you'll need during the early game in AI Limit, and they are:
- Luminous Carbon and Luminous Diamonds for weapon upgrades.
- Tiny Resonance and Contemporary Resonance for Main Seal upgrades.
All of these materials can mostly be found as collectibles around the map. However, if that isn't enough for you, you can farm them by killing elite mobs. The easiest elite mobs to farm for these seem to be Necros, mostly in the areas right around the Abandoned Houses Branch and towards the Cemetery within the Outer-Wall Ruins.
The Sunken City Overground Boundary Bridge is a solid place for farming these enhancement materials, and the enemies permanently respawn, so you don't have to walk far. However, it's a bit further into the progression.
How to Increase Your Flask (Life Dew) Charges
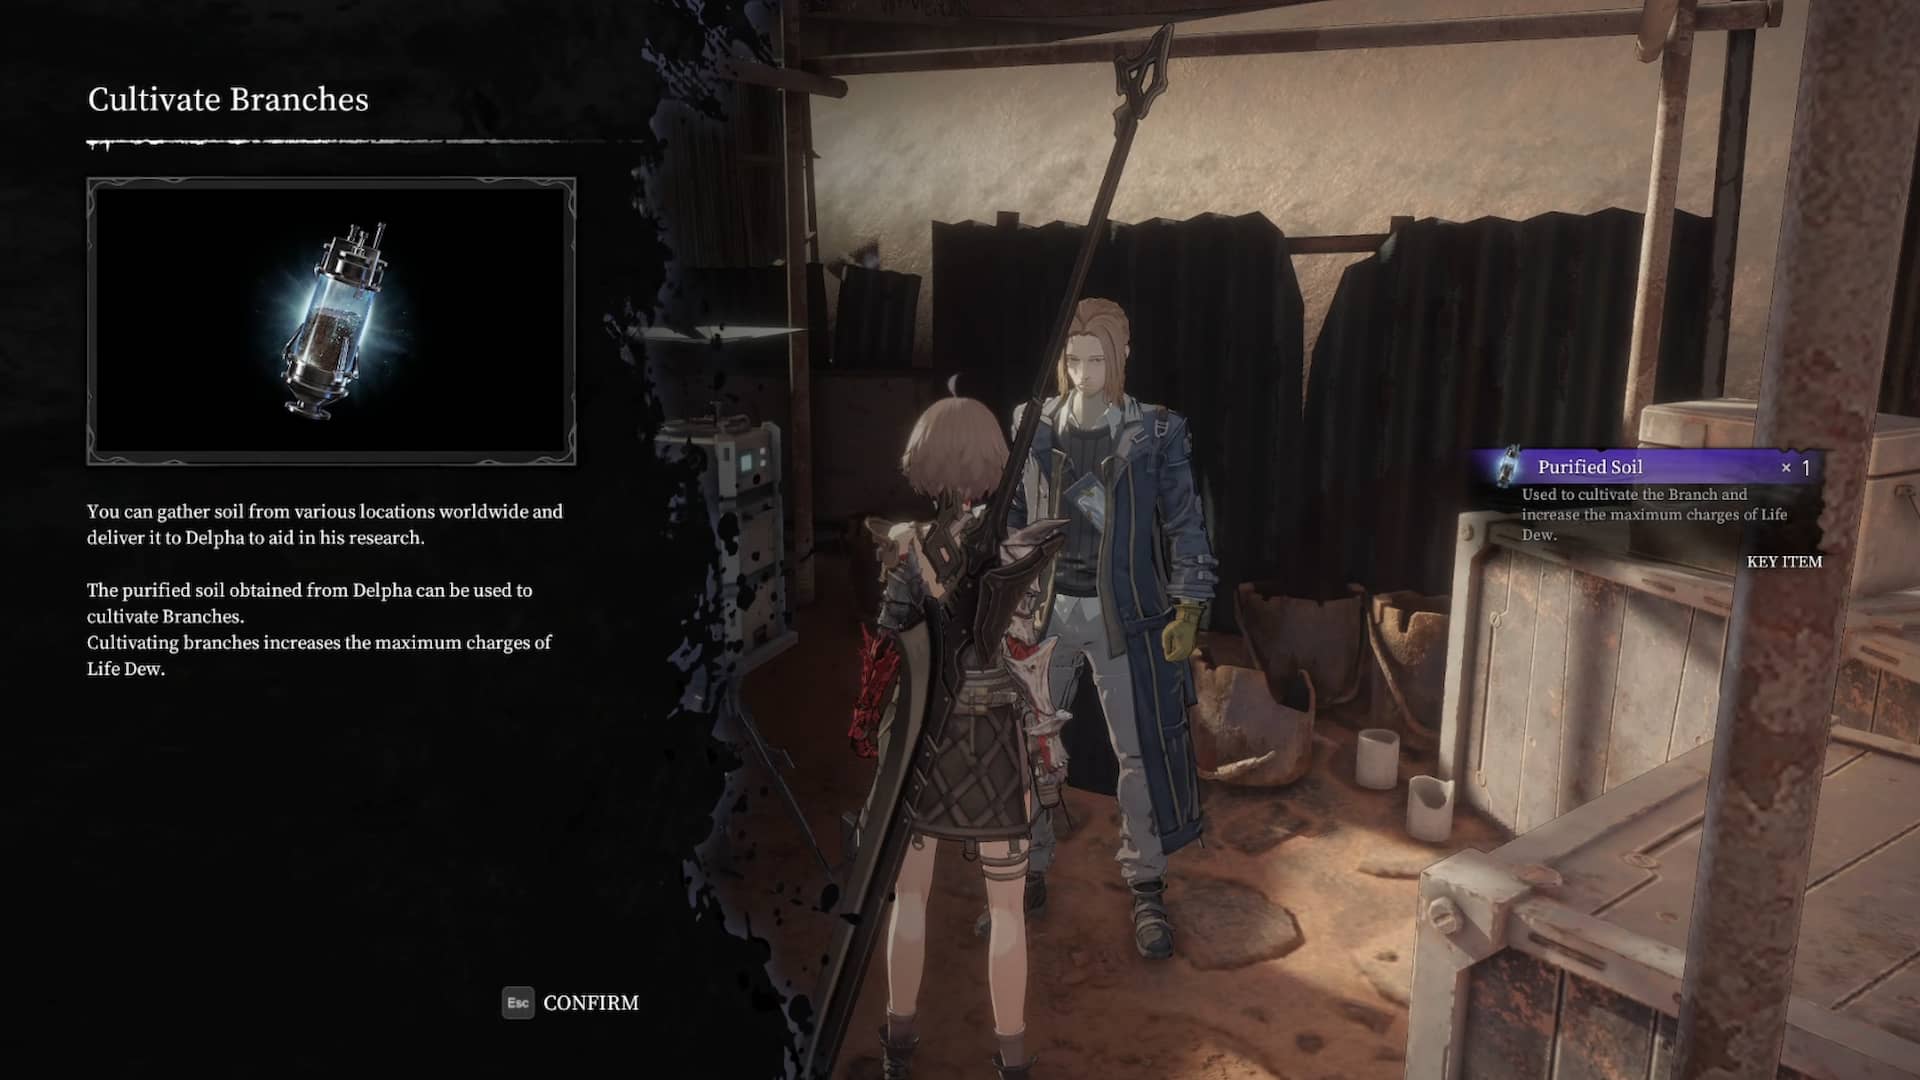
To increase your max Life Dew charges, you first need to collect Soil Samples in each area and turn them in with the Soil Researcher Delpha at the Temporary Campsite. He will give you Purified Soil in return, which you can then use to Cultivate Branch and permanently increase Life Dew charges.
Best Early Game Spells & Accessories in AI Limit
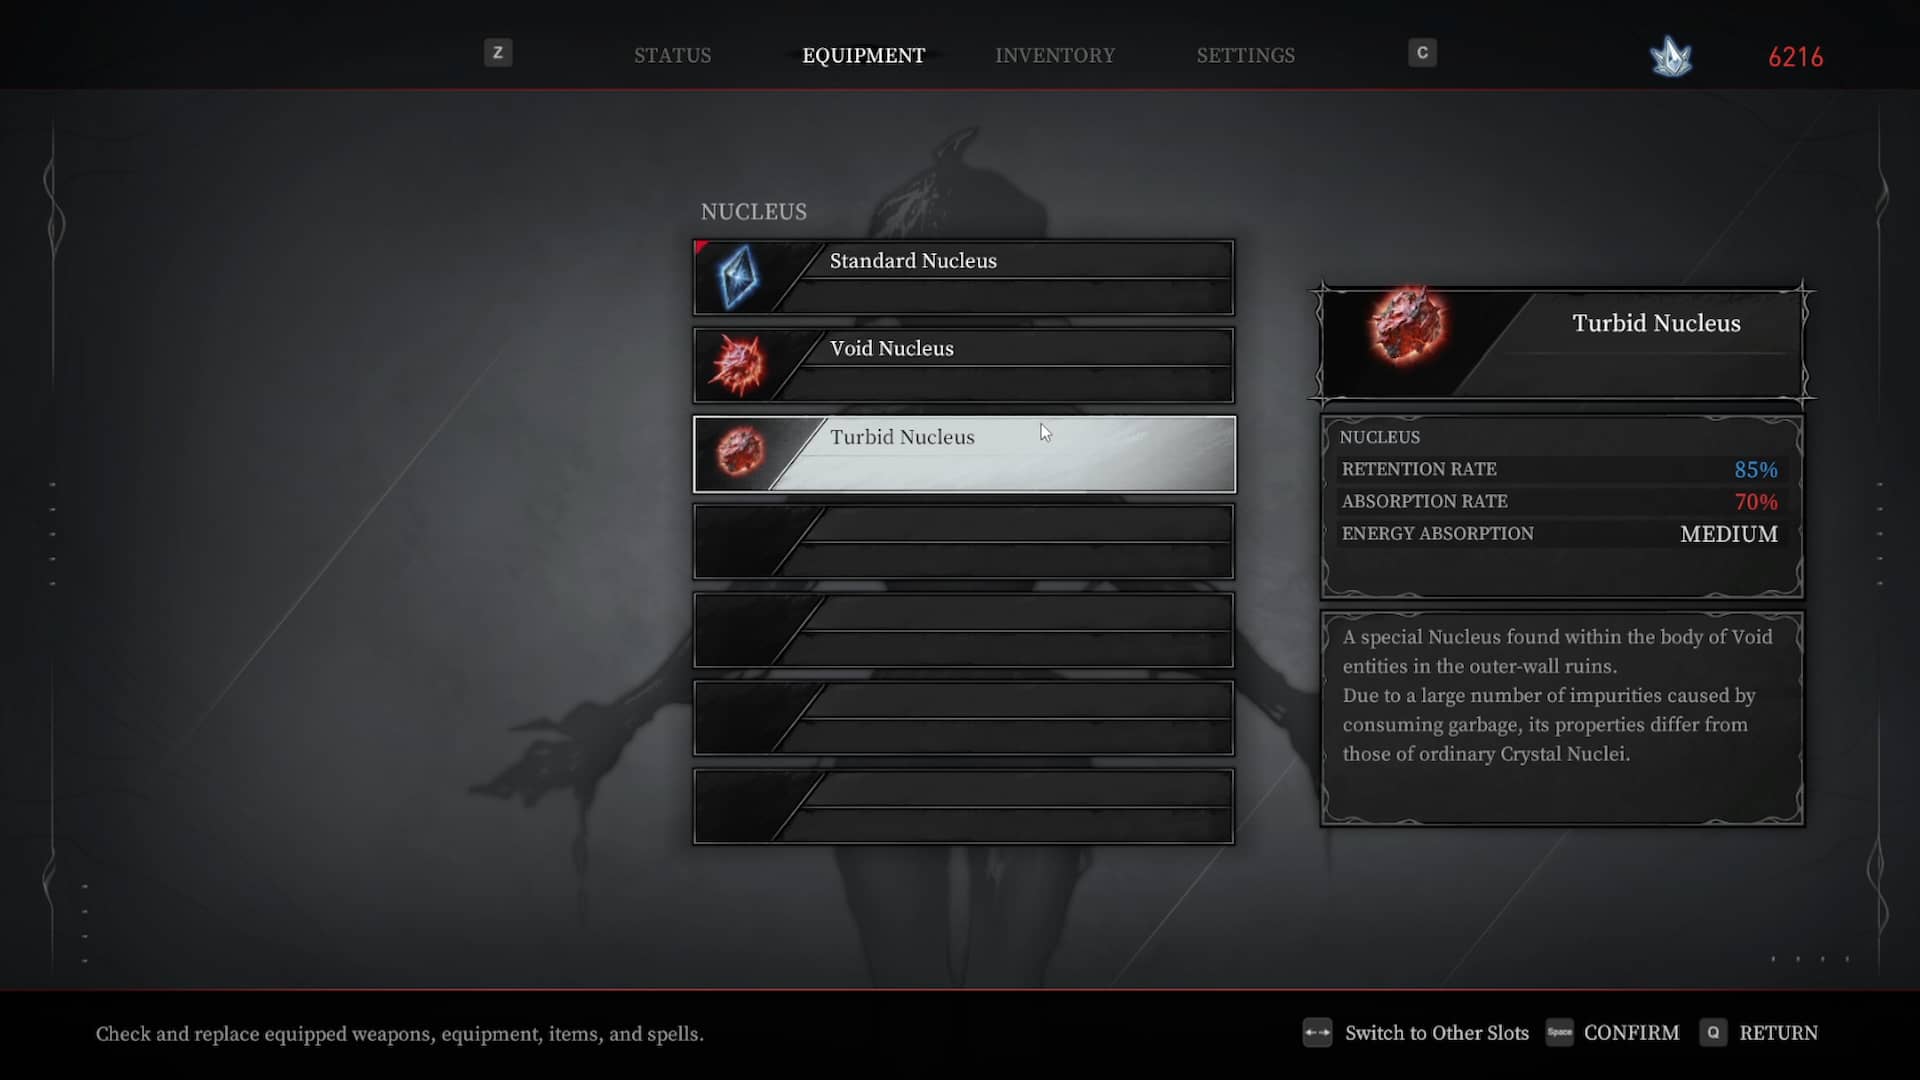
The choice of spells and Nuclei is fairly limited during the early game in AI Limit. Still, there are a few that you unlock fairly early, and that are worth using well into the mid and maybe even into the late game, depending on your build. Here are the best early-game spells and Nuclei in AI Limit and how to get them:
| Item | Stats | How to Get |
|---|---|---|
 Turbid Nucleus [Accessory] | Retention Rate: 85% Absorption Rate: 70% Energy Absorption: Medium | Defeat the Scavenger Patriarch in the area past the Abandoned Houses Branch within the Outer-Wall Ruins. |
 Railgun [Spell] | Sync Cost: 20% Spirit: 10 | It's the first spell you learn in the game. It's great for dealing with ranged enemies and doesn't require you to invest in Spirit to use it. |
General AI Limit Gameplay/Progression Tips & Tricks
In the list below, you can find all the miscellaneous AI Limit tips and tricks we discovered that are sure to enhance your gameplay. If you discover any tricks yourself, let us know in the comments, and we will add them to the list.
- Spend all your Crystals before you switch Nuclei to maximize your Crystals usage.
- Use weapons with Pierce/Poison as the extra DPS and stagger from the outvalues the higher base DMG from elementless weapons.
- Talk with NPCs repeatedly until you exhaust their dialogue. They usually give you an item after three or so interactions, so always spam Talk until they start using the same line over and over again.
- Explore every area thoroughly and backtrack later if you need. There is a lot of parkour in the game and plenty of hidden areas off the beaten path that contain rare items and gear.
- Don't greed for extra attacks. Like in most Soulslike games, greed doesn't pay off in AI Limit. Instead, dodge and weave in a few attacks whenever possible. Surviving is crucial.
- Use appropriate defensive Seals and armor for the boss/area. If the boss stacks Piercing, get as much Piercing Resistance as possible; if they deal Lightning damage, stack Lightning Defense. The only stat that is universally good, especially early on, is Physical Defense.
- Unlock your camera for more mobility and lock it whenever you're in melee or using a spell for better accuracy.
- Sell Goods items at vendor places for some extra Crystals. These items are meant to be sold and aren't required for the story or anything else.
- Don't waste upgrade resources on random Seals and weapons. Save them and only use them on items you know you'll be using for a long time.
And that does it for our ultimate AI Limit beginner's guide. If you found all the info above helpful, you'll be happy to hear that we've got loads more in the AI Limit section here on our website. Also, be sure to bookmark this post as we'll continue to expand it with all the extra tips and tricks we think of.