
If you like story-driven fantasy adventure puzzle games, you’ll love the Lost Lands series. If you’re starting the series with the original, Dark Overlord, read on for my full guide and walkthrough covering all the puzzles and hidden objects.
Lost Lands 1 Dark Overlord Full Walkthrough

In the game, you play as Susan, a mother whose child, Jimmy, has been kidnapped by a mysterious force that somehow dragged him into an old tree. Click the campfire (a1) for a close-up, take the Trowel, and then take the Knife from the table (a2). Use the knife to cut the knot stopping you from accessing the cellar (a3), open it, and take the Fishing Rod. Add the rod to the stick by the water (a4), and you’ll automatically fish out a Wooden Disc. Click the tree in the background (a5) to move forward.
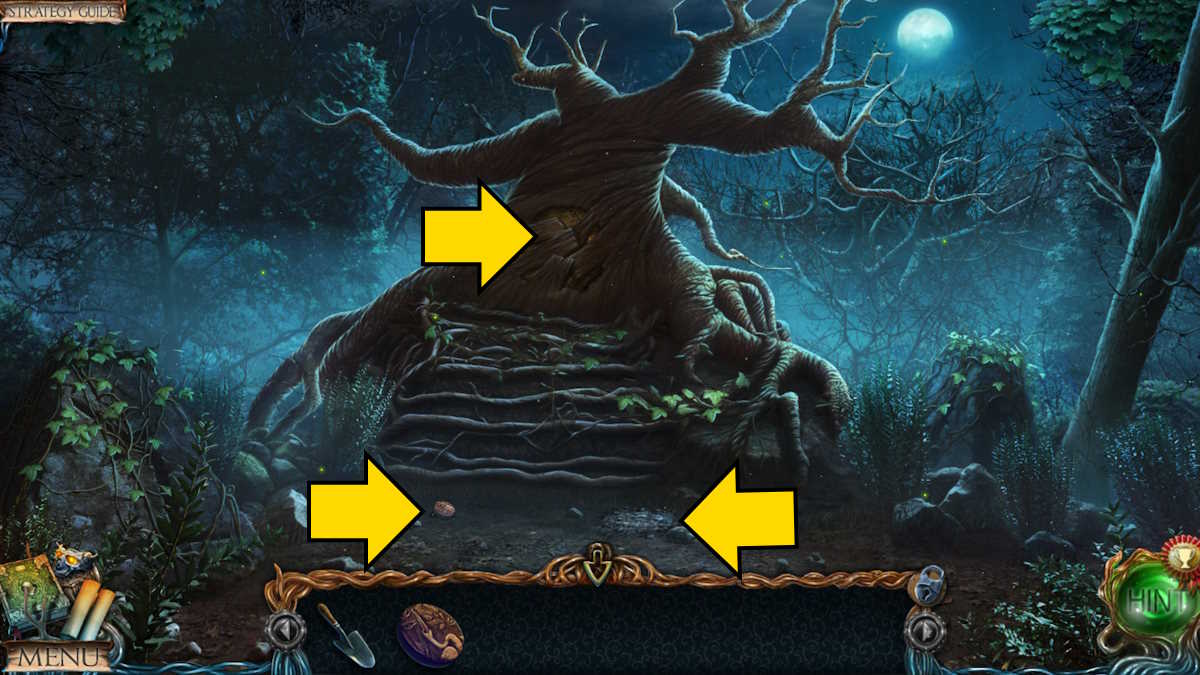
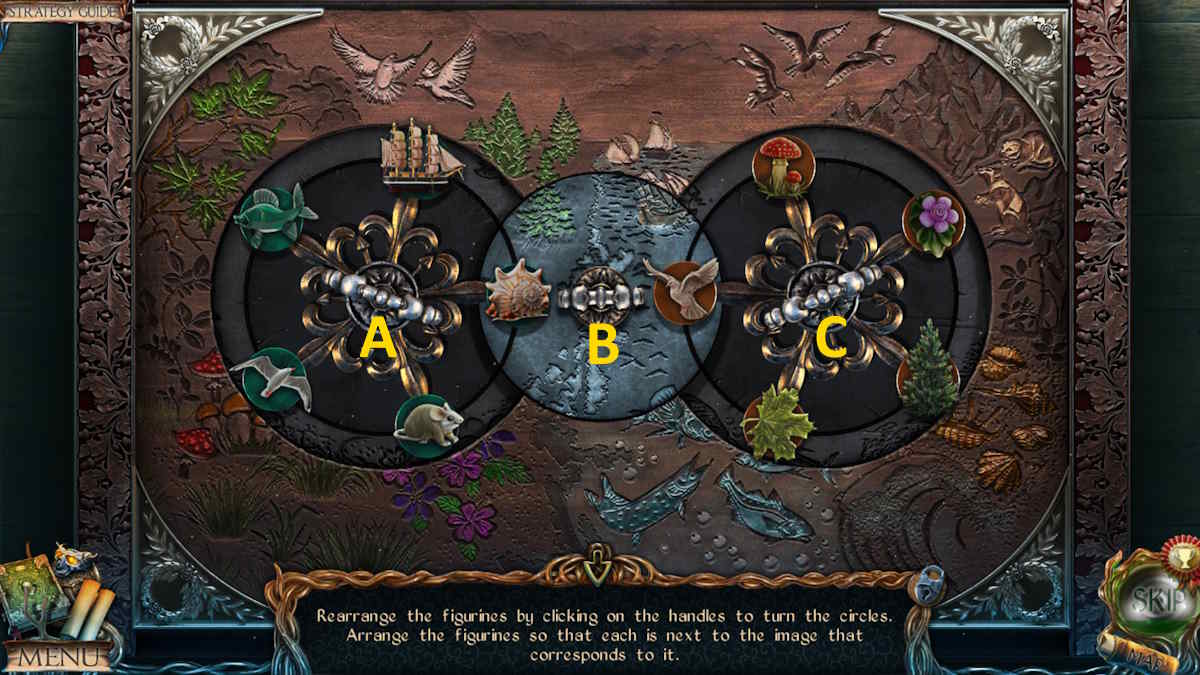
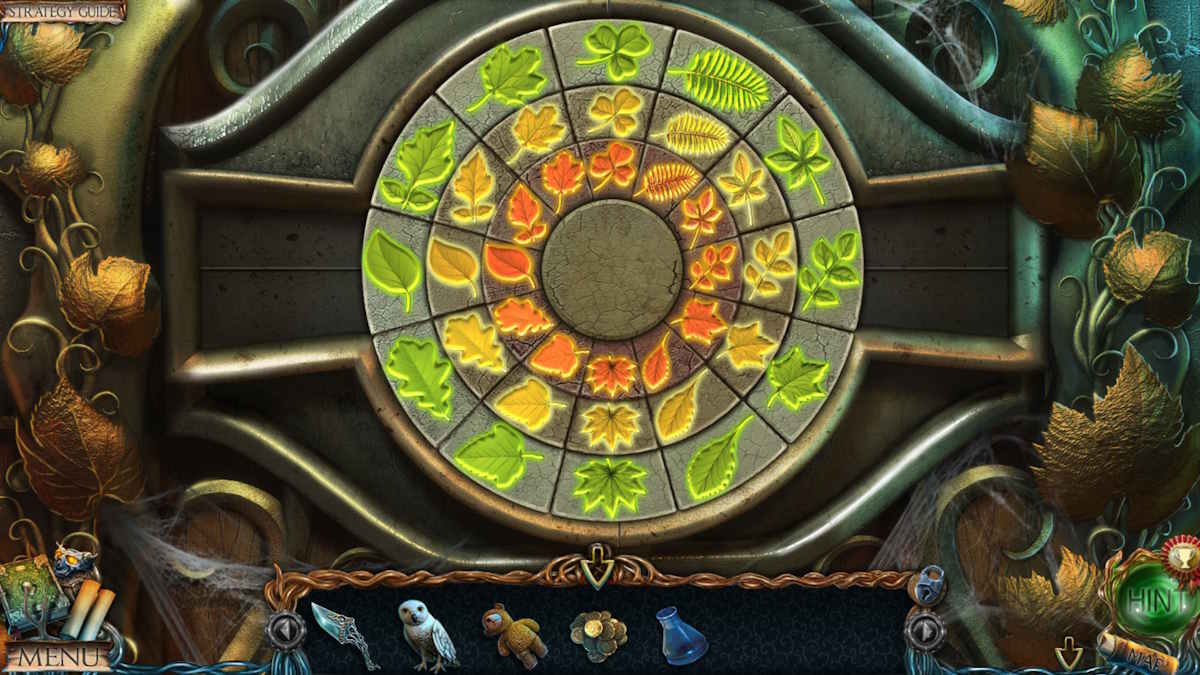
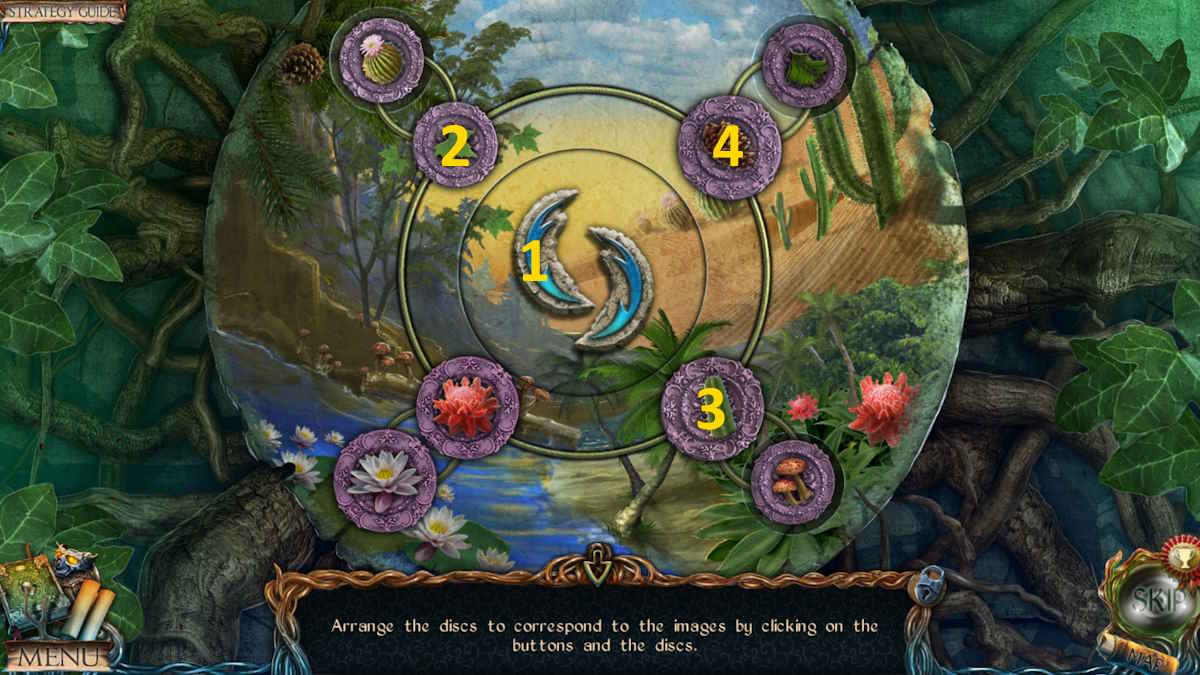
Pick up a second Wooden Disc, then use the trowel to dig in the dirt, and find a third Wooden Disc (both marked above). Select the tree for a close-up and then keep clicking the bark to reveal an ornate carving. Add the three wooden discs to it to begin a rotation puzzle.
You can’t fail with this one; it just takes a bit of patience. Each disc can be swapped by placing one disc in the middle and then moving another into its correct spot. Each disc can also be turned to put it at the correct angle. You’ll know one is exactly right as it will briefly light up. I’ve included the completed image above. Once done, you’ll be pulled into the tree and arrive in The Forest.
Lost Lands Dark Overlord Chapter 1 Walkthrough: The Forest
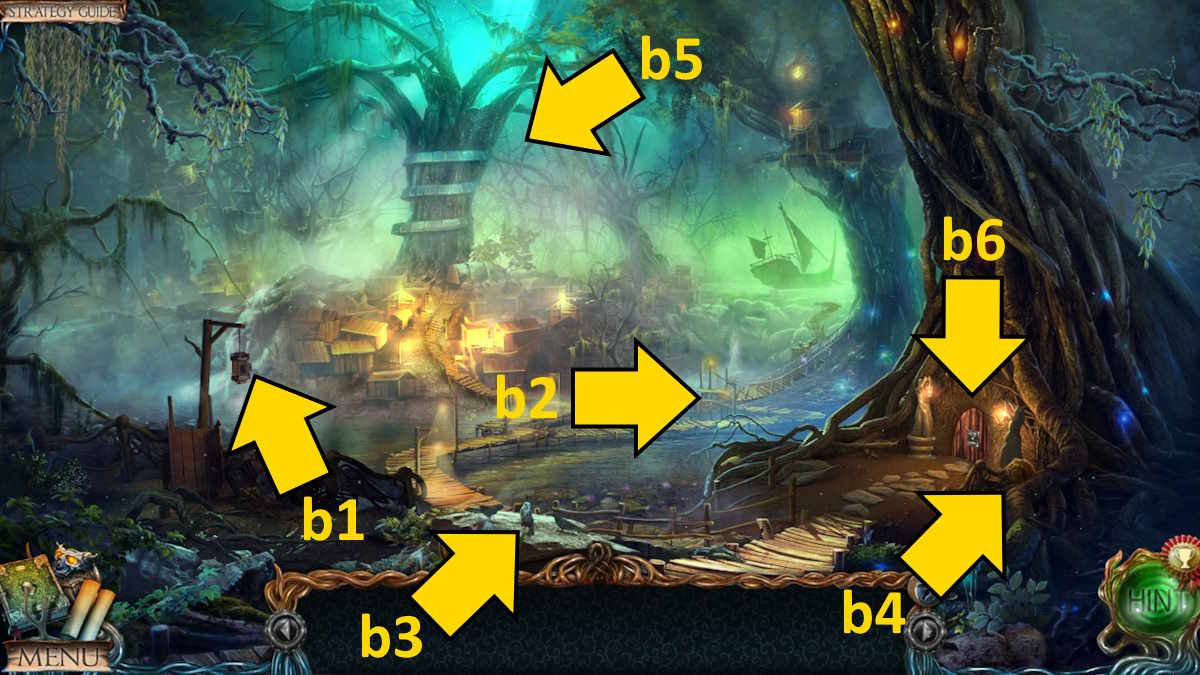
After watching Jimmy be carried away by a ghostly flying figure, select the lantern (b1) and take the Dagger. Select the bridge (b2) to find a Dried Twig and use it to scare away the crows (b3), which gets you an Owl. Click the stone plate it was standing on to find a note telling you you’re in Firefly Forest in the Lost Lands! Grab the Collectible (b4) and then click the town (b5) to go on to Outside the Tree.

Pick up the Weight (c1), select the owl in your inventory, and click the Door Knocker up in the tree (c2) to make the owl fly up and grab it for you. Also, grab the Collectible (c3). Return to the previous screen, add the knocker to the door (b6), and use the knocker. The door will open, so head inside Uri’s Cottage.
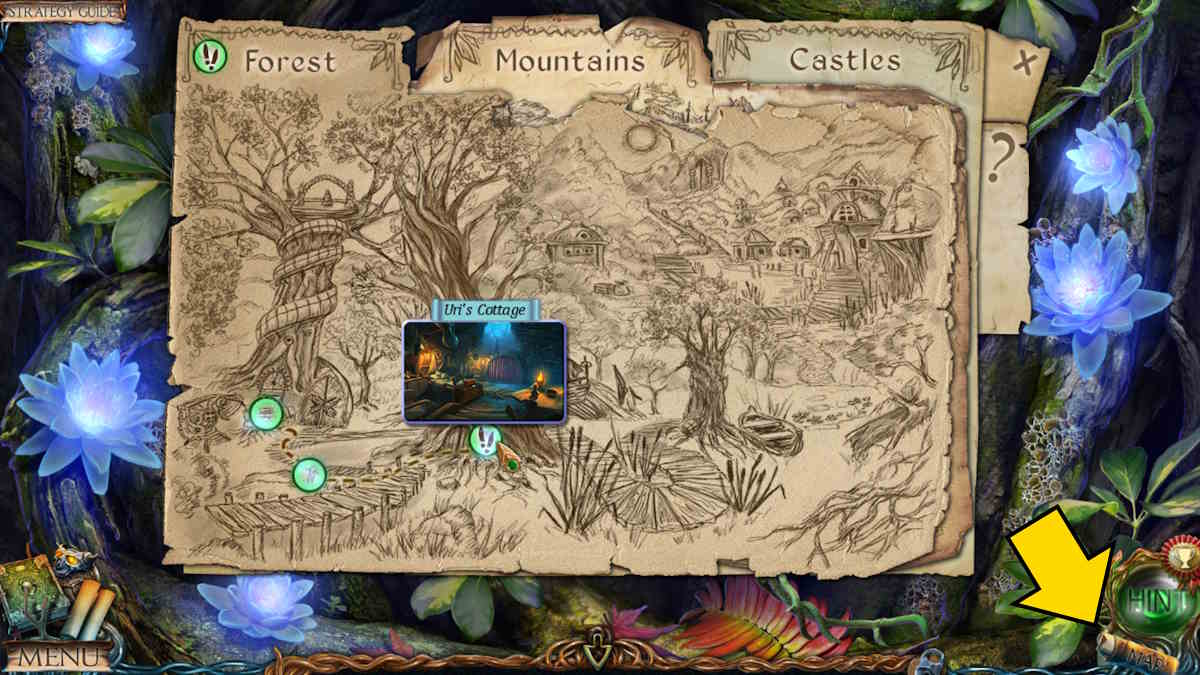
Speak to Uri, who will give you a Map. This now appears at the bottom-right of your screen (see above) and acts as a super useful fast-travel device. Hovering over a location will show you its name, which I’ll use throughout the guide to make it easier for you to get to the right places. Also note that if you've already played other games in the series, you will find collectibles in this game but not morphing items (those were first introduced as 'beyond objects' in Lost Lands 2).
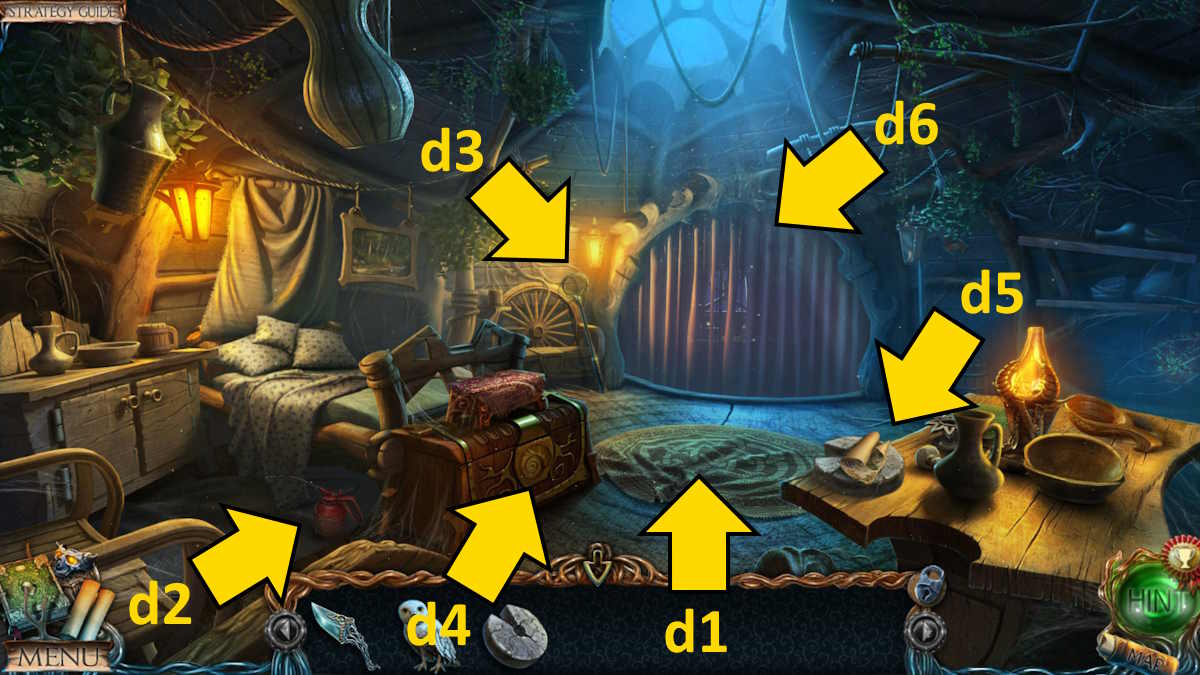
Move the rug (d1) and get a close-up of the floor here to find a Red Disc. Pick up the Oil Can (d2), the Butterfly Net (d3), and the Collectible (d4). If you click the table (d5) you’ll find instructions on how to summon the Lake Spirit. Once you’ve looked at it, take the Weight from the table.
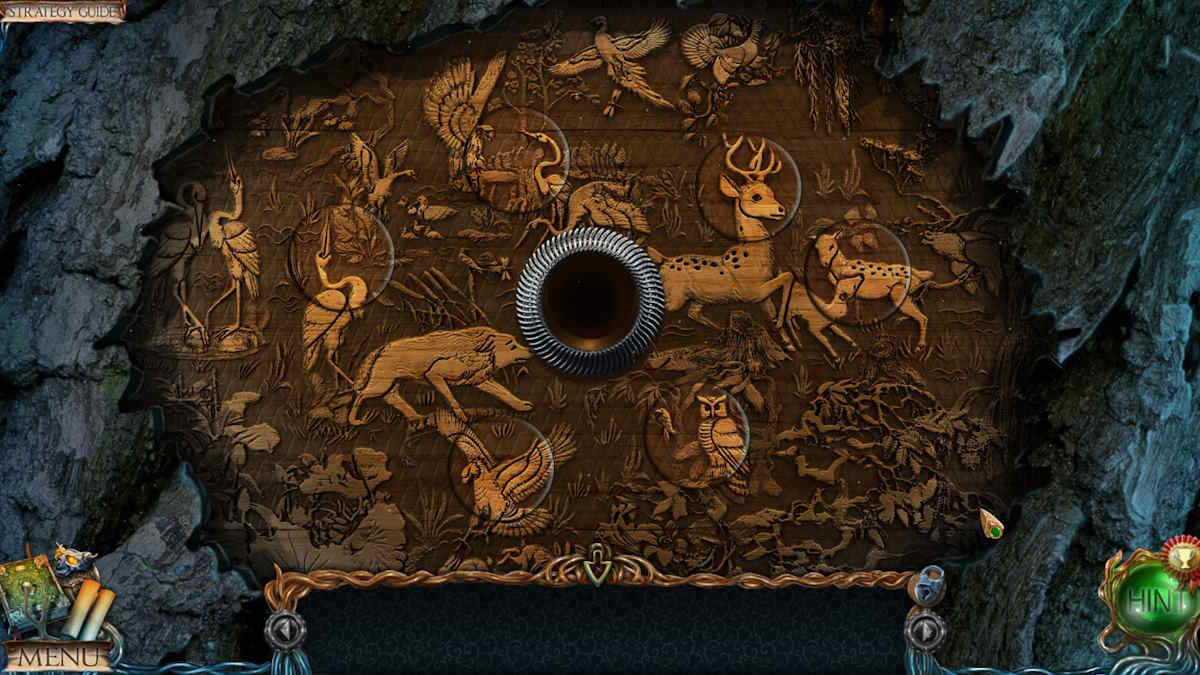
Uri’s house missing object mini-game solution
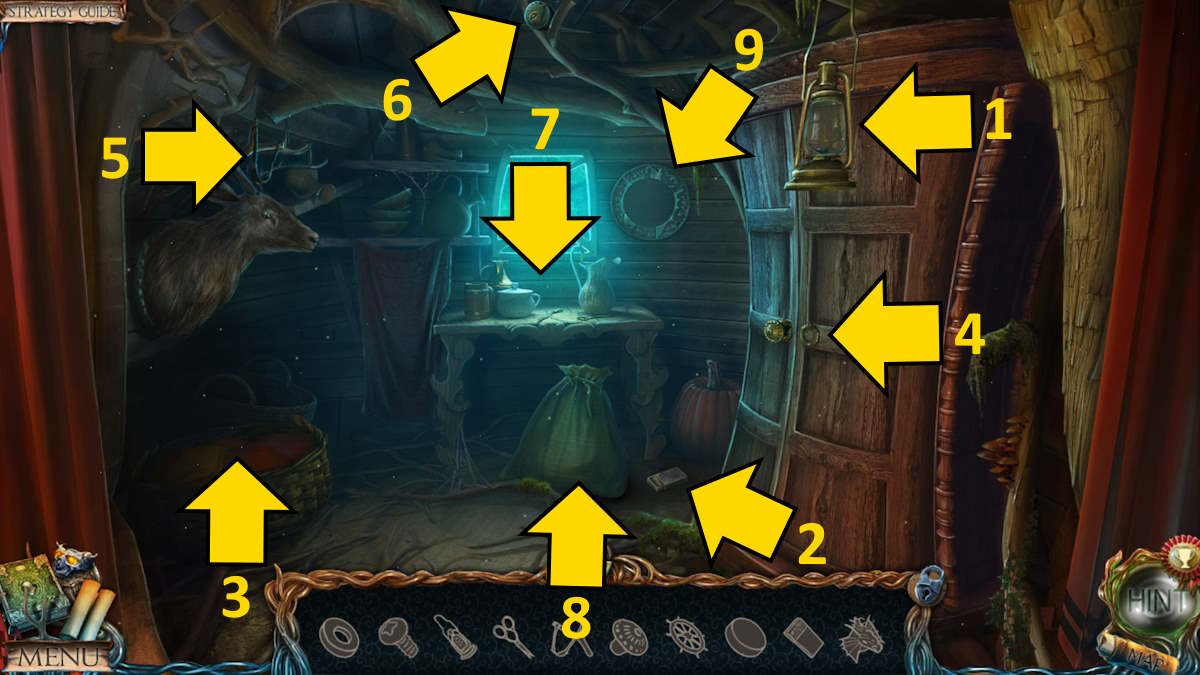
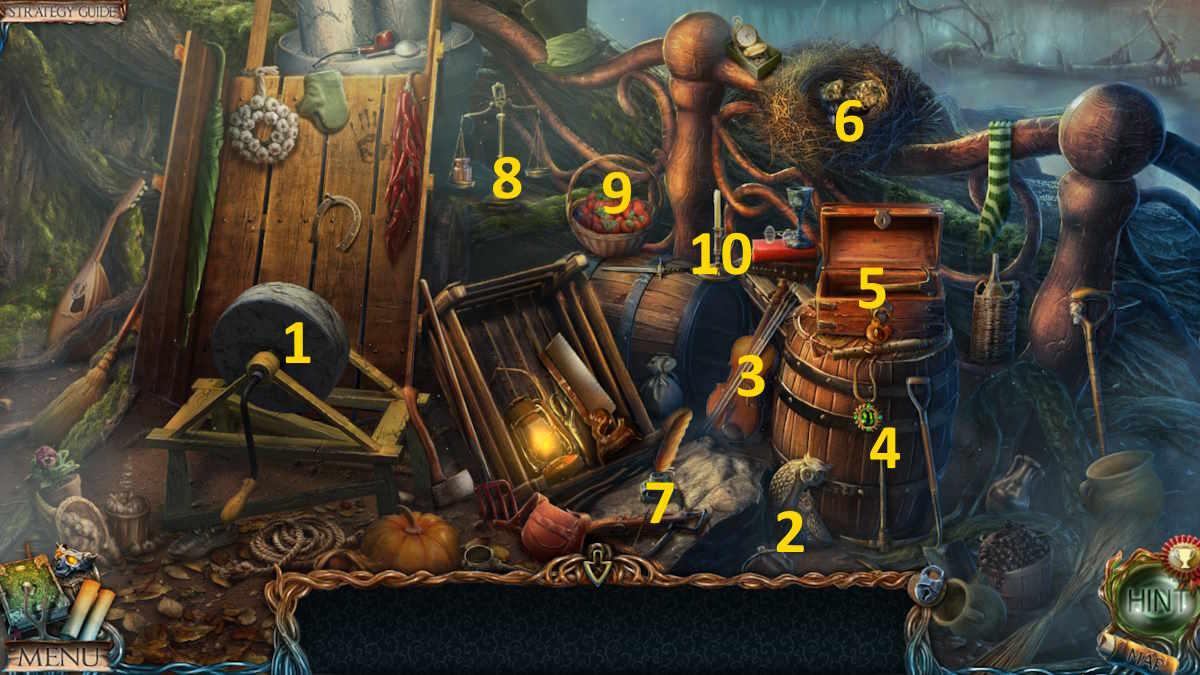
Now click the curtain at the back of the room (b6) to start a missing objects mini-game.
- Take the Lantern (1) and the Matches (2)
- Put the lantern in the deer’s mouth and light it with the matches
- Select the basket (3) and keep clicking the contents until you find a Handle
- Put the handle on the cupboard door (4), open it, click the ship inside, and take the Bolt
- Take the Slingshot (5) from the deer’s antlers, then use it to knock down and then collect the Disc (6)
- Select the table (7), place one piece of the scissors on the other, and use the bolt to fix them and take the Scissors
- Use the scissors to rip the bag (8) and click the grain inside until you find the Ship’s Wheel
- Add the ship’s wheel to the ship and take the Disc
- Add the two discs to the wallhanging (9) and rotate them into place to find and collect the Head
Move back to outside the tree, add the head to the door (c4), click each head twice to remove the bolts, and then click the door to gain access to The Library. Head inside and take the Weight that’s leaning against the lectern, and then go to the forest. Add the three weights to the bridge (b2) to fix it and then head across the bridge to Outside the Ship.
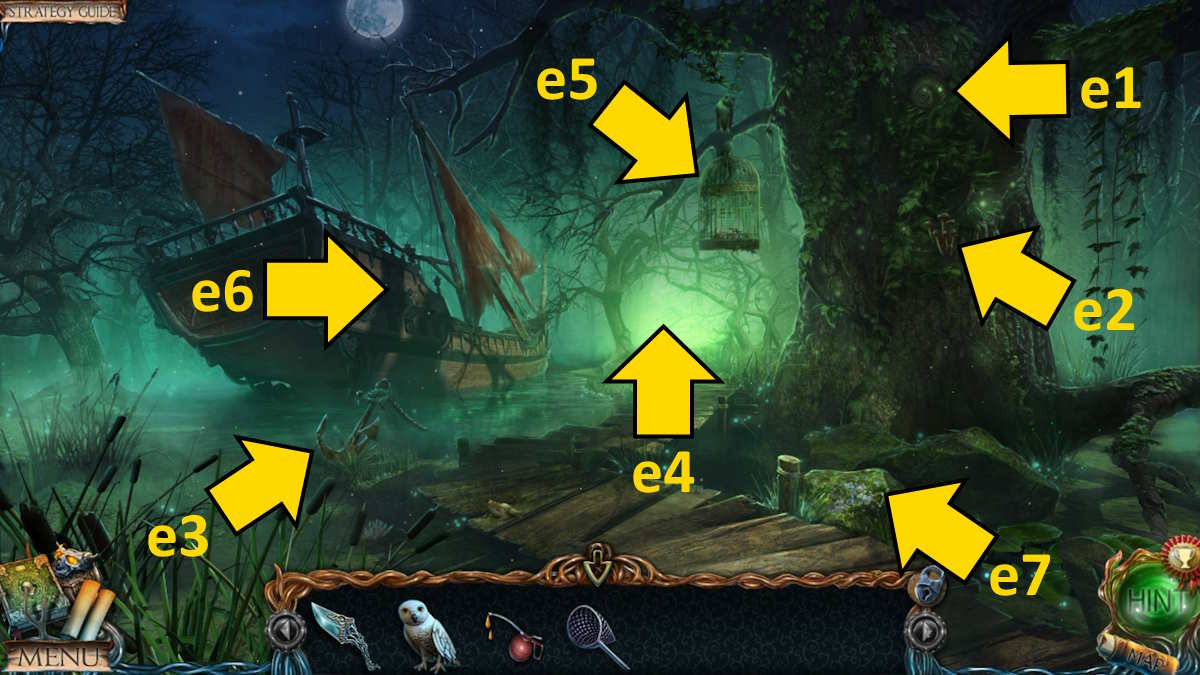
You’ll briefly see Jimmy once more, so you know you’re on the right track! Take the Collectible from the tree (e1), use the knife to get some Mushrooms (e2), and take some Pondweed from the anchor (e3). Move on down the path (e4) to The Swamp.
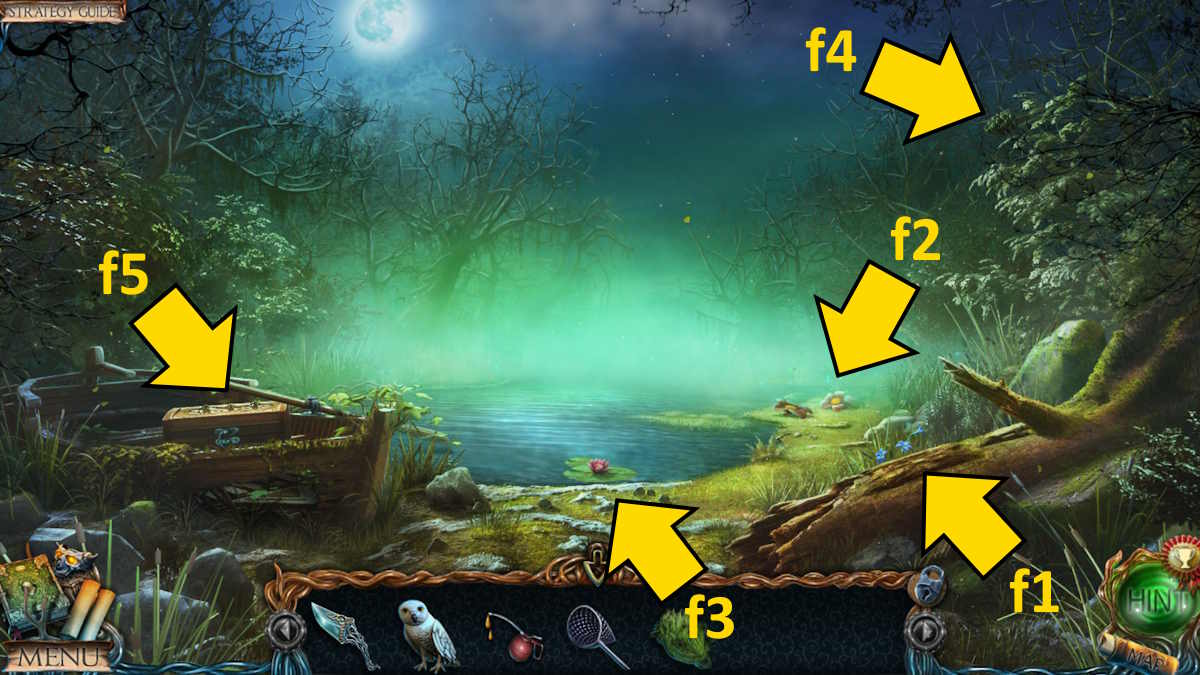
After you watch Jimmy being taken away in a raft, Uri will appear and tell you it’s his brother who has taken him. Take some Bark from the fallen tree (f1), and then use the knife to get a Flower Root (f2) and the butterfly net to grab some Fireflies in the same close-up. Use the knife to get a Lily (f3), grab the Collectible (f5), then select the boat (f5) for a close-up and click the box to start a puzzle. The solution is below. Once complete, take the Red Disc from inside.
- Cx3, B, A, Cx4, B, A, Cx4, B, A, Cx3, B, A, C, B, A
The lantern placing object mini-game solution
Return to the forest and add the fireflies to the lantern (b1) to start a placing object mini-game. The solution is below if you’re stuck on this one. Once complete, you’ll get a Claw Hammer.
- The axe
- The owl
- The violin bow
- The gem
- The key
- The seed
- The feather
- The weight
- The fruit
- The candle
Go to the swamp and use the hammer in the boat (f5) to get the Oar. Move outside the ship and use the oar to knock down the cage (e5) and take the Empty Bottle and a Page with a Constellation from inside. Use the dagger on the tree where you got the mushrooms (e2) to make the sap leak and use the bottle to collect some Tree Sap.
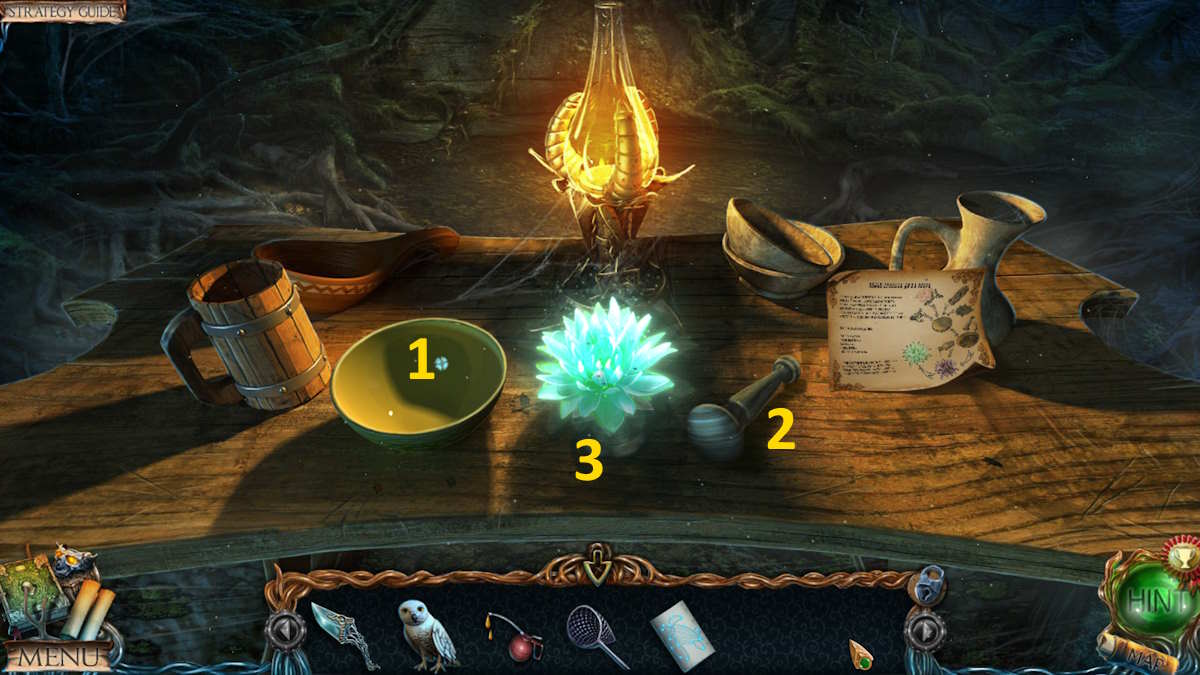
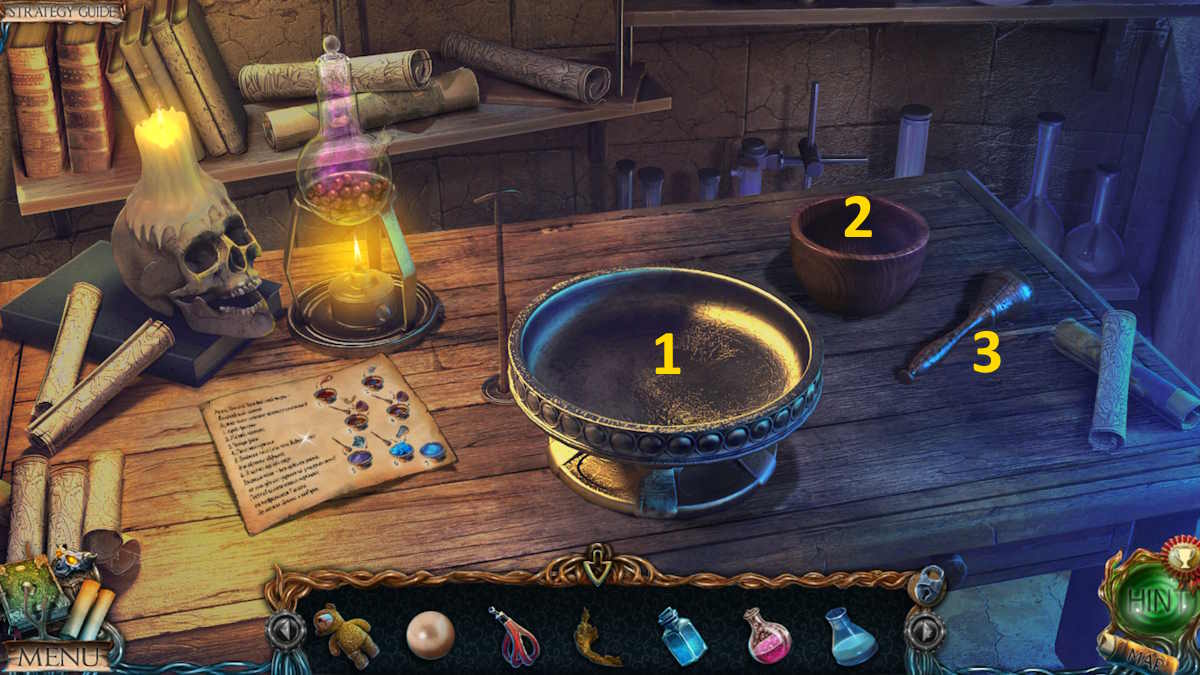
Head back to Uri’s cottage, select the table (d5), and add the mushrooms, fungus, bark, and pondweed to the bowl (1, above). Use the mortar and pestle (2) on the table to crush it up and then add the lily to the metal object in the center of the table (3). Pour the contents of the bowl onto the lily, add the tree sap, and take the Enchanted Lily. Return to the swamp, place the enchanted lily in the water (f3), and you’ll summon the Lake Spirit.
Lost Lands Dark Overlord Chapter 2 Walkthrough: Helping The Lake Spirit
Speak to the spirit and she’ll ask you to get her pearl from the ship. If you do, she’ll grant you access to the mountains. After speaking to her, take the Arrow with Rope that appears just to the left of where you got the tree bark (f1). Use this in the crossbow in the boat (f5) to get a Loaded Crossbow. Select the ship (e6) and use the loaded crossbow on the gangplank in the close-up, lowering it and giving you access to The Ship.
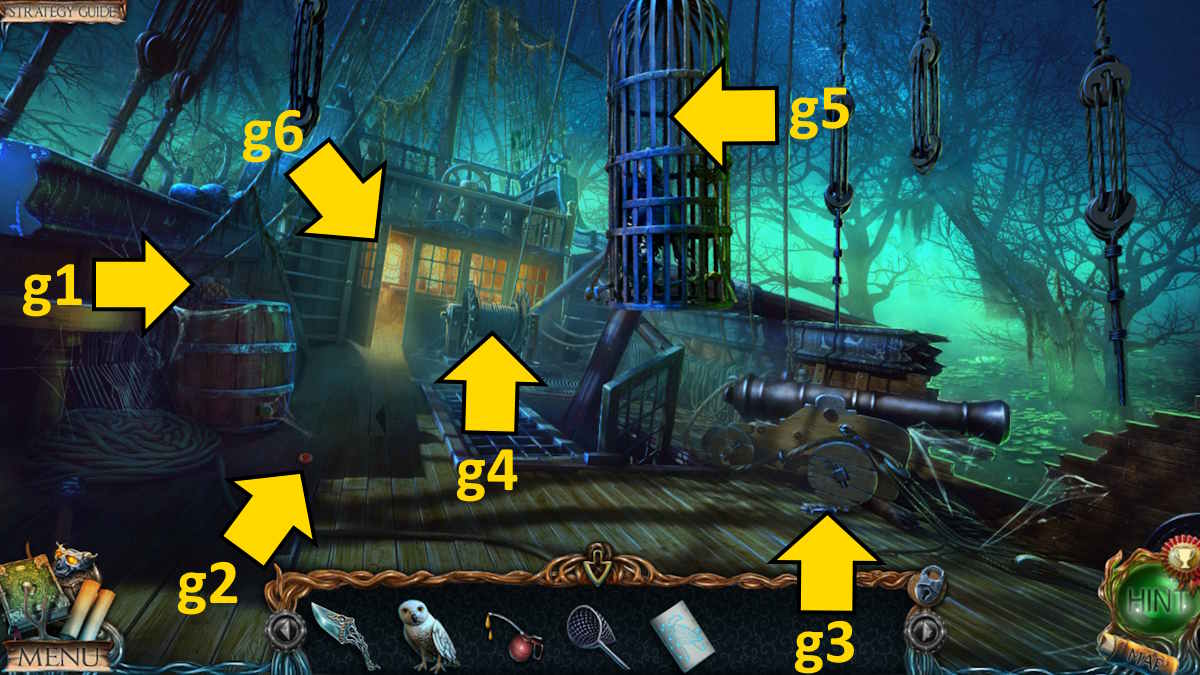
Grab the Collectible (g1) from the barrel, the Red Octagon from the deck by the barrel (g2), and the Brush from the floor by the cannon (g3). Use the oil on the winch (g4) and then use it to lower the cage (g5). Cut the ropes on the cage with your dagger and take the Mechanism Part from the skeleton inside.
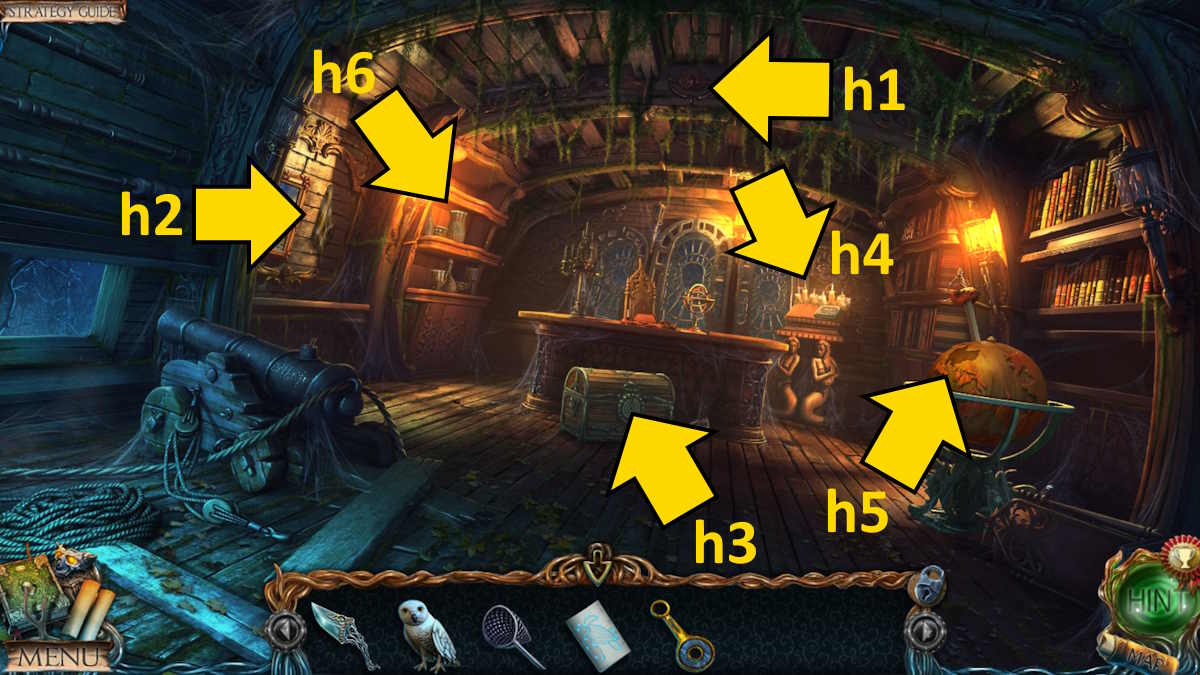
Use the brush back outside the ship on the mossy rock (e7) to uncover a Blue Anchor, and then head into the Captain’s Cabin (g6). You’ll find the Collectible on the top beam (h1). Select the painting (h2) for close-up and remove the rag that’s hanging up to reveal a Green Ship’s Wheel. Also, take a Purple Octagon from the chest (h3).
Select the lectern next (h4) and add your constellation to it for a hint. Click the buttons to open them, matching the constellation, and when the book opens take the Red Disc. The solution is above.
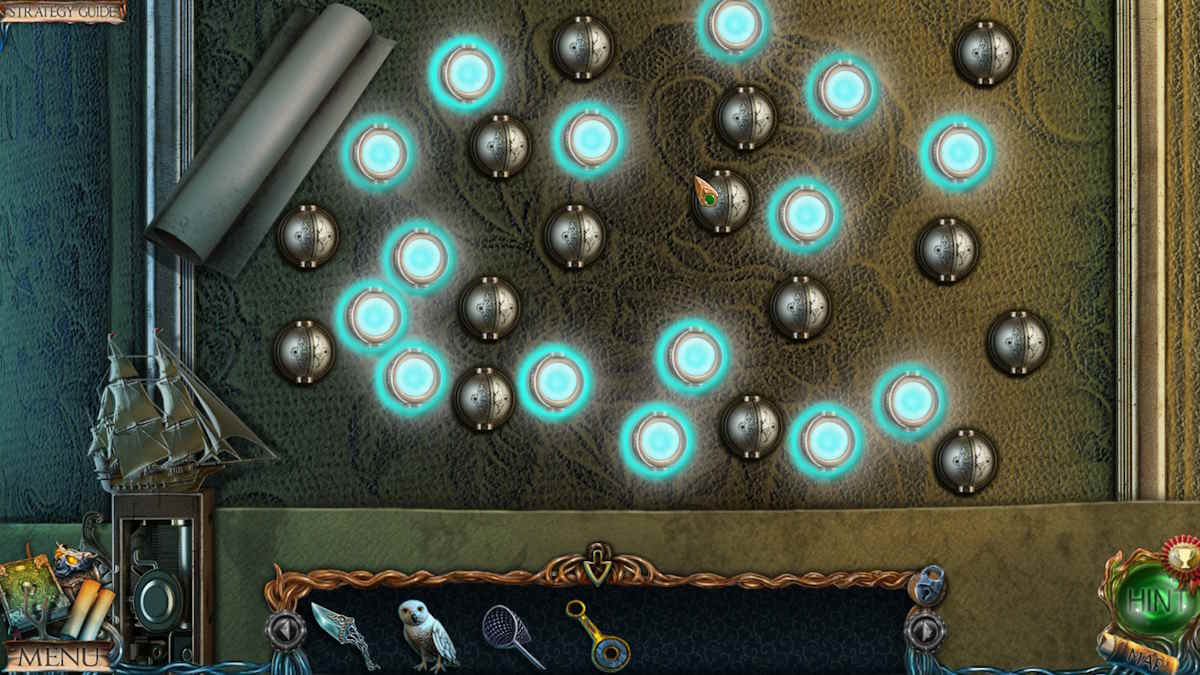
The sliding disc puzzle solution
Return to outside the tree and add the discs to the door (c5) to start a movement puzzle. Each disc needs to be put in the area with the correct matching color. The solution is below (note the letters on the image below refer to the position, not the disc shown).
- C to J, B to F, A to D, F to A, D to N, E to F
- N to E, J to D, K to B, L to C, M to N, D to M
- F to L, G to K, H to J, I to D, N to I, J to H
- C to J, B to G, J to B, D to C
Once complete, the door will open and give you access to the Top of the Tree. Grab the Collectible (i1), read the note (i2), and then take the Stick that’s underneath it. Move outside the tree, use the stick to move the rock (c1), and note the Red Ship on the cloth underneath.
Return to the captain’s cabin, add the mechanism to the chest (h3), and set the hands to match the three colored symbols you’ve seen (red ship, green wheel, blue anchor, as shown above). When the chest opens, take the Pearl from inside. Take the pearl to the swamp, give it to the spirit, and enjoy the cut scene.
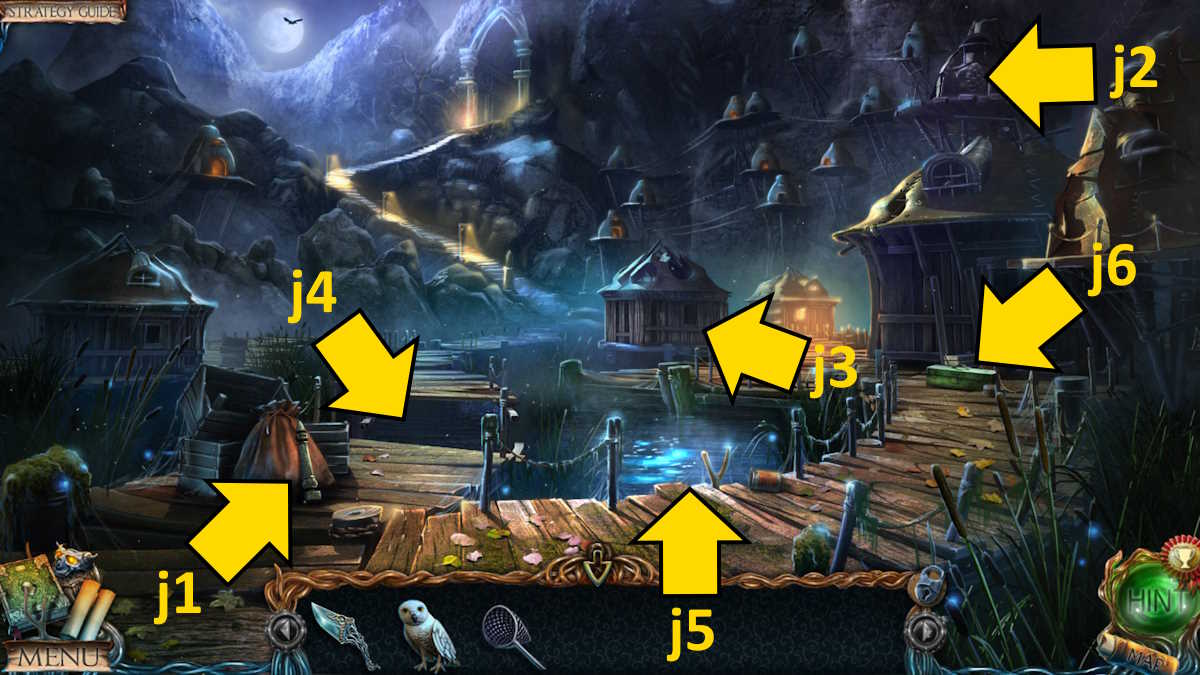
You can now select the area behind where the spirit appeared to move on to the Bank at the Cliffs. Take the Stool Leg (j1), grab the Collectible (j2), and then move forward (j3) to outside the Cottage by the Water.
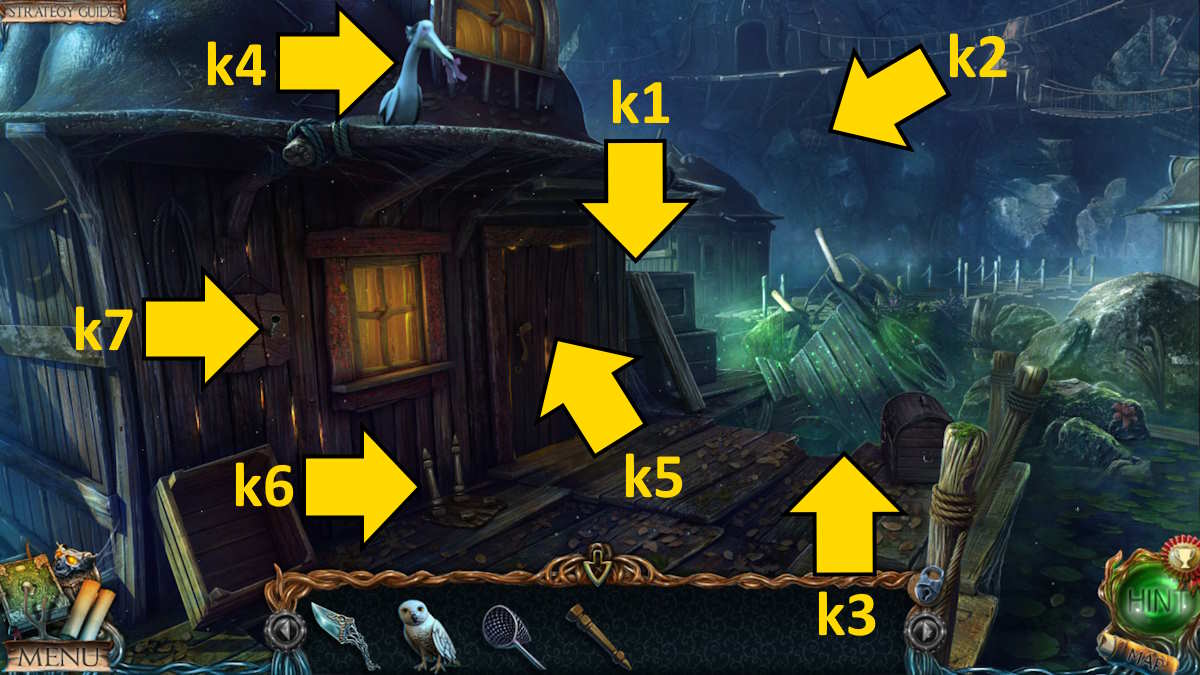
Take the Long Plank (k1), and the Collectible (k2), then click the cart (k3) for a missing object mini-game. You can’t go wrong here, as you just need to click the items when you spot them. Note that some items are marked in red. These can only be found once they’re revealed by picking up something else. The tricky one is the signet ring, which is inside the wooden box (it’s just very small). Once complete, you’ll receive a Crystal.
Arriving at the gates
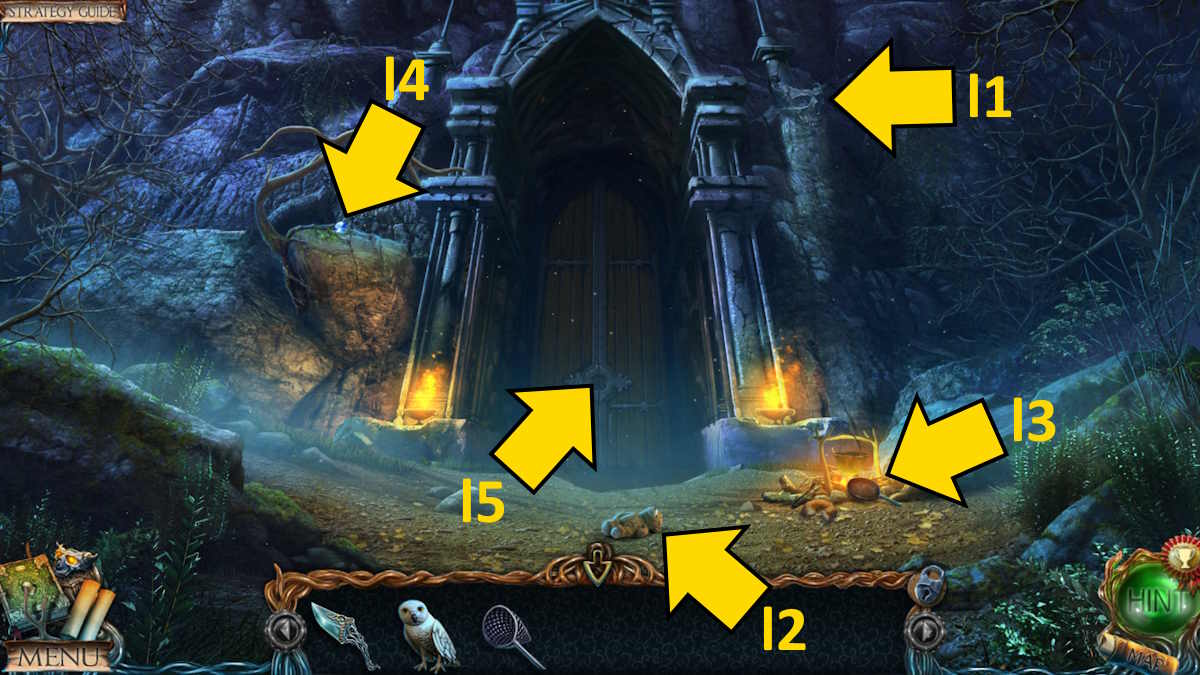
Return to the bank, use the plank to cross the broken bridge (j4), and move on to The Gates. Speak to Uri when you arrive, just too late to stop his brother from taking Jimmy into the caves. Take the Collectible from the rock face (l1); the Teddy Bear and an Emerald (l2); and some Breadcrumbs and Tongs from the fire (l3). Send the owl up to get the Sapphire (l4), and then move back to the bank.
Throw the breadcrumbs in the water (j5), and then use the fishing net to catch a Fish. Give the fish to the bird on the roof of the cottage (k4) and take the Key it drops on the floor outside the door. Use the key to open the door (k5) and head into the Cottage on the Water.

You’ll find the Collectible on the roof beam (m1), a Stool Leg under the table (m2), and a Gold Octagon in the fish’s mouth (m3), which you can grab with the tongs. Use the dagger to cut open the pillow on the bed (m4) to find a Mosaic Piece, and take a Clock Hand from the table (m5), also noting the time scratched onto the table (6:10). Add the hand to the clock (m6), set it to 6:10, and take the Fish Figurine.
Select the table (m5) and add the fish figurine to the box there to begin a placement puzzle. All you need to do is place each fish on the central line. Keep clicking the fish, from the left, until they’re all lined up. Anytime centering one moves one you’d already completed, just go back and move that one back to center, always working from the left. Once done, take the Bird Figurine.
The mosaic puzzle solution in Uri’s house

Move to Uri’s cottage and add the mosaic piece to the pattern on the floor (d1) to begin a segment-swapping puzzle. Once complete (see the finished mosaic above), the ground will open to reveal an object-finding mini-game.
- Pickup the Sieve (1) and use it on the grain bag (2) to get some Nails, also taking the Hammer from the grain bag close-up
- Take the Broom (3) and use it to sweep the cobwebs (4), allowing you to take the Handle
- Use the handle on the press (5) and then take the Cup of Sap (6)
- Move the apples (7) to find some Glass Grapes
- Take the Planks (8), add them to the ladder (9), and use the nails and hammer to fix it
- Open the curtain (10) and keep moving the bottles there until you find more Glass Grapes
- Add the glass grapes to the box (11), pour in the sap, and take the Crystal.
Outside the cottage on the water, add the two legs to the stool (k6), then take the Stool back inside to gain access to the loft space (m7). Take the Stick and a Picture. Go outside once more and use the stick on the hook in the wall (k7) to get a Boat Hook.
Return to the captain’s cabin and put the picture on the wall alongside the other one (h2). You need to find all the repetitions on the two images to complete the puzzle. They’re all marked below. Once complete, take the Deer Figurine.
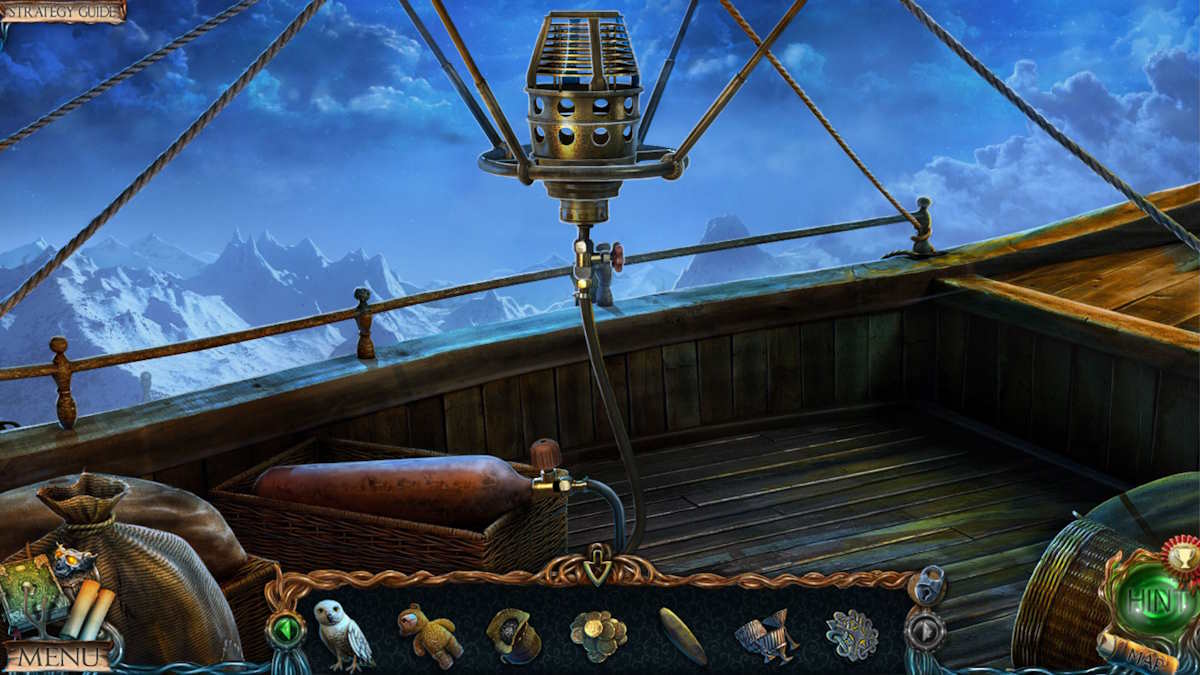
Move to outside the tree and add the crystal to the front of the device (c6). Pull the lever (c7) and the device will cast light onto the tree, which in turn lights up the library inside.
Head inside, grab the Collectible from the base of the central tree (n1), and take the Coin from the lectern (n2). Use the dagger to remove the picture from its frame (n3) and take the Fish Figurine.
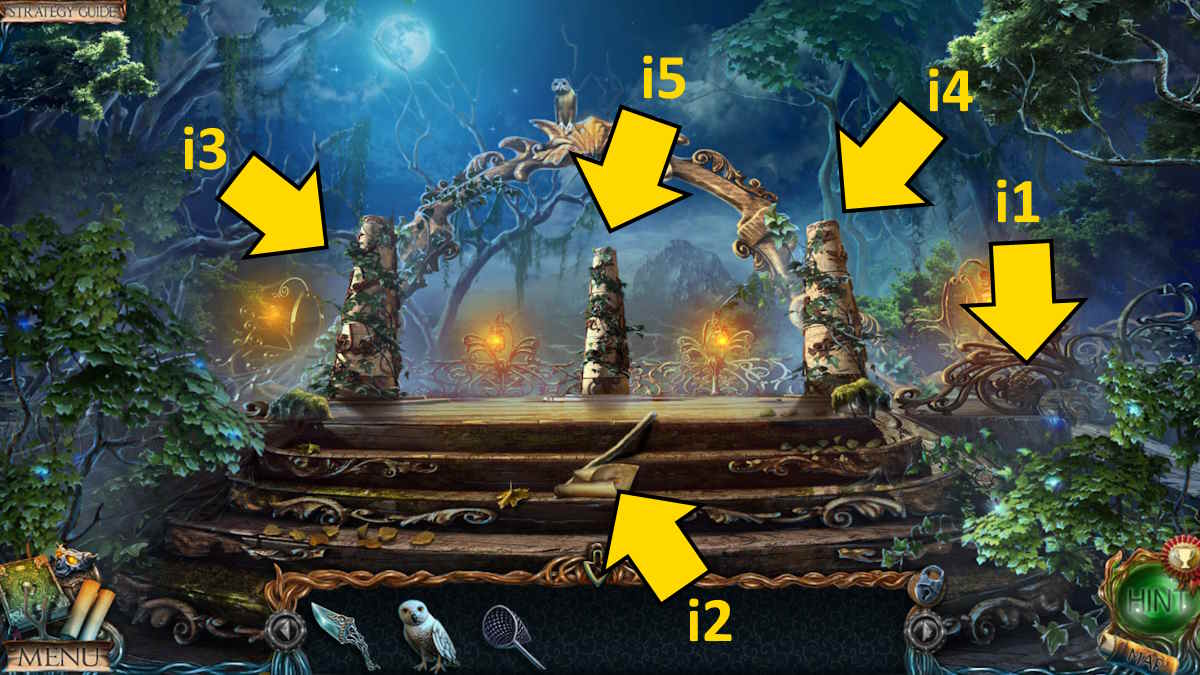
Go to the top of the tree and place the bird figurine on the left pillar (i3), the deer figurine on the right pillar (i4), and the fish figurine on the central pillar (i5). Now twist the sections of the pillars to create images. You can’t go wrong here. Simply start from the bottom of each pillar so the bottom section lines up with the base part of the image, then do the middle sections, and finally the tops.
The middle pillar will disappear to be replaced with a new one, from which you can take the Gate Key. Use the gate key on the gates (l5) to open them and continue your journey.
Lost Lands Dark Overlord Chapter 3 Walkthrough: Entering The Mountains
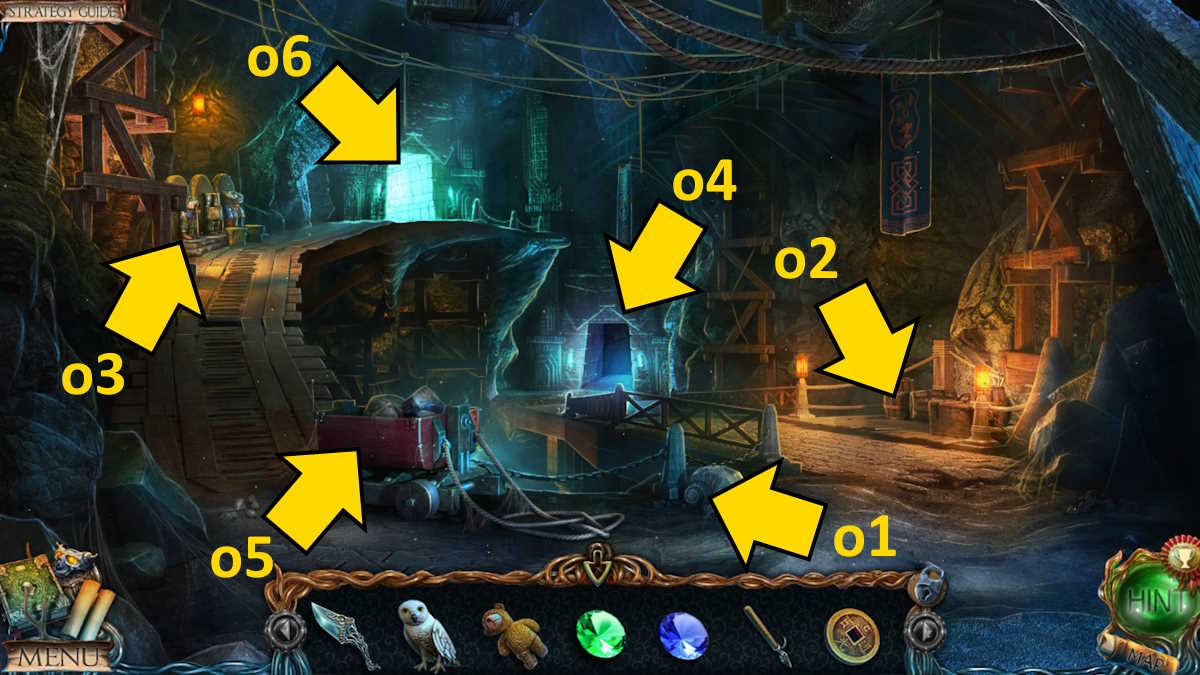
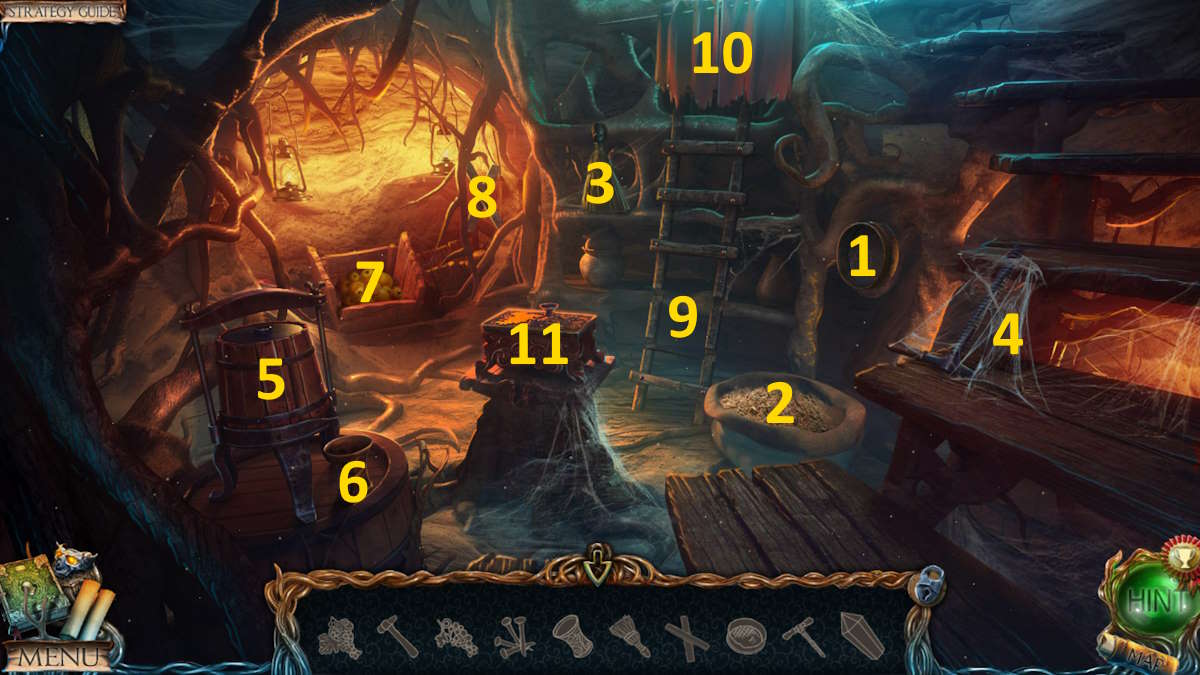
You find yourself in the caves. You’ll find the Collectible by the railings (o1), a Torch on the barrel (o2), and a Statue Head in the barrel (just click it to open it after taking the torch). You can add the statue head to the statues (o3), but you still need to find two more. Move out the door to the rear (o4) to move to the underground descent.
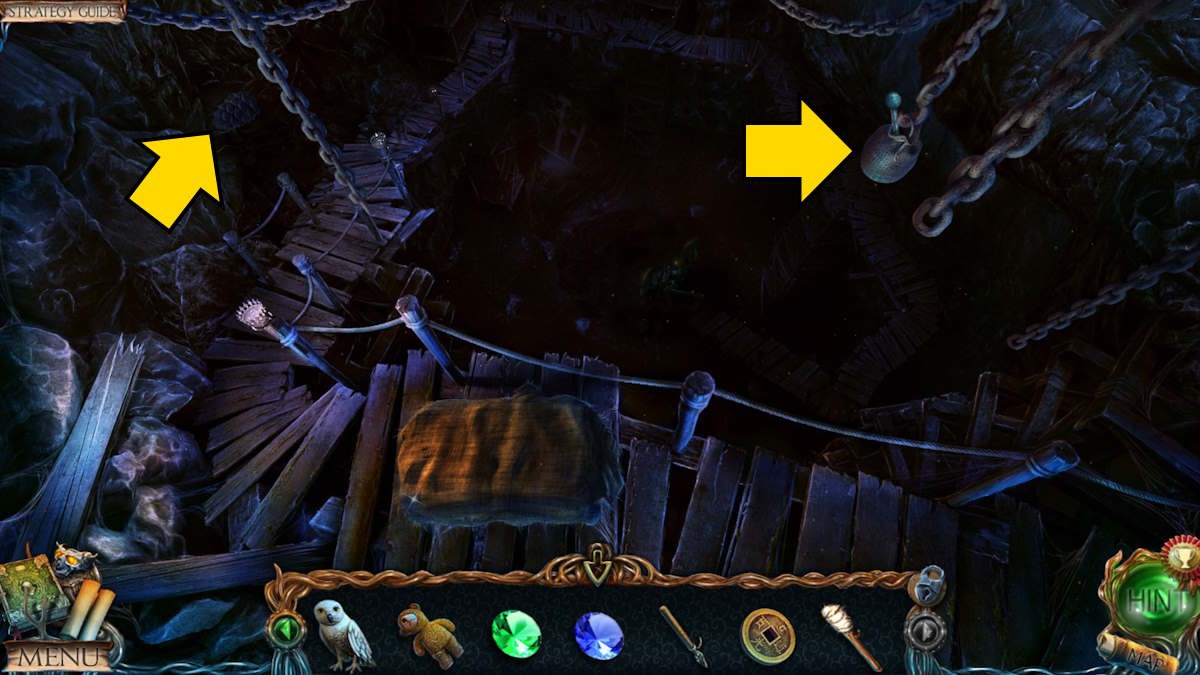
Take the Collectible from the rock face, and use the boat hook to knock down and collect the Sack and a Lever (see above). Return to the caves, add the lever to the cart (o5), pull both levers (one is already in place), and spill the contents of the cart. Pick up the Tar, then head through the other exit (o6) to the underground lake.
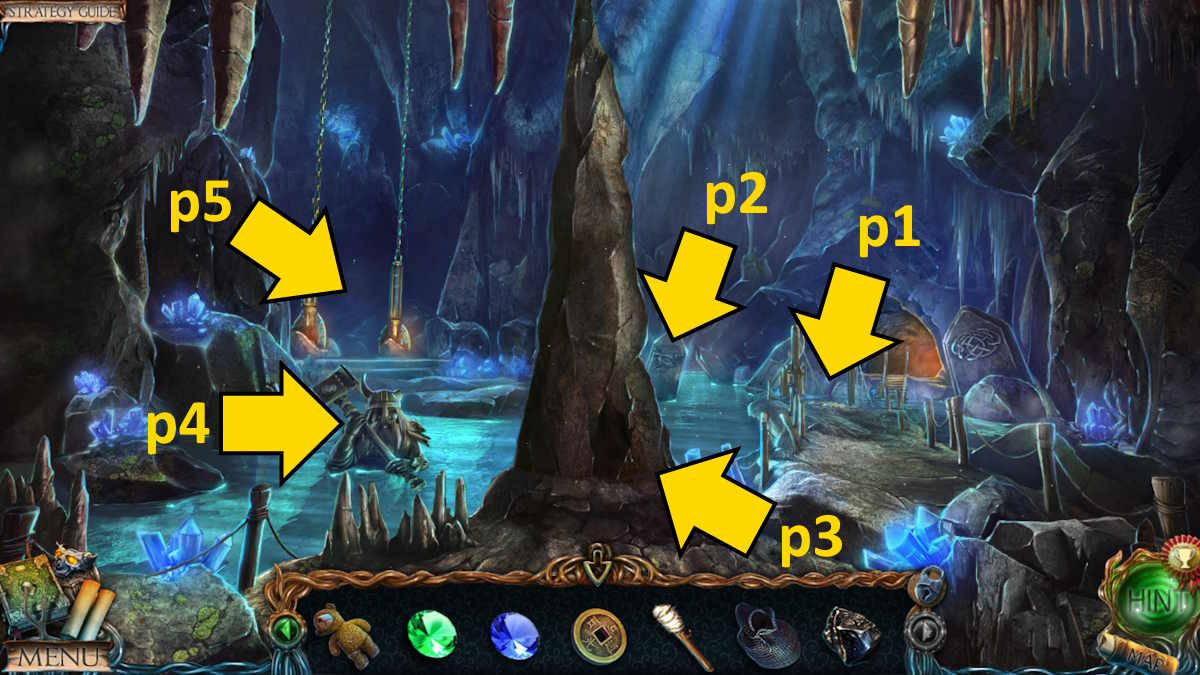
Select the bridge for a close-up (p1) and collect the Handle. Grab the Collectible (p2), then head back to the gates. Select the campfire (l3), add the tar to the pot to boil it, and then use your torch on it to get a lit Torch.
How to light the underground descent
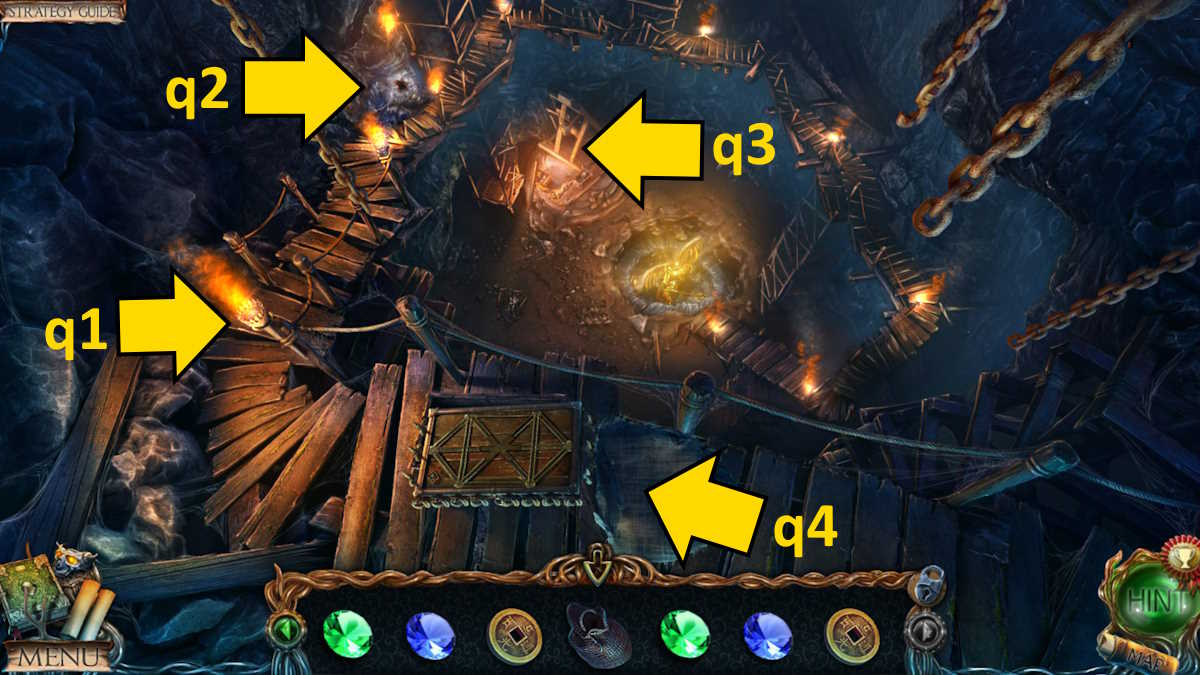
Return to the underground descent, and use your torch on the burner (q1) to light up the path forward. Grab the Spade plus an Emerald from the dig site (q2) halfway down, then click the junk at the bottom (q3) for a simple object-finding mini-game. Once complete, you’ll be rewarded with Dynamite.
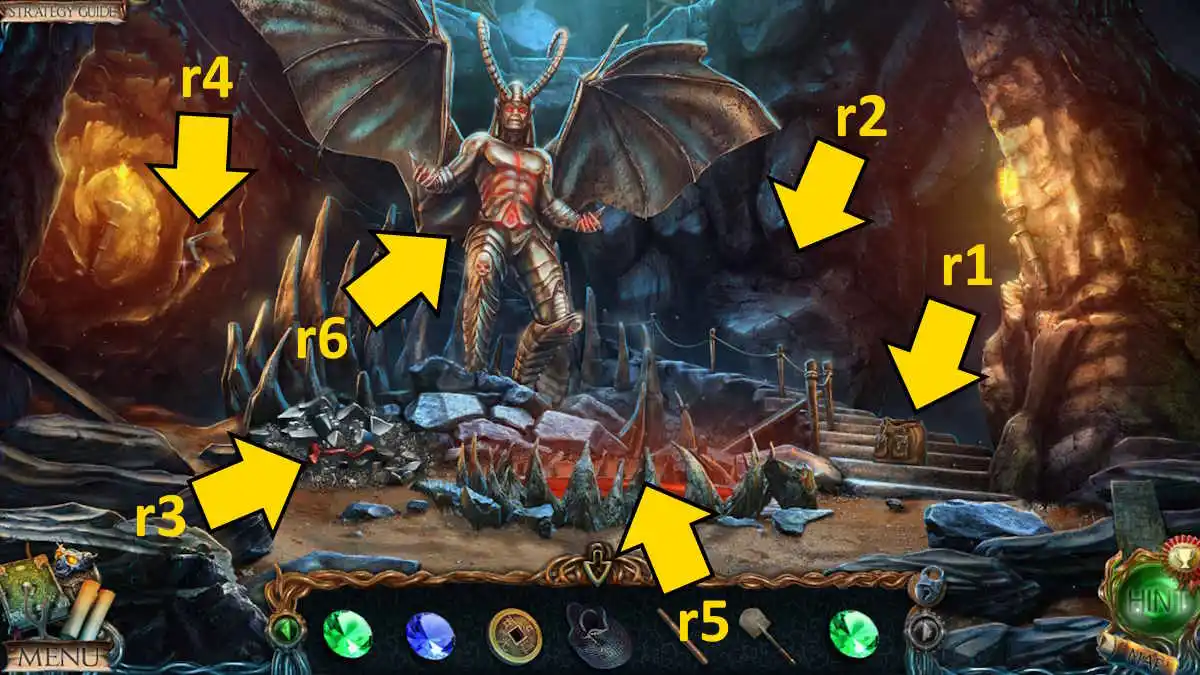
Go down the underground descent to the demon statue, use your dagger to cut the rope on the bag (r1), and take a Sapphire. Also, read the book inside the bag to find out more about Uri’s brother. Grab the Collectible from the rock face (r2), completing your snail collection. Use the spade to dig through the stones (r3) to find a Wooden Cog, plus a tapestry that you’ll make a note of in your diary. Now click the left wall (r4) for a close-up, click the broken pick handle to remove it, add your handle, and retrieve the Pick.
Move back to the descent and use the pick to break through the wall at the dig site (q2) and take a Coin. Move back to the underground lake, place the dynamite in the rocks (p3), light it with the torch, and watch it fall. Now add the wooden cog to the bridge (p1), raising it. You now have access to both the underground lake shore and the hanging bridges.
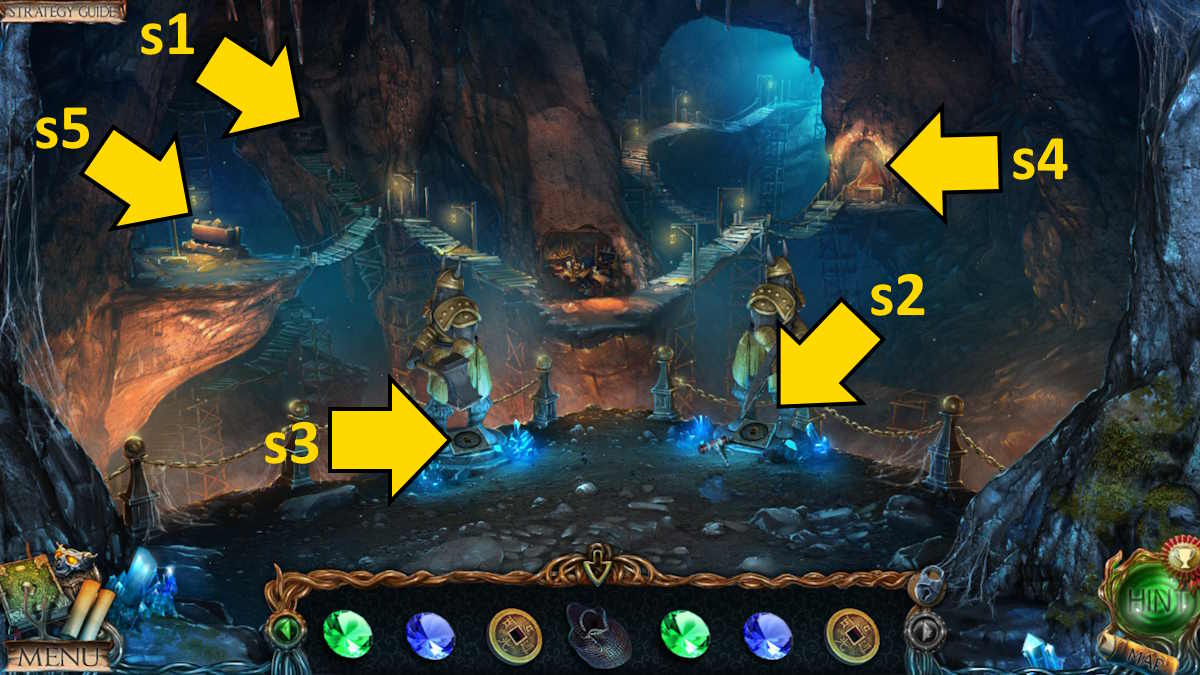
Head to the hanging bridges, take the Collectible from the far cave entrance (s1), and then take the Corkscrew from the statue on the right (s2) while adding a coin to it. You can add the other coin to the statue on the left, and click the coins to move the statues, but you need to learn their required positions.
Move right back to the ship and use the corkscrew on the barrel (g1) to collect a Torn Page, and then use the sack to collect some Gunpowder. Move into the captain’s cabin, select the lectern (h4), and add the torn page to the book. Rearrange the pieces of the jigsaw to complete the drawing, and the completed image will be added to your diary.
Hanging bridges puzzle solution
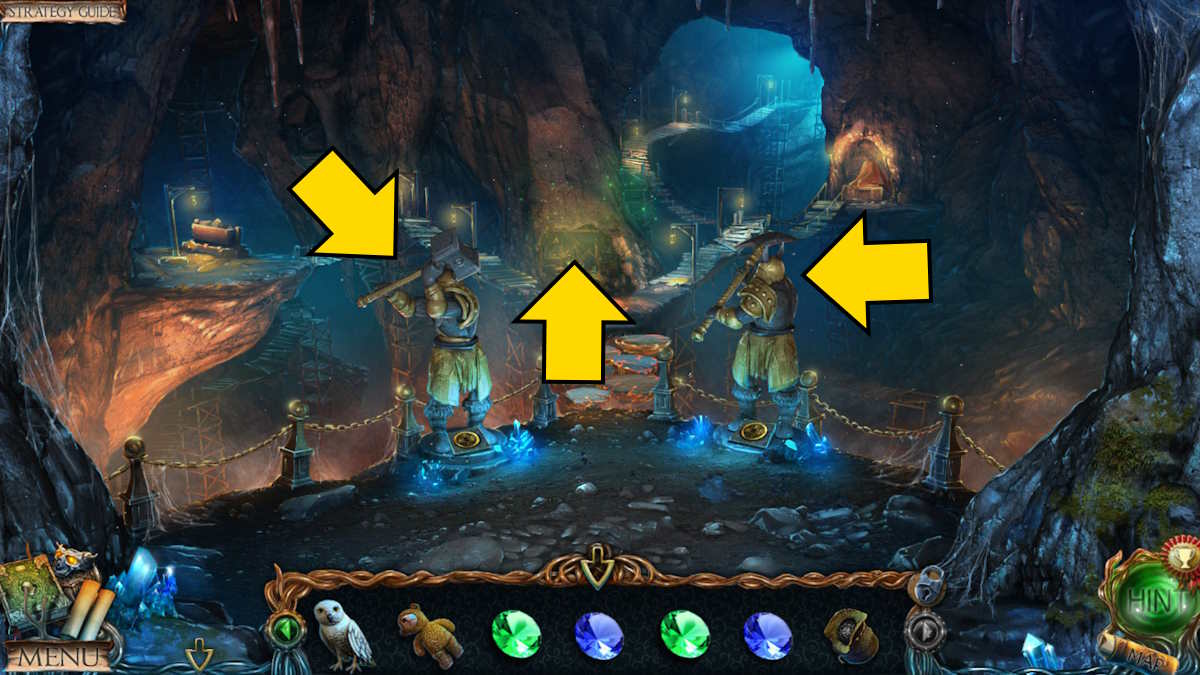
Return to the hanging bridges and pose the statues correctly to open the bridge to the middle of the cave (see above) and gain access to an object-place mini-game. You can see all the answers marked in the image below.
- Horseshoe
- Arrow
- Dagger
- Boot
- Weight
- Flower
- Cheese
- Glove
- Precious stones
- Matches
Once complete, you’ll receive a Sapphire. You can also remove the cloth from the statue on the right (s4) to collect a second Statue Head, and move the rubble on the cart (s5) to claim a Key (see above).
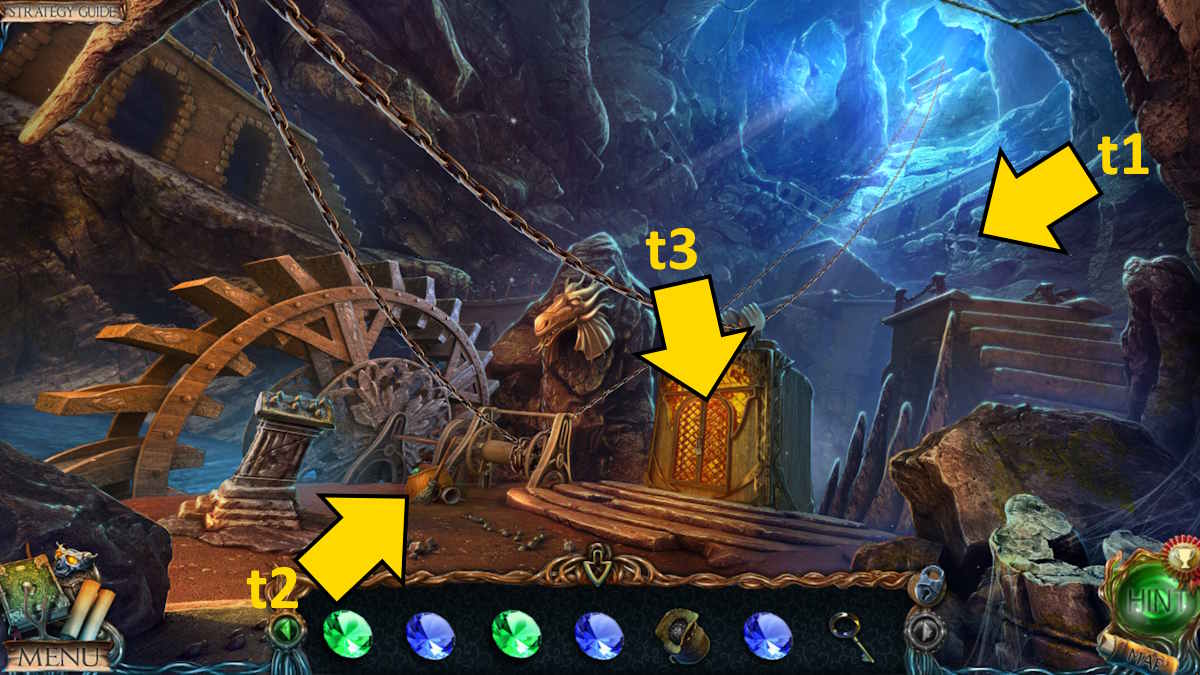
You now have access to a new area, at the lift, on your map (or via s6). Grab the Collectible from the cliff face (t1), plus an Emerald, a Broom, and a Stone Horn from the basket (t2). Use the key on the doors here (t3) to gain access to the lift and head inside.
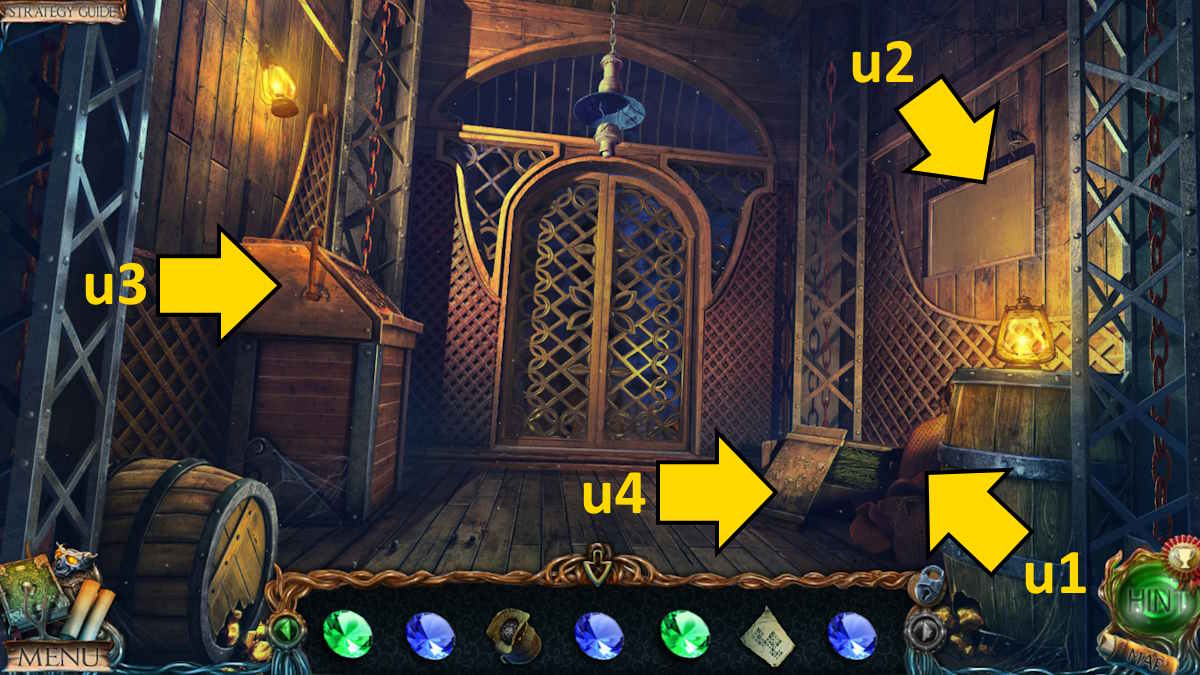
Grab the Collectible from next to the barrel (u1), and use the broom to clear the cobwebs from the picture (u2) and take the Diagram. Return to the underground lake and place the horn on the dwarf statue (p4), taking the Saphire from its hammer’s secret compartment. Now you can move forward to the underground lake’s shore (p5).
The Lake Shore axe puzzle

The Collectible is on the left of the screen (v1) and will complete your cone collection. Add the four sapphires to the axe on the left (v2), also taking the Emerald in the same close-up. Now you can add the four emeralds to the axe on the right (v3) to begin a symbols puzzle.
The symbols you need are on the tapestry you saw earlier. Click the symbols as they appear on the tapestry, from top to bottom, and the ground will open. I’ve marked the order in the image above and it doesn’t matter whether you do the left or right axe first. Click the raised pedestal for a close-up and read the note inside to get a diary update. It seems you need to summon the Mountain Spirit to get yourself out of these caves. After reading the note, take the Green Octagon that was underneath it.
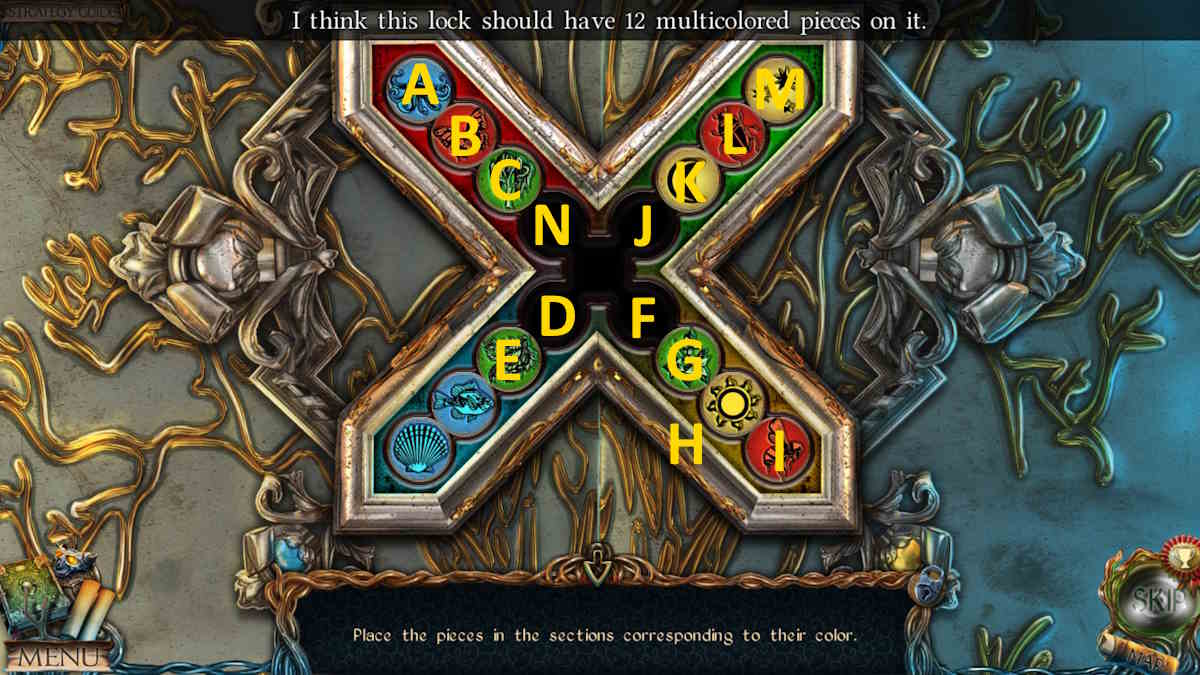
Return to Uri’s cottage, remove the cloth from the small box on the chest (d4), and add all the octagons you have to begin a sliding puzzle. Each octagon needs to be in the spot matching its color. If you’re stuck on this one, I’ve put the solution above. Once complete the box will open, allowing you to take a Continent Figure and Solvent.
Move to the captain’s cabin, place the continent on the globe (h5), and take the Cross-Shaped Key from inside. Go to the bank, use the key to open the green box there (j6), and grab the Magnet. Head into the cottage next, and use the magnet on the hole in the floorboards (m8) to get the Star Medallion.
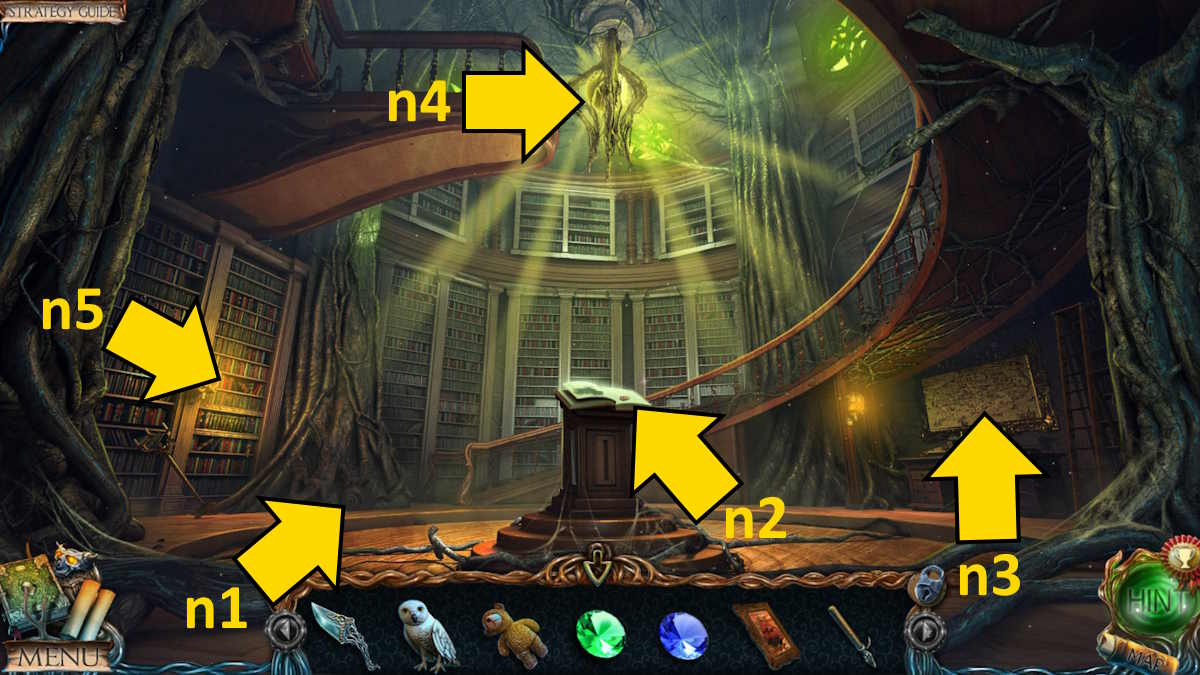
The next stop is the library. Use the solvent on the lectern (n2) and then click the book to make another note in your diary, this time revealing a pattern of creature heads. Place the star medallion into the matching space in the tree roots above the lectern (n4) to receive an Orb.
Helping the Mountain Spirit

Return to the lake shore and place the orb on the pedestal to unveil the Mountain Spirit (see above). It asks you to bring it a potion to restore its strength. Before you leave here, make sure to pick up the Cog (also marked above).

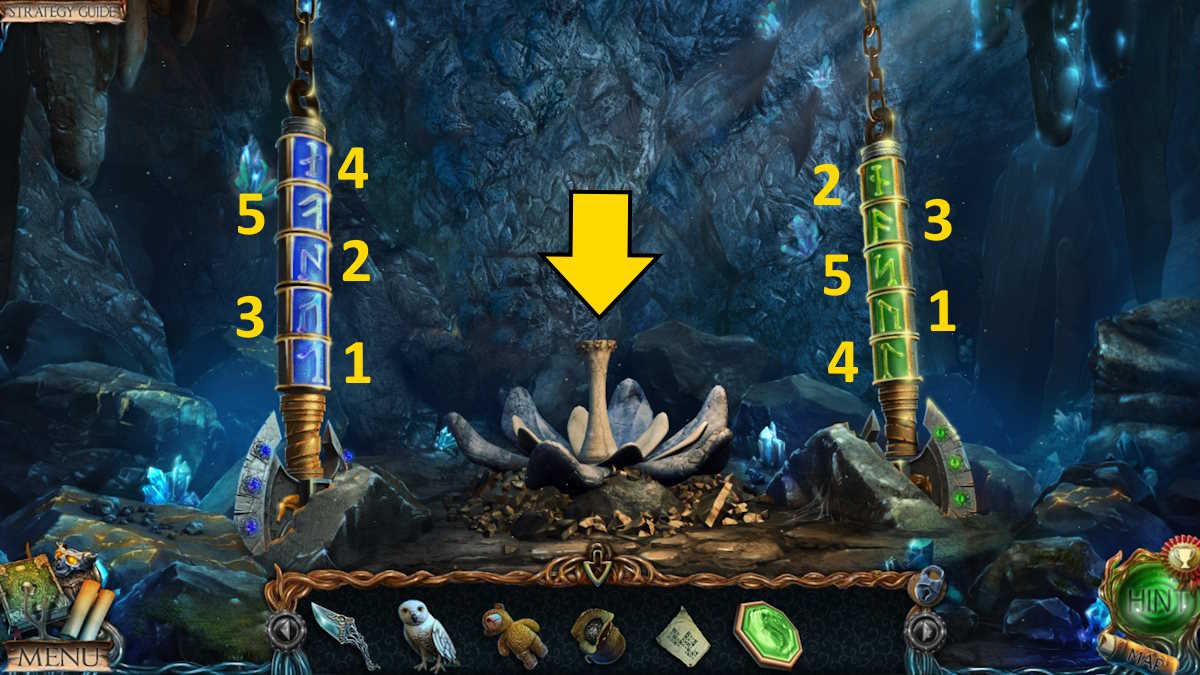
Move to outside the lift and use the pattern you got in the library to start the system working again, using the pedestal (t4). I’ve included the correct order to press the dragon heads above.
Now move inside the lift and the cog to the operation mechanism here (u3) to begin a cog system puzzle. The solution is above (it’s easy to miss the tiny cog). Once complete, the lift will take you to the surface. Click the gates and move forward to the castles.
Lost Lands Dark Overlord Chapter 4 Walkthrough: The Castle
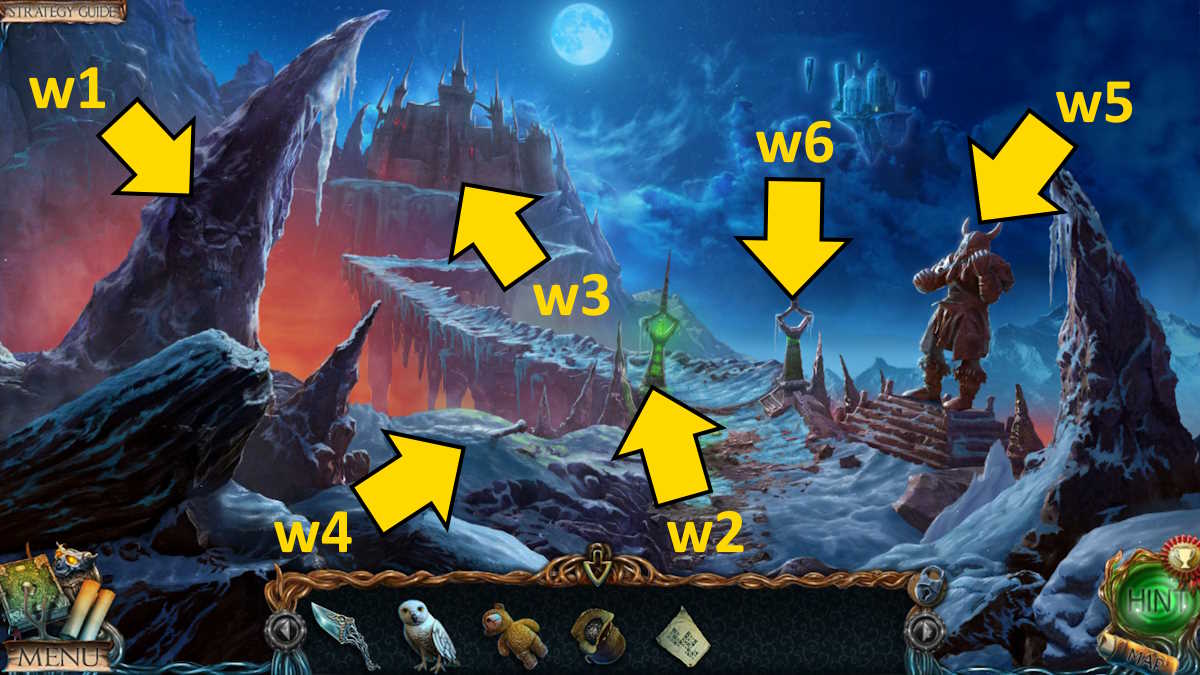
Once you’ve taken the Collectible from the rock on the left (w1), note the symbols on the glowing pillar (w2) and take the Bas-Relief Piece in the same close-up. Now move along the path (w3) to outside the castle.
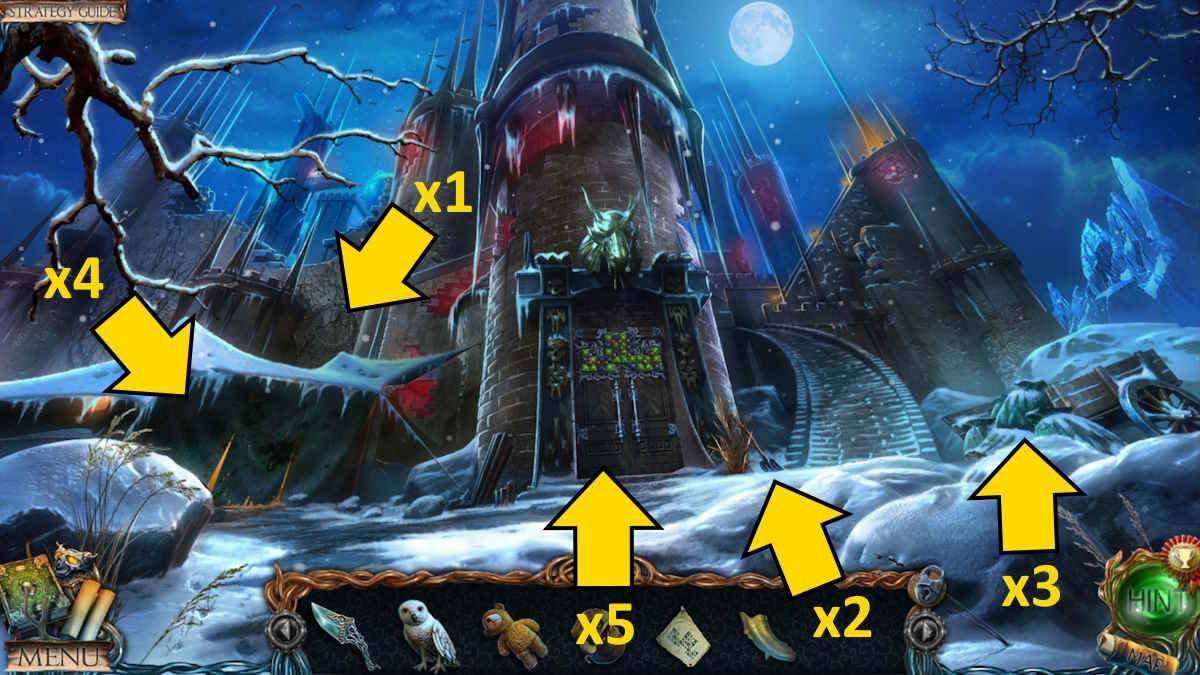
Take the Collectible on the wall (x1), grab the Shovel (x2) and some Coins (x3), and then click the tent (x4) to reveal a simple hidden-object mini-gamer. Once complete, you’ll receive an Oven Mitt. Return to the path to the castle, use the shovel on the snow (w4), and take the Hammer. Place the hammer in the hands of the dwarf statue (w5) and it will topple, revealing a hole from which you can take a third Statue Head. You should also send the owl down to collect a Valve in the same close-up.
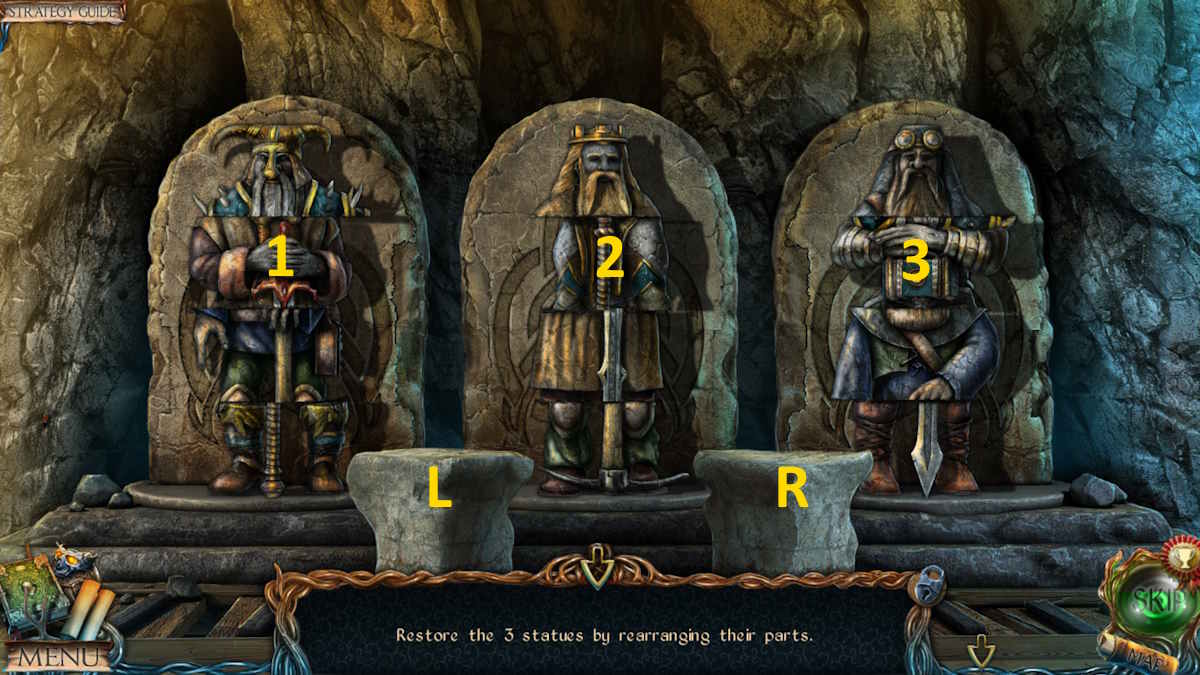
Return to the caves, place the three statue heads on the statues there (o3), and complete the puzzle. You need to move pieces from the three statues (1 to 3 above) and place them on the two plinths (L and R) to help you put all the statute pieces in order (where I’ve written x2 or x3, you need to move several pieces from one place to the same place in a row). I’ve listed a solution below. Once complete, take the Mosaic Pieces.
- 2 to L x3, 1 to R x2, 1 to 2, L to R, L to 1
- 3 to L, 3 to 1, 3 to 2, L to 2
- R to 3 x2, L to 3, R to 1
The demon statue room mosaic puzzle
Now go to the demon statue, add the mosaic pieces to the floor pattern (r5), and rearrange the pieces until they match the image above. Once complete, it will slide open and allow you to take some Buttons, and read a note about the demon in the statue.
Back at the castle, move up to the viewing point, where you’ll find a Collectible by the machine (y1). Select the book (y2) to find some Coal and a Blank Piece of Paper. Move back to the lift and use them on the board (u4) to make a copy of the picture of a Dining Set.
The throne room door puzzle solution
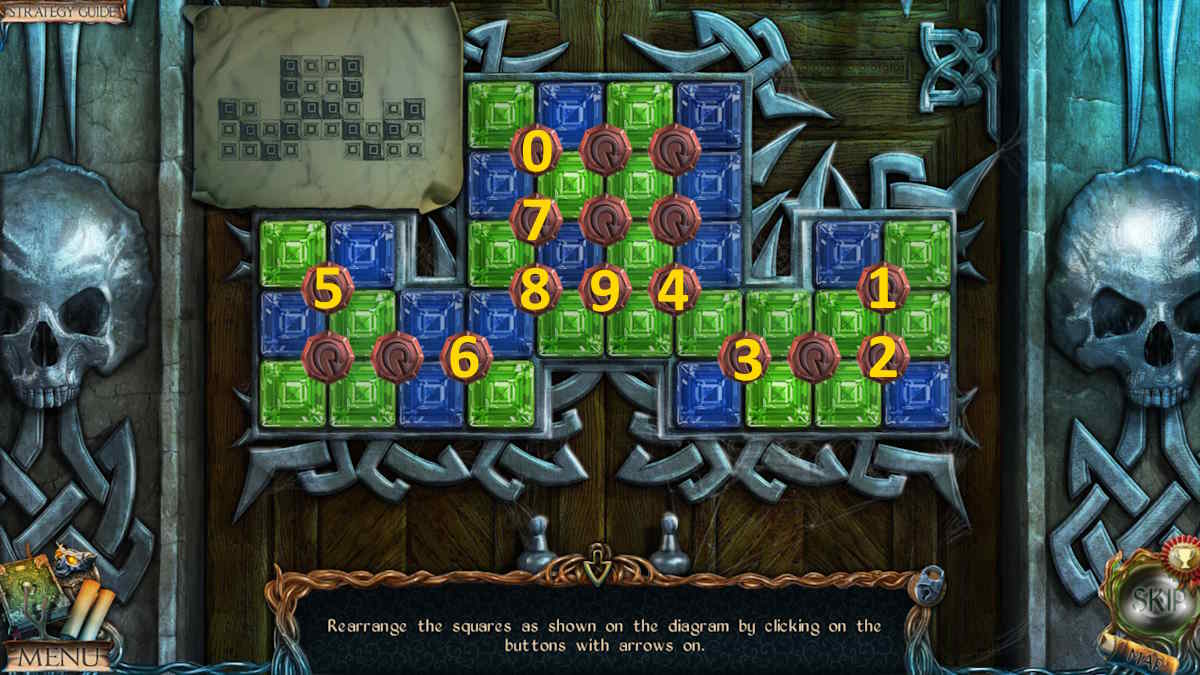
Select the door (x5) outside the castle and add the diagram and the buttons to start a pattern puzzle. Click the numbered buttons the number of times each as indicated below, which will make the green and blue squares match the diagram. Once complete, you’ll be able to enter the throne room.
- 1 once
- 2 twice
- 3 three times
- 4 once
- 5 once
- 6 once
- 7 once
- 8 twice
- 6 again (once)
- 9 once
- 0 once
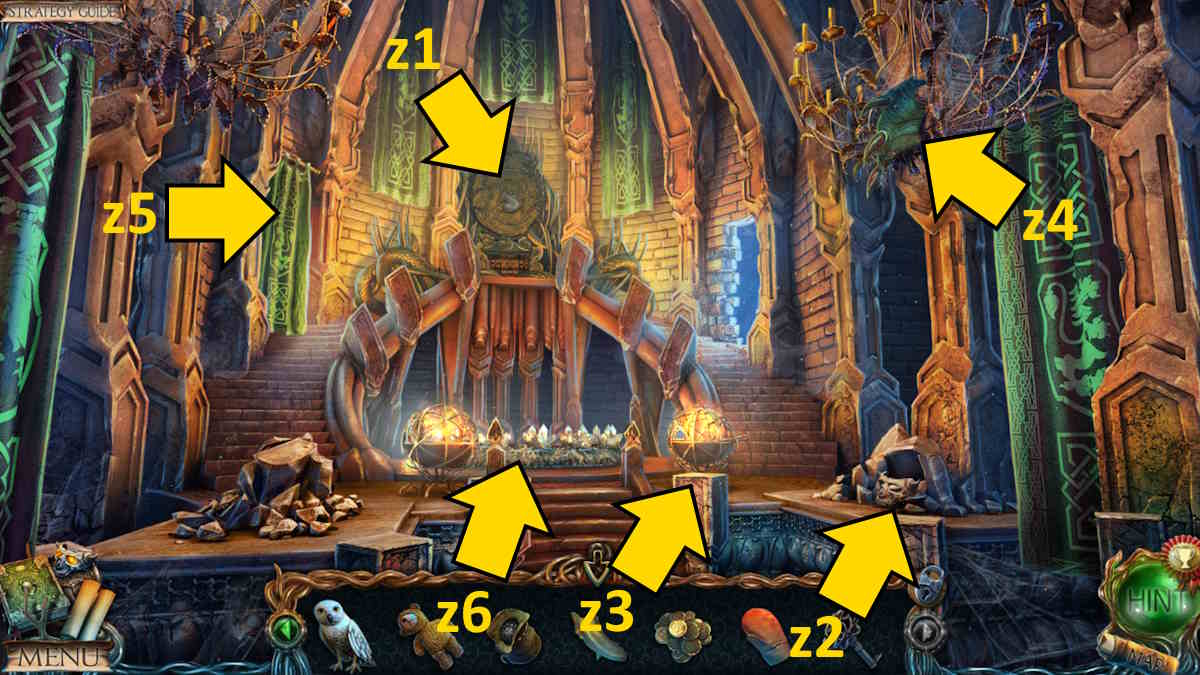
Once inside the throne room, talk to Uri’s brother (at z1), who will run off after giving you a Key. Grab the Collectible from the pile of rubble (z2), and then use the oven mitt to take the Sword (z3) from the brazier (along with the Fire Symbol in the same close-up). Send your owl up to collect another Bas-Relief Piece (z4), move the curtain (z5) to reveal the passageway to the corridors, and move there. You can add the bas-relief pieces to the wall (at z1) as you go if you like to keep a tidy inventory, but it’s not essential.
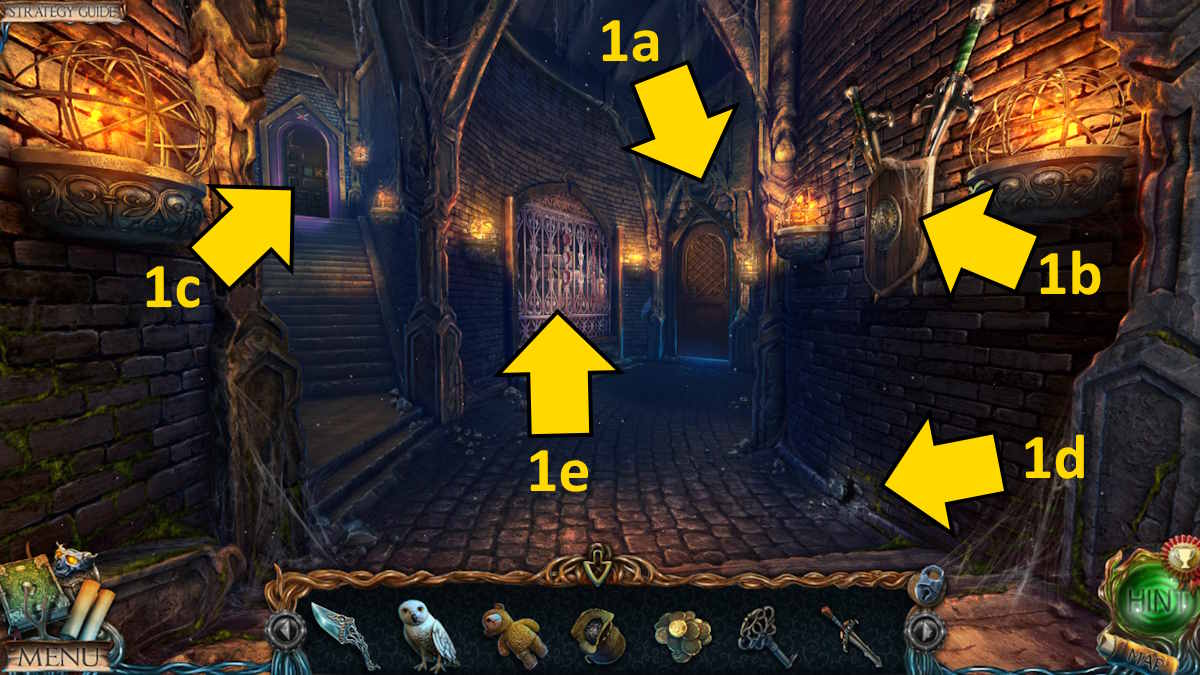
Grab the Collectible from above the door (1a) and then click each of the two swords in the shield close-up (1b) to make another Bas-Relief Piece drop down for you to collect. Use the key on the right door (below 1a) to open it and find Jimmy, but he has had a spell cast on him and won’t listen to you. Two animated guards also block your path. Once you’ve opened the door, click it again to get a look at the halberds blocking the door and note the pattern on the left one.
Move to the exit to the dirigible, take the Collectible from the wall (2a), use the sword to break the ice on the fountain (2b), take the Object in Ice, and click the pattern in green in the same close-up to note the pattern.
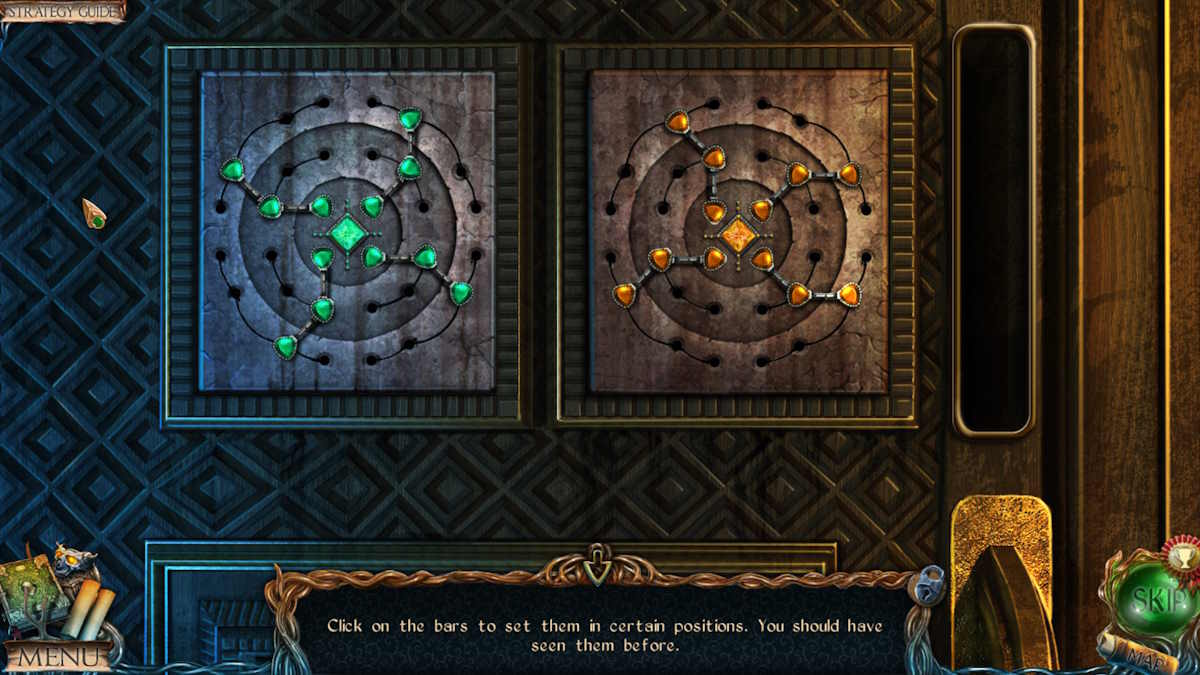
Return to the corridors, select the door on the left, and copy the green and orange patterns you’ve recently uncovered to manipulate the plates on the doors (1c) and open them up (see above), gaining you entry to the dwarf’s room.
The dwarf’s room object placement puzzle
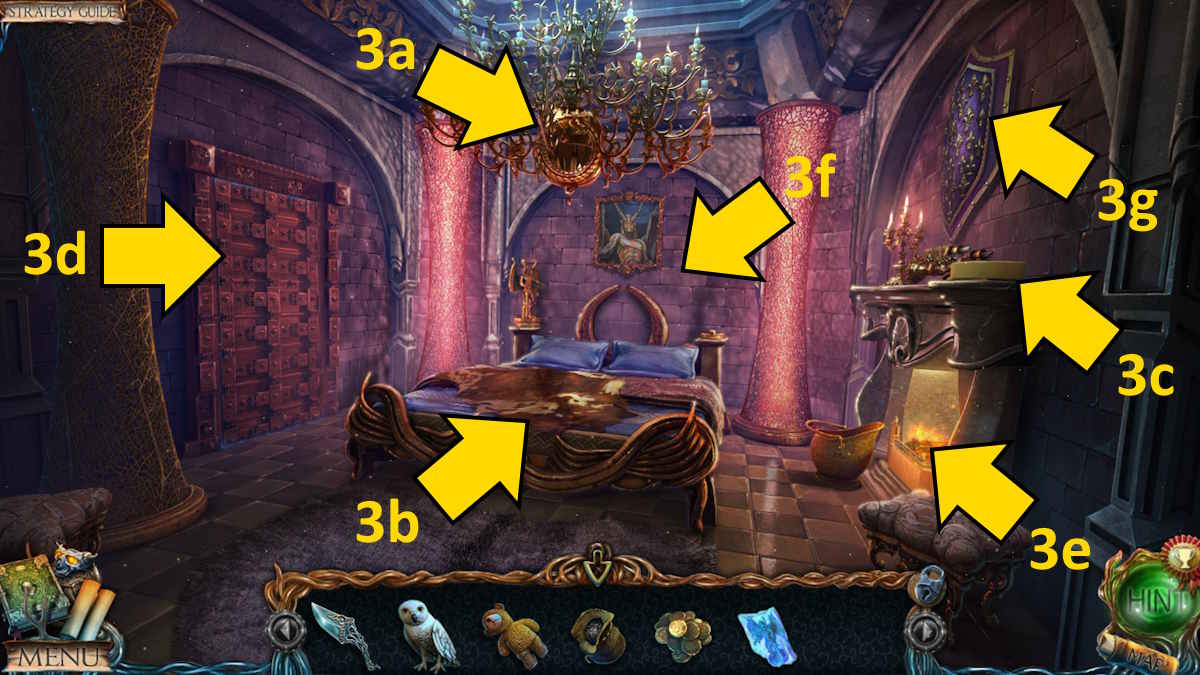
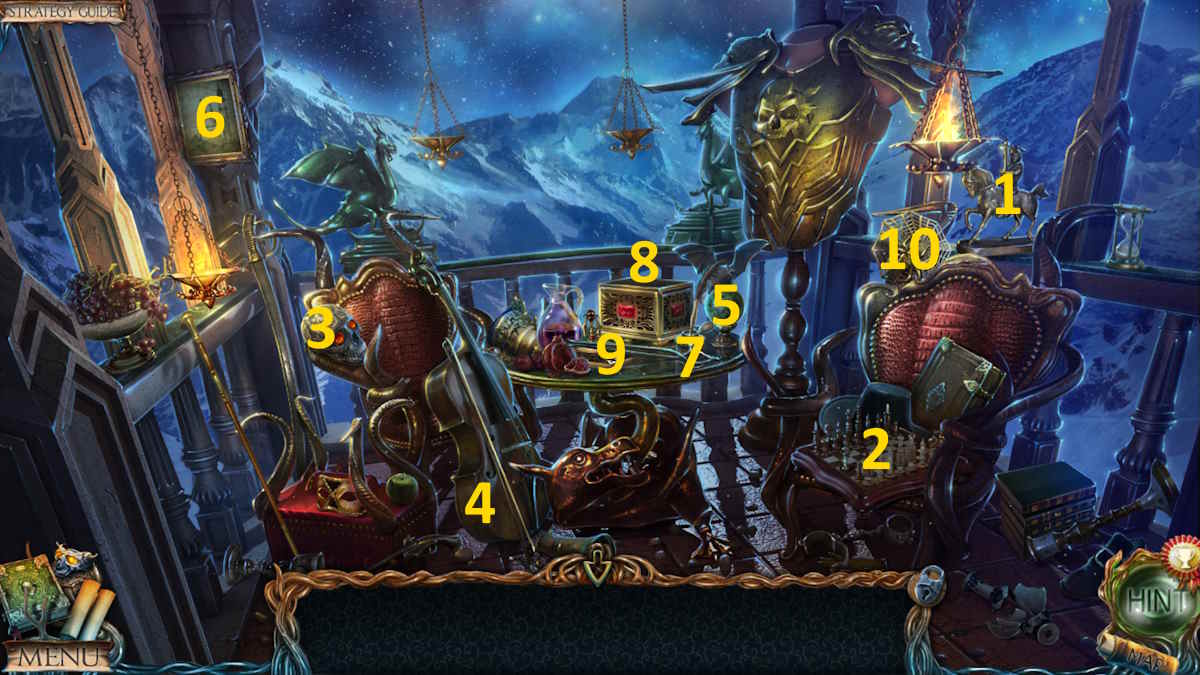
Head inside and talk to the spirit alchemist, who tells you everything you need can be found in his tower. Take the Collectible from the chandelier (3a), move the skins on the bed (3b) to find a Symbol, use the dagger to get a Piece of Cheese (3c), and then click the doors (3d) to begin an object-placement mini-game. The solution is below. Once complete you’ll receive the Pincers.
- The Knight on the horse
- The Chess Piece on the board
- The Ruby in the skull
- The Bow on the cello
- The Wing on the bat
- The Picture in the frame
- The Quill in the ink pot
- The Tobacco in the pipe (you need to open the box first)
- The Pincers on the table
- The Spider in the web
Put the object in ice into the fire (3e) and then remove the Statuette with the pincers. Attach the statuette to the bed (3f) to reveal a secret compartment and take the Pieces from inside, also reading the note about transference.

Go back outside to the corridors, place the cheese in the hole (1d), and catch a Rat. Move to the throne room next and add the mosaic pieces to the mosaic (z6). Rearrange them to match the image above. You can’t go wrong here, as the pieces go dark as you drop them into the correct spots and you can make the image in any order. Once complete, take the Symbol and a Propeller Blade.
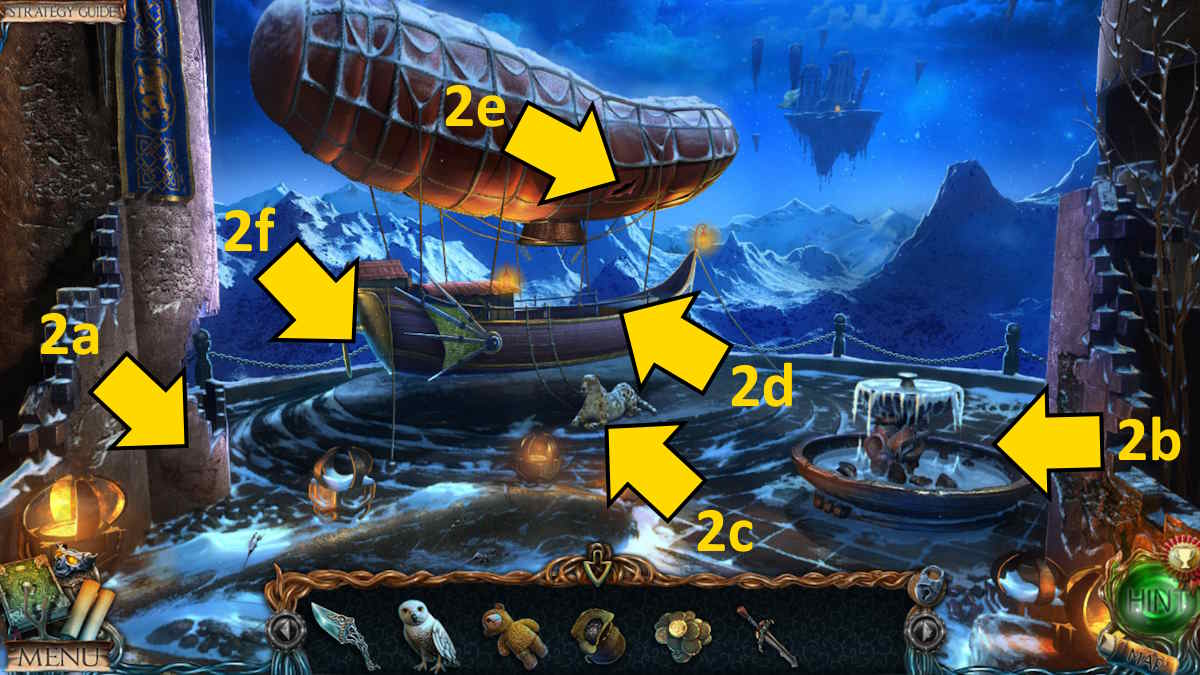
Release the rat near the dirigible and the big cat (2c) will chase it away, leaving you free to access the flying machine. Click it (2d) for a close-up and follow the instructions (look for the highlighted areas on-screen) to assemble the burner. Once done (see above), you can collect the Cups, as well as another Symbol. Come out of the close-up, click the hole in the dirigible (2e), take the Air Symbol, and then click the propeller (2f) to find a Valve. In the same close-up, click the propeller itself to remove the broken blade and then replace it with the one you have in your inventory.
The captain’s cabin cups puzzle, solved
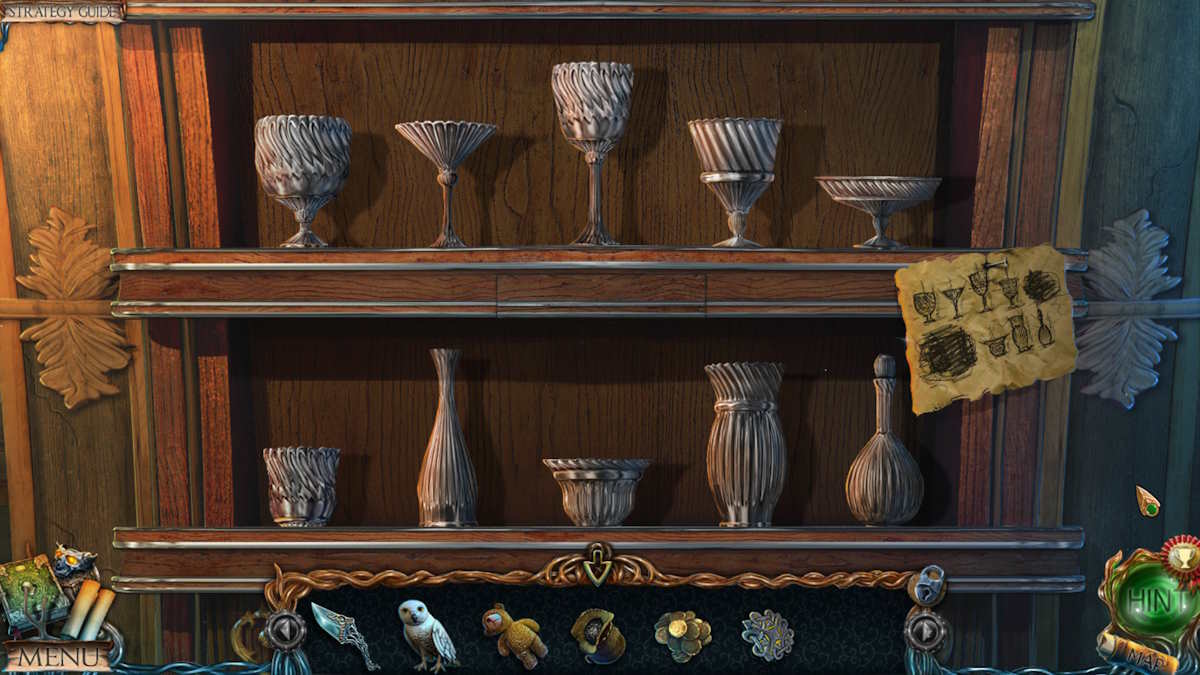
Go right back to the captain’s cabin next, select the shelves (h6), and then add the cups and the dining set diagram to begin a placement puzzle (see the solution above). Afterward, you can take a Book.
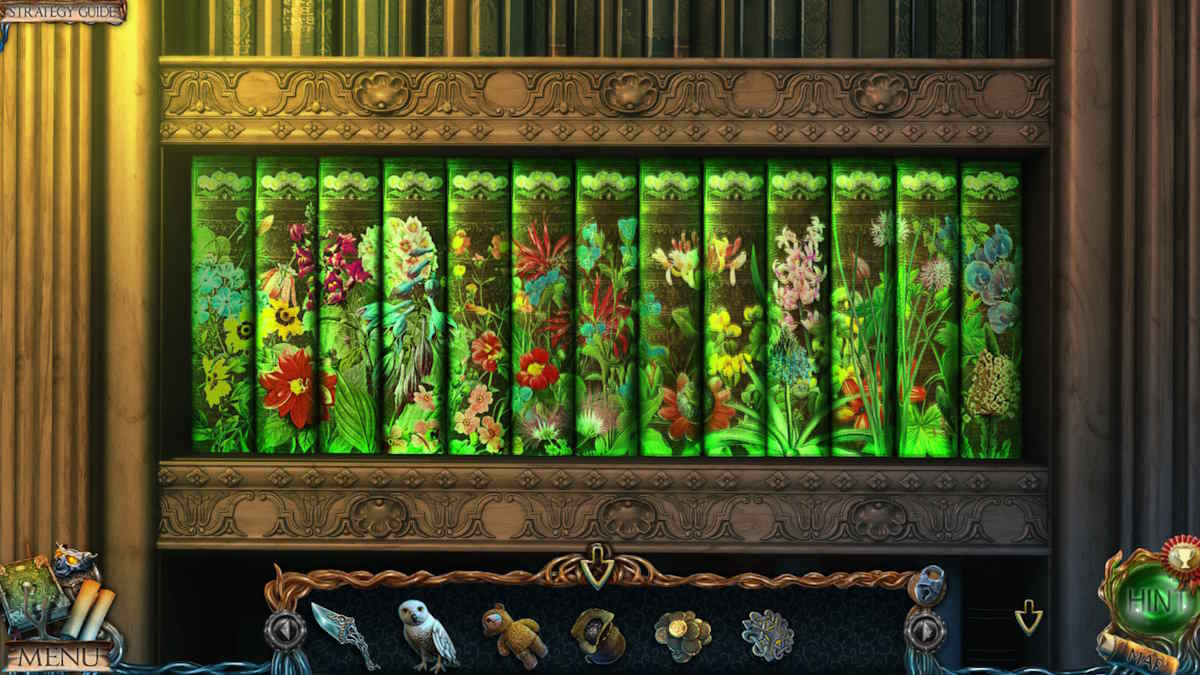
Take the book to the library, add it to the shelves on the left (n5), and complete the book order as pictured above. The books will slide away, allowing you to collect a Water Symbol.
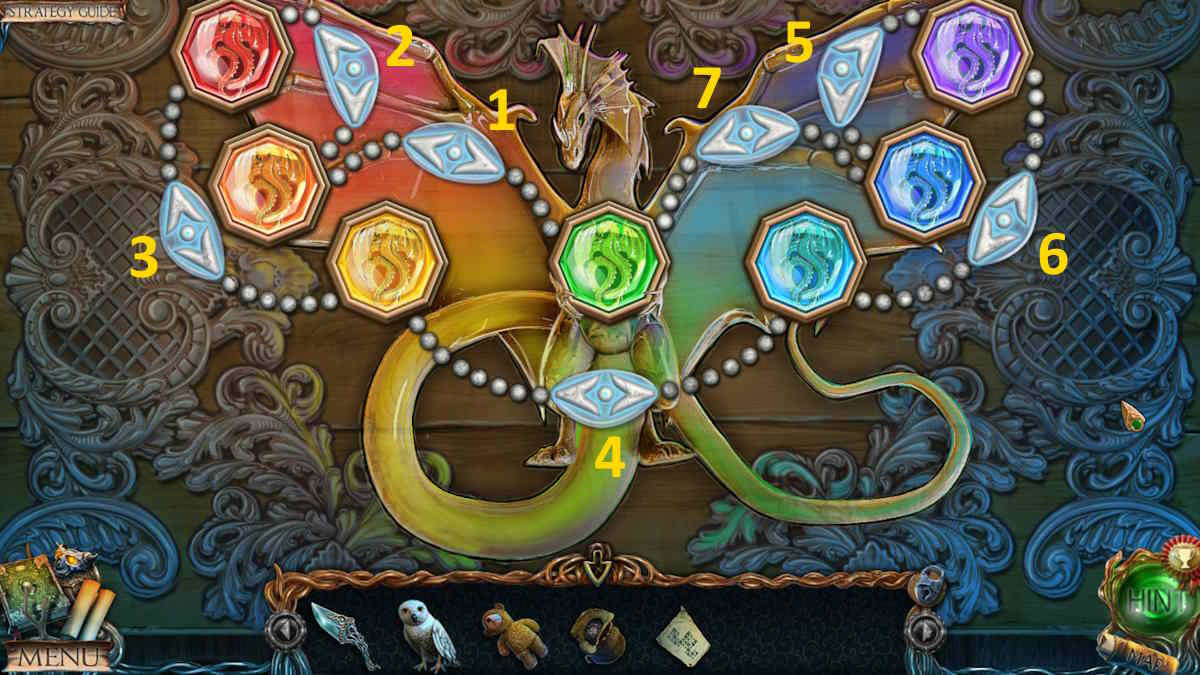
Return to the corridors, add the three symbols to the gates (1e), and examine the model you find behind them. Reassemble the model (see above) and take the Earth Symbol. Move to the viewing point, add the four element symbols to the book (y2), and then open the book.
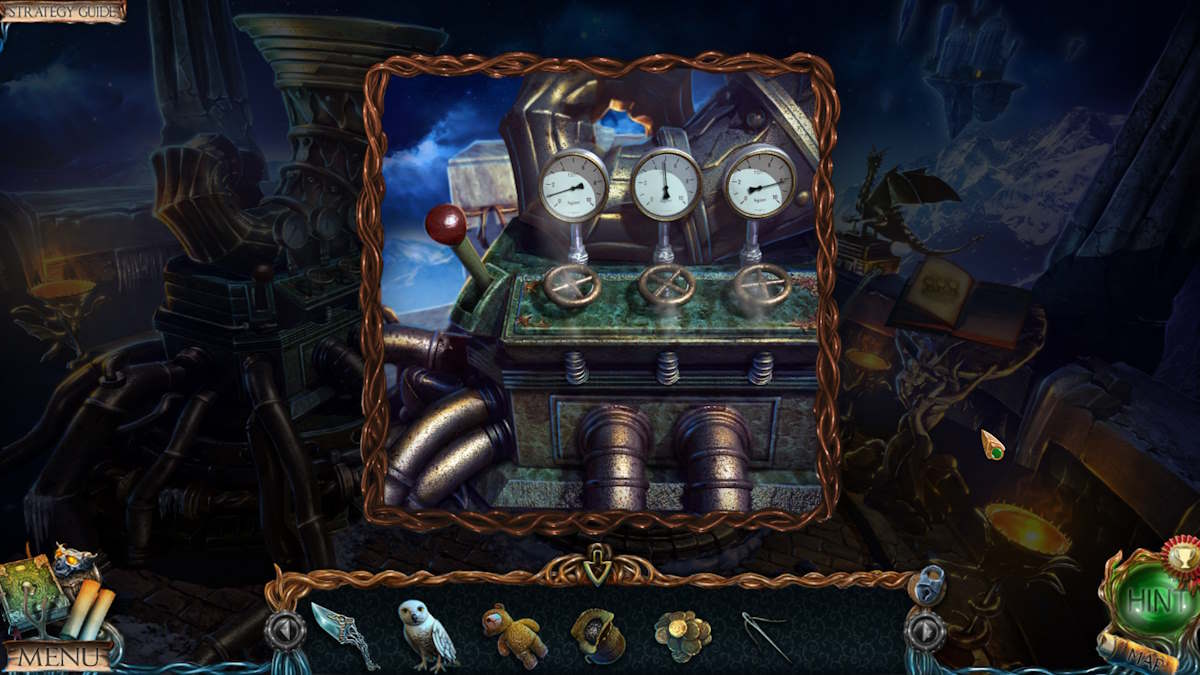
Take the Needle and note the gauge positions in the diagram the needle was in. Set the gauges (y3) as shown (above), and then pull the red handle in the same close-up to sound the horn, which scares away the dragon guarding the tower. Return to the dirigible, use the needle to fix the hole (2e), climb on board (2d) fire up the tanks, and then click the dirigible once more to move on to the alchemist’s tower.
Lost Lands Dark Overlord Chapter 5 Walkthrough: The Alchemist’s Tower
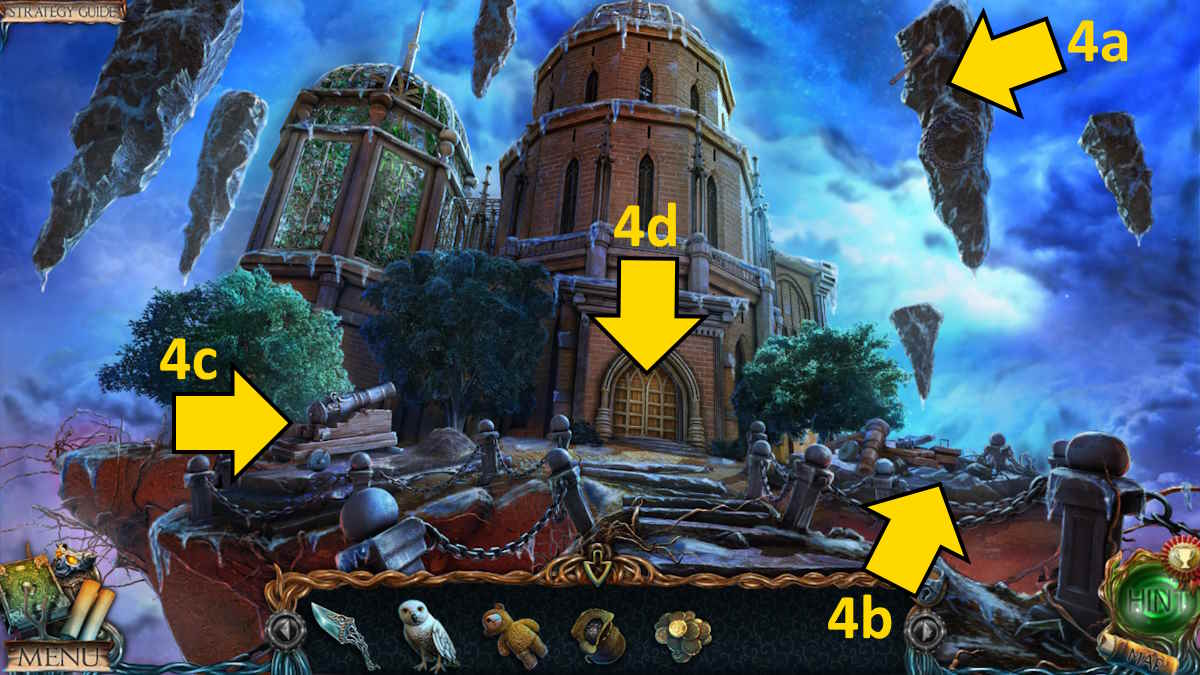
When you arrive outside the alchemist’s tower, take the Collectible from the floating rock (4a) and send the owl up to collect the Ramrod that’s just above it. Take the Mallet and a Cannonball from the broken cannon (4b), using the mallet in the same close-up to knock off and collect a Wheel.
Take the Rune from beside the cannon (4c), pour the gunpowder into the cannon, add the cannonball, and use the ramrod to ready it to fire. Add the wheel in the same close-up, attach it using the mallet, and then click the cannon to move it into position. Click the cannon once more and it will fire, removing the door (4d) and giving you access to the tower hall and the observatory.
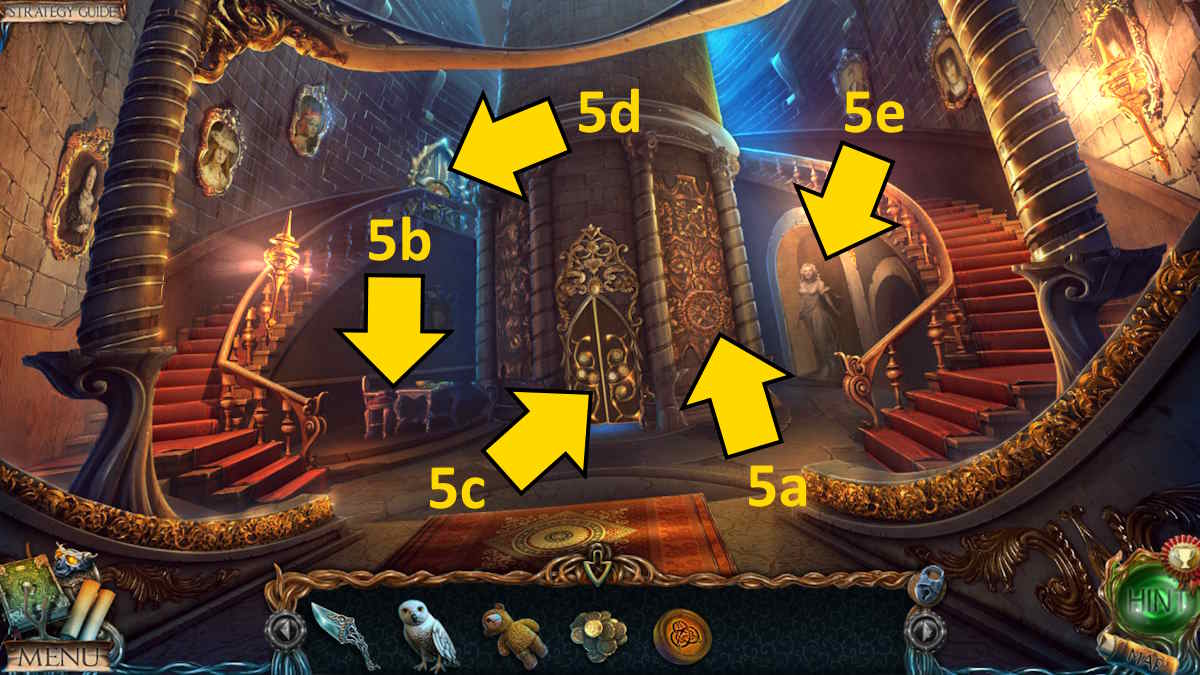
Enter the tower hall, take the Collectible from the right of the door (5a), take the Bas-Relief Piece from the table (5b), read the note there about making the Lunar Tear, and take another Rune.
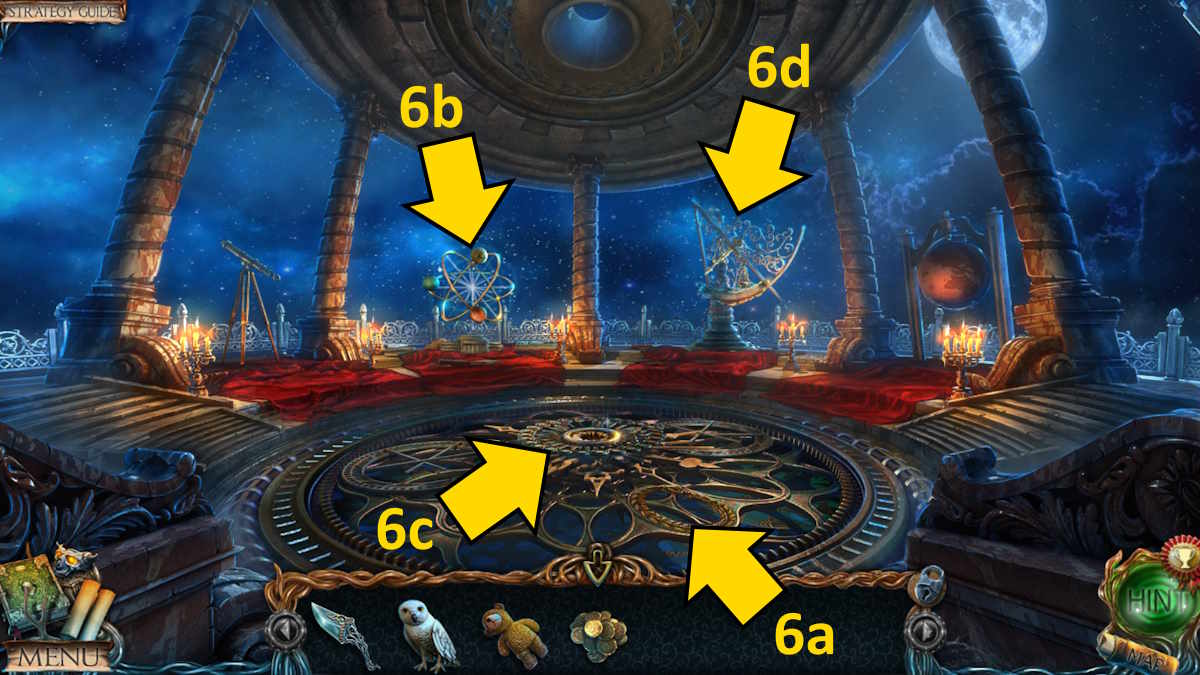
Move to the observatory next, where you’ll find another Collectible on the central mechanism (6a). Select the planet device (6b) for a close-up to find another Rune, as well as another Bas-Relief Piece.
Completing the viewing point pipes puzzle
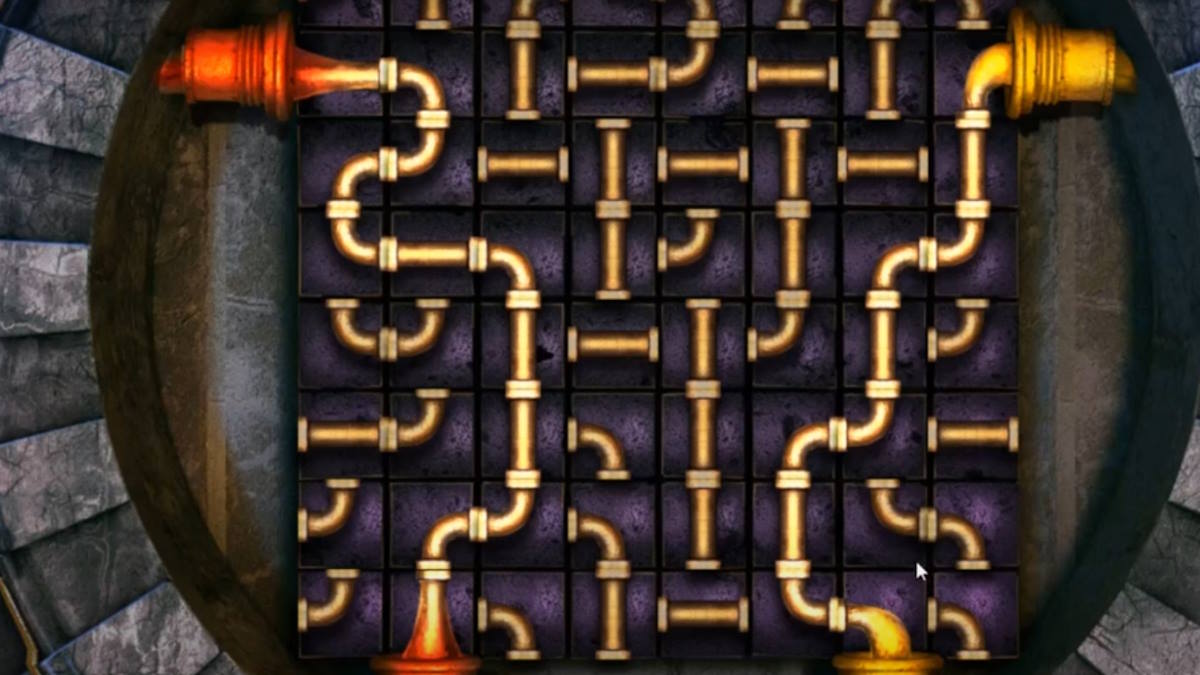
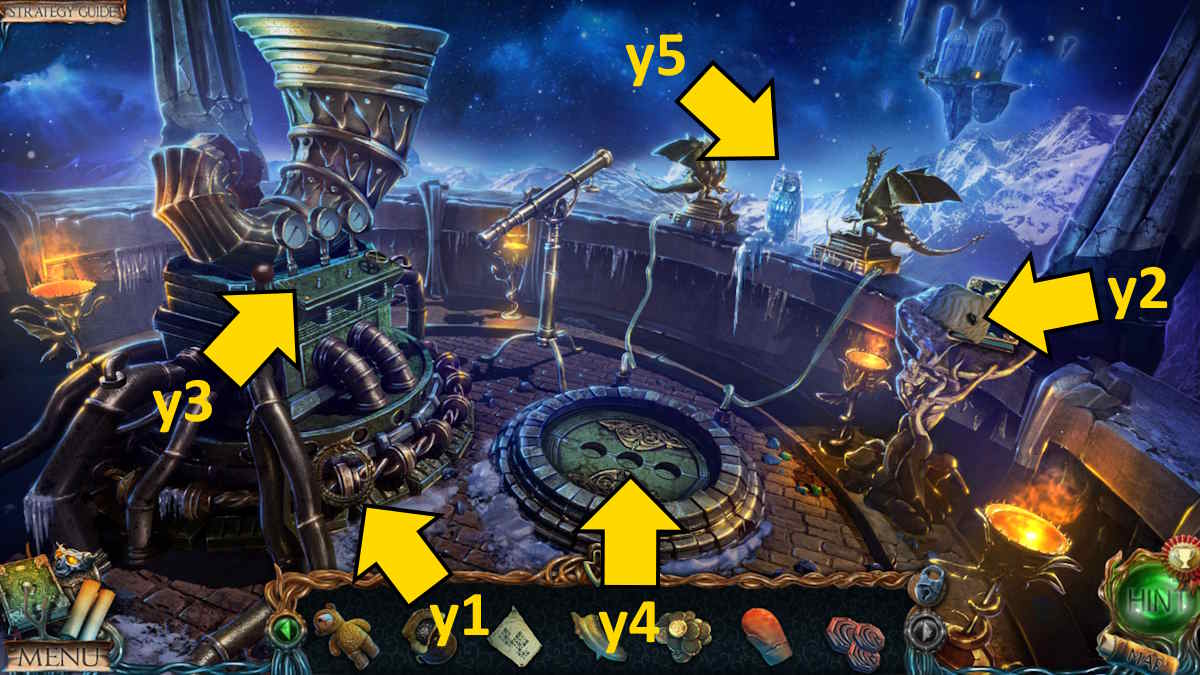
Move to the viewing point, add the runes to the plate in the ground (y4), and complete the pipes puzzle. Both the two red and two yellow sections need to be joined to complete it. I’ve pictured the solution above. Once done, power will flow to the two dragons on the railing (y5). Twist each dragon’s head so they burn away the ice, and take the Glass Owl.
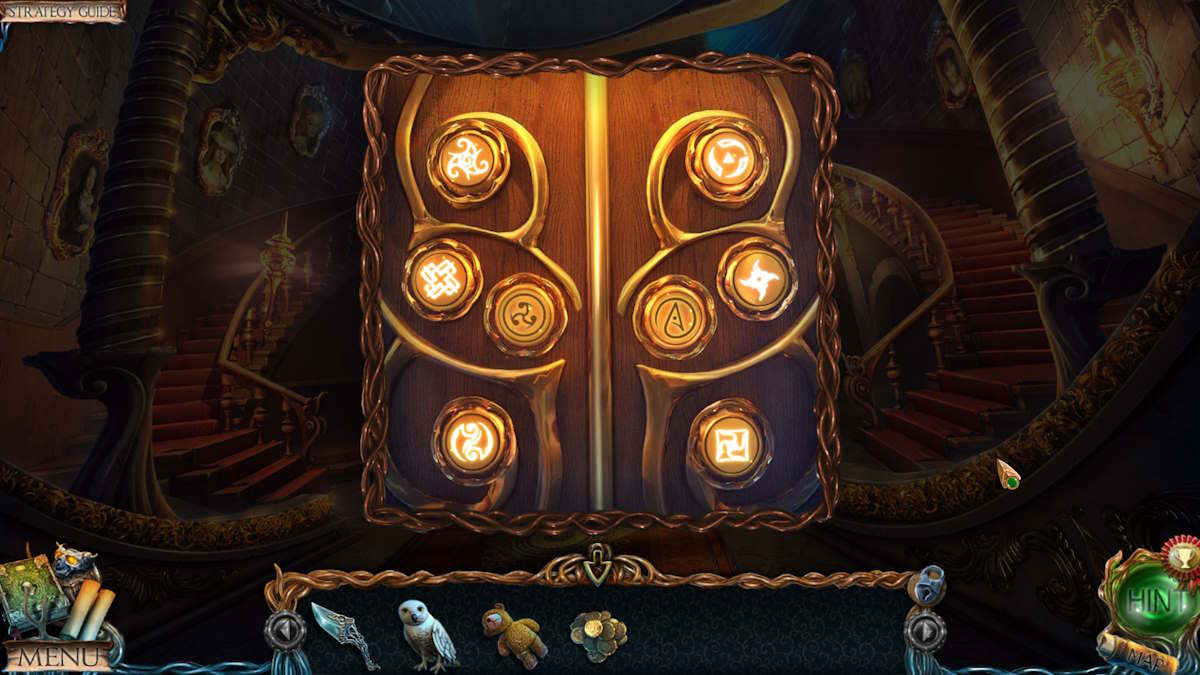
Head to the path to the castle and add the owl to the broken statue (w6), powering it up. Note down the symbols revealed. Go back to the tower hall, select the correct six symbols on the door (5c, see above), and move into the alchemist’s laboratory.
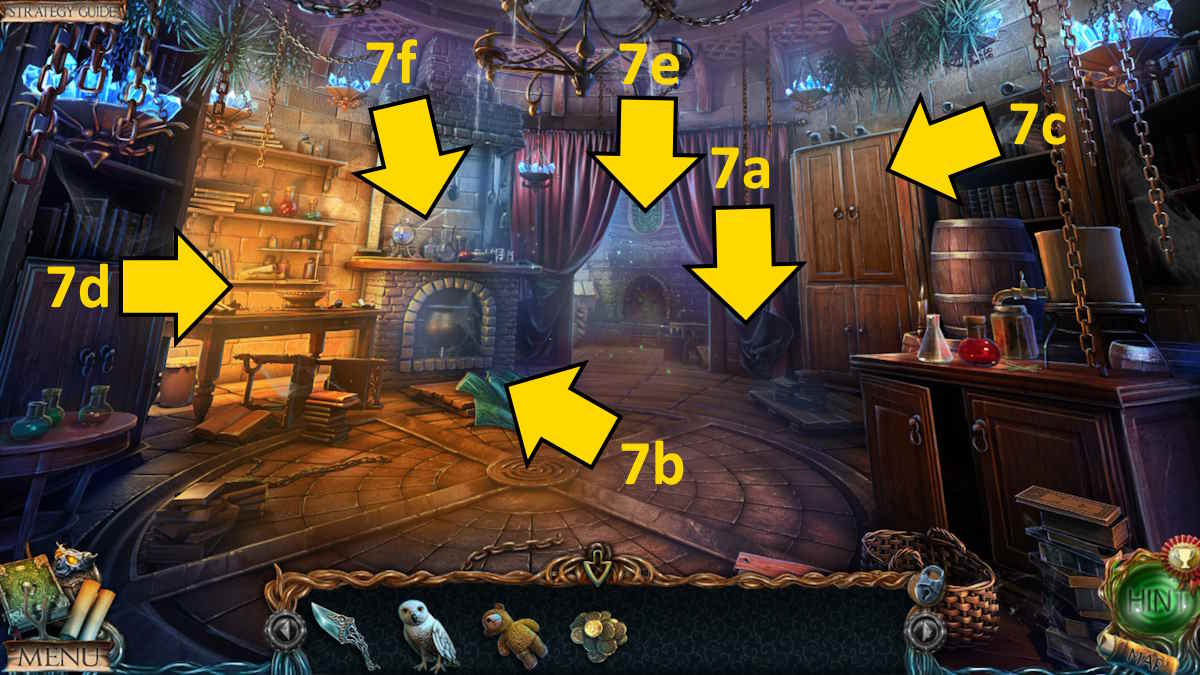
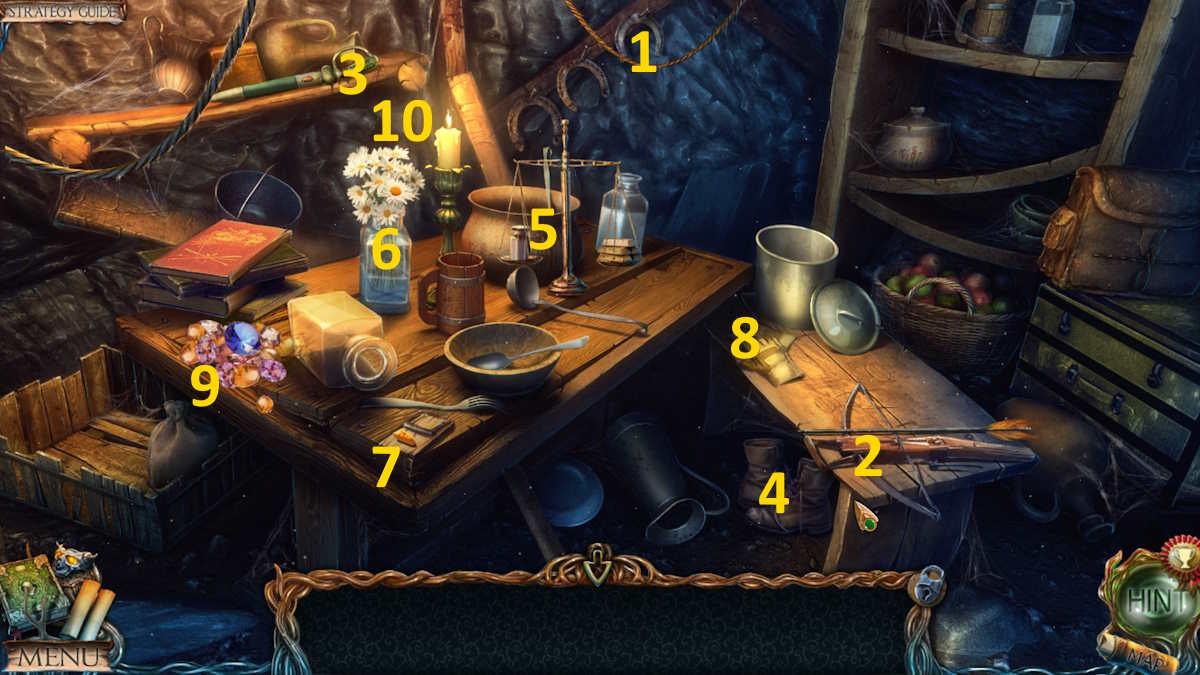
After talking to the alchemist, you’ll find the final Collectible for the mystic collection at the base of the curtain (7a). Take another Bas-Relief Piece from the floor (7b), take the Aconite from the table (7c), the Rails plus a Flask from the top of the cupboard (7d), and then select the back of the room (7e) to trigger an item-collection mini-game.
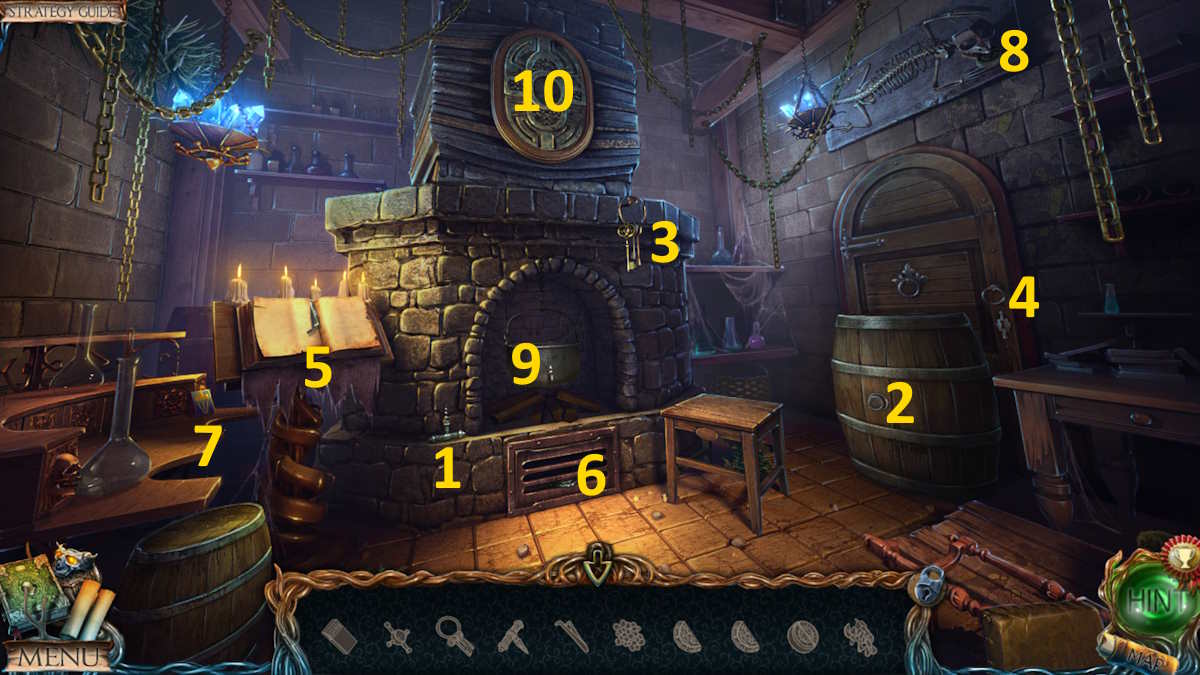
- Grab the Corkscrew (1) and use it to empty the barrel (2)
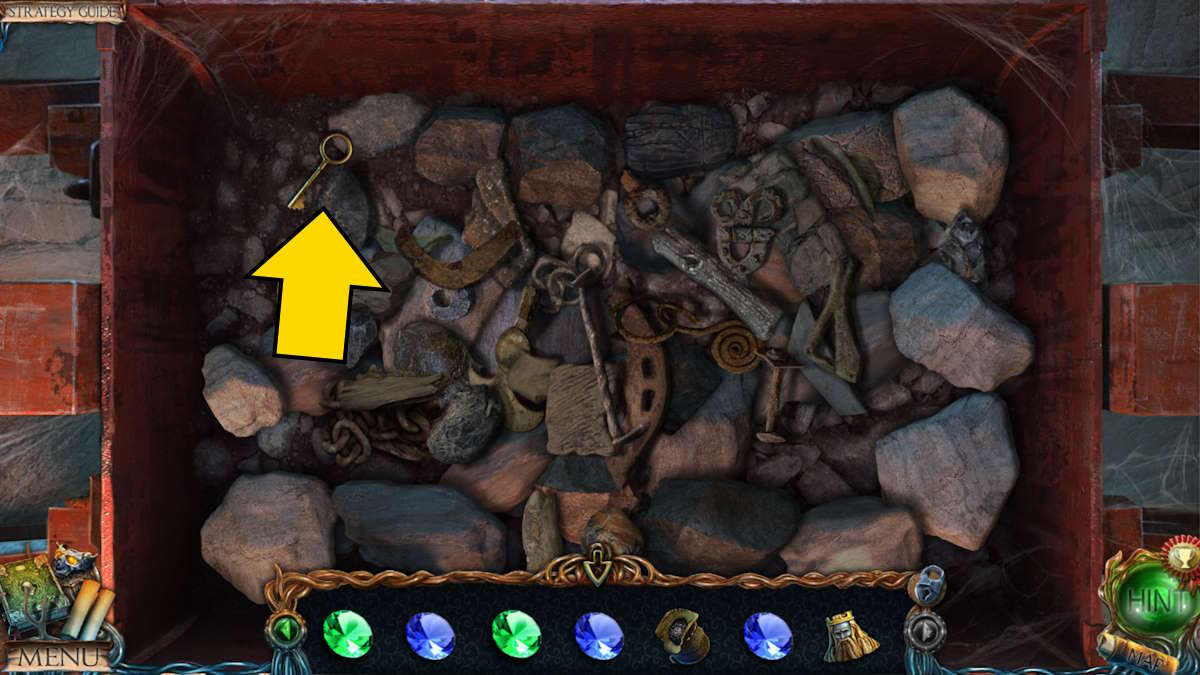
- Click the barrel again to move it, take the Key (3), and open the door (4)
- Take the Lead Figure and Valve from inside the cupboard behind the door (4)
- Get the Tweezers from the lectern (5) and use them to get a Medalion Half from the grate (6)
- Grab the Matches (7) and the Mold (8), light the fire (9), add the valve to the pot in the same close-up, and melt the lead figure
- Place the mold below the tap, use the tap, and click the filled mold to get the second Medallion Half
- Place the two medallion halves in the shield (10), which opens, allowing you to take the Dried Nightshade Berries.
Go way back to the underground descent in the mountains, remove the cloth from the box there (q4), and add the rails to the top of the box to start a wagon movement puzzle. You need to move the wagon along the rails so that it covers all of them. If you’re stuck on this one, I’ve included a solution above. When the box opens, take the Bas-Relief Piece and Circle Segment from inside.
Take the segment to the tower hall, add it to the circle at the top of the stairs (5d), and then line up all the pieces by using the slots on either side to help rearrange the segments. See the completed image above. Once complete, you can click the door there (5d) to enter the greenhouse.
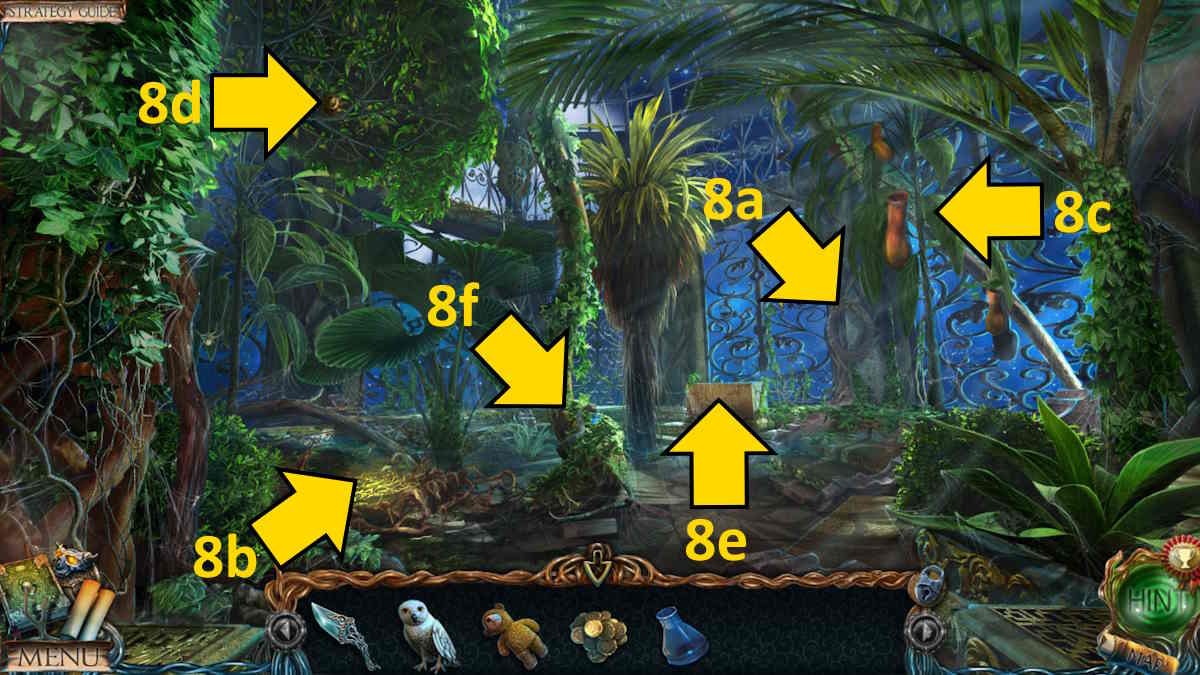
You’ll find the Collectible on the wall (8a), use the dagger to cut back the roots (8b), move the leaves (8c) to find a Trowel and send your trusty owl up to get the Sun Figurine from the tree (8d).
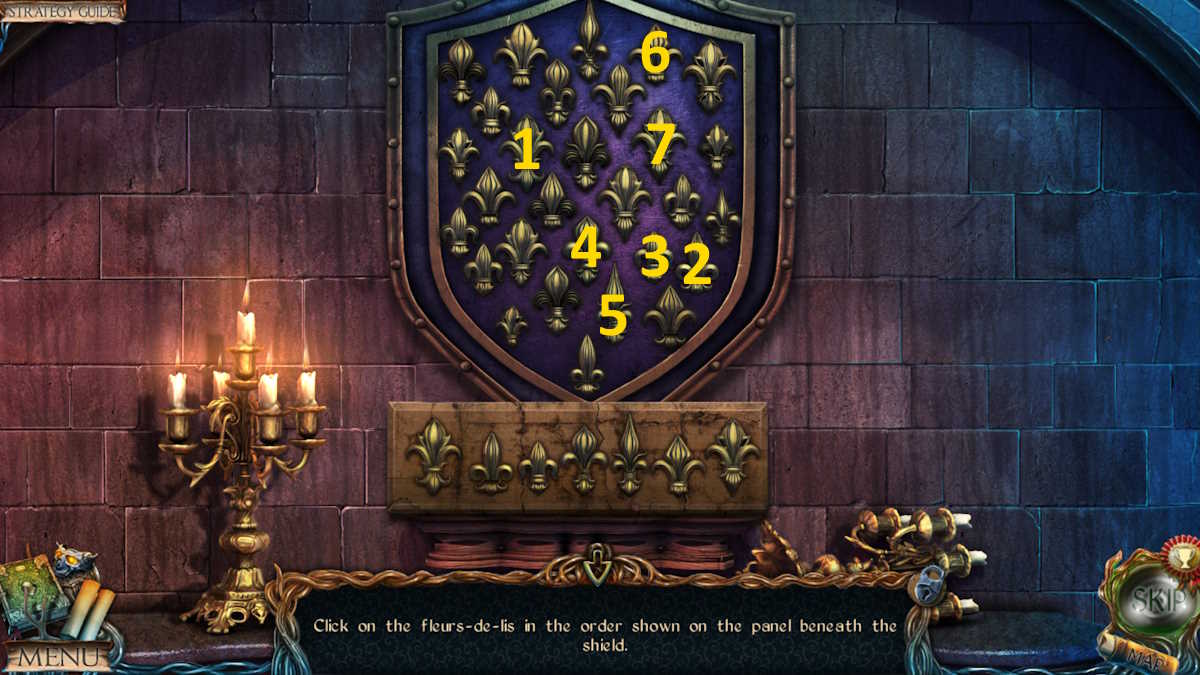
Use the sun figurine on the floor in the middle of the observatory (6c) to start the machine and free the Tablet Piece. Take the piece to the dwarf’s bedroom, add it to its other half beneath the shield on the wall (3g), and then click the seven fleurs-de-lis (shown on the tablet) on the shield in the correct order (see above). The shield will slide across, allowing you to take a Glove and a Bas-Relief Piece.
Return to the greenhouse, use the trowel in the dirt (8e), and use the glove to pick up the Mandrake Root. Also, don’t forget to take the Key that this uncovers in the hole. Use the key to open the cupboard in the alchemist’s lab (7c) and take the Pyramid, Dropper, and Recipe from inside. Put the recipe on the table (7d) to finally see the ingredients required for the philosopher’s stone.
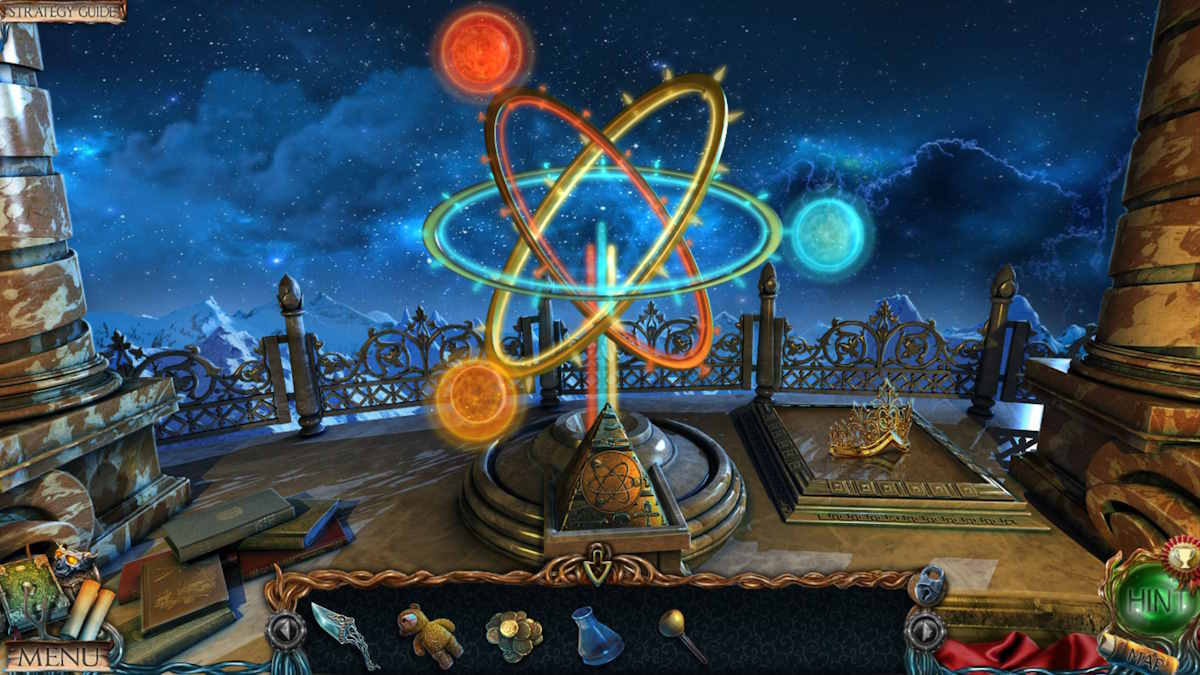
Move up to the observatory, place the pyramid on the planet machine (6b), and once it activates drag the planets to their correct locations (see above). A Crown will appear to the right of the machine, so pick it up. Take the crown to the tower hall, place it on the statue head (5e), and you’ll gain entry to the indoor patio.

Take the Collectible from the rock on your left (9a), which should complete your final collection. Take yet another Bas-Relief Piece from the steps (9b), a Mosaic Piece from the pond’s edge (9c), and pick a shell out of the water in the same close-up. Use your dagger to open the shell and take a Pearl. Finally, use your flaks here to get a Flask of Water.
Grab a Lens from the roses (9d), and then keep clicking and collecting Rose Buds in the same close-up until you have seven. Now click the pergola (9e) to start a simple item collection mini-game. At the end, you’ll receive a Scale Dish.
Completing the greenhouse disc puzzle
Head to the greenhouse and use the dropper on the orange plants (8c) to get Pitcher Plant Nectar. Now add the mosaic piece to the pattern you uncovered beneath the cut roots (8b) to begin a disc-moving puzzle. Click the four segments in the order shown above, then the segment marked 1 three more times to complete it and get the final Bas-Relief Piece, along with a Flute. Now use the flute to charm the snake (8f), allowing you to take some Snake Scales and Copper Powder. Finally, add all the bas-relief pieces to the bas-relief (z1) in the throne room to receive the Dragon’s Blood.
Go to the alchemist’s lab next. Select the shelf (7f), place the mandrake on the board, slice it with the dagger, and add it to the mortar (bowl). Put the aconite and rose buds in the mortar too, and mix them with the pestle that’s already on the table. Place the berries in the container on the Bunsen burner, which will drip into the central container. Add the nectar from your inventory, and then pour in the contents of the bowl. Take the Life Potion.
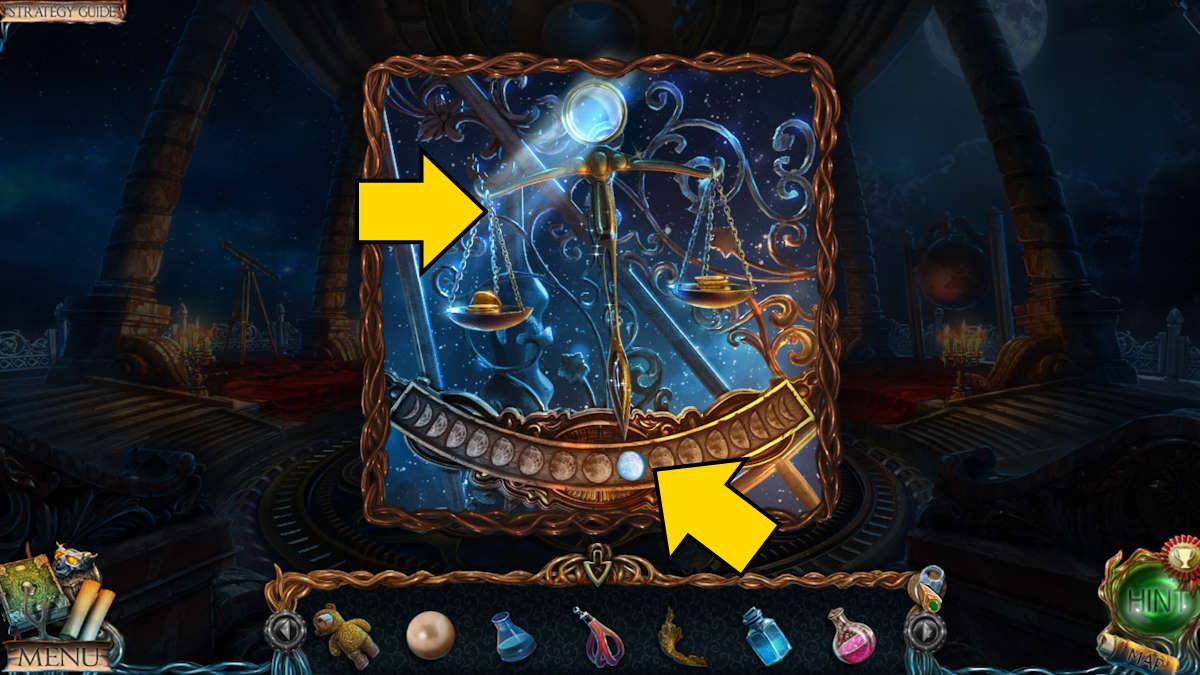
Head to the observatory once more, add the scale dish to the scales (6d), and then add the coins to the dish on the left. Move coins one by one from there into the dish on the right until the scales trigger (see above). Add the lens, and then use the flask of water where the lens is shining (in the same close-up) to get the Lunar Tears.
Creating the Antiphilosopher’s Powder
Move to the underground lake shore and give the life potion to the Mountain Spirit, who will repay you by giving you a Living Stone. Return to the lab, select the table (7d), and follow the instructions:
- Put the dragon’s blood in the bowl (1)
- Add the copper powder (1)
- Use the mortar and pestle (2, 3) to grind the snake scale and add it to the bowl
- Use the mortar and pestle (2, 3) to grind the pearl and add it to the bowl
- Use the pestle (3) to mix the contents of the bowl (1)
- Add the living stone to the bowl (1), pour over the lunar tears, and use the pestle (3) in the bowl
You can now take the Antiphilosopher’s Powder. Return to the demon statue room, add the powder to the statue (r6), and destroy it forever! Congratulations, you’ve completed the main game.
To solve the bonus chapter, check out my Lost Lands 1 Bonus Chapter Walkthrough - Dark Overlord. If you're looking for more puzzle adventure walkthroughs here at Pro Game Guides, check out Haunted Hunt Walkthrough (Adventure Escape Mysteries)!