While most puzzles in Darkness and Flame 2 can be solved if you watch for minor details, some of them had me scratching my head during a playthrough. To help you out, here's a complete Darkness and Flame 2 walkthrough that will guide you through the game step by step.
How to beat Darkness and Flame 2 - Full Walkthrough
Darkness and Flame 2 is divided into tasks you must complete to progress the story and move to different areas. Remember that selecting objects to zoom in will help you find hidden objects in this Adventure Escape Mysteries game. I've prepared image galleries for each task so you can easily find Darkness and Flame 2 Guide puzzle solutions.
Task 1 – Wake up Colin
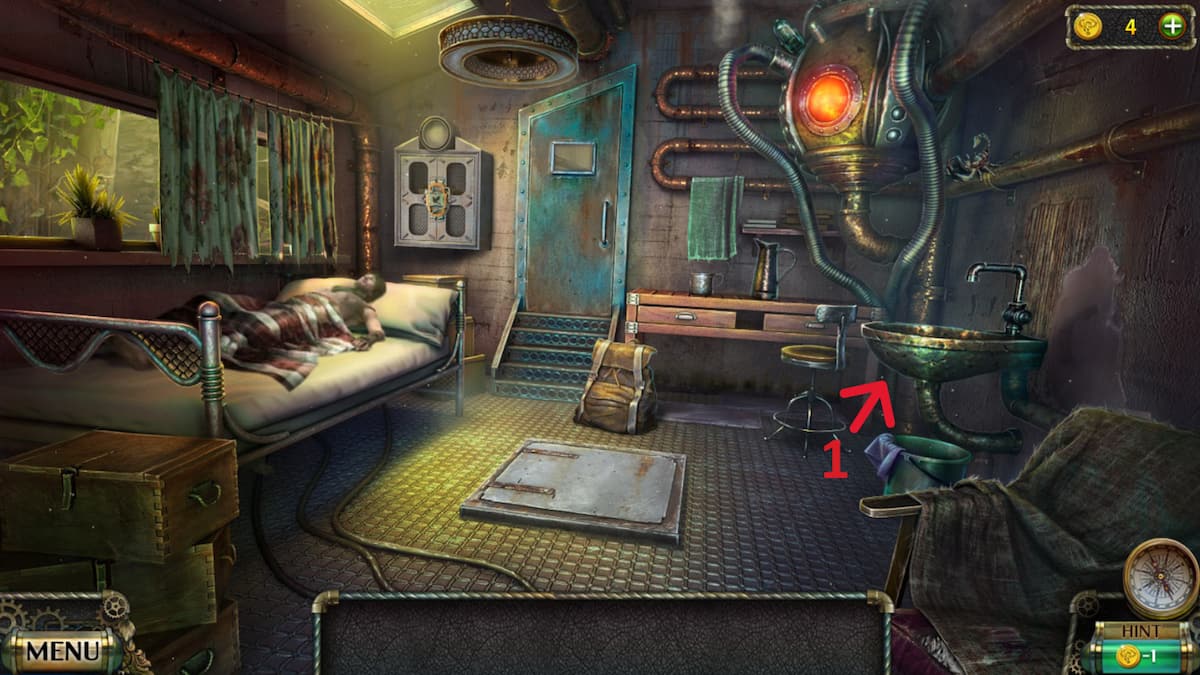
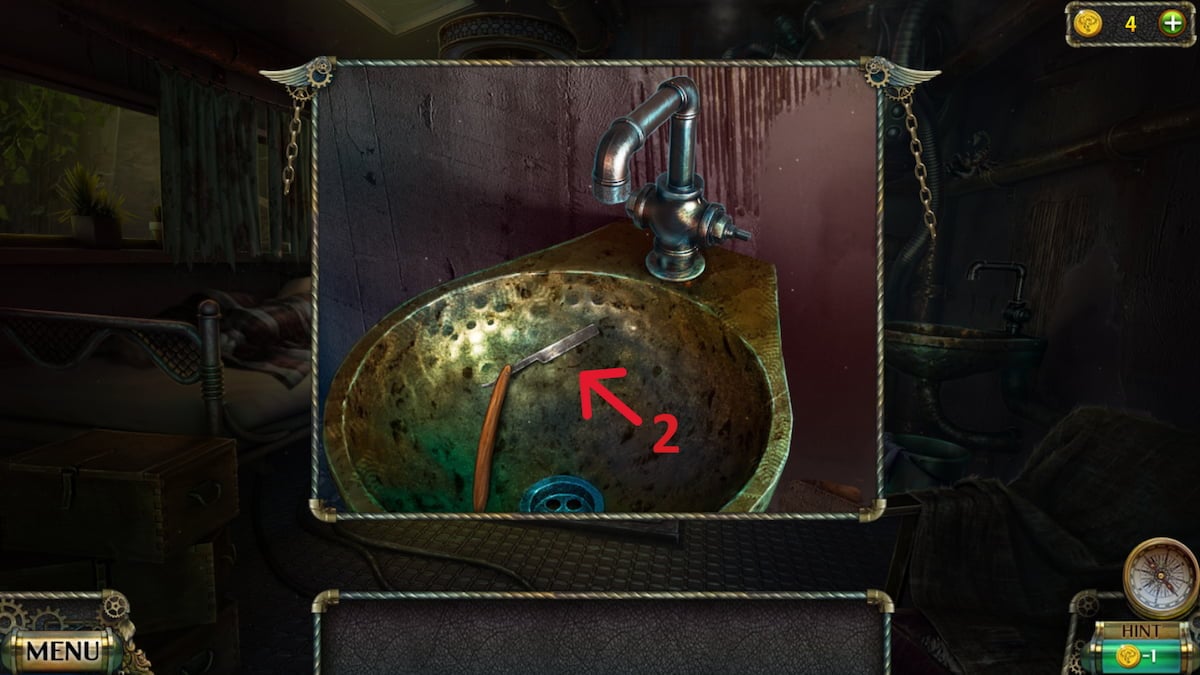
- Select the sink (1) and take the razor (2).
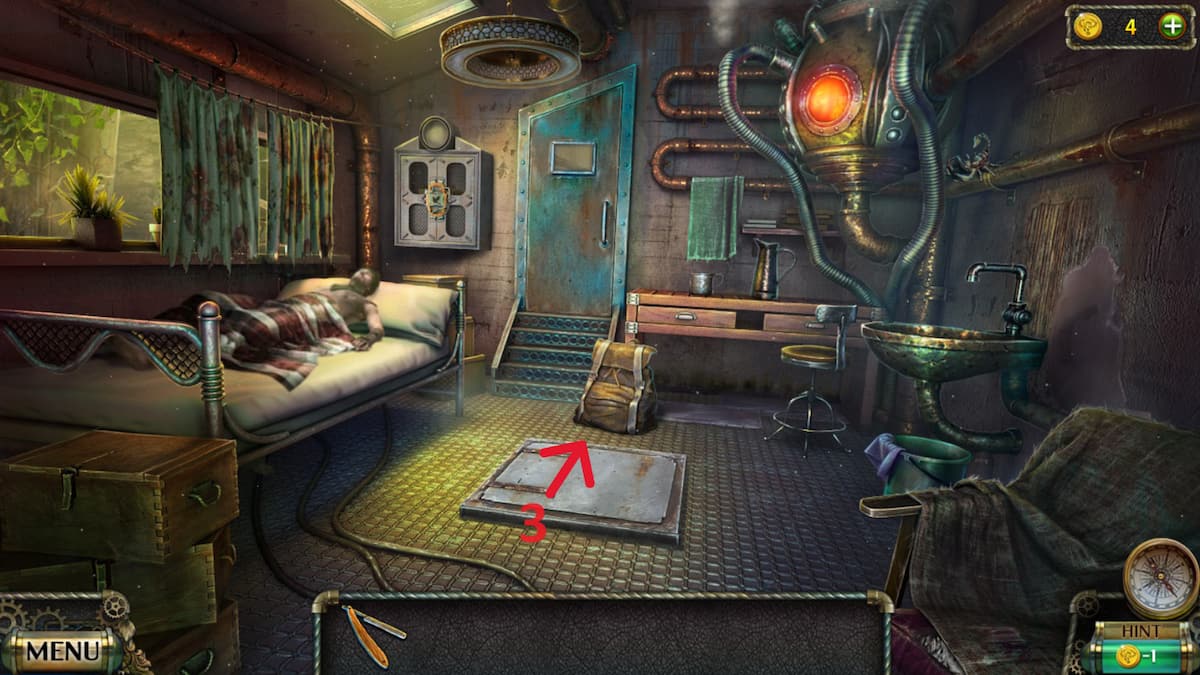
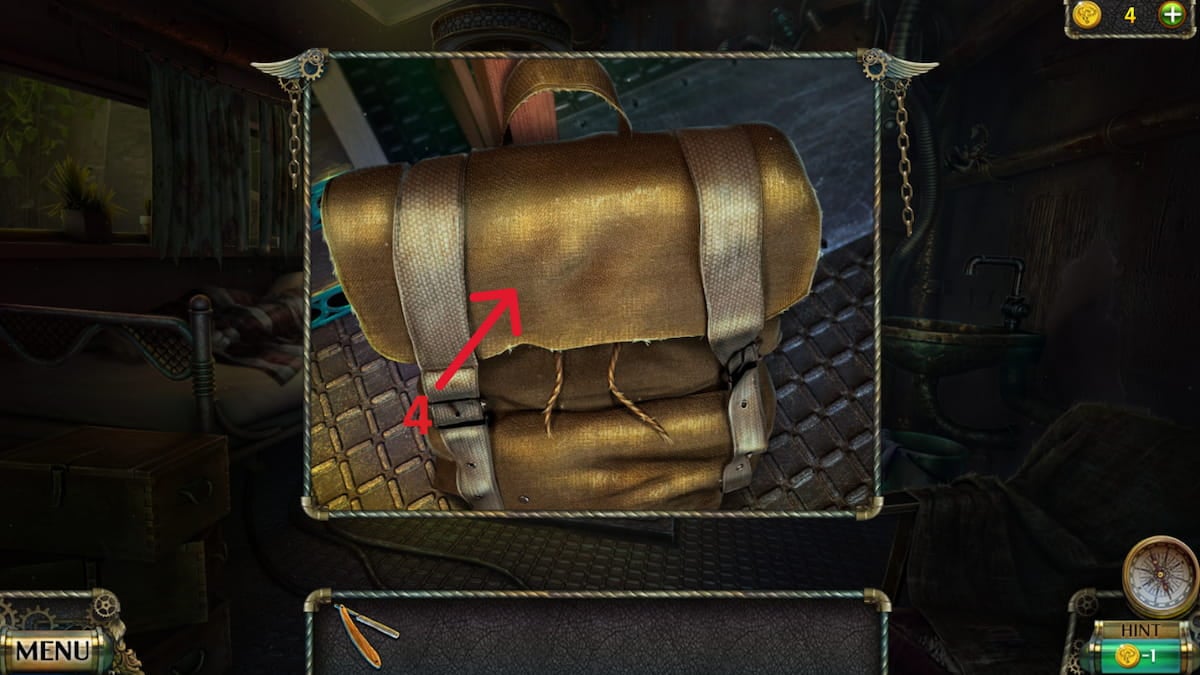
- Select the backpack (3) and press the strap to raise the cover (4).
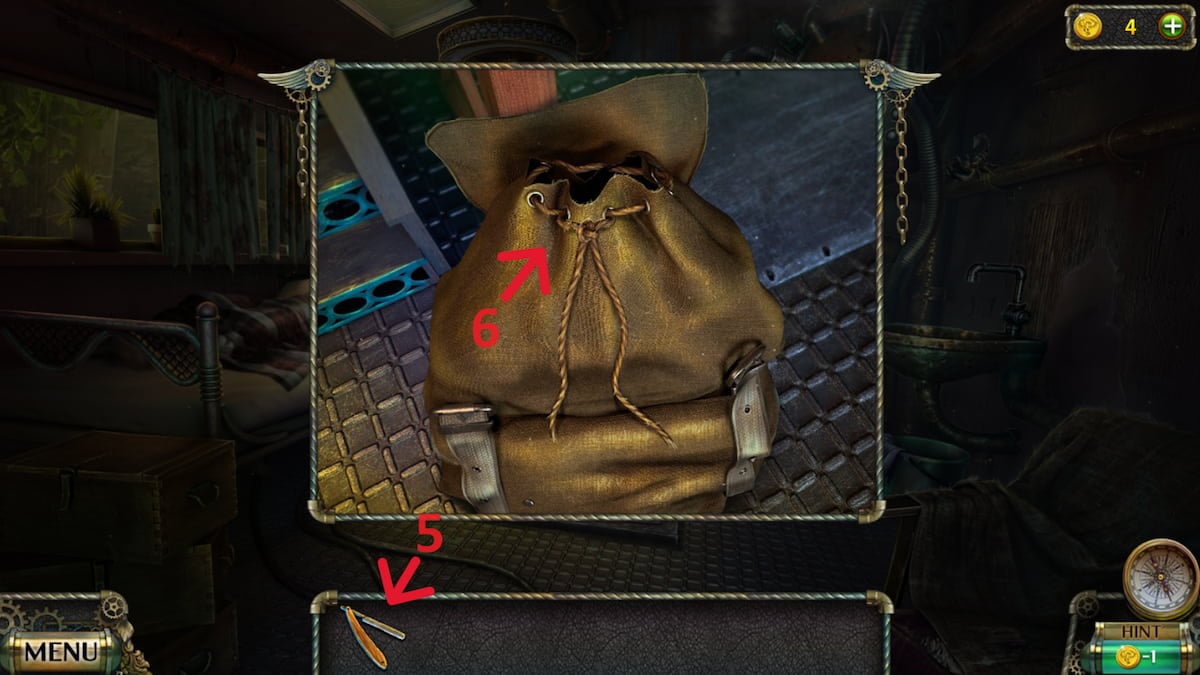
- Select the razor (5) and then the knot (6) to cut through it and open the backpack.
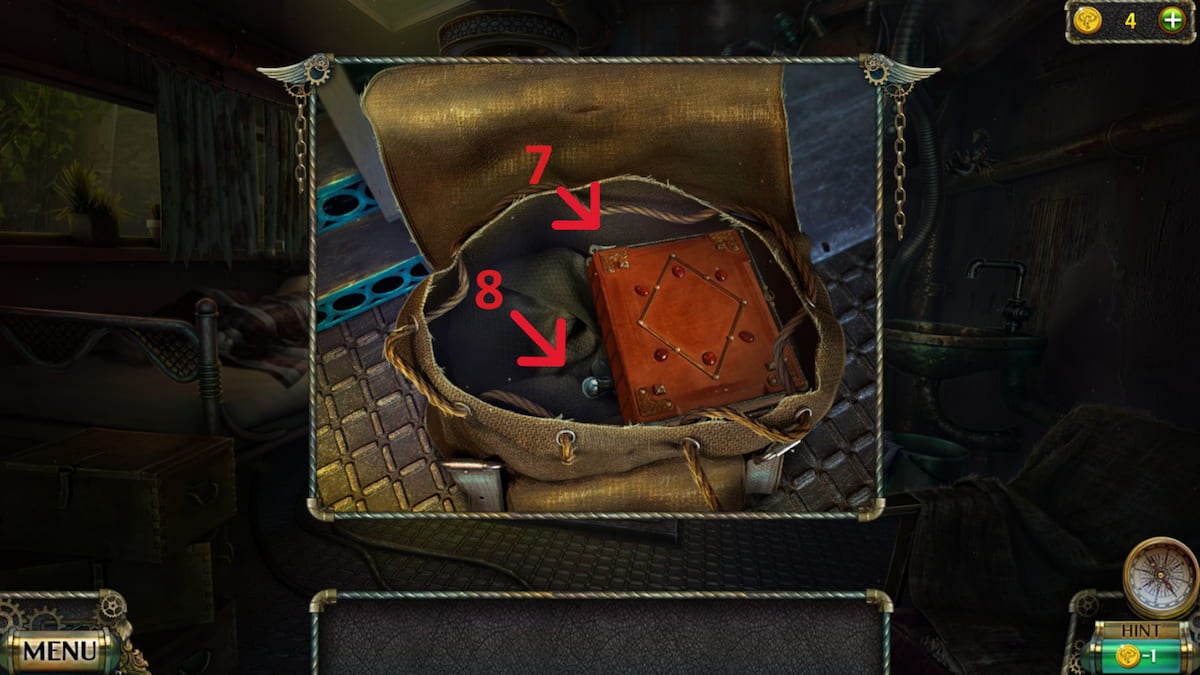
- Take the book (7) and the valve (8).
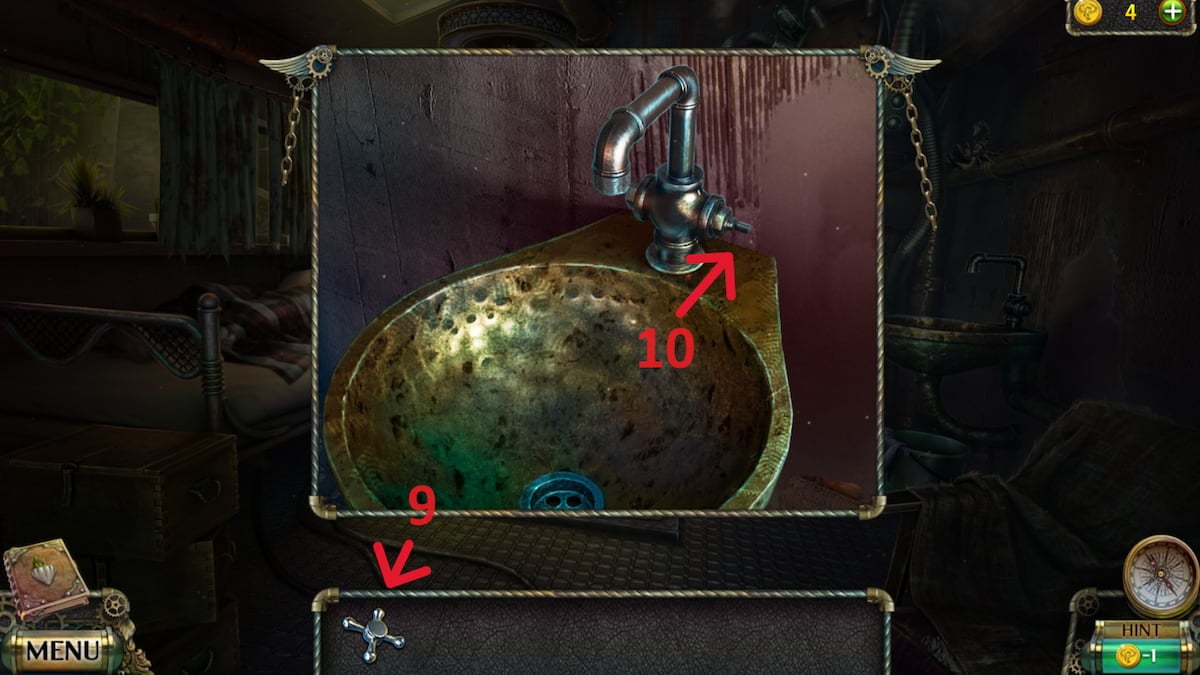
- Select the sink and place the valve (9) on the water tap (10).
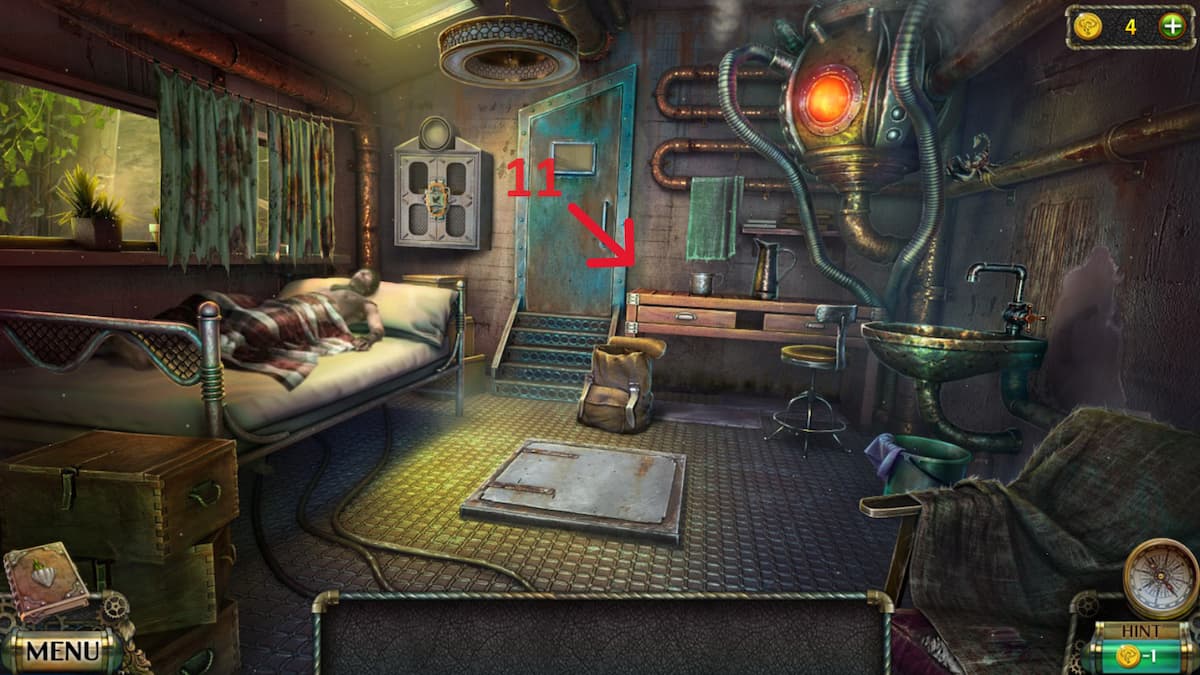
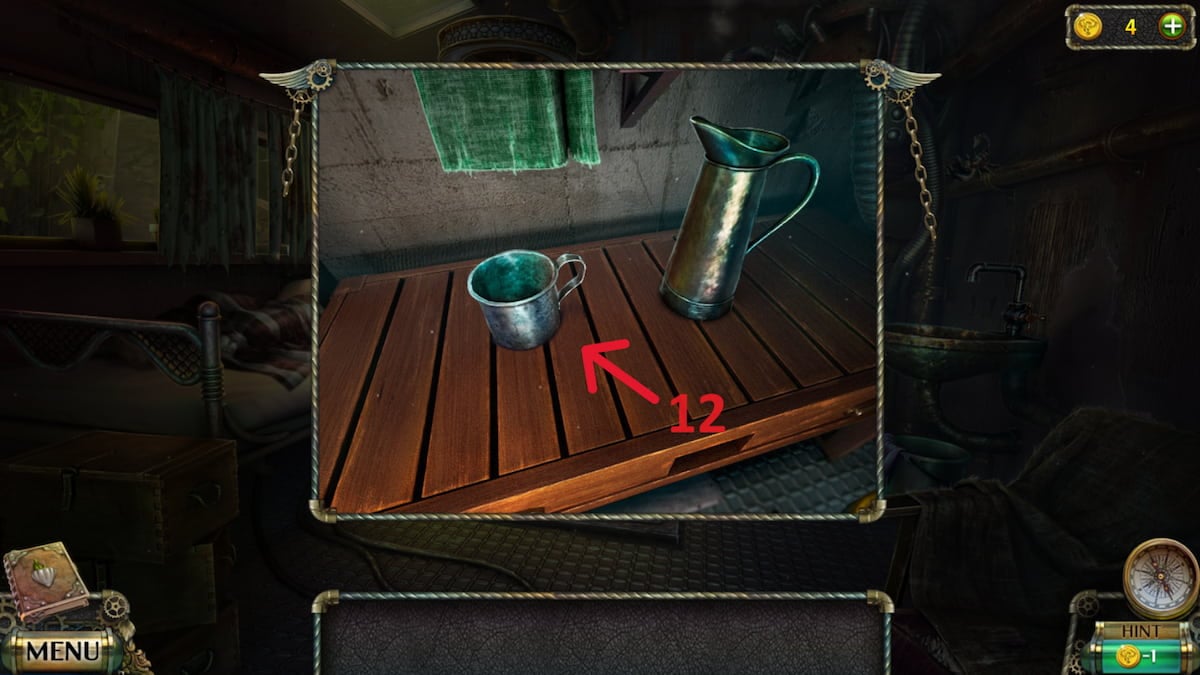
- Select the table (11), pick up the mug (12), and return to the sink.
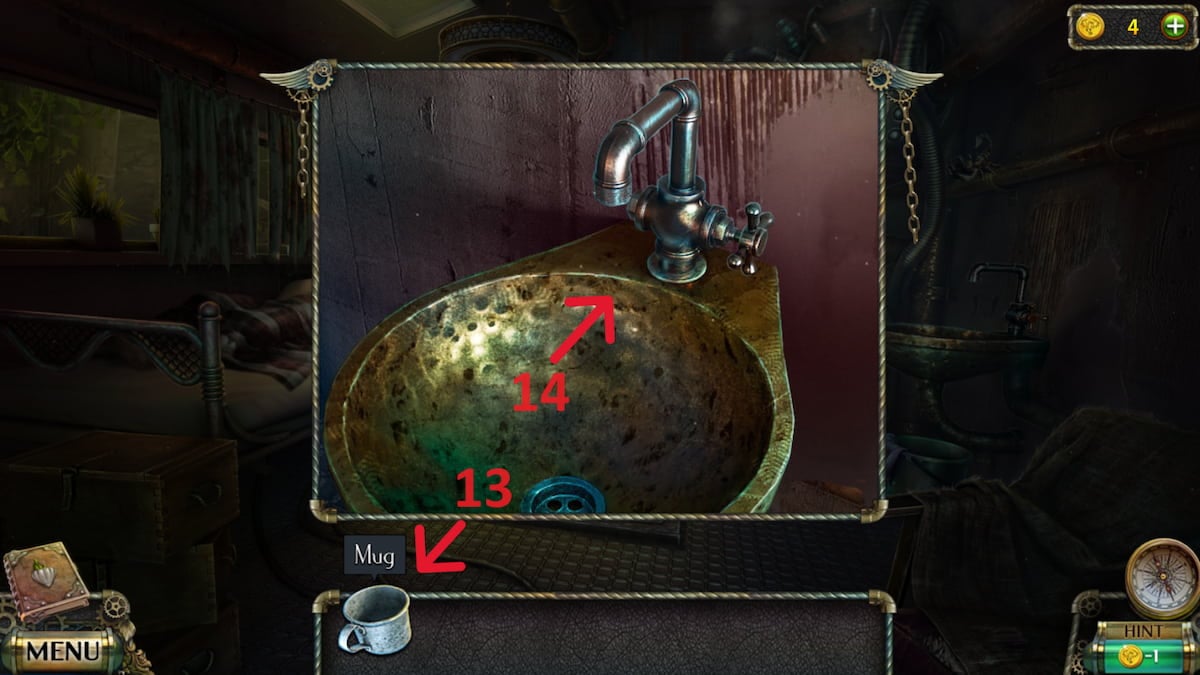
- Select the mug (13) and then the water tap (14) to fill it with water.
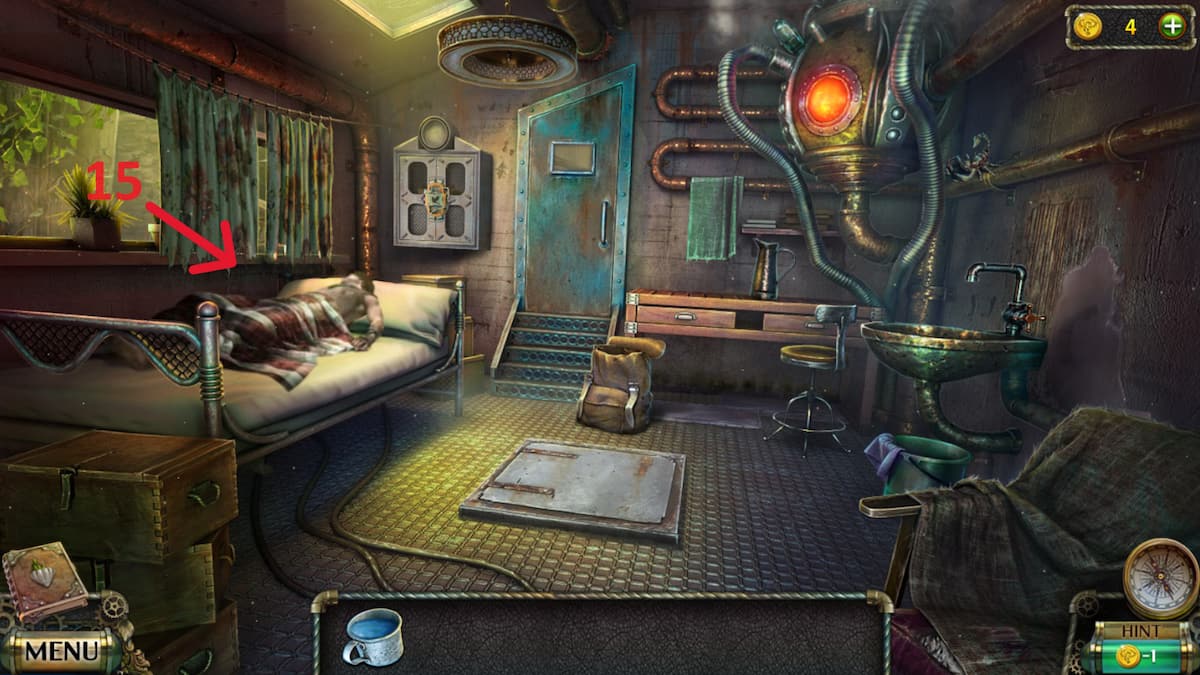
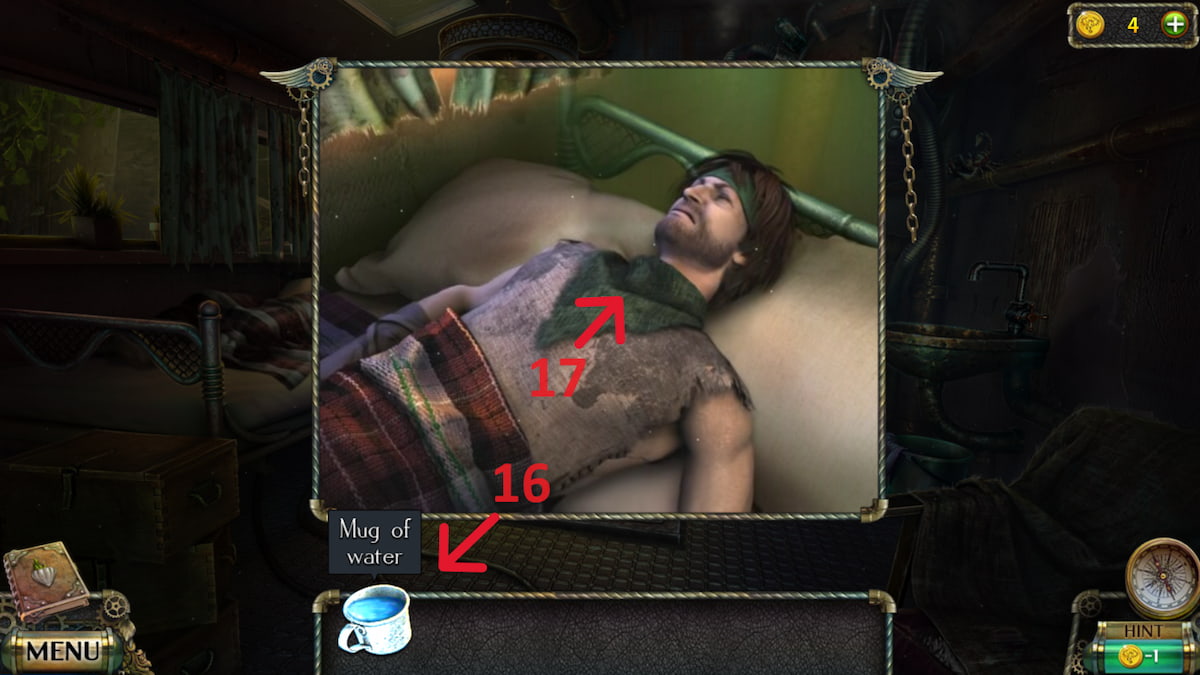
- Go to Colin (15), select the mug (16), and then select Colin (17) to splash him.
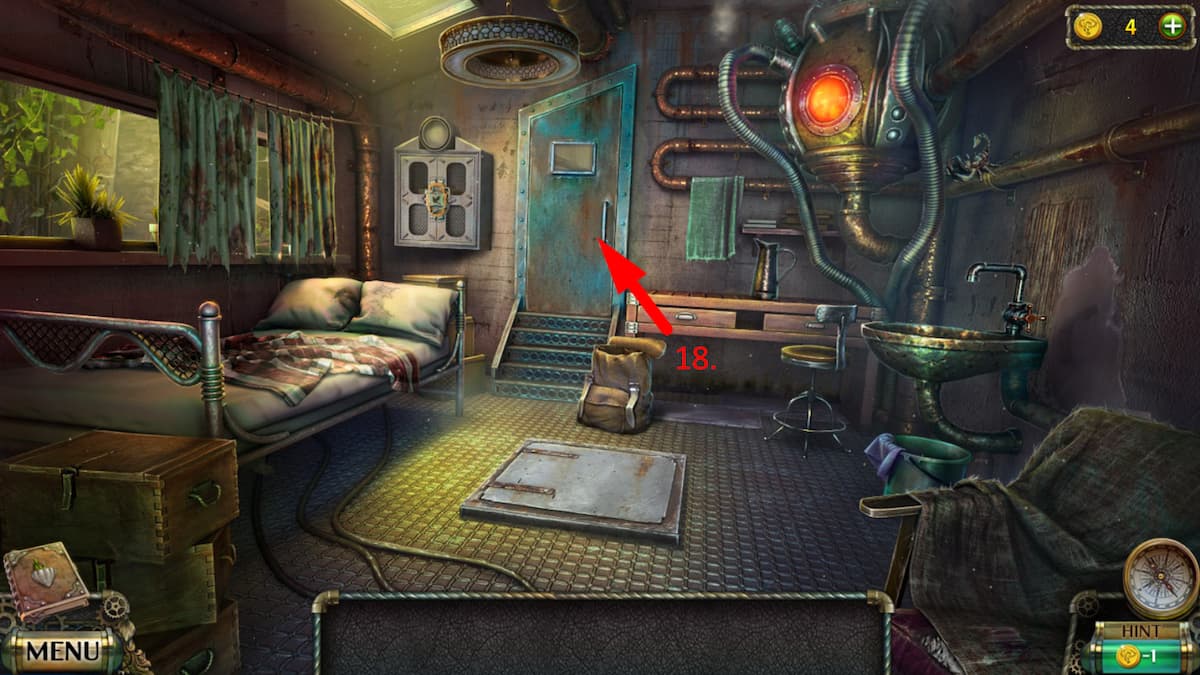
- Open the door (18) and exit.
Task 2 – Visit the hermit for help
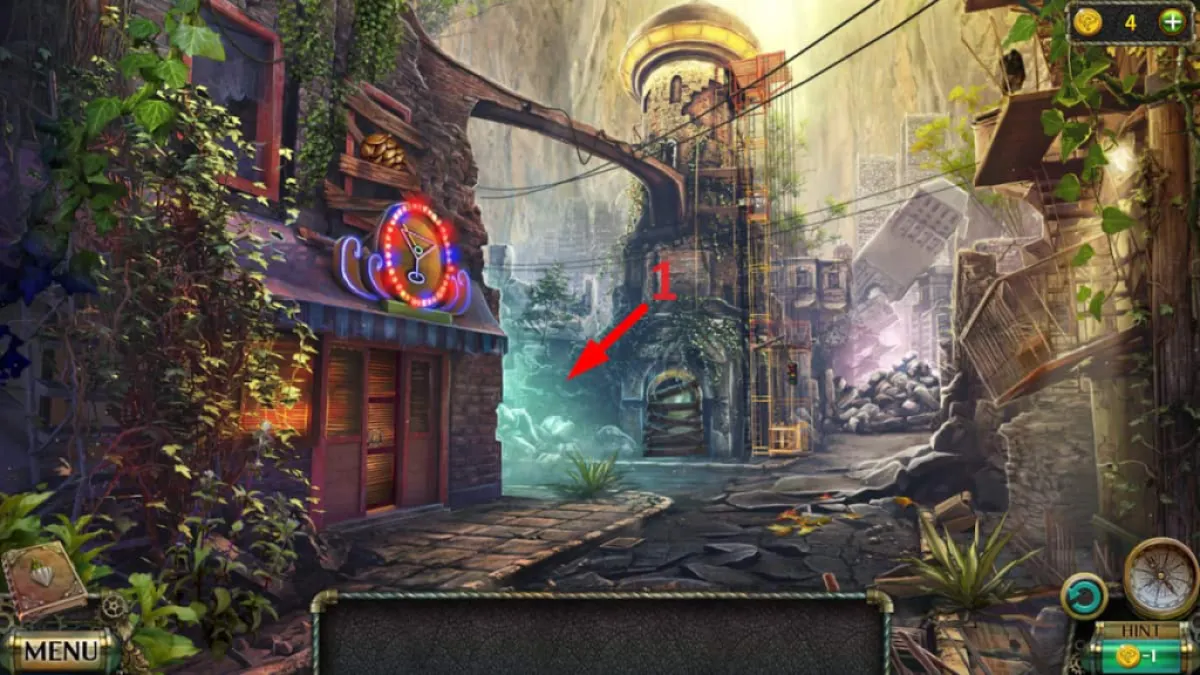
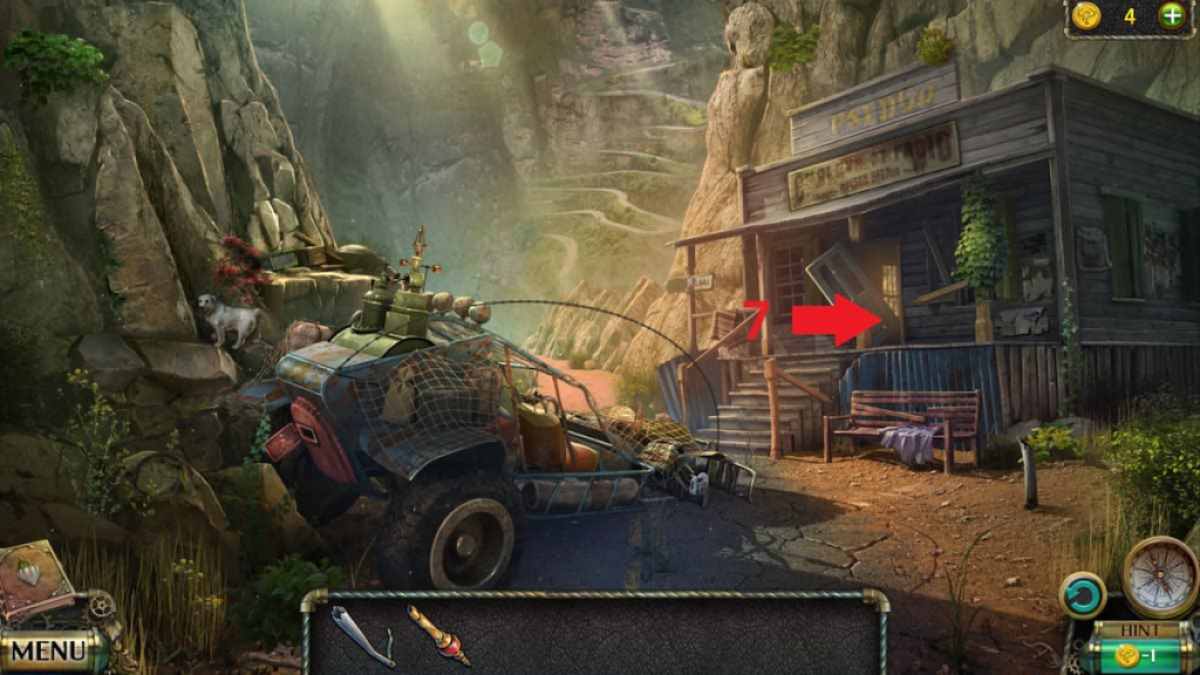
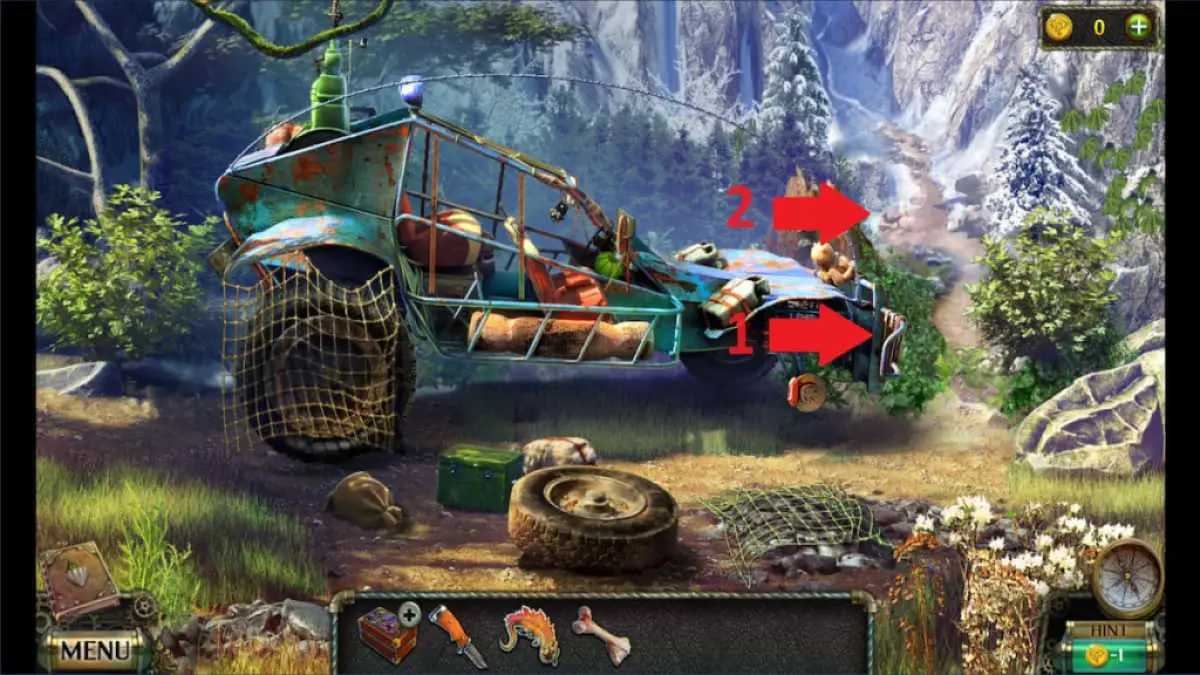
- Go through the bluish passage (1)
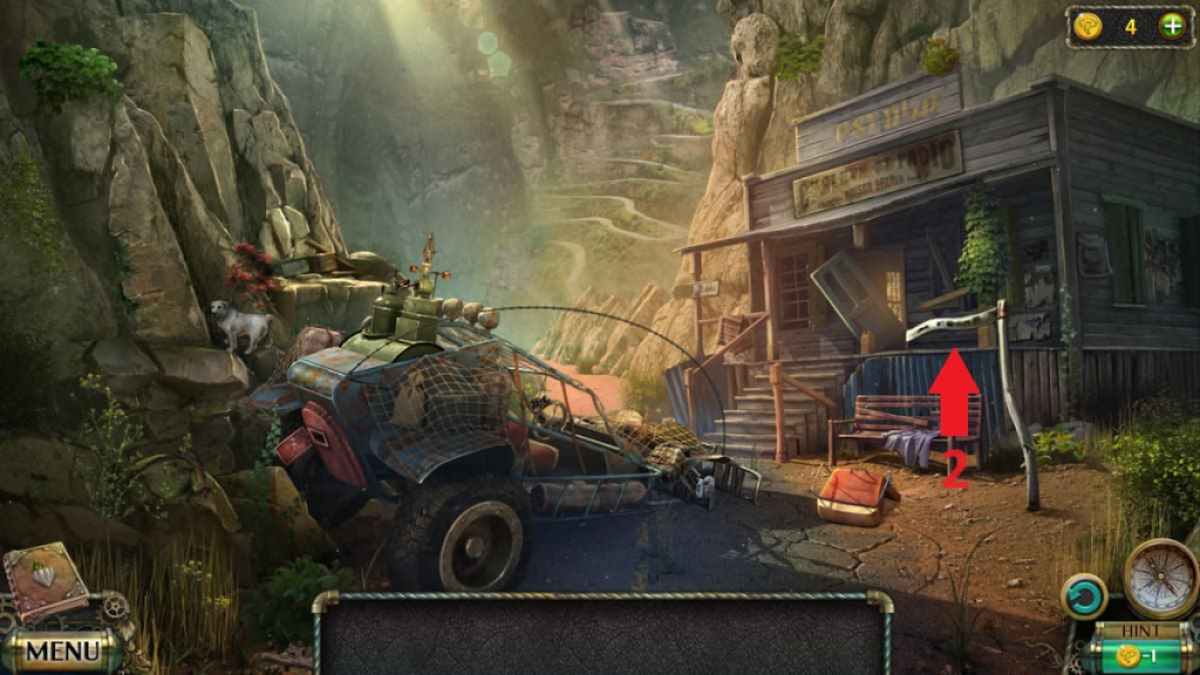
- Select the road sign (2) to take its fragment.
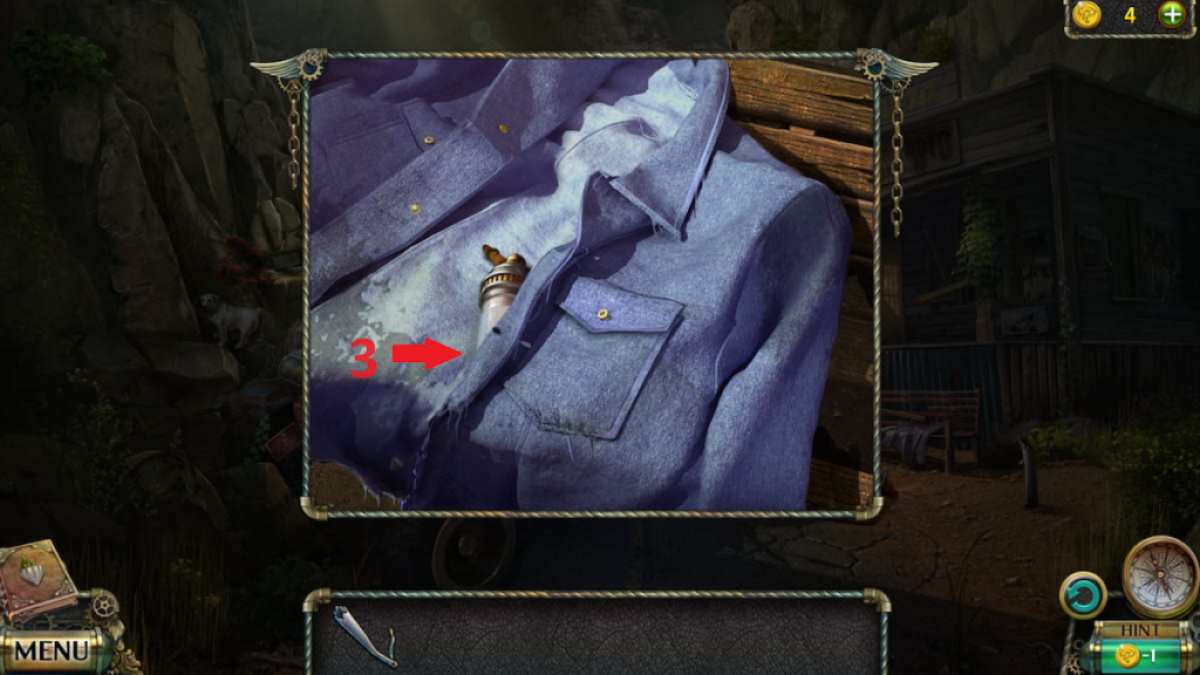
- Select the jacket and open it to take the capsule and the pipe (3).
- Take the seat (4) and place it in the car.
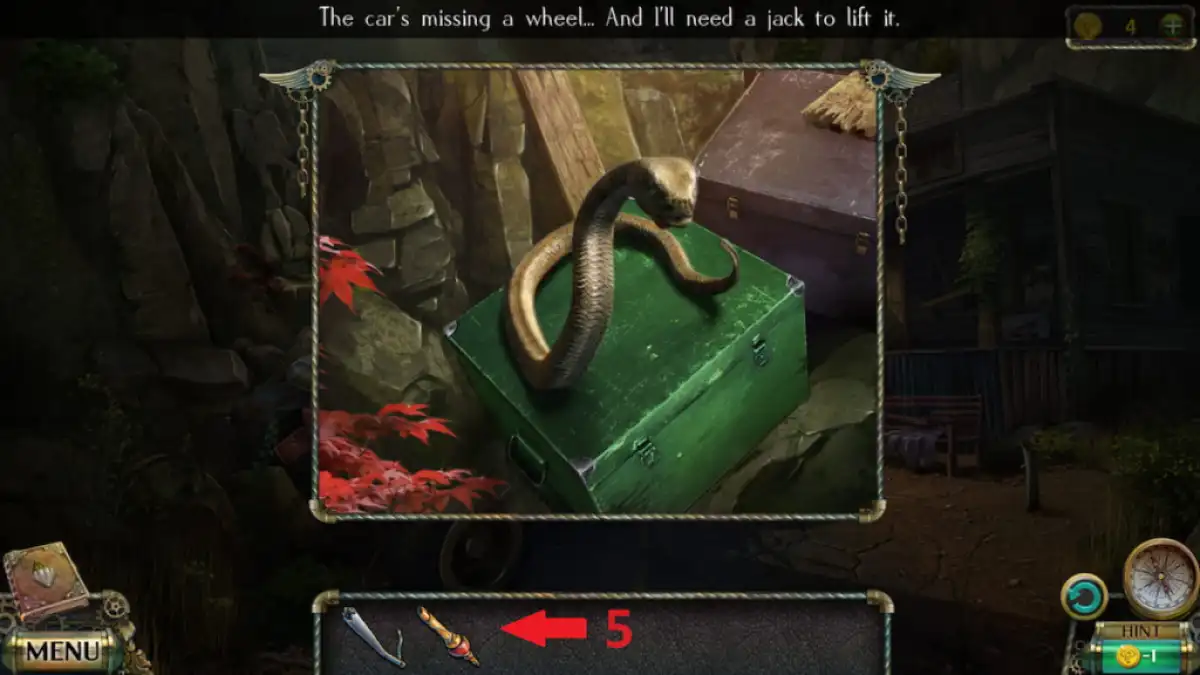
- Click on the crate and use the pipe (5) to chase away the snake.
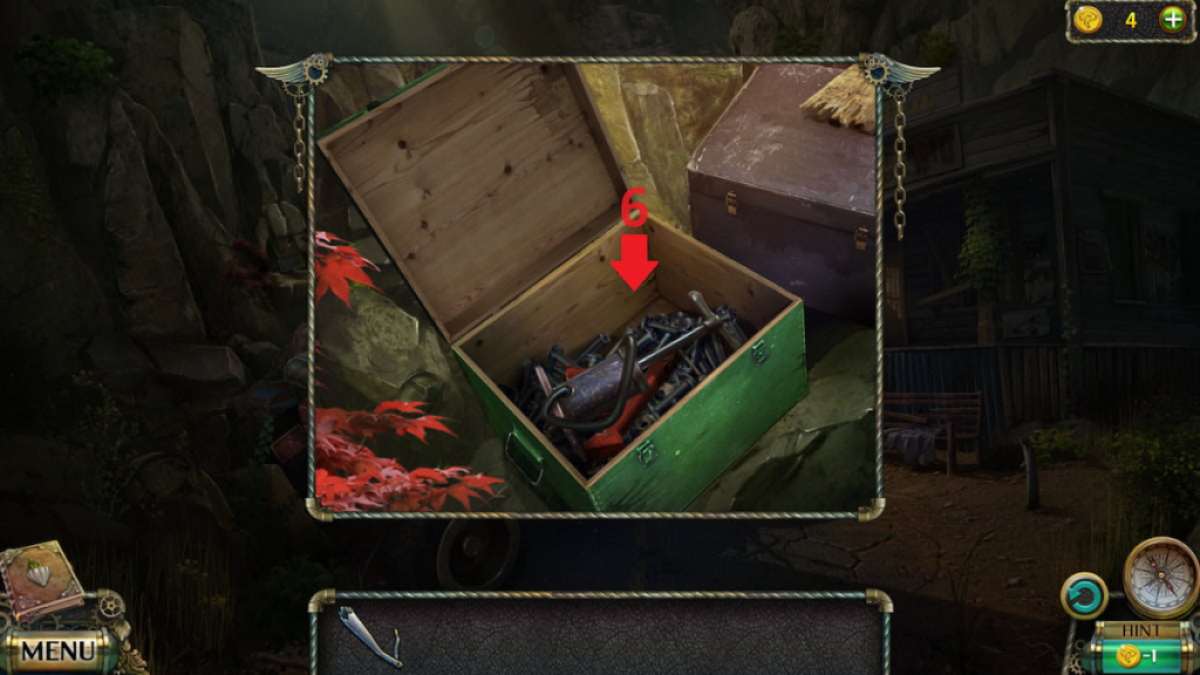
- Open the crate and take the pump and the jack (6).
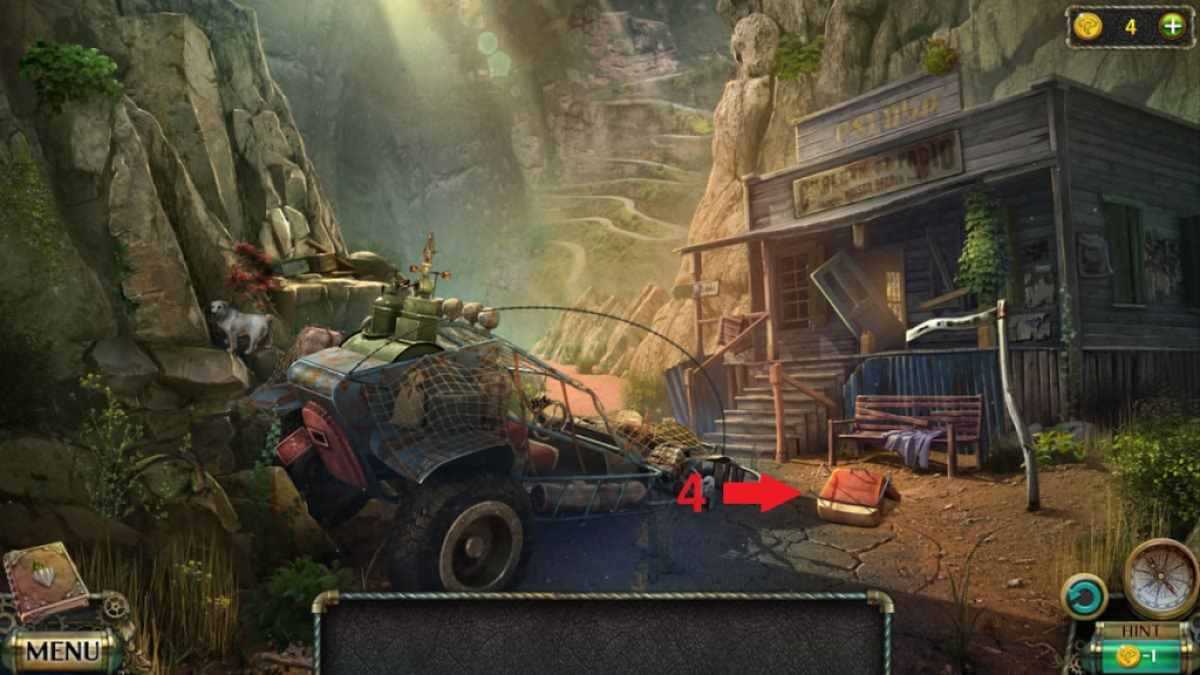
- take the crowbar and the bag of charcoal next to the door (7).
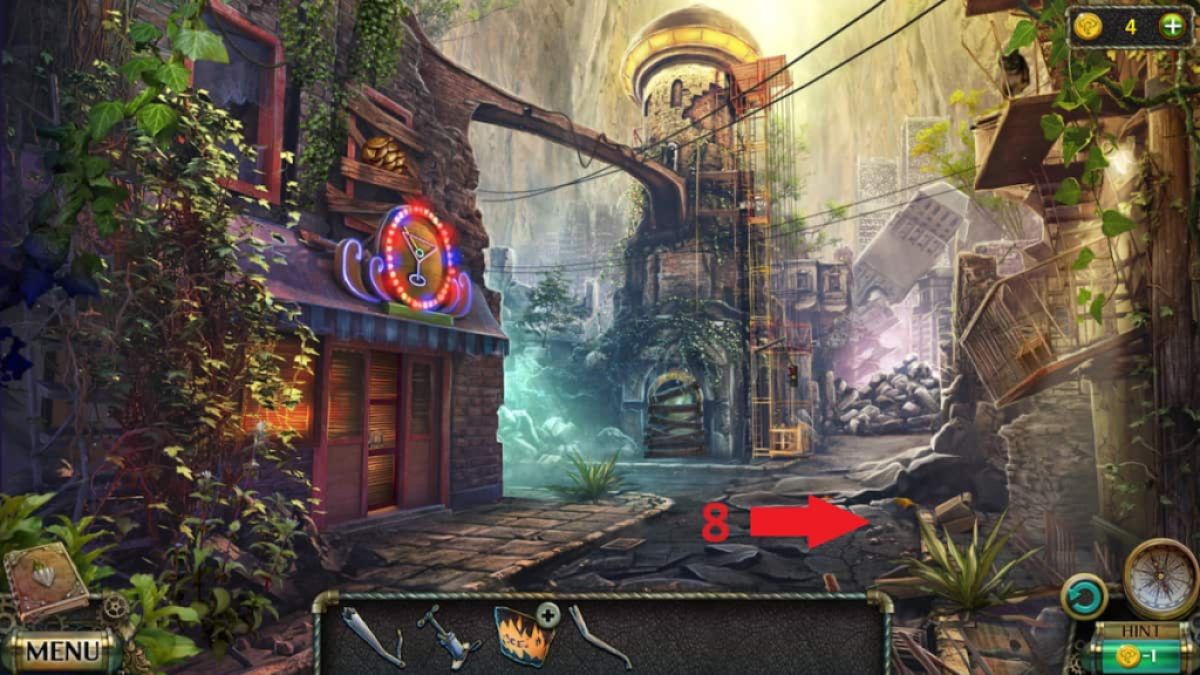
- Go back and click on the roadside (8).
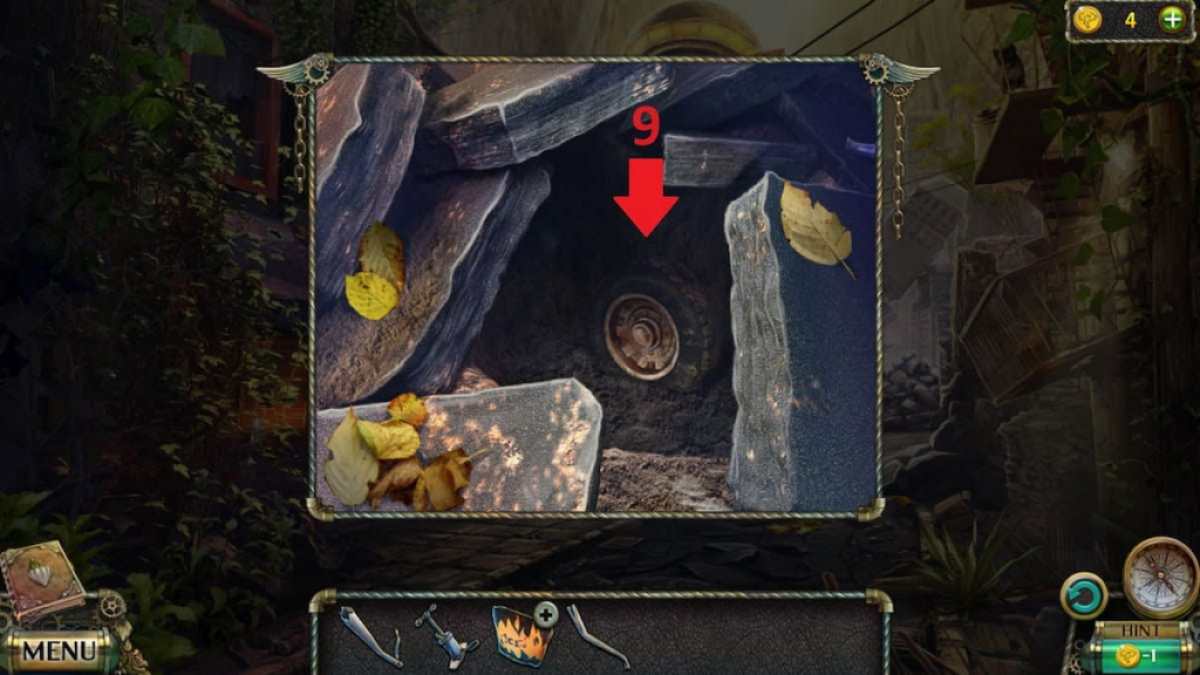
- Use the road fragment to take out the tire (9).
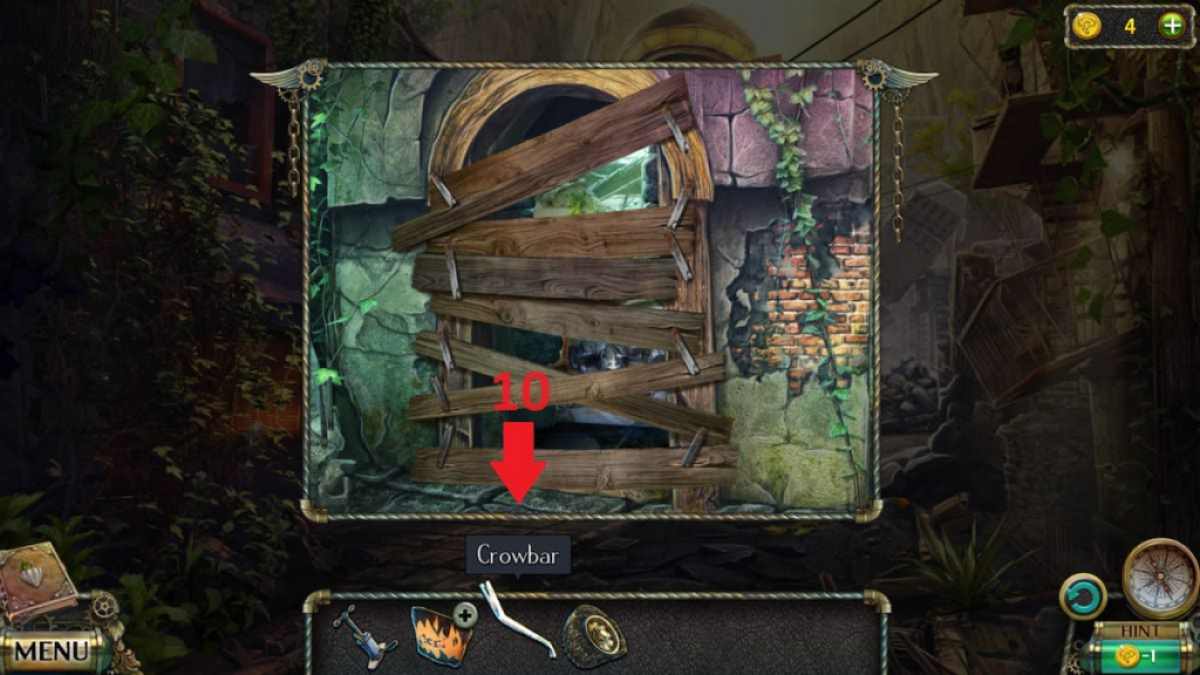
- Click on the barricaded door and use the crowbar (10) to open it.
- Find all the items to receive a utility knife and return to the car.
- Place the jack and the flat tire on the car and use the pump on the tire.
- Use the utility knife on the bag of charcoal.
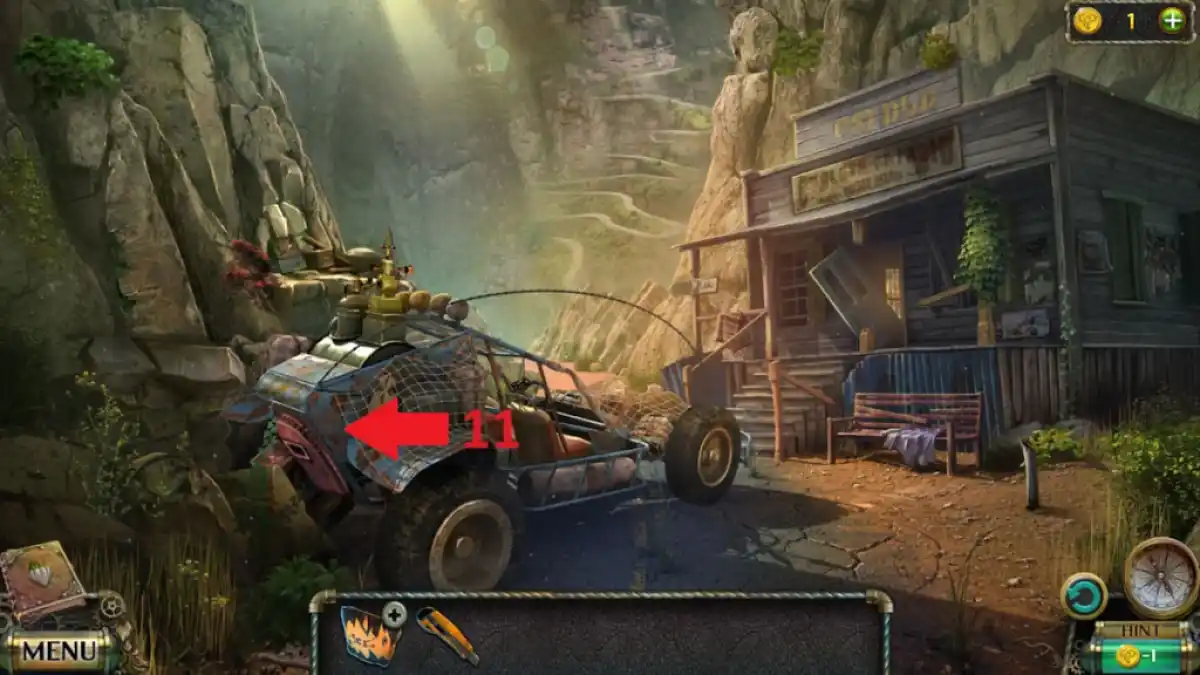
- Place the charcoal into the car furnace (11) and get into the car.
Task 3 – Get inside the hermit's hut
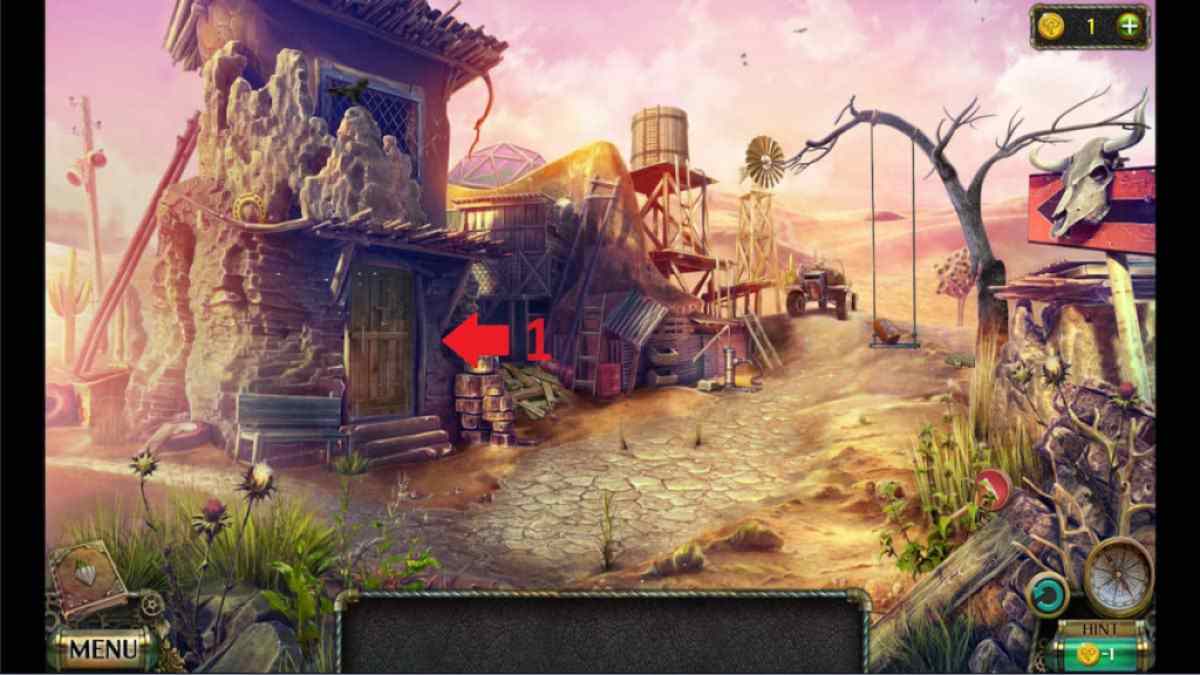
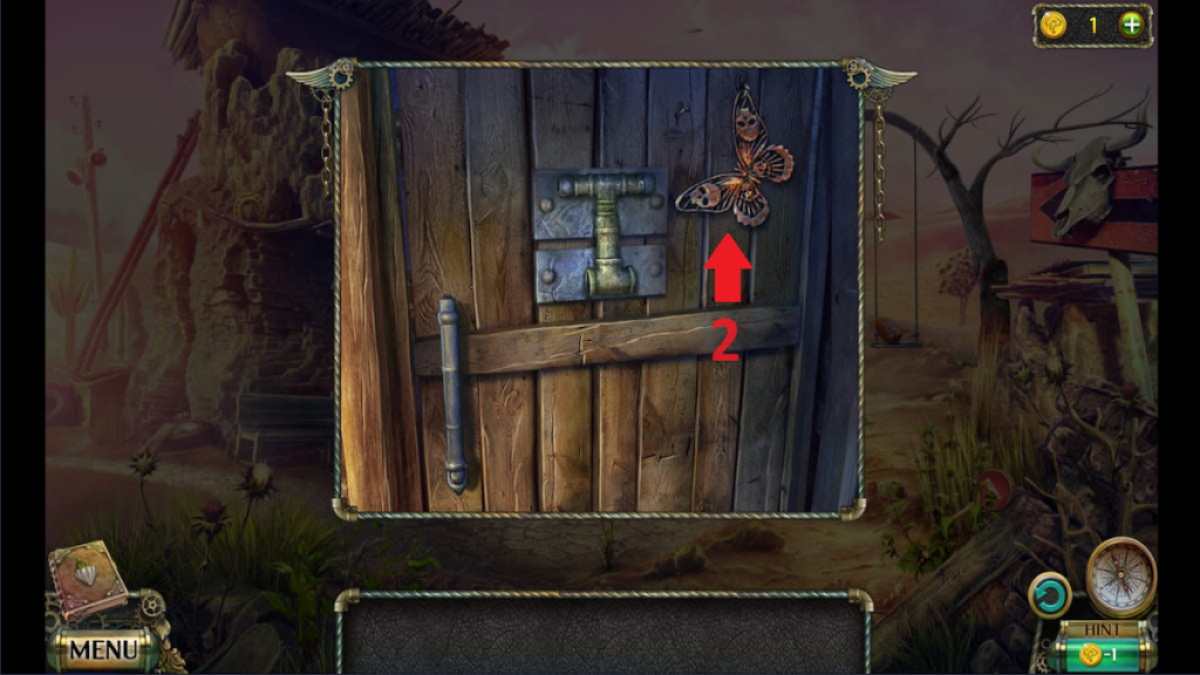
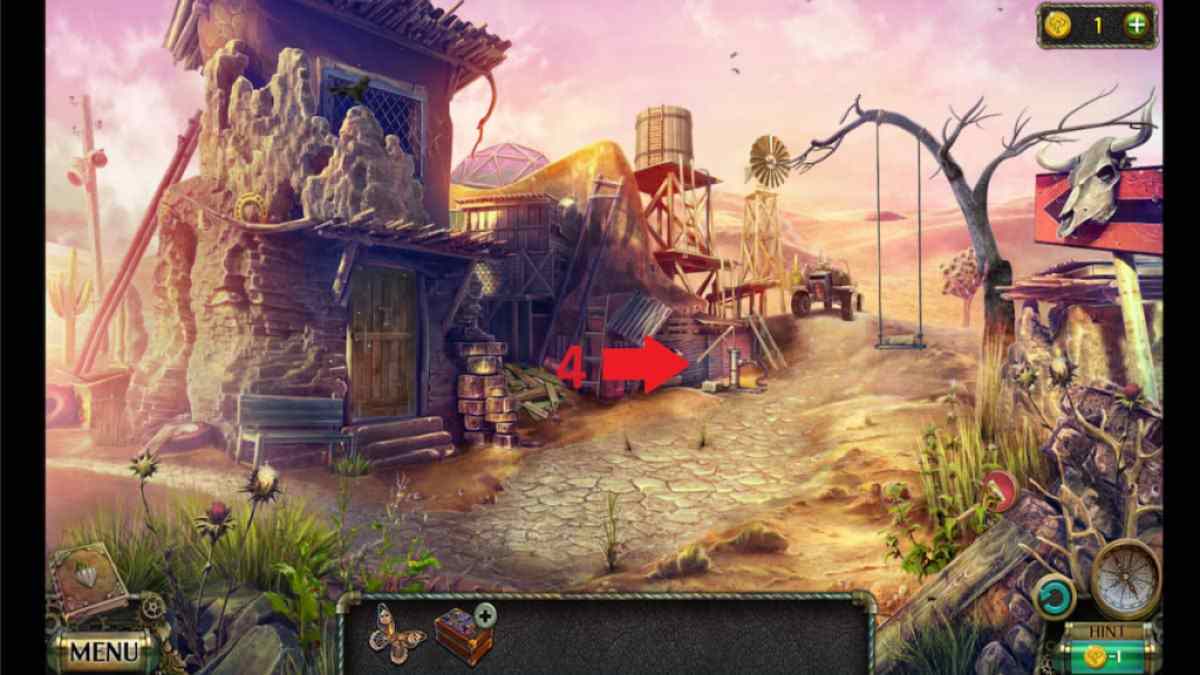
- Knock on the door (1) and pick up a butterfly (2).
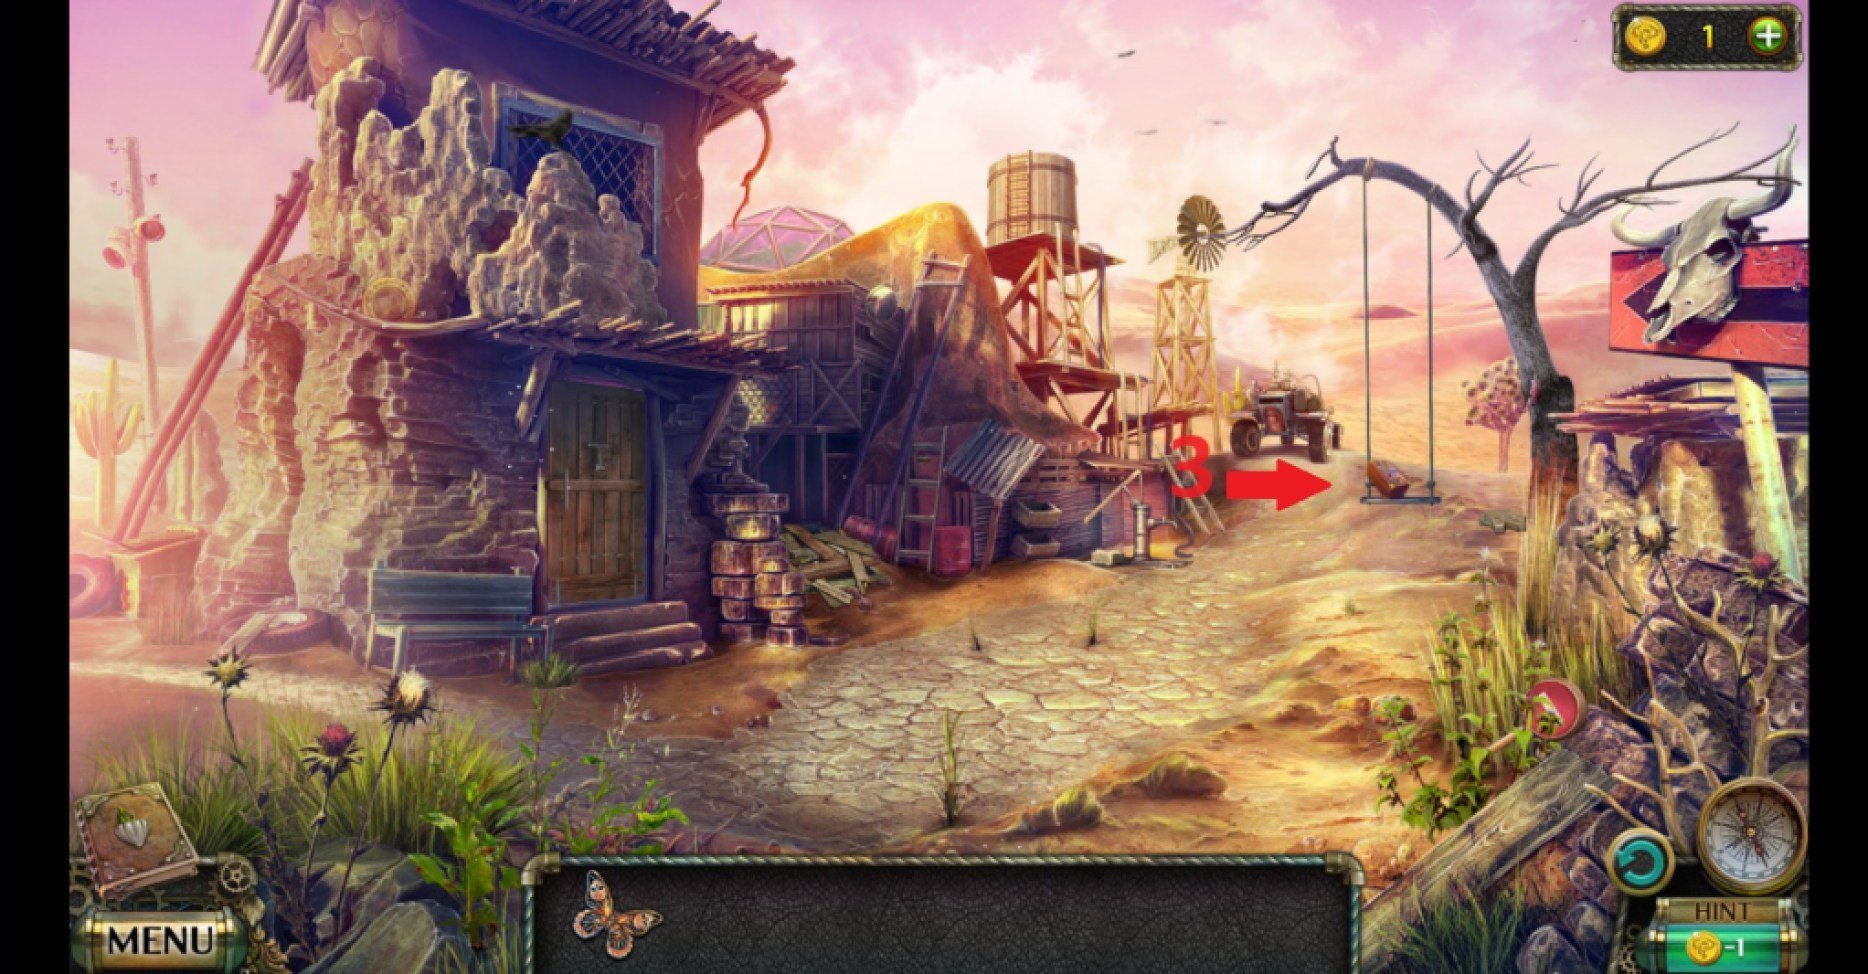
- Take the casket from the swing (3) and place a stone on it.
- Connect the hose to the water pump (4) and take the stone.
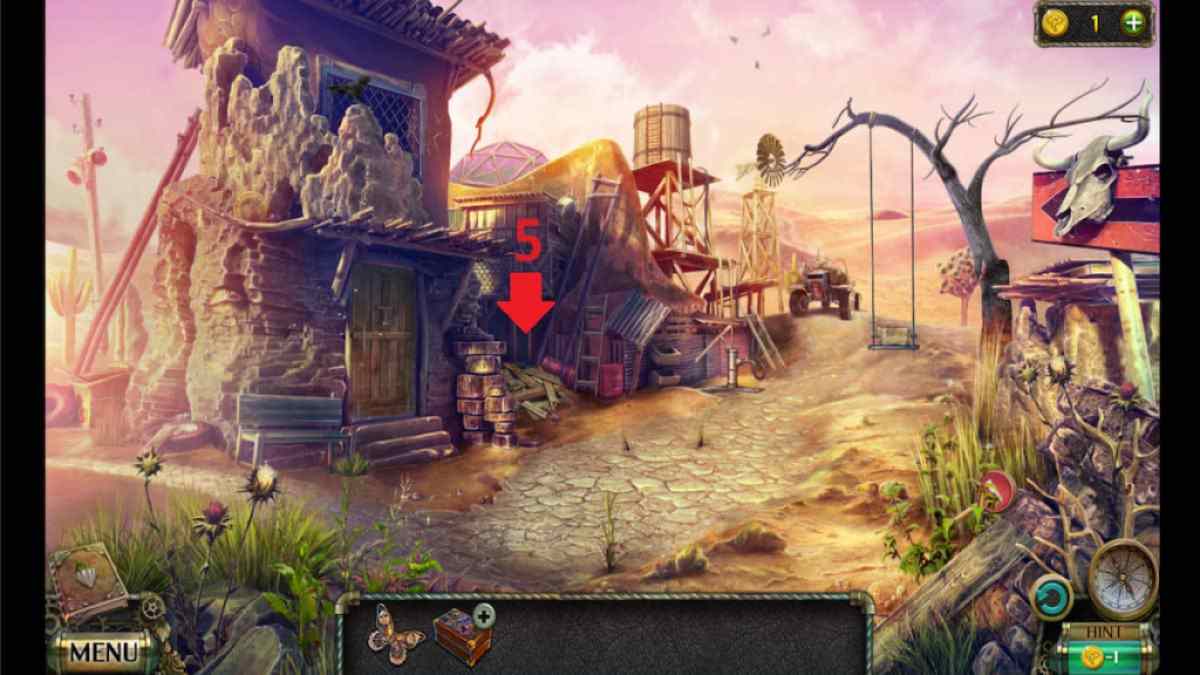
- Move the boards above the basement door (5) and take the third stone.
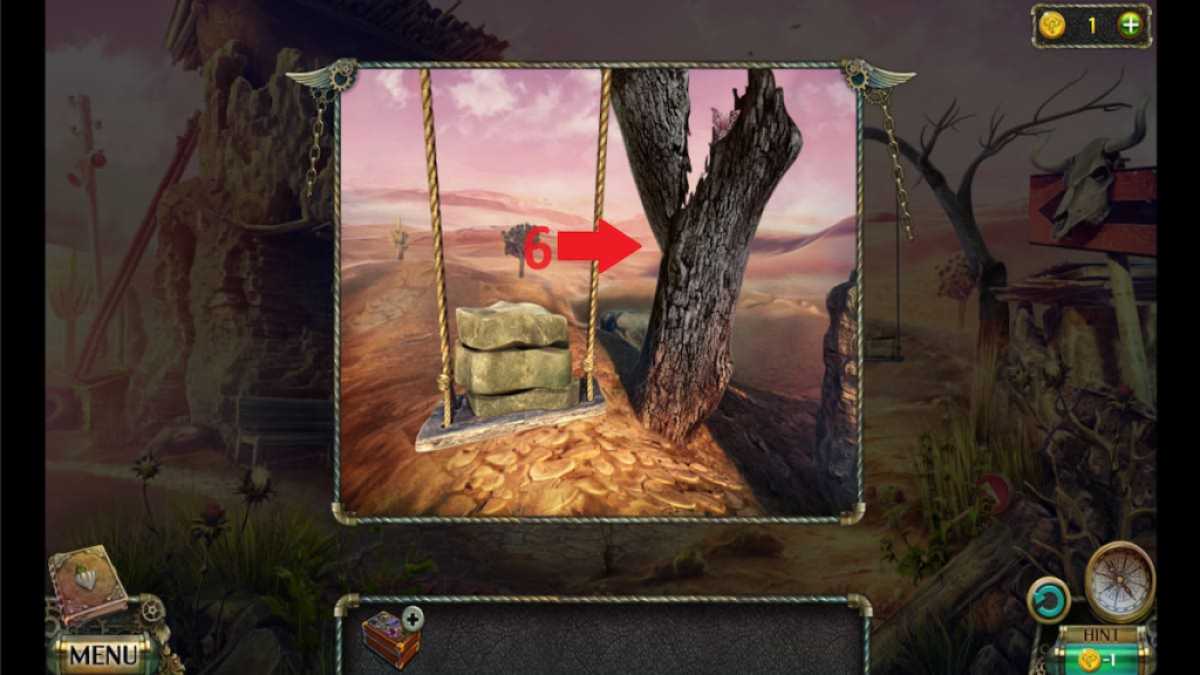
- Place both stones on the swing and click on the tree (6) to claim the second butterfly.
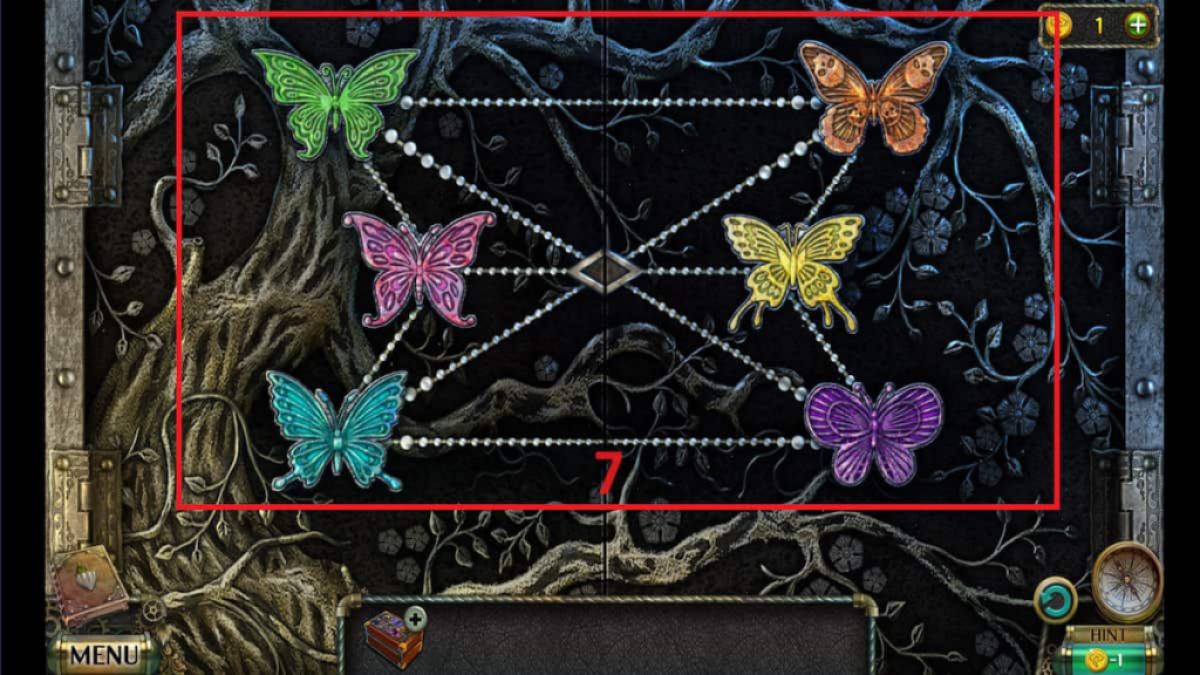
- Place the butterflies on the basement entrance and arrange them in the correct pattern (7).
- Enter the hut.
Task 4 – Help the healer
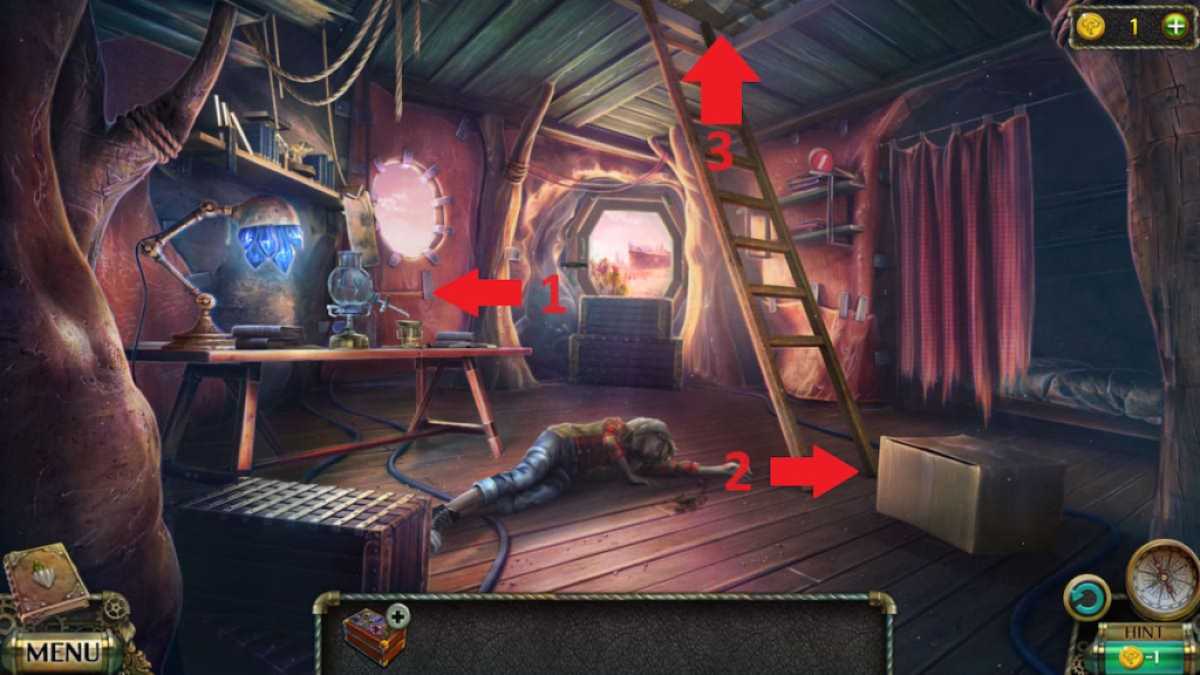
- At the table (1), take the deer figurine, the knife, and the key underneath the recipe.
- Use the knife to open the box (2) and take the bottle of acid, the hammer, and the snake figurine.
- Use the key to open the attic (3) and climb up.
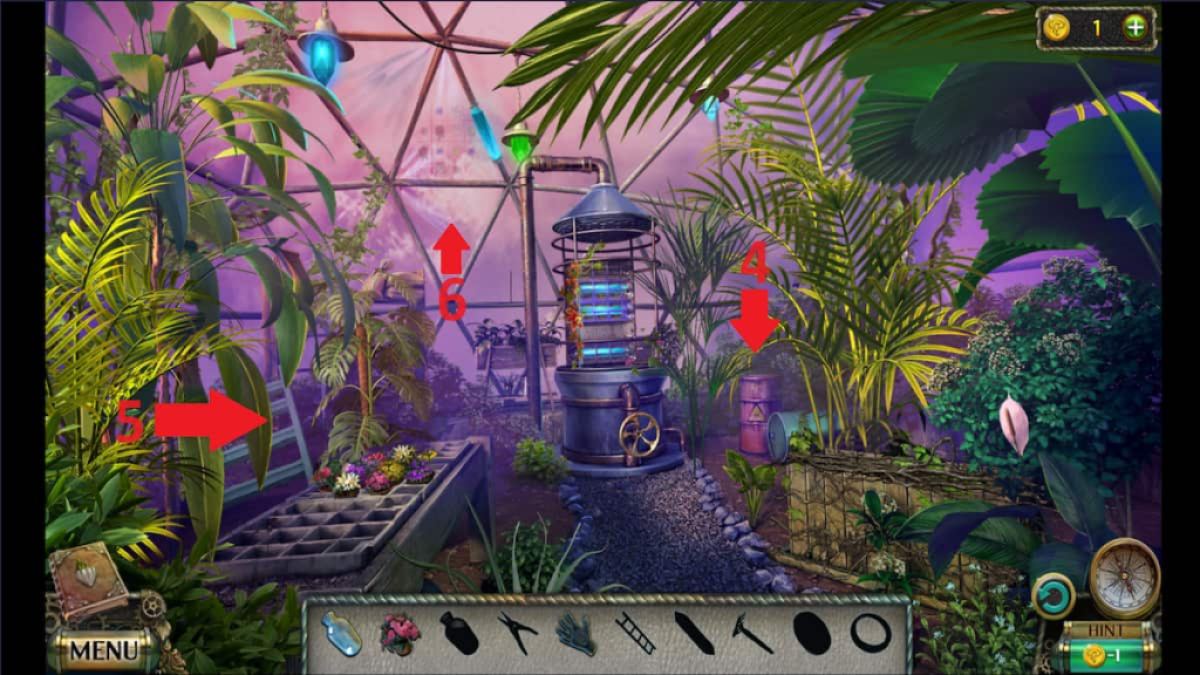
- Collect the empty bottle, a flowerpot, and rubber gloves next to the red barrel (4).
- Fill the empty bottle with acid.
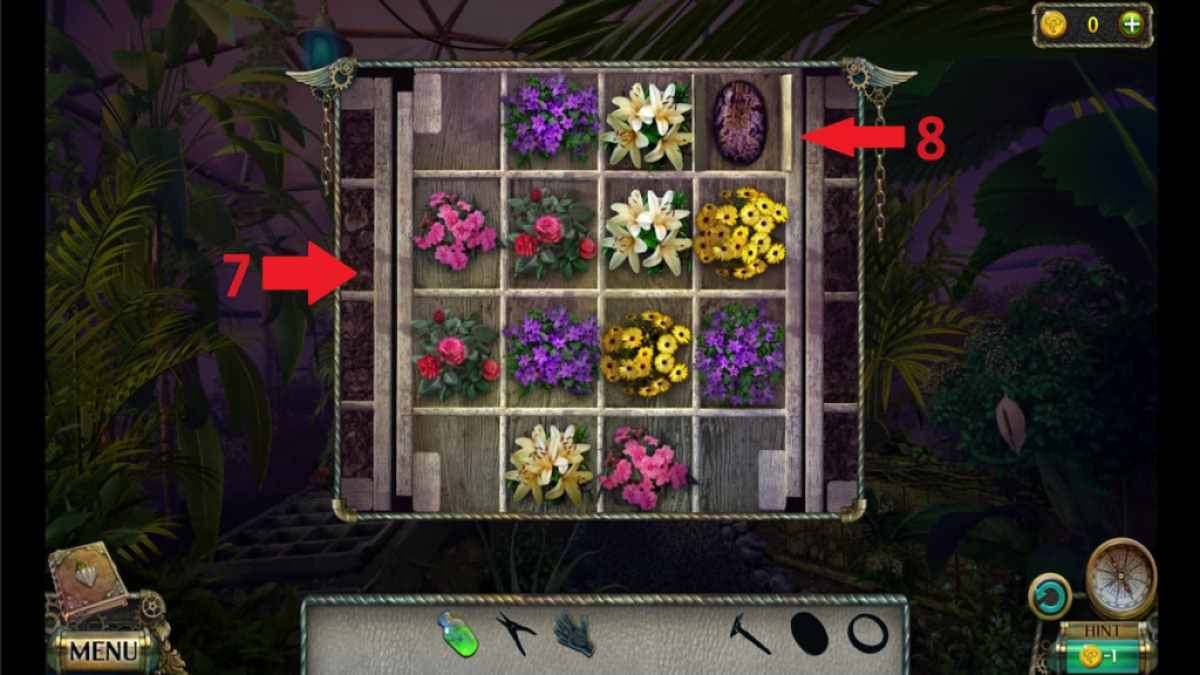
- Take the ladder behind the flowerpots (5) to reach the crystal (6) and the flowerpot pattern.
- Place the flowerpot next to other flowerpots and arrange them accordingly (7).
- Collect the seed (8) in the top right corner.
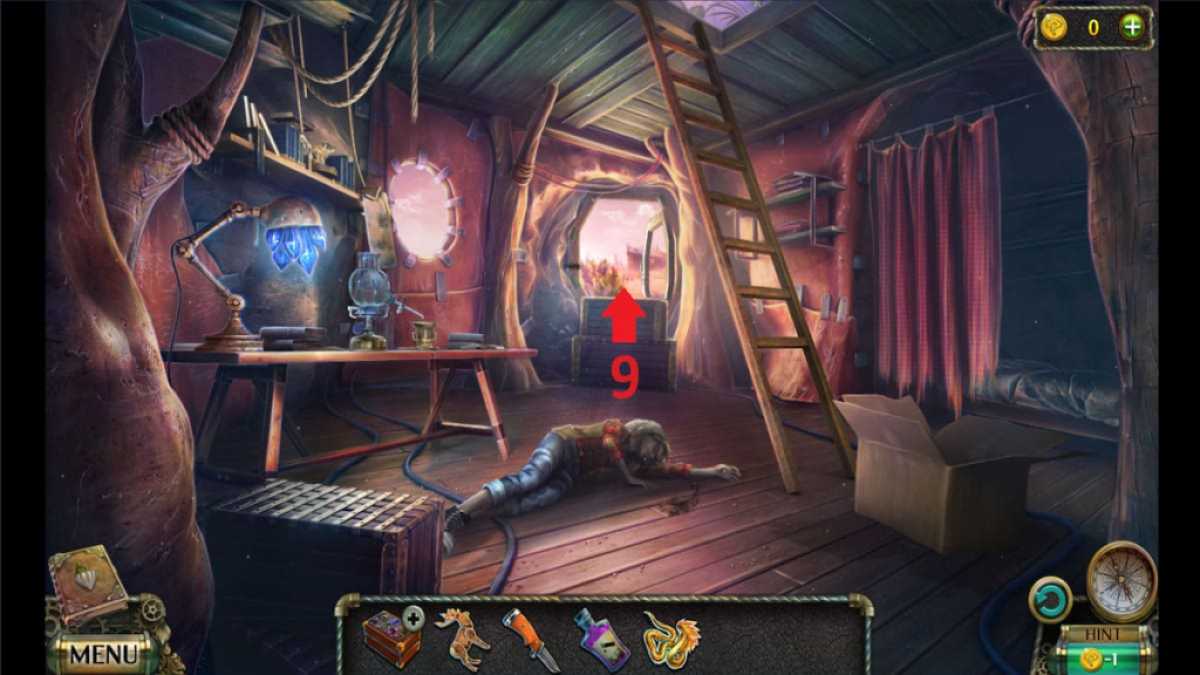
- Use the hammer to break the window lock (9) and exit.
- Match the pairs of plants (10) to find the rare plant and cut its root using the knife.
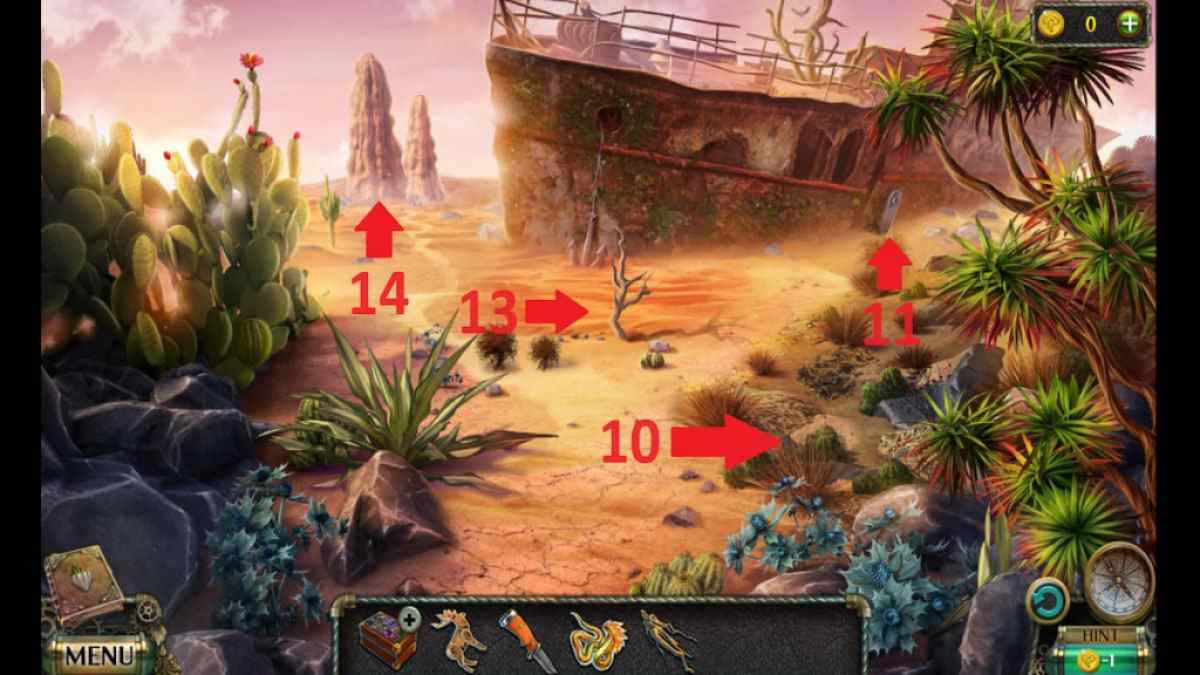
- Use the acid to dissolve the seashells on the ship door (11) and enter.
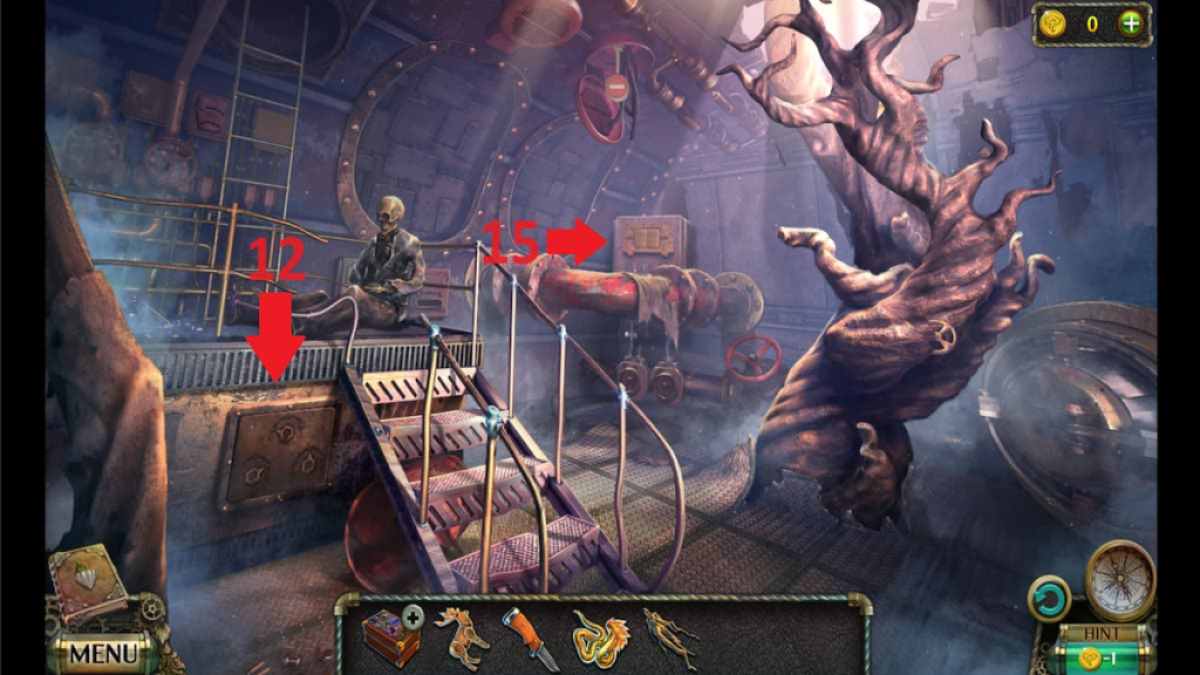
- Arrange the switches (12) the following way: The left switch is pointing right, the middle switch is pointing left, and the right switch is pointing upward.
- Grab the rope and the wasp figurine and exit the ship.
- Tie the rope around the tree (13), then take it to acquire the handsaw.
- Go back into the ship and cut the branch to get the handwheel.
- Use the knife to cut off a honeycomb from the beehive (14) and exit the ship.
- Place the honeycomb underneath the anthill, take a part, and go back inside the ship.
- Place the part into the missing slot (15) and complete the mini-game by connecting chests to keys.
- After completing the mini-game, collect the syringe and tweezers and return to the hut.
- Use the tweezers to take the scorpion and exit the hut.
- Place the handwheel on the water pump and pull the lever.
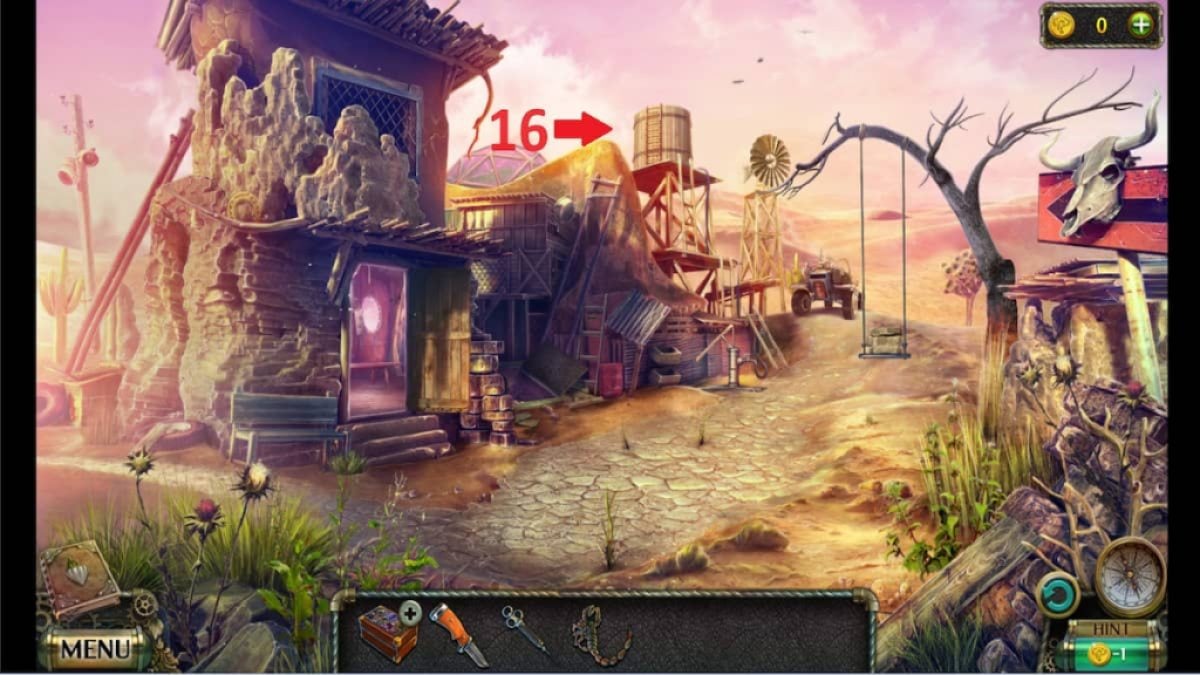
- Take the scythe and the lizard figurine from the barrel (16).
- Go back to the cacti and use the scythe to collect the cactus flower.
- Place the flower on the table and go to the attic.
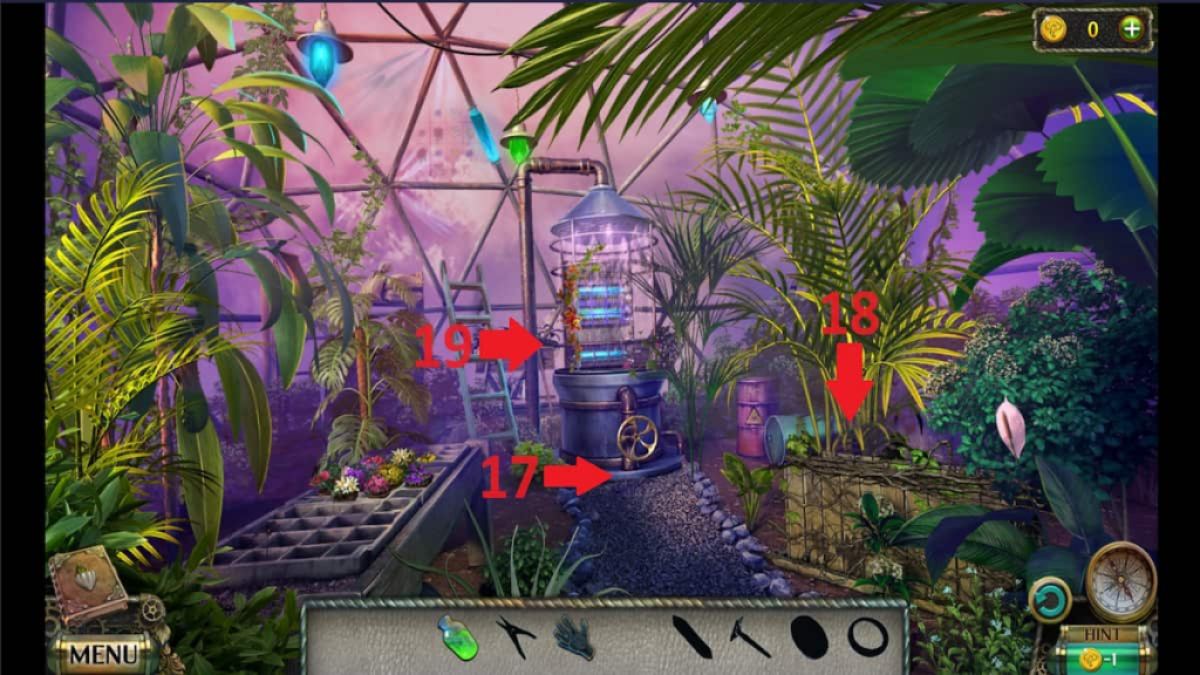
- Remove the dust underneath the handwheel (17) to pick up garden shears.
- Use the shears to clear the roots (18), and take the rake and a coil of wire.
- Use the rake to dig a hole (19), plant the seed, and then pour the full bottle onto it.
- When a carnivorous plant sprouts, use the coil of wire to tie it up and pick up the fruit using rubber gloves.
- Return to the table, open the jar, and pour the water into the glass container.
- Follow the instructions on the table to create an antidote.
- Inject the healer with the antidote.
Task 5 – Search for the magic stone
- Get in the car and drive.
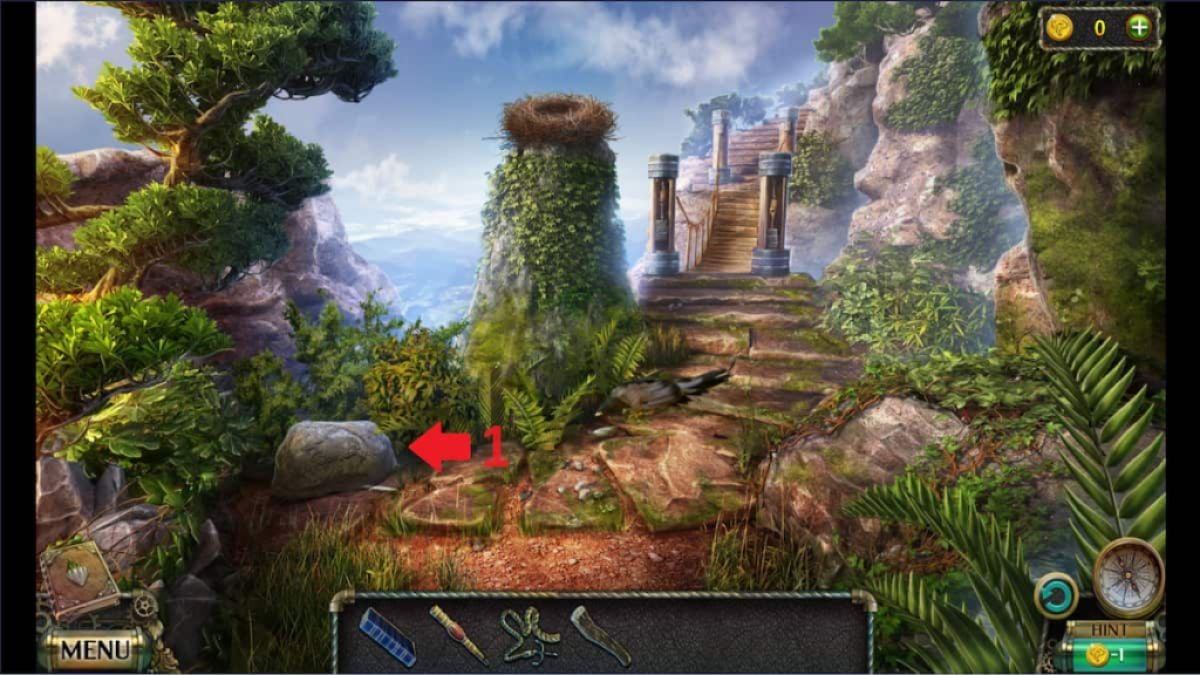
- Take the bone from the shrubs (1) and go uphill (2).
- Throw the dog a bone to receive a flint from Nort.
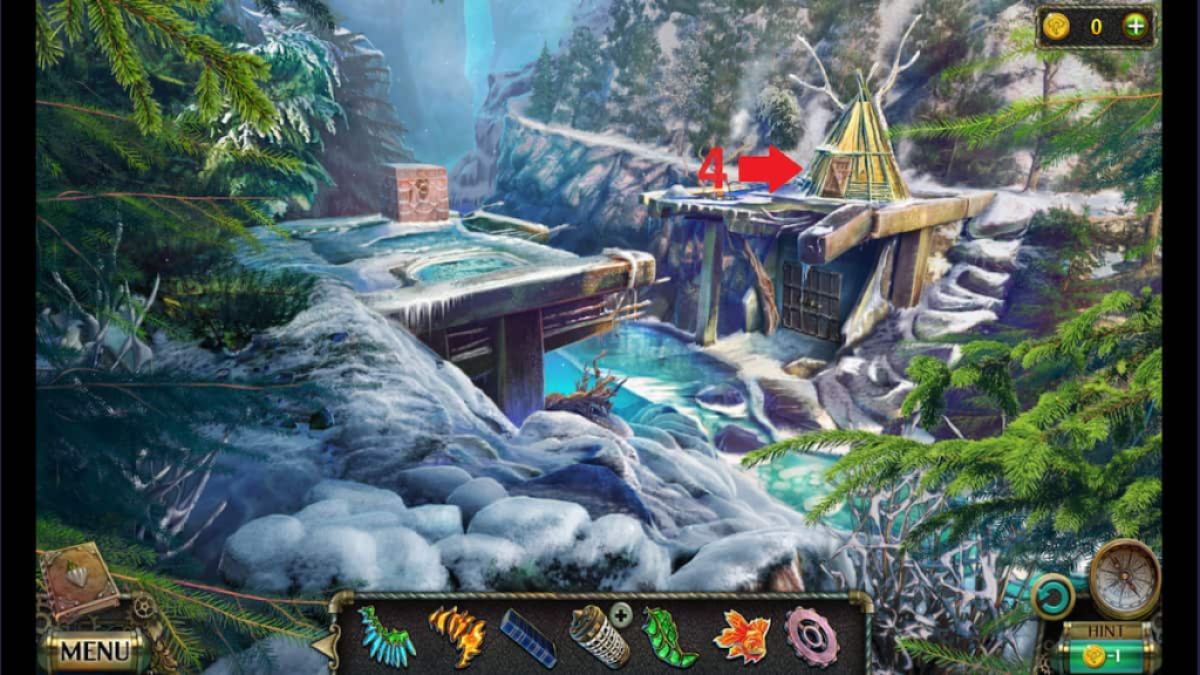
- Go to the door below the tent and pick up the lion figurine in the branch.
- Use the flint on the branches to receive splinters.
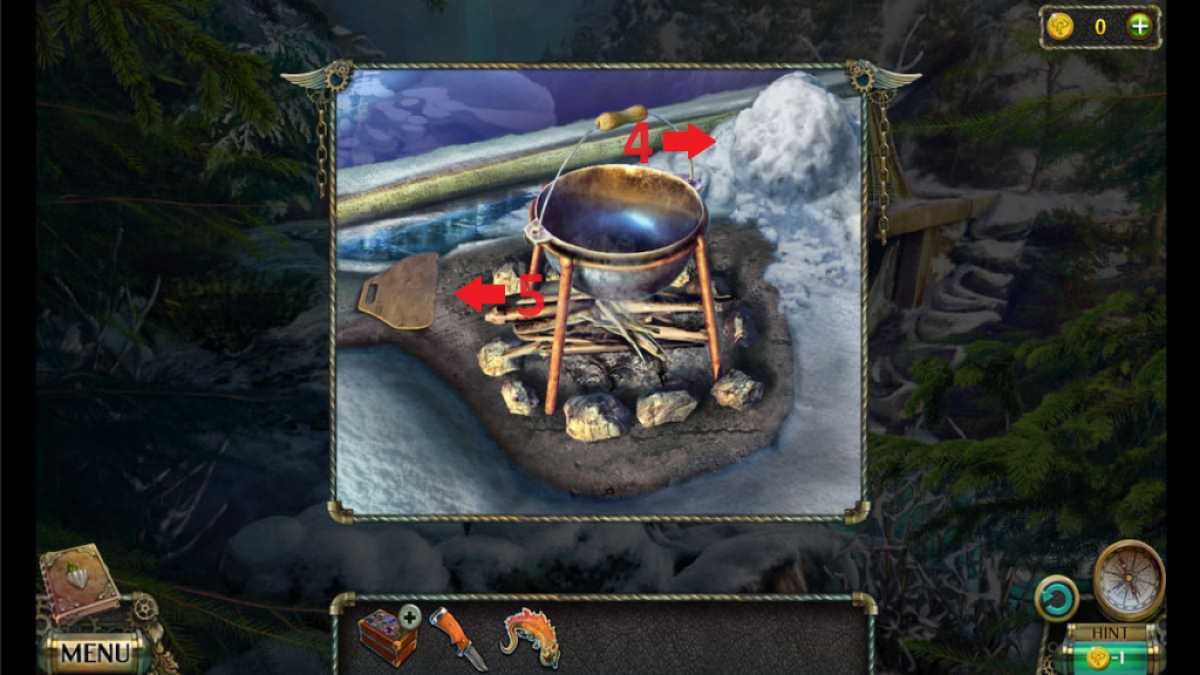
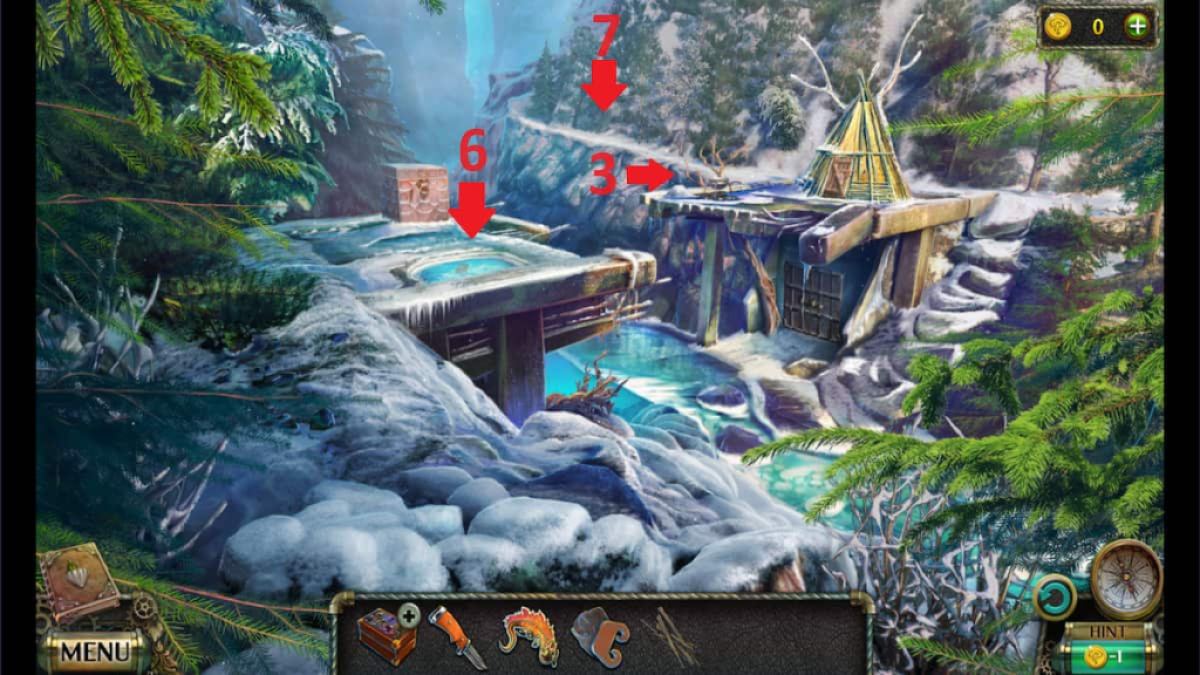
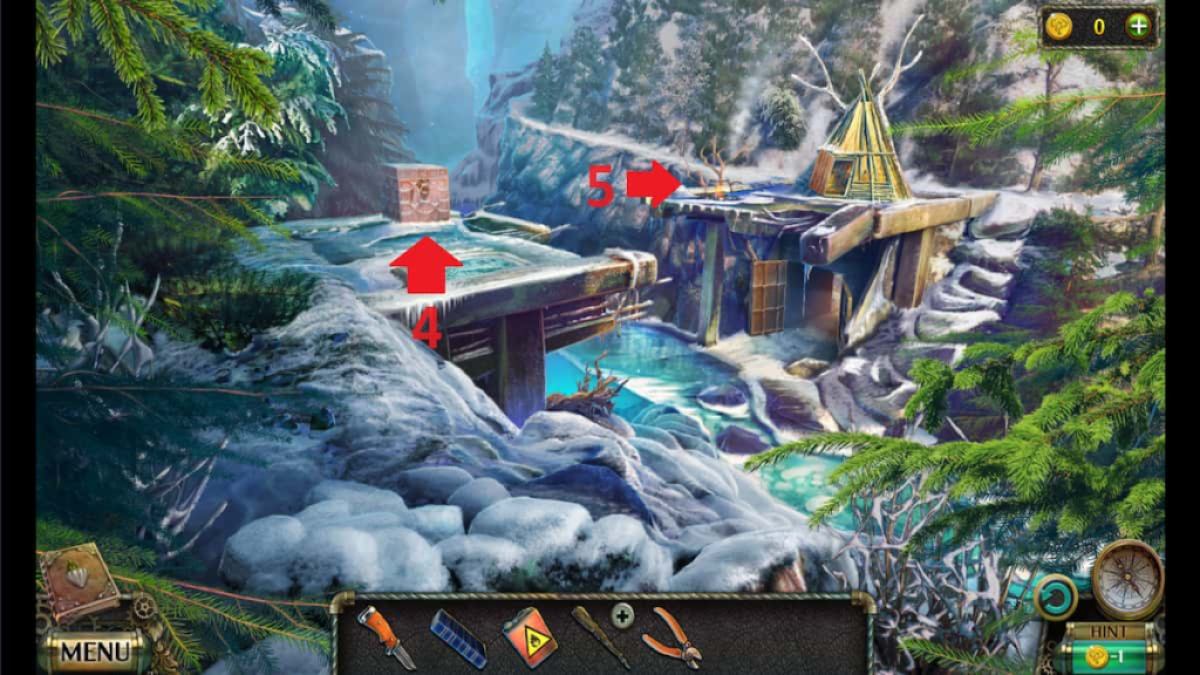
- Go to the cauldron (3) and place the flint and the splinters below it.
- Put snow (4) into the cauldron and fan (5) the flames.
- Pick up the cauldron of hot water.
- Throw the cauldron onto the frozen pond (6) and take the crystal.
- Follow the road (7).
Task 6 – Reach the temple
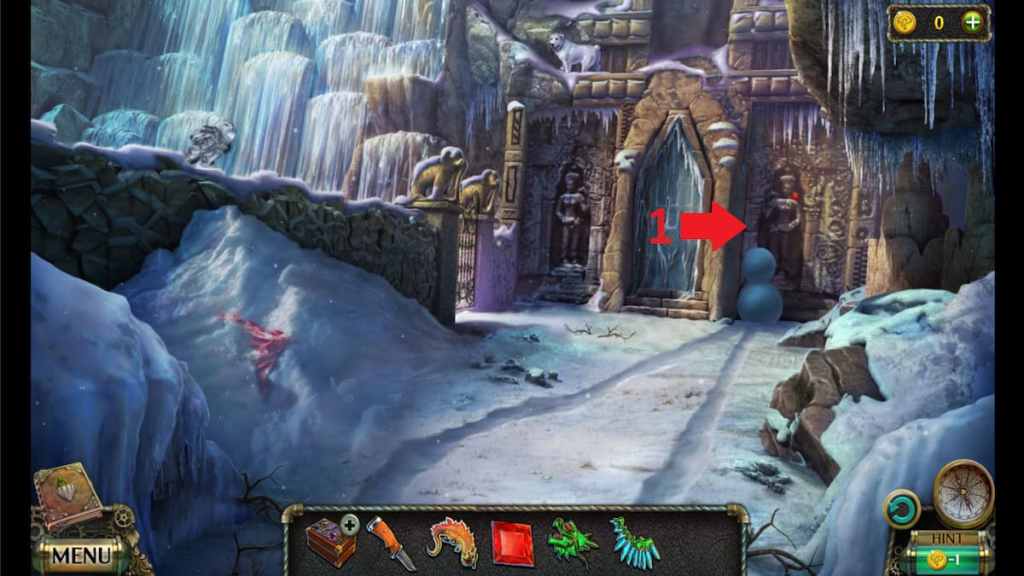
- Follow these directions: right, left, forward, left, right, left, left, right, forward, right.
- Take the dragon head on the right and the dragon wing at the gate.
- Roll the two snowballs and take the chrystal from the statue (1).
- Approach the temple entrance and place the two crystals into the door.
- Move the gem across the empty spaces in the following pattern: right, up, down, left, up, right, up, down, up, left, down, up, down, right, down, left, down, right, up, left, down, left, down, left
- Enter the temple.
Task 7 – Where's the stone?
- Take the plank and the shovel.
- Go underneath the giant statue and move the gems to collect a Bas-relief part and a book.
- Approach the pond, take the cryptex, and go back outside.
- Use the shovel to clear the snow and collect oil.
- Use the oil on the rusty gate to unlock it and enter.
- Collect the Bas-relief part (1) and the fish figurine (2).
- Place the plank across the gap (3).
- Pick up the pink gear and go back twice.
- Place the gear inside the tent door (4) and go inside.
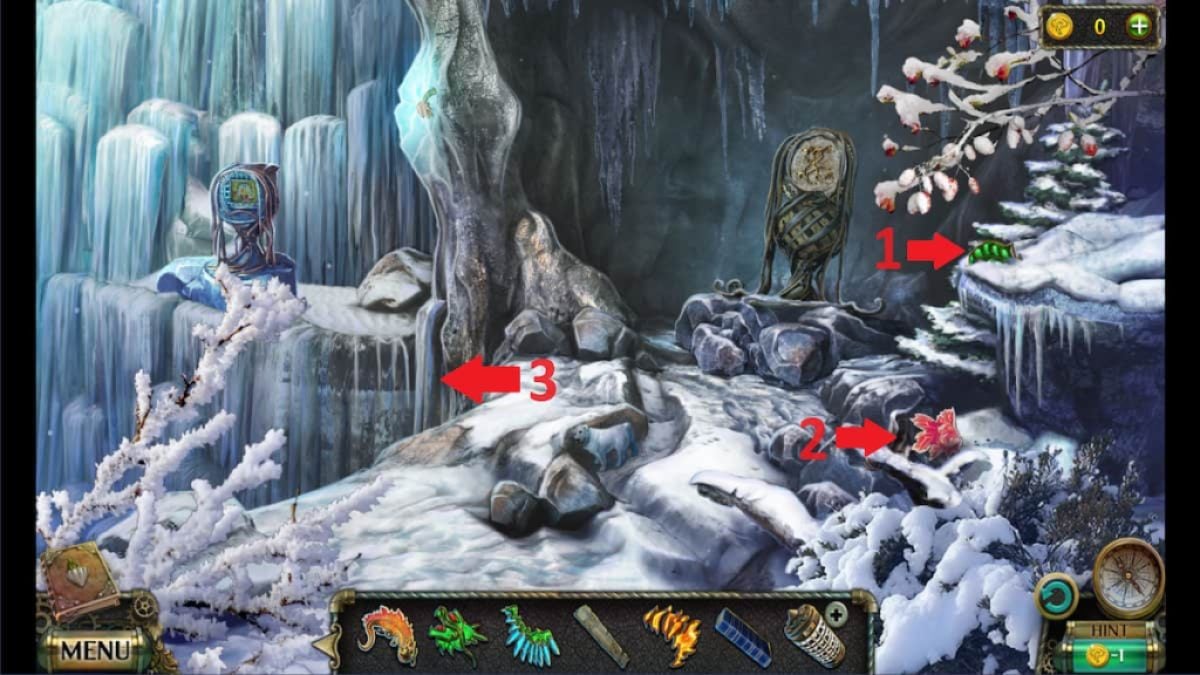
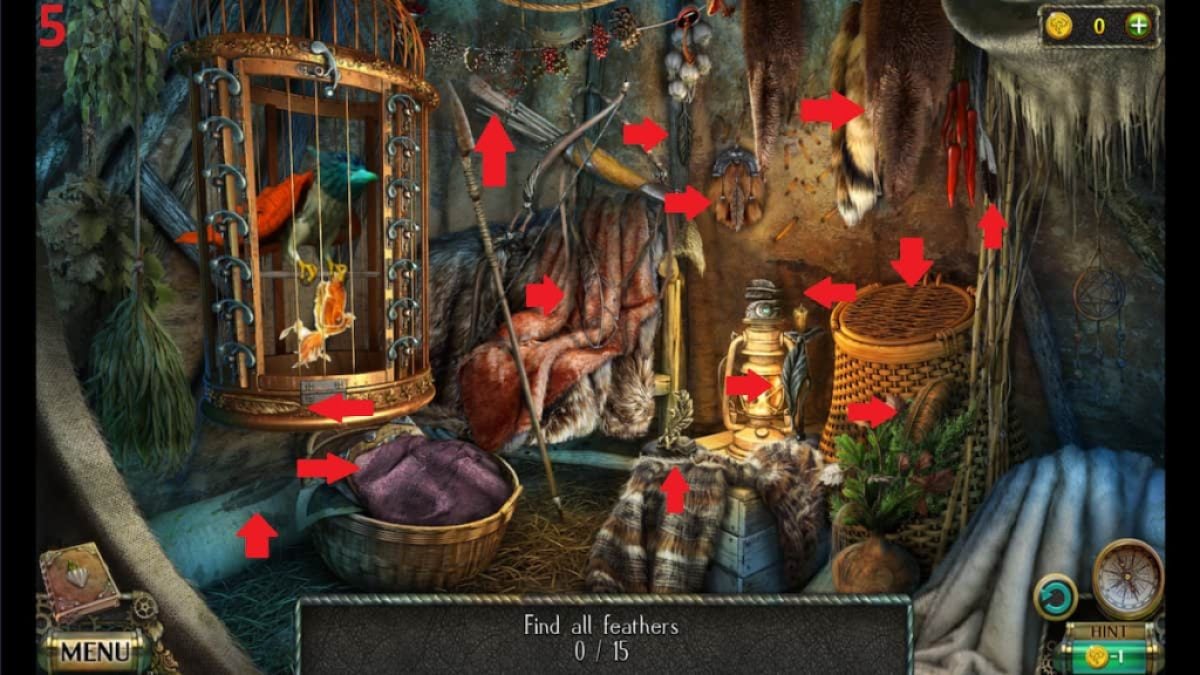
- Find 15 feathers to receive a bird figurine. (See image 5).
- Place the figurines onto the casket and arrange them to unlock it.
- Take the pen and paper and the Bas-relief part from the table.
- Take the hieroglyphic message and the bird figurine and return to the temple.
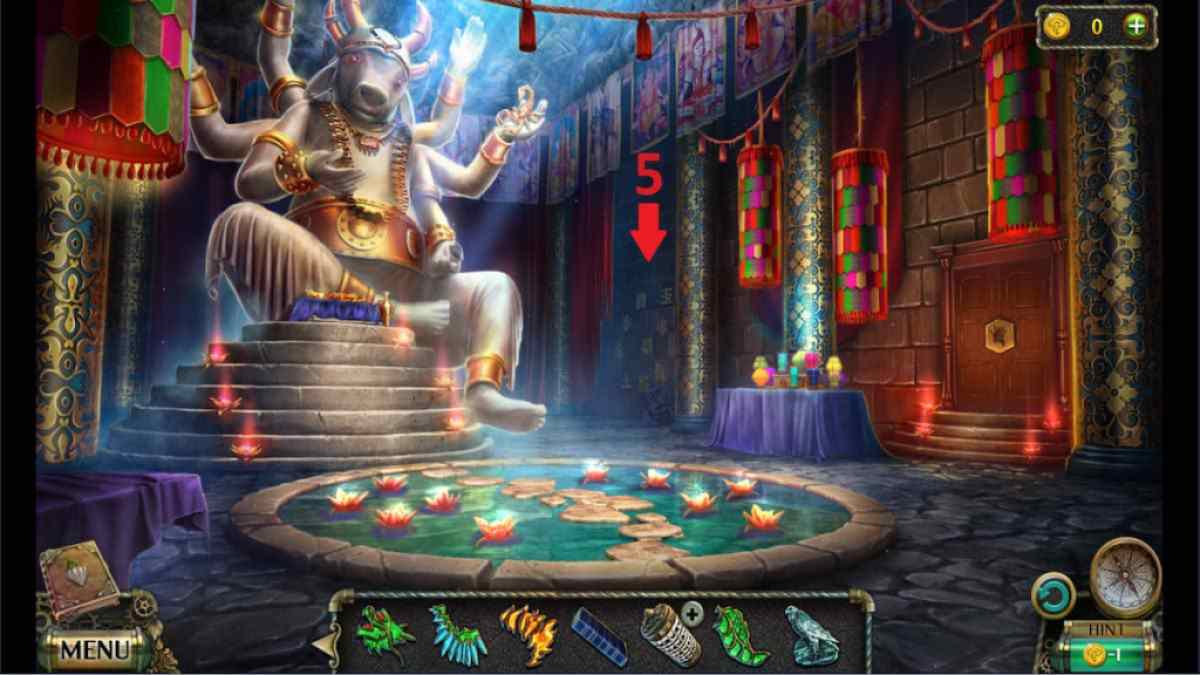
- Place the hieroglyphic message onto the wall (5) and press the symbols in the order shown on the message.
- Enter the secret passage.
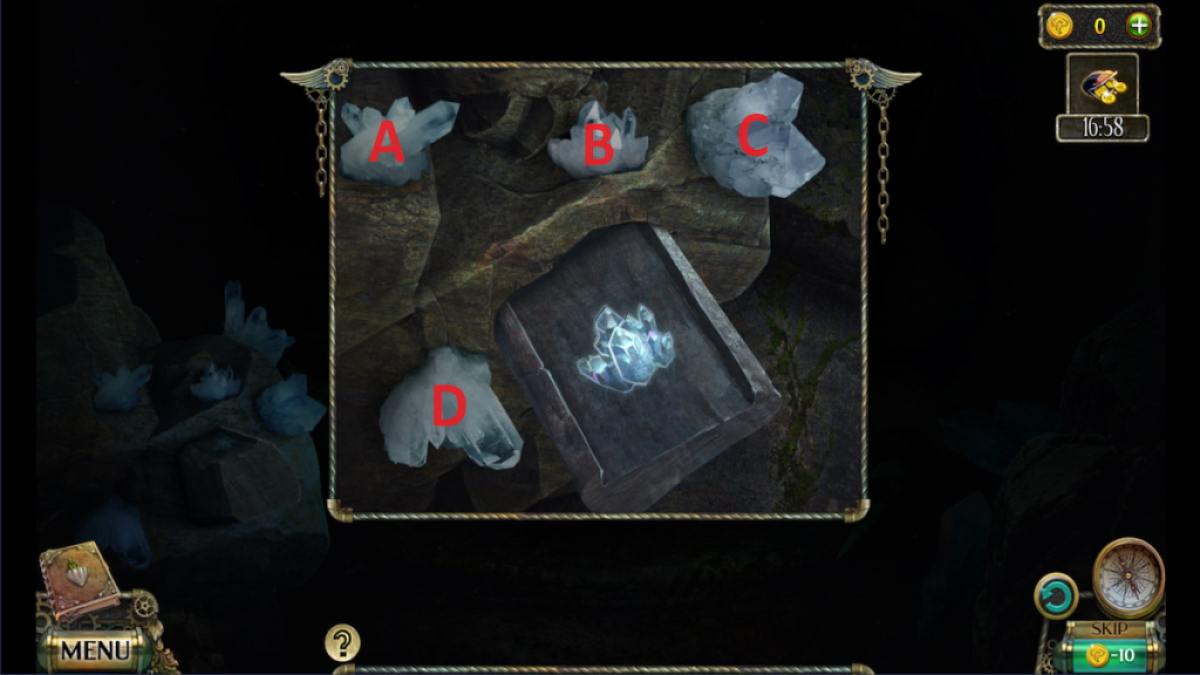
- Take the bas-relief part and press the crystals in the following sequence: A, C, B, D, C, A.
- Press your hand onto the sliding imprint and enter.
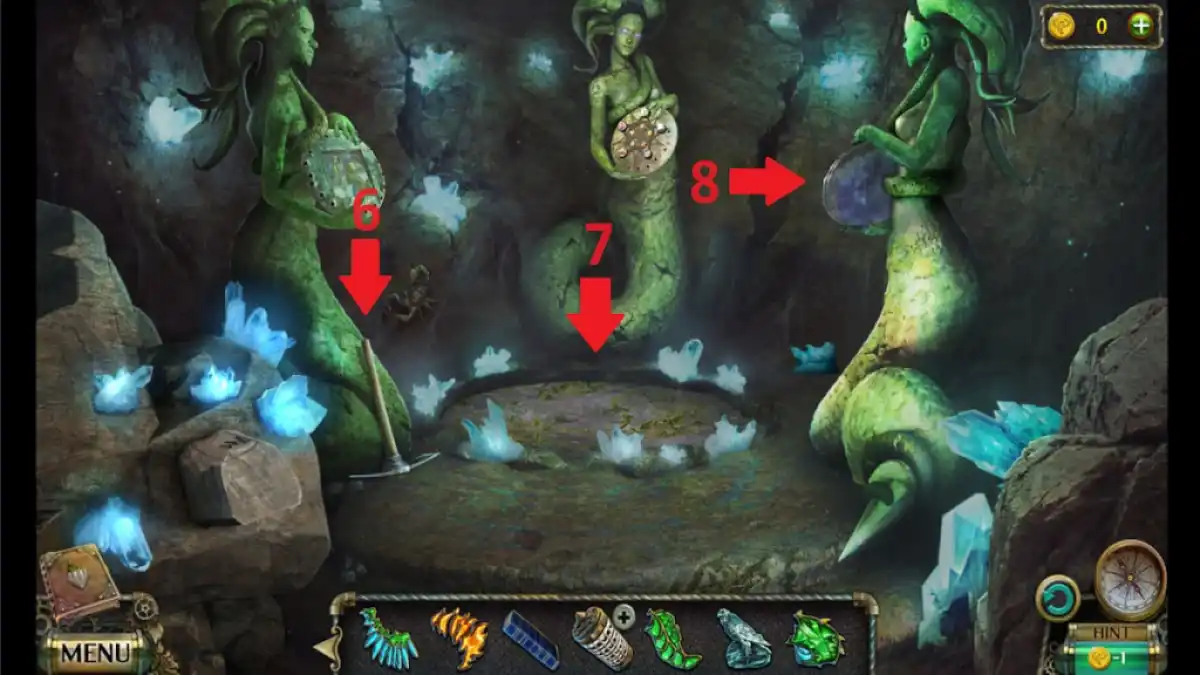
- Take the pickaxe (6) and place the pen and paper into the circle (7).
- Place the bird figurine onto the right statue (8) and put them in the right position (9).
- Go back to the temple.
- Place the hint onto the cryptex and input the code to receive a deity-shaped key.
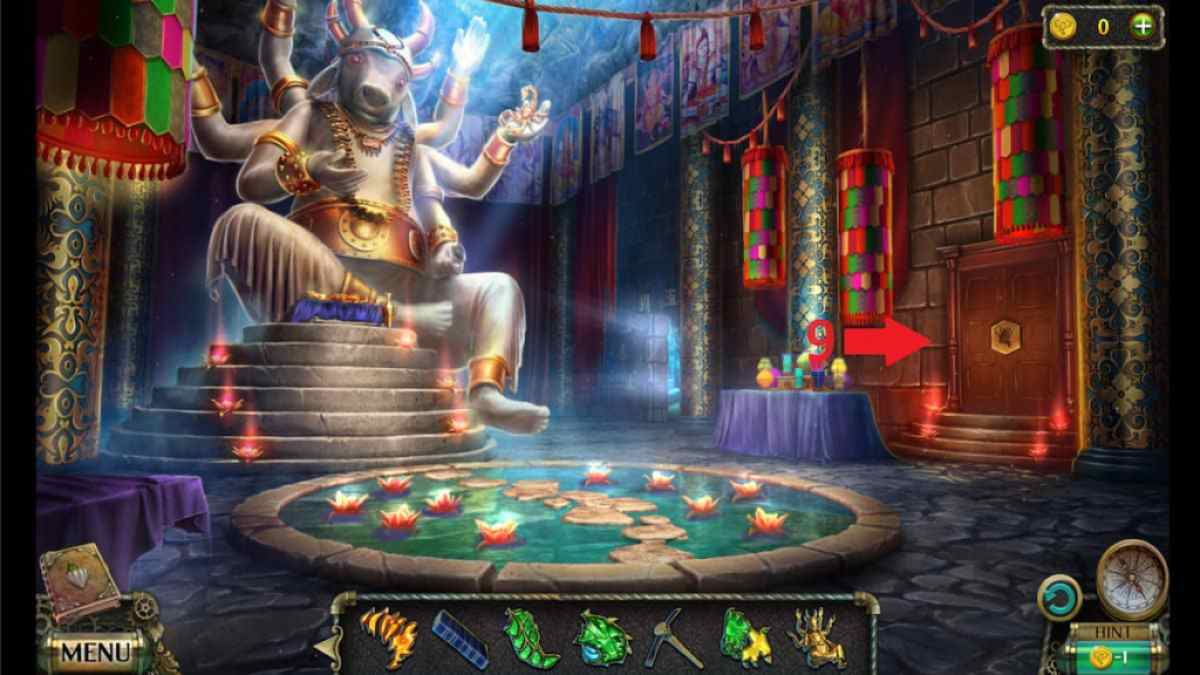
- Place the deity-shaped key into the door (9) to open it and enter.
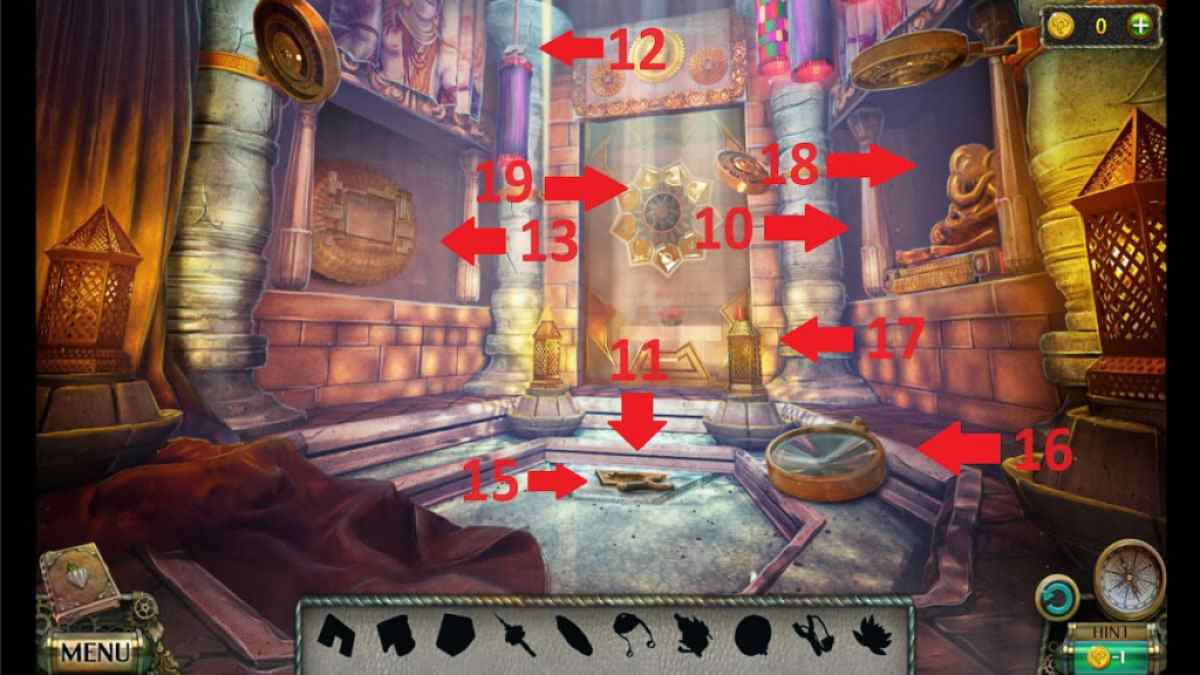
- Take the leather pad (10), combine it with the slingshot (11), and use it to knock down a puzzle piece (12).
- Place the puzzle piece onto the puzzle (13) and arrange them in the correct pattern (14).
- Pick up the helmet and the lotus figurine.
- Place the lotus figurine into a lotus opening (15) and take the scepter and the stone petal.
- Place the mirror (16) onto the column and pick up the bracelet (17).
- Place the scepter, the bracelet, and the helmet on the elephant statue (18) and collect the crystal.
- Place the stone petal into the empty slot (19).
- Exit the temple and go through the opened iron gate.
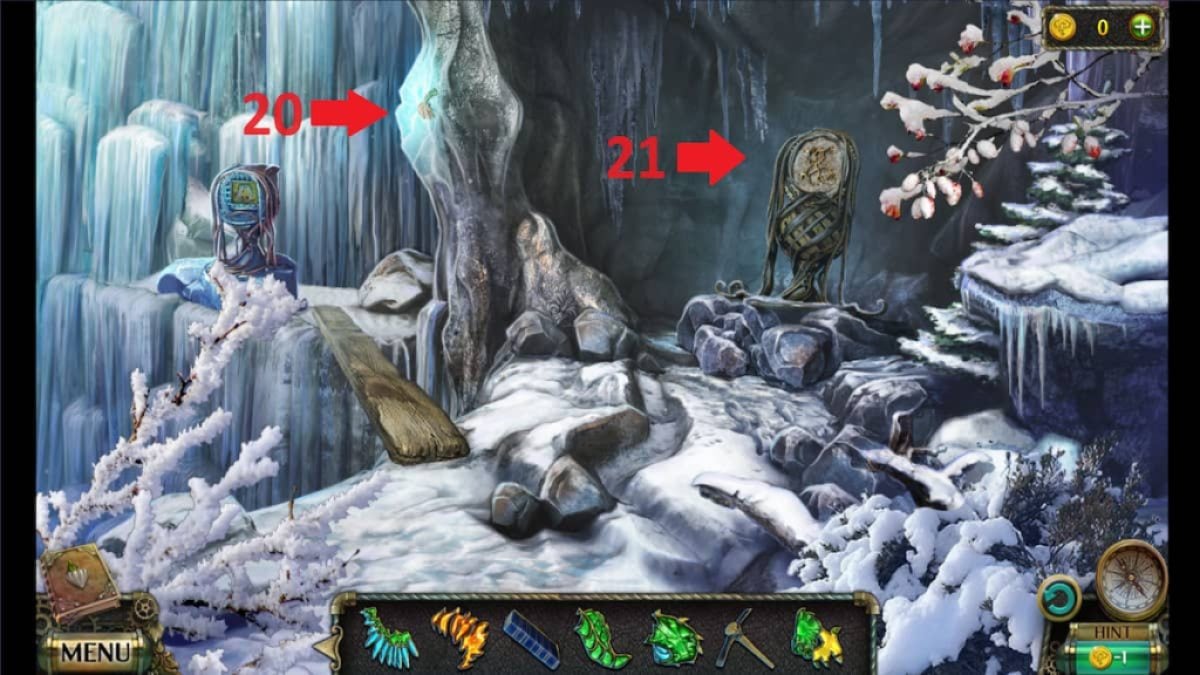
- Use the pickaxe on the ice block (20) to extract the bas-relief part.
- Place all the bas-relief parts onto the puzzle (21) to get the mosaic parts.
- Return to the temple and enter the room with the three statues.
- Place the mosaic parts onto the statue on the left and arrange the pieces.
- Exit the room and go through the large door.
- Place the crystal onto the lantern (22), arrange the mirrors to reveal the button combination, and receive a flower.
- Go back to the statue room and place the flower on the middle statue.
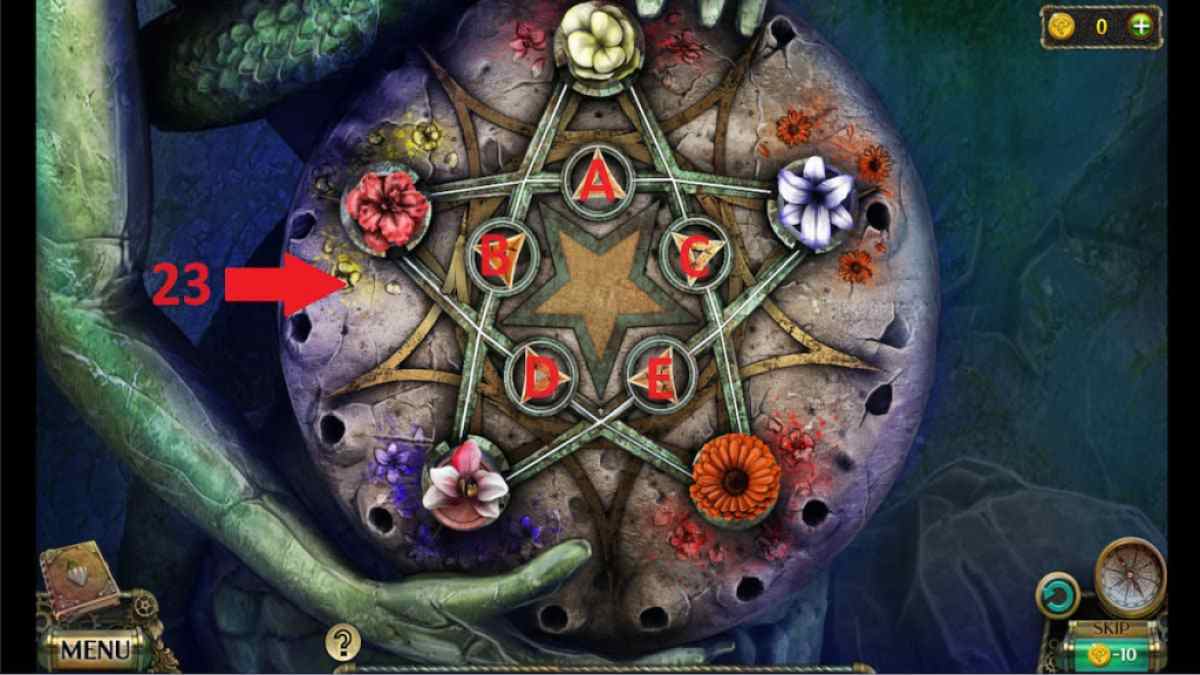
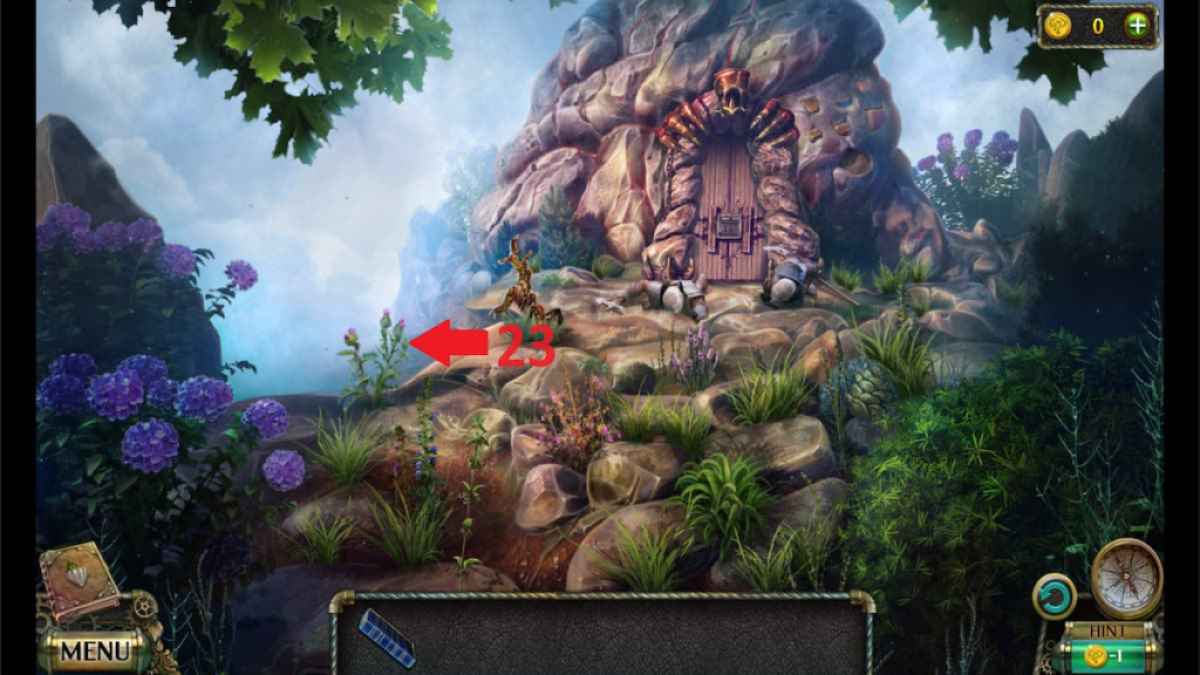
- Press the buttons (23) in the following order: C, D, B, E.
- Inspect the giant rock and go back three times.
Related: On Thin Ice – Full Walkthrough & Solutions (Chapters 1-4)
Task 8 – Searching for the dream woman/An old mine
- Talk to the man to receive a key and use it to open the door to the mine.
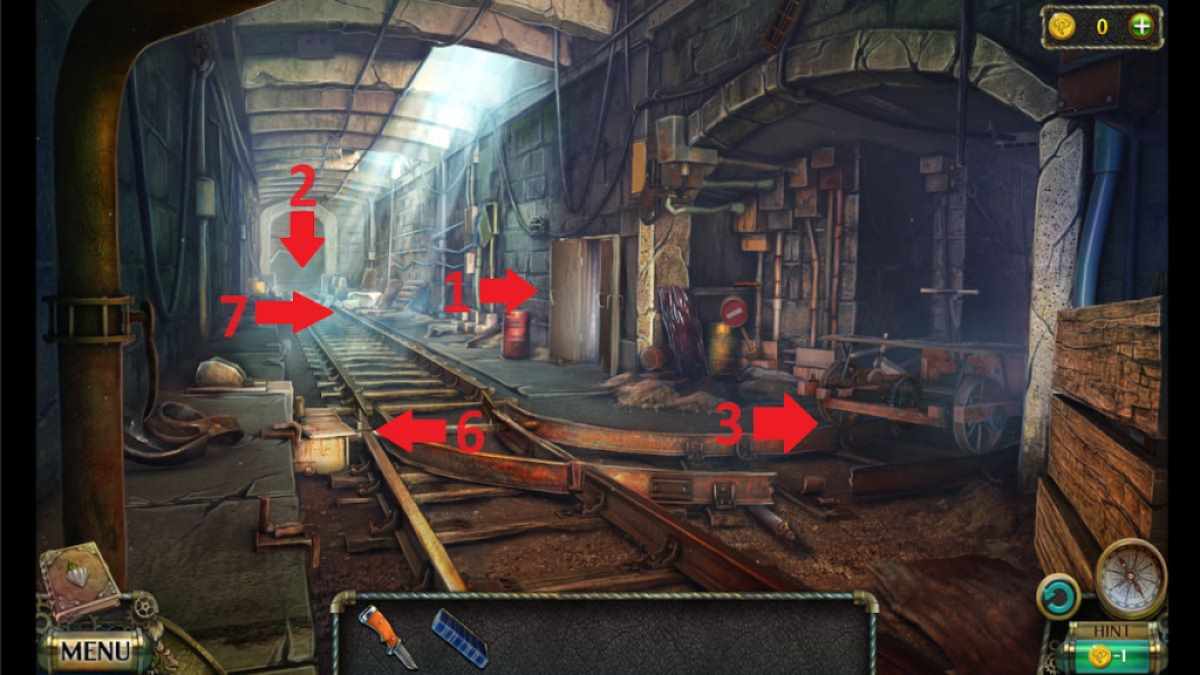
- Pick up fuel and rail part (1).
- Pick up the club and the fastening (2) and move the rocks from the railway.
- Place the rail part and the fastening in front of the mine cart (3), and collect clippers
- Go back outside.
- Use the clippers to open the box (4), and take the lever and the rag.
- Combine fuel and the rag with the club to create a torch.
- Use the fireplace (5) to light the torch and return to the mine.
- Place the lever into the railway (6) and use the torch to light up the way (7).
Task 10 – Getting to the island
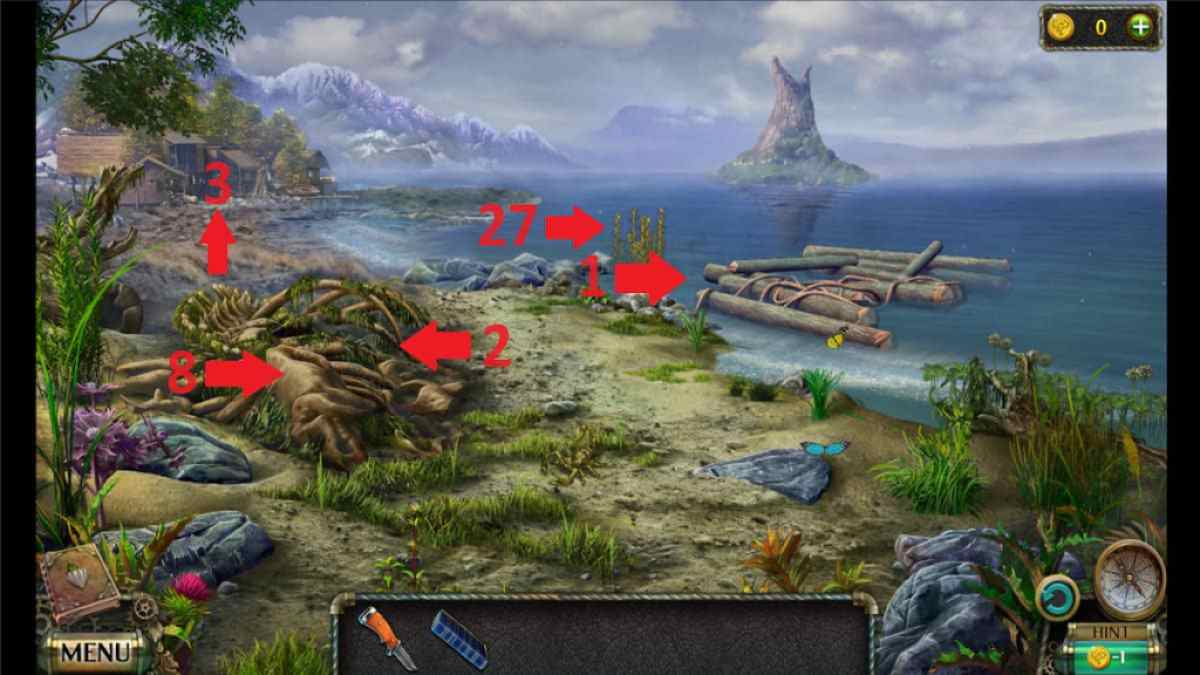
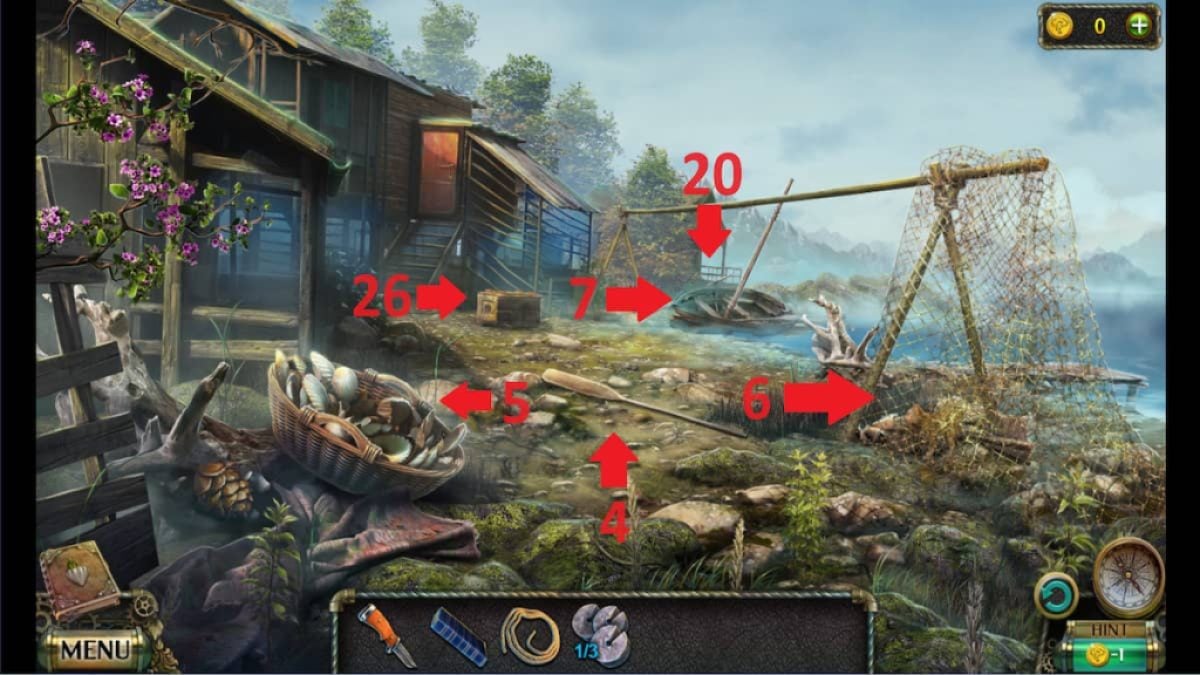
- Assemble the raft (1), pick up the rope (2), and go to the beach house (3).
- Pick up the oar (4) and move the shells (5) to find the third of the load.
- Use the knife to free the cat (6) and take the sailcloth.
- Pick up the rake (7) and go back to the shore.
- Use the rake to clear the weeds (8) and reveal a key.
- Go back to the beach house and enter using the key.
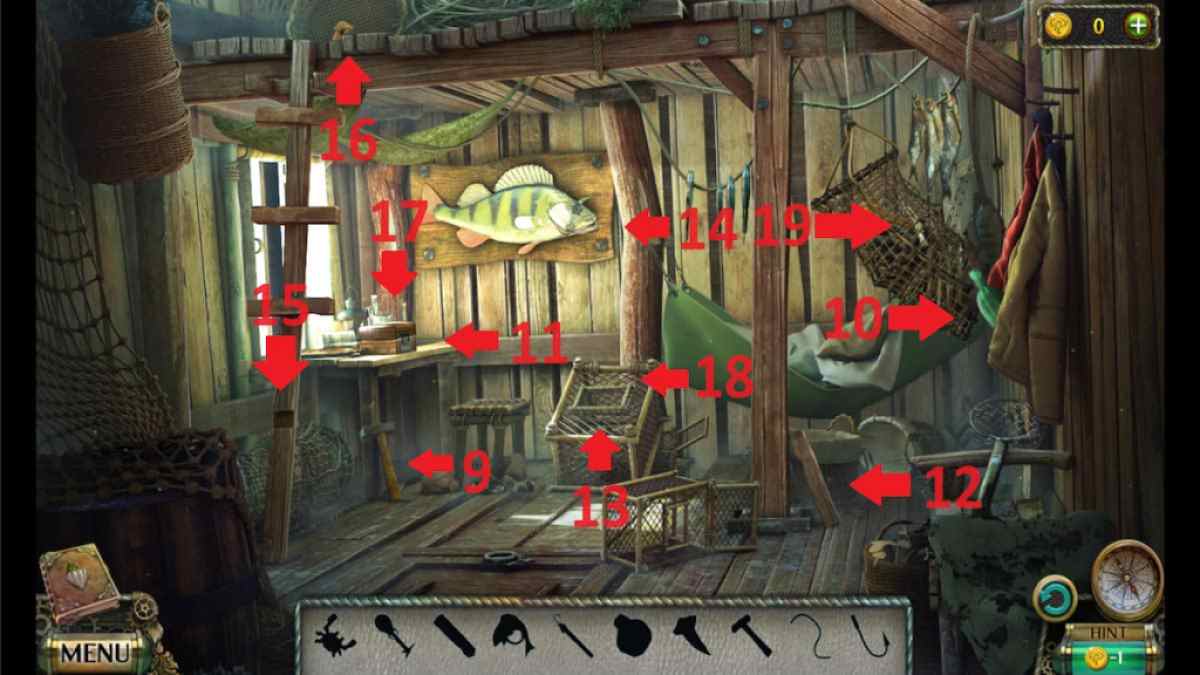
- Pick up the hammer (9), nails (10), a crab-shaped key (11), and a step (12).
- Use the crab-shaped key to open the cage (13) and take the fish's eye.
- Place the fish eye into the fish's eye socket (14) and place the step into the ladder socket (15).
- Use the hammer and the nail to secure the ladder step and climb up to retrieve the key and the rope (16).
- Use the key to open the casket (17) and retrieve a hook.
- Place the hook and the rope onto the club (18).
- Use the club with a hook to retrieve the fish-shaped key from the fish's mouth.
- Use the fish-shaped key to unlock the cage (19) and take the nail puller.
- Use the nail puller to take the mast (20) and return to shore.
- Place the mast onto the raft and use the rock to hammer the nails.
- Place the sailcloth, the rope, and the oar onto the raft and sail.
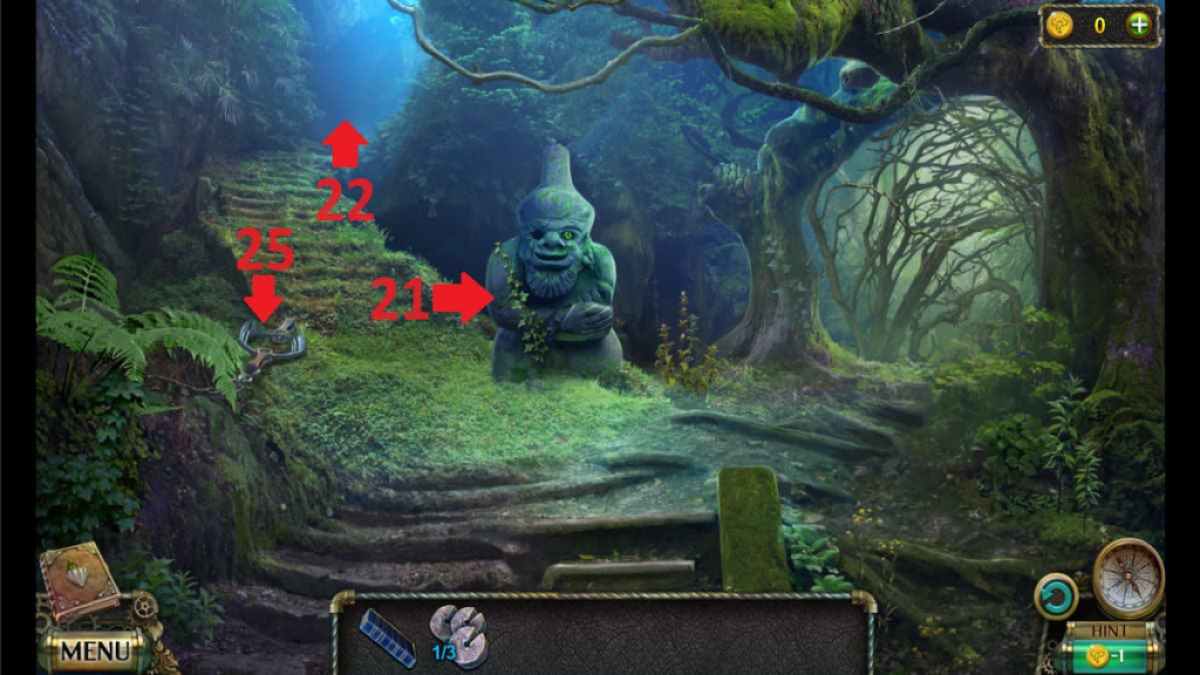
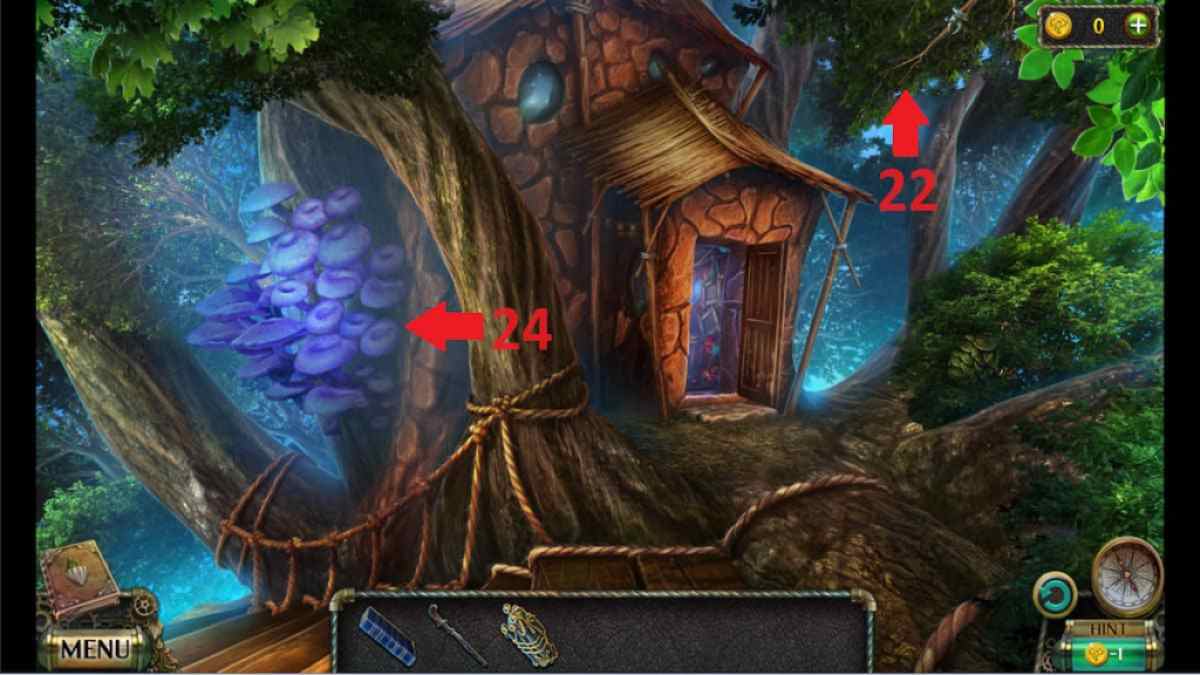
- Take the pipe (21) and enter the woods (22).
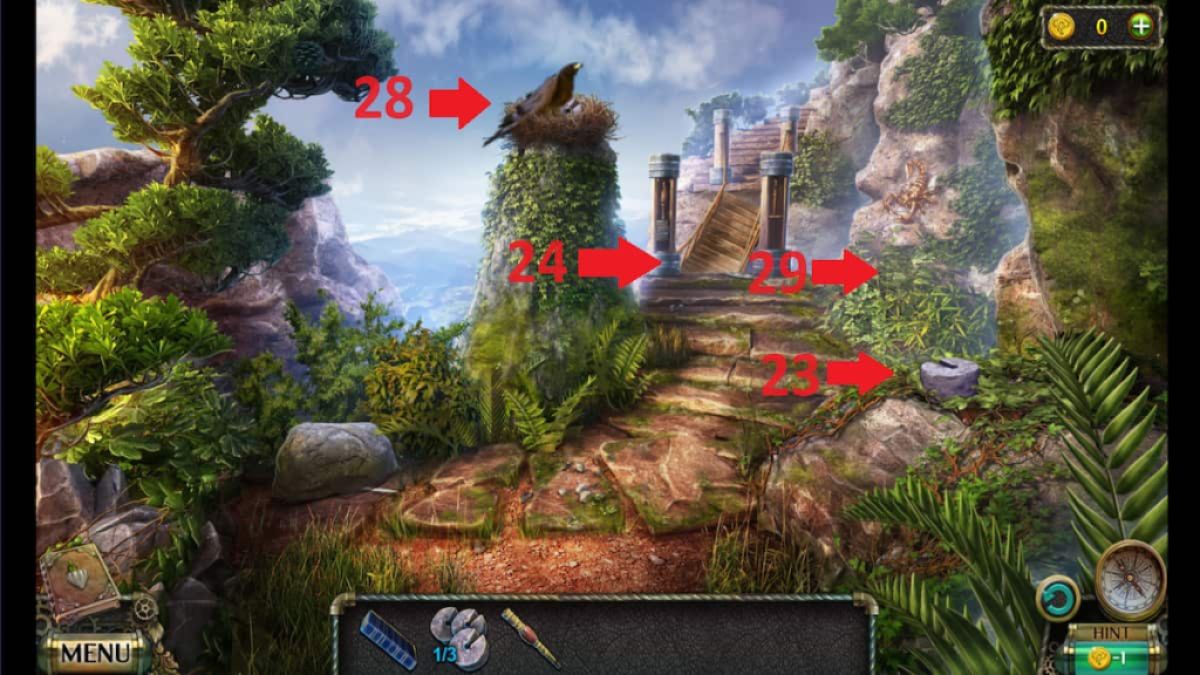
- Take the second third of the load (23) and the spreader (24).
- Return to place the spreader onto the bear trap (25) to retrieve a brush.
- Go back in front of the beach house and paint the fish (26) so that no fish remains adjacent to the fish of the same color.
- Pick up the fishing rod and go back.
- Use the fishing rod to catch a fish (27).
- Go back to the broken bridge and throw the fish to the eagle (28).
- Pick up the final third of the load from the nest and place the load into the bridge pillar.
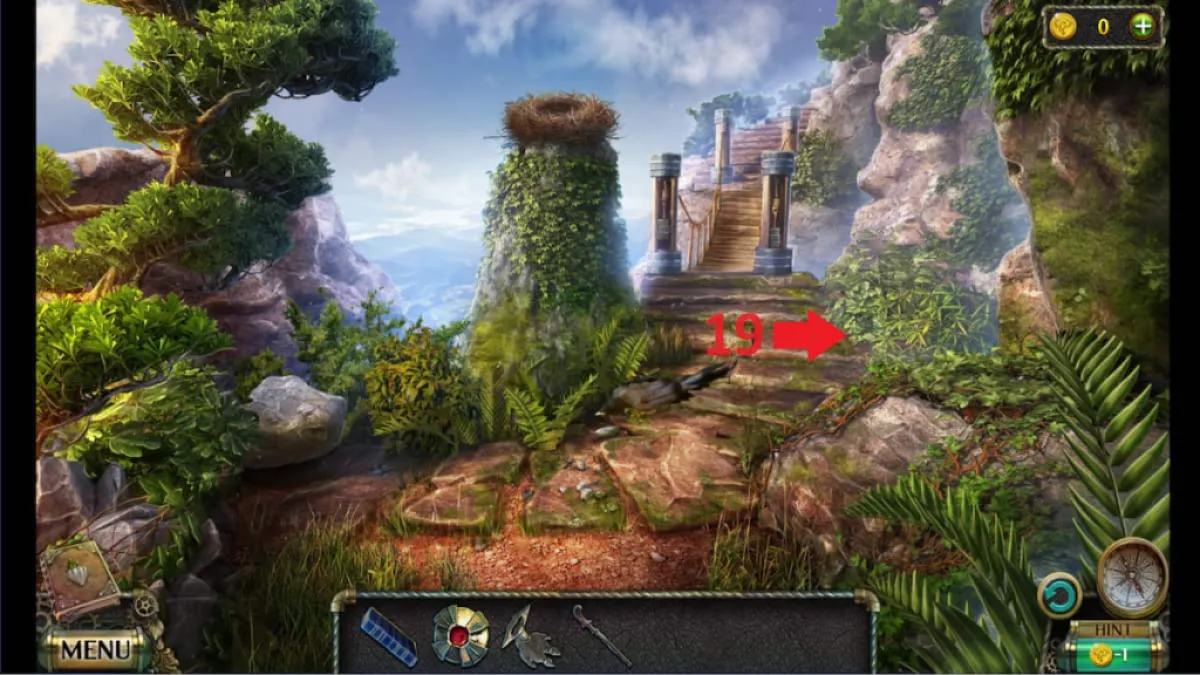
- Uncover the vines (29) and cross the bridge.
Task 11 – A way to the dungeon
- Pick up the rope with the hook and the club.
- Use the club to lift the stone (1) and get the garden shears.
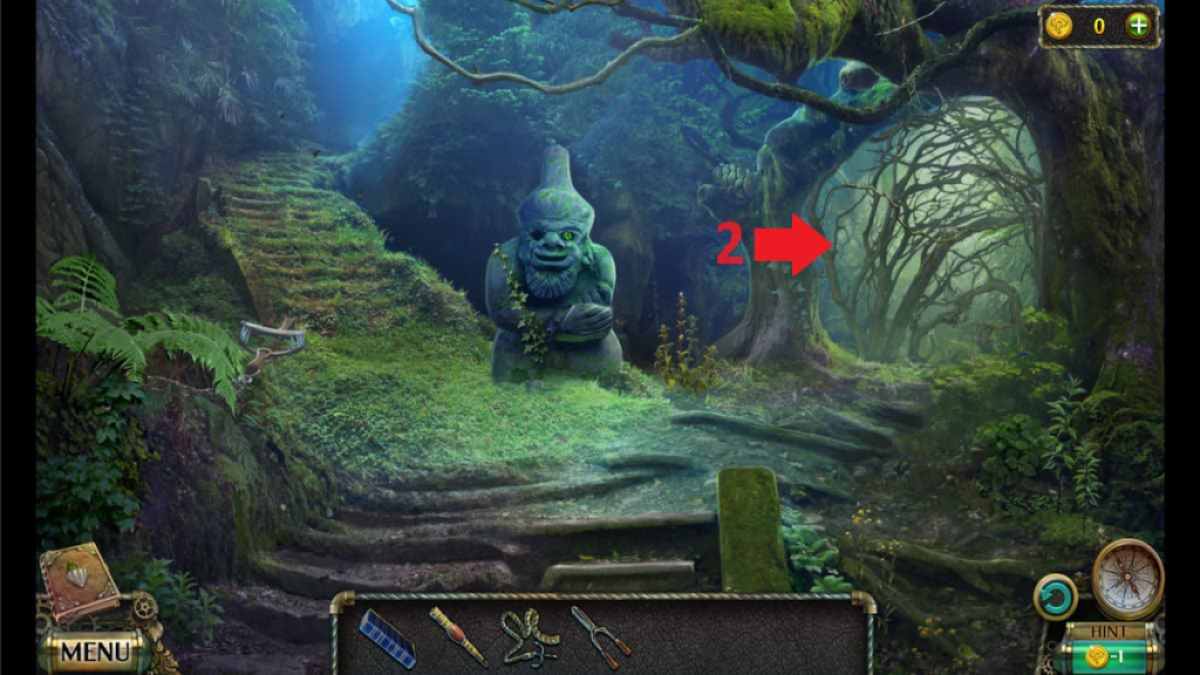
- Return to the crossroad, use the shears to clear the path (2), and pass through.
- Talk to Halanvir to get a map leading to his hut.
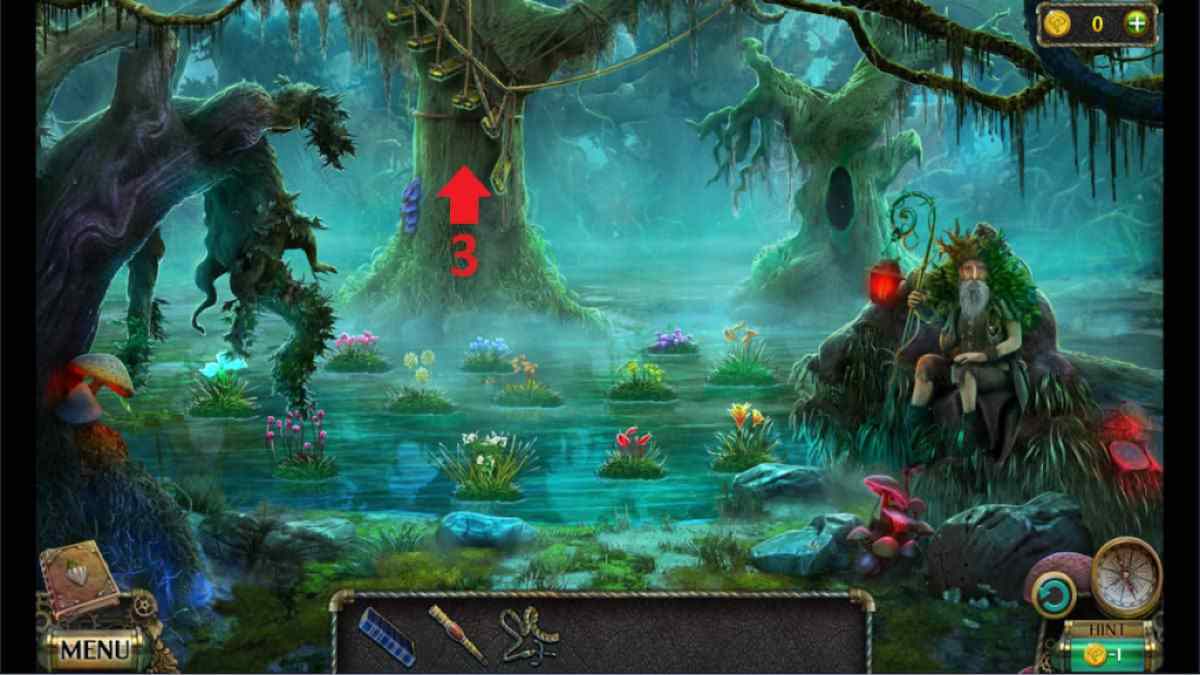
- Use the instructions on the map to cross the swamp.
- Use the rope with a hook to reach the bridge (3).
- Take the darts in the tree, the bell next to the door, and return to Halanvir.
- Offer the bell to Halanvir to receive a key and use it to enter his hut.
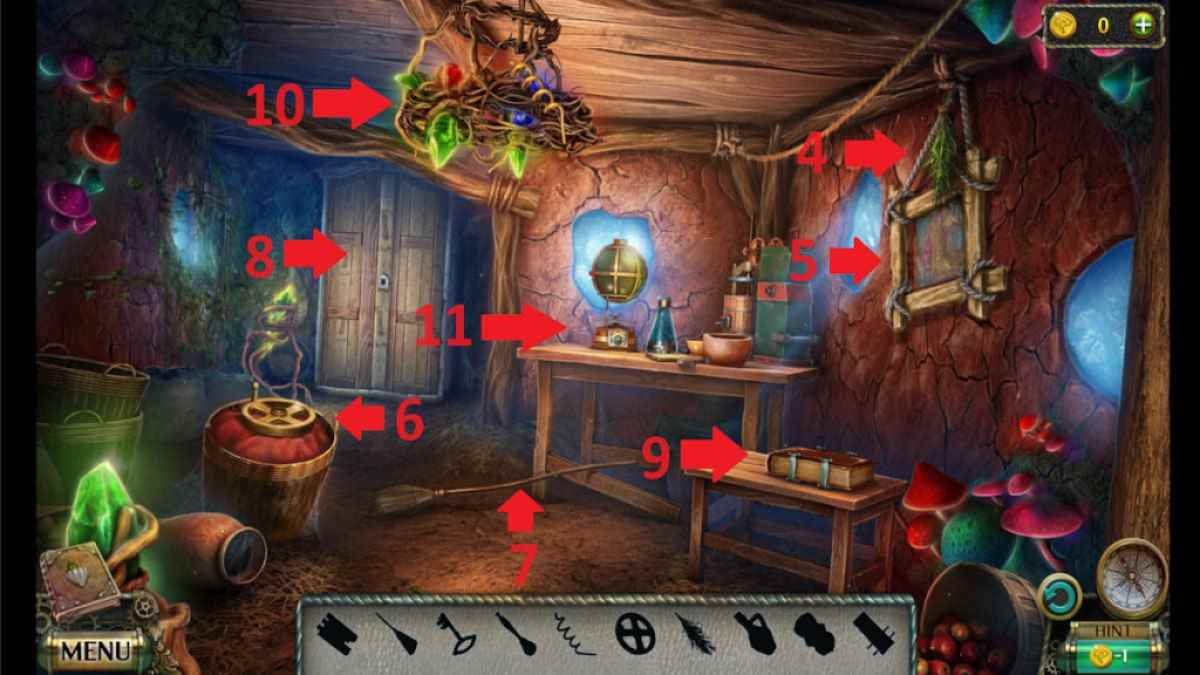
- Take the grass (4) and remove the picture frame (5) to reveal a hole containing a key.
- Take the device fragment (6), move the cloth and the apples to take a strange fruit.
- Take the broom (7) and use the key to unlock the wardrobe (8).
- Move the items to reveal a detail and a potion.
- Place the detail on top of the puzzle (9), press the illuminated crystals to open the book, and take the pestle.
- Use the broom to reach the spiral tube (10).
- Place the book on the table (11) and follow the instructions to create a sleeping potion.
- Head back to the dungeon entrance, dip the darts into the sleeping potion, and insert them into the pipe.
- Use the blowpipe to put the guards to sleep and take their keys.
- Split the bunch of keys into keys and a hook.
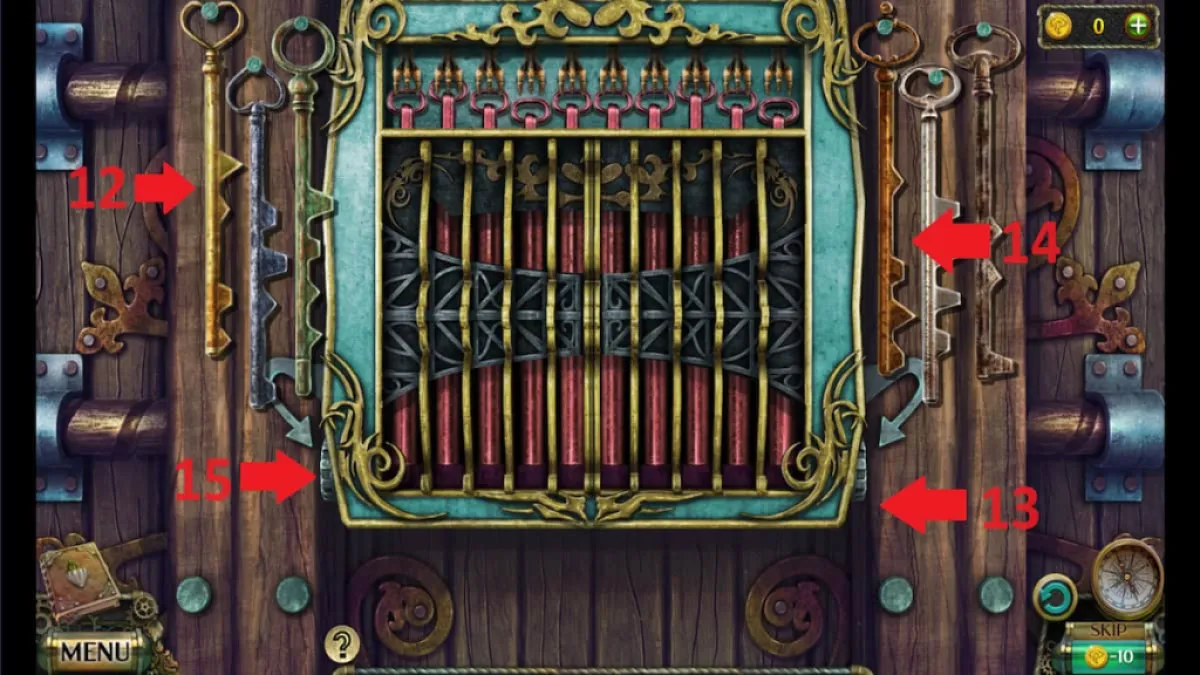
- Place the gold key (12) into the left lock (13) and the bronze key (14) into the right lock (15).
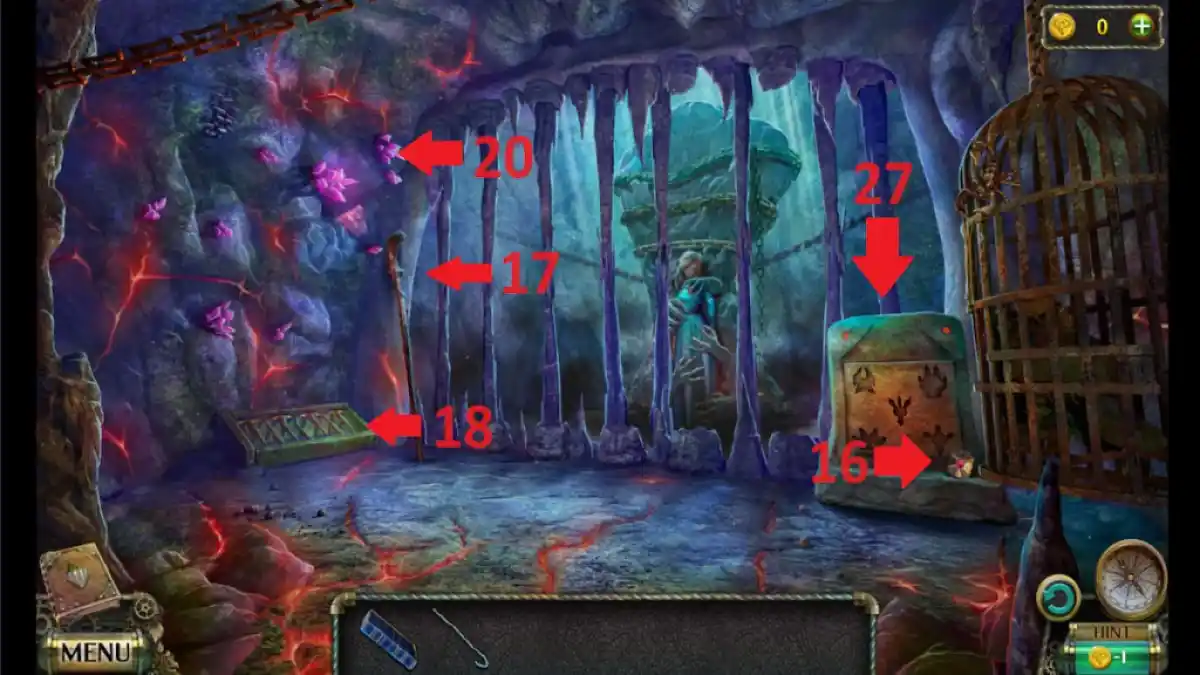
- Enter the dungeon and take the detail (16).
- Take the staff (17) and use the hook to reach the key (18).
- Go back twice and place the detail into the puzzle (19).
- Guide the beam through all of the chips to solve the puzzle.
- Collect the key and the chisel and go back into the dungeon.
- Place both keys onto the board and use the chisel and rock to take the crystal (20).
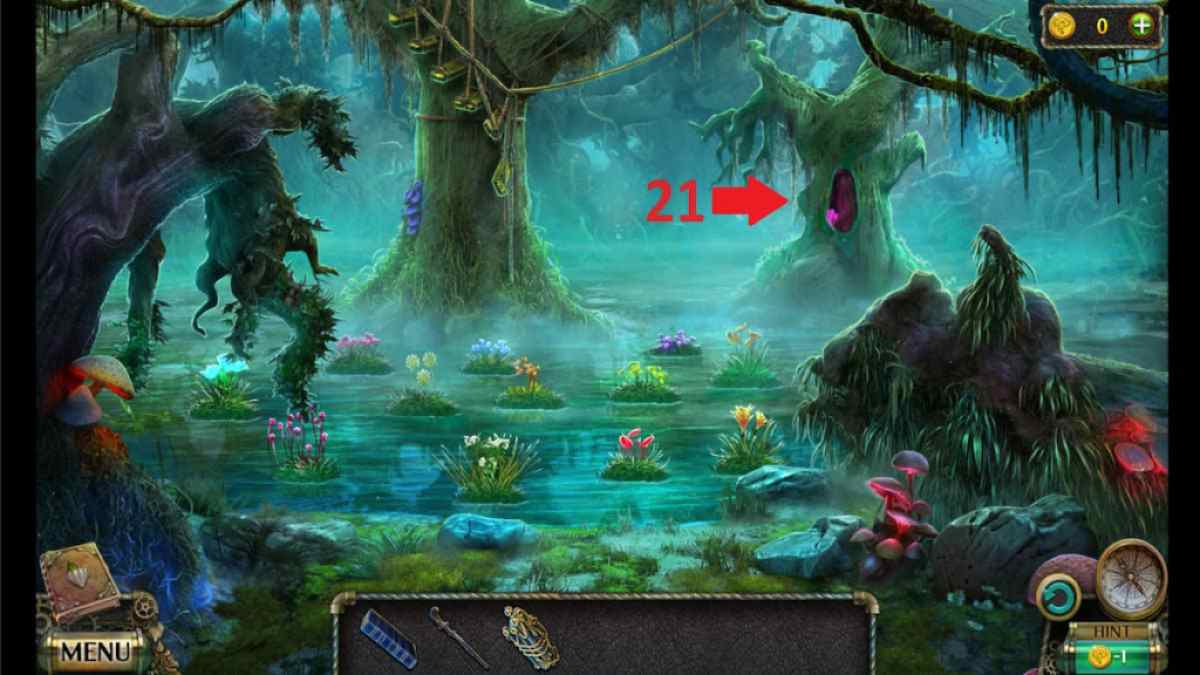
- Go to the swamp and put the crystal into the tree hollow (21) to collect a rope ladder.
- Climb to the hut and use the staff to reach a key (22).
- Go to the dungeon entrance and use the rope ladder to reach the key and the mushroom (23).
- Climb to the hut and place the mushroom into the puzzle (24).
- Chain all the mushrooms to collect the statue's eye.
- Go back twice and place the statue's eye into the statue to receive a rune.
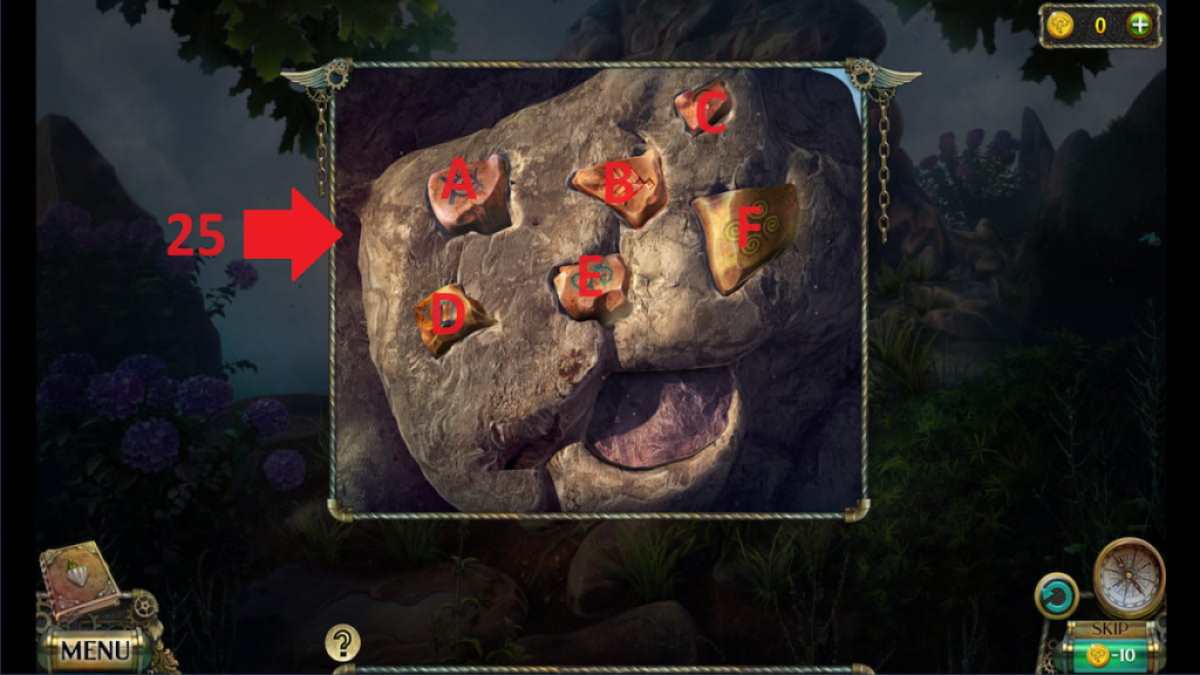
- Place the rune to the right of the dungeon entrance and press the runes (25) in the following sequence: D, B, E, C, A, F.
- Take the final key, enter the dungeon, and place all the keys into the board.
Task 12 – Blood transfusion
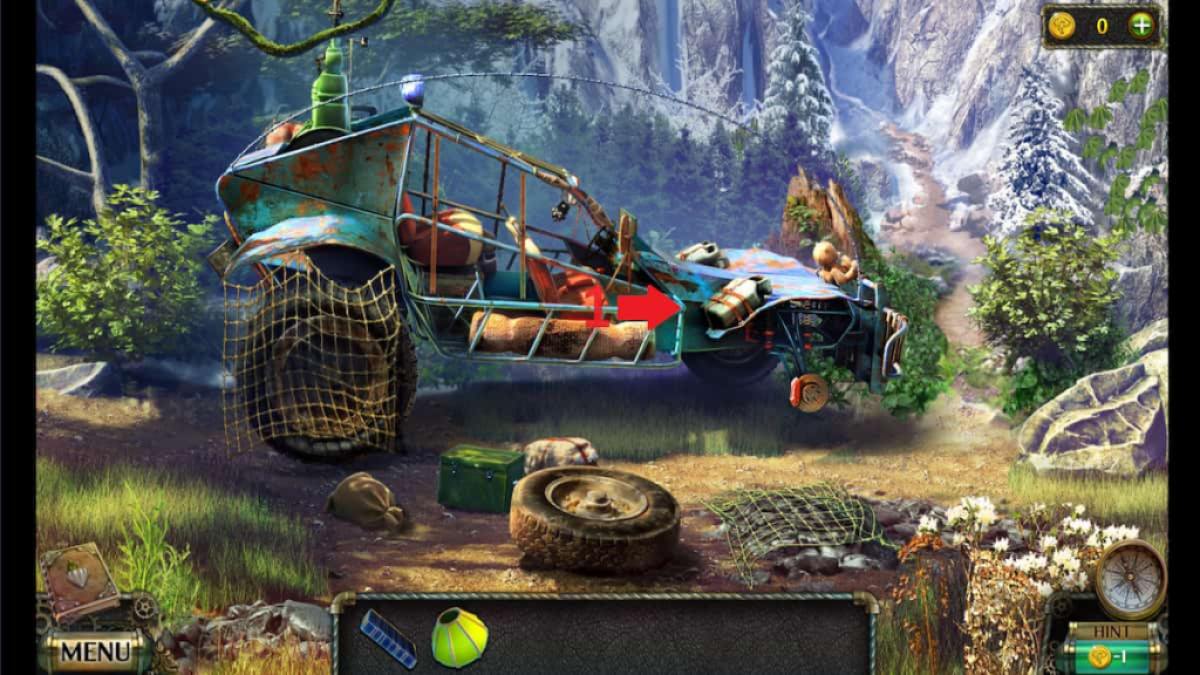
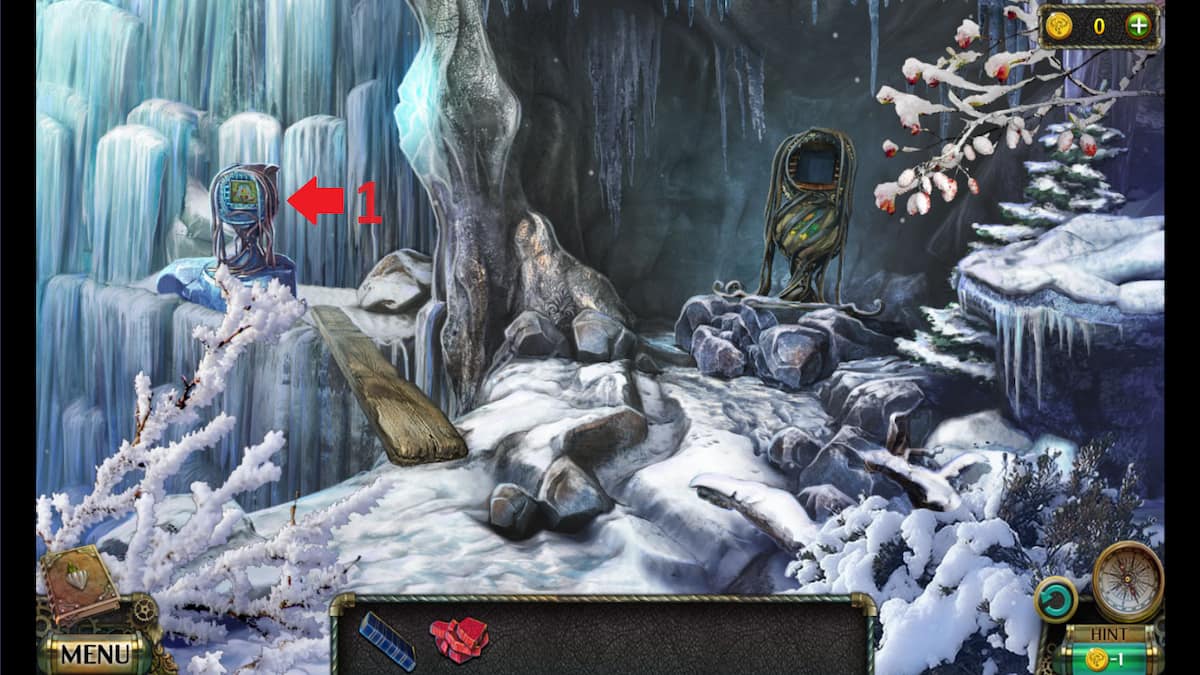
- Go back to the car and take the lantern (1).
- Go back to the temple and place the lantern on the table.
- Match the lantern colors to the crystal colors and collect the colorful mosaic parts.
Task 13 – Find a crystal for the device
- Exit the temple and go left through the iron gate.
- Place the colorful mosaic parts into the puzzle (1) and color the mosaic.
- Collect the energy crystal and go back to the car.
- Put the crystal in the car and drive.
- Talk to Kiara to receive a map.
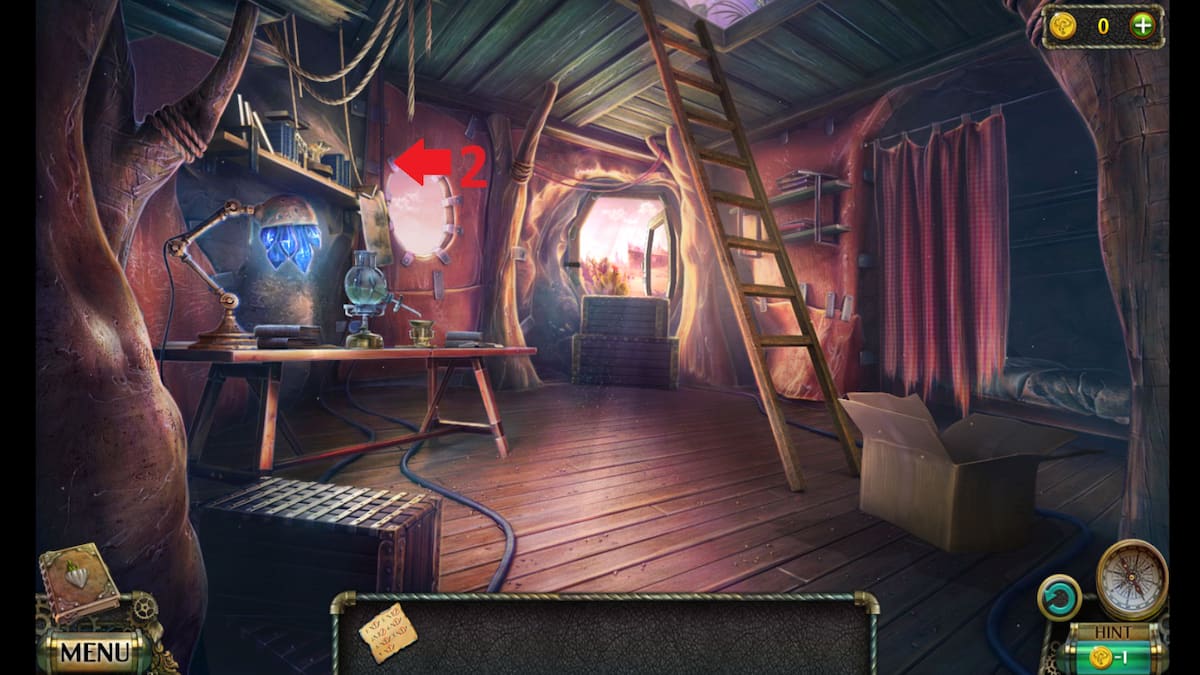
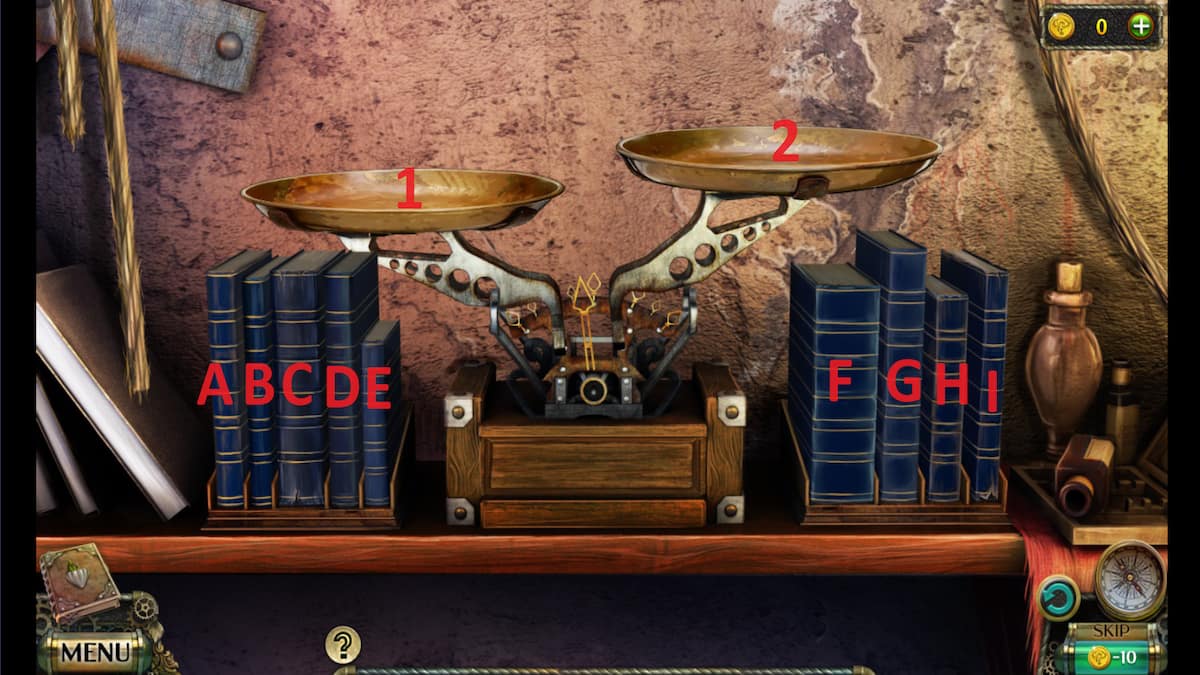
- Go inside the hut and place the book onto the beam scale (2).
- Put book D on a scale 1 and book G on a scale 2, then collect the pill.
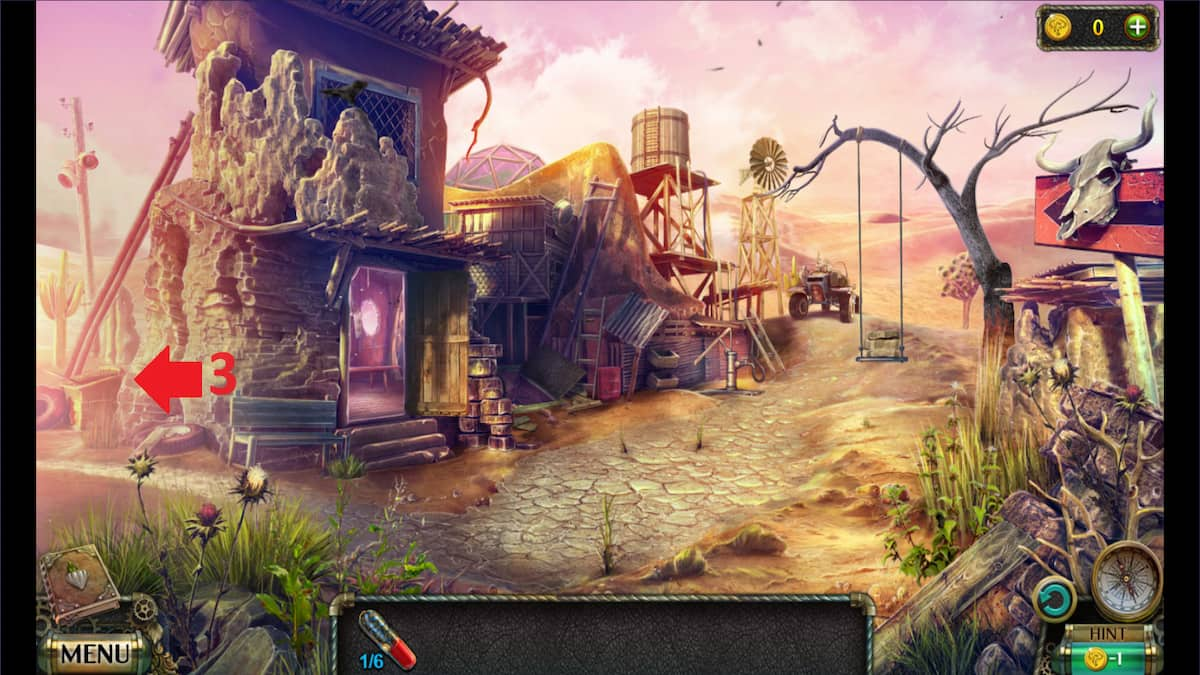
- Exit the hut and enter the labyrinth (3).
- Follow the directions on the map to reach Steve and talk to him.
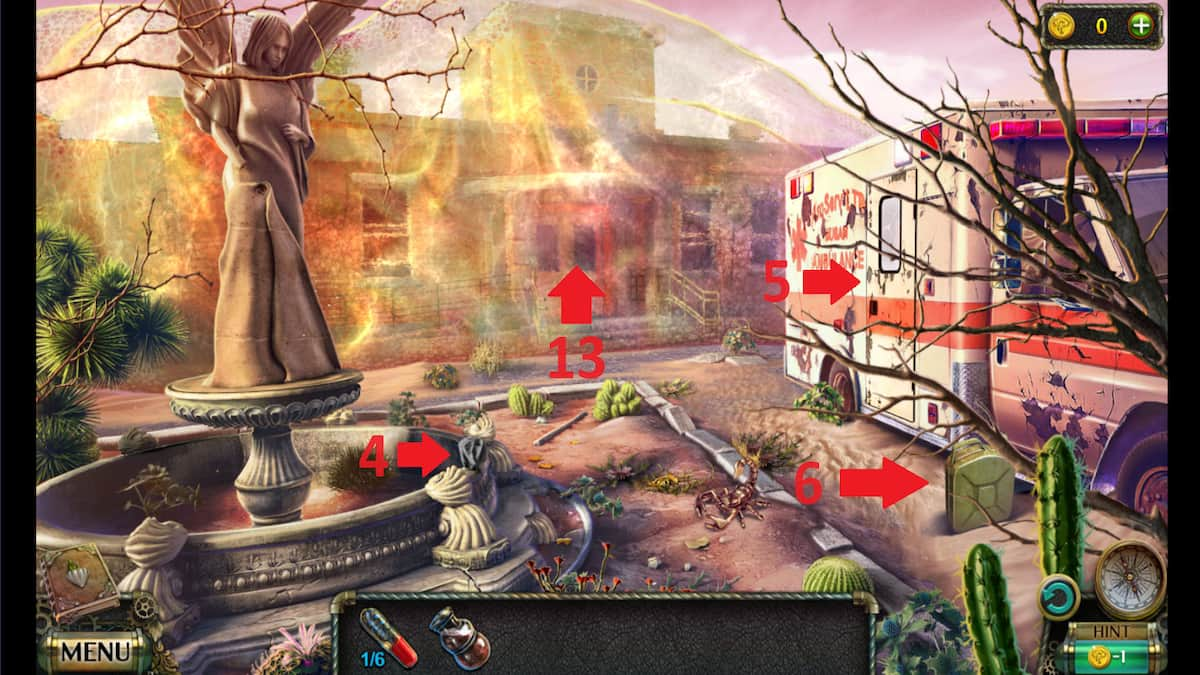
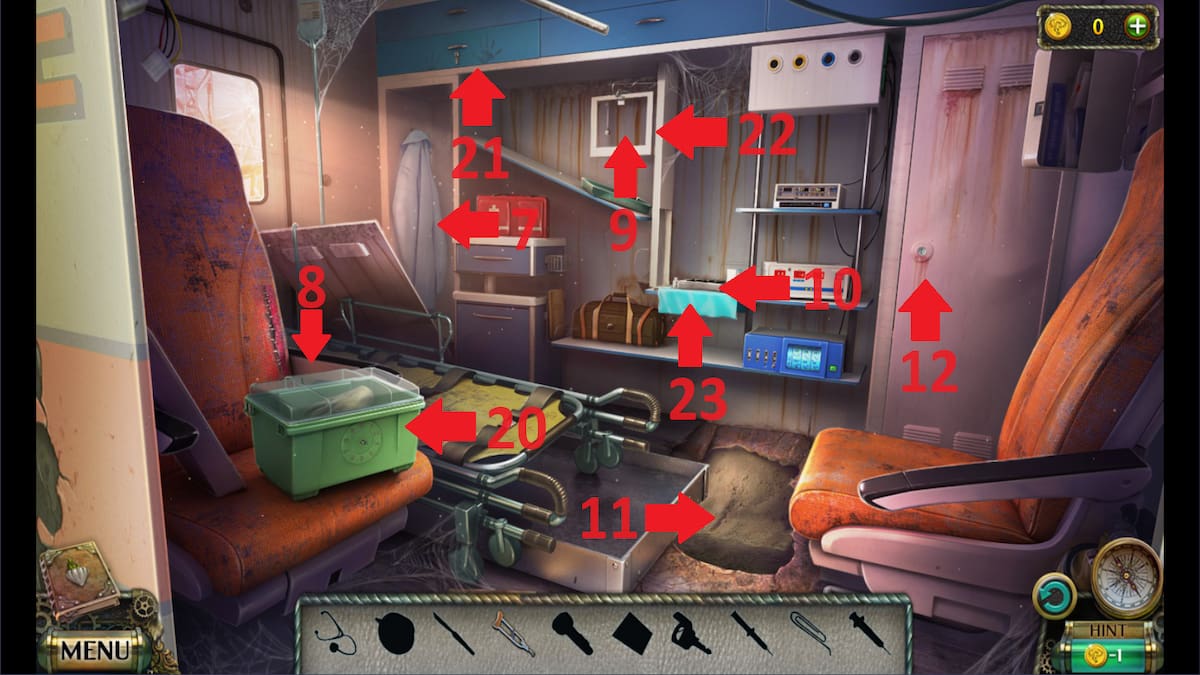
- Take the stone (4), smash the ambulance window (5), and take the jerry can (6).
- Enter the ambulance, take the crutch (7), the syringe (8), and the key (9).
- Use the syringe to extract oil (10) and the crutch to reach the stethoscope (11).
- Put the key into the locker door (12) and use the syringe of oil to unlock it.
- Collect the scalpel and the paper clip and exit.
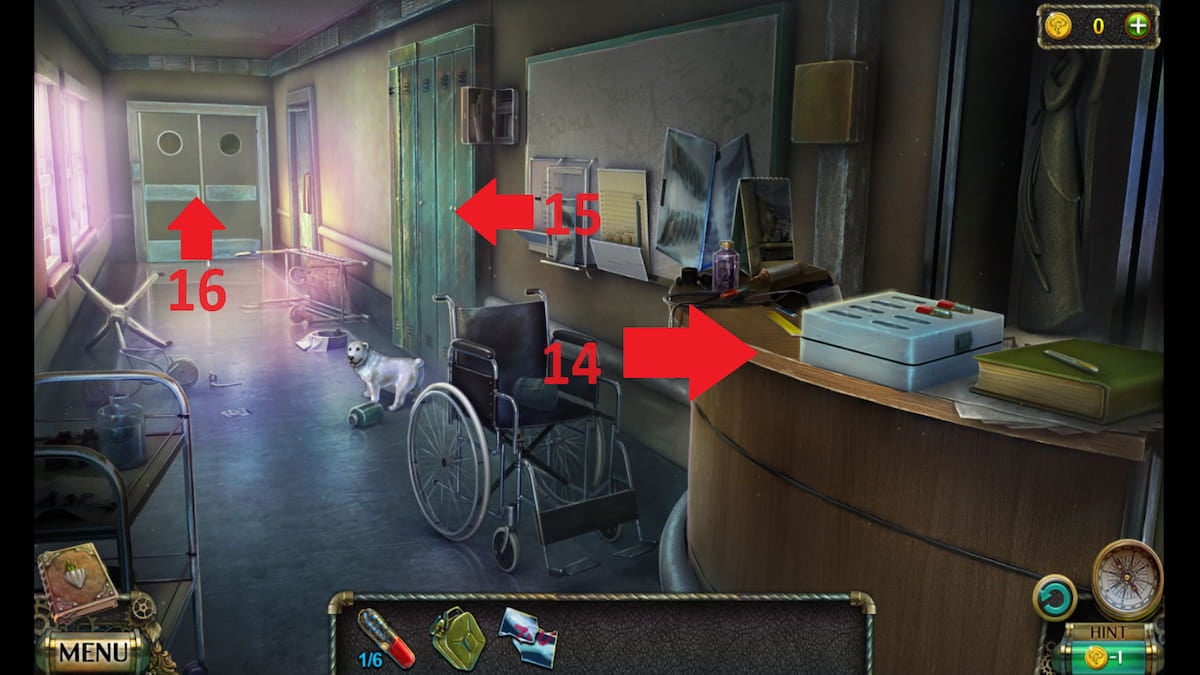
- Use special powder on the hospital (13) and enter.
- Take the ruler, the pen, the pill, and image fragments from the desk (14).
- Use the ruler to open the locker (15) and take the card and the pill.
- Use the card to enter the operating room (16).
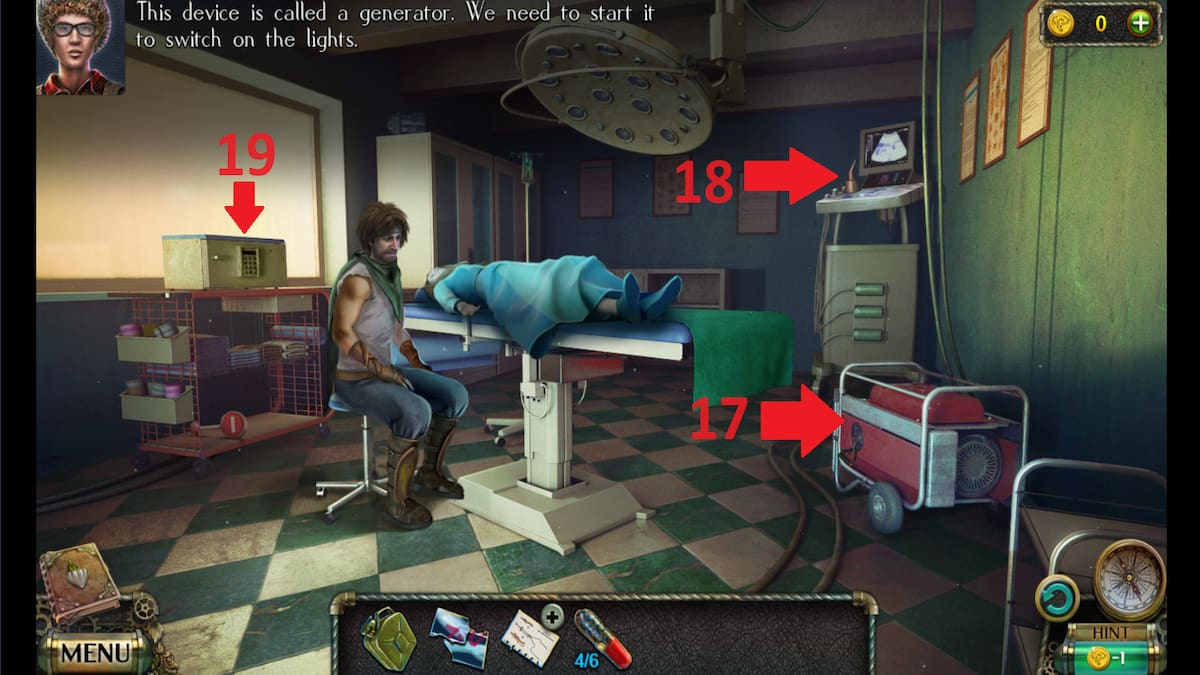
- Collect the pill from the generator (17), take the funnel and place the image fragments on the ultrasound (18).
- Use the code 7450 to open the safe (19) and collect the syringe and the pill.
- Use the funnel to pour the jerrycan of gas into the generator and start it.
- Return to the ambulance and use a scalpel to cut through the seam (20) and receive an X-ray image.
- Use the paper clip to unlock the drawer (21) and take a flashlight.
- Place the X-ray image onto the screen (22) and use the flashlight to reveal the code.
- Use the code 5139 to open the safe and take the dial.
- Place the dial on the green cooler and unlock it with the combination 926.
- Take the statue's hand and place it on the statue outside of the ambulance.
- Take the pill and the bandage and go back into the hospital.
- Place the pills into the white suitcase to collect the key and the pipes.
- Go into the operating room and combine the pipes, the bandage, and the syringe to create a transfusion pump.
- Place the transfusion pump on the girl's arm.
Task 14 – Warn the Sacuums
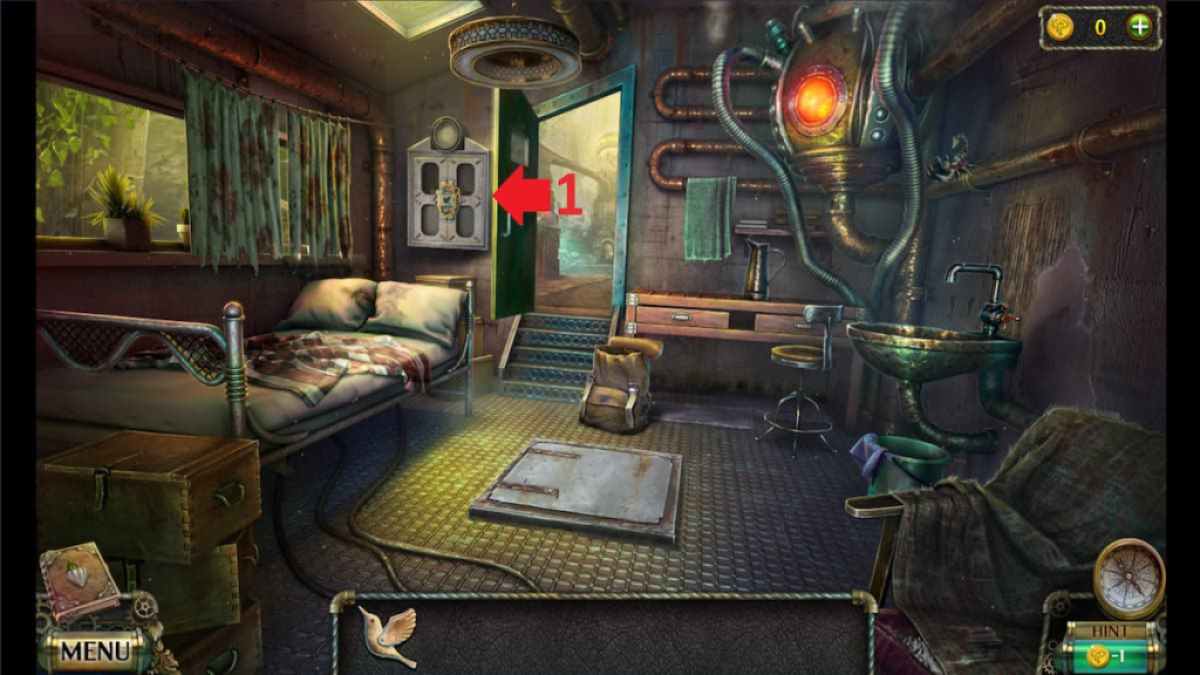
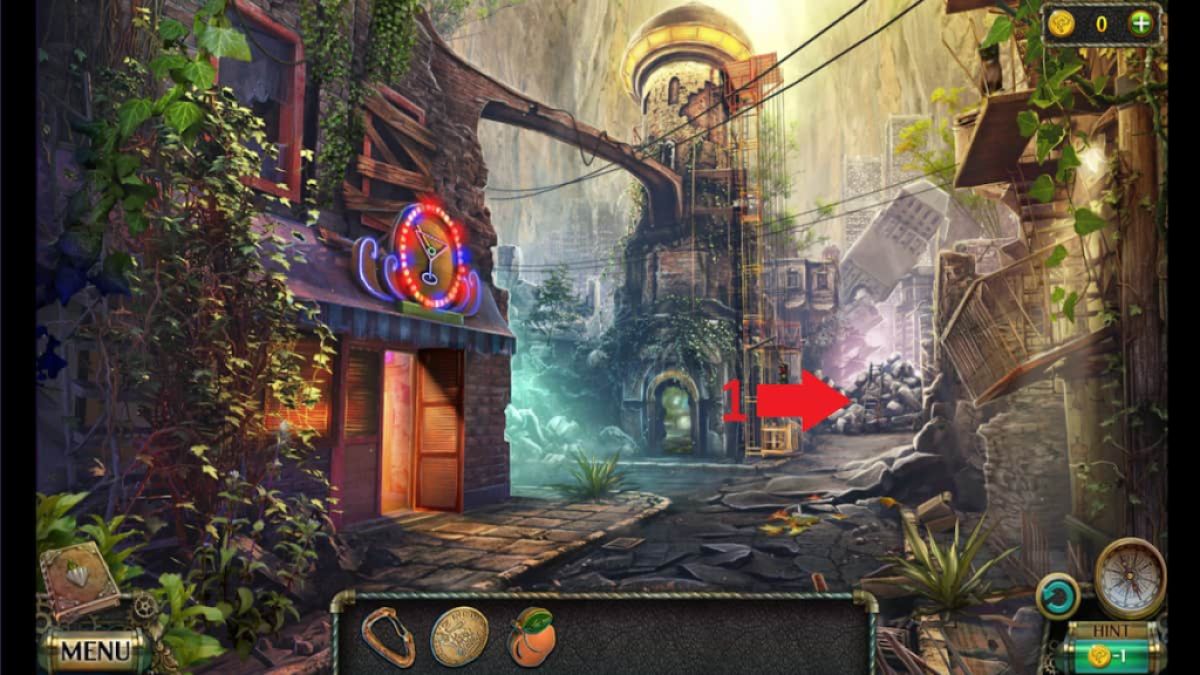
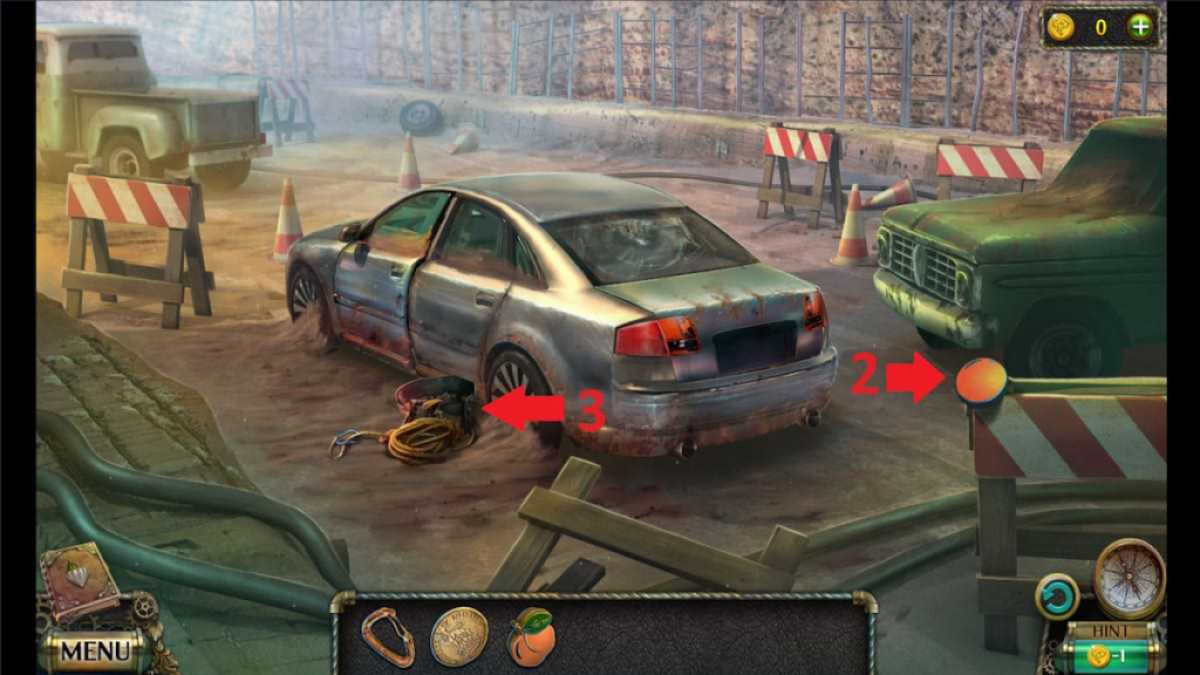
- Go back to Colin's cabin - the first room.
- Use the key to open the locker (1).
- Place the items in the correct spots to receive the code 6347.
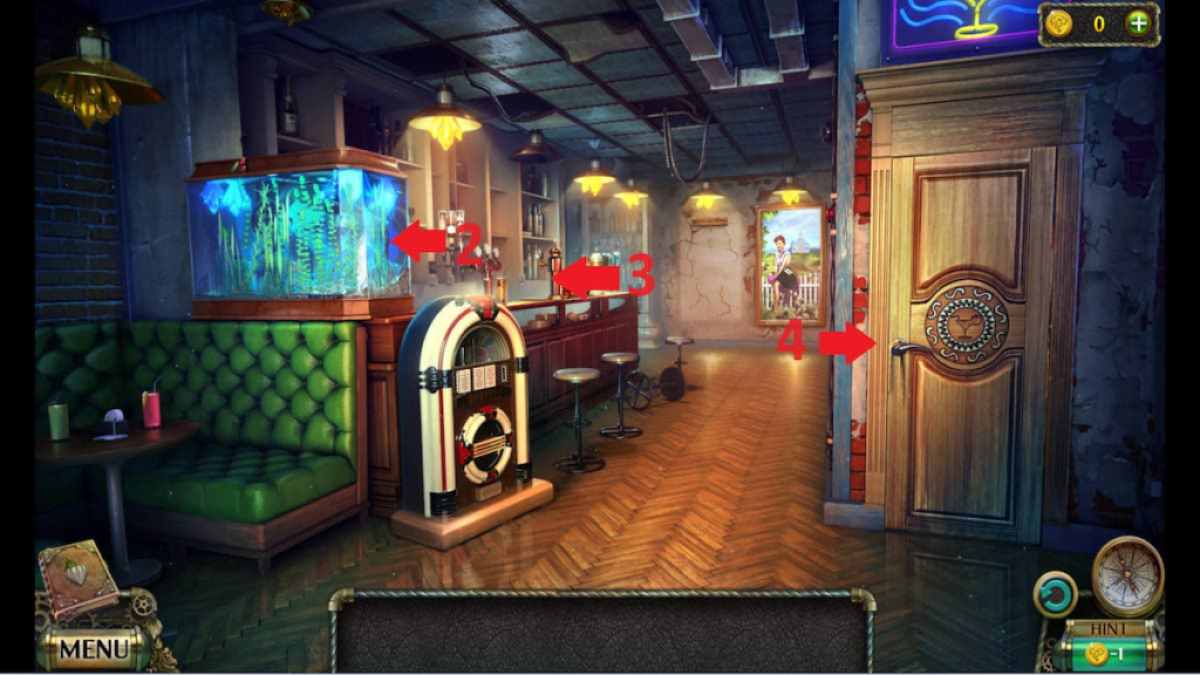
- Exit the cabin and use the code to enter the bar.
- Take the fruit from the aquarium (2) and the carabinier and magnet from the bar (3).
- Take the rope from the door handle (4) and tie it to the magnet.
- Use the magnet to get the goblet-shaped key from the aquarium.
- Use the key to unlock the door and enter.
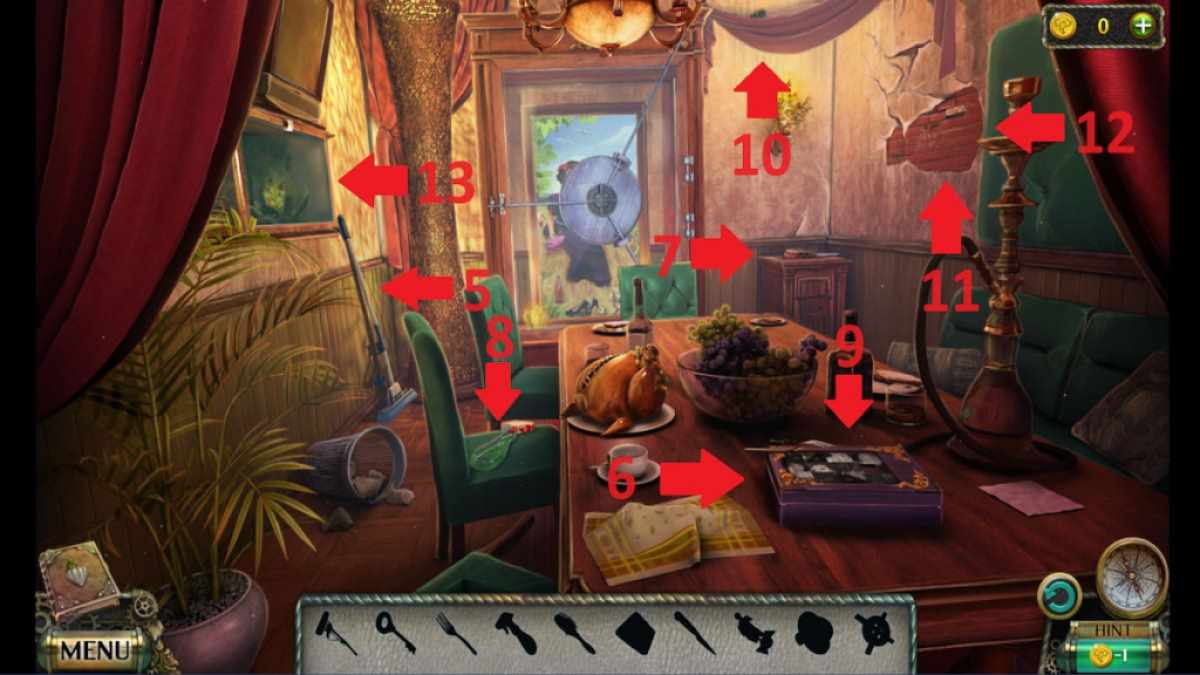
- Take the mop (5), the fork (6), the knife (7), and the spray (8).
- Use the knife to cut the turkey and get the missing puzzle piece.
- Place the puzzle piece into the puzzle (9).
- Use the mop to reach the brush (10).
- Use the spray and the brush to show the puzzle hint on the wall (11).
- Arrange the puzzle pieces to receive a lock part.
- Use the fork to move the brick (12) and reveal a key.
- Use the key to open the terrarium (13) and collect a statue.
- Place the statue on its stand (14) to reveal a lock part.
- Place both lock parts onto the lock and take the picture.
- Exit the room and place the picture in the empty space on the wall.
- Find the similarities between the two pictures to open the safe and collect a keycard.
- Exit the bar, go to the yellow elevator and use the keycard.
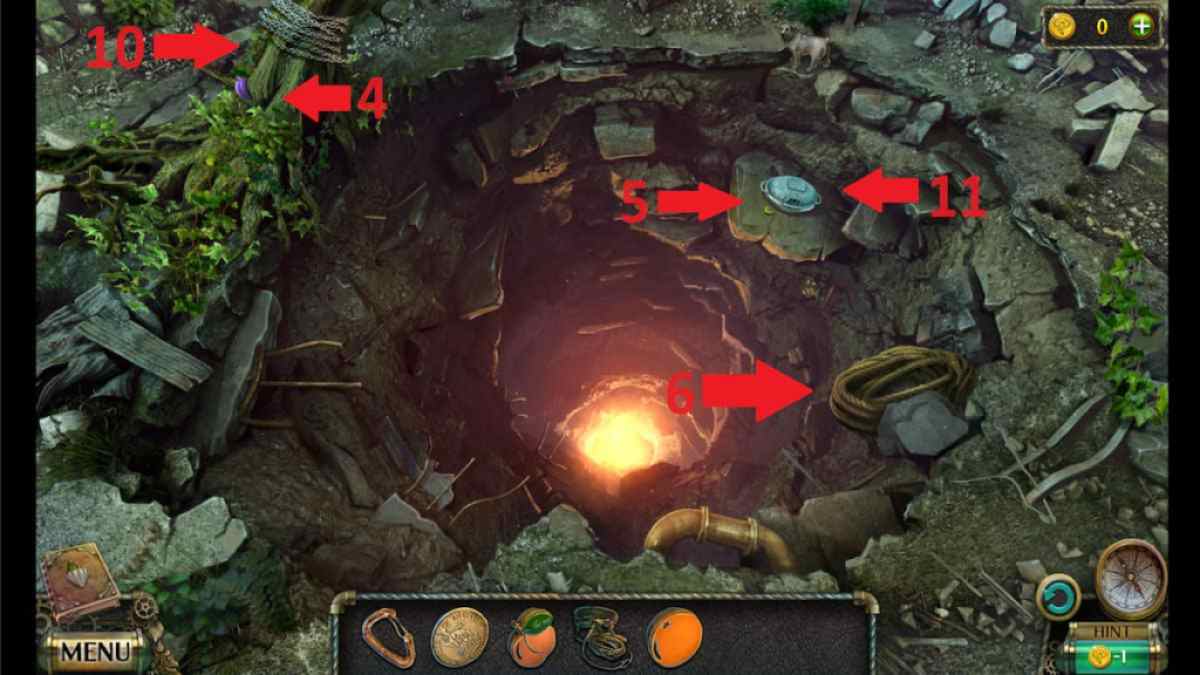
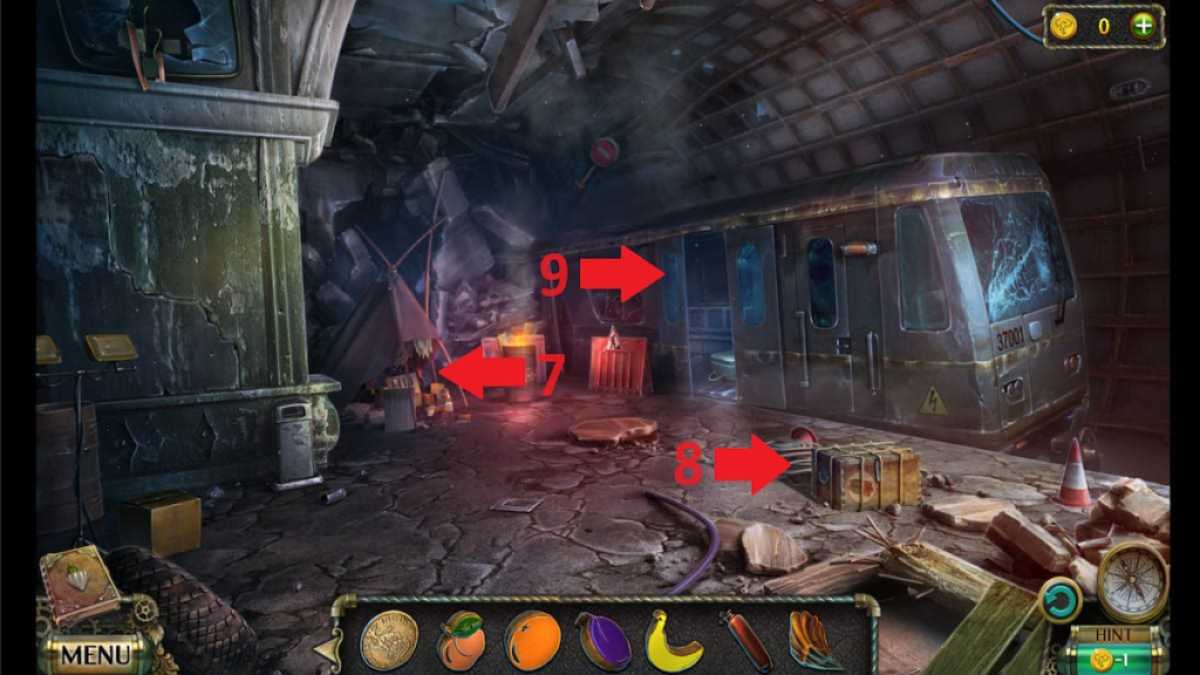
Task 15 – Dam destruction
- Talk to Farador.
- Take the coin and the fruit from the desk.
- Take the ladder behind the chair and go down.
- Place the ladder onto the rubble (1) and climb.
- Climb the second ladder, take the fruit (2) and the straps (3).
- Climb down and go right.
- Collect the first fruit (4) and the second fruit (5).
- Place the straps on the rope (6) and go down.
- Take the gas tank and the balloon canvas.
- Play the puzzle (7) to get the hoist.
- Take the pin and the rope next to the box of dynamite (8).
- Use the pin to open the suitcase (9), and take the battery and the fruit.
- Place the hoist and the rope onto the trunk (10).
- Place the carabinier onto the rope and attach it to the box of dynamite.
- Return to the tower and place the battery inside the robot to get the key.
- Go back to the mine entrance and use the key to take the burner (11).
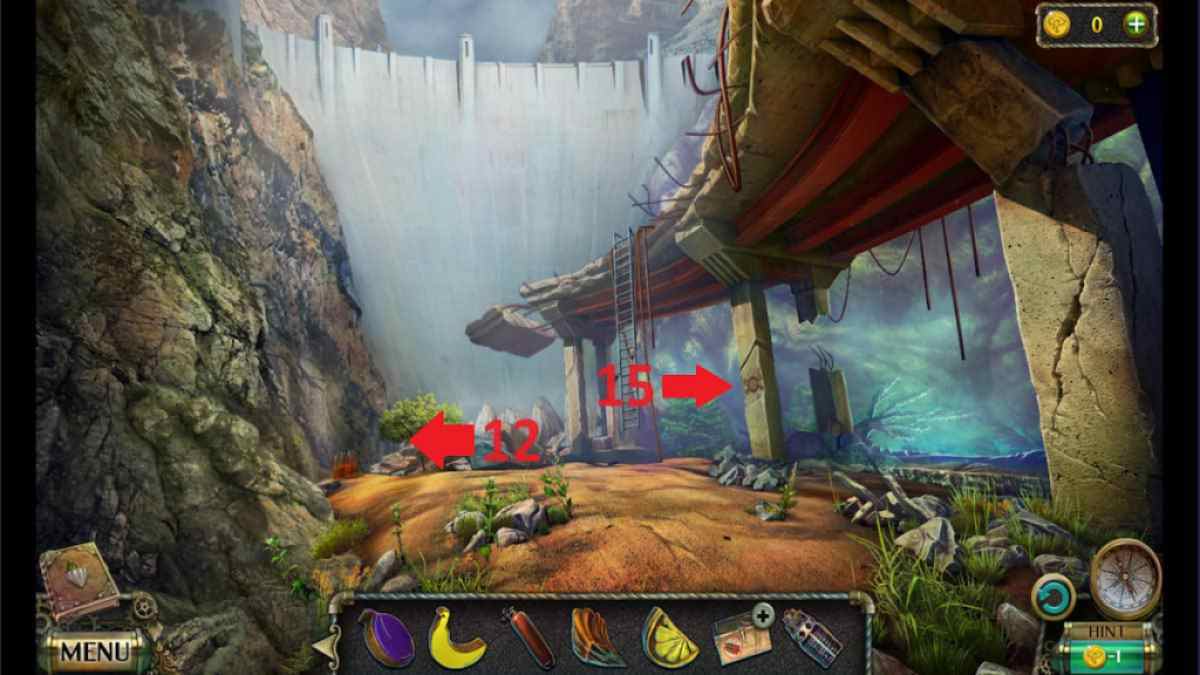
- Resurface and go to the balloon basket (12).
- Assemble the hot air balloon.
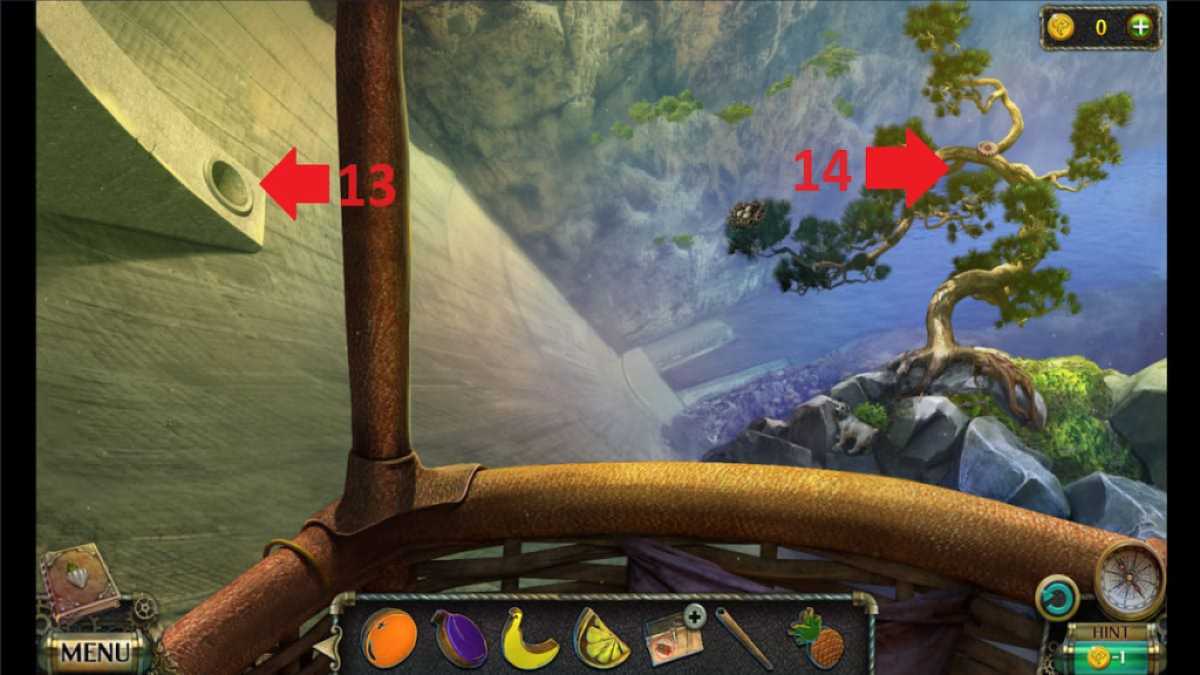
- Take the metal pipe and the fruit (12), and return to the bridge.
- Use the metal pipe to open the car door and take the key.
- Use the key to open the car boot, and take the hook and detonator.
- Return to the balloon and use the hook to get the gear (14).
- Return under the bridge and place the gear into the puzzle (15).
- Move the ball into the hole and collect the fruit.
- Return to the bar and put the coin into the jukebox to receive the last fruit.
- Place all fruits into the box on the bar and collect the fuse.
- Return to the balloon and connect the box of dynamite with the fuse and the detonator.
- Place the bomb into the dam.
Do you like point-and-click adventure games? Check out our Haunted Hunt Walkthrough – Adventure Escape Mysteries on Pro Game Guides.
