
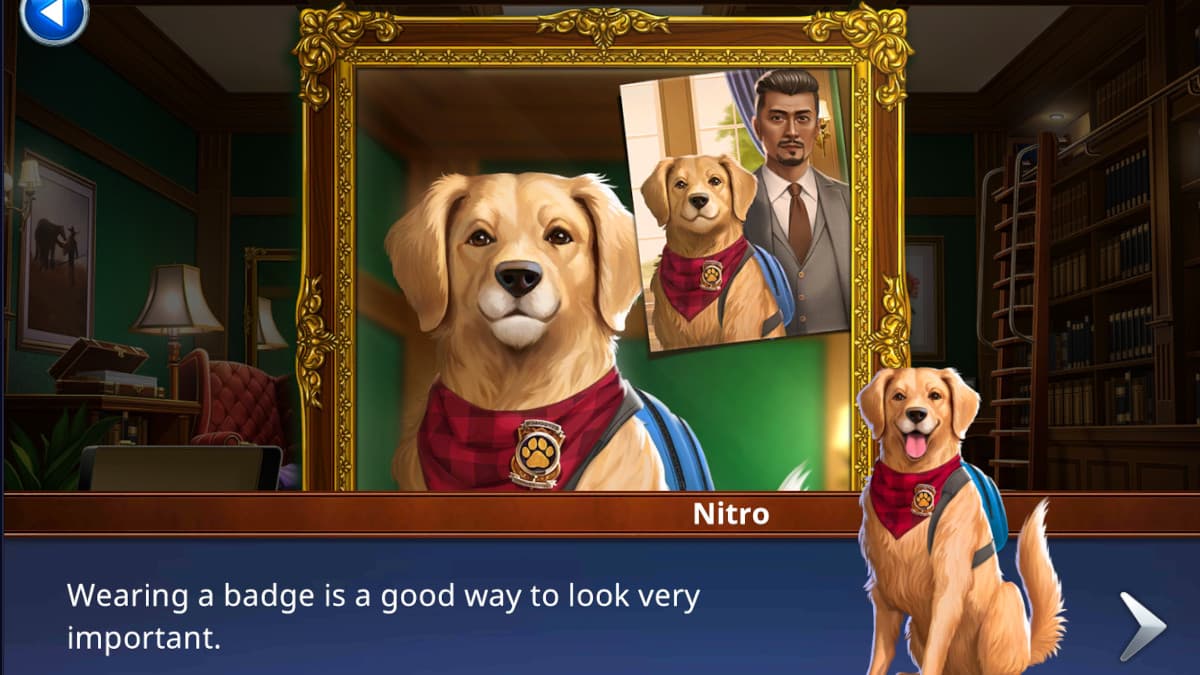
Adventure Escape Mysteries has a massive library of cases. In Canine Cases, you are Nitro, a detective dog sniffing out suspects for this mysterious disappearance. This walkthrough will guide you through all the puzzles and to the finish line.
Canine Cases, as well as all the other AE Mysteries cases, can be played on mobile devices and mobile device mirroring programs. It plays like many other similar titles; you will need to point-and-click (or point-and-tap if you're using your fingers) around various locations looking for collectibles, clues, things you can interact with, and to chat with NPCs. Canine Cases contains four short chapters, each with different puzzles to solve.
Canine Cases Walkthrough – Chapter 1
Chapter 1 will give you some establishing shots of Alex and how she is doing after her father's death. You learn that she finally has a case, and you need to ready the office for your new clients. After that, you'll need to search the client's home for clues.
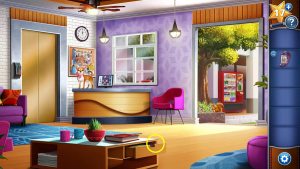
Alex's Office
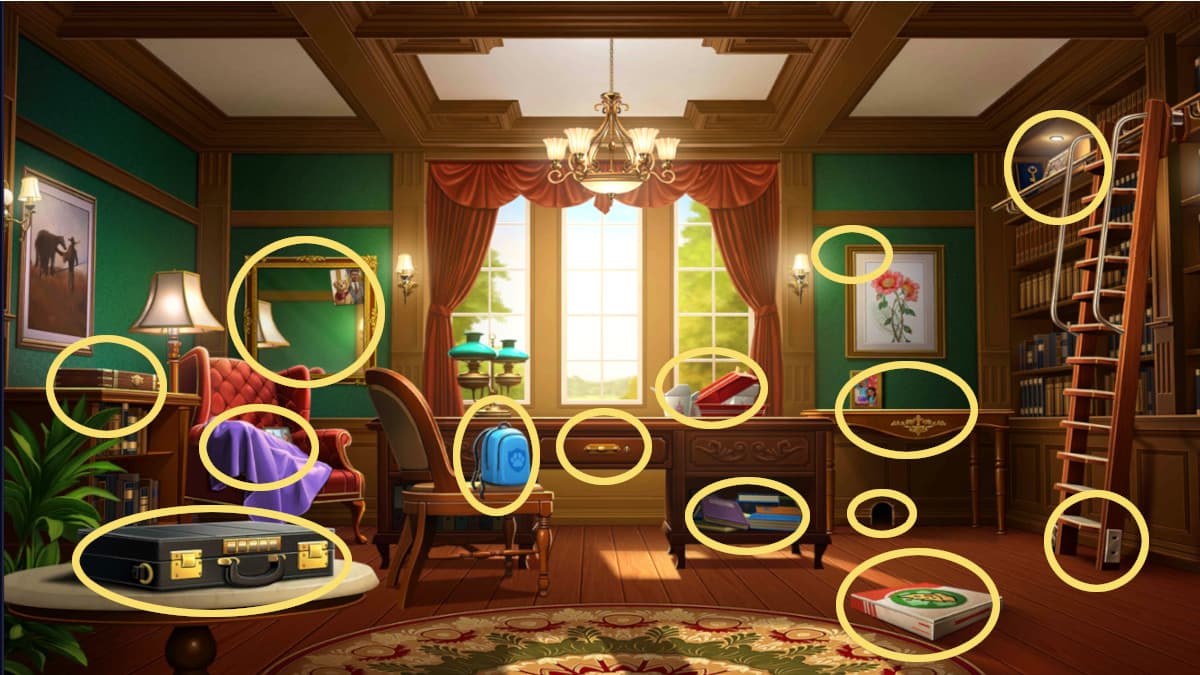
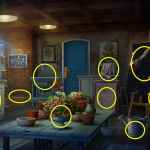
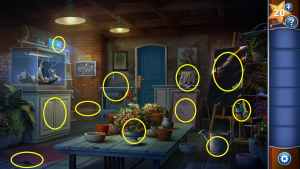
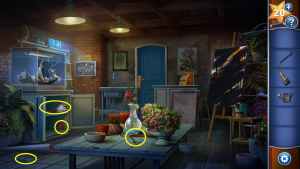
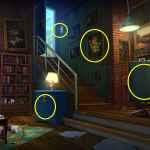
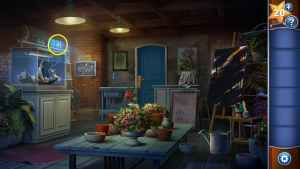
After the tutorial, you will be given free reign of Alex's office. You need to find a handful of items while cleaning up to make sure both you and Alex look ready for your meeting.
- First, interact with the Star collectible (1/12) in the upper left of the photo of the flower.
- If you skipped the tutorial, collect the pencil from the mirror.
- Open the drawer in the middle of the screen and use the pencil on the notepad inside.
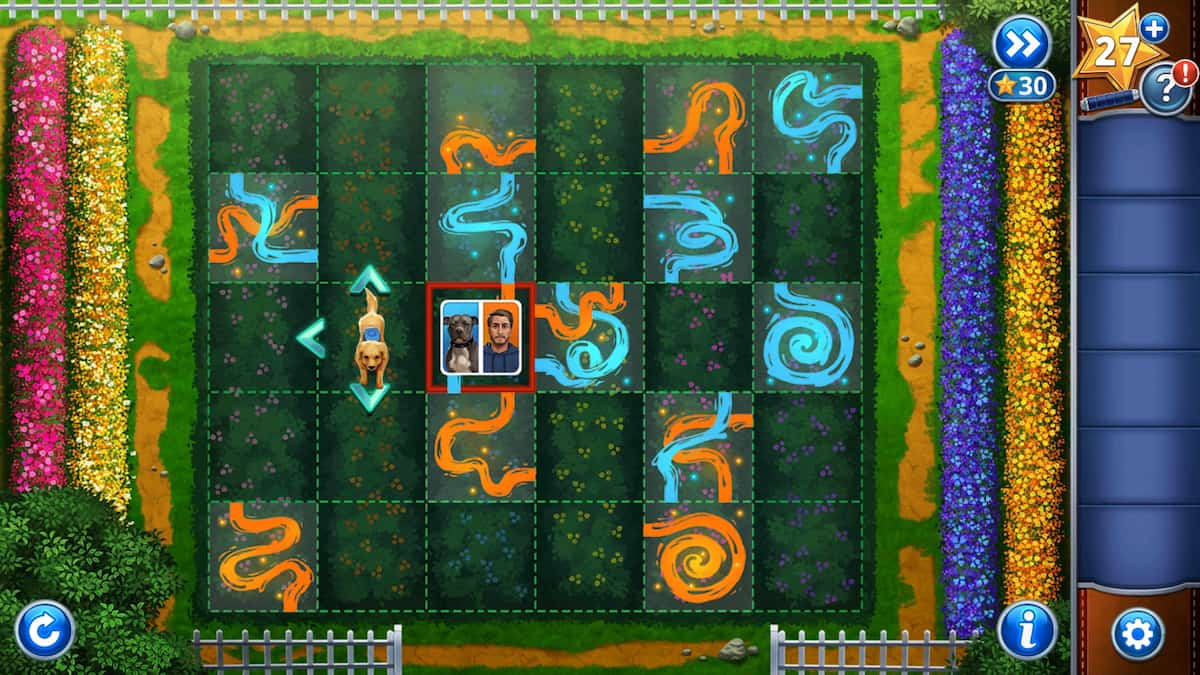
- Next, click the mousehole on the bottom right of the screen. The mouse inside has stolen your neckerchief, and you will need to get a pepperoni to exchange for it. This can be done by clicking the pizza box on the bottom right under the mousehole and completing the puzzle.
The Pepperoni puzzle in Alex's Office
In order to complete the pepperoni puzzle and get the pepperoni for the mouse in exchange for Nitro's handkerchief, you will need to line up the scent to track it down. When you walk over a tile, it will move it back into the space you previously were occupying. Here is a video of how to complete it.
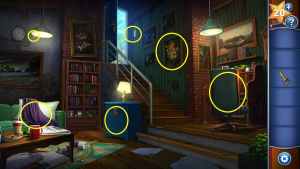
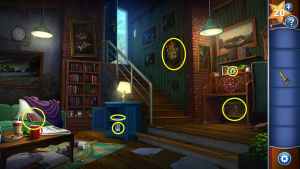
- On the right side of the desk, click the messy books to clean them up and find the hidden photo (1/4).
- Click the Chinese takeout boxes twice, first to pick up the chopsticks, then to clean up the mess.
- Use the chopsticks on the mousehole to collect your neckerchief.
- Click the purple blanket on the chair to the left of the screen under the mirror to fold the blanket. Behind it will be hidden another photo (2/4).
- On the far left is a brown briefcase on the bookshelves; this is locked with pictures of farm animals. If you recall during the tutorial, you have to use the pencil to get the message "Farm animals biggest to smallest" from the drawer. This is how you solve this puzzle; the code is horse, cow, pig, goat, then chicken. Inside the briefcase will be a buckle.
- Put the buckle on the blue backpack in the center of the room, then collect the backpack.
- Open the drawer in the desk near the backpack where the "Farm animals biggest to smallest" note was. Click around the papers to uncover a wheel.
- Put the wheel on the rolling ladder, then collect the key and a photo (3/4).
- Click on the drawer where you found the wheel and the "farm animals" note, then use the key you just got to unlock a secret drawer with a photo (4/4) inside.
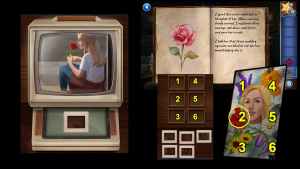
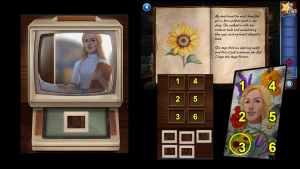
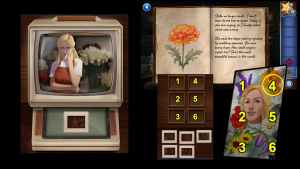
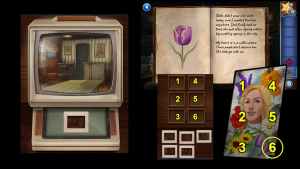
- Click the shelf with one photo on it on the right side of the room under the flower painting. You need to put all four photos you have found around the room down onto this shelf then put them in order.
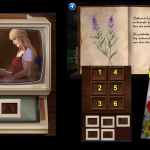
The photo puzzle in Alex's Office
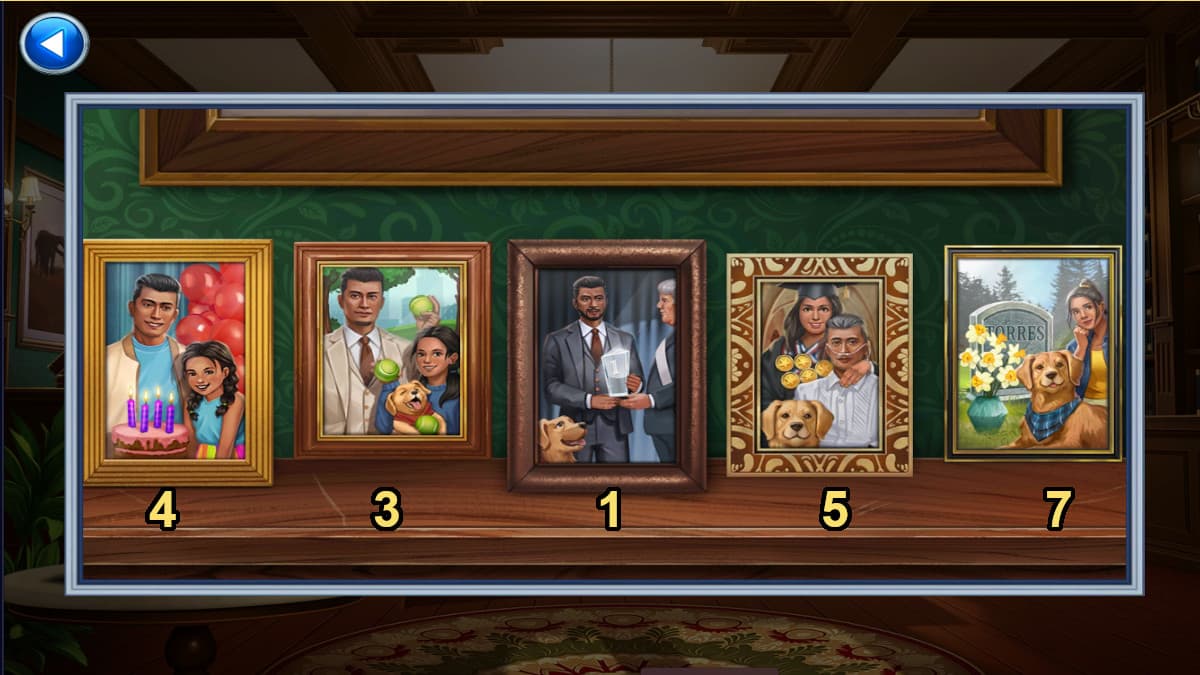
Once you have collected all four of the photos, put them onto the shelf with the fifth photo on the right side of the screen. Next, you will need to put them in order; put the birthday photo first, as this is the oldest photo. Then the photo with Nitro as a puppy with the tennis balls. Next up, the photo with Alex's dad accepting an award. Second to last is the photo of Alex's dad ill, and last is the photo with them at her father's gravesite. If you look carefully at the photos, you will see the first photo has four candles, the second three tennis balls, there is a one in the third photo, then five medals in the fourth, and seven flowers in the last. On the left side of the room, there is a briefcase that needs a five-digit code, and that code are the numbers of the important items from above: 4-3-1-5-7.
- Now that you have collected the neckerchief from the mouse hole, the badge from the brown briefcase, and the backpack, you need to look in the mirror and put those three items on. This will complete this section.
Stella's Home
This next part of the chapter will bring you to Stella's home. Here, you need to interact with the Butler and the Cat. Both will give you clues. Once you are done chatting with both of them, you can start your investigation.
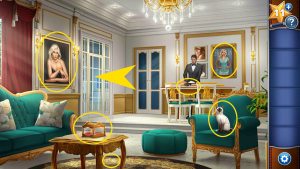

- Grab the Star collectible (2/12) underneath the coffee table.
- Interact with the large painting of Stella on the left wall. In it, she is wearing one diamond-shaped jewel, two tear-drop shaped jewels, three round gold bracelets, and four flower-shapes on her necklace. This is the solution to the glass box on the coffee table.
- Interact with the glass box on the coffee table, and click on these buttons in order: diamond, tear-drop, circle, then flower. Take the bird whistle from inside the glass case.
- Go out onto the balcony through the door next to the large painting.
- Look into the window with the backpack.
- Interact with the croissant on the table, then take the plate from underneath it.
- Grab the Star collectible (3/12) from the upper left part of the screen, in the flower vine climbing the side of the building.
- Interact with the flower pot filled with the large, red-flowering plant. Inside is a wrench.
- Use the wrench on the panel next to the window, then solve the puzzle inside. This will turn on the birdbath.
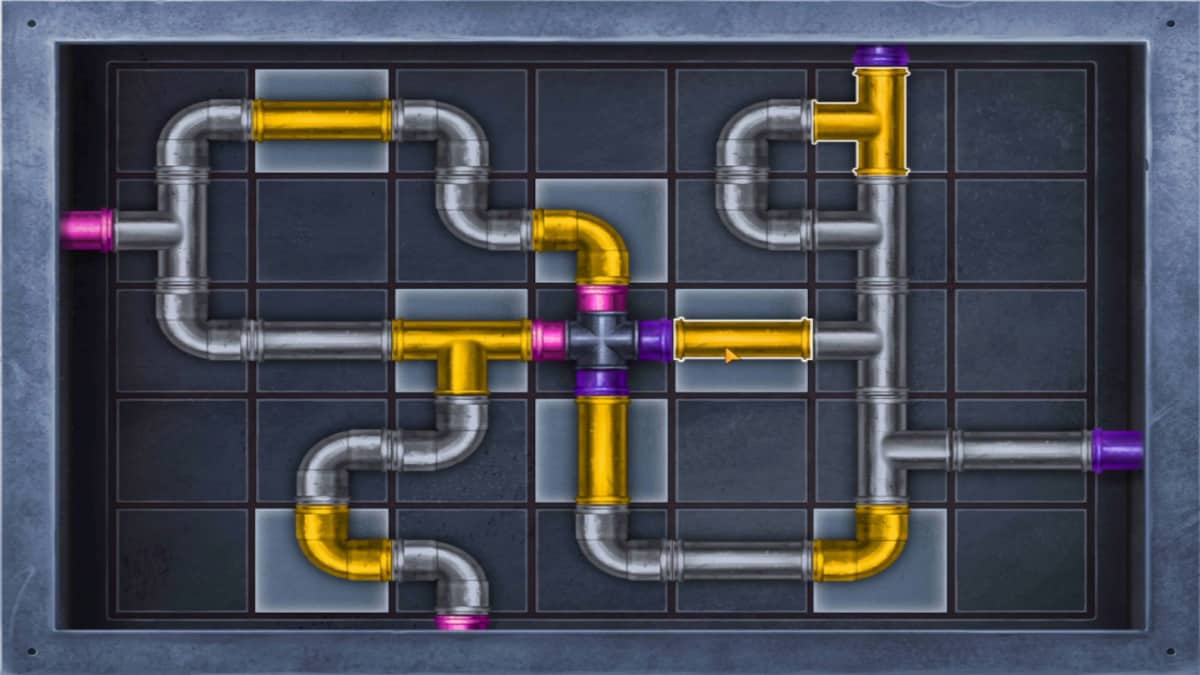
How to solve the panel pipe puzzle on the balcony of Stella's house
The gold pipes can only be swapped with other gold pipes, and the silver pipes can only be rotated but can't be moved. In order to connect all the pink pipes on the outside to the pink ones on the inside, and the same with the purple pipes, you will need to use every pipe. Here is the finished solution:
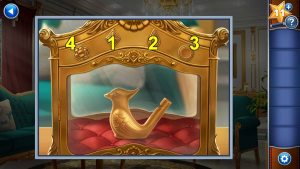
- Use the bird whistle on the birdbath, and it will summon a bird. Chat with the bird, then go back inside the house.
- Under where the cat was sitting is a key.
- Interact with the butler to distract him, then interact with the picture on the far right of the screen. Behind it will be a safe. Use the key on the safe, then take the pet passport and the second plate out of the safe.
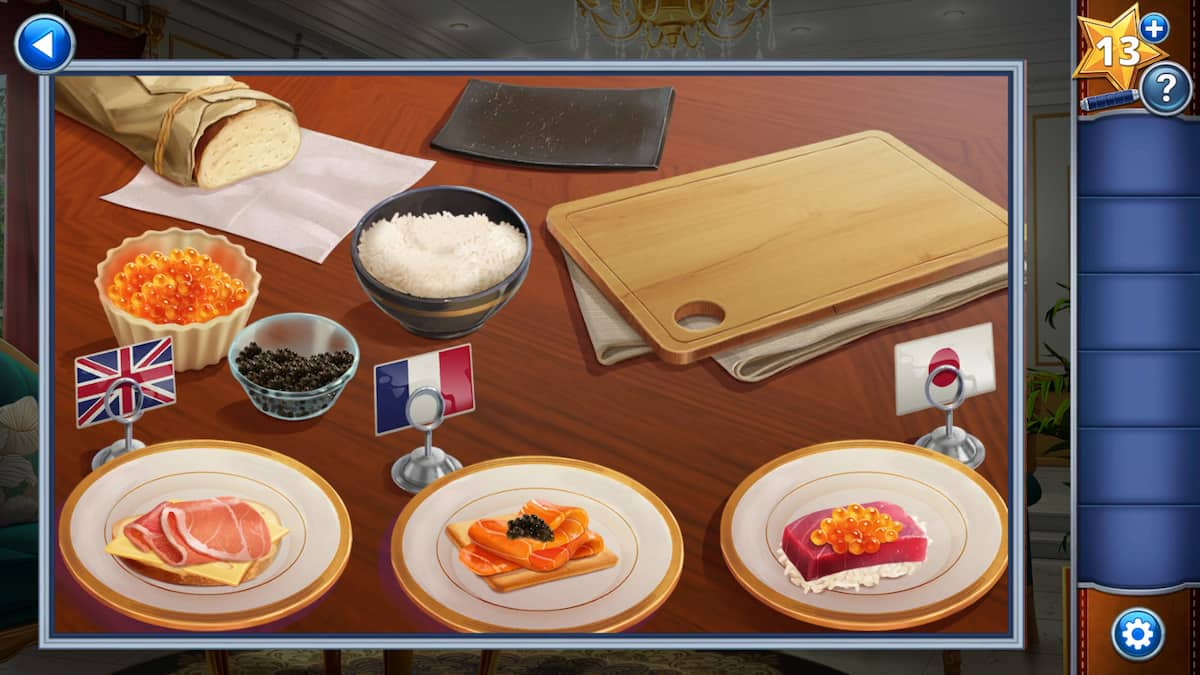
- Interact with the table where the butler was preparing the cat's meal. Place down both plates.
- The first plate with have an English flag on it. You must match the food from the passport photo in England to the food on that plate. This one need the bread first, then the Swiss cheese, then the prosciutto.
- The second plate has a French flag above it. Match the plate to the passport photo in France but placing down the cracker, then the salmon, then the black caviar.
- The third plate will have a Japanese flag on it. This plate gets the rice, then the tuna steak, then the orange caviar.
- Tell the cat her food is done, and she will leave the blue jay in peace. Interact with the blue jay on the balcony, and it will open the window for you.
- Grab the backpack and look through everything inside. You will take Emily's college campus badge.
Canine Cases Walkthrough - Chapter 2
In chapter 2, you will need to go to Emily's dorm room. In order to get there, you have a lot of puzzles to solve and animals to chat with.
The lobby on campus
The lobby on campus is the first hurdle you'll need to get through to get into Emily's dorm room to look for more clues. To enter the elevator, you'll need to distract the chihuahua on the desk.
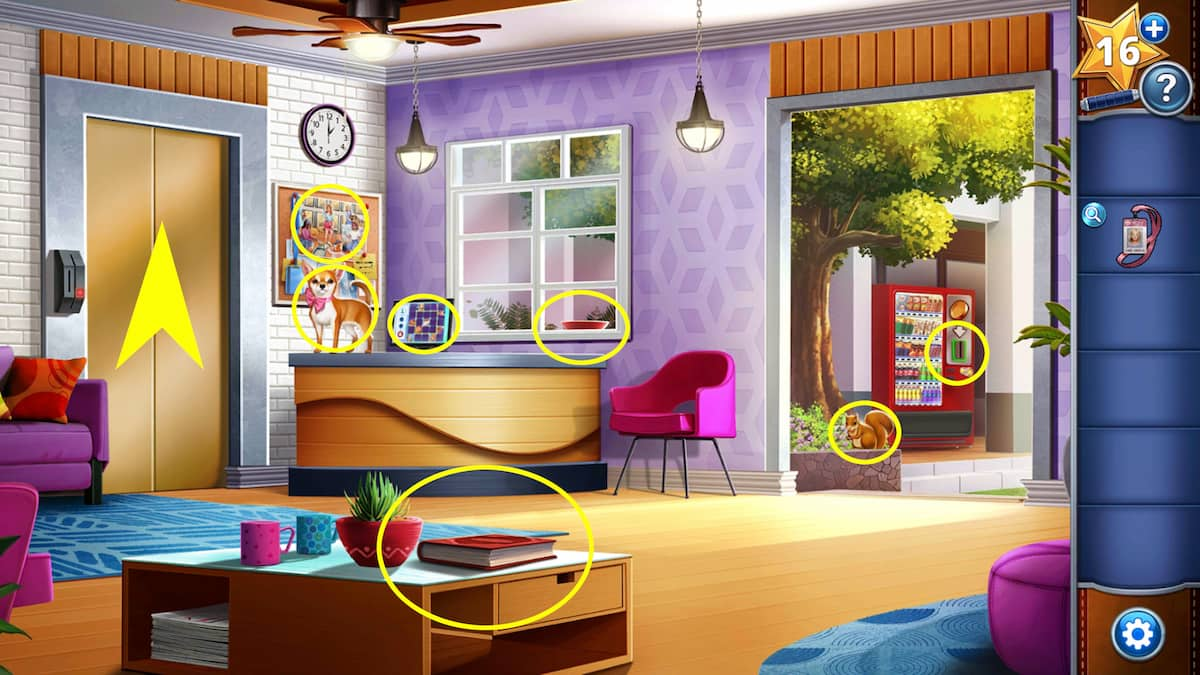
- Chat with the chihuahua, and then chat with the squirrel.
- Move the book on the coffee table; there will be a coin to pick up underneath it.
- Open the drawer under the book, and grab the Star collectible (4/12) out from inside it.
- Use the coin in the vending machine; it will drop a bag of trail mix.
- Put the trail mix into the bowl on the window ledge. This will distract the chihuahua.
- Click on the computer screen; you will need to complete two different rotating puzzles to get into it.
- There will be an email on the screen. Take note of the dorm code (894).
- There is a list of the activities that each person did and the room they were in. Dog walking was in 201, feeding 503, sweeping 202, litterbox cleaning 402, and dog washing 303.
- Interact with the bulletin board above the computer; there is a photo there of all the women from the dorm completing the chores as listed in the email. If you look at Emily's campus badge, you can match her face to the girl who is dog washing. She lives in dorm 303. Take the elevator badge from the bulletin board.
- Use the elevator badge on the elevator to go up.
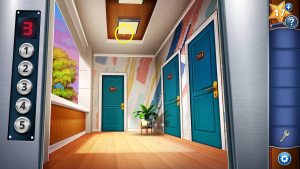
Dorm floors
- On the second floor of the dorm, you'll meet up with the squirrel again. He'll help you, but only if you can answer some questions. You'll need the room number and dorm code from the email in the lobby. Give him number 303 and 894. The squirrel will give you Emily's spare key.
- On the third floor, grab the Star collectible (5/12) on the ceiling. This floor also has Emily's room, but I will cover that in the next section. On the left side of the screen, look at the piece of paper caught in the tree.
- The fourth floor has a recycle bin in front; knock it over to get the recycling days poster. In it, you can see that plastic bottles are only picked up on Tuesdays, which means today is Tuesday. Interact with the plant and pick up the fish food (1/4) from behind it. Under the rug is a piece of a flyer (1/3).
- The fifth floor has a sandwich Nitro can eat; underneath it is another piece of a flyer (2/3).
- Return to the third floor to go through Emily's dorm.
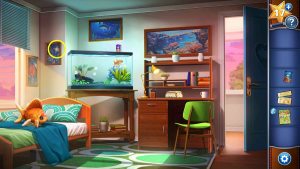
Emily's dorm room
Using the key you picked up from the squirrel on the second floor, open up room 303. Inside you will see a whole bunch of fish artwork, a fish plushie, and a real fish. Have a chat with the fish to get things started. He will say he hasn't been fed in forever, and he will need you to collect all five of his foods from around the dorms to feed him properly.
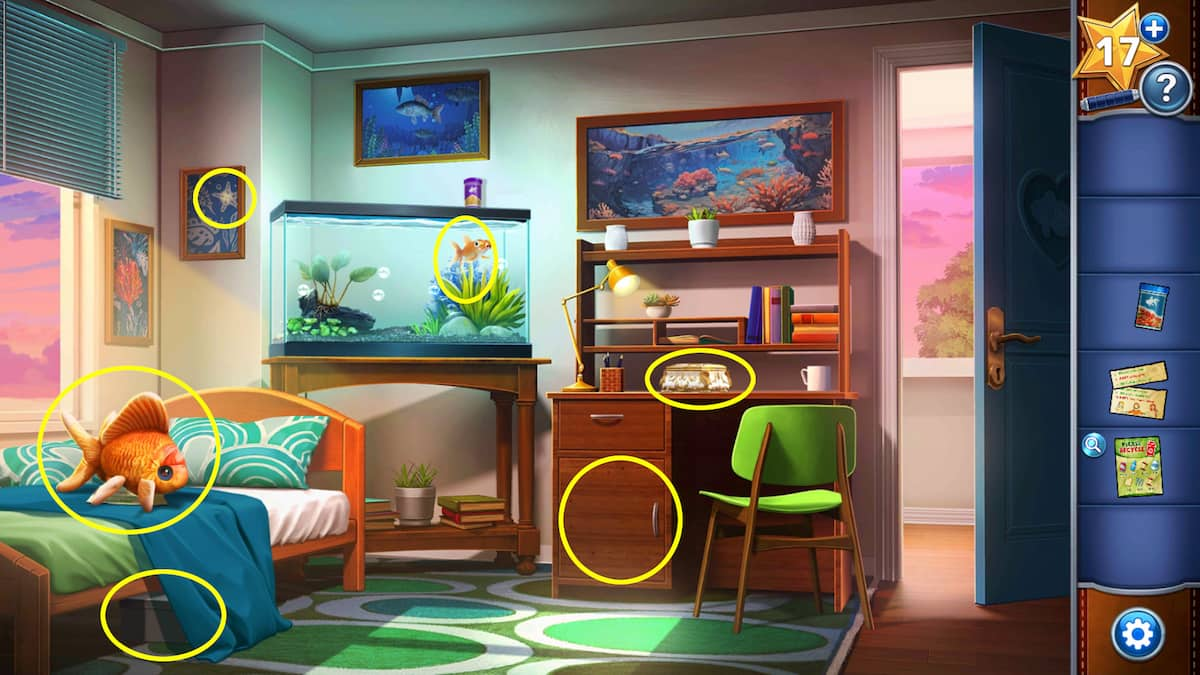
- Interact with the fish plushie on the bed to find a piece of a flyer (3/3) underneath it.
- There is a Star collectible (6/12) on one of the framed pictures above the bed.
- Under the bed is a box with a note in it. Read the note, then pick up the fish food (2/4) from inside it.
- Open the cabinet in the desk to get fish food (3/4).
- Interact with the white jewelry box on the desk.
- Now that you have all the pieces to the flyer, you can return to the fifth floor of the dorms. Put the pieces of the flyer back into the slot for them on the wall.
- Look at all the DO rules on the flyer, then note the numbers of them. This is the code to the storage room door on the fifth floor: 1-2-4-6-8-9.
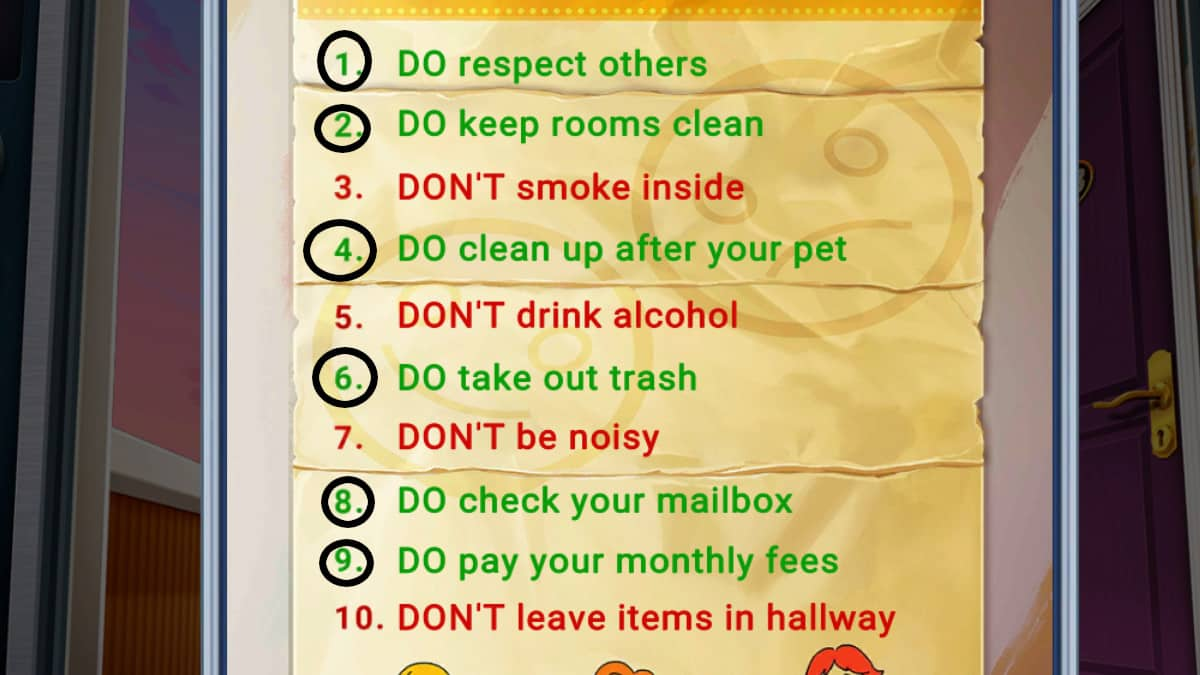
- Type the code into the storage room door, and take the scooper and the fish food (4/4).
- Return to the third floor, and use the scooper on the paper caught in the tree.
- Take the paper caught in the tree, and look at Tuesday. The correct order of the fish's food will be there: yellow, purple, green, blue, red.
- In Emily's dorm, put the food on top of the tank, then pour them into the aquarium in the correct order.
- This will start the necklace sniffing puzzle.
- Once you have the necklace, you can open the jewelry box on the desk in Emily's dorm.
Solution to the Necklace puzzle in the dorm
It turns out the Emily threw the necklace that opens the jewelry box out the window. Nitro can smell it, but it's faint, so you will have to complete a puzzle to find it, just like with the pepperoni puzzle. The video solution is below.
Canine Cases Walkthrough - Chapter 3
The third chapter has Alex and Nitro breaking into a flower shop. In order to find Emily, you'll need to get inside and figure out the puzzles in the basement.
Outside the flower shop
When you first walk up to the flower shop, it's pretty obvious that it's closed up. A clever little raccoon friend will pop out of a trashcan and offer to help you break in. Here is how to complete this section.
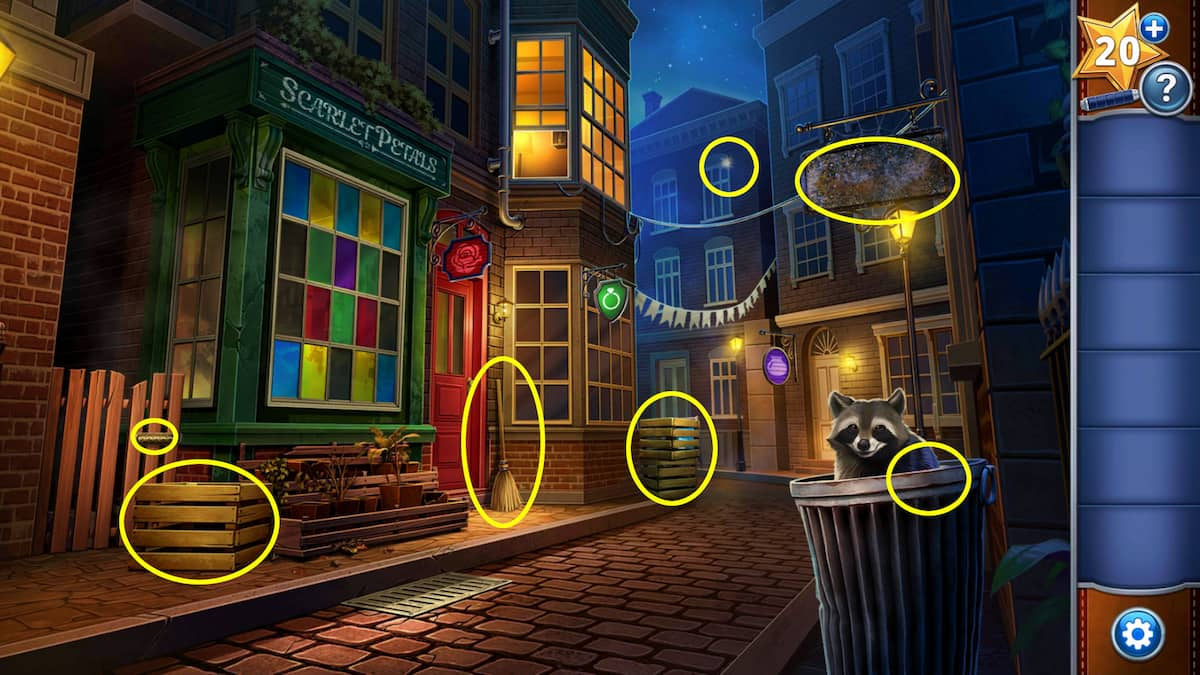
- There is a Star collectible (7/12) on the window above the pottery shop sign.
- Pick up the broom from in front of the flower shop door.
- Pick up the crate on the left side of the screen near the fence door.
- Put the crate on the pile of crates next to the jewelry store. The raccoon will jump out and knock down the streamer with the flags on it.
- Pick up the streamer.
- Use the broom on the dirty sign above the raccoon's trashcan.
- Take the bubble gum out of the trashcan.
The fence locked door next to the flower shop
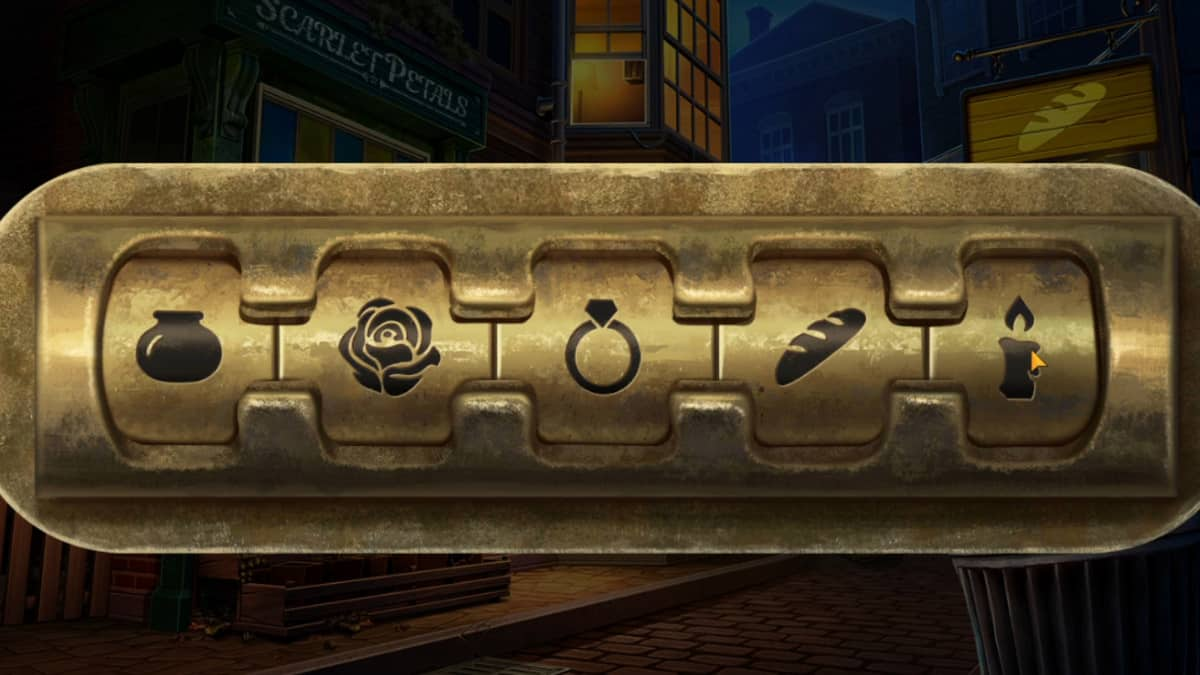
In order to solve this one, you need to figure out what order to put the symbols from the shops all around the street. The signs of each of the stores has a different color: the flower shop sign is a red rose, the jewelry store is a green ring, the candle store is a blue candle, the bakery is a yellow bread, and the pottery is a purple pot.
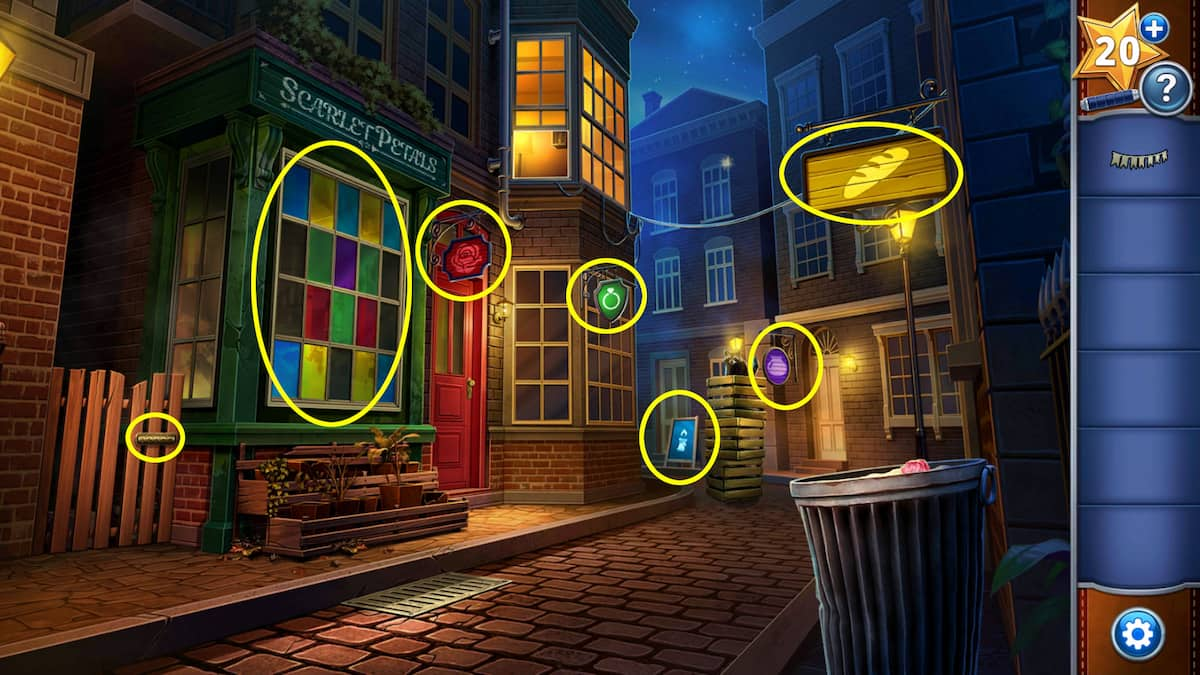
The window of the flower shop is a stained glass window with one purple panel, two red, three green, four yellow, and five blue. These colors correlate to the shop signs; so purple is first, red is second, etc. Since purple is first, the first sign in the fence lock is the pottery's purple sign, the pot. The order of the signs is pot, rose, ring, bread, then candle.
- Take the bucket and the fishing rod from behind the locked fence.
- Throw the flag streamer over the pipe by the open window near the flower shop, then attach the bucket to it. The raccoon will use it to go up into the window, then will throw down a ruler and a ball of yarn. Pick both those up.
- Attach the yarn to the fishing rod, then attach the bubble gum from the trashcan to the end of the yarn.
- Use the fishing rod on the grate in front of the flower shop to get the key.
- Head inside the flower shop, then use the ruler on the fuse box. This will begin the fuse box puzzle.
The fuse box puzzle inside the flower shop
In order to finish this puzzle, you will need to move each of the colored electricity circles into the corresponding colored segments. You can turn the pathing between broken wires on by placing any of the electricity circles inside the high voltage circle. You will first need to move the blue electricity over to the high voltage spot, then replace it later with the red one. Here's how to do it.
Inside the flower shop
Now that you are inside the flower shop, you have several more puzzles to complete. Your goal is to open the door in the back and go into the basement/living space underneath the flower shop, so you need a key.
- In the upper left, there is a window with a Star collectible (8/12).
- Under the fuse box is a crowbar you can pick up.
- Use the crowbar on the loose boards underneath the rug on the very bottom left of the screen. Inside will be a notebook.
- Open the cabinet under the snake tank; there is a feather duster and a valve inside.
- Use valve on the pipes under the sink to get the sink working again.
- Move the flower vase on the table in the middle bottom of the screen; behind it there will be a crank for the cash register.
- Take the feather duster and use it on the dirty sign under the cash register. This will uncover the prices of flowers, which will be important later.
- Pick up both the dirty paintbrush and the watering can from the right side of the screen, then put them both in the water in the sink. This will give you the full watering can and the clean paintbrush.
- Use the full watering can on the rose in the glass vase in the center on the table. This will depress a pressure plate underneath the vase and open the keyhole in the door.
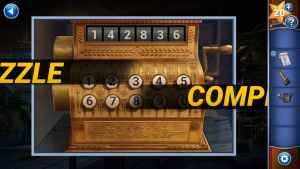
- Interact with the cash register to uncover it from the sheet that was overtop of it. Use the crank on the register, and you can put in a six-digit code to open it up.
The code to the cash register in the flower shop
To solve the cash register code puzzle, you need to look at the three invoices in the notebook you found underneath the floorboards. Put them in order by date, then use the flower sign with the prices on it to calculate how much each invoice was.
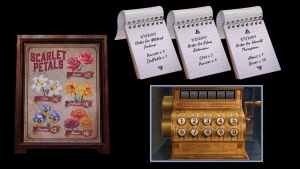
- The invoice for 1/1/2001 is three pansies and one daffodil. Pansies are $2, and daffodils are $8. So ($2x3) + ($8x1) = $14.
- The invoice for 1/3/2001 (which is the third page because they are out of order) has five lilies ($4) and four pansies ($2). ($4 x 5) + ($2x4) = $28.
- The last invoice is for ten roses ($3) and one mum ($6). ($3x10) + ($6x1) = $36.
- So the code is 142836.
The downstairs of the flower shop
- Interact with the blanket on the couch and take the book from behind it.
- There is a Star collectible (9/12) on the light hanging from the ceiling.
- Inside the blue side table is a glowstick and a thing of baby powder. Take the glowstick, then knock the baby powder onto its side. Use the clean paintbrush on the baby powder.
- Move the desk chair out of the way, and talk to the snake in the vent.
- Take the tape from the desk.
- Turn off the lights using the light switch at the top of the stairs, then use the glowstick on the red mug on the table to the left of the screen. There will be a fingerprint on the mug.
- Use the clean paintbrush with the baby powder on it on the mug's fingerprint, then lift the fingerprint off of the mug with the tape. This will give you a fingerprint.
- Open the painting on the stair's wall to find a fingerprint-locked safe behind it. Use the fingerprint to open it up and take the wooden flower and the screwdriver out of the safe.
- Use the screwdriver on the vent to let the snake out, then take the paper cutout and the photo slides out of the vent.
- Use the wooden flower on the flower puzzle in the desk to start the flower puzzle.
How to solve the desk's flower puzzle in the flower shop's basement
Once you have put the final piece onto the desk puzzle, you can begin to rotate the flowers. First, rotate the flowers in the center until the petals of each flower matches the color of the petal next to it. Once the center is finished, it will lock, and you will need to then match the petal colors of the outside flowers. You can rotate each flower individually and rotate the whole center as well. Here's a video on how to do it:
- Take the paint thinner from the desk, then bring it upstairs to use on the painting covered in black paint. Take note of the positions of each flower around the girl in the painting.
- Look at each of the journal entries, and take note of the flowers drawn next to each one.
- Next, take the photo slides and put them into the photo slide reader on the desk. This is a puzzle to solve with the information you have gathered in the flower shop.
How to solve the photo slide puzzle in the flower shop
The painting has six flowers on it in the same positions as the empty slots in the photo slide puzzle. Each slide matches up with a journal entry in the book. You need to put them in the same order as the flowers appear in the painting that was covered in black paint.
- First is Stella looking at lavender.
- The second position is Stella looking at a rose.
- The third is Stella holding a folder and shaking someone's hand.
- The fourth is Stella crying.
- The fifth is Stella on the phone.
- The sixth is an empty flower shop.


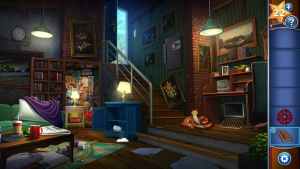
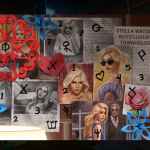
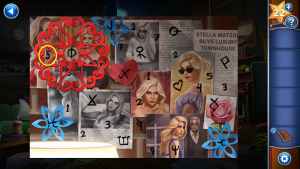
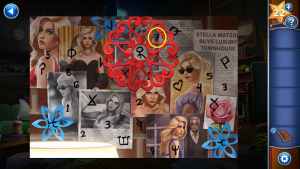
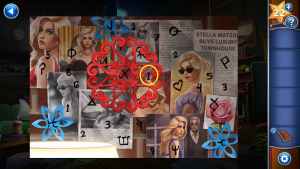
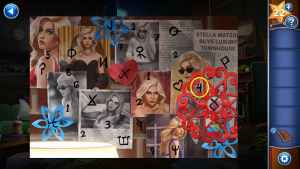
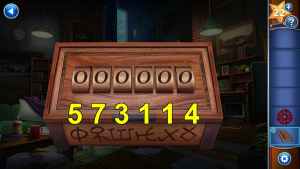
How to solve the locked symbols box
Interact with the altar inside the secret compartment behind the bookcase. You can click on the photo collage and the box underneath the side table inside. Both will have notes on them. Then, using the paper cutout, line the symbols up with the center of the cutout from the collage that match the symbols on the locked box. After putting in the answer, which is 5-7-3-1-1-4, look at everything inside the box to finish up this chapter.


Canine Cases Walkthrough - Chapter 4
The final chapter has Alex and Nitro chasing down the kidnapper and Emily in an attempt to get her back alive. You'll need to get some more help from friendly animals and solve a bunch more puzzles. The first location you will find yourself at will be the front gate of Scarlet Petals.
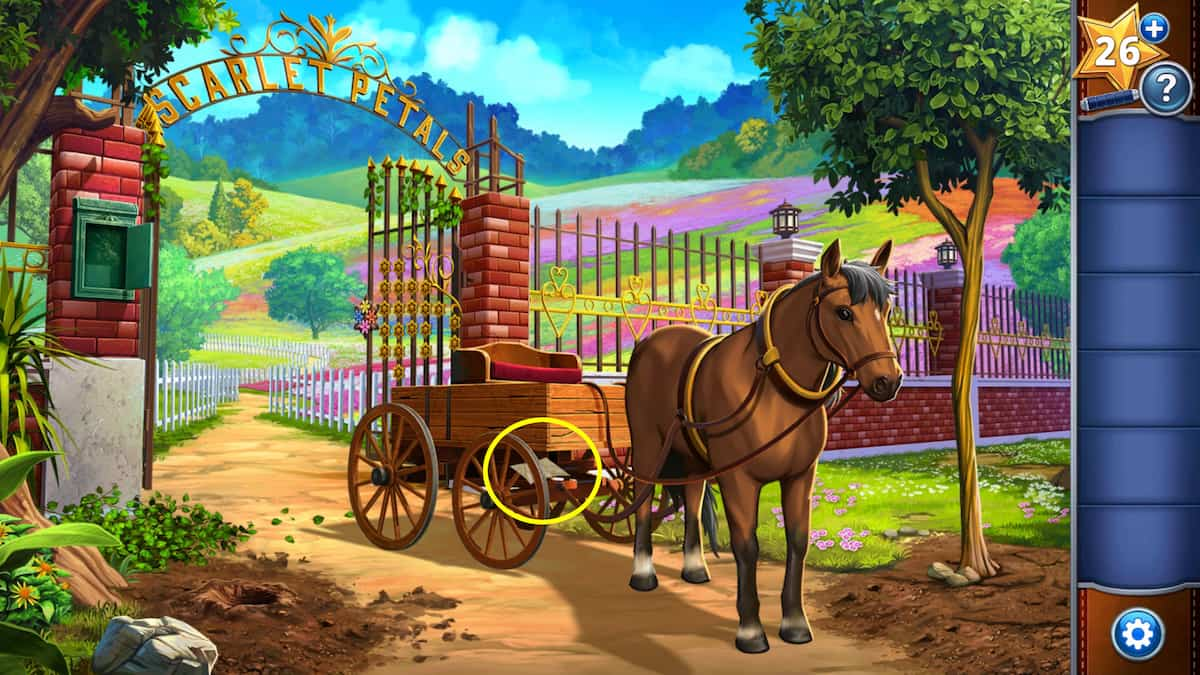
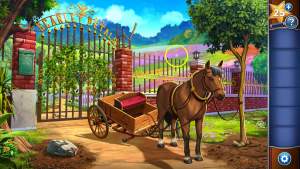
The front gate of Scarlet Petals
The front gate has grown over with a lot of vines, so you'll need to clear them away in order to get the horse's wheel back. Once you have the wheel back, you will be able to continue to the next location.
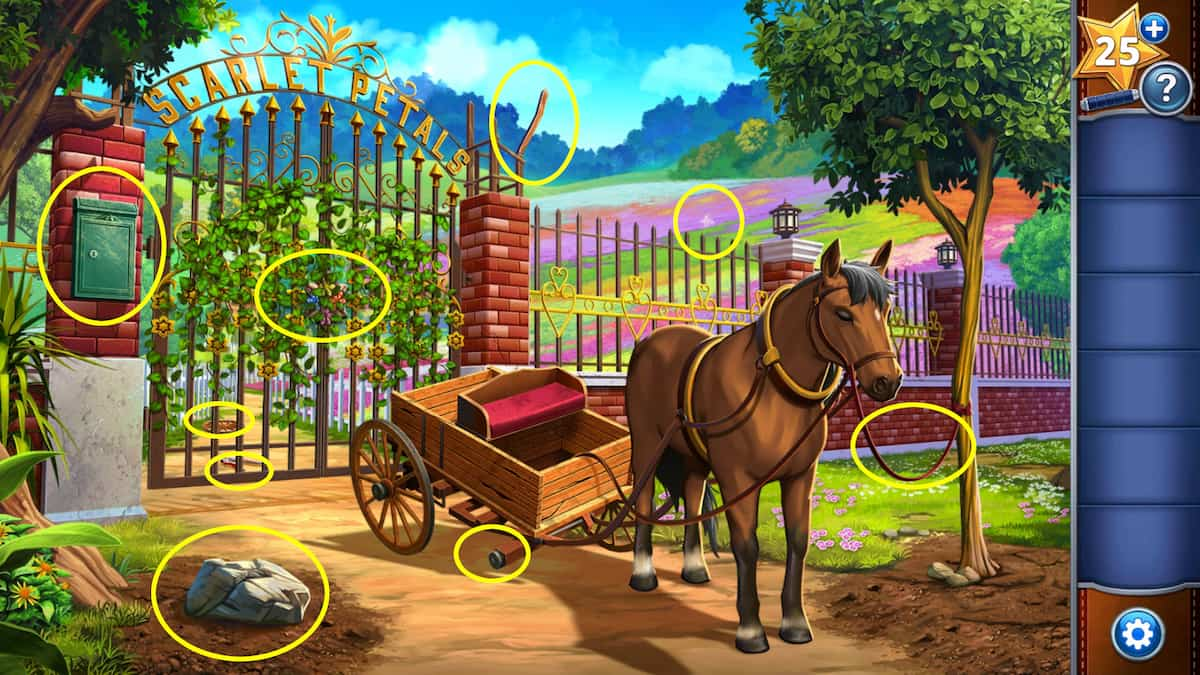
- Take the strap that is tying the horse to the tree next to it.
- Use the strap on the metal bar that is bent on the top of the gate.
- There is a Star collectible (10/12) on the pink part of the field in the background.
- Use the metal bar to scoot the garden sheers under the gate close enough to pick them up.
- Use the garden sheers on the gate to clear the vines away.
- Move the rock on the left side of the screen near the bottom to get the key from under it. You'll have to click it twice to have Nitro dig the dirt under the rock.
- Use the key on the locked mailbox. Take the binoculars out of the mailbox.
The Scarlet Petals gate puzzle solution
Now that you have the binoculars from the mailbox, you can solve the gate's puzzle. Using the binoculars, look out over the fields. You can see there are two rows of blue flowers, then one row of orange, three rows of yellow, and six rows of pink.
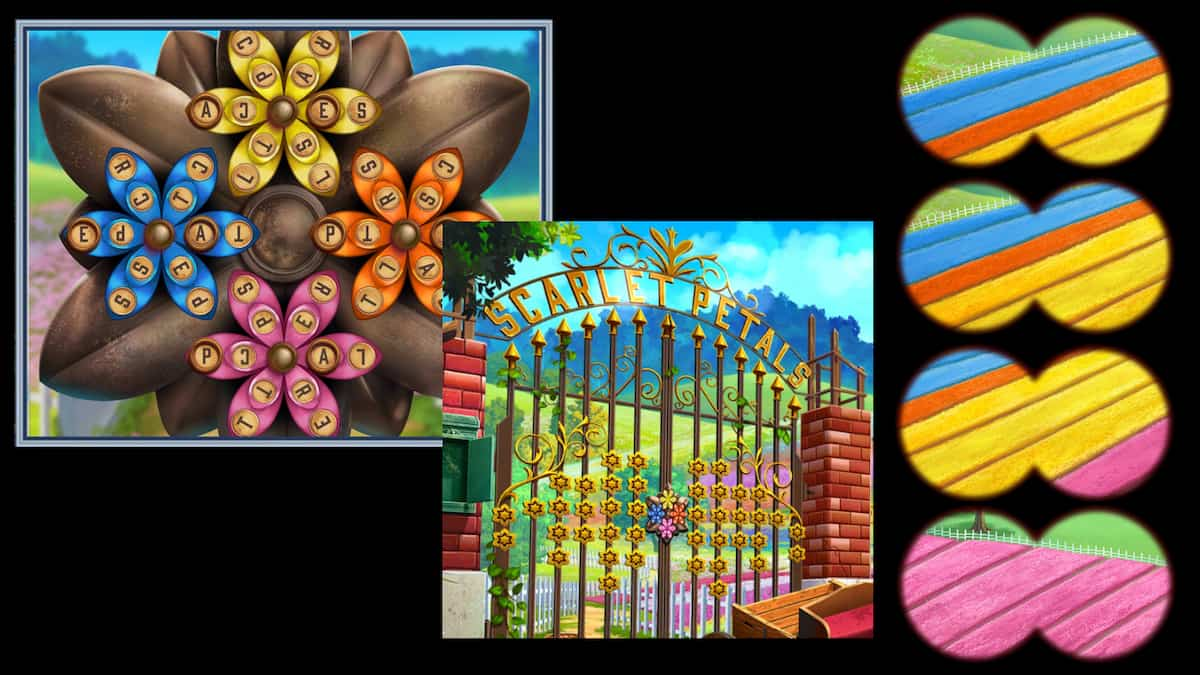
In order to see what two letters need to be highlighted in the blue flower on the gate, you need to find the two letters on the gate that have two stars underneath them. The first S in Scarlet and the final S in Petals both have two stars underneath them, so the blue flower needs to have S and S in it. The orange flower has two lines, and the two letters with one star under them on the gate are L and C. The yellow flower needs letters R and T, and the pink flower requires L and E.
The Scarlet Petals map puzzle
Once the gate is open, pick up the wheel from the other side of the gate, then put it on the cart. Pick up the map from behind the wheel on the cart. Now it's time to go, but the map is pretty confusing. In order to get through this section, you'll need to follow the map carefully.
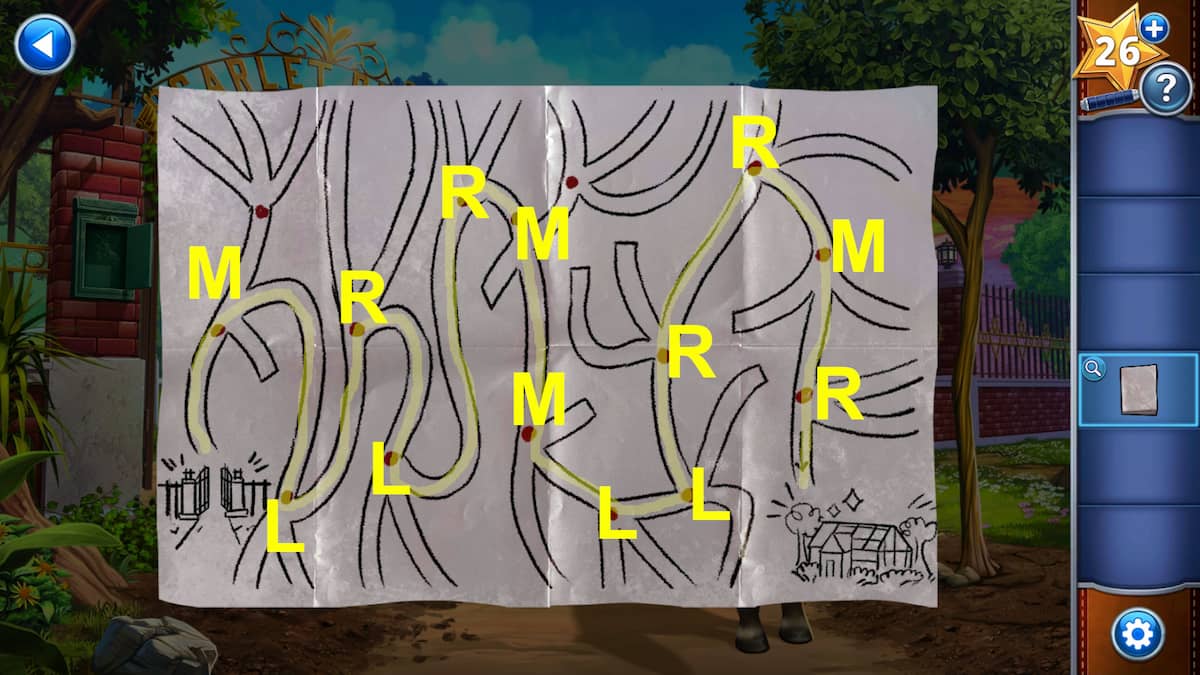
- Middle
- Left
- Right
- Left
- Right
- Middle
- Middle
- Left
- Left
- Right
- Right
- Middle
- Right
In front of the greenhouse
You will have a new challenge to contend with here; you will need to trick Biff the dog into leaving the area so you can get inside the greenhouse. You'll need the prairie dogs' help to get this done and help save Emily.
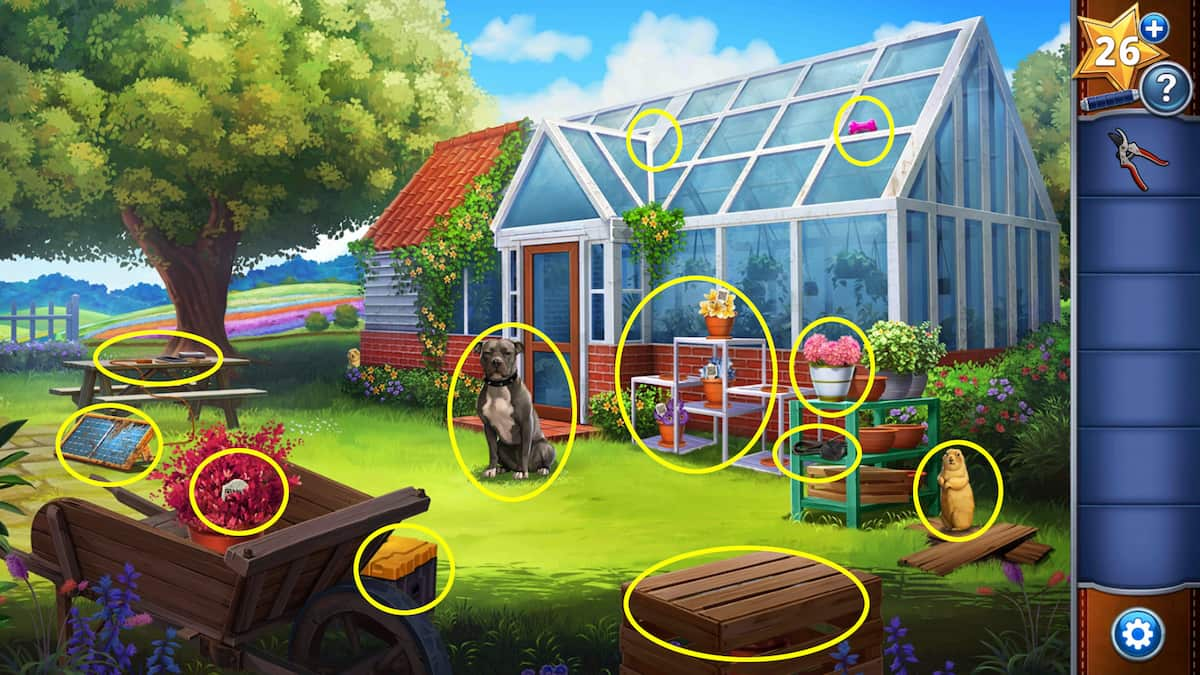
- On the top on the greenhouse, above the door, there is a Star collectible (11/12).
- Talk to the prairie dog on the right side of the screen.
- Next to the prairie dog is a phone charger on the green cart.
- On top of that same green cart is a flower pot with a QR code (1/3). Knock it over, then pick it up off of the ground. Behind the flower pot will be a brush.
- Use the brush on the solar panel to clean it off.
- Click on the table above the solar panel, and use the phone charger on the phone there. While you are charging the phone, Nitro will find a screwdriver in the grass.
- Use the garden shears to trim the red plant on the left in the wheelbarrow, then pick it up to gain the flower pot with a QR code (2/3).
- Use the screwdriver on the crate on the bottom of the screen under the green cart. Open it to take the flower pot with a QR code (3/3) out from the inside of it.
- Place all of the flower pots with a QR code on the plant rack next to the pitbull.
- Pick up the phone, and swipe it open. Close the message from "Dad," then open the QR code app on the bottom left of the phone's screen. Pick up the phone.
- Use the screwdriver on the old radio on the table next to the cell phone to get the battery from inside.
- Go back to the flower pots with a QR code on the rack and use the phone to identify each one.
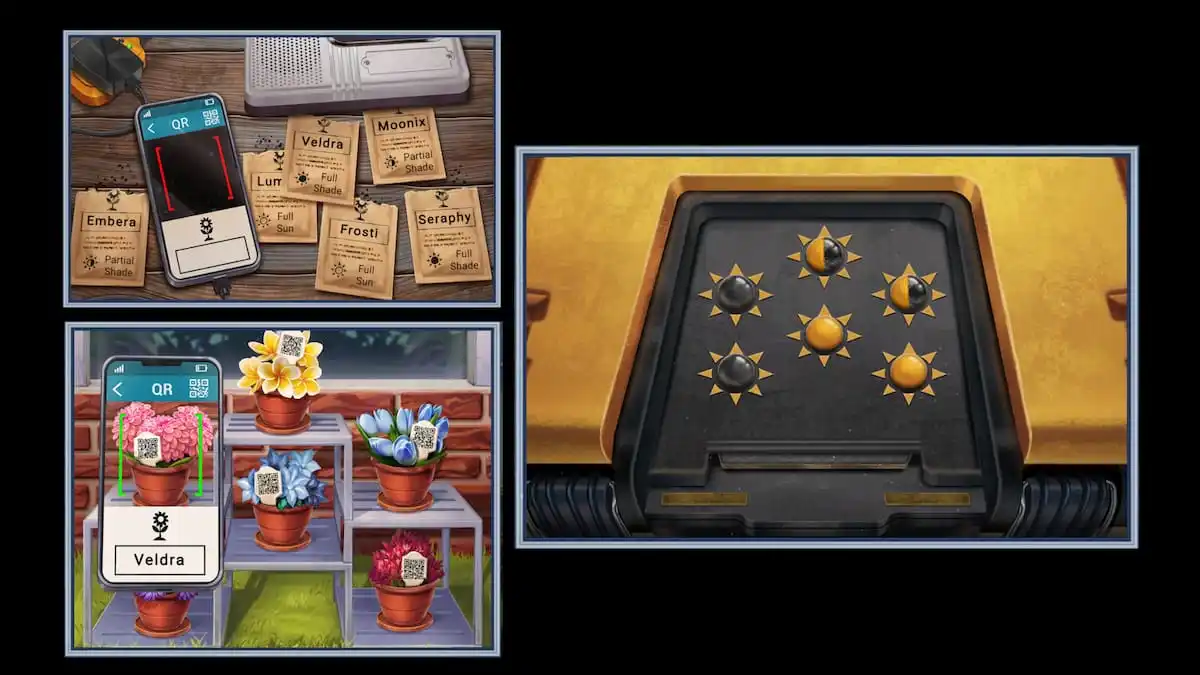
How to solve the QR code flower puzzle
Now that you have the charged phone with the QR code scanner, use it to look at each of the flower pots' QR codes in turn. Match the name of the flower to the seed packets on the table. It will say what amount of sunlight each of the flowers wants to grow its best.
- The left two suns on the top of the locked box are both full shade.
- The middle top is partial shade.
- The middle bottom is full sun.
- The right top is partial shade.
- The right bottom is full sun.
- Put the battery inside the drone from the locked box.
- Use the drone to get the squeaky toy off of the roof of the greenhouse.
- Use the squeaky toy on the pitbull to chase him away.
- The prairie dogs will tunnel under the greenhouse, and unlock the door for you.
The Prairie dog puzzle solution
Each prairie dog will move in the opposite direction of the other. In order to get them into the top together, you need to get one caught in a location where it can't get out while the other is moving. The easiest way to do this is to scoot the bottom dog into the little 1x1 square to the right of its starting place. Below is a video of how to do it.
Inside the greenhouse
Now that you have found your way inside the greenhouse, you'll need to release Emily from behind the gray door inside. In order to do this, you will need to uncover the three sets of three numbers for each of the animals.
- Pick up the rake on the far left of the screen. Use it to rake the leaves on the floor. Under the leaves will be a knob.
- Pick up the Star collectible (12/12) on the hanging plant closest to the entrance door of the greenhouse.
- Interact with the box underneath the table with the TV on it. Take the video game cartridge from inside the box. Behind the box will be a water valve (1/3).
- Move the potted plant next to the TV to the side to uncover a wrench. Pick this up.
- In the sink, pick up the trowel.
- Use the trowel on the loose brick on the floor to find another water valve (2/3).
- Move the ladder to the back right out of the way to find the final water valve (3/3). Turn on all three water valves.
- Turn on the sink, washing the cube down the drain. Use the wrench on the pipe to get the cube out.
- Use the garden shears on the ladder to clear the vines.
- Put the knob on the TV so you can turn it on. Put the video game cartridge in the console next to the TV.
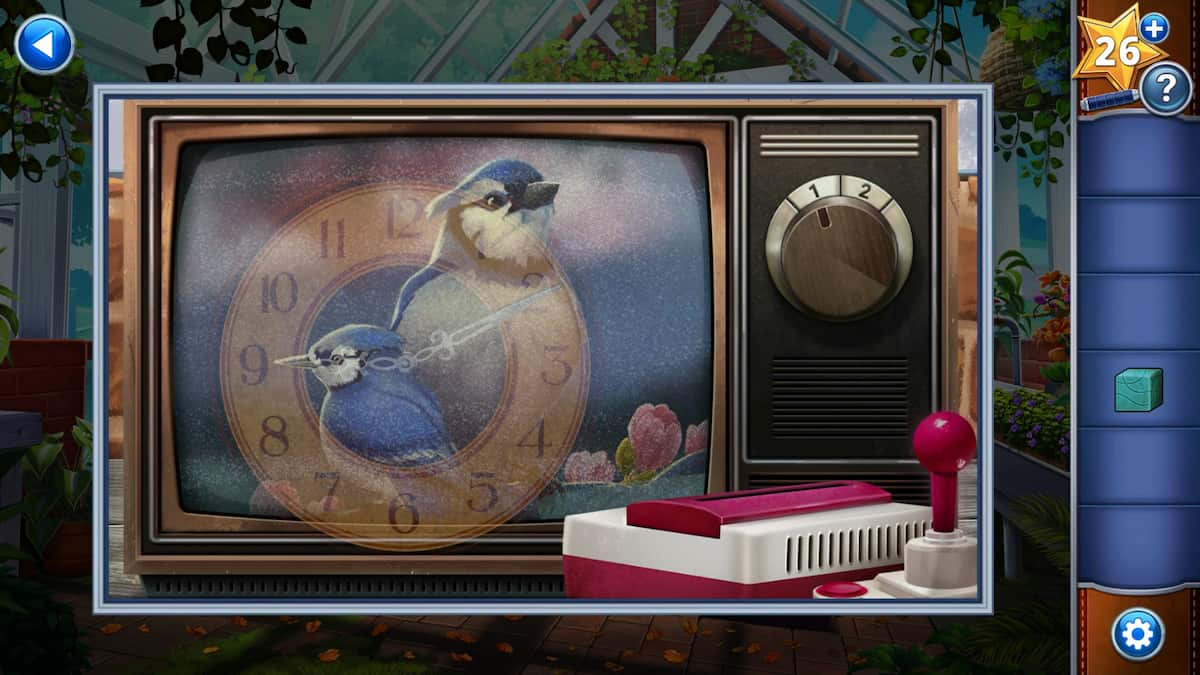
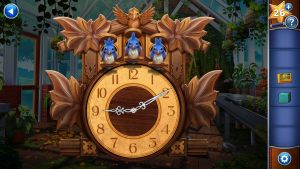
The bird clock puzzle in the greenhouse
The TV has a picture of some birds on it. The small bird is facing 9 o'clock and the large bird is facing 2 o'clock. Recreate this with the small and large hands on the clock on the back wall. This will cause three little birds to pop out; you will need this for a later puzzle.
The fish puzzle in the greenhouse
Put the cube inside the fish puzzle next to the door. You need to push each of the blocks in or out to get all the paths to line up. This is what the completed puzzle will look like:

The door puzzle solution in the greenhouse
Now that you have the snake game plugged into the console, turn the TV knob to channel 2. You also have the solutions to the fish numbers and the bird numbers in the door.


- The fish numbers can be found by looking closely at the fish block puzzle. The first slot in the door under the fish is a circle, than a triangle, than a diamond. If you look at the three symbols of the coral on the fish puzzle, one looks like a circle, one a triangle, and the last one is a diamond. If you trace the route from the circle coral, it leads to a fish with four stripes on it. The triangle path leads to a fish with two stripes. Finally, the diamond leads to a fish with three stripes on it.
- The fish numbers solution for the door is 4-2-3.
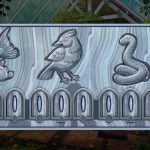
- The bird clock has three holes in it for the birds to come out of. The first hole is marked with a diamond and a bird with three feathers on its head comes out. The triangle hole has a bird with one feather. The circle hole has a bird with two feathers on its head. The order of the numbers on the bird section of the door is circle, triangle, then diamond.
- The bird numbers solution is 2-1-3.
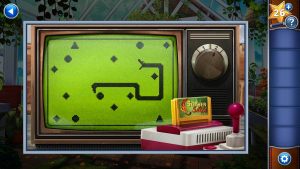
- Last, you need to look at the snake game on the TV. Count the number of circles, and you'll find four. Count the number of diamonds, and there will be eight. The number of triangles on the screen is two. The order for the snake's part of the door is also circle, triangle, then diamond.
- The snake numbers solution is 4-2-8.
- The final solution to the door puzzle is 4-2-3-2-1-3-4-2-8.
The final chase puzzle
The final puzzle of the game is another scent-following puzzle, just like the pepperoni and necklaces ones before. This time, there are two different scents, and you'll have to line both of them up. When you walk over a spot, it will move into the spot that you previously were on. Here's how to do it:
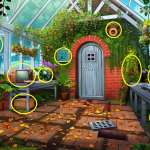
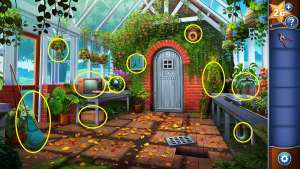
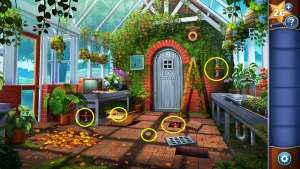
All Star Collectibles in Canine Cases
There are a total of twelve Star collectibles in AE Mysteries: Canine Cases. These are important to pick up since they give you extra stars for hints and skipping puzzles. Here are all 12 locations, one for each location you go to in the game.


For more indie game walkthroughs, check out Mystery Detective Adventure Walkthrough – Case 1 on Pro Game Guides.