
Rusty Lake has earned a fine reputation for its unique graphical take on the point-and-click adventure puzzle game genre, with hits such as Samsara Room. If you need some guidance while playing Underground Blossom, read on for my full walkthrough.
Underground Blossom Walkthrough - All Chapters
During the game, you’ll sometimes notice small arrows on the screen. Clicking these allows you to move to the next location, so if I say ‘move right’, ‘move left’, etc it means clicking the appropriate arrow. Click ‘Start’ and a train will arrive on the platform. Click the doors to board the train and begin chapter one.
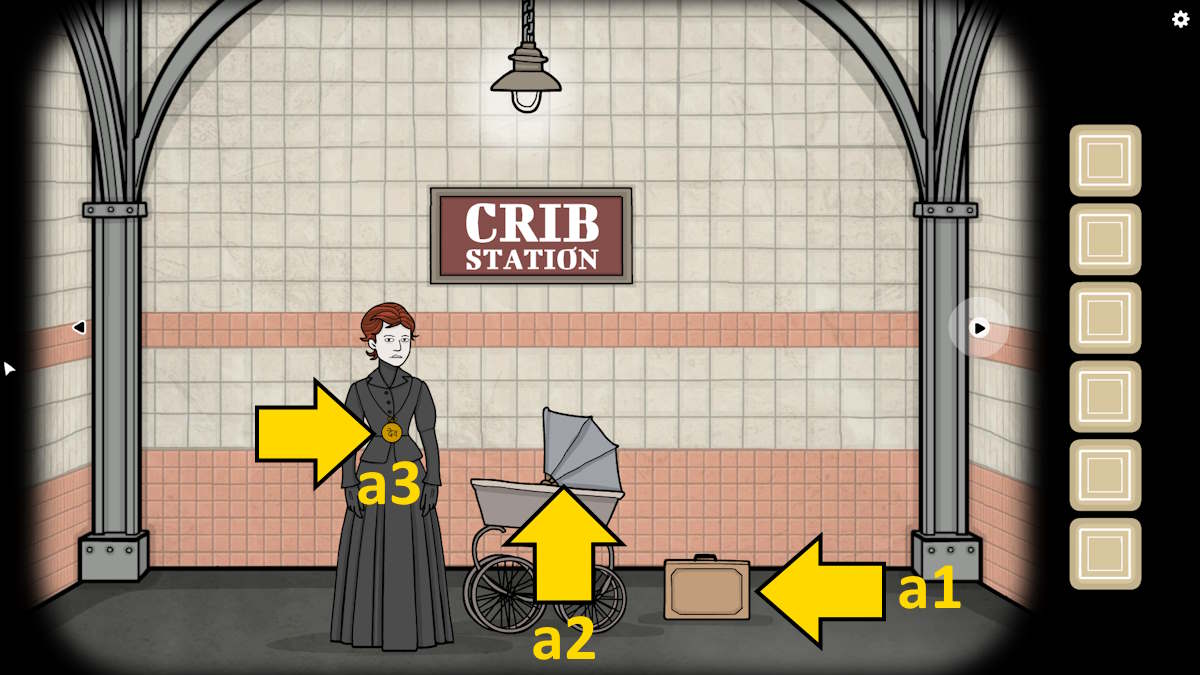
Chapter 1: Crib Station

Click the briefcase (a1) to lay it down, several more times to open it, and take the Bottle With Milk and Matches from inside. Click the baby’s crib (a2) for a close-up, take the Safety Pin, pull back the baby’s blanket, and give her the bottle. Select the lady in black (a3) and click her mouth to listen to her. She’ll ask you to take care of her baby, Laura.
Move right, open the box (b1), and take the Iron Saw and Cloth. Select the grate (b2) for a close-up and then click the broken lefthand rod until it breaks, giving you a Rod. Use the rod on the key in the same close-up to move it to the left of the screen, and then collect the Key. Return to baby Laura (a2), add the cloth to the baby, and then use the safety pin to create a diaper. Keep clicking the bottle in Laura’s mouth until she poops, giving you a Dirty Diaper.
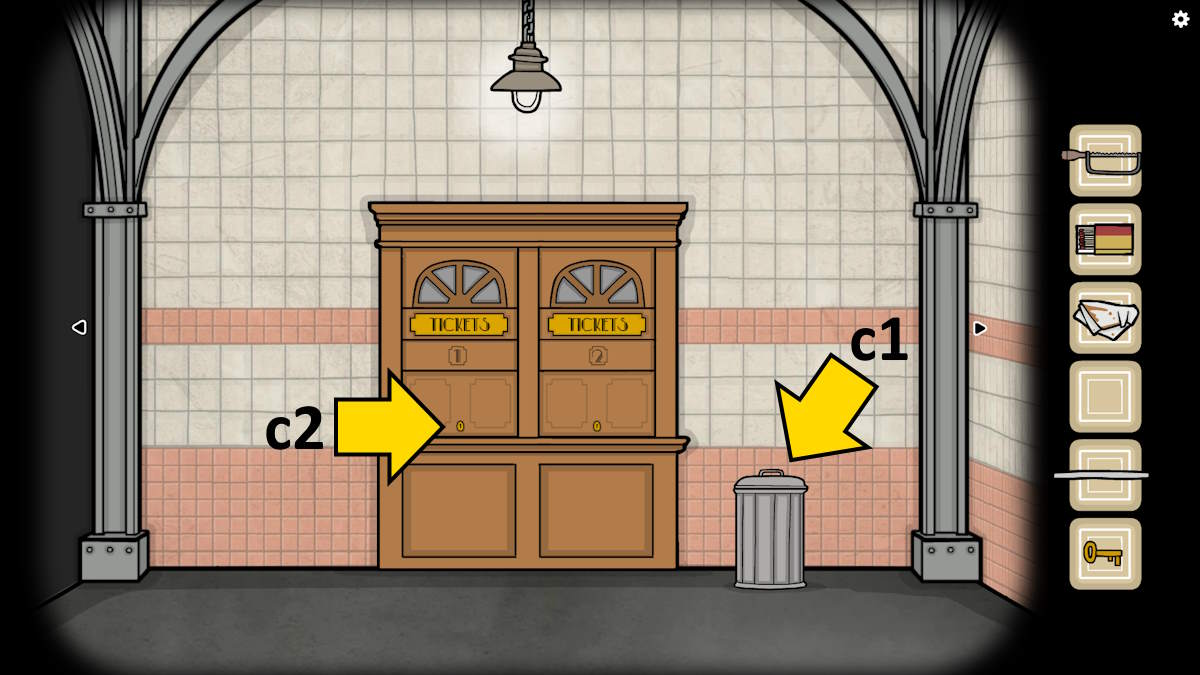
Move left and remove the trash can lid (c1). Put the dirty diaper in the trash can and then set it alight with the matches. Click the burning bin and it will explode. Take the Scraper you’ll find in the wreckage. You can also use the key to open ticket counter 1 (c2). Slide the shutter up afterward and use the rod to wake the sleeping ticket agent. They want a coin to get you a ticket to go to the next station.
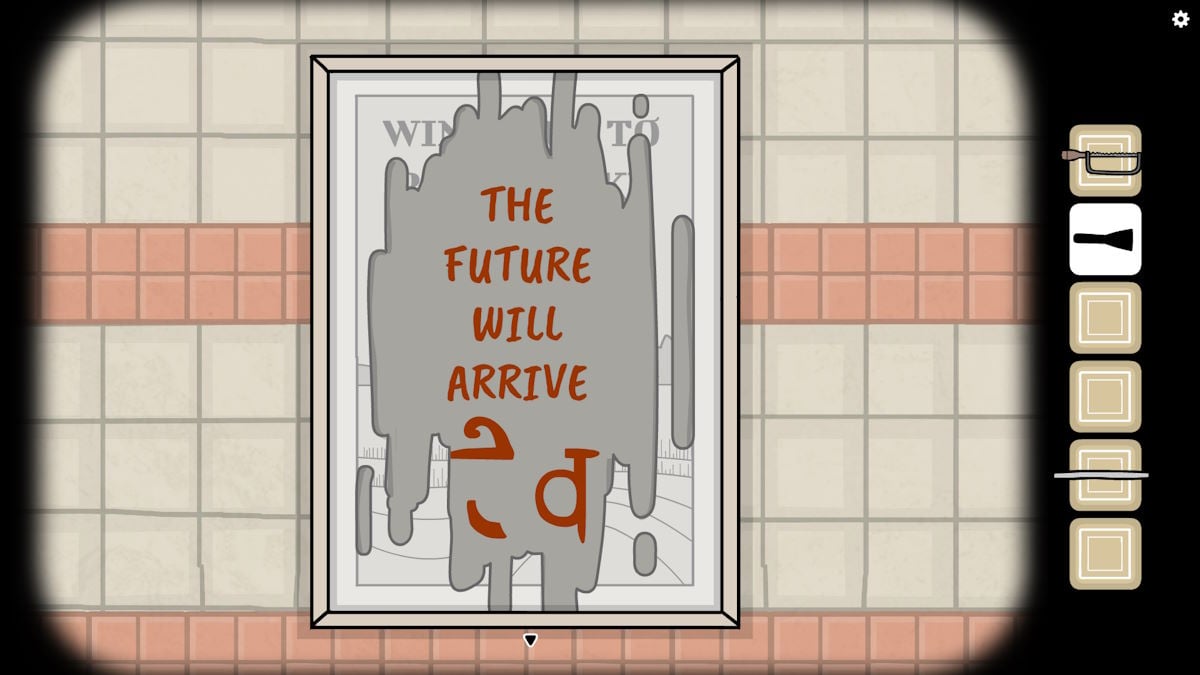
Go either left or right twice and use the scraper on the poster (b3) until the full message is revealed (see above).
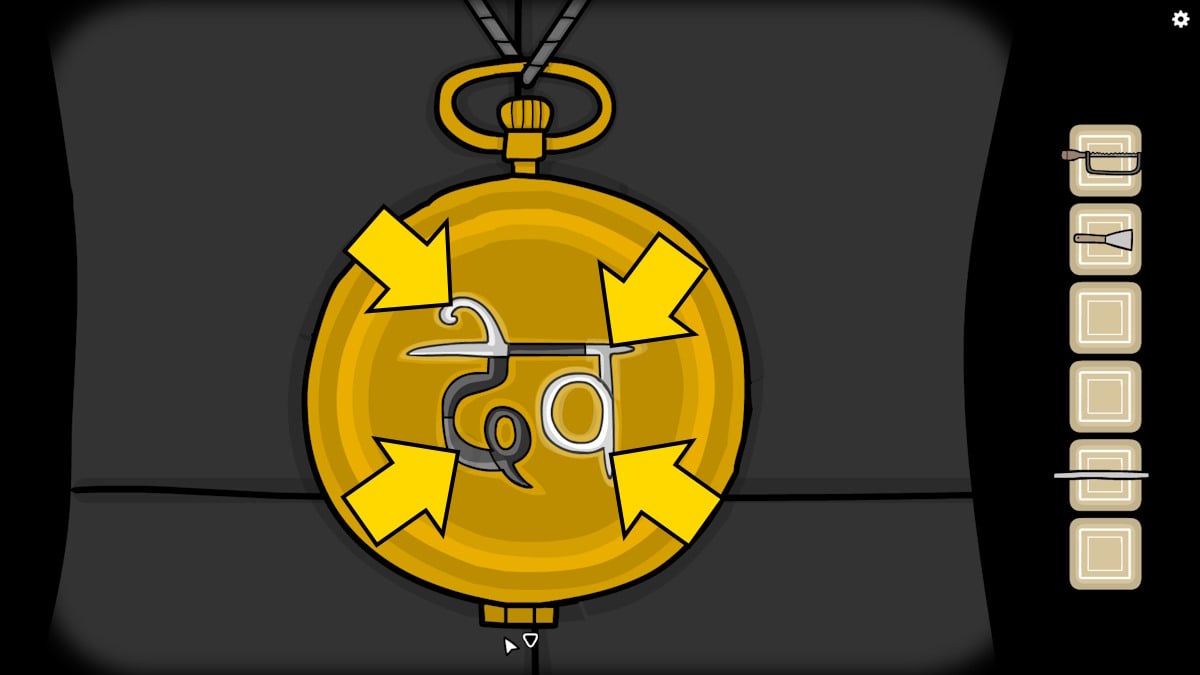
Return to the lady in black (a3), click the gold watch hanging around her neck for a close-up, and click the four parts of the pattern highlighted on the poster (see above). The watch will open, showing you the time 10:15.
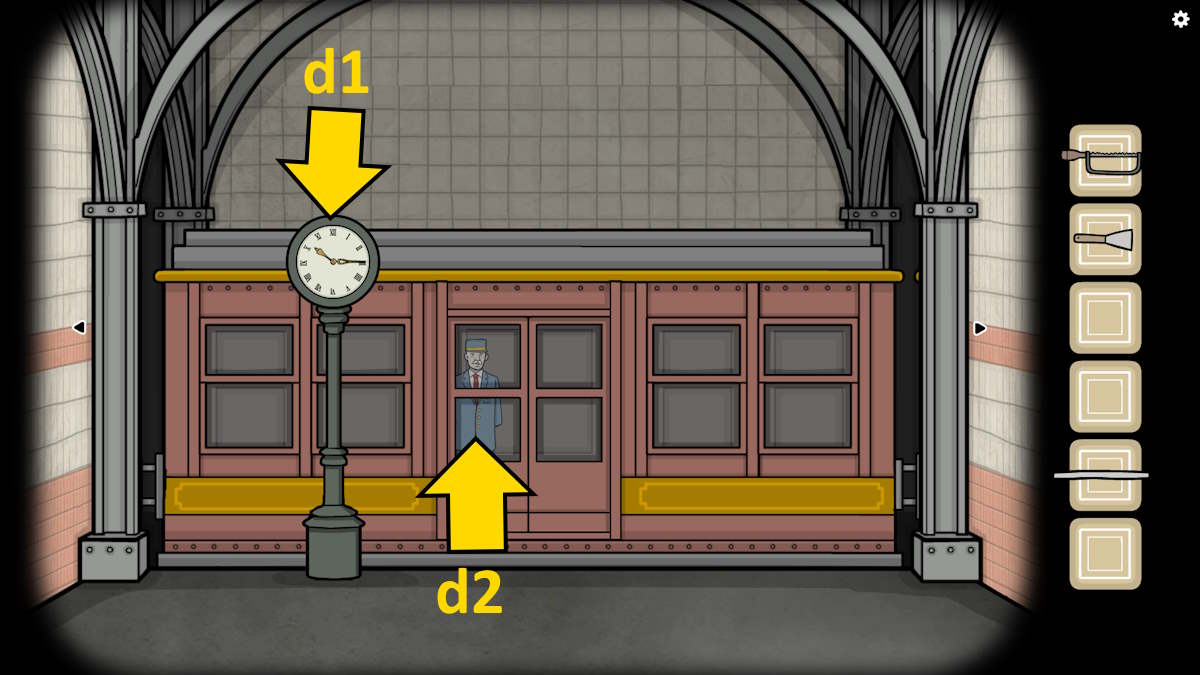
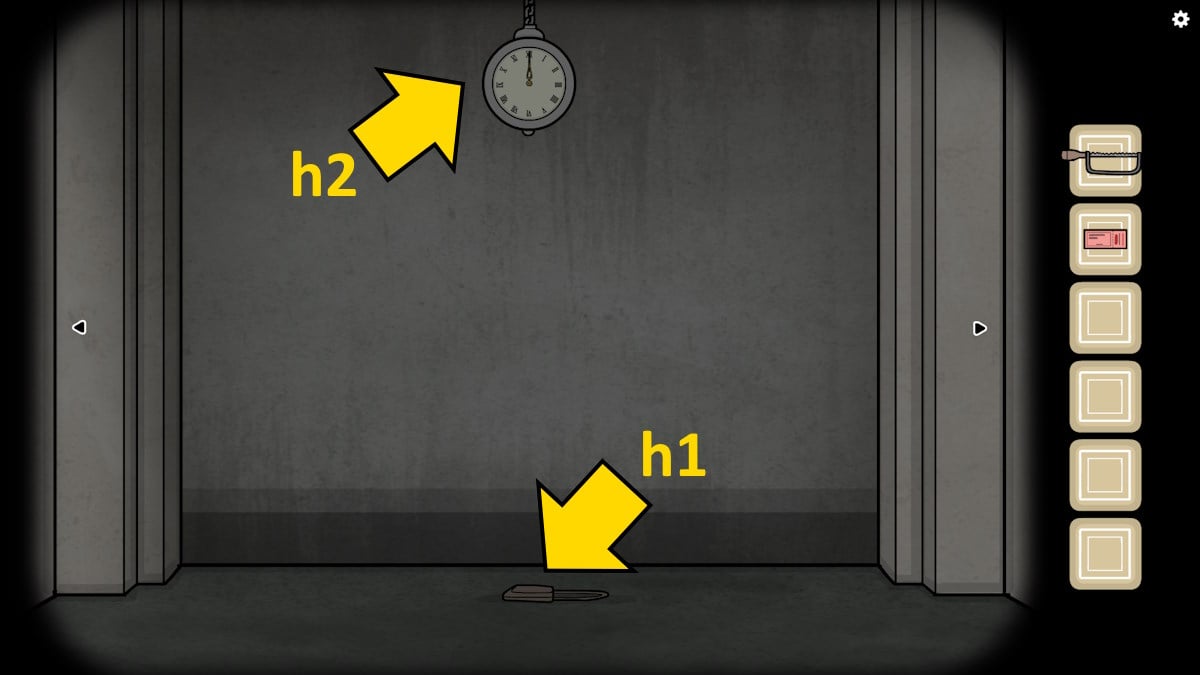
Go left or right twice, select the clock (d1), and change the time to 10:15. A train will arrive. Click the doors to open them, and then the ticket inspector inside (d2) to get a close-up. Select his pocket to open it and once more to receive a Coin. Return to the metro ticket office (c2), give the lady the coin, and she’ll give you a Ticket. Give this to the train ticket inspector (d2), then click his hole puncher to open it, and slide your ticket across to punch it.
Now you can click the doors to enter the train, and then once more to complete Chapter 1.
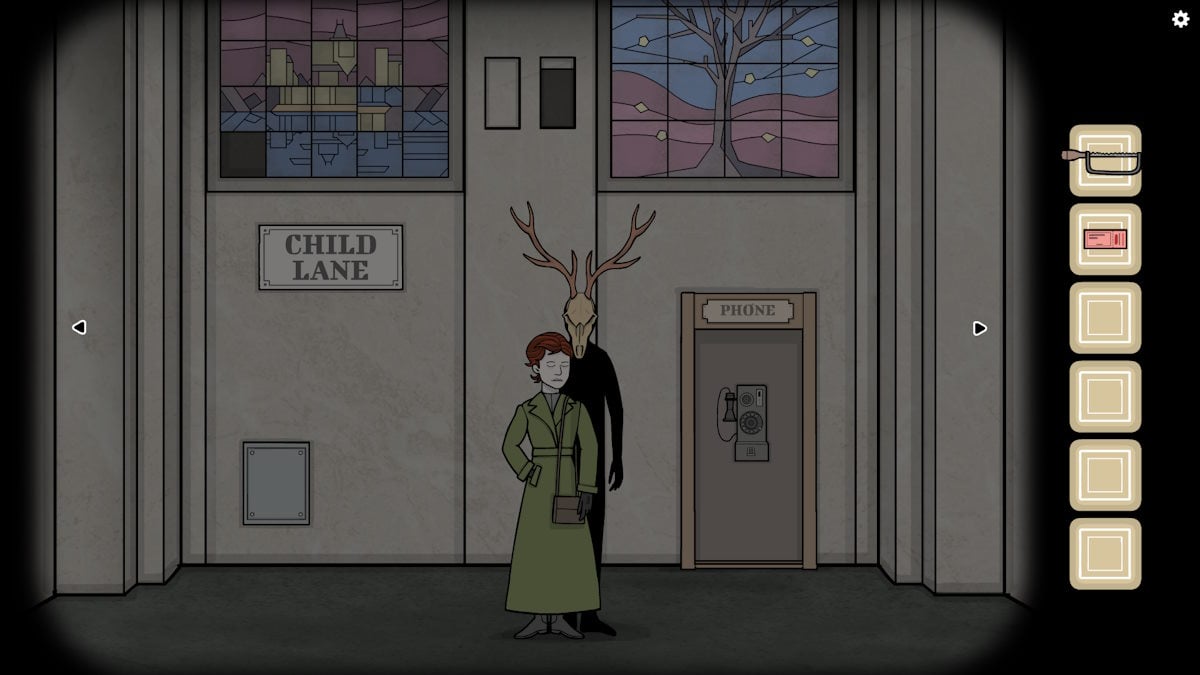
Chapter 2: Child Lane

Exit the train, talk to the lady in green (e1), then click the child in the same close-up to find that she wants candy. Use the scraper on the metal plate (e2) to get some Old Gum and give it to the child. Click her mouth to blow a bubble, and then pop it to collect some Chewed Gum. When you come out of the close-up, she will have disappeared.
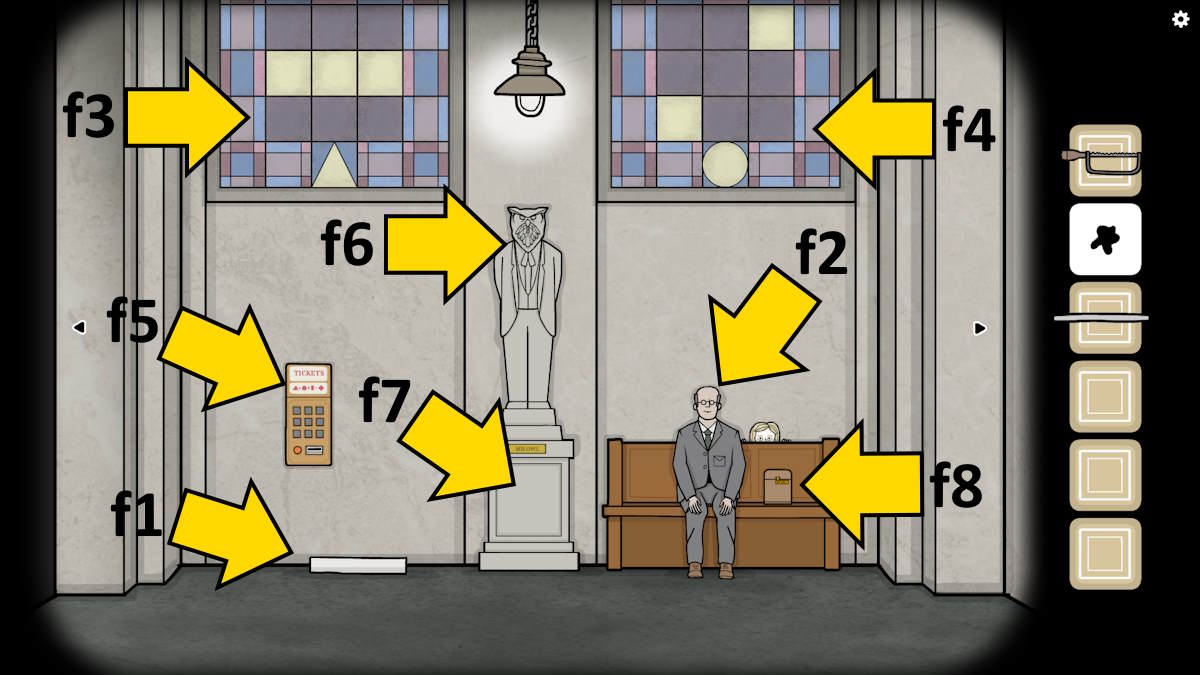
Move right and take the Poster (f1), click the girl (who’ll be hiding behind the bench next to the man, f2), and then move right twice.
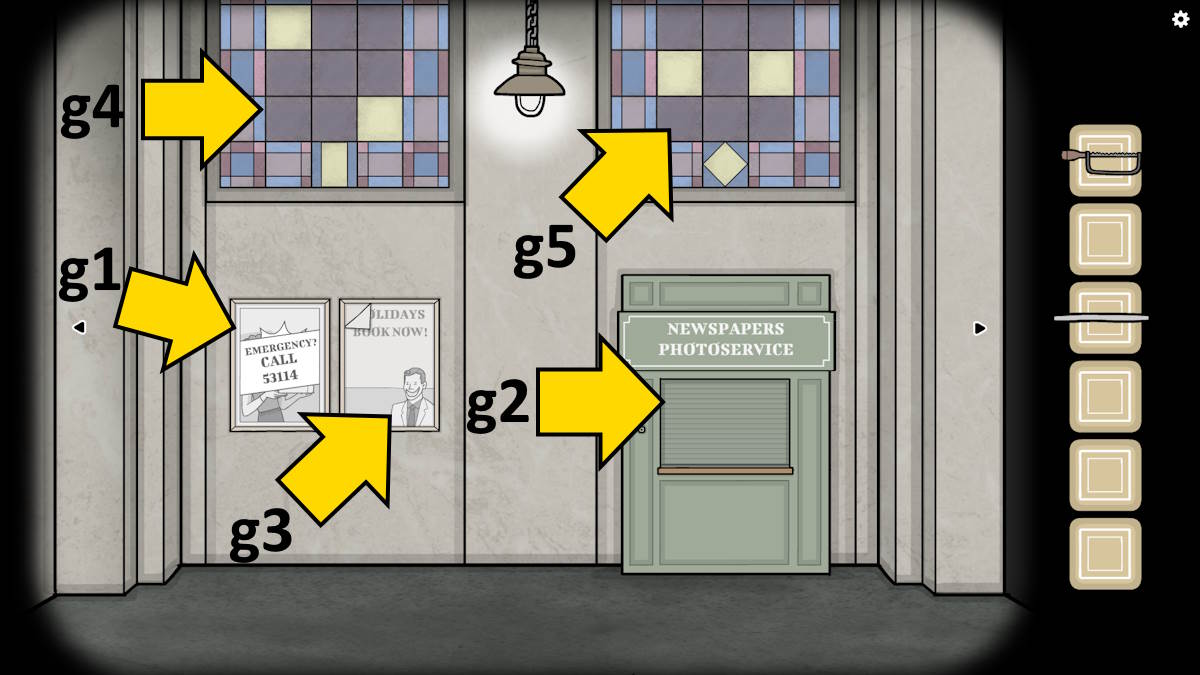
Place the poster on the wall (g1) and use the chewed gum to hold it in place. Click the mouth of the lady in the poster and it will change from saying Smile to saying Sparkling Eyes. Click her eyes for the message to change to New Bracelet, click the bracelet for it to change to New Hair, her hair for Large Eyes, her eyes for Bigger Smile, and then the box for a knife to appear. You’ll now have a message reading, ‘Emergency? Call 53114’.
You’ll see the girl hiding again, this time behind the newspaper stand (g2), so click her again. Select the second poster (g3) and click the items in the following order:
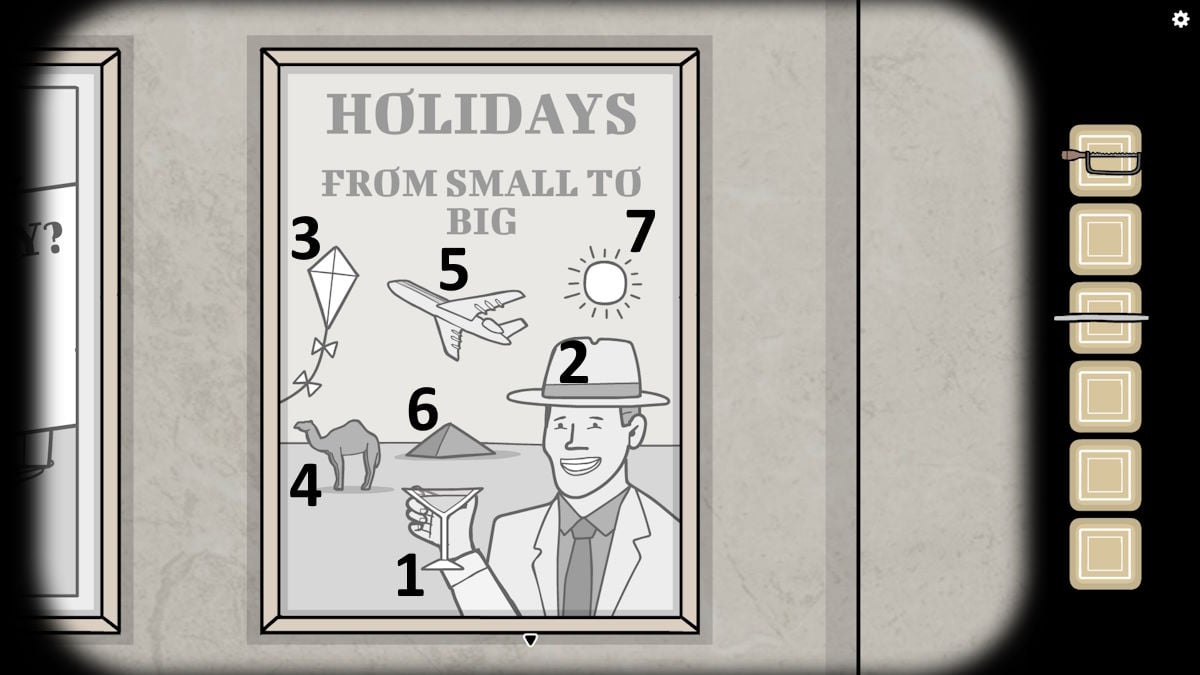
- Glass
- Hat
- Kite
- Camel
- Plane
- Pyramid
- Sun
The corner of the poster will now peel back, allowing you to take a Key. When you come out of the close-up, note the patterns on the wall above the poster and the newspaper stand (g4 and g5). Each has a shape at the bottom (an oblong and a diamond), and several of the nine central squares above each one are lit up.
Move back to the view of the man and note two more patterns at the top of the screen (f3 and f4), this time with a triangle and a circle and also with more panels each lit up. Select the ticket machine (f5) and note the clue at the top.
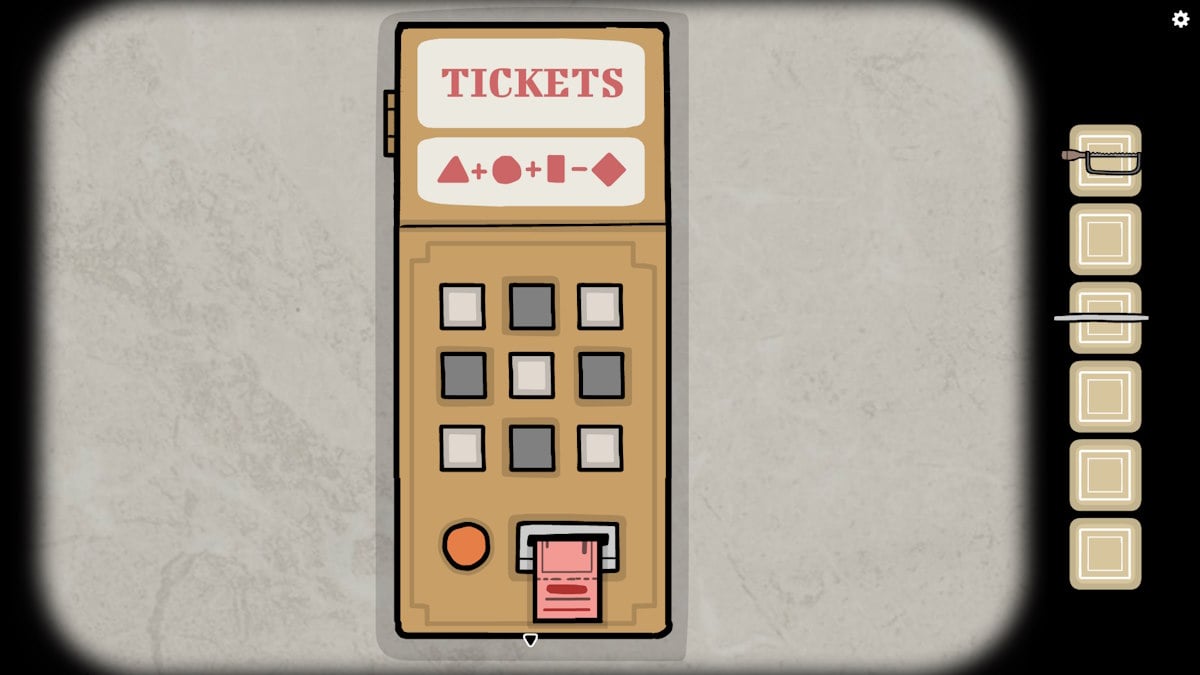
As the clue suggests, click all the buttons so the ones showing on the triangle, circle, and oblong murals are lit up. Now click the ones showing on the diamond mural to darken them, and then press the red button (I’ve pictured the correct buttons pressed above). Take the Ticket. Note that the girl is now hiding behind the owl statue (f6), so click on her once more.
Move back to where you put the poster and you’ll find the girl waiting for you. Click her for a chat and she’ll give you a Glass Panel. Head back to the scene with the lady, and add the glass panel to the top-right mural (e3). Each of the panels can be flipped vertically or horizontally by dragging them either top to bottom (vertically) or left to right (horizontally). Using the image below, flip each of the marked tiles once in the indicated direction:
- Flip vertically
- Flip horizontally
- Flip vertically
- Flip horizontally
- Flip horizontally
- Flip vertically
- Flip horizontally
- Flip vertically
- Flip horizontally
- Flip horizontally
- Flip vertically
- Flip horizontally
- Flip vertically
- Flip horizontally
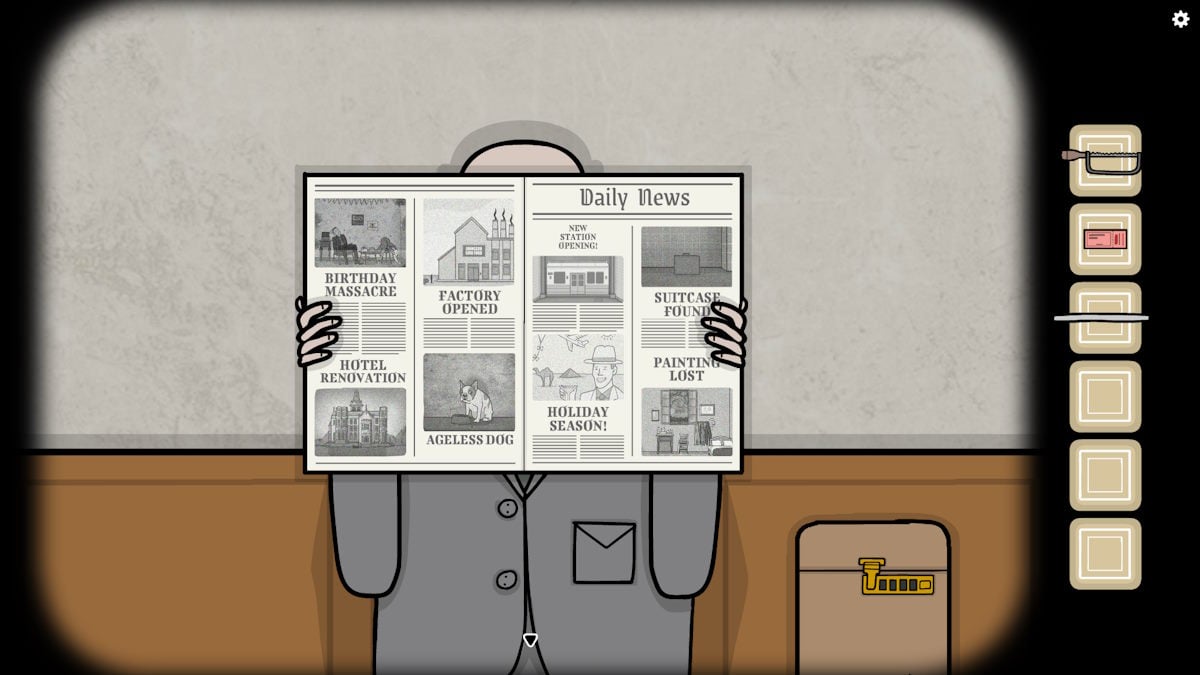
Once complete, take the Crank (marked above). Move to the newspaper stand (g2), add the crank, and keep clicking the crank to wind up the shutter. Click the revealed Newspaper to take it. Give the newspaper to the man (f2) and then click the paper for a close-up. Drag each headline so that it matches the correct image (see above). He will raise his paper, allowing you to take a Coin from his top pocket.
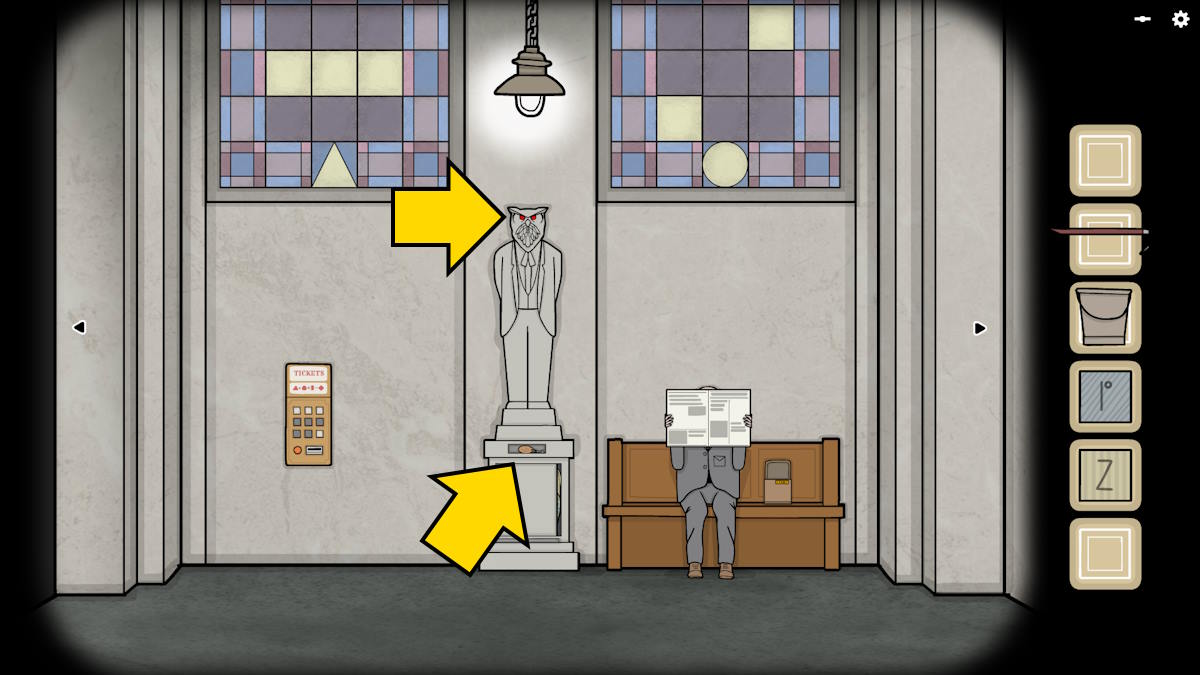
Return to the scene with the lady and use the key to open the phone booth (e4). Put the coin in, dial 53114, and keep clicking the earpiece to receive a message. You need to look in the eyes of the bird. Go to the statue of Mr. Owl (f6), and click both eyes to make them go white, which slightly opens the plaque at the base of the statue (f7). Use the rod to fully open it and reveal a code, 8827. Input this code into the bag next to the man on the bench (f8), press the button next to the numbers, then click the bag again to open it and take a Camera.
Move back to the newspaper stand (g2) and give the camera to the girl. Keep clicking the camera in her hands until she screams. Go back to the lady to find a man in a mask standing behind her. Click him for a conversation, after which they will both disappear.
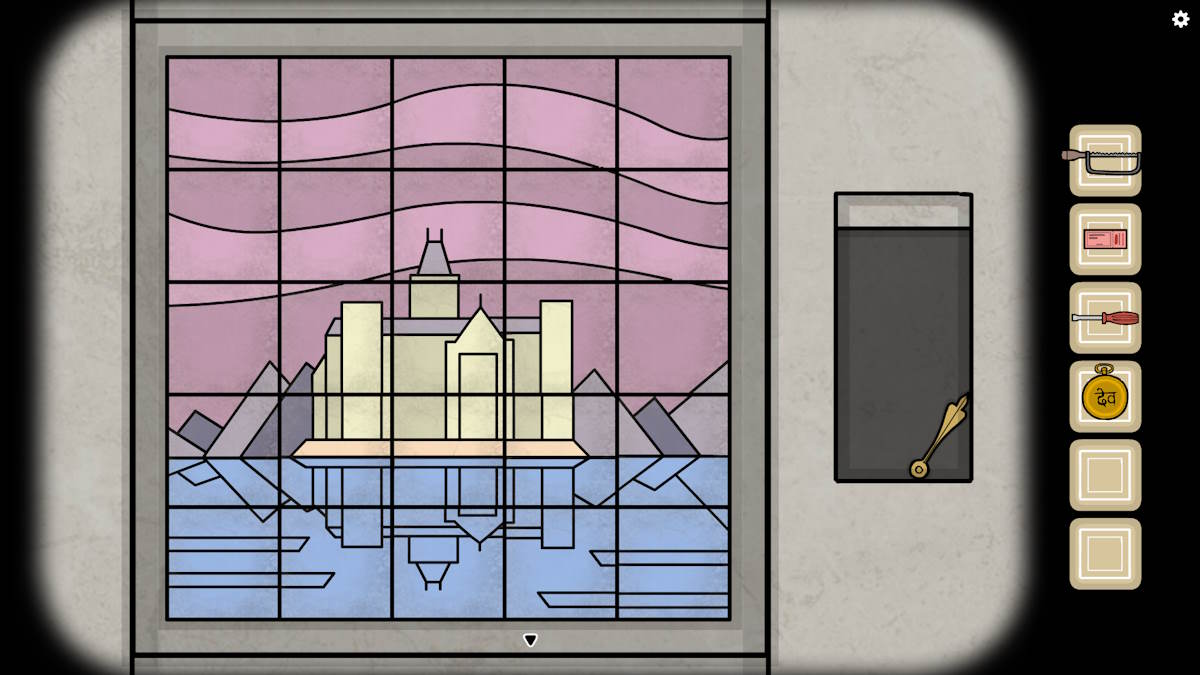
Go to the platform next, to see them disappear on the train. Click the bag on the floor (h1) to open it, take the Nut Driver and the Golden Timepiece, and read the note from Rose. Go to the metal plate once more (e2), use the nut driver to remove it, and find another Glass Panel. Add it to the mural above the panel (e5) and repeat the same process as before. The completed image is below. Once complete, take the Clock Hand.
You’ll now find the girl hiding in the Mr. Owl statue (f7), so click her once more and then pick up the Roll of Film she drops when you do. Move back to the newsstand (g2), put the film in the basket you took the paper from, and then click the Photo Service sign to be told to come back in 20 minutes. Move to the platform, add the clock hand to the clock (h2), and drag the minute hand forward 20 minutes (to 12:20).
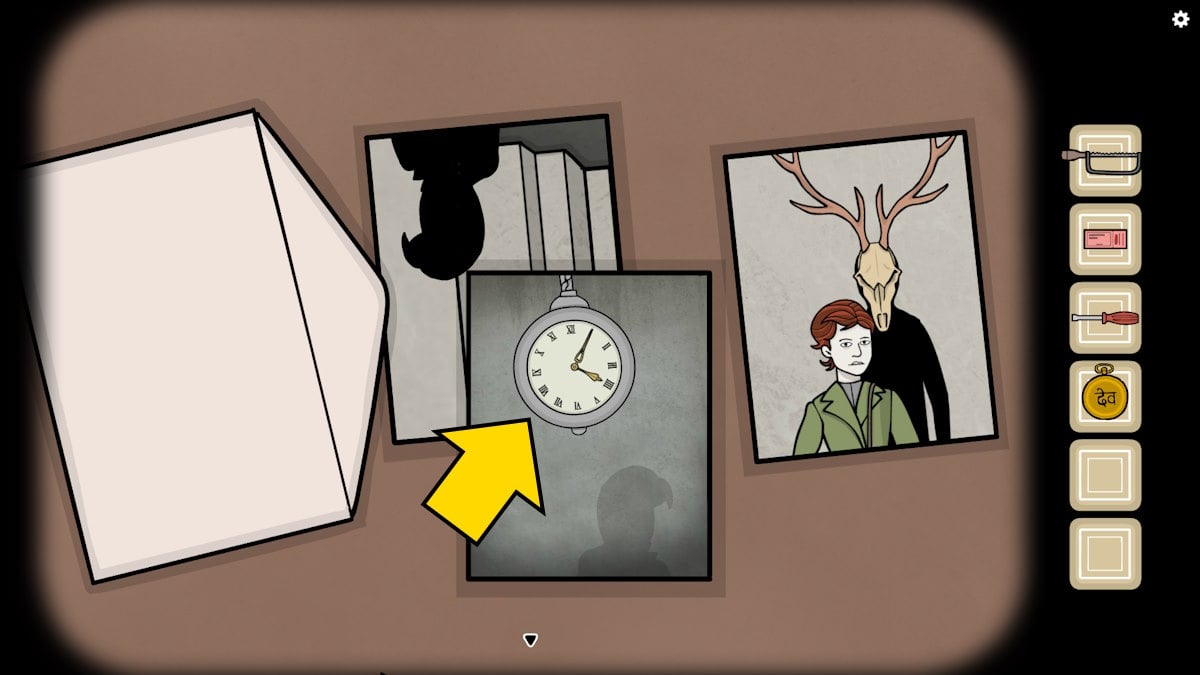
Go back to the newsstand (g2) and you’ll find an envelope in the basket. Click it to open it and find three photos. Note that the photo of the clock has the time at 4:05. Return to the platform, set the clock to 4:05, and the train will arrive. Get your ticket stamped as before and head onto the train to complete Chapter 2.
Chapter 3: School Street
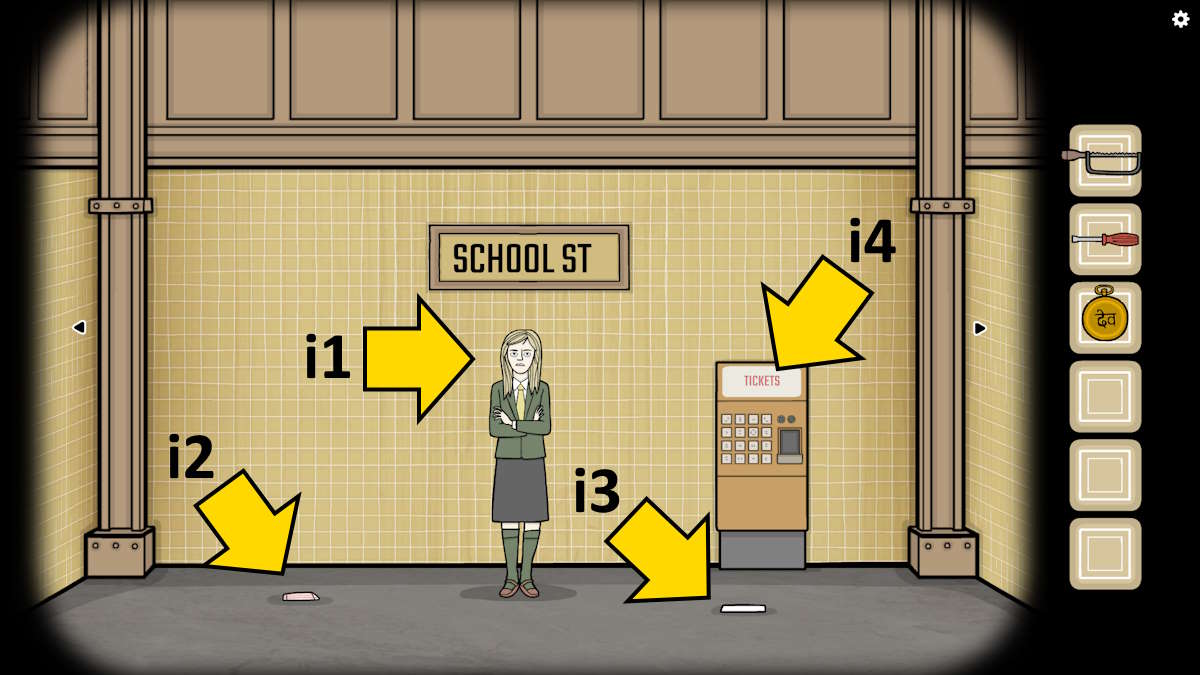
Click Laura (i1) to find someone has stolen her photos and then click the peanut packet (i2) to get a Peanut. Pick up the piece of paper (i3) and keep clicking it until you make a Paper Plane.
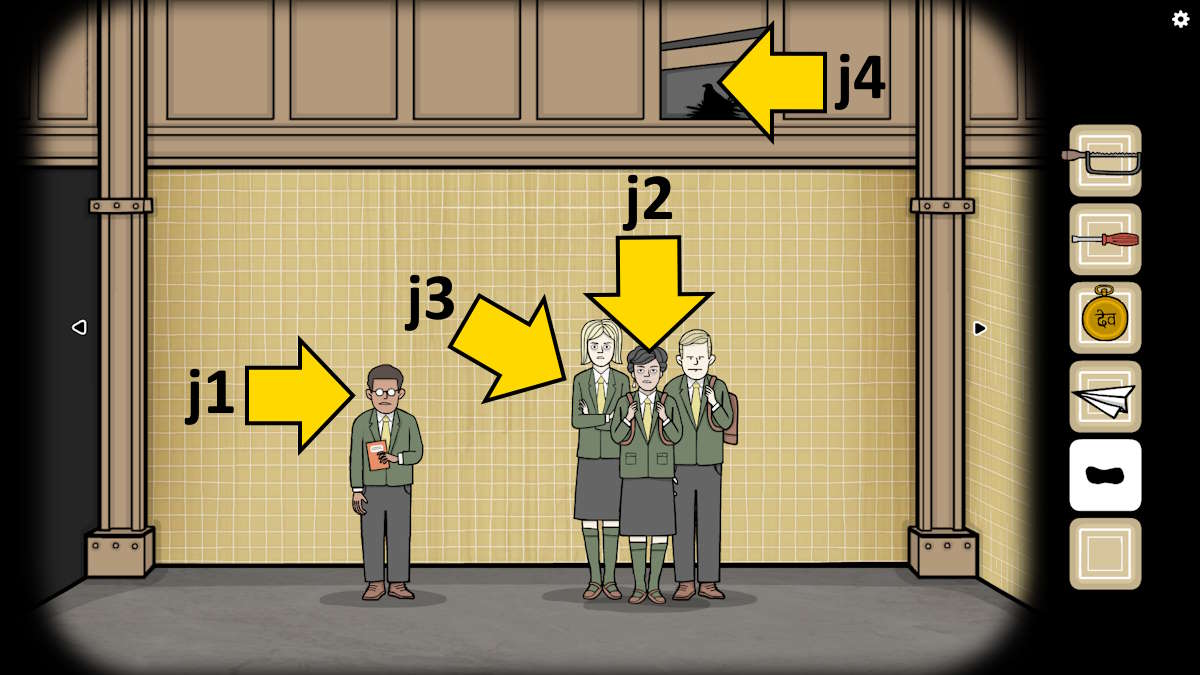
Move left, select the solitary boy (j1), then click his book to find out lots of gossip about the children on the platform. Click his mouth and he’ll say he’ll give you something if you help him with his book. You need to rearrange all the pictures in the book, as they don’t currently match the right names (you already know Laura, of course). Click the central girl (j2) and check her pockets to find a picture of two lovers, which gives you the identities of Sam and Jonnhy (standing to her right).
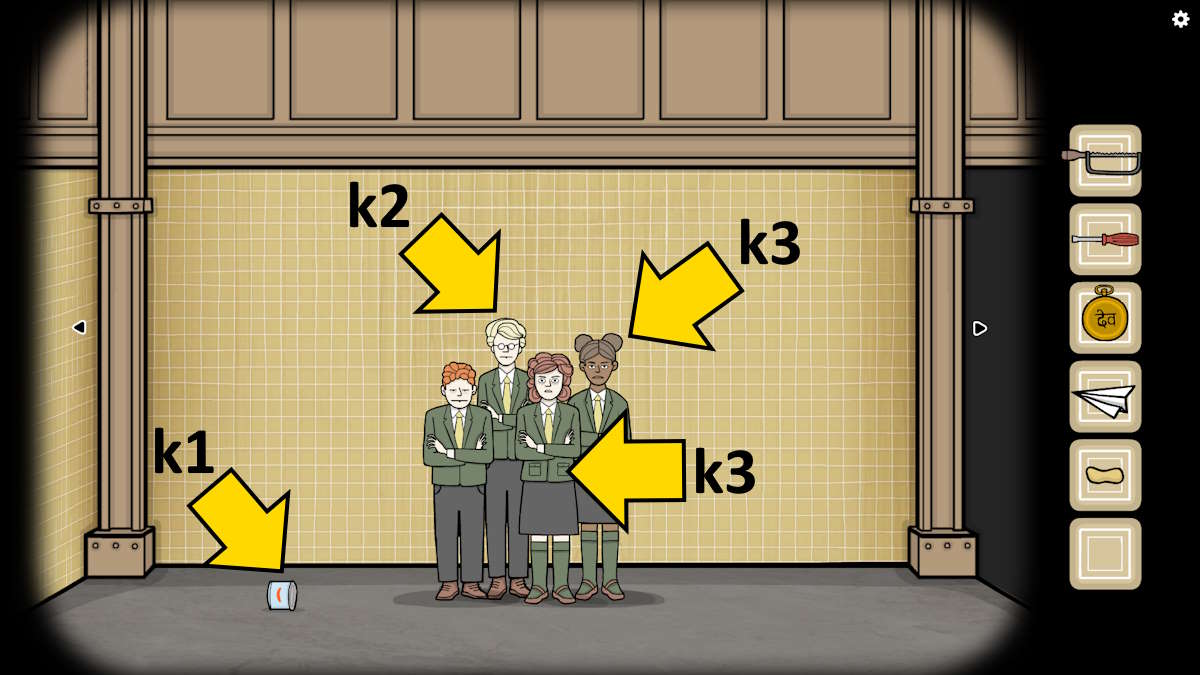
Move left or right twice to find another group of students. Use your nut driver on the can on the floor (k1) to open it and take a Sausage. Use the peanut on the tallest kid here (k2) to find he has a peanut allergy, so it must be Jimmy. Click the girl with visible pockets (k3) to find an earring, which matches the one another student was wearing, making the two of them out as Franky and Alex. Drop the paper plane on the girl on the right (k4) to discover she must be Bobby.
Go back to the other group and drop the sausage on the girl on the left (j3) to find she hates them, making her Tess. This gives you everything you need to rearrange the photos (j1), so do that and then speak to him once more. Give him the peanut, the paper plane, and the sausage and he’ll give you a Worm.
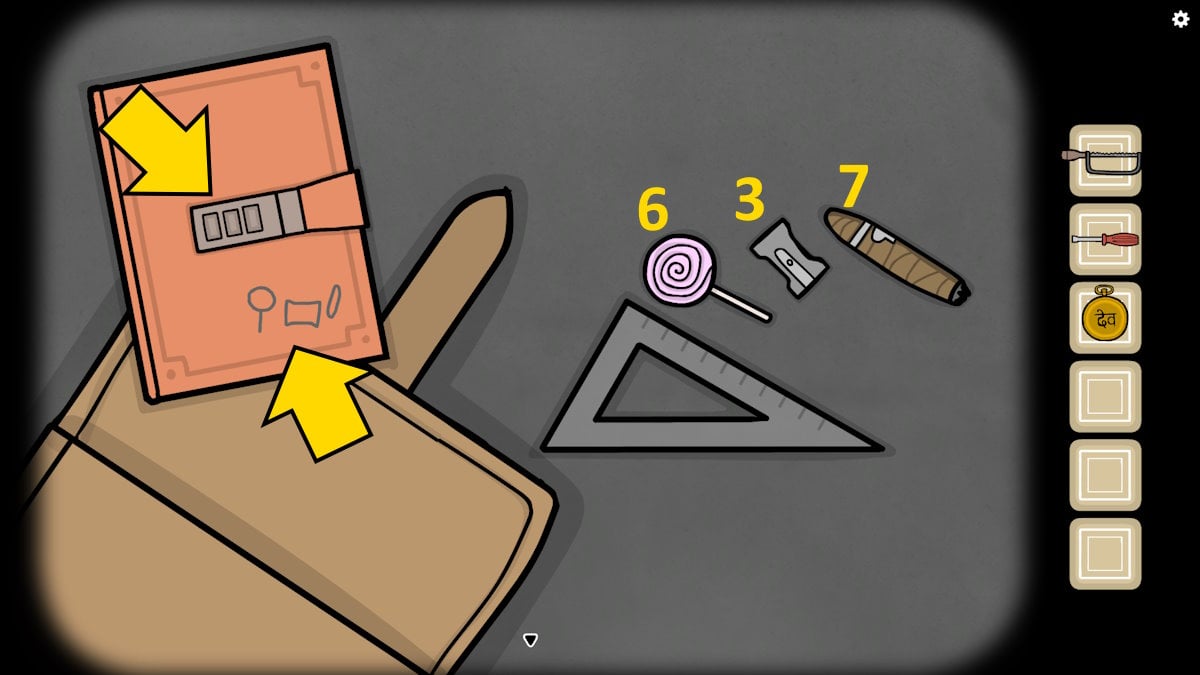
Give the worm to the bird (j4) and it will fly away, allowing you to knock an egg from its nest. The student below will drop their bag, which you can empty (see above). You can move each item, so use the ruler to measure each of the other three items. Note the shapes drawn on the diary, and measure the items in that order (lollipop 6, sharpener 3, cigar 7). Enter this code (637) into the diary to open it and take the Photos.
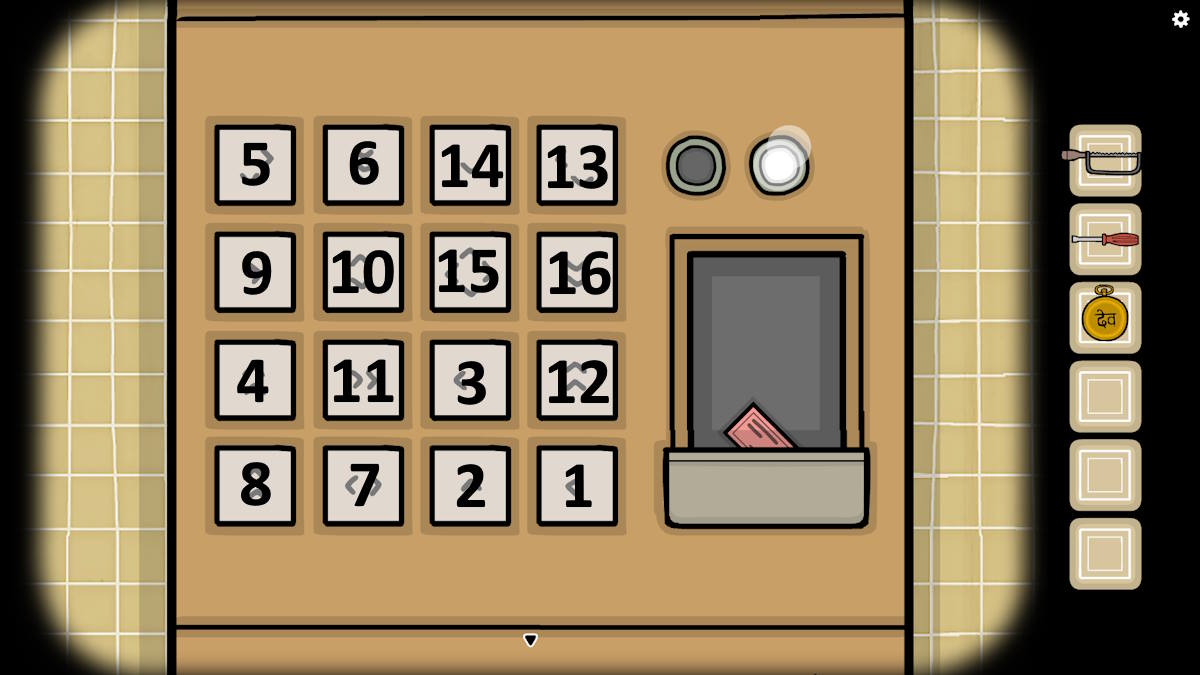
Give the photos to Laura (i1). Click her for a conversation, at the end of which she’ll tell you that your train leaves at 2:45. Now select the ticket machine (i4) and solve the puzzle to get your ticket. The order to press the buttons is in the image above. Now you just need to set the clock to 2:45 and the train will arrive as usual, allowing you to complete Chapter 3.
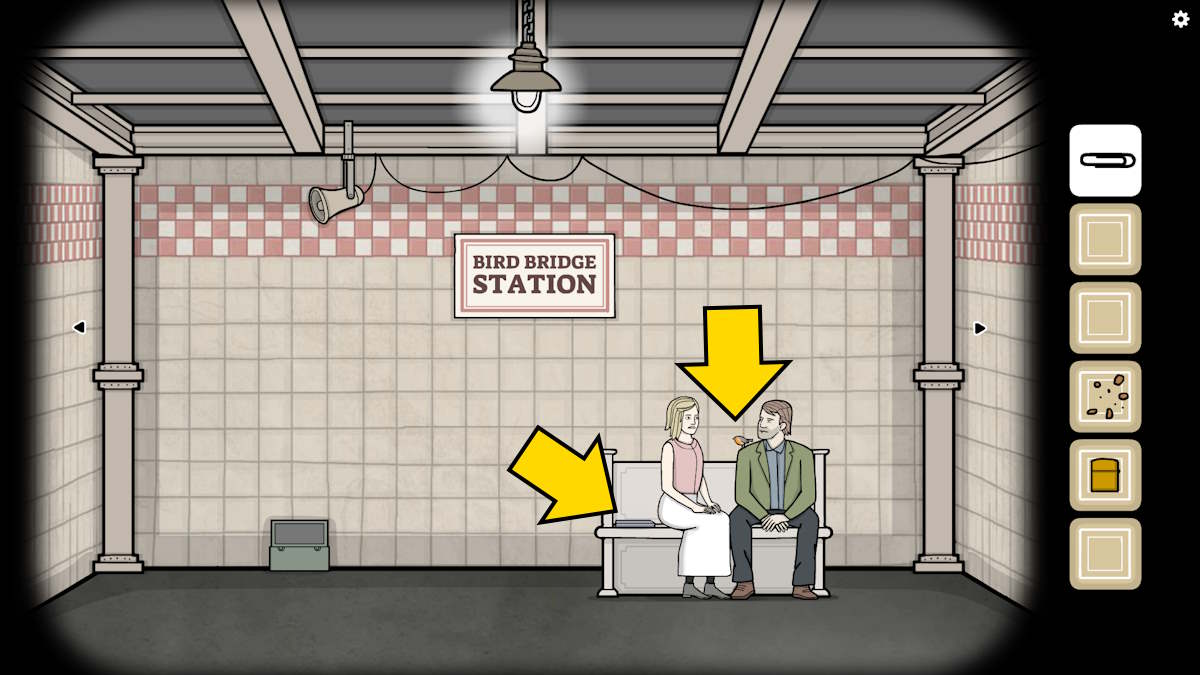
Chapter 4: Bird Bridge Station
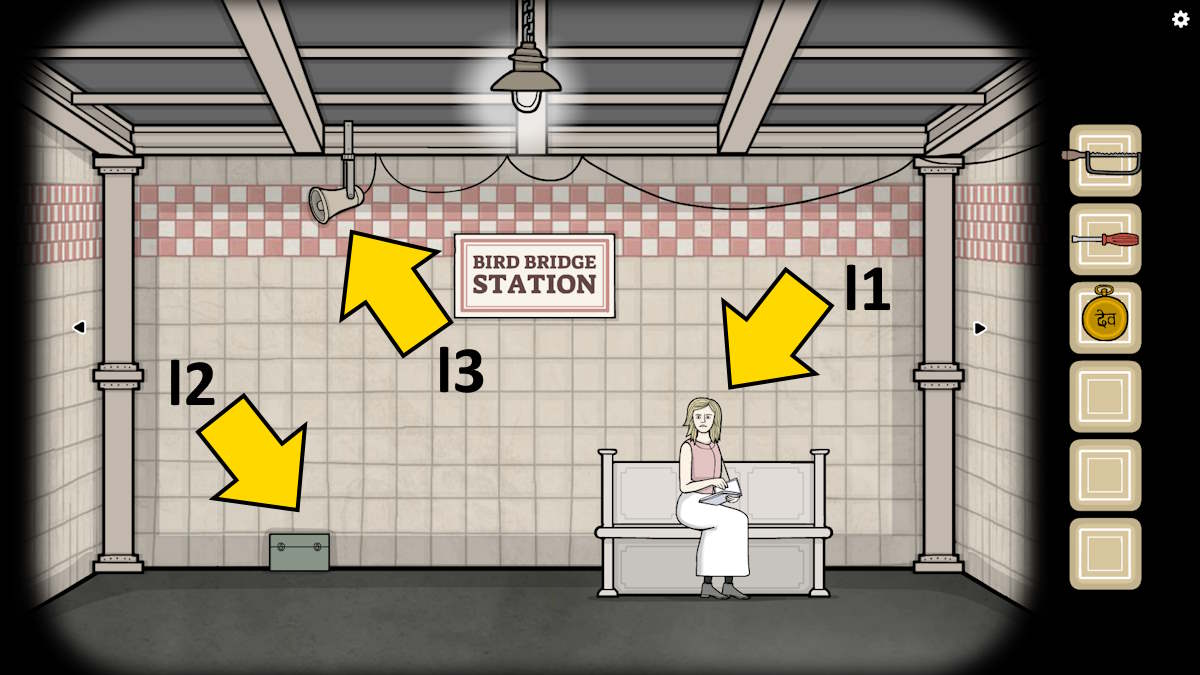
Speak to Laura (l1) to find that she needs to finish her sketch, and then click and open the box (l2) to find a Pencil and a Piece of Sausage. Click the sketchbook in Laura’s hands, put the pencil in her hand, use it to draw on the page, and click whatever you draw (it doesn’t matter) to get a Line.
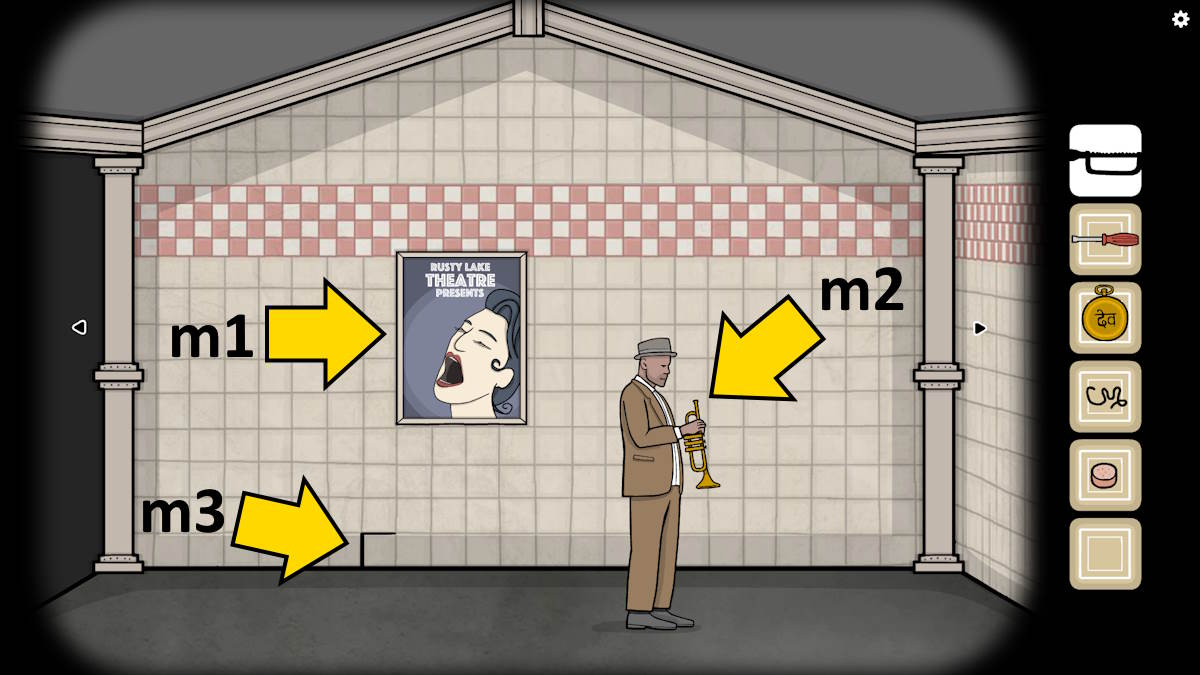
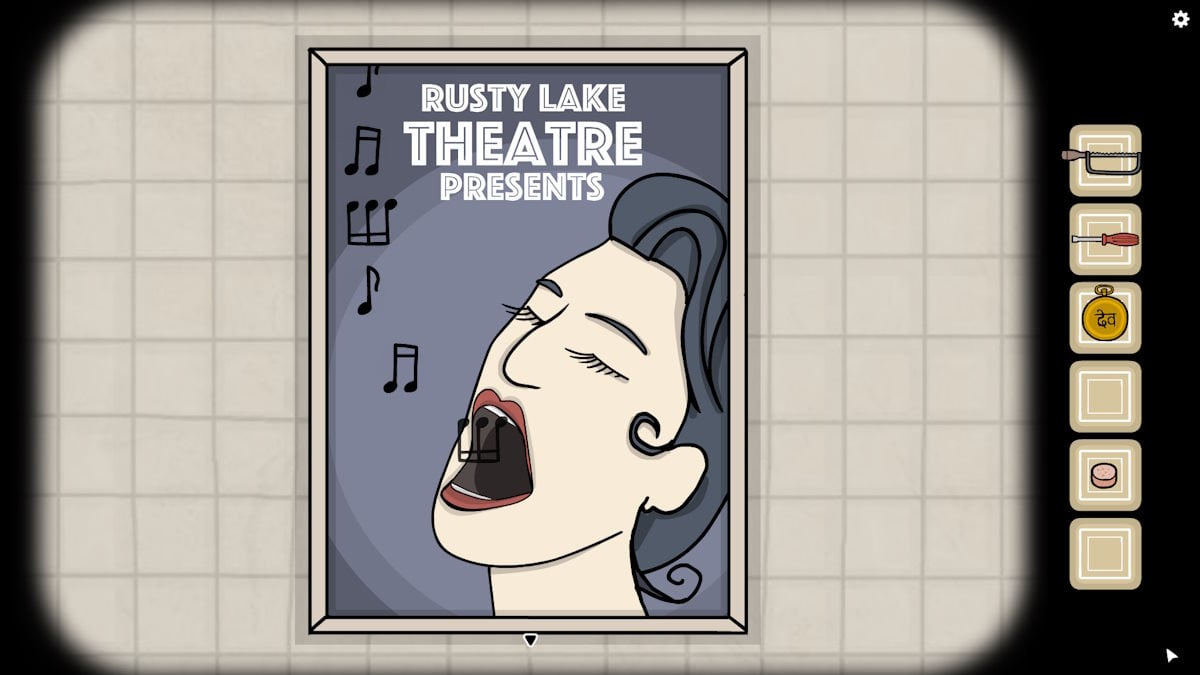
Move left and click the poster (m1). Hold the mouse button on the mouth and six notes will appear (see below), which amounts to 123123. Now click the trumpet player (m2) for a close-up, and click the buttons from left to right, twice, which will make the notes 1, 2, 3, 1, 2, and 3 appear, after which he’ll go into a solo. When it ends, click the end of the trumpet and a fish will drop out. Click the fish where it lands on the ground by his feet, and it will cough up a Hook you can pick up.
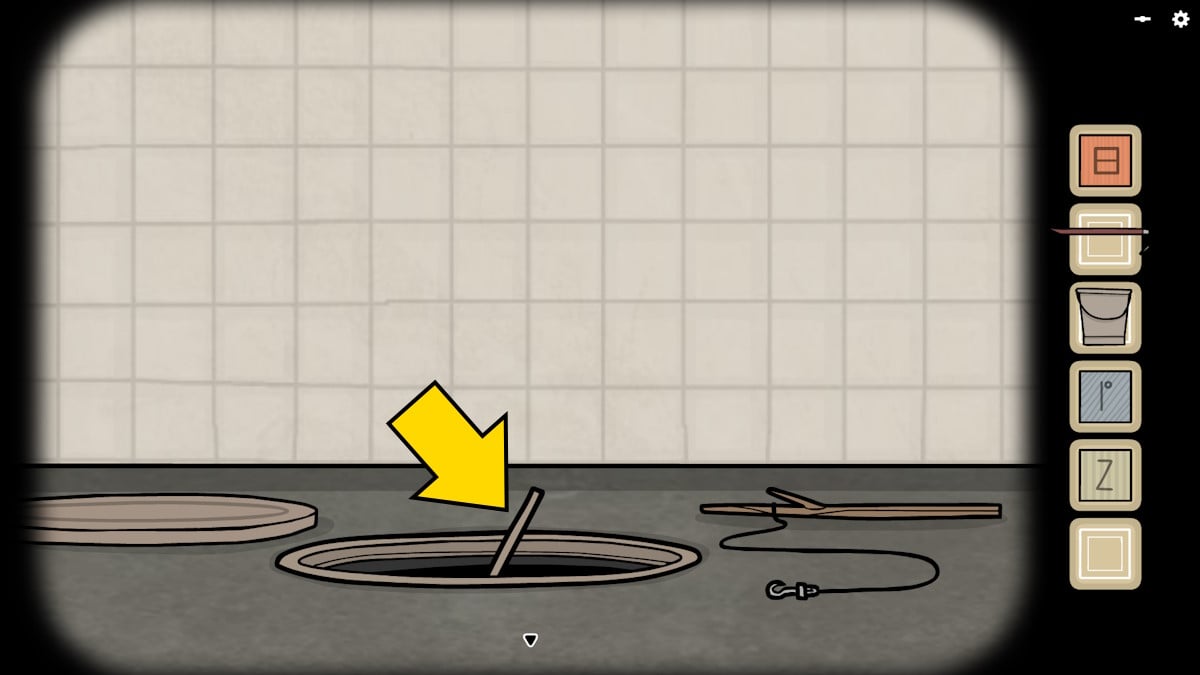
Go left or right twice and click the manhole cover (pictured below) for a close-up, open it, and click inside the hole to find a stick. Attach the line to it to make a fishing pole, add the hook and the piece of sausage, and then use the pole in the hole. You’ll fish up a rat, which will run off when you click it.
Head back to the trumpet player screen and you’ll see the rat against the back wall. Click it and it will run into the hole (m3). Click the hole next, and a piece of paper will appear. Open it to find out Johnsson Bird foor Factory is hiring, and that the daily drop off is at 5pm.
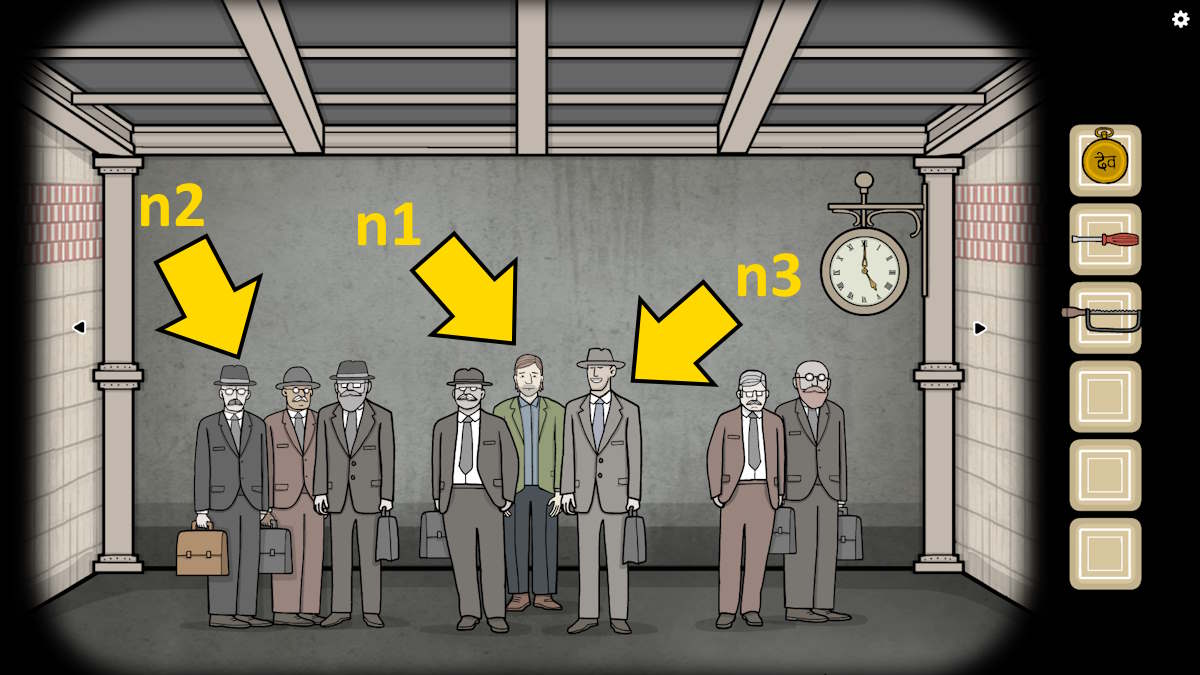
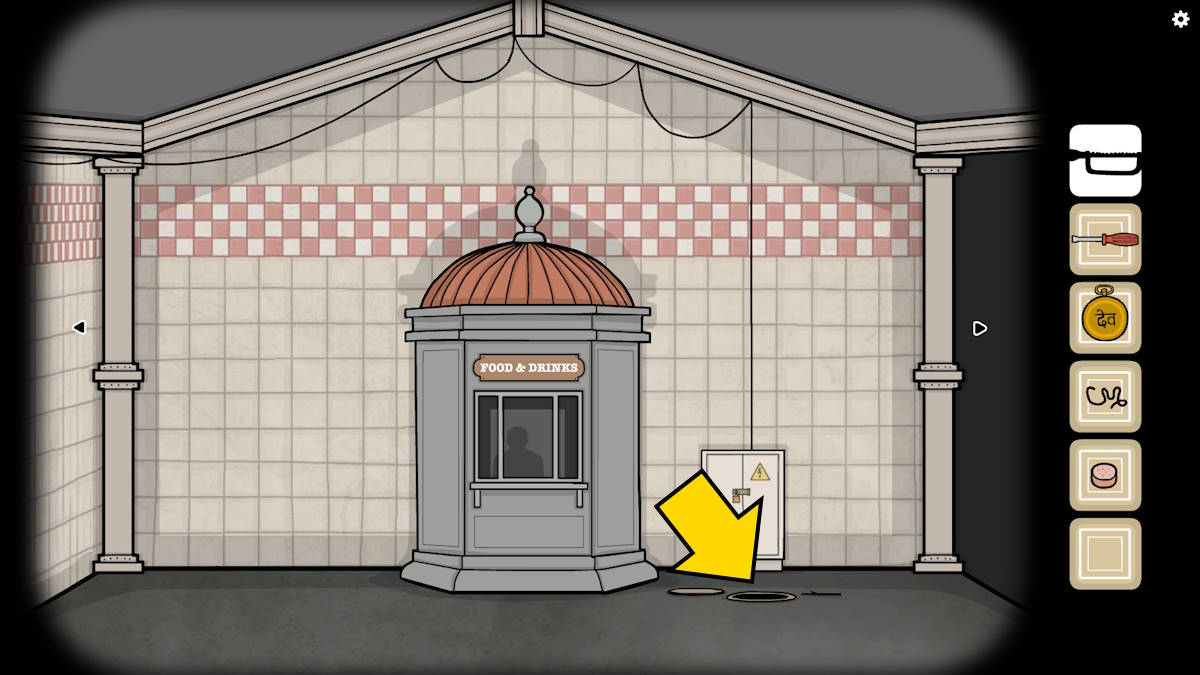
Move to the platform, set the clock to 5:00, and a packed train will arrive. Click the doors and eight men will appear on the platform. Talk to the guy in the green jacket (n1) and he’ll ask you to buy the girl a coffee, and a sandwich for him. He gives you 20 bucks. All the other men say that you are looking for a man in a red hat.
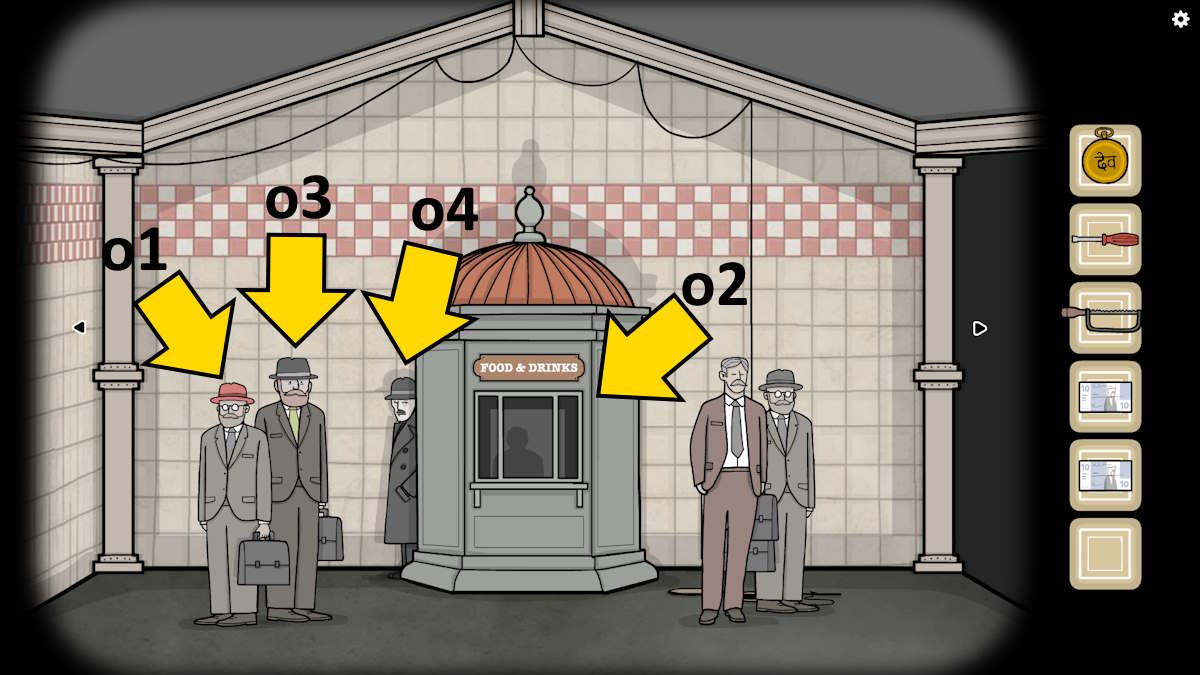
Go to the food and drinks kiosk, click the man in the red hat (o1), and he’ll tell you to talk to his colleague with the brown suitcase. Now buy the Coffee and the Sandwich. Click the item sign while in the kiosk (o2) close-up, then the man to give him the money, and finally the item once more. Make sure to buy one of each.
Return to the screen with the clock and give the sandwich to the guy with the green jacket (n1). Click him again and he’ll say he won’t eat it. Select the sandwich, remove the bread and tomato, and fish out all the worms. He’ll now eat the sandwich. Talk to him once more, and he’ll give you some Breadcrumbs.
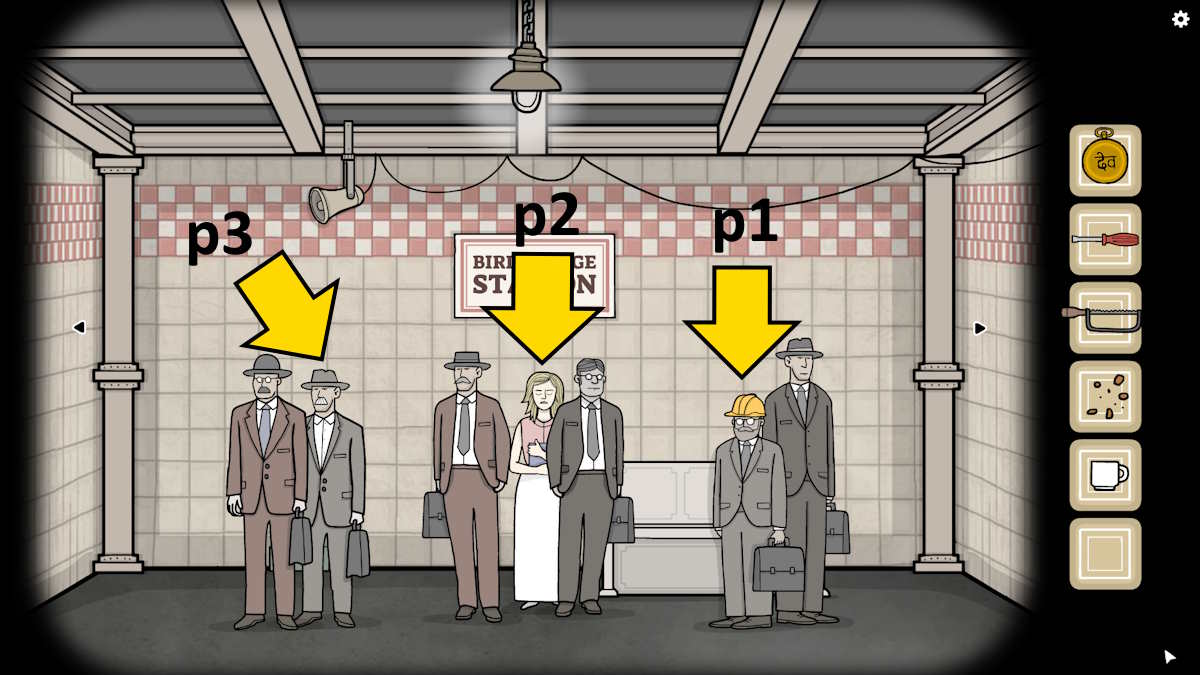
Now click the guy with the brown briefcase for a chat (n2). He’ll say check his pocket, so click his top pocket to get some Glasses. He tells you to give them to the guy with the hard hat. Move to Laura’s screen, give the hardhat guy (p1) the glasses, and then speak to him. He’ll tell you to speak to the smiling man. Give Laura (p2) the coffee, click it to get her to drink it, then click the cup again and take the Cigarette.
Head to the clock screen, select the smiling man (n3), and click his top pocket to get a Tie. Back on Laura’s screen, give the tie to the person who isn’t wearing one (p3) and he’ll tell you to talk to the guy wearing a green tie. You’ll find him by the food and drink stand (o3), but he claims you’re confusing him with his twin brother. You’ll find the brother by the theatre poster and when you check his pocket, you’ll get a Lighter.
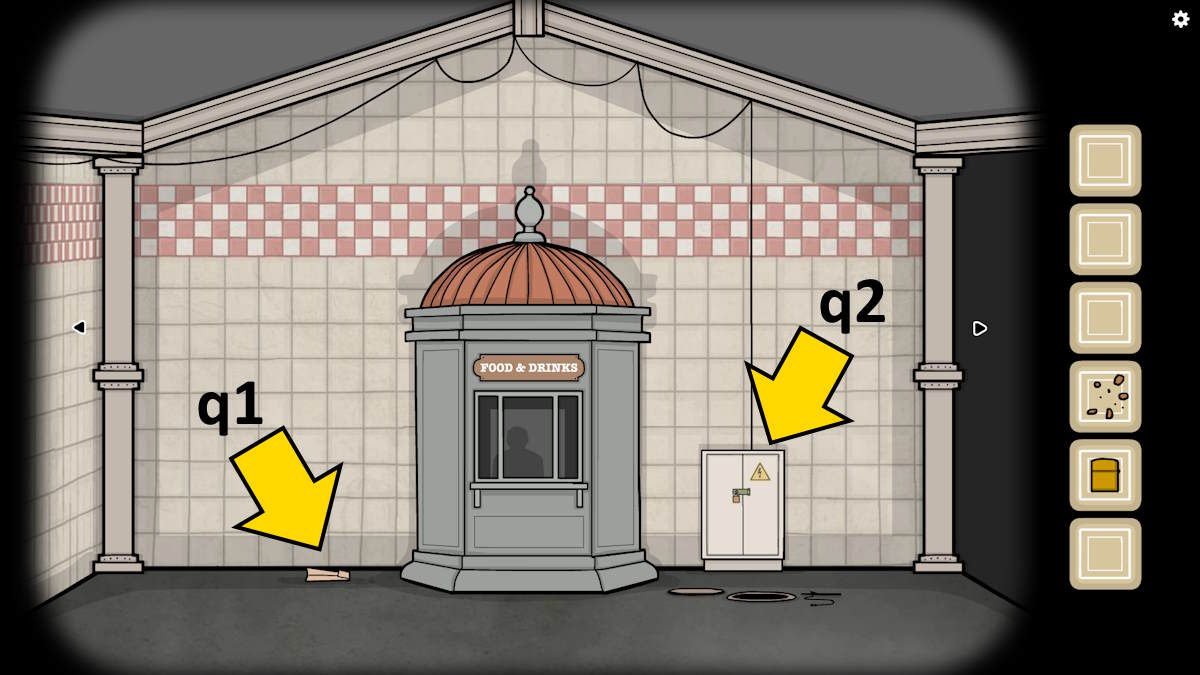
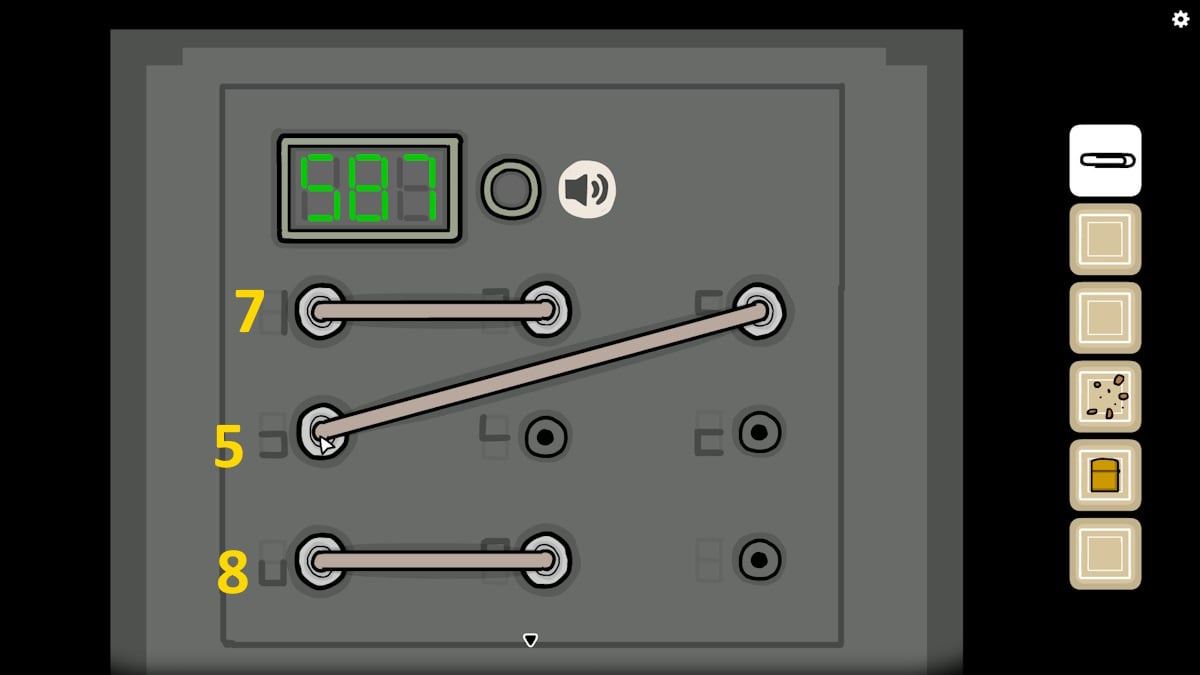
There will now be a solitary figure (o4) next to the food stand. Give him the cigarette and lighter, light the cigarette, and he’ll ask you the time. He’ll then disappear. Click the note on the floor (q1) and read it to find you’ve been robbed. Pick up the Paperclip in the same close-up and use it to pick the lock on the power cupboard (q2), revealing a puzzle. Connect the cables to make the digital numbers pictured, as each is either the top or the bottom of a number. In the example below, I’ve made the number 587. Do this three times and the green light will come on, which means the tannoy will now work.
Move to Laura’s screen, click the tannoy (l3), and note the six musical notes played by the jingle (112233). Move back to the trumpet player and play those notes on the trumpet to trigger him to play another solo. This time a bird will fly out of his trumpet. Move back to Laura's screen to find her talking to the man in the green jacket.
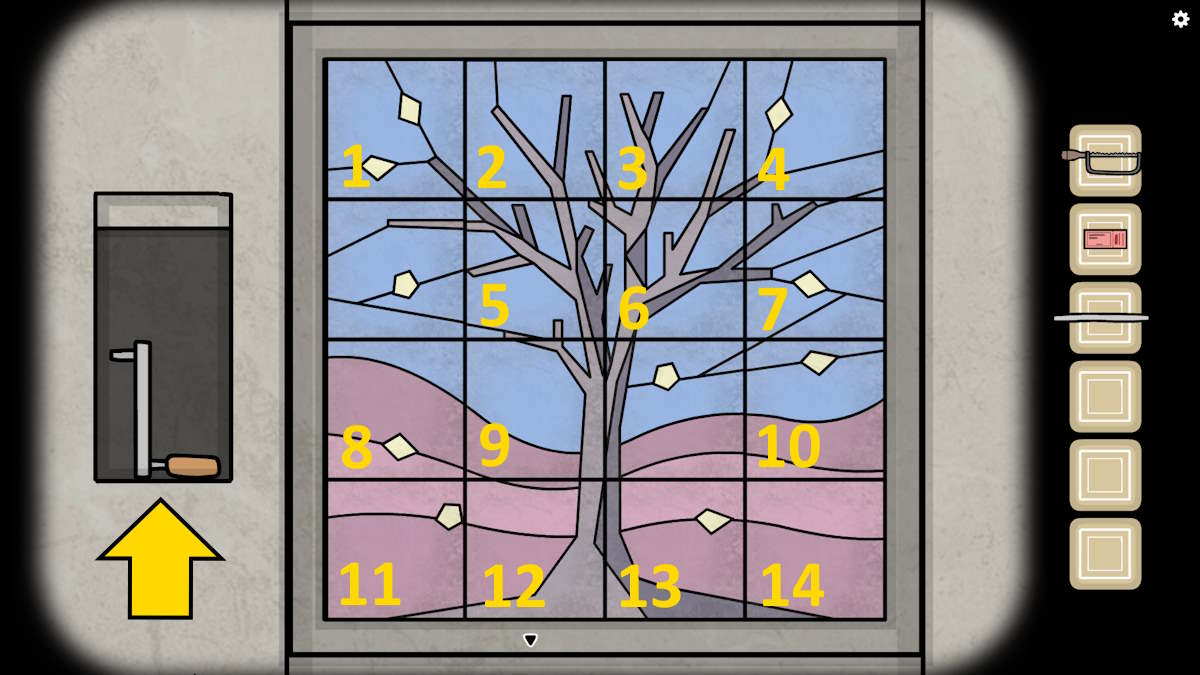
Click her book and flick through it to the note at the back. The long-hand line mentions a tree and the short-hand one is a dark soul. As the tree is on page 9 and the dark soul on page 4, you have the time 4:45. Click the Robin (above) and it will fly to her hand. Give the crumbs to the robin, then click it again to get the musical notes 331311.
Repeat the trumpet player trick once more, this time getting a Metro Ticket. Move to the clock on the platform, set it at 4:45, and you’ll have completed Chapter 4.
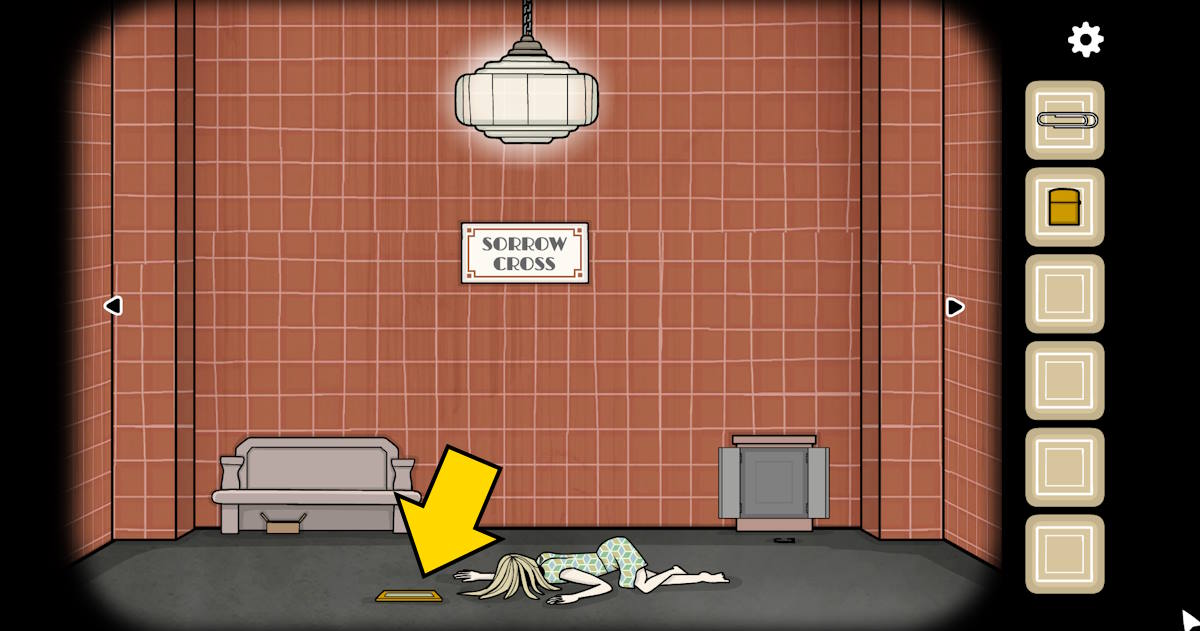
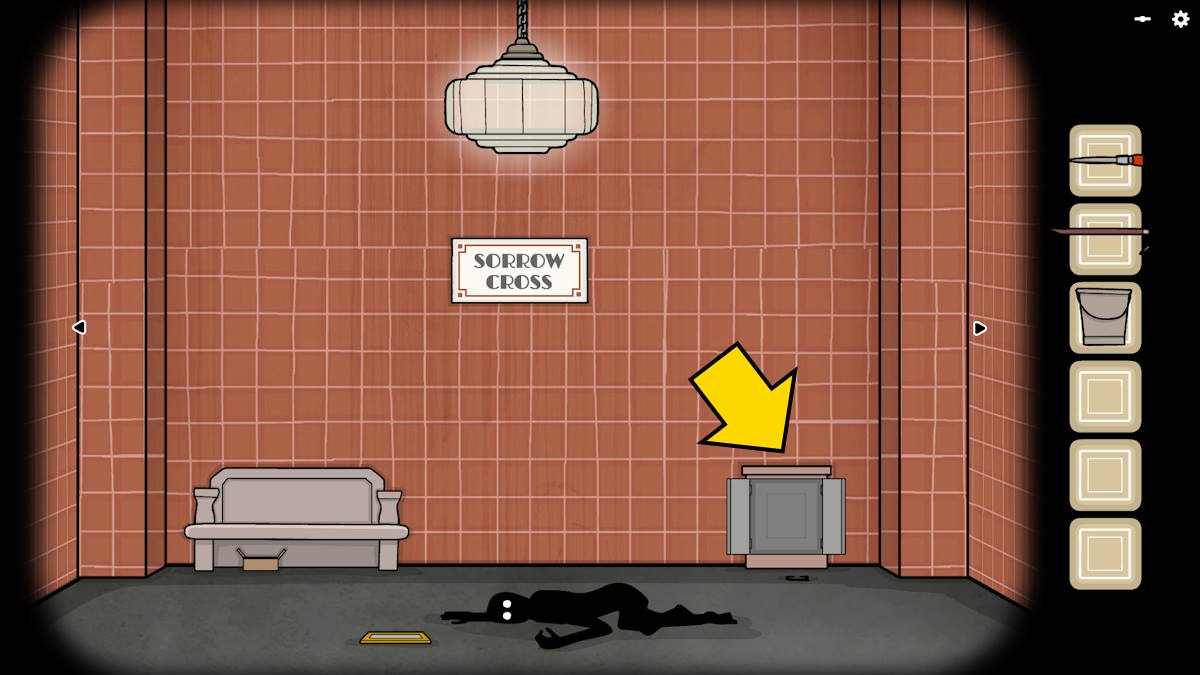
Chapter 5: Sorrow Cross
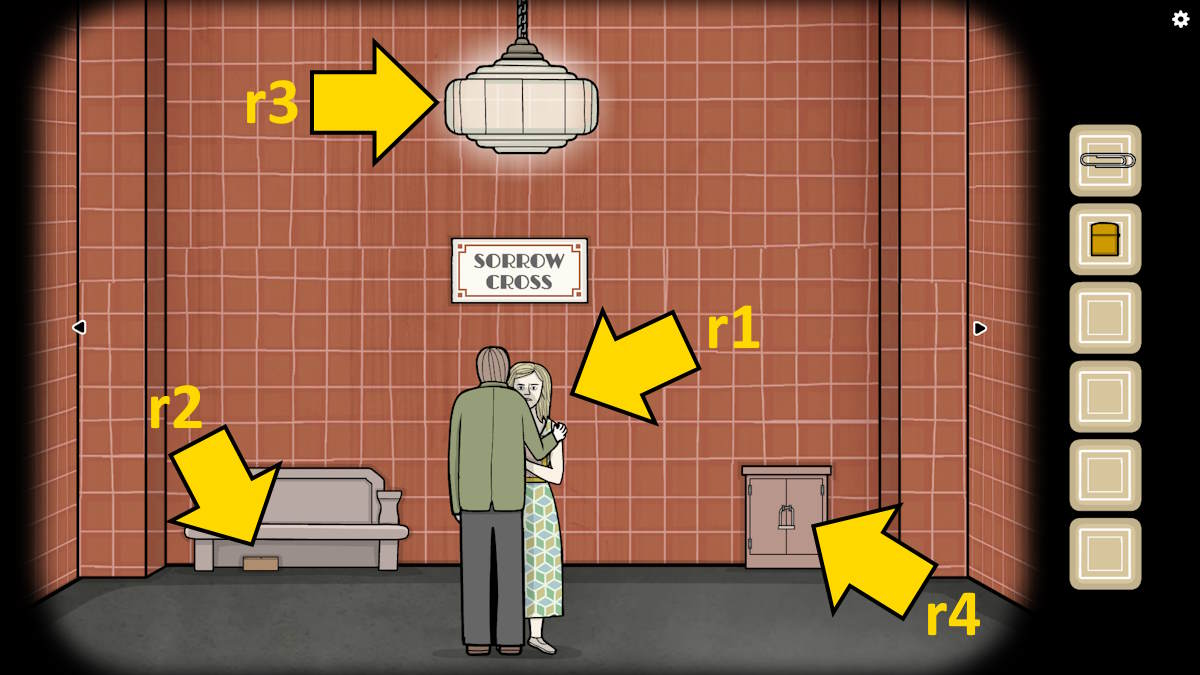
Speak to Laura (r1) to find out that Bob’s train leaves at 4pm. Open the box (r2) and take the Clock Hand. Move left or right twice, add the clock hand to the clock (s1), and set the clock to 4:00.

When the train arrives, click the doors to open them and then click Bob. He’ll ask you to take care of her as she is not well. Open the wallet he leaves behind (s2), take 10 Bucks, a Coin, and note the White Door Mental Health and Fishing card.
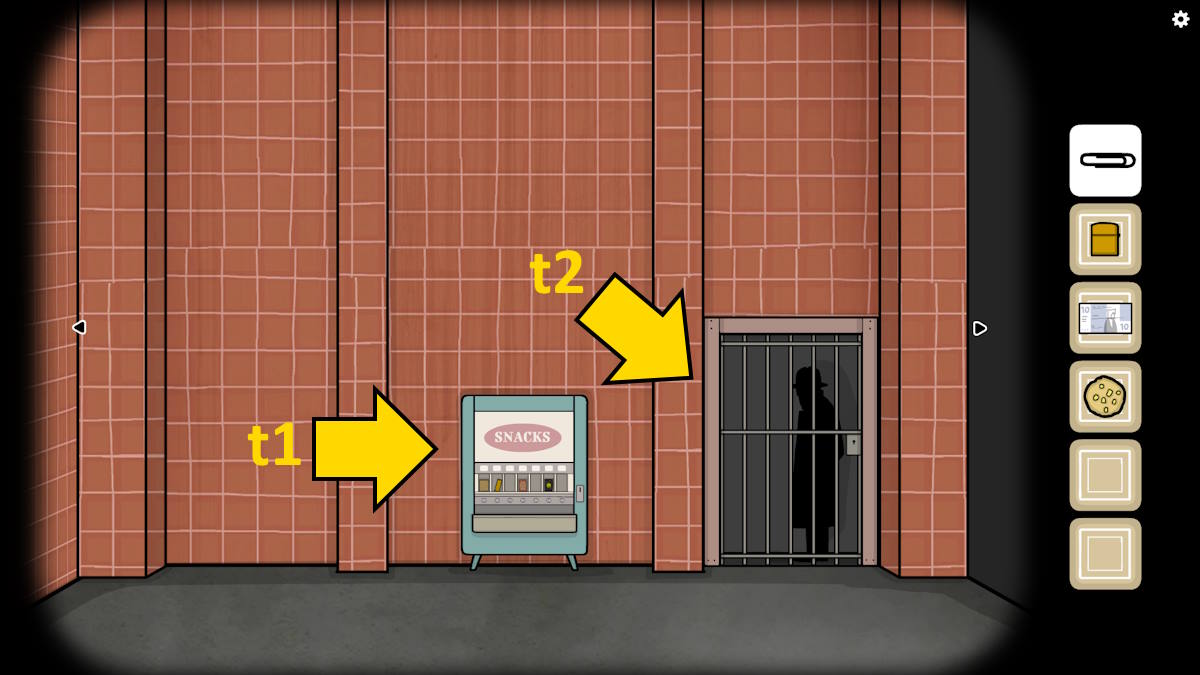
Return to Laura and she’ll ask you to leave her alone as she doesn’t feel well. Move right once and put your coin in the snack machine (t1), which gives you 100 to spend. Click the three buttons marked below, then lick the drawer below to get them.

You now need to move the loose items into the correct bags:
- Vehicles: the bicycle bag (1)
- Food: the food bag (2)
- Animals: The dog bag (3)
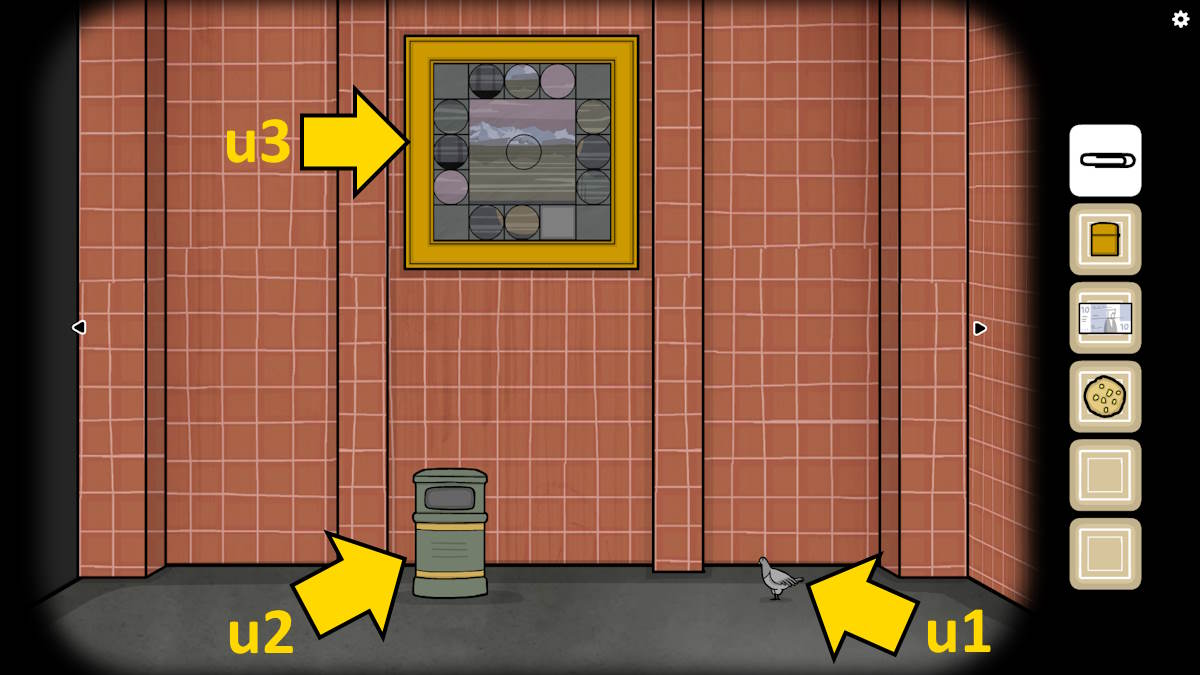
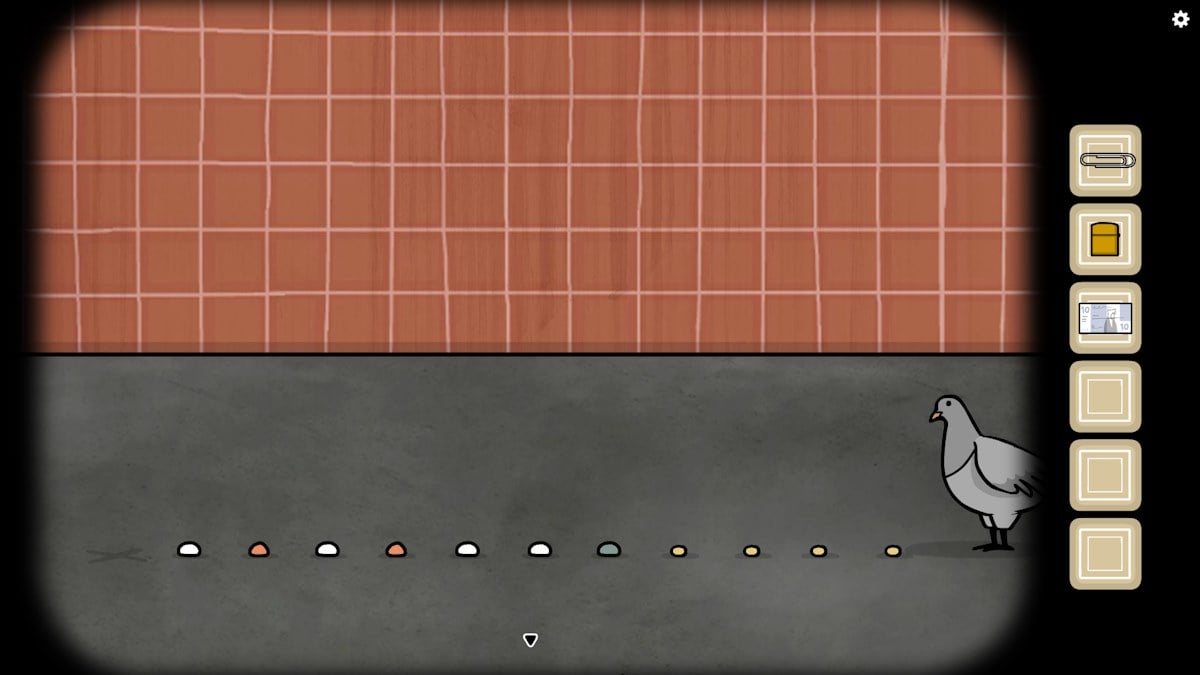
Keep doing this until you get the Corn Cookie. Move left or right twice and give the cookie to the pigeon (u1). Sort out the pellets in the order I’ve shown below. Once done, the pigeon will eat a bunch of the pellets and then fly off. It will now be sitting on the rubbish bin (u2). Click it and it will fly off the screen. You need to keep doing this, moving the pigeon on each time by clicking it. You’ll find it...
- On the light above Laura (r3)
- On the post by the clock (s3)
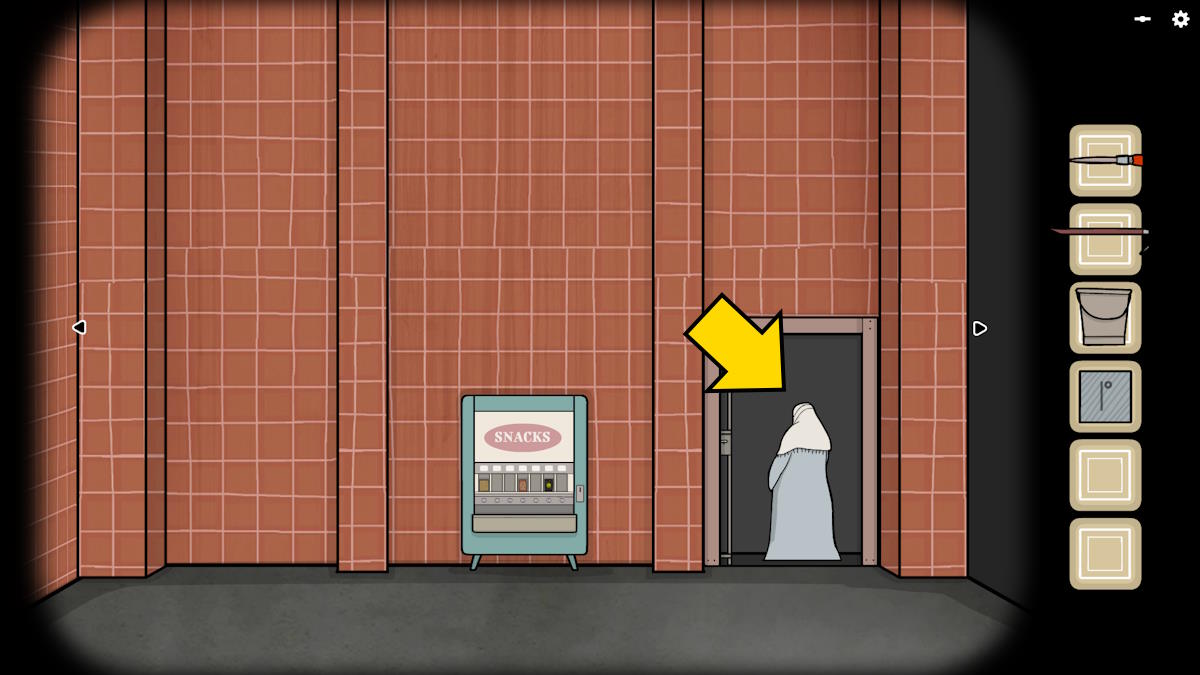
As it flies off this time, it meets an unfortunate end. Click the remains (s4) and take the Key. Use the key to open the gate by the snack machine (t2), then click the man standing there. It’s the man who robbed you! He’ll say you can have your stuff back if you leave some money under the bench and then return at 9.
Put your 10 bucks in the box near Laura (r2), set the clock (s1) to 9:00, and then go back and get the Iron Saw from the bag that’s now left in the box. There’s also a note, saying that he’s keeping the watch. Use the saw padlock on the cupboard near Laura (r4), open it, and take the Painting Panel.

Screenshot by Pro Game Guides 
Screenshot by Pro Game Guides 
Screenshot by Pro Game Guides 
Screenshot by Pro Game Guides 
Screenshot by Pro Game Guides 
Screenshot by Pro Game Guides 
Screenshot by Pro Game Guides 
Screenshot by Pro Game Guides 
Screenshot by Pro Game Guides 
Screenshot by Pro Game Guides 
Screenshot by Pro Game Guides 
Screenshot by Pro Game Guides
Move to the painting (u3) and add the panel to start a picture-matching puzzle. You need to find each of the images in the circles around the edge by moving the central circle around the main image. The order doesn’t matter (you don’t need to be that precise, and you can’t fail). If you’re stuck, all the locations are in the gallery above. Once you have an image in the central circle, click the one on the outside to reveal a hidden image.
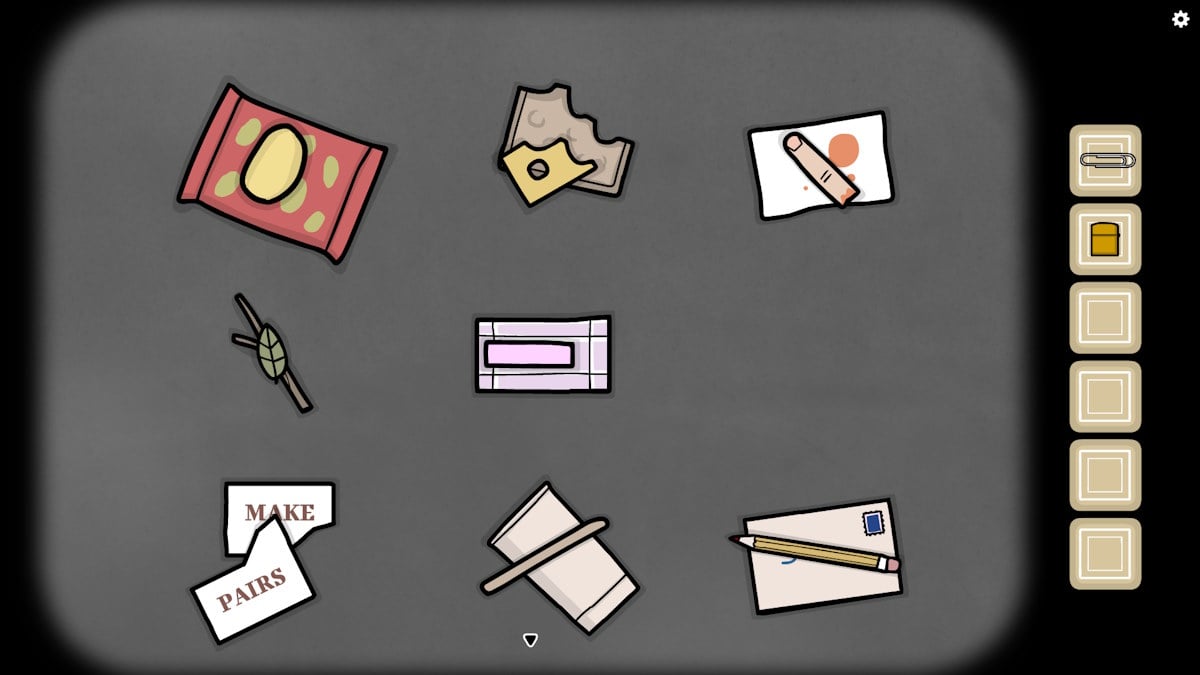
Once you’re done you’ll hear a crash, as the bin (u2) has fallen over. Click the spilled rubbish twice to start a matching puzzle. All the items need to be put into pairs, as pictured above. Once done, you’ll notice a blue line moving on the letter in the bottom-right corner. Click it to open and read the letter, and pick up the Pill. Return to Laura (r1) and put the pill in her mouth. Click her again to talk to her about her nightmares. Click out of the close-up once she closes her eyes to experience her dreams.
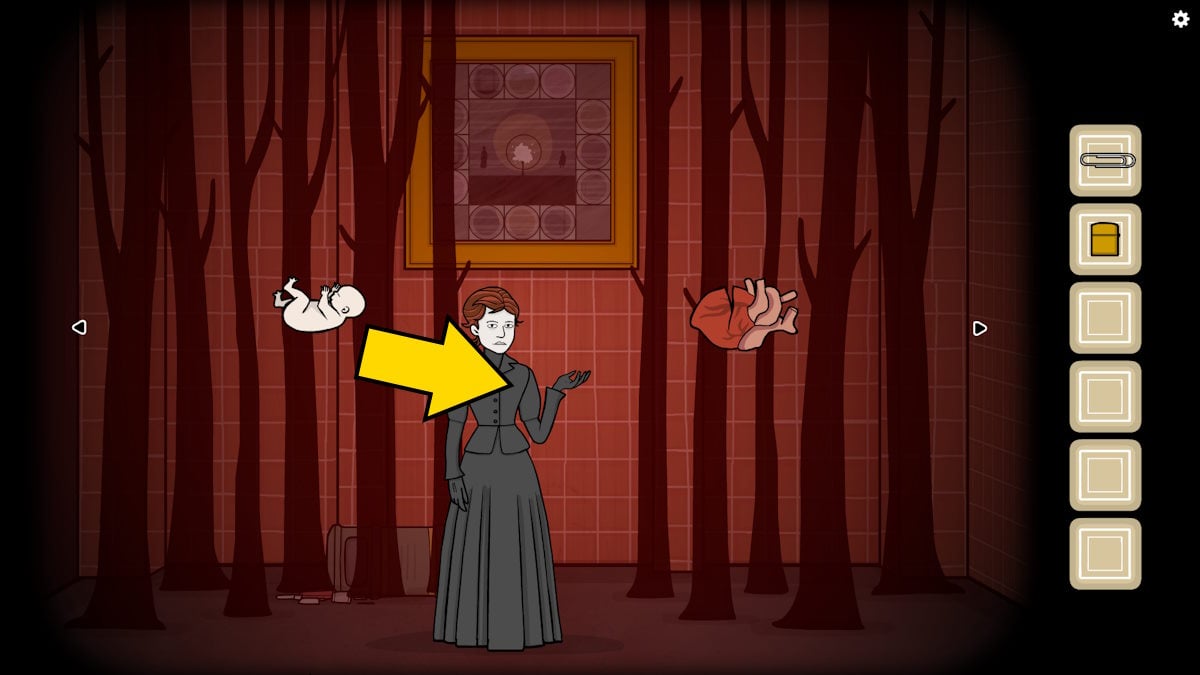
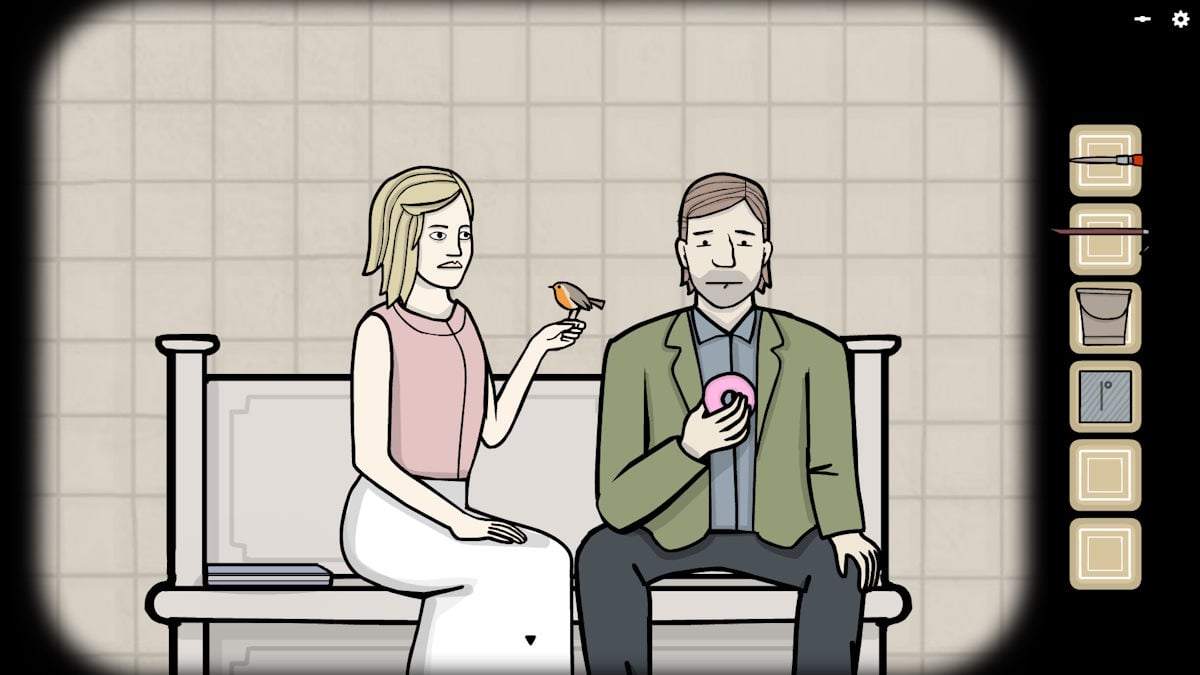
This section requires you to drag specific items onto individual characters. In the example above, you must drop the baby onto the woman in black’s hand. Note that floating images can be dragged to the side of the screen to move them onto adjacent screens. Talking to Laura will give you all the clues you need, but I’ve listed the matches below:
- The baby: The woman in black
- The heart: Bob (in the green jacket)
- The head: On the woman in black’s hand
- The hand: On the woman in black’s hand
- The fish: The detective (under the painting)
- The rat: To Bob (who now has a robin’s head), replacing the heart
- The head: On the corrupted soul (beneath the clock)
- The branch: to the feathered friend (beneath the painting)
- The black cube: To Laura’s mother (in front of the vending machine)
Afterward, Laura will be on the floor. Click her to get a Metro Ticket from her hand, then click the frame on the floor and take the Brush (see above). Return to the dead pigeon (s4) and use the brush on the remains to get a Brush with Paint.
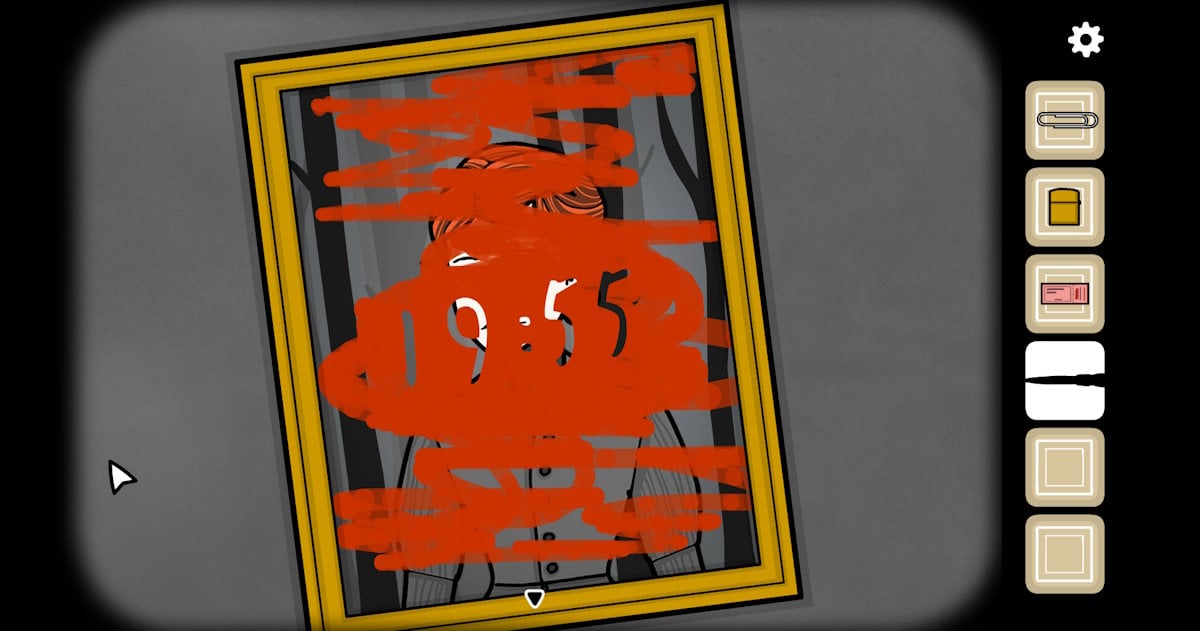
Use the paint in the middle of the painting to reveal a time, 19:55. Go to the clock (s1), change it to 7:55, and get on the train to complete Chapter 5.
Chapter 6: Soul Street
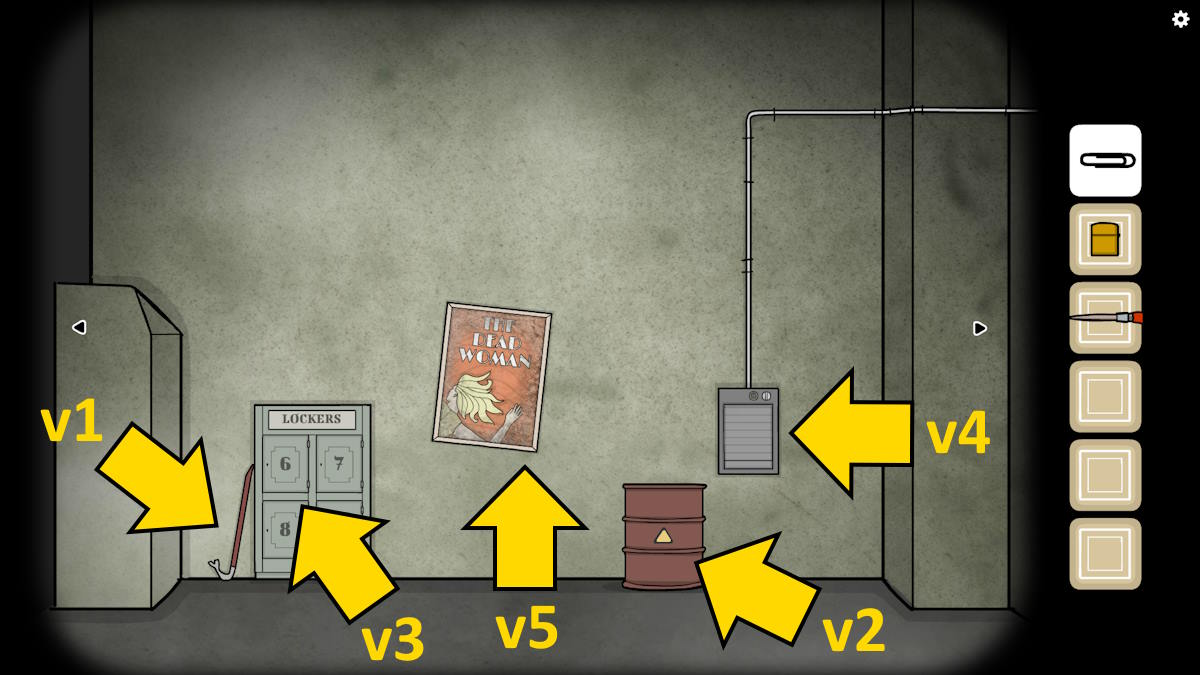
Move left immediately, pick up the Crowbar (v1), use it on the barrel here (v2) to spill something onto the platform, and then use the lighter to set it on fire.
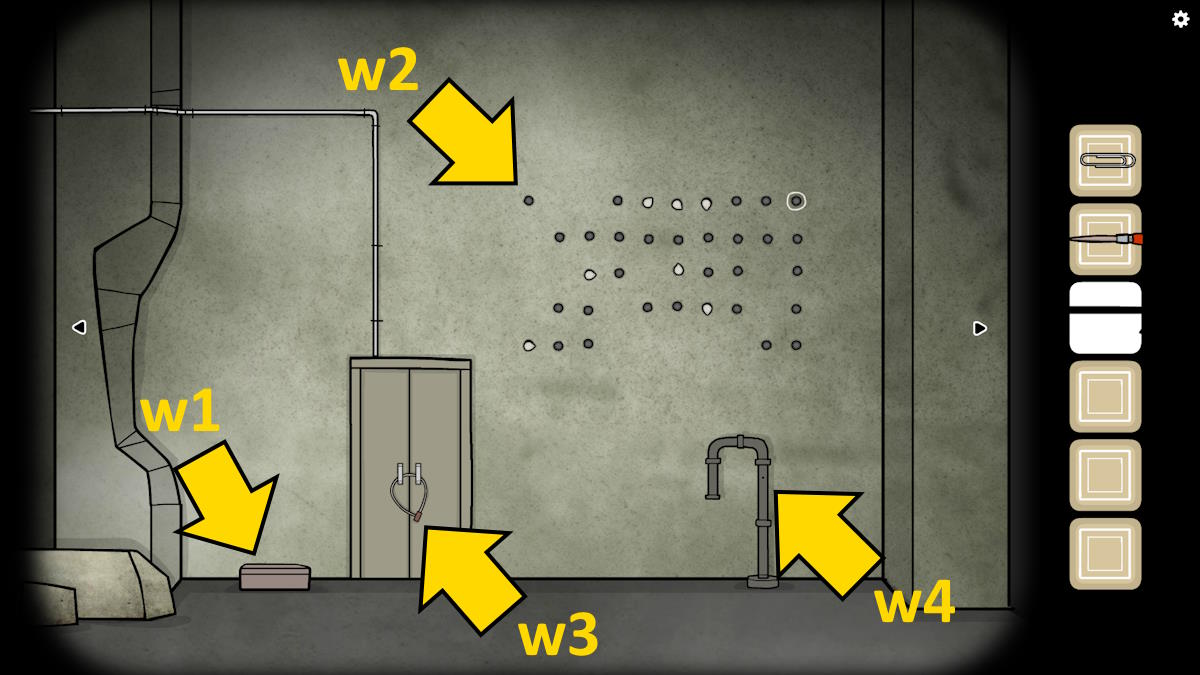
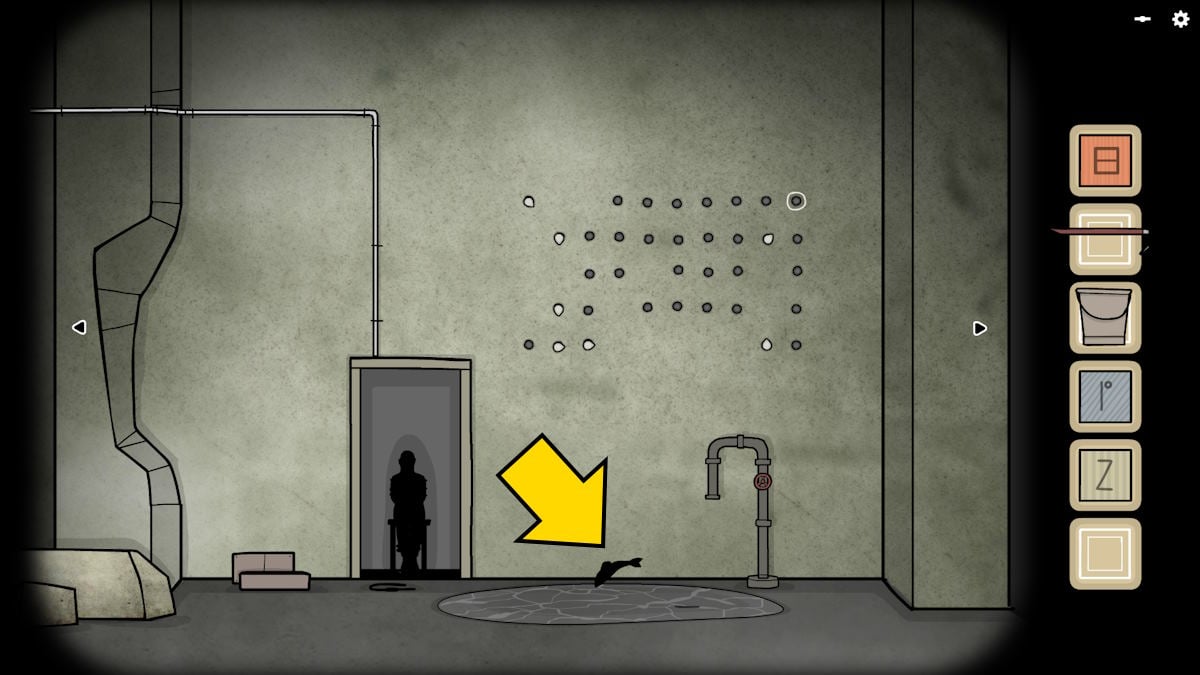
Now go left or right twice and open the box (w1) to find and take a Locker Key. Select the pattern of holes in the wall (w2).
A butterfly is in the hole at the top left (marked above). You need to move the white dots (noting the direction they’re pointing) to move the butterfly across to the top-right hole. I’ve marked the order above. Once done, the butterfly will fly away.

You’ll find the butterfly hovering above the black mass on the screen you arrived at (x1). Click the butterfly and a hand will reach up and pull it into the black slime. Click the slime again and it will form into a human shape. Click the creature and it will open its hand, ask you to help it, and will then allow you to take a second Locker Key. Click its head once more and the butterfly will be released.
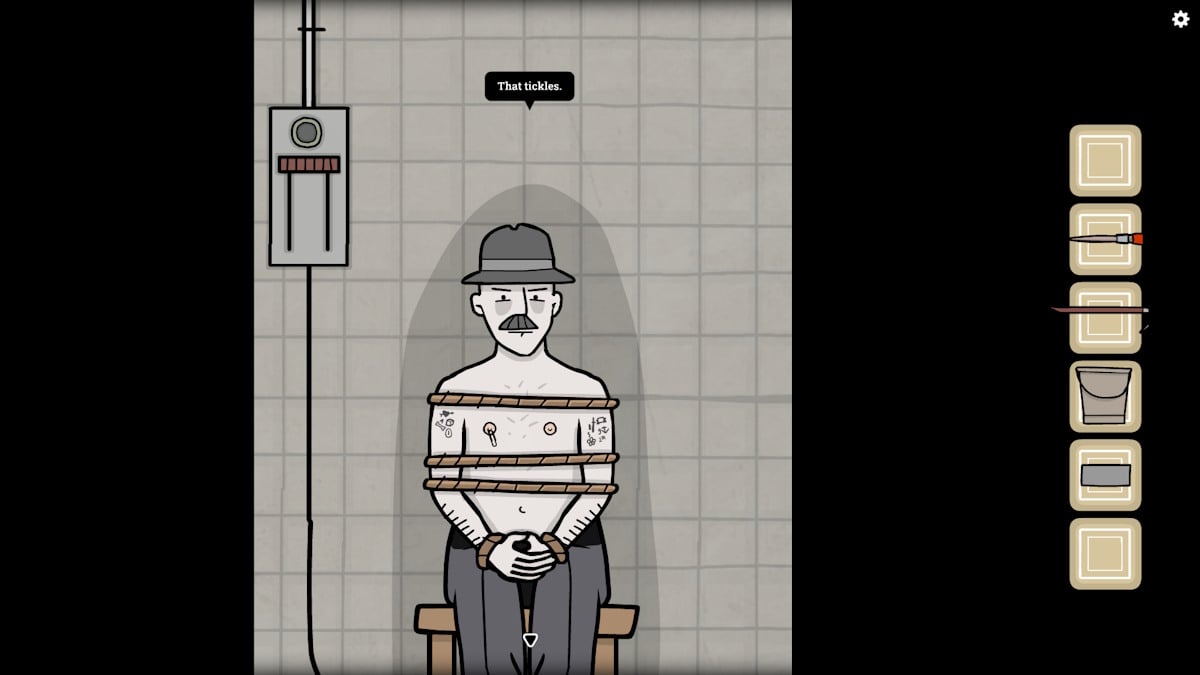
You can now open both locker 6 (v3), taking the Bucket, and locker 7, taking the Pincers. Return to where you found the butterfly and use the pinchers to break the lock on the door (w3). Open the door to find your old nemesis, the thief, tied up in a chair (shame). Remove the tape from his mouth to get a Piece of Tape. You can also put the paper clip on his nipple and pull it, but he’ll just say it tickles!
Go back to the screen with the creature and click the power box (x2) to remove the cover and reveal five knobs. Turn the one on the left to the ‘up’ position and the broken power line directly above the box (x3) will begin to spark. Use the piece of tape to fix it, and also turn the second knob on the control panel to the ‘up’ position.
Go left to the locker screen to see that you've fixed the power to the shutter (v4). Click it for a close-up, and hold the mouse down on the top-right button on the shutter to open it and take a Valve. Place the valve on the pipe below the butterfly wall (w4), and then turn it to pour the water. Use the bucket on the spill to get a Bucket with Water. You can pour some water on the thief (w3), who’ll admit it's starting to hurt a little; just make sure to refill the bucket afterward.

Move right, use the crowbar to open the grate (above), pour the water in, and take the Clothespin. You can put this on the thief’s other nipple, but he’ll only ask you to stop doing that for now. Make sure to get another refill to regain the Bucket with Water while you’re here.
Return to the burnt barrel (v2) and use the water to put it out, allowing you to take an Iron Wire once it starts to cool. Use this wire to fix the next section of the wiring (x4), and then set the first four control knobs below as follows:
- Up, right, up, left
This will get power running to the thief’s cell (w3). Go back to him, pull the lever for some electrocution japes, and then talk to him. He’s had enough and tells you the key is behind the dead woman. Return to the locker room now and get a close-up of the poster (v5). Click Laura’s hand on the poster twice to rip it and find a third Locker Key and another Piece of Tape. Use the key to open locker 8 (v3) and find a suitcase, but it needs a combination.
Head back to the fault wiring and use the piece of tape to fix the next section (x5). Now readjust the knobs once more:
- Up, right, up, up, right
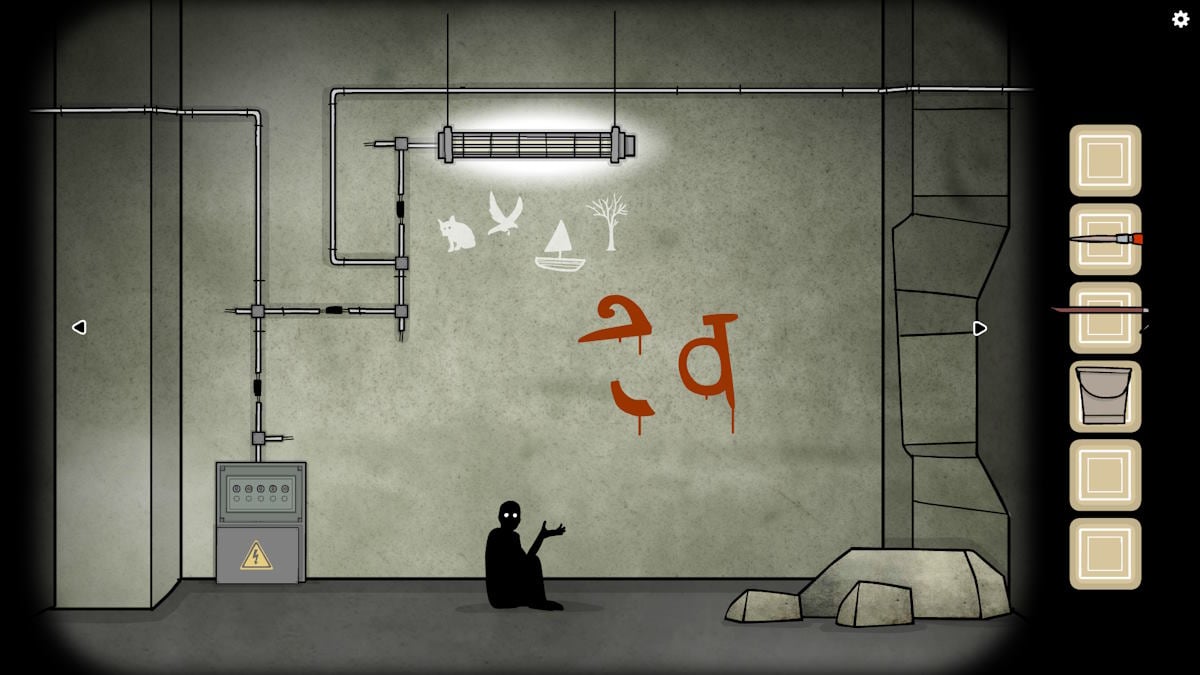
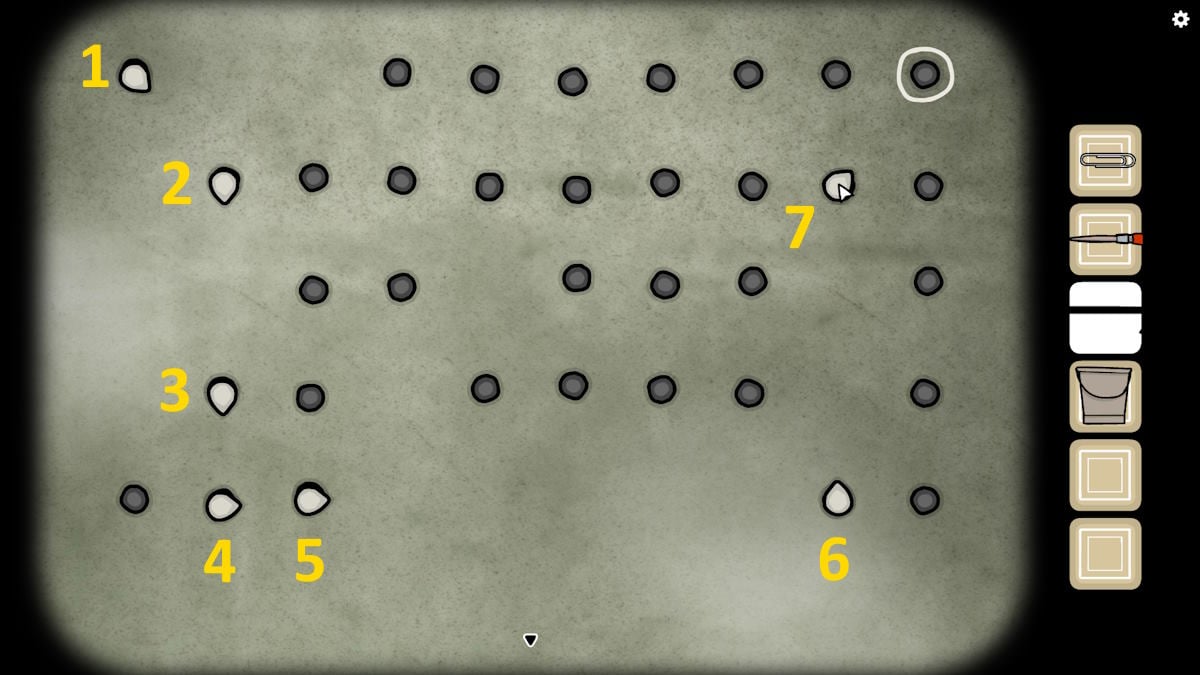
This powers up the light, showing you the image above. Move back to the thief (w3) and check his tattoos to find numbers that correspond to the animals in the image. The code is 4195 (dog bone for the 4, bird egg for the 1, boat anchor for the 9, and plant flower for the 5). Use this code to open the case from the lockers (v3) and finally retrieve the Golden Timepiece.
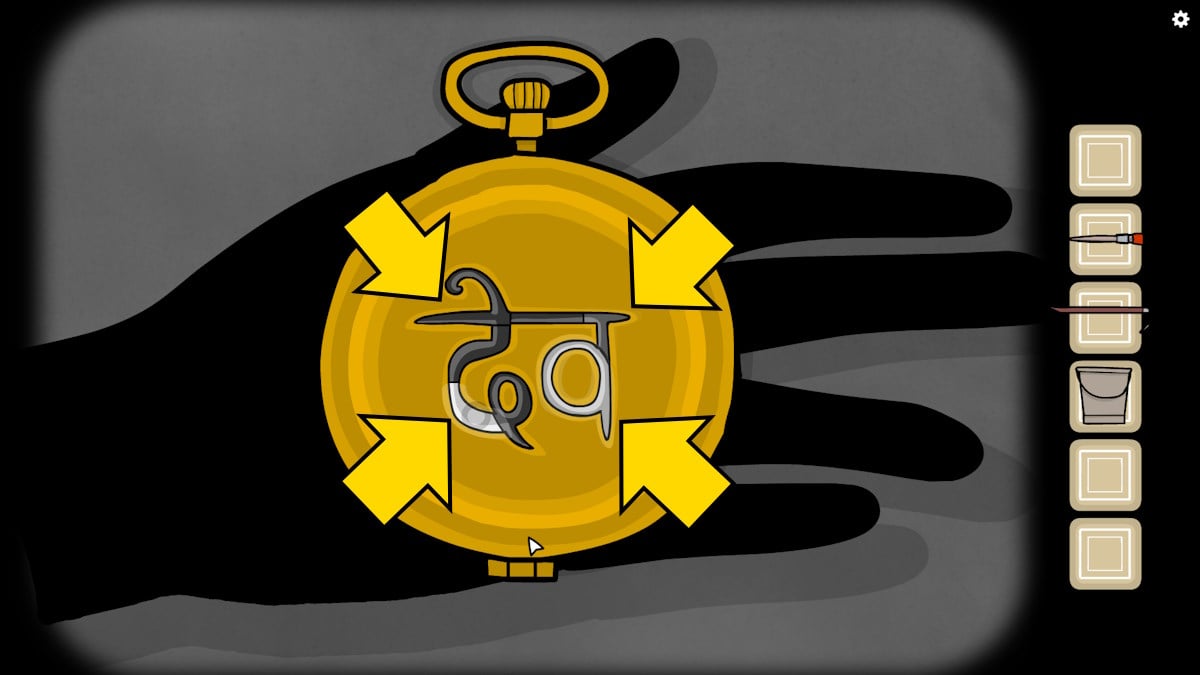
Give the golden timepiece to the creature (x1), click it in her hand, and click the sections highlighted on the wall behind her (as you did back in Chapter 1). The watch will crack at 4:15. The creature will move to the train platform. Click her and she’ll say it's time to leave, and then get on the train. Join the creature on the train to complete Chapter 6.
Chapter 7: The Lake
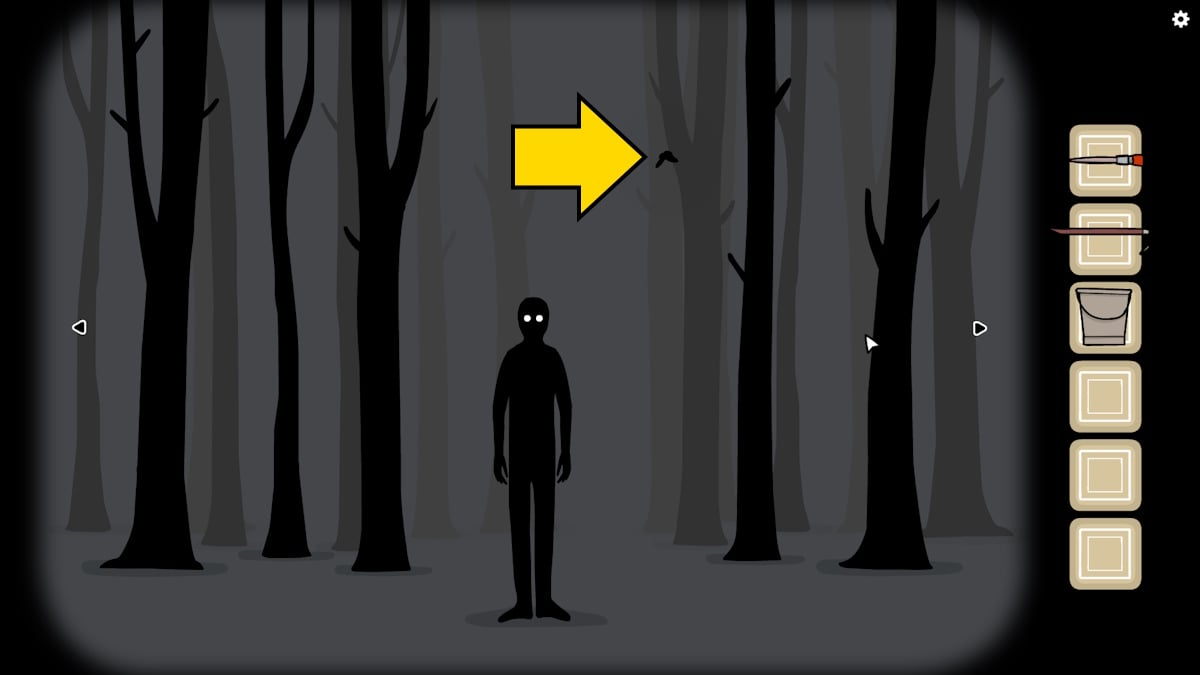
When you get off the train by the bench, move left and speak to the creature, which will tell you this is where it belongs. It says to look behind you. Note you will see butterflies on each screen at random points in Chapter 7 (I've marked one above). Always click them, as you’ll get the ‘The Future in the Past, The Past in the Future’ achievement if you click three.
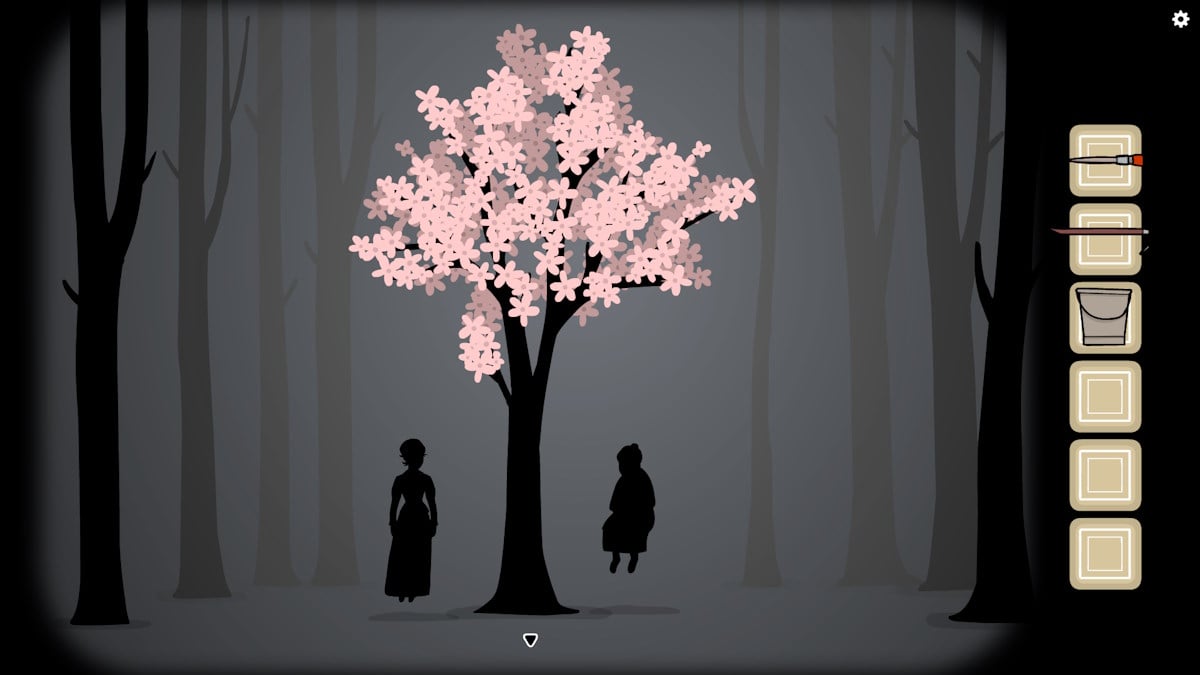
Move left or right twice to turn around to see the tree. Keep clicking it to move closer and eventually, two shadows will appear next to it. Click the lady in black (on the left) and speak to her, and then do the same with the old woman (on the right). They both say they belong to the lake now. Afterward, they will both disappear and the blossom will all go from the tree.
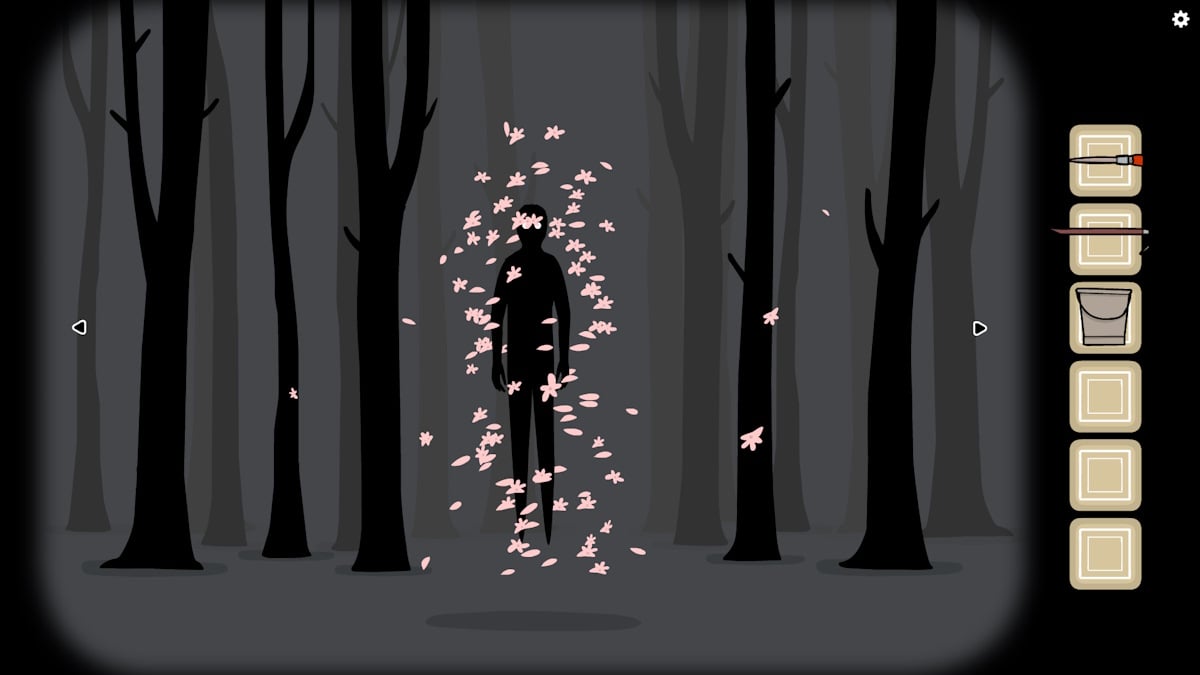
Move back to the creature to find it surrounded by blossom. Click it and it will become adult Laura. Speak to her and she says, ‘My dear Harvey, take the train and find your own future’. She will then disappear; move left once, reboard the train, and the game concludes. However, there is more to be done.
Afterward: Collect the 7 Cubes
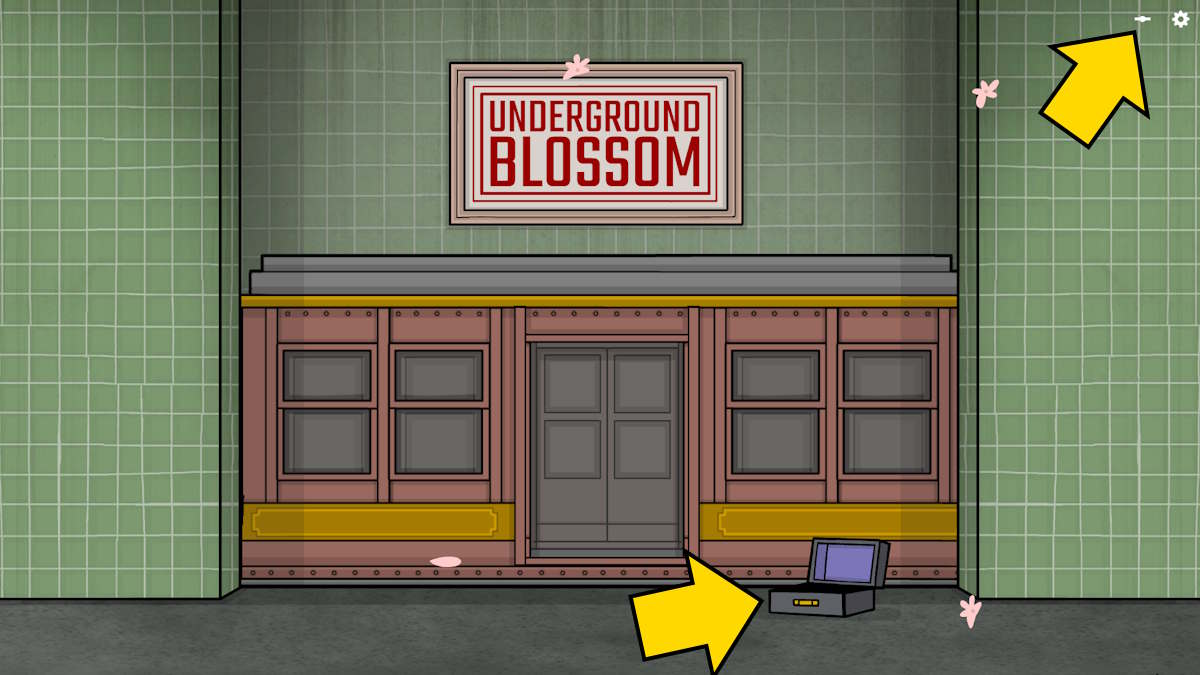
After the credits, click continue to begin again on the opening screen. Click your suitcase (above), read the note about the map, and then open the letter. It is from Mr. Owl, who will ask you to meet him by the lake. You can now freely move between the chapters by clicking on the new icon at the top-right of the screen (marked above).
You can do these in any order. Also, note that you can mix and match them as you go, doing multiple things at each station to hunt for all the cubes at once. However, for ease of reference, I’ve separated each cube as an individual entry below.
The Stone Cube
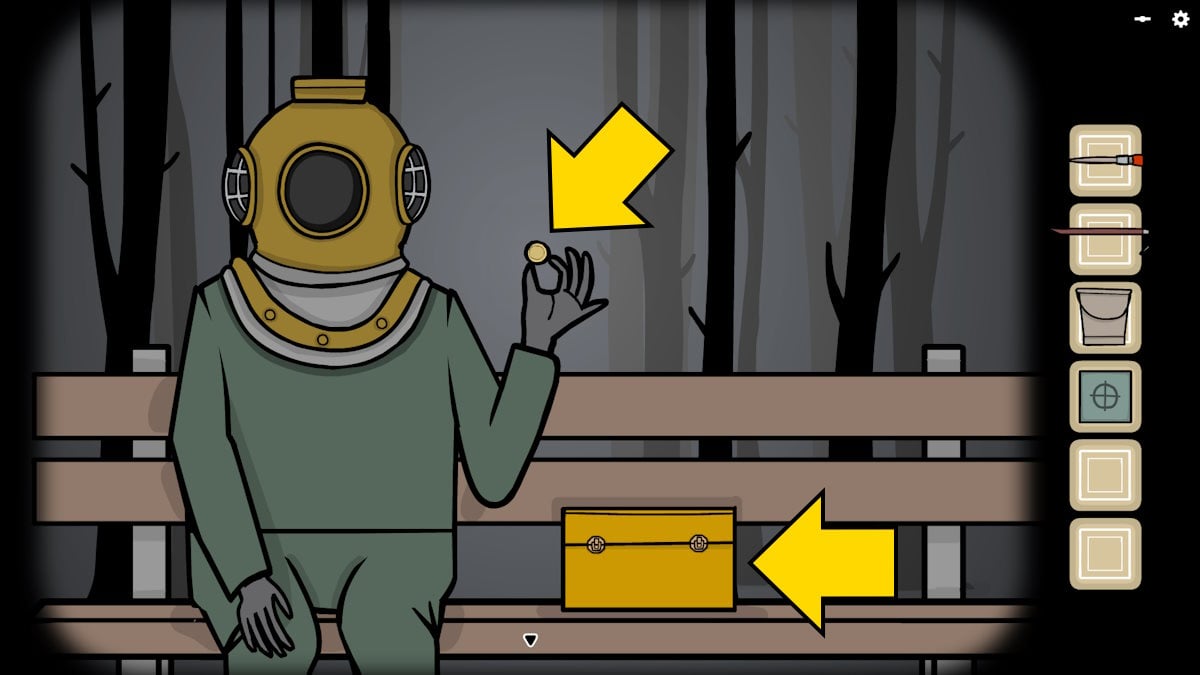
Go to The Lake and find someone in a diving suit (apparently Mr. Owl) on the bench. He will ask you to collect all the cubes and tell you there is one in every station. Keep talking to him until he allows you to take a Coin from him. Note there is a yellow box next to him. It has nine compartments, two of which are already filled. This is where you need to put the seven cubes.
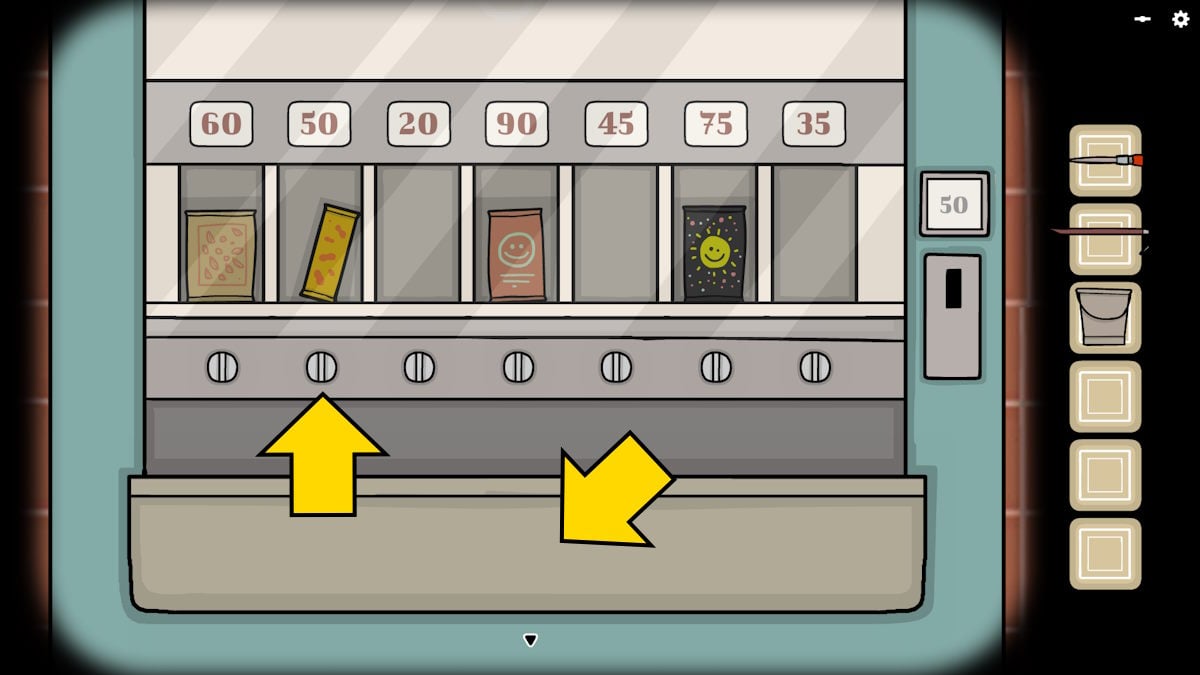
Now go to Sorrow Cross and use your coin in the snack machine. Note this coin is worth 50, so buy the item that costs exactly that (marked above) and then click the tray to take the Nut Bar.
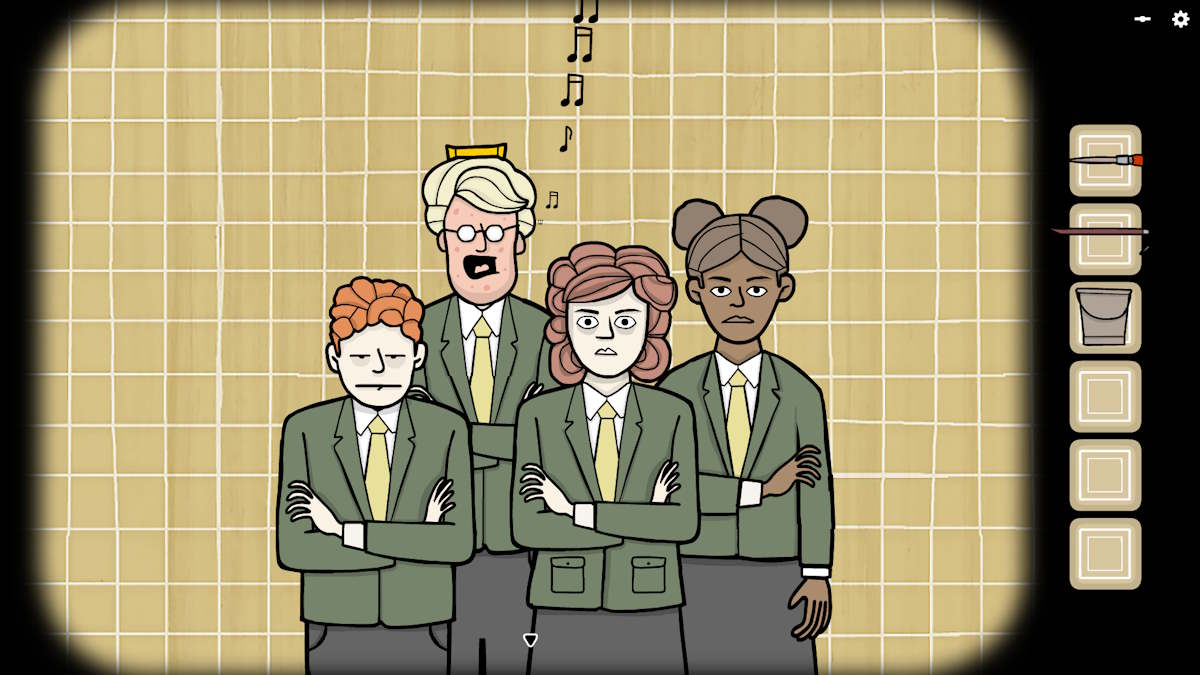
Move to School Street next and drop the nut bar on the child with the nut allergy. He’ll scream, giving you the following note sequence: 2, 2, 2, 1, 2, 3. Go to Bird Bridge Station, play those notes on the trumpet (see below), and take the Stone Cube from the trumpet once the solo goes wrong.
The Bone Cube
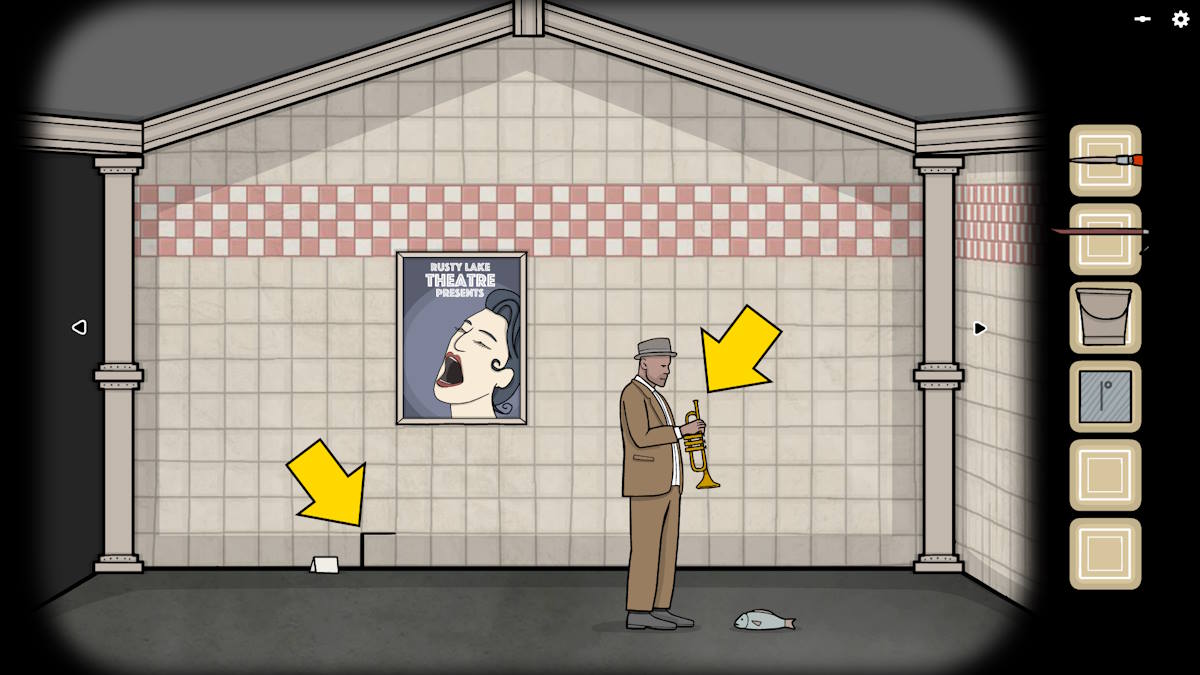
Go to the trumpet player screen at Bird Bridge Station, use the crowbar on the broken tile below the poster (see above), and take the Bill from inside. Move left or right twice to the food stand, select the stand, click the donut sign, hand him the bill, click him once more, and take the donut.
Move to the platform screen where Laura and Bob sit, and give Bob the donut. He’ll tell you a mysterious woman visits the red station at noon.
Head to Sorrow Cross, change the clock time to 12:00, and then move left once to the snacks machine. Select the lady (see above), and click on her until she gives you the Bone Cube.
The Marble Cube
Head to Sorrow Cross and use the crowbar on the inside panel of the box there (see above). You’ll see a pattern of nine small squares, with all the top row and the bottom-right squares filled in.
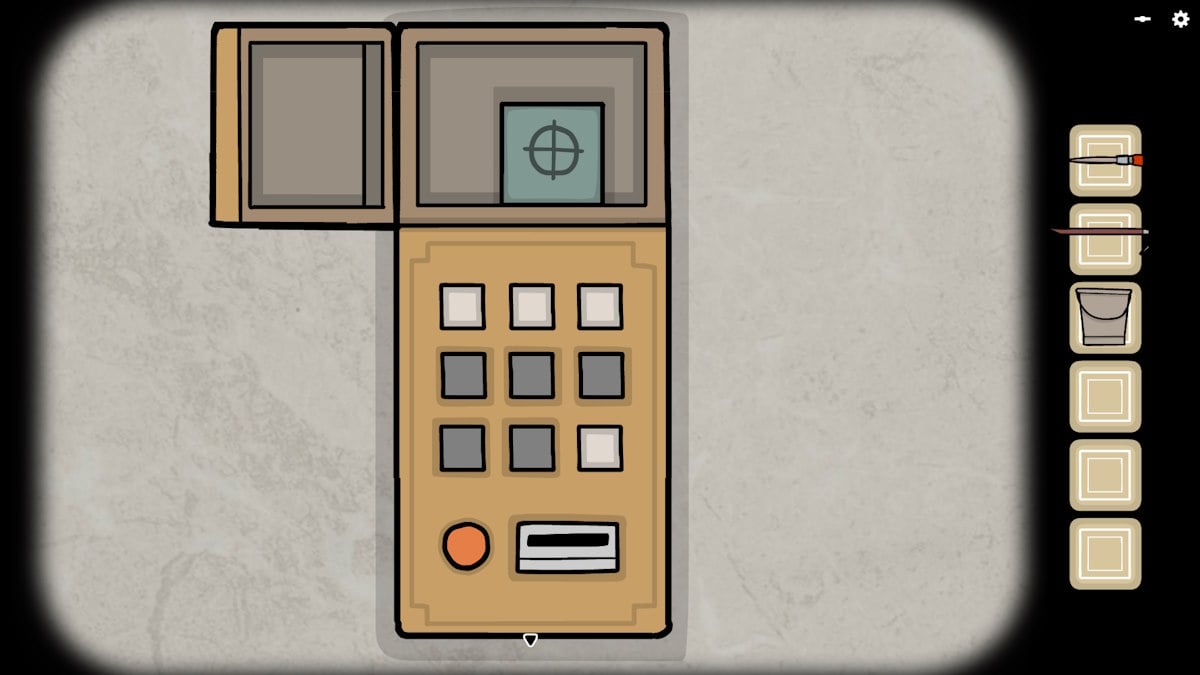
Now get the train to Child Lane, move left once, and enter this pattern into the ticket machine using the opposite of what you saw (so the top row and the bottom-right squares need to be lit, while the others are dark). Take the Marble Cube from above the ticket machine.
The Copper Cube
Go to Child Lane, move to the screen with the Mr. Owl statue, and use the brush with paint to make both its eyes red. A hatch appears below, allowing you to take a Locker Key.
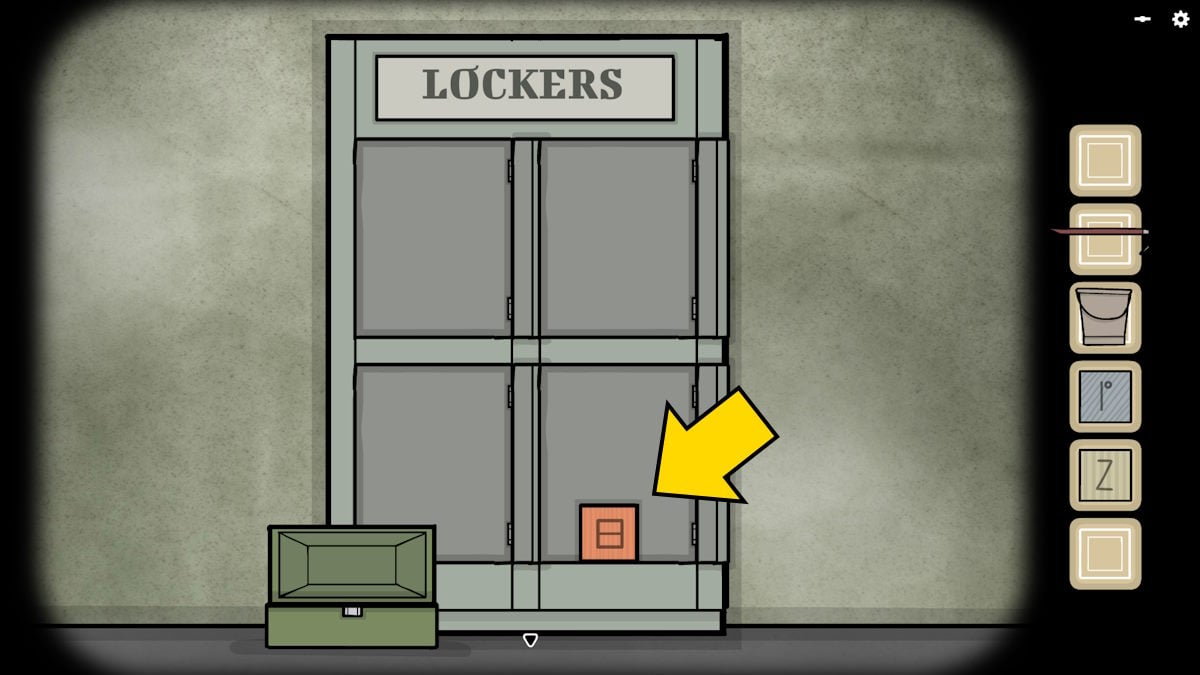
Head to Soul Street, open the final locker (number 9), and take the Copper Cube.
The Bronze Cube
Go to Soul Street and move to the pipe screen to get a Bucket with Water. Now head to Bird Bridge Station, and use the bucket on the hole next to the food stand. Something will pop up from the hole, so grab it to get a Fishing Net.
Return to the puddle Soul Street, get a close-up, select the net in your inventory, and then click the fish as it jumps to catch it. Use the crowbar on the fish and take the Key you find inside. If you’re doing these cubes in the order I’ve laid out here, refill your Bucket with Water.

Head to Crib Station and open the righthand side of the ticket office by using the key. Take the Bronze Cube, but also click the animal in the ticket office to find that it wants payment of a Shrimp to get a ticket to the next station.
The Ice Cube
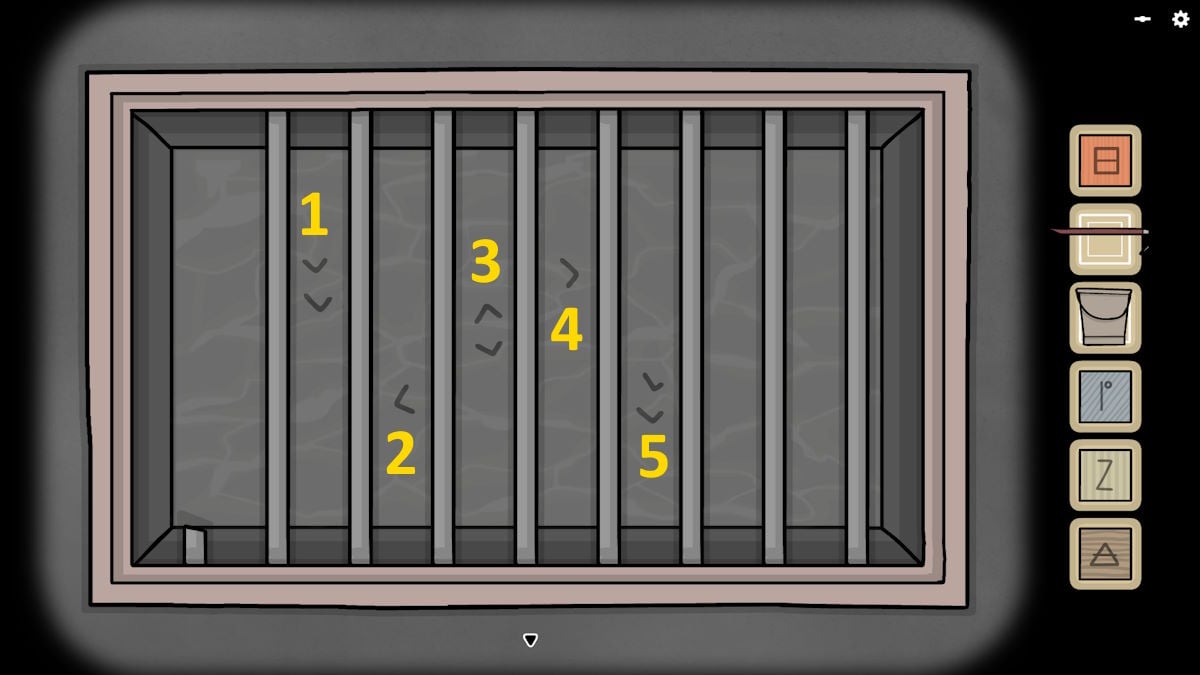
If it isn’t already full, go to Soul Street and move to the pipe screen to get a Bucket with Water (see the Bronze Cube, above). Now head to Crib Station, pour the water into the grate to the left of the poster, and note the pattern that appears in the water if you click it again (see above).
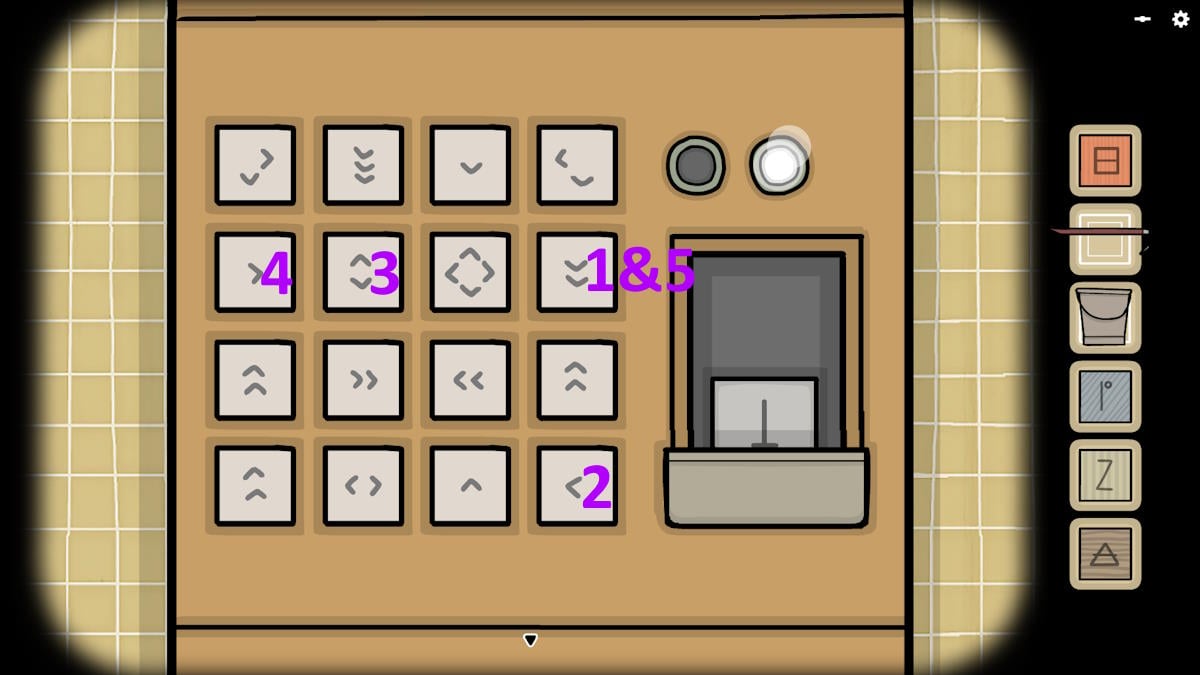
Move to the ticket machine at School Street, click the matching buttons (from left to right in the grate image), and then take the Ice Cube.
The Wooden Cube
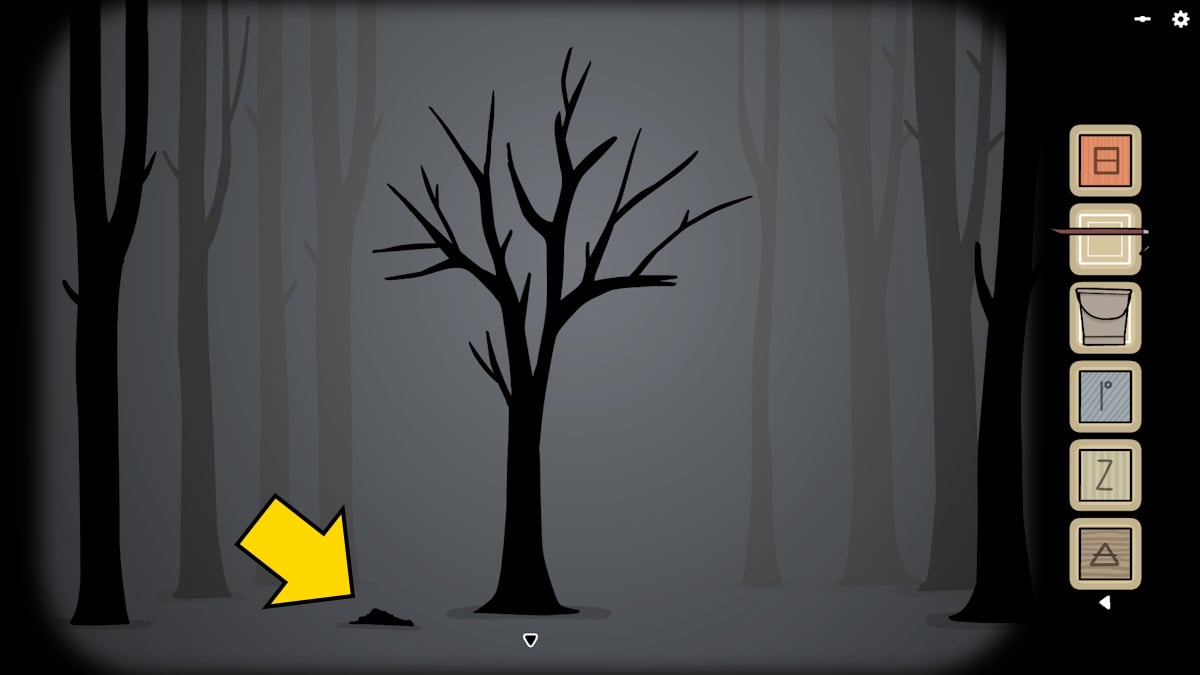
Return to The Lake, move right to the tree, get fully close up, and click the ground to the left of the tree (see above) until you find the Wooden Cube.
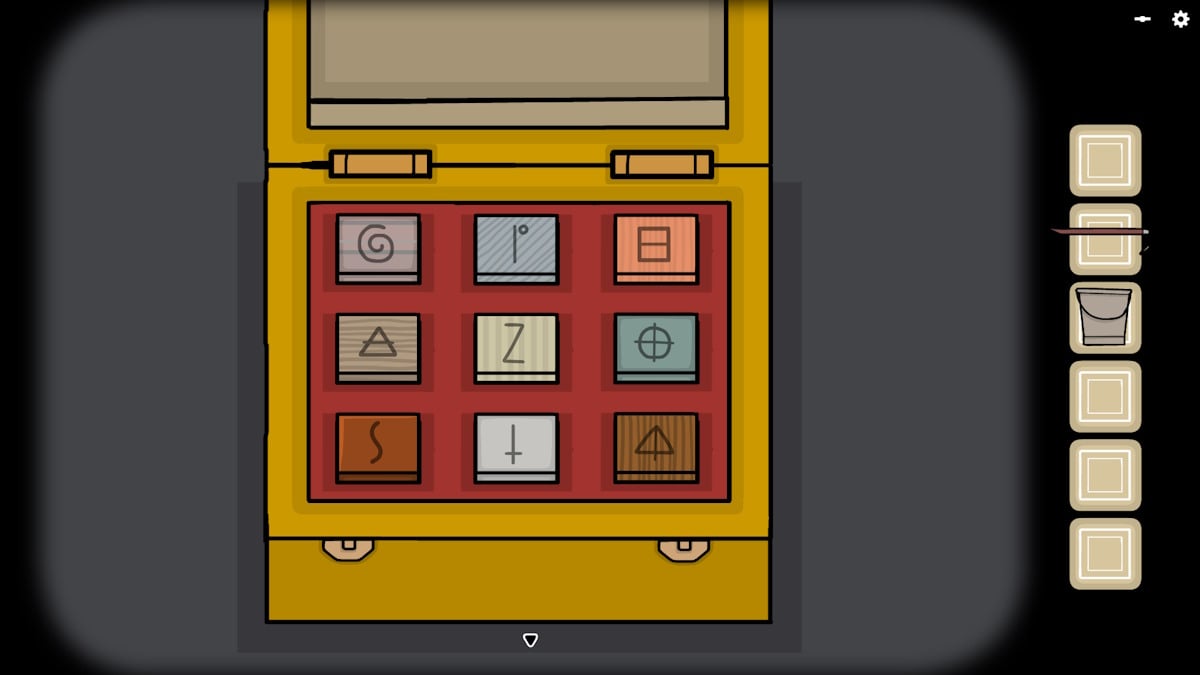
You can now return to the bench and place all the cubes into the box. Zoom back out, take the Shrimp from Mr. Owl, and go back to Crib Station.

Give the shrimp to the creature in the ticket office, and you’ll get a Ticket along with the knowledge that the train leaves at 2:25. Move across to the platform, set the clock to 2:25, and the train will arrive. Get your ticket punched by the bird conductor, and continue on your journey.
Conclusion: The Hotel
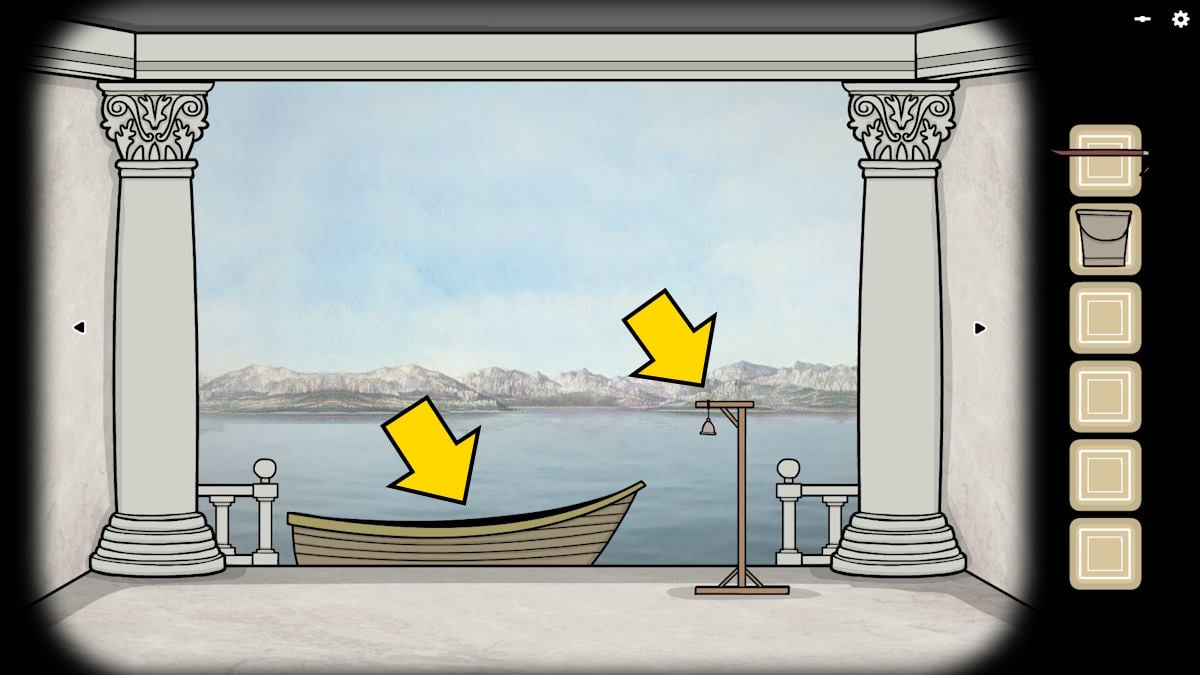
When you arrive at the hotel, click the bell to call a boat and then select the boat to get onboard.
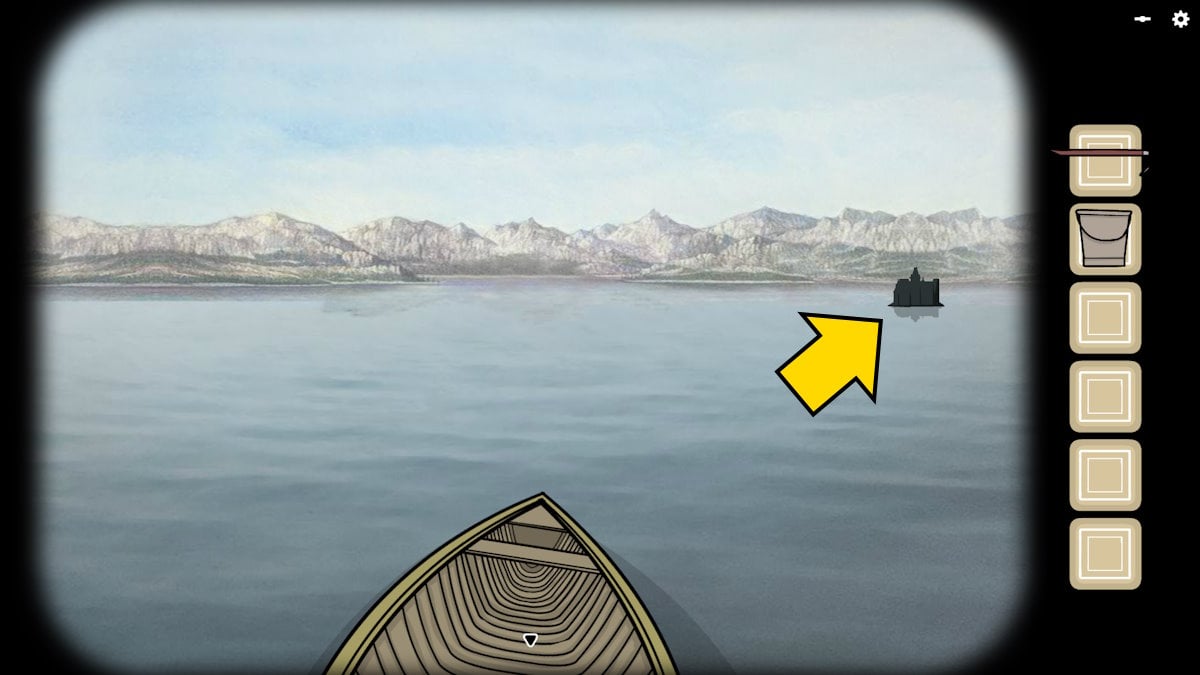
Keep clicking the island that appears until you arrive at the hotel. Click Mr. Owl, who will tell you the day of the lake is coming. That concludes the story, so far…
For more Rusty Lake game help and information, check out my Cube Escape Seasons Walkthrough here at Pro Game Guides!