
One of the great things about the Lost Lands Special Edition puzzle adventures is that each has a bonus chapter. If you’re looking for some information about the Dark Overlord bonus chapter, read on for my full walkthrough.
Lost Lands 1 Dark Overlord Full Bonus Chapter Walkthrough
Once you’ve saved Jimmy from the dark overlord in the main story of Lost Lands 1, the bonus chapter becomes available. If you’re still playing the main game, check out my Lost Lands 1 Walkthrough - Dark Overlord. Note that there are no collectibles in the bonus chapter.
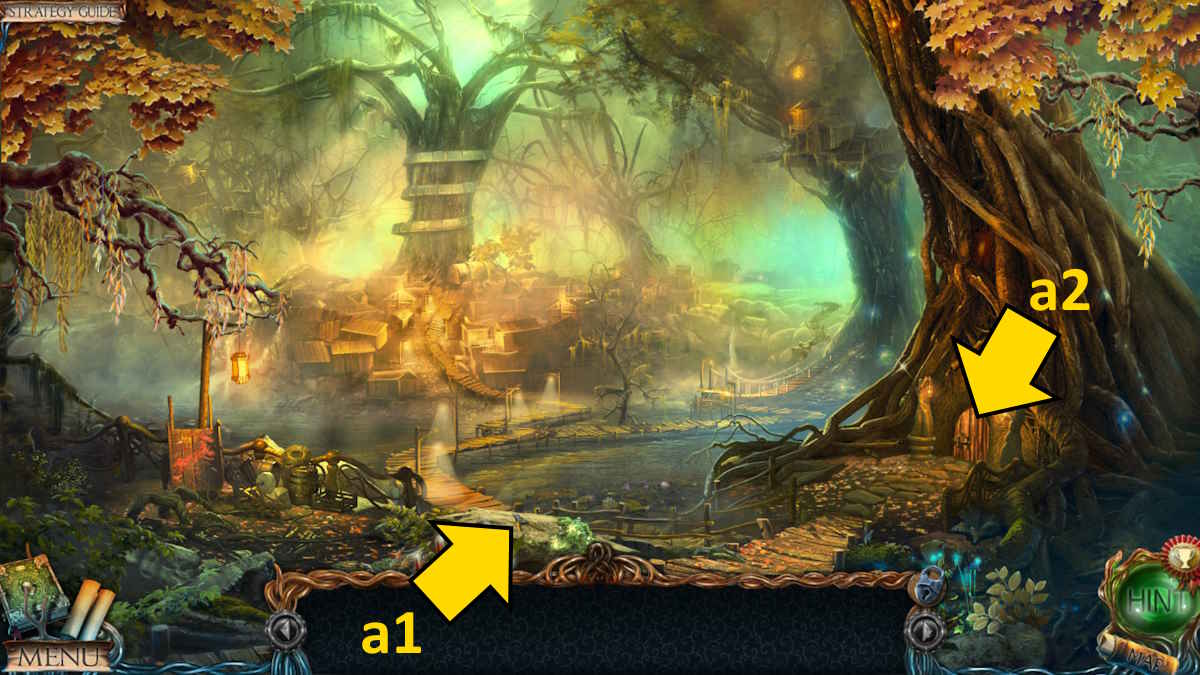
Susan feels another calling from the lost lands, returns to the tree, and is drawn into the forest once more. Use the shears on the stone (a1) to cut the leaves in the same close-up to find and take some Antlers. Also, read the note on the door (a2) to find the dwarves have gone deep into the forest.

Move to the lake and speak to the Lake Spirit (b1), who gives you an Unfinished Potion that will allow you to breathe underwater when complete. She asks for your help in saving the creatures at the bottom of the lake and says the dwarves should have the mushroom ingredient required to finish the potion. When the spirit disappears, take a Seashell from the planks (b1) and the Cicada from the rock (b2).
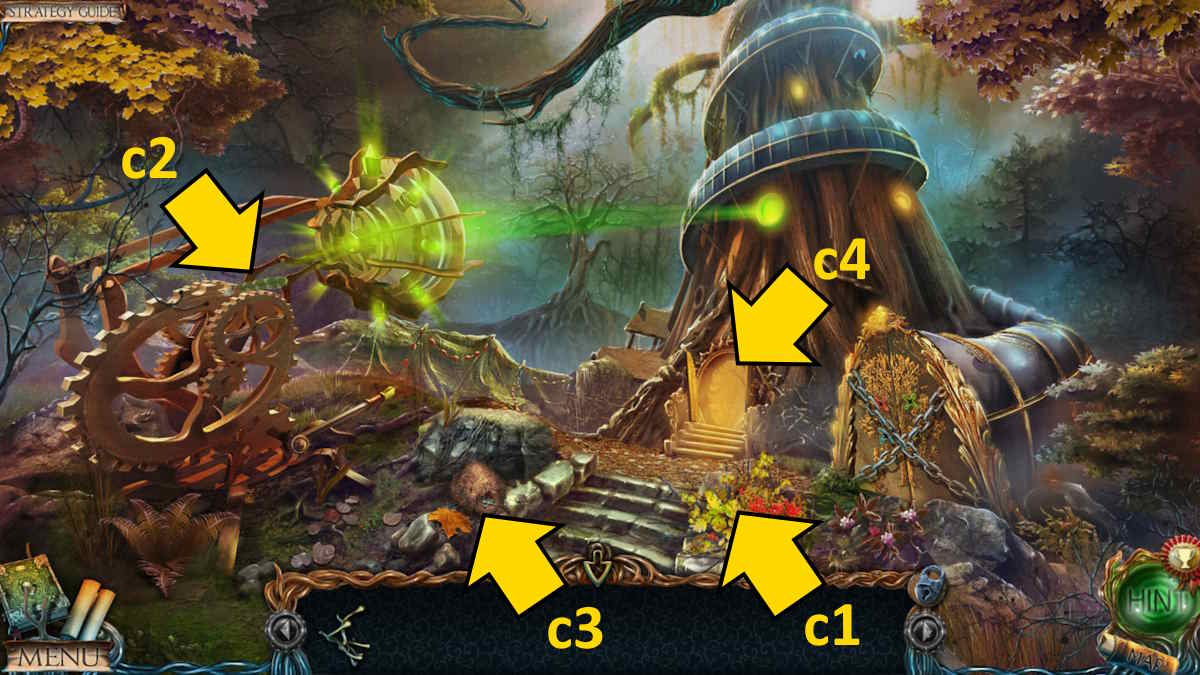
Head to the foot of the tree next, search the bushes (c1) to find a second Seashell and take a Feather from the machine (c2). Use the cicada to tempt away the ants (c3), allowing you to take the Tile, and then move into the library (c4).
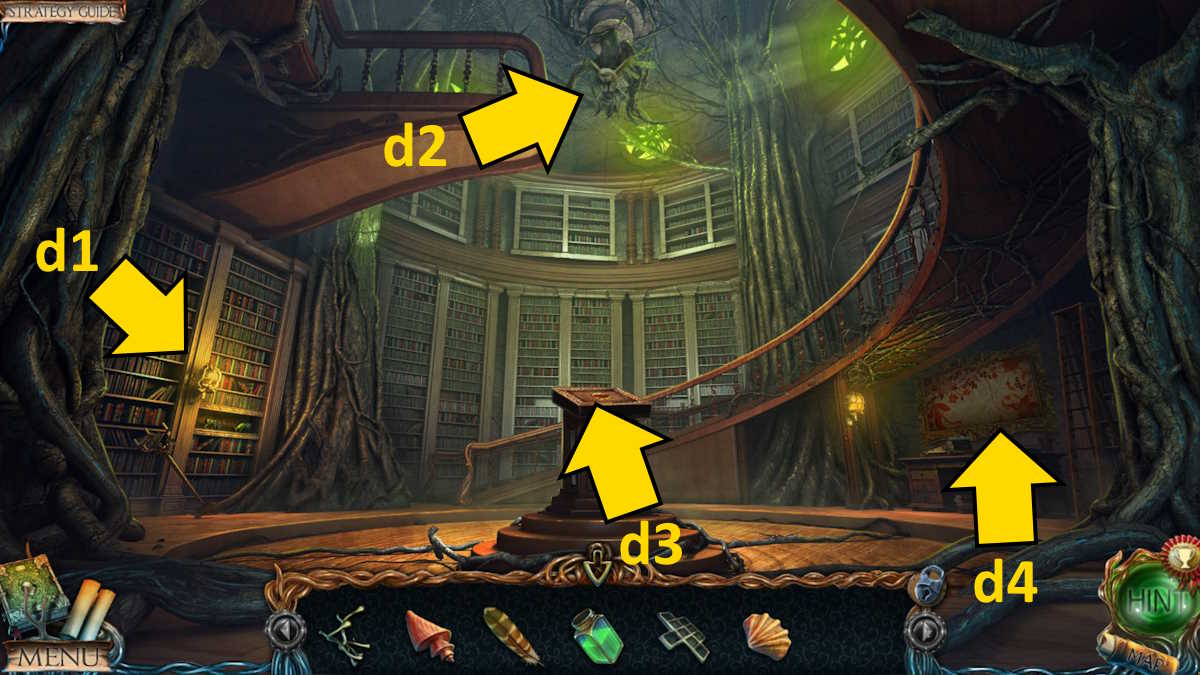
Add the antlers to the model deer on the shelf (d1) to open a secret compartment and take a Hammer. Return to the forest, use the hammer on the door (a2), and enter the dwarf’s cottage.
The dwarf’s house grid puzzle solution
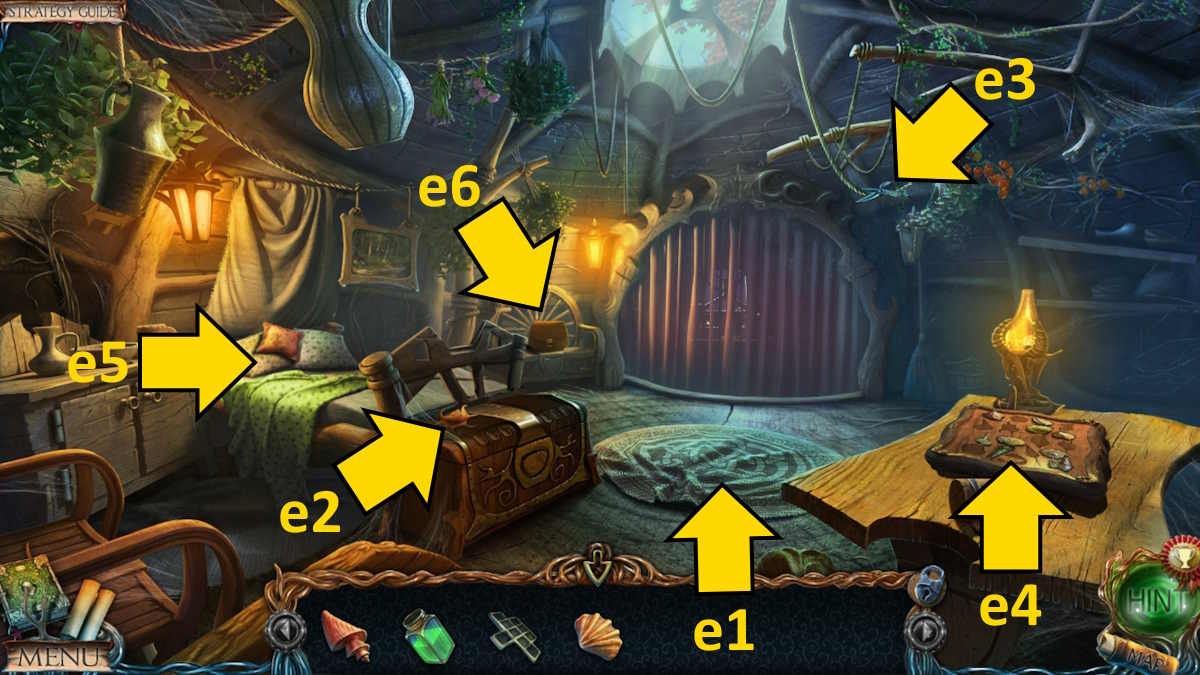
Move the rug (e1) to reveal a grid on the floor and add the tile to begin a grid movement puzzle. You need to move through every circle to complete the challenge and I’ve marked the order to do this below. Once complete, take the Hook.
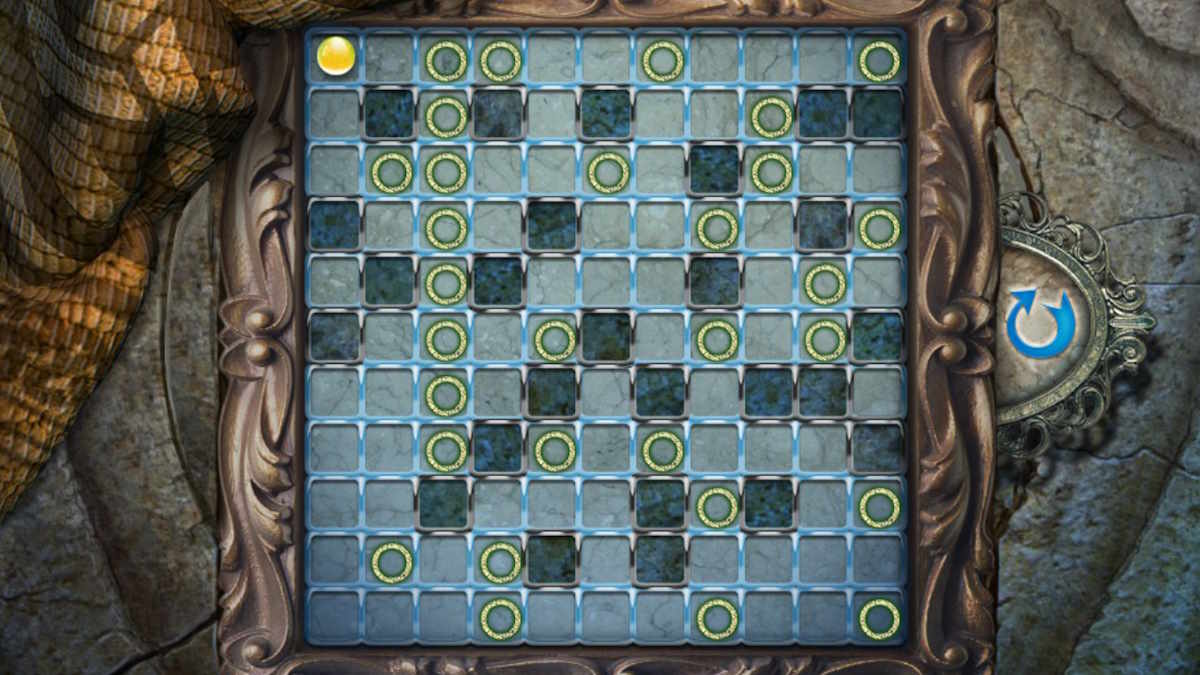
- Down 2, right 1, down 1, right 1, down 2, left 1, down 1, left 1, down to the bottom left corner
- Straight across the bottom row to the bottom right corner, up 2, left 1, down 1, left 3, up 2, left 3, down 1, left 1, down 1, left 2 (you’re now one in diagonally from the bottom left corner)
- Up 2, right 1, up 1, right 1, up 1, right 1, up 1, right 3, down 1, right 3, up 1, right 1, up 2 (you’re now two spaces below the top-right corner)
- Left 2, down 1, left 3, up 1, left 3, up 2, right 4, down 1, right 2, up 1, right 2
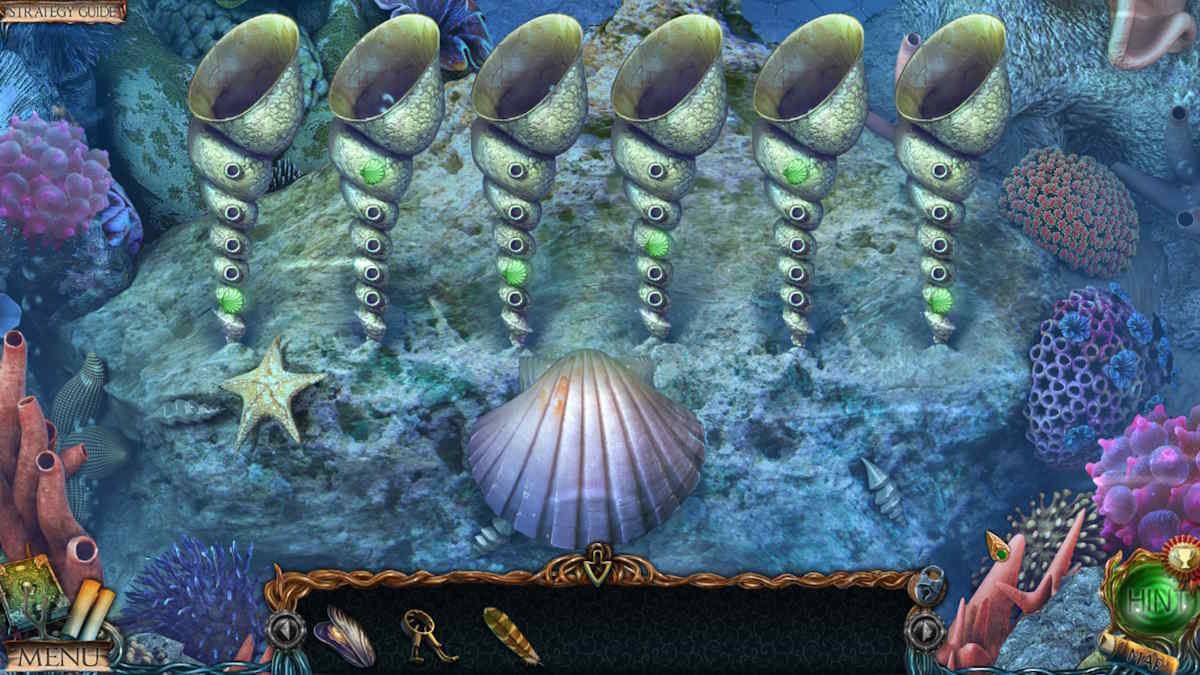
Take the Shell from the chest (e2), get the Shears from the ropes (e3), and add the three shells you’ve collected to the box on the table (e4). You still need plenty more! Move back to the lake and use the hook on the net (b1), use the shears to cut the net, and get the Tweezers. Use the tweezers on the rock (b2) to get the Medallion, and then return to the cottage.
Move the cushions on the bed (e5) to reveal a box, use the medallion to open it, and take the Wax. Use the wax on the bag lock (e6), open the bag, and put the unfinished potion on the chair next to the bag. Add the mushroom extract from the bag to the potion, and take the Potion. Head back to the lake, click the water, and head into the lake.
The object placement puzzle at the forest entrance

There’s nothing to do at the square where you arrive right now, so move to the entrance to the old forest. Take a Seahell and a Shellfish from the waterfall (f1), an Owl Tablet from the well (f2), the Statue Hand from the floor (f3), and a Bent Pipe and Medallion from the tree stump (f4). Now select the ruined tower (f5) to begin an object-placement mini-game. The solution is below; once it’s complete, you’ll receive the Component.
- The Snake’s Head on the statue
- The Mask matched with the other mask
- The Feather with the scroll
- The Pipe with the matching pipe
- The Sheath with the sword
- The Matches with the candle (in the close-up)
- The Scissors with the sack (in the close-up)
- The Lens with the statue
- The Doll with the other doll
- The Coffee in the grinder
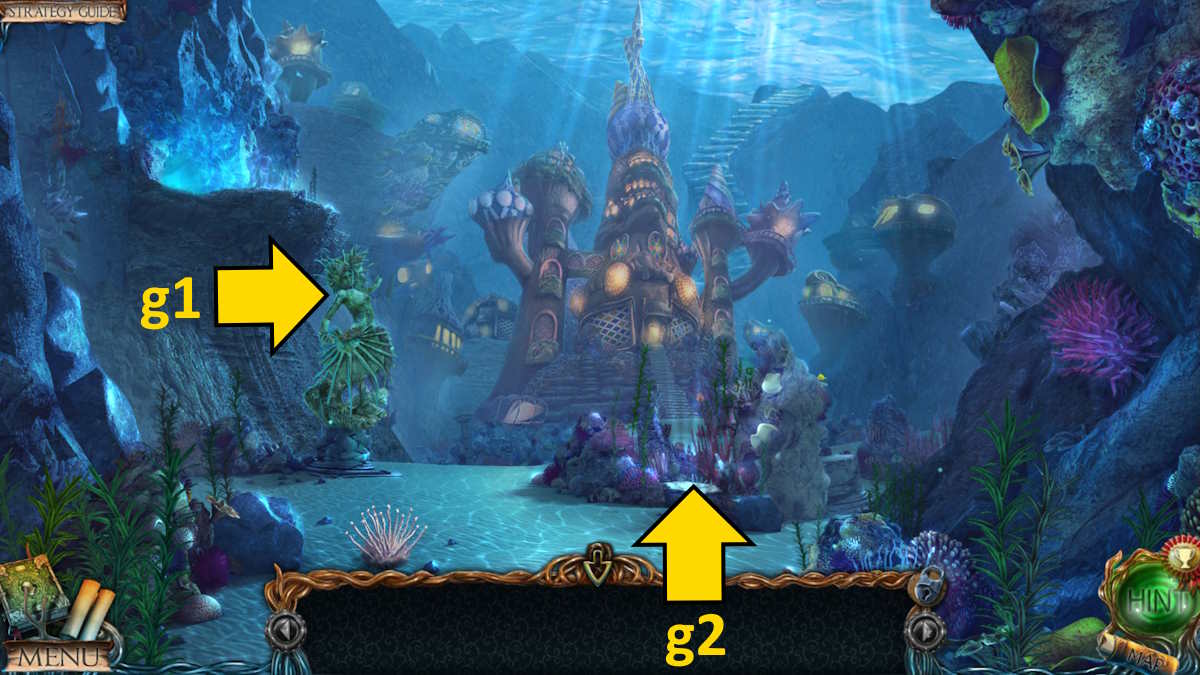
Return to the square, attach the statue hand to the statue (g1), and take the Seashell from its now open hand.

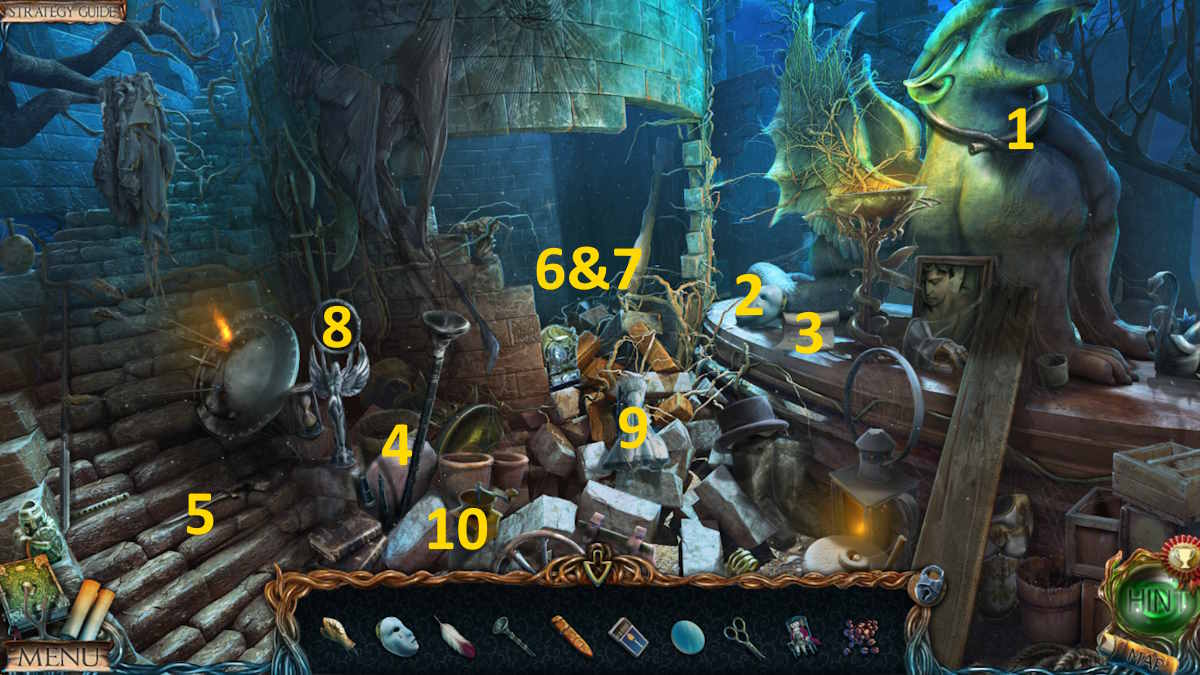
Moving on to the caves, pick up the Seashell (h1), use the pipe to move the rock in the same close-up, and move the shells (h2) to find another Medallion.
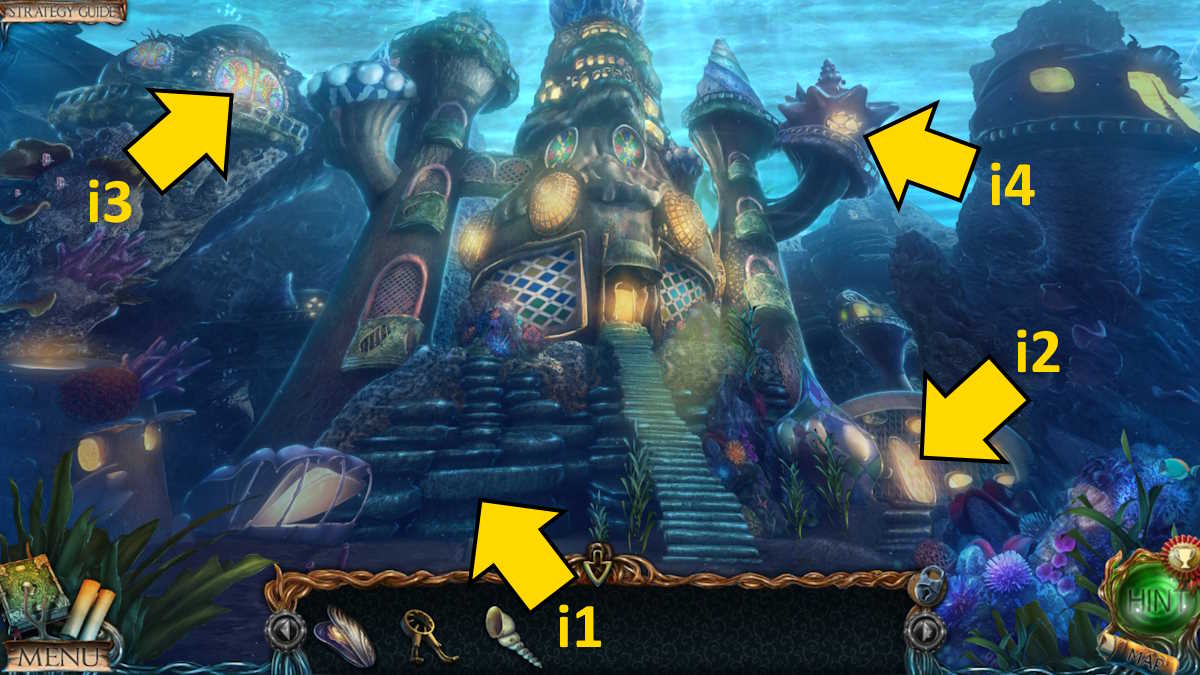
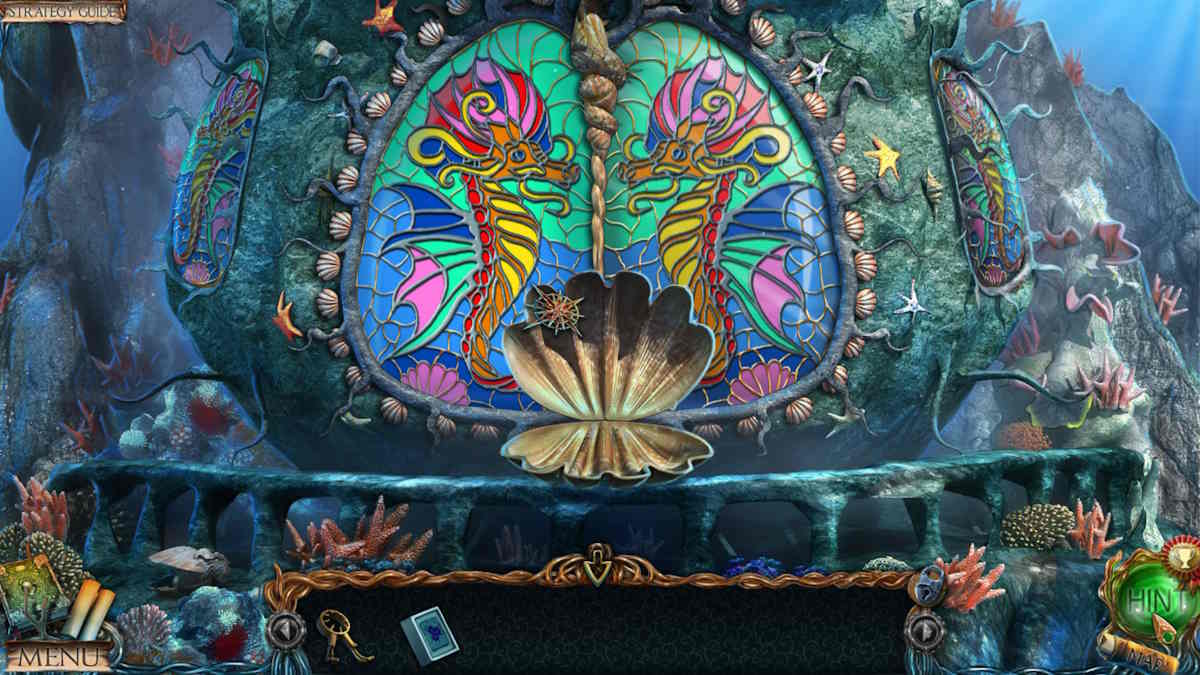
Now head outside the castle and talk to Undine, who asks you to find the hermit in the forest and then gives you a third Medallion. Grab the Seashell (i1) and then head inside the underwater castle.
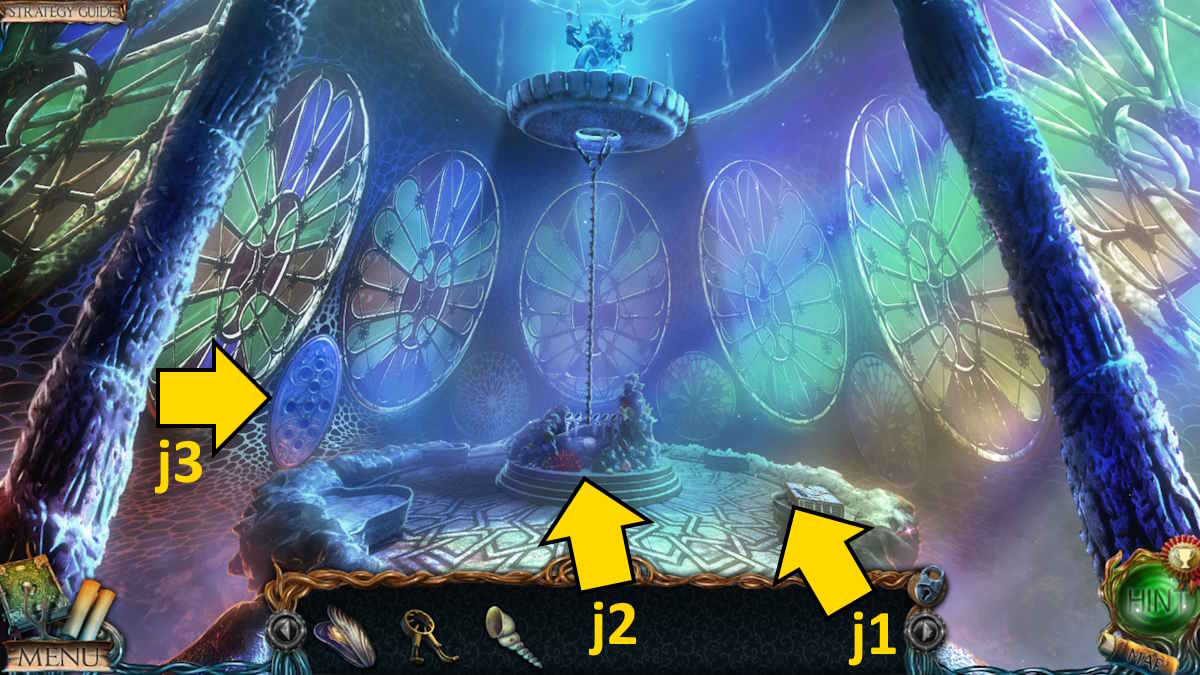
Take a Feather from the top of the box (j1) and then add the large seashell to the device in the center of the room (j2). You’ll know which seashell it is, as it looks like the others on the device. It’s also the only one you can’t place on the box in the dwarf’s cottage (e4), as it will say it’s too big.
The owl's feathers puzzle solution
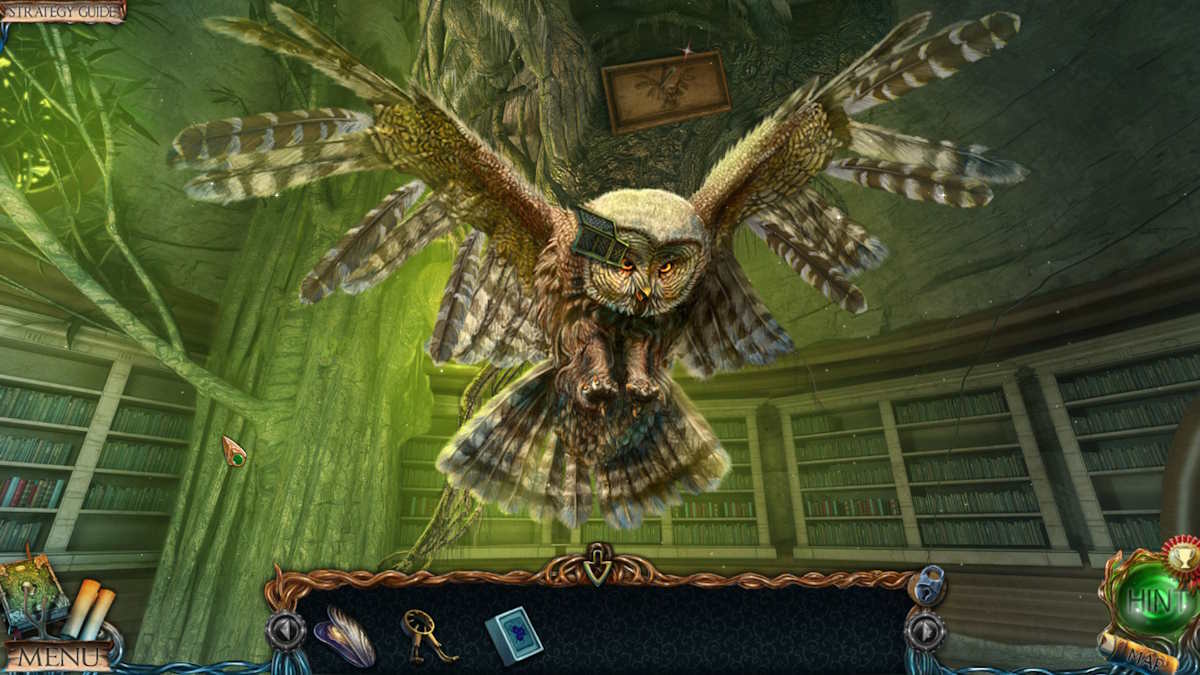
Placing the shell begins a simple placement puzzle, the solution to which is above. Once complete, take a fourth Medallion from the shell. Return to the library next, and add the owl tablet and the two feathers to the owl (d2) to start a feather-arranging puzzle. Arrange the feathers as pictured above, and you’ll receive your final Medallion and a Crab Trap.
Return to the caves, place the crab trap (h3), put the shellfish inside it in the close-up, and you’ll trap the crab. Click the trap again and take another Medallion. This latest medallion can be used outside the castle to open the door (i2) and begin a simple hidden object mini-game. Once complete, take the Chest Piece. You can now add the chest piece to the chest in the underwater castle (j1) to open it and find another Seashell and a Mosaic.
Back outside the castle, select the mosaic (i3), add the mosaic lives you just received, and start a color-matching mini-game. All you need to do is place the pieces so they exactly mirror those on the mosaic that’s already complete in the same close-up (you can’t fail here, see above). If you have doubts, each color will run out of pieces once complete, so do the simple colors first. Once you’re done, take the Lock Piece.
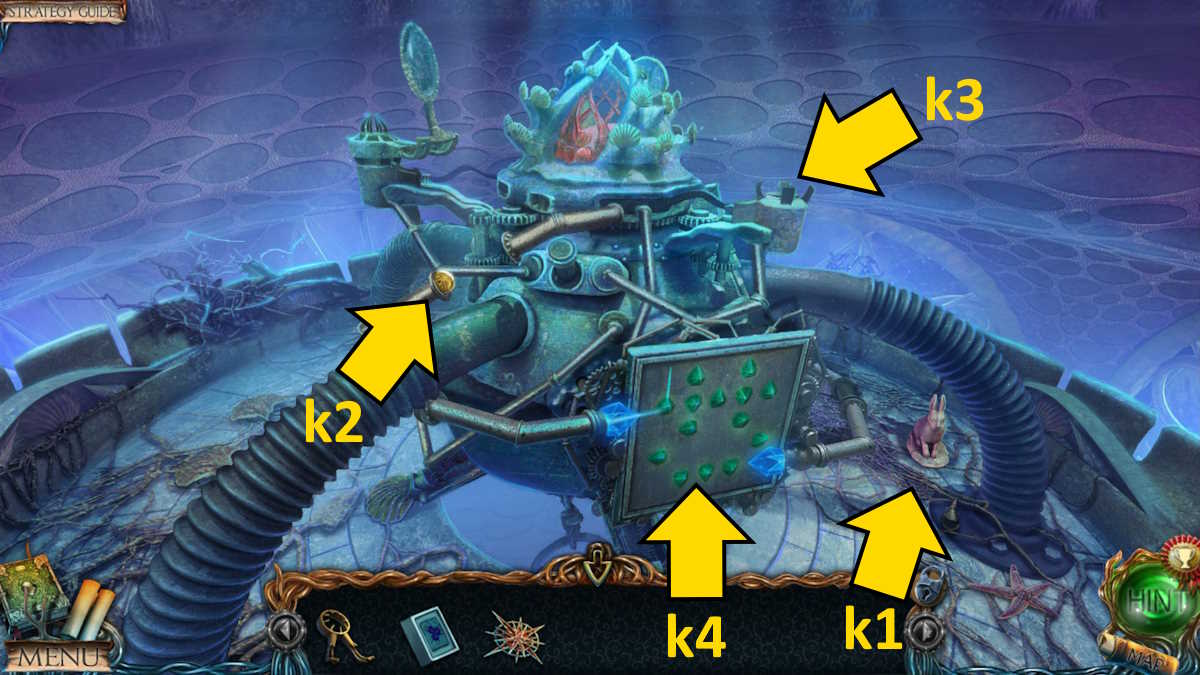
Move up to the top of the castle, to the device. Take the Animal Figurine (k1) and yet another Medallion (k2), and then return to the library. Use this new medallion to open the lectern (d3) and take a second Lock Piece from inside. Also, be sure to read the note you’ll find underneath it, which explains that the hermit built the device that purified the water.
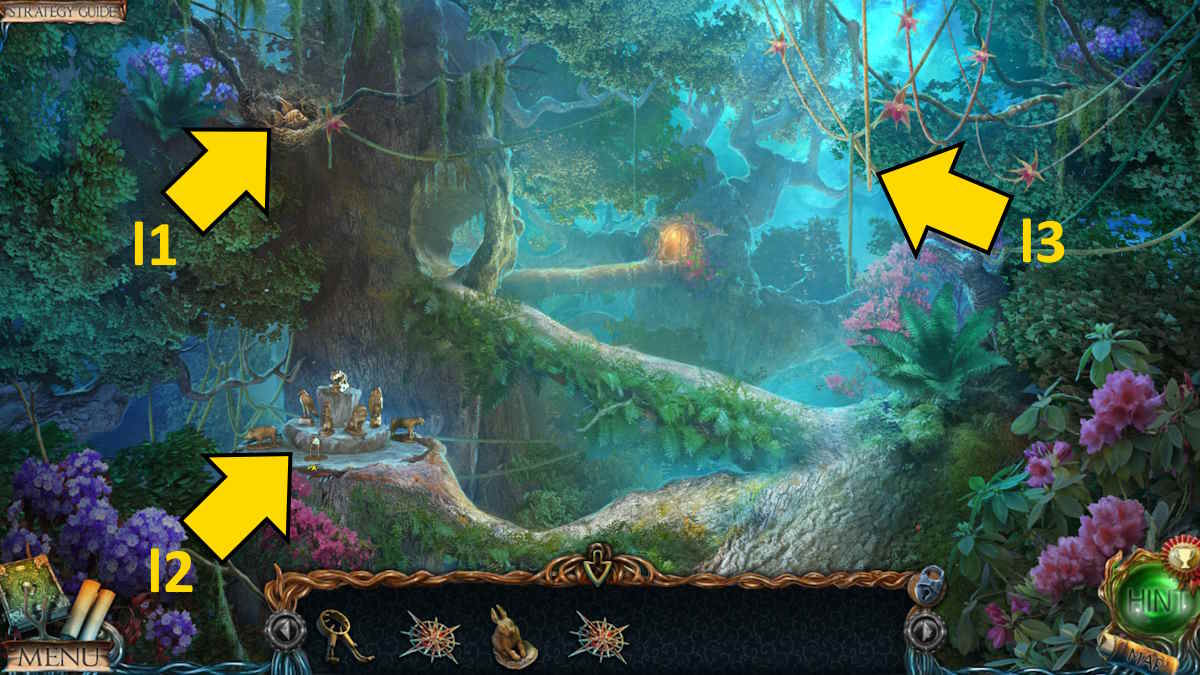
Go back to the old forest entrance and place the five medallions in the gate (f6), giving you access to the old forest itself. Take the Fish Figurine (l1) and add the animal figurine to the set (l2), but you still need to find more.
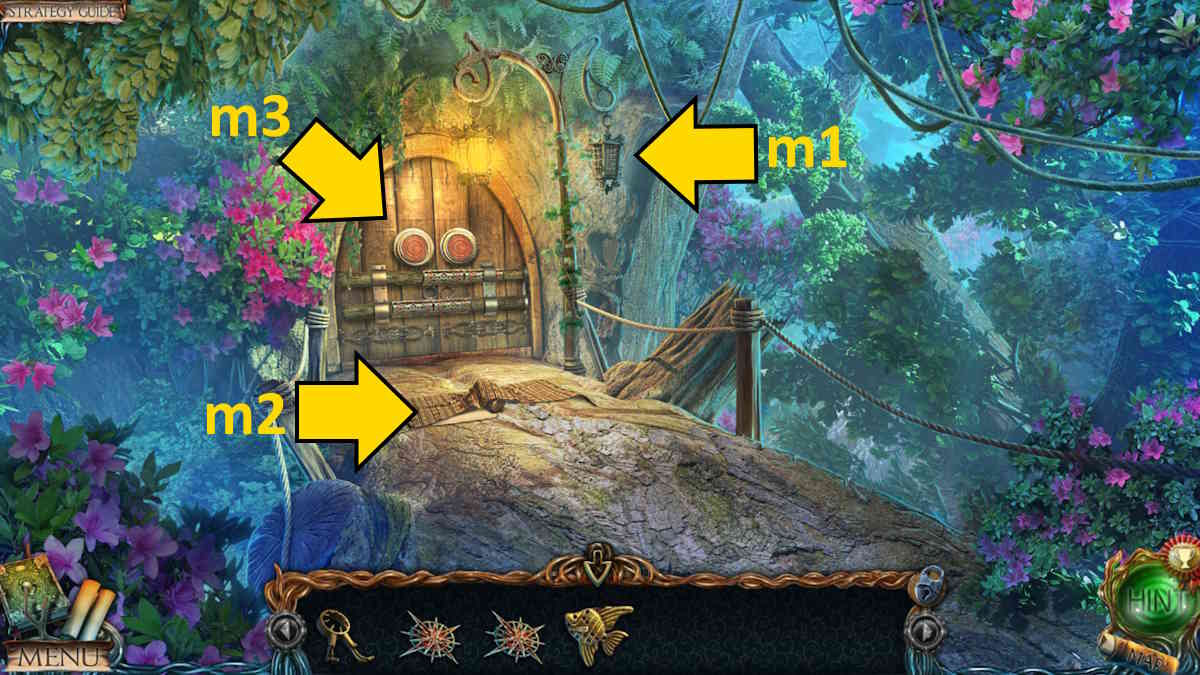
Keep going up to outside the hermit’s hut, open the right lamp (m1), and take the Oil. Move the rug (m2) to find an Animal Figurine and a note from the hermit, saying they have left but a friend will be able to find a way in.
Fixing the lock on the hermit's hut door
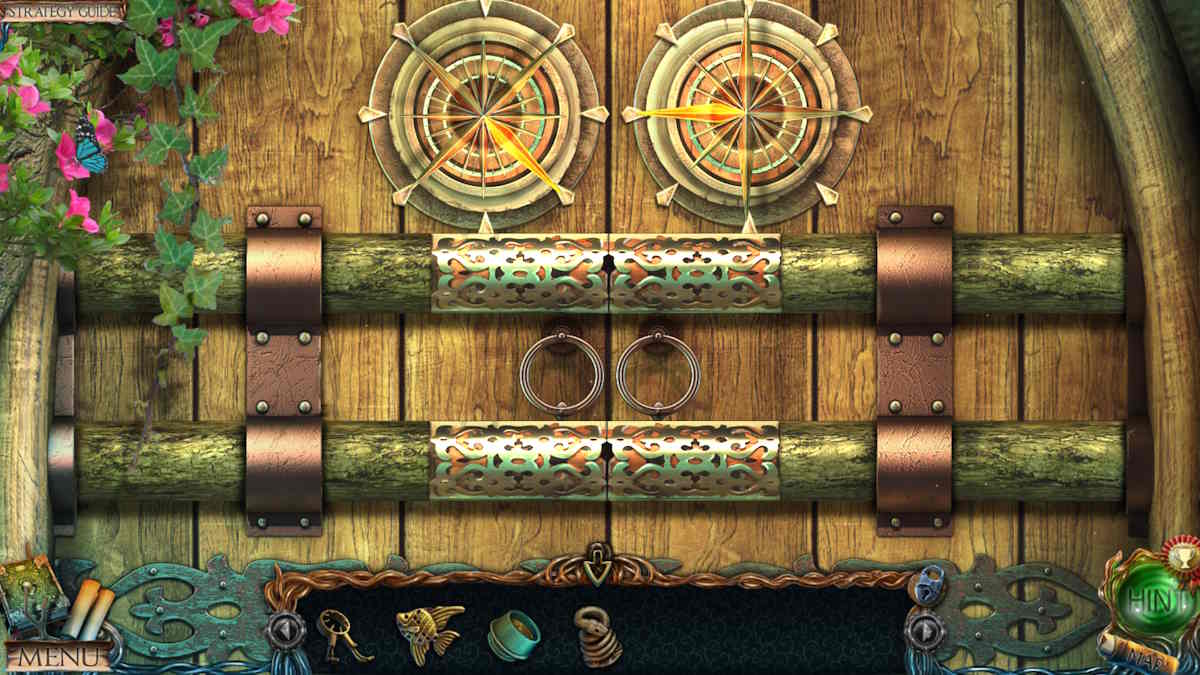
Select the door (m3), add the two lock pieces, and then find the correct positions for the locks. Move the left lock five times, and then the right lock six times, and the doors will open (see the image above for the correct lock positions). Use the door to enter the hermit’s hut.

Click the top of the stairs (n1) and take the Animal Tablet, before opening the draw in the same close-up and finding some Screws, a Nut, and a Brush. Select the desk (n2) and examine the note to find the machine instructions. You can now put the component on the table, add the jade to it (it’s already on the table), and then add the oil, but you still need to find the lens.
Move to the caves, add the fish figurine to the chest that’s behind the rock you moved earlier (h1), and solve the sliding puzzle. You need to move the piece in the slot on the left across to the slot on the right. To do so, follow the guide below.
The sliding puzzle in the caves, solved
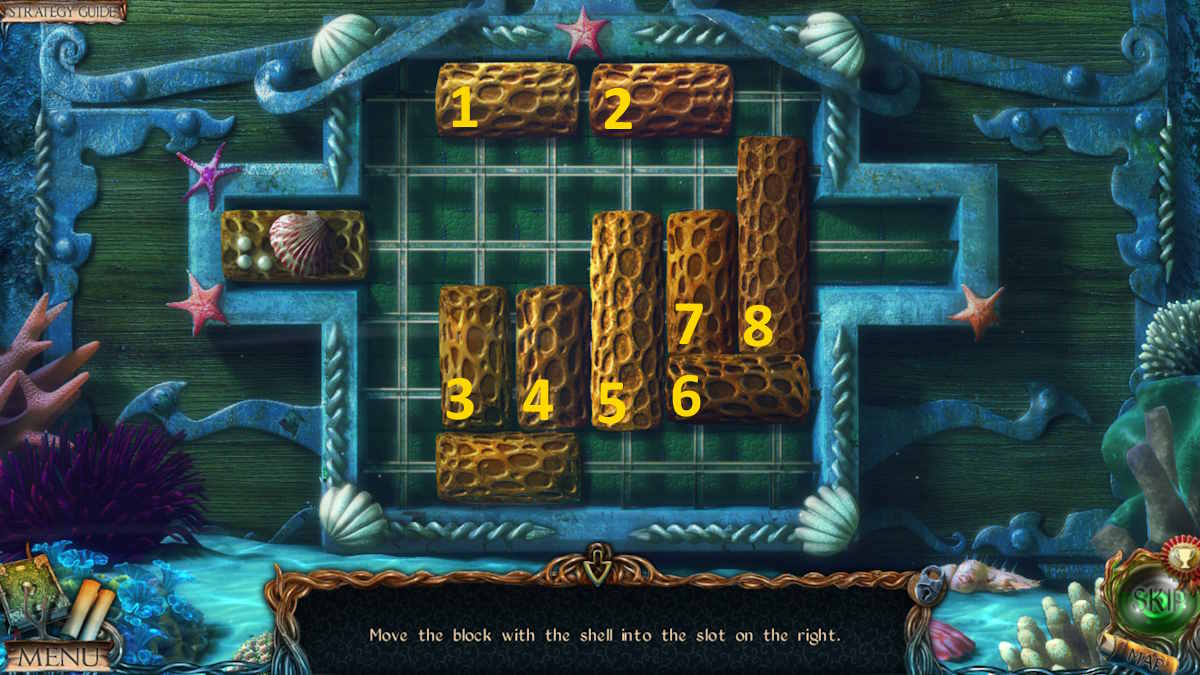
- Move pieces 2 and then 1 to the right
- Move pieces 3, 4, and 5 as far up as you can
- Slide piece 6 all the way to the left
- Move pieces 4, 5, 7, and 8 down as far as possible
You can now slide the piece on the far left right across, open the chest, and take another Animal Figurine and a Piece of Pipe. Move outside the castle, use the brush on the window (i4), and you’ll note down the pattern you find underneath.
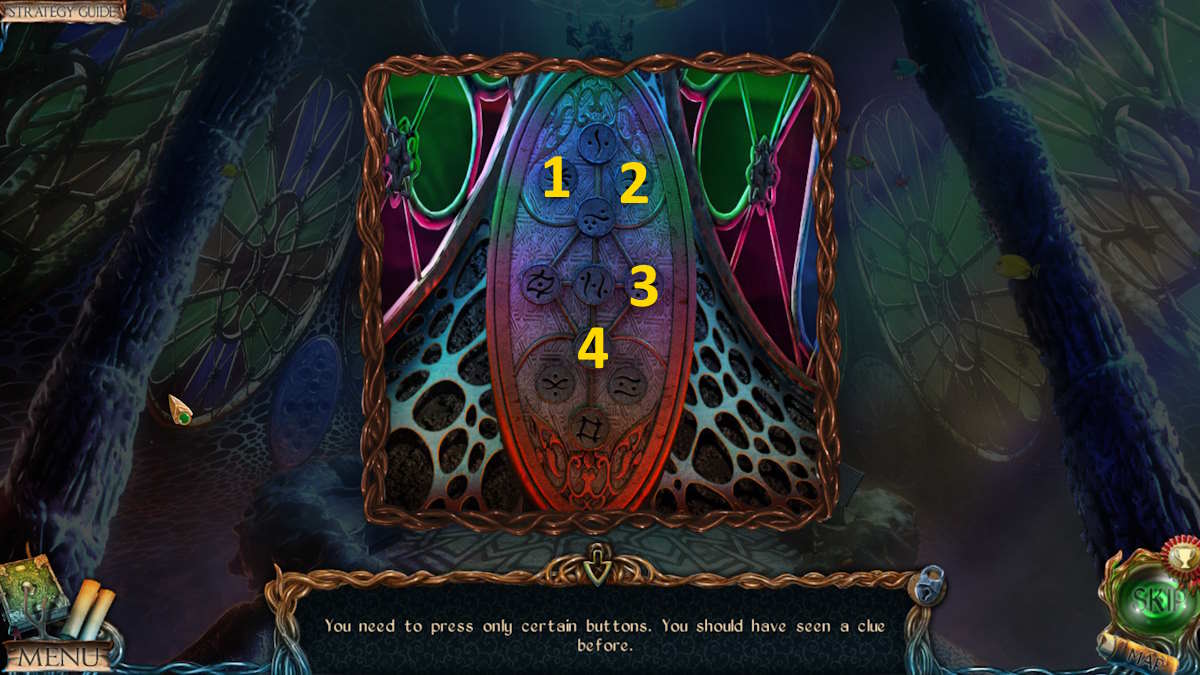
Move inside, press these symbols on the device on the left of the room (j3) in any order (see above), and head to the Bathyscaphe.
Open the valve on the top of the sub (o1) to open the hatch and find a Hexagon. Move to the square, add the hexagon to the glowing rock (g2), and complete the matching puzzle. I’ve put all the matches in the image below. Once complete, take the Glass Eye.
Back at the entrance to the forest, give the nut to the squirrel (f7) and take the Hook from the tree once it leaves. Move to the forest itself, add the figurines and the tablet to the treestump, arrange the animals as pictured on the tablet, and take the Seashell.
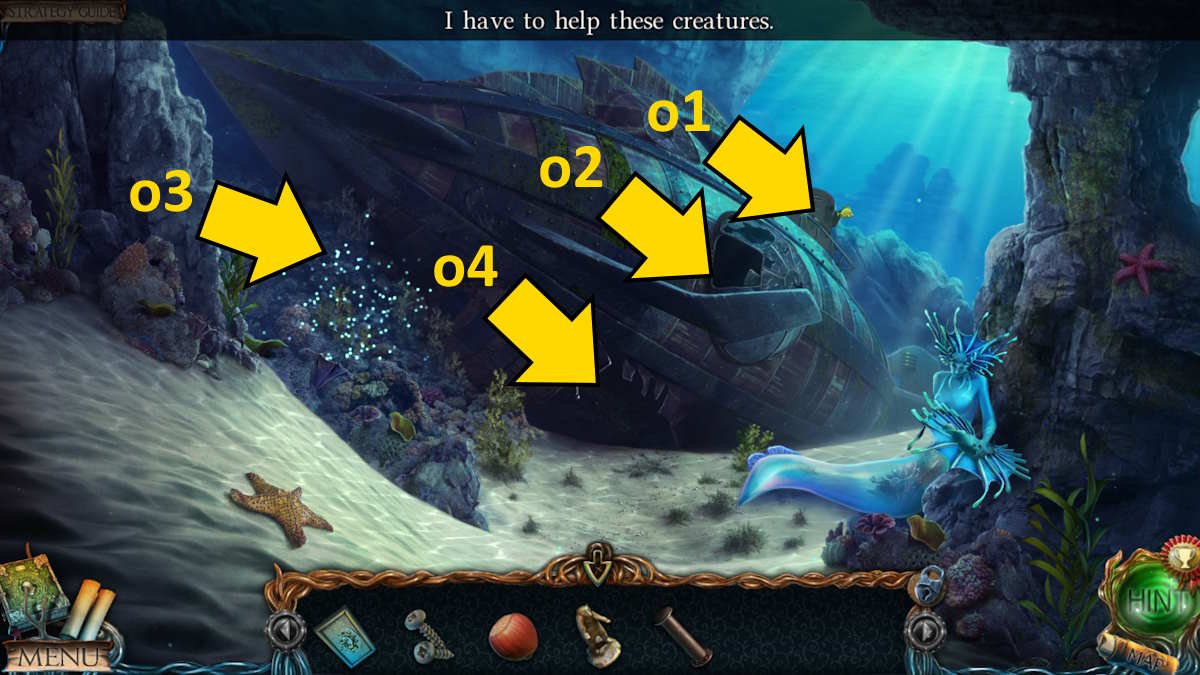
Go up to the hermit’s hut, add the eye to the golem (n3), and take the Screwdriver. Head to the bathyscaphe next and use the screwdriver to remove the panel (o2) to get the Shard of Glass. Now you can add the hook to the vine in the forest (l3), and then use the glass to cut the vine and make a Vine With Hook. Take this to the old forest entrance and use it to fish out the Fishing Net from the drain (f2).
Go to the bathyscaphe once more, use the net (o3) to get a Net Full Of Plankton, and use this to light up the hole in the hole (o4) to begin a simple missing-objects mini-game. Once complete you’ll get the Valve.
Solving the ball-rolling puzzle in the hermit's hut
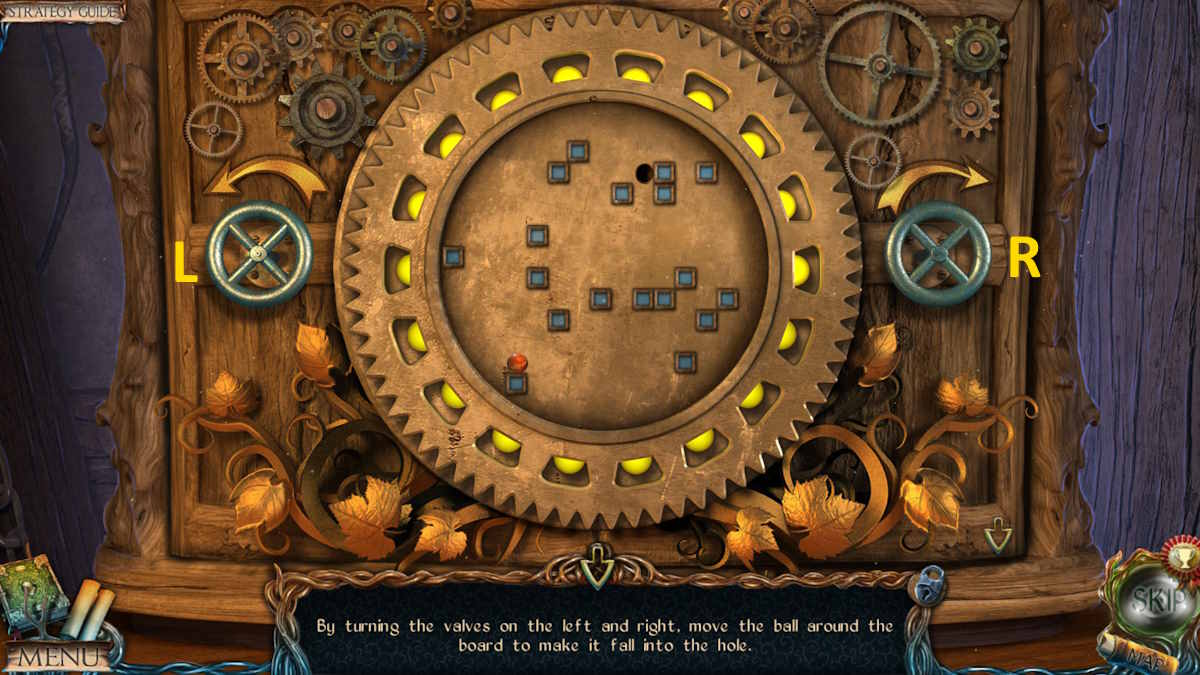
Return to the hermit’s hut and add the valve to the machine on the wall (n4) to start a ball movement min-game. To complete it, click the right valve (shown above) three times, and then the left valve twice. You can now take the Brush With Paint.
Head to the library and use the paint on the painting (d4) to get the last Seashell you need. Go to the dwarf’s cottage, add all seashells to the box on the table (e4), and it will slide open, allowing you to take the Lens. Back at the hermit’s hut, you can now add the lens to the component on the table (n2), put the screws into place, and use the screwdriver to complete and then take the Assembled Component.
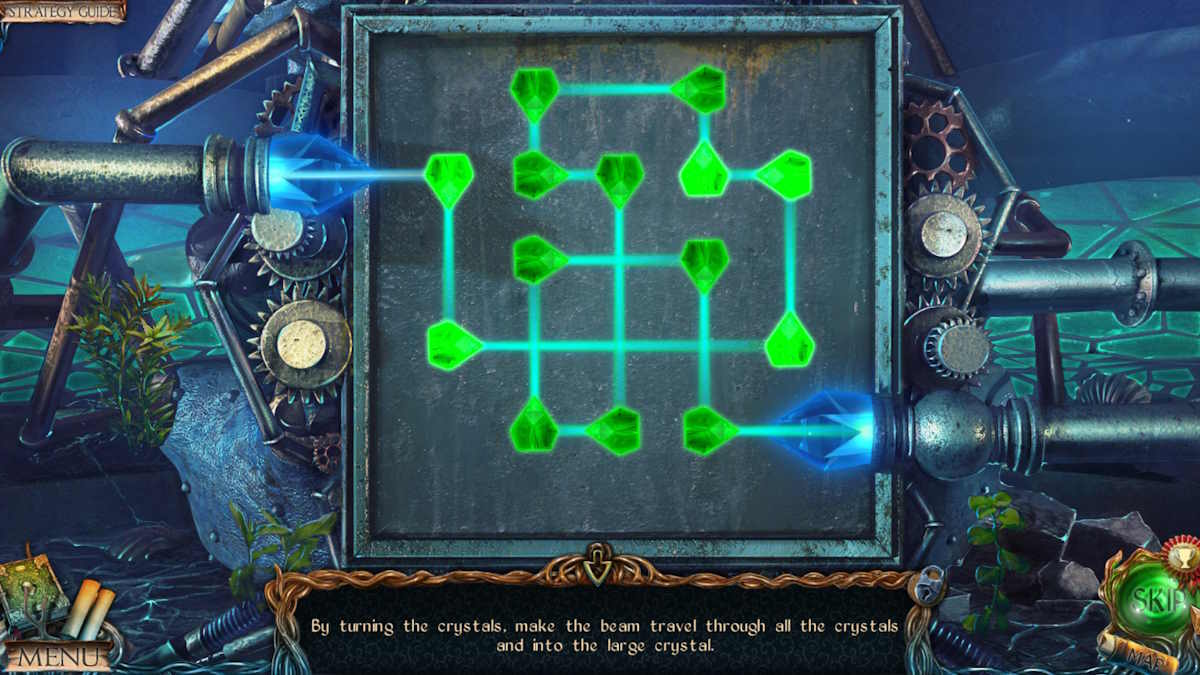
Go to the device, add the piece of pipe (k2), add the assembled component (k3), and get a close-up of the panel that lights up (k4) to start a light and lenses puzzle. I’ve pictured the completed puzzle above. Once done, the device will spring back to life, and you’ll have completed the bonus chapter of Lost Lands 1: Dark Overlord!
For more Lost Lands help and information here at Pro Game Guides, check out Lost Lands 2 Walkthrough – The Four Horsemen and Lost Lands 3 Full Walkthrough (Golden Curse)!