The remake of the 1997 classic Riven is slightly different from the original, containing a lot of the same story with several changed puzzles and even some new music. If you need help getting through it, this 100% walkthrough of Riven 2024 will get you through the game from start to finish, including all endings and puzzles.
Riven 2024 Walkthrough - All puzzle solutions, achievements, and endings
The first thing you will see is Atrus, one of the main figures from the original game, Myst, sending you through a linking book into a new world. You will need to sit through a couple of cutscenes before getting started.
An introduction to the world of Myst
If you didn't play Myst, you might get a little lost in the story. You don't need to know much about the first game to play the second, but here is an oversimplified and very short breakdown of some of the most important points. Beware of spoilers for the story of Myst.
Myst begins with you falling into a rift and picking up a book that sucks you in. This is called a Linking Book, which is a book that connects two worlds (called Ages in Myst) together. When you touch a Linking Book, you are transported to the place on the other side.
In Myst, you find yourself alone in an abandoned world. There are three Linking Books in the library, and each one seems to contain a person. The first two have Atrus' sons, and the third contains Atrus himself. Atrus' sons have worked together to alter the Linking Book their father took with him to prevent him returning and locking him forever in D'ni. The boys then got trapped inside of their own Linking Books. We hear a lot of lore about Catherine, Atrus' wife, who has also been trapped inside a different Age called the Fifth Age or Riven. The most important point we learn about in Myst is that you can trap people inside of the Books if you alter the text just a little or rip out a page. We also learn that it is possible to create new Ages through the writing a Linking Book, discovered by the ancient D'ni people and relearned by Atrus.
In the canon ending, you head into Atrus' book, returning the missing page needed to complete his Linking Book. He kills both of his very evil sons for trying to trap him and their other crimes. At the end of Myst, Atrus is working on writing a new Linking Book to help get his wife out of the Fifth Age where he trapped her along with his evil father accidentally. At the beginning of Riven, you are still hanging out with Atrus, waiting for him to finish the Linking Book to get Catherine out. He finally finishes it when the game begins.
On Temple Island: Part 1
Achievement: The First Step is Not Always Simple
Take your first step onto the island.
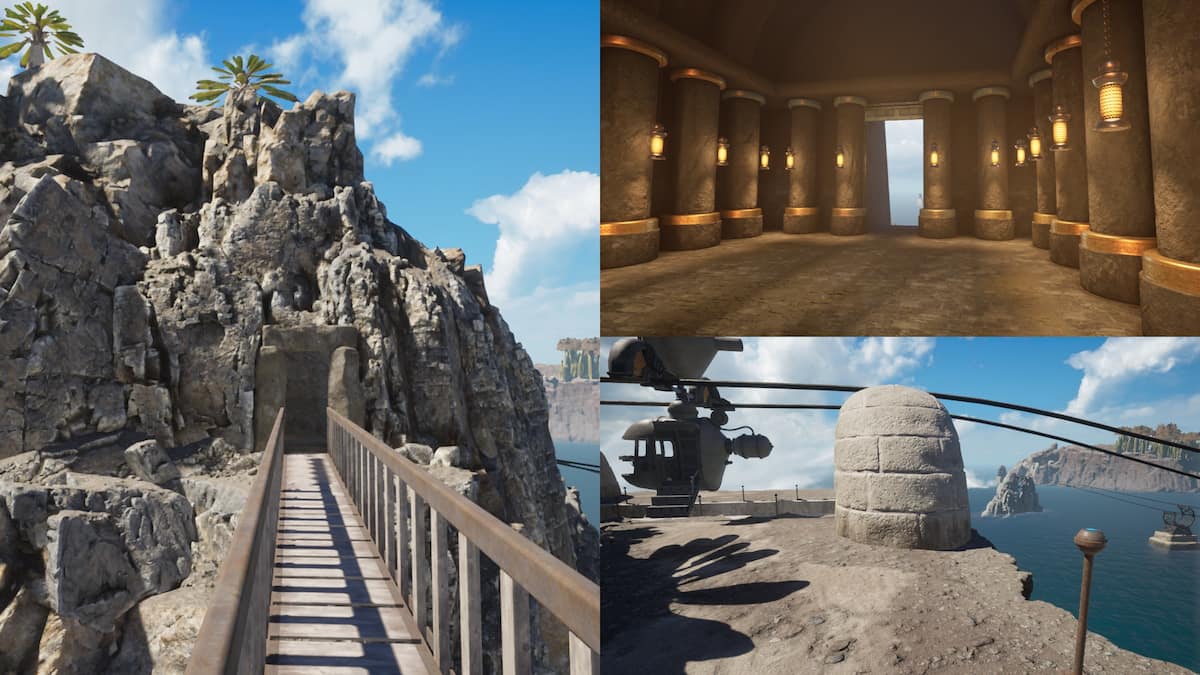
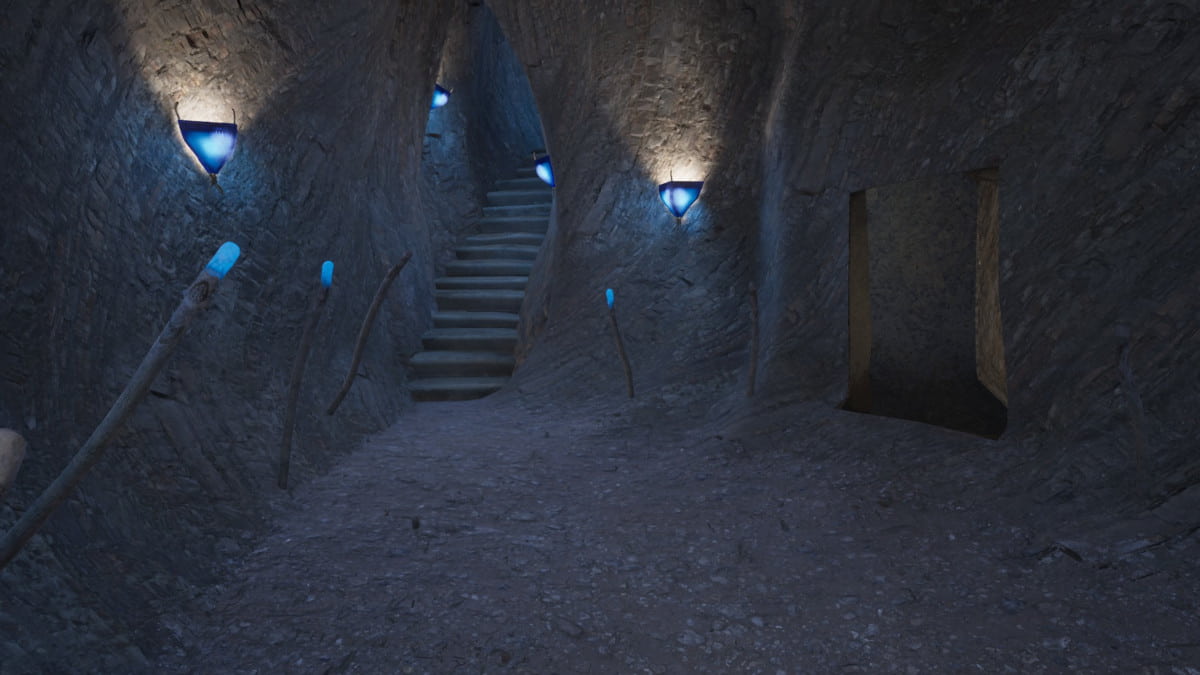
Temple Island is the beginning island in both Riven: the Sequel to Myst from 1997 and the remake of Riven in 2024. After watching the frankly baffling first cutscenes, you are thrown into a desert-like area filled with rusty mechanical items that don't seem to work. Make sure to read Atrus' journal he gave you all the way through for the journal achievement. Then you will want to do is walk to the right, then look down the cliff's edge near the stairs. You will see the body of the man there, and you will get an achievement.
Achievement: Cho?
Find the unconscious body of Gehn's man, the man from the first cutscene, whose body was thrown over the edge of the cliff.
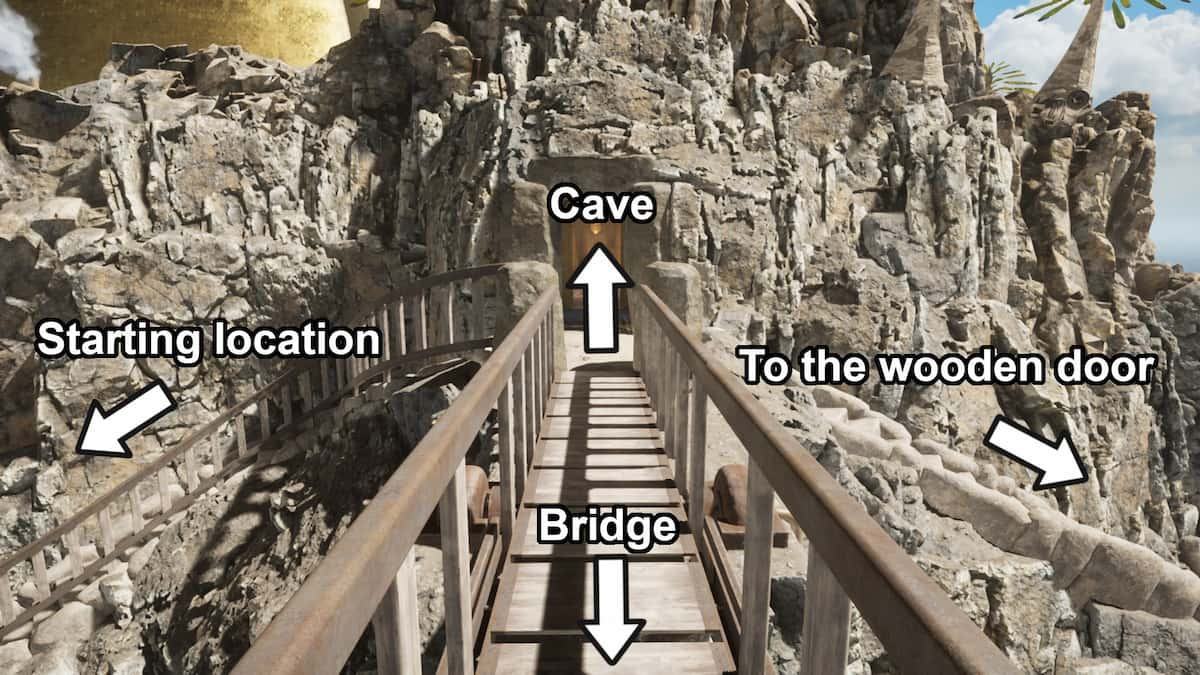
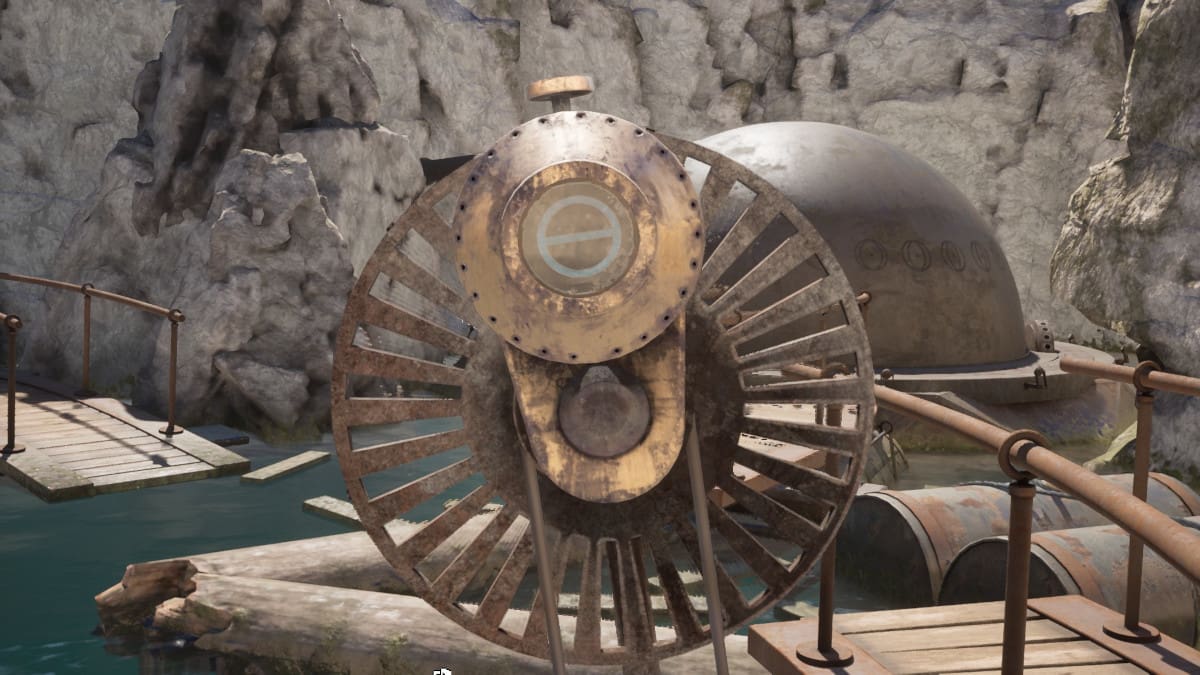
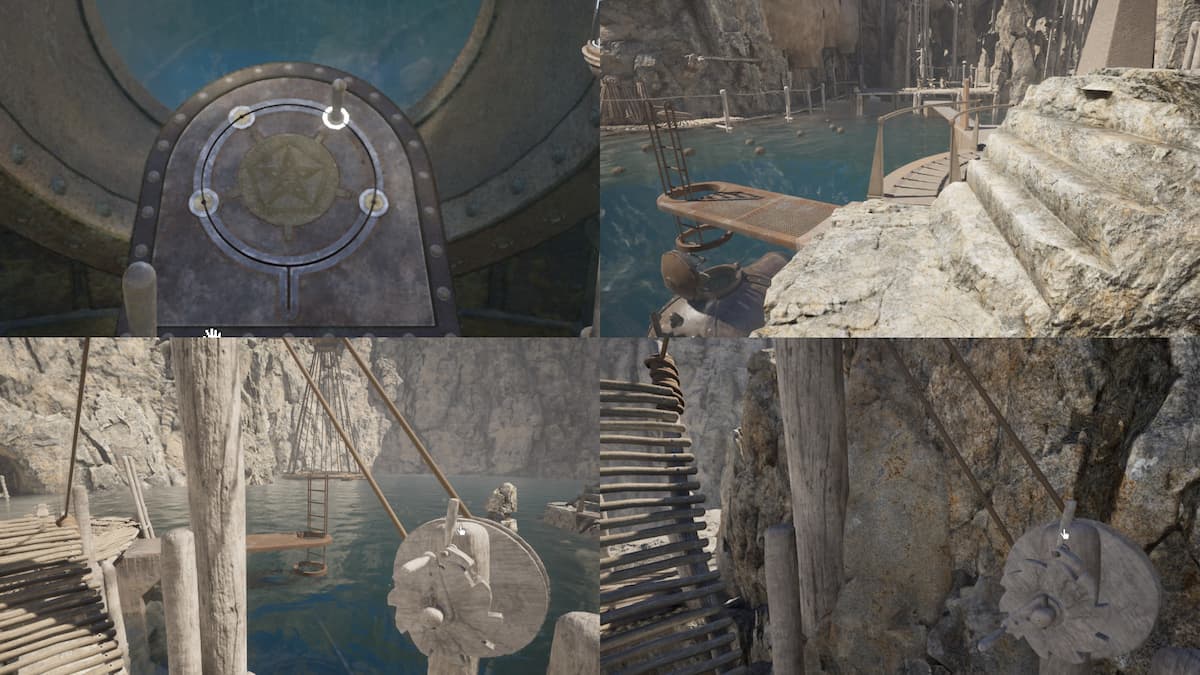
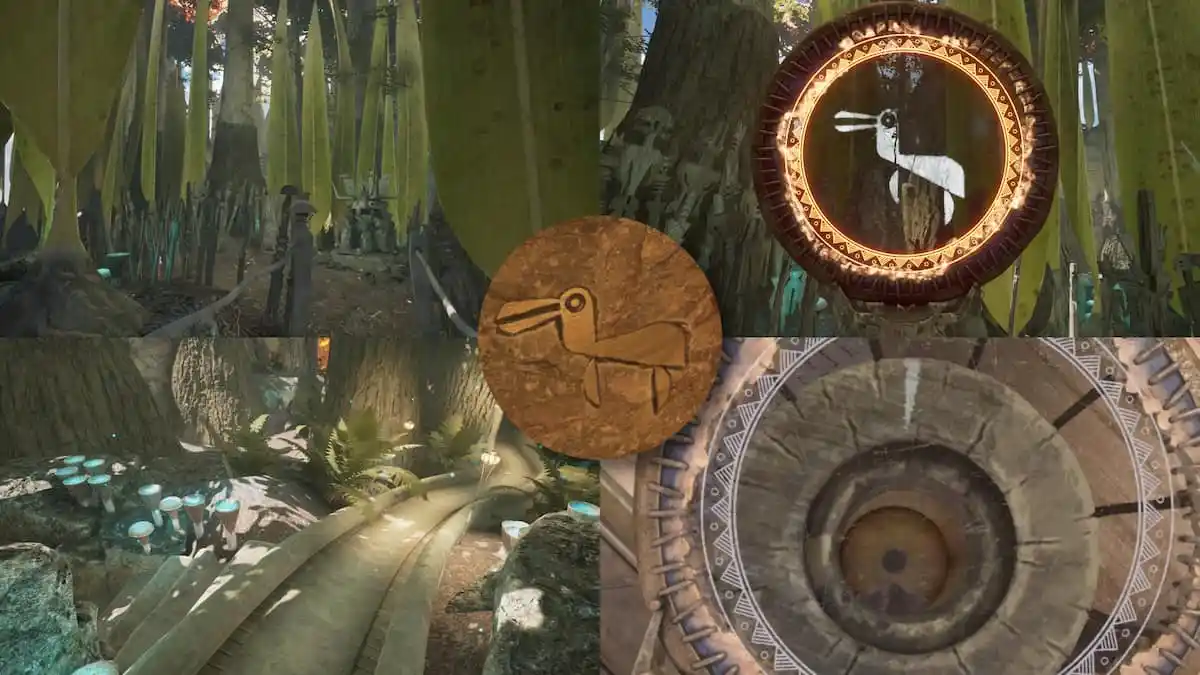
Go up the stairs on the right side of the screen. At the top of these stairs, you have a choice to turn left into a cave, right to go across a bridge, and straight to go down some stairs to the wooden door puzzle. First, you will want to head into the cave. In this cave is a button that can be pressed to rotate the entrance. Inside the round room are five pillars with golden scarabs on them. If you pull the rings at the bottom of each of these golden bugs, they will open to show you some stained-glass artwork. This will get you another trophy/achievement.
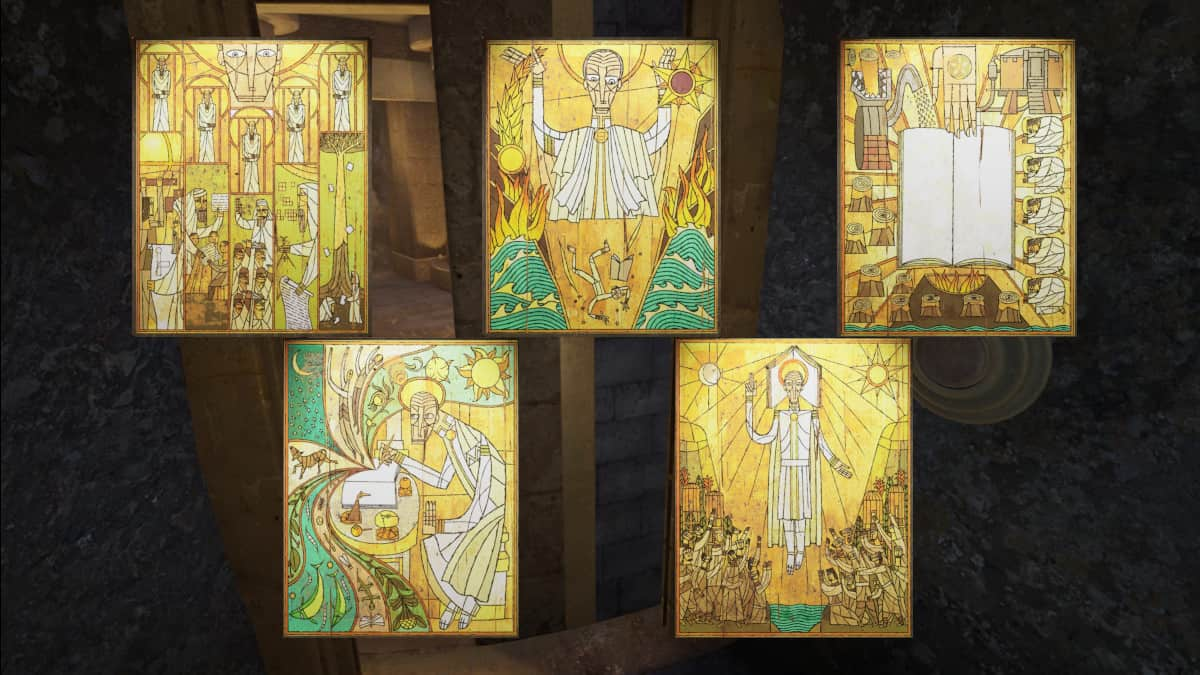
Achievement: Visual History
Look at all five pieces of artwork hidden inside the scarabs in the spinning room.
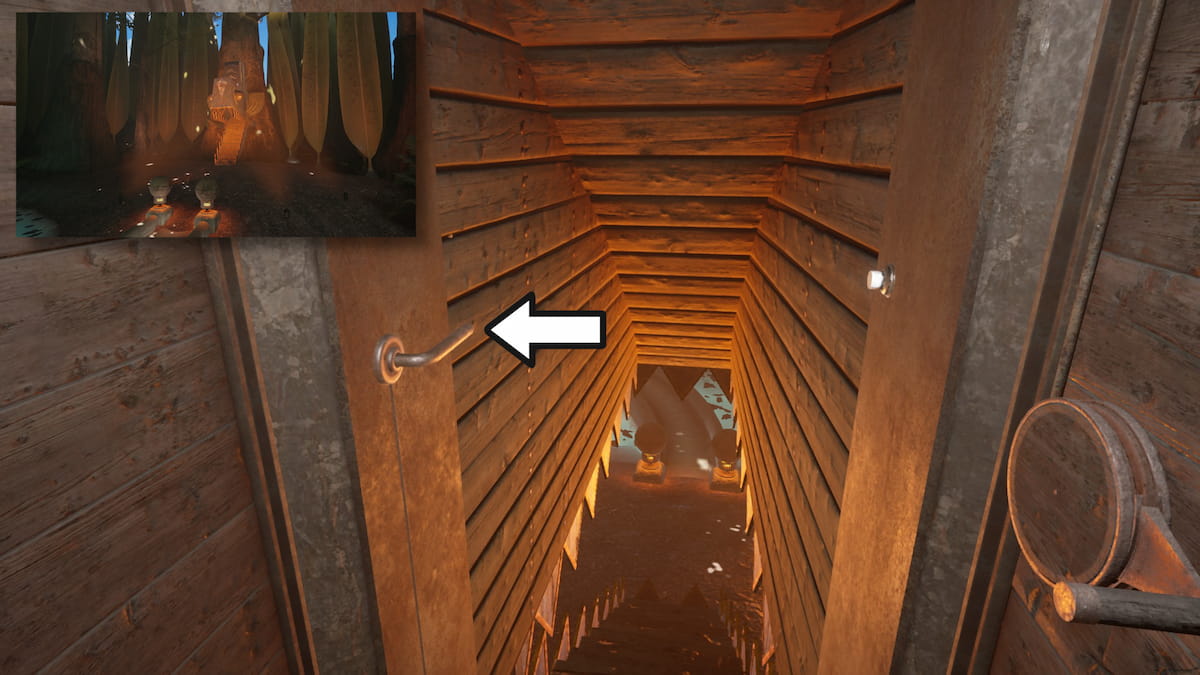
How to open the wooden gate on Temple Island
Now you will need to head down the other side of the stairs, and look for a wooden door at the bottom. You'll find that the wood gate is locked with what looks like a padlock. In order to open the the wooden gate, you will need to remove the hinge holding the door closed. Then push on the door to open it.

Once you are inside, you will notice that the door in this cave leads to the same, round, spinning room from the top of the stairs. You'll need to press the button from the cave at the top of the stairs, return to the cave behind the wood gate, and keep doing this until you can enter the spinning room behind the wood gate and have an open door on the other side.
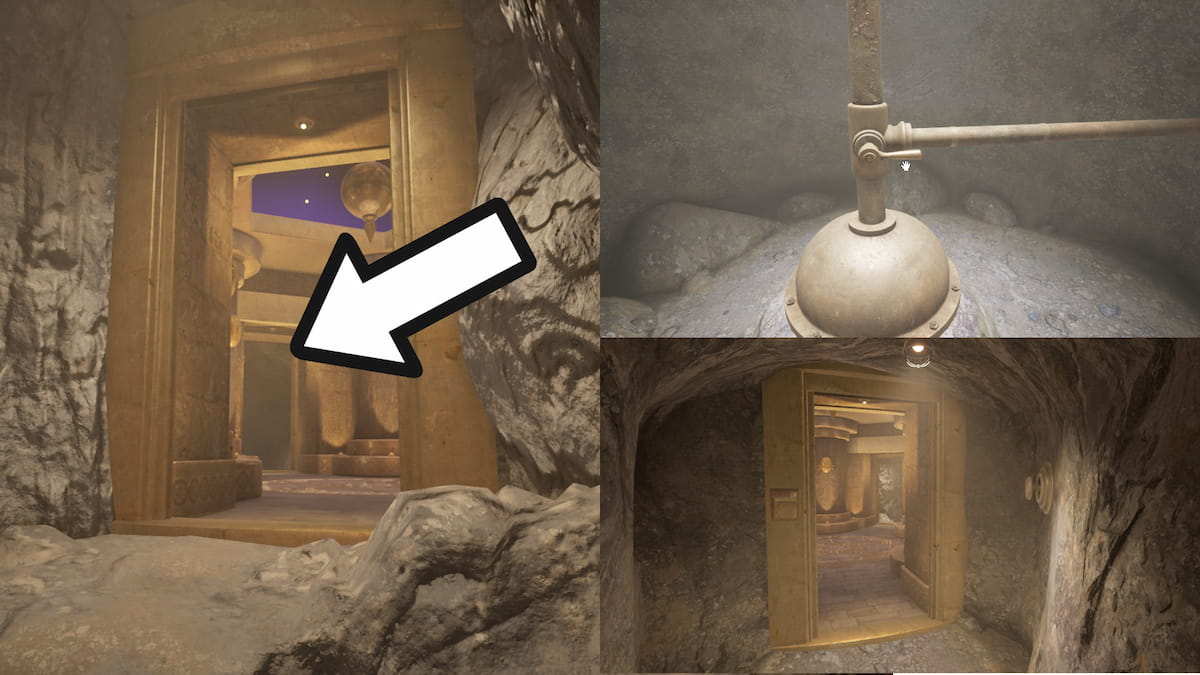
Inside this door, you'll find some brass pipes that go to the mechanisms outside. Turn the lever on the pipe into the on position, then head back out to the starting location. One the way back out into the round, moving room, you'll see there is a lever to open one of the gates that appears inside the round room. Lift this up, then use the button on the right side of the door until you can enter the round room and exit out into a new location. There are some things you can fool around with, but none of these matter at the moment. The other side of this new door has yet another button to spin the room, and it also has another lever to unlock one of the gates in the spinning room.
How to get into the Golden Dome on Temple Island
Achievement: Monument to Hubris
Enter the Golden Dome for the first time.
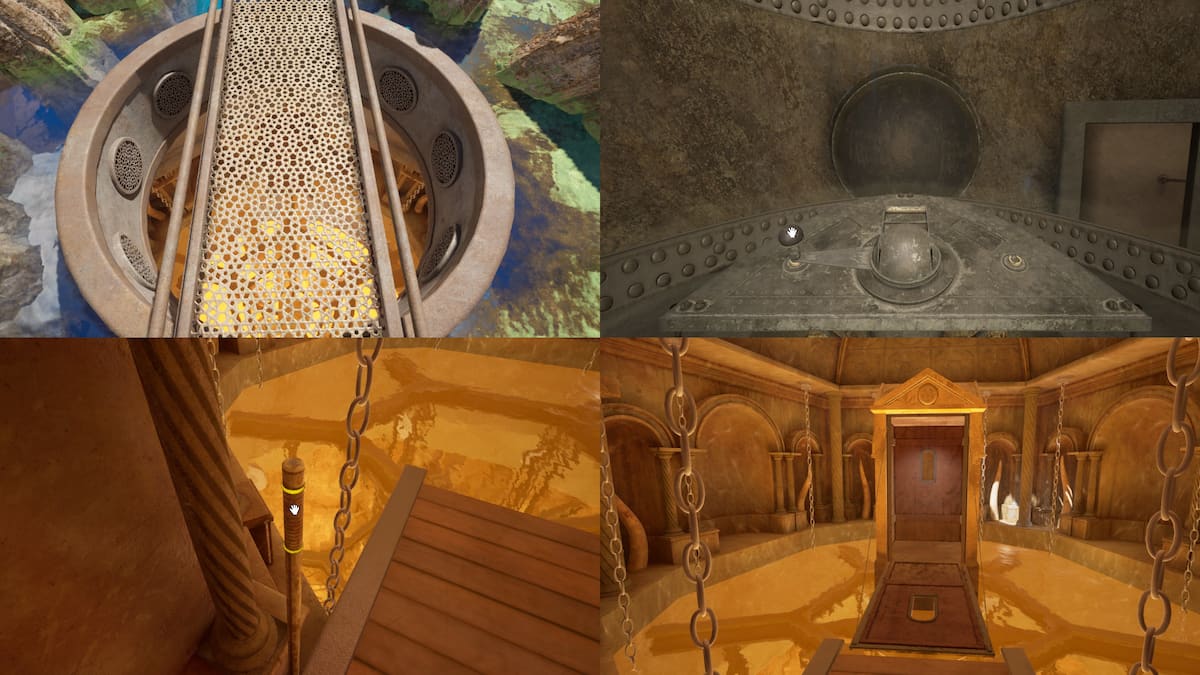
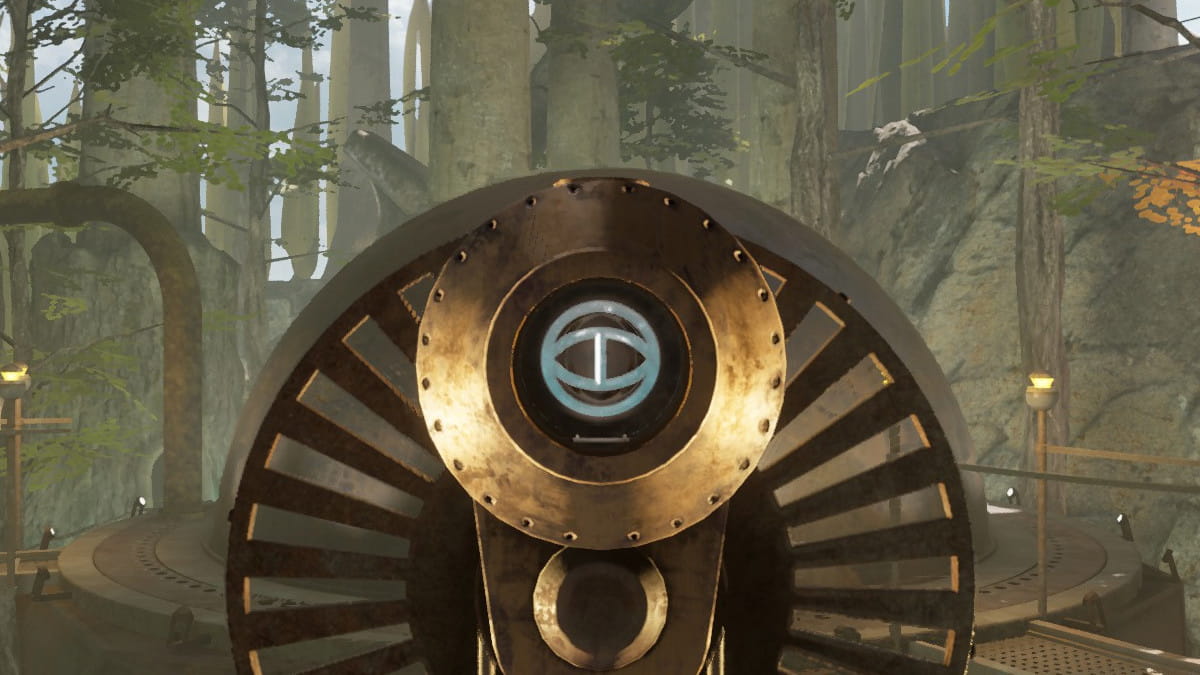
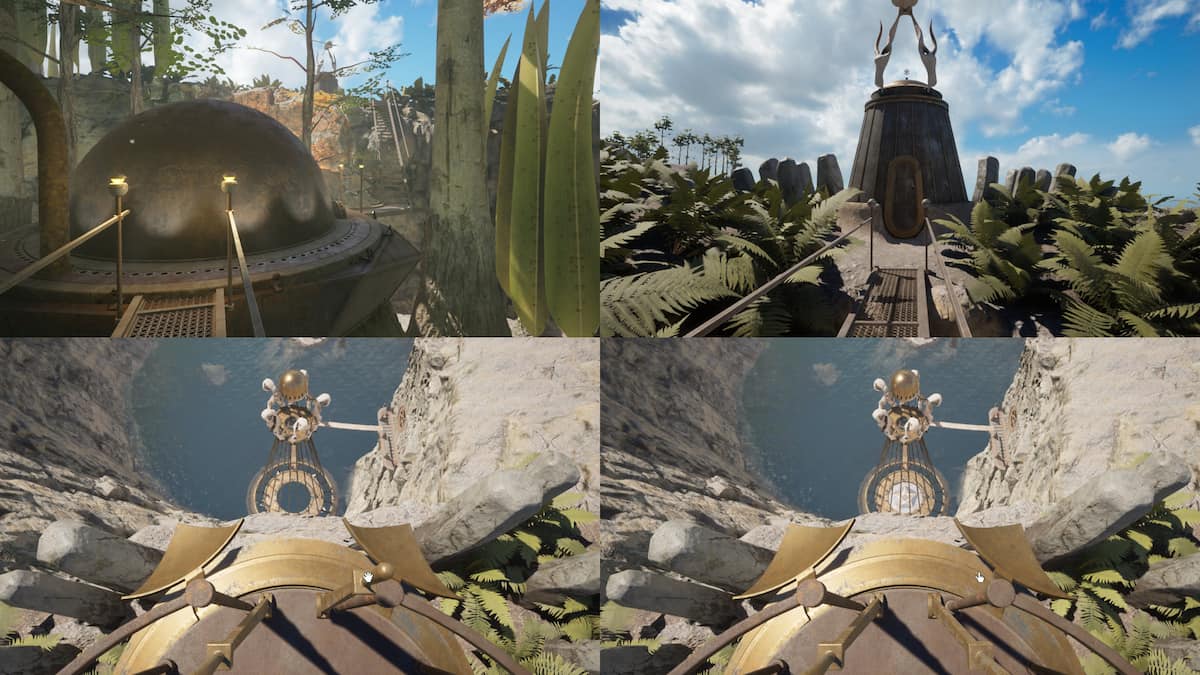
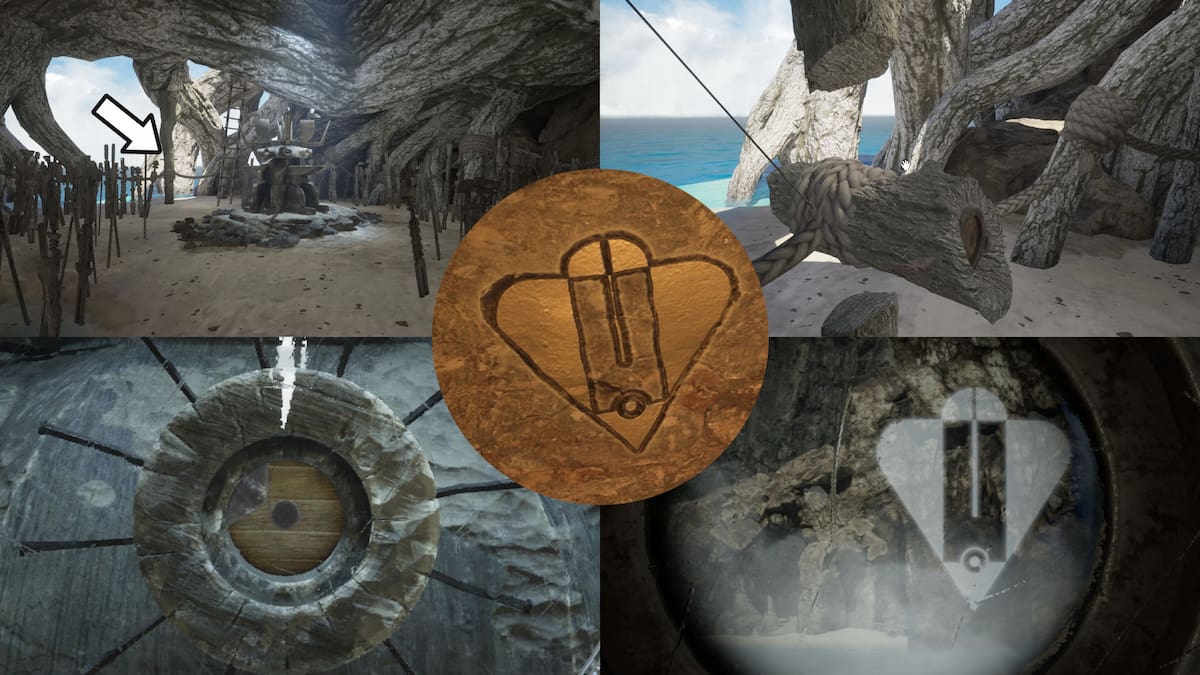
Once you have opened both the gates this way, you will be able to return to the first cave you could access and use it to enter the Golden Dome location. Along the top of the inside of the Golden Dome, you can look through some small windows, and in the center is a broken Linking Book. When you first enter the Golden Dome, there is a staircase to your immediate right; head down those stairs. There will be two doors at the bottom; enter the first door you come across.

This door will lead you outside. There is a path to your right when you exit the Dome. If you head around the bend, you will see a small bridge with another door on the other side. Pass over the bridge, slide the door on the other side open, and you will find yourself in a control room with a giant chair machine in the center. Interact with the chair, and you will sit down on it.
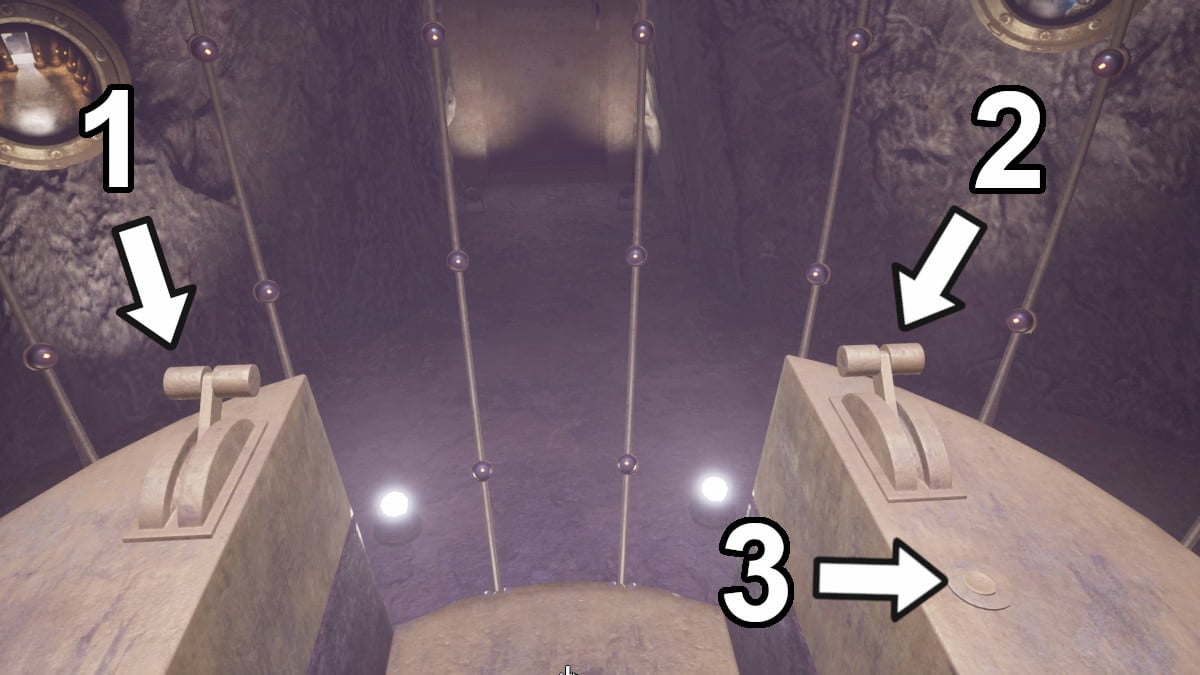
There are three things you can interact with from the chair: the lever on the left (1), lever on the right (2), and the button on the right (3). Pull the lever on the left (1). This will open a door you will need to progress. Don't bother with the other two interactables.
Head back into the Dome, then head right and out of the other door. There is another pipe with another lever you can pull on it, attached to the bridge that looks like it should go up and down. However, if you pull this level, it will destroy the bridge, giving you an achievement. You won't need this bridge later, so you don't need to save and restart after it's broken.
Achievement: Collateral Damage
Destroy the Boiler Island Bridge from the Golden Dome.
How to get to the second island (Jungle Island) from Temple Island
If you go back to the starting location, look for the bridge that is by the stairs. The bridge lead straight out from the first, starting cave into the round room. Go across it, down the stairs, and open the door at the bottom of the stairs. The large door in this chapel-looking room should now be open, thanks to pulling the left lever in the chair room. Walk through it, then press the blue button. It will summon the little flying lift thing called a maglev to the next island.
Jungle Island: Part 1
This new place you have traveled to is called Jungle Island, and it is the largest of the islands. On this island, you can find a village and the only trees that seem to grow in any amount on the five, dying islands. Now that you are here, there is only one thing you have to do before you can move on.
Achievement: Brittle Brown Leaves
Make it to Jungle Island via the rollercoaster-like lift called a maglev.
Where to find the Rebel Lens on Jungle Island
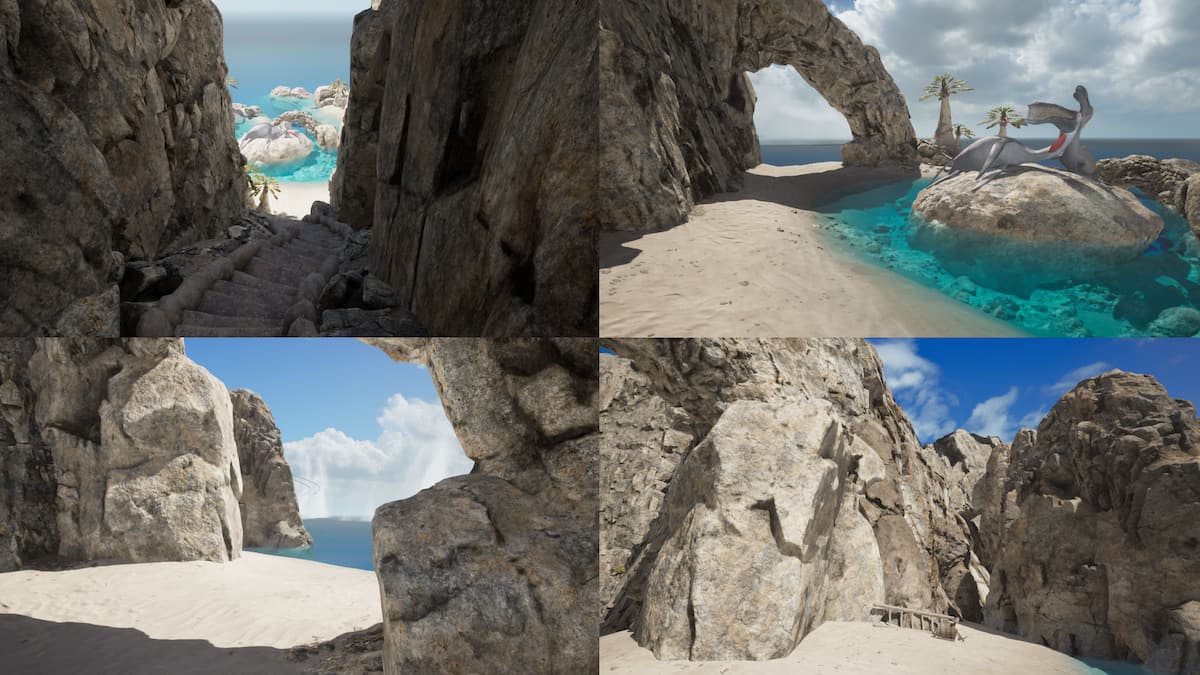
Hop out of the vehicle and walk across the platform away from the water. There will be a cave in the back left corner of the platform. Head inside the cave, up the stairs, then turn to the left right outside the cave where the stairs branch to the left and right. At the bottom of these stairs, you will come across two giant water creatures sunning on stones by the sea. Walk to the left along the beach, then turn the corner. There will be a sparkling object attached to the wall; pick this up. This is the Rebel Lens, and you'll need it for the rest of the game.
Achievement: A New Perspective
Pick up the Rebel Lens off of the beach on Jungle Island.
You can use the Rebel Lens to see invisible white paint that is used by the Moiety rebels to signal other Moiety of important locations, codes, and items. If you use it in certain locations, you'll learn a lot of interesting tidbits. After picking up the Lens, you will want to head back up the same stairs you came down to get to the beach, and take it all the way to the top. Cross over the wooden bridge, then walk to the left a little on the other side of the bridge. There will be a weird, floating black wiggly bubble; there appears to be another world inside of it. Look at it to get an achievement.
Achievement: Total Collapse is Imminent
Look at the weird, floating, tear in the world on Jungle Island.

How to go to the third island (Boiler Island) from Jungle Island
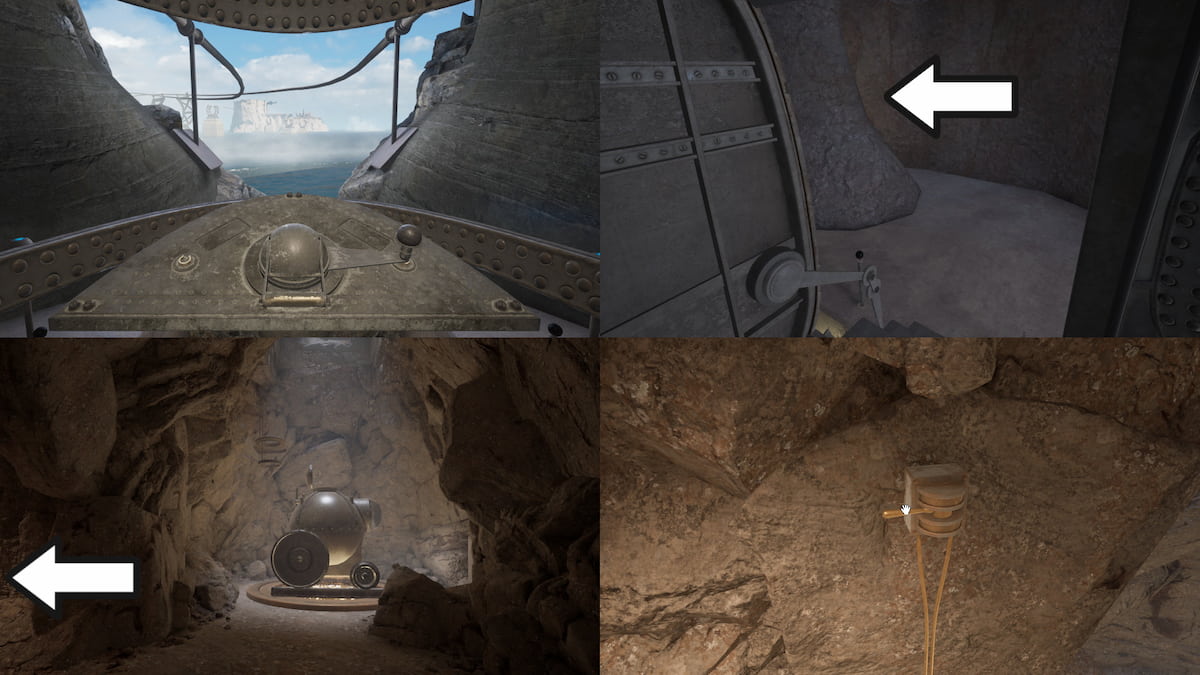
From the rift in the section above, right after walking over the wooden bridge, take the right-branching path toward the trees. There will be a place you can turn off of the main path on the right where all the butterflies have landed. There will be some stairs heading down, and they will lead to a mine cart. Click on the back of the mine cart to hop on the back, then pull the lever on the left of the screen to ride it over to the next island.
Achievement: A Tree Falls, A Page Arises
Arrive on Boiler Island for the first time.
Boiler Island: Part 1
The third of the five total islands is Boiler Island, named after the giant boiler near the central lake. There is a surprising amount to do on this island right now; you'll need to get inside the boiler, go into the mines, break into Gehn's lab, and more. So let's get started.
How to turn off and get inside the boiler on Boiler Island
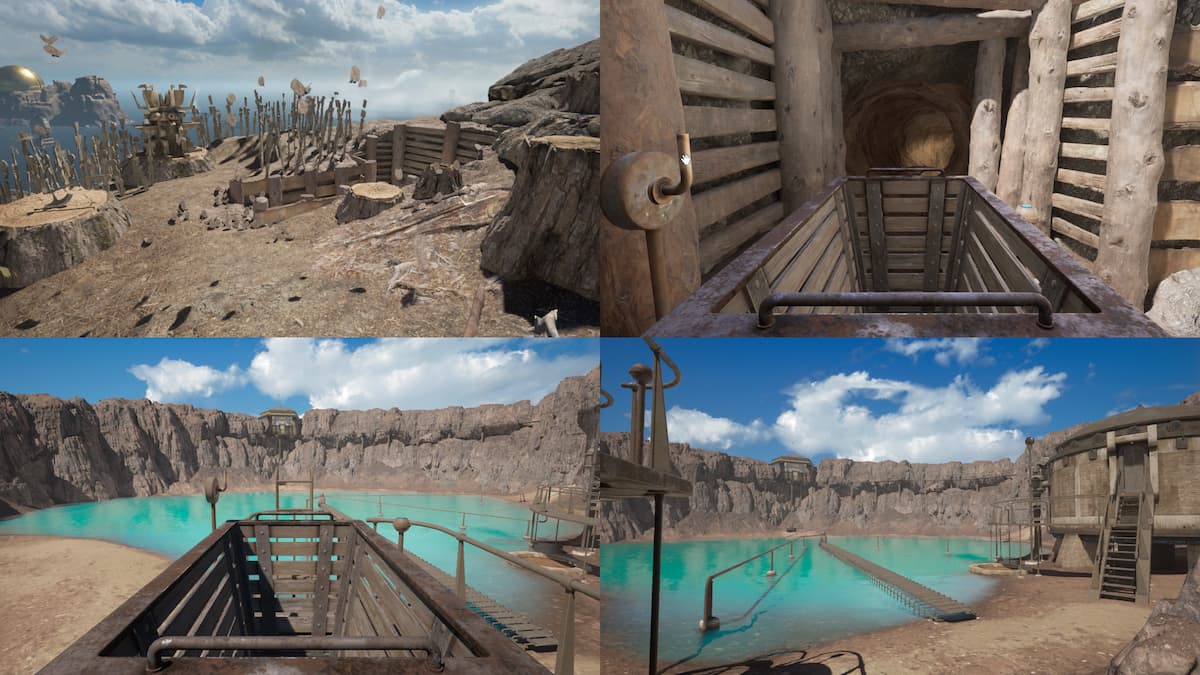
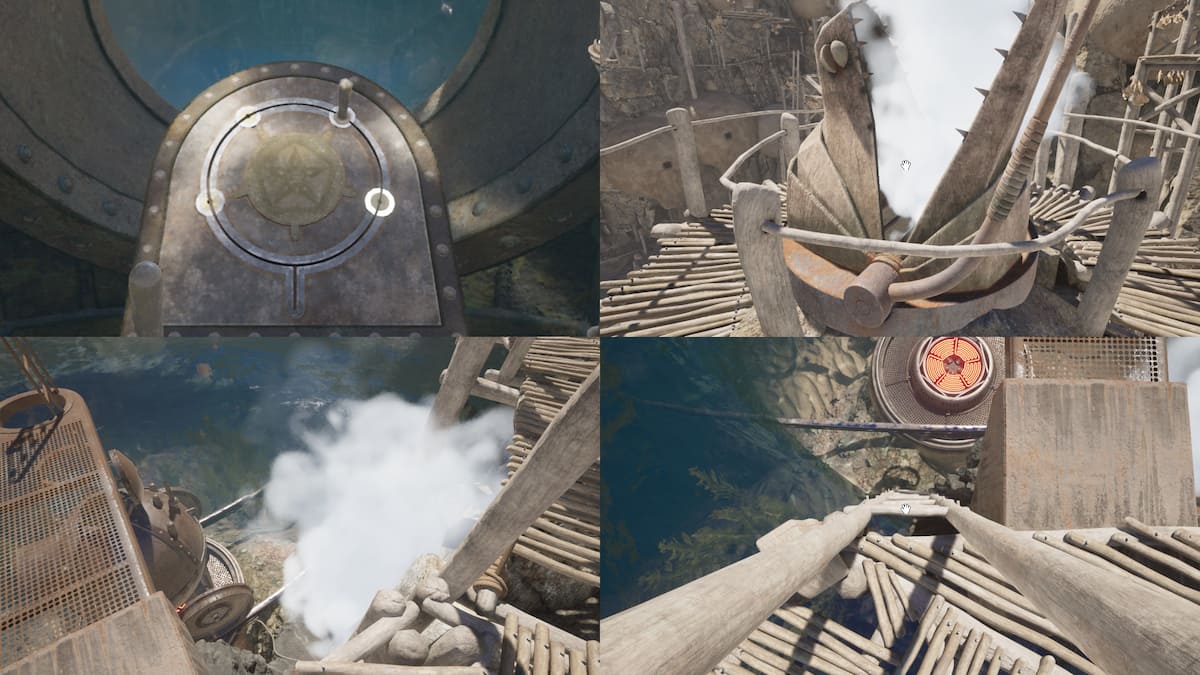
The first thing you have to do is get inside the boiler. The first thing you need to do is go across the lake on the bridge and turn the handle of the central lever to the center. Walk over to the door of the boiler, up the stairs, then turn left on the platform, and walk over to the the buttons. There are a total of four levers. First, spin the crank (1), then wait until the water has completely emptied from the boiler. After it's completely empty, turn the lever on the left (2). Then, push up the lever in the middle (3) to lift up the floor inside the boiler. Last, make sure to turn the lever (4) on the right to turn off the heat so you can safely go inside.
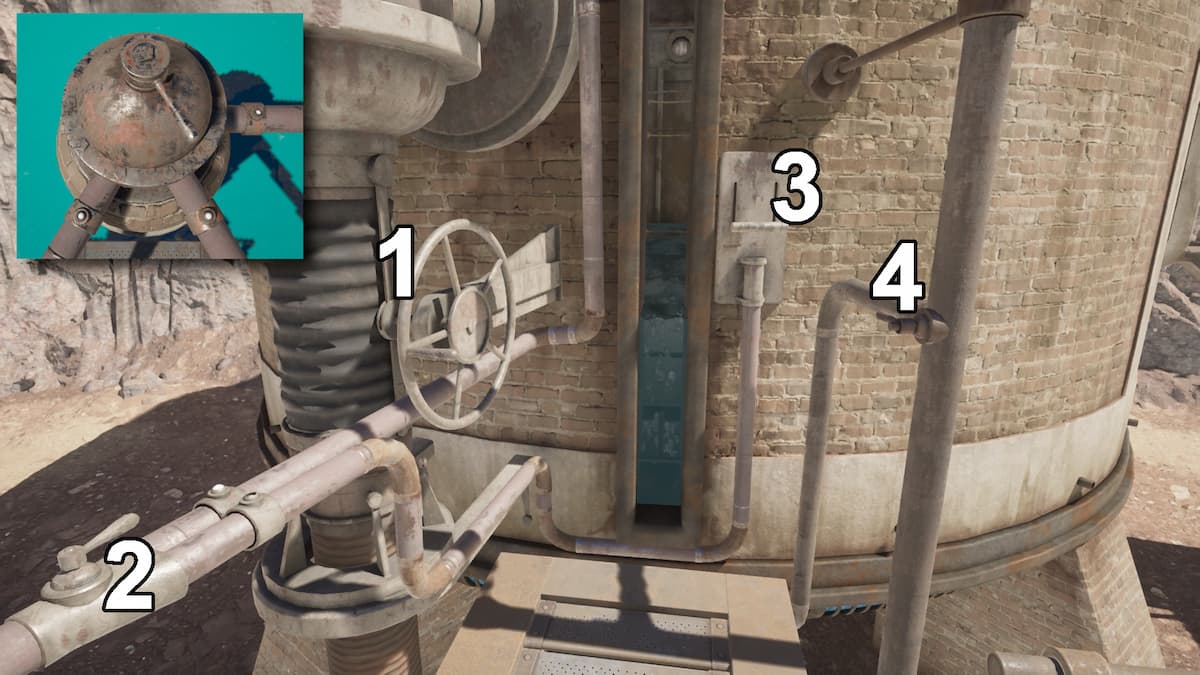
Head inside the boiler (it will take a second for the door to open when you walk up to it. Take the ladder down; if it won't let you down, you didn't drain the water all the way out. Once your in the pipes under the ground, head to the left and go out onto the side of the island. Take the walking path up and around to the platform overlooking the boiler. Make sure to open the sliding hole in the platform so that you can get up and down the ladder, then go down the ladder. Head back to the middle of the lake and turn the lever in the middle of the lake to the far right. This will supply power to the cave you are about to head into.
How to get into the golden building on Boiler Island
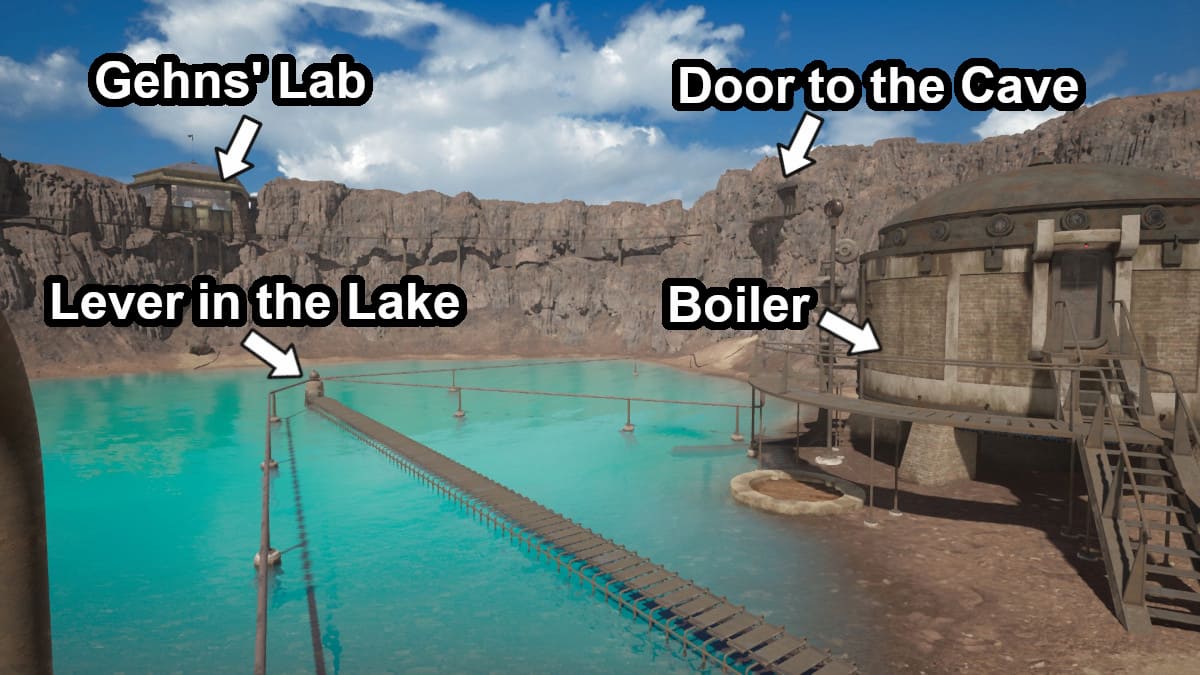
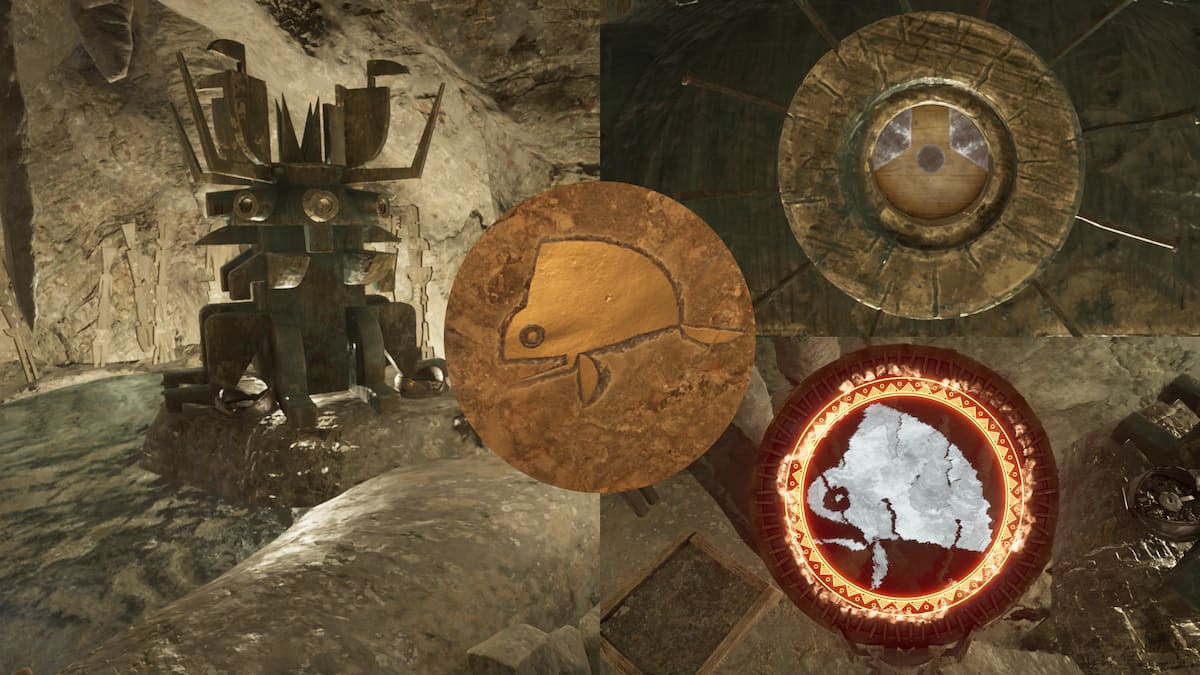
Head back up the ladder and into the cave. Go straight, and head around to walk across the platforms next to the water. At the end of this path is a big, water-sucking vacuum. If you didn't turn the lever in the lake as stated above, it will not work. Press the on button on the vacuum, then wait for the water to empty out enough for you to go down the ladder.

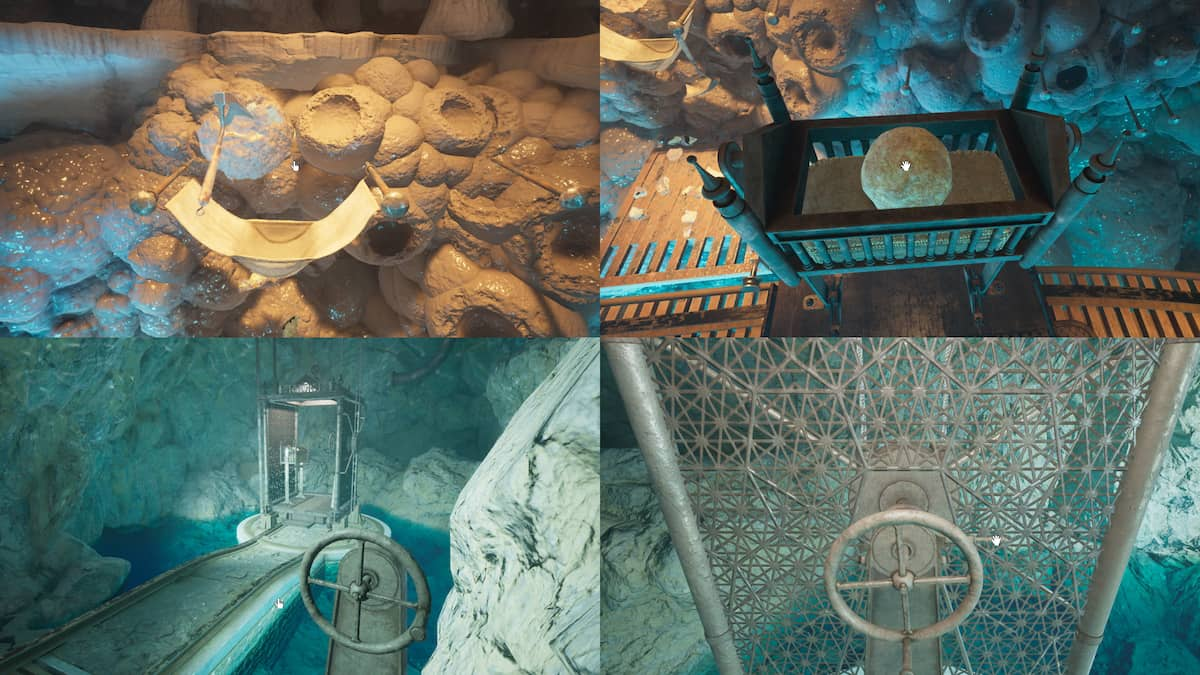
Almost immediately on your left, you will see a little platform with a tiny hammock and a pickaxe on it. Pick up the pickaxe, and it will automatically carve out a geode from the wall. Pick up the geode, and put the rock in the cradle designed for it on the cart on the tracks in front of you. Use the crank to push the cart away from the ladder you took to get down here, and all the way to the end of the cave. Once you are at the end of this tunnel and you can't move the cart any further, get out and use the crank inside this room to bring down the elevator. The cart should roll into the elevator automatically. Lock the cart into place with the lever next to the wheel in the elevator, then use that same wheel to move the cart up into Gehn's lab.
Achievement: Pens of Fate
Break into Gehn's Lab through the geode mine underneath it.
What to do inside Gehn's Lab / the golden building on Boiler Island
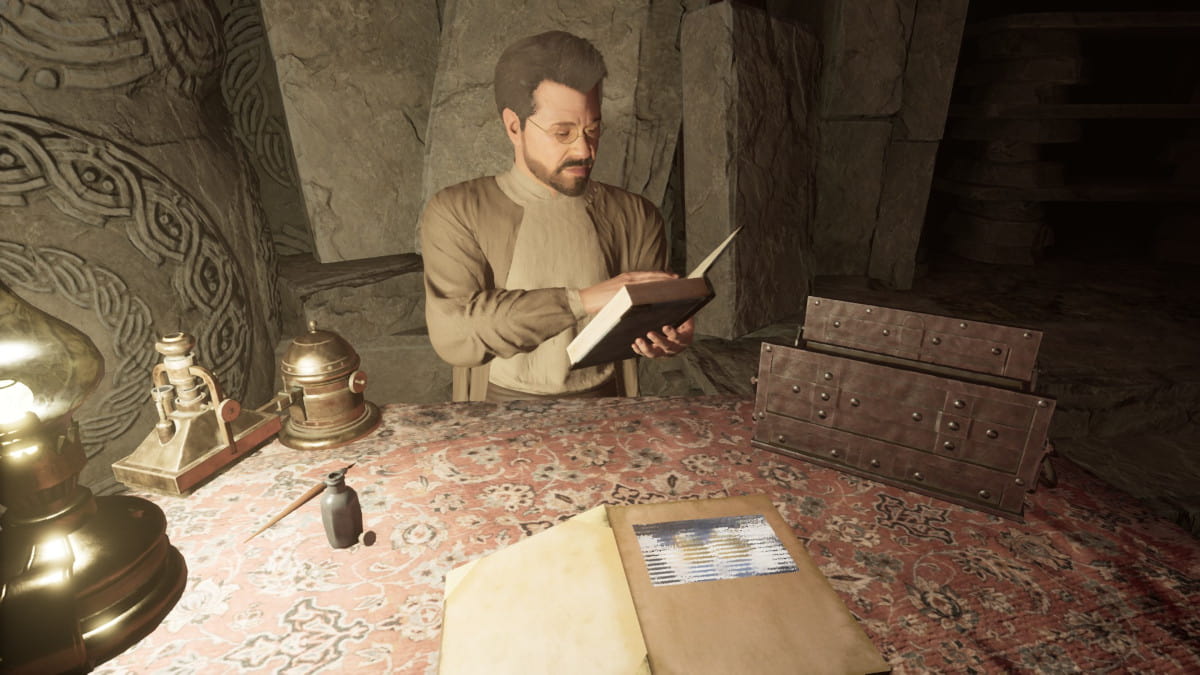
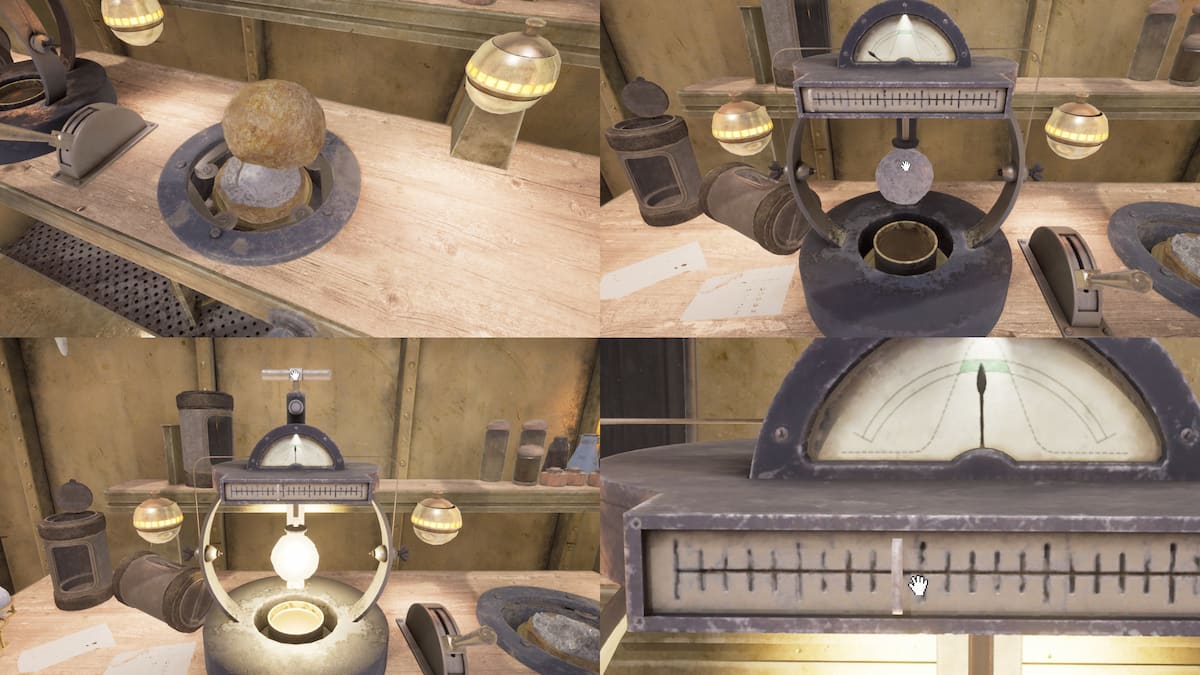
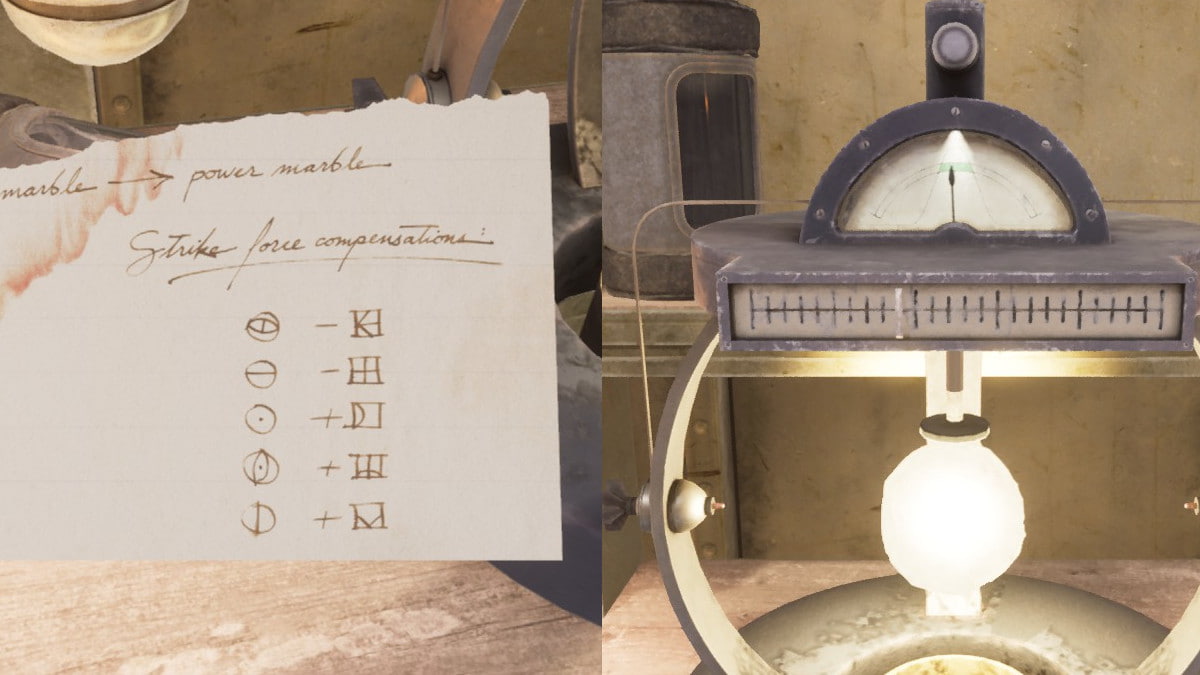
There are several things to interact with inside the lab. First, you should read through his journal. There is a lot of lore inside Gehn's journal (5) for the journal reading achievement, but you won't really need any of it to solve any puzzles. Once you are done with the journal, head to the desk on the other side of the mine cart door. Inside the cage is a little poisonous frog (4). While letting this little guy free doesn't change anything in the gameplay, it will feel nice. Next up, head over to the desk to the left if you are facing the frog desk. This one contains the geode cutter (3) and two pieces of paper; read and make note of both pieces of paper (1, 2), especially the note about the compensations (2). You will also want to pick up journal paper (6), fire marbles paper (1), and compensations paper (2) for the journal reading achievement.
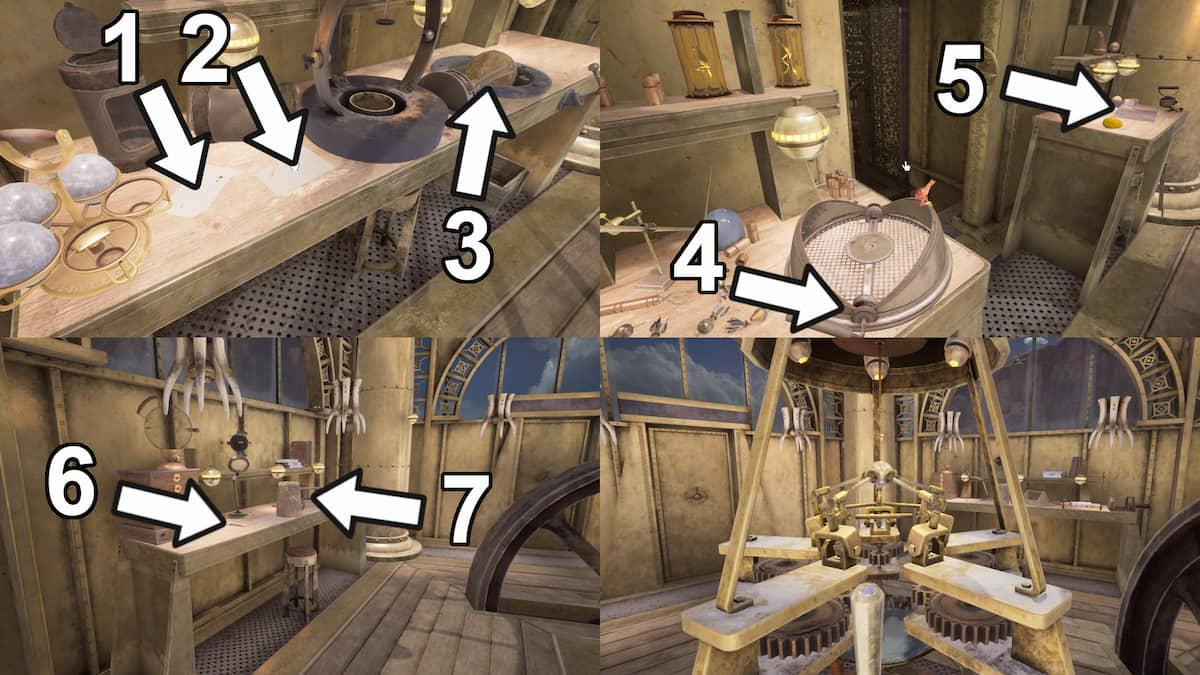
The last desk along the outside of the lab has another piece of paper on it (6) with Gehn's handwriting. He is pondering over what the symbol inside this carving means. Look at the wooden item (7) through the Rebel Lens and take note of what the symbol inside looks like. You will need this later. In the center of the room is a marble polisher. If you pull the levers, you can keep it spinning. If you watch the marble polisher for 15 real minutes, you will get an achievement.
Achievement: The Watcher
Stare at the marble polisher in the center of Gehn's Lab for 15 real-world minutes.
Place the geode into the geode cutter (3), then turn the crank below it to cut it open. This will cut the geode in half and show the marble on the inside. Pick up the marble and place it inside the machine next to the geode cutter. This machine has a place for the marble underneath, a ruler-like bar, a handle on top, and a button right under the handle. Move the indicator along the ruler-like number scale then pull the handle on top and press the button until the marble glows really brightly and the meter is centered in the green. This will be the 10th line from the left, as shown in the bottom right corner of the screenshots below. Make note of this number, as it will be critical later on.
Next, unlock both the front and back doors leading out of the lab (you will want to be able to move freely between these, so unlocking them now is a good idea). After the doors are unlocked, head back to the Geode cave out of the front door. This walkway overlooks the boiler and the little lake in the center of this island. If you turn to the right, you will hit a dead end with nothing to do in it, so go to the left instead. Walk as far as you can until you get to a staircase that goes down. There will be a rusted metal door at the bottom, and there is a spinning ball inside.
What to do with the spinning ball on Boiler Island
If you head right inside the door that leads to the geode cave, then close the doors behind yourself, you'll see a hallway on both the left and the right. The left one goes out to the walkway that leads to Gehn's Lab, and the right one goes down some stairs to a spinning ball. If you picked up the Rebel Lens off of the beach from Jungle Island, you will be able to interact with this. Look through the Rebel Lens at the spinning ball. You'll notice that one of the symbols has a bit of invisible paint underneath it.

Since the ball is spinning pretty fast, it might be hard to see it as it spins your way; to make it easier for you, the symbol you are looking for is the circle with the vertical line down the center. Now that you have marked the symbol you need, turn around and walk up to the rusty door that is right behind you. Close the door, then head into the secret passage to the right that was hidden behind the open door. Go through this short cave path, and interact with the mechanism at the end.

There is a little button on the top of this mechanism; press it when it has the right symbol in it, the marked symbol on the spinning ball. It is the one that looks like a circle with a vertical line through it, as written above. When you press the button at the right time, it will open the spinning ball. Walk inside the ball, and you will be transported to a new location.
Into the Starry Expanse from Boiler Island
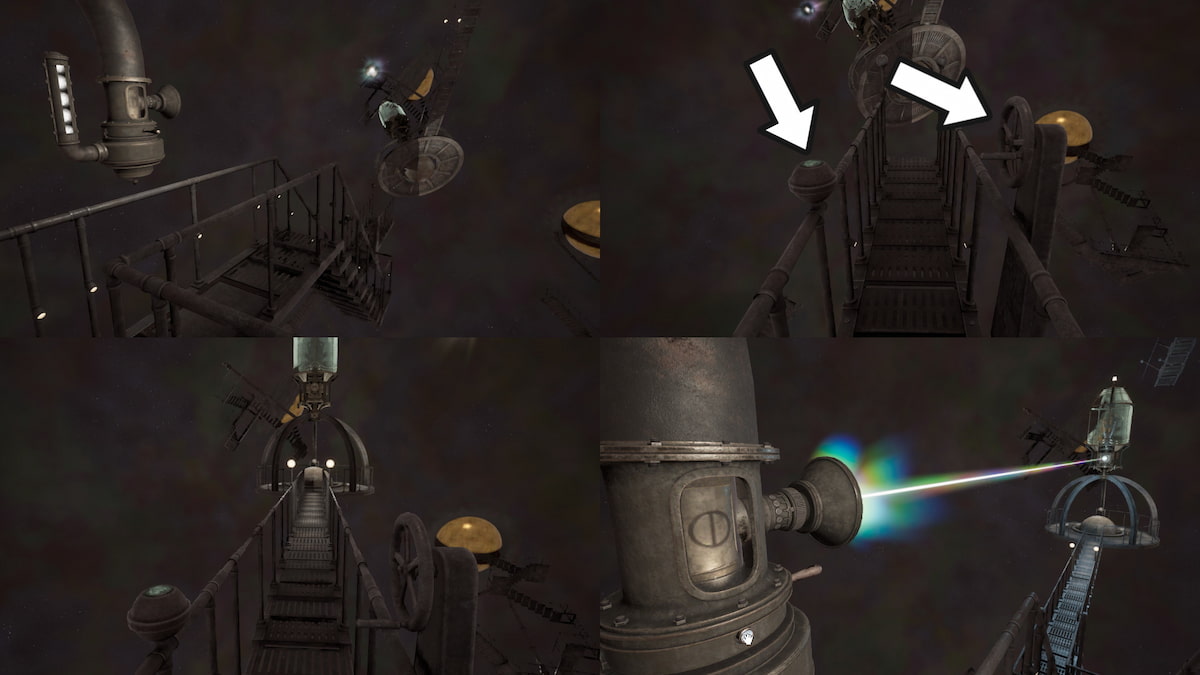
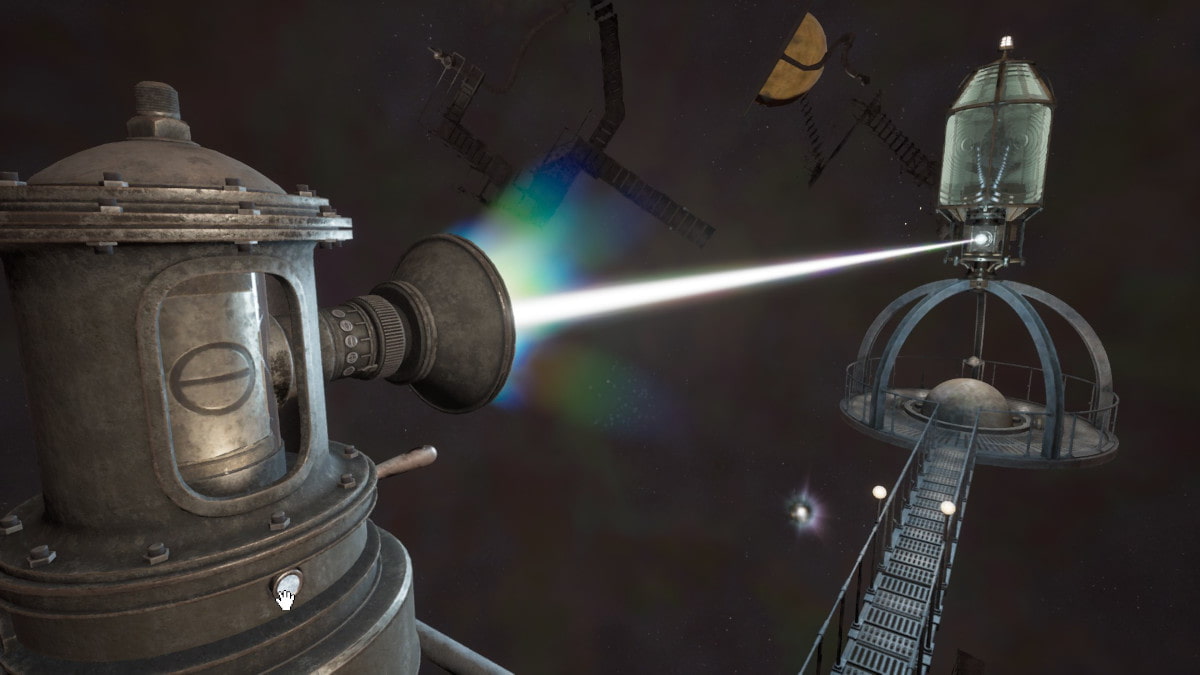
Inside the Starry Expanse, you need to do three things: first, head down the stairs and press the button on the railing near the edge where the walkway ends. This will summon the central hub. Next, interact with the crank on the right side of the walkway. This will unfurl the walkway to it can connect with the central hub. Last, you need to interact with the weird mechanism that is up closer to the dome you came out of. Interact with the lever on this mechanism four times to load it up with a fire marble (the glowing white balls on the left side of this machine), then press the button once the central hub is lined up with the mechanism. Next, head back to the spinning circle, and go back through to Boiler Island again.
Achievement: Dipped in Black
Enter the Starry Expanse for the first time.
What is the Starry Expanse?
The Starry Expanse is part of the rift from the original Myst game. It is slowly eating away at the edges of Riven, an Age that is slowly but inexorably collapsing. The Starry Expanse is reachable through each island through the spinning balls. Runic metals have been put around each to help contain them by Gehn and his men. This is the tension in the world that pulled the single island and severed it into five different islands that are there today. Atrus and Gehn have both been working to keep the collapse from happening, but the writing is on the wall for the Fifth Age.
In game terms, it is used as both a solution to a puzzle and as fast travel points between islands. As you open each and push the walkways out, connecting each to the center, it opens up new ways to connect the islands to one another. Every time you come across a spinning ball, make sure to follow the steps above to both connect it to the center by putting out the walkway, and used the pneumatic tube device to send a fire marble to the Golden Dome.
Survey Island: Part 1
Once you are back on Boiler Island, walk through Gehn's Lab, then take the other exit out of it. This will lead you to another platform with yet another maglev connecting you to a new island. Press the blue button on the way down the stairs to call the maglev, then get on to head to Survey Island for the first time.
Achievement: Of Scheming and Schemata
Arrive on Survey Island for the first time.
The overlook on Survey Island
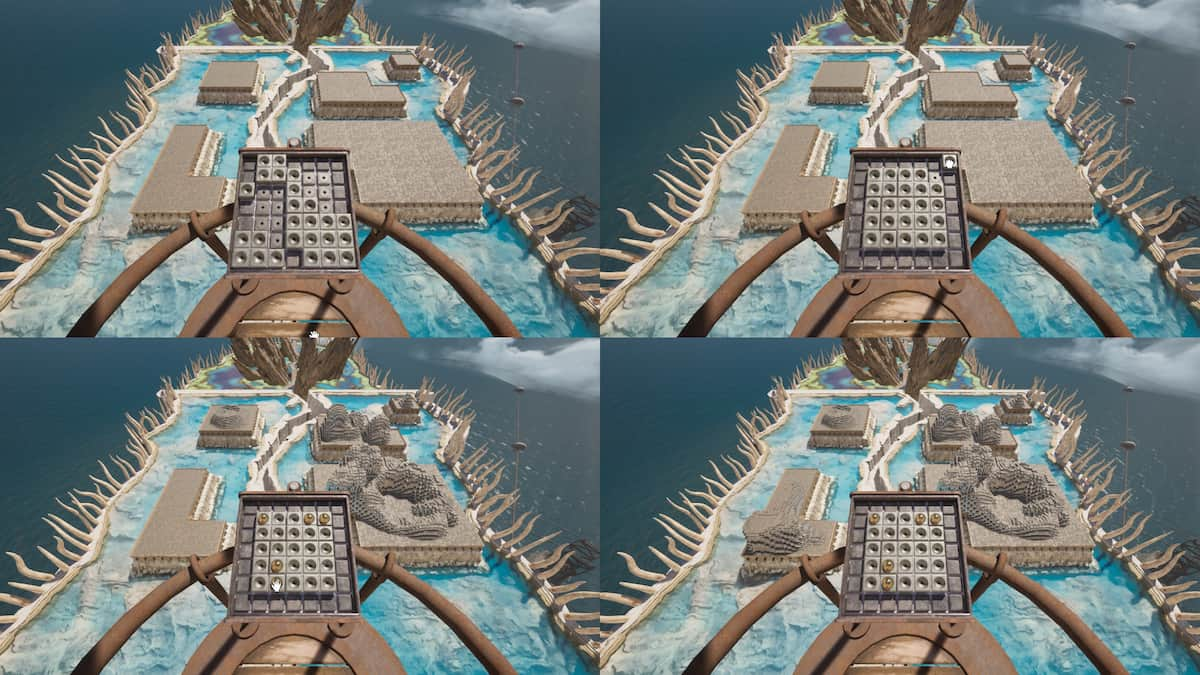
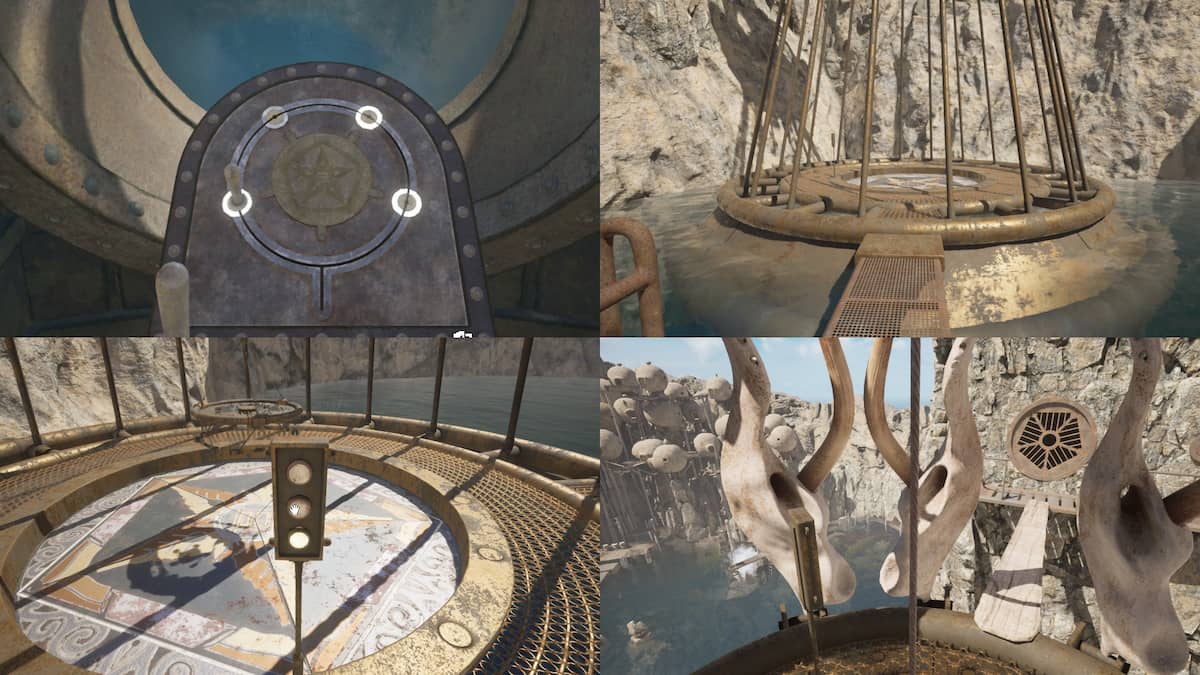
Once you are on Survey Island, you can go up the stairs through the crack in the center of the island, then up the elevator. On the top, you can find a weird little puzzle on the overlook. You need to take the Tetris-like pieces and put them in the same positions they are on the island from your perspective, the piece them back together, putting the five broken islands of Riven back into one, as it was before the Age started to break down. When all the pieces are put back into a square, some buttons will pop up. Memorize this pattern; you will need it later. Press all five buttons, and you will see a map of the islands pop up.
The puzzle on the elevator on Survey Island
Now that you have completing the balcony puzzle above, you can get to the hidden level on Survey Island. Head back into the elevator, then interact with the pad underneath the buttons. This grid of buttons matches the grid that overlooks the balcony. If you put in the same pattern, it will take you down to a secret level of Survey Island.
Achievement: Below the Surface
Head down to the hidden basement floor of Survey Island.
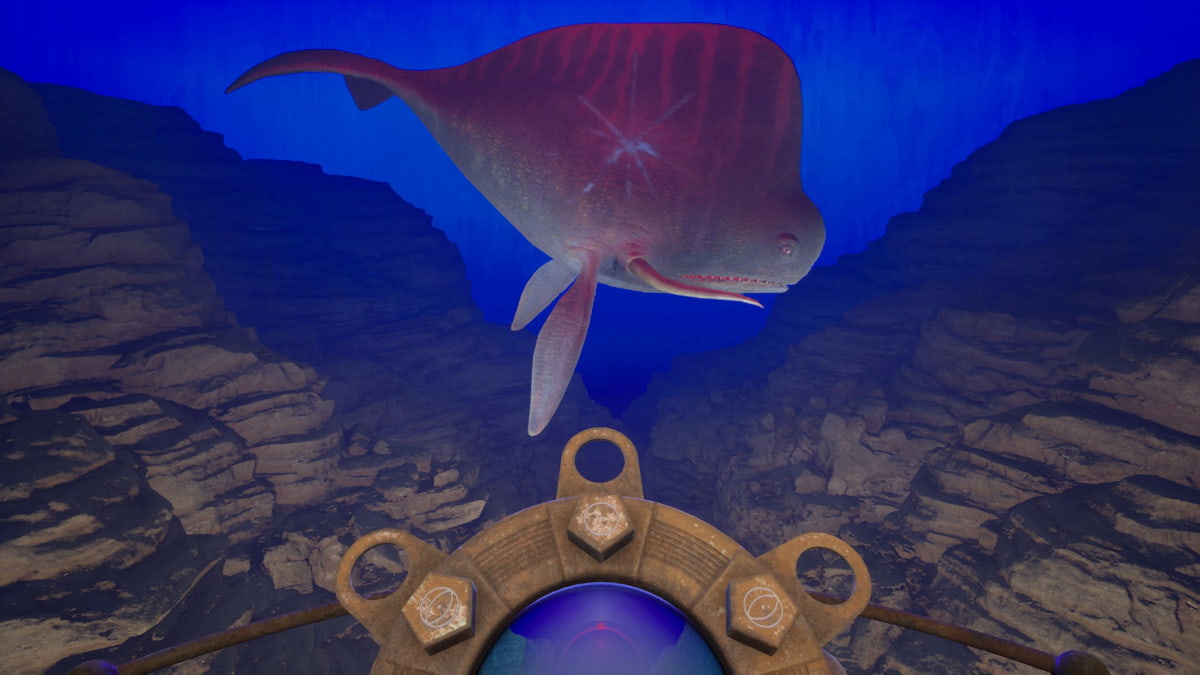
Down below, you'll find a device in front of what looks like an aquarium. If you pull down the left lever, it will show you different video feeds from around the island. This one is kind of neat, but doesn't really give you any information you need. The lever on the right, however, shows you colors associated with the symbols for each of the islands' symbols. Make note of these as you'll need them later. If you spin to the red light and press the button, a massive underwater creature called a Wahrk will show up. If you call it several times, it will eventually get irritated with you and will charge, putting a crack in the glass between you.
Achievement: Animal Instincts
Anger the Wahrk by calling it over with the red light too many times.
The spinning ball on Survey Island
Survey Island also has a connection to the Starry Expanse. If you ride the elevator up, you can walk around the pool and reach it. The symbol for this Expanse connection is a circle with the horizontal line through it. Press the button as the apparatus and the symbol on the spinning ball properly line up. Make sure to press the button to call the central hub, unroll the walkway, and send the fire marble through the pneumatic tubes up to the Golden Dome with the mechanism.
Prison Island: Part 1
Achievement: Life is Taken; An Age is Given
Find your way to Prison Island through the Starry Expanse.
While you are here in the Starry Expanse, you might as well visit the Prison Island for the first time. You can see Catherine and the last of the cemetery carving here if you want. This will get you an achievement and allow you to use the apparatus to shoot the fire marble through the pneumatic tube.
Achievements: He Who Numbers But Does Not Name
Visit all five islands in the Age of Riven
How to get underneath Survey Island
As you walk across the path to and from the maglev that brought you to this island, you probably noticed that there is a room you can see below you. In order to get down inside this location, you will need to head back down the stairs. Get inside the maglev, turn it around, then get out of the maglev. This will let you out on the correct side to go inside the door that shows up on the right side when you hop into the maglev. Go inside, then pull the lever to call the elevator, and take the elevator down.
After that, you will get a brief cutscene of a guy who sees you, then runs away. Follow him out to see him take the maglev to escape; this will give you an achievement if you try to catch him.
Achievement: Giving Chase
Witness the scribe man running away on the maglev.
Jungle Island: Part 2
The maglev above will bring you back to Jungle Island. You can get off of the maglev on either side, and it will lead you somewhere new. First, you will want to take the path on the left, which is the way the maglev is facing when you arrive. Get up, then walk down the the elevator and summon it with the button on the right side.
How to open the giant metal fish on Jungle Island
In the original Riven, there was a button by the metal fish that opened it up so you could get inside. This is not the case in the remake of Riven, and you have to instead go up the elevator from Survey Island as stated above. Once you are inside the elevator, ride it up once, then pull the lever that appears on the left. This will open the fish's mouth and a shortcut to the maglev and the spinning ball. Don't forget to interact with the spinning ball too; take the elevator to the top floor, then walk to the apparatus. Make sure to push the walkway out and use the apparatus to charge the fire marble while you are there, just like you have done with the others so far.
How to get the achievement Gods-Eye View
If you look at the spinning ball from the walkway, you can see that there is a staircase on the other side of it. Walk around the edge of the spinning ball, up the stairs, and go inside the tiny building. Once inside, pull the lever on the left. This will lift you up to look over the village, giving you a bird's-eye view of the village and an achievement. Pull the lever on the right to close the floor of the weird apparatus below you, then ride the elevator back down.
Achievement: God's-Eye View
Ride up into the building overlooking the village on Jungle Island.
How to get into the village on Jungle Island
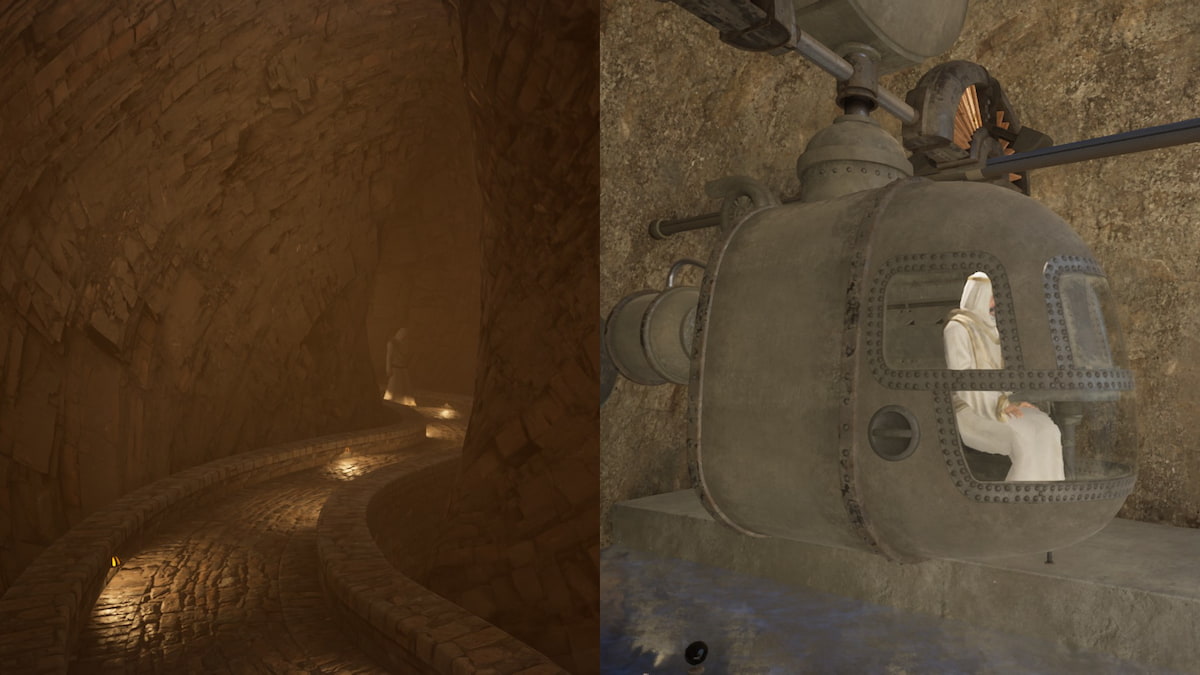
Hop back into the elevator and take it down to the maglev that took you from Survey Island to Jungle Island. Get inside the maglev, then turn it around without leaving. Get out of the maglev onto the opposite side of it from the elevator you just took. This will lead you to the underwater sub. Go into the cave, then when you see the sub, take the branching path off to the left. This will lead up up some stairs to the ladder to get into the submarine. Pull the lever to push the ladder out to the entrance of the sub, then climb down inside it.
When you enter the sub, it has four locations you can go to. First, you'll want to select the third circle. If you look around on this tiny island, you'll see that there is an extendable walkway. You'll finally be able to get into the village this way. Once inside, make sure to open both of the shortcuts into the village from the sides so you can easily get back inside.
Head all the way up to the top of the village where a home is overlooking a small balcony with some of that invisible paint being made on it. This is the only house you can knock on the door of. If you knock five times, a face will appear for a moment, giving you another achievement.
Achievement: The Sign of Five
Knock on the door five times to get the villager to answer the door.

How to get into the prison on Jungle Island
Now that you have found your way into the village and you have also closed the overlook portal from the God's-eye view achievement where the spinning ball is for Jungle Island, you can head into the prison above Jungle Island village. Take the submarine to the first location on the star. Walk into the center of the platform and press the bottom button on the control pad. This will bring the elevator down. Hit the middle button, then immediately walk over to the elevator platform. You will ride up to the top. If you hit the top button, this will not work.
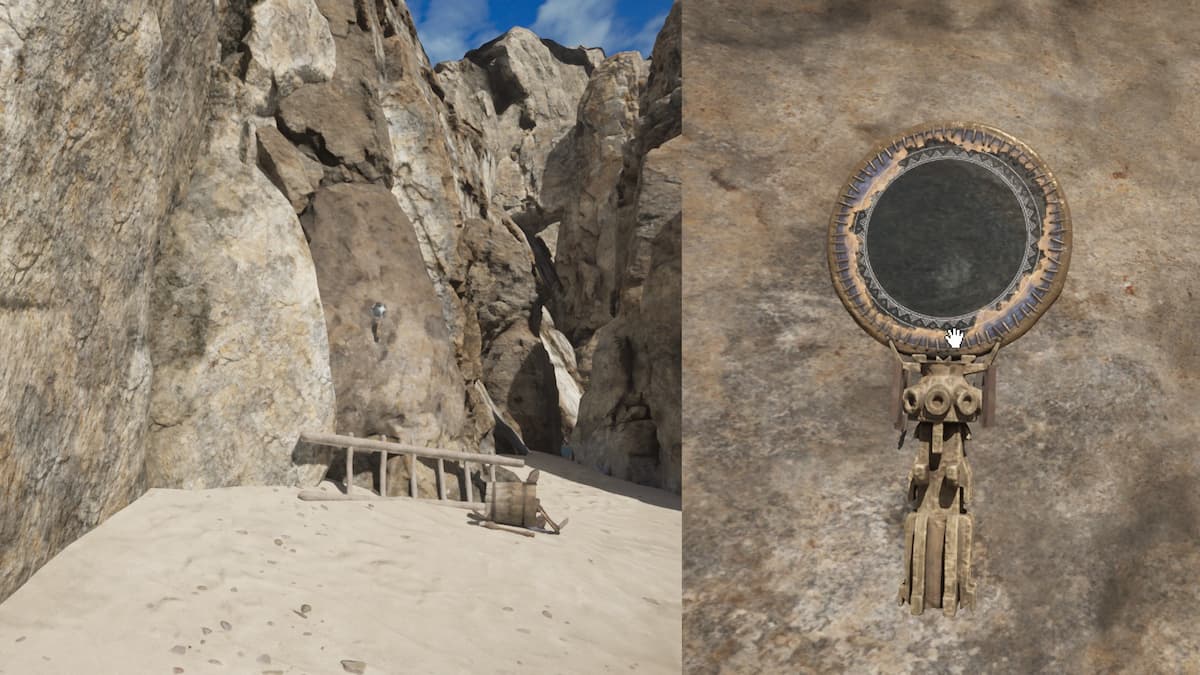
Once at the top, interact with the little crank on the right side of the prison cell. This will open the door so you can head inside. If you looked into the cell before opening it, you probably noticed there was a person inside, but they aren't inside anymore. They must have escaped, but they didn't pass by you. So how did they get out? Turns out, if you look at the prison wall with the Rebel Lens, you will see a secret painted arrow pointing to a rock. This rock is a secret button. Press it to open the wall up and get inside the secret passage.

Now that you have the secret door open, you will find yourself in a very dark hallway. Use your Rebel Lens to see the path through. There doesn't seem to be anything to do at the end, so you just have to turn around to walk back. But on the wall, you might see a strange object; it will look like a ping-pong paddle with a ball attached to it. Interact with it to light up the hallway. As you walk all the way back, you will see more of these paddle objects; light all of them up, and it will reveal a door at the beginning of this secret hallway.
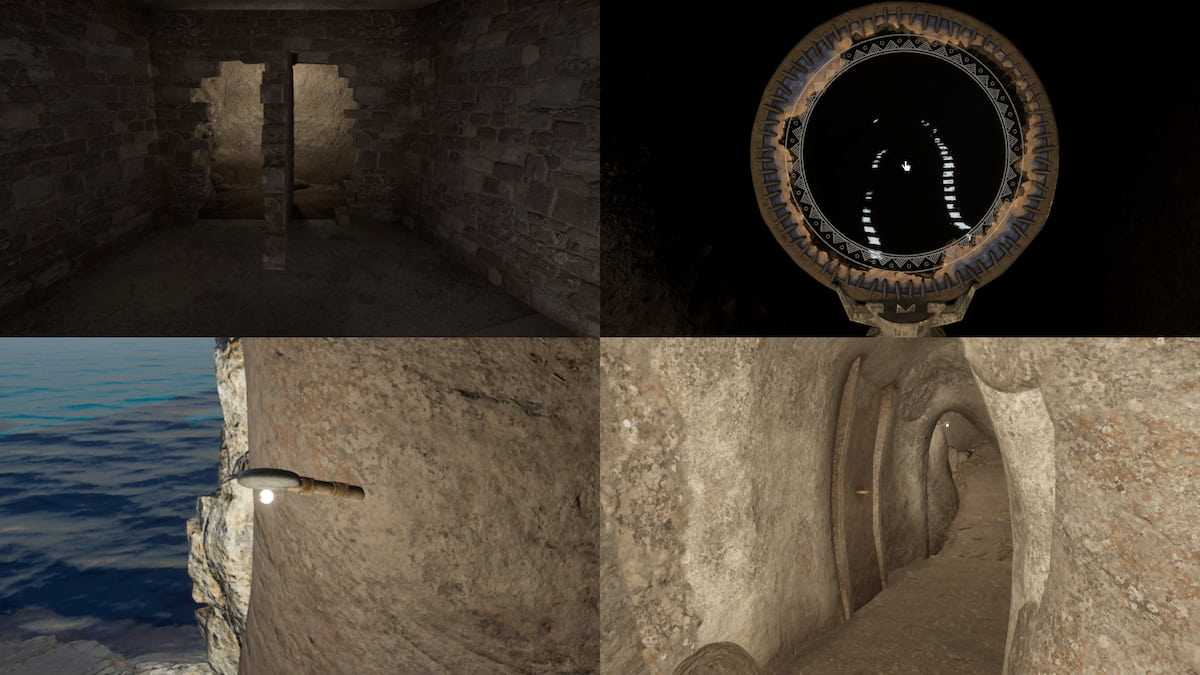
Open the door and head inside; if you want to grab a quick and easy achievement, lift up the flat fish (1), the beetle (2), the frog (3), the sunner (4), and the wahrk (5) in that order. This is the old solution from the original game; it is NOT the solution needed to solve it in the remake of Riven, but it does give you an achievement for remembering the old puzzle's solution.
Achievement: Not the Way You Remembered It
Use the incorrect code as shown above on the animal circle puzzle. This is the original solution, but it no longer works. It does give you an achievement though.
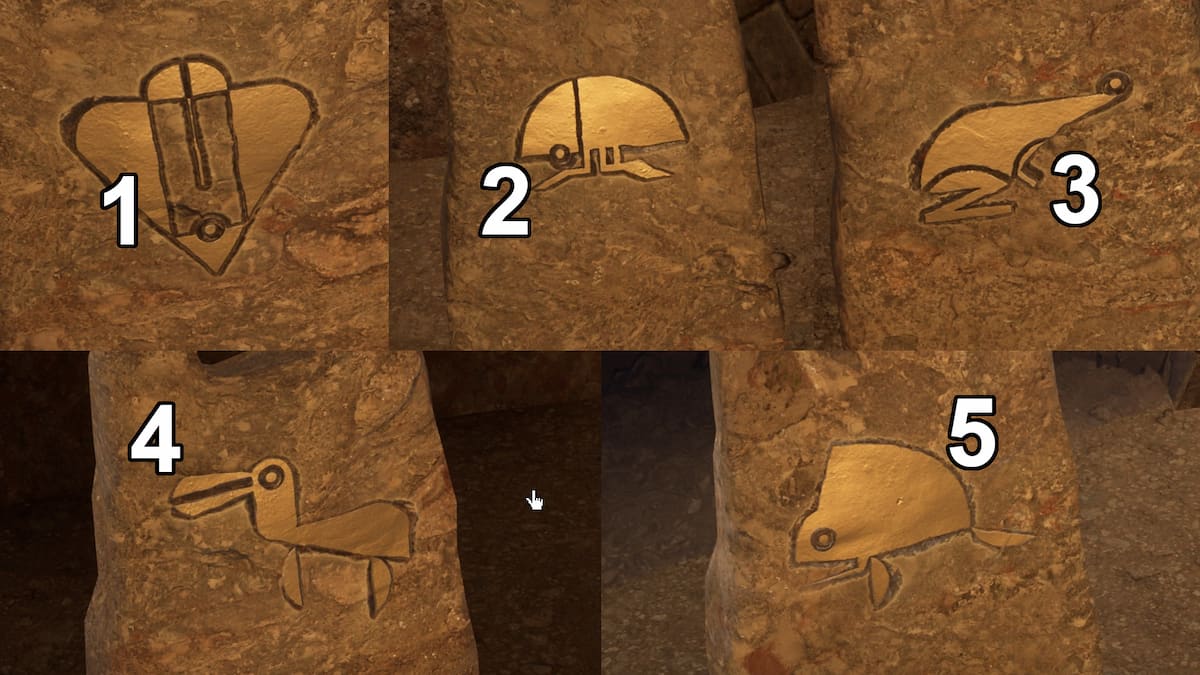
How to solve the animal circle in the Moiety hideout on Jungle Island
Now for the actual solution to the animal circle puzzle. Instead of five animals like the original puzzle, this one has six animals to pull up in order to progress. In order to figure these out, you will need to do two things: figure out the counting system first, then find the animal pictures around Jungle Island second.
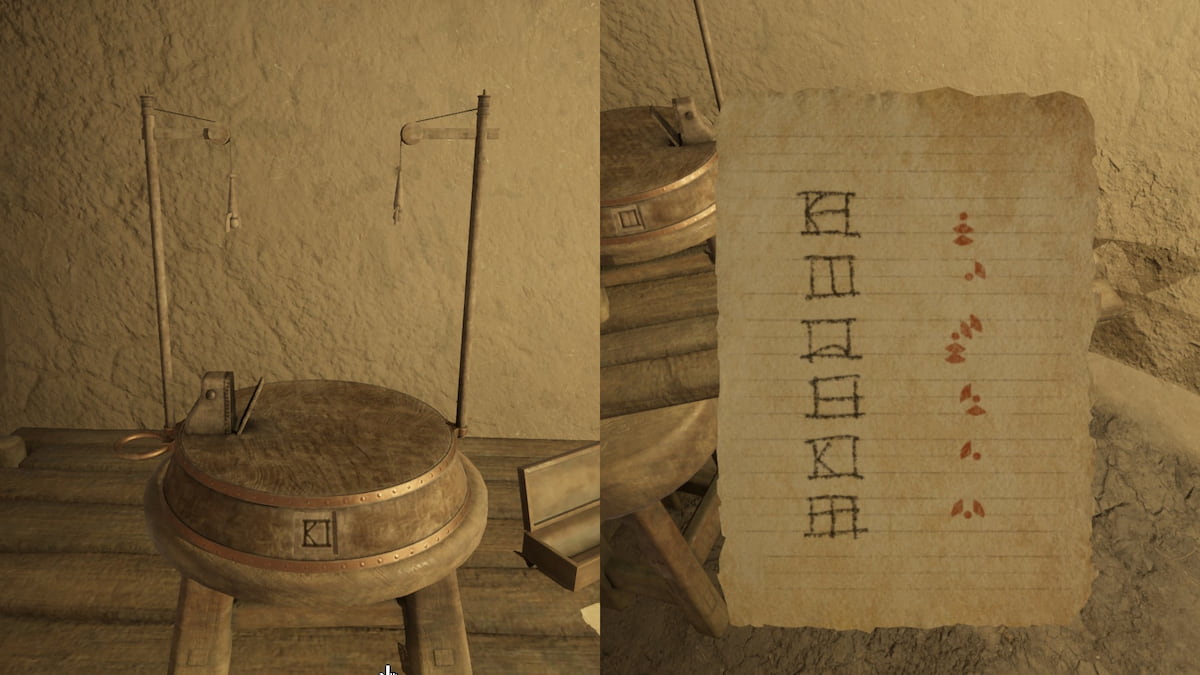
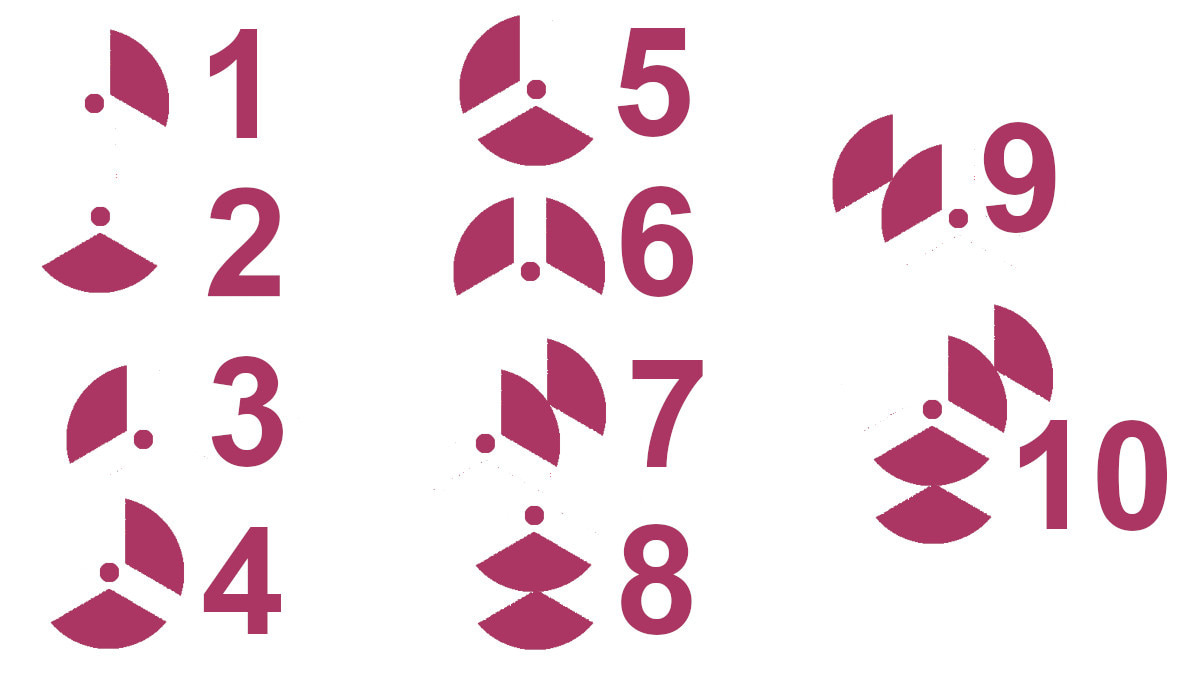
In the school house, you can find hints to both of the important number systems in Riven. The first is D'ni number system, which is based on fives and has five main symbols in it. They are all contained in squares. The second is a radial system of numbers used by the native people of Riven before. In order to learn the D'ni numbers, you need to use the board game with the two hanged men over the wahrk. If you pull the tab, it will roll a random number. Write down the symbol, then count the number of times the person falls toward the wahrk's mouth. This will give you all the important numbers from D'ni.
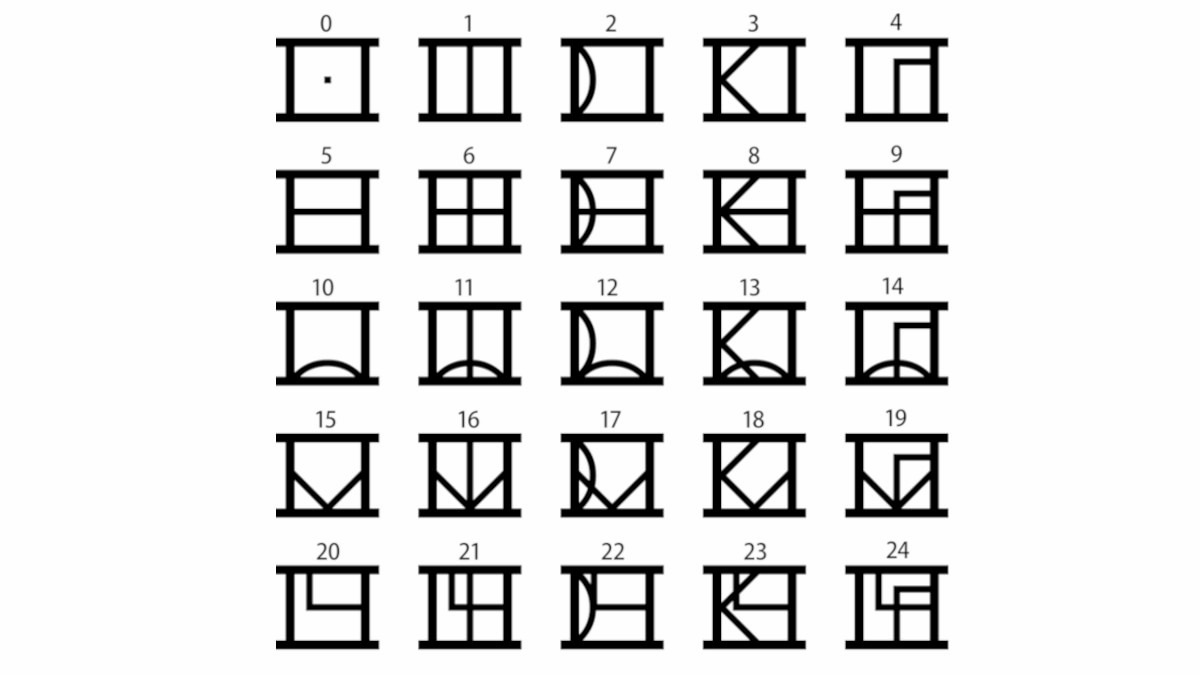
Next to the board game is a translation of D'ni numbers to the local numbering system of Riven. Each of these numbers will be important later, either for translating Catherine's journal and for the cemetery statues that have the solution to the animal puzzle in the Moiety hidden hideout. The solutions will change in every playthrough, but the numbers themselves will remain the same. Here is what one-through-10 look like in Riven's counting system.
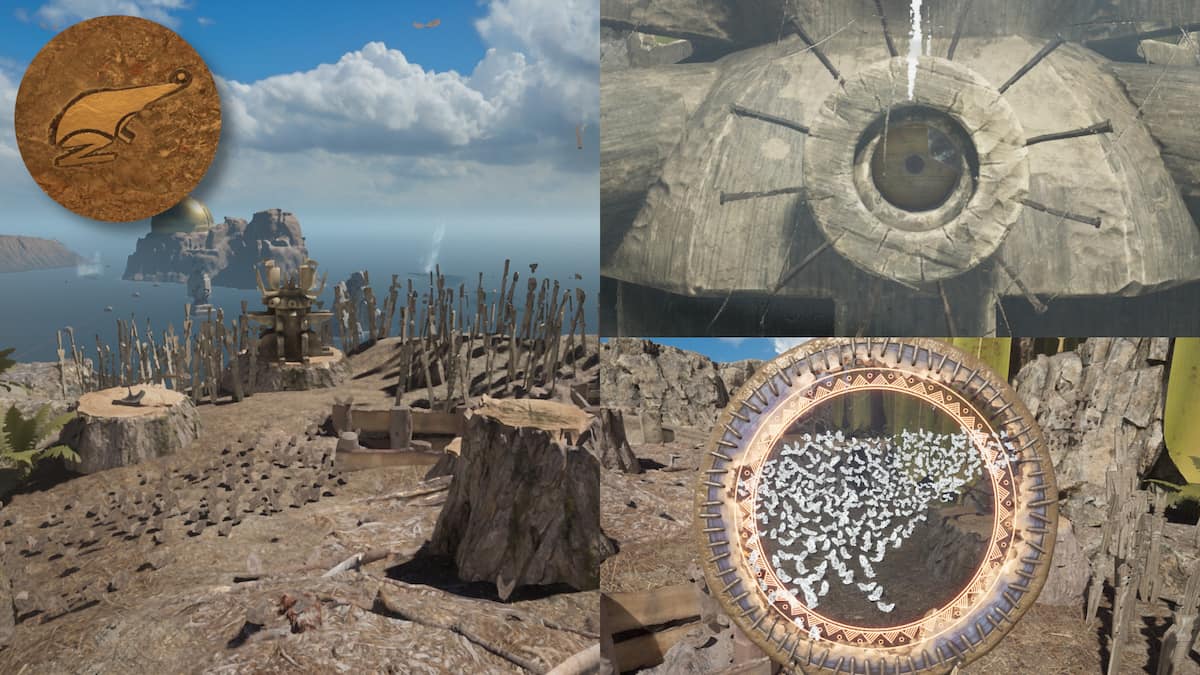
The frog near the cemetery carving at the mine cart
The cemetery carving over by the mine cart on Jungle Island that has a number that will change each playthrough. This one is located near a flock of butterflies that make up the frog symbol. In this playthrough, it shows the number 1 in Riven's number system, but the number that shows up will be unique to your playthrough.
The sunner near the cemetery carving in the jungle
The second cemetery statue you can find it has a painted sunner in the leaves nearby it. In my playthrough, it was marked with a number two, but your playthrough will vary.
The Prison Island cemetery marker with the flatfish
The third cemetery grave marker is located on Prison Island which can only be accessed through the Starry Expanse. This one has a flatfish on it, which will be another animal in the sequence. In my playthrough, this one was third.
The beetle tree near the next cemetery carving
The next animal is the Beetle found in the tree at the end of the pier on Jungle Island. In order to see this one, you need to water the tree first, from the watering apparatus at the very top of the village. Next, you need to run down to the tree before the water runs out, to see the beetle. Then check out the number on the cemetery carving.

The underwater butterfly cemetery carving
The next animal is the most challenging cemetery structure to get to. In order to open the way, you first need to hop into the submarine, and go to the circle on the bottom right of the star. After you are there, head to the one north of it, then get out of the submarine. You'll notice that the location on the bottom right stays hot for a while even after the submarine is gone, allowing you to walk down there.
Next. head to the top of the village where the smoking wahrk head is located, and close it. This will force the steam out of the door at the bottom. Go down the ladder next to this location, then head inside the cave. If you use the Rebel Lens on the cemetery carving, you'll see it has a number on it, and the ceiling shows a picture of a butterfly. In my playthrough, it was the fifth animal.

The wahrk cemetery carving near the maglev
The final cemetery statue is located in the first cave right inside where you rode the maglev onto this island the first time. In the cave, the statue will have the number six in it, and there will be a ton of white paint all over the ceiling. Using the water spout, redirect the water so it is still, the point the Rebel Lens down at the water to see the wahrk fish reflected in the water.
The answer to the animal circle in the Moiety hideout on Jungle Island is always different
Once you compile all the items from above, you have this as the final answer. The frog is first, the sunner is second, the flatfish is third, the beetle is fourth, the butterfly/moth is fifth, and the wahrk is sixth. This will be a different order in your playthrough, but it will always have those six animals. Pull each of these stones up in the right order, and the locked box on the other side of the room will open, giving you the Linking Book to Tay.
The world of Tay
Achievement: A Warm Welcome
Arrive on Tay.
You won't be on Tay too long; you just need to walk around the limited space the people of Tay give you. Pick up the journal and the Trap Linking Book when they are offered, then leave. There isn't anything else to do here. This will dump you back into the animal circle puzzle with the Trap Book in hand and Catherine's journal. Read her journal all the way through for the journal reading achievement.
Get the achievement for the hidden Moiety Entrance to the animal puzzle hideout
When leaving the Moiety hideout, you can either go the way you came, or you can push the door back into place and go through the secret entrance. When you open the way, you will see that three of the plants stuck in the walls outside will be lit up. These will tell you the three plants you need to touch to make the door open up. This pattern is different in every playthrough.
Achievement: Hidden in Plain Sight
Use the secret code to get back into the Moiety hideout after leaving.
Finish connection all spinning balls and the Starry Expanse
In order to complete the next part of the game, you will need to go around to each island and ensure all of the spinning balls are connected in the Starry Expanse. All five need to be connected, and each one has to have the fire marble sent into the center via the weird little gun-like mechanisms on each platform. Once all of them are connected, you can return to Temple Island to complete the book to get you to the 233rd Age where Gehn is hiding out.
Achievement: Strands of the Web
Connect all the Starry Expanse walkways to the center.
How to create a Linking Book to the 233rd Age
- You need to know the grid positions of each of the islands (balcony overlook on Survey Island puzzle).
- You need to know the colors associated with each island (right mechanism in the wahrk tank room under Survey Island).
- You will need to know the frequency calibration for each island (a note in Gehn's workshop).
- You will need to have sent a fire marble through each of the five Starry Expanse connections around Riven.
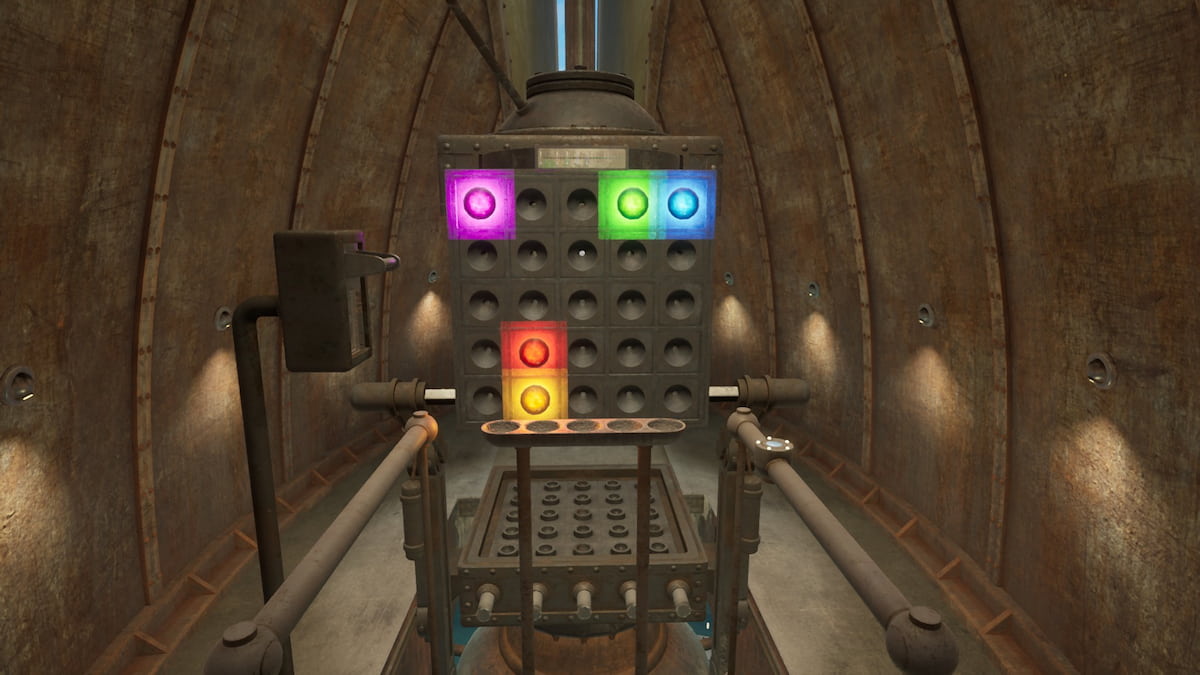
Now that all the fire marbles have been charged and pushed through the five pneumatic tubes in the Starry Expanse back to Temple Island, you can finally finish making your Linking Book to visit Gehn. Go into the Golden Dome, then press the now-lit button on the walkway's railing on the right side when facing the empty linking book in the center. This will give you a grid, five colored balls, and a slider with colored lines on it. In order to figure out where to put everything, you will have to combine all the knowledge you have gained so far.

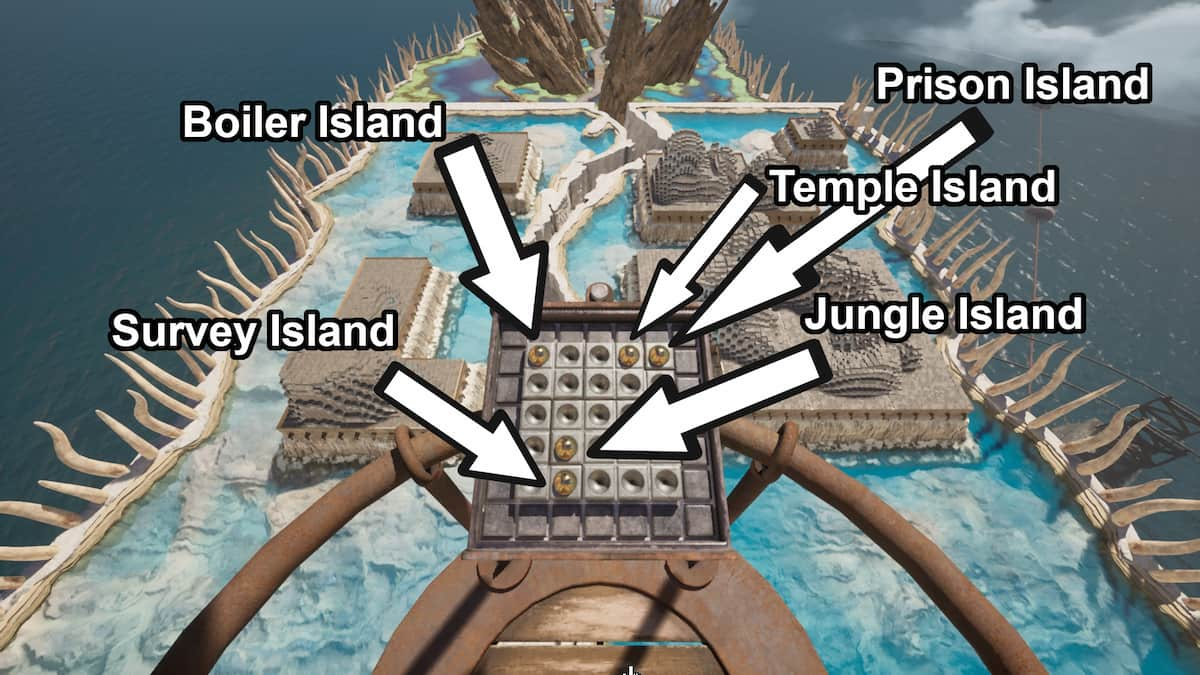
First, the colored balls go into the grid in the matching locations from the grid on Survey Island. The five pieces in this grid puzzle are shown on the map below. The colors of the five islands are shown in the Survey Island secret basement where the wahrk is located. Each symbol is matched with a color, except for the Boiler Island, whose colored light is broken. But we can figure out the color based on context clues. Here are the things that remain the same between playthroughs:
| Island Name | Symbol | Color |
| Jungle Island |  | Red |
| Survey Island |  | Orange |
| Temple Island |  | Green |
| Prison Island |  | Blue |
| Boiler Island |  | Purple/Pink |
Last but not least, you need the final piece of the puzzle: the calibration for the different colors of fire marble. Based on their color, you should now know where each of the colored balls goes in the grid. The slider above the grid, however, also needs to be properly calibrated. This information can be found in Gehn's Lab. The base number is the ninth number on the slider, so, in my playthrough, I needed to move it to the left eight for the red slider, six to the left for the yellow slider, etc. The numbers on this piece of paper will be different in every playthrough, so head to Gehn's lab to get these numbers.
And now you just need to put all this information into the Linking Book creator in the center of the Golden Dome to finally be at the end of Riven. You can finally confront Gehn, save Catherine, and called Atrus. Or not, depending on the ending you choose.
Achievement: The Cage Has Finally Failed
Escape the Fifth Age by visiting the 233rd Age.
All endings for Riven 2024
There are several different endings you can get in Riven, and you will need to see all of them in order to complete the achievement for getting all the endings. I have categorized the endings by which achievement they are connected to.
This is Where Our Paths Must Part ending
In order to get the only ending that doesn't fit in with an achievement, you will need to do a little bit of weird saving. At the beginning of the game, make a new save after you have turned the steam power on to the panel that rips the rift open. After that, go through the game without saving over that original save. Progress until you get Catherine's journal on Tay, make note of the code for the mechanism, then reload the save from the beginning of the game you made above. If you rip the rift open at the very beginning, you get a unique ending where you are sucked into the rift. Atrus doesn't have time to show up, so you are on your own in this one.
Achievement: This is Where Our Paths Must Part
Complete the game with any ending.
Mixed Signals endings
There are two different endings you can get when summoning Atrus before you have completed all your tasks. In one, Atrus lives. In the other, he does not. Here is how to see both of them.
Achievement: Mixed Signals
Summon Atrus prematurely.
Mixed Signals, Artus lives ending
If you put in the code in the steam apparatus on Temple Island after trapping Gehn before releasing Catherine, Atrus will show up. He will ask where Catherine is, and when he realizes you haven't freed her, he runs off, presumably to attempt to find her before the end of the Age.
Mixed Signals, Artus dies ending
If you summon Atrus early while Gehn is free, you will see this ending. In it, Gehn escapes to D'ni, Atrus dies in front of you, and all the people of Riven are doomed as well. This one is probably the worst possible ending you can get in this game.
This Must Be the End for You endings
To get this achievement, you will need to get yourself trapped in the Trap Book. There are plenty of places to do this, and it will look a little different each time. But it all counts as the same ending and no matter which one you pick, it will give you the same achievement.
Achievement: This Must Be the End for You
Trap yourself in the trap book.
Trap Book in D'ni
In order to get this particular ending, you will need to use the Trap Book as soon as Atrus gives it to you. So while you're still on D'ni, before you take the other book into Riven, this is the ending you will get.
Trap Book in Tay
If you have a Trap Linking Book with no one inside, you can use it in Tay in order to get this ending. You can either use it one your first visit or head back through the book in the Moiety hideout at any time and use the Trap Book.
Trap Book after trapping Gehn
After you have visited Gehn with the Trap Book in hand, you will be able to trap him. Once he is trapped in the fake Linking Book, you can use the book again, locking you inside and letting Gehn back into the world to cause more chaos.
Trap Book in Tay after Trapping Gehn
If you use the Trap Book in Tay after trapping Gehn inside, you get a slightly different ending than the one above. Gehn will make mention of the place you dropped him before locking you inside the book forever.
Finality endings
Finality is an achievement you can get from two different endings. Both of them end with you getting shot by Gehn in Age 233; here is how to see them both.
Achievement: Finality
Get shot by Gehn when he learns what the Trap Linking Book is.
Finality by locking Cho in the Trap Book after meeting Gehn
After you have created the book in Temple Island, visit Gehn before you get the Trap Linking Book back from the Moiety. When you return, get the book back from the Moiety, then trap yourself in the book. Gehn will force Cho to lock himself into the book in your place, and then he will shoot you for trying to trick him.
Finality by locking Cho in the Trap Book before meeting Gehn
This one is basically the same ending as meeting Gehn before getting locked in the book, but it has slightly different dialogue.
Finality refuse Gehn's request to go into the book three times
If you travel to Age 233 through the book you make in the center of the Golden Dome with the Trap Book, Gehn won't trust you and will ask you to go into the book first. He will ask kindly the first time, but don't click on the book. Head back to the Golden Dome, go through the book again, and refuse again. After that, go through the Golden Dome Linking Book one last time, refusing to go through the book, and Gehn will shoot you.
The Journey of Another ending (The Good Ending)
The good ending requires that you first lock Gehn in the Trap Linking Book. Get the book back from the Moiety, then go through the Linking Book you made on Temple Island. When Gehn tells you to test the book, click on the Trap book as quickly as you can. This will get you an achievement.
Achievement: Perhaps It Would be Best
Touch the Trap Book immediately when Gehn asks you to.
Since you didn't hesitate, Gehn won't either, and he will replace you in the the Trap Linking Book. This will release you and lock Gehn in the book with no way out forever. After that, you can finally release Catherine from prison. But first, you should take a look around Gehn's quarters now that you have a moment to. Down the ladder, you can find his bedroom; there are three things of note in here. Check out the journal on the side table, the bell on the side table, and the recording player by the window. The journal, which you will need to read to get the journal reading achievement, will have three numbers on the last page. Each one of these numbers has a name next to it; it is the number associated with the recording in Gehn's Journal.
There are four recordings to watch. In order to watch them all, press the button in the center of the recording device. Inside, there is a panel with five buttons. Each of the names have one to three numbers; for example, if Anna's video is labelled with the D'ni number for three and five, you need to turn the third and fifth lights on, close the panel, then turn the crank on the recorder. This is the way to see all three of the recordings on the device.
Achievement: A Great Deal of History
Watch all three recordings on Gehn's video machine.
Next up, interact with the bell-like object on the side table. It will make a series of sounds consisting of different combinations of three different chimes. If you have trouble distinguishing between the sounds, you can turn on Sound Context Subtitles for this part to help you figure out the order of the sounds. Note the order of the sounds, then head to Prison Island. Use the chimes on the prison door to let Catherine out.
Achievement: Who Will Link the Broken Chain?
Release Catherine after trapping Gehn.
After that, head back to Temple Island and use the code from Catherine's journal to turn on the mechanism from the starting location to rip up the rune metal from the ground and summon Atrus. This code will be different from playthrough to playthrough, so you will need to know the D'ni numbers and the Riven numbers listed above.
Once that's done, you have finally given Atrus back his wife, trapped his dad, and saved all the people on the breaking world of Riven.
Achievement: The Path Home Now Is Clear
Complete the good ending.
Where to find all journals in Riven 2024

The final achievement in Riven requires that you read every journal in the game. Here are all the journal locations to make sure you get this final achievement to 100% complete this challenging puzzle game.
- Atrus' notebook he gives you at the beginning of the game.
- Gehn's notebook in his lab. You will also need to pick up all the loose pieces of paper around the lab.
- Catherine's notebook you get on Tay.
- Gehn's second notebook, found in his side table in Age 233.
Achievement: The Journey of Another
Read all the journals found in Riven in one playthrough.
For more 100% walkthroughs for indie games, check out Chants of Sennaar Walkthrough – 100% All Achievements on Pro Game Guides.