
Sayu is one of the most fun characters to play in Genshin Impact. As a four-star Claymore user, Sayu uses Anemo Damage to proc Swirl while healing herself and her teammates. Her position on a team can vary depending on how she is built, but players will be able to find synergy in many compositions regardless.
Gameplay
There are two main playstyles for players wanting to use Sayu effectively. This is because of how her Elemental Skill and Elemental Burst scale, using both Elemental Mastery and Attack to calculate damage. Depending on how players prefer to play Sayu, they can opt to maximize their Elemental Mastery to increase the damage of her Swirls while also increasing her healing, or they can maximize her Attack to raise her base Anemo Damage and healing from her Burst.
Players will have to decide whether they want to increase Sayu's Attack or Elemental Mastery as they both provide similar functions. Attack will increase the damage of her Normal and Charged Attacks, Anemo Damage, and the amount of healing her Elemental Burst does. Elemental Mastery will increase the damage of Swirl, the healing from her Passive Talent, and make her synergize with other characters' Elemental Bursts more. Elemental Mastery is better overall, but that doesn't invalidate Attack builds.
Talents
- Yoohoo Art: Fuuin Dash - This is easily one of the most fun Elemental Skills in the game. Sayu can either do a quick dash kick if players choose to Tap the skill, or they can continuously move around in a ball like Sonic The Hedgehog if they Hold. The cooldown for tapping is only six seconds and the cooldown for holding the skill down gets bigger depending on how long Sayu is rolling around. She can roll up to 10 seconds and get a maximum cooldown of 11 seconds. While in this state, Elemental Absorption is possible, spreading an Element while constantly proccing Swirl.
- Yoohoo Art: Mujina Flurry - Sayu's Elemental Burst damages and heals party members. After the initial hit, it will heal characters below 70 percent HP, but if everyone is higher than that value, it will start to attack and deal Anemo Damage. Unlocking her First Constellation will remove the 70 percent cap and make the Muji-Muji Daruma attack and heal regardless of how much HP characters have. Despite this having good scaling with Attack, Elemental Mastery is still the preferred stat to prioritize.
Related: Best Hu Tao build in Genshin Impact – Weapons, Artifacts, and more!
Passive Talents
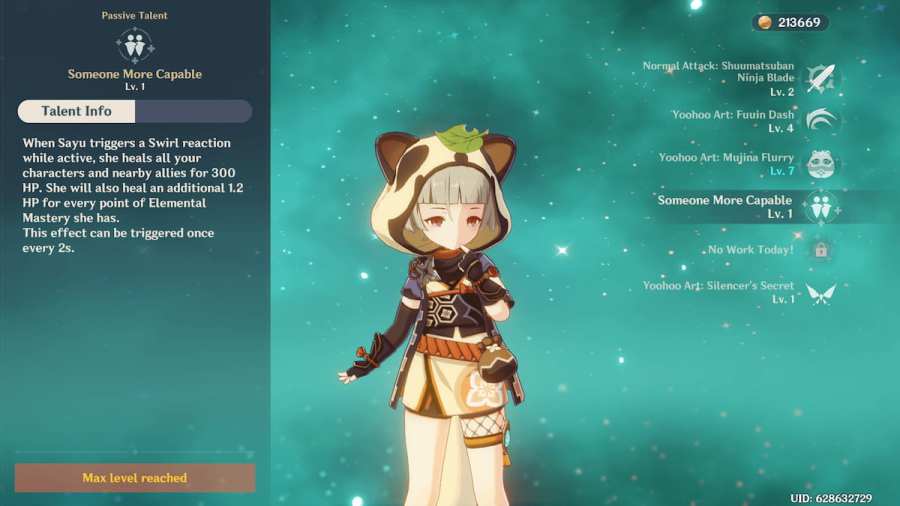
- Someone More Capable - This Passive is another reason why Elemental Mastery covers everything on Sayu. With it, whenever Sayu triggers a Swirl reaction while on the field, she heals all characters and allies for 300 HP plus an additional 1.2 HP for every point of Elemental Mastery she has. Sayu, at Level 90, gets 96 Elemental Mastery. Along with three Artifacts with Elemental Mastery as their Main Stat, this can get to 655.5 not including any additional Elemental Mastery from her weapon, or Flower and Plume's Substats. That is 786.6 plus the base 300 for a total of 1086.6 HP every time Swirl is triggered.
- No Work Today! - An additional way to heal allies, this Passive increases the healing of Sayu's Elemental Burst. This is done by causing other characters to heal for 20 percent of the damage healed off of whichever character the Daruma is healing. It also increases the AoE of its attacks.
Weapon
The choice in what Claymore to use for Sayu can vary as it heavily depends on how much Energy Recharge she and Energy economy there is on the team she's on.
- Wolf's Gravestone - A five-star weapon with an Attack of 608 and an Attack Substat of 49.6 percent, this weapon is debatably the best weapon for Sayu. It's Passive increases Attack by another 40 percent at Refinement Five while buffing all party member's Attack by 80 percent for 12 seconds when hitting enemies below 30 percent HP. This can happen every 30 seconds and remains one of the best buffs for many characters.
- Favonius Greatsword - As Sayu's Energy cost for her Elemental Burst is quite high, running weapons that give her Energy Recharge can be important in using her Elemental Burst off cooldown. Favonius Greatsword is a four-star weapon that has an Attack of 454 at Level 90 with an Energy Recharge of 61.3 percent. It also can regain even more energy when dealing Critical Hits as it will cause Elemental Particles to come out. If Crit Rate is high from her Substats, this weapon is excellent at increasing the entire team's Energy economy.
- Sacrificial Greatsword - This four-star weapon has an Attack of 565 at Level 90 and an Energy Recharge of 30.6 percent. It has a higher Attack than the Favonius Greatsword but much less Energy Recharge, making it a good balance between players who don't want to sacrifice much of their damage from Anemo and Normal Attacks. Its Passive is the real reason to use it as it has a chance of resetting Sayu's Elemental Skill whenever she deals damage with it. At Refinement Five, this chance is at 80 percent and is almost guaranteed to reset the cooldown with how much she damages enemies and procs Swirl.
- Rainslasher/Bloodstained Greatsword - These are the only two Claymores that have Elemental Mastery as their Substat. They are highly situational in their effects and the three-star Bloodstain Greatsword actually gives more Elemental Mastery at 187 compared to the Rainslasher's 165.
Artifacts
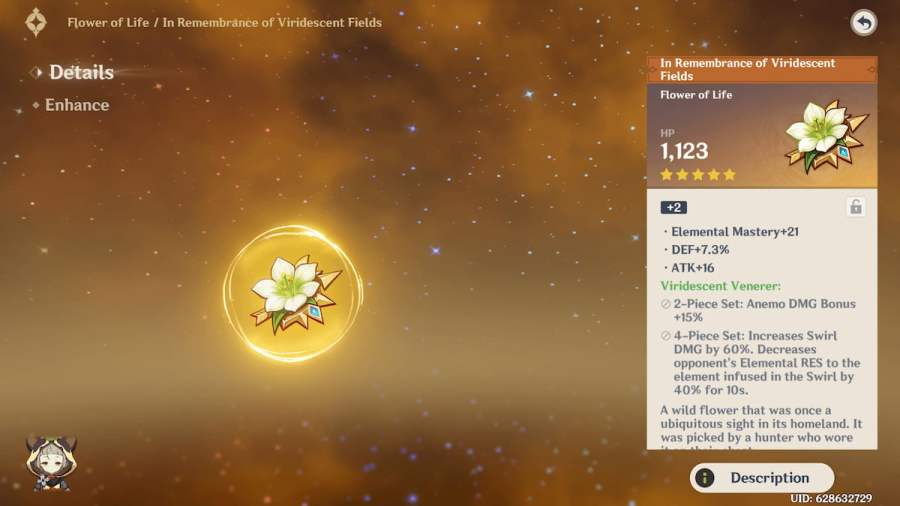
Whether prioritizing Attack or Elemental Mastery, the Viridescent Venerer set is the best that Sayu can use. It increases Swirl Damage by 60 percent while lowering the Elemental Resistance to the element infused in the Swirl by 40 percent for 10 seconds. Getting Elemental Mastery as the Main Stat for these Artifacts can take some time, but the payoff is well worth it.
Noblesse Oblige works as a Supportive option as well, giving an Attack buff of 20 percent for 10 seconds to the party after Sayu uses her Elemental Burst. It is also much easier to get Noblesse Oblige Artifacts in Elemental Mastery as players can use three bad Artifacts to exchange for a random Noblesse Oblige Artifact in the Crafting Menu.
Related: Viridescent Venerer Artifact Set: Stats, how to get, and who can use it in Genshin Impact
Artifact Stats
- Flower
- Main Stat - HP
- Substats - Elemental Mastery, Energy Recharge, Attack, Attack Percent
- Plume
- Main Stat - Attack
- Substats - Elemental Mastery, Energy Recharge, Attack, Attack Percent
- Sands
- Main Stat - Elemental Mastery
- Substats - Energy Recharge, Attack, Attack Percent
- Goblet
- Main Stat - Elemental Mastery
- Substats - Energy Recharge, Attack, Attack Percent
- Circlet
- Main Stat - Elemental Mastery
- Substats - Energy Recharge, Attack, Attack Percent
Swap out Attack or Attack Percent for Crit Rate if using the Favonius Greatsword.
Best Team For Sayu
Because Anemo characters are so diverse, Sayu works in any team composition apart from one highly dependent on Crystalize. Her ability to continuously spread Elements, proc Swirl, and stay mobile makes characters with Elemental Bursts that follow you very useful. Xiangling, Xinqiu, and Kaeya, for example, all have Elemental Bursts that Sayu can stay in her ball form for to deal a high amount of damage.
Teams for Sayu that use Elemental Reactions are also very good as she can spread one Element while another character creates Reactions with their own attacks.
Team Examples
- Melt - Kaeya, Xiangling, Rosaria/Diluc
- Vaporize - Hu Tao, Xingqiu, Xiangling/Thoma/Amber
- Overload - Klee/Xiangling, Beidou/Lisa, Fischl
- Electro-charged - Xinqiu/Barbara, Fischl, Beidou/Lisa/Raiden
- Freeze - Chongyun, Xinqiu, Rosaria/Shenhe
- Physical/Superconduct - Beidou/Raiden, Eula/Razor, Fischl/Rosaria/Kaeya
For more Genshin Impact character builds, check out Best Sucrose Build in Genshin Impact on Pro Game Guides.