
The Heart of Fire Tall Tale in
Sea of Thieves is an adventure outside of the main Shores of Gold questline. It can be considered an extension of The Seabound Soul, although they can also be played independently. In this portion of the guide, we cover how to start the adventure and then find and solve Stitcher Jim's Hideout.
Sea of Thieves | Heart of Fire Tall Tale | How to Find Stitcher Jim's Hideout and Flameheart's Lair
Before we begin, if you have already solved the hideout and are instead looking for help finding or making it through the Heart of Fire, you can find that guide in the links below. Alternatively, if you were looking for the Hidden Journal locations, you can also find those linked in the list below.
- Sea of Thieves | Heart of Fire Tall Tale | Flameheart's Lair Three Paths Guide
- Sea of Thieves | Heart of Fire Tall Tale | How to Escape With the Chest of Rage
- Sea of Thieves | Heart of Fire Tall Tale | Hidden Journal Locations
HIDDEN JOURNAL LOCATIONS: When you start this adventure, you might notice in your Pirate Log that one of the Commendations associated with it is for finding all the Hidden Journals. You must have the Heart of Fire Tall Tale active to find these Journals! This Tall Tale requires you to complete it three times to find all the Journals, so we strongly recommend starting on your first run-through!
Most of this quest feels akin to running a parkour map. You'll be focused on dodging traps, walking tight beams, and jumping between platforms. However, there is one riddle to solve at the beginning of the Tall Tale. Before we get to that, let's go over how to start the quest.
Related: Sea of Thieves | The Cursed Rogue Tall Tale | How to Find the Skeleton Key - Pro Game Guides
Step One: Start Heart of Fire

To begin this adventure, you'll be headed to Morrow's Peak in The Devil's Roar. This is the only Outpost located on this portion of the map, and you will find it right in the center. When you approach the island, you'll need to speak to Tallulah behind the Tavern bar. Next to her on the bar's counter is the Heart of Fire Quest Book. Interact with it to begin the adventure.
The next thing you'll need to do is speak to Grace, who is located right outside the Tavern. From this point, you can choose whether or not you'd like to listen to the story. If you did the Seabound Soul Tall Tale and took a liking to Sir Arthur Pendragon, he ends up making an appearance next to Grace to help partially explain the adventure.
Step Two: Find Stitcher Jim's Hideout
Once you're on your Ship, you'll note that it gives you the location of Stitcher Jim's Hideout in your Quest Book. This is always the same location: Liar's Backbone.
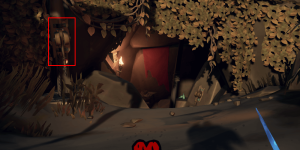
Liar's Backbone is a small island Northwest of Morrow's Peak, and you can find it half-way across on the upper section of The Devil's Roar. Once you sail there, you will find a vault in the center, closed off by a stone door. To open it, pull the lever to the left. Thankfully, the hideout is about as small and simple as the island itself. Inside, you'll find a single room with a mechanism in the center that has three blocks you can turn.
Step Three: Solve the Puzzle
If you look around the room, you might notice the wall's symbols match the symbols on the mechanism's blocks. You can try to decipher which words are the correct ones by putting them together to form the phrase/title. If you came to this guide just looking for the answer, you can look at the image below.
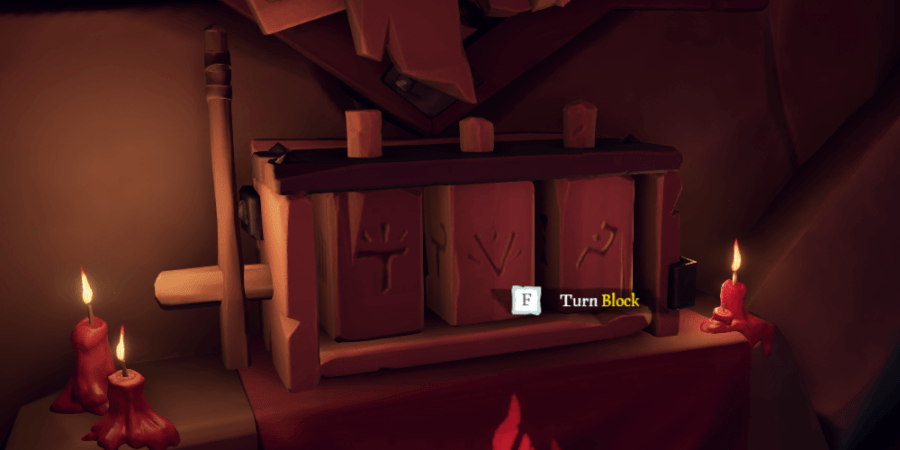
The three blocks must be turned to show the symbols for King, Flame, and Heart. This makes plenty of sense since, in the story, Stitcher Jim has taken to worshipping the undead pirate as his leader. Once you enter the symbols like the ones above, you must pull the lever on the left of the mechanism. It will reveal the Mysterious Key in the wall behind it. Grab the Mysterious Key, and head back to your ship!
Step Four: Find Flameheart's Lair

Now that you have the Mysterious Key, set your Ship South-by-Southeast to The Devil's Thirst. This is a larger island on the southern edge of The Devil's Roar. It's quite a distance away, so now's the perfect time to do some fishing!
Once you've reached The Devil's Thirst, you have two options: follow along with the story and ignite the beacon on the island to light the way to Flameheart's Lair's entrance, or park your boat and look in the area marked in the image below.

In front of the Lair's underwater entrance is a slot in the ground to place the Mysterious Key. Go ahead and put it here to open the large stone door, then go back up for air. You're about to do a lot of swimming!
Dive back below the surface and follow the tunnel into the Lair. Flameheart will begin speaking to you, trying to intimidate you into turning back to save your hide. Ignore him. He don't know you. He don't know your LIFE. Continue swimming through the underwater tunnels. You're going to go through several of them before you finally make it to the center of his Lair.
Related: Sea of Thieves Fish Guide: Fish Prices, Cooking Time, & Locations - Pro Game Guides
The final underwater tunnel you need to swim through will have you swimming downward between several wooden posts. If you've found this tunnel, you're almost there! Get through it to find the center room to Flameheart's Lair, which has three doors marked with the symbols for King, Flame, and Heart.
What's Next
These three doors block three different paths into the next part of the Lair. From this point on, you'll feel like you're navigating an obstacle course. However, you only need to make it through one of the paths to finish the quest! We cover the basic guide for navigating these tunnels in the next section: Flameheart's Lair Guide!
Have you achieved all the Commendations for the Wild Rose Tall Tale? Use our guide to start it again and find the things you missed!