
Your handy-dandy Field Guide has tons of information about your surroundings, and conveniently, you can find these pages scattered around all over the map on specific items. However, you will need to use Revelio to reveal them and add them to your collection. Since there are so many pages to find, it helps to take it one region at a time. The Bell Tower Wing of Hogwarts has 34 of its total pages; here is where you can find them.
All Bell Tower Field Guide Page Locations in Hogwarts Legacy
According to the map, the Bell Tower Wing has 34 total Field Guide Pages. However, I seemed to have encountered a few more than this, including the Moth frames, puzzles, and secrets. Here's where you can find 34 of them and some extras if you need them:
All Bell Tower Courtyard Field Guide Pages in Hogwarts Legacy
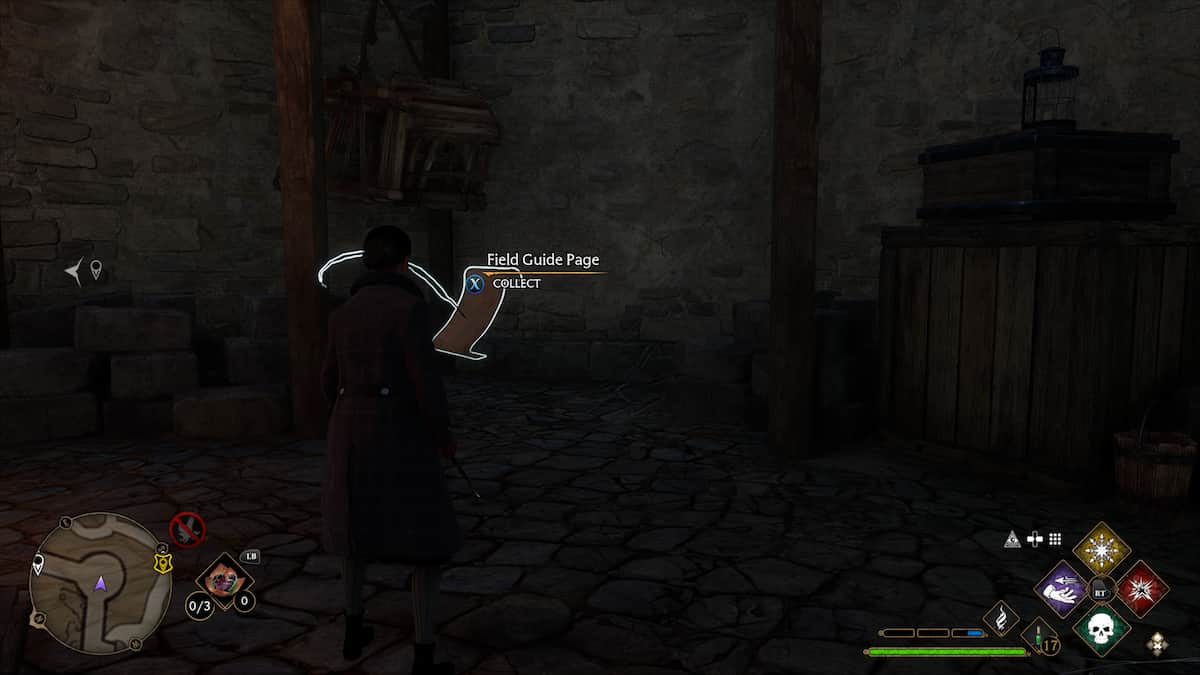
To begin collecting the Field Guide Pages, take the Bell Tower Courtyard Floo Flame and then head to these different nearby locations to collect the pages. The key to tracking them all down and revealing them is to use the spell Revelio as much as possible.
Bell Tower Courtyard Field Guide Page #1: Three Sisters Bells

Once you take the Bell Tower Courtyard Floo, turn right to get the Three Sisters Bells Field Guide Page.
Bell Tower Courtyard Field Guide Page #2: Broken Broom

After you get the bells, step back to face the double exit doors. You can reveal the Broken Broom Field Guide Page on the right side of the door.
Bell Tower Courtyard Field Guide Page #3: Flattened Armour

Across from the Broken Broom is another display where you can collect the Flattened Armour page.
Bell Tower Courtyard Field Guide Page #4: Flying Page

Now back up once again and look up toward the staircase above the Sisters Bells. You should spot a flying Field Guide Page in the air. Use Accio to pull it to you and collect it.
Bell Tower Courtyard Field Guide Page #5: Wooden Cat

Head up the stairs in front of you, and you can collect the Wooden Cat page on the right side of the door.
Bell Tower Courtyard Field Guide Page #6: Dragon Brazier

Take the stairs to the right of the Wooden Cat display, and you'll spot a Dragon Brazier statue. ( It's not pictured above, but you can find it in this exact location.) Use a fire spell to light the brazier and collect the page.
Bell Tower Courtyard Field Guide Page #7: Gorgon Painting

Head back down the stairs to the main floor of the courtyard and enter the door between the two pillars behind the Floo Flame. When you enter, you'll see an animal number puzzle door. Solve this puzzle to enter a storage room with the Gordon Painting. Use Revelio to reveal the page, but be careful getting too close to the painting because it will turn you to stone.
Bell Tower Courtyard Field Guide Page #8: Goblin Artifact

Exit back into the Bell Tower Courtyard Floo area. Then take the stairs on your left side. Right at the top, you'll see another display of Goblin Artifacts. You can get another Field Guide Page in front of it.
Bell Tower Courtyard Field Guide Page #9: Scorch Marks

Turn around from the Goblin display and proceed to the next landing. You'll see an outline of a wizard on the wall, and you can use Revelio to collect the Scorch Marks Field Guide Page.
Bell Tower Courtyard Field Guide Page #10: Frog Choir

There is another staircase to the right of the Scorch Marks, and you'll want to follow them all the way up to the music room. Here you can get the Frog Choir page.
Bell Tower Courtyard Field Guide Page #11: Dragon Brazier 2

From the frogs, take the steps to your right and go through the door to a storage area. On the far side of this landing, there is a level 1 locked door. Unlock the door and continue forward and to the left to see another Dragon Brazier statue. Ignite it just like the other one to collect the page.
Bell Tower Courtyard Field Guide Page #12: Moth Frame
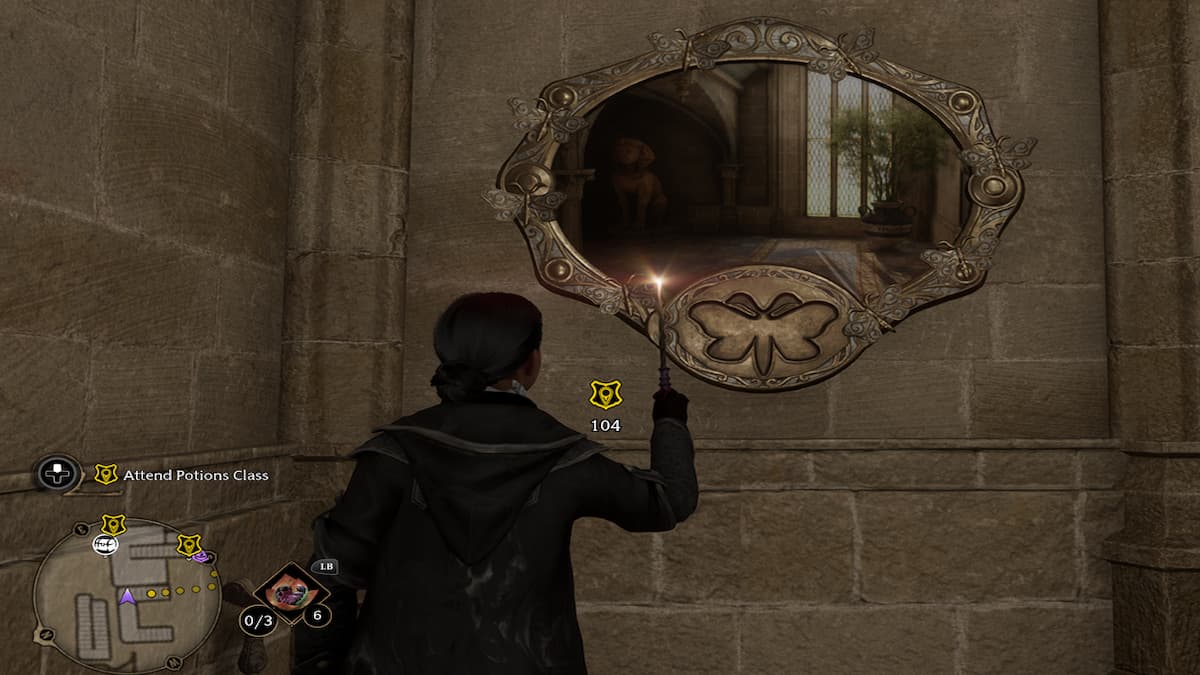
Exit back out the door you came into the storage landing and begin descending the staircase to your left. Past the rhino statue, keep heading down until you see the Moth Frame on the wall. Use Lumos to reveal the image picture.
To get the missing Moth, head down the stairs and enter the classroom in the right corner. There is a level 1 door behind the teacher's desk. Unlock the door and then immediately turn to the right to see a potted plant. The Moth is clinging to the side of it. Use Lumos to return the Moth to the Frame and then collect the page.
Bell Tower Courtyard Field Guide Page #13: History of Magic Windows

Head back into the History of Magic classroom after returning the Moth, and locate the stained glass window with the name Merlin written on it. Use Revelio to reveal the Field Guide Page.
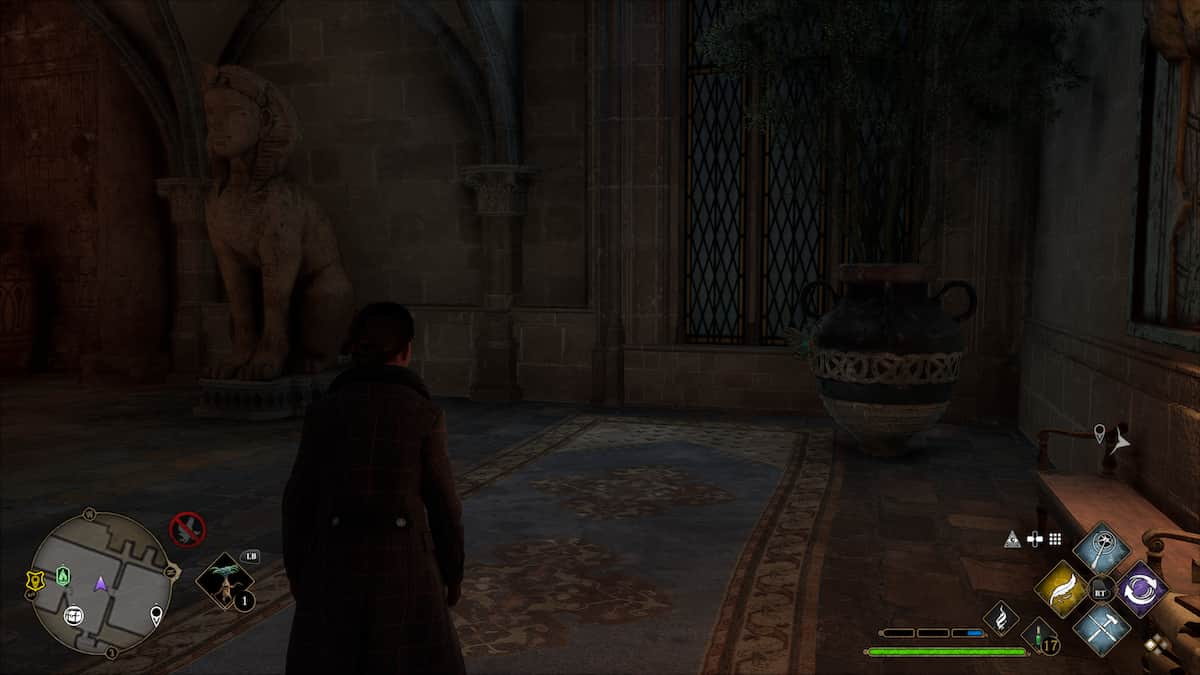
Bell Tower Courtyard Field Guide Page #14: Sphinx Statue

Head back through the door behind the History of Magic teacher's desk and find the Sphinx statue on the right side of the hall.
Bell Tower Courtyard Field Guide Page #15: Flying Page 2

Then turn left of the Sphinx Statue, and you should see another flying page floating around the corridor of pillars. Use Accio to collect it.
Bell Tower Courtyard Field Guide Page #16: Levioso Statue

Walk to the end of the pillared corridor and see a Levioso statue. Use the Levioso spell to open the figure and collect the Field Guide Page.
Bell Tower Courtyard Field Guide Page #17: Levioso Statue 2
Now, head back through and out of the History of Magic Classroom and take a right down the hallway. Exit out of the double doors to the Transfiguration Courtyard. Directly to the left of the door, there will be a level 1 locked door. Unlock the door and head up the stairs, and you'll see another Levioso Statue. Use the spell to collect the page.
Related: All Puzzle Objects in Hogwarts Legacy and Which Spells To Use On Them
All Dungeons Field Guide Pages in Hogwarts Legacy
The next set of Bell Tower Wing Field Guide Pages is located in the Dungeons area. To get there, take the Bell Tower Courtyard Floo Flame and then head up the stairs on your left and through the door. Follow the staircases down until you get to another entrance, and then enter the Dungeons.
Dungeons Field Guide Page #1: Werewolf Saga Tapestries

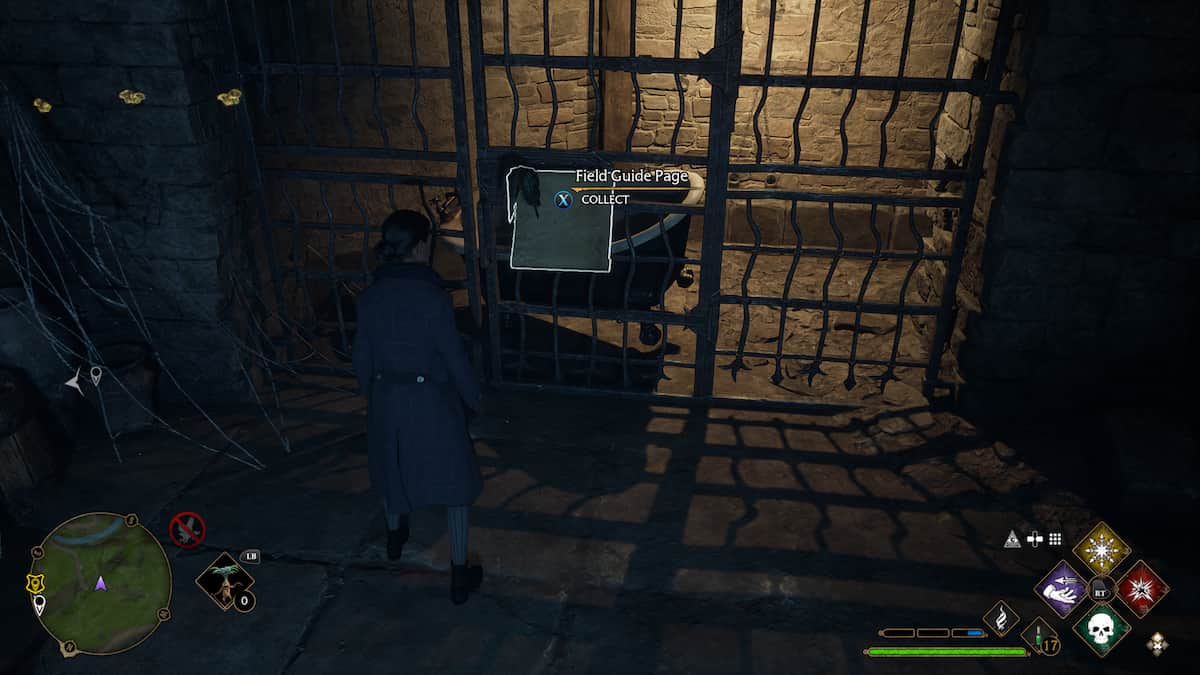
When you enter the Dungeons and walk around the corner, you should see a large tapestry hanging on the wall with the letter 'K' on it. This tapestry is actually a hidden door. Walk through the 'K' and through the secret corridor until you reach the werewolf room. Walk past the werewolf statue, and the Werewolf Saga Tapestries page will be in front of the first tapestry when you use Revelio.
Dungeons Field Guide Page #2: Urn of Ashes

Exit out of the secret tapestry door once again until you're back into the Dungeons, and then turn the corner to the left to see a dragon urn. You can collect the Urn of Ashes page in front of it.
Dungeons Field Guide Page #3: Sleeping Dragon Statue

Continue down the stairs opposite of the urn and turn left until you see the Sleeping Dragon Statue. Collection the page with Revelio.
Dungeons Field Guide Page #4: Important Muggle Artifact

Turn away from the dragon statue and begin down the long stretch until you see a locked door to your left. Unlock the level 1 door, and you'll enter the Muggle Studies Classroom. On the left side of the room is a display case with a canon in it. Use Revelio to gain the Important Muggle Artifact page.
Dungeons Field Guide Page #5: Alchemy Class

Head back out of the Muggle Artifact Classroom to the long stretch and walk to the end, opposite the dragon statue, and you'll see another locked door with stacks of cauldrons beside it. Unlock it to enter the Alchemy Classroom and immediately use Revelio to collect the page.
Dungeons Field Guide Page #6: Flying Page

Walk back out of the Alchemy Classroom and follow the corridor around the corner to a barrels storage area of the Dungeons. Here you should see another flying Field Guide Page in the air. Use Accio again to collect it.
Dungeons Field Guide Page #7: Levioso Statue

Then, take a left past the staircase and turn left again to see a locked gate. Use Alohomora to unlock the level one lock and then enter the grog statue portal. You'll be teleported to a hidden area with another Frog statue and beside it is a Levioso Statue. (This isn't pictured above, but you will find it in this exact location.)
All Beasts Classroom Field Guide Pages in Hogwarts Legacy
The next set of Field Guide Pages is located outside of the castle near the Beasts Classroom Floo Flame.
Beast Classroom Field Guide Page #1: Flying Page

Once you use the Beasts Classroom Floo, look up above Professor Howin's Office, and you'll see a page flying around it. Use Accio once it circles around to collect it.
Beasts Classroom Field Guide Page #2: Hogwarts Owls

From Professor Howin's Office, hop onto your broom and fly toward the southwest to the Owlery, the tall tower in the distance. Enter the tower and climb the winding staircase until you come to the first landing, where a bunch of owls are housed. Use Revelio to locate a page.
Beasts Classroom Field Guide Page #3: Levioso Statue

Once in the Owlery, find the ladder on the main landing and climb it all the way to the outer level of the tower. Circle around the walls until you spot the Levioso Statue. Use the spell to open it and grab the page.
Beasts Classroom Field Guide Page #5: Caged Bathtub
Now head back toward the Beast Classroom and walk around the backside, where there are animal pens and stacks of pumpkins. In the distance to the west, you'll see a tower connected to the castle ramparts. Use your broom to fly over to the upper door and walk inside. Inside you'll spot a bathtub in a caged area. Use Revelio to locate the page.
Beasts Classroom Field Guide Page #6: Quidditch Pitch

Exit back out of the tower door and use your broom to lower yourself to the ground on the Quidditch Pitch side of the wall. Directly in front of you should be a Field Guide Page for the Quidditch Field.
Related: All 10 Demiguise Statue Locations in Hogwarts in Hogwarts Legacy
All North Exit Field Guide Pages in Hogwarts Legacy
To find more of the Field Guide pages, take the Floo Flame to the Hogwarts North Exit and then head off to these locations:
North Exit Field Guide Page #1: Bloody Meat

Once you take the Floo Flame to the North Exit, turn around and walk back into the Hogwarts grounds. Turn right and enter the Thestral Stables. A level 1 locked door is to the right of the stable entrance. Unlock the door and enter to see a butcher table. Use Revelio to locate the Bloody Meat page.
North Exit Field Guide Page #2: Brazier

Head back out of the stables and look past the stables opposite of you, and you'll see a Brazier hanging from the top of the castle wall. (Not pictured above, but you should find it in this exact location.) Use a fire spell to light the brazier, and then use Accio to pull the page to you.
North Exit Field Guide Page #4: Levioso Statue

Now walk past the stables to the steps on the left leading up onto the wall. Take another left and keep ascending the staircases through the ramparts until you are pretty much directly over the North Exit Floo Flame. You'll spot another Levioso Statue here.
North Exit Field Guide Page #3: Castle Ramparts
Head back to the main outer courtyard and face the castle. To your left, you'll see another tower, part of the castle ramparts, and you can enter. Head over to it and use your broom to reach the door quickly. Inside, use Revelio to reveal the Castle Ramparts page.
North Exit Field Guide Page #5: Glumbumbles

Walk out of the Castle Ramparts, circle around to the left, and follow the path past the dragon hedge until you come to a smaller fountain courtyard. Past the fountain to the left is an archway you can enter, and you'll find some bee-like hives. Use Revelio to collect the Glumbumbles page.
Now you should have 34 pages collected. However, occasionally the map total will not add up to this amount, so if you need a few extra Bell Tower pages, you can start the History of Magic sidequest to collect two more pages. Check out our Moth to the Frame article to find more, keep a close eye out for flying pages you may have missed, and of course, use Revelio as much as you can as you wander around.
Looking for more Pro Game Guides Hogwarts Legacy content? Check out our guides on All Revelio Field Guide Pages in The Great Hall Wing in Hogwarts Legacy or All Astronomy Wing Revelio Field Guide Pages in Hogwarts Legacy!