After completing the Evermist Solstice Shrine, you've probably realized that there are several more out there to solve as well, which will eventually open up a secret in the Evermist Island cave. Two of these shrines are on their very own islands on the Home World map, and they are much more challenging than the first two you may have come across. Stay calm, though; we have all the steps to help you solve them as seamlessly as possible!
How to solve the last two Solstice Shrines on separate islands in Sea of Stars
To get to these islands, you're first going to progress through the main story until you unlock a new form of travel that will help you access them. Until then, you won't be able to reach them by ship since they don't have docks like the other islands do. Keep reading below for all the steps to complete these two Home World Solstice Shrines.
No Port Island Solstice Shrine Solution
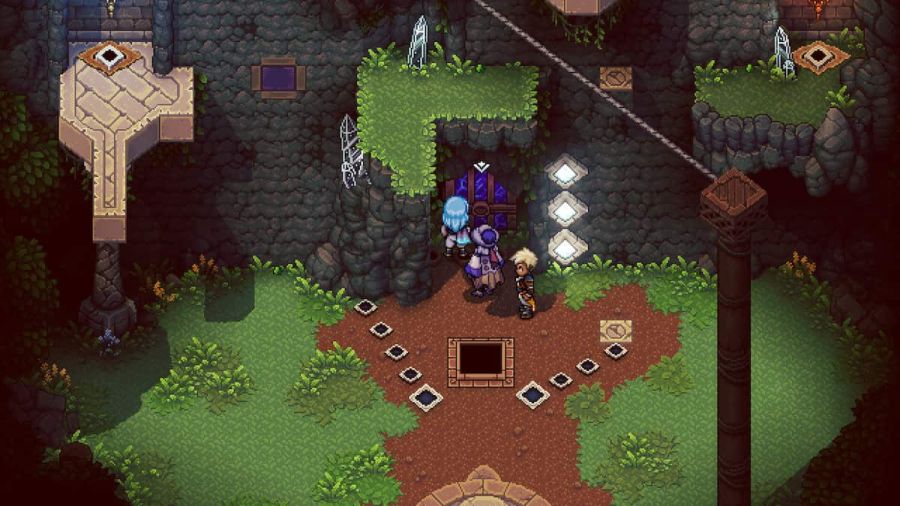
You can head to this Solstice Shrine island on the southwestern side of the map, between the Evermist and Sleeper Islands. To enter the shrine, you'll first need to complete the puzzle at the entrance, which shouldn't be too difficult. Here are the steps you can take (follow along by flipping through the images and using the list below):

- The first step is to step on the button to raise the solstice Prism in the center of the solstice puzzle.
- Then, use your Solstice Amulet ability to rotate the prism by using your controller triggers. You'll need to have all of them active at the same time to open the door. The moon ones on the outer sides require more dials and will stay active for a longer time, so you'll want to do these two first and then catch the two sun ones in the middle. You'll need to be quick. I started on the right moon one and rotated counterclockwise to hit all of them in the most efficient way.
Related: How to solve the Day & Night puzzle in Jungle Path – Sea of Stars Solstice Quest Guide
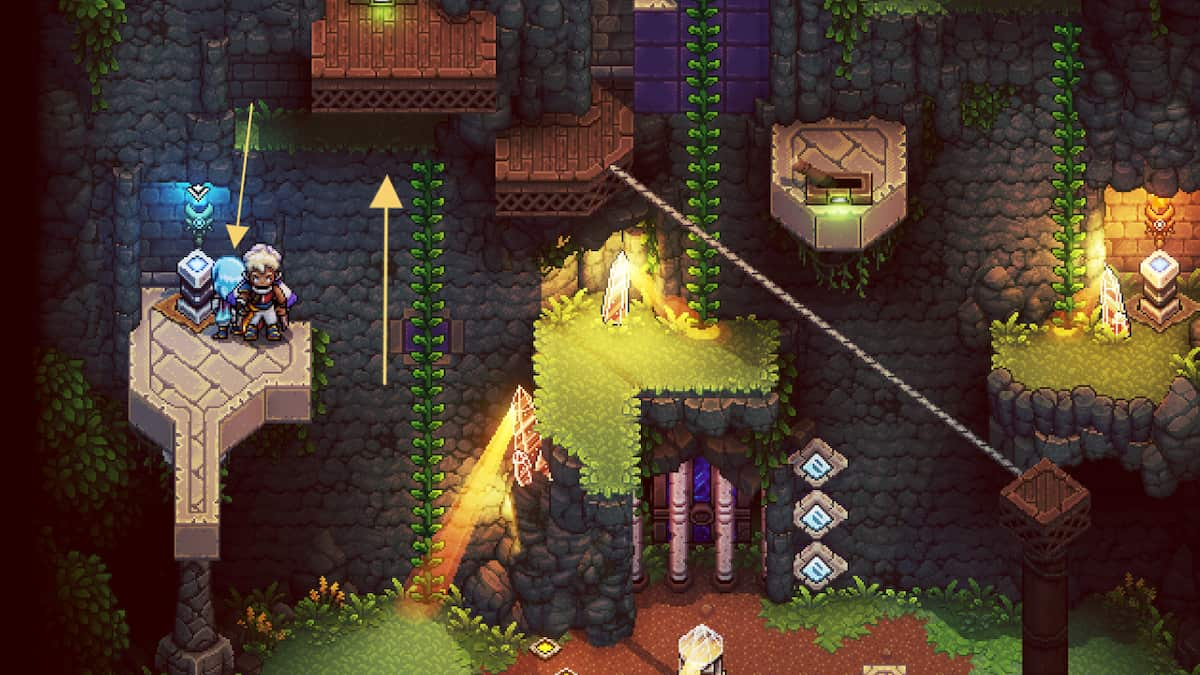
Once all of them are active at the same time, the door will open, and you can enter the shrine. This is where the main puzzle is located. Like always, your goal is to make it to the shrine chest. However, you'll realize to do that, you'll need to unlock the bars holding it by activating two glowing pillars. The pillars and the chest are separated by a large pit, so to navigate to each one, you'll need to use the moving platform in the center.
This moving platform is a little tricky because to move it, you need to step on the arrowed tiles on its surface. The catch is you can only use each tile one time. However, you can reset the platform at any time by jumping off, respawning at the entrance, and pressing the button. Here's how we went about completing this shrine:
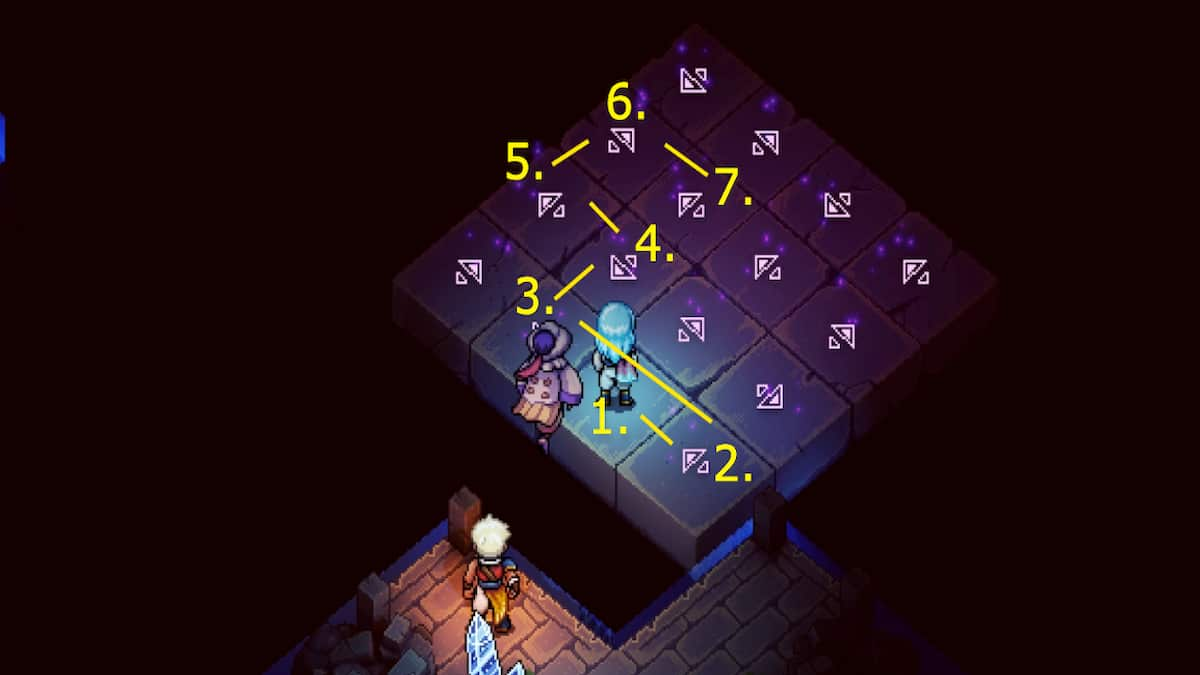

- The first step, once again, is to step on the button at the entrance to spawn in your moving platform.
- Then you'll want to step on these arrows in the correct order to reach the far left glowing pillar:
- Right Arrow
- Up Arrow
- Left Arrow
- Left Arrow
- Up Arrow
- Right Arrow
- Up Arrow
- Then, you can jump over to the platform and activate the first glowing pillar. Once you do that, you can jump off the edge to respawn at the entrance and reset your platform by stepping on the button. This will give you a better chance at reaching the other pillar.
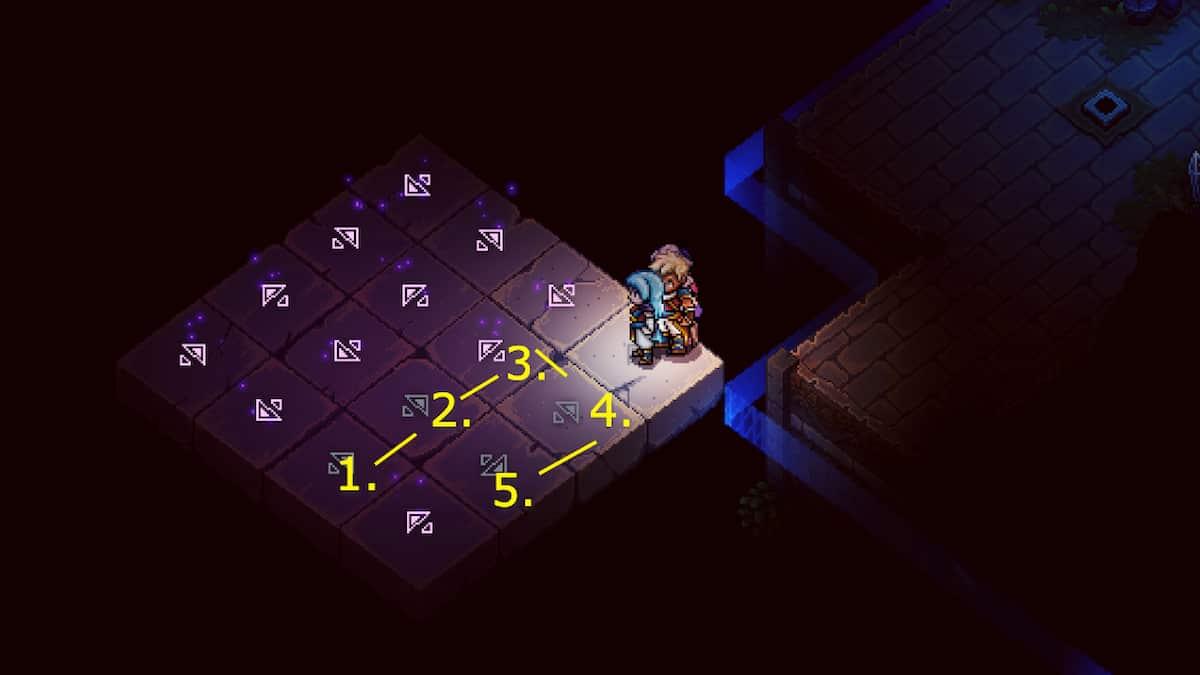
- Now, you'll want to step on these arrows to reach the far right glowing pillar:
- Right Arrow
- Right Arrow
- Up Arrow
- Right Arrow
- Down Arrow
- Once you're close enough, you can jump over and activate the second glowing pillar. This time, you won't need to reset the platform because you'll be heading directly for the chest, and you can do it with the tiles you have available.
- Move the platform by stepping on these arrows to reach the chest (don't worry about stepping on the tiles you've already been on, it won't affect it):
- Up Arrow
- Up Arrow
- Left Arrow
- Up Arrow
- Right Arrow
- Now climb up onto the platform and claim your chest, which is now unlocked from the bars.
Once you claim your loot from the chest, you'll have successfully finished this Solstice Shrine and can carry on to the next island in the Home World map.
Related: Sea of Stars Serai's World Solstice Shrine Island Puzzle Solution
Floating Island Solstice Shrine Solution
The second Solstice Shrine Island in the Home World is located to the northeast of the map near Mesa Island. Once again, you'll find a puzzle to complete at the entrance before going inside. Here's how to get through quickly:

- First, step on the button to raise the Solstice prism in the center of the puzzle.
- Then, use your Solstice Amulet ability with the triggers to rotate the prism to light up all the dials. Start with the middle one since it's the longest, then rotate to the outside ones as quickly as you can. I found it easier to cross back over the middle dial to get to the other side.
Once all the dials are active at the same time, the door will unlock and allow you to enter the shrine. This shrine looks a bit different than the last one, but it runs practically the same. To unlock the chest, you'll need to disable the lock by activating three glowing pedestals. Here are the steps to take to do so successfully:
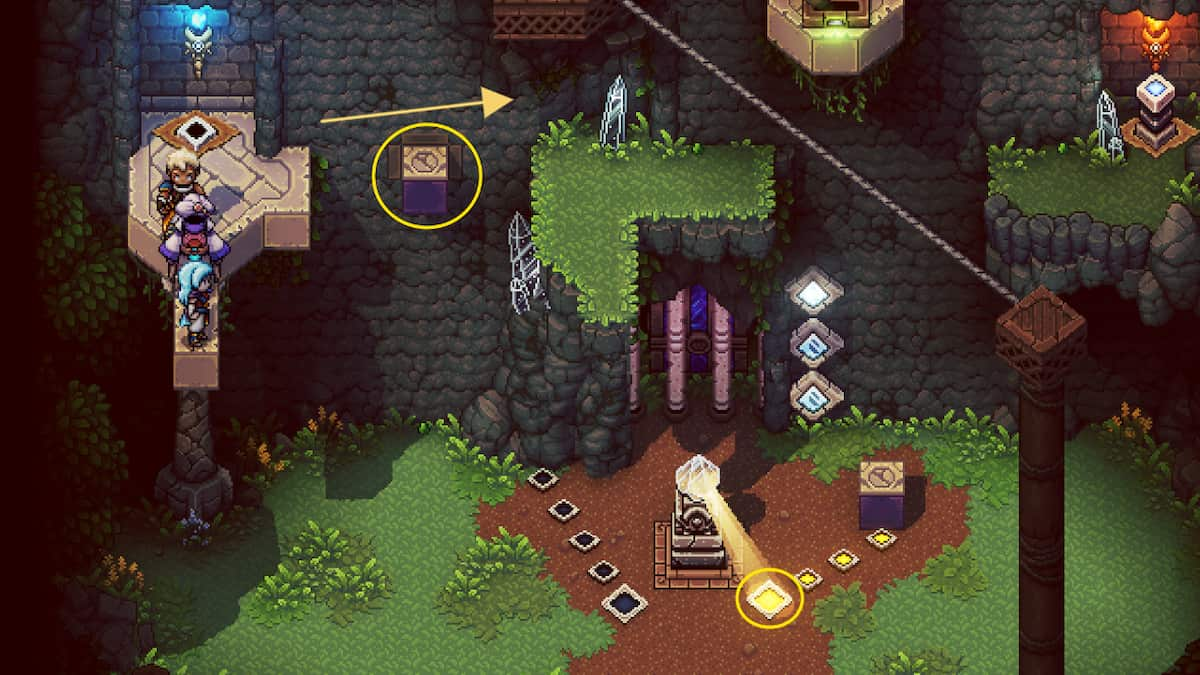


- Step on the button to raise the Solstice prism in the center. You'll only need to hit this button once for the prism to stay out. Use your Solstice Amulet ability to rotate the prism toward the left side and light up the dials. This will grow a vine for you to climb up and reach a grassy ledge. From the grassy ledge, drop down to the platform below and activate the first glowing pillar. This will disable the first lock.
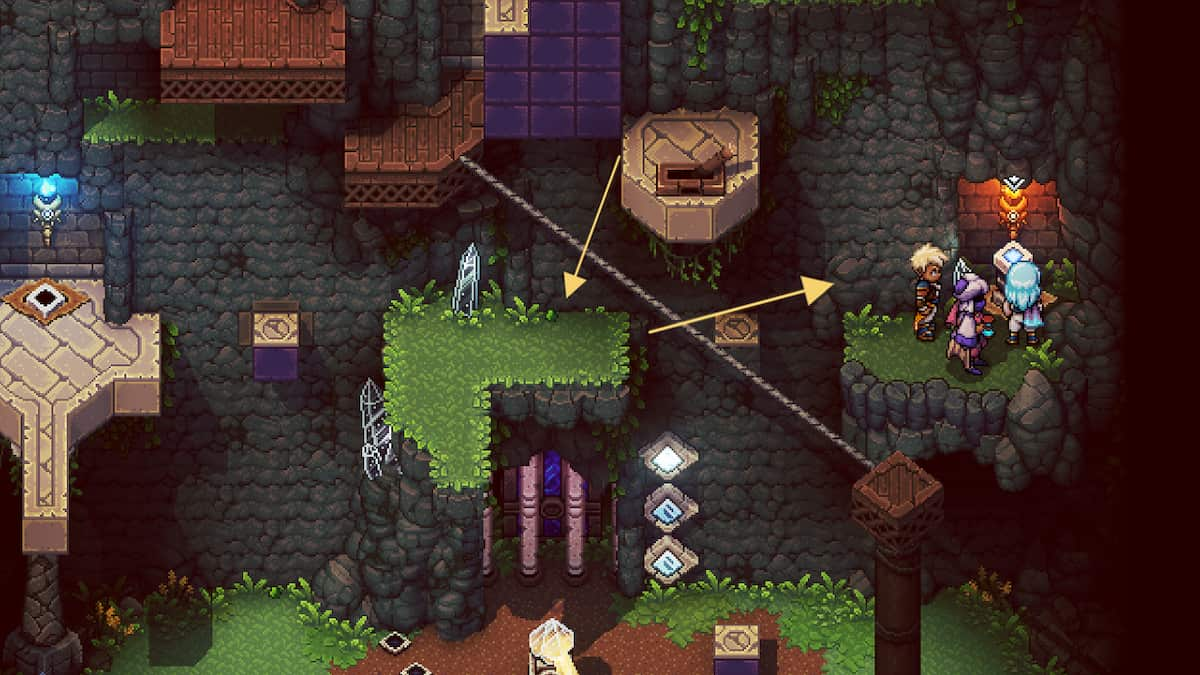
- Then, walk to the edge of the platform to look down on the Solstice prism and rotate it toward the right to light up the other dials. This will extend a beam out for you to cross the gap to another grassy ledge.
- Walk to the edge of the grass ledge for a view of the prism and then rotate it again to the left to grow a vine. Climb all the way up and then drop down to the lower step and climb up to the wooden platform, where you can reach the first lever. Activating this lever will place a stepping stone at the bottom right.
- From the lever platform, drop down and cross the tightrope to rotate the prism to the right and extend the purple beams. Head back over the tightrope and climb up the beams so you can drop down to the second lever. Switching the lever will extend a wooden walkway at the very top right.
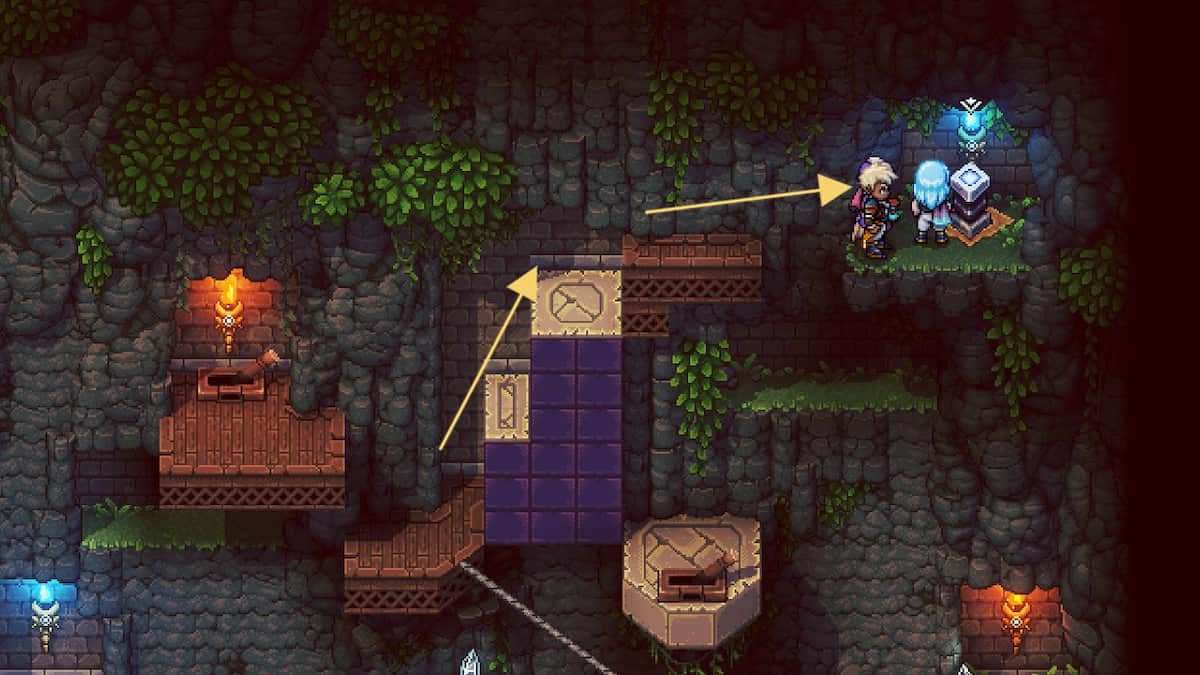
- Drop down from the lever platform and now use the stepping stone to jump across the gap and activate the second glowing pillar.
- Cross back over the stepping stone to the grassy ledge and then turn the prism to the left to grow a vine again. Use the vine to climb up and drop back down to the tightrope platform.
- Use the tightrope to rotate the prism back to the right, extending the beams and allowing you to comfortably cross over the extended wooden ramp and jump to the final glowing pillar. Once you activate this, it will open up the cage with the chest.
Now, you can drop down and claim your chest, successfully completing yet another Solstice Shrine. If you haven't already, be sure to finish the Evermist and Wraith Island shrines to finish off all of them in the Home World. Then, you'll have one left to go to uncover the secret reward in the Mountain Trail cave.
Looking for more Pro Game Guides Sea of Stars content? Check out our guides on Sea of Stars Wraith Island Solstice Shrine Puzzle Solution or All Artifact Locations in Sea of Stars!