Wartales has stolen a lot of PC RPG fans’ hearts thanks to its solid mix of turn-based squad combat and a harsh, gritty storyline that fits its medieval setting perfectly. If you're heading into Grinmere Province, read on for my full map and locations guide.
If you’re playing in region-locked mode, you’ll have worked your way through Tiltren, neighboring lands Vertruse and Artes, and then the plague-ridden Ludern. But bigger challenges await, starting just east of Vertruse Province. It’s a tricky area, thanks to some tough battles and arcing storylines, but we have everything you need to know below.
Full detailed Grinmeer Province maps – Wartales
Below, you’ll find a map of Grinmeer Province, with all the locations marked with their descriptions. You’ll enter via the Gosenberg Border Crossing on the eastern edge of Vertruse Province and can travel both east and north, although the area is self-contained with coast all around.
The region also contains a huge city to explore with Bandit groups that seem to keep coming back no matter how many times I clear them, which is at least good for XP as you’ll want to have mostly level eight-plus companions here.
Differences from previous regions
Make sure to head to the Brotherhood Fortress immediately upon entering the area, as the storyline works differently than in previous regions. There is just one large story to follow, and you’ll need to question many of the area’s inhabitants to get to the bottom of a murder mystery.
After the story update from the Brotherhood, many NPCs will have a Question button above their speech box. Always remember to click this, as it will be vital to gain as much evidence as you can. That said, you do not need to be at 100 percent to complete the Grinmeer scenario quest (I completed it at 92 percent).
All locations in Grinmeer Province
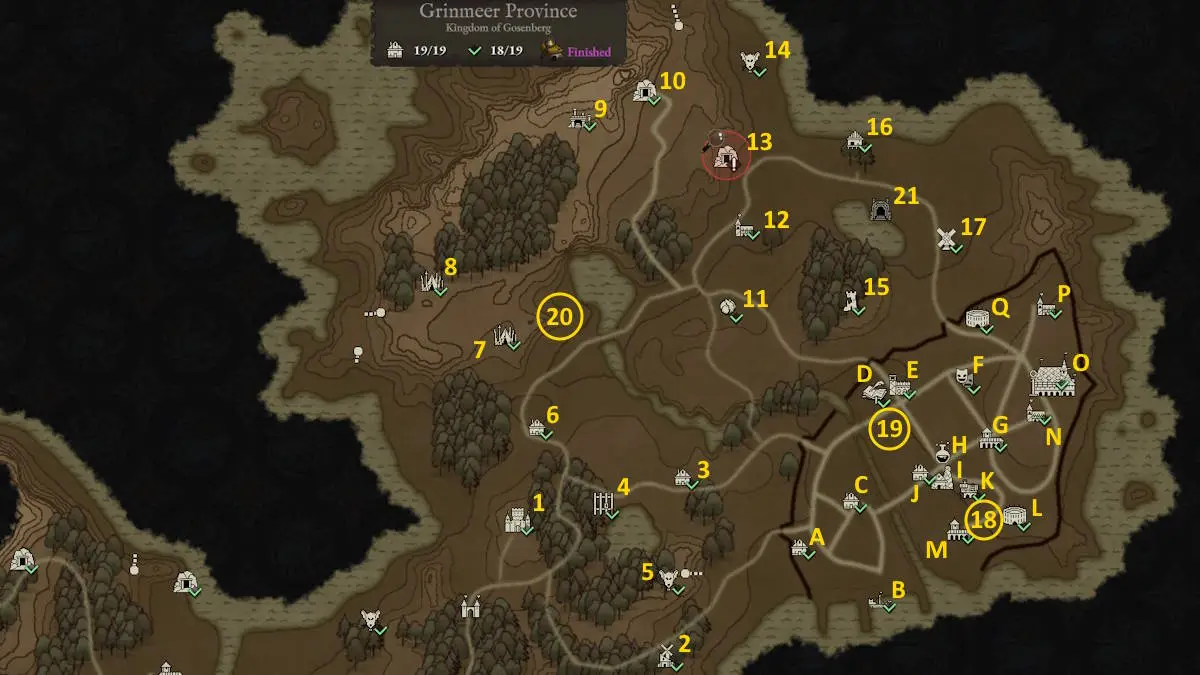
(You can open the image in a new tab.)
The first 19 locations listed below make up those required to be at 19/19 on the area map. Note that the last two will not be accessible until you’ve reached a certain section of the Grinmeer scenario quest and do not have permanent in-game map markers before or afterward. Entry 20 is the champion of the area. As with other regions, he will not aggro from a distance when you approach him and will only fight you if challenged.
- Brotherhood Fortress: Scenario quest location. Also acts in the same way as a Brotherhood Training Ground from other regions, so offers Skill books, respecs, and Legendary Weapon upgrades.
- Grinmere Sawmill: Scenario quest location, potentially with a battle (other options available).
- Beautiful Pigkeeper’s Farm: The Prize Specimen quest starts here. Find the prize boar needed by going northeast along the road, over the bridge, and talking to the group on the road just beyond. Return the pig to get a Golden Key.
- Grinmeer Jail: There’s no recruiting here, only part of a scenario quest you’ll trigger elsewhere. You'll come here to retrieve its only prisoner, Yorvenn, having completed the part in the Church of the Saving Eye (M). You have to fight the guards to free him, gaining 160-180 Suspicion in the process. You then need to take Yorvenn to the Church (M). Note you can rest in the church immediately after dropping him off to reduce suspicion.
- Rat Infestation: Self-contained quest location.
- Grinmeer Stables: Ponies for sale, as usual, but once you are victorious in Hoevendorp's Arena (Q) you can return to Madeltruda here to gain access to the Barbarian Specialisation (for axe wielders).
- Trackers' Camp: The Grinmere Hunt starts here, as well as having the usual store that only accepts Pristine Fangs.
- Bandit's Lair: A very tough battle. Defeat the potential adds nearby to make it manageable, but still one of the hardest battles in the region. Completion gets you a map that can get you access to the Alazarian Embassy (P) from a digging spot near Dawn Tower (15).
- Grinmeer Tomb: This is the largest tomb yet, with 15 locations, but it is relatively straightforward and still has only three battles. The only tricky bit is a floor puzzle. Wait until you find the solution later in the tomb, as there's an image on a wall (where you meet a historian) that gives you the answer you need. Tomb completion and subsequent relic research will land you Behedite's Kris (Legendary Dagger), alongside a set of three Codex.
- Hoevendorp Mine: The quest here works like a hunt in that you have to follow a blood trail. Examine the blood on the floor near the entrance inside, then go back outside and follow the trail to Dawn Tower (15) for a battle and the conclusion of the quest.
- Rouste Field: Another new feature, this location has a food market plus two quests. Win at Bernna's Arena (L) to gain access to the Duelist specialization (for sword wielders) from Jootold. The second is part of the scenario quest and requires you to win a game of Rouste Ball. This is a bit like Blood Bowl – American football, but more violent.
- Armeman Estate: You’ll get a quest here to defeat a wolf pack (level 9), which you will find just to the north at Great Growler Cave (13).
- Great Growler Cave: Part of the scenario quest and the location for the quest from Armeman Estate (12).
- Rat Infestation: Self-contained quest location.
- Dawn Tower: This will be empty unless you arrive after visiting the mine (10) and have followed the blood trail back here. If you do and win the battle, you’ll gain more towards the scenario quest. It is also the location of the tunnel that will allow you to access the Alazarian Embassy (P), but only once you've learned of its location by defeating the Bandit Camp (8).
- Well-Earned Rest Fishery: Speak to Diewagger, then use the fishing spot here and land all three fishing attempts. Talk to him again to complete his quest and get the Mead Pike recipe.
- Grinmeer Windmill: You’ll need to win quite a tough bandit battle to liberate the site, but a dead body there gives information about The Magnificient (B). For a short time (until you take the Magnificent out as part of the scenario quest), you can trade with the ship.
- Sewer hideout: Sewer entrance on the road between Church of the Saving Eye (M) and Brenna's Arena (L) that is marked on the map after completing the Midnight Gardens battle (C).
- Sewer hideout: Sewer entrance outside Gosenburg University (D) that is marked on the map after completing the Midnight Gardens battle (C).
- Fenris Dredd: Champion of Grinmeer Province. He’ll go after your weakest (lowest HP) unit, so keep them well away from him. Defeating him will get you the Legendary Weapon, Liberator (polearm).
- Sepulchre door: This will only appear on your map once you have completely translated the Merchants Codex (from Vertruse Tomb). Once you have, head here and use the runes (unique each playthrough) as the code to enter. It is a one-room dungeon with no battles. Inside, you can collect a Legendary Belt Accessory.
All locations in the city
All of these map locations are within the city walls. For some reason, in the southeast of the region, despite being part of Grinmeer, they are not part of the ‘locations discovered’ stat on the world map.
Related: Wartales Legendary Weapons List
- St-Septimus District Market: This area is a marketplace that also has a self-contained quest. When triggered, the stalls close, and you’ll find yourself wanted by the guard. During this time, you can’t use the market, but it passes quickly, and afterward, it returns to being a standard food market.
- The Magnificent: Has a few items for sale, or more once you’ve liberated the Bandits at Grinmeer Windmill (17). You'll also be sent here for a battle as part of the scenario quest. Afterward, use a lockpick to get into the hold, search the shelves back left for the Crude Key, and use it to open the chest between the two sets of steps in the hold. This gets you the Stolen Official Document. Note that once you’ve completed this battle, the ship will no longer be available for any trading.
- Midnight Gardens: Has a few items for sale. You'll need to visit after the scenario quest leads you here from Artist's Square (F). After a tough battle here, you'll get two new bandit locations for the scenario (both in sewers 18 and 19 above).
- Gosenberg University: Hand over five human remains to one of the NPCs here for a small amount of scenario quest XP.
- Guard Post: Connected to the scenario quest via the Alzarian Embassy (P).
- Artists' Square: You'll come here for a scenario quest. When this happens, you’re looking for a hat that is at the side of the stage to the left. You'll also need an animal in your party (bears and wolves work) to follow the scent to Midnight Gardens (C).
Note that if you don't already have a Lute for the Bard skill, and the entertainers are now here because you completed the quest at the Juggler's Camp in Ludern, you can get it here. If you've already completed the quest here, you'll need to buy one from The Tavern of Fortunes Made. - Cathedral of St Eleor: Quest location.
- Grinmeer Apothecary Clinic: Standard apothecary.
- Master Magdeleen's Forge: Standard forge.
- Tavern of fortunes Made: You’ll reunite with Reno Waarheid here and gain 600 Krowns if you loaned him 200 at the Gosenberg Border Crossing from Tiltren. Otherwise, it is a standard tavern for bounties, the informant, etc. You can also buy a Lute here for your Bard.
- Grinmere Travel Post: Can set up a Travel Post for 1,500 Krowns.
- Bernna's Arena: A standard arena but also a standalone part of the scenario quest, as you’ll be asked to represent Bernna's versus Hoevendorp's Arena. Completion will earn you the Legendary Weapons Glory (one-handed sword) and Prosperity (two-handed sword). The last fight is pretty tough, with the keys to the final battle being to keep the two enemies separated and reduce their health simultaneously rather than one at a time. After the win, you can also buy Skill Mastery books, Back Brace (Knock Back bonus), and Lead Best (gain Immovable).
- Church of the Saving Eye: You’ll need an Ornate Key to enter the Crypt, and to get it from here, you need to sing the rightmost (third) choice song when speaking to Abbot Egbetic. From what I can work out, the third song choice only becomes available after you complete the scenario quest that ends in the battle at Dawn Tower (15). I didn't have this option before doing so, but if you have a spare Ornate Key from elsewhere, that will also work. The Crypt is home of the People's Fellowship (scenario quest linked to saving a prisoner from Grinmeer Jail (4)). You can also rest in the bed here repeatedly (you just lose time) and each rest loses 50-80 Suspicion, so it’s great if you steal a lot of stuff!
- Hoevendorp Manor: Part of the main scenario quest. After finding the Love Letter here, you'll need to go to Artist's Square (F) to continue the storyline.
- Broker's Palace: Once you get to around 70 percent completion in the scenario quest, you'll be called back to the Brotherhood Fortress (1). After some dialogue there, you'll have the ability to accuse someone of the murder that the whole storyline hinges on. Once you’ve got the ability to accuse, you can go to Bernna's Arena (L), accuse the culprit there, and be taken here for the trial. The answers you need to give are No, Broker's Palace, Rooks, Clients, and Reclaim Bernna's Arena. (Note: You'll need to have found the evidence at The Magnificent (B)).
- Alazarian Embassy: An early part of the scenario quest sees you needing to collect the Ambassador here and escort him to the Guard Post (8). This is made difficult by roaming bands trying to attack you as you go. I found the easiest way to avoid them (if you don’t want the fights) is to go outside the castle walls and come back in as close to the Guard Post as possible.
- Hoevendorp's Arena: A much easier arena than Bernna’s Arena, as the firepits seem to hinder your AI opponents much more than they’ll likely hinder you. Victory will get you the Legendary Weapon, Victorious (one-handed axe).
We have loads more on Wartales here at Pro Game Guides! For example, why not check out Wartales Profession Bonuses, Explained, and How to remove armor layers in Wartales.