For players wanting to experiment with the point-and-click mystery genre, 3D Escape Room Detective Story is a great game due to its accessibility as a free mobile game. In this guide, I'll walk you through all of the puzzles in Chapter 5 of 3D Escape Room Detective Story.
Each chapter of the game has a separate guide since each contains many puzzles of varying difficulties. If you haven't made your way to the final chapter yet, check out our guides on the previous chapters to help you move in the right direction.
The final chapter begins with another phone call from the unidentified individual. They refer to the train as the fourth test and discuss how Pete and Claude have become immortal beings. They tell you to go to a lighthouse to take the final test, which will help you uncover the truth behind all of these unconventional cases.
3D Escape Room Detective Story Chapter 5 guide
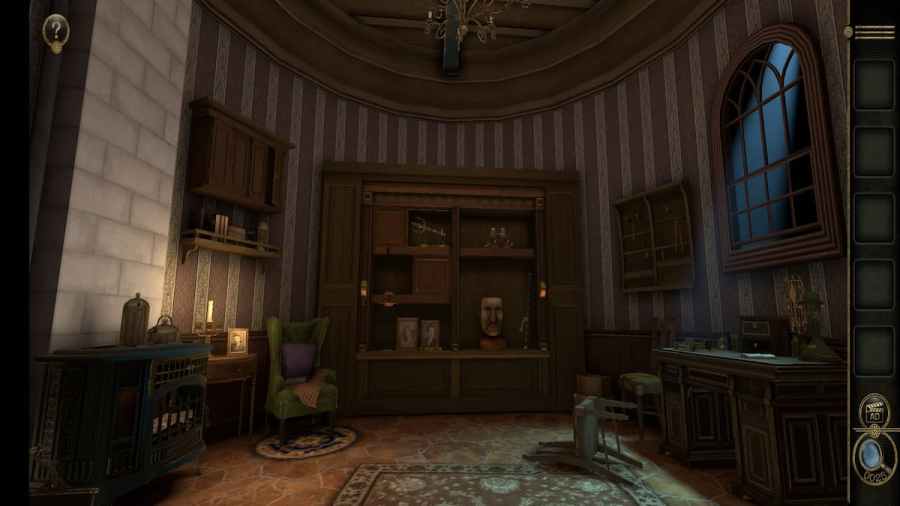
The key features of this room are the blue stove on the left, the bookcase in the back, and the desk on the right.

Beginning bookcase puzzles
Start at the bookcase in the back.

In this view, grab the Sword resting to the right of the creepy head statue.

Creepy head puzzle
Focus on the creepy head in the bottom right.

Sliding its mouth down will reveal a chest with two sliders on its head.

To unlock the first compartment, pull both switches to the bottom. Let them rise back to the top, then drag both down to the bottom. This open compartment contains a Star-Shaped Device.

To open the top compartment, slide the left slider down to the second space and the right slider to the bottom.

This will unlock a Mermaid Statue.

Picture frames
Check out the picture frames on the shelf to the left.

Take note of the writing on the left frame. It is both upside down and backward, so the code is correctly read as "x2x6x8x9".

Rotating the base of the right photo reveals a Slider hidden behind it.

Trident puzzle part 1
Look at the Trident displayed on the top left.

Grabbing it causes the left handle to shift.

Rotate the right handle to match the left.

Doing this causes the cabinet door on the left to slide right, revealing a new puzzle.

Place the Trident into the center.

This reveals a strange mechanism on the left door, which cannot be used yet.

Desk puzzles
Head over to the desk.

Take note of the code on the front left of the desk, "4x7x3x5x".

Set of drawers
Look at the set of drawers on top of the desk.

Pull the bottom drawer out and view it from the left to find a hidden slider.

Pulling the slider reveals a secret compartment in the drawer containing a Knob.

Locked slider drawer
Now look at the two locked drawers on the left.

Place the Slider onto the bottom drawer.

Open it to get a Music Box Cylinder.

Desk instrument puzzle
Open the Music Box Cylinder in your inventory.

Rotate to the left edge, which has a gear on it.

Spin the gear until the two red dots align.

Attach the Music Box Cylinder to the instrument on the left of the desk.

Before starting the puzzle, look at the music book on the right side of the desk. The placements of the music notes correspond to the correct placements of the pegs on the cylinder.

Start by placing the red peg in the leftmost hole, the peg above it in the rightmost hole, and the peg above that in the third hole from the left.

Rotate the cylinder so that the next three pegs are visible.

Put the first peg of these three on the fourth hole from the right, the second on the third hole from the right, and the third on the fourth hole from the left.

Rotate the cylinder so the last two pegs are visible, with the red peg peeking out of the top.

Slide the first peg to the second hole from the right and the second peg to the second hole from the left.

This will open the Music Box Cylinder, which contains a small Handle.

Bookshelf puzzles part 2
The next puzzles available on the bookshelf are the scientific machine and the star-shaped lock from the trident puzzle.
Scientific machine puzzle
The scientific machine is on the top left shelf.

Place the Knob between the two gold switches.

Rotate the switch to face the right.

Flip the outer switches to face downwards to open the two drawers on the sides of the machine.

The left drawer contains a Key and the right drawer contains a Dinosaur Statue.

Trident puzzle part 2
Before heading to the trident puzzle, return to the set of drawers on top of the desk. Use the Key from the scientific machine in the top drawer to get a Windmill Blade and a Strange Device.

Open up the Strange Device in your inventory.

Lift all four sides of the Strange Device to turn it into a Transmission Device.
Open the Star-Shaped Device in your inventory.

Place the Handle in the device's hole to create a Star-Shaped Handle.

A hole with four points can be found on the left side of the bookshelf near the photos.

Place the Transmission Device into it.
Place the Star Handle into the hole above the door handle.

Use the Star Handle to rotate the orb until the gap on all three sections lines up, clearing a path between the Transmission Device and the Trident.

Then add the Metal Rod to the gap.

This causes the Trident to press into the top shelf and rotate, moving the cabinet door on the second shelf.

Focusing in on the castle gives you a Strange Key. Nothing else can be done here, so leave it behind for now.

Desk eight-digit code puzzle
The Strange Key can be placed into the keyhole in the desk's right drawer.

Rotating the Strange Key reveals an eight-digit number lock at the front of the desk.

To solve it, you need to combine the set of numbers from the desk with the set of numbers from the photograph. The numbers in the second code take the place of the X's in the first, creating the final code "42763859". Entering this code flips the drawer to reveal a chessboard.

Chess puzzle
The chessboard contains a variety of aquatic creatures as chess pieces.

The Dinosaur Statue is added to the empty slot on the left while the Mermaid Statue is added to the empty slot on the right.

Solving this puzzle requires moving each puzzle piece until they're in the proper places. Moving one puzzle piece will move one or two other pieces on the board. The image below shows what the board looks like when the puzzle is solved.

This gives you a Clock Dial.

Castle puzzle
Add the Clock Dial to the front of the castle.

This allows you to rotate the castle pillars.

Rotating all sections of the pillar to place the gold sides in the front opens up the castle doors.

Entering the castle
Entering the castle reveals a large room with a table in the center.

The table contains a castle missing pieces, a broken windmill, and an empty spot.

The Windmill Blades can be placed on the windmill to open up the door at its base.

Windmill part 1
The inside of the windmill contains a small wooden structure on the front table.

Looking at the front of the structure reveals that the front right peg is loose.

Tighten it to get a Strange Gear.

Opening the castle doors
Slide over to the empty base and grab the large Metal Disc on top of it.

Take a step back to view the base of the table.

Slide the panel in the front to the right to view a set of gears and a space for the large Metal Disc.

Place the Metal Disc and rotate it.

This reveals a tower in the center of the castle and leads you to a puzzle on the left side.

Move the red slider to the bottom to open up the doors.

Pedestal room puzzle
Entering the doors has you facing a hallway with a closed door hidden on the right wall and an open corridor on the left.

Head straight into the next room, which has two stone pedestals on either side of a cell.

Spin the right pedestal clockwise to get a Metal Button.

Spin the left pedestal clockwise to get a Small Key. Leave this puzzle for now and return to the main room.

Chute puzzle
In the main room, turn to the left to view a room with a statue.

Enter the room to approach the puzzle.

Pull the four levers on the left and right walls to move the pieces of the chute around.

The puzzle is completed when every piece of the chute lines up in the middle.

This gives you the first Heavy Metal Ball.

Chess puzzle
Insert the Key into the locked door and rotate it to reveal a tiny room with a locked chest.

Opening the chest reveals a chessboard.

The goal of this puzzle is to make the queen pass over every square and end up at the circular platform in the bottom left.

Move the queen right one space.

Move the queen up one space.

Slide the queen right two spaces.

Move the queen down one space.

Push the queen one space to the right.

Slide the queen up two spaces.

Move the queen to the left four spaces.

Push the queen down one block.

Push the queen left one block.

Move the queen up one block.

Move the queen left one block.

Slide the queen down two spaces.

Push the queen right one space.

Move the queen down one space.

Slide the queen one space to the left.

Move the queen one space down.

Move the queen right two spaces.

Slide the queen up one move.

Push the queen right one space.

Move the queen down one space.

Slide the queen one space to the right.

Move the queen up one space.

Slide the queen right one space.

Push the queen down one space.

Solving this puzzle gives you the second Heavy Metal Ball.

Completing the pedestal puzzle
Open up Heavy Metal Ball A in your inventory and rotate it to view the square hole in the bottom.

Open Heavy Metal Ball B in your inventory and rotate it to view the triangular hole in the bottom.

Place Heavy Metal Ball B on the right pedestal.

Place Heavy Metal Ball A on the left pedestal to unlock the gates to view the owl puzzle.

Owl puzzle
Tap the owl's beak to unlock a puzzle at the back of its head.

Place the Metal Button in the center.

The sliders are used to push the smaller gear between the four larger gears. Pressing the button stops the larger gear for a moment so all four of the holes between the gears can be aligned.

Let the gear rotate until the holes reach the top, completing the first part of the puzzle.

This unlocks the owl, giving you the Extremely Heavy Mechanical Ball item.

Lever box puzzle
Completing the pedestal room causes one of the castle's towers to shrink into the building, with a gear sticking out.

Spinning the gear makes the tower rise to reveal a doorway.

This room has a box with eight handles, plus a space in the front for an item.

The box's first puzzle involves sliding all of the handles so they are at the top of their row at the same time. However, each of the sliders falls after a set period of time.

I found it easiest to move the two handles on the right side of the front first. Then slide the back handles up from right to left and finish by moving the two handles on the left side of the front. Solving this puzzle gives you a Wooden Statue.

Add the Wooden Statue to the front of the box to unlock the handle on the top.

Rotate the handle 360 degrees to open the top of the box.

This reveals a wooden urn with sapphires embedded in it. We don't have the pieces for this puzzle yet, so we'll leave it behind for now.

Oven slider puzzle
Exit the castle and return to the oven in the first room.

The front drawers open up to reveal a puzzle, which we'll return to later.

Focus on the tiny rectangular compartment on the lower right of the oven.

Slide it open to reveal a mechanism with two gears.

Insert the Strange Gear into the compartment.

This will give you a Screwdriver.

While looking at the oven's bars, rotate the camera to the left to view a hidden slider.

Push the slider down to unlock a small compartment containing the Metal Badge A.

Golden table puzzle part 1
Head to the tallest castle tower on the left.

The room inside the tower has a golden table in the center and a closed door in the background.

Looking at the table reveals a gear in the center.

Spin it to reveal a blue circle in the center.

Place the Extremely Heavy Mechanical Ball into this blue circle.

This reveals a fleet of ships in the center and raises one of the platforms.

The raised platform has a geometric shape with badges at five of its edges, with the sixth edge being empty.

Place the Metal Badge A into the empty spot.

The direction of the badges indicates which way the boats should be facing.

Start with the ship that has the same boat symbol as the bottom on the top of the geometric shape.

Arranging all of the pieces correctly will flip over the platform, giving you a Rotary Handle. It will also unlock a second platform missing a metal badge.

Oven top lock
Return to the lock at the top of the oven.

Place the Rotary Handle on top of the lock.

Rotating the Rotary Handle will unlock the square compartment on the right containing the Metal Badge B.

Golden table puzzle part 2
Return to the room containing the golden table and focus on the new platform missing a badge.

Place the Metal Badge B into the empty spot.

Start at the ship with the matching steering wheel symbol on the flag.

Completing the second part of the puzzle gives you a Drawer Handle.

Desk drawer and small box
Return to the desk in the main room.

Place the Drawer Handle on the drawer above the Slider drawer.

Pull the handle to the right to unlock a puzzle on top of the desk.

Rotate both sides of the wheel until the squares are visible to get Small Box A, until plus-signs are visible to get Small Box B, and until hexagons are visible to get Small Box C.

Small Box A
Open Small Box A in your inventory.

Slide the slider in the center down to get the Metal Badge C.

Small Box B
Open Small Box B in your inventory.

Rotate the mechanism in the middle to get a Small Gear.

Small Box C
Open the Small Box C in your inventory.

Rotate the sides of the box so that the triangles line up to get a Sapphire.

Sapphire puzzle
Return to the urn-shaped puzzle.

Add the Sapphire to the empty place on the puzzle.

This unlocks the sliders, which can be moved up and down to change the colors of the sapphires between blue and red.

Turning all of the sapphires blue raises the lid of the urn, unlocking a second puzzle.

The metallic puzzle pieces are moved up and down to allow the wooden blocks in the center to be rotated.

Rotate the top and bottom two blocks so they all align in the same direction as the center block. This will give you the Slider B item.

Golden table puzzle part 3
Head to the golden table in the tall left tower and focus on the newest platform missing a badge.

Add the Metal Badge C to the empty spot.

Unlike the previous two puzzles, this one involves both rotating and angling the ships.

Completing it gives you the Slider A item.

Windmill slider puzzle
When looking at the object in the windmill, there is an empty slot for a slider on the left side.

Place Slider A into this spot.

There is a second empty spot on the right side.

Place Slider B here.

Slider A puzzle
Moving Slider A will open up the sides of the structure, allowing a small box to be grabbed from the center.

Opening this small box gives you an Inconspicious Small Iron Piece.

Slider B puzzle
Moving Slider B unlocks a small puzzle.

Add the Inconspicious Small Iron piece on the left side.

Rotate the pieces to change the path and move the slider back and forth to travel between all of the sections. Completing the puzzle gives you a Roof Component piece.

Related: Cafe Bacon Escape Room Walkthrough
Roof Component puzzle
Place the Roof Component piece into the empty spot to enable the final puzzle.

Looking at the puzzle reveals a space for a gear and a hole for another piece.

Place the Screwdriver into the hole.

Place the Small Gear between the top two gears.

Rotate the Screwdriver to unlock a Birdcage Decoration.

Birdcage room
Completing the windmill unlocks a third tower with an upside-down cross on its roof.

Entering the tower leads you to a room with a birdcage in the center.

Head to the chimney at the top right of the birdcage.

Open it up to get a Decoration.

Birdcage Decoration puzzle
Open the Birdcage Decoration in your inventory.

Flip the lid to reveal a metal button. Press it to solve the Birdcage Decoration and return it to your inventory.

Decoration puzzle
Open the Decoration item in your inventory.

Open the bottom two sections of the Decoration, which will return it to your inventory.

Birdcage roof puzzle
Looking at the roof reveals missing decorations on the left end.

Place the Birdcage Decoration on the edge of the roof.

Place the Decoration on the inner part of the roof to unlock a raised compartment.

Slide the left chimney toward the center to get an Owl Disc.

Place the Owl Disc in the center of the raised portion of the birdcage.

Rotate it to open the cage, which contains the Owl Board and Broken Decoration A items.

Constellation puzzle
On the right side of the birdcage, there is a gap the same shape and size as the Owl Board.

The Owl Board flips over, turning into a clue for the constellation puzzle.

This unlocks the constellation puzzle on the left side of the cage.

To solve the puzzle, rotate each section until the constellation shown matches the one in the clue.

This will give you the Broken Decoration B.

Colorful Metal Box puzzle
Combining Broken Decoration A with Broken Decoration B creates an Owl Badge.

Looking at the right side of the cage reveals an empty slot for the Owl Badge.

Place the Owl Badge there to unlock the bars surrounding the Colorful Metal Box.

Open the Colorful Metal Box in your inventory. The goal of the puzzle is to rotate the four rows and move the colorful sliders so that each row only contains its color.

Completing the puzzle gives you a Door Panel.

Door Panel puzzle
Open the Door Panel in your inventory and view the back to get a golden piece.

Move to view the front door.

The gold piece can be added to the front door. Adding it allows the three pieces to be moved up around using the gears on either side of the door.

The end goal of the puzzle is to move the gears to match the grooves on the back of the Door Panel.

When completed, the triangle is upside-down at the top right, the semi-circle is right-side up at the bottom center, and the leftmost shape is facing the right side one space higher than the center circle.

Place the Door Panel onto the door to open up the front of the cage.

The owl statue will slide forward, giving you a Metal Cylinder.

Inspecting the Metal Cylinder reveals that the right side can be twisted off.

Twisting the cap off reveals a hidden piece of paper.

Written on the paper are a series of numbers and symbols. After this, the game will display a short scene before ending.

Can't get enough of escape room mysteries? Check out our Haunted Hunt Walkthrough here on Pro Game Guides for a fantastical take on the genre.