Scary Horror 2 follows a man trapped in an unknown building, with puzzles, traps, and enemies lurking behind every corner. It took me a while to complete Chapter 2, and if you need help finding solutions to puzzles, take a look at this complete Scary Horror 2 Chapter 2 walkthrough.
Complete Scary Horror 2 Guide, Chapter 2
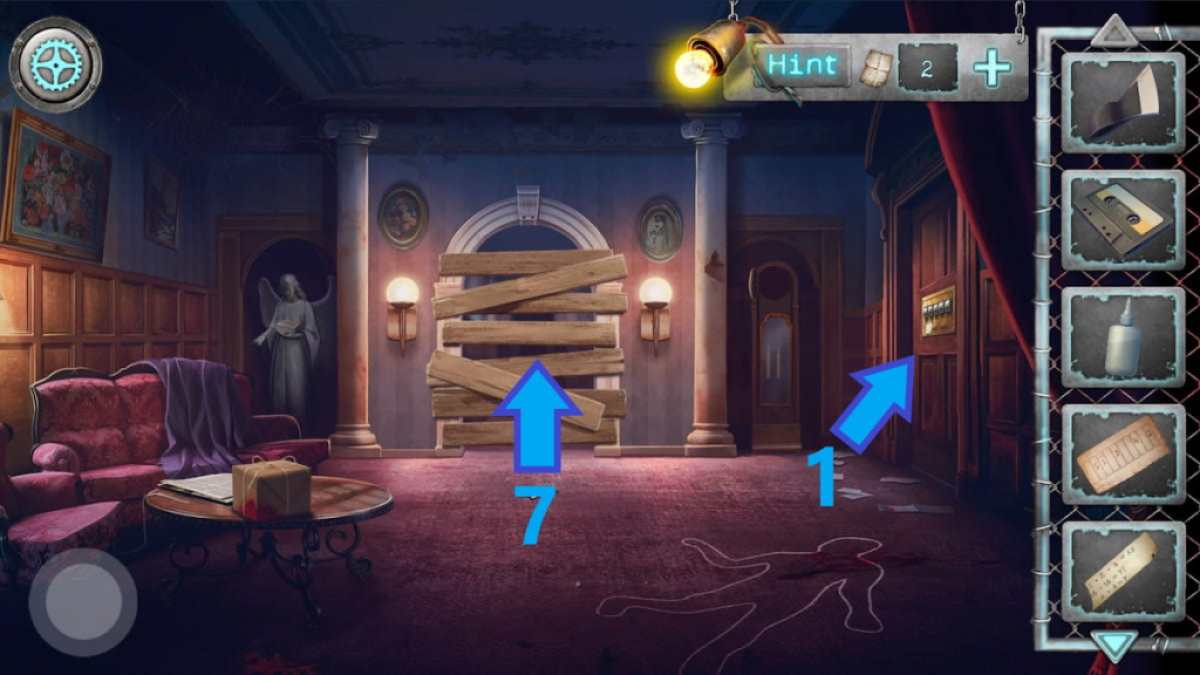
After escaping the first building via the rooftop and crossing into the hallway of the second building, two ghost girls will greet the player, which sets the tone for what follows in Scary Horror 2 Chapter 2. If you haven't done so already, follow the Scary Horror 2 Chapter 1 Walkthrough to complete the first chapter since you won't be able to access Chapter 2 otherwise.
Hallway
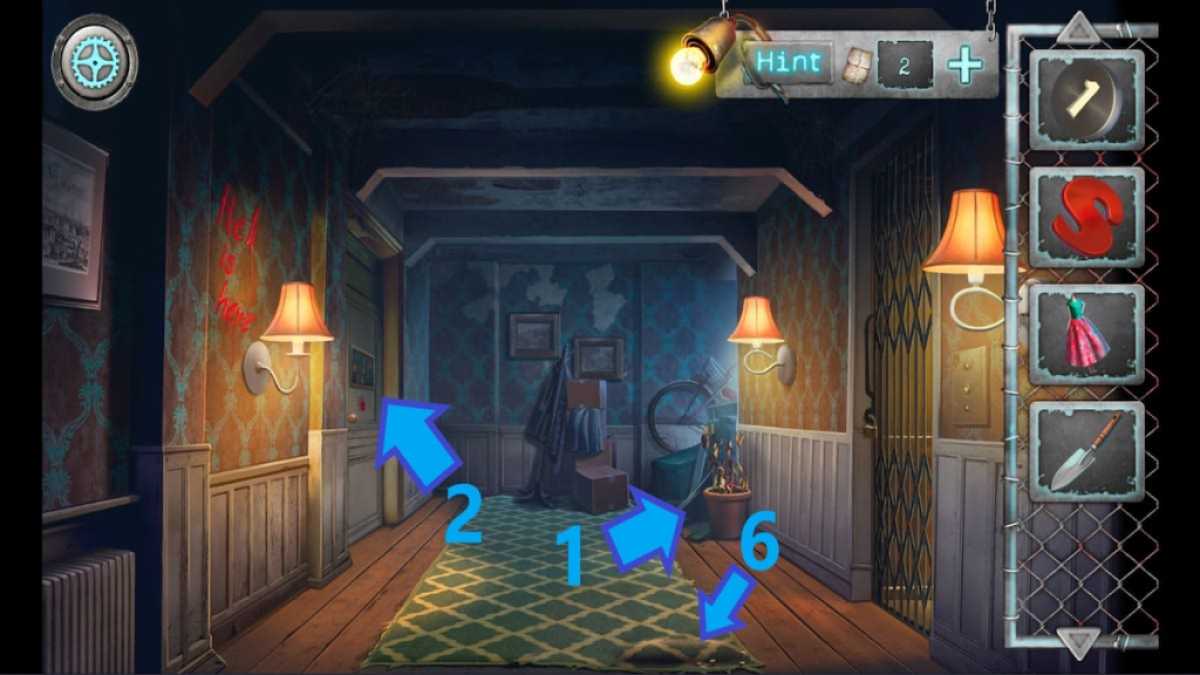
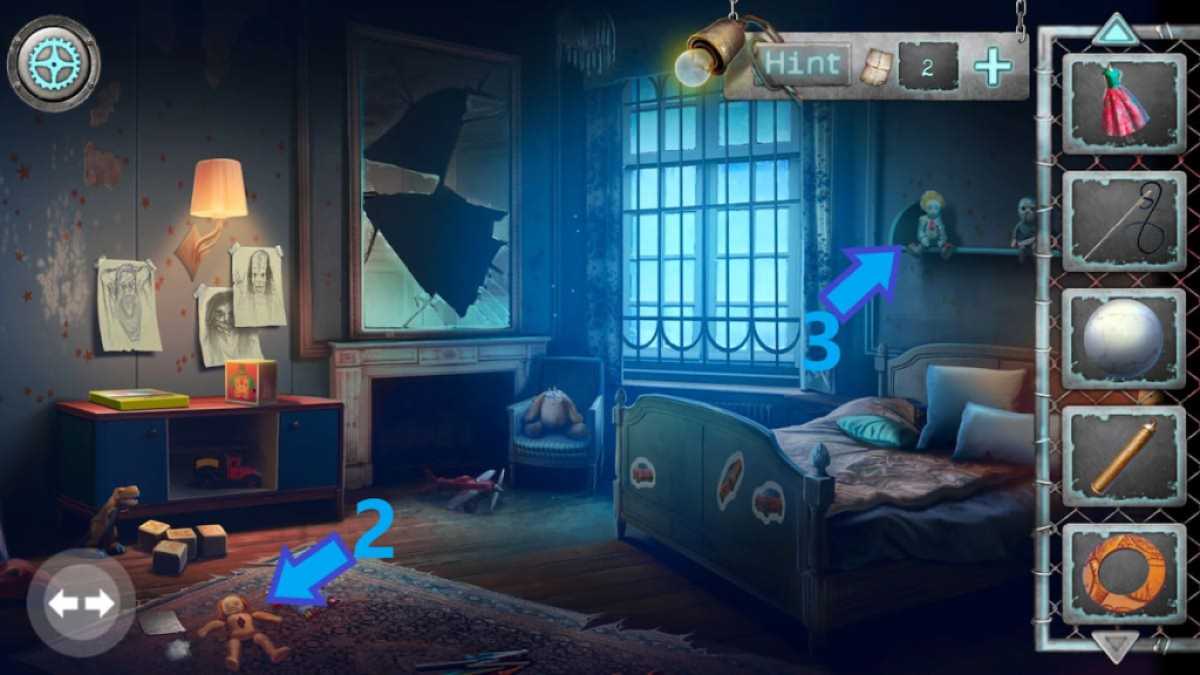
- Approach the flower pot (1) and dig with the garden shovel to dig up the letter H.
- Go to the left door (2) and place the letters on the letter board.
- Arrange the letters to spell the sentence HELL IS HERE and take the key that drops from behind the board.
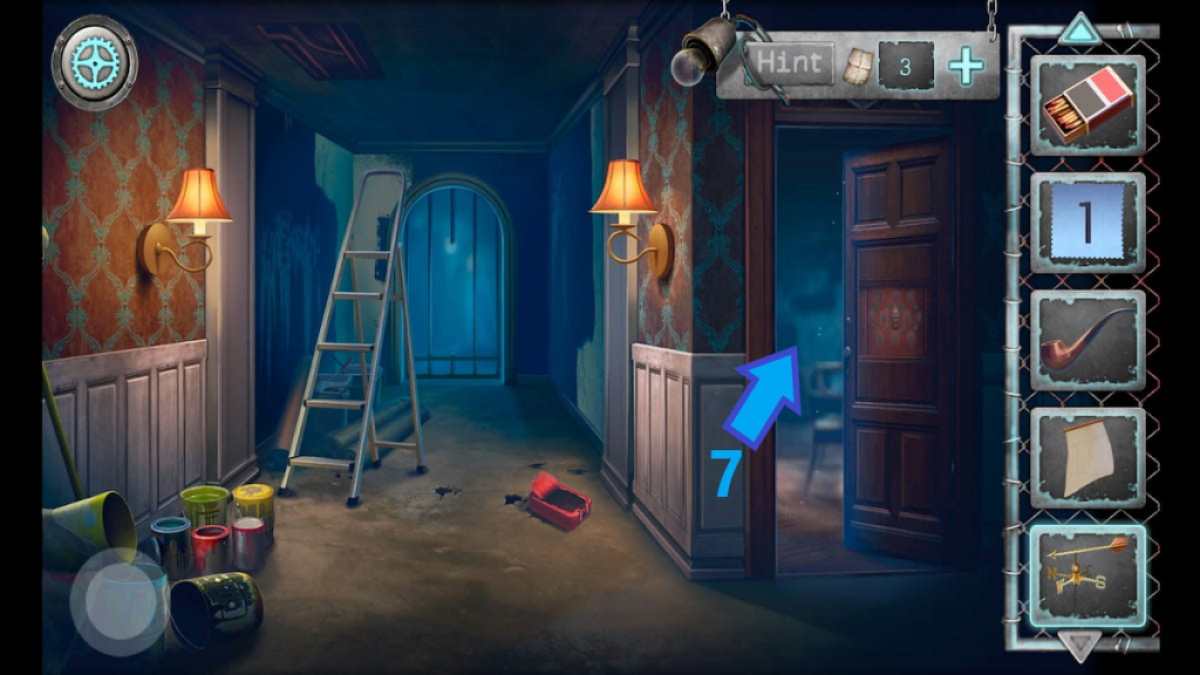
- Unlock the door using the key and enter the children's room,
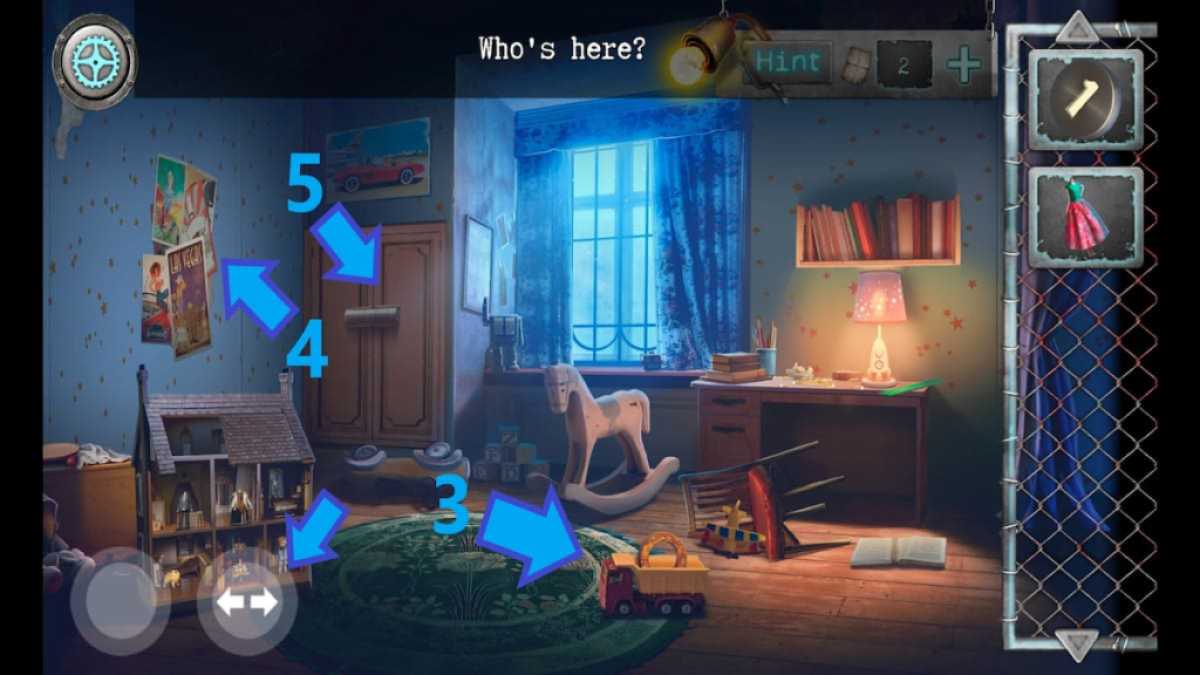
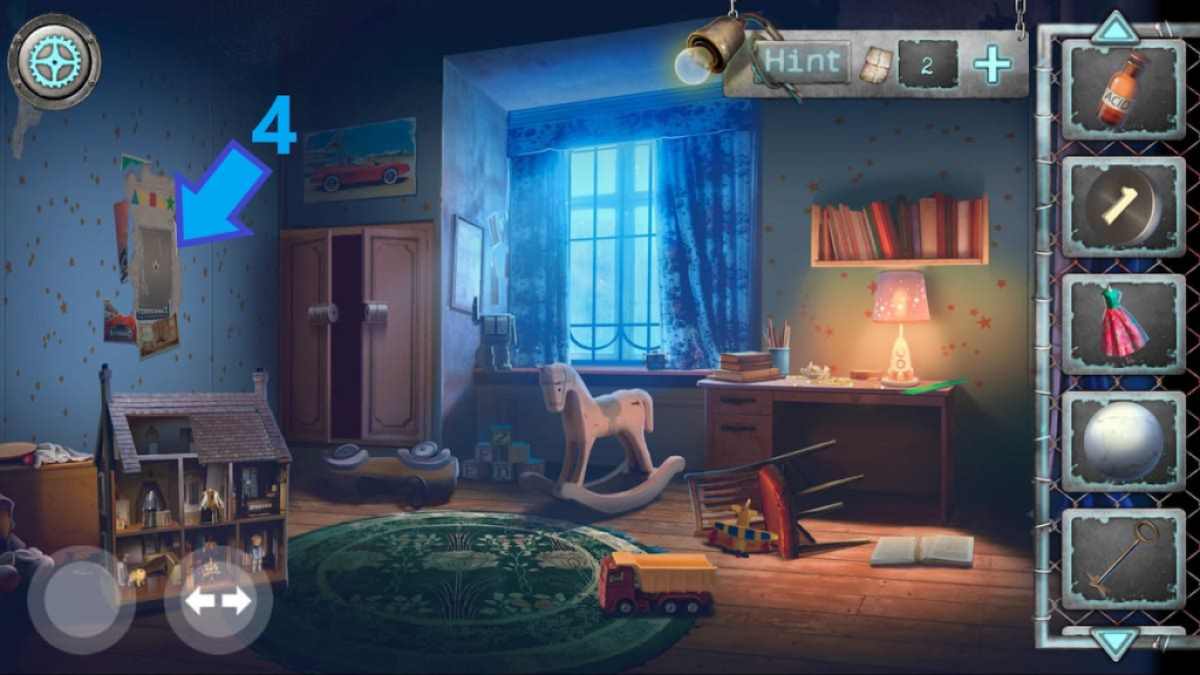
- Collect the round detail from the truck (3) and approach the posters (4).
- Rip the posters to reveal a combination of five shapes, and go back and approach the cupboard (5).
- Use the combination from behind the posters to unlock the cupboard.
- Move the clothes to the top shelf, take the crowbar, and click on the cassette player.
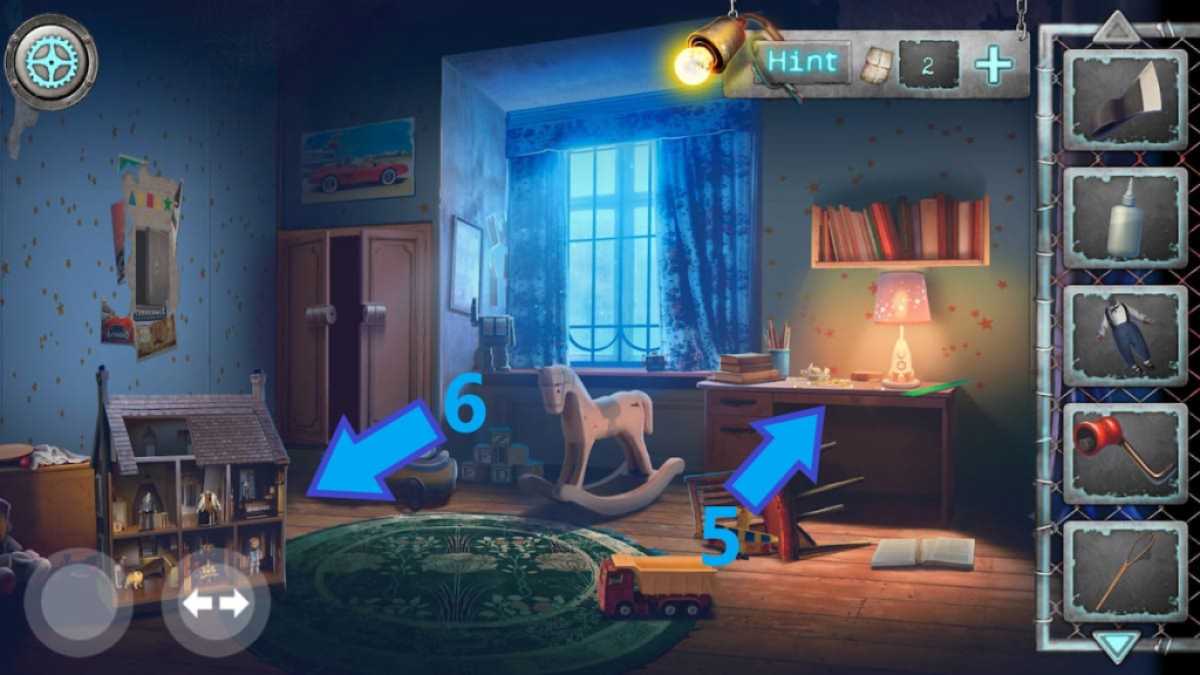
- Go back to the hallway and inspect the carpet (6).
- Remove the nails from the carpet using the crowbar and take the weight and needle underneath.
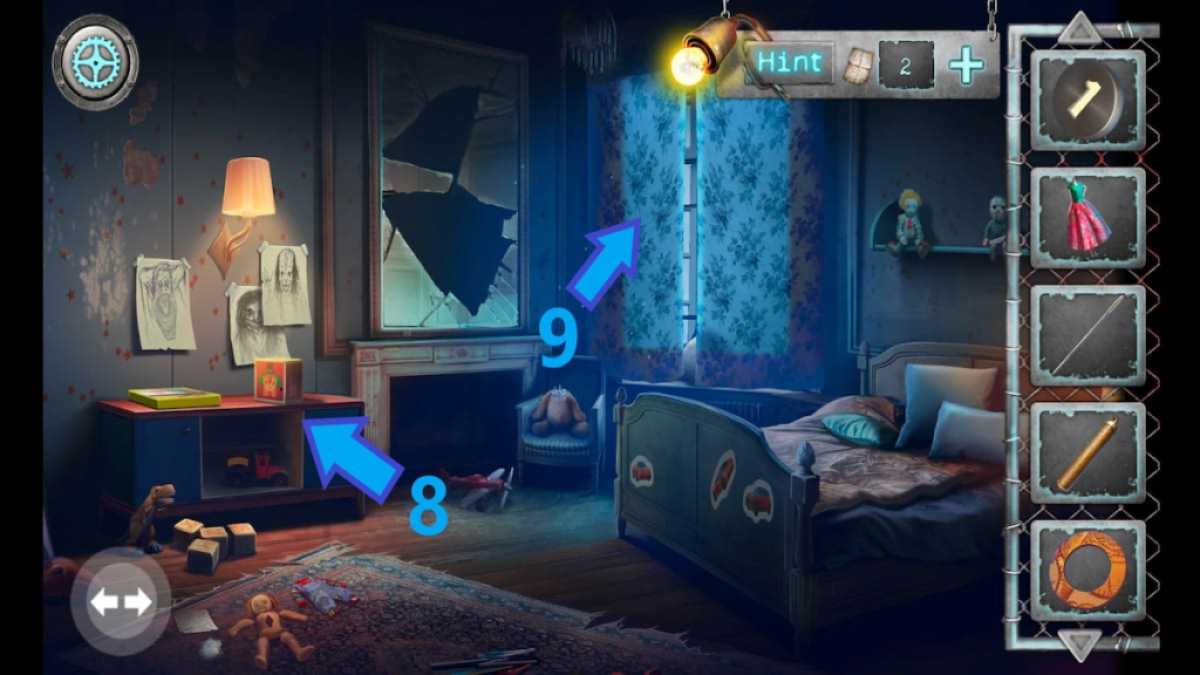
- Return to the children's room and press the arrow button (7) to view the other side.
- Approach the table (8) and play the purple ring game.
- Move the ring game and take the acid from the suitcase underneath the game.
- Open the curtains (9), collect the marble ball under the window, and look under the bed.
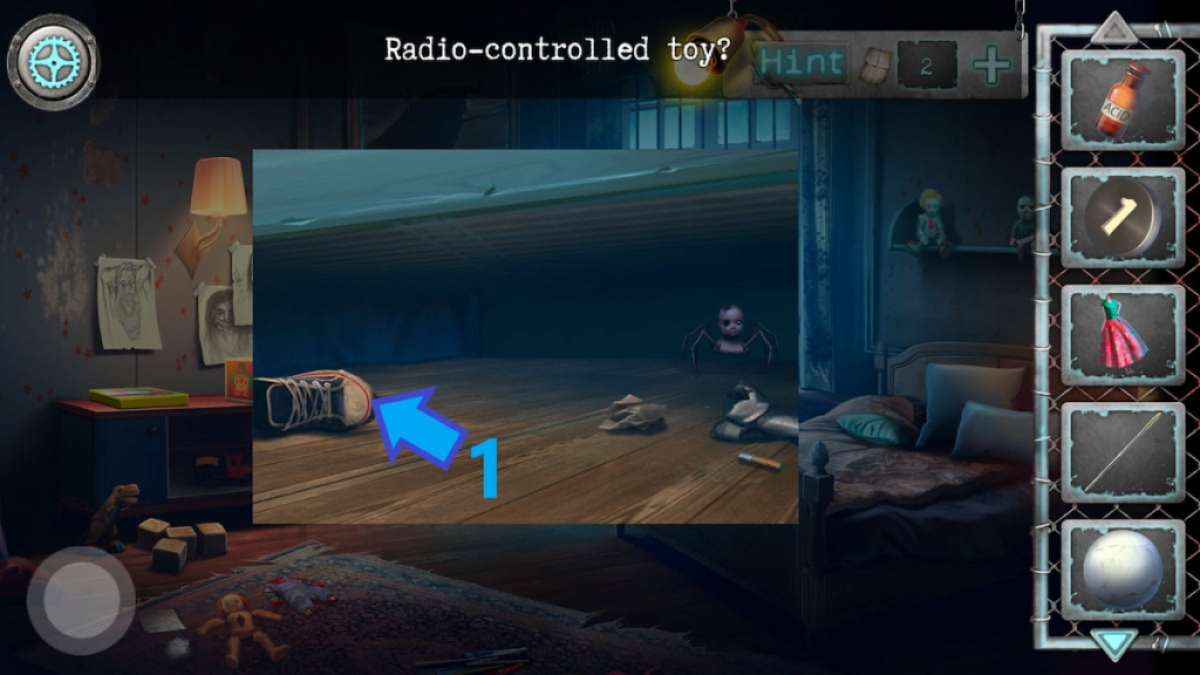
- Move the shoe, take the threads (1), and combine them with the needle.
- Approach the doll (2) and assemble it as per instructions on the paper.
- Drag the clothes onto the doll to dress it up and take it.
- Approach the shelf (3), place the doll between the two dolls, and take the key with a star.
- Go back to the first part of the room and approach the ripped posters (4).
- Use the key with a star to open the safe and take the glue bottle.
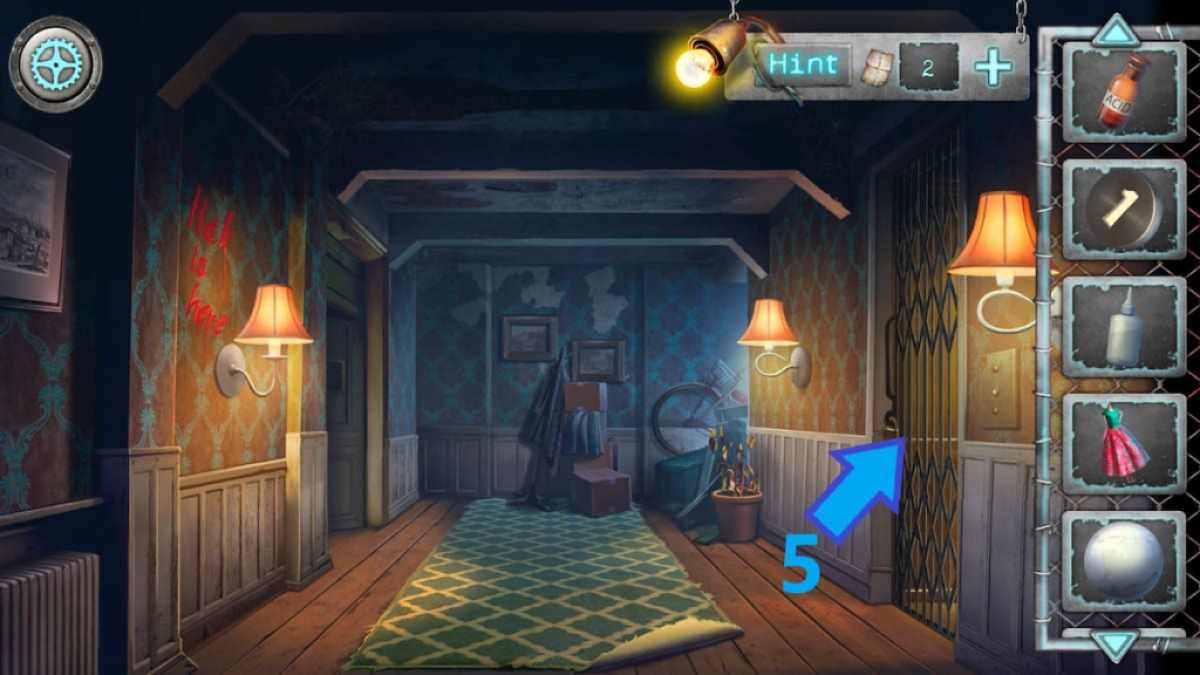
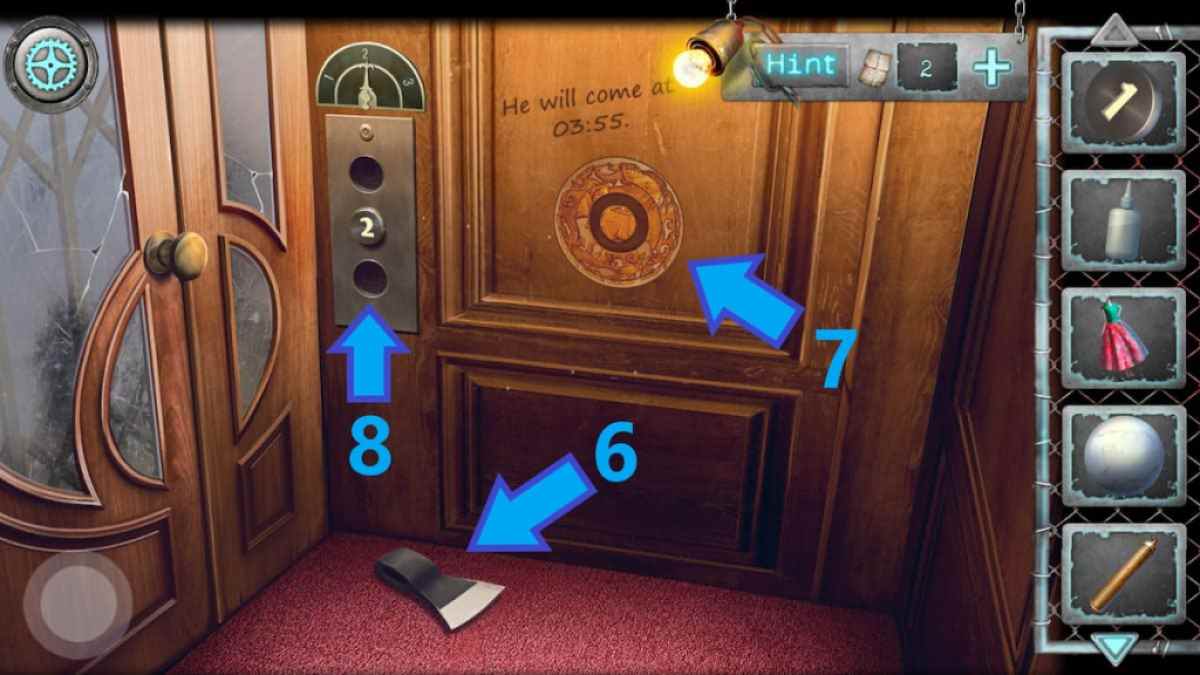
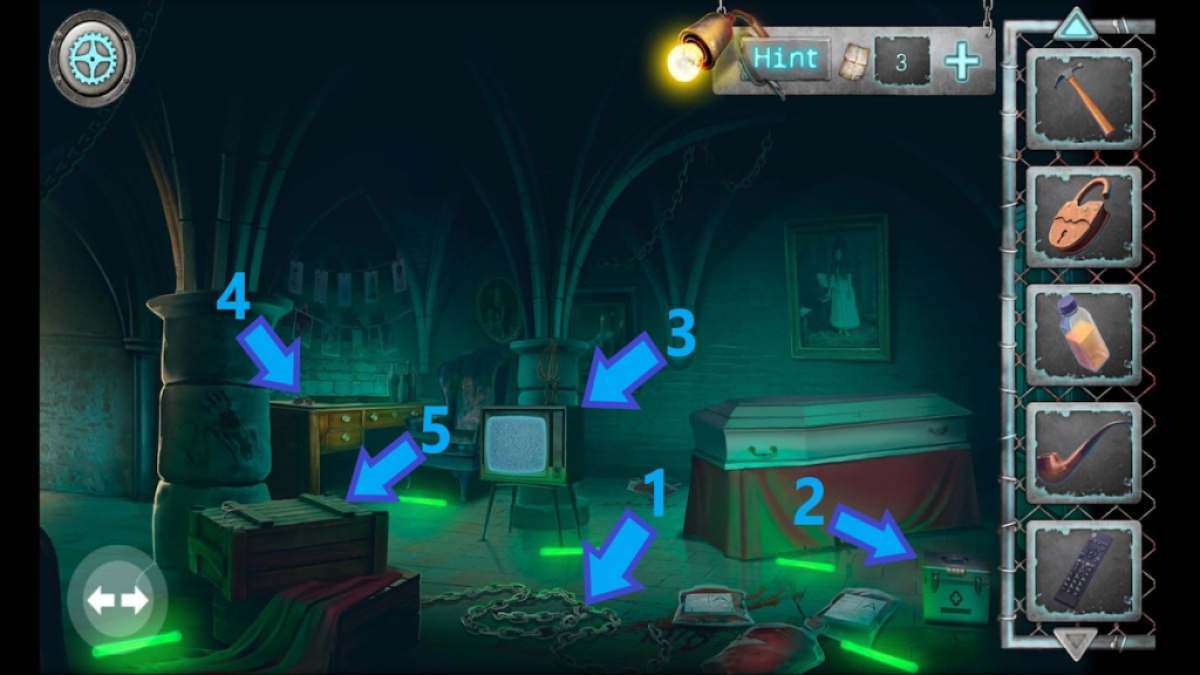
- Return to the hallway and approach the elevator (5).
- Use acid to melt the padlock and enter.
- Inspect the writing on the elevator wall and take the axe head (6).
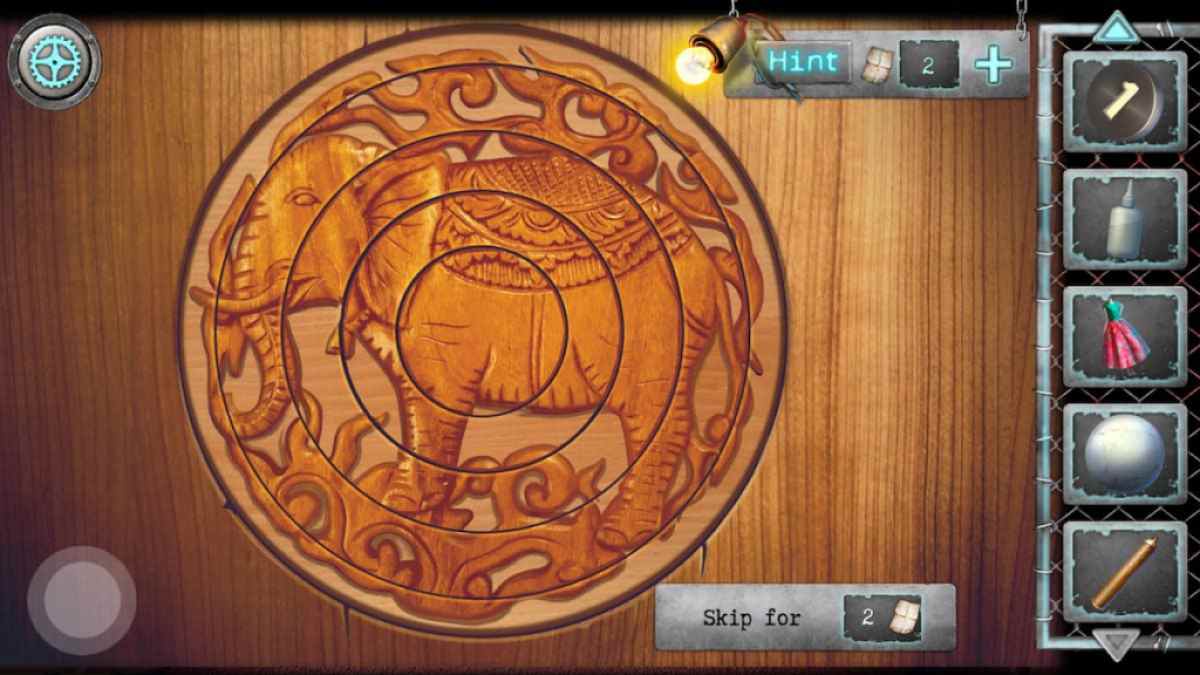
- Approach the puzzle (7), add the round detail, and arrange the circles correctly (Image 6).
- Take the handle from the box and add the first-floor button to the elevator switch panel (8).
- Press the first-floor button to go down.
Second floor
- Take the net (1) and approach the table (2).
- Take the newspapers from the table and approach the statue (3).
- Take the sheet with the book order from the statue's hand and place the marble ball in its place.
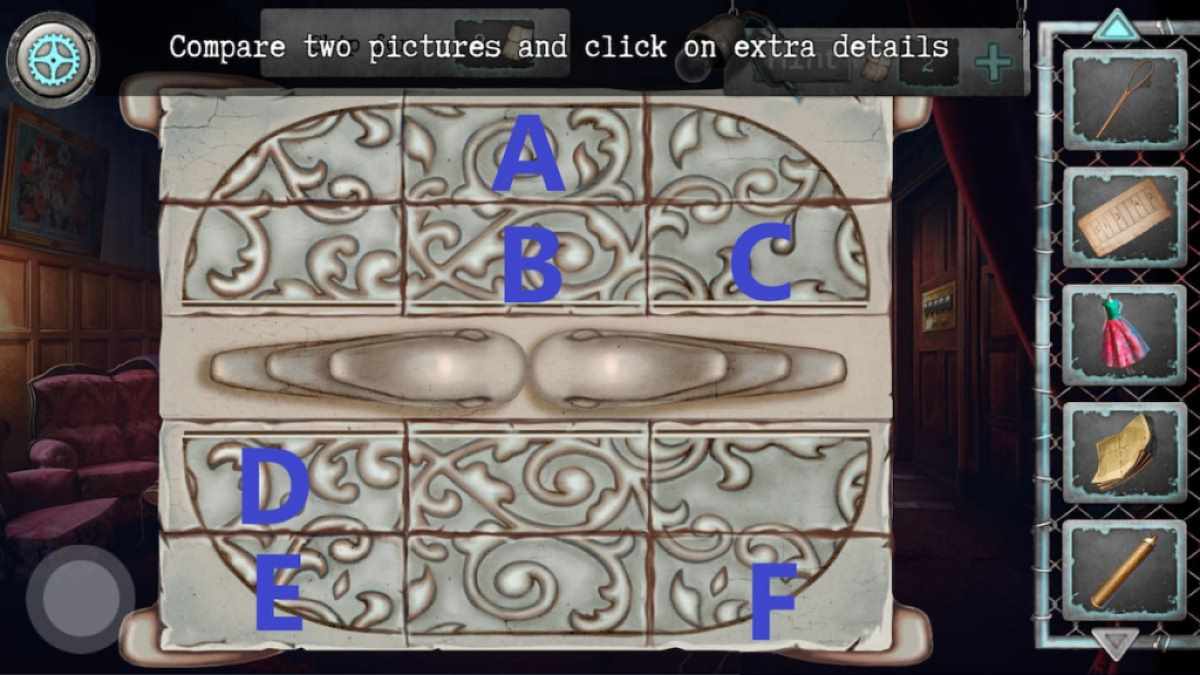
- Tap on extra details (A-F) to open the box and take the notes inside.
- Go to the grandfather clock (4) and place the weight on the cable pulley inside the clock.
- Set the small hand to 3 and the big hand to 11 to open the clock, and take the grandpa doll inside.
- Return to the elevator, go to the second floor, and enter the children's room.
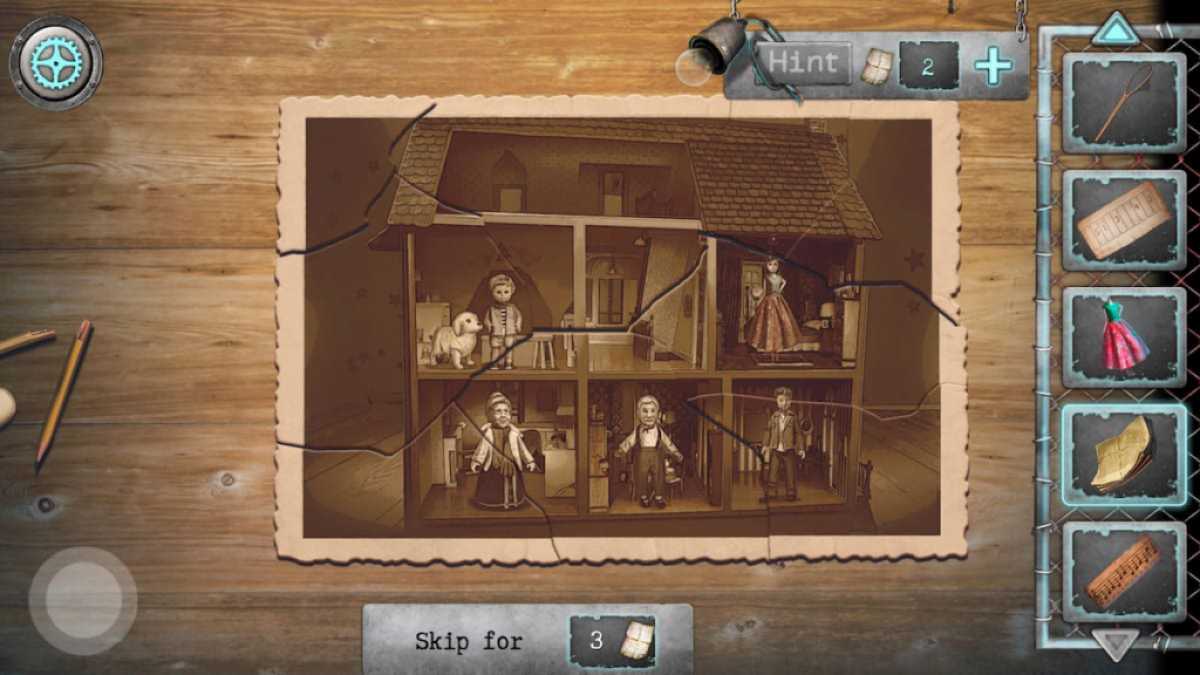
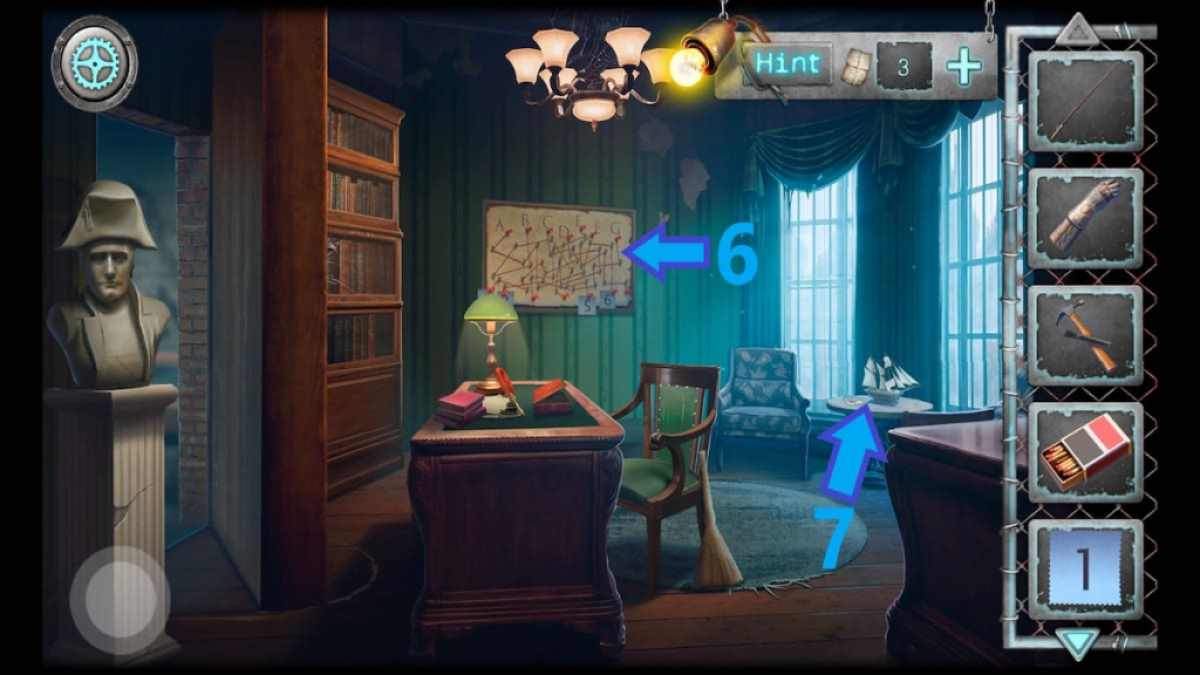
- Approach the desk (5) and move the objects from the edge of the screen to reveal photo pieces.
- Arrange the photo pieces (Image 4) and collect the photo.
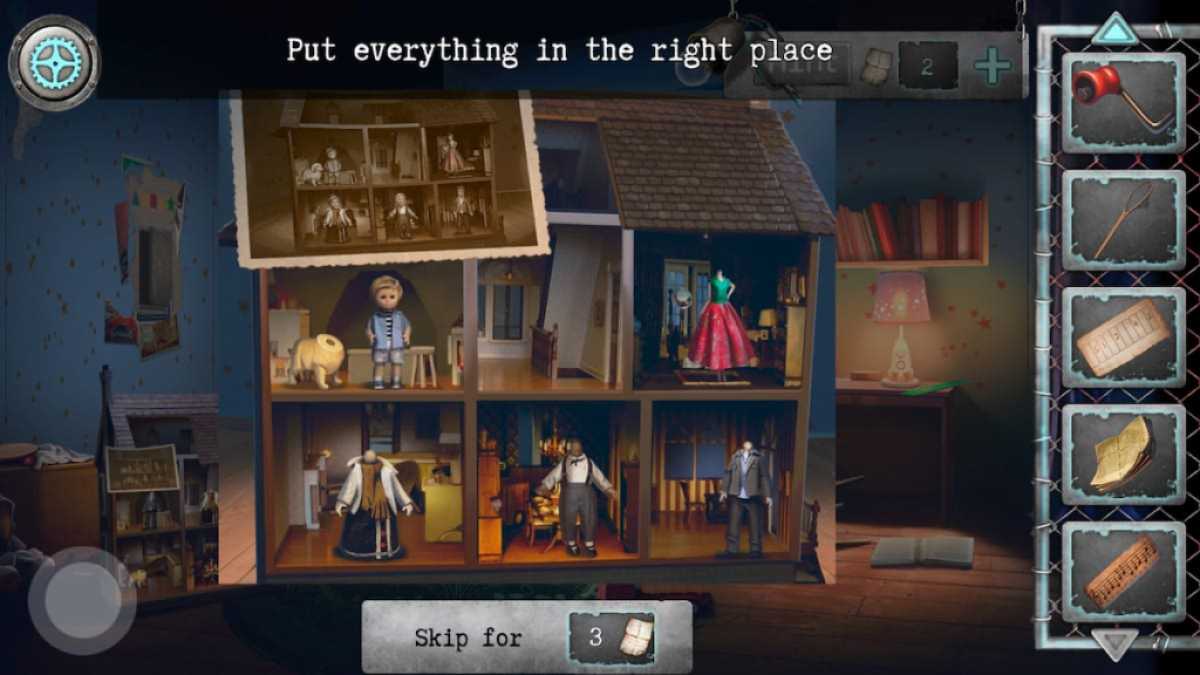
- Go to the doll house (6) and add the picture to the house.
- Arrange the dolls according to the photo (Image 5) and take the matchbox from the attic.
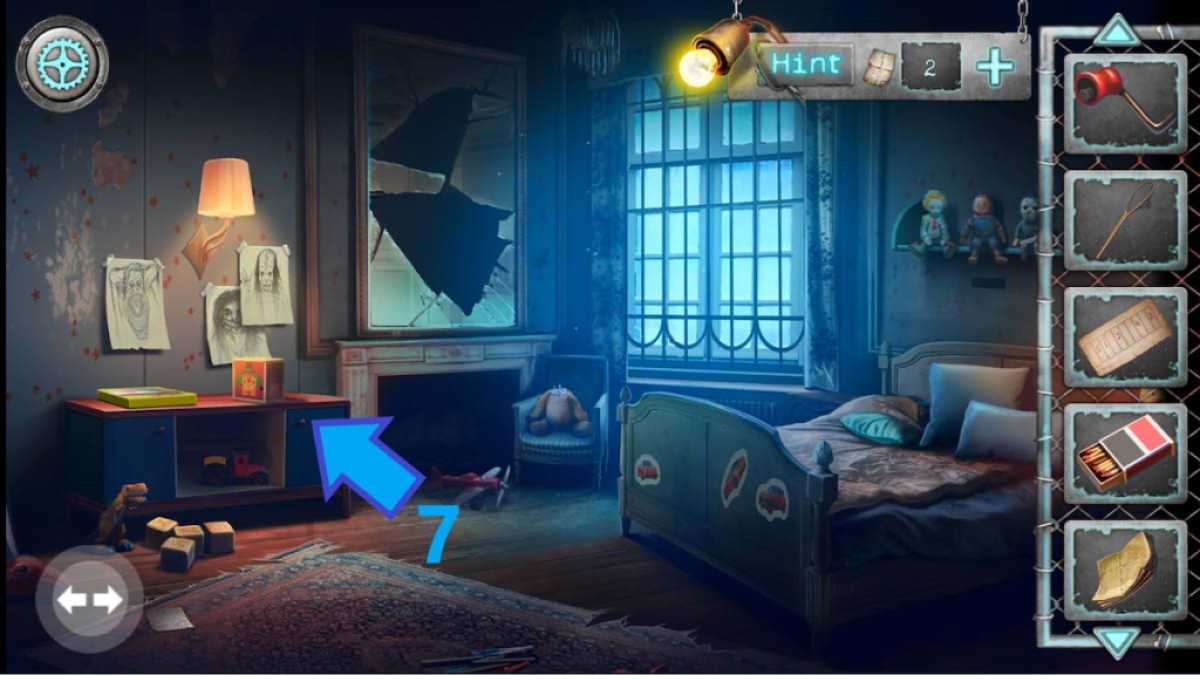
- Go to the other side of the room and inspect the furniture under the creepy drawings (7).
- Add the handle from the box to the jack-in-a-box and wind it to make the audio cassette pop out.
- Take the audio cassette and go under the bed.
- Use the butterfly net to catch the doll's head and take half of a sheet from the head.
- Go to the closet and play the audio cassette using the cassette player.
- Collect the piano key 1, return to the elevator, and return to the first floor.
Related: Vanishing Act Walkthrough - Adventure Escape Mysteries
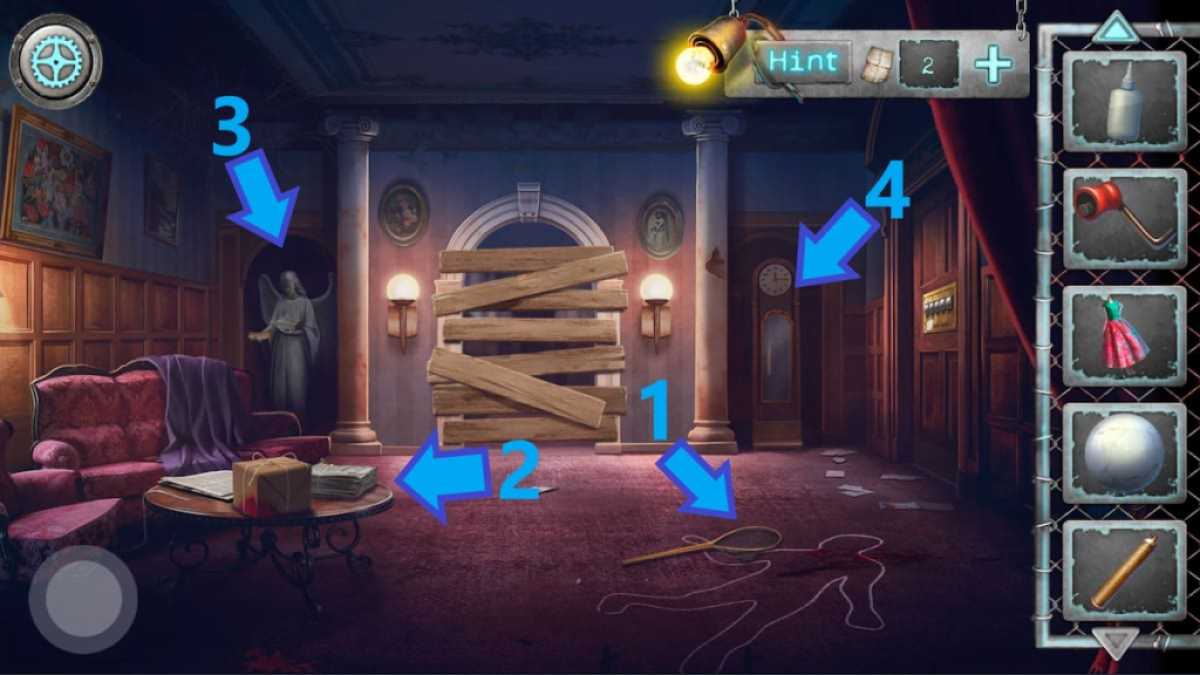
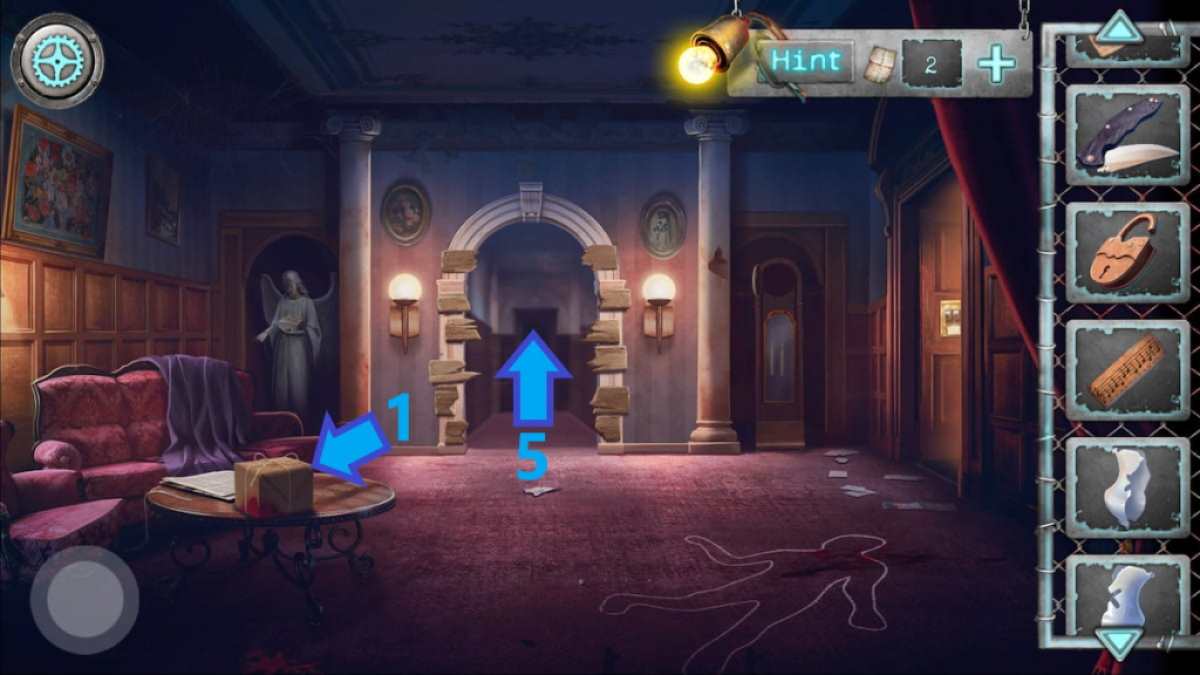
- Approach the door (1) and add the half of a sheet to the piece of paper.
- Enter the combination 40213 to unlock the door and enter the library room.
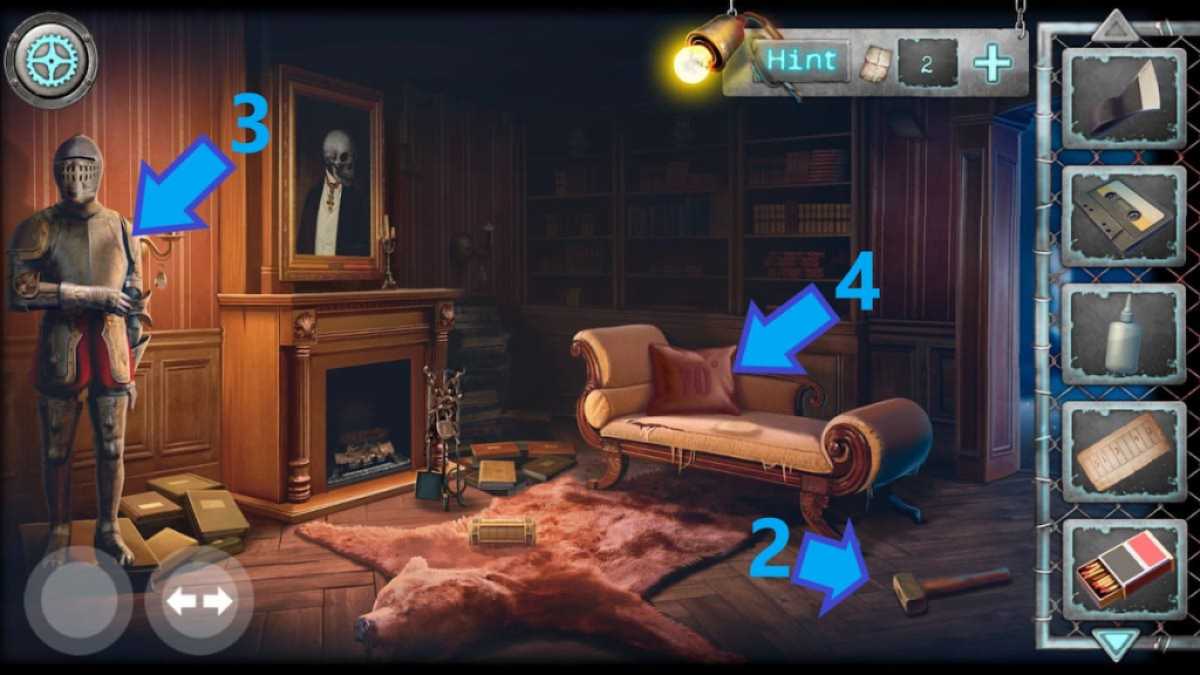
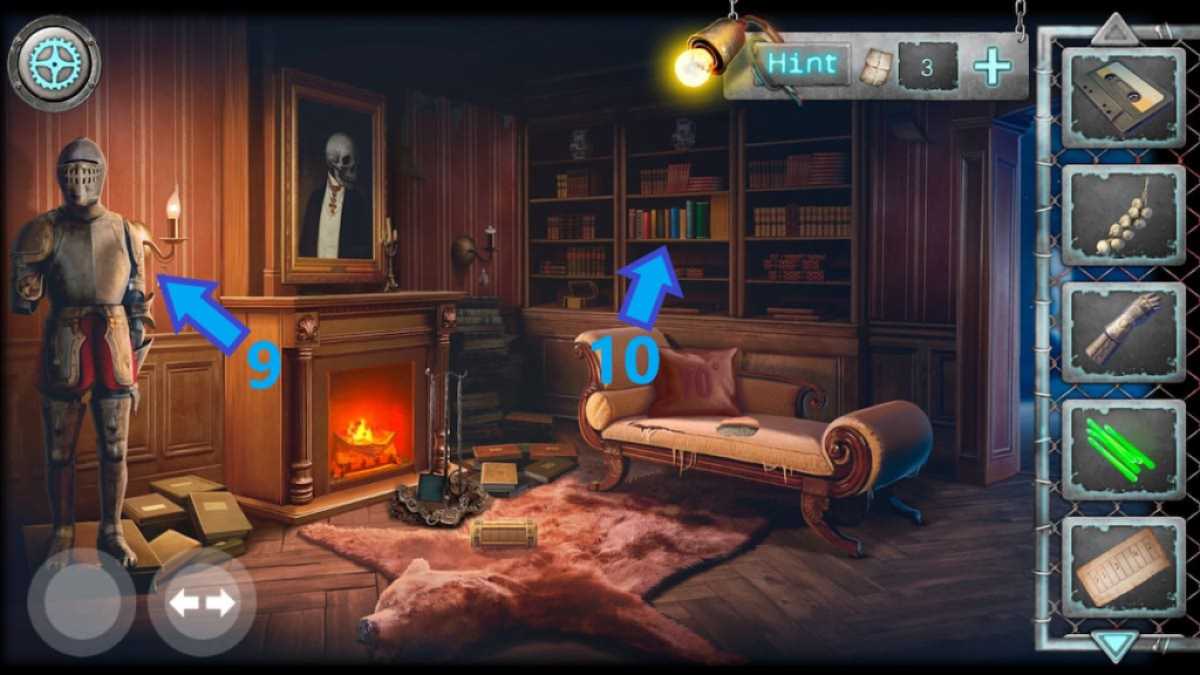
- Take the hammer (2) and approach the medieval suit of armor (3).
- Take the gauntlet from the hand and approach the sofa cushion (4) to inspect a clue.
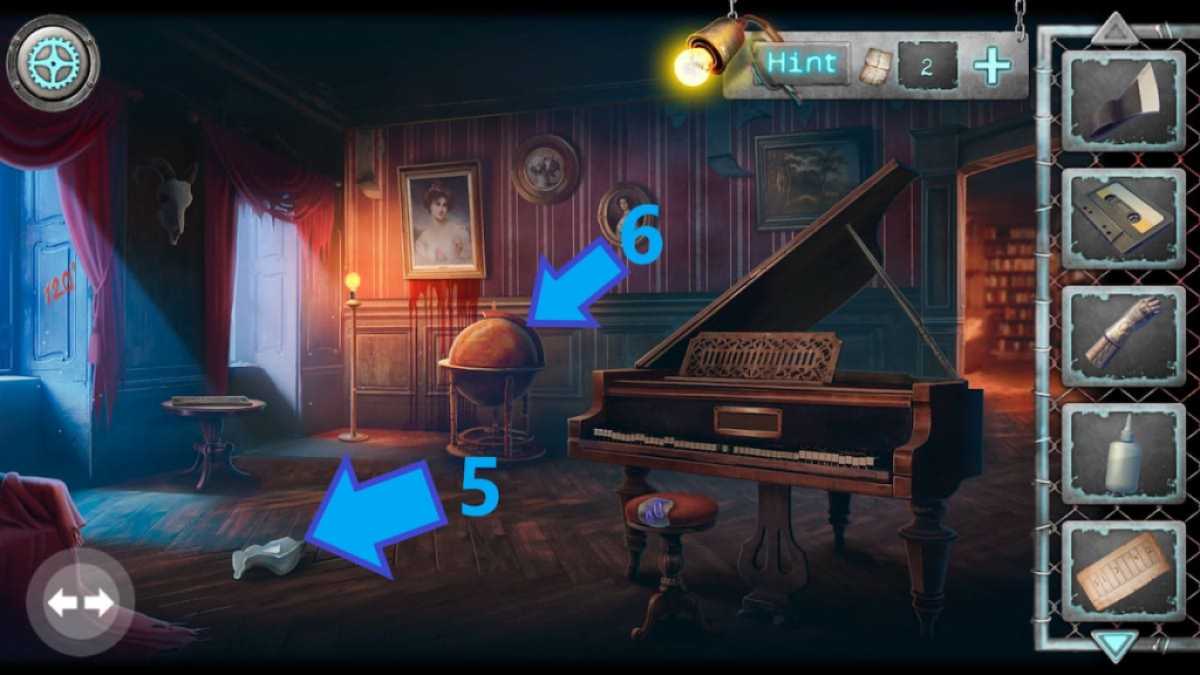
- Go to the other side of the room and take the half lampshade (5).
- Approach the globe (6) and set the coordinates to 70 degrees, then 120 degrees and finally 40 degrees.
- Take the axe handle from the globe and combine it with the axe blade.
- Exit the library room, use the axe to remove the boards (7), and enter through the doorway.
Library room
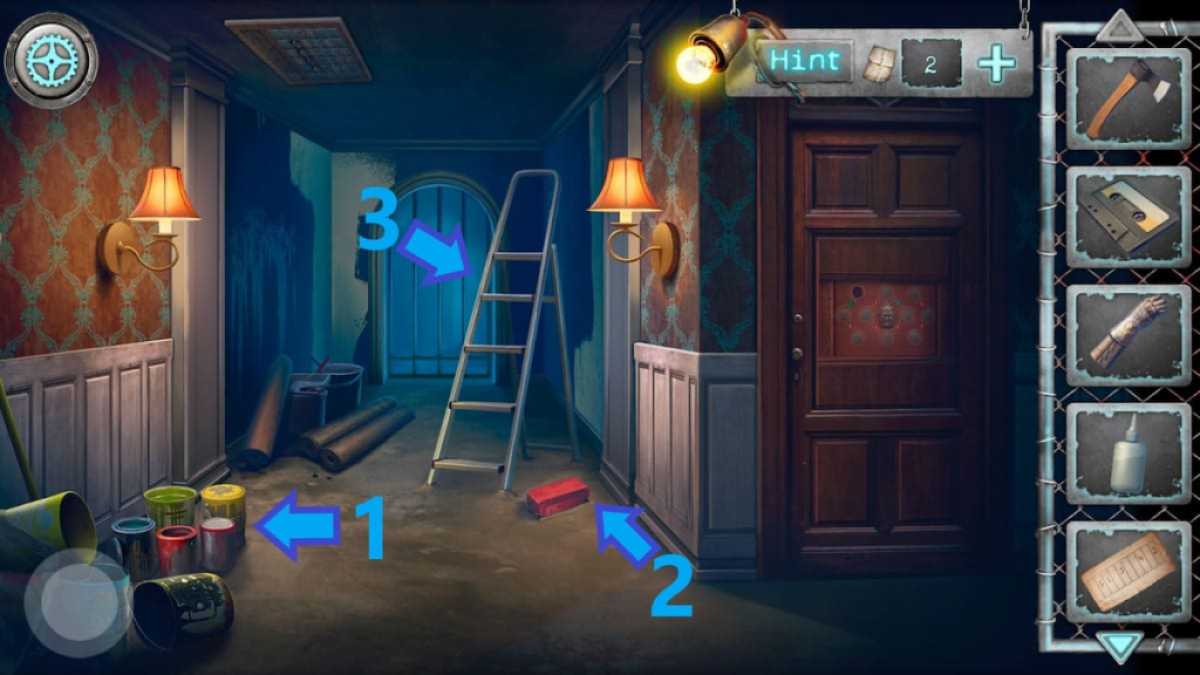


- Move the paint cans (1) and collect wire cutters.
- Approach the red box (2) and break the ground around the box and the ladder's legs using your hammer.
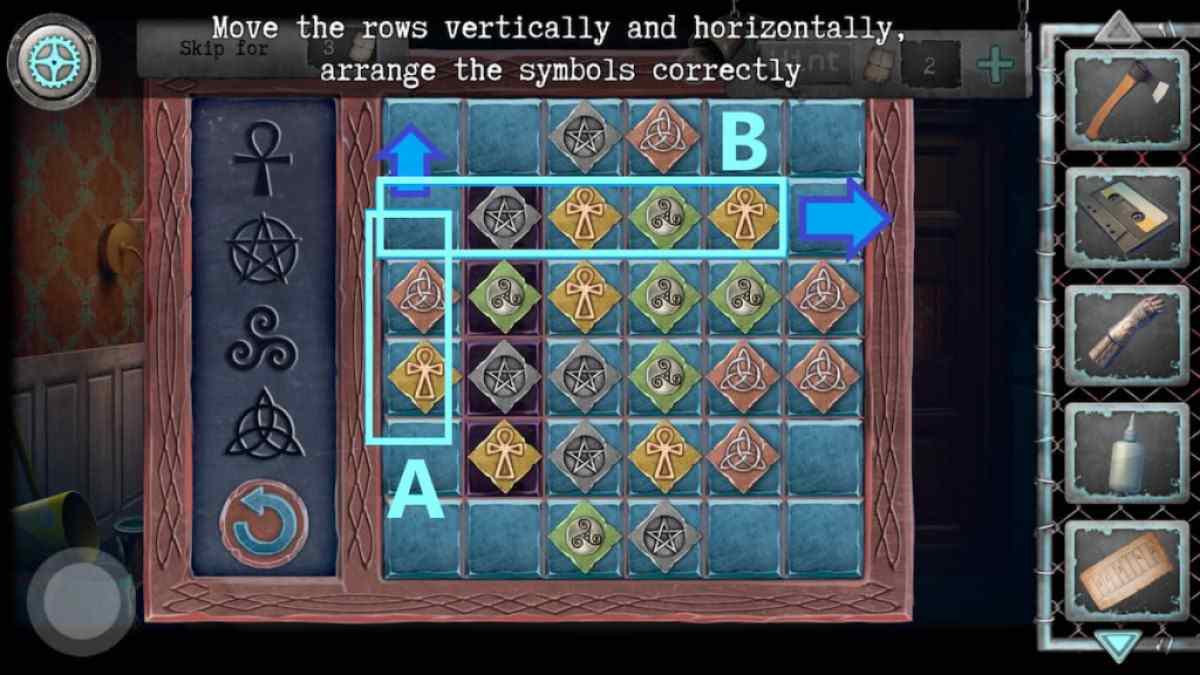
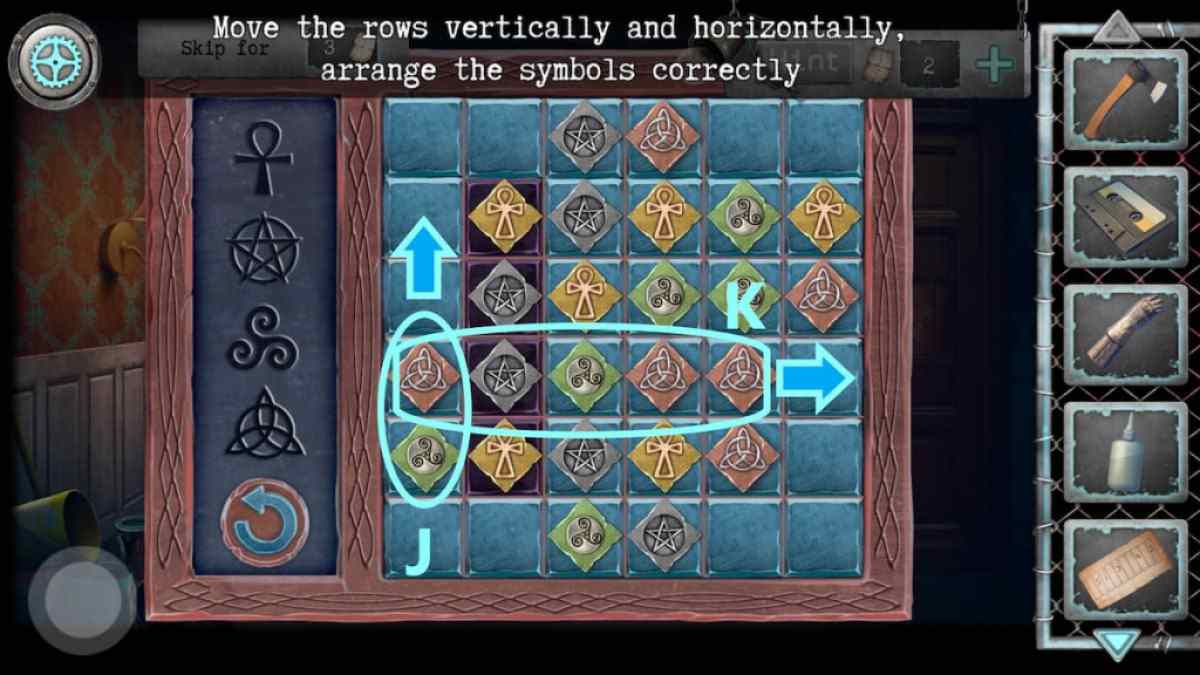
- Go back and move the ladder (3), climb it, and solve the symbol-matching puzzle by following these steps:
- Move vertical row A to the top.
- Move horizontal row B to the right.
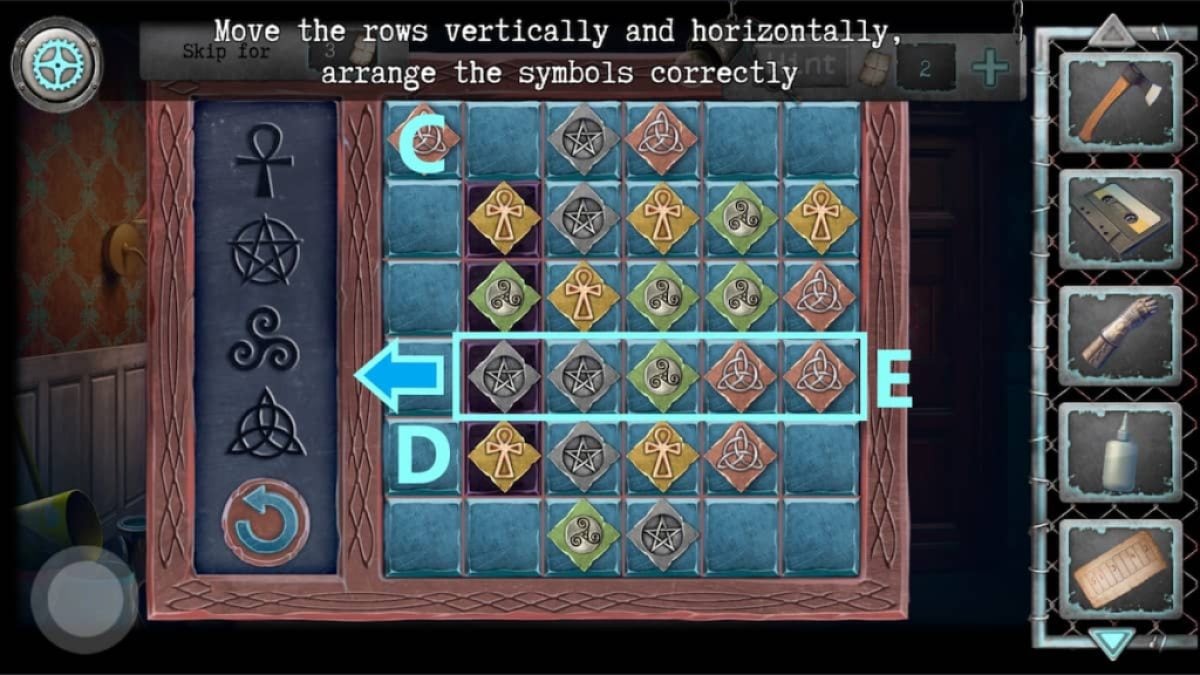
- Move block C to position D and move row E to the left
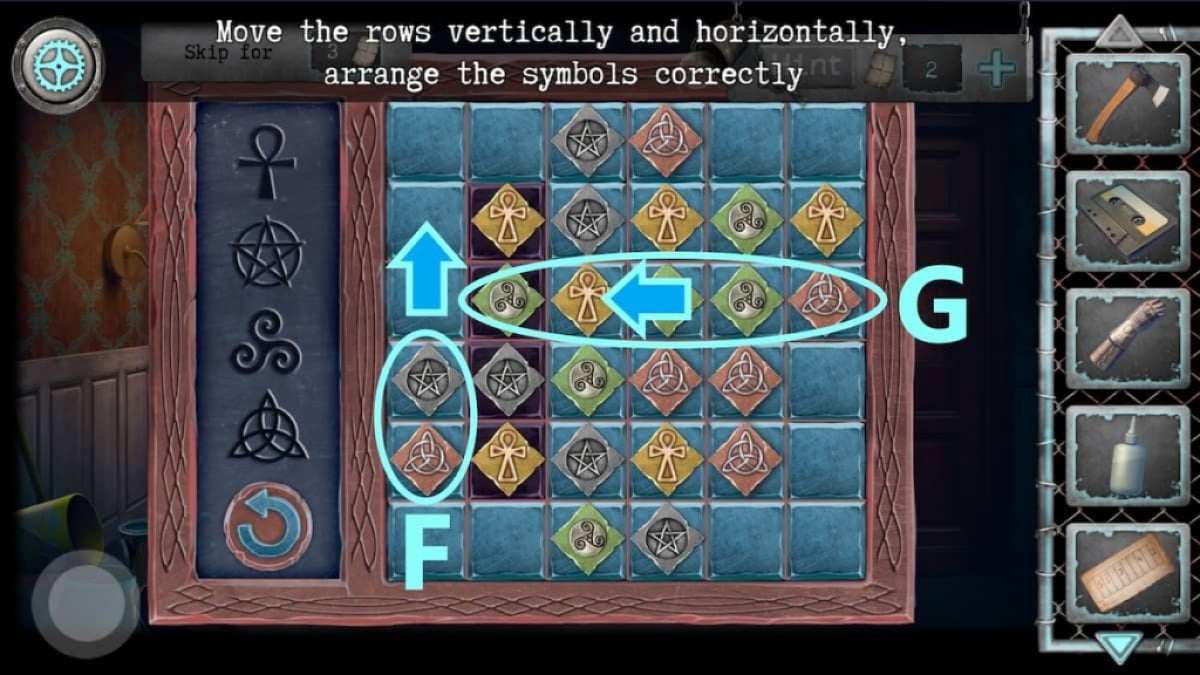
- Move vertical row F to the top.
- Move horizontal row G to the left.
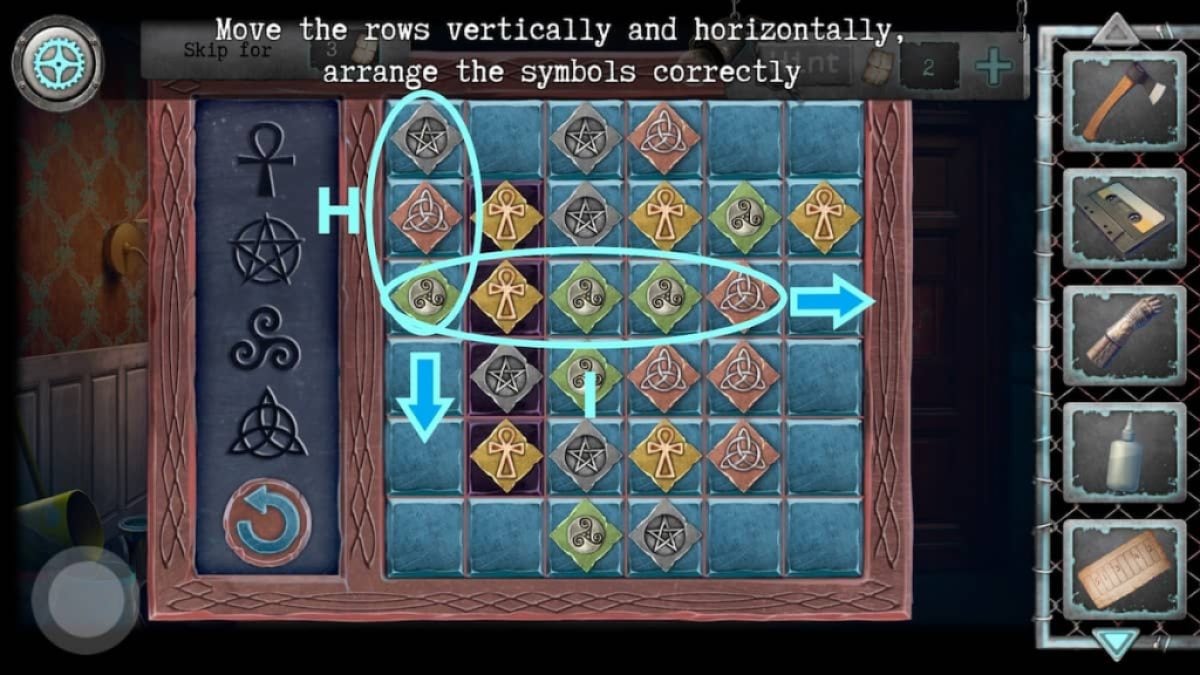
- Move vertical row H two blocks down.
- Move horizontal row I to the right.
- Move vertical row J up by one block.
- Move horizontal row K to the right.
- Move block L two blocks down.
- Move block M to the right.
- Take the second half of the lampshade and the metal saw and return to the library room.
- Approach the fireplace (4), throw the newspapers into the fireplace, and use the matchbox to set it on fire.
- Inspect the box (5) on the bookshelf and play tic-tac-toe using angels and demons.
- Take the key from the box and approach the fireplace again.
- Use the key to unlock the padlock on the right and take the poker.
- Use the poker to retrieve the golden key behind the fire.
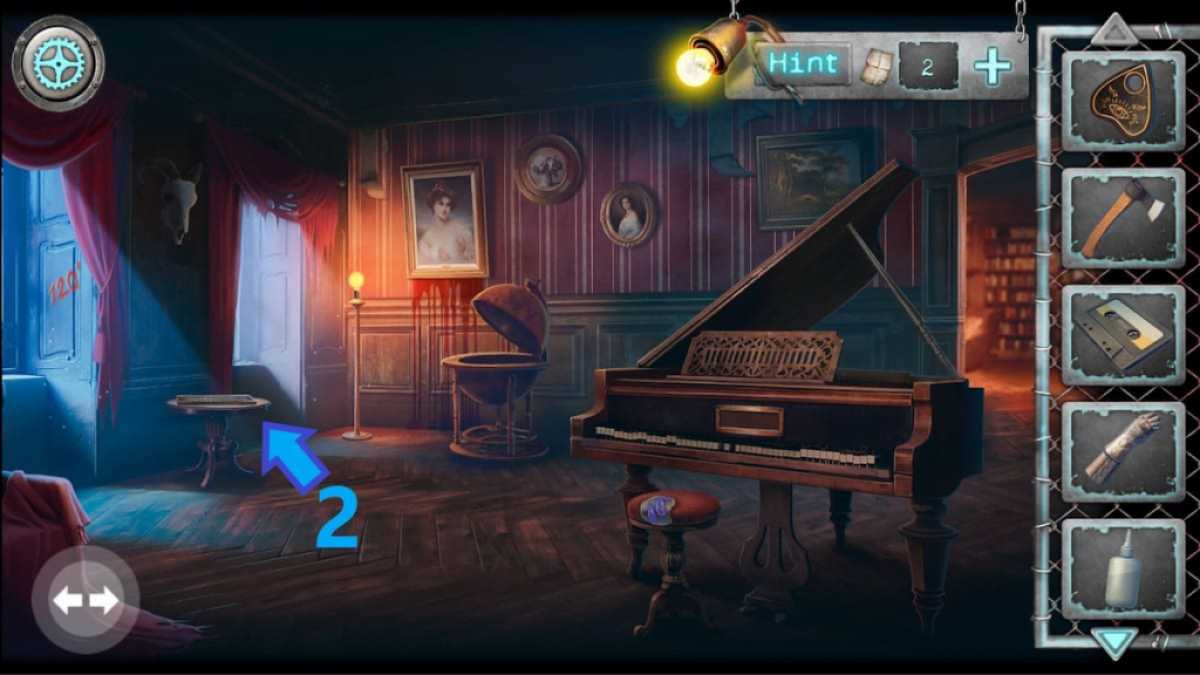
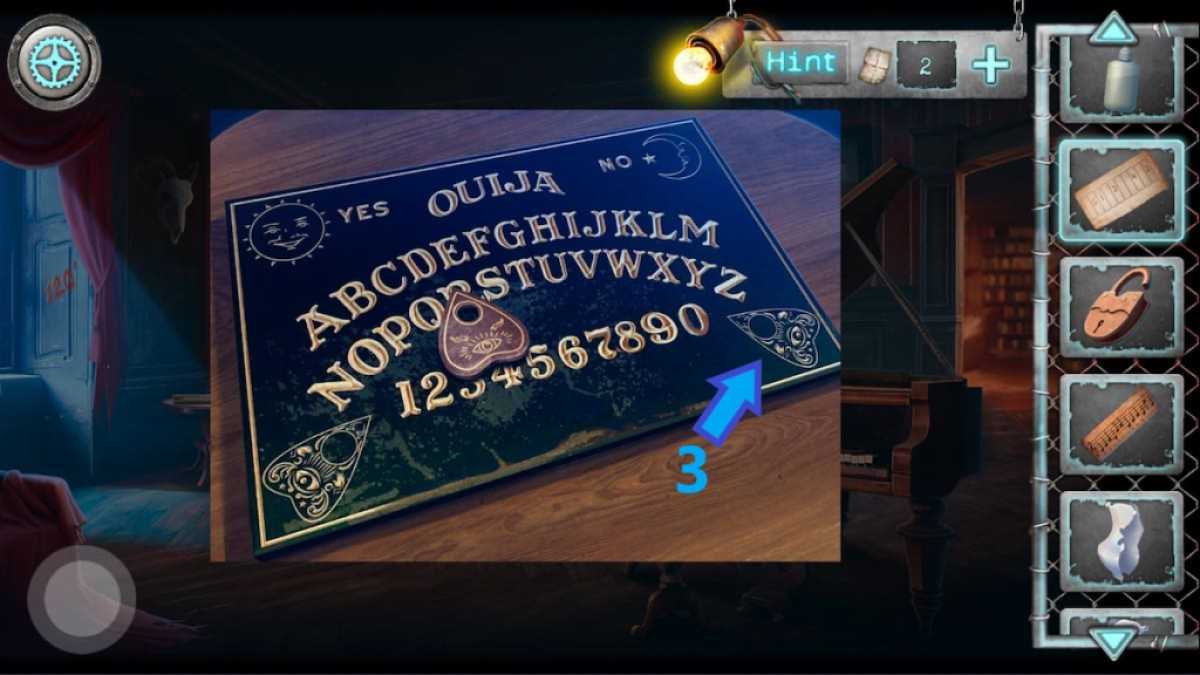
- Go to the other side of the room and approach the Ouija board (6).
- Take the knife next to the board and go back to the first side of the room.
- Go to the sofa (7), tear the fabric using the folding knife, and take the padlock.
- Exit the room.
- Approach the box (1) and cut it open using the folding knife.
- Take the Ouija pointer and go back to the library room.
- Go to the other side of the room and add the Ouija pointer to the Ouija board (2).
- Press and hold the pointer symbol (3) to move the pointer, spelling out the word DEATH.
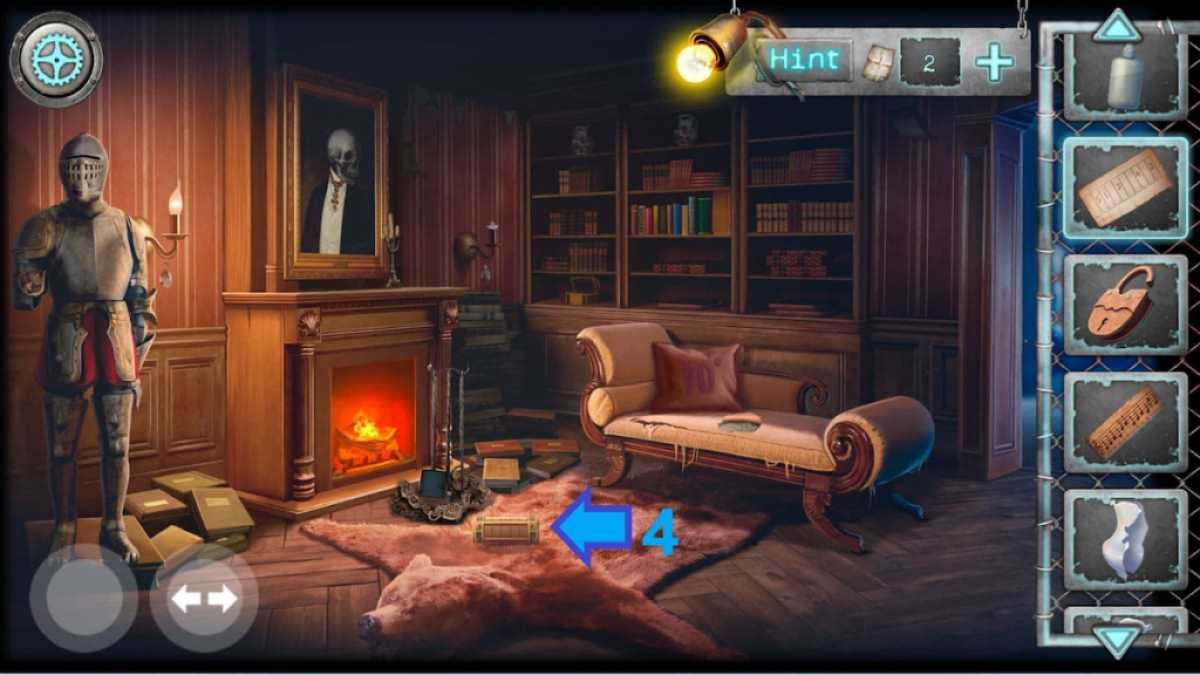
- Go back to the first side of the room and inspect the box on the bear carpet (4).
- Spell the word DEATH to open the box and take the detail inside.
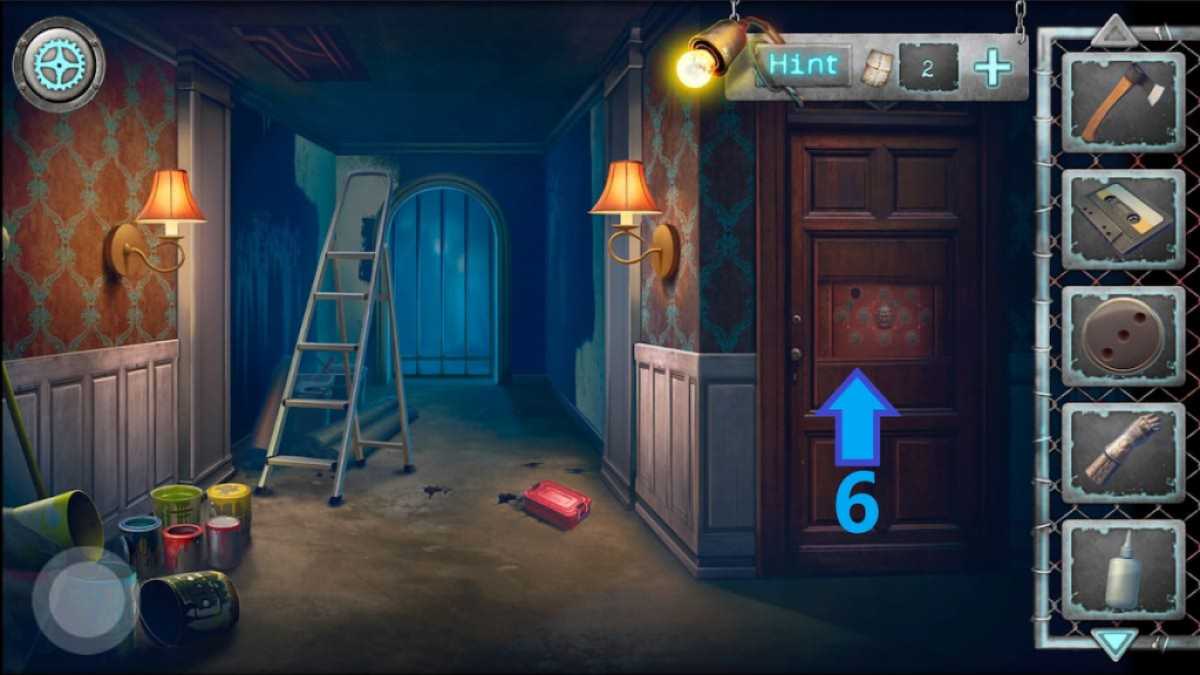
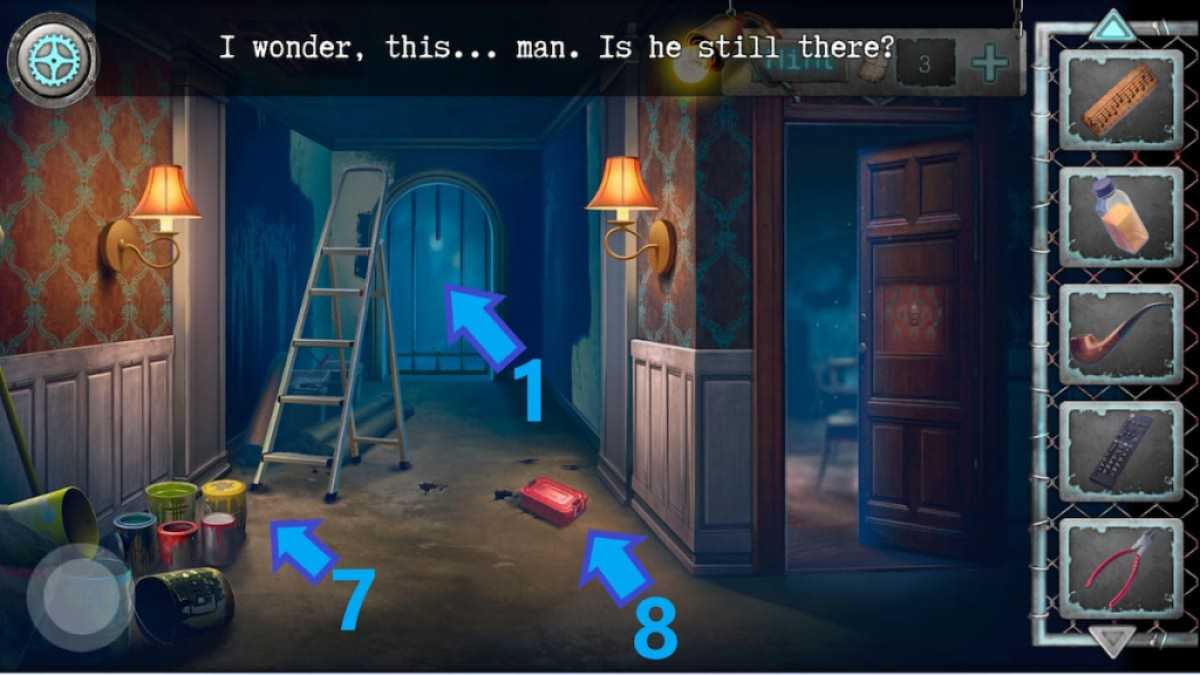
- Go back to the hallway and through the boarded doorway (5).
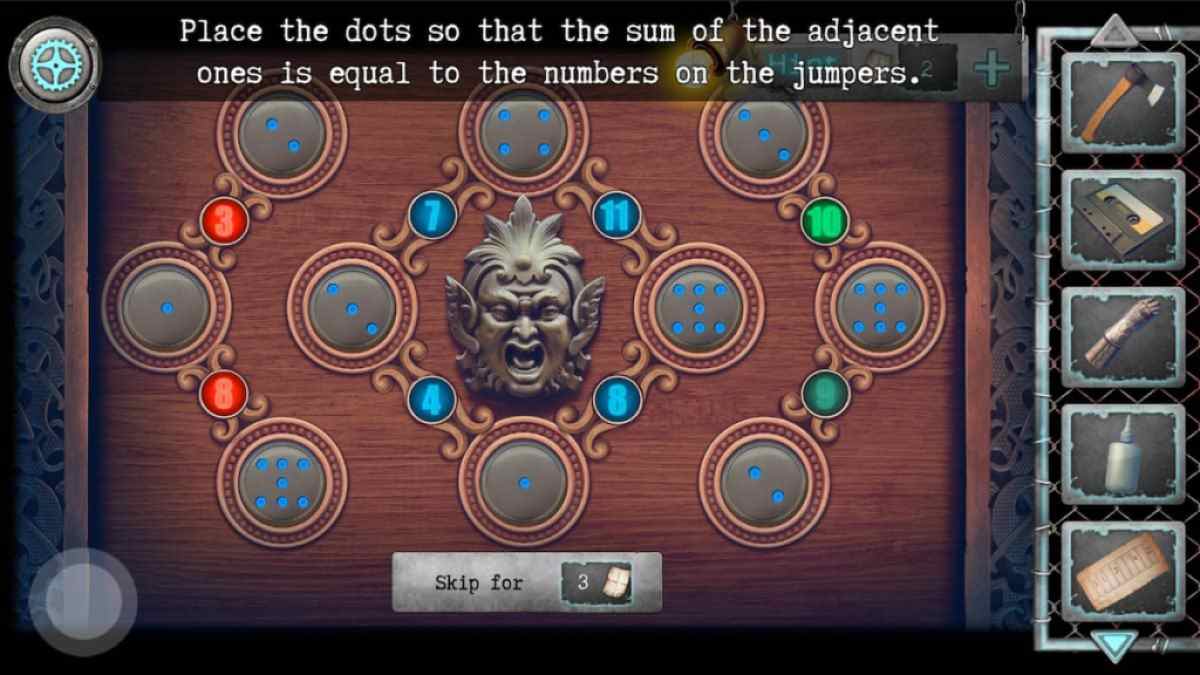
- Approach the door (6) and add the detail to the puzzle.
- Solve the puzzle by placing the dots so that their sum matches the numbers (Image 6).
- Go through the door to enter the study room.
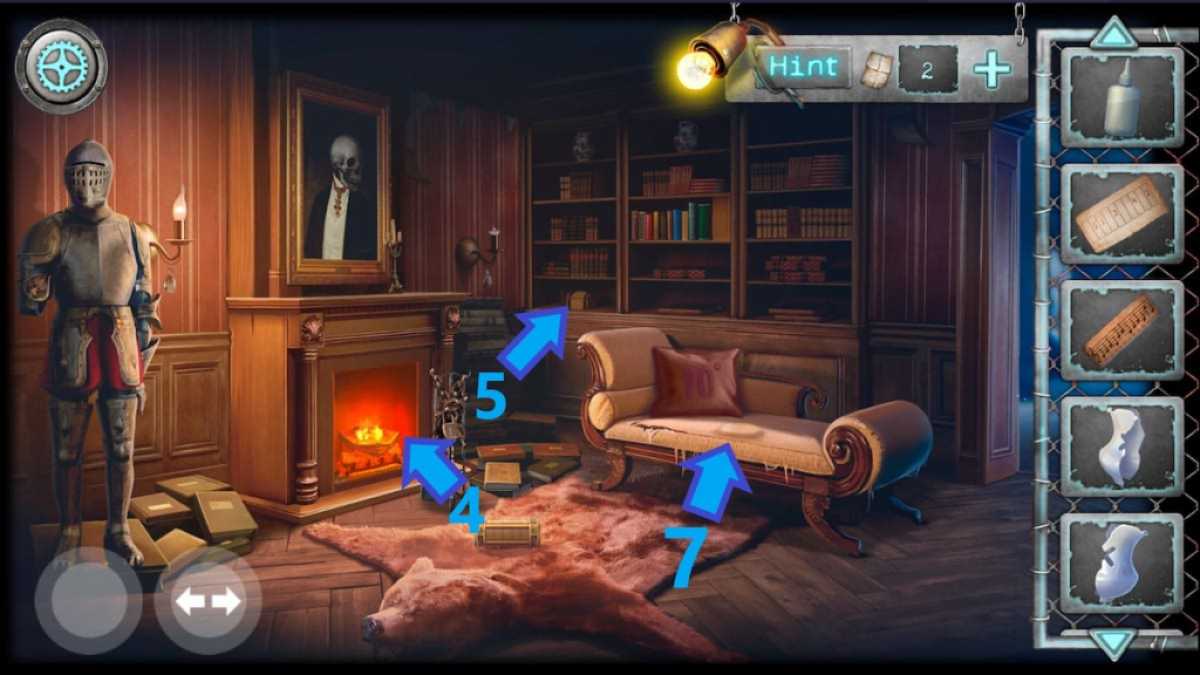
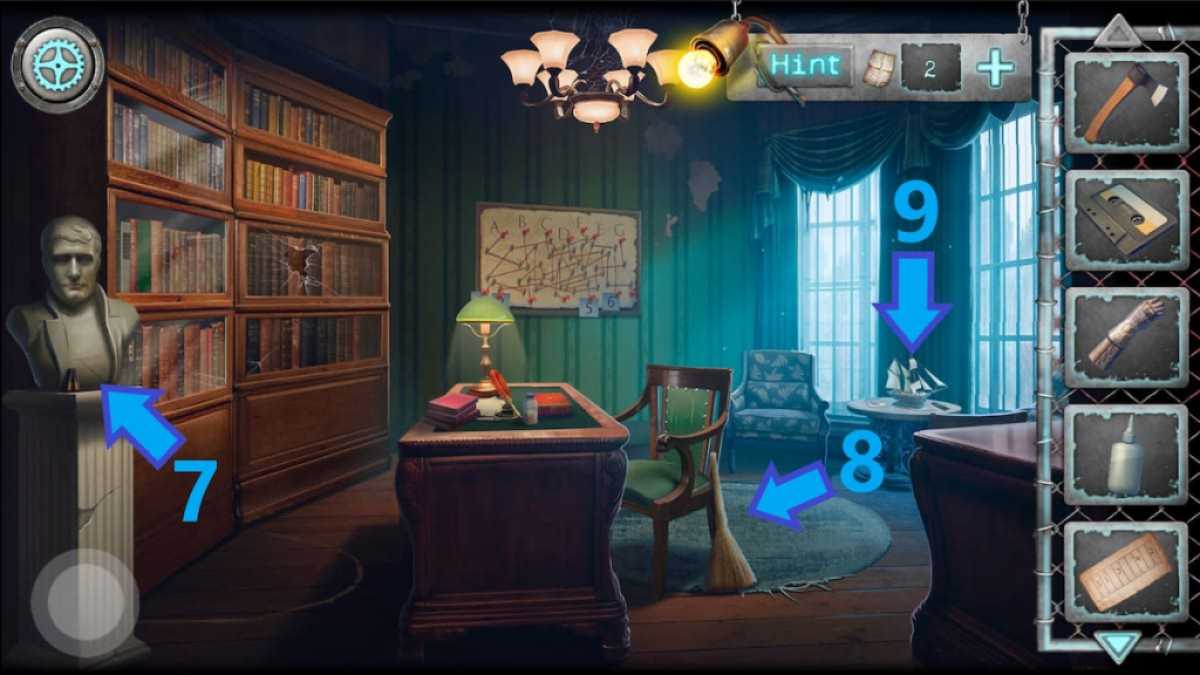
- Take the batteries on the statue (7) and the broom leaning against the chair (8).
- Approach the desk (9), take the developer bottle on the left, and use the golden key to unlock the box.
- Arrange the picture pieces to open the box and take the tube (smoking pipe).
- Go to the table by the window (10) and assemble the ship by dragging the parts from the table to the ship.
- Take the remote control from the table and combine it with batteries.
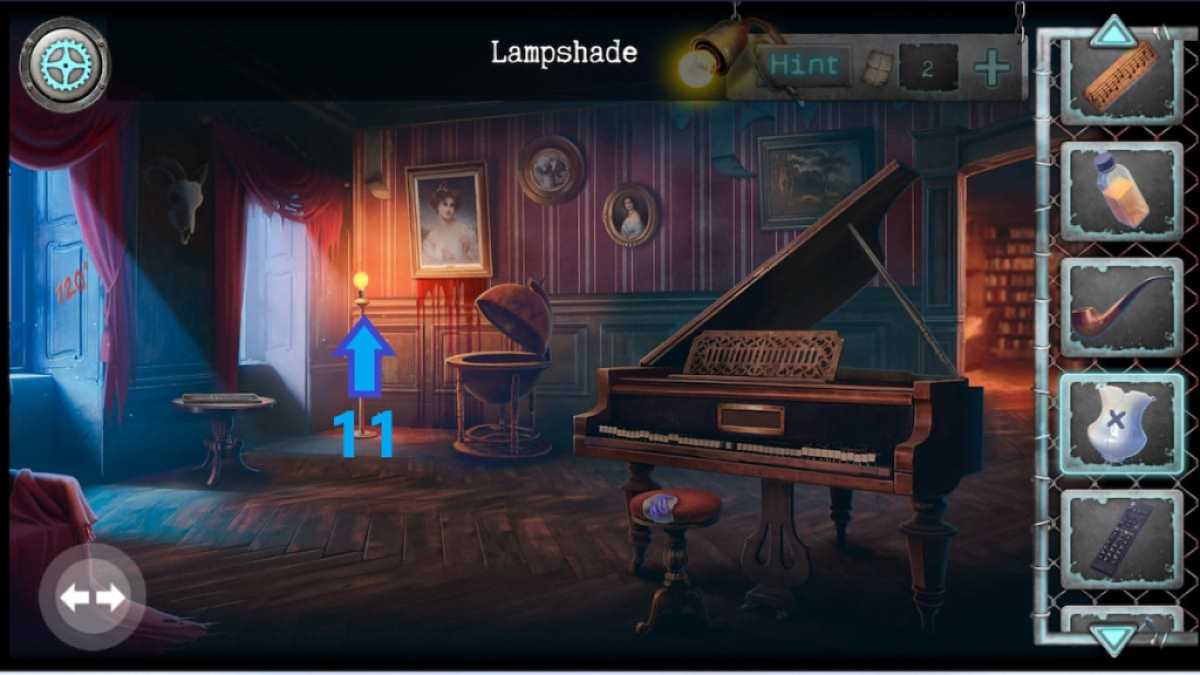
- Go to the other side of the library room and combine two lampshade halves.
- Combine the lampshade with the glue and place it on the lamp (11).
- Use the axe to chop at the spot highlighted by the lamp and take the neckerchief from the hole.
Related: New York Mysteries 5 Walkthrough
Medieval room
- Go back to the room with the ladder and cut the bars (1) using the saw.
- Go through the bars and approach the head on the box (2).
- Use wire cutters to cut wires and pull out the sword from the top.
- Take the paint remover from inside the head and inspect the horned skull (3).
- Input the numbers 2 and 4 into the horns to open the secret partition and take the garlic.
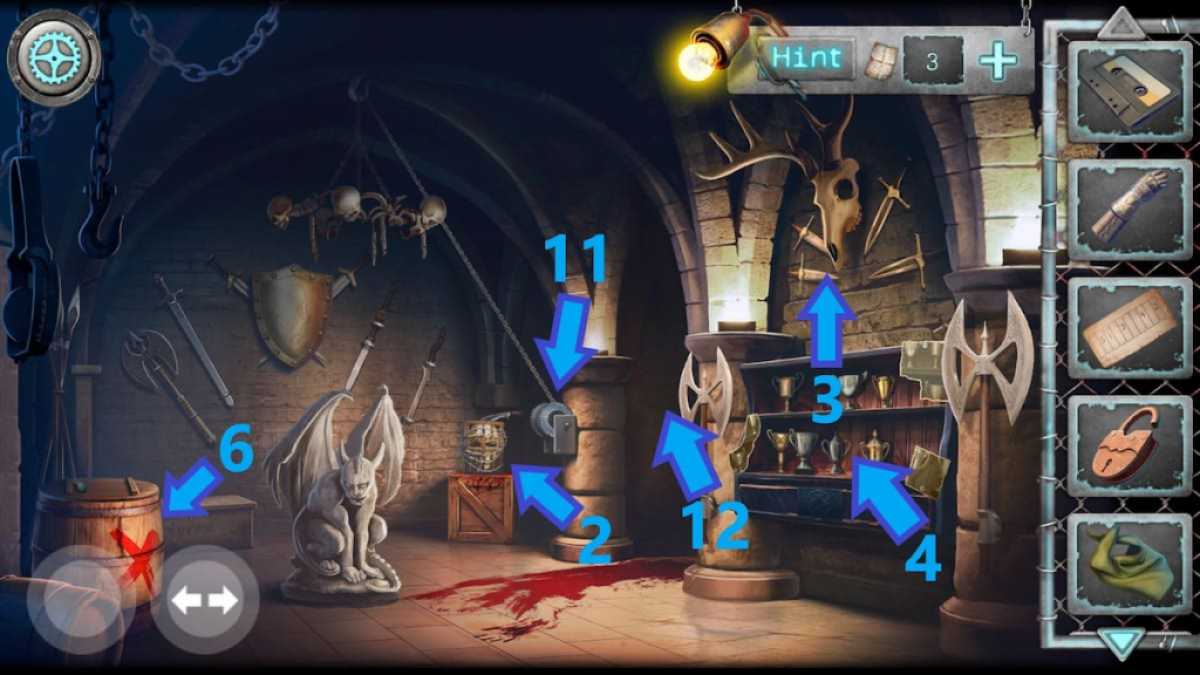
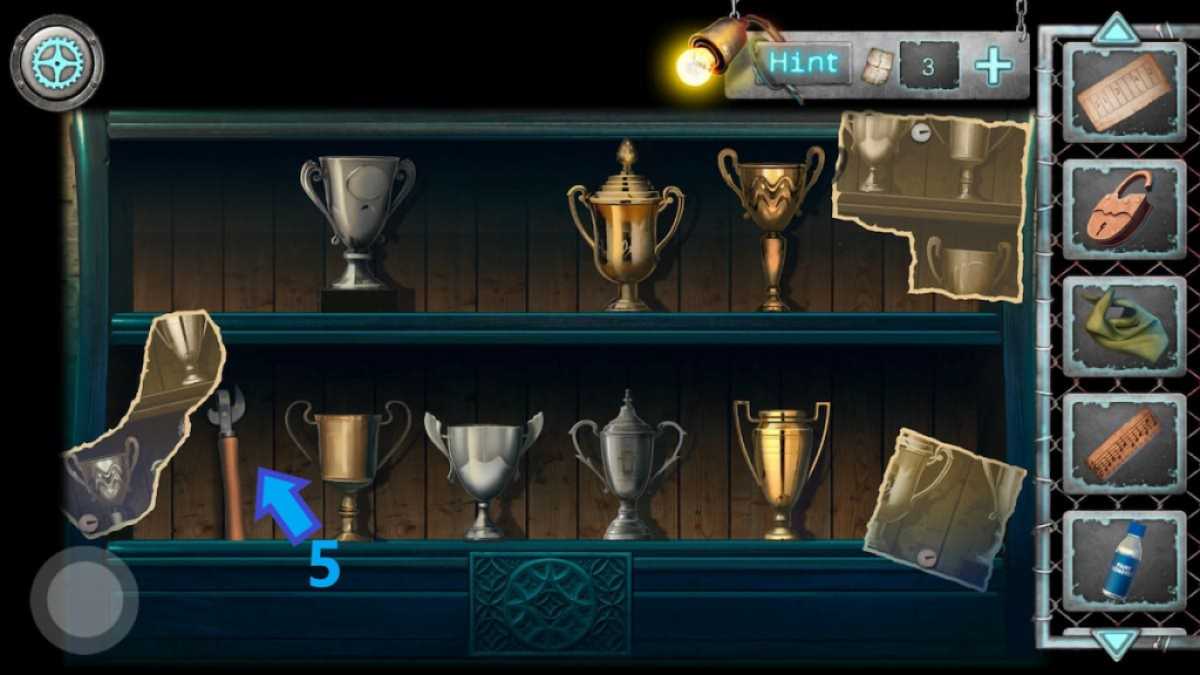
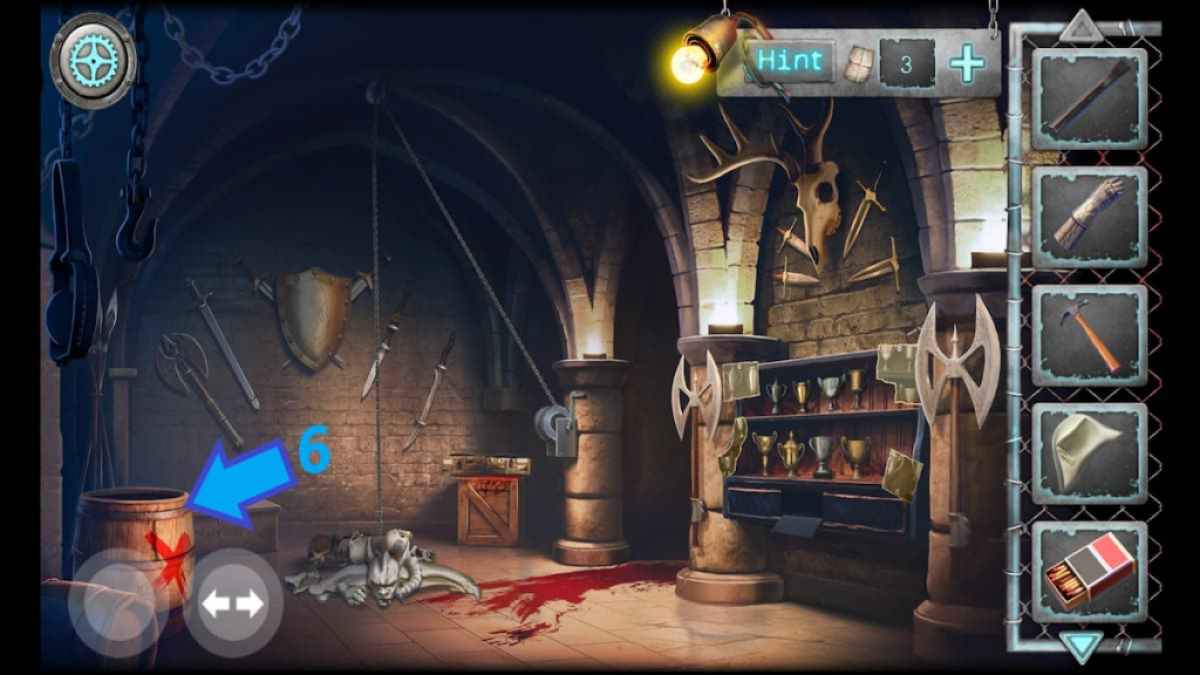
- Approach the trophies (4) and take the opener (5).
- Take the oiler from the top of the barrel (6).
- Return to the ladder room and approach the paint cans (7).
- Combine the solvent with the neckerchief and use the solvent-soaked neckerchief to remove blue paint, revealing the code 8162.
- Use the can opener on the red box (8) and take the neon sticks inside.
- Return to the library room and inspect the suit of armor (9).
- Use the oiler on the head to open it and take the handle inside the face plate.
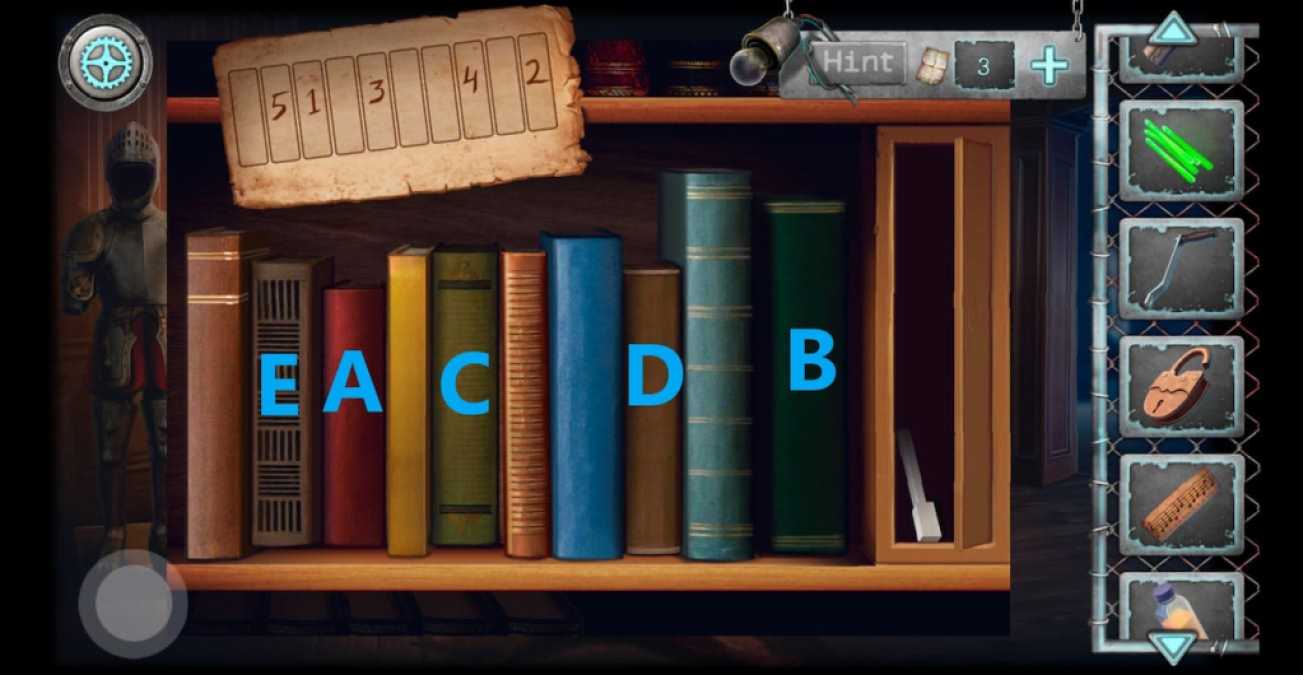
- Approach the books (10) and add the sheet with the book order to the books.
- Press the books in order A-E and take key 2 from the unlocked partition.
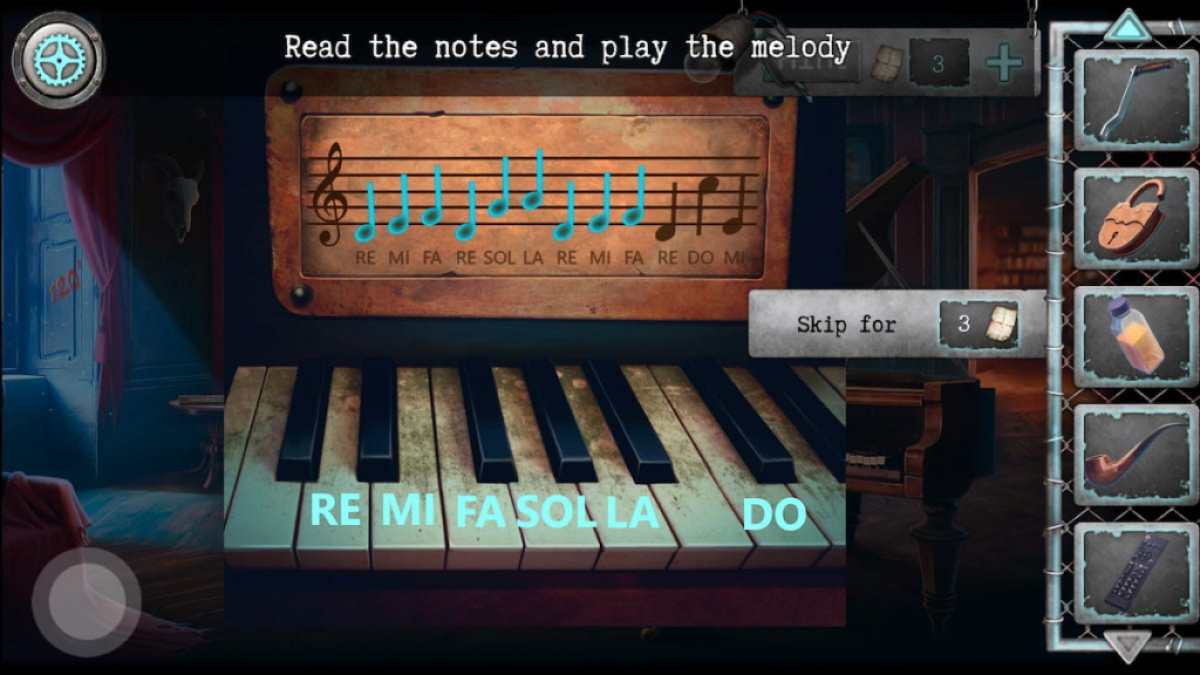
- Go back to the library room, switch to the other side, and add piano keys 1 and 2 to the piano.
- Add the notes to the piano and play the piece on the notes (Image 6).
- Take the trophy from the unlocked partition and go back through the cut bars.
- Add the trophy to the trophy shelf (4) and the handle to the chain pulley (11).
- Move the gargoyle pieces and take the hammer underneath.
- Enter the next room (12).
- Light up the room using green neons and use garlic to chase the vampire into the coffin.
- Take the chain (1), use it on the coffin, and add the padlock.
- Use the code 8162 to open the box (2) and take the sail.
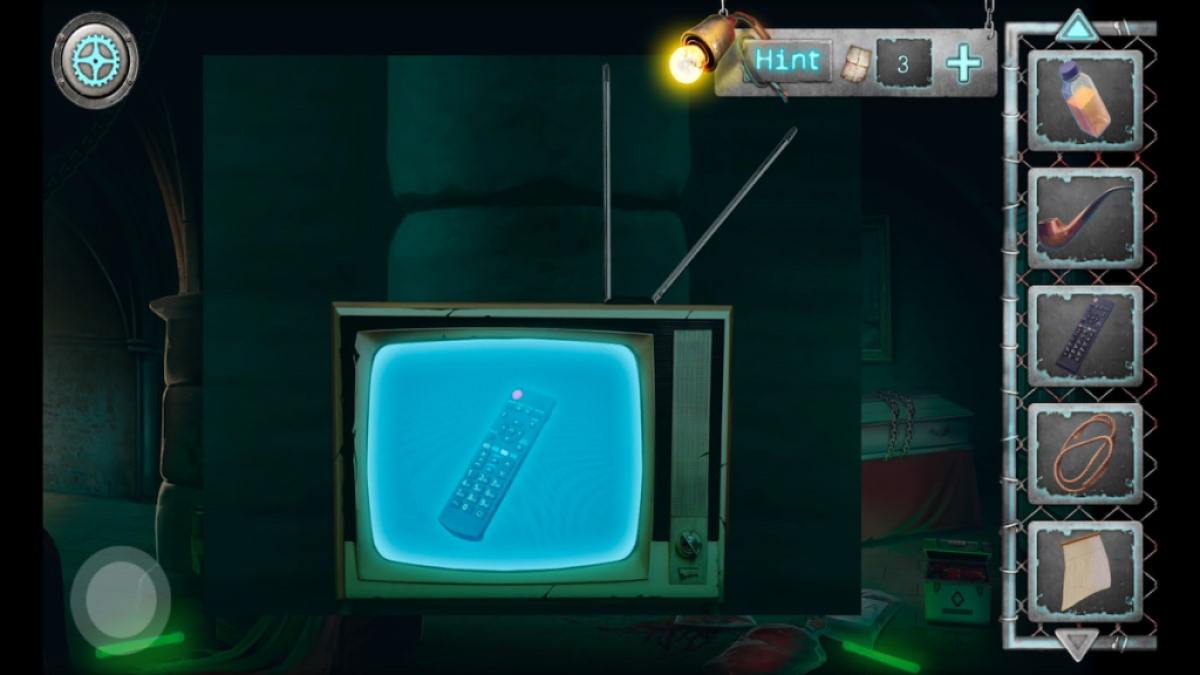
- Approach the TV (3) and take the rope from its antennae.
- Move the antennae until you get a clear image of the TV remote (Image 2).
- Use the TV remote to open the TV and take the three-cornered hat.
- Go to the desk (4) and pour the developer fluid into the empty container.
- Take the crowbar above the photo and drag the tweezers below the second container to the picture.
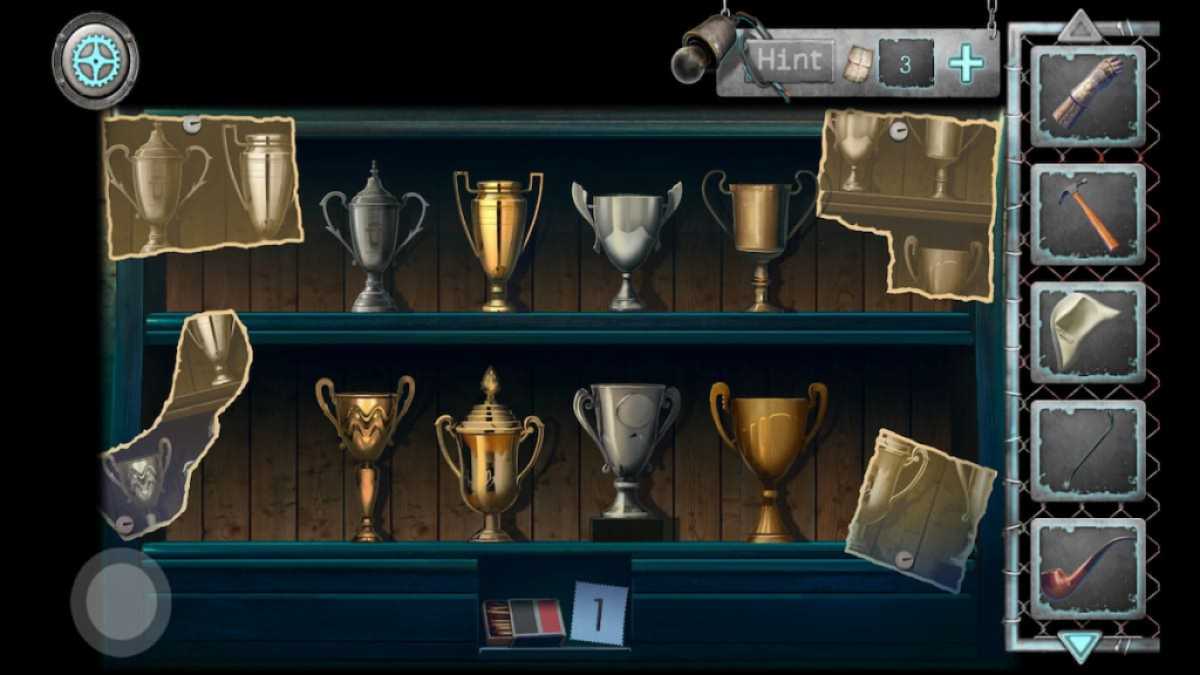
- Collect the developed photo with trophies and go to the trophy shelf in the previous room.
- Approach the crate (5), take the hook and combine it with the rope.
- Open the crate using the crowbar and take the chisel inside it.
- Arrange the trophies to match the photo (Image 3), and take the matchbox and the sheet with the number 1 from the opened partition.
- Go to the barrel (6) and use the rope with hook to retrieve the vane.
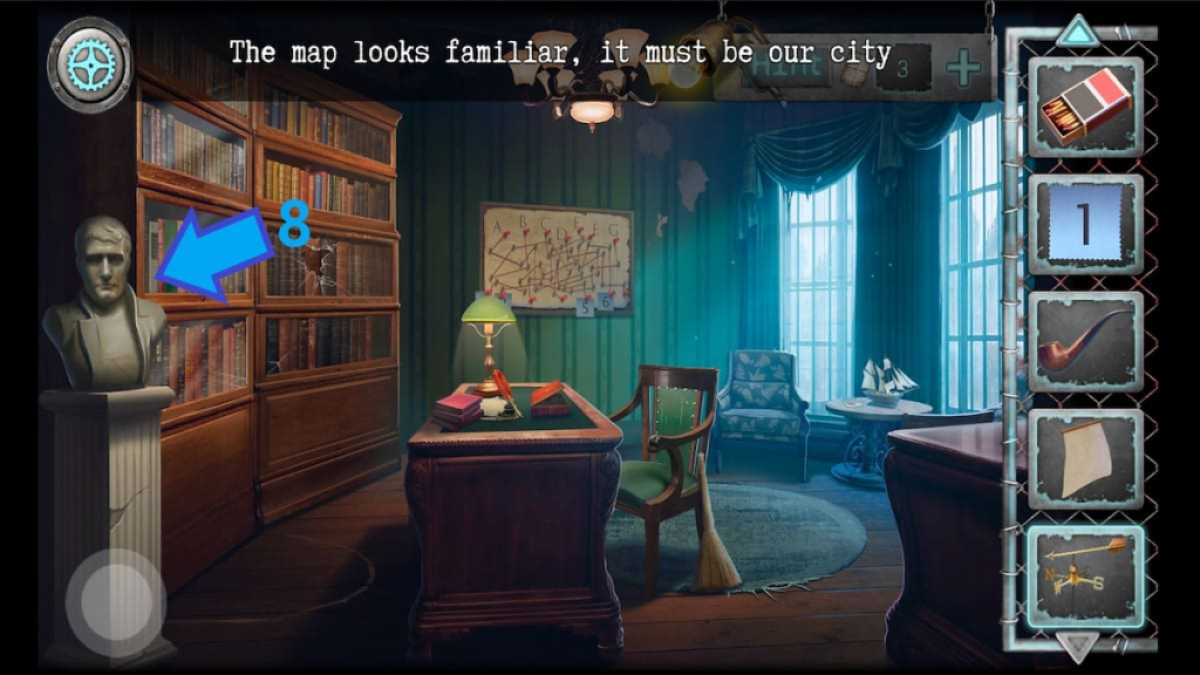
- Go back to the study room (7) and add the three-pointed hat to the Napoleon bust (8).
- Enter the secret room behind the Napoleon bust.
Related: Darkness and Flame 2 Walkthrough
Secret room
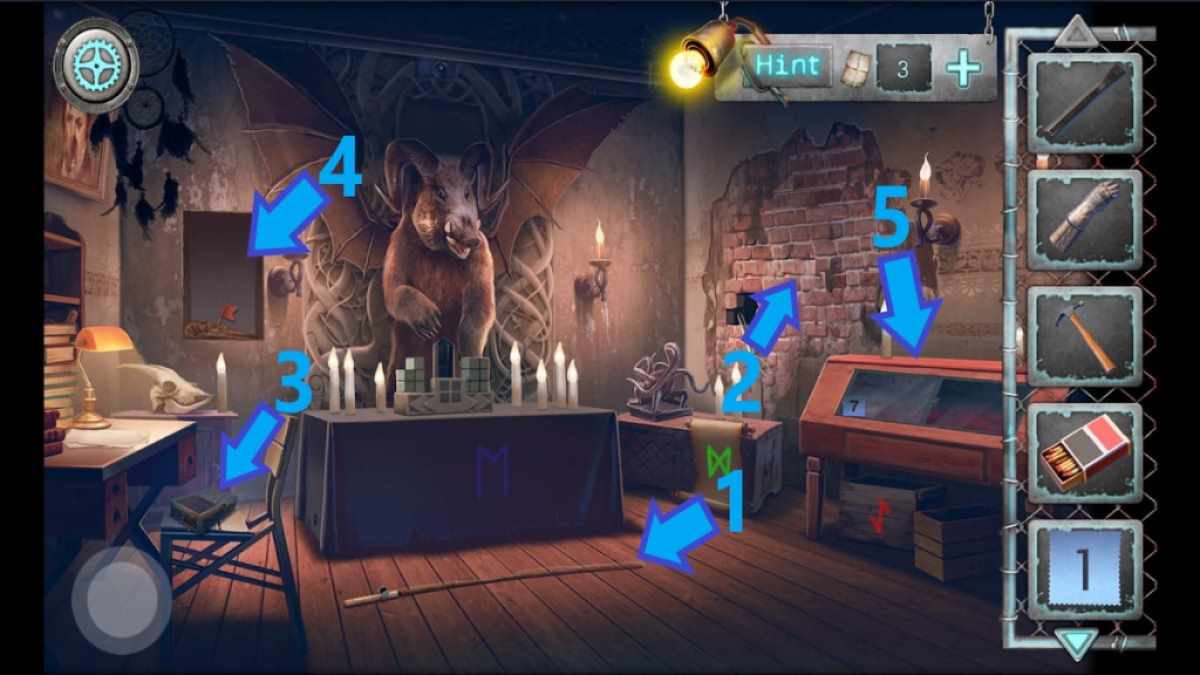

- Take the fishing rod (1) and combine the chisel with the hammer in the inventory.
- Approach the wall (2) and use your chisel hammer three times to break it.
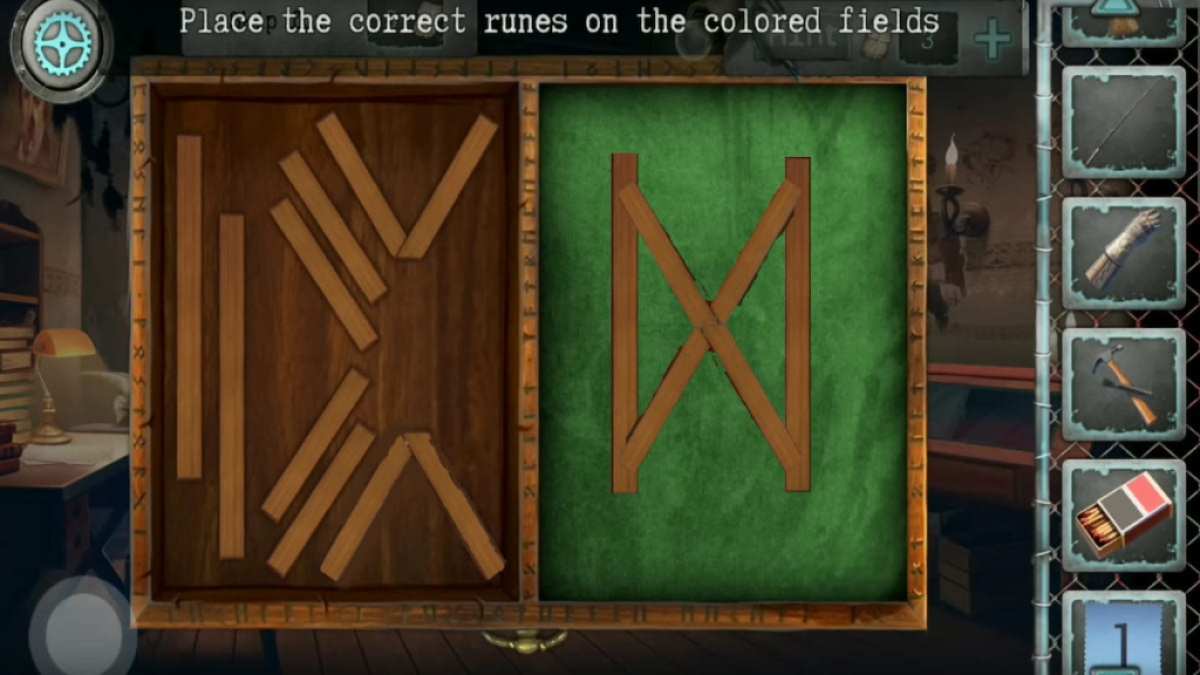
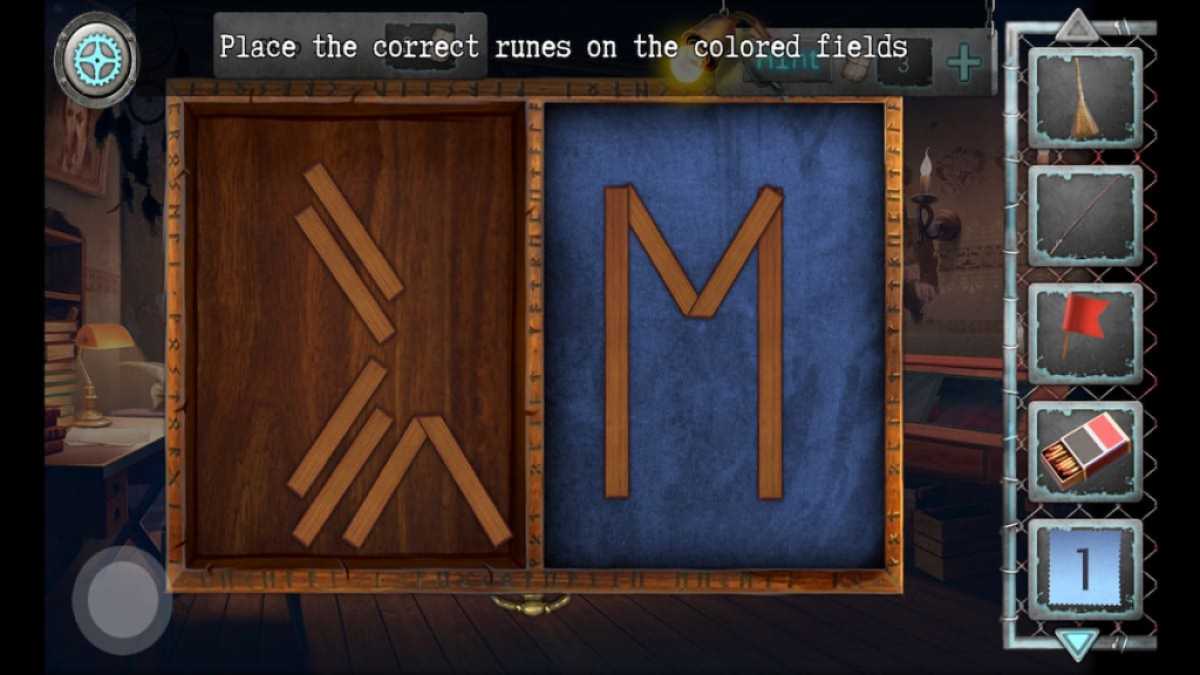
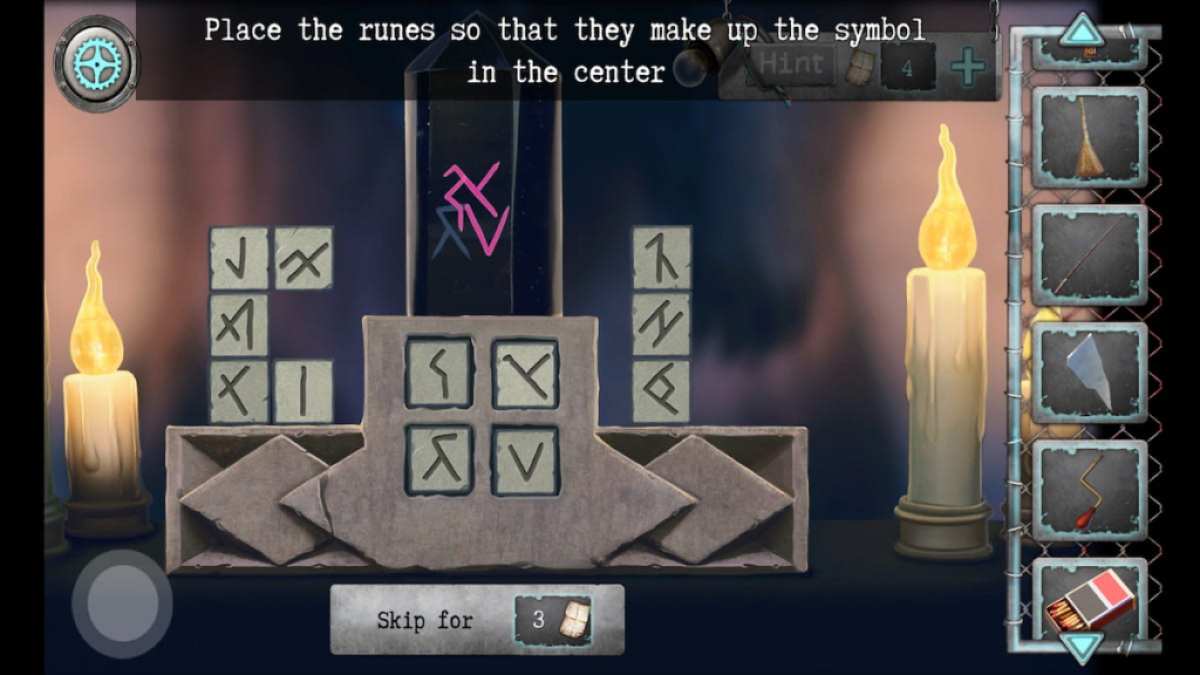
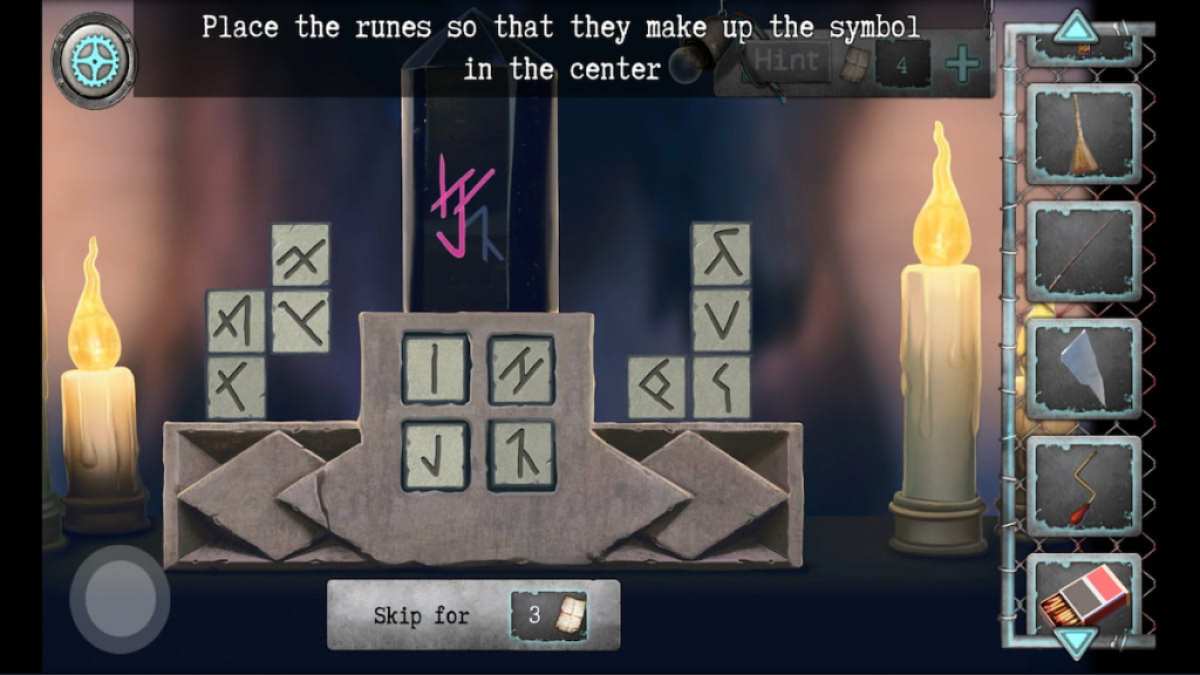
- Inspect the box (3), arrange the puzzle pieces to make runes (Images 2-4), and collect the sheet with the number 3.
- Add the metal gauntlet to the opening (4) and take the red flag.
- Go to the glass cabinet (5) and take the sheet with the number 7.
- Go back to reach the study room and approach the map noticeboard (6).
- Add all three numbered sheets and arrange them in the following order: 3, 7, 6, 4, 2, 1, 5.
- Take the bone saw and the key from the showcase.
- Approach the model ship (7).
- Add the red flag and the sail to the model ship, and take the rune from the boat.
- Return to the secret room, use the bone saw to take the skull from the skeleton in the wall (2), and take the pendant around his neck.
- Go back to the glass cabinet and unlock it using your small key.
- Add the pipe and the skeleton's skull to the cabinet, and take the gramophone handle and the mirror shard.
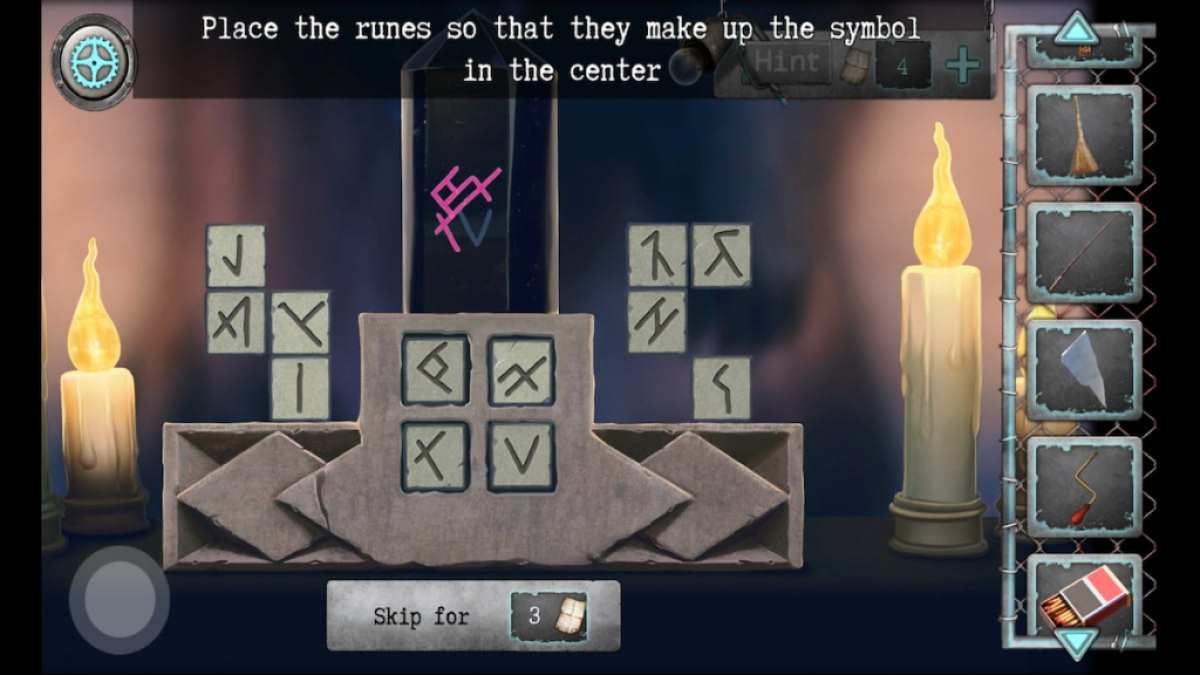
- Add the rune from your inventory to the left block pile on the puzzle (1).
- Complete the puzzle by arranging the rune blocks to form three pictures (Images 2-4) and take the third floor elevator button.
- Go back to the elevator, add the third floor button and press it to go up.
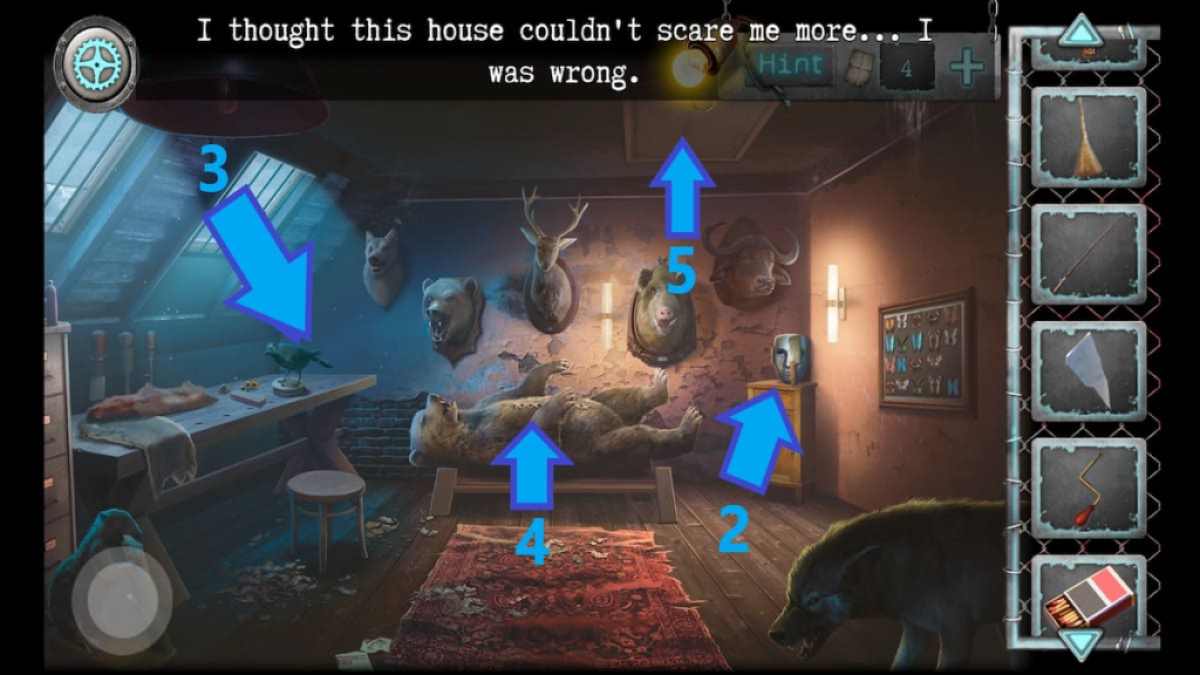
- On the third floor, approach the mask (2) and take the rusty cleaver.
- Approach the bird figure (3) and sharpen the cleaver on the sharpening block next to the figure.
- Use the sharp cleaver to cut the bear's stitches (4), move the stuffing and take the hook and the hammer.
- Combine the hook with the fishing rod and use the rod to open the trap door (5).
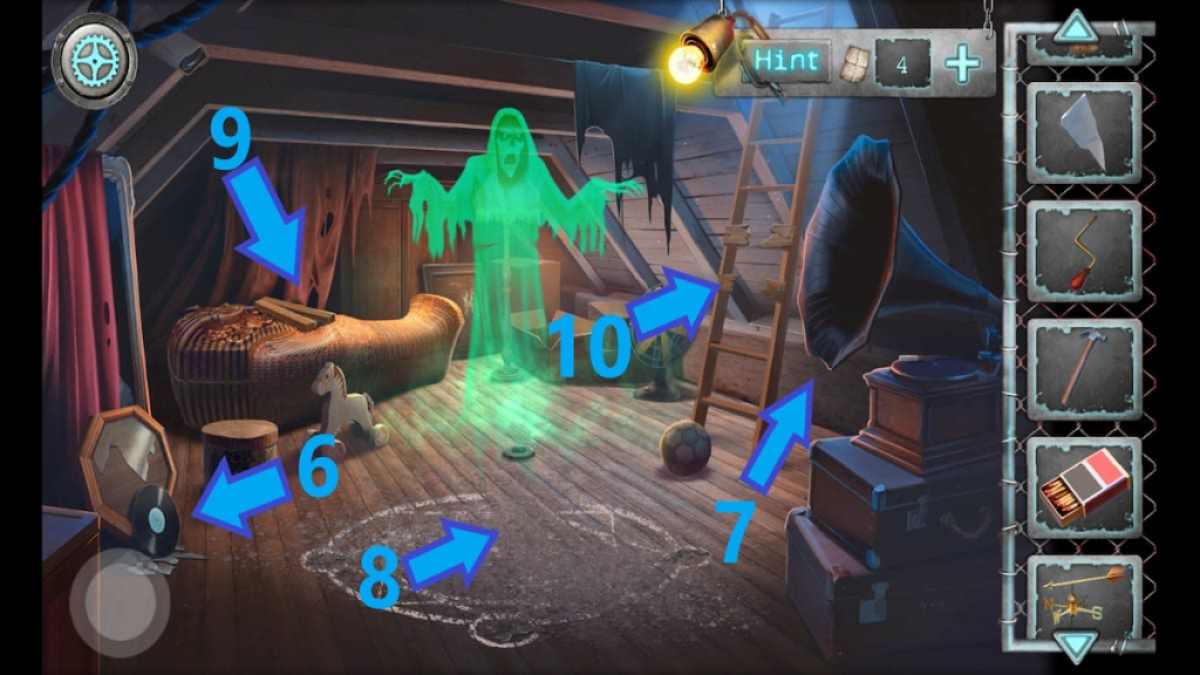
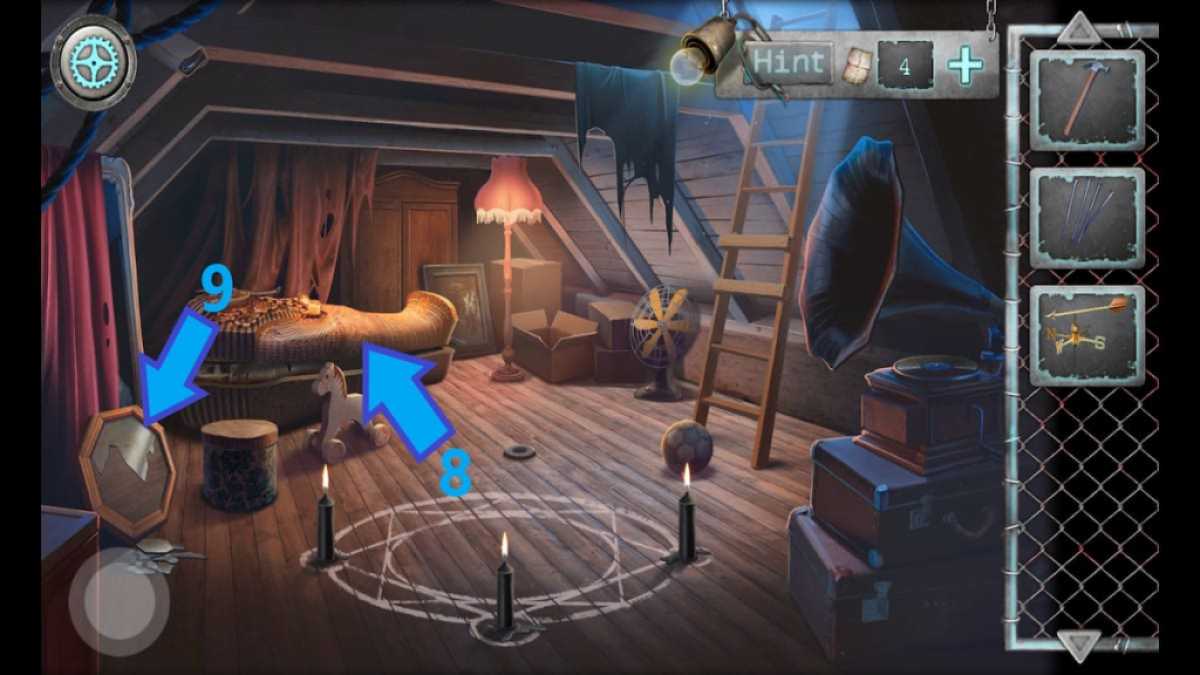
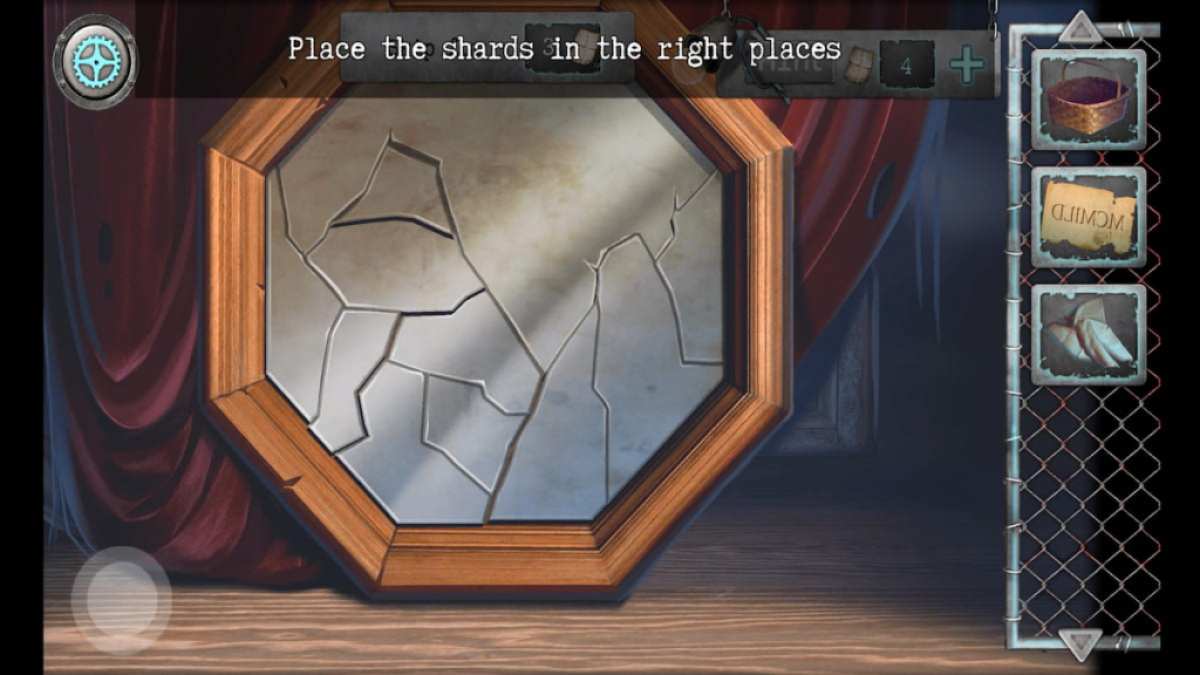
- Go up the ladder into the attic and take the vinyl record (6) by the broken mirror.
- Approach the record player (7), take the chalk on the player and add the vinyl record.
- Add the handle, turn it to open the drawer, and take the black candles from the drawer.
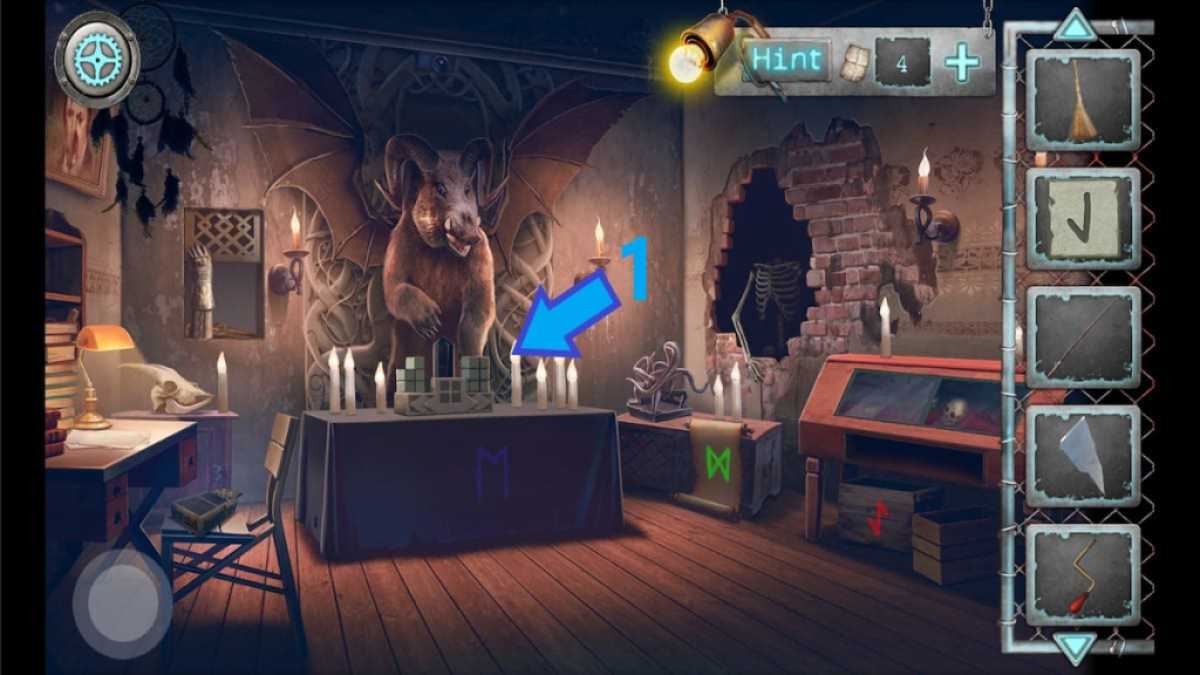
- Use your broom to sweep the dust (8) and then use chalk to complete the symbol.
- Place the black candles onto the symbol and light them using your matchbox.
- Approach the sarcophagus (9), take the planks and place the pendant into the slot.
- Take the plasma cutter from the sarcophagus.
- Approach the ladder (10), take the silver key and use the hammer to remove the broken slats.
- Add planks to the ladder frame and go back to the third floor.
Related: On Thin Ice – Full Walkthrough & Solutions (Chapters 1-4)
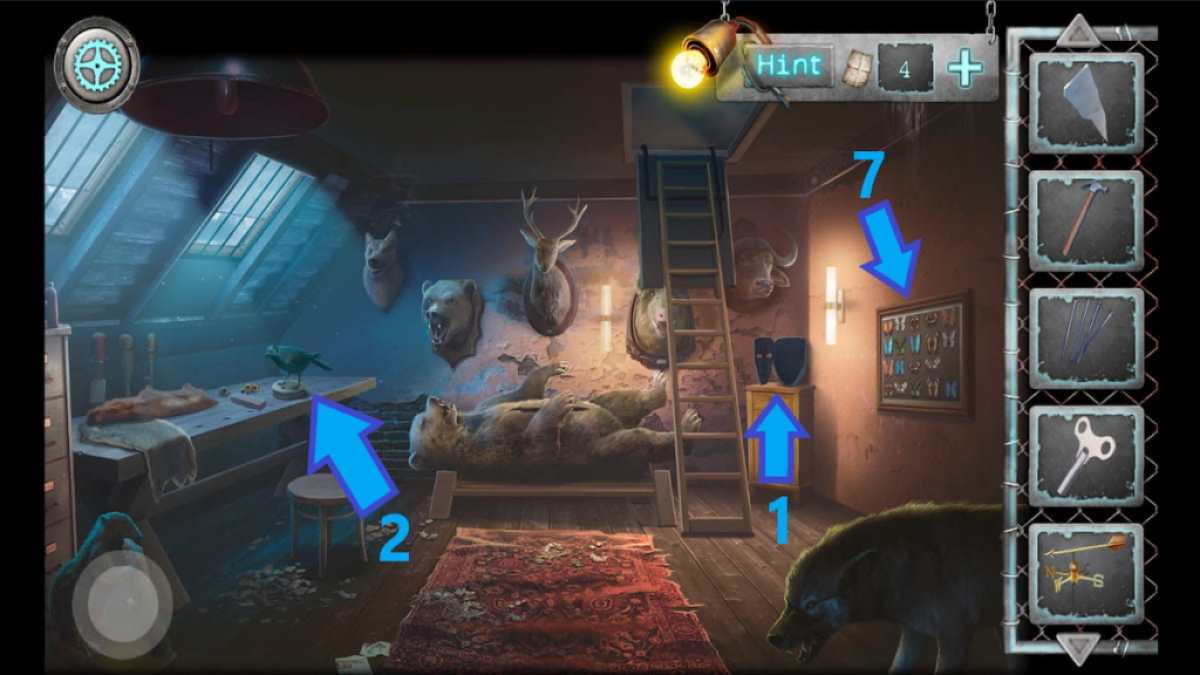
- Use the plasma cutter to open the mask (1) and collect the nails.
- Place the silver key into the bird figure (2) and take the second mirror shard.
- Climb the attic, add nails to the ladder and hammer them into the boards.
- Climb up the ladder to reach the roof.
- Add the vane to the chimney (3) and tap the vane to point the arrow South.
- Take the latin inscription and approach the statue (4) .
- Take the medical scissors and approach the eggs (5).
- Take the dirty neckerchief by the eggs and take the butterfly by the nest (6).
- Go back to the third floor and place the butterfly into the butterfly frame (7).
- Match the identical butterflies to slide the frame and take the basket.
- Climb the attic again and use the medical scissors to cut the bandages on the mummy (8).
- Take the third glass shard and place all shards onto the broken mirror (9).
- Arrange the mirror shards (Image 4) and place the Latin inscription on the mirror to reveal the Roman numerals MCMILD.
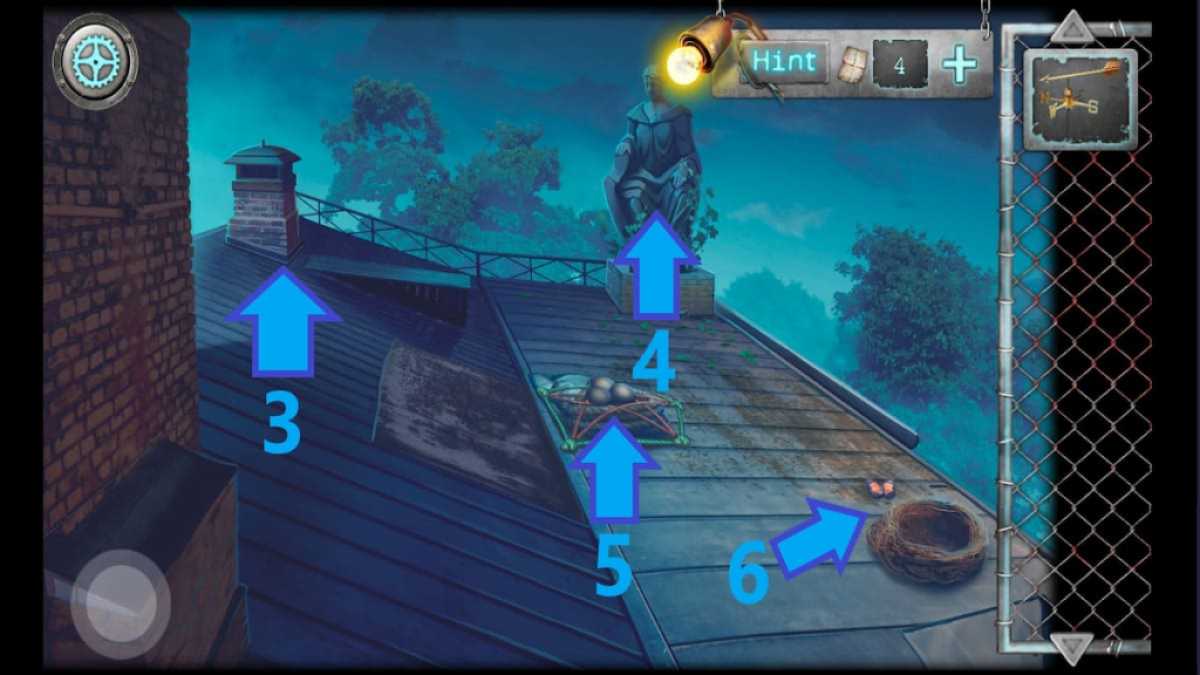
- Climb back onto the roof and approach the statue again (4).
- Press the bricks according to the paper clue and take the metal ring.
- Place the basket next to the eggs (5), place the eggs into the basket and take the basket.
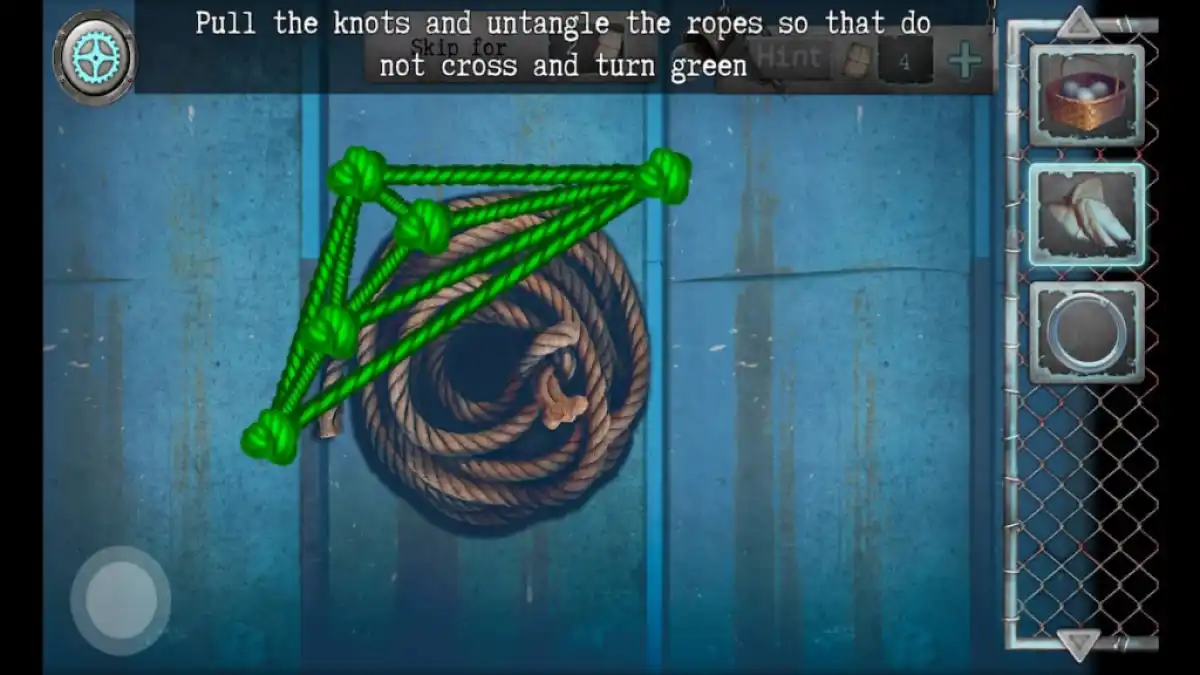
- Drag the rope to untangle the knots (Image 5) and collect the long rope.
- Go to the nest (6) and place the eggs into the nest.
- Combine the metal ring with the long rope and place the rope with ring onto the protruding pole.
- Climb down the rope.
For more point-and-click adventure games, check out The Visitor walkthrough and Lost Lands 6 Walkthrough – Mistakes of the Past on Pro Game Guides.