I love helping Kate solve every mystery, but it sometimes gets pretty difficult. If you want to know the solutions for all the puzzles Kate encounters, follow this Vanishing Act walkthrough in the Adventure Escape Mysteries.
How to beat Vanishing Act - Walkthrough guide
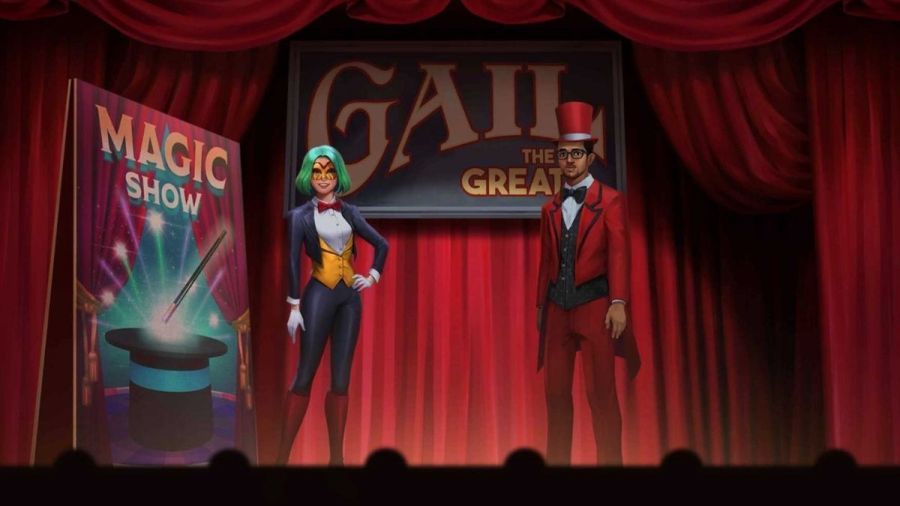
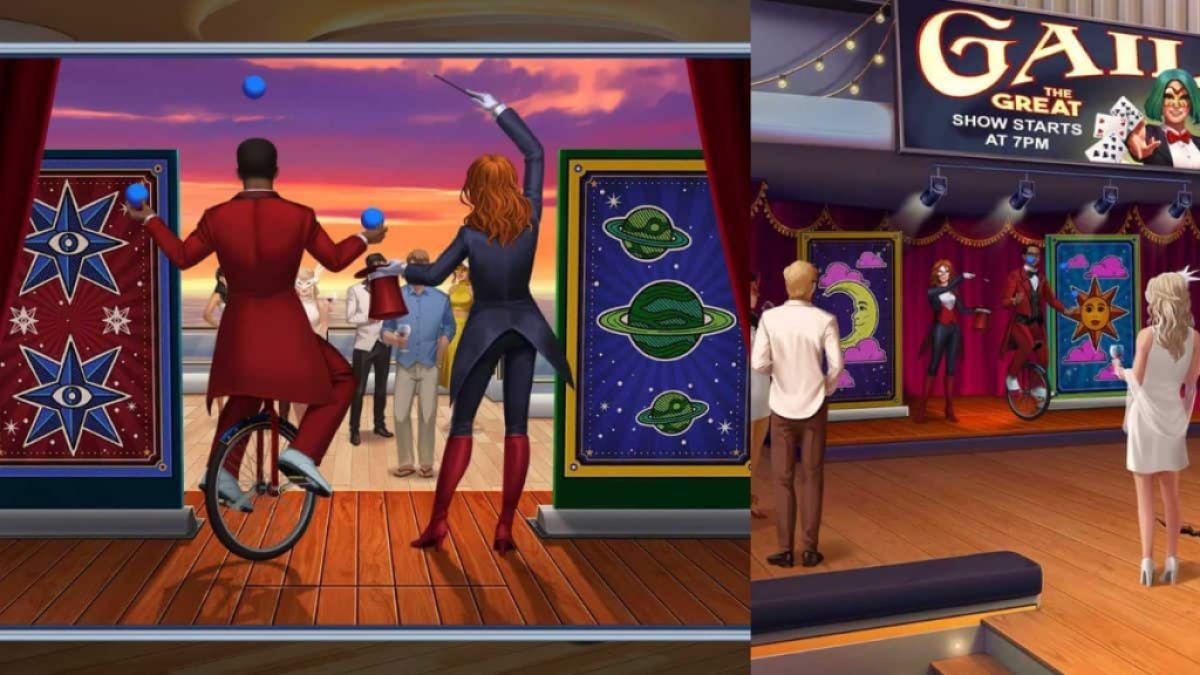
After being on thin ice, Kate and Murphy get to relax and go on a date to watch the show of Gail the Great, a magician. However, as Murphy disappears, so does his wallet. Let's get on the hunt to find it!
Chapter 1
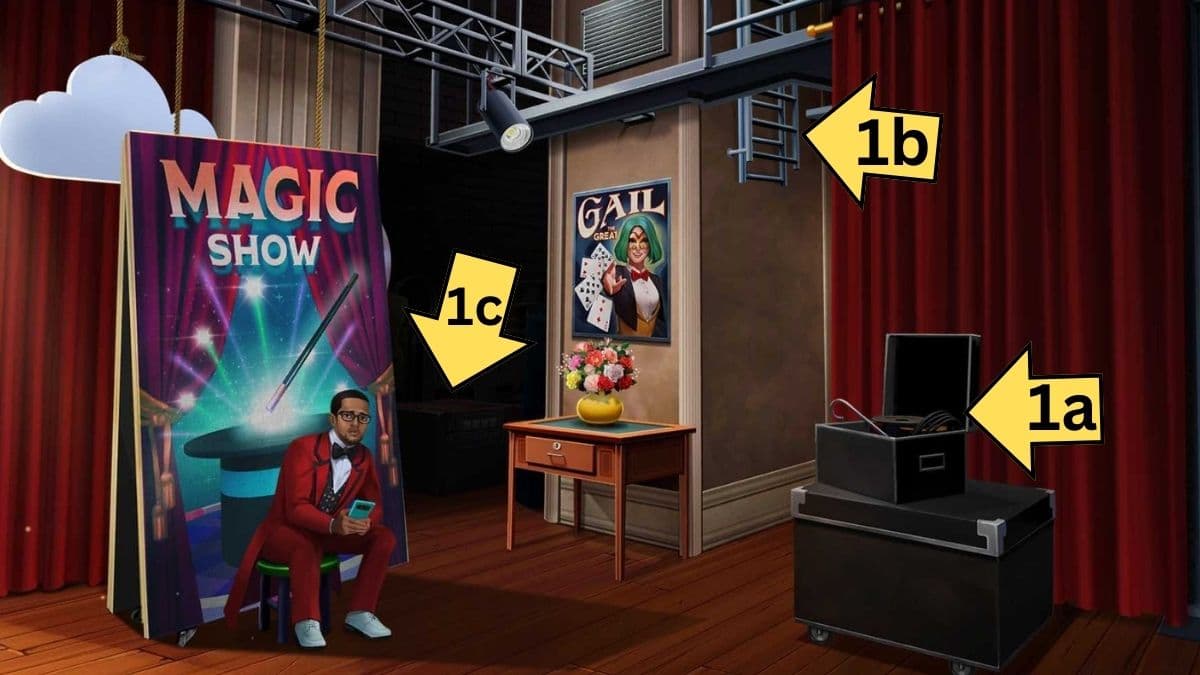
Kate and Murphy first head backstage to check if he had perhaps dropped his wallet while they were performing the trick. Click on Harry, the magician's assistant, to see what he knows. Harry claims he doesn't remember anything, but they can look around and see if they find anything.
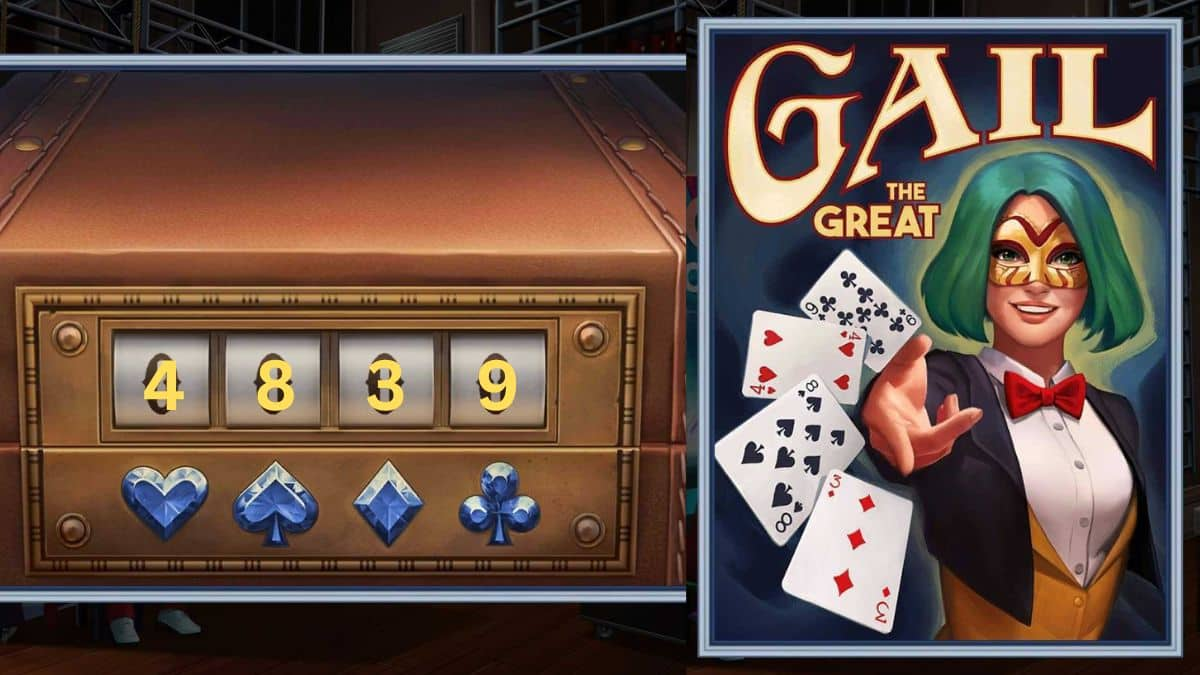
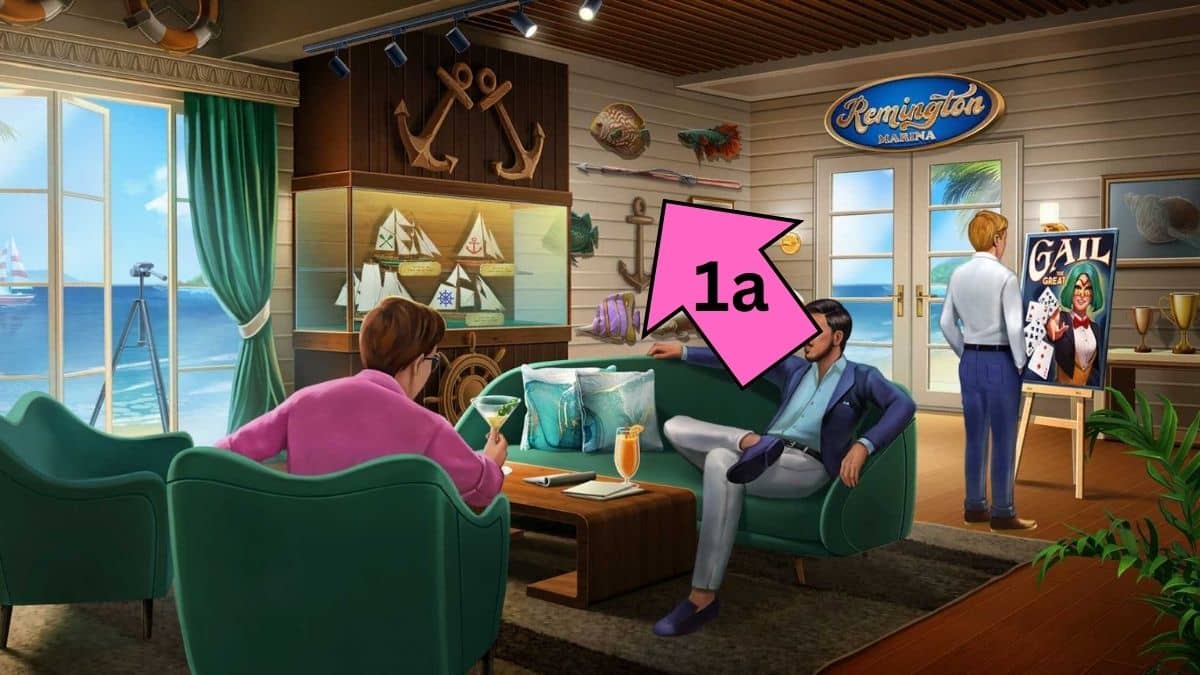
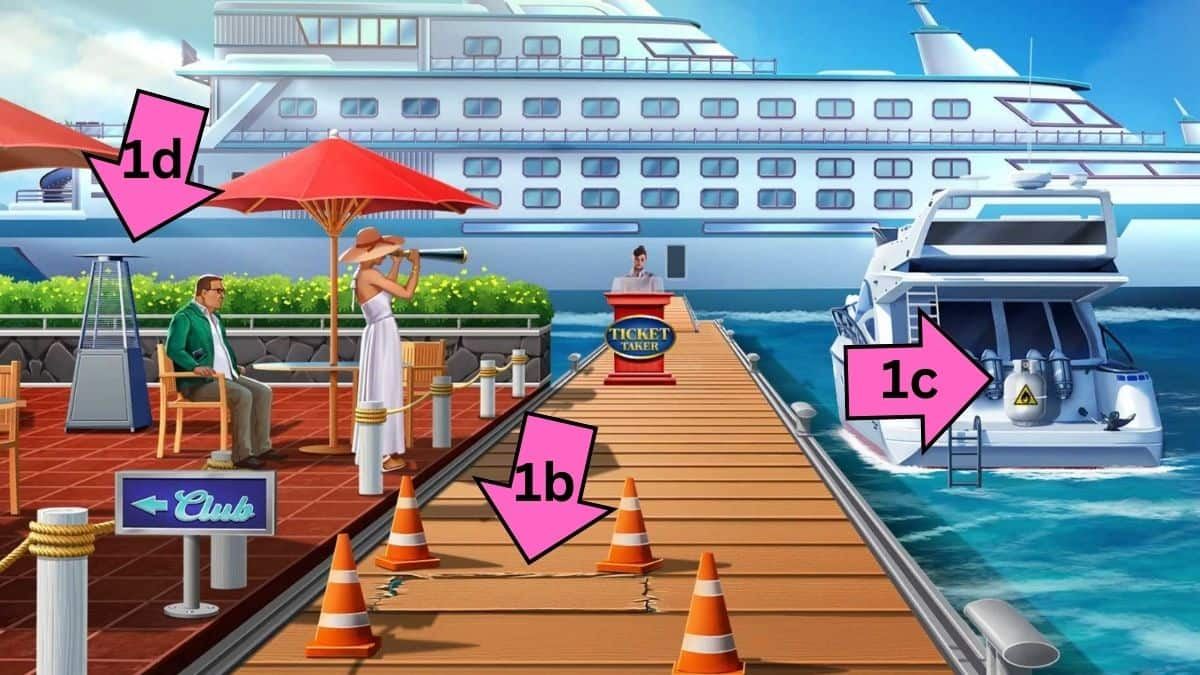
First, open the box on the right to find a Magician’s cane (1a). Use the cane on the ladders (1b) to pull them down. Murphy will climb the ladders and turn on the spotlight, revealing a locked suitcase (1c) that requires a password. Luckily, the correct password can be found in the Gail poster on the wall and the cards she is throwing. The password is 4839.
The suitcase will now be open, and you’ll see a bunch of stuff. Whoever packed wasn’t very organized. Start moving things around until you find a box cutter, but don’t stop just yet; keep searching until you find Murphy’s wallet.
The hunt isn’t over just yet, as Murphy’s driver’s license is missing. Head back over to talk to Harry about it. He acts pretty suspiciously but says everything in the chest belongs to Gail and you need to talk to her in her dressing room.
Related: Haunted Hunt Walkthrough
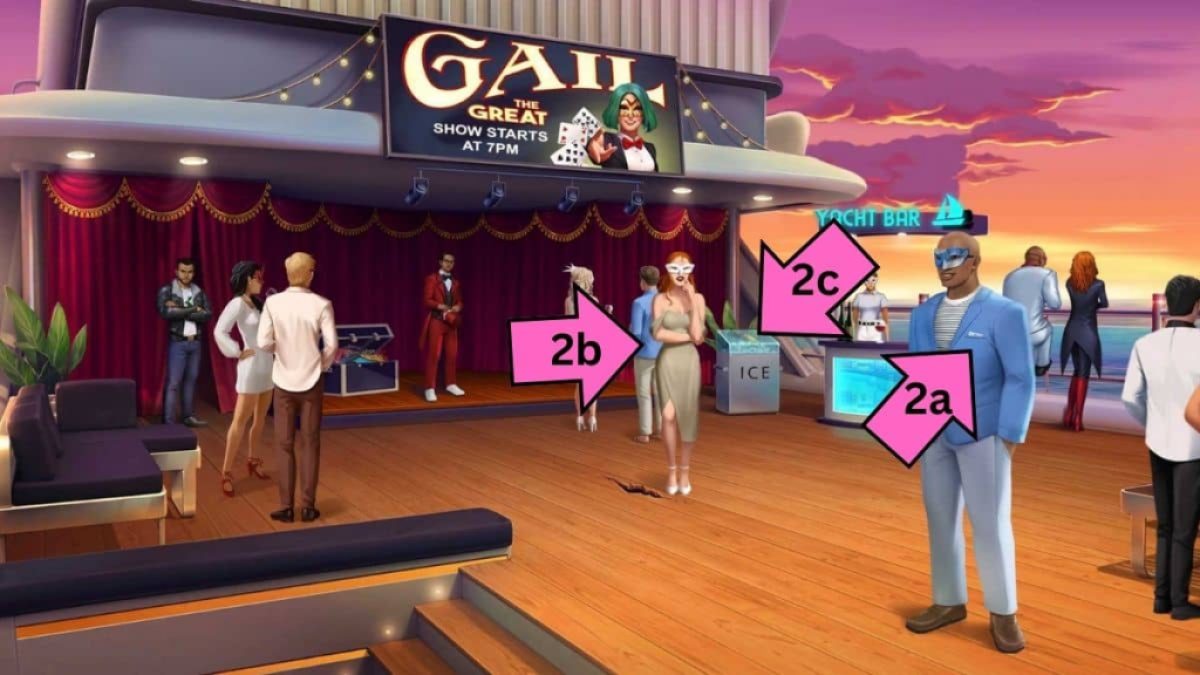
Move the chests and the curtains aside to knock on Gail’s dressing room. Once you tell her it’s the police, you get no further answer, and Harry is now gone, too. The goal for Kate and Murphy is to get into the dressing room.
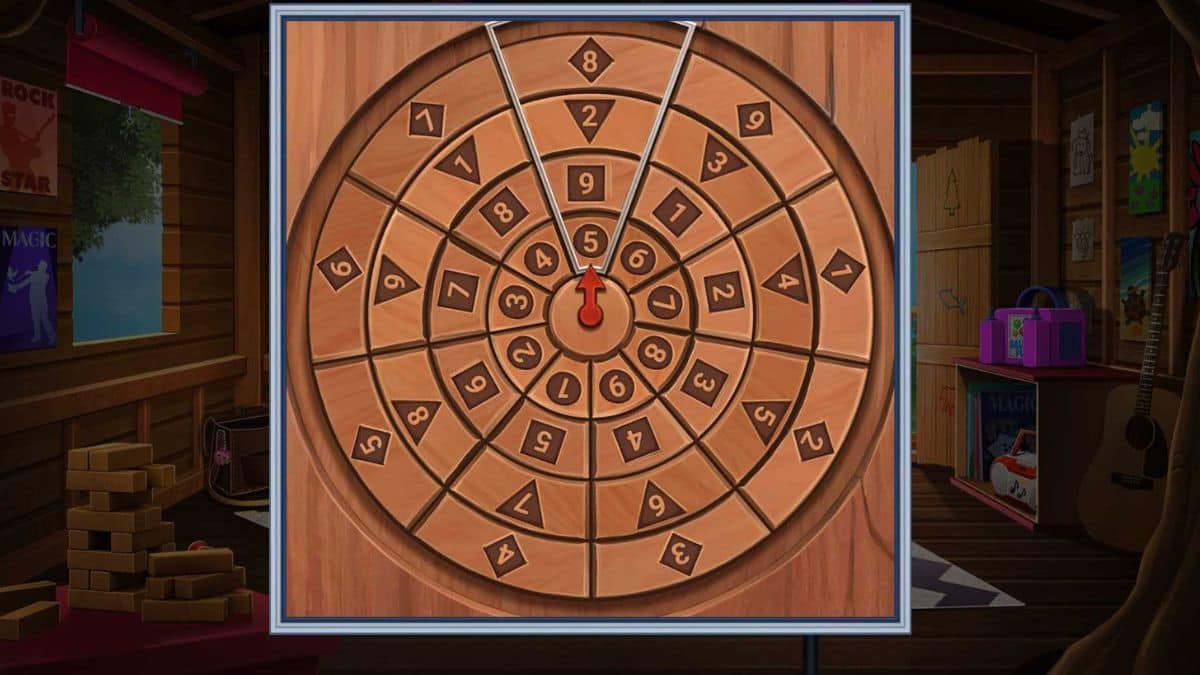
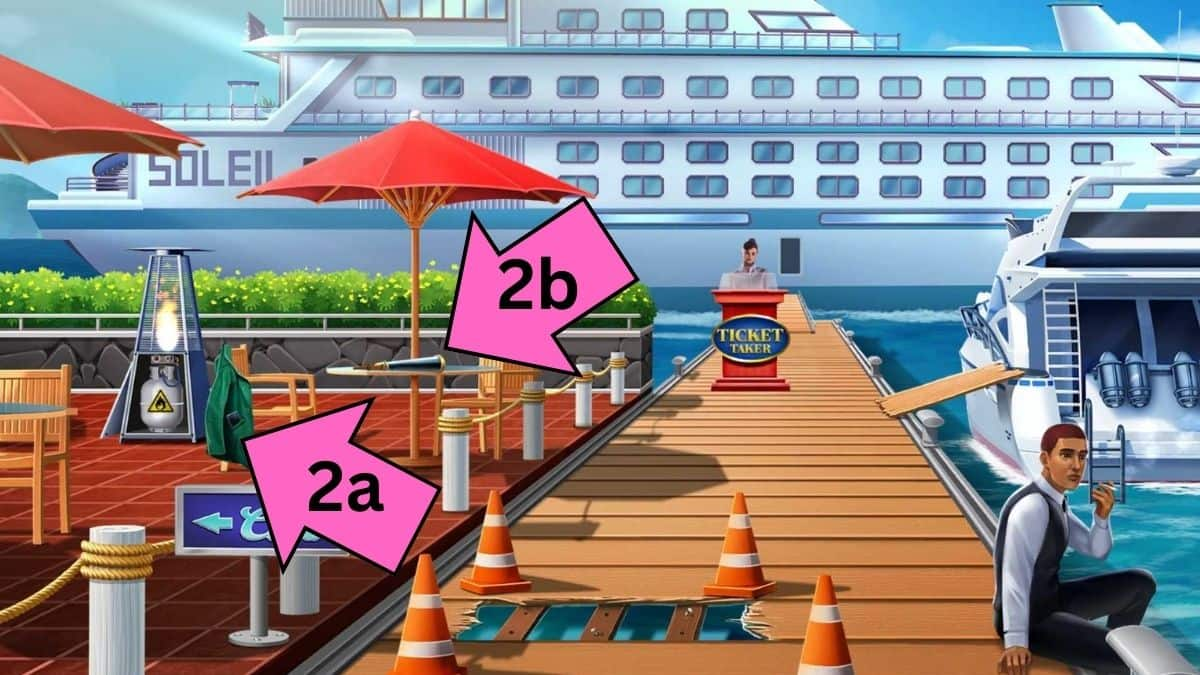
Click on the light above the door to get a star. Next, grab the wheel (2a) and put it on the magic show board (2b). This way, we can move it aside and see a moon stage prop. Cut the rope, and the moon will reveal a cabinet.
In the cabinet, you’ll find a drawer key (2a), which you can use to open the drawer (2b). Pick up the screwdriver from the inside and use it to unscrew the vent grate (2c) so Murphy and Kate can crawl through it.

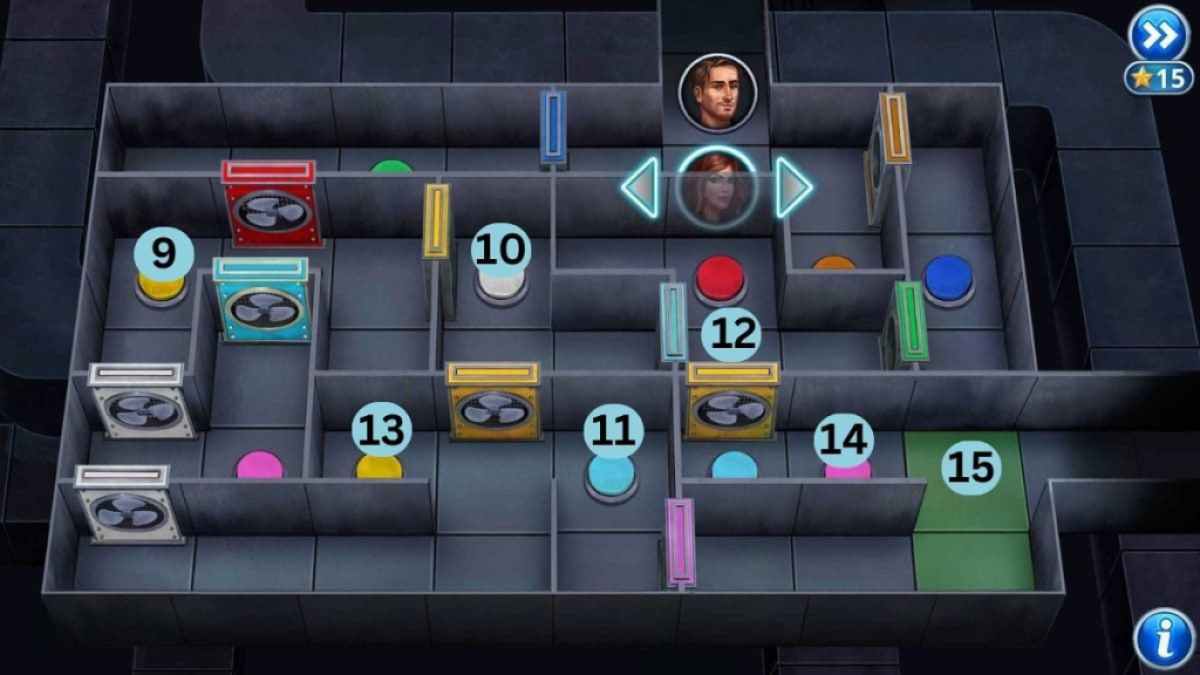
Now, you have to solve two puzzles to get them through the vents. Here’s what you need to do for the first one.
- (1) Kate to the blue button.
- (2) Murphy to the green button.
- (3) Kate to the red button.
- (4) Murphy to the yellow button
- (5) Kate to the pink button.
- (6) Murphy and Kate to the green tiles.

And here’s what you need to do to get through the second one. This one is a little more complicated.
- (1) Kate to the orange button.
- (2) Murphy to the dark blue button.
- (3) Kate to the green button.
- (4) Murphy to the red button.
- (5) Kate to the left yellow button.
- (6) Murphy to the right light blue button.
- (7) Kate to the left pink button.
- (8) Murphy to the left blue button.
- (9) Kate to the left yellow button.
- (10) Murphy to the white button.
- (11) Kate to the left light blue button.
- (12) Murphy through the light blue gate and waits in front of the yellow gate.
- (13) Kate on the right yellow button.
- (14) Murphy on the right pink button.
- (15) Kate and Murphy to the green tiles.

You are now out of the vents and in the dressing room. First, you’ll click on a note stabbed into the corkboard by a dagger. Take the dagger (3a) and then click on the outfit on the mannequin (3b). The jacket will open up, and you’ll see a sewn-in pocket. Use the dagger to cut the threads and find a desk key.
Unlock the drawer (3c) with the key. Pick up the tablet and a heart pendant from it. Put the tablet to charge (3d), and you’ll see you need a password. Let’s find it. Put the pendant into the box on the table (3f). This box will give you makeup and a mask.

Related: The Squire's Tale Walkthrough
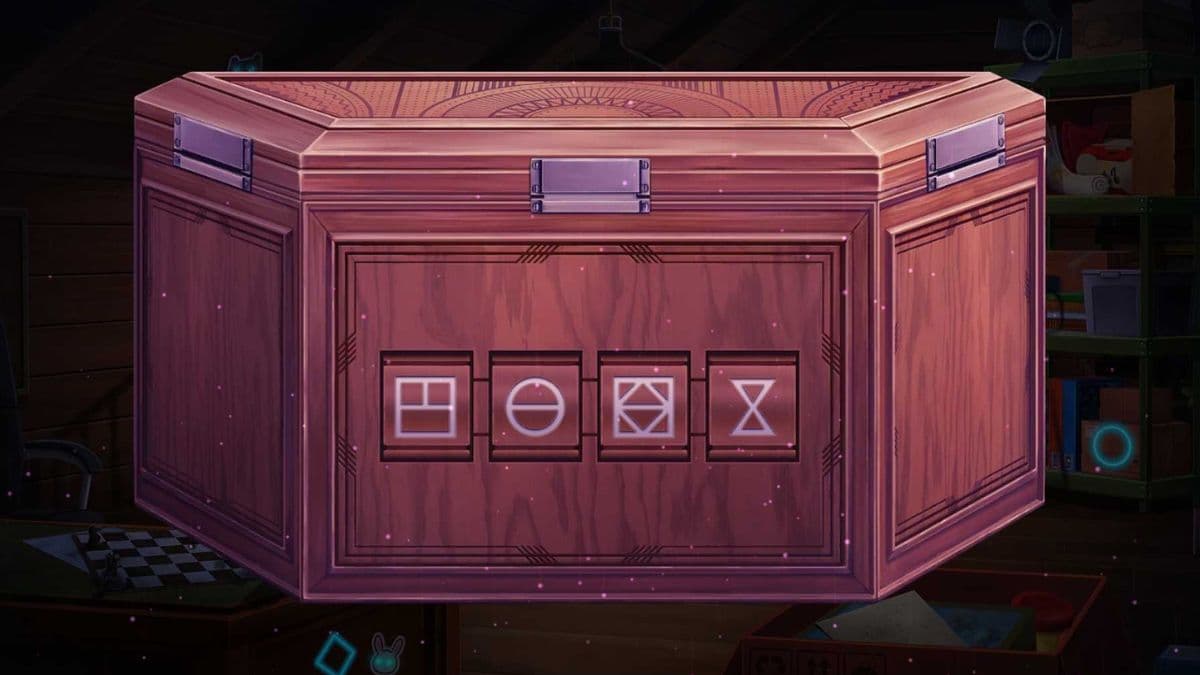
Click on the mirror to approach it. Kate wants to check the smudges, but she doesn’t have a fingerprinting kit. Use the makeup on the mirror, and you’ll see HOCUS spelled backward. This is the password to the tablet in the corresponding numbers, so 35177.

From the tablet, you’ll actually find out that this was no accident and Murphy was targeted. You definitely need to find Gail now to get to the bottom of this. Click on the lock icon on the tablet and press the unlock button. This will open up a hatch on the floor where you will find a ginger wig.
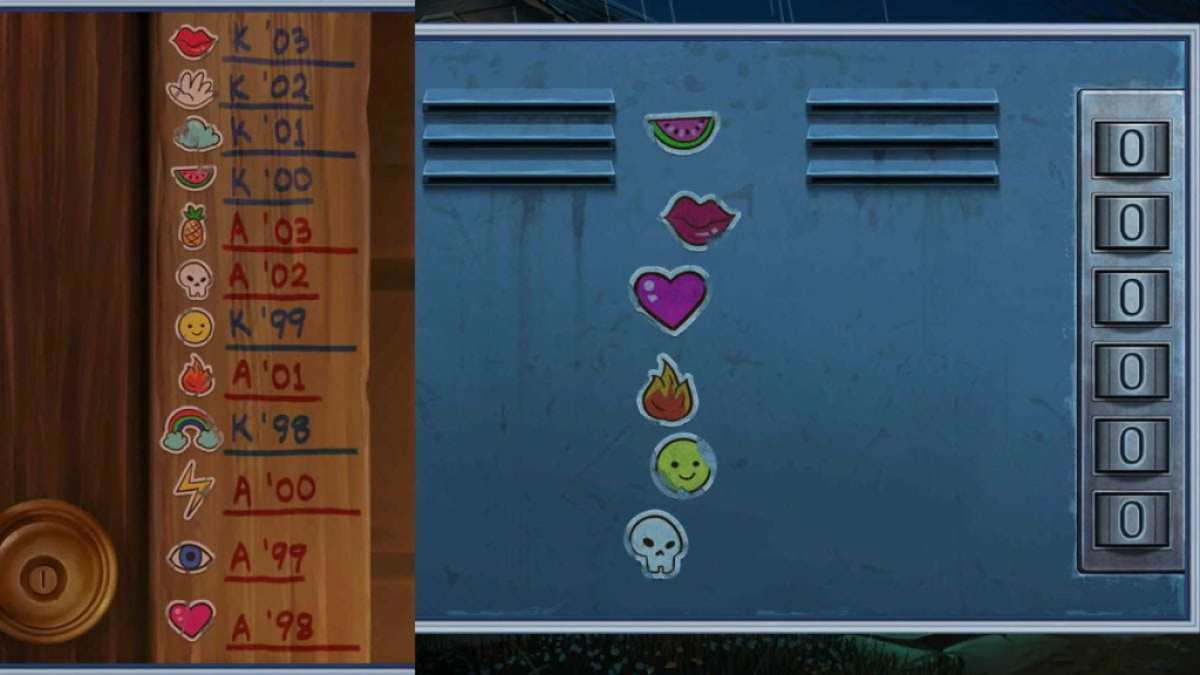
Now check the rest of the drawers and cupboards. You’ll find a golden mask in the middle drawer and a green wig in the right cupboard. We need to put these on the mannequin heads in the correct order, which you can find in the photos on the tablet. You can also see the order in the photos below.


The fourth mannequin has a magician’s coin in its mouth. You can find another coin under the pillow on the red couch. Now, you can add both coins to the mechanism under the hatch to solve it. You need to put all suns into the yellow circle, all stars into the blue circle, and all moons into the grey circle.

Once you complete the puzzle, you’ll open up a tunnel system through which Gail escaped. But she left behind a membership card for Smoke&Mirrors, where our dynamic duo will be heading in the next chapter.
Chapter 2
You’ll get to the club and talk to a bouncer (1a), but you need a membership card to get in. Lucky for you, Kate kept the card from the tunnels. Click on it and then the bouncer. It will work, but we also need to do a trick to get in. So Kate and Murphy have to ask around first.
The street musician (1b) is your best bet. Click on her, and she will immediately guess what you are trying to do. She will help you as long as you get her a drink. Now, even though Murphy got his wallet back, the two don’t have coins for the vending machine, so you have to complete an elaborate scheme to get some.
- Steal oil from the instrument case (1c).
- Oil up the water lever (1d).
- Use it to stop the fountain and collect coins (1e).
- Go to the vending machine (1f).

The musician wants a Cherry Cola, but the number for it is scratched off. However, we can deduce it. The difference in numbers for the first row is one. The difference in numbers for the second row is two. And the difference in numbers for the third row is three. So you need to type in #121 to get Cherry Cola.
With the can, head back to the musician. She’ll tell you that you need to pull out a bird from a hat. There are plenty of birds around, we just have to lure them in and also find a hat.
Related: Samsara Room Walkthrough
With perfect timing, an old lady (2a) will start yelling at you from the balcony. However, once you talk to her, she will recognize Murphy and give him bird seeds to lure the pigeons since they are also bothering her. Drop the seeds to the ground, and the birds will flock to it.
Open the upstairs window and steal someone’s hat (2b). It's pretty funny how this is happening right in front of the bouncer, but he doesn’t notice as you use the hat to grab a pigeon. Maybe he is nearsighted. Kate will pull off the trick, and you can now enter the club.

Once you’re in the club, you’ll run into Harry again. He will tell you how he is glad Murphy found his ID, according to Gail, which is very much not the truth. He’ll leave after telling us she is in the VIP area so we can continue searching.
First, open the curtains (3a) at the back to reveal a VIP Scanner. You need to scan Gail’s membership card and three other cards to get inside. Gail’s was a heart card. You need to talk to other people in the club to find the rest.

Click on the woman to the right (3b). You must pick up all the cards to get her to help you, starting with two of diamonds and ending with the queen of hearts. Check out the image below for just how to do it. Once you complete it, she will give you the diamond card to scan.

Talk to the guy at the bar (4a) who will let you use his card if you get him a drink. However, the bartender has cut him off, so you need to distract him first. Pick up the three napkins (4b) scattered across the floor and table, as these will come in handy.
Click on the stairs to go to a different room (4c). First, pick up two more napkins (4d) and open the door to the toilet (4e). Shove them all into the bowl before flushing and overflowing it. The bartender will be busy with unclogging, so you can grab the keys from his belt.
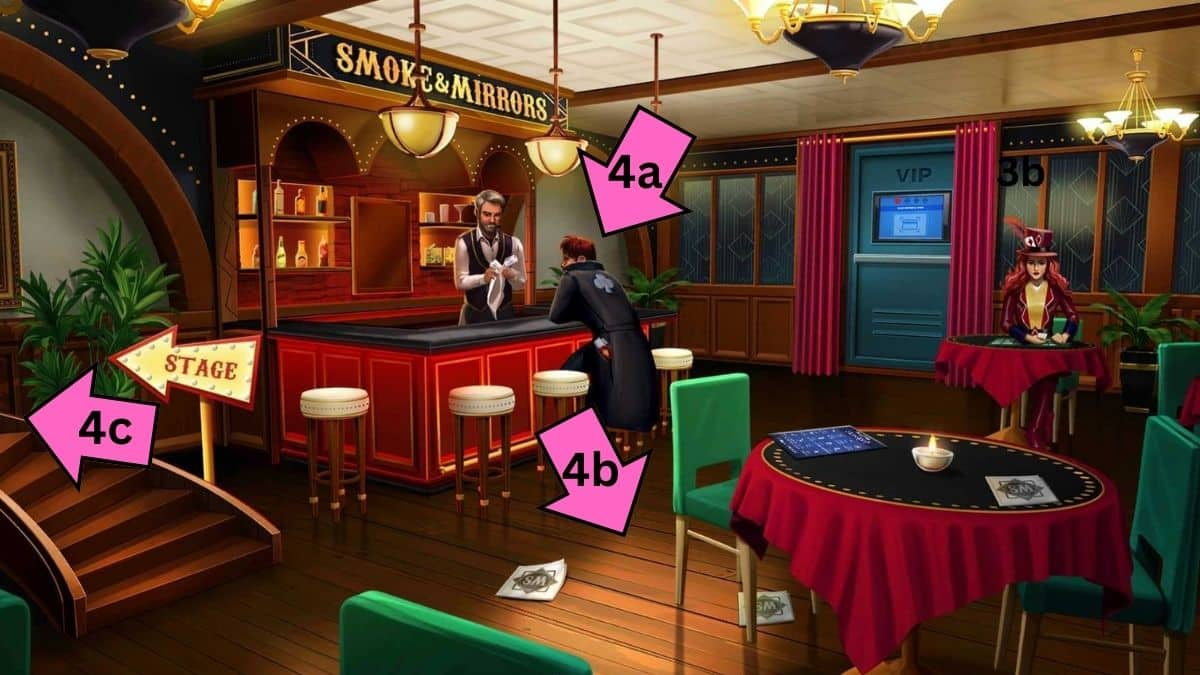
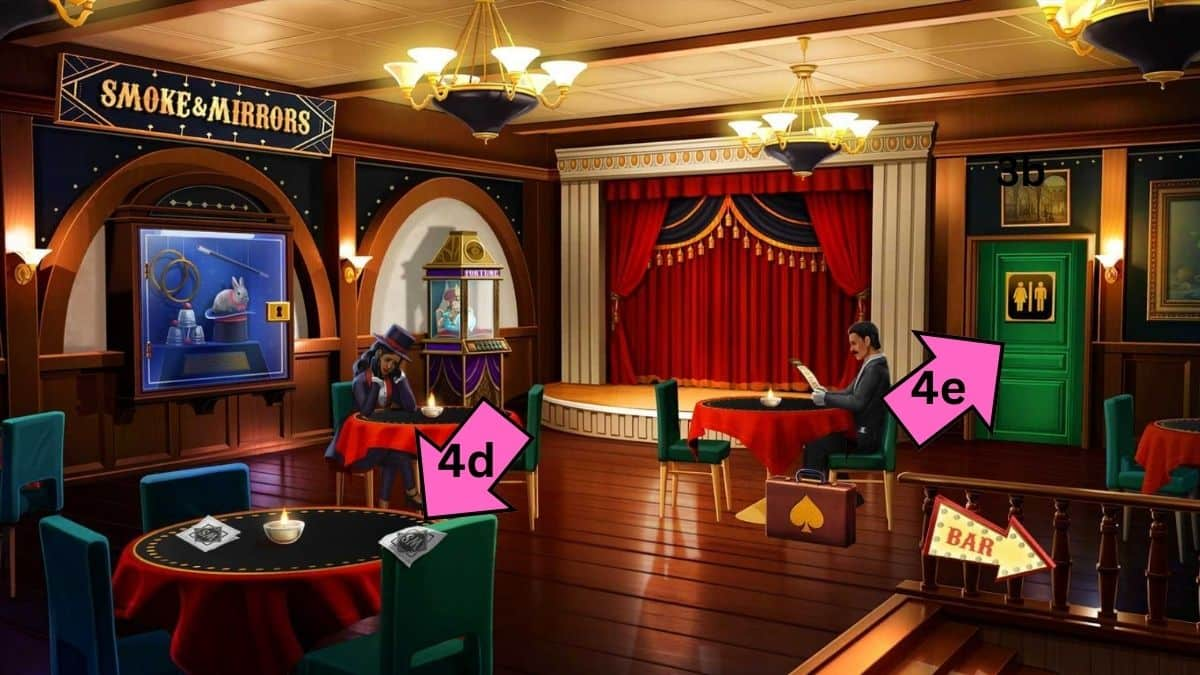
Use the keys to unlock the display and grab a wand (5a). Next, click on the stressed-out woman (5b) at the left table. She’ll tell you she forgot her wand at home, but it’s just her luck you just found (stole) one. The other magician will stand up to watch her so you can take the cocktail menu (5c) he puts down on the table and head back to the bar.

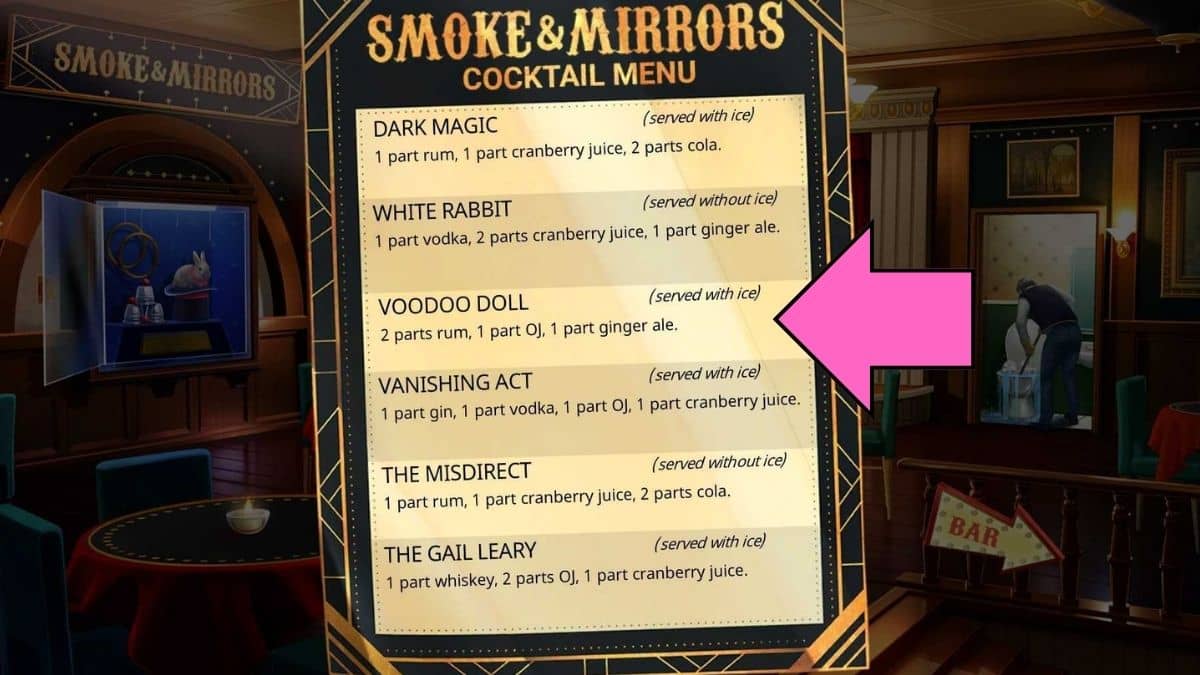
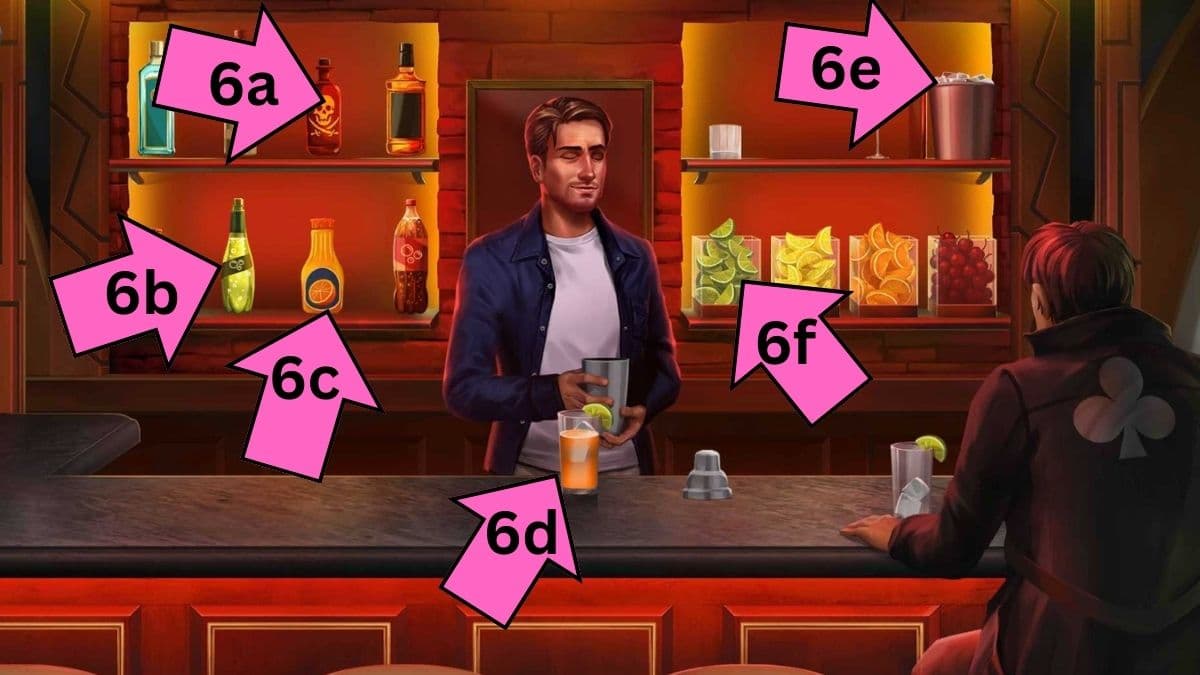
The drunk magician isn’t really sure what he is having; he just knows he has something bubbly with two shots of liquor. Based on that, we can tell he is drinking Voodoo Doll after looking at the menu. We also know about the details of his drink based on the empty glass in front of him.
- (6a) Add two shots of rum.
- (6b) Add one shot of orange juice.
- (6c) One shot of ginger ale.
- (6d) Pick the tall glass.
- (6e) Add ice.
- (6f) Add a lime slice.
He will pass out after giving you permission to take his card, so grab it from his pockets and the tokens too, while you’re at it. Click on his phone and unlock it. You will see that Atticus' birthday falls on March 2, which means this guy is a Pisces based on the chart on the table.
Related: Echo Bay Murders Walkthrough
Head back to the other room and go to the fortune teller. Put in the tokens and click on the Pisces sign. You’ll get a card with the fortune on it and some numbers highlighted. This is the password for the briefcase of the magician watching the performance, Atticus. The code for the case is 4812. You’ll find the last card here.

Now, go back to the door and scan all three cards. You’ll start a puzzle where you need to recalibrate the security system. Since the club suit has 17 squares, make sure to use it in the middle of an area—that way, you can get everything like in the image below.

This will open the door, and you can enter the VIP room to find none other than Allie, Kate’s sister, pretending to be Gail the Great. With this shocking revelation, the chapter ends.
Chapter 3
This chapter of Vanishing Act starts off with a flashback of young Kate 20 years prior, sitting underneath a tree. You’ll get a radio call from Allie telling you to bring Lola the bunny across the river to the treehouse. Allie took the kayak, so you should look for the old canoe in the garage.
There are three dwarves outside. Click on the right one to get the key to the garage. Unlock it and head inside. The canoe is hanging from the ceiling, so you have to get it down. Let’s roam around the garage to find what we need. You’ll find one wrench (1a) in the drawers and another in the cupboard (1b).

Place them on the board, then switch their order exactly like in the photo with Grandpa. It goes blue, white, black, green, red, yellow, pink. This will unlock the back and give us the key to the mower which was in the way.

Grab a hammer from the red toolbox on the shelves to the left and check out the locked locker next to it. We need to find the numbers on the wrenches with the matching colors. So, the answer will be 4964. This will unlock the locker from which you can grab nails and a pulley lever.

Use the pulley to lower the canoe, but as you’re doing it, it will drop and break. Now, you can grab wood from the wheelbarrow to the right. Together with the nails and hammer, you can fix the canoe right up. It totally isn’t going to sink.
Open the backpack in the canoe and grab bunny treats. Go outside with the cage you pick up from the shelves to guide the bunny into it. Put the cage into the pen and then add the treats. Lola will get in, and you can close her inside and pick her up.
Head back into the garage to grab the canoe. Put the cage with Lola into it and head onto the water. This time, you’ll play another puzzle game to follow the currents and get across.

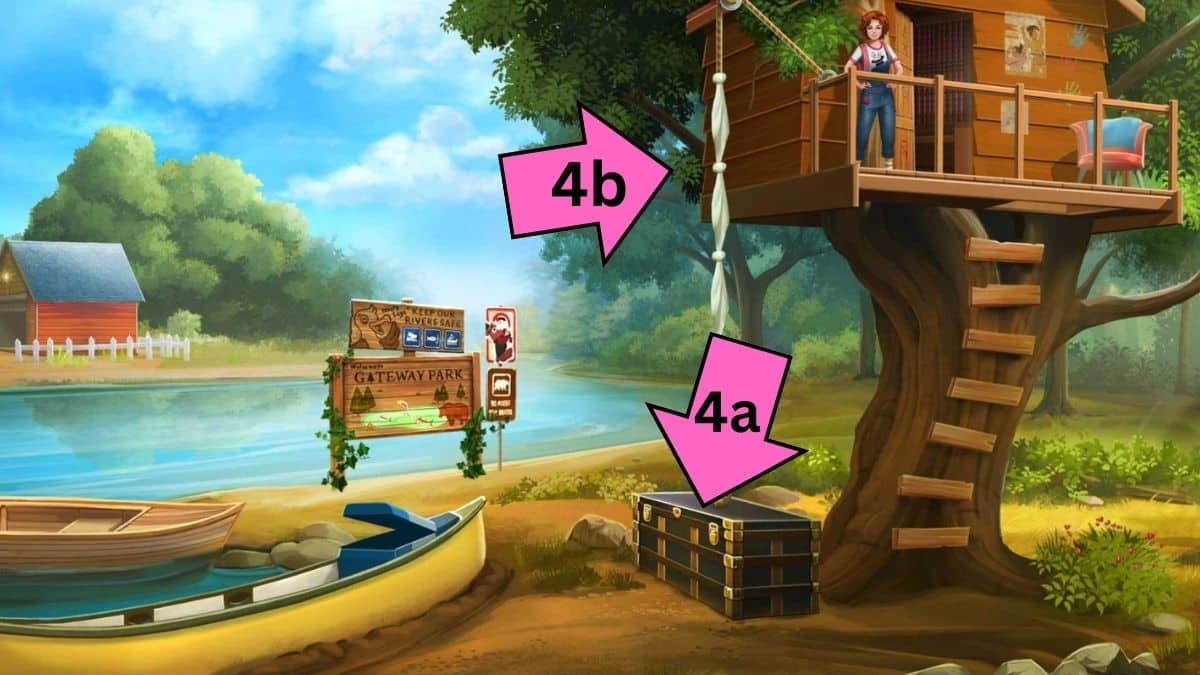
Once you get there, Allie asks you to help her with a magic trick. However, she has locked herself in the tree house and is asking you to do the secret knock. You need to find clues to what it is. Click on the box in the kayak to grab work gloves and a fishing rod.
Use the work gloves to clean the sign and see a bunch of trees, fish, and bears, which match up to the three symbols from the door. Count them all to figure out the number of knocks in each area. There are six trees, four fish, and three bears.

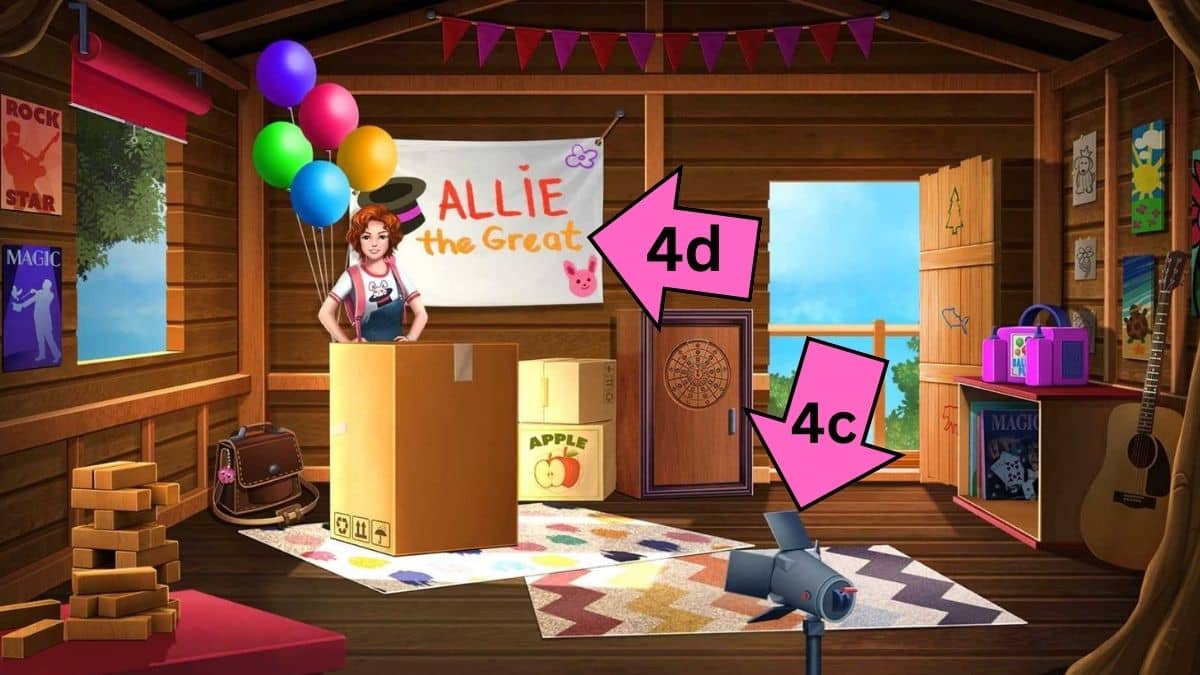
Allie will let you in and make you complete a few tasks. She’ll give you a memo pad so you can remember everything that needs to be done. Let’s go step by step.
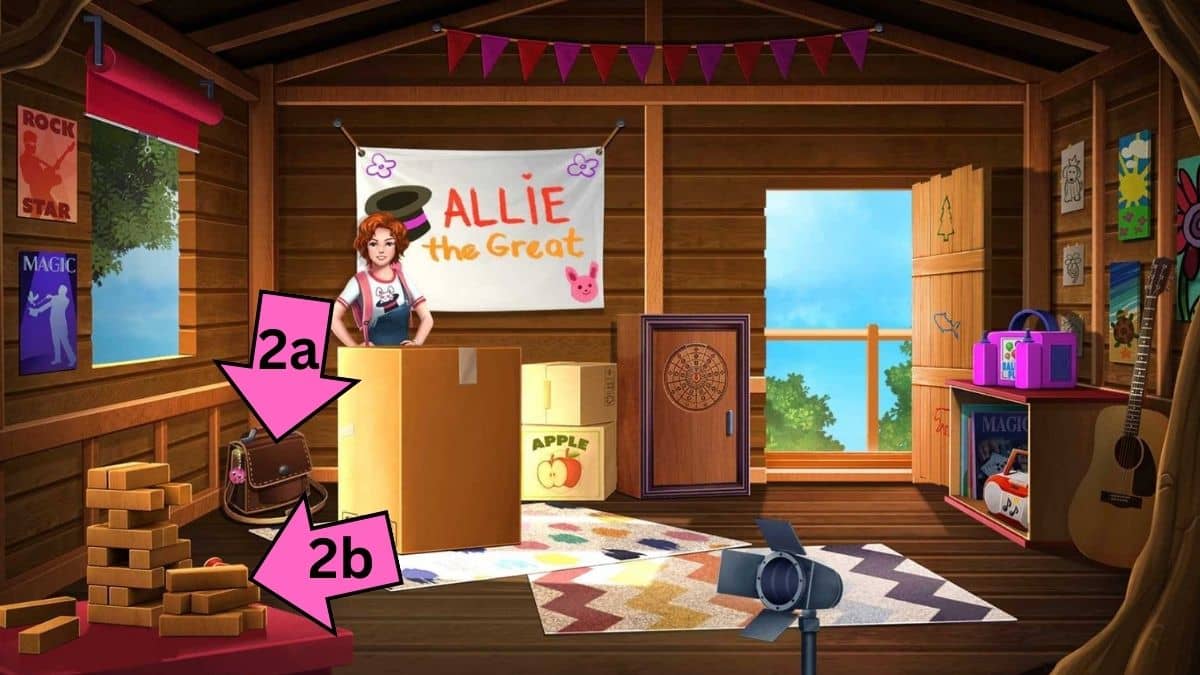
- Open the bag and get balloons (2a).
- Move the Jenga blocks to grab the binoculars (2b).
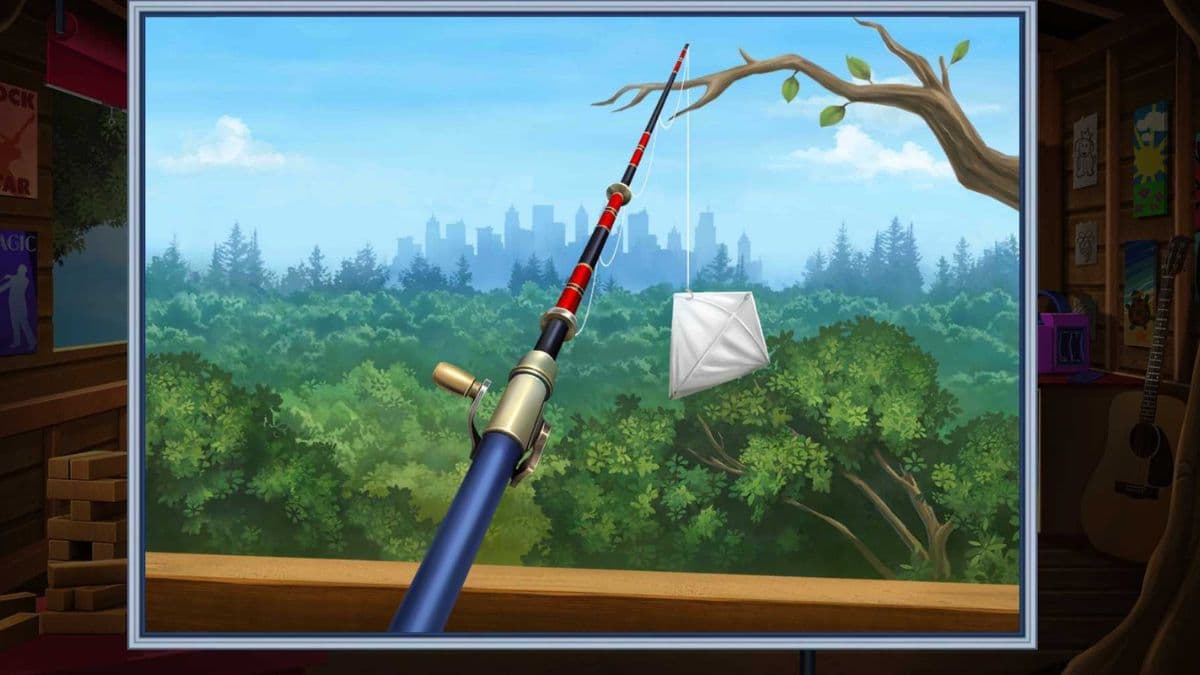
- Move to the window and grab a kite with a fishing rod.
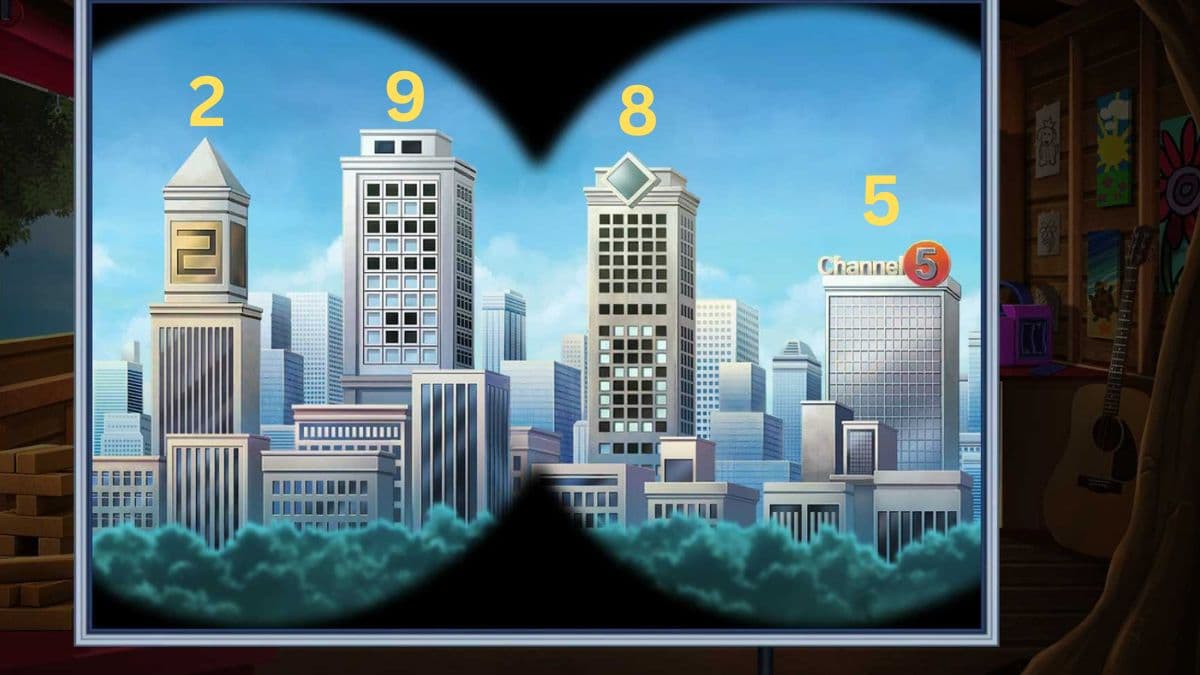
- Use the binoculars to look at buildings.
With the binoculars, you will see a code for the cupboard next to the door. For the circle, it is 5; for the square, it is 9; for the diamond, it is 8; for the upside-down triangle, it is 2. So, from top to bottom, the code is 8295.
Once you unlock it, you can grab a screwdriver and a cloth blanket (3a), which will combine with the cloth from the kite. Next, pick up the stereo (3b), investigate it, and use the screwdriver on the back to grab the batteries. You can add them to the balloon machine (3c) and inflate the balloons.

Give the balloons to Allie, and she'll give you the key to the trunk outside. Head back down and grab the black light bulb and a cloth cape (4a). You now have three bundles of cloth to add to the rope (4b), but we need more. Climb up the tree again and fix the light first (4c).
Allie will give you the banner from the wall (4d), which you can add to the rope. You can now finally pick up the cage and lift Lola up to the treehouse. Allie will levitate Lola with the balloons, but Kate will mess this up when she opens both the window and the door.
You'll now have to chase her down. The important thing to know is whichever way you move Kate, Allie will go the opposite way. Try to corner Lola in the top area and lift up Allie there by moving Kate down into the bush. She won't move because of the obstacle, but it will register as such and move Allie up.

You'll grab Lola, but you'll also see Kate's old school papers Allie was copying and selling to others. Are these Allie's scheming origins? The flashback ends, and we are back at the club. Allie disappears but messages Kate to meet her at Grandpa's cabin. I know where we're going in the next chapter.
Chapter 4
Kate is parked in front of the cabin, waiting for Allie. She will message Allie to check where she is and find out she stopped for coffee but will arrive in five minutes. Kate decides to snoop while she waits.
Related: Viking Ship Escape Walkthrough
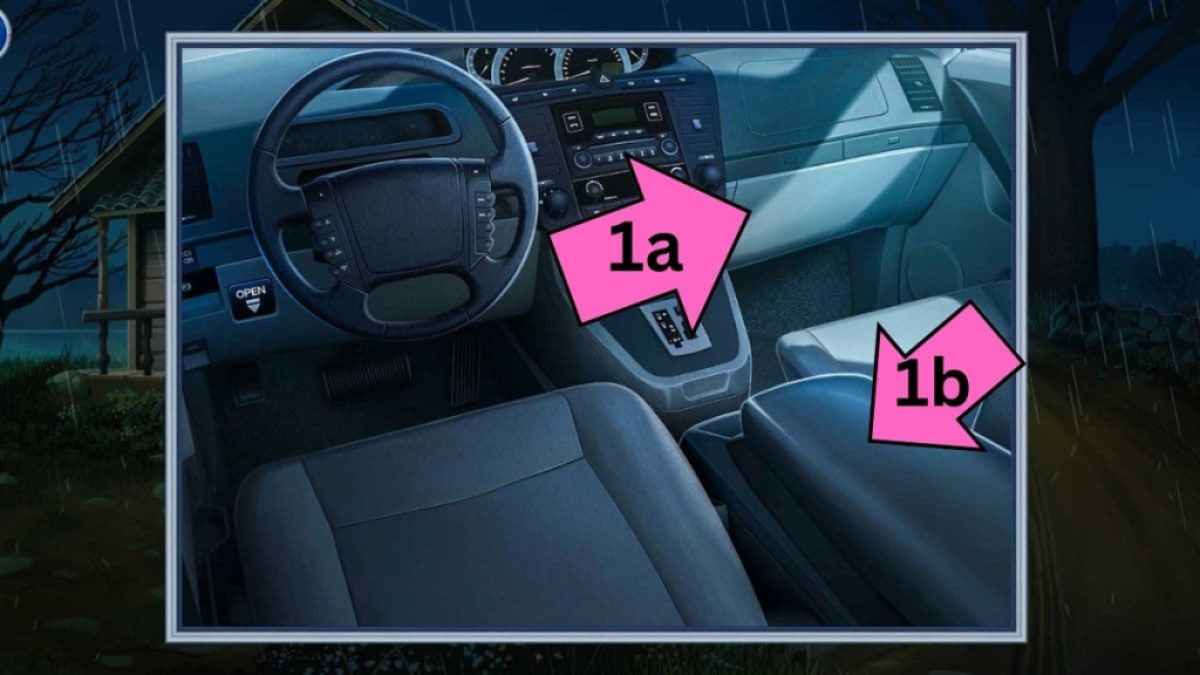
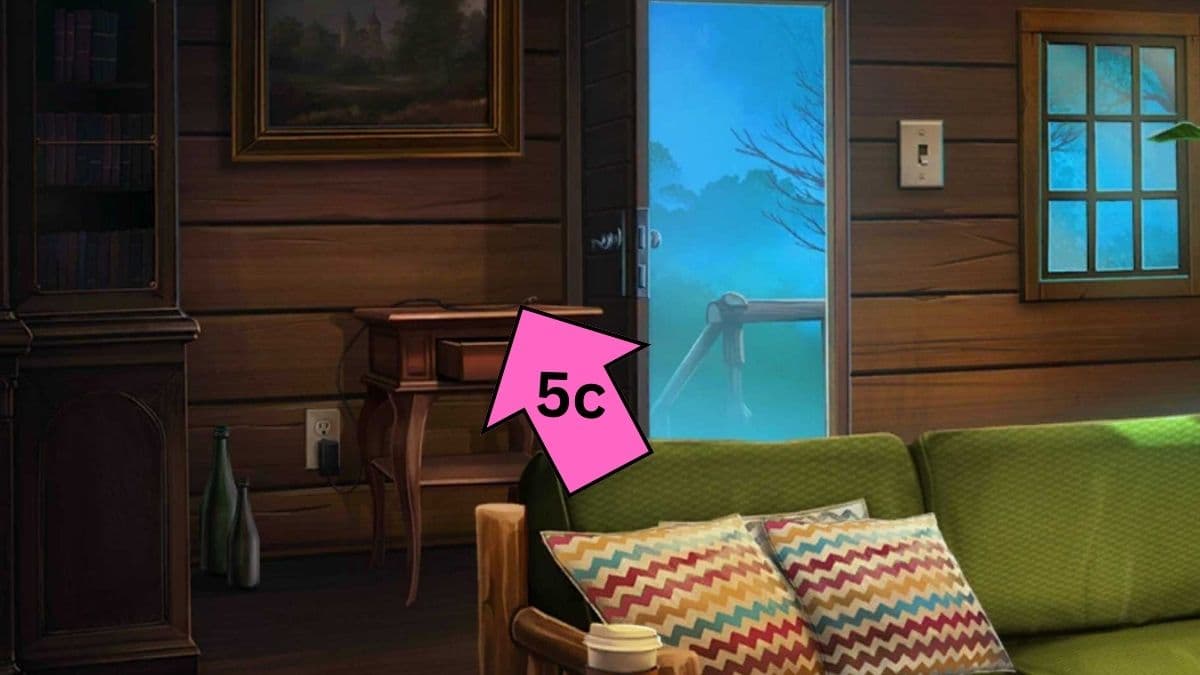
Click on the car, press the open button, and grab the flashlight (1a) from the glove compartment and a bobby pin (1b) from the center console. This is essential in any breaking and entering kit. Use the bobby pin on the cabin door to get in.
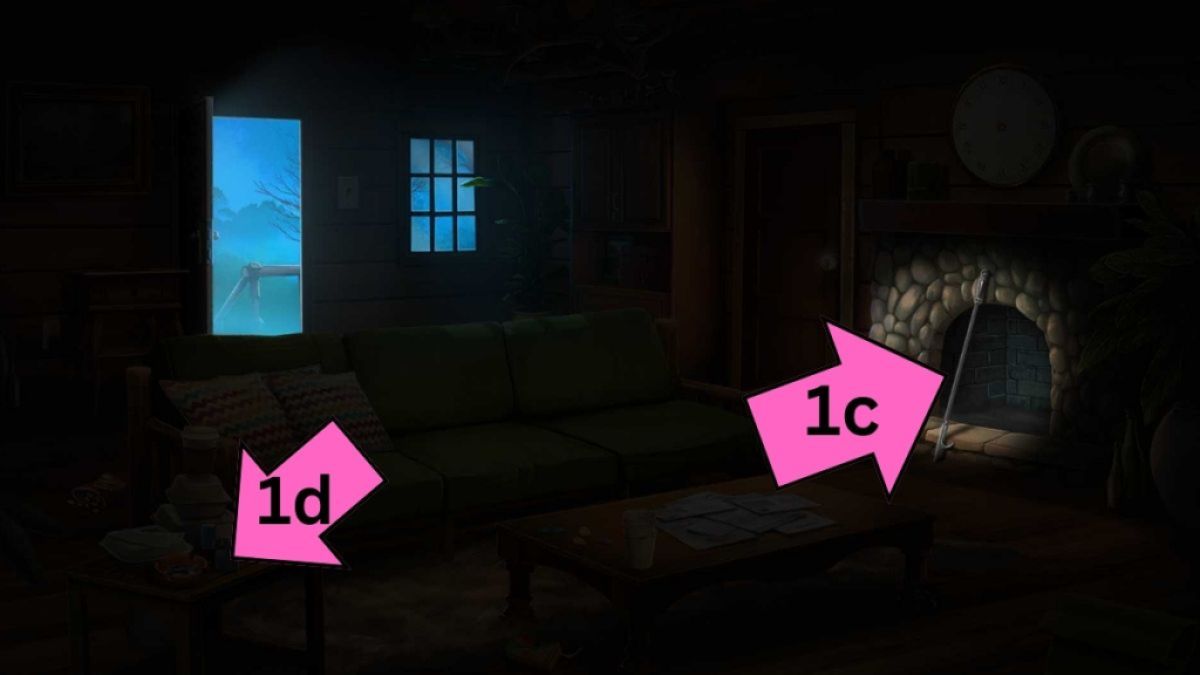
The lights are off in the cabin, so turn on the flashlight and start looking. Move the beam to the fireplace, where you will find a fire poker (1c). Kate wants to start a fire, so you must find everything she needs. Move the light to the table on the left and pick up a lighter (1d).
Go back outside and open the outside storage box (2a) with the fire poker. You'll find a hatchet and hedge clippers inside. With the hedge clippers cut down the overgrown bush to reveal Grandpa's old canoe (2b). This canoe holds memories, but you're cold, so you have to use the hatchet on it to get firewood.

Head inside and put the wood into the fireplace. Light it up with the lighter and keep snooping. On the coffee table, you will see a lot of overdue bills in Allie's name. Clear away all of the papers to find an album of summer memories. As you're looking through the photos, Allie will come back.
She complains about sitting in the dark, so you'll need to fix the fuse box outside. The stickers on it match with the stickers on the doorway of Allie's and Kate's heights Grandma and Grandpa recorded. These stickers are actually a password to the power unit outside. You need to go through the photo album for the year next to each sticker they share, and you'll figure it out. From top to bottom, the password is 624908.

Once you open it, you'll see that the fuses are all messed up. Rearrange them by using them all and making sure they are all green. Follow the image below to get it done quickly. Once the lights are on, get the full story from Allie, and at the end, she'll ask you to look the other way. She'll get a call from Charlie, her crook boyfriend, and go outside. Use this time to snoop some more to help her.

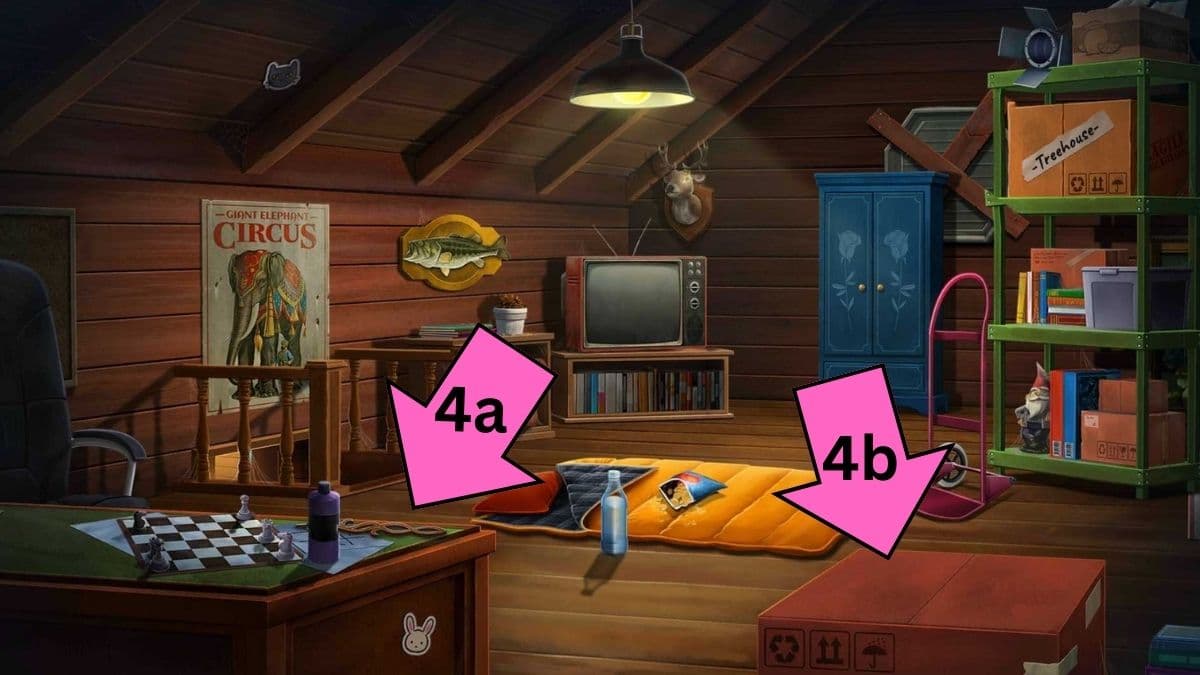
Check Allie's bag (3a) next to the door, and you'll find Murphy's ID. Allie needs it, but Kate decides to keep it for now. Make sure also to take the hour hand and Allie's keys from the bag, too. Use the keys to unlock the door to the attic (3b). Kate needs to reach the window in the back to listen.

Grab the second hand from the desk (4a) and a minute hand and drawer knob (4b) from the box to the right. Go back downstairs and add the knob to the drawer (4c). Take a wheel from it and go up again. Add the wheel to the hand truck (4d) and move the wardrobe (4e). Use the poker to remove the planks from the window.

Click on her car keys to set off the car alarm. She'll step away, but you can see the shadow on the garage that resembles clock handles. Go downstairs and replicate the shadows on the clock. It will open to reveal a hiding place with Allie's journal in it. You'll find that she has another gig planned, but you get interrupted by Charlie and Elias showing up.

Kate will hide in the attic and watch as Charlie (who looks just like Murphy) and Elias arrive. Allie will get in trouble since you took Murphy's ID, and they'll take her with them. You need to find something to access her emails and find Allie.
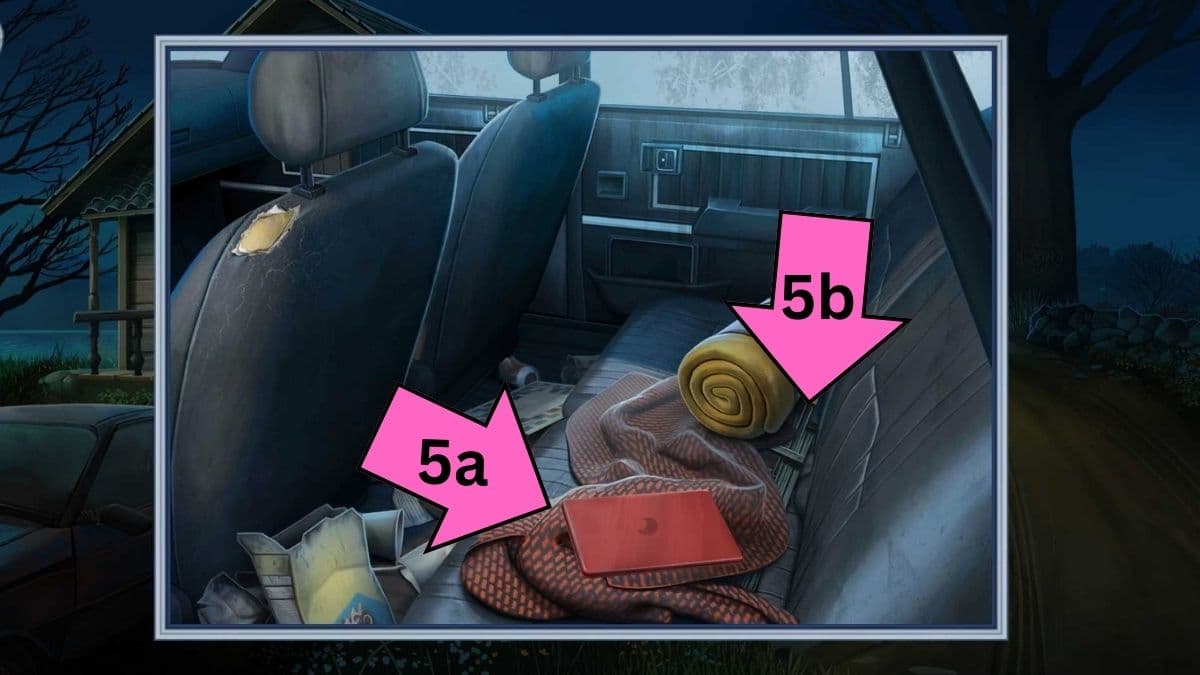
Go outside to Allie's car. Use the poker to open the back door and find her laptop (5a), but it's dead. Keep searching in the back seat until you get to the stepladder (5b). Pick it up and head back inside. Place Allie's laptop on the charger (5c) next to the side table, but you need to unlock it first. The password is the Magic Quest high score, an old game they used to play and which you now need to find.
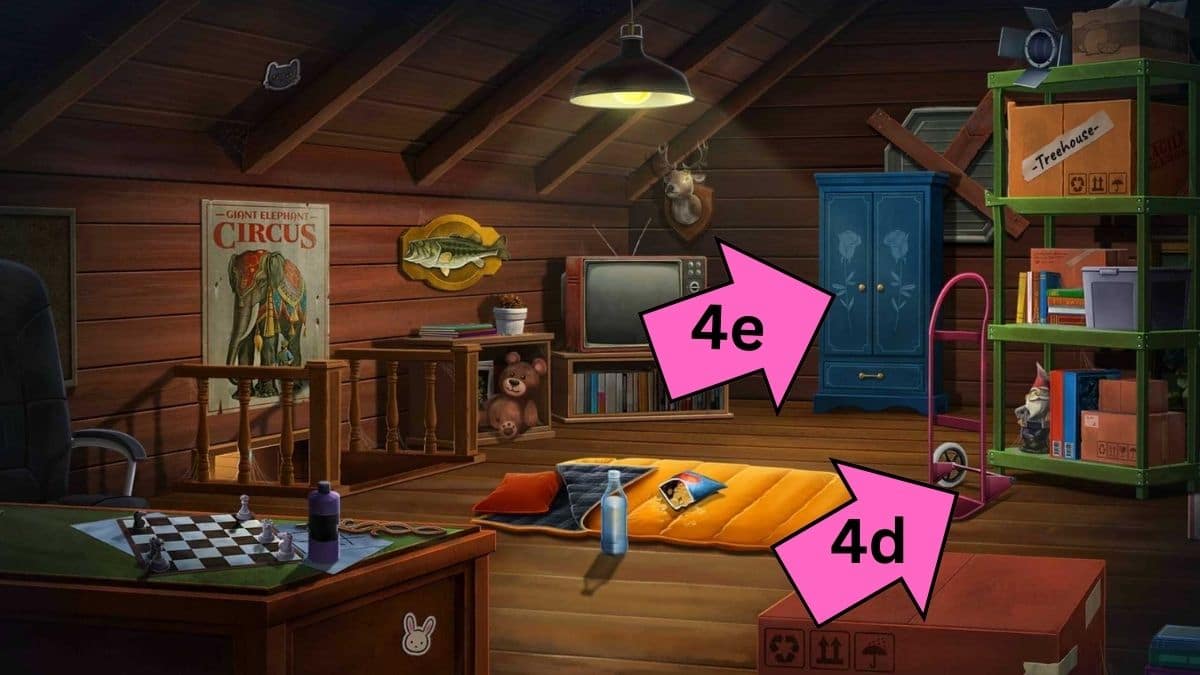
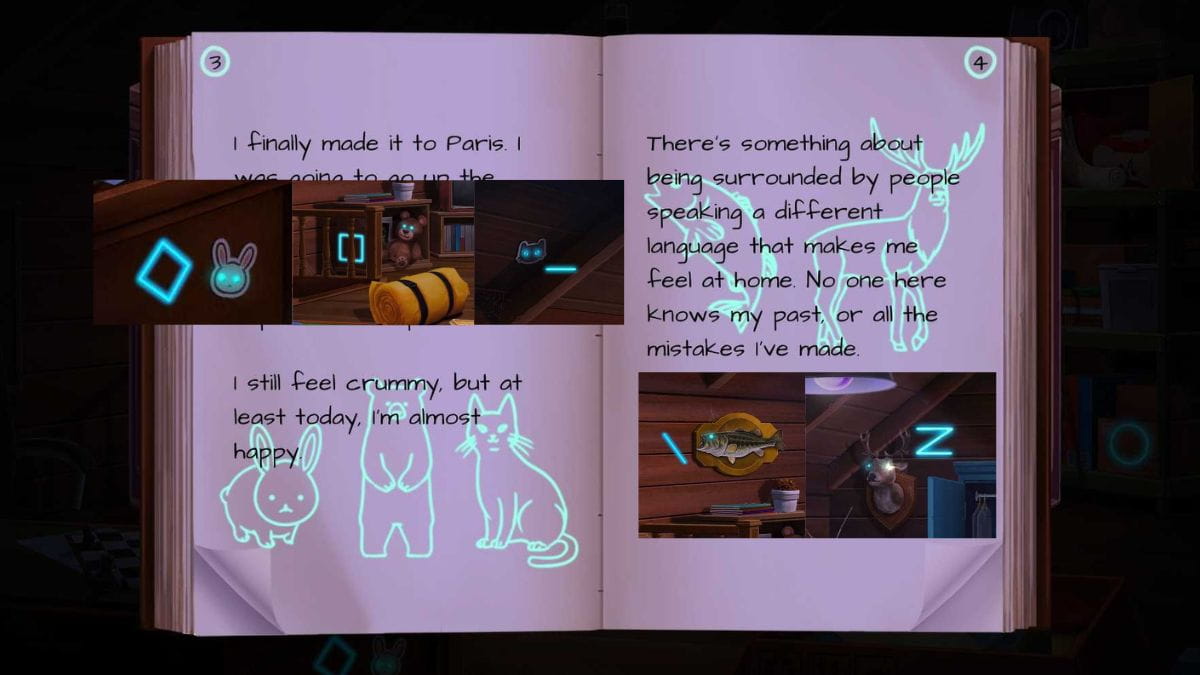
Use the stepladder in the attic to reach the treehouse box (6a). Open it with the poker and grab a black light bulb and a game controller. Replace the bulb in the overhead light (6b) and turn it on. You'll see many glowing drawings and arrows that point underneath the sleeping bag (6c).
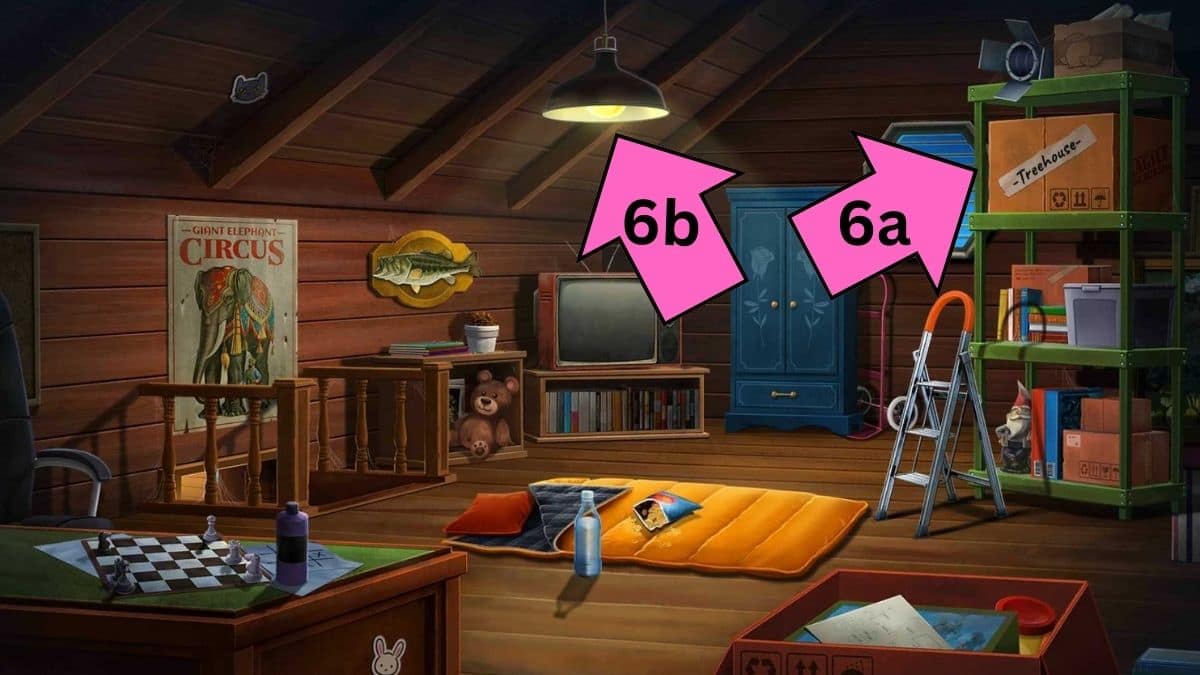
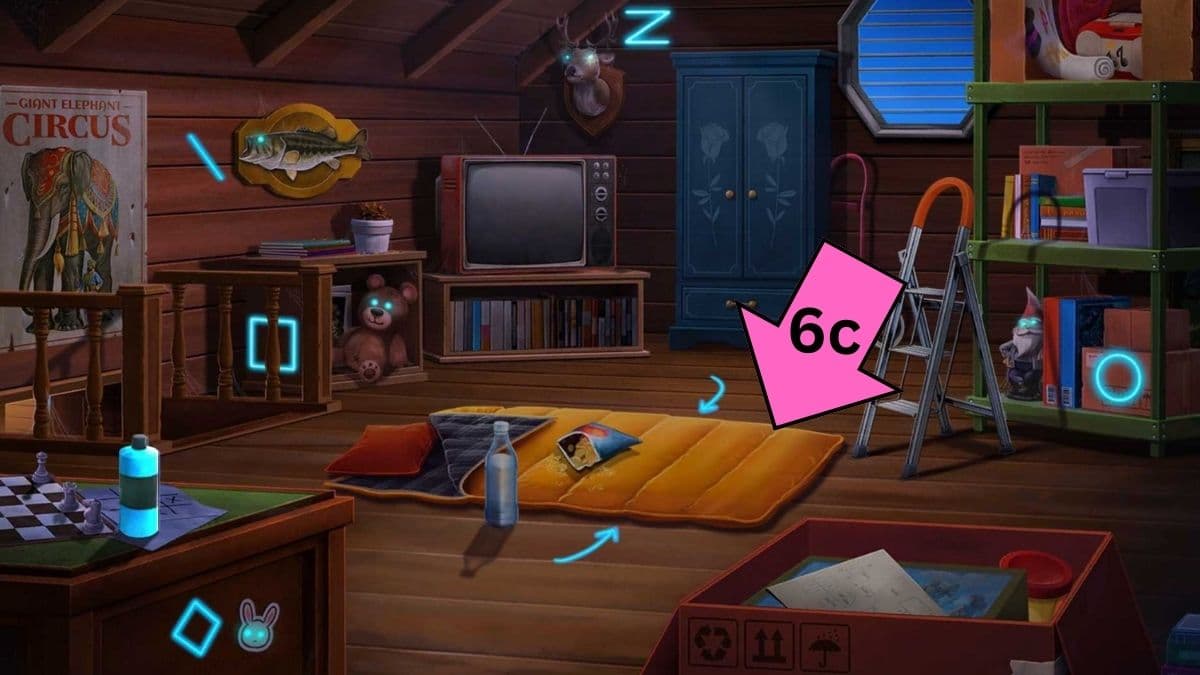
Roll up the sleeping bag and lift the two weird planks with the poker. You'll find a box with a weird lock combination on it. You have to check the journal, and you'll see drawings under the black light. We need to combine these into the password combination, like in the image below. You'll find a cabinet key and the Magic Quest cartridge inside.

Head downstairs and unlock the cabinet to grab the game console. Connect it to the TV in the attic and put in the cartridge. Play the game until you defeat the level and get a high score, and here's how to do just that. This will be a long one.
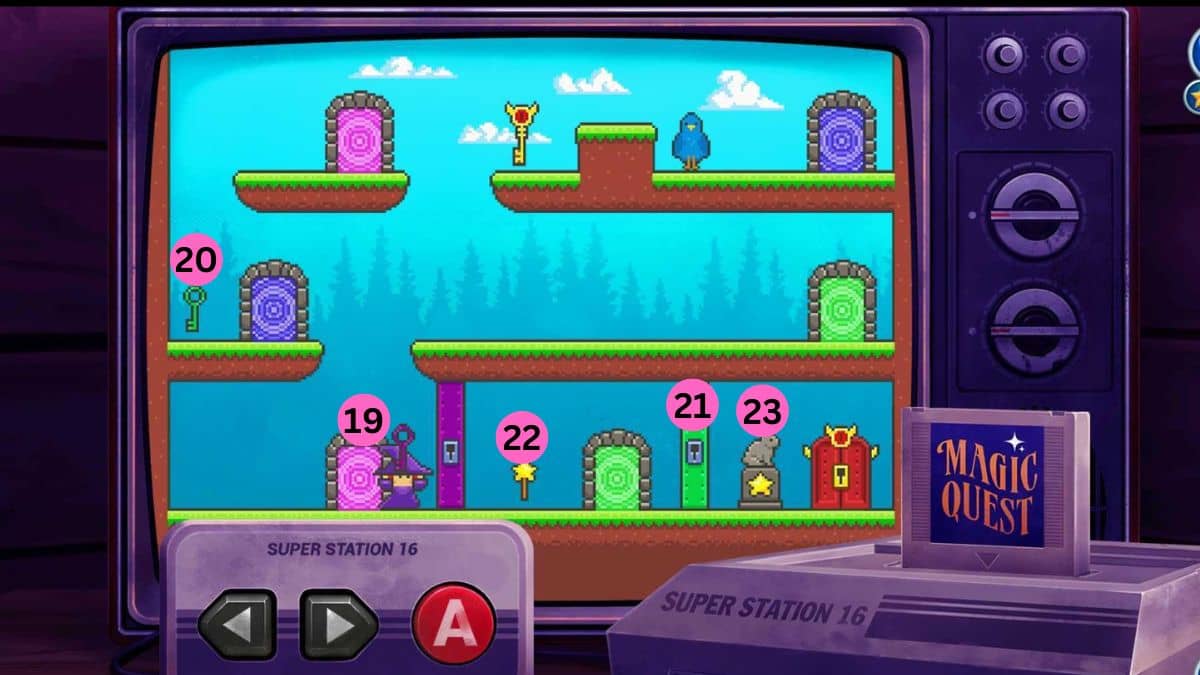
- (1) Jump down to the blue bird.
- (2) Fly across the gap and go through the purple teleport door.
- (3) Grab the magic wand.
- (4) Go back through the purple teleport door.
- (5) Jump down and magic the bunny statue away.
- (6) Grab the orange key.
- (7) Use the pink teleport door.
- (8) Jump down to the middle platform to unlock the orange wall.
- (9) Go back to the lowest platform for the magic wand.
- (10) Use the pink teleport door to get to the highest platform.
- (11) Jump down to the middle platform and magic away the bunny statue.
- (12) Use the green teleport door.
- (13) Grab the yellow key.
- (14) Use the green teleport door.
- (15) Jump down and use the pink teleport door.
- (16) Unlock the yellow wall on the highest platform.
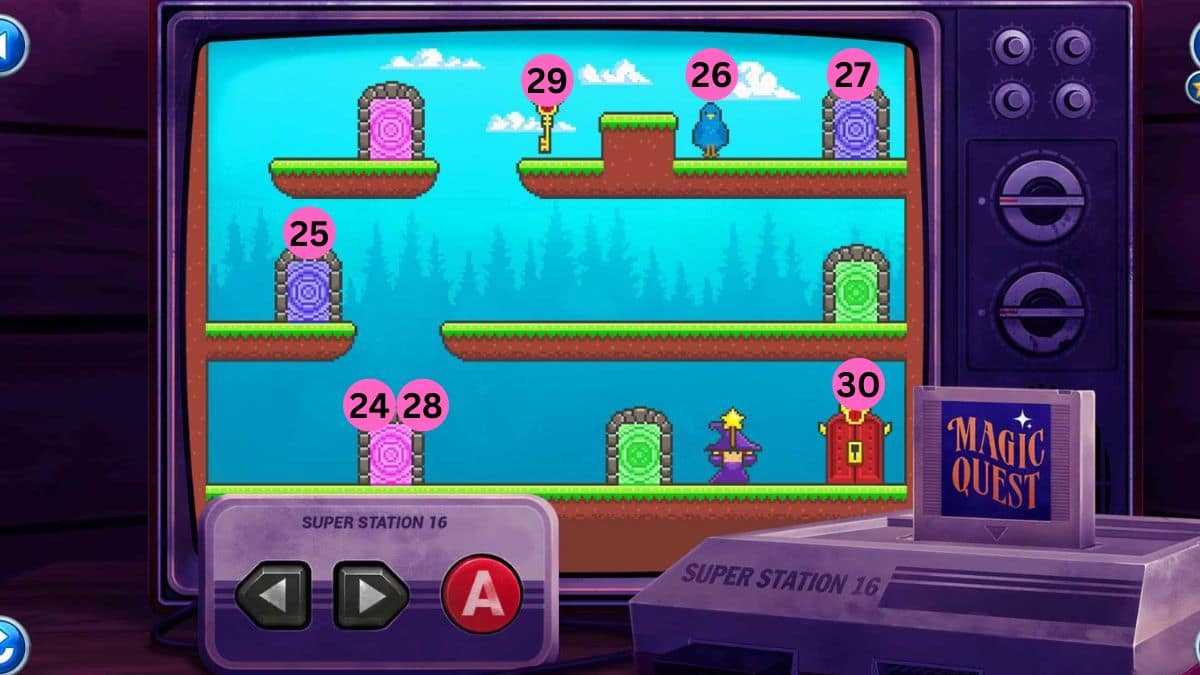
- (17) Fall down with the magenta key to the lowest platform.
- (18) Unlock the magenta wall.
- (19) Go through the pink teleport door.
- (20) Fall down to the left middle platform to get the green key.
- (21) Unlock the green wall.
- (22) Grab the magic wand
- (23) Magic the bunny statue away.
- (24) Go through the pink teleport.
- (25) Jump down and go through the purple teleport.
- (26) Grab the blue bird
- (27) Go through the purple teleport.
- (28) Jump down and go through the pink teleport.
- (29) Fly across to grab the final key.
- (30) Fall down and unlock the final door.
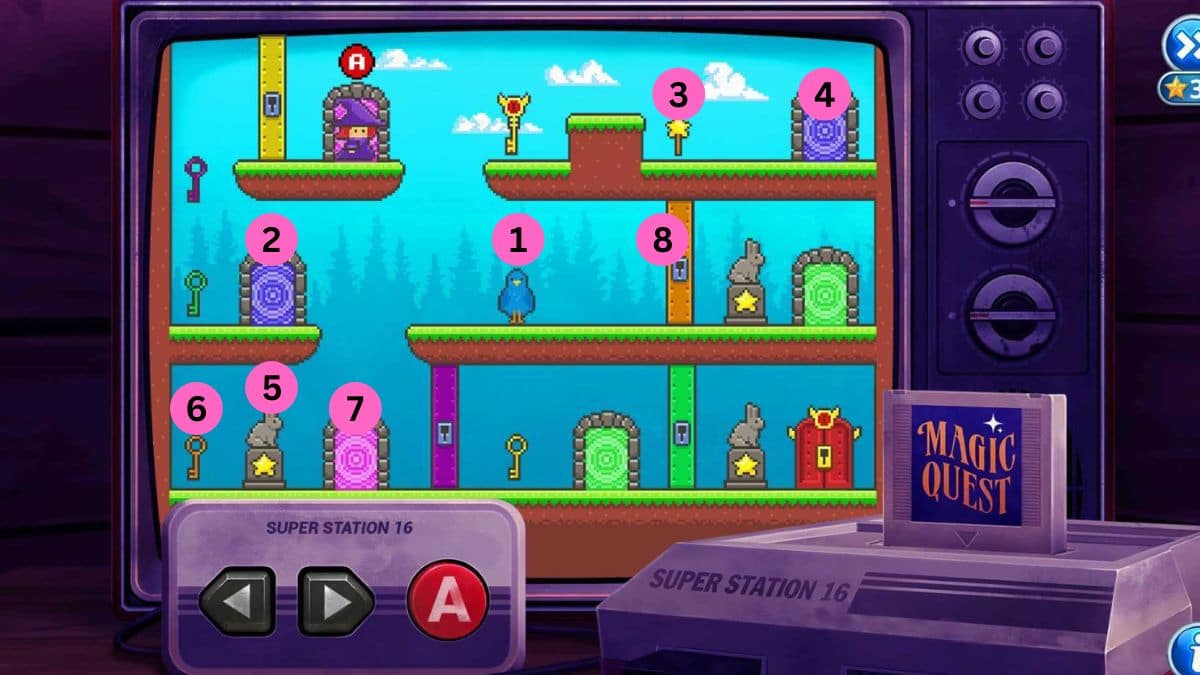
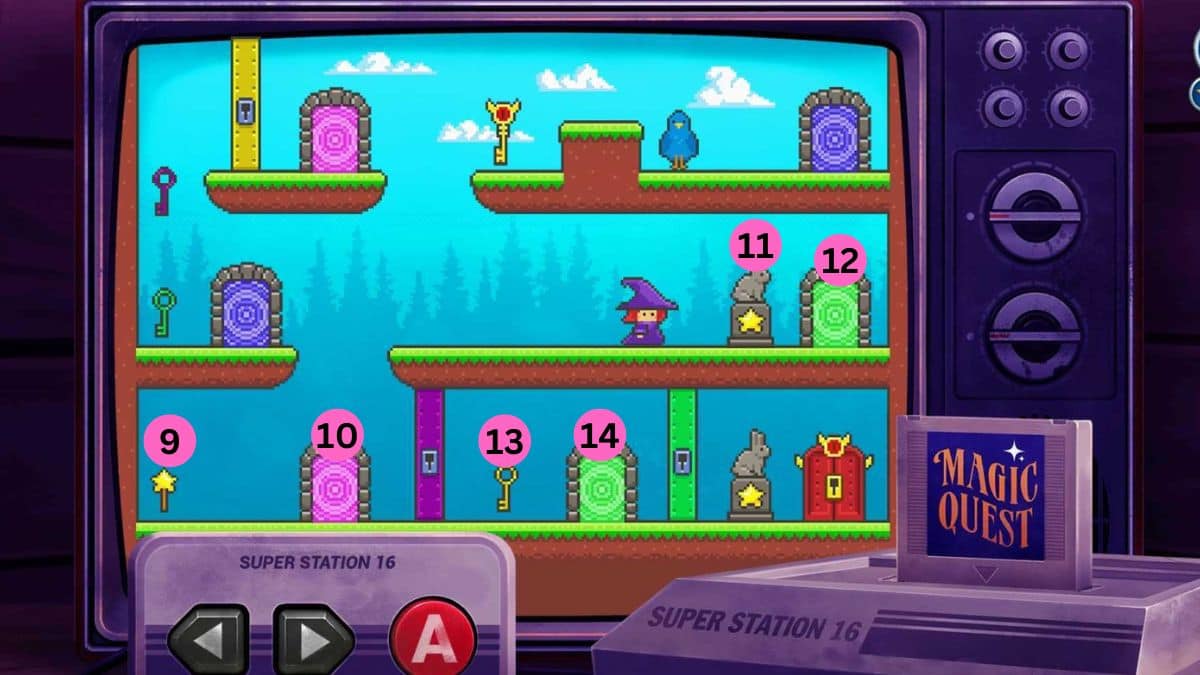
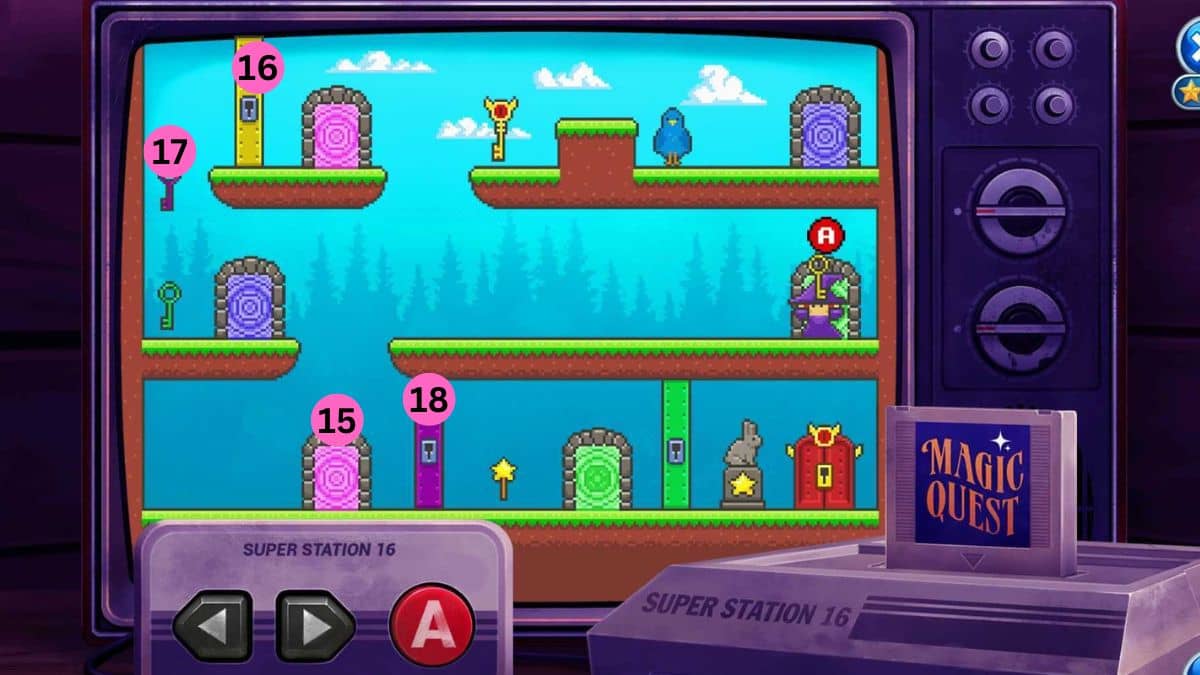
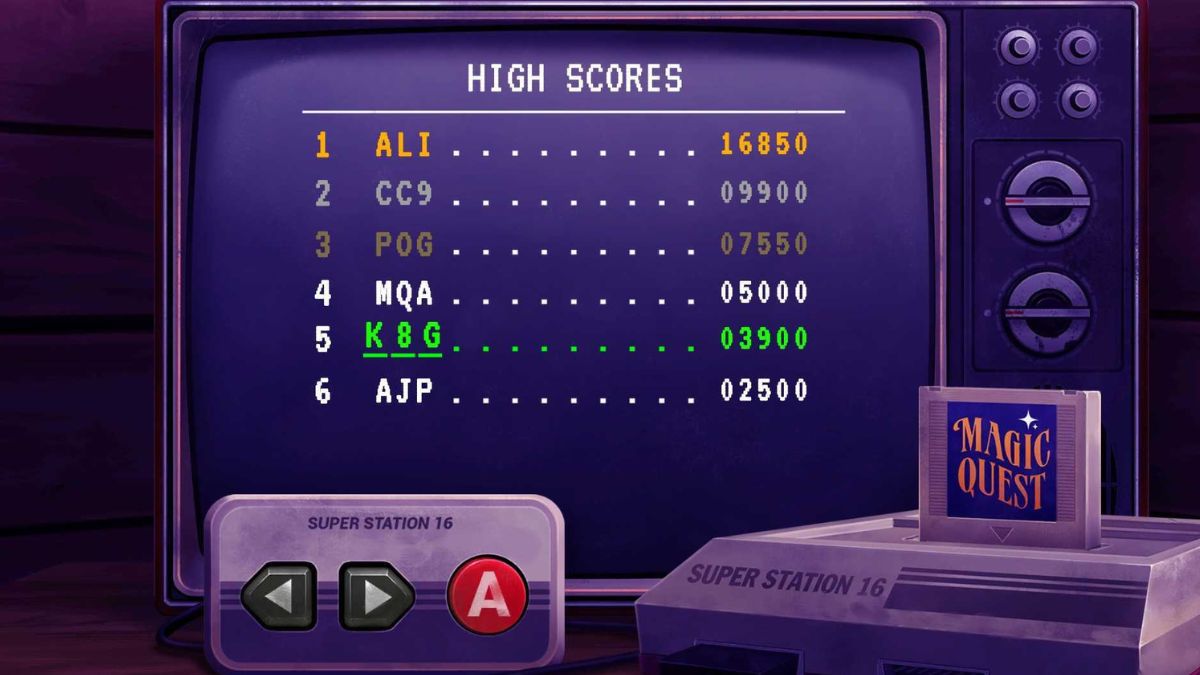
You'll see that Allie's high score is 16850, which is the password for her laptop. You'll find that the next gig is at Remington Yacht Club through her emails and messages. Call Murphy, and he'll meet you in the next chapter.
Chapter 5
The yacht party is a private affair, so Kate and Murphy have to find an email with a ticket. Charlie is outside, too, and Murphy will track him while Kate tries to find a ticket. The guy and his wife on the dock are supposed to go to the yacht party. The guy has the invites on his phone, so we want to steal that from him.
Head to the club first. You can grab the harpoon from the wall (1a), then head back with it to the dock. Break the already damaged plank (1b) and pick it up. Use the plank to lean it onto the boat and get on it. You’ll grab a propane tank (1c), which you can now use on the heater (1d) behind the man.
However, you are still missing the igniter. You need a lighter or something. Go back to the club, and you’ll see a waiter who’s supposed to be handing out hors d'oeuvres, but he is confused about which one goes to which customer. He has a lighter, so if Kate helps him, she can turn on the heater.
Related: Machinarium Walkthrough
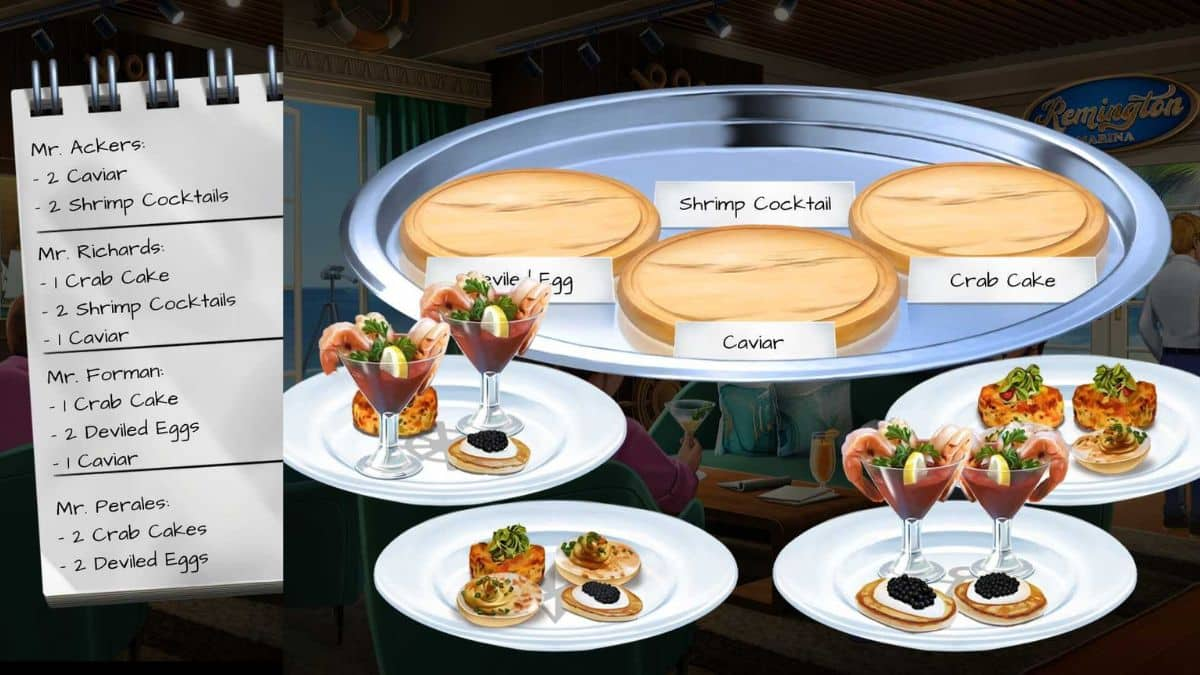
The waiter will give us the notepad to figure out exactly what goes to whom. We can do that by examining the yachts in the display case and connecting the symbols to the symbols on the plates.

The waiter will meet you outside once you help him sort out the food. He will give you a lit cigarette with which you will turn on the outside heater. The wealthy man will start feeling really hot since he is sitting right in front of it. He will leave, and his wife will follow him.
Take the phone from the jacket (2a) he left behind, and the telescope (2b) the wife left behind. Put the telescope on the tripod in the club, and you’ll get a look at the buoys. Based on the pattern of the green rope connecting them, you will see the password for the phone.
However, all of this trouble over getting the ticket was for nothing, as Murphy won’t show up, and Kate will be forced to stay on the pier to look for him. He is in the club, where he’ll let Kate know that Charlie also wasn’t on the yacht, so they decide to keep tailing him.
You’ll follow Charlie to a different dock, where you’ll see him loading bags onto a boat. He’ll get a text and head back up to the pier. Kate and Murphy now have the time to snoop around his boat.
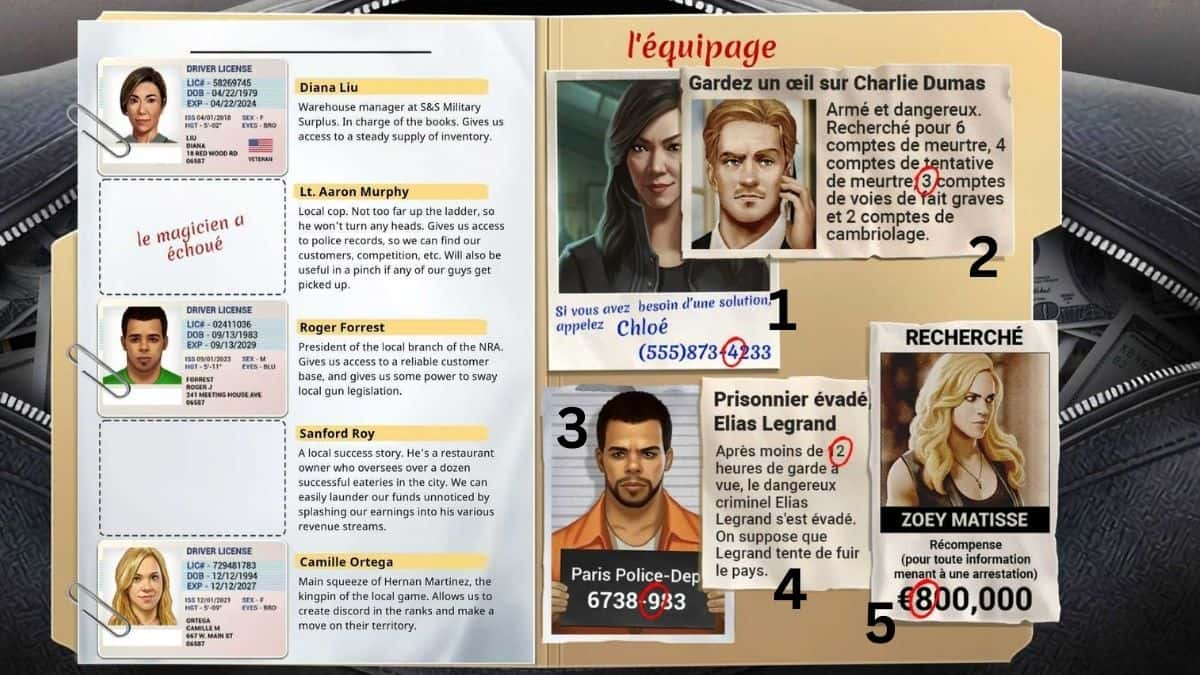
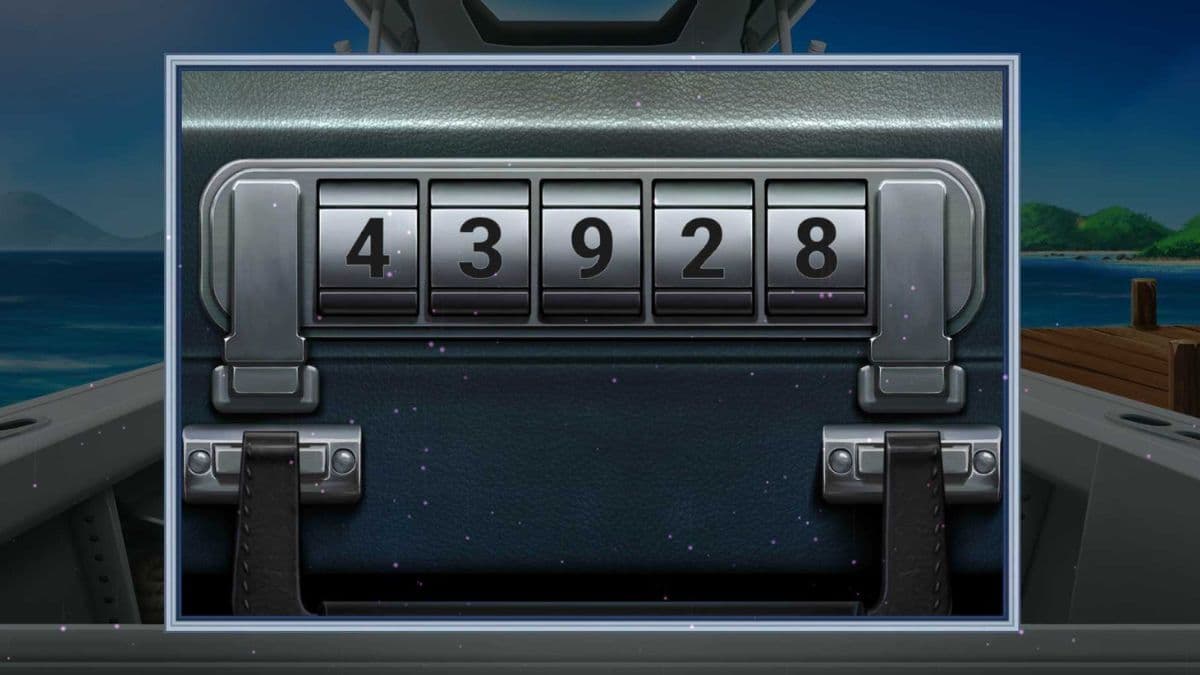
First, let’s head to the boat and look through the gym bag (3a). You’ll find loads of cash in it. You’ll also find a manilla folder with a lot of IDs and newspaper clippings in French. There are numbers circled on the clippings, and you'll use this combination to unlock the briefcase (3b). The order is based on the ID order of the lookalikes to the left.
From the papers in the briefcase, you’ll find out they are trying to steal an ID for Elias. As you’re reading through the documents, Charlie will show up and try to attack you, but Murphy saves you by knocking him out. He also drops a phone (4a) when Murphy hits him, which you can check out.
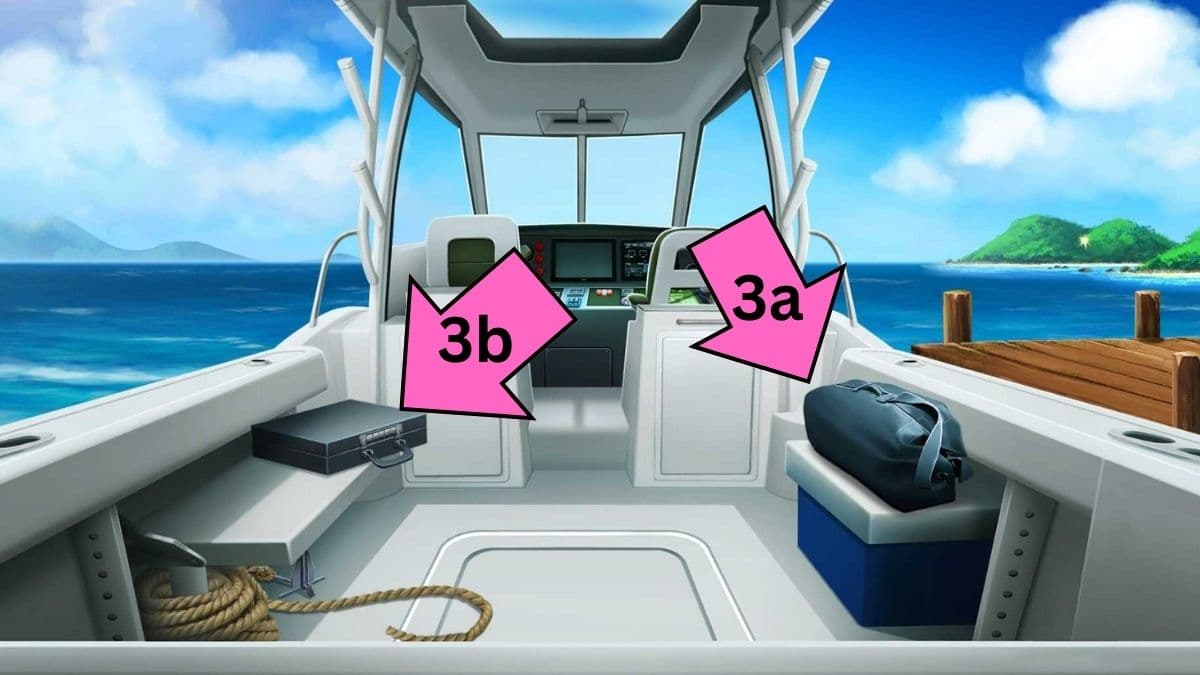
You’ll find out they are trying to kill Allie, so the goal is getting to that yacht. Don’t forget to grab the crowbar from the floor (4b), it will come in handy, as well as a pocket square from Charlie (4c). Kate tries to start the boat, but almost no fuel is left.

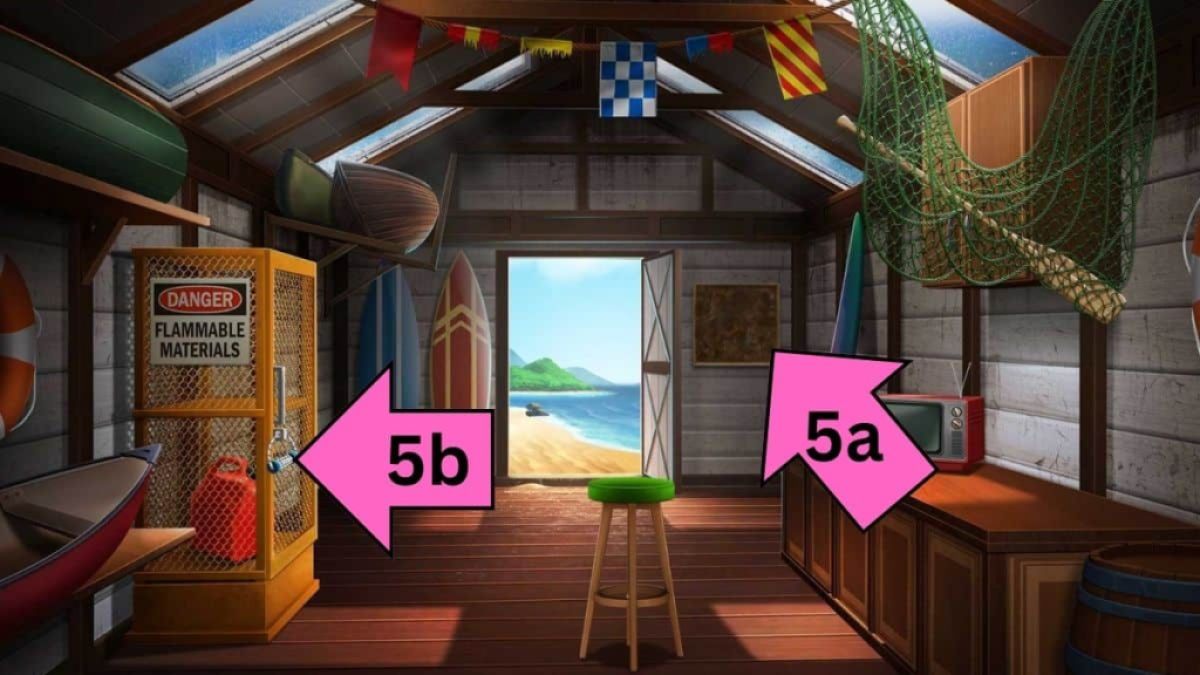
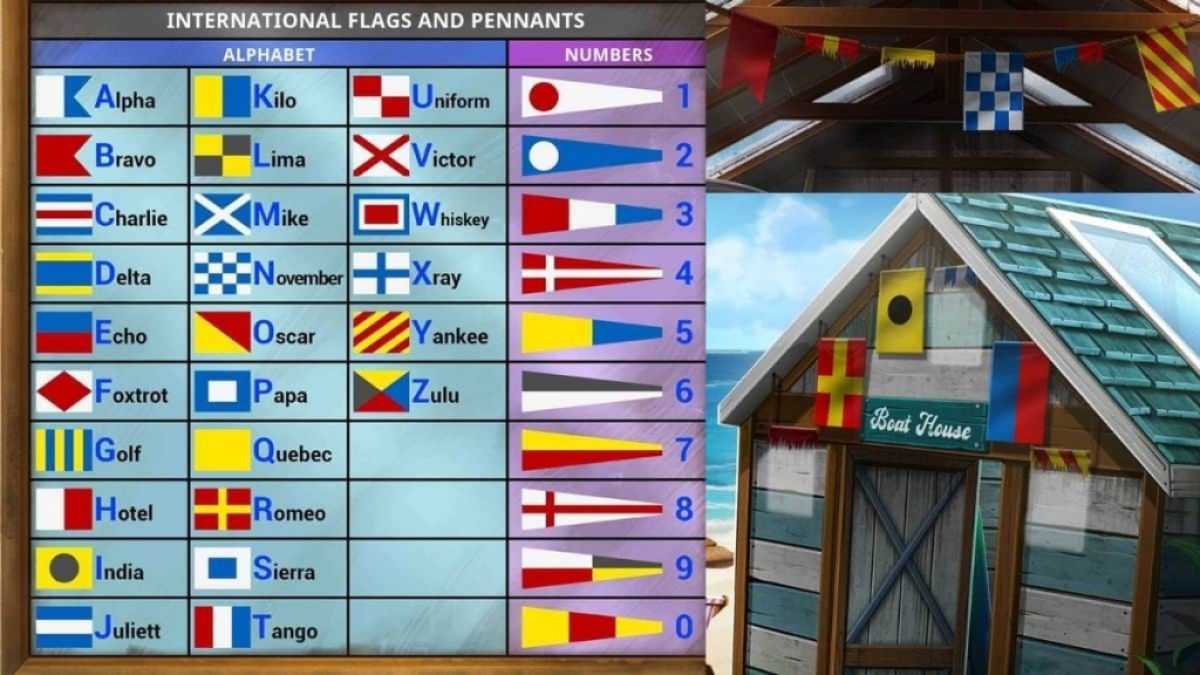
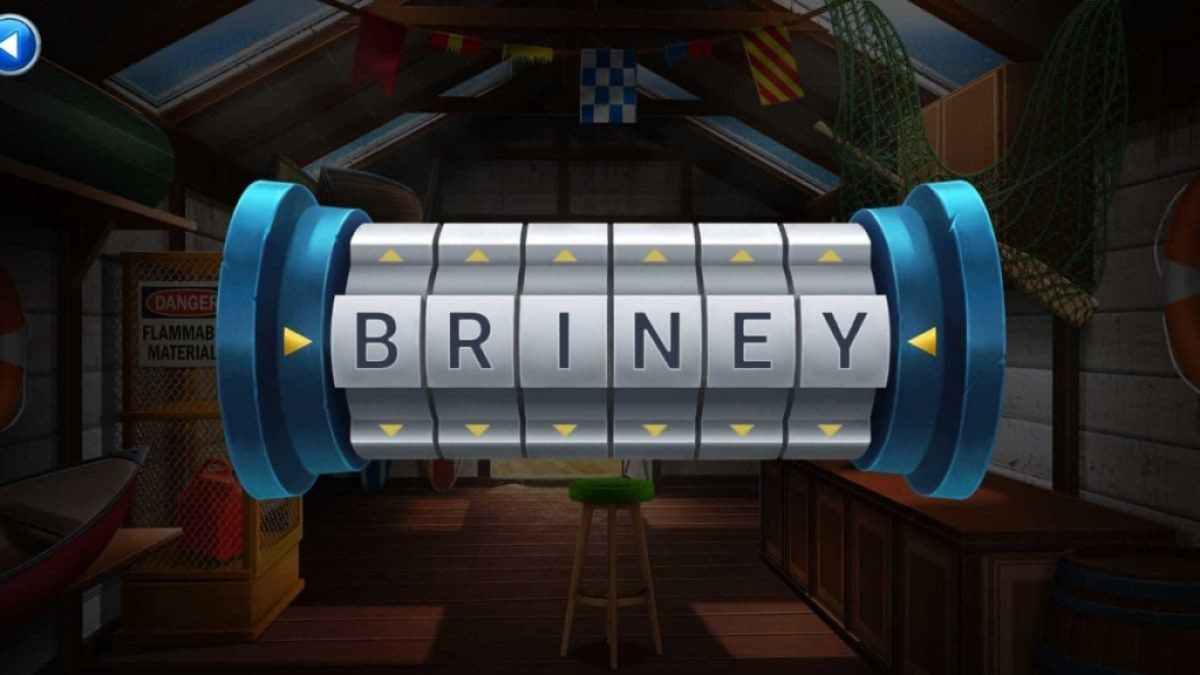
Go back to the beach to look for more fuel. Use the crowbar to open the shed door and get inside. Use the square to clean the board of flags and pennants (5a). You need a letter password to open the cage (5b) in the shed, and you’ll find it based on the flags hanging from the rafters.
Take the gas can and head back to the boat. Refuel it and start the ignition, but Charlie will go for his ankle knife and hit the boat console. Murphy and he will fight, but you need to grab the knife from the floor quickly and cut up the rope so you can restrain Charlie.

The boat console is damaged pretty badly, with some of its chips being fully destroyed. You have to find more old electronics, as they will have chips, and we’ve seen a few in the area. Head back to the beach and into the shed, ignoring the radio for now.
Push the stool (7a) towards the cupboards to reach and cut the net (7b). The ore will drop, allowing you to open the top cupboards (7c). Inside, you’ll find a red toolbox with a screwdriver in it. Grab it and pick up the oar, too.
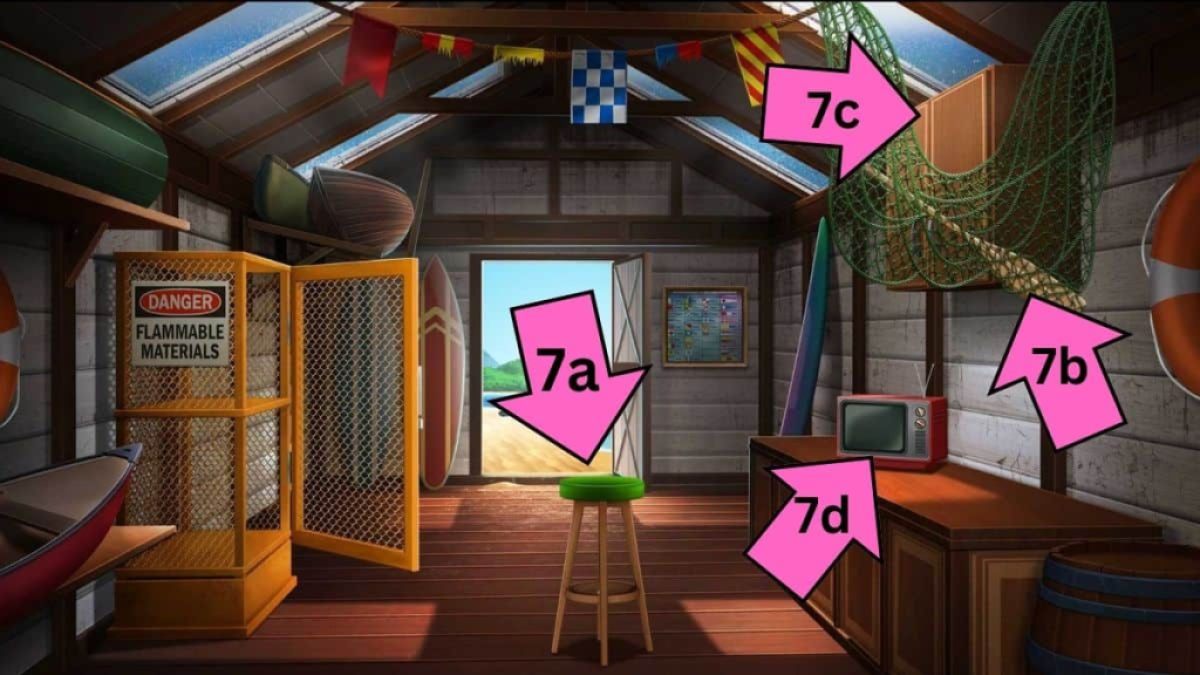
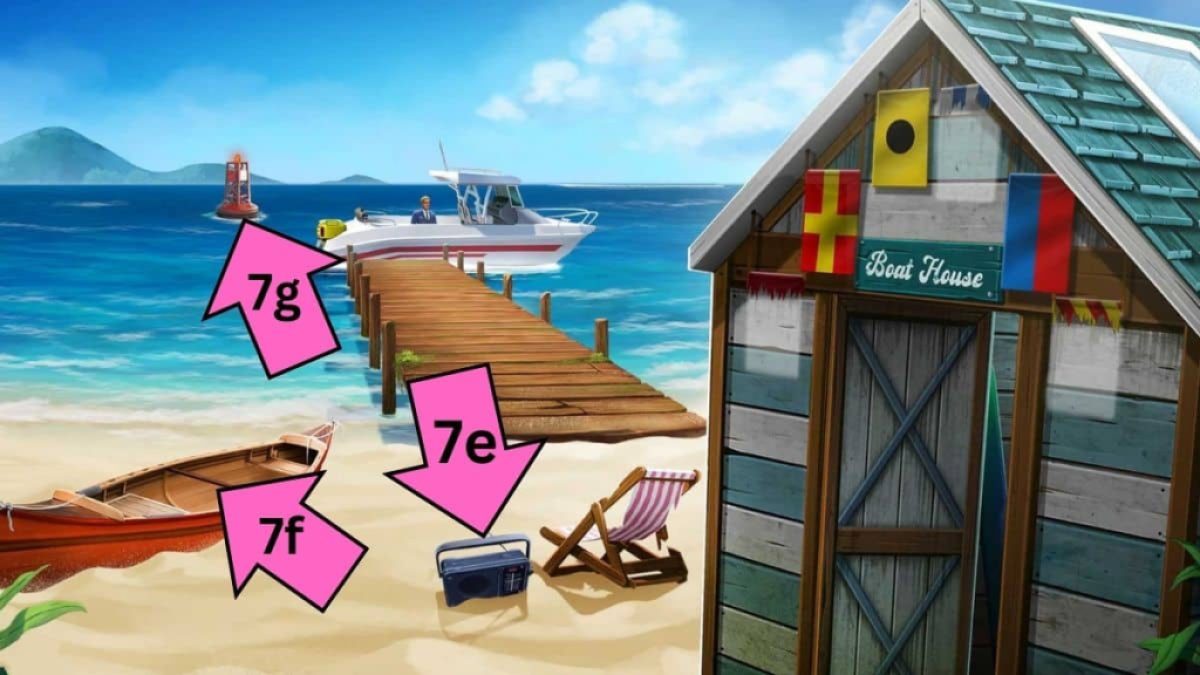
Now, turn the TV around (7d) and unscrew the back to grab a chip. Do the same to the radio (7e) next to the beach chair. Finally, use the canoe and the oar (7f) to reach the buoy (7g) and grab the last chip from it. Let’s place the chips in the right places. Once you’re done, you can head to the last chapter to save Allie.

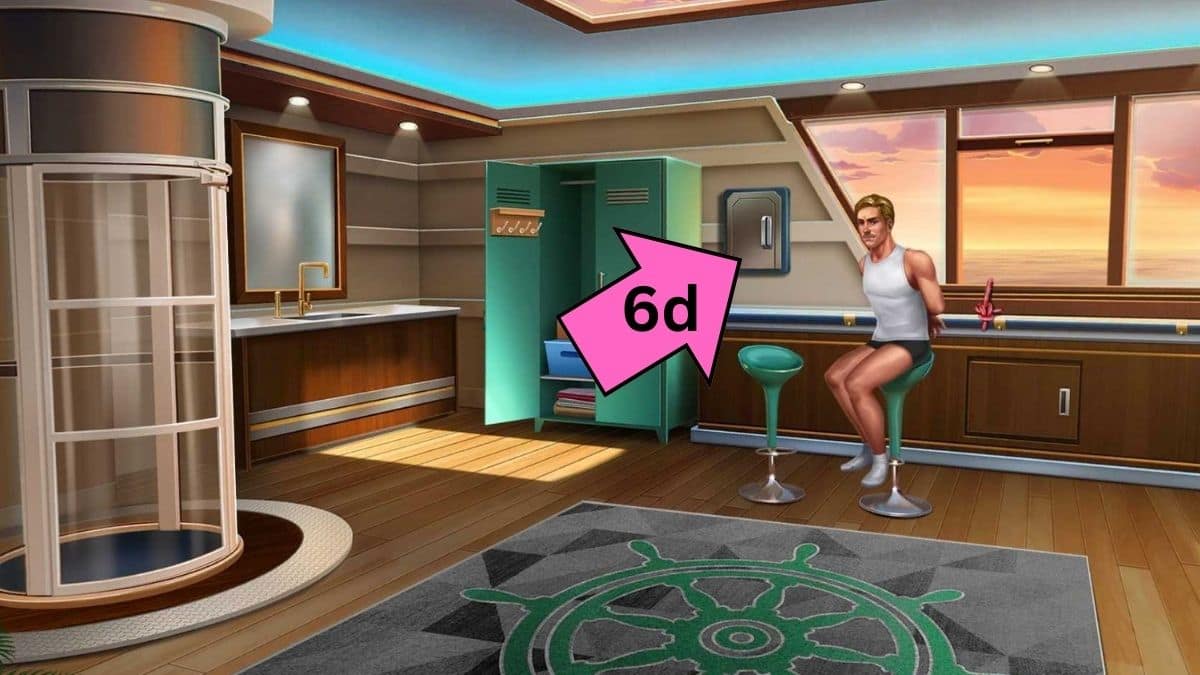
Chapter 6
Kate and Murphy make it to the yacht. Head up to the top deck where a masquerade party is happening, so the two need to find masks so they don't stand out. You meet the same bouncer (1a) from the club and convince him to give Murphy his mask if you bring him some wine.
Click on the chest next to Harry (1b) to grab one mask, so all we need is one for Murphy. Go to the yacht bar (1c) to get wine, but you need a ticket. You need to head back down to the boat to grab Charlie’s phone for his ticket.
Go with the phone to the yacht bar and grab the wine, then give it to the bouncer in exchange for his mask. With the masks on, go to the crowd of people (1d) to the right and start asking about the magician. Once everyone is out of the way, you’ll see Allie at the railing with Elias.

Elias will message Charlie, so you’ll have to use Murphy in disguise to get Allie to leave with you. Go to the lower deck to take Charlie’s suit. However, just as you are doing this, Elias will come down the elevator. However, that isn’t him but Roy, the owner of the yacht whose ID the criminals want to steal.
Luckily, they all manage to hide without Roy noticing, but now Kate and Murphy have a plan to access the elevator. The card for it is in Roy's breast pocket (2a), so you need to figure out how to get it. Click on the bar to grab another glass of wine, but Charlie is a Bronze-level ticket holder with a one-drink limit.
You’re interrupted by a frantic woman (2b) looking for her necklace. Kate promises her she will keep an eye out for it. Open the ice box (2c) behind the woman to grab a corkscrew. You can use it to open the locker downstairs (2d). Pick up the boat hook from inside and use it to reach a valve (2e) the necklace is hanging from (how it got there is anyone’s guess).
Go back up the stairs and give it to the woman; she will get you another wine in return. Approach Roy, and Kate will spill the wine on his shirt. She will steal his elevator card while helping him clean the spill. Insert the card and go to the upper deck with Charlie.
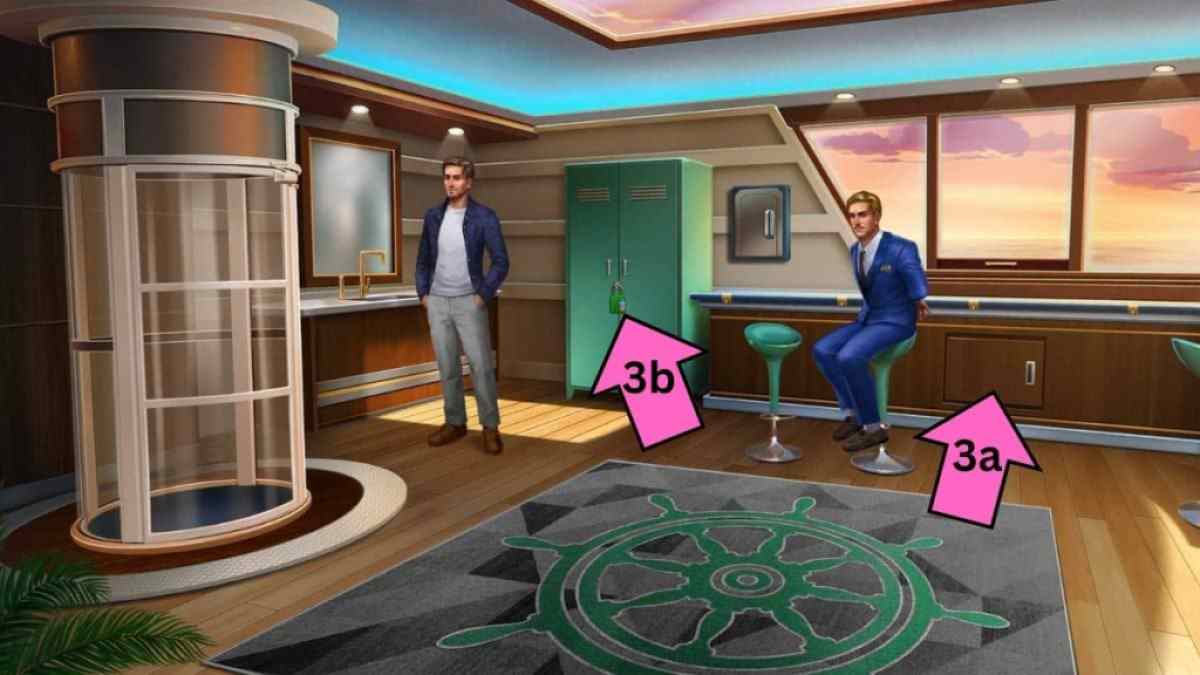
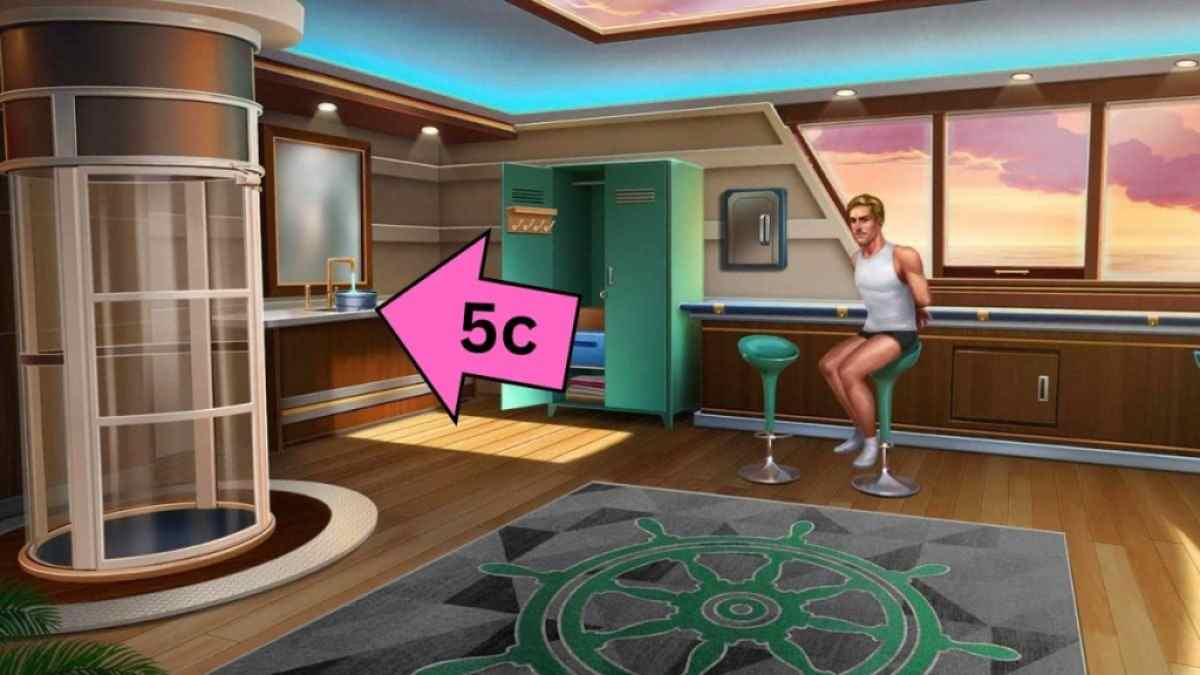
Now, you need to get Murphy ready. Open the cupboard (3a) next to Charlie and take the bottle of bleach. Spray it on Murphy’s hair to make him blond (not how it works and really not safe practice, but it is an emergency). Let’s open the green locker (3b) next. The lock is based on symbols that can be found on each of the floors, starting from this one.

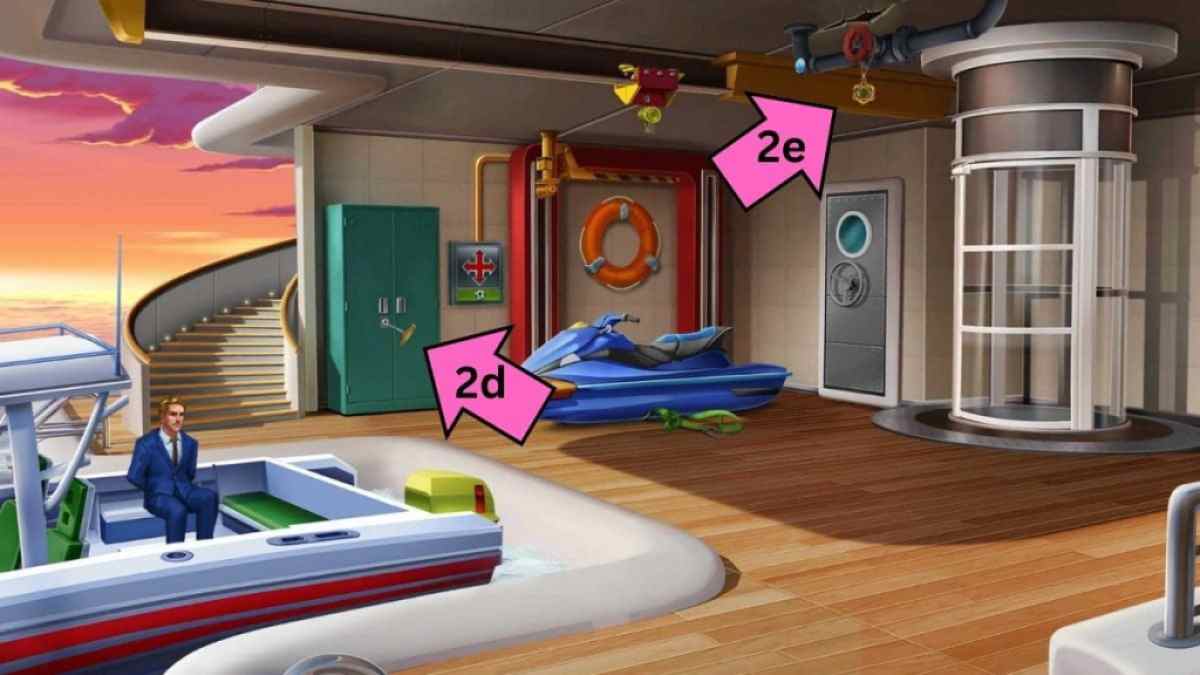
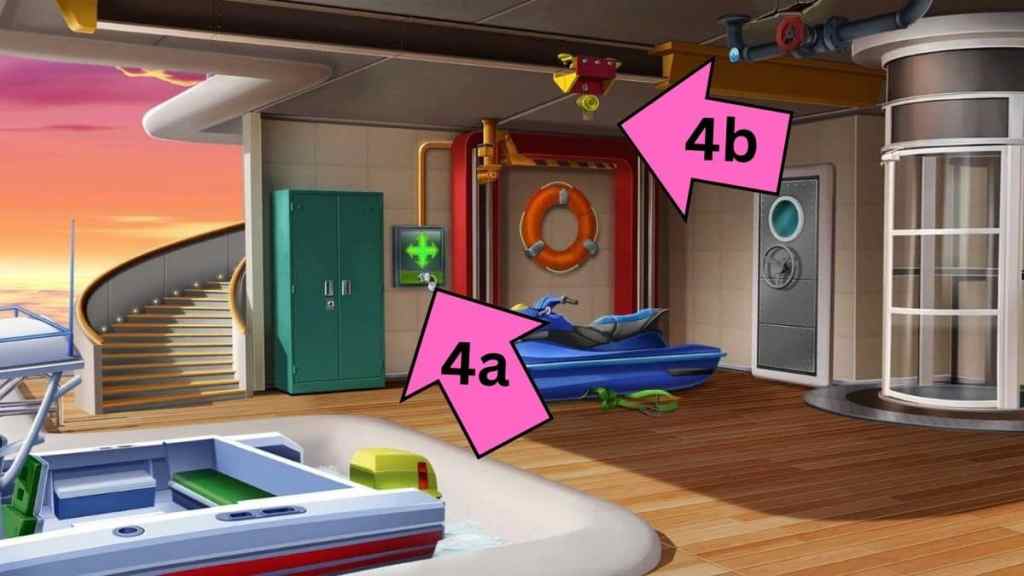
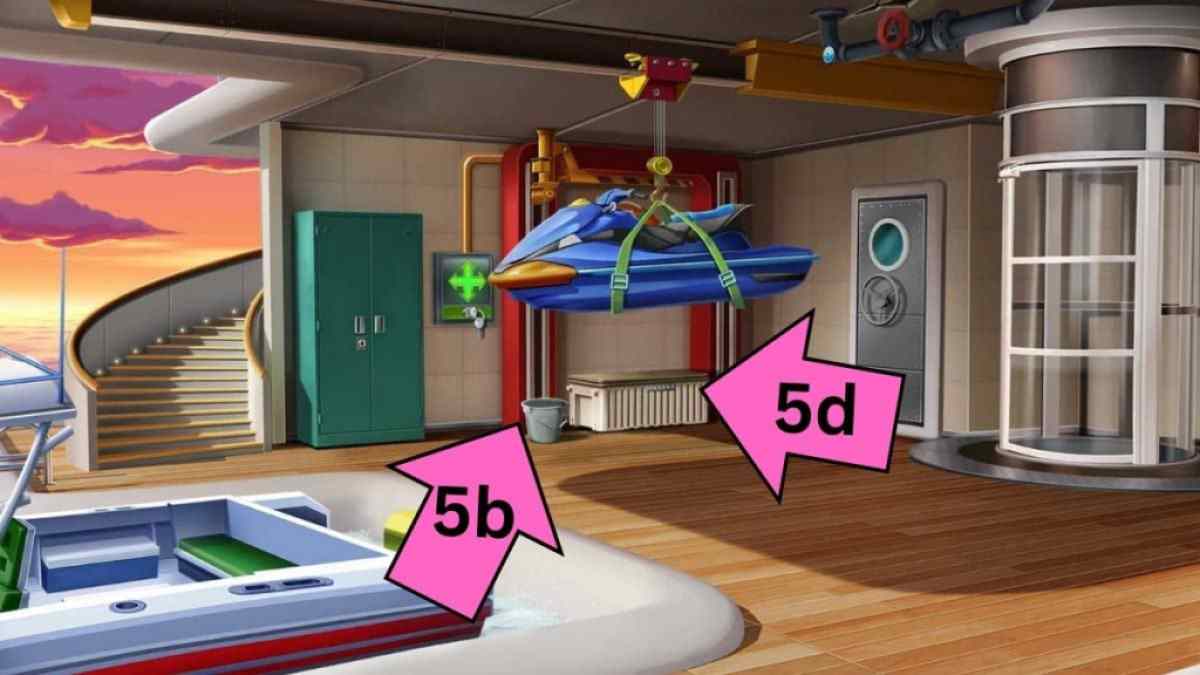
You’ll find a lift key and shaving kit inside it, just what Murphy needed. After he shaves, go back down to the lower deck and use the key on the box (4a) to try and activate the lift above the jet ski. It’s missing a hook (4b); we need to find it.
Go back up to take Charlie’s clothes and then go to the deck where the party is happening. However, Allie has to do the show, so Murphy can’t get her to go with him yet. You will discover that Elias plans to kill both Allie and Roy after the show, so you must act fast.
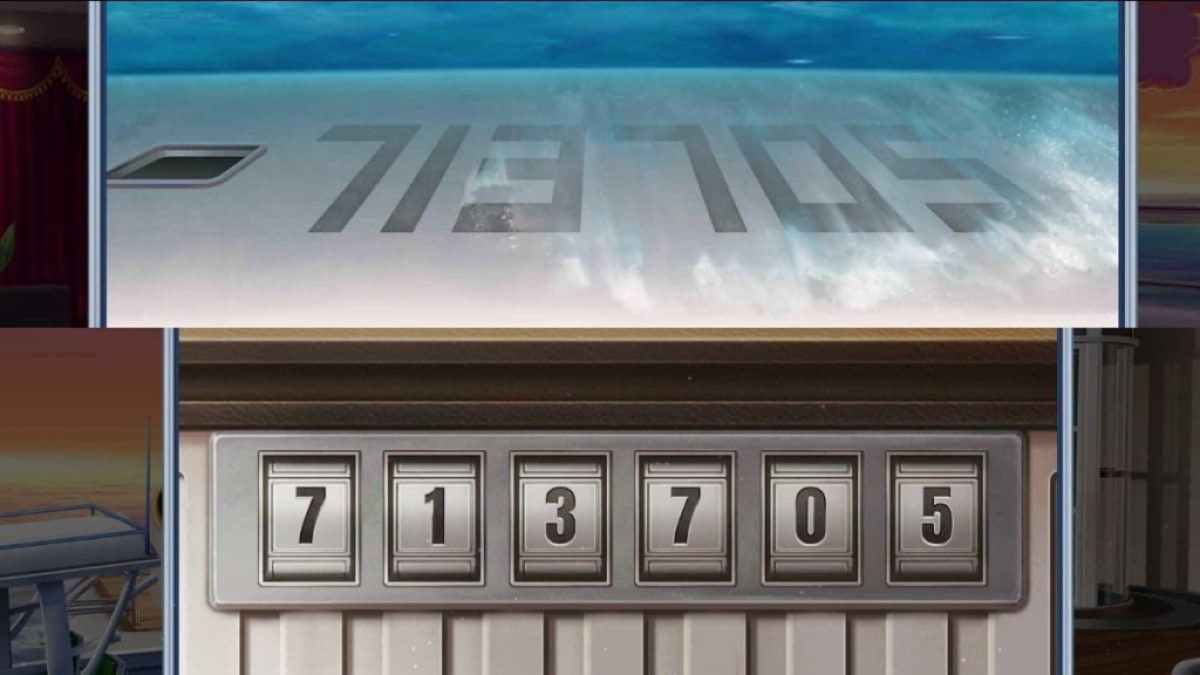
Click on the railing where Elias and Allie were standing to grab a hook (5a), which you need to add to the jet ski lift. Once the jet ski is up, you’ll find a bucket (5b) behind it. Pick it up and head to the upper deck, where you will fill it with water (5c). With the filled bucket, go back, finish what the cleaner started, and reveal a password for a box downstairs (5d), which is 713705.

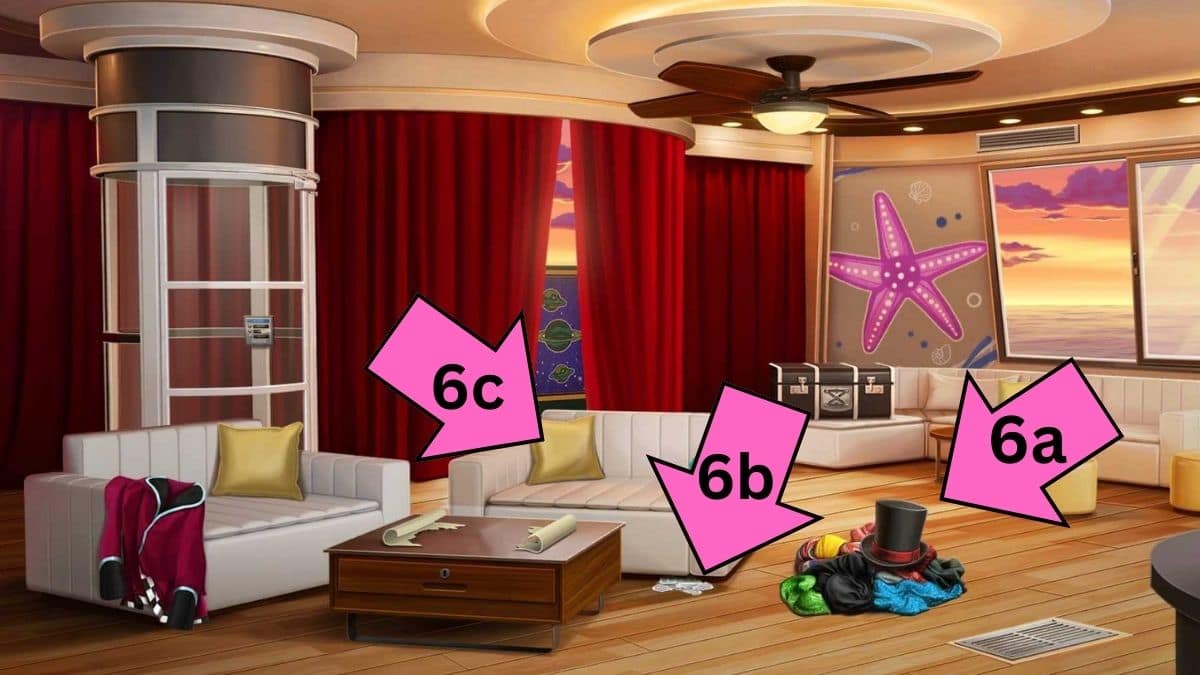
Take rappelling gear and go to the upper deck. Open the window to the right and use it to climb backstage. Kate has to figure out how the vanishing act works to save both Roy and her sister from being killed. Search through the mess on the floor to find a special access card (6a) as well as paper pieces underneath the sofa (6b). You’ll find more paper underneath the pillow (6c) on the right.
Go up to use the special access card on the locked box (6d) and gain a drawer key, then insert the card into the elevator so you don’t have to use climbing gear to reach backstage again. Unlock the drawer (6e) with the key to grab the last pieces of paper.

Now, you need to unlock the chest. Open the curtains to see out onto the stage and two poster boards to the left and the right. These are the symbols you will be working with to unlock the chest. Go to the deck where the show is happening, and you'll see more symbols on the other side of the boards. You need to arrange these symbols exactly like on the Post-it note, which you can find on the table next to the pieces of paper.

Grab a dagger and more paper pieces from the chest. Take the dagger and unscrew a grate from the floor to find more pieces of paper. Now, you can place them all on the table and assemble them into a plan.

Kate doesn't have a lot of time left to warn Allie, so she runs onto the stage and falls through the trapped door. The elevator takes her right to Elias, who shoots at her, but the bullets ricochet, start an engine fire, and break the glass, so now the yacht is filling with water. Somehow, he managed to cause both a fire and a flood; the man is very talented but not at aiming a gun.
Related: The Visitor walkthrough
Elias rips the handle off the door and closes Kate in. There's no time to panic, you have to deal with this. Use the dagger to open a box (7a) and grab a fire extinguisher. Put out the fire and grab a yellow wrench (7b) from the engine. Use it to shut down steam coming from the burst pipe (7c).
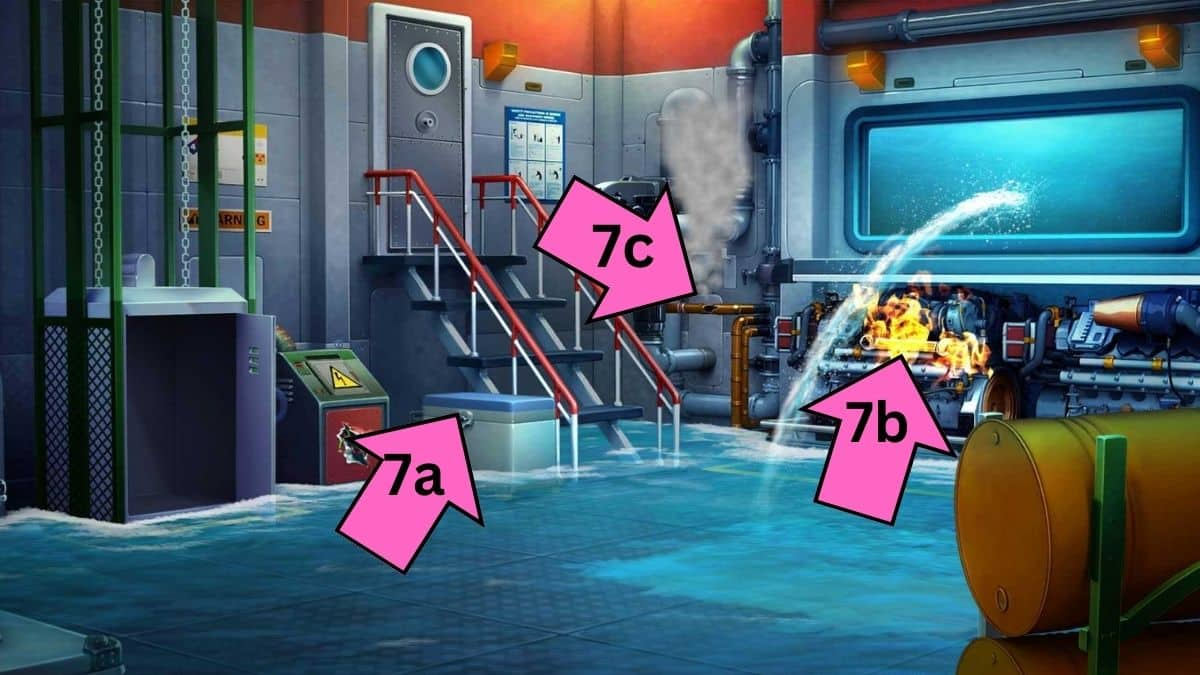
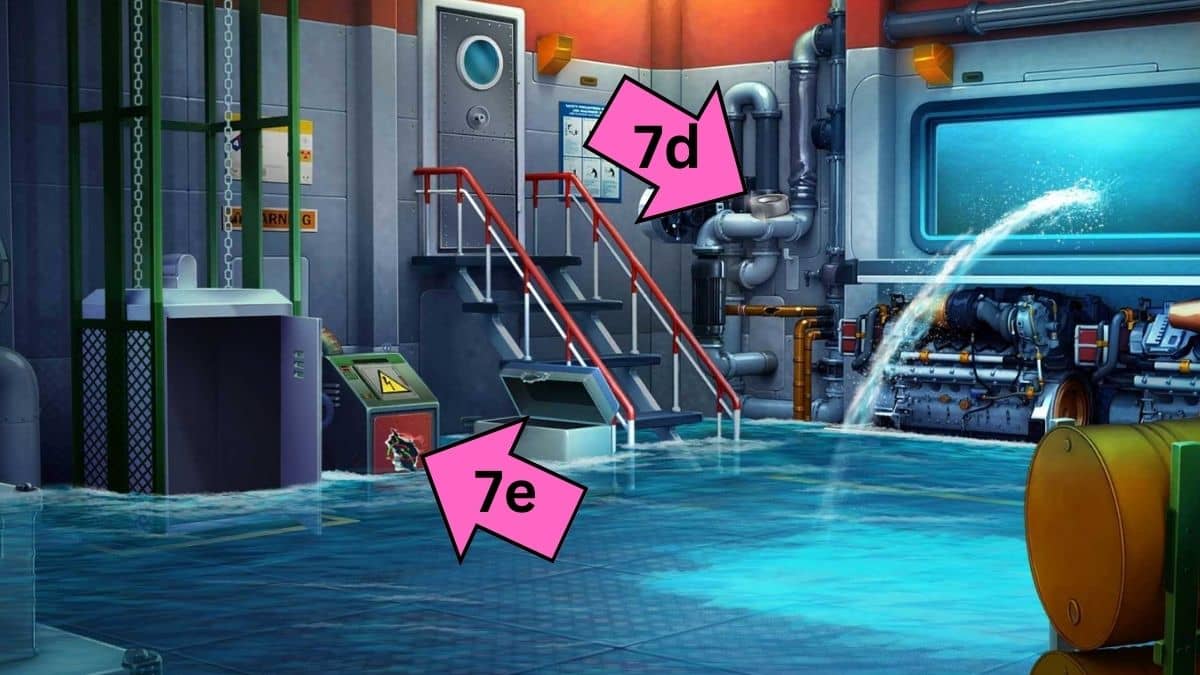
With the steam gone, you can grab duct tape (7d) from the above pipe. You can use it to cover the exposed wires (7e) and prevent Kate from getting fried. Since the wires are fixed, the elevator should be, too, but of course, there is an error. Let's reroute the power. You have to get the right amount of power to the elevator; too much and it will overheat; too little and it won't work.

Once fixed, the elevator will immediately start going up without Kate, then crash down and break seconds later. Kate is running out of options, but luckily, Murphy opens up the hatch. He throws down a unicycle to use on the door. Use the wrench to take off a bolt and then the wheel. Put the wheel on the door first, and then tighten it with the bolt.
Murphy gets shot, taking a bullet for Allie, but Kate, opening the door, washes away the two crooks onto their boat. The two start the boat and try to run away. Harry and the bouncer come down to help Murphy so Kate can finally get to use the jet ski we've been preparing the entire chapter.

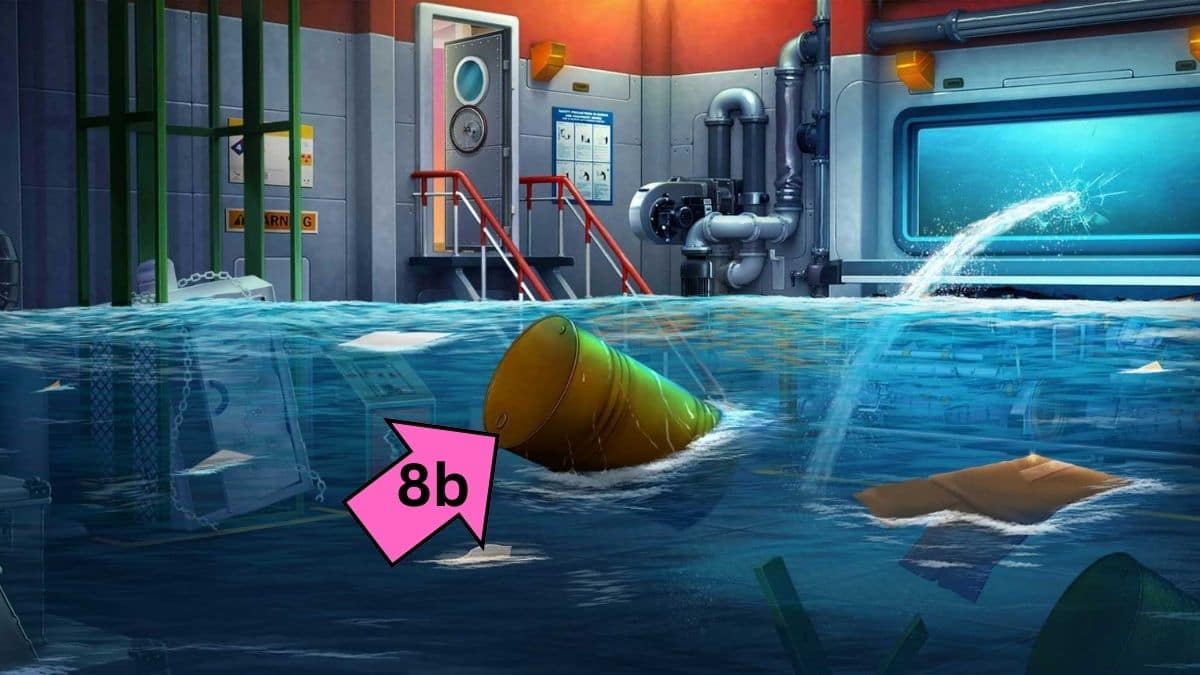
However, there is no fuel. First, grab the bucket (8a) next to the elevator. Head to the engine room, where you will find a fuel barrel (8b) that you can burst with the dagger. Use the bucket to collect the fuel and put it into the jet ski. Allie will drive, and Kate will shoot. After three shots, Elias and Charlie are done, and we get to enjoy watching them be taken to jail and Allie escape.
For more puzzle game walkthroughs, check out Superliminal Walkthrough - Full Guide on Pro Game Guides.