
Once you complete the main story of a Lost Lands collector’s Edition game, it opens up new content, including a Bonus Chapter to complete. Below is my walkthrough and solution to the Lost Lands 6 bonus chapter.
The Lost Lands point-and-click puzzle game series is one of my favorites in the genre. The bonus chapters are a lovely part of this, as they offer insight into part of the unseen story that runs alongside the main one.
How to complete Lost Lands 6 Mistakes of the Past bonus chapter
In the Lost Lands 6 bonus chapter, we find ourselves playing as Maaron just after Cassandra has been poisoned in battle. However, you can only access the bonus chapter after completing the main story. If you’re looking for help and information on that, head over to my Lost Lands 6 Walkthrough hub page.
Finding the ingredients
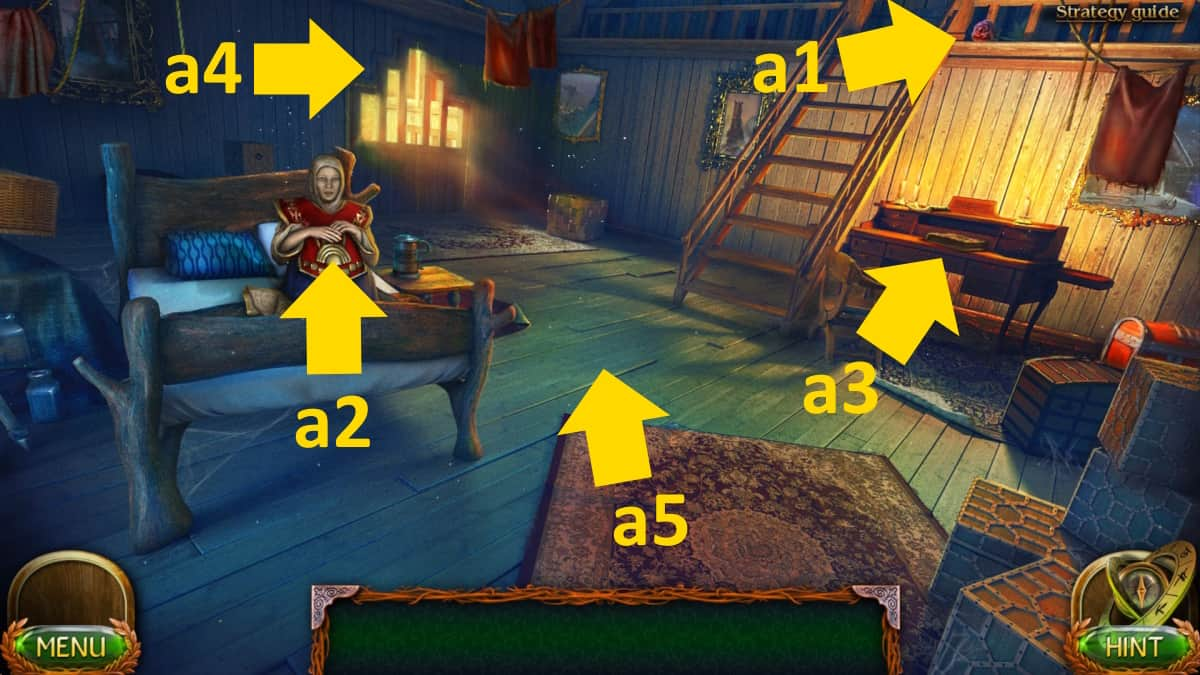
The Collectible is at the top of the stairs (a1). Click Cassandra (a2) for a close-up and take the Empty Mug, then select the desk (a3) and take the Reaping Hook while noting the portal patterns in the book there. Select the door (a4) to go outside into Maaron’s yard.
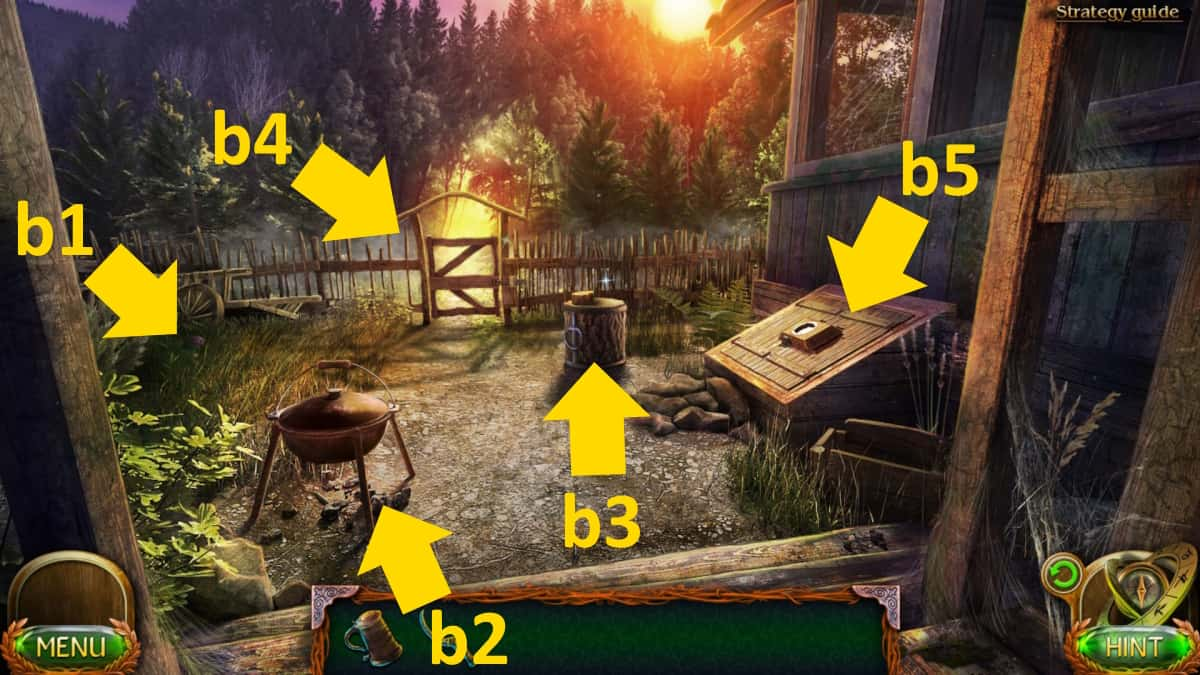
Take the Collectible from the grass by the wagon wheel (b1), then click the cooking stand (b2) to remove the lid and take the Empty Pot. Take the Grindstone from the chopping block (b3), use it to break open the back gate (b4), and head out to the Forest Glade.
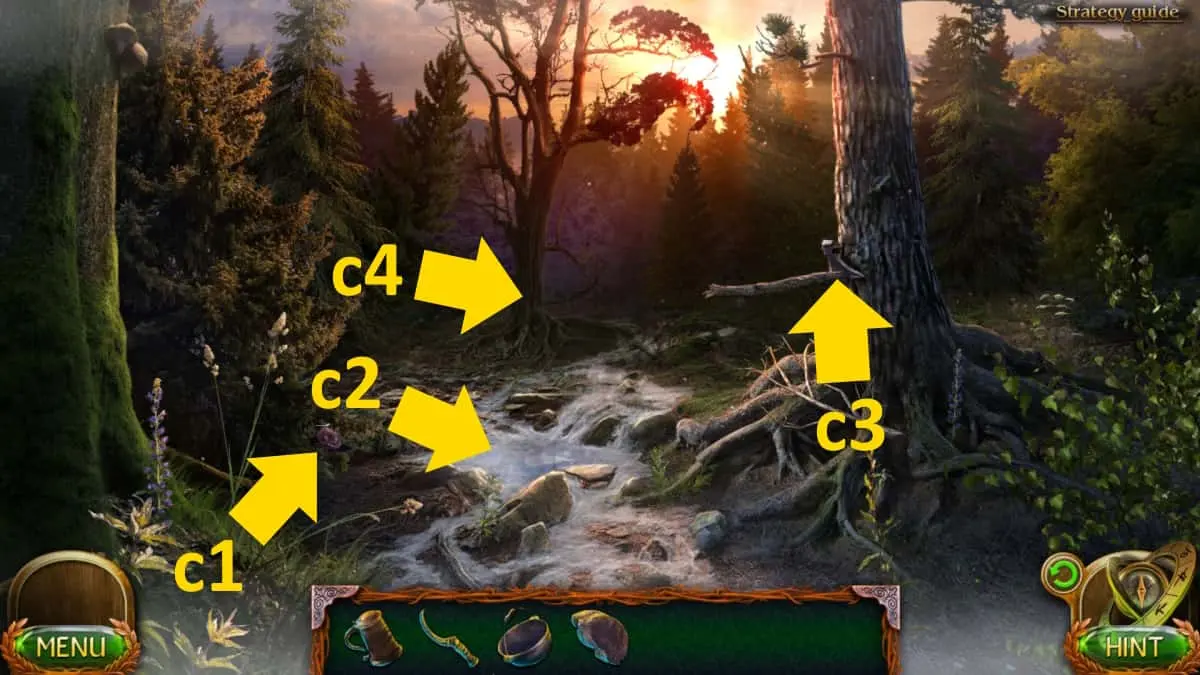
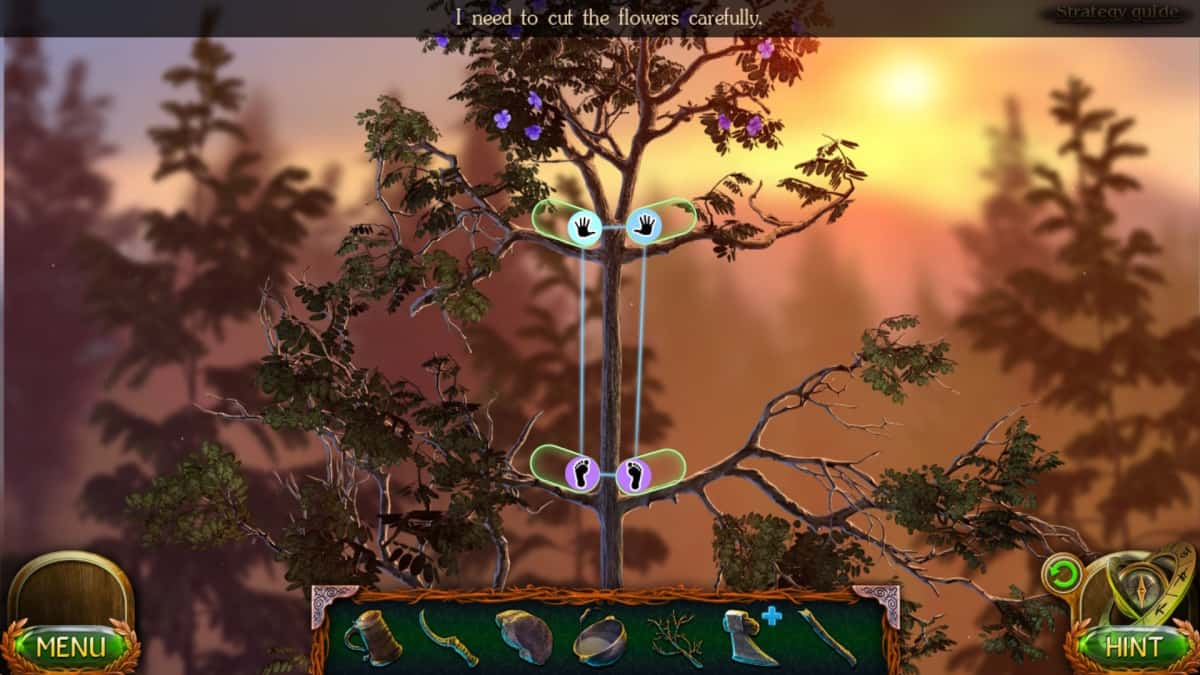
The Collectible (c1) is to the left of the stream. Use the empty pot in the stream (c2) to gain a Pot with Water, then take the Stick, Axe Head, and Dry Branch from the tree (c3). Now select the tree at the back (c3) to begin a tree-climbing puzzle. Just drag the feet and hands from one box to the next. You can’t go wrong, as a symbol will show red if it is invalid. Once at the top, use the reaping hook on the Tranquility Flowers.
Making the potion
Move back to Maaron’s yard. Select the axe head in your inventory, click the broken wood in it to remove it, and add the stick to the image. Use the reaping hook on the stick in this image to cut it down, add the whittled stick to the axe head, and then use the grindstone to sharpen the axe head. You’ll now have an Axe.
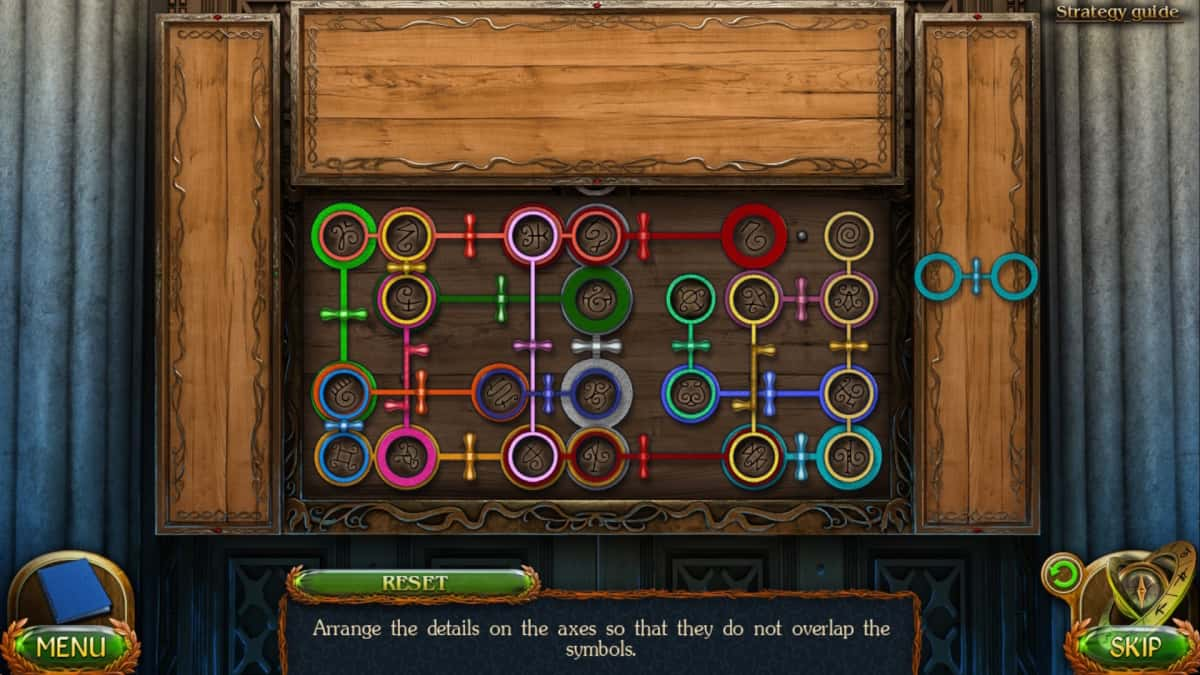
Add the dry branch to the chopping block (b3), use the axe in it, then collect the Brushwood. Put the brushwood under the cooking stand (b2) to begin a line-connection puzzle. You need to click the dots in the correct order (see the image above). Once done, the fire will light. Add the pot with water and the tranquility flowers, then use the mug to get the Decoction of Tranquility. Give it to Cassandra (a2), and she’ll give you the Key to the Cellar.
Lighting the cellar
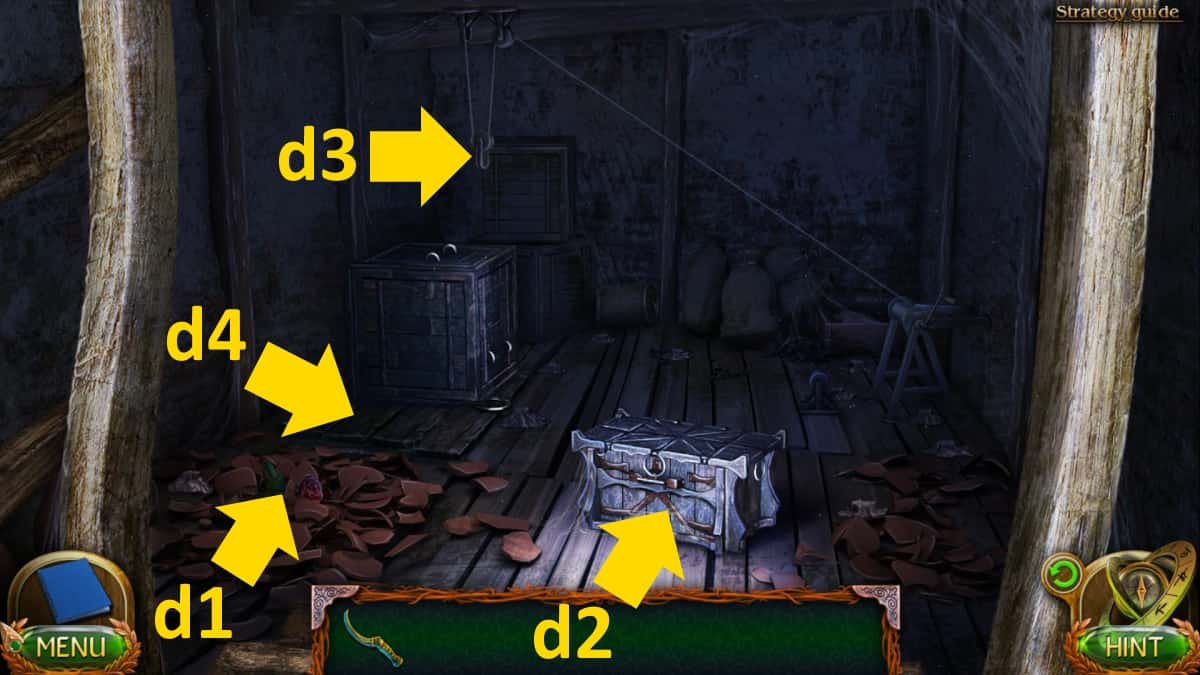
Back in the yard, use the key on the cellar door (b5) and head into the storeroom above the cellar. Take the Collectible from the potshards (d1), then click the chest (d2) several times to open it, and take the Cable with Carabiners and some Candles.
Related: On Thin Ice Walkthrough Guide
Select the candles in your inventory to start another line-connection puzzle, using exactly the same line as you made to light the fire (see above), then click them once lit to get the Lit Candles.

Now select the lit candles in your inventory and click anywhere on the (d) image to start a wax-track puzzle. You need to light the entire area with the correct placement of the candles, noting the candles are different sizes. See the image above for a solution, which shows the situation when just the smallest candles still need to be placed. Once done, you can see the back of the room.
The portal disc
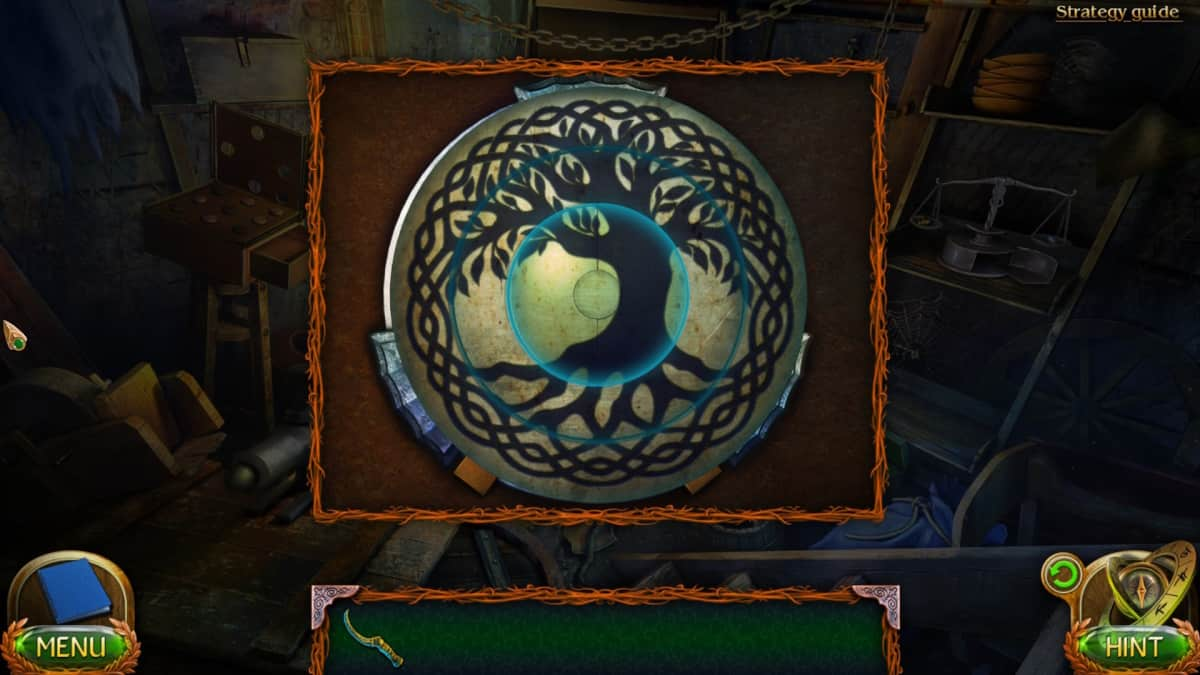
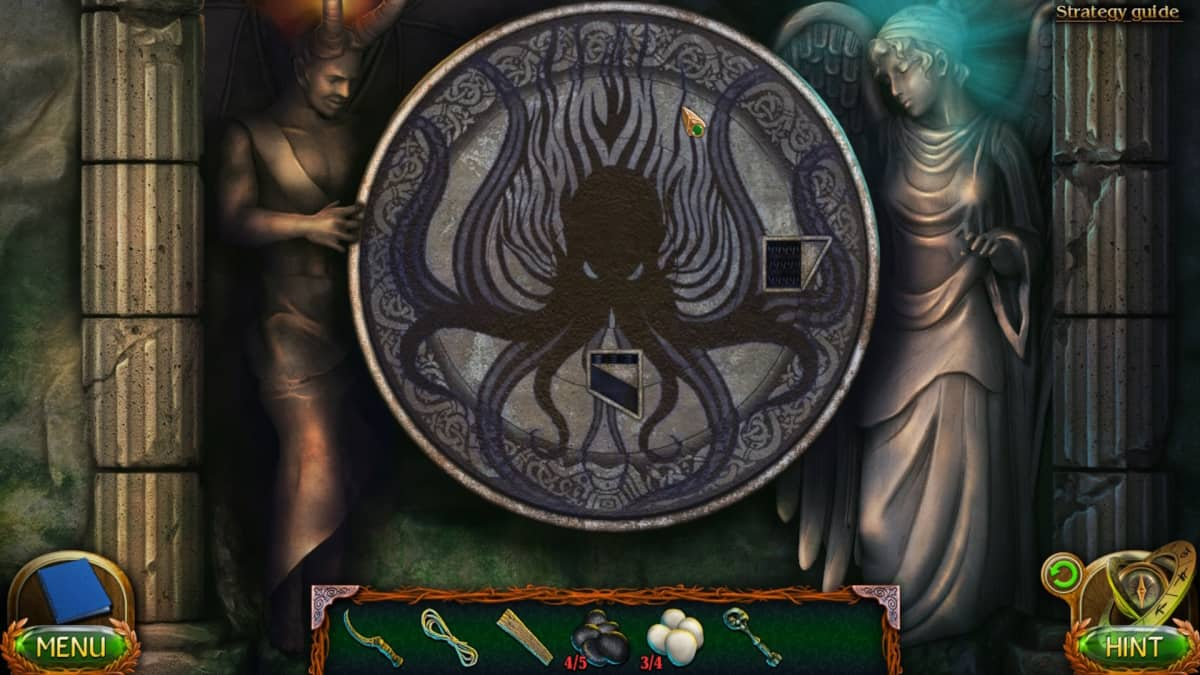
Add the cables to the hook (d3), which pulls the box away and gives you access to the cellar entrance (d4) and an item-matching puzzle. Use the jar and spoon to collect the termites, and use them to gain access to the wooden box. Use the hacksaw and clamp to halve the size of the gold weight, giving access to the secret scales compartment. Make the image pictured above for the tree puzzle to get the Portal Disc.
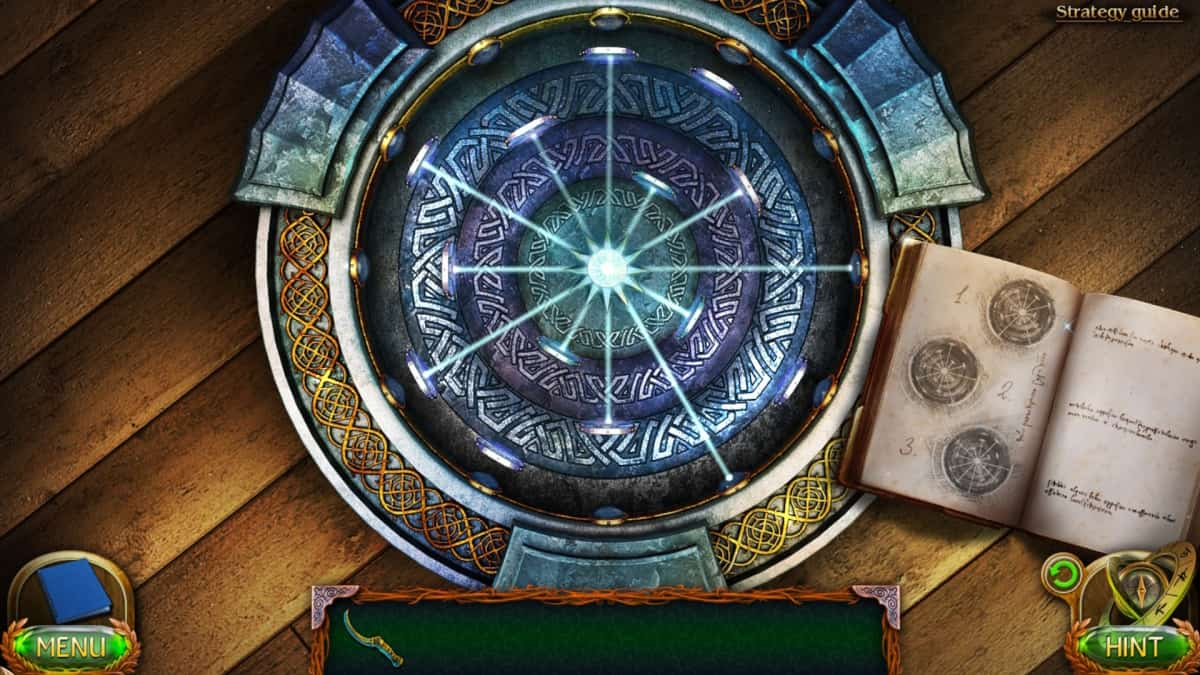
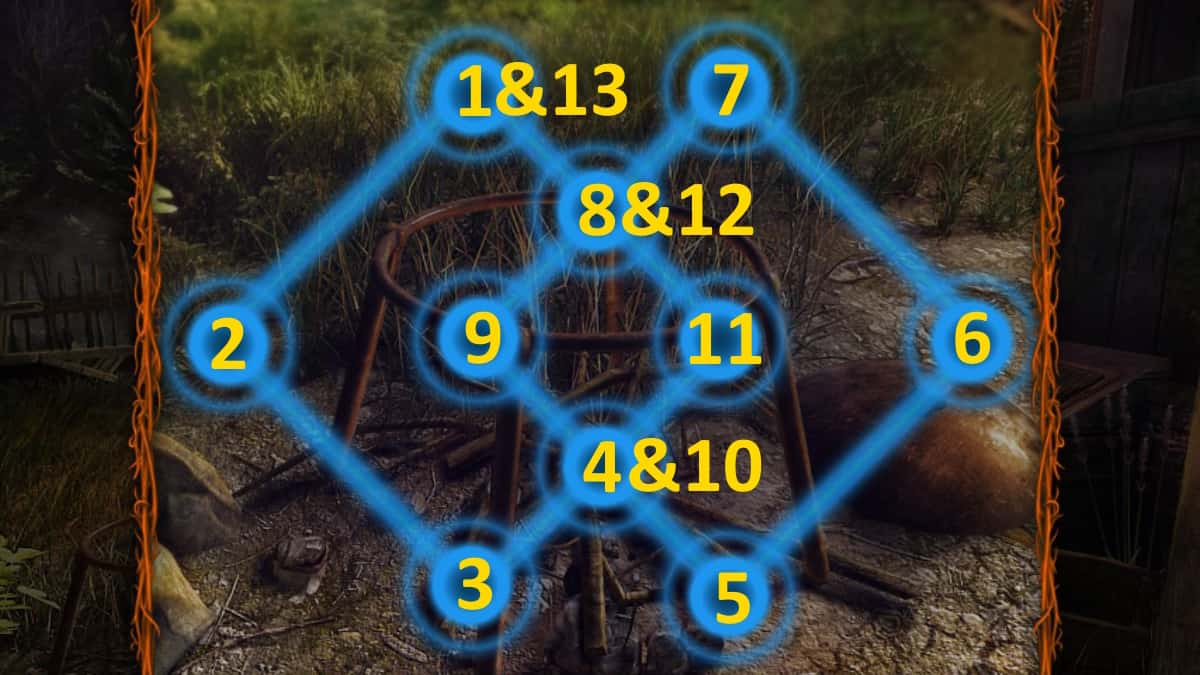
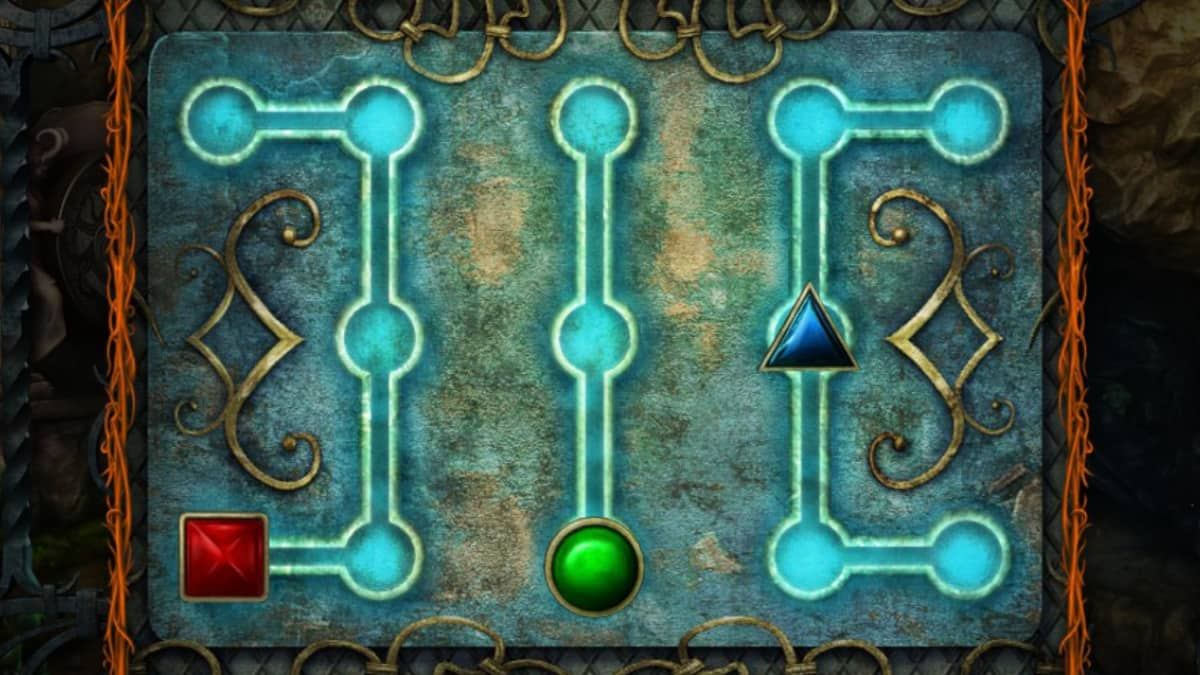
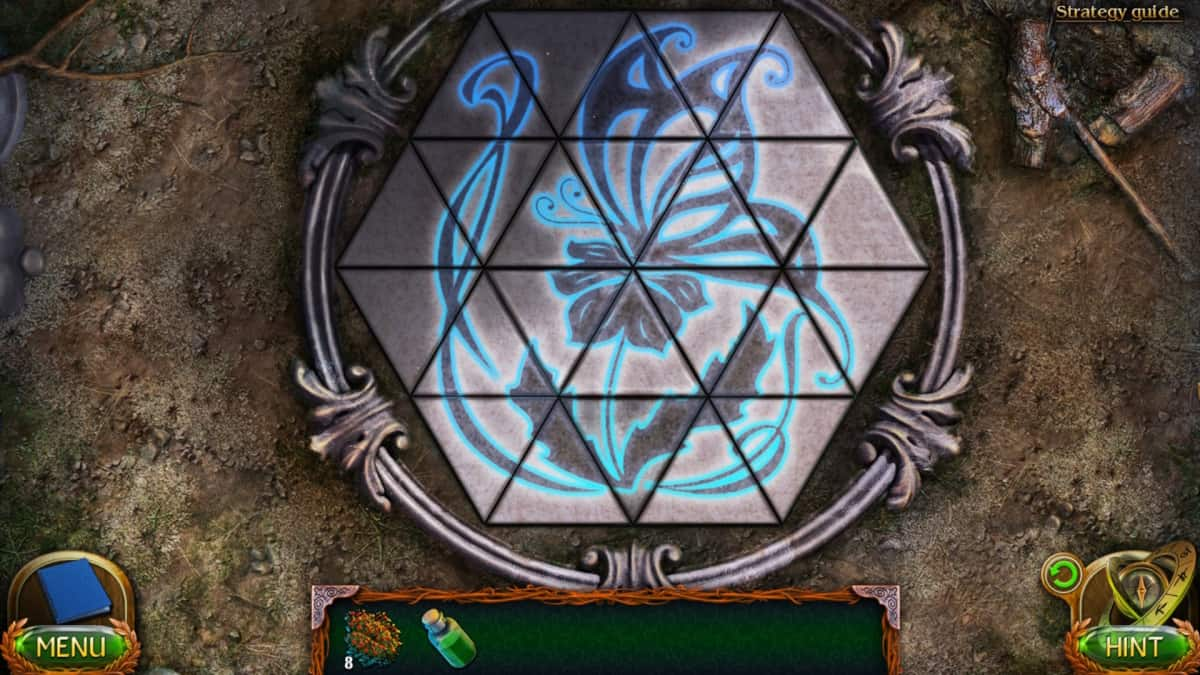
Return to Cassandra and place the portal disc on the floor (a5). Examine the disc once placed and move the rings to match pattern 2 in the book (see above). Now click the portal to transport yourself to the swamp.
The Swamp
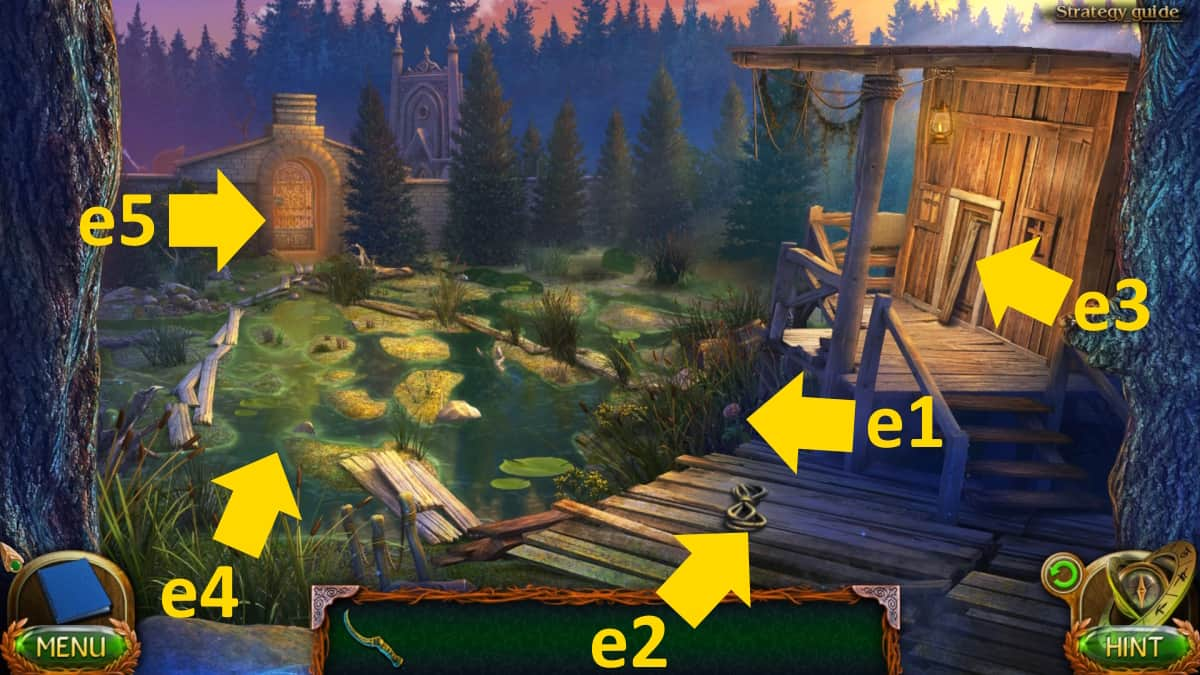
Take the Collectible (e1) and the Rope (e2) from the walkway and the Long Board from the close-up of the door (e3). Click the door handle to try to knock, then click the lower door hinge to open the door. Head inside.
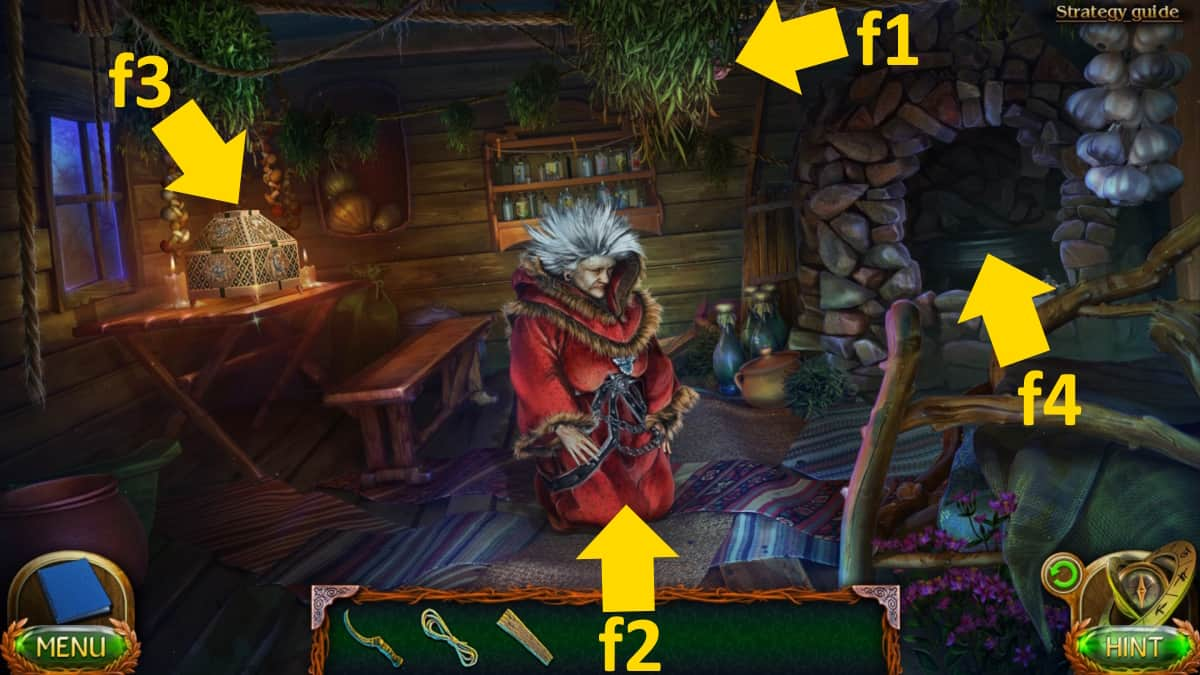
The Collectible is in the plants on the ceiling (f1). Click Helma (f2) for a close-up, take her Medallion, and add the medallion to the box (f3) to open it. Read the note, and then click the powder box to start hallucinating. Click the witch again, and this time, you’ll see a shapes puzzle. Make all the colored patterns on the sides at the same time to solve each one. You need to do this three times. The solutions are below:
- Puzzle 1 (dots 1-3 across the top and 3-6 across the bottom): 2-5, 1-6, 4-6, 2-6
- Puzzle 2 (1-3 top, 4-5 middle, 6-8 bottom): 7-8, 2-3, 1-2, 6-8, 2-7, 1-3, 6-8
- Puzzle 3 (12 clock number positions): 2-6, 1-7, 5-11
Once complete, you will enter Helma’s mind.
Helma’s consciousness
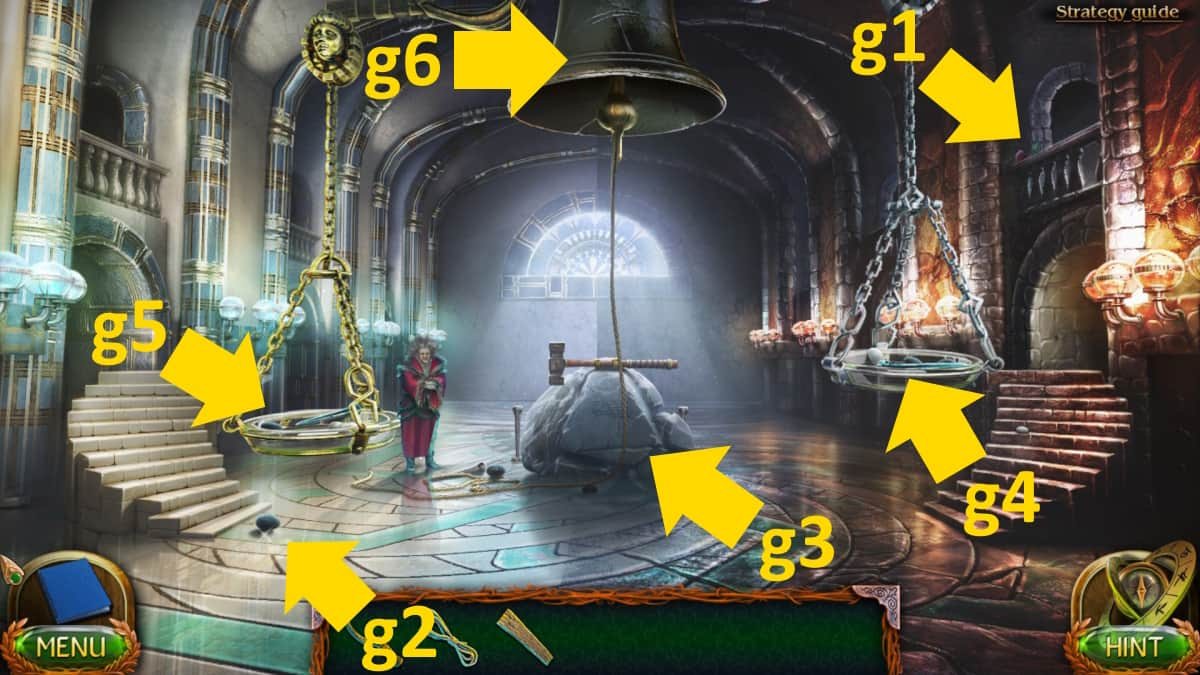
After a cutscene with Helma, take the Collectible from the right balcony (g1) and then collect all the black and white stones you need. Grab the Black Stone on the floor (g2), and a second Black Stone from the hammer close-up (g3) where you can also put the Wedge into its hole.
Click the right scale (g4) to get two White Stones and a second Wedge. From the left scale (g5), take a third Wedge and a third Black Stone. Add the wedges to the remaining holes near the hammer (g3), then click the hammer to use it to knock the wedges in. Once the floor collapses, get a close-up of the hole, click the rope to drop it into the hole, then click it again to go down. Take a quick look at the door puzzle here, then head back up.
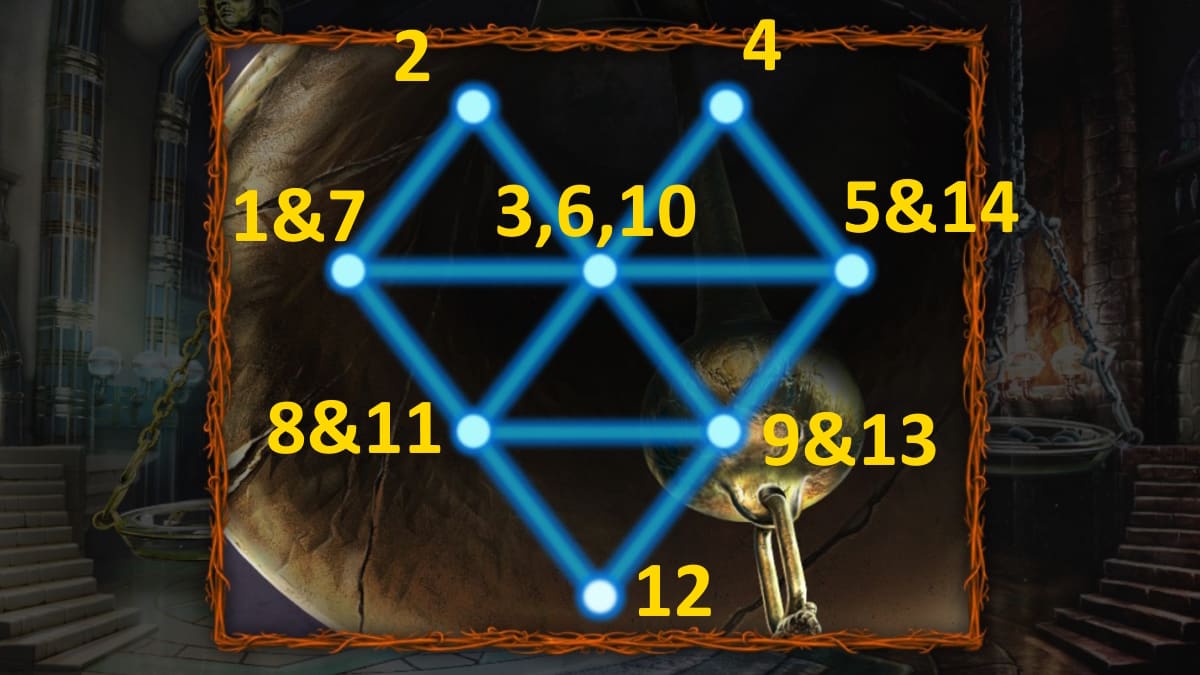
Click the bell (g6) for a close-up to start another point-connection puzzle (see the solution above). Once complete, you’ll see the gate puzzle solution in the image of the inside of the bell. Head back down and open the gate (see below).
Helma’s subconscious
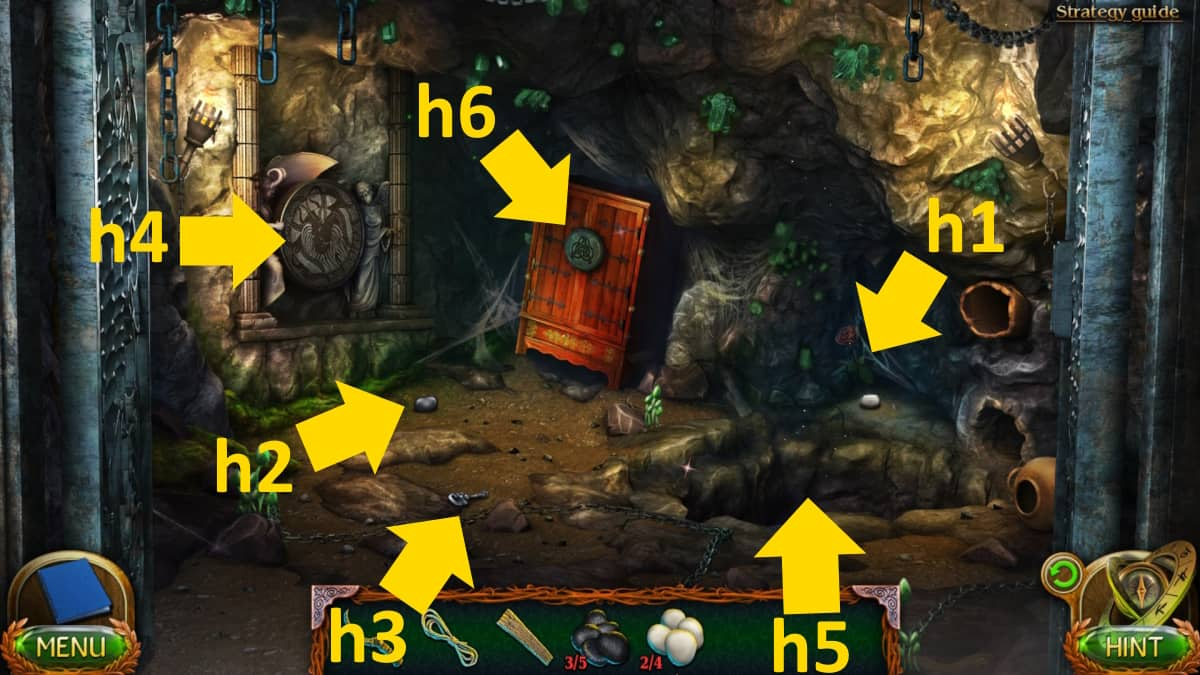
Take the Collectible and third White Stone from behind the hole ( h1), as well as the fourth Black Stone (h2) and the Key (h3). Click the monument for a close-up (h4) and move the circles to make an image (see below). Once complete, the pool (h5) will fill with water.
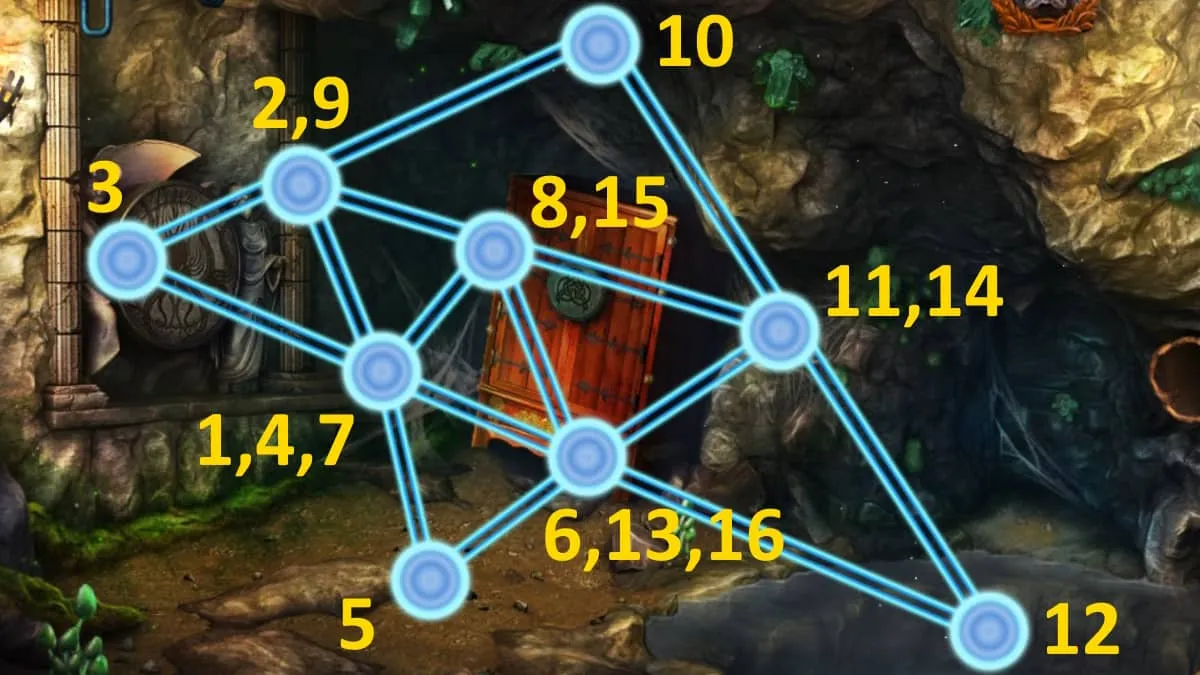
Clicking the pool starts yet another line-connection puzzle (see solution below). Once complete, you’ll have a missing-objects puzzle to complete in the pool. Take the Chest. Select the chest in your inventory and use the key to open it, taking the fifth Black Stone and the Key to the Cabinet. Use the key on the cabinet (h6) and take the fourth White Stone from the skeleton’s mouth.
Go back upstairs, add the white stones to the left scale and the black to the right, and the meditation will end. Click Helma, who will give the Key to the cemetery after a cutscene. Back out in the swamp, add the plank to the path (e4), click the cemetery gate (e5) for a close-up, use the key to open it, and head inside.
The cemetery

The Collectible is in front of the crypt (i1). Select the crypt door (i2) for an axes puzzle. If you’re struggling, in the image below, there’s just one blue axe left to place (into the top-right space). The order in which you place them doesn’t matter.
Related: Haunted Hunt Walkthrough – Adventure Escape Mysteries
Click the open crypt door for a close-up and take the Brush and Mask. click the cloth to lay it on the crypt, then head back outside. Use the reaping hook to collect two flowers (i3), then add the mask to the statue (i4) to reveal a secret passage (i5). Go down the passage.
The tower ruins
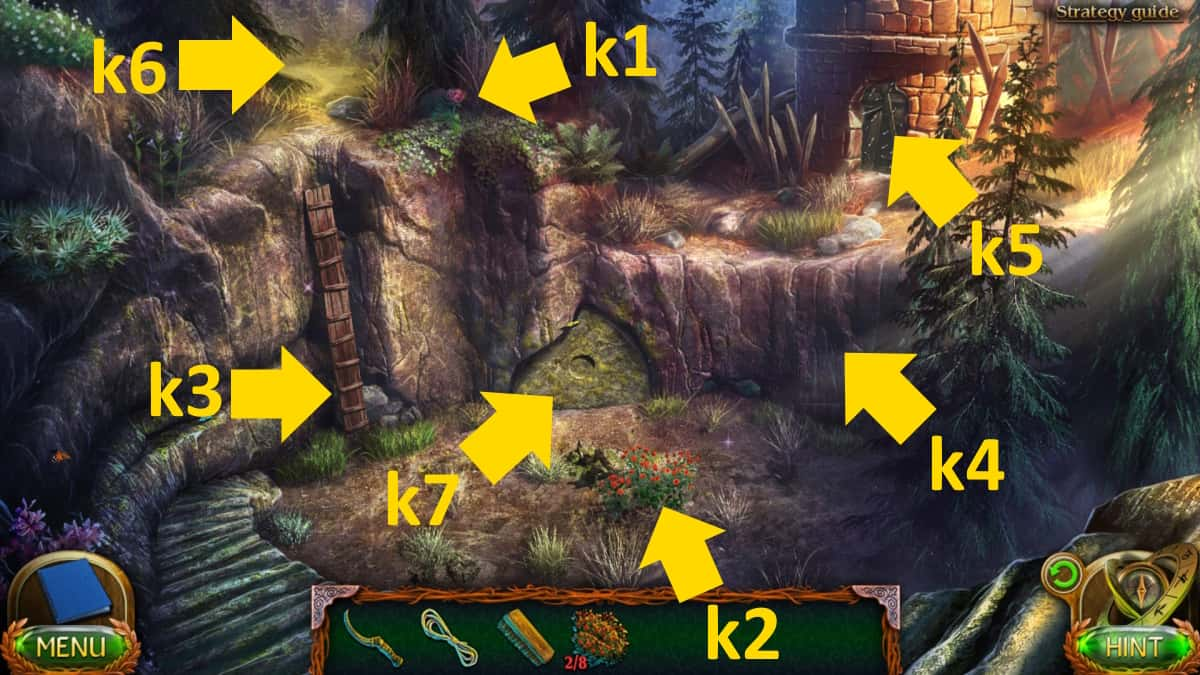
Take the Collectible at the top of the ladder (k1), then use the reaping hook to collect five more Flowers (k2). Once you’ve picked them up, also take the Soiled Stone Ring in the same close-up.
When you click the ladder (k3), it breaks. Click the pieces in the close-up afterward, add the rope, and pick up the Short Gangway. Put this in front of the tower (k4), click the door (k5) to take a Spear, then click it again for a cutscene.
The tower dwelling

After talking to the arachnoid, you’ll find the Collectible in the top-left of the scene (l1). Take the Spearheads (l2), the Bowl with Water (l3), and the Hammer (under the twigs at l4). Select the ring in your inventory, add the water, and then use the brush on it to get the Outer Part of the Pattern.
Move back to the tower ruins and select where the ladder was initially (k3) for a close-up. Add the spearheads, then use the hammer to make a climbing wall of spikes. You can now select the top of the cliff (k6) and head to the gravesite.
The arachnid gravesite
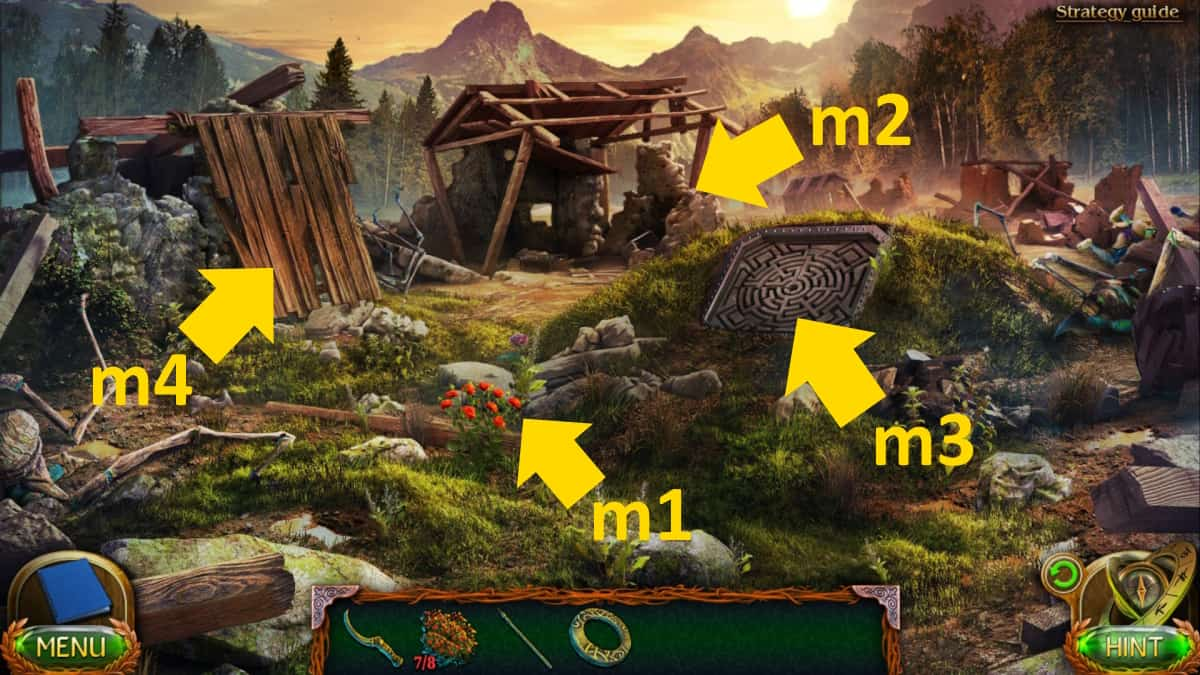
Take the Collectible (m1) and use the reaper to cut and collect the eighth Flower at the same spot. Get a close-up of the ruins (m2), then click the rubble to find a box. Open it and take the Package from inside. Open it in your inventory, and you’ll get Leather, a Gouge, and Blacksmith Tongs.
Now click the tomb entrance (m3) for a positioning puzzle to restore the labyrinth drawn in it. You can’t go wrong, as it’ll color sections green once they’re in the right place. Once done, add the spear to the canopy (m4) to stand it up and get a close-up of the window behind. Click the shutter to remove it and take a Piece of Glass.
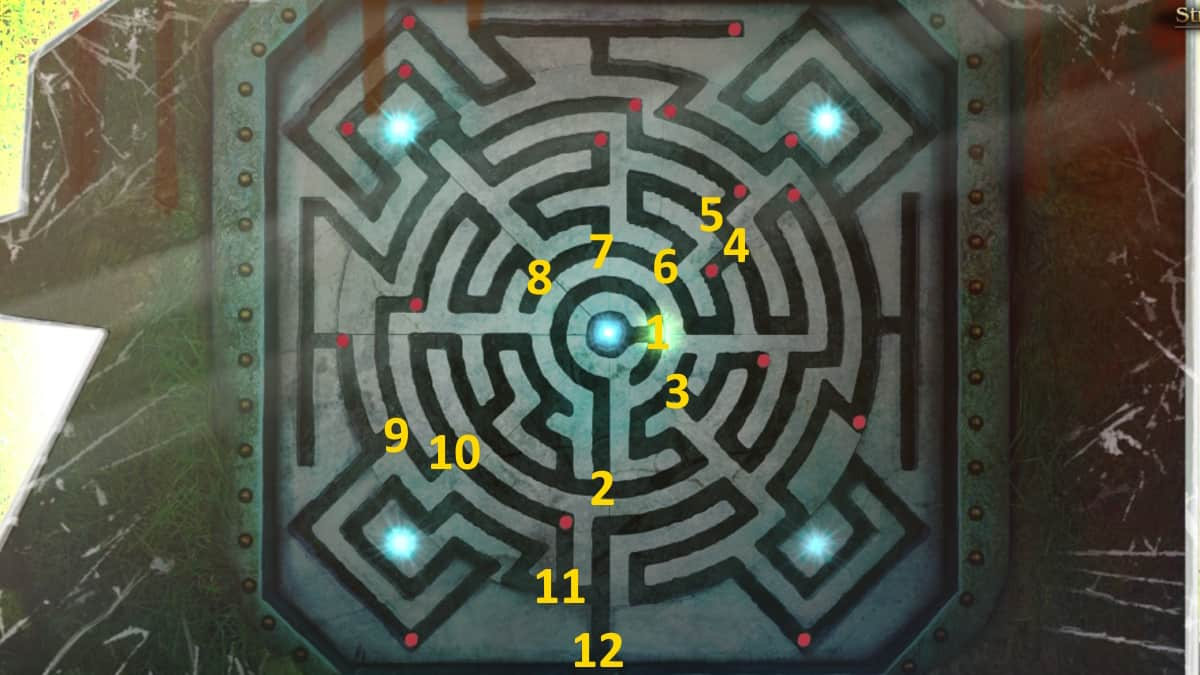
Back at the tower dwelling, click the cave (l5) and add the leather to the fire in the close-up. Add the glass to the image, then use the tongs to smoke the glass in the fire to get Smoked Glass. You can now go to the tomb entrance once more (m3) and use the glass to start a labyrinth puzzle. The central crystal must be blue when it leaves through the bottom exit. To do this, click the green dots in the order you’ll see above.
Once done, you can click the entrance once more to start an object-matching puzzle. Once complete, you can take the Arachnid Blood as well as the Central Part of the Pattern from the Arachnid corpse.
Return to the tower ruins and use the gouge on the wall (k7) to reveal a pattern. Add the two parts of the ring to it and the wall will move aside, where you can take a Part of the Puzzle. Return to the tower dwelling and add the piece to the floor pattern (l6), then turn the pieces to make the picture above. Once done, you’ll receive the Sting of the Queen.
Making the potion
Return to Helma’s hut, put the sting and blood into the pot (f4), and use the vessel in the bottom-right of the pot close-up to get the Sleeping Potion. Add the flowers in the crypt (i2), return to Maaron’s house, get the Pillow (in the Cassandra close-up), and add that to complete the bed in the crypt. Give Cassandra the sleeping potion and enjoy the final cut scene.
For more Lost Lands walkthroughs, check out Lost Lands 8 – Bonus Chapter Walkthrough & Solutions and Lost Lands 3 Full Walkthrough (Golden Curse) here at Pro Game Guides!