
Bethesda's games have always been popular with the modding community, and Starfield is no different. The expansive world combined with a vast ship and character-creating mechanics make this game ripe for modders to express their creativity. But sometimes the mods need to be fixed or they crash my game. It's good to have a mod container that lets you organize them in such instances, so this guide will show you how to install and use the Mod Organizer 2.
Guide for using and installing Mod Organizer 2 for Starfield
This guide will explain how to install and use Mod Organizer 2 for Starfield in a few simple steps. The Mod Organizer 2 is a mod container, and you can use it to quickly load up and turn all your favorite Starfield mods on and off quickly. Some mods may still fail to work or can cause your main game's files to be corrupted because the Mod Organizer 2 has yet to support Starfield officially. We will update this article with any relevant changes once the developers issue an update.
How to install Mod Organizer 2 for Starfield
To install Mod Organizer 2 for Starfield, follow the steps below:
- Download the Mod Organizer 2 and install it onto your system. I used the same directory pathway that leads to my Starfield game files to avoid possible conflict with Windows permissions.
- Download the Mod Organizer 2 Starfield plugin to make the Mod Organizer 2 compatible with Starfield. Extract the Plugins folder in the same directory path that contains the Mod Organizer 2 .exe file.
To use Mod Organizer 2 for Starfield, first ensure you run Starfield without any mods at least once before. You most likely did this step already, but it's important because doing so initiates the generation of certain files that Mod Organizer 2 requires to operate properly. Once you have Starfield closed, follow the steps below to create your first instance:
- Once you start Mod Organizer 2 for the first time, the app will prompt you to create a new instance in a popup menu. Select Next.
- Select Create a Portable instance. If Starfield doesn't show on the list of manageable games, tick the box Show all supported games.
- Scroll down the list until you find Starfield and select it.
- Click Next.
- If you installed Starfield in any directory location that's not default, you must navigate to the folder you installed the game to.
- Select the location where you would like to save a new instance. The default directory will be where you installed Mod Organizer 2.
- Click Next. Don't try initializing the Mod Organizer 2 because we still need a single component for the build to be complete.
Creating the StarfieldCustom.ini for Mod Organizer 2
Follow the steps below to create StarfieldCustom.ini for Mod Organizer 2 manually:
- Navigate to C:\Users\yourprofilename\Documents\My Games\Starfield, and change yourprofilename with your Windows profile name.
- Right-click on an empty space, and select the new .txt file.
- Edit the text file's name to say StarfieldCustom.ini.To edit the .ini suffix, ensure you click View and have File name extensions checked at the top of your window.
- This action will convert the text file you created to a config file, enabling Mod Organizer 2 to work.
When starting Mod Organizer 2 for the first time, do the following steps before loading up the mods:
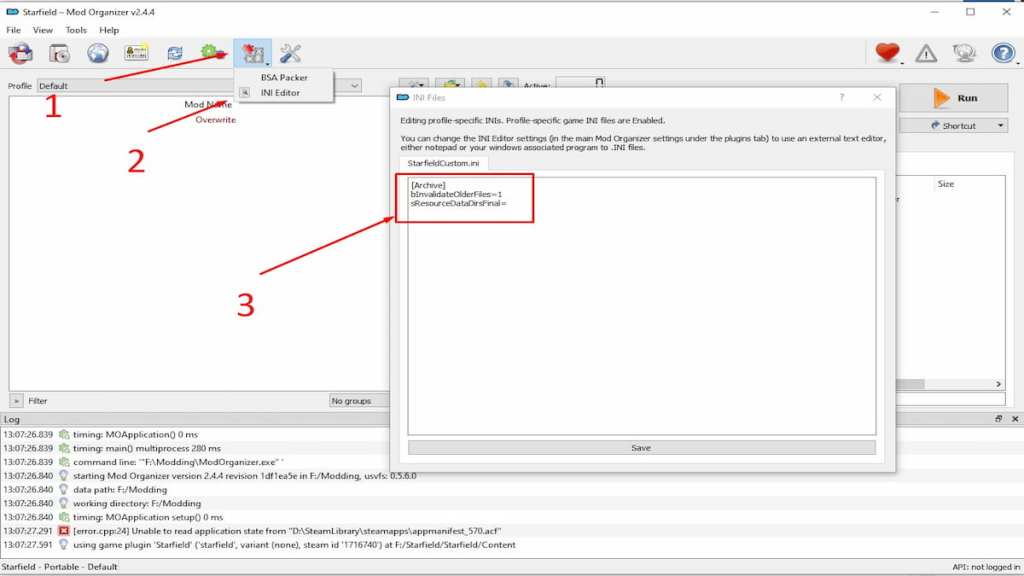
- Click the Tools button.
- Select the .ini editor.
- Copy and paste the following lines into the text box window before clicking Save:
[Archive]
bInvalidateOlderFiles=1
sResourceDataDirsFinal=
How to use Mod Organizer 2 for Starfield
To use Mod Organizer 2 for Starfield and load any mods you downloaded, follow the steps below:
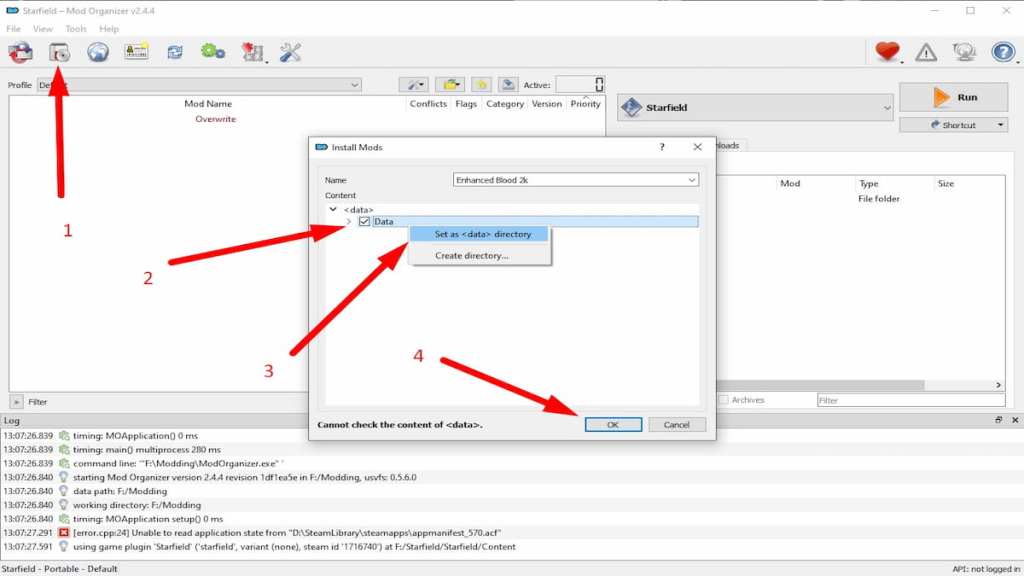
- Click Install a new mod from the archive button.
- Select a mod from your downloads directory.
- Specify the data directory by navigating around the mod directory. This is an important step designed to mirror the game files. If you can't find the data directory, there is a high chance that the mod won't work correctly.
- Once you find Data, right-click and choose Set as <data> directory.
- Click OK to initiate the mod installation.
- Repeat the process above for all mods you wish to install.
Looking for more guides on Starfield? You got you covered! Check out How to increase Maximum Jump Range in Starfield and Best Starfield Female Outfits & How To Get Them, here on Pro Game Guides!