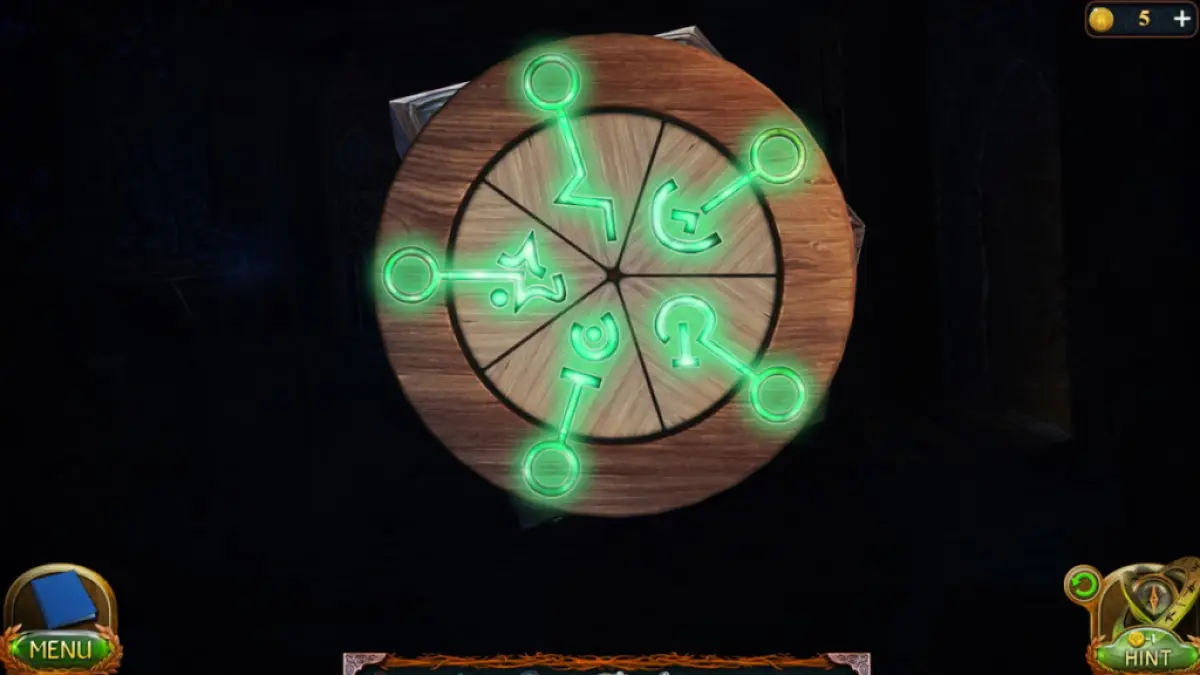
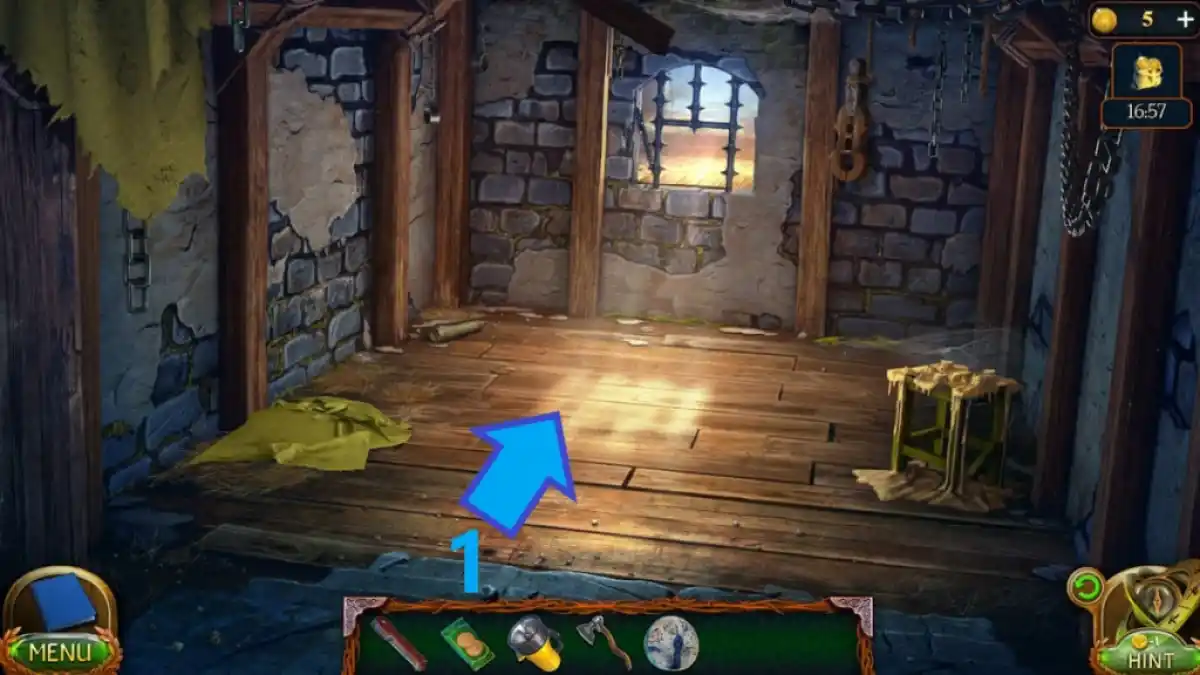
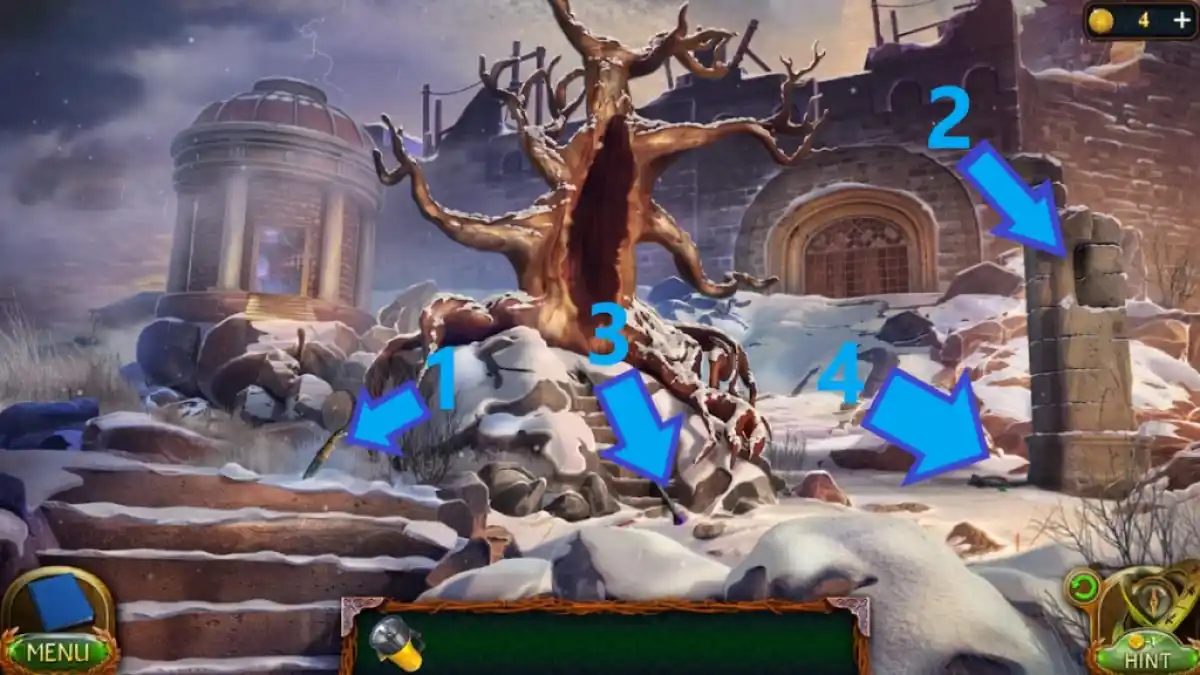
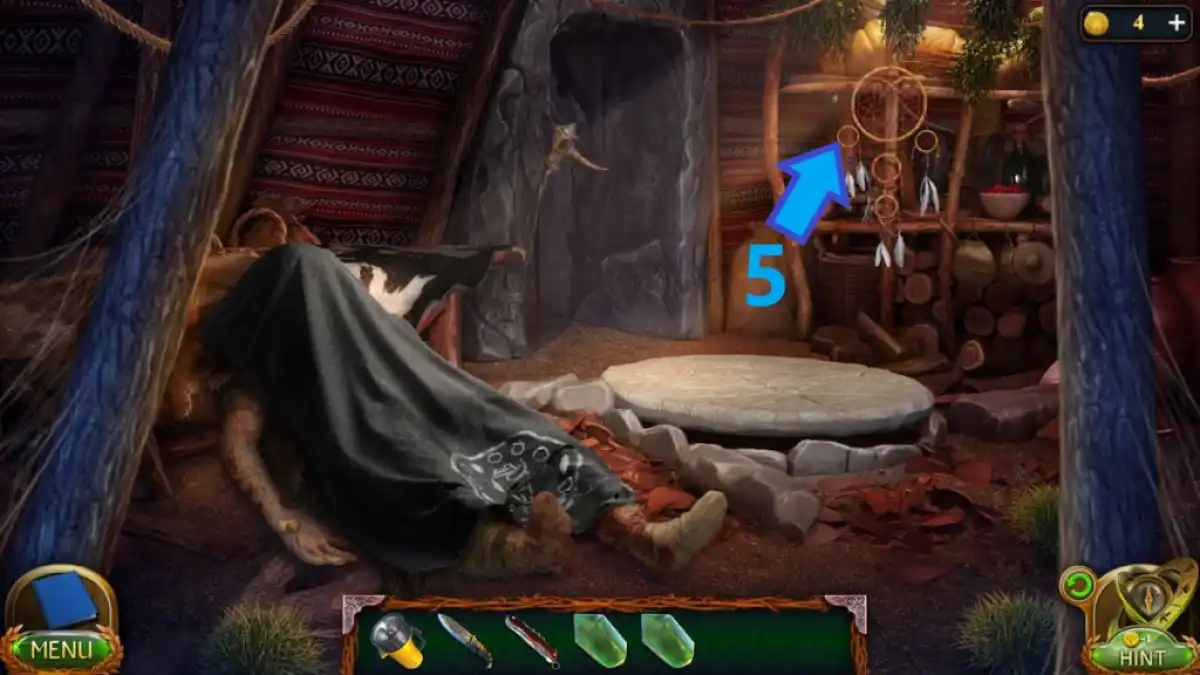
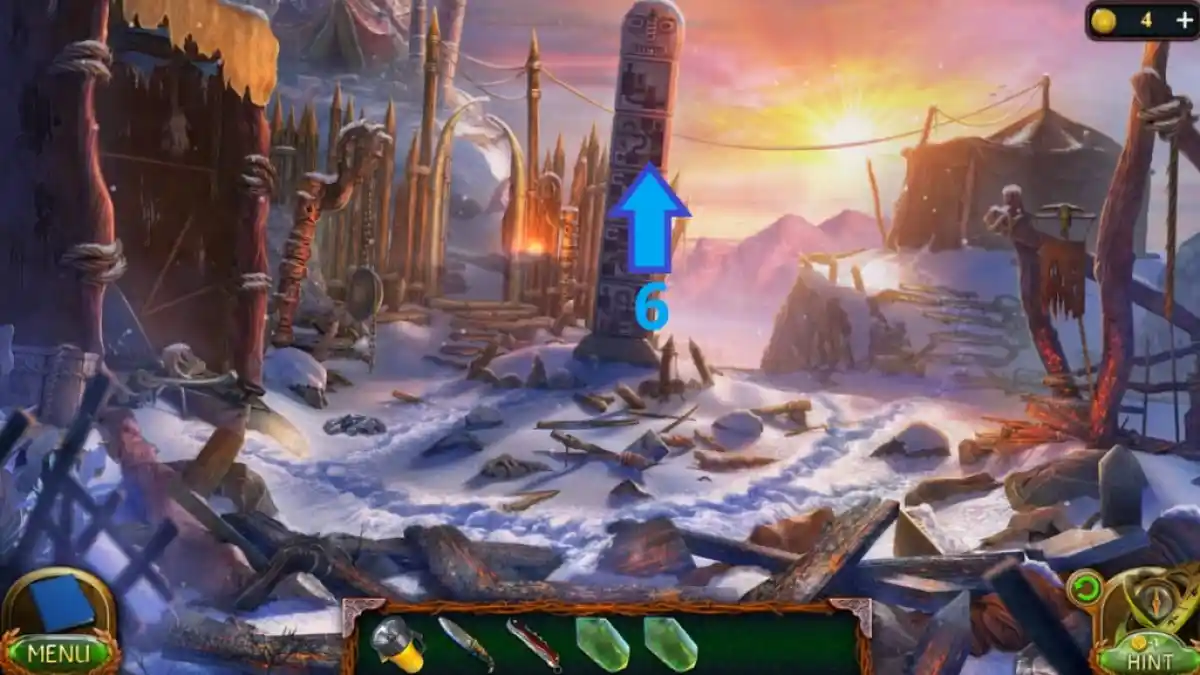
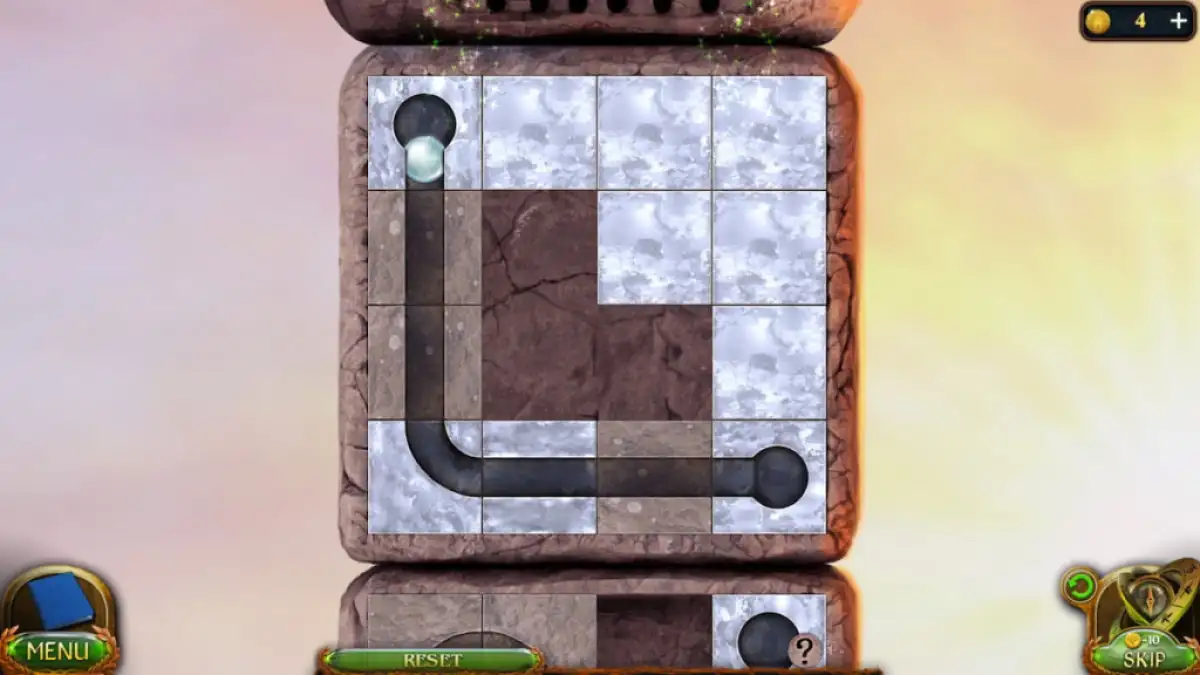
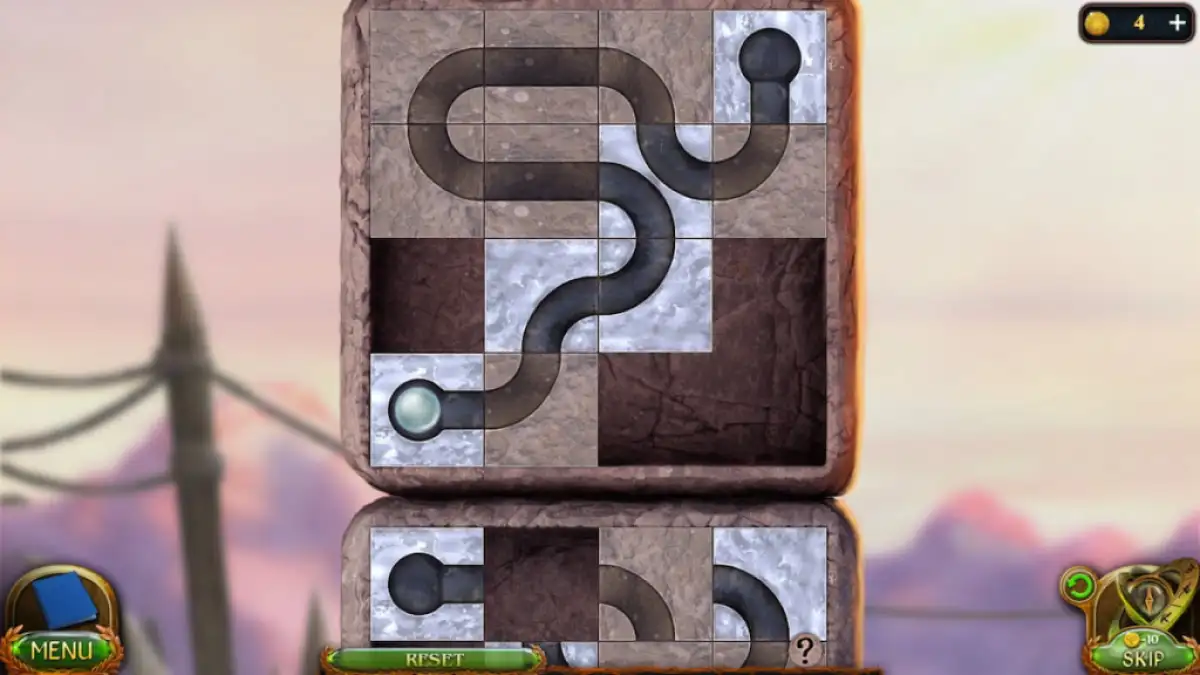
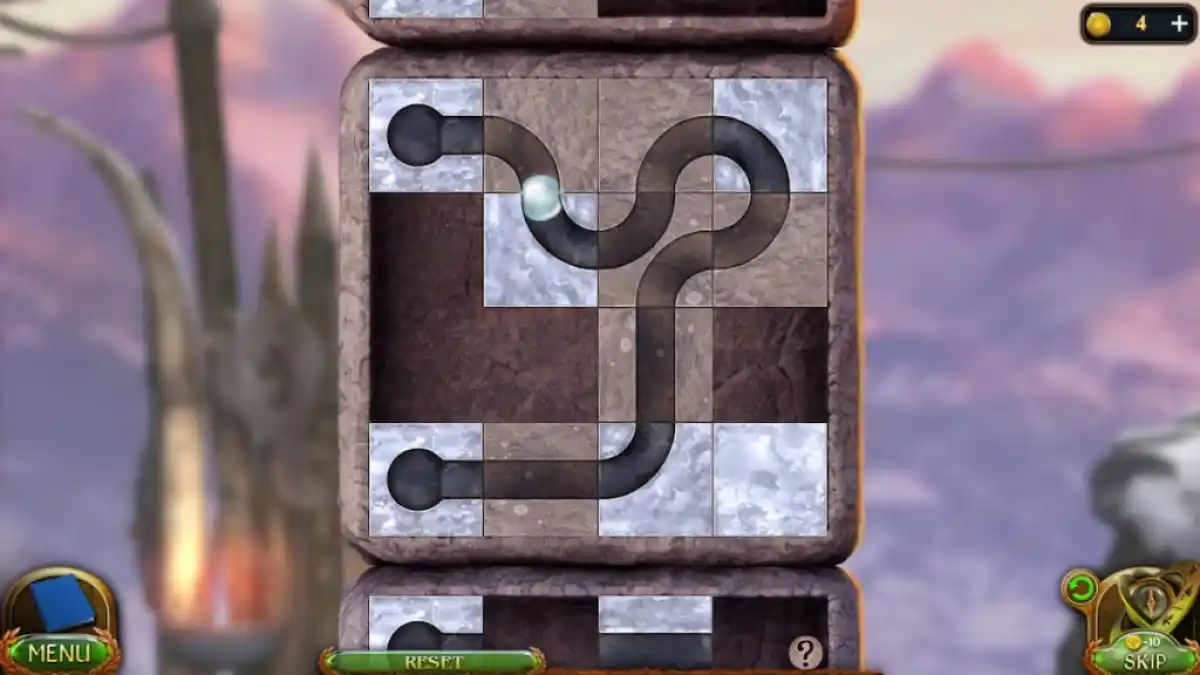
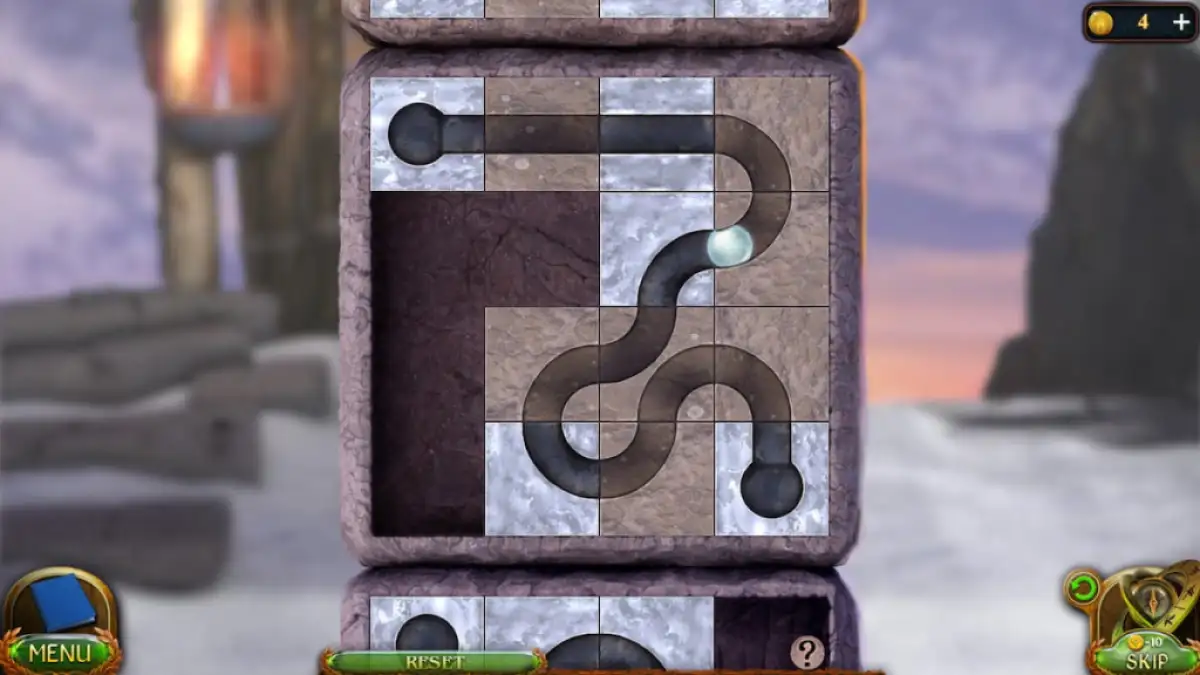
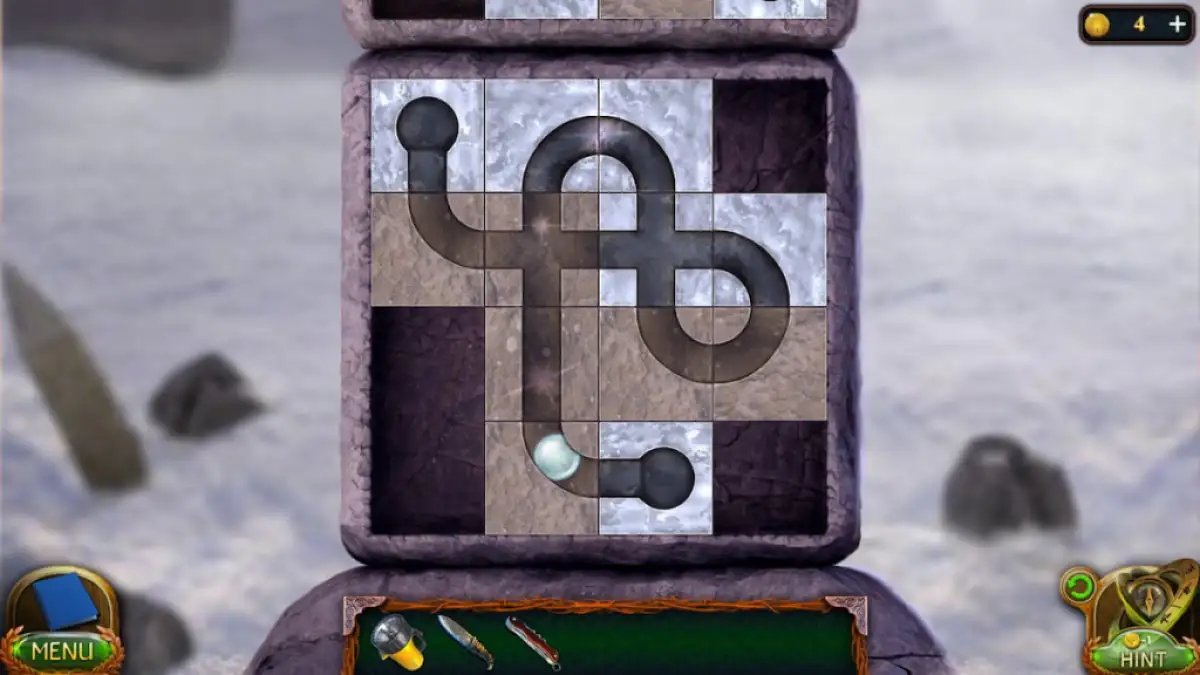
Lost Lands 7 is an engaging point-and-click adventure game with challenging puzzles, some of which took me lots of time and effort to solve. If you've gotten stuck in certain areas of the game, here's a complete Lost Lands 7 Redemption walkthrough to help you complete levels with ease.
Lost Lands 7 Walkthrough - Redemption complete guide
Lost Lands 7 is an adventure escape mystery game divided into 18 tasks, spanning across multiple levels with varying environments. Most of the game's clues are hidden in plain sight, but you'll need to explore every nook and cranny to find the well-hidden secrets and retrieve objects needed to progress further.
Task 1 - Maaron's Artifact
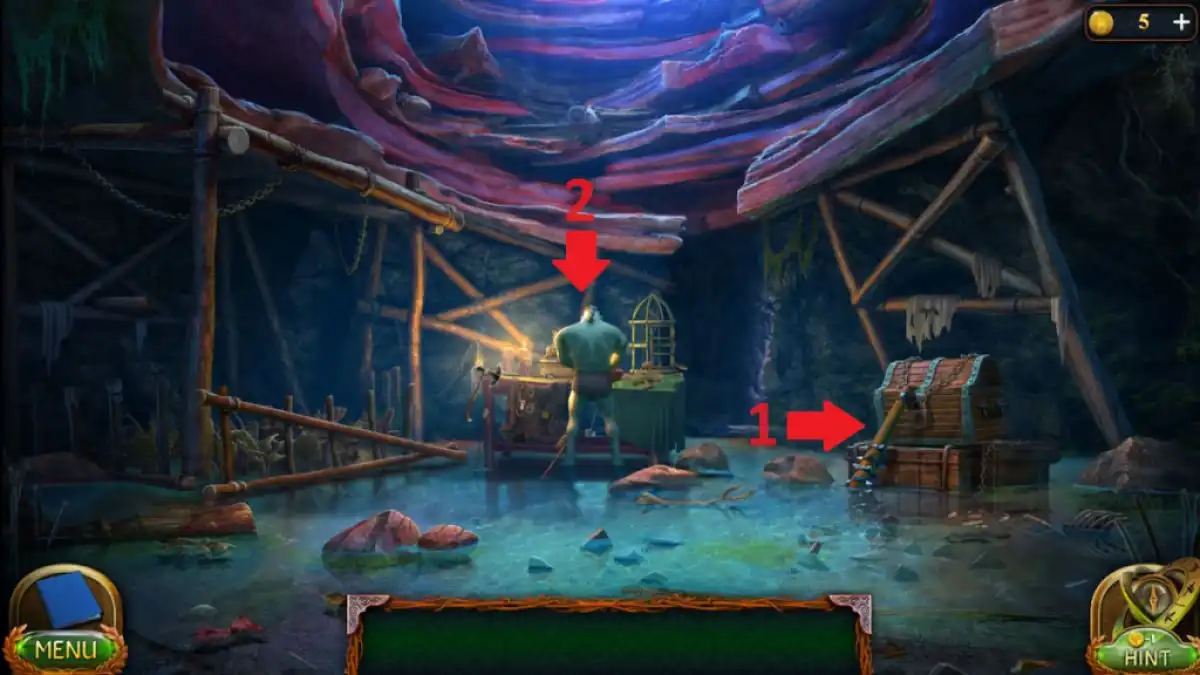
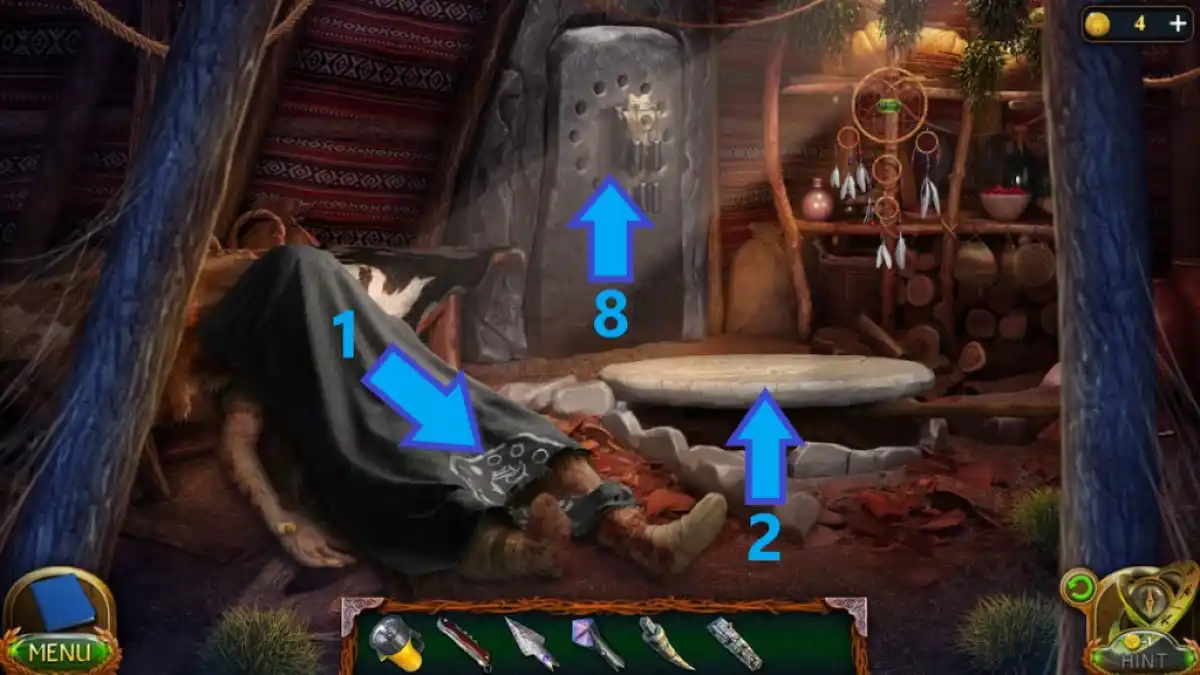
You've woken up in a dark and gloomy tent, and you spot an orc slouched over the table. Luckily, he hasn't noticed you, and you have a chance to take him out and escape.
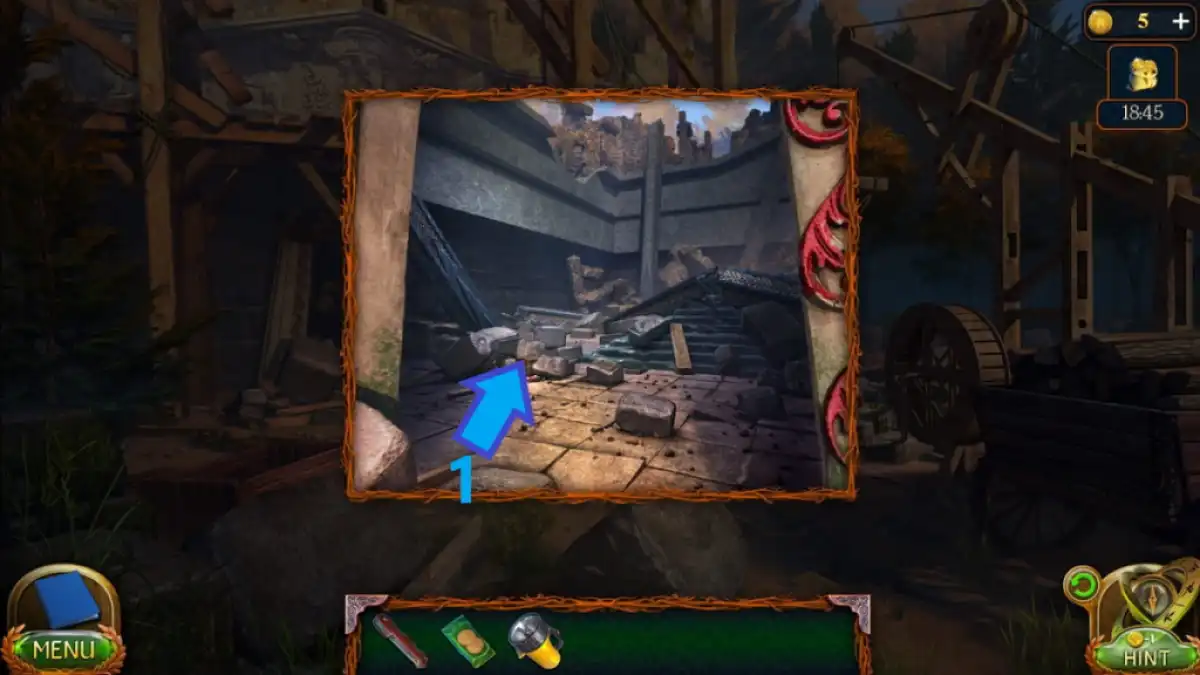
- Drag the club (1) to the orc (2) to knock him out and approach his table.
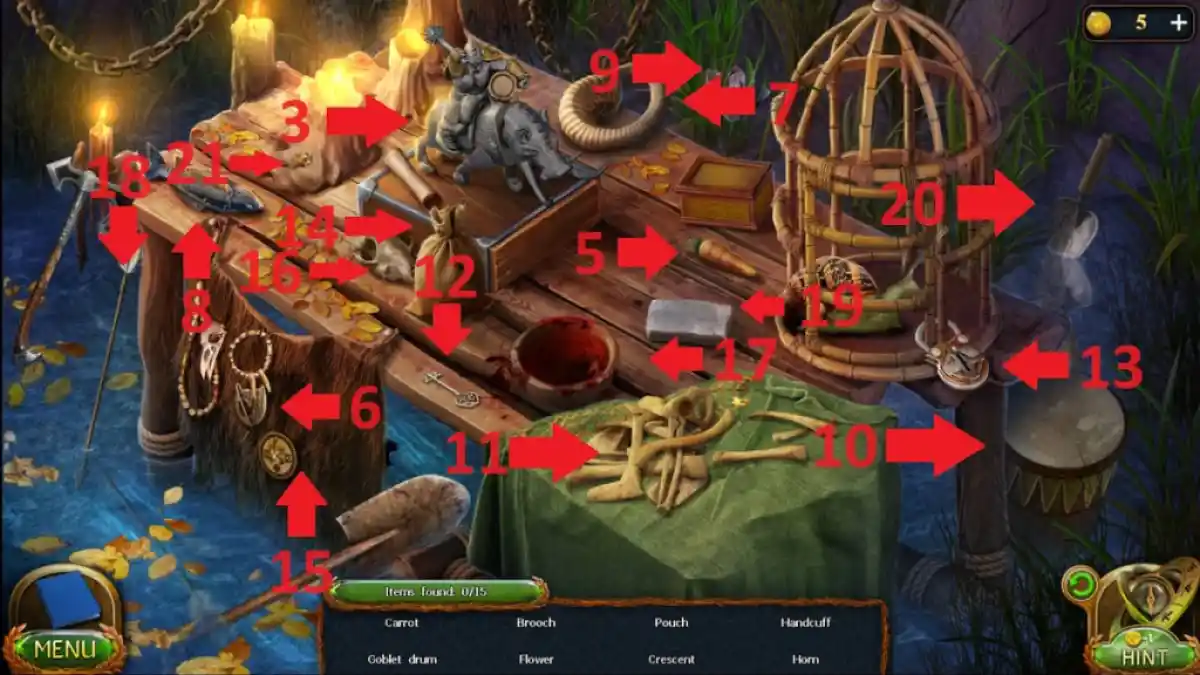
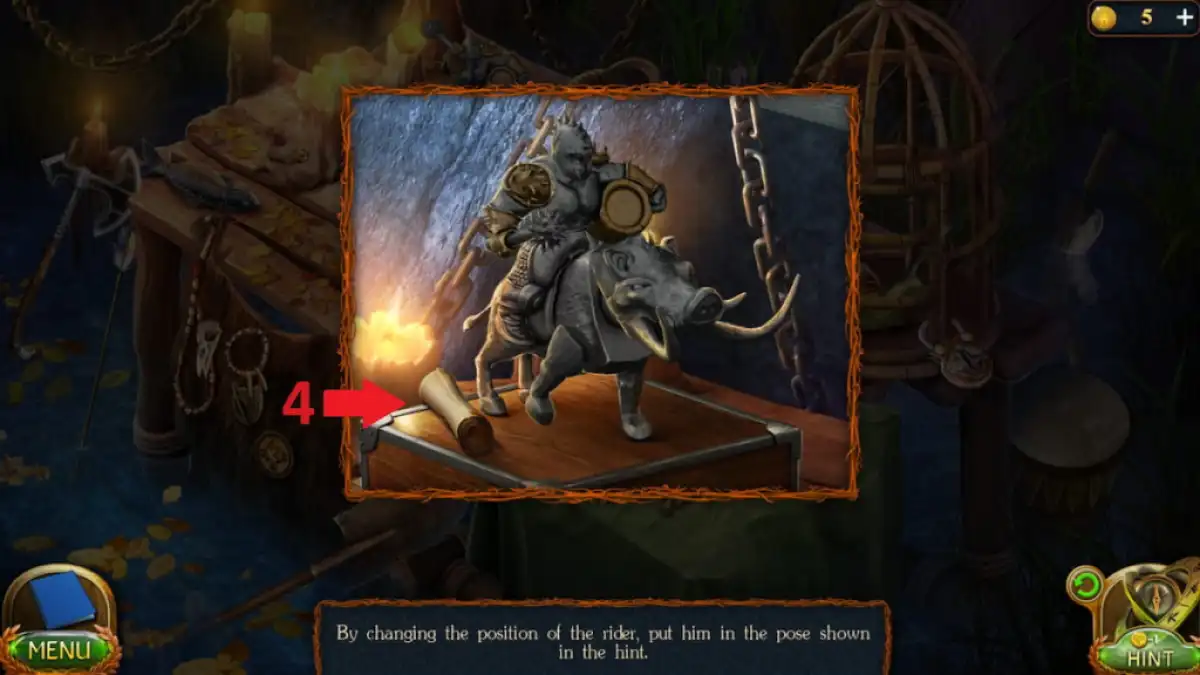
- Position the rider (3) as seen in the parchment (4).
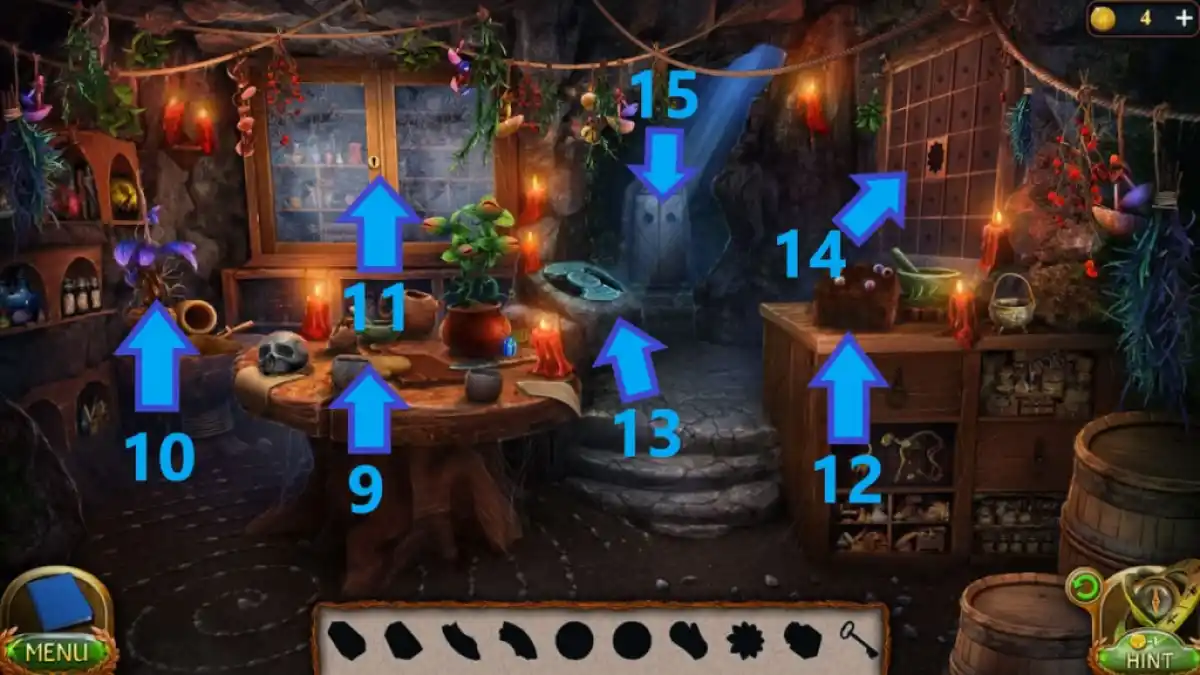
- Find the following items: a carrot (5), a brooch (6), a horn (7), a fish (8), a flower (9), a golden drum (10), and a crescent underneath the bones (11).
- Use the key (12) to unlock the cage lock (13), open the cage, and click the snail.
- Take the pouch (14)
- Move the fur (15) and the apples underneath to reveal a cannonball and rope.
- Take the handcuff from the drawer underneath the rider.
- Place the skull (16) into the wodden bowl (17) and collect the red skull.
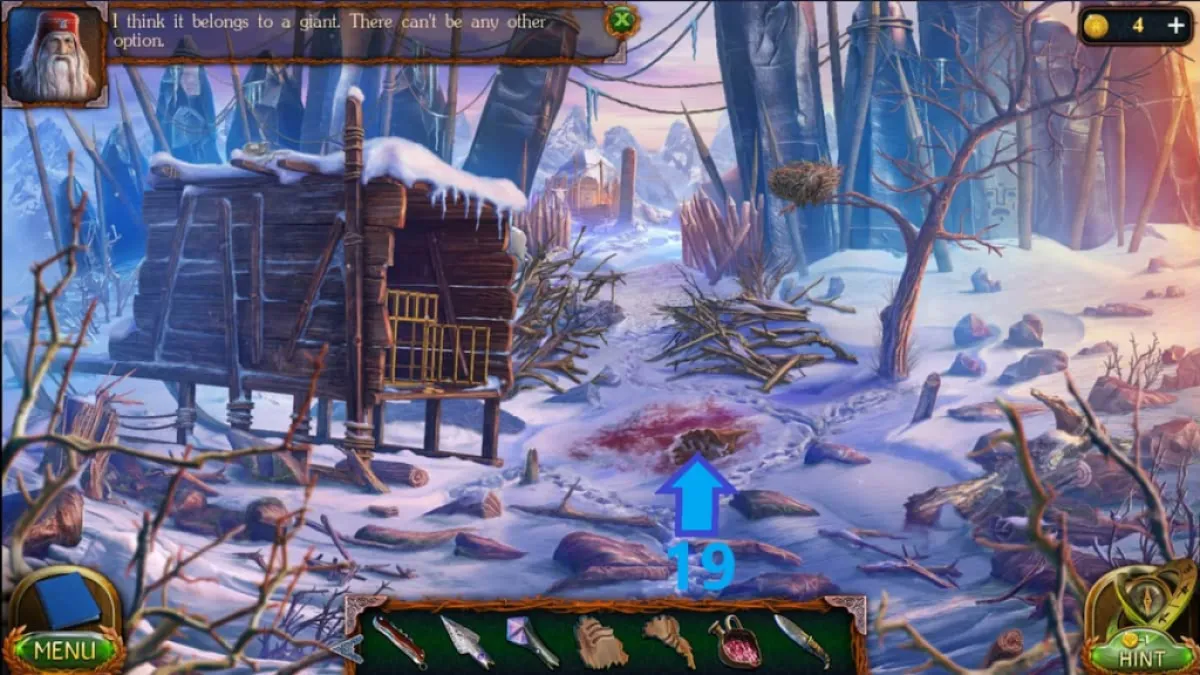
- Place the arrow (18) onto the whetstone (19) and collect the sharpened arrow.
- Place the garden trowel (20) underneath the candle (21) and collect the signet.
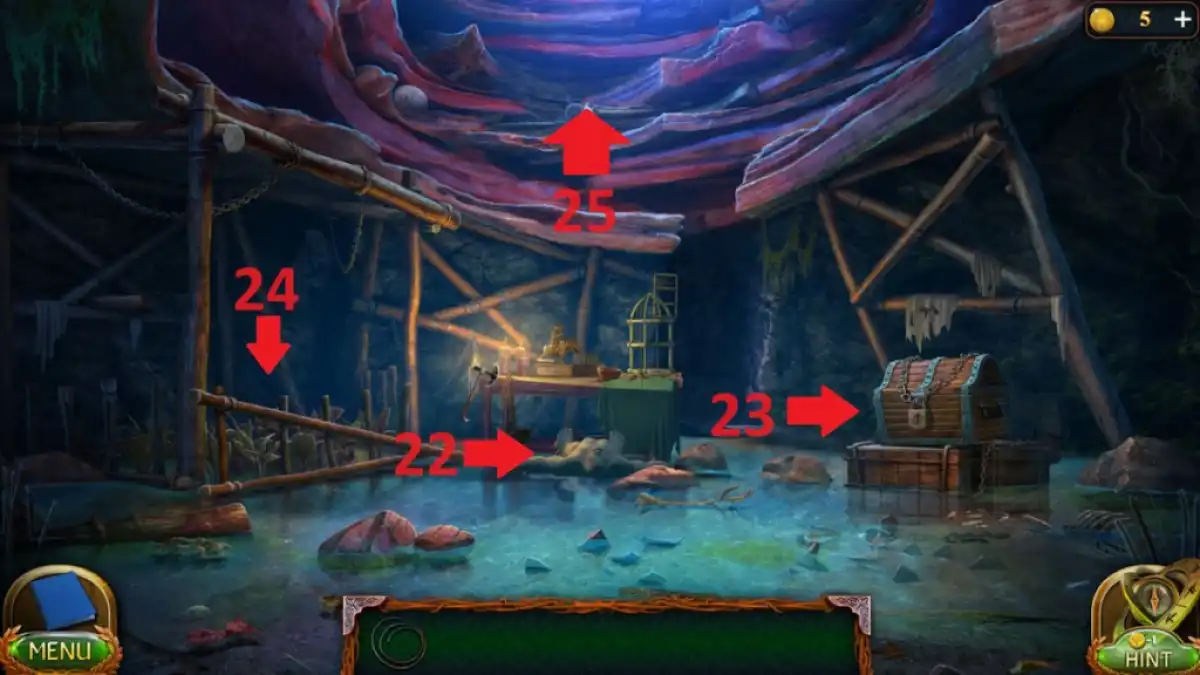
- Collect the key from the orc (22) and use it to open the chest (23).
- Move the armor and the shield to collect the spherical stone and scissors underneath.
- Take the slats (24), join them with rope, and use scissors to make a ladder.
- Place the ladder on the wall (25) to climb out.
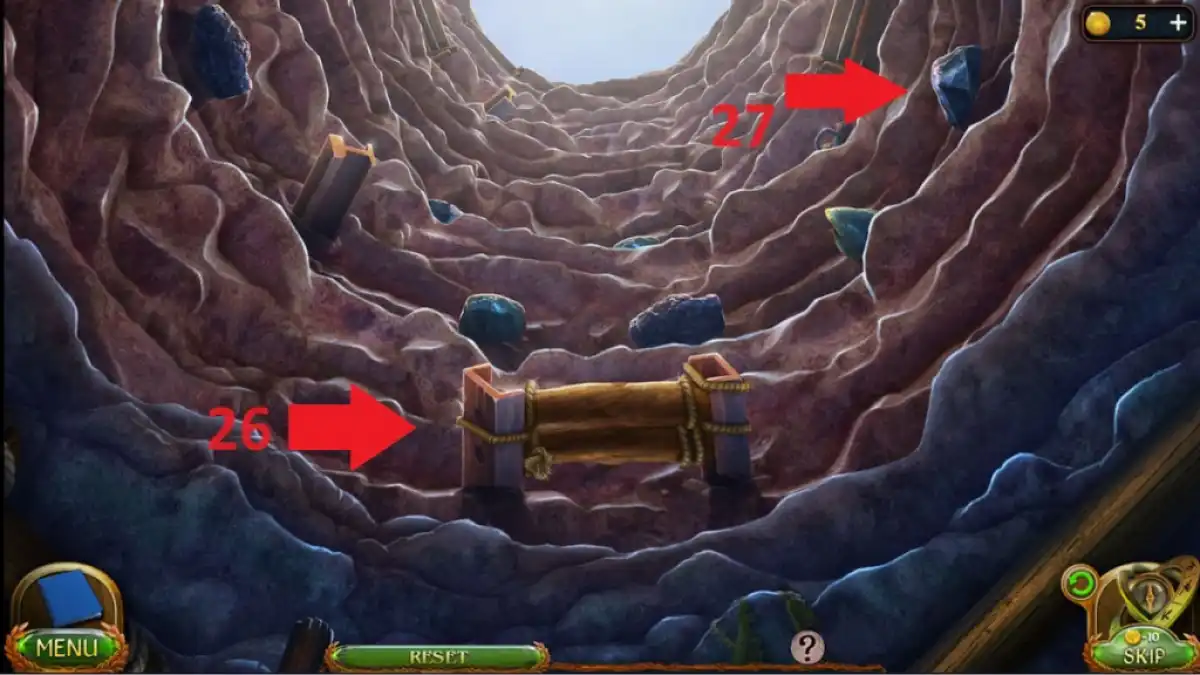
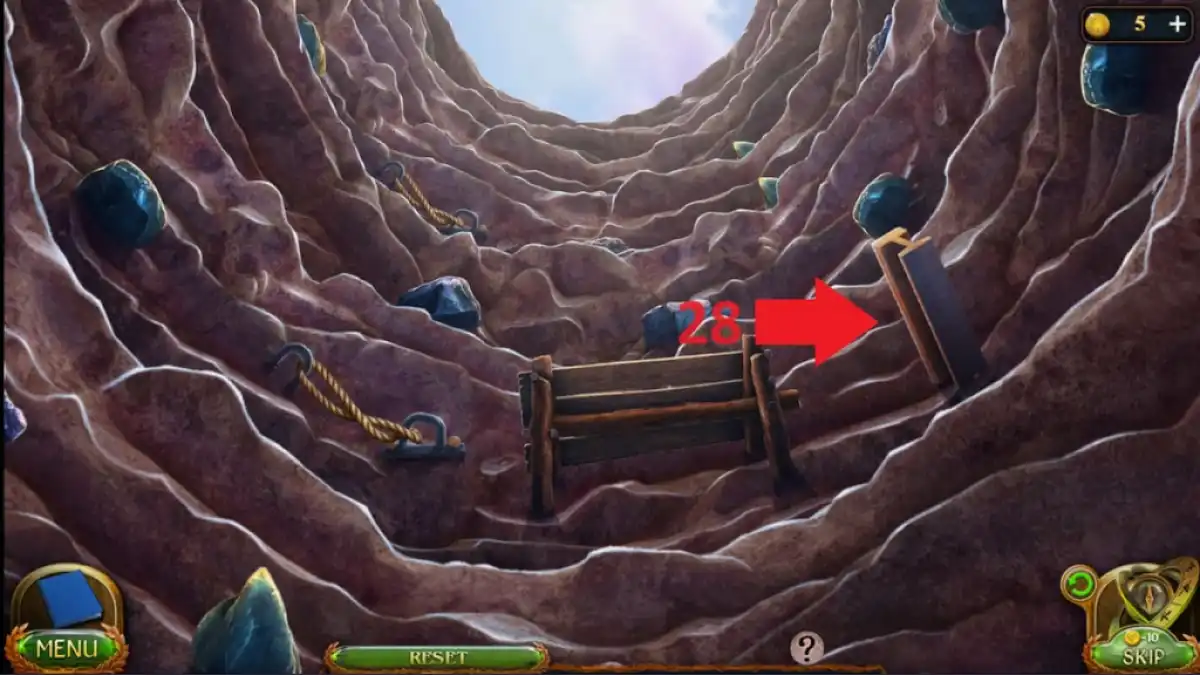
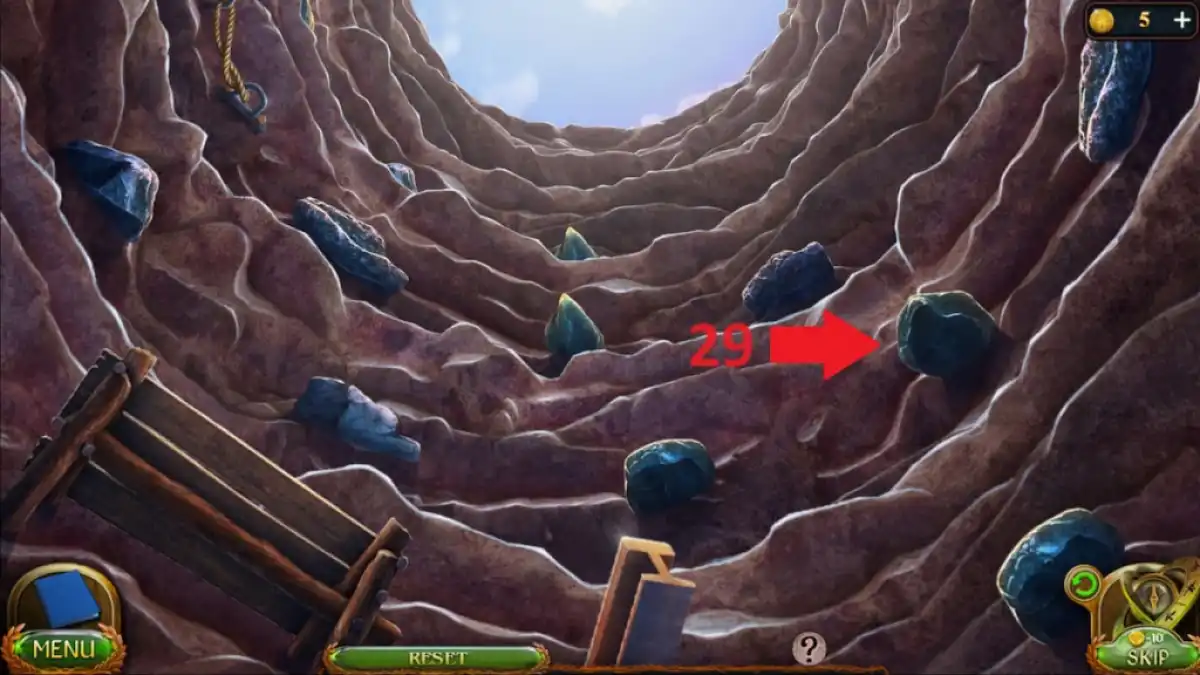
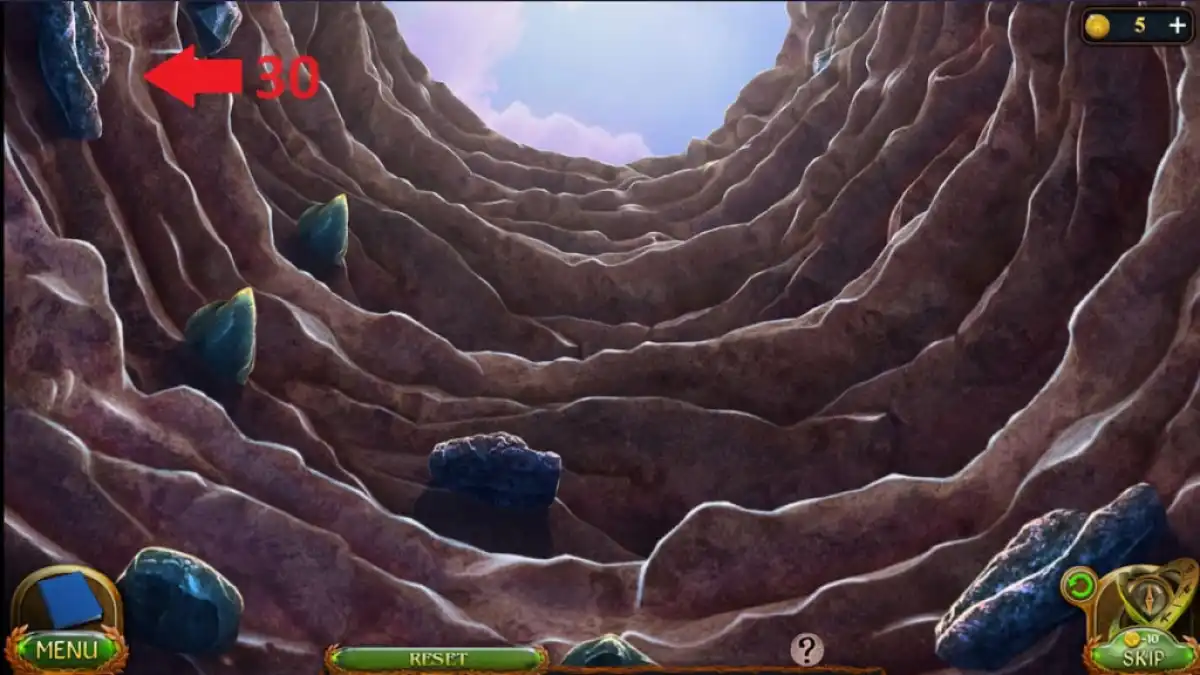
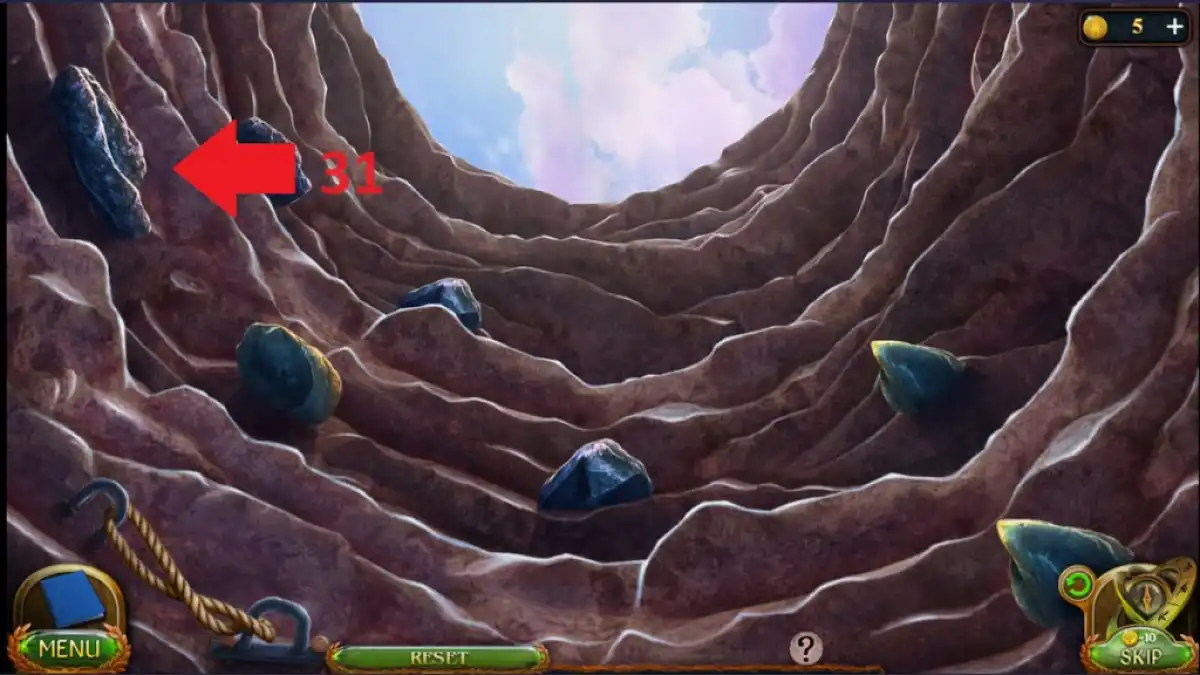
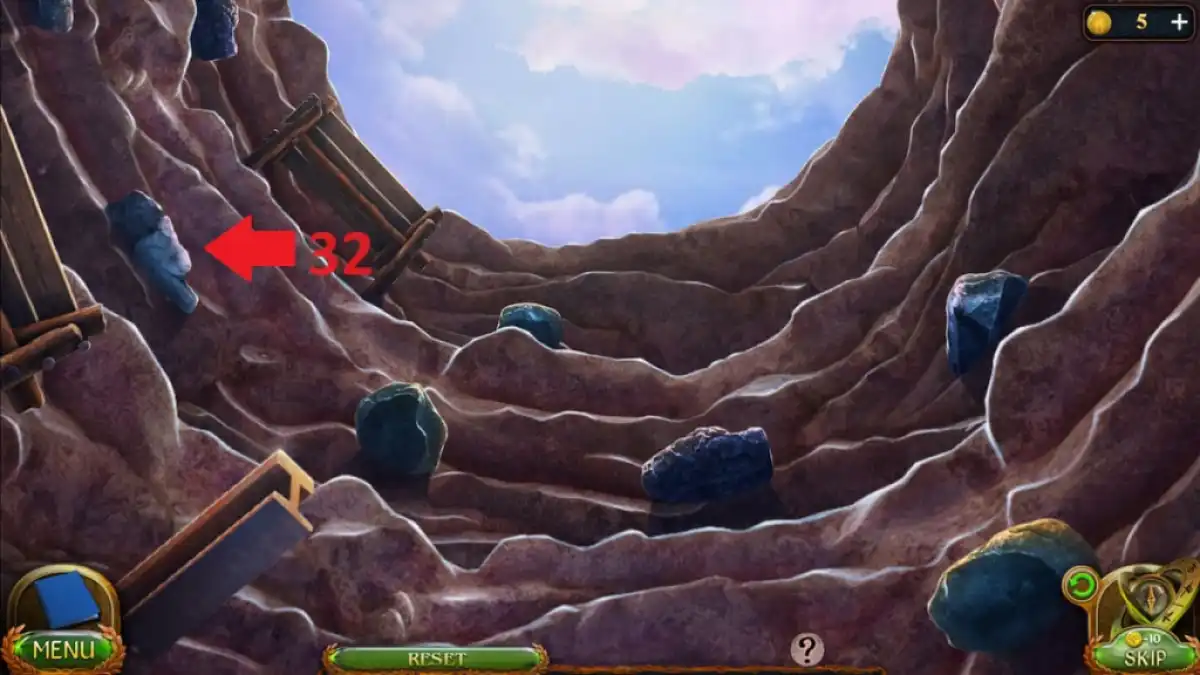
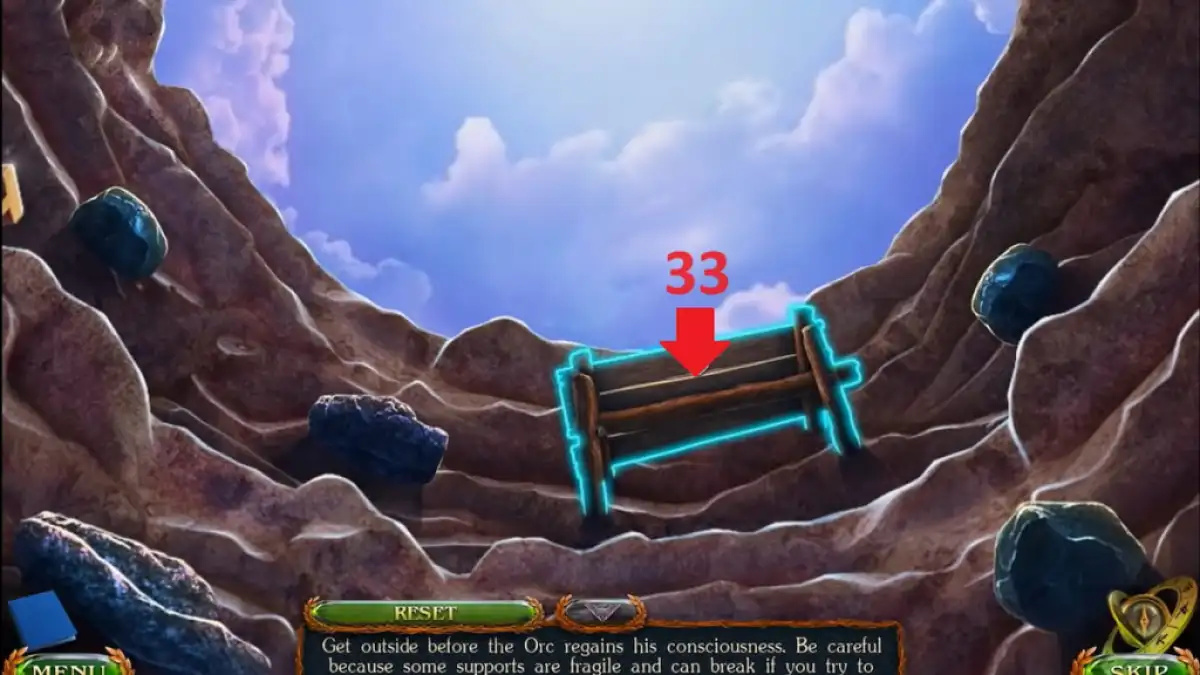
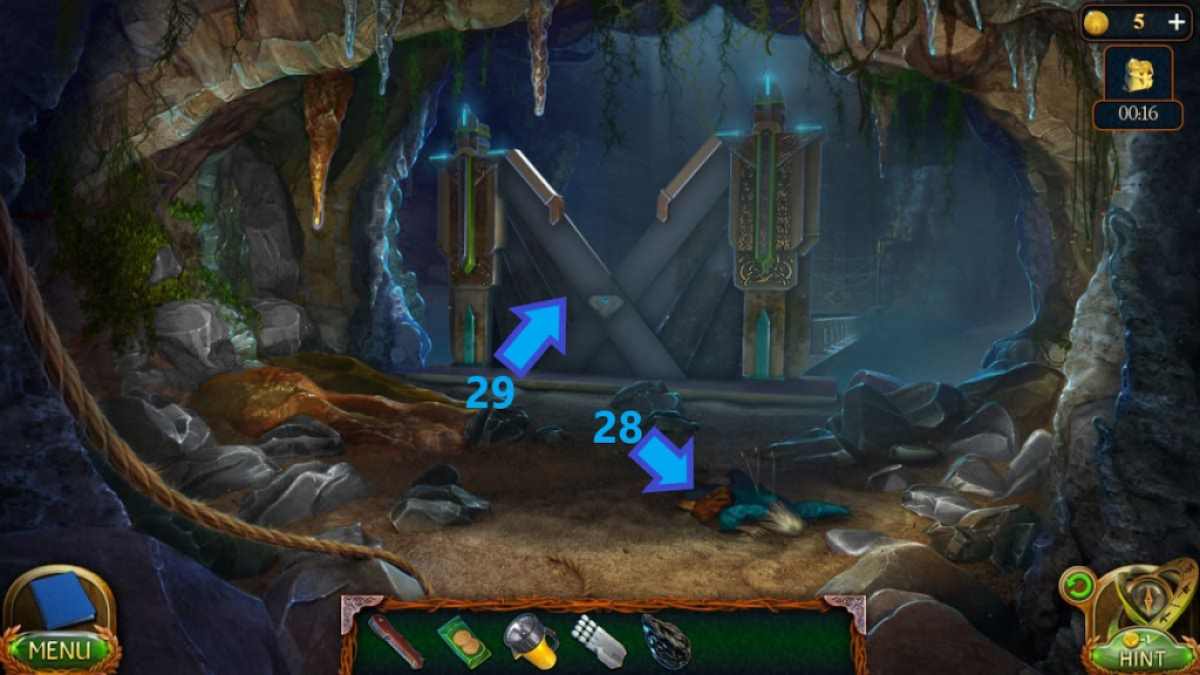
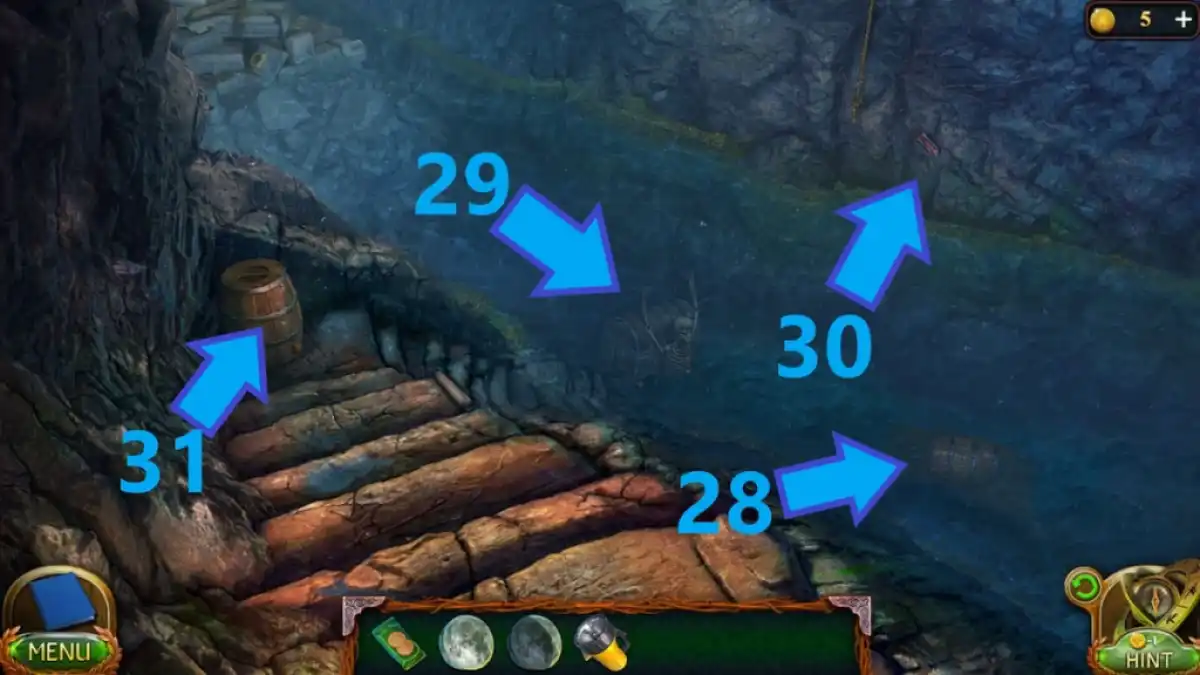
- Click the ladder (26), the rock (27), the steel beam (28), the second rock (29), the upper left rock (30), the second upper left rock (31), the middle rock on the left (32), and the wooden step (33) to get out.
Task 2 - Hilamir the Keeper
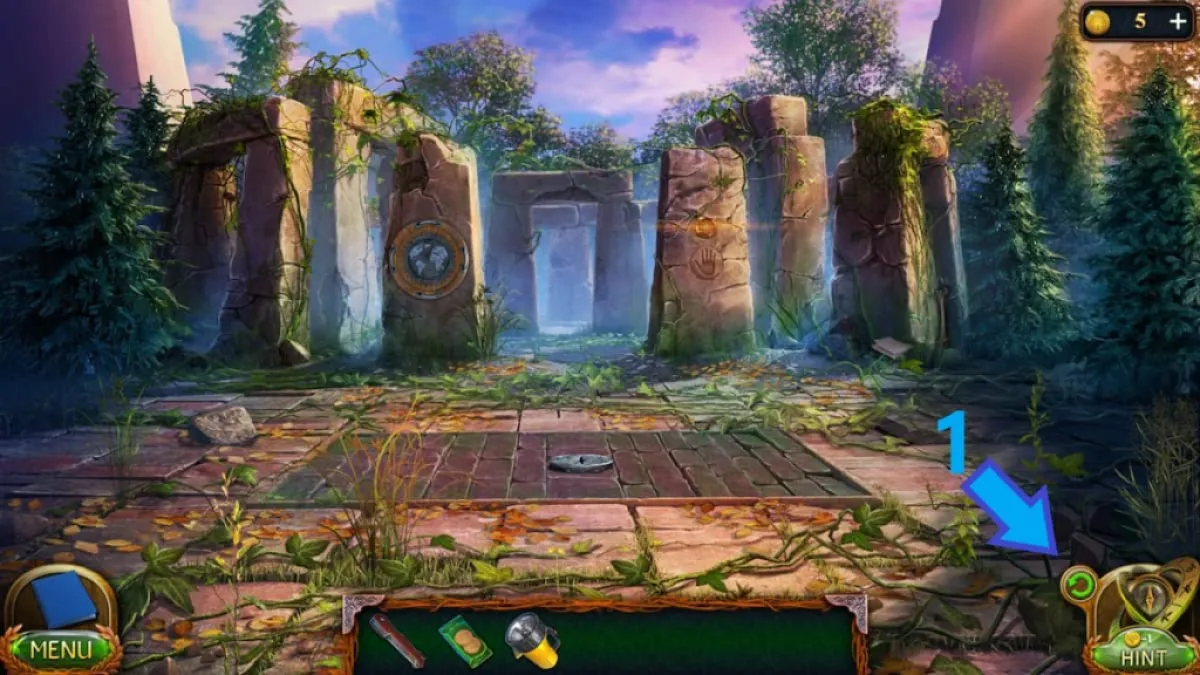
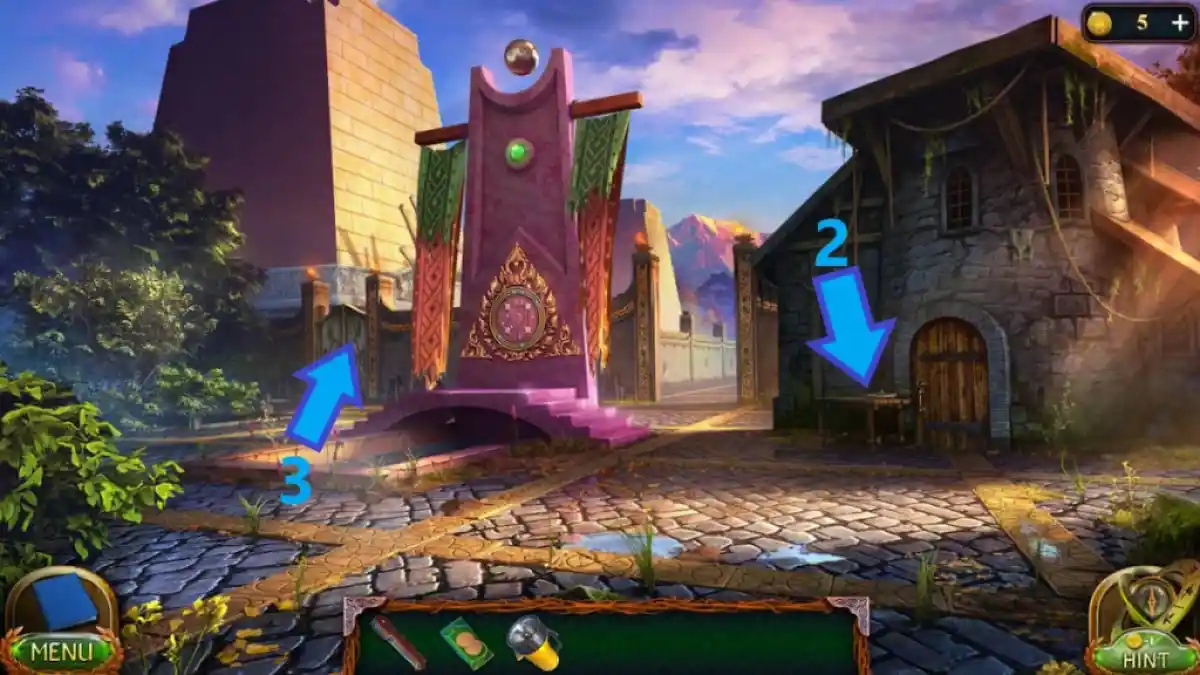
You've made your way to Drak Square, where you find Hilamir's home. To find a key to his home, you'll need to find all fragments of the Steele and look for the key behind one of the stone gates.
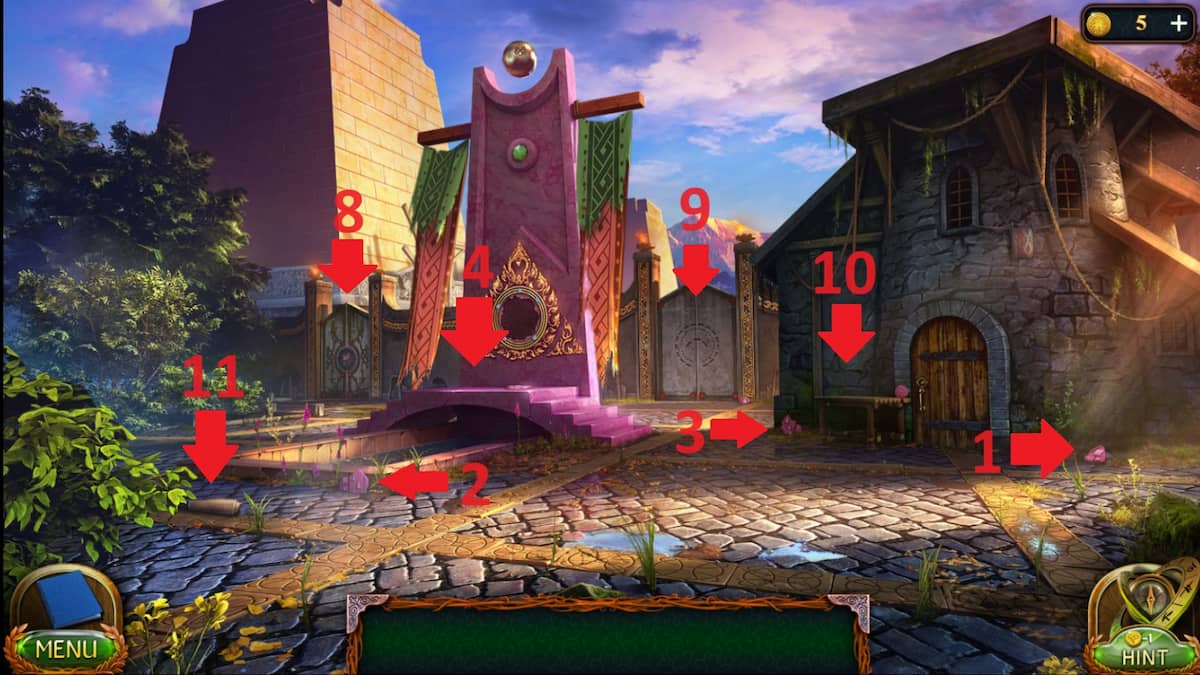
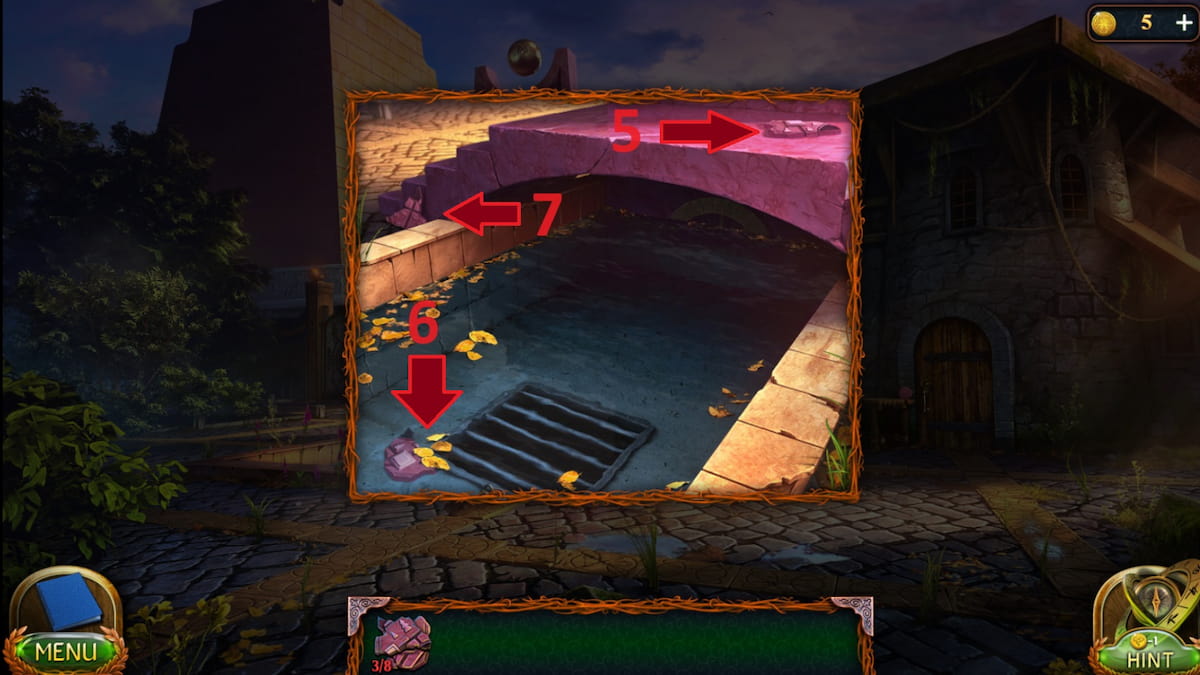
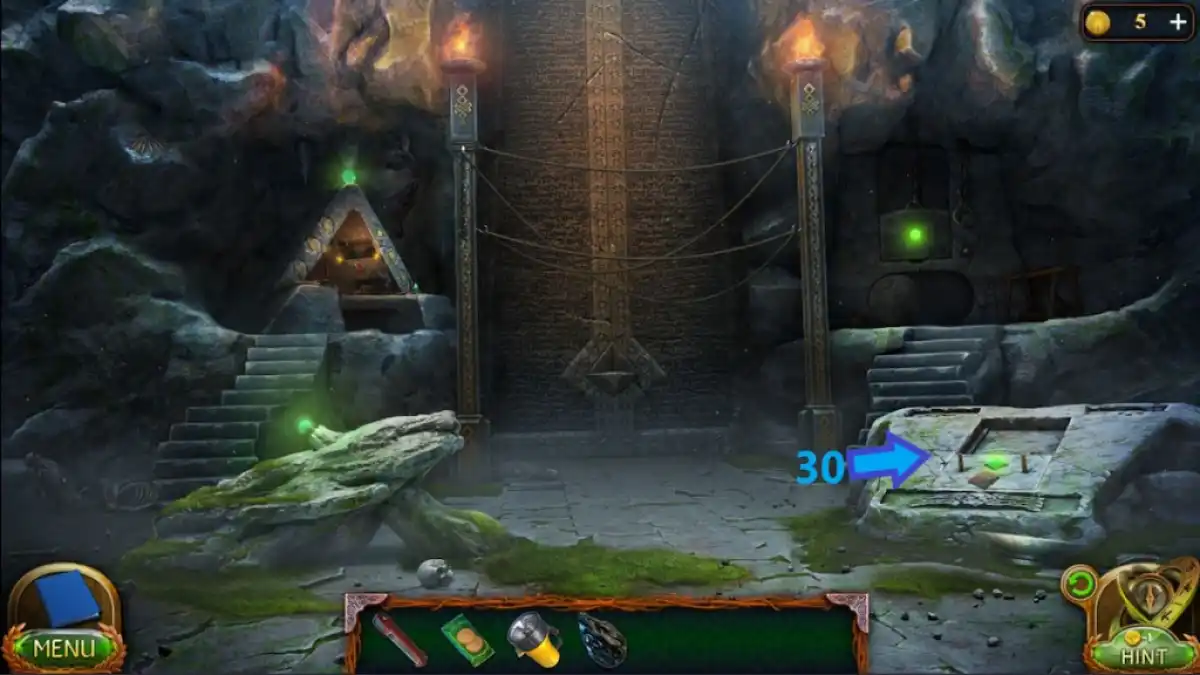
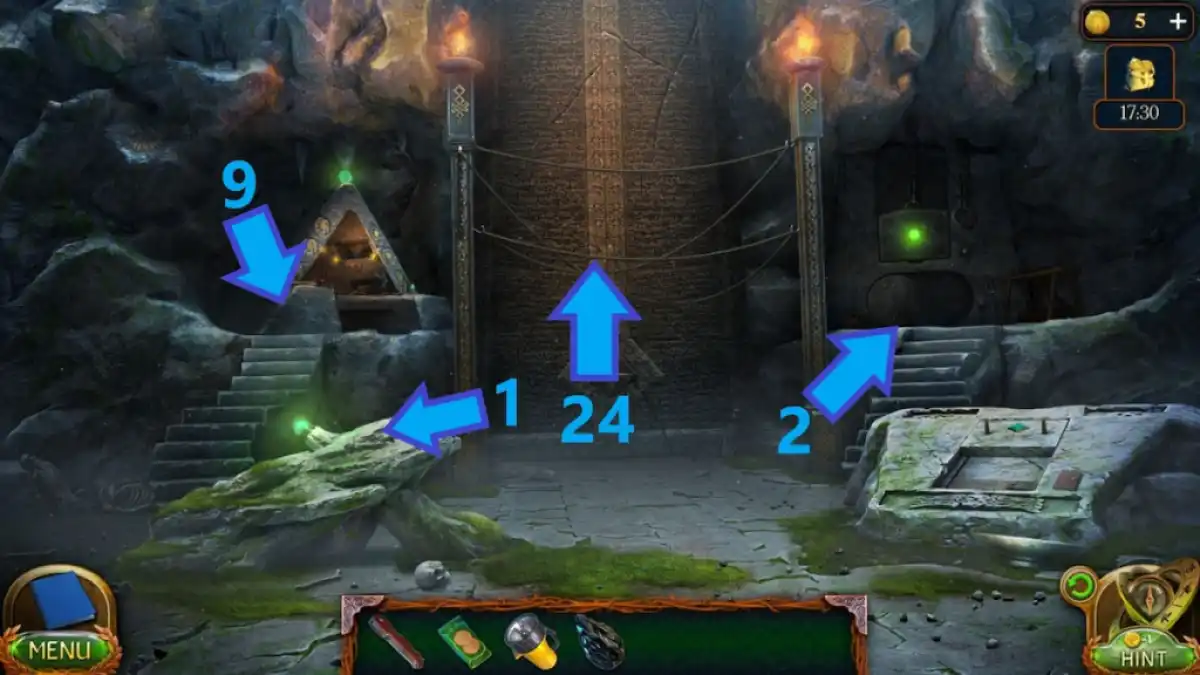
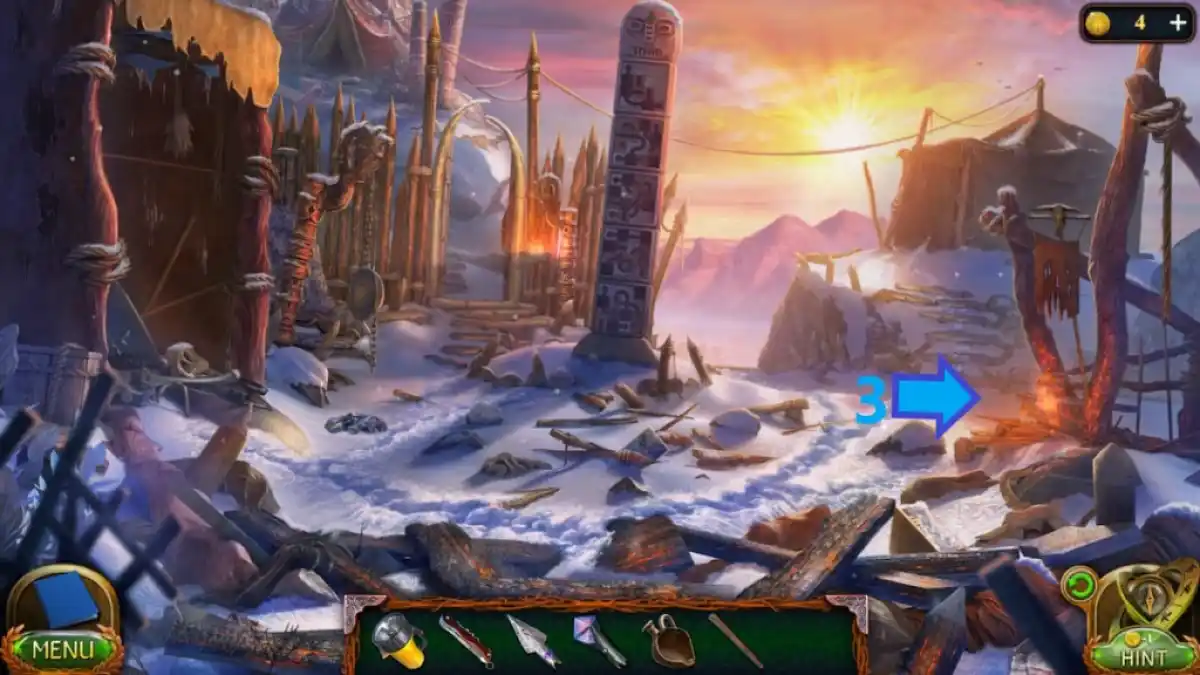
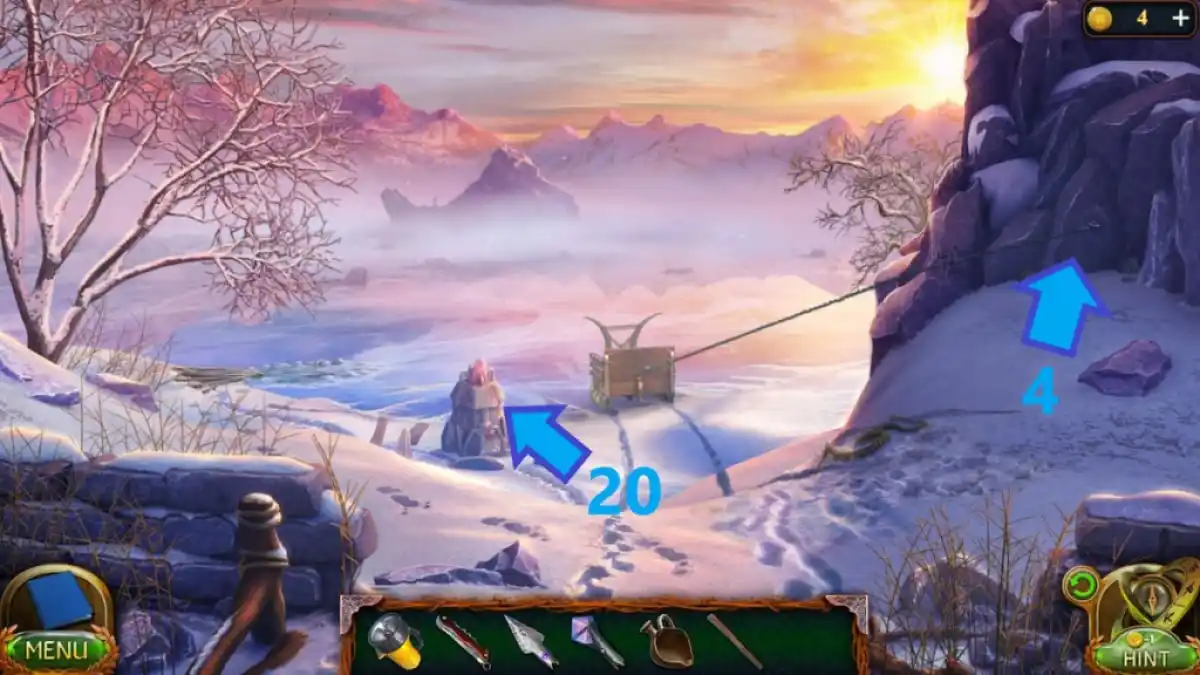
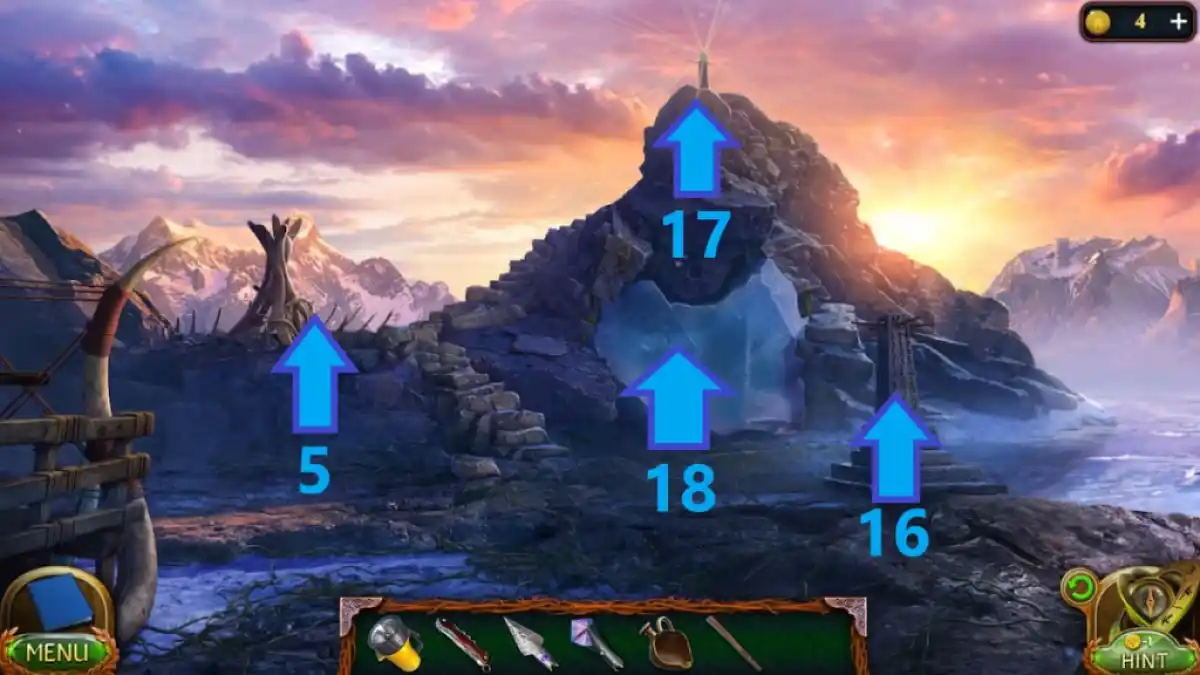
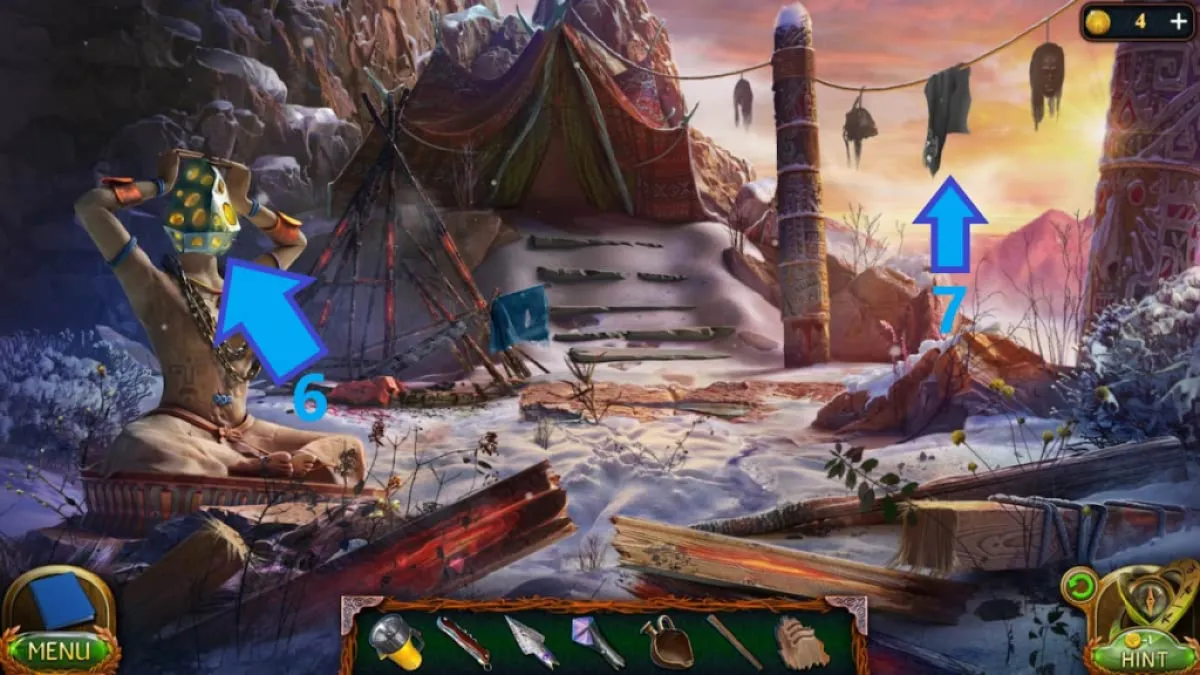
- Collect three fragments of the Steele (1-3), go underneath the arch (4), and collect three more fragments (5-7).
- Collect the fragment in the first gate (8) and the second gate (9).
- Collect the central element (10) and the parchment (11).
- Go to the golden triangle and use the elements and the fragments to fill the void.
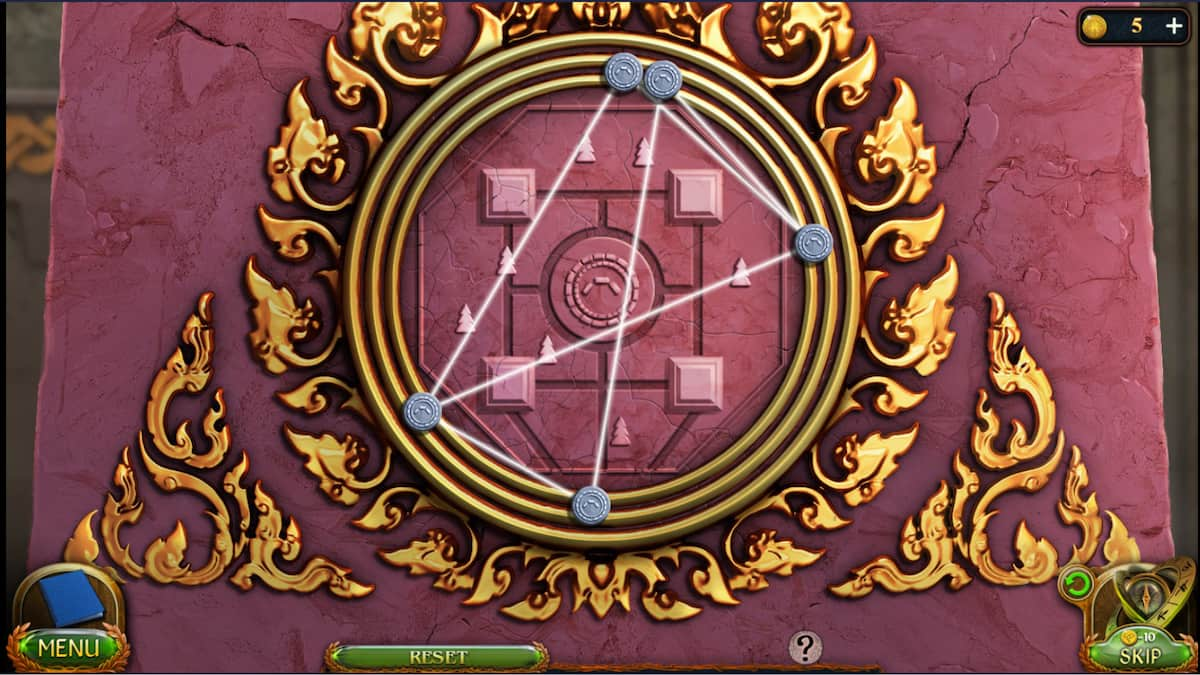
- Position the silver chips so the rays pass through all the trees (Image 3).
- Enter the open gate.
Related: Darkness and Flame 2 Walkthrough
Task 3 - Particles of the void.
A mystical temple hides an entrance to the secret room, which holds the Particles of the Void. Let's unlock it!
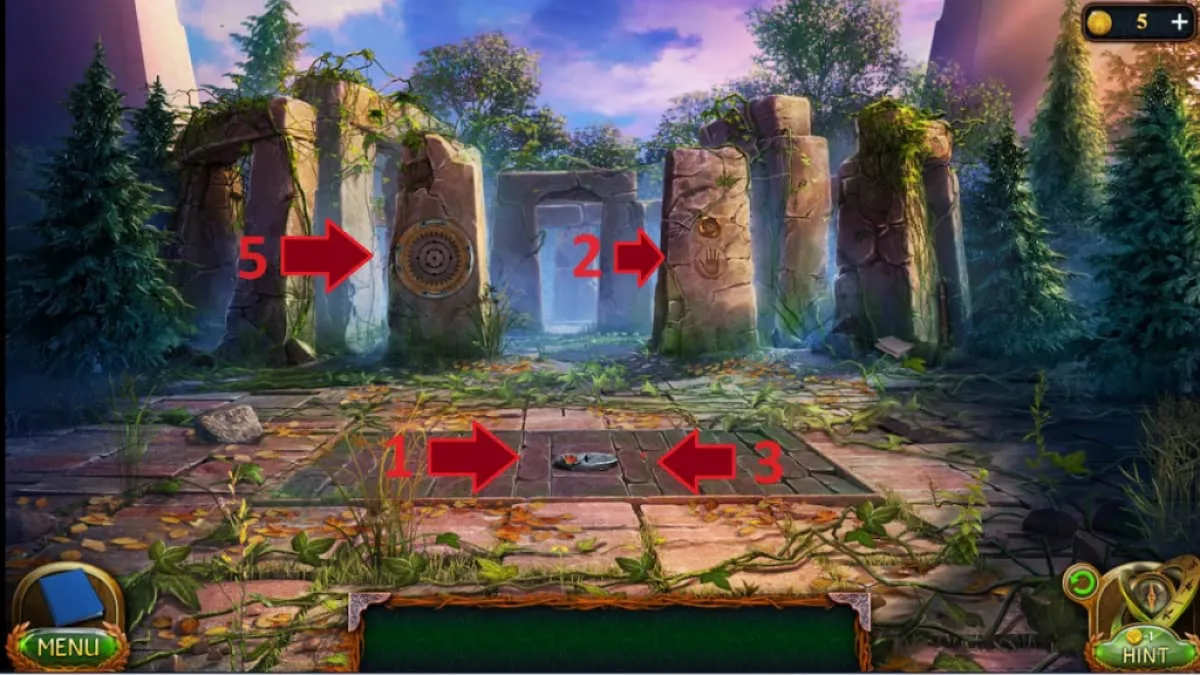
- Collect the framed crystal (1) and place it above the hand imprint (2) to get the vessel for particles and the key from the hatch.
- Select the key from the hatch and use it on the floor opening (3) to open a secret room.
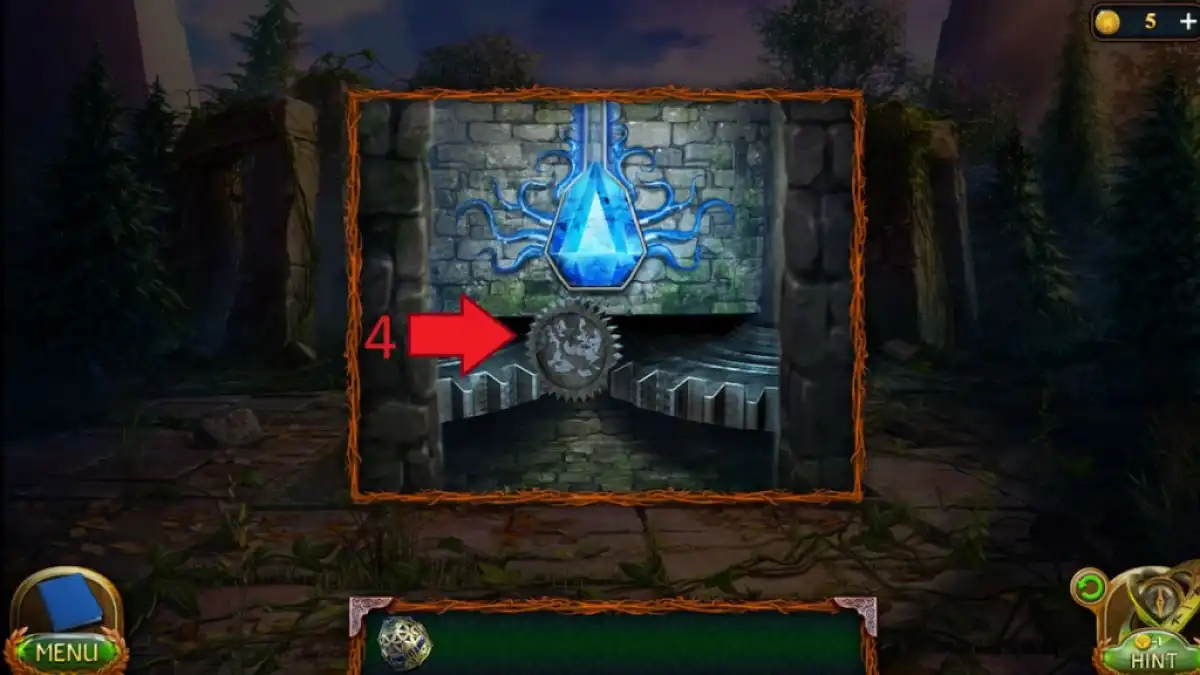
- Enter the secret room and get the control element (4).
- Select the control element and use it on the left stone pillar (5).
- Press the elements three times, and then press the hand imprint.
- Enter the dark portal and use the vessel for particles.
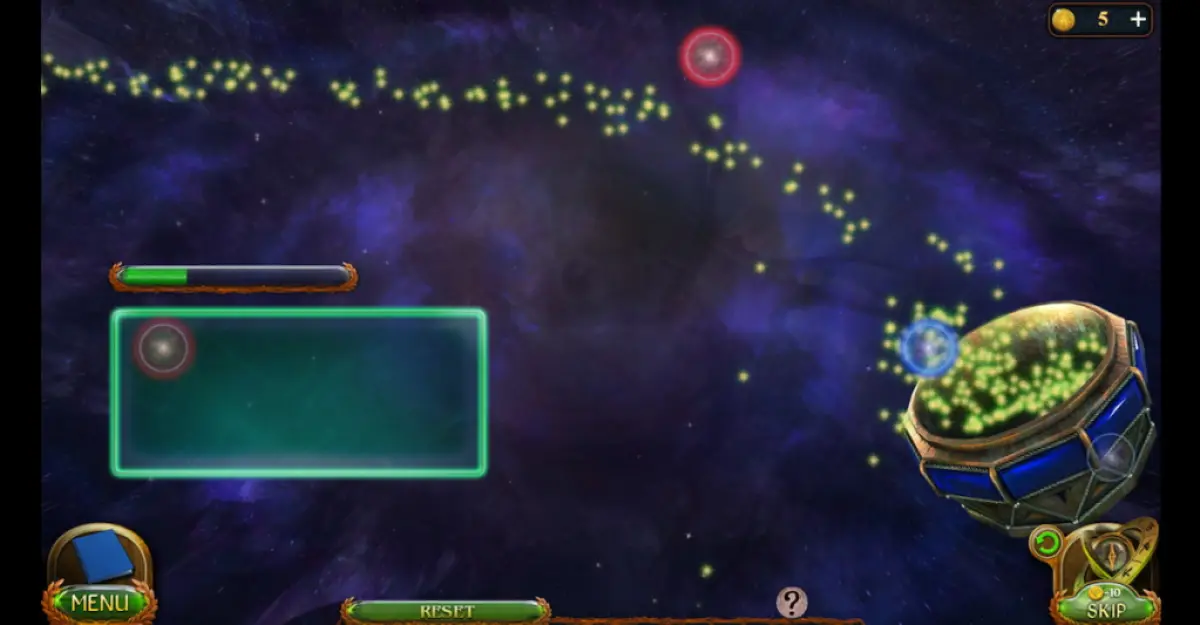
- Drag the red energy ball into the particle flow and place two blue energy balls onto the vessel to redirect the flow into the vessel (Image 3).
Task 4 - News
The Particles have teleported you to a memory long gone. You'll need to assemble the puzzle fragments of your memories to open the next room and uncover the secrets of your past.
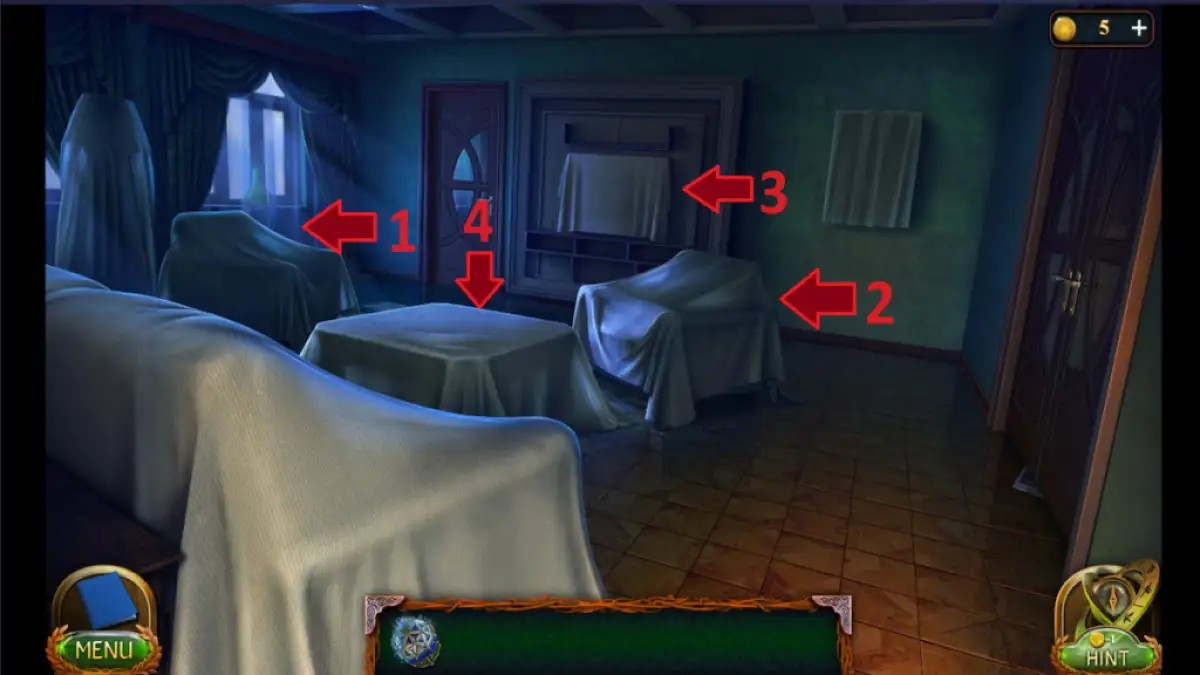
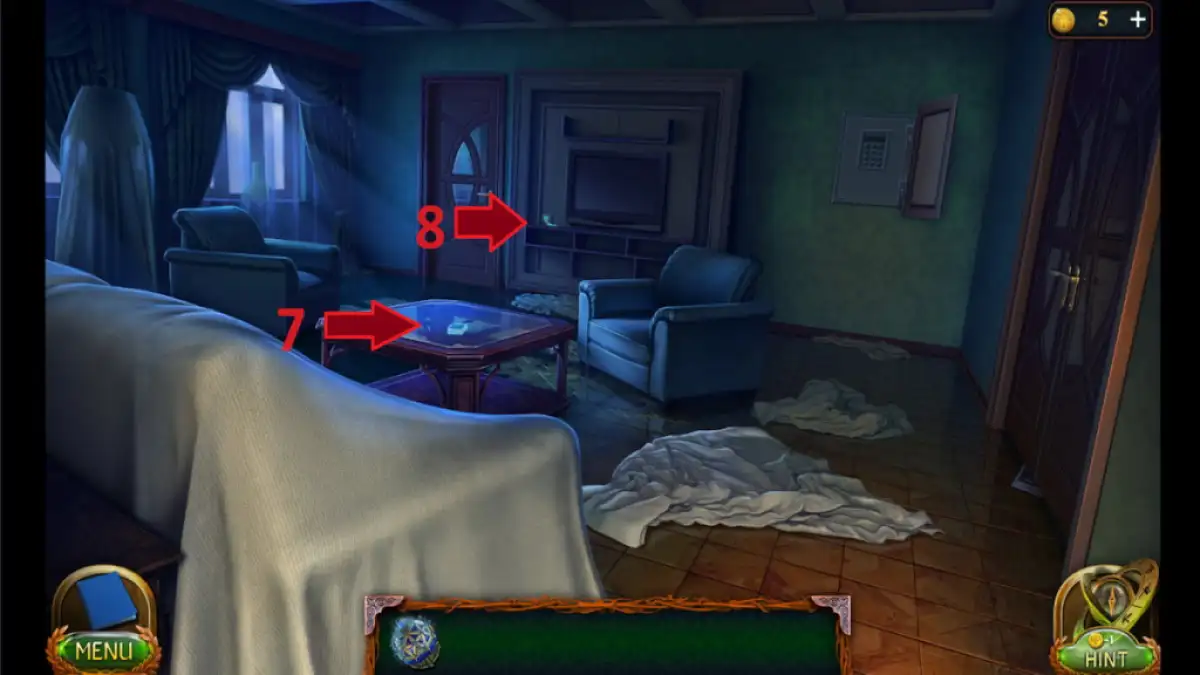
- Uncover the armchairs (1, 2), the TV (3), and the coffee table (4).
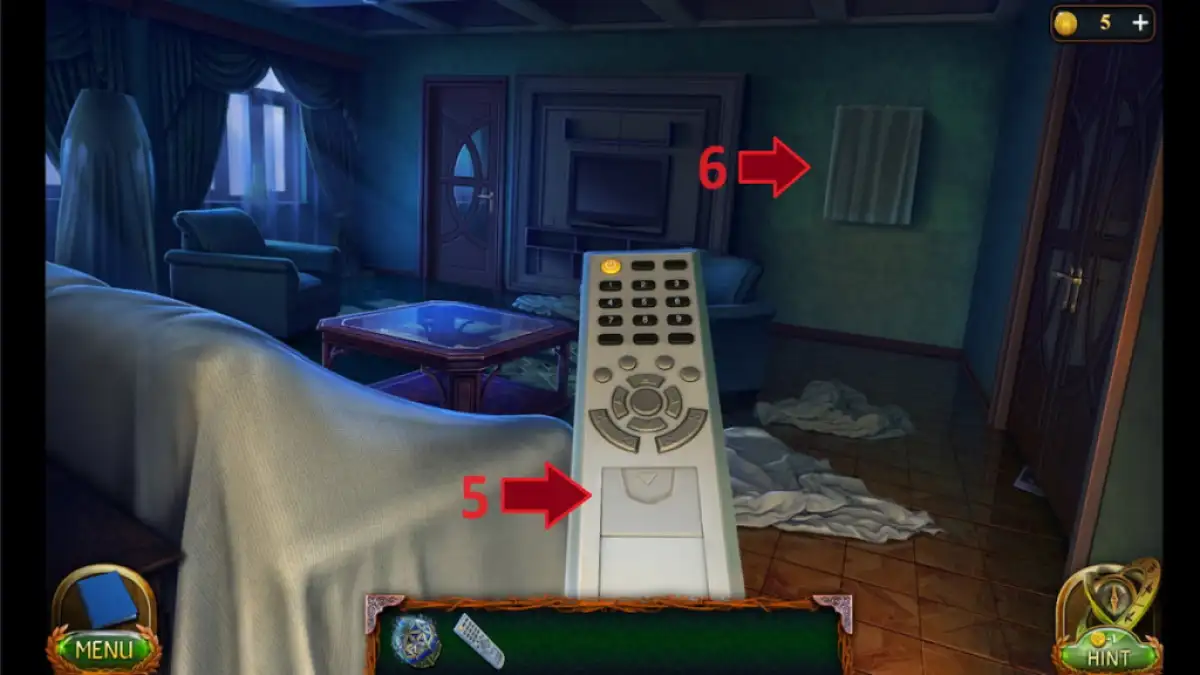
- Grab the remote from the coffee table and use it on the TV.
- Press the sliding part (5) to reveal a secret button, and press it again to open the safe (6).
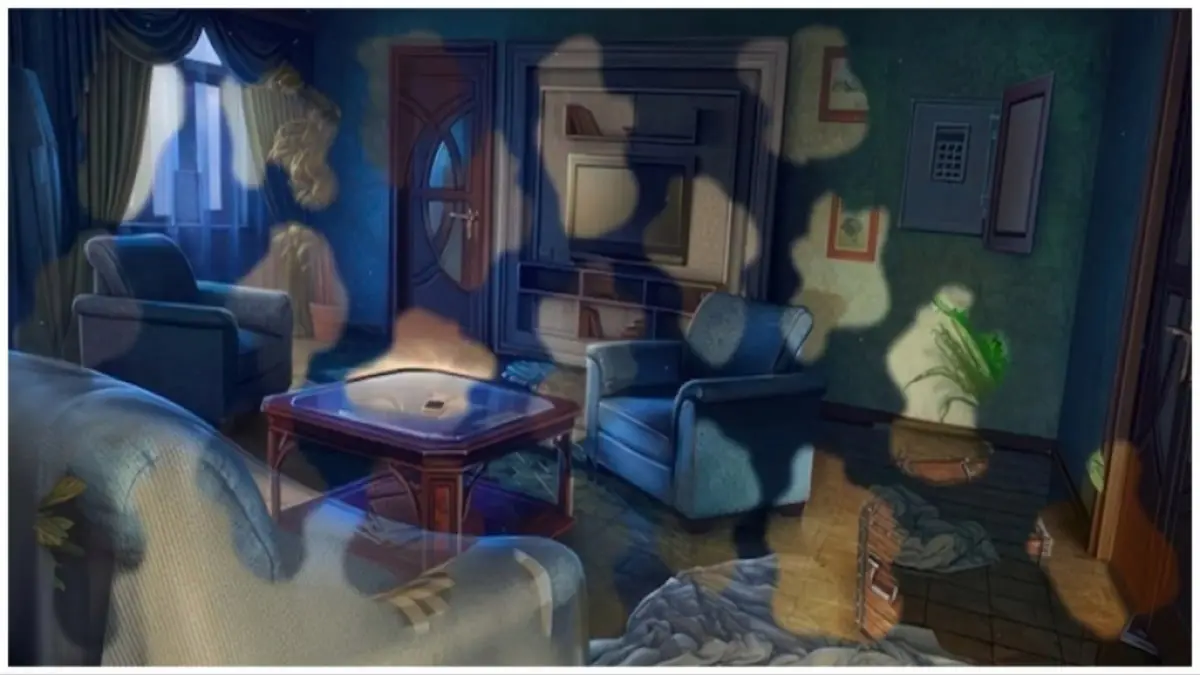
- Approach the safe and then place the fragments across the picture to color it in (Image 3).
- Pick up the memories about the phone (7) from the coffee table.
- Connect the memories about the phone to the charger (8).
- Read the message from the phone, input the message code (4815162342) into the safe keypad, and press enter to open it.
- Pick up the knife and the money, and receive the key.
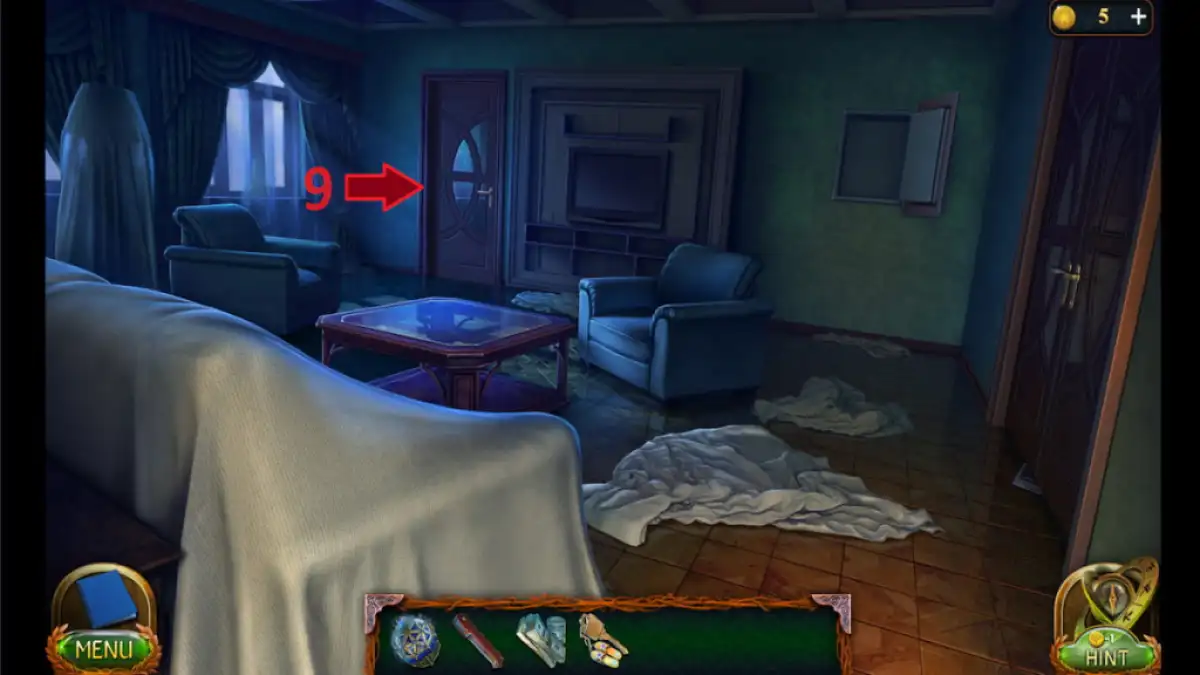
- Use the key to unlock the door (9) and enter the room.
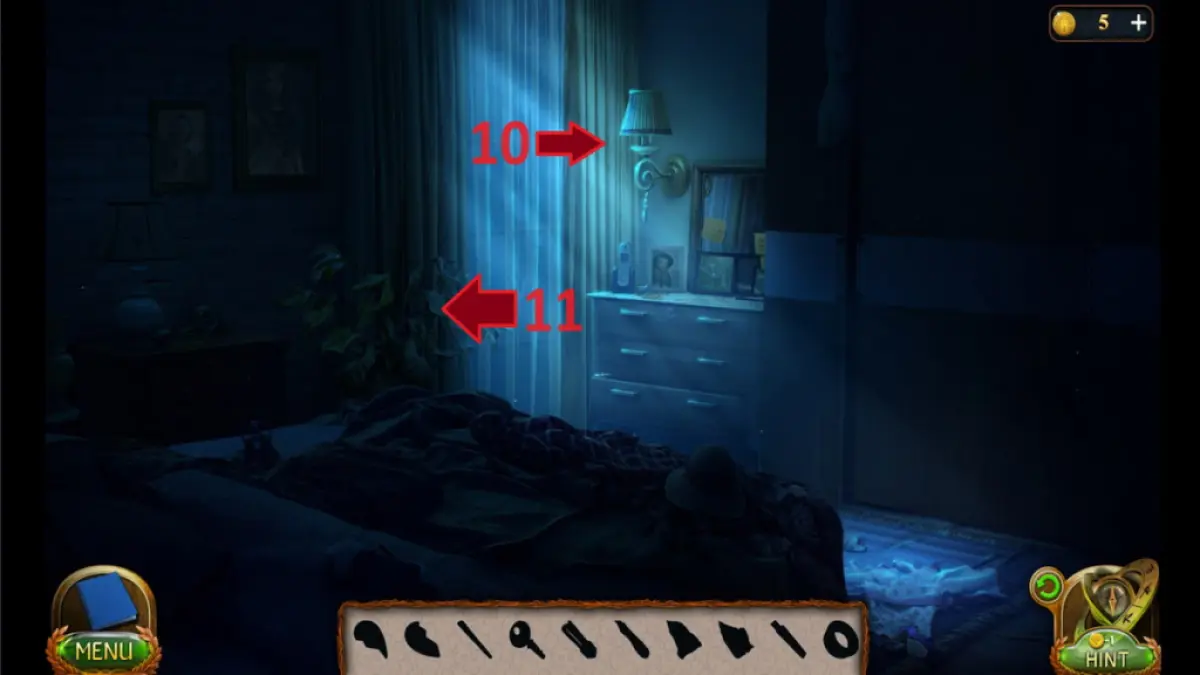
- Turn on the lamp (10) and take the stick (11).
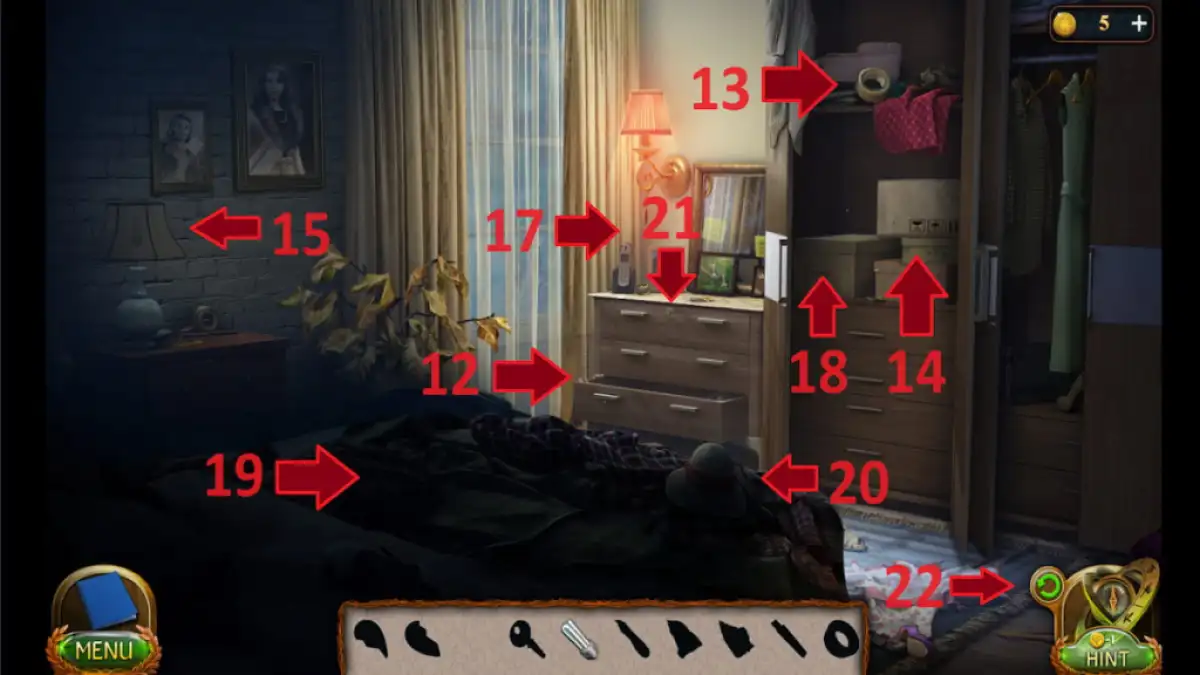
- Use the stick to open the drawer (12), take the key and a set of blades.
- Open the wardrobes and take the duct tape (13) and a part of the photo (14).
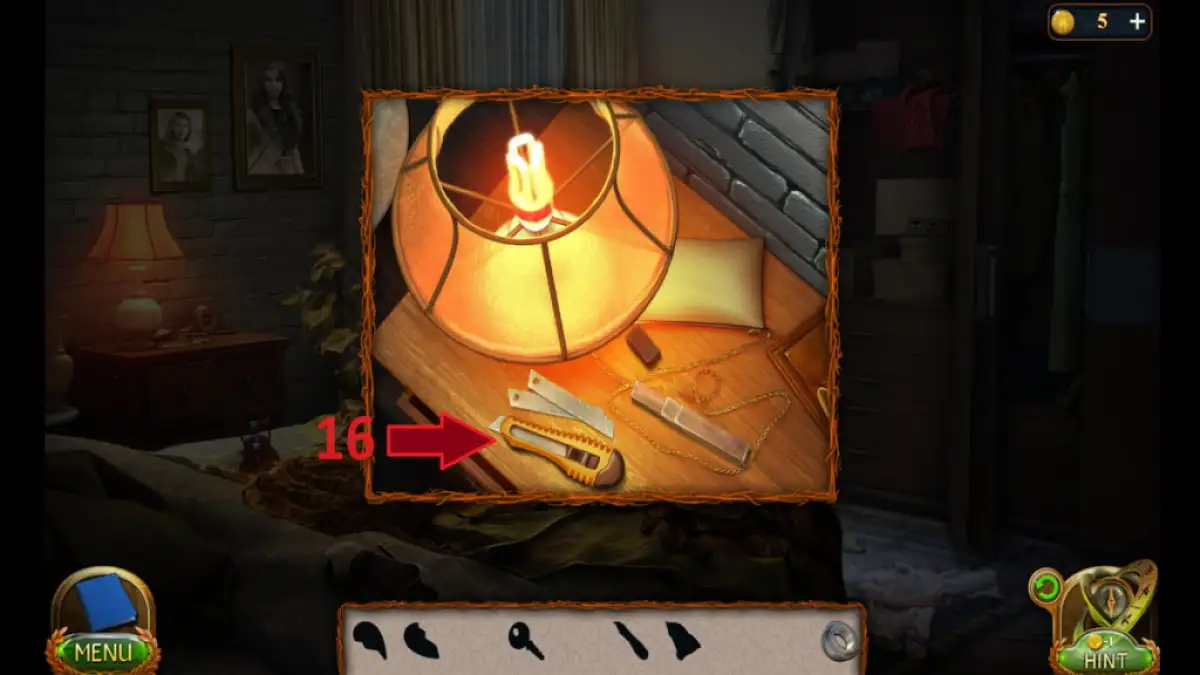
- Use the bulb on the lamp (15) to turn it on, use the set of blades on the knife (16), and pick it up.
- Place the part of the photo into the photo on the drawer (17).
- Use the knife to open the box (18) in the drawer and collect half of the heart.
- Move the bedsheets (19), collect a part of the photo and open the puzzle.
- Place the half of the heart into the puzzle and go back to the drawer photo.
- Place the part of the photo into the photo on the drawer, and use duct tape to reassemble it.
- Move the hat (20) on the bed and take the second half of the heart.
- Place the second half of the heart into the puzzle.
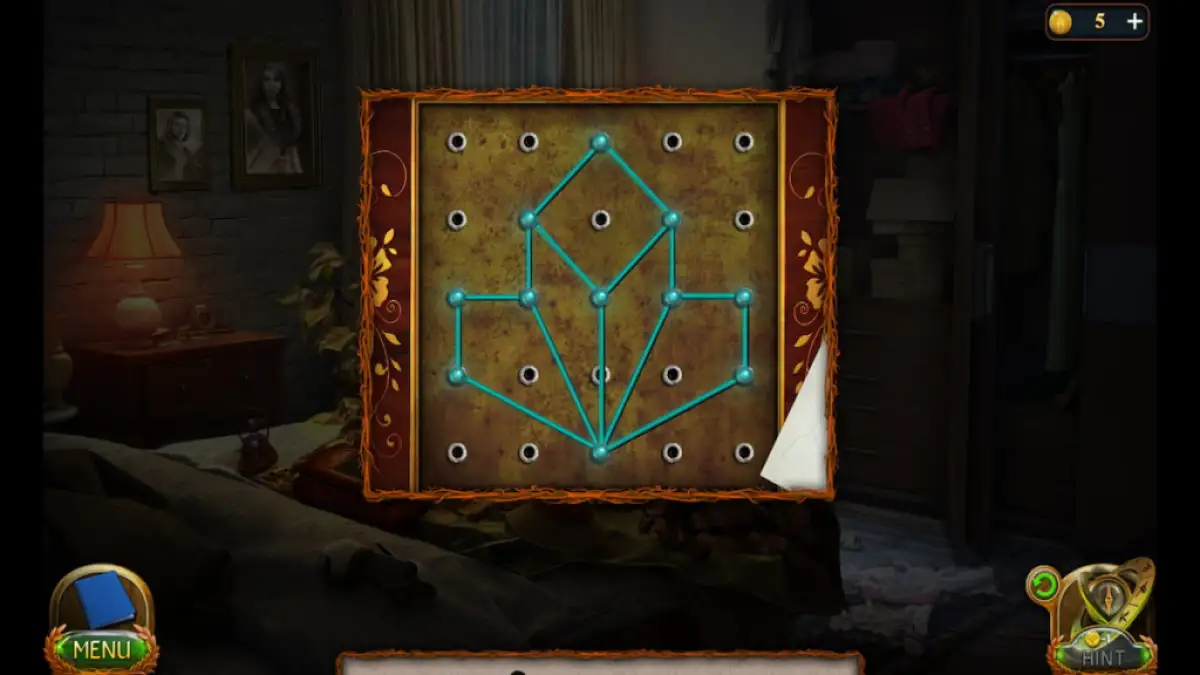
- Draw the symbol on the picture (Image 8) to open the puzzle and take the key.
- Use the key to open the drawer (21) and take the bag with the laptop.
- Open the bag with the laptop by pressing the zippers, and take out the laptop and the charger.
- Exit the room, place the laptop on the coffee table and open it.
- Press the laptop three times.
- Open the browser, select the Boogie tab and go to Breaking news.
Task 5 - The scene of the accident
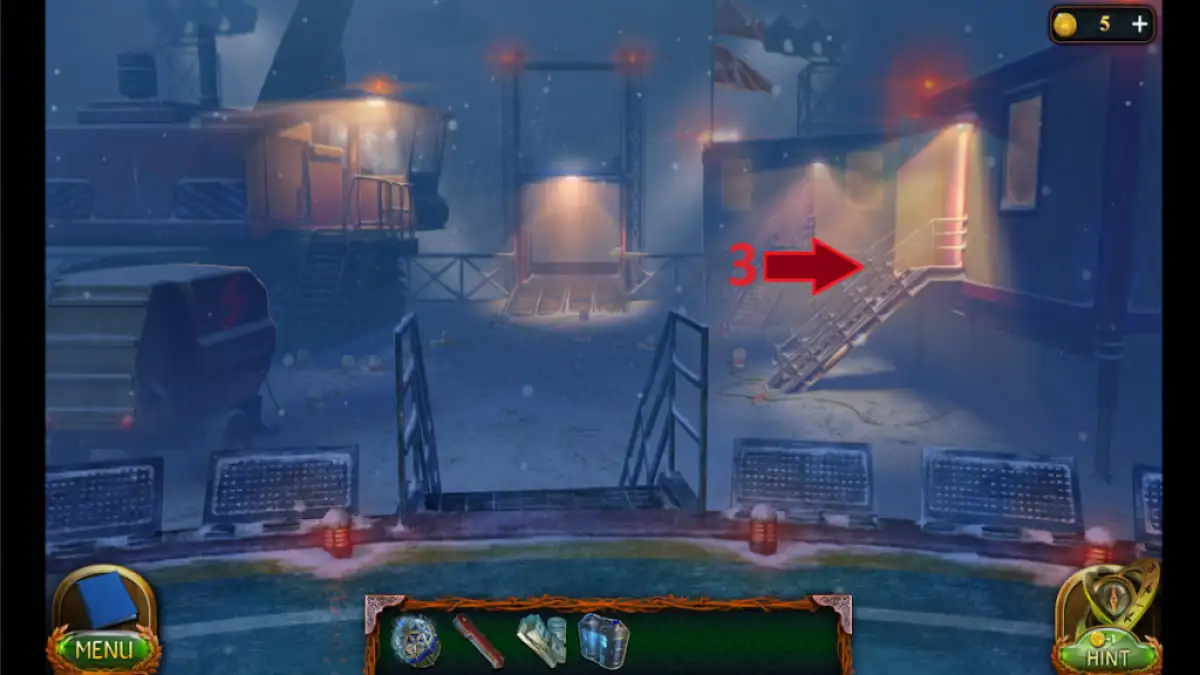
The helicopter dropped you off at a freezing remote location, where a terrible crane accident took place. Something tells you it was no accident...
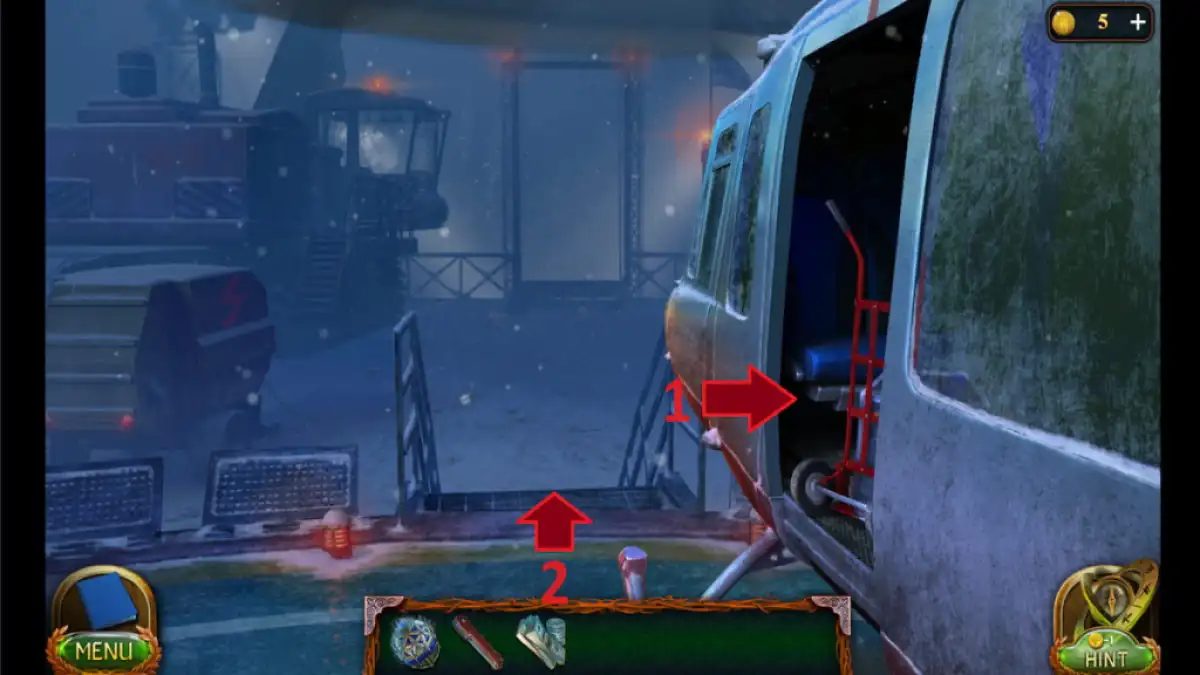
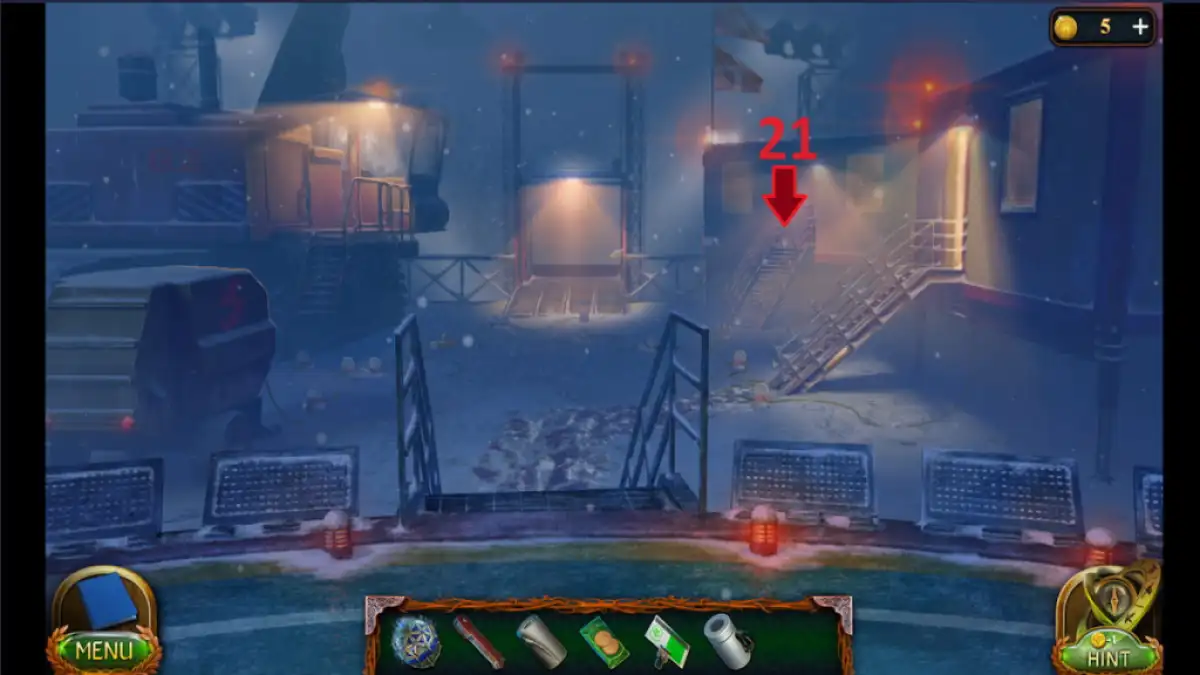
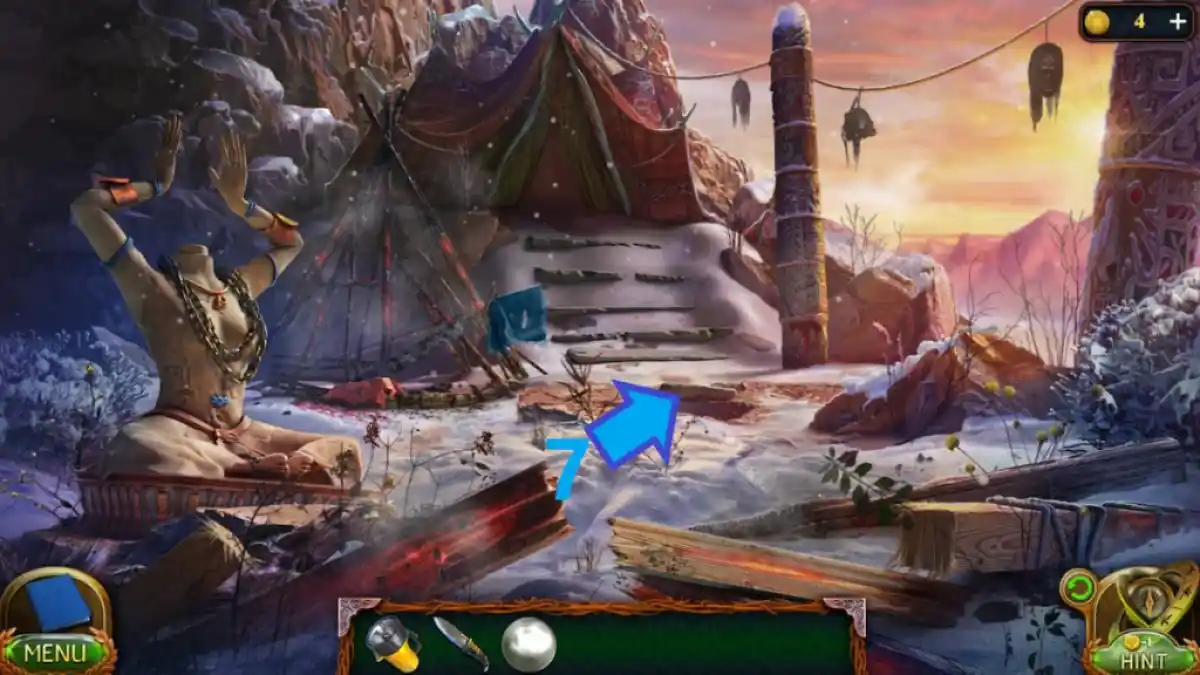
- Get bottles of water (1) and go down the stairs (2).
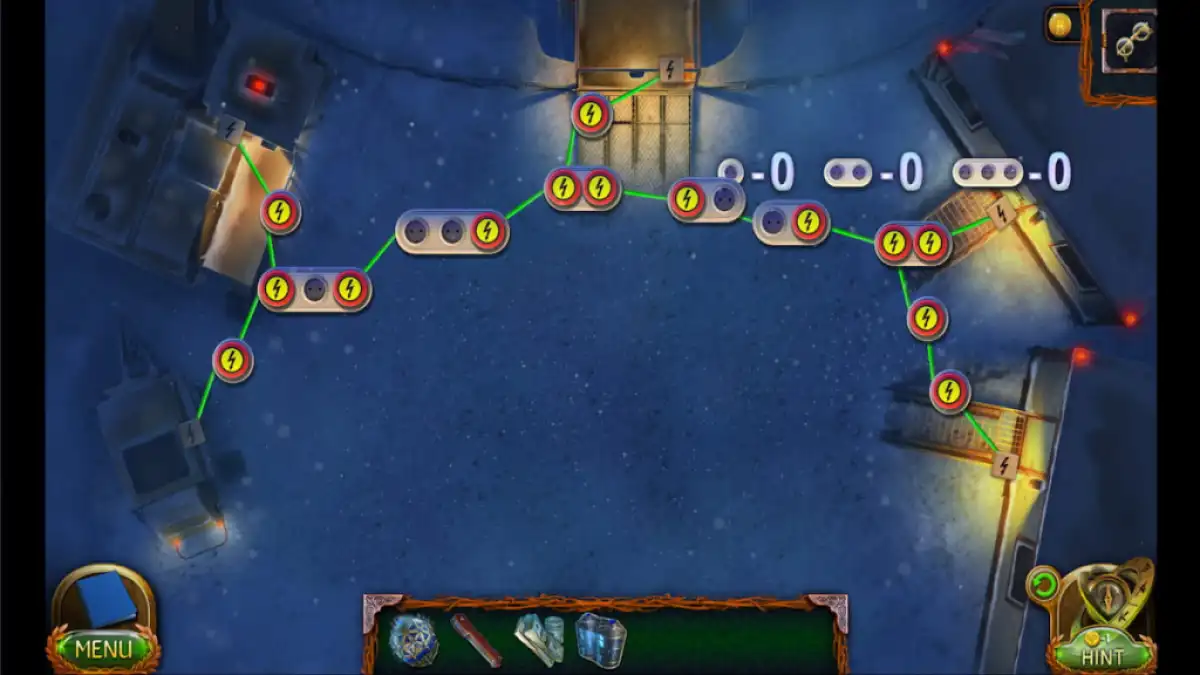
- Connect all the generators to the trailers (Image 2).
- Climb the stairs (3) and talk to the person.
Task 6 - Plan B
Inside the cabin you meet a security guard who is suspicious of you. There must be a way to earn his trust, or at least make him move out of your way.
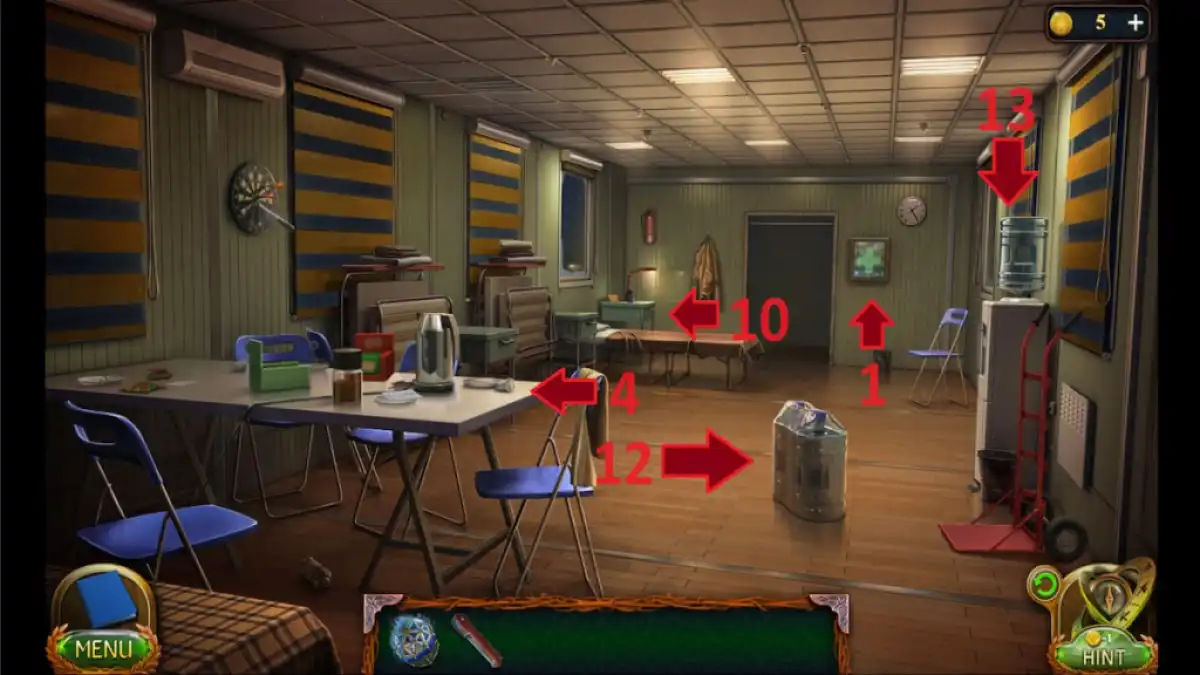
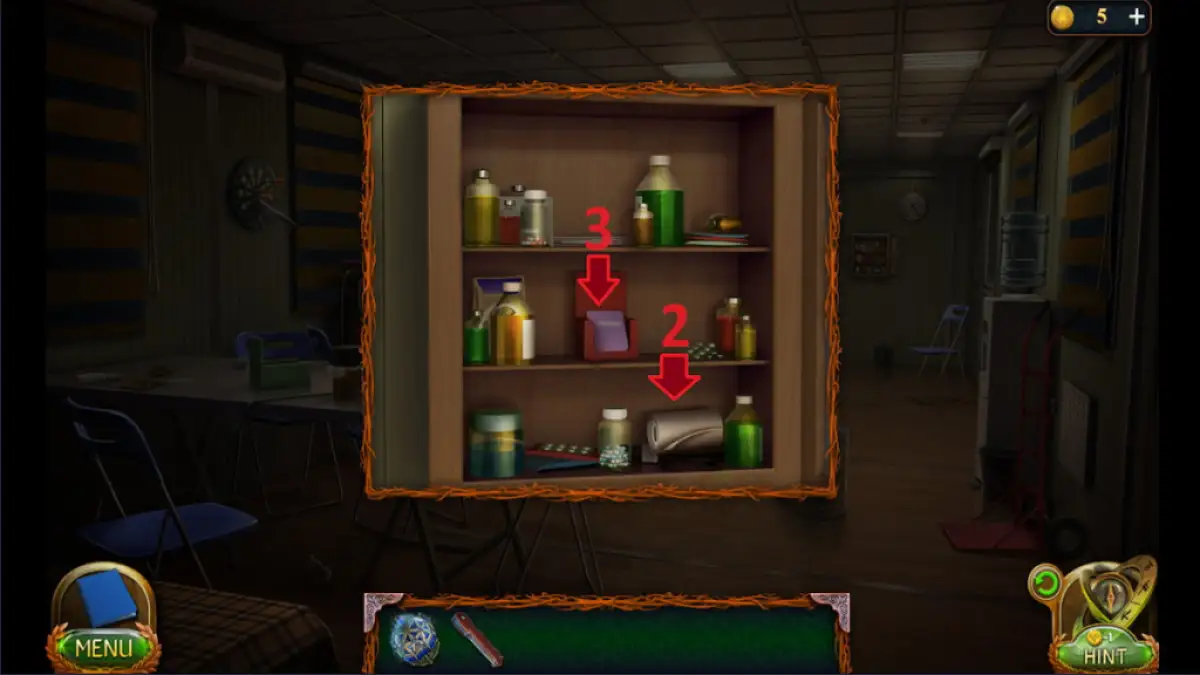
- Approach the medicine cabinet (1) and take the bandage (2) and the laxatives (3).
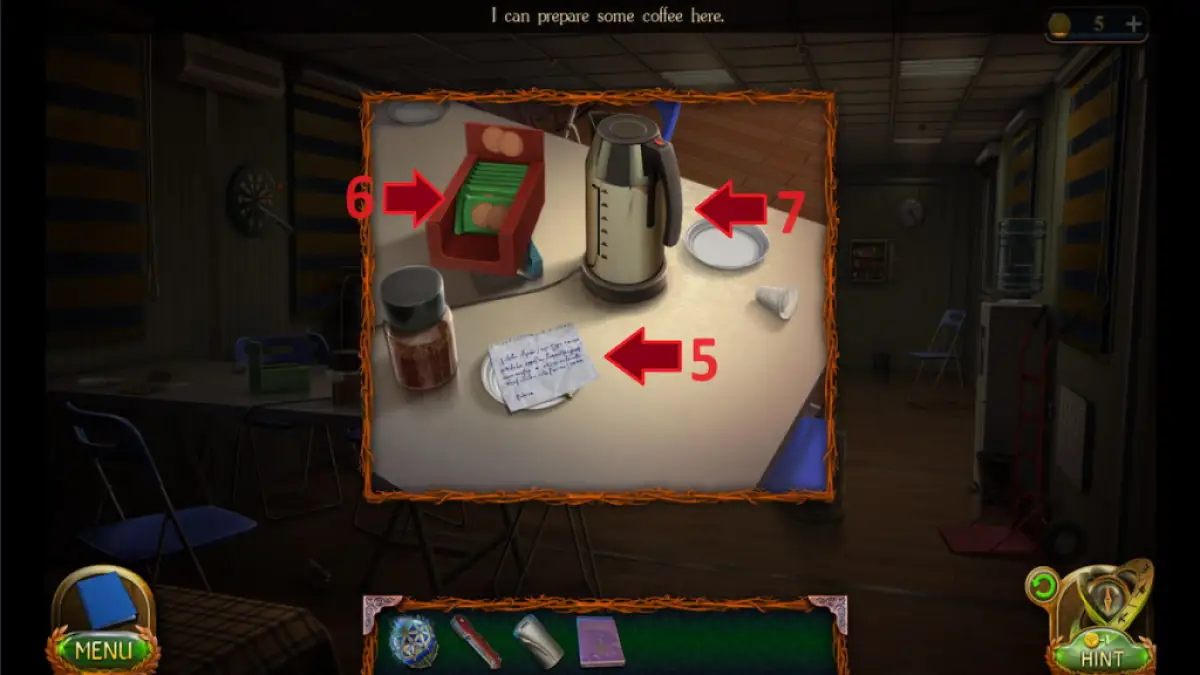
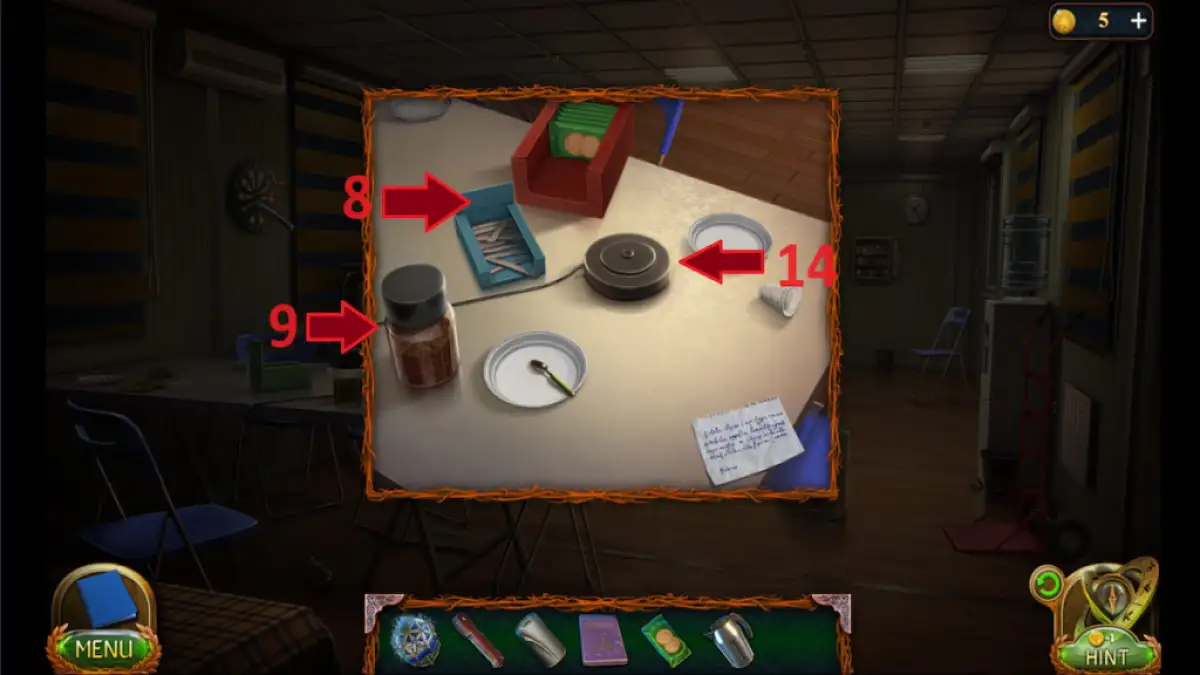
- Approach the table (4) and take the note (5), cookies (6) and the empty kettle (7).
- Move the cookie box (8) and open the jar (9).
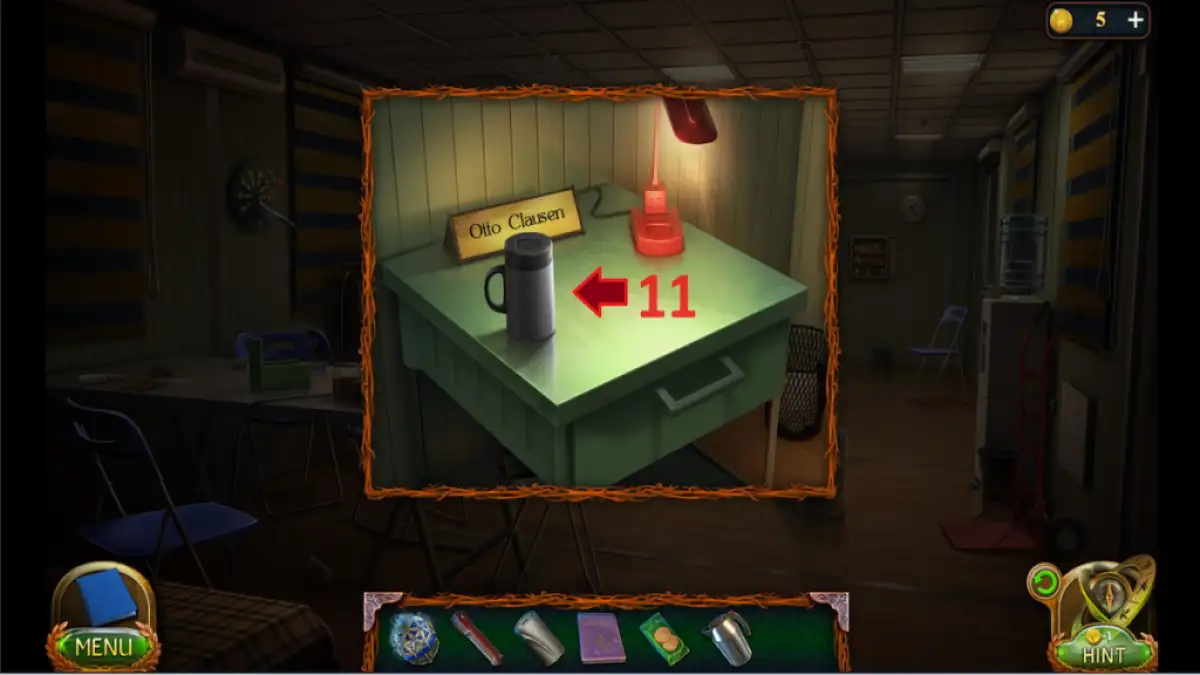
- Got to the nightstand (10) and take the cup (11).
- Use the knife to open the plastic foil (12) and take a bottle of water.
- Place the water bottle onto the water cooler (13).
- Place the empty kettle onto the water cooler to get the kettle with water.
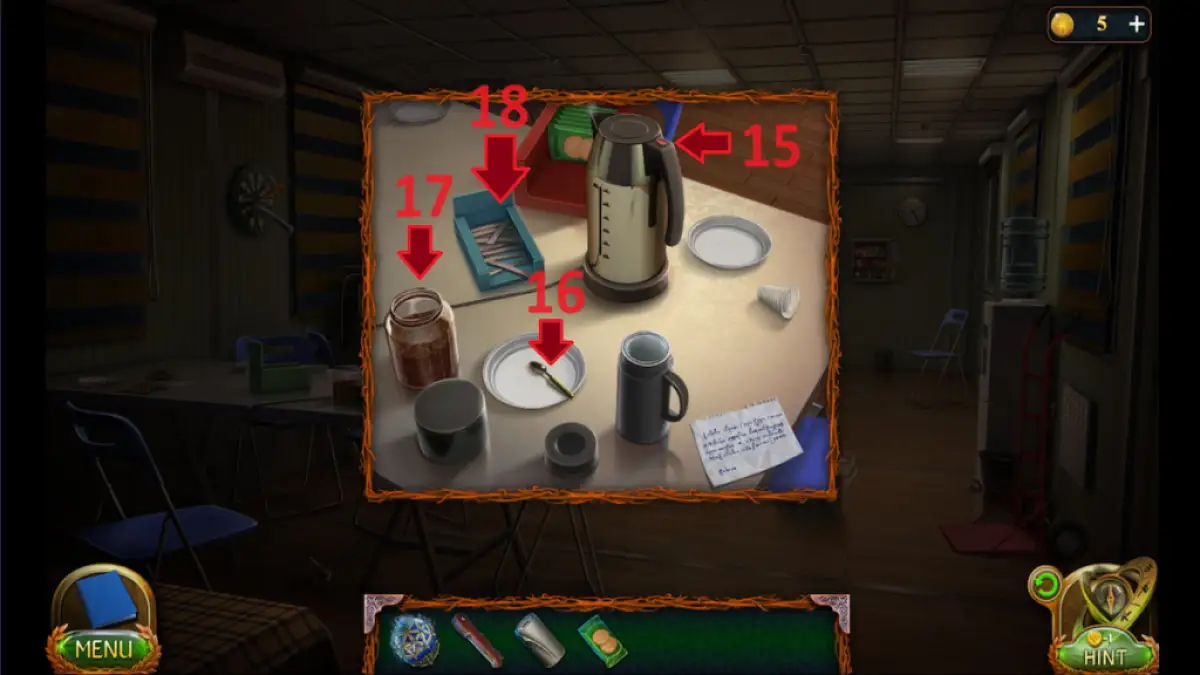
- Place the kettle of water onto the kettle stand (14) and turn it on (15).
- Take the cup from the inventory and place it on the table.
- Open the cup and put the laxative into it.
- Take the teaspoon (16) and grab coffee from the jar (17).
- Take the sugar bag (18) and pour it into the cup.
- Take the kettle and pour it into the cup to make coffee.
- Use the teaspoon to mix it and receive coffee.
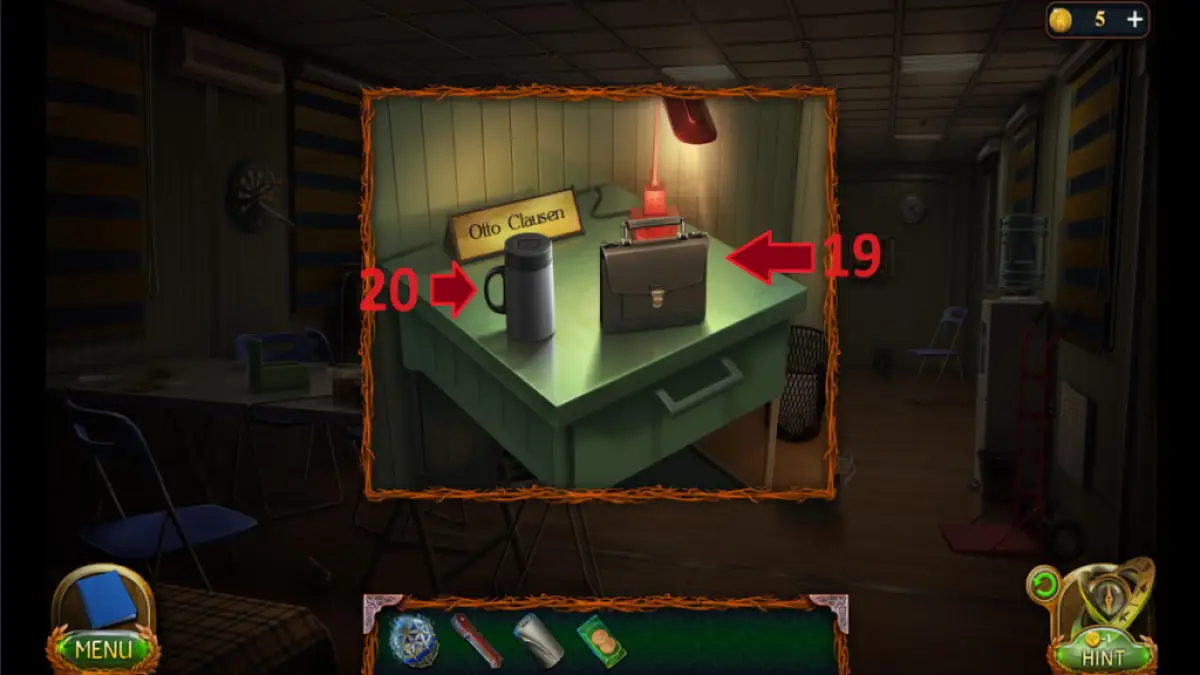
- Open the suitcase (19) on the nightstand, take the green key card, and grab coffee (20).
- Go back outside and swipe the keycard at the middle staircase (21).
- Use coffee on the keypad, type in 681 and press enter to open the door.
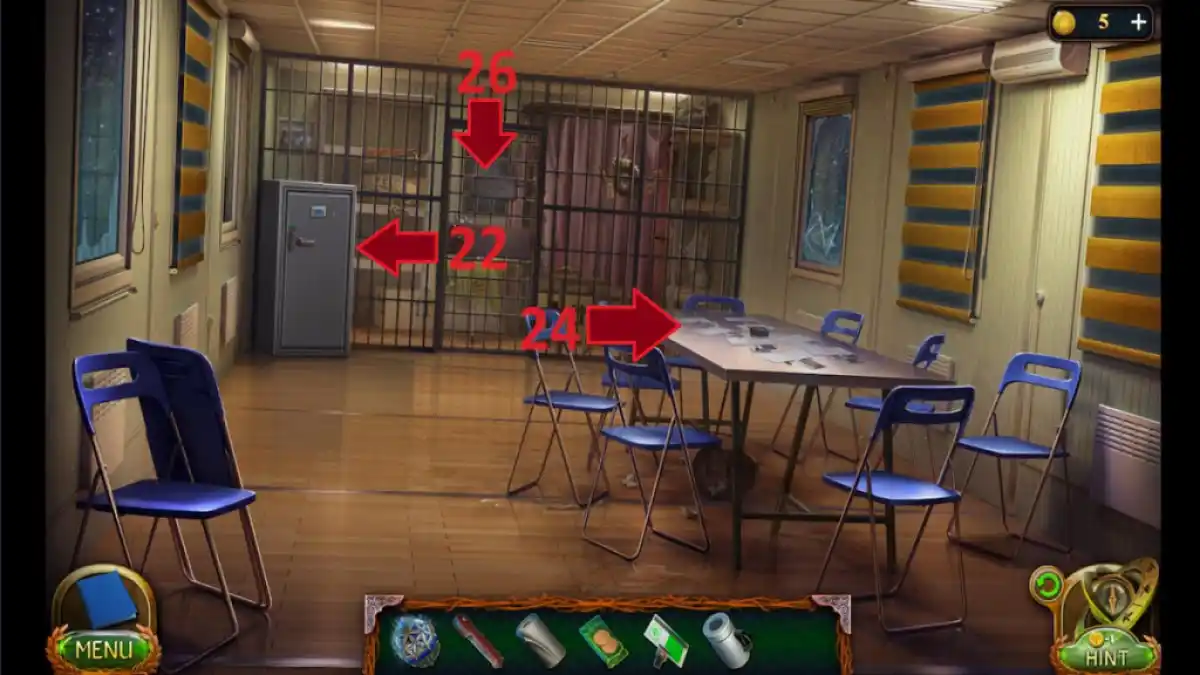
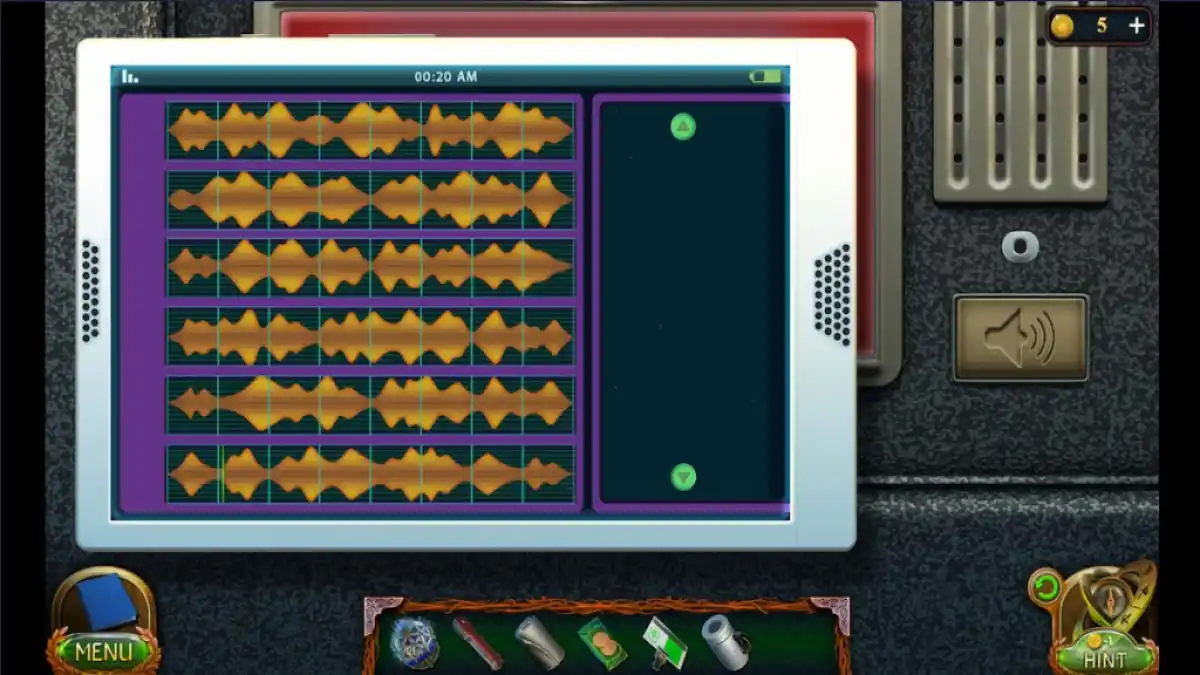
- Go inside, approach the safe (22) and use the green key card to open it.
- Arrange the sound fragments to open the safe (Image 10).
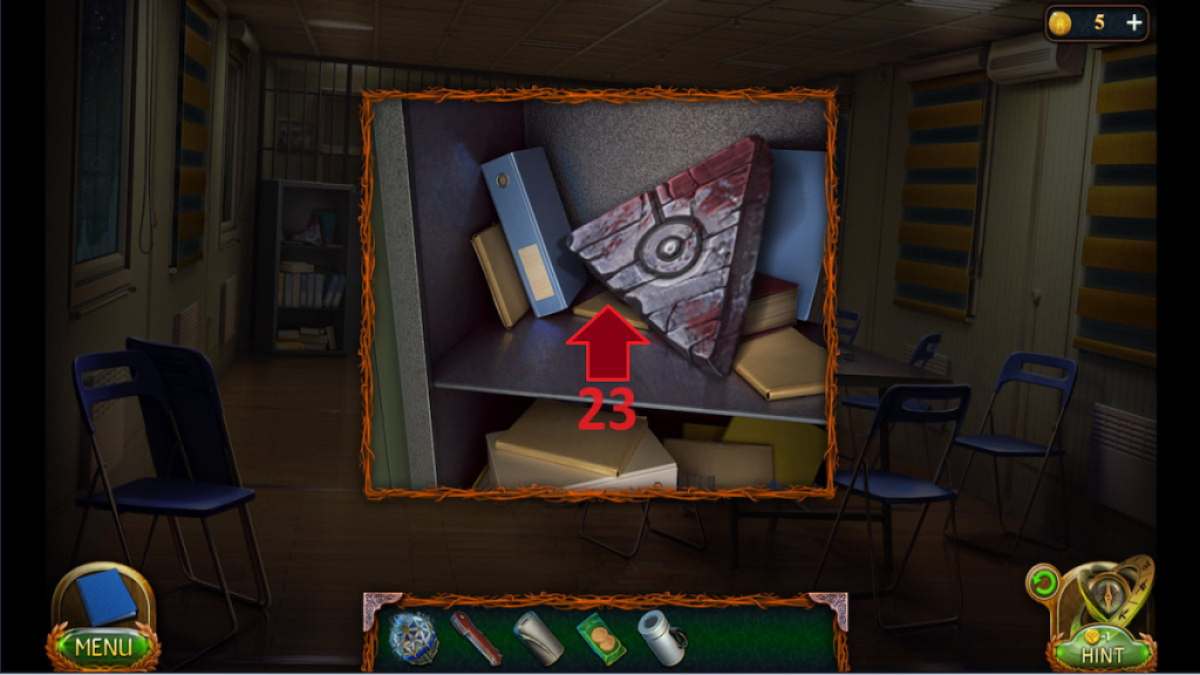
- Take the runic stone (23) and approach the table (24).
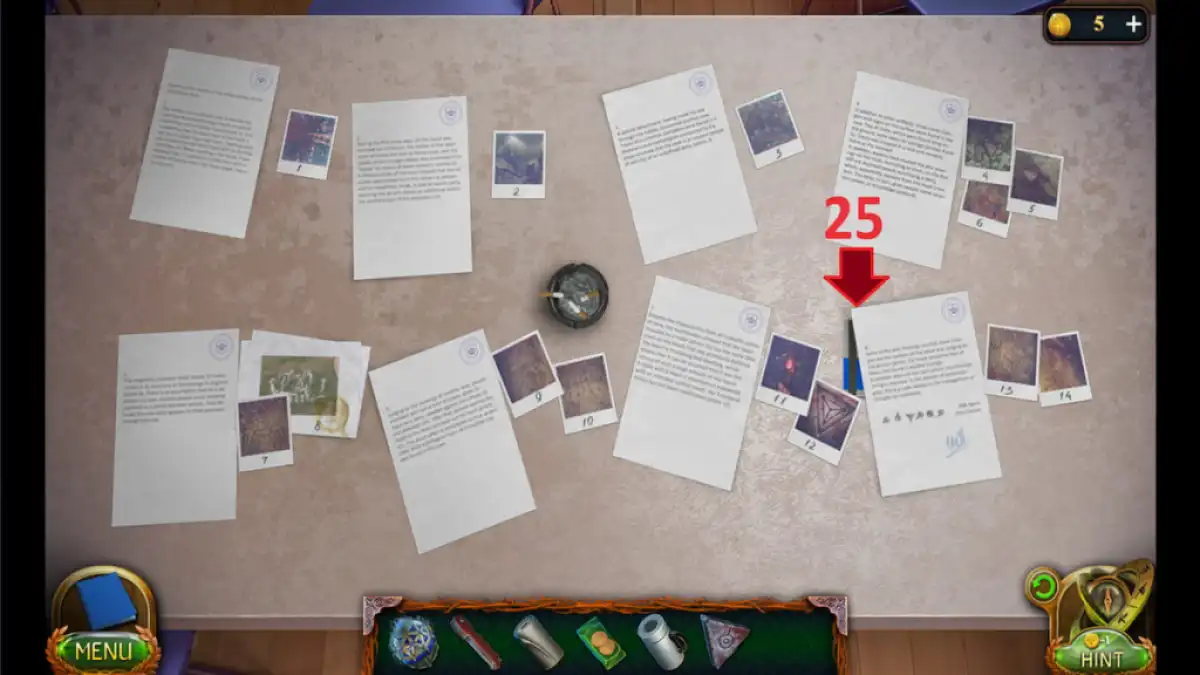
- Select and unselect every piece of paper to read its contents, and take the blue key card (25).
- Approach the archive door (26) and use the blue key card to enter.
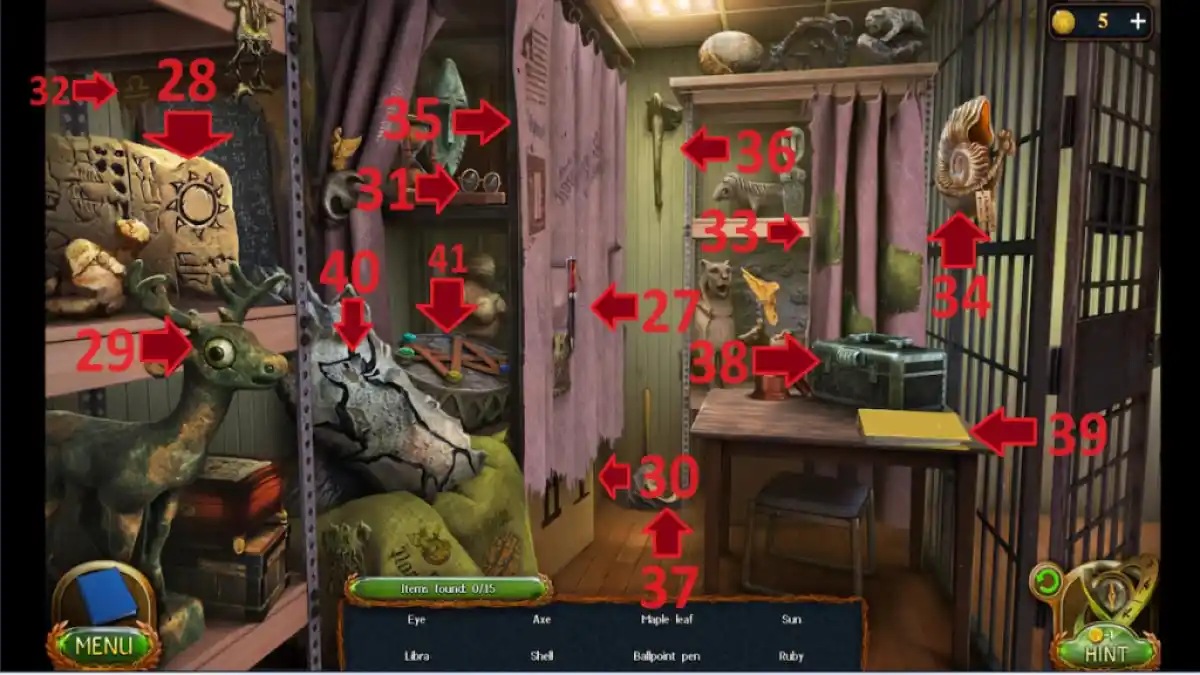
- Find the following items: ballpoint pen (27), sun (28), eye (29), glass (30), glasses (31), libra (32), leaf (33), shell (34), necklace (35), axe (36), and feather (37).
- Use the code 342 to open the chest (38) and take the runic stone.
- Take the paperclip from the yellow file (39).
- Find the bull (40) and complete the puzzle (41) by matching all the chips to its symbols.
- Collect the ruby and go outside.
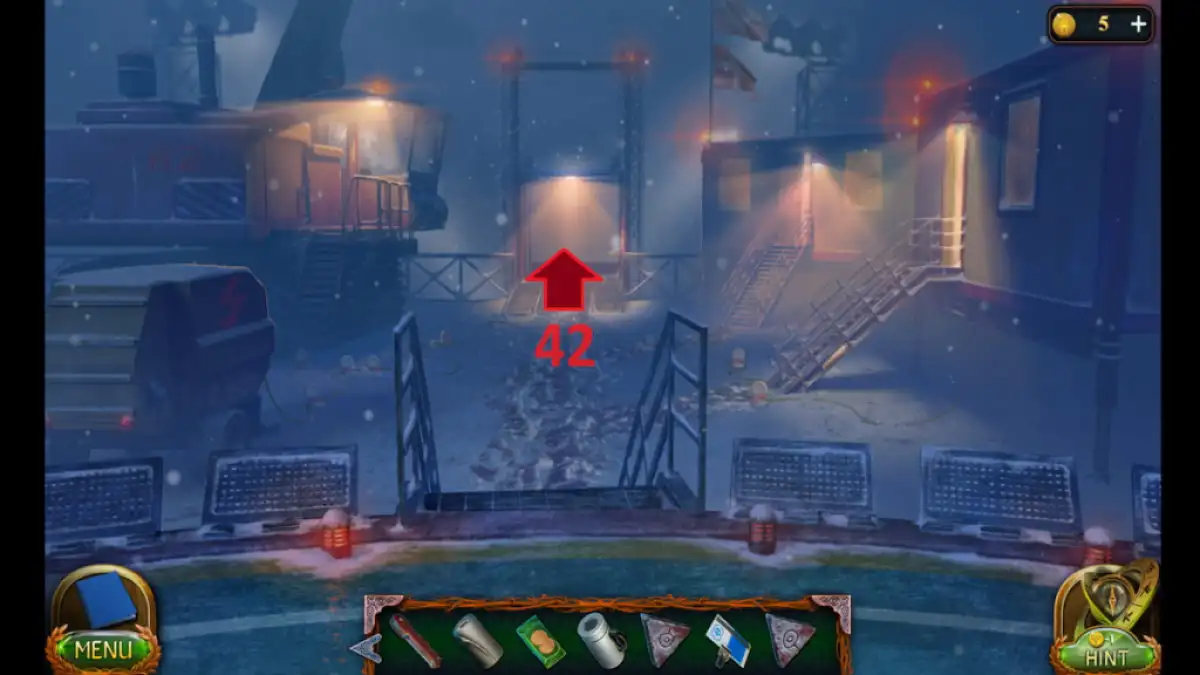
- Go to the elevator (42), use the blue key card to open the button case, and press the button to go down.
Related: Samsara Room Walkthrough
Task 7 - Through thorns...
The destroyed crane stands between you and the mysterious cave. You'll need heavy machinery to move it out of the way, and the crane next to the helipad is still operational! The keys and the fuel must be around here somewhere.
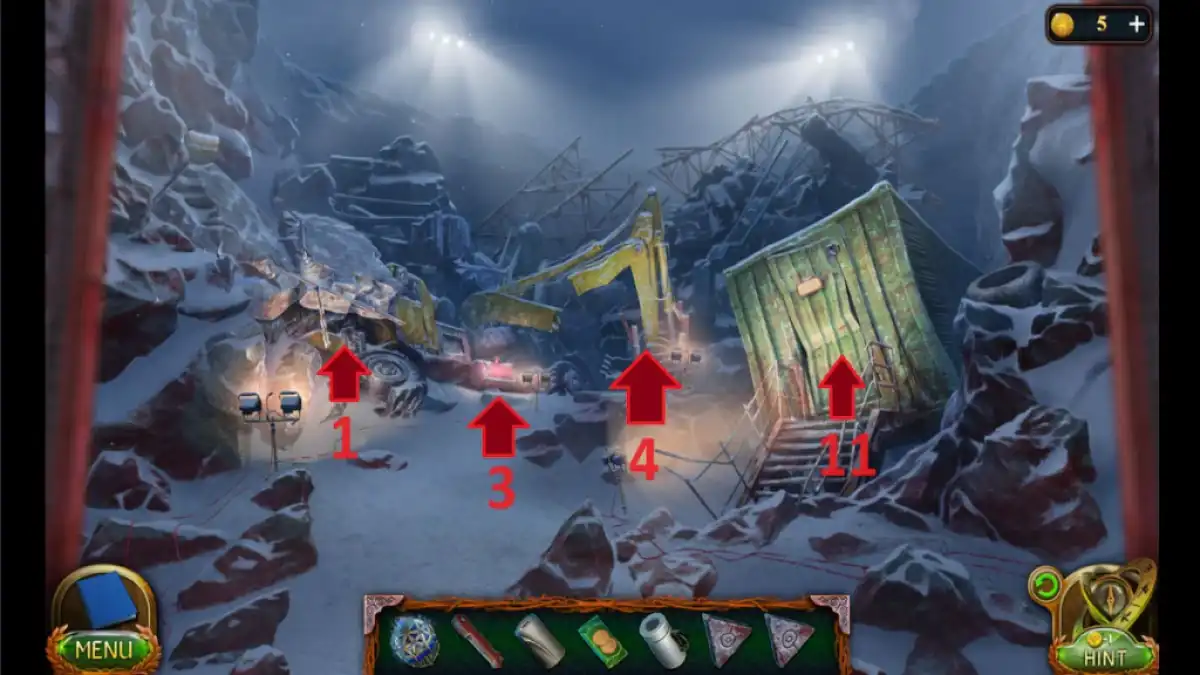
- Approach the crane (1) and take the keys (2).
- Go to the fuel tank (3) and open the lid.
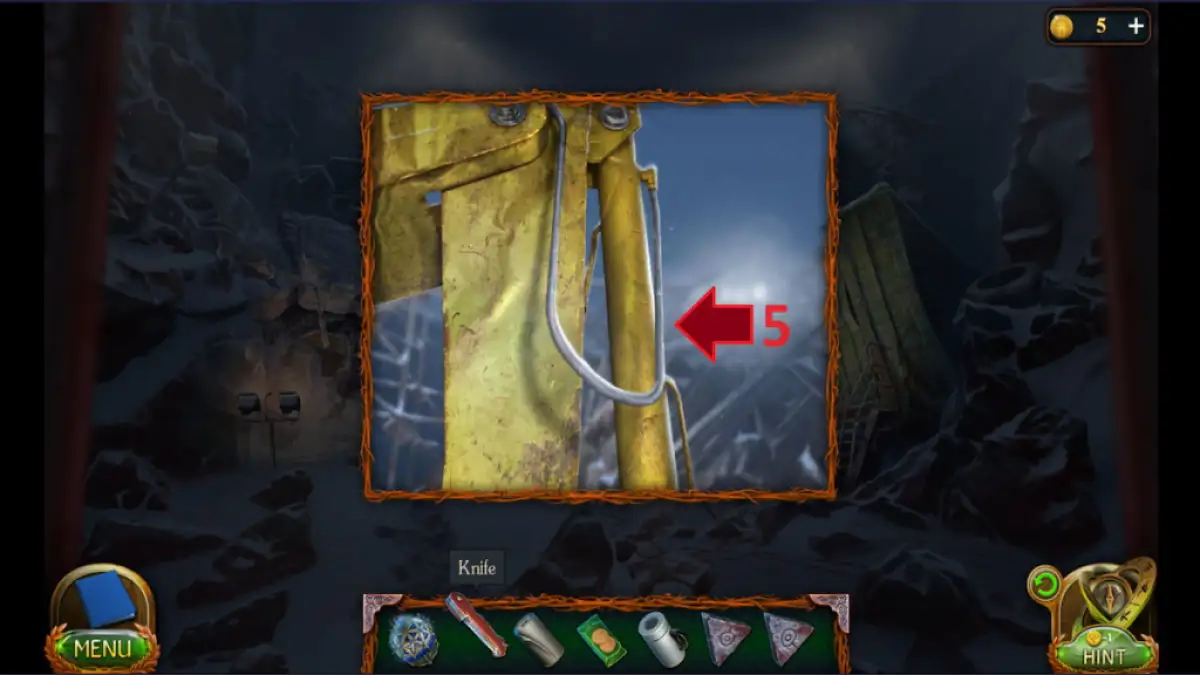
- Go to the back of the crane (4) and use the knife to cut the hose (5) and take it.
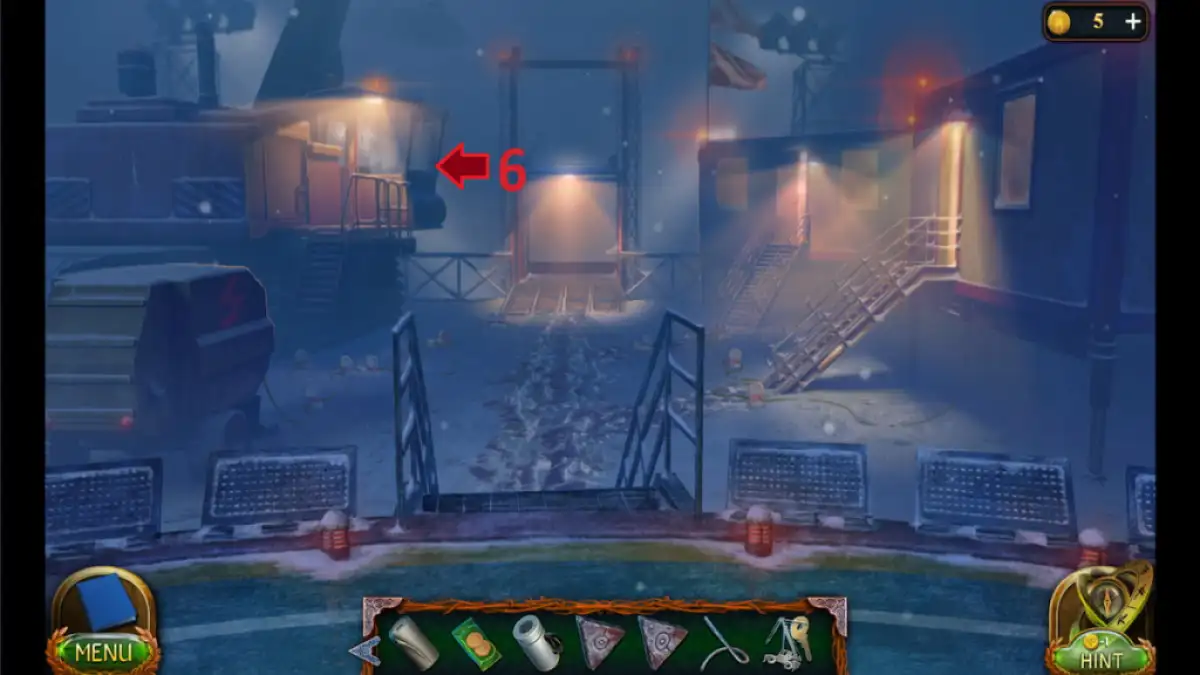
- Go back to the helipad, approach the crane cabin (6) and use the keys to enter.
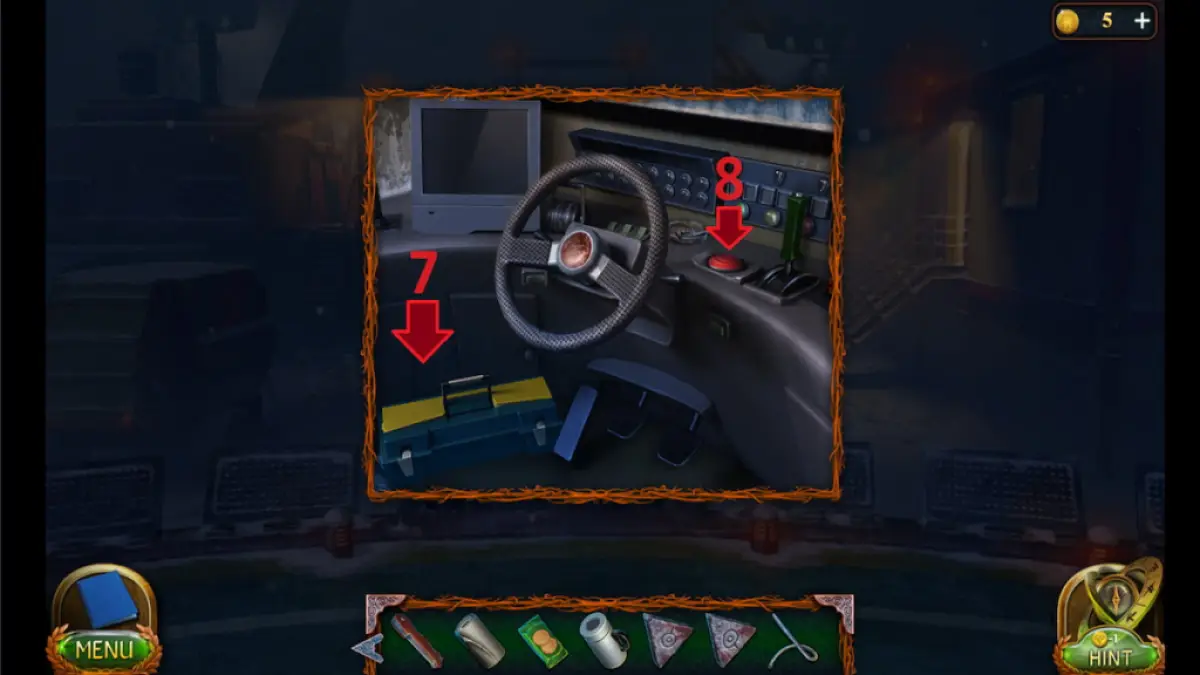
- Take the case with angle grinder (7) and press the button (8).
- Open the case with angle grinder and connect the parts inside to get the angle grinder.
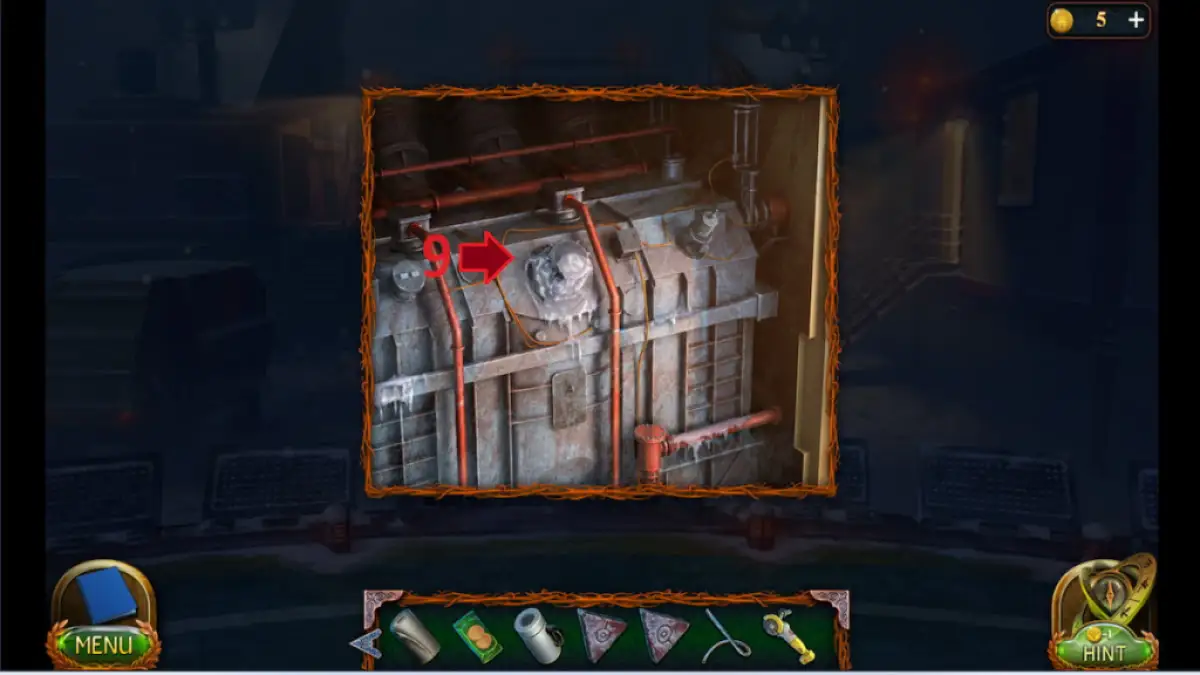
- Use coffee to thaw the ice on the tank lid (9) and use the bandage to open it.
- Go down the elevator and go to the crane (1).
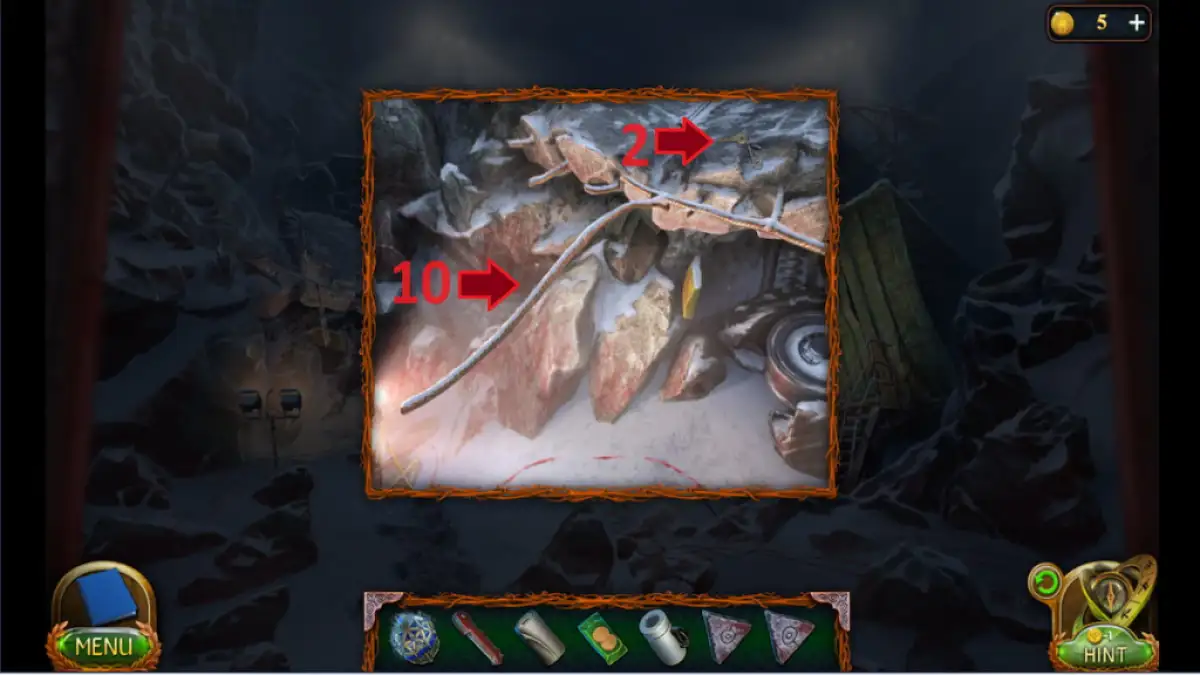
- Use the angle grinder to cut the rod (10) and collect it.
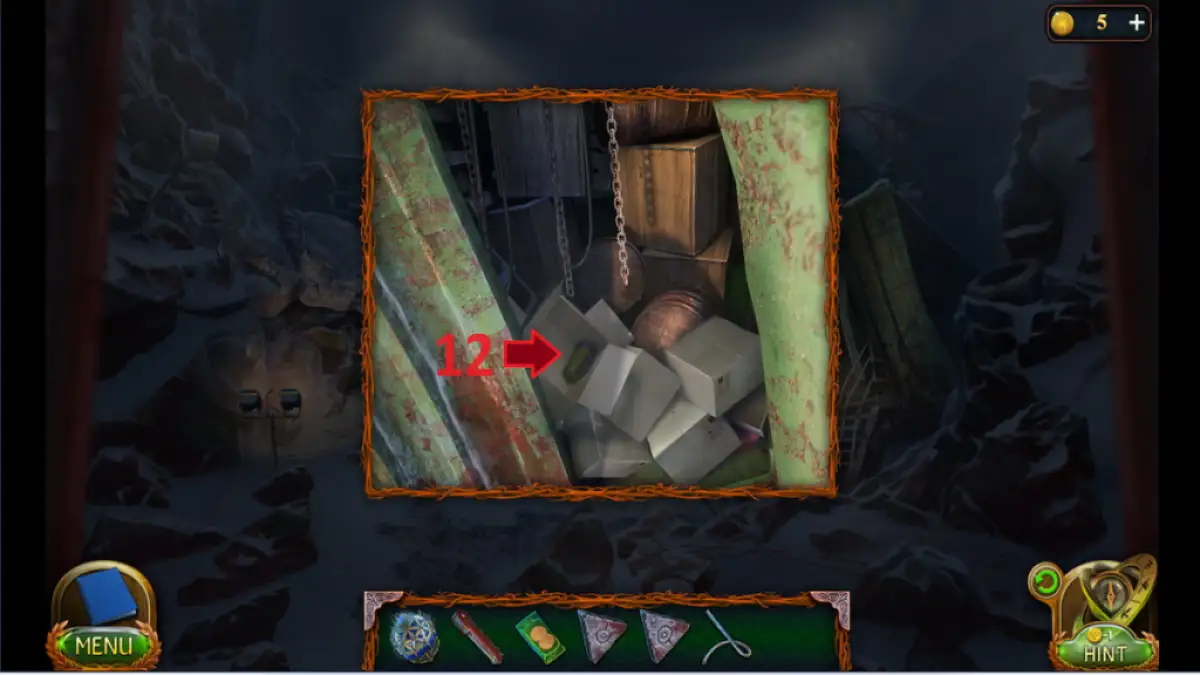
- Use the rod to open the container door (11) and take the flashlight (12).
- Move the boxes and take the canister underneath.
- Go to the fuel tank (3) and place the canister beside it.
- Place the hose into the fuel tank and connect it to the canister.
- Once you get the canister with fuel, go back up to the crane (6) and pour the canister of fuel into the crane's tank.
- Enter the cabin and press the red button to drive the crane.
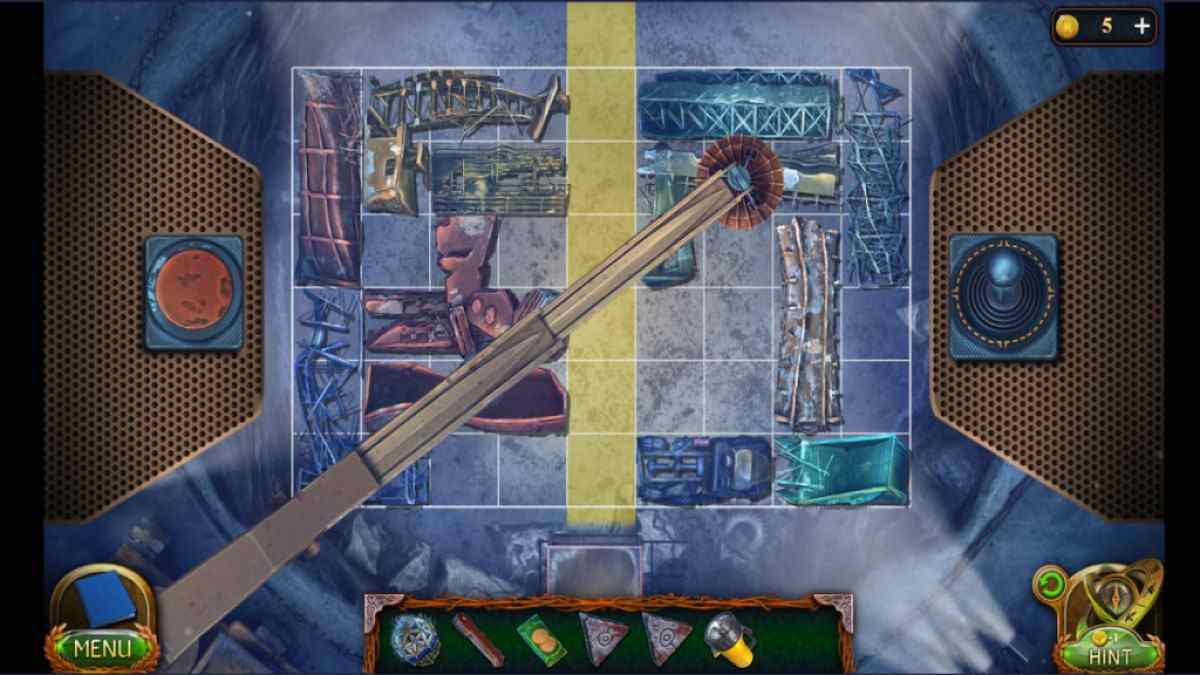
- Move the debris from the yellow squares to clear the path.
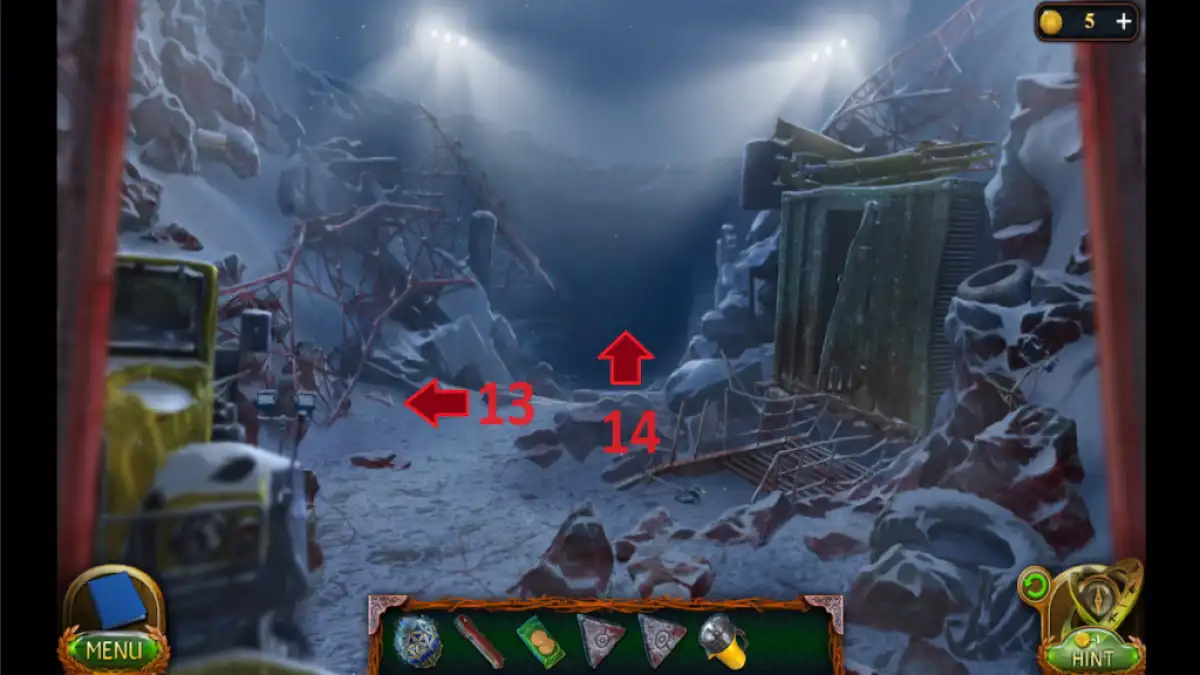
- Go down the elevator, take the runic stone (13), and enter the cave (14).
Task 8 - Heart of Drak Ul
The cave appears to be a ritual ground, and the pierced heart on top of the altar can only mean one thing: dark magic.
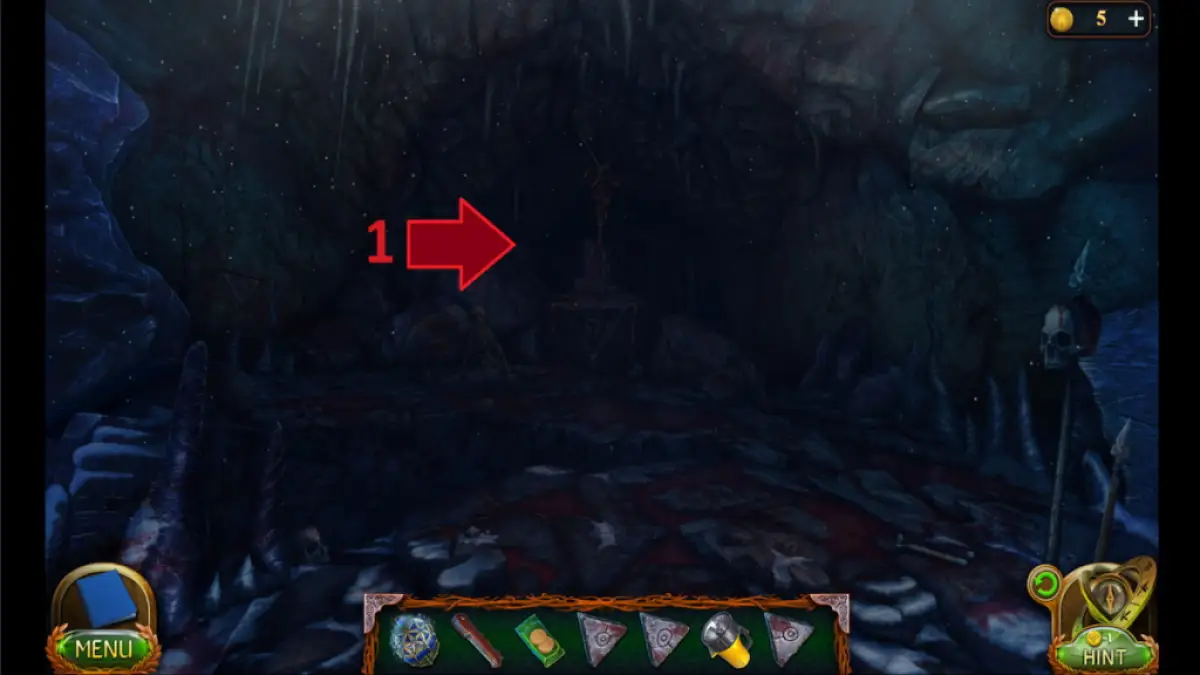
- Use the flashlight to light the cave (1).
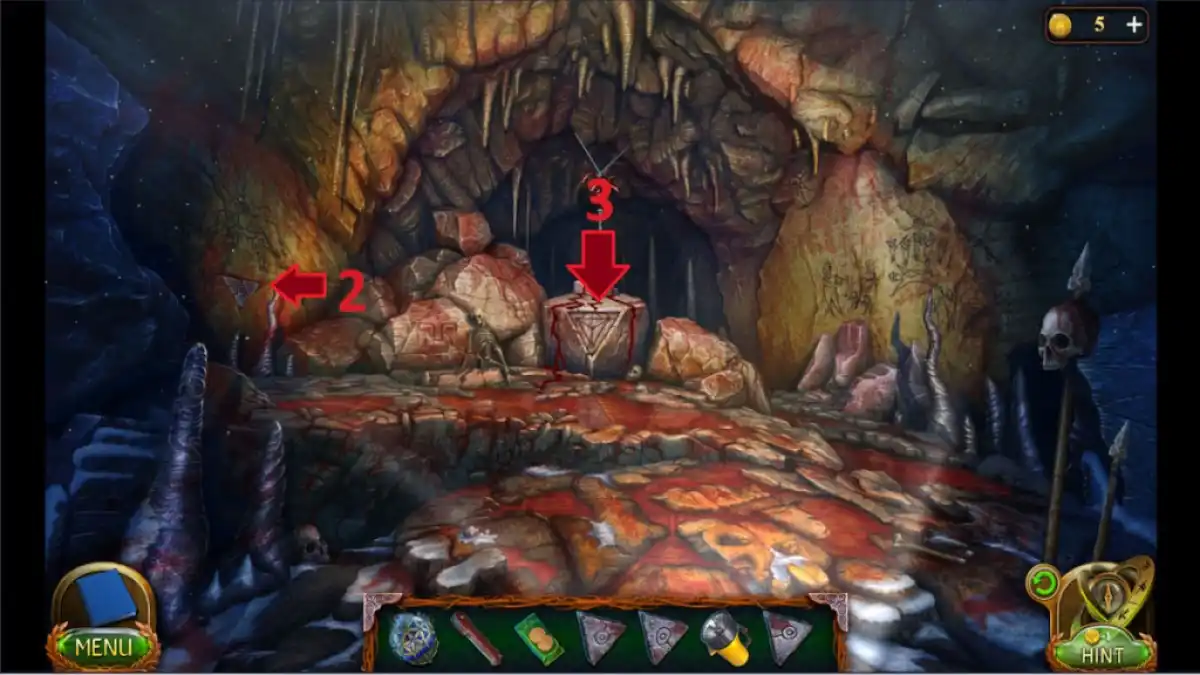
- Use the knife to take out the runic stone (2).
- Place all runic stones into the altar (3).
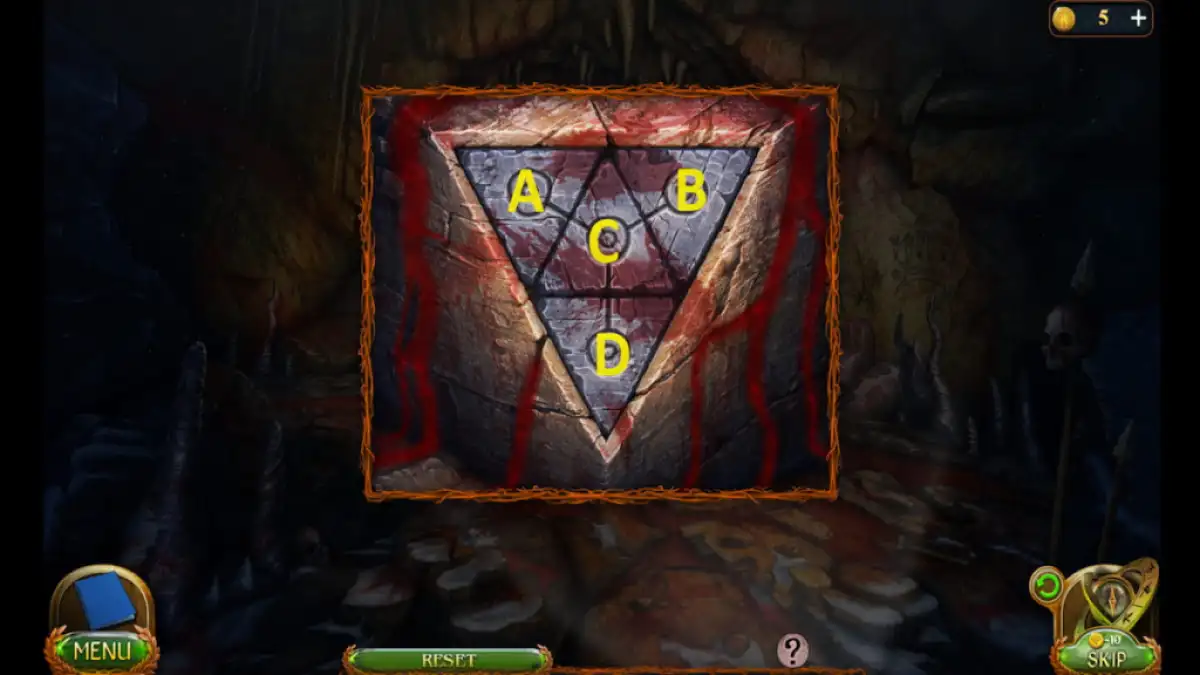
- Press the circles in the runic stones in the following sequence: B, D, C, B, A, B. (Image 3)
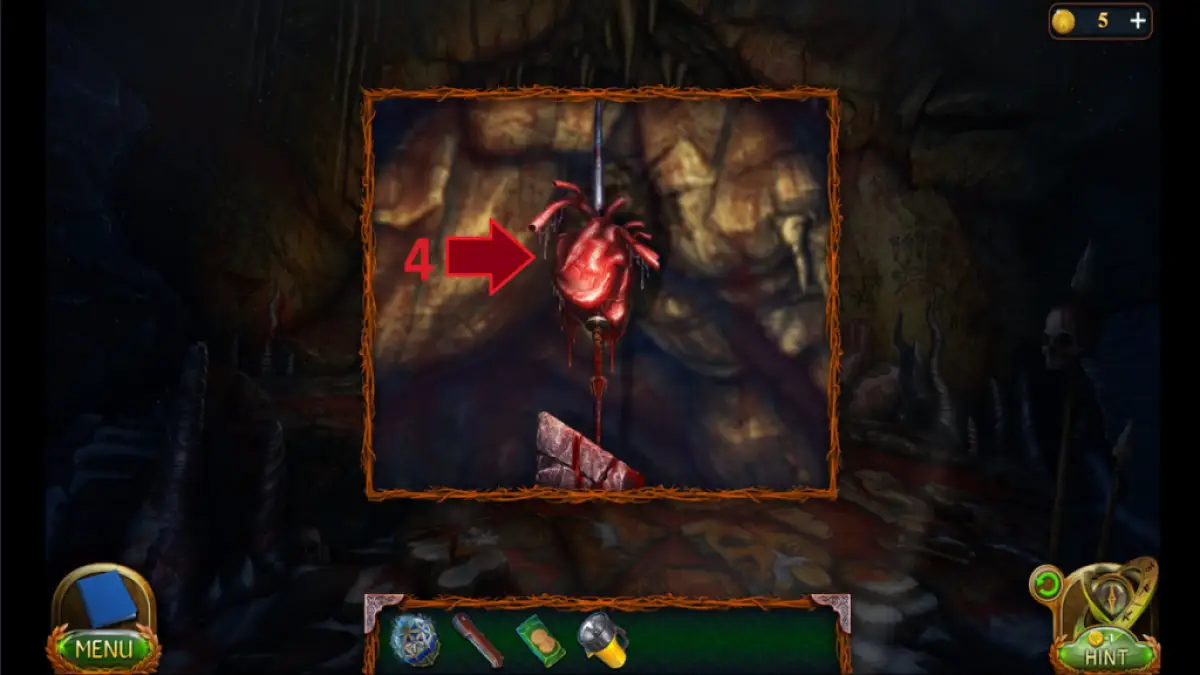
- Use the particles of the void on the heart (4).
Task 9 - Only to Maaron
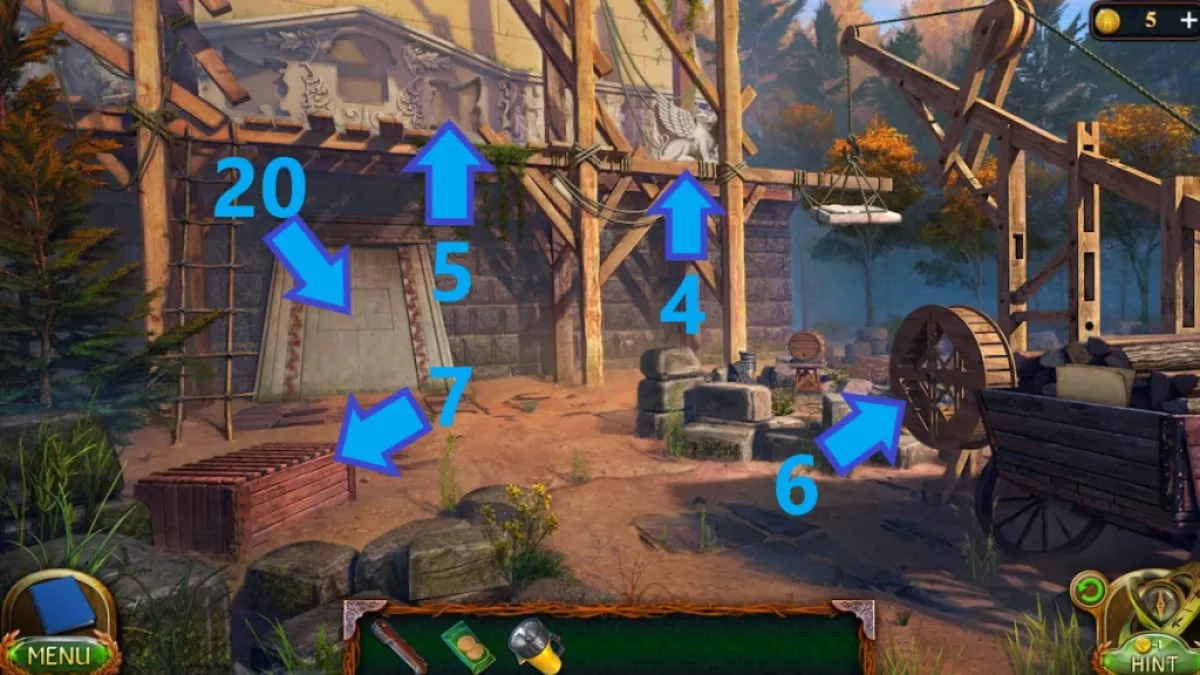
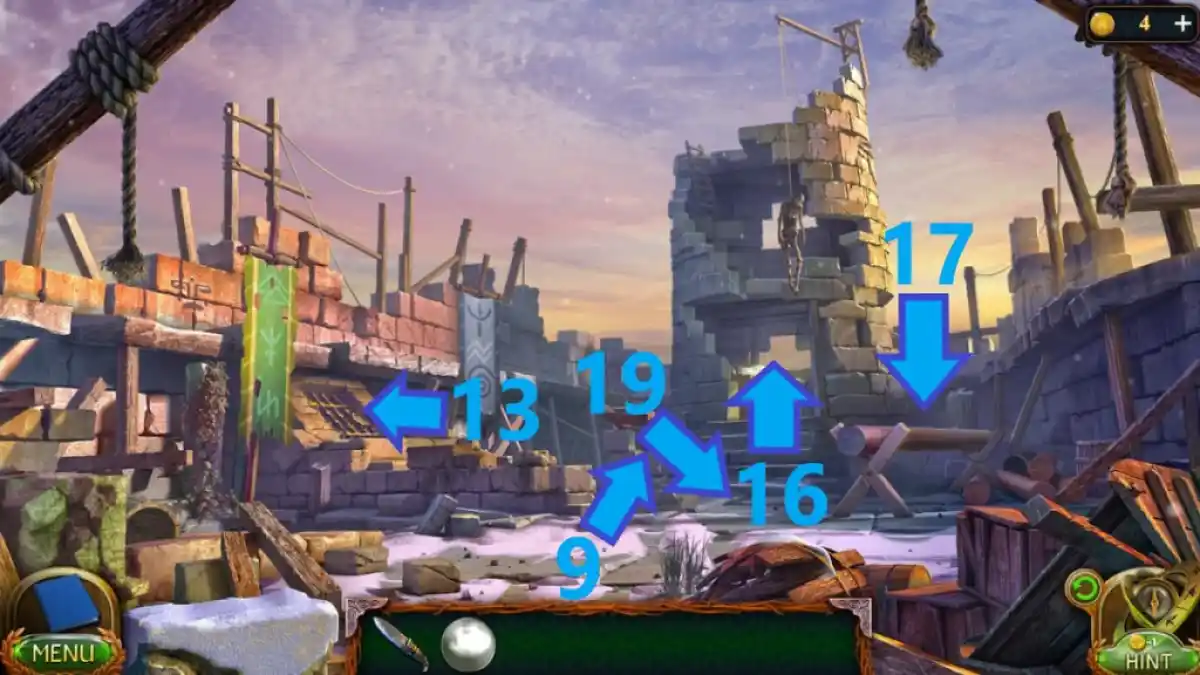
You're back at the stone temple, and now you have the key to unlock the second stone gate. Behind the gate you find an abandoned construction site, and the bas-reliefs are missing from their slots above the gate. Luckily, you have all the tools you need to build them!
- Go back to Drak Square by pressing back (1).
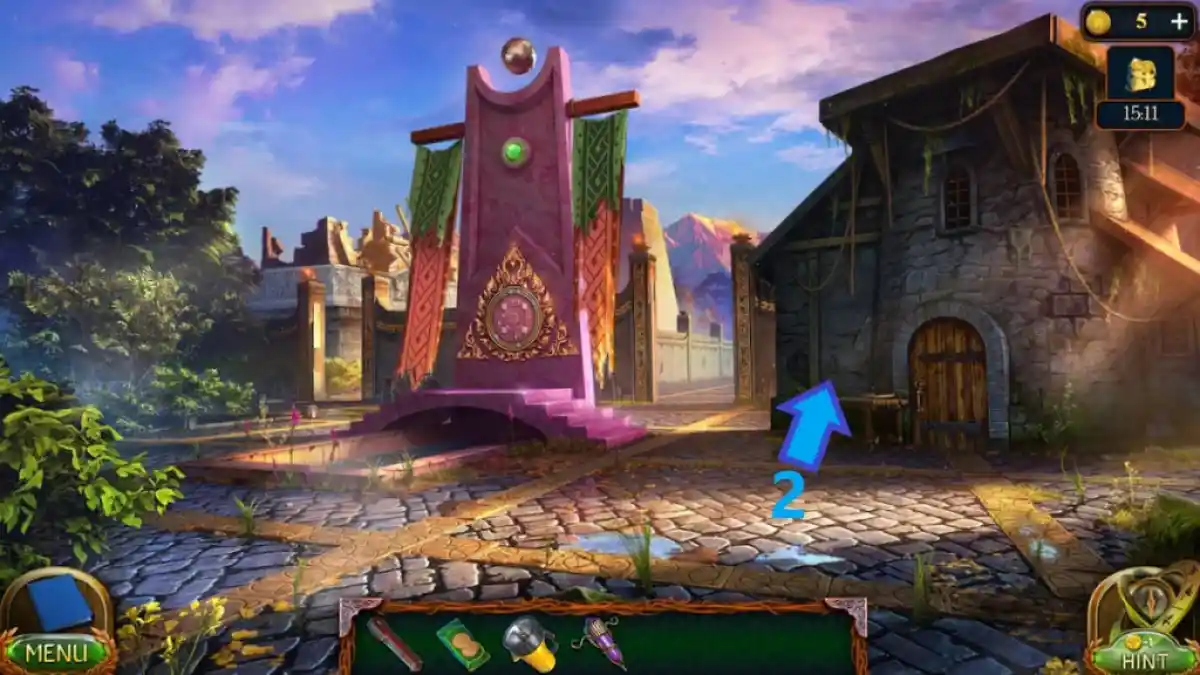
- Approach the table next to the door (2) and take the key from the stone gate underneath a parchment.
- Go back to Drak Square and approach the stone gate (3).
- Use the key from the stone gate to unlock it and enter.
- Take the lion bas-relief (4) and the handle (5).
- Place the handle on the wheel (6) and roll it down.
- Use the knife to open the crate (7) and take the second lion bas-relief inside.
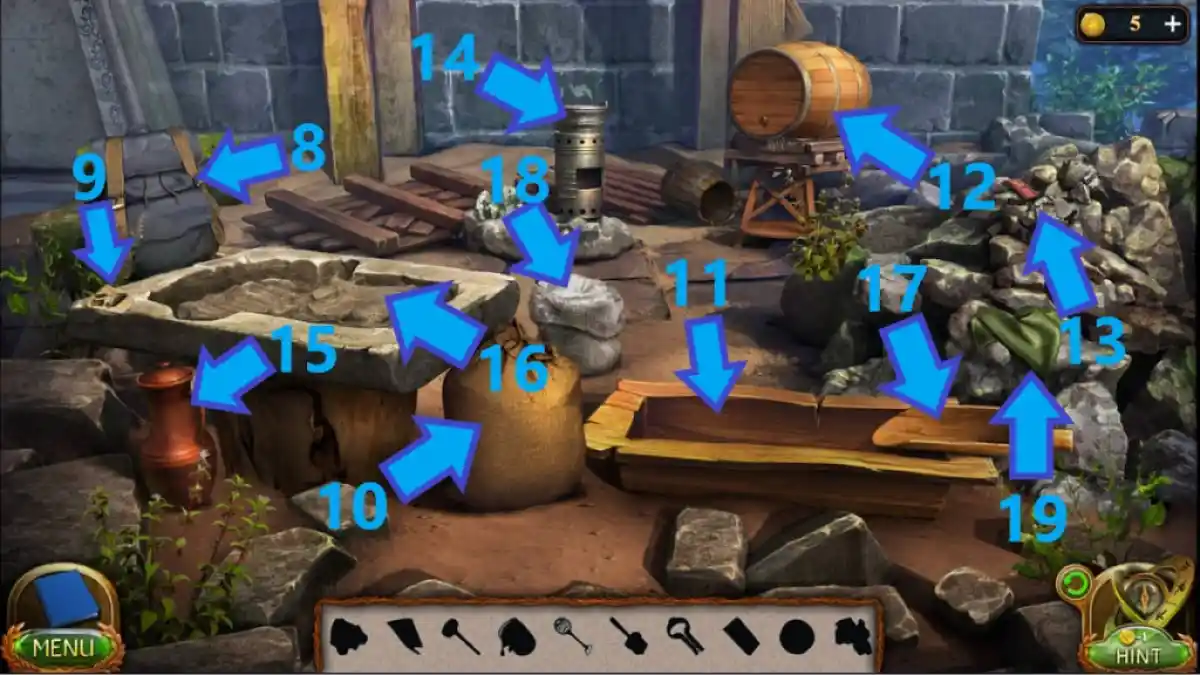
- Press the wheel, open the backpack's (8) pockets, and take the resin, solid alcohol, building instructions, and a clamp.
- Take the second part of the drawing (9), take the bag of plaster (10), and pour it into the wooden trough (11).
- Take the beater on the barrel and the brush next to it (12), and place the bucket in front of the barrel.
- Move the stones to take the mallet and take the matches from the satchel (13).
- Use the clamp to pop the cork on the barrel and fill the bucket with water.
- Take the bucket of water and pour it into the wooden trough (11).
- Mix the plaster and water using the beater, and go to the heater (14).
- Place the resin and solid alcohol into the heater, and use the match to light solid alcohol.
- Pour the jug (15) into the mold (16), take the spatula (17) and pour the plaster into the mold.
- Take the wax next to the heater (14) and use the mallet to break the mold.
- Take the melted resin from the heater (14) and pour it onto the statue.
- Take the bag of white powder (18), pour it onto the statue, and clean it using the brush.
- Put wax on the statue, take the cloth (19) and clean the statue.
- Collect the statue a.k.a. the face bas-relief.
- Place both lion bas-reliefs and the face bas-relief above the door (6).
- Complete the door puzzle (20) by dragging the chips in the following sequence: down, left, up, up, left, down, down, right, down, left, up, left, down.
- Enter the door.
Task 10 - New Adviser
Hilamir's lifeless body lays beneath the ruins, still clenching his pendant. You cannot bring Hilamir back, but the pendant is a powerful and magical item that will help you down the road.
- Take Hilamir's pendant (1) and go back.
- Place Hilamir's pendant into the door (2) to open it and enter.
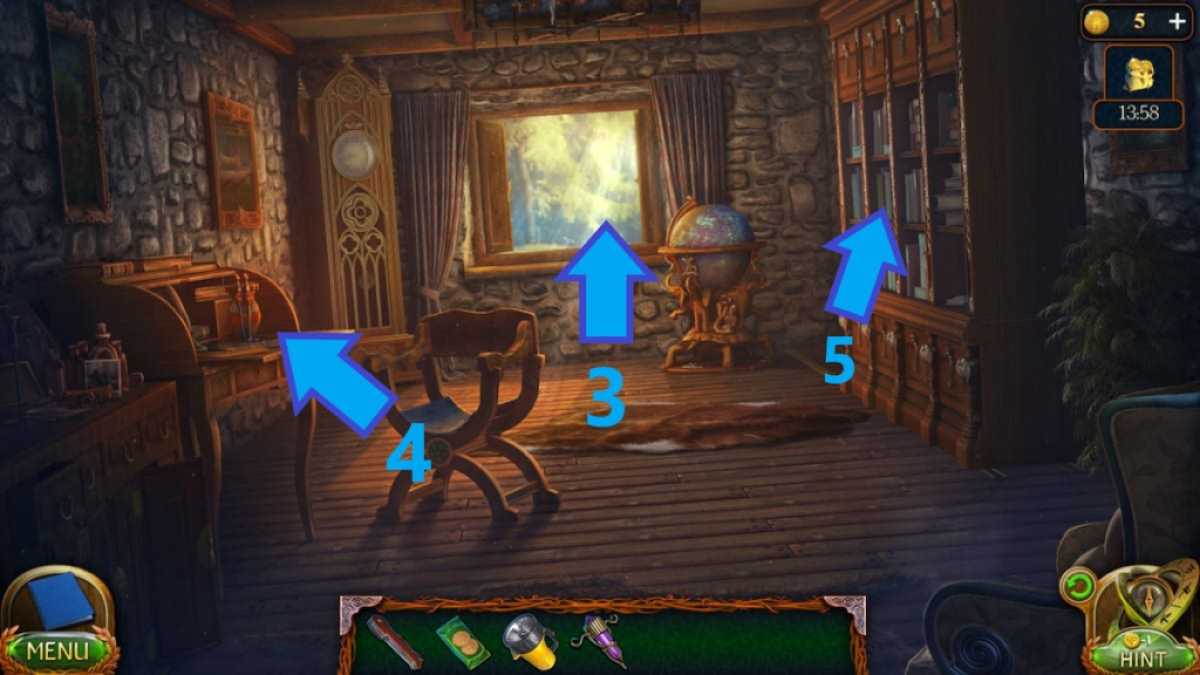
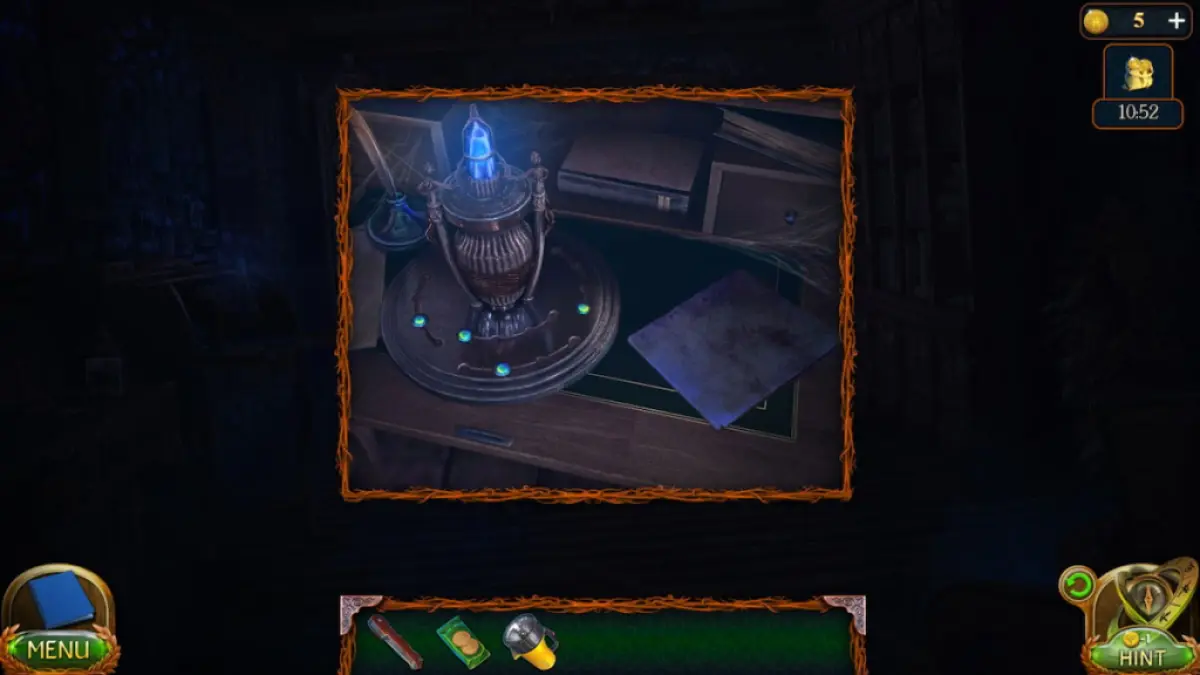
- Close the window (3), approach the table (4) and place Hilamir's pendant.
- Arrange the chips around the pendant (Image 4).
- Approach the symbols on the window shutters (3), then go to the bookshelf (5).
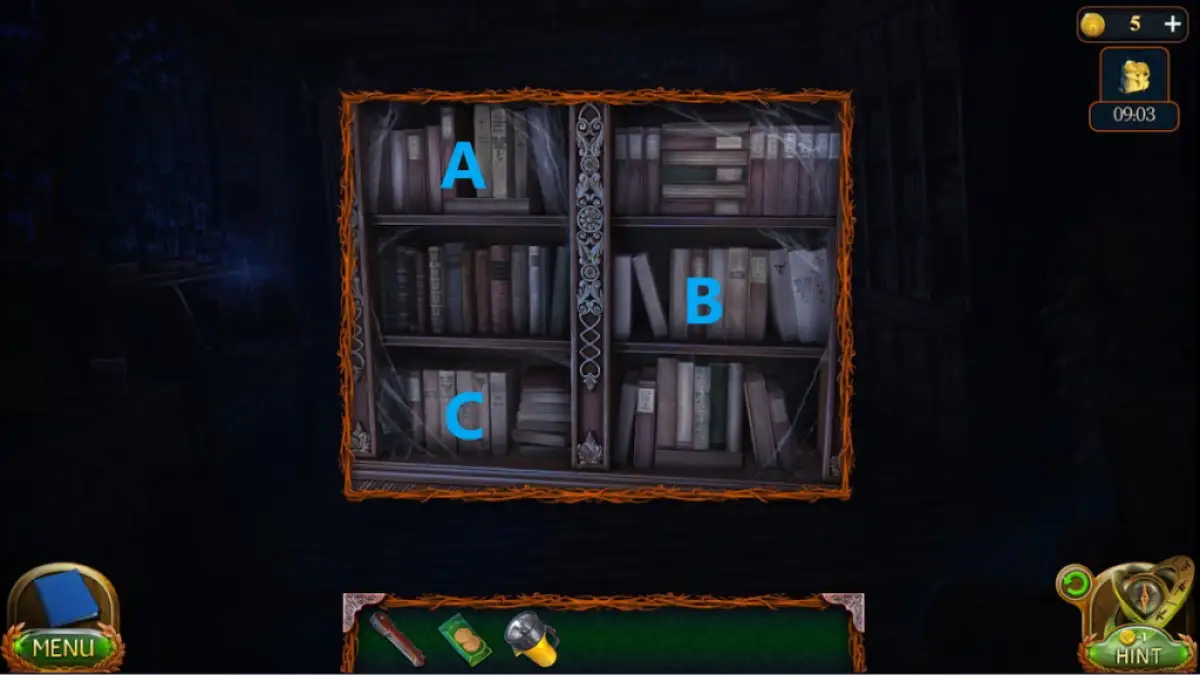
- Press the books in the following sequence: A, B, C (Image 5) to open the secret passage.
- Enter the secret passage.
Task 11 - Sip of water
Maaron was locked up behind Hilamir's bookshelf all along! He has the answers you seek, but he must be thirsty—he needs water!
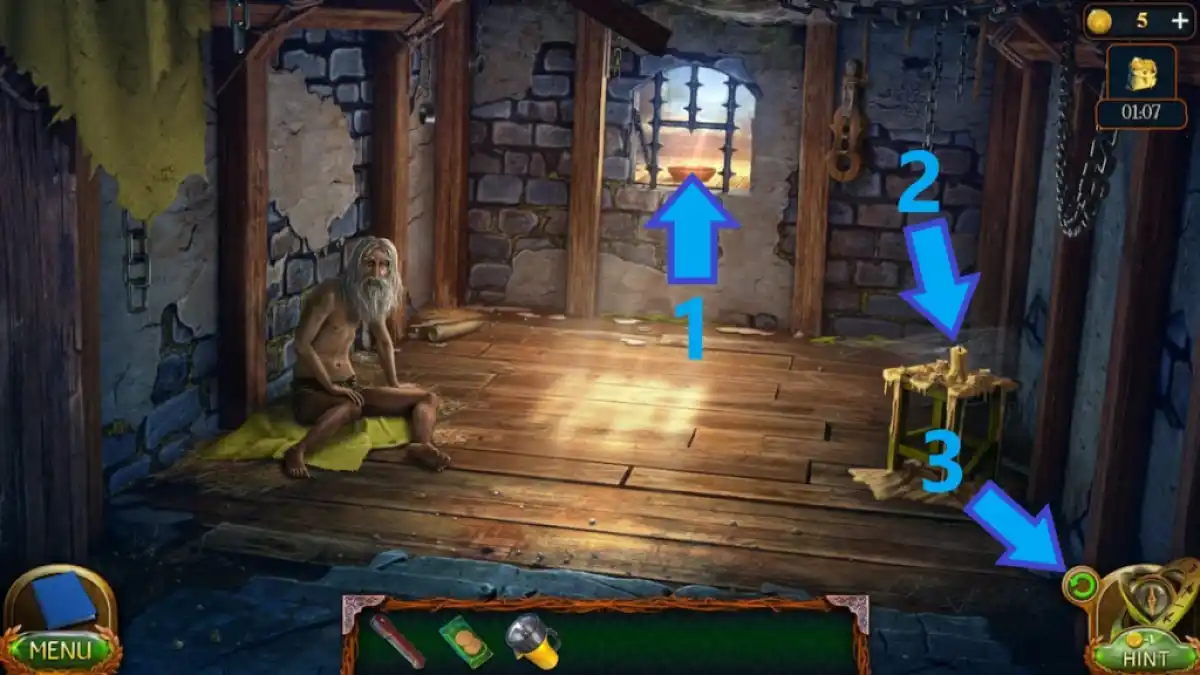
- Approach the cell window (1), and inspect the bowl.
- Use the knife to take the candle (2), and use the candle on Maaron to receive a burning candle.
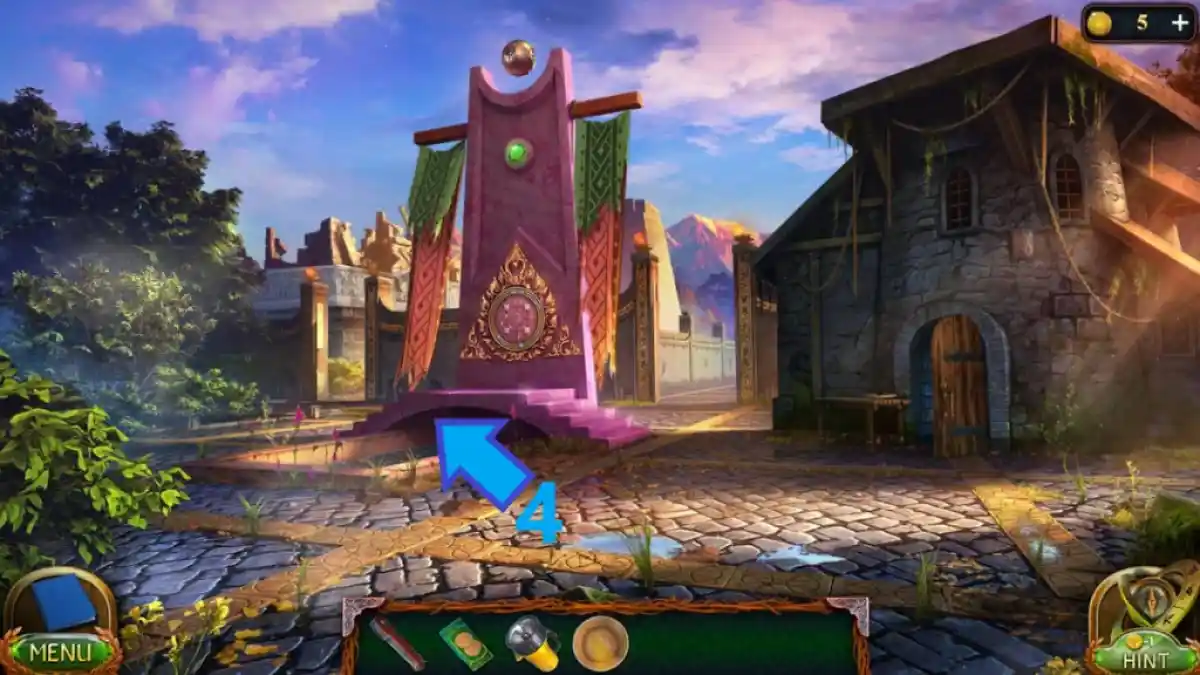
- Use the burning candle on the bowl to collect it, and press the back button (3) twice to return to Drak Square.
- Use the bowl to collect water (4) and bring the bowl of water back to Maaron.
- Move the cloth and hay where Maaron sat and inspect the symbols.
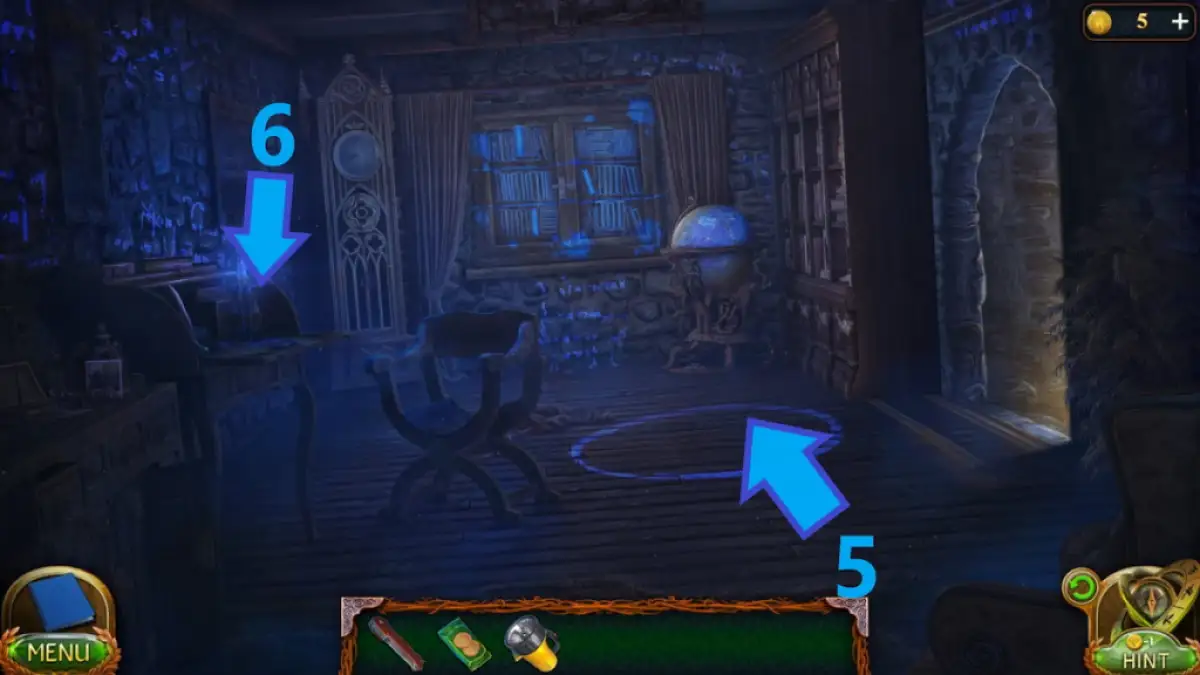
- Go back to Hilamir's room and move the carpet on the floor (5).
- Use the knife to cut the floorboards, move the clutter, and collect Hilamir's casket and an axe.
- Open Hilmir's casket by placing the symbols correctly (Image 4).
- Collect a round tile and the diary of Hilamir.
- Place diary of Hilamir on the table (6) and read it.
Task 12 - Temple of the Universe
The creaky floorboards in Maaron's cells make a hollow sound, which means there's a secret passage underneath. Let's start chopping!
- Go back to Maaron's cell and use the axe to break the floorboards. (1)
- Place the central tile into the big tile, and move the disks to connect the drawings.
- Go down the secret dungeon entrance and use the flashlight to illuminate it.
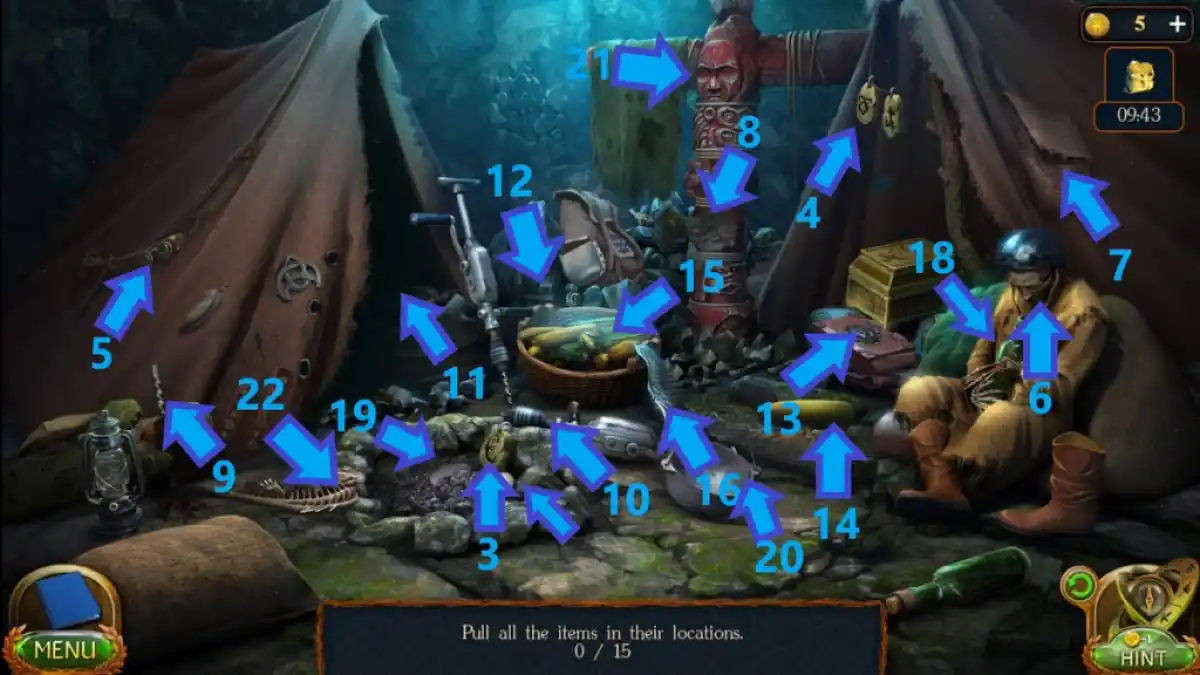
- Go to the tents (2) and place the items as follows:
- Place the golden piece (3) onto the necklace (4).
- Place the goggles behind the tent wing (5) on the corpse (6).
- Put the mask (7) onto the totem (8)
- Place the drill bit (9) on the driller (10).
- Move the golden coins inside the tent (11) to collect chips.
- Take the metal rod next to the backpack (12), use it to get the flask, and put the flask in the backpack pocket.
- Take the clasp and put it on the front of the backpack.
- Move the jewels next to the chest (13) and use the key to unlock the book.
- Flip through the book, and place the golden bird onto the golden chest.
- Place the corn cub (14) into the corn basket (15).
- Place the wing (16) on the bird inside the tent (11).
- Place the bull horns inside the tent (11) onto the golden bull's head.
- Place the chestnut inside the tent (11) into the chestnut bag.
- Put the cork (17) in the bottle (18).
- Place the lid (19) on top of the pot (20).
- Place the fish head inside the totem (21) onto the fish skeleton (22).
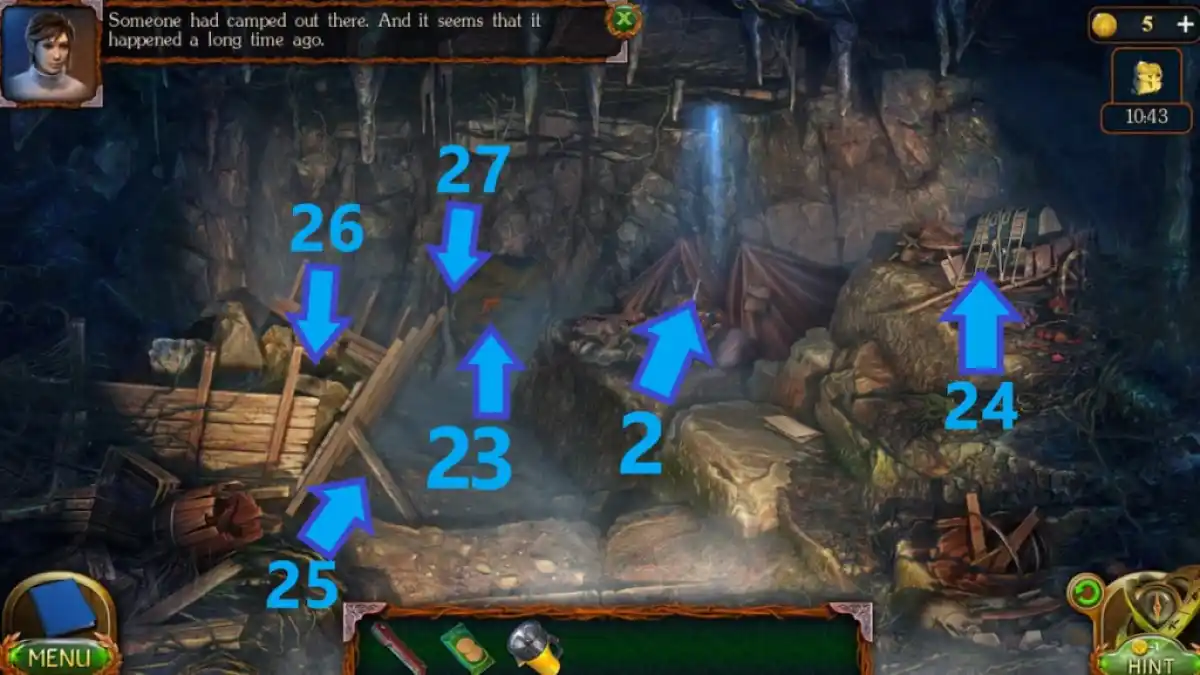
- Receive a mechanical palm and take the saw (23).
- Use the knife to get rope (24).
- Use the saw to cut the board and release the stones (25).
- Collect the meteor stone on the wagon (26) and place the rope on the stalagmite by the cave entrance (27) to climb down.
- Approach the body (28) and take the mechanical palm from the satchel.
- Go to the gate (29) and place two mechanical palms underneath the gem.
- Go forward and pass the obstacles to get to the other side.
- Approach the glowing crystal (30), read the diary and slide the door to read instructions.
Related: Vanishing Act walkthrough
Task 13 - The topper of the staff
After a ruthless obstacle course, you've found a giant stone gate. The keys are hidden at the top of the staircases, but getting them it won't be as easy as it seems.
- Place the meteor stone into the rock's opening (1).
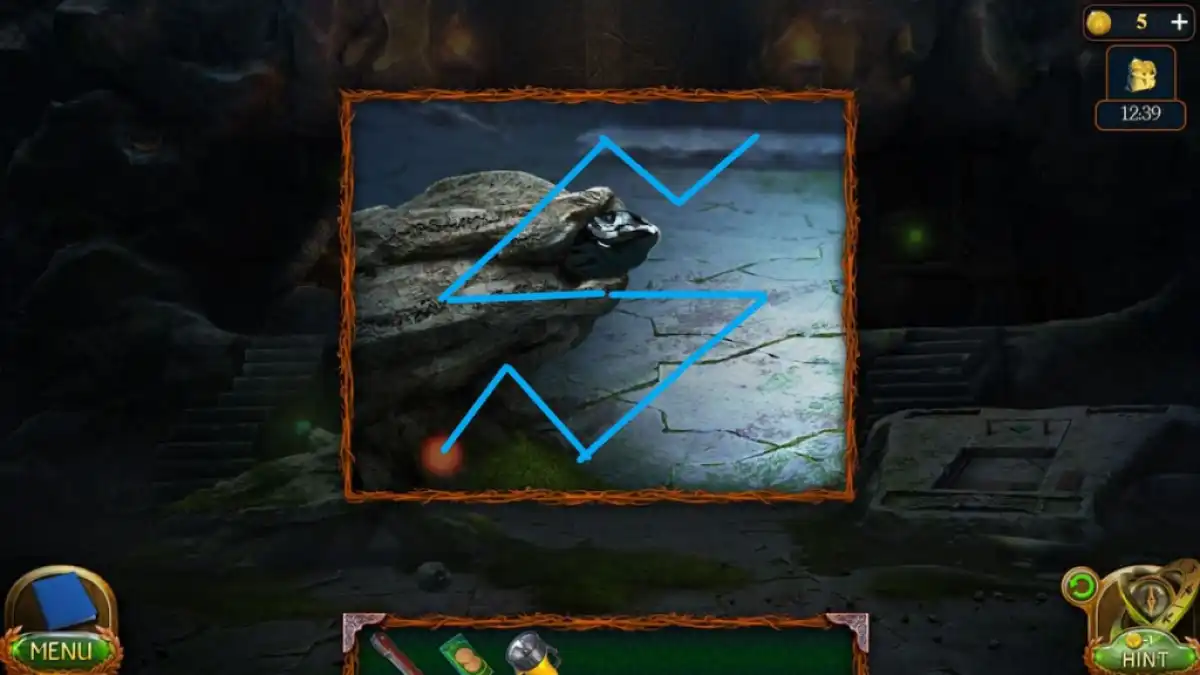
- Draw the symbol from the hint by connecting the dots (Image 2).
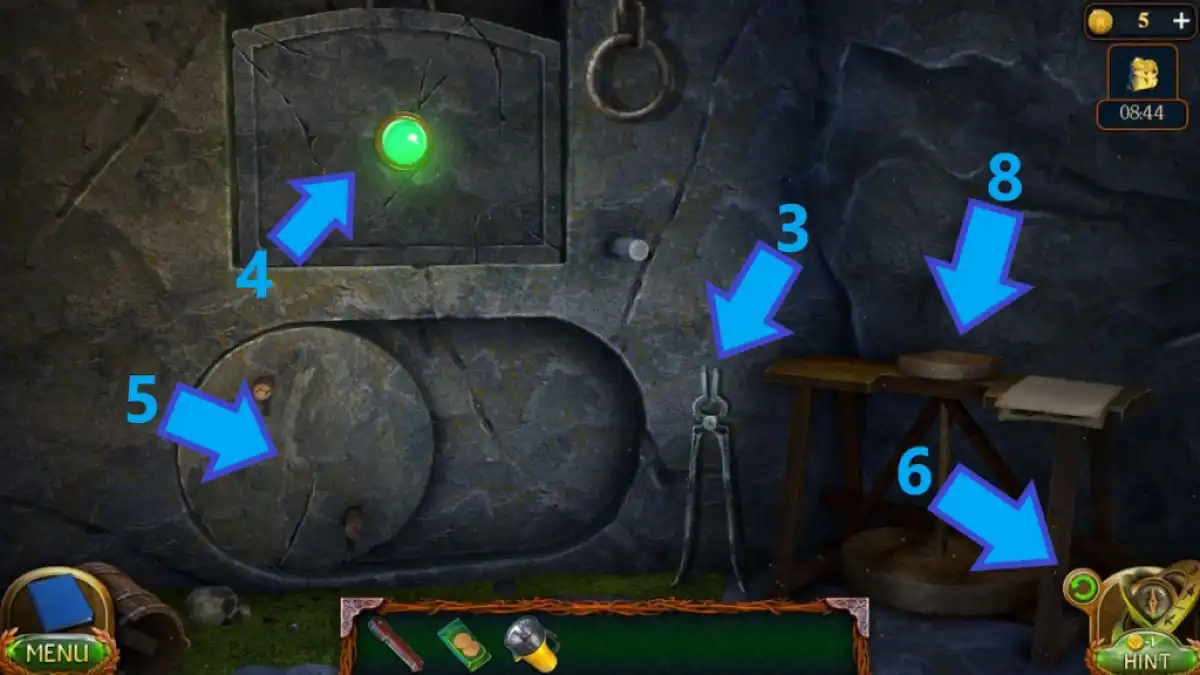
- Go up the right flight of stairs (2) and take the blacksmith tongs (3).
- Open the oven (4), move the wheel (5) and collect the blade from the round hole.
- Go back and use the blacksmith tongs to collect the fire shard (1).
- Place the fire shard into the round hole (5) and roll the wheel back.
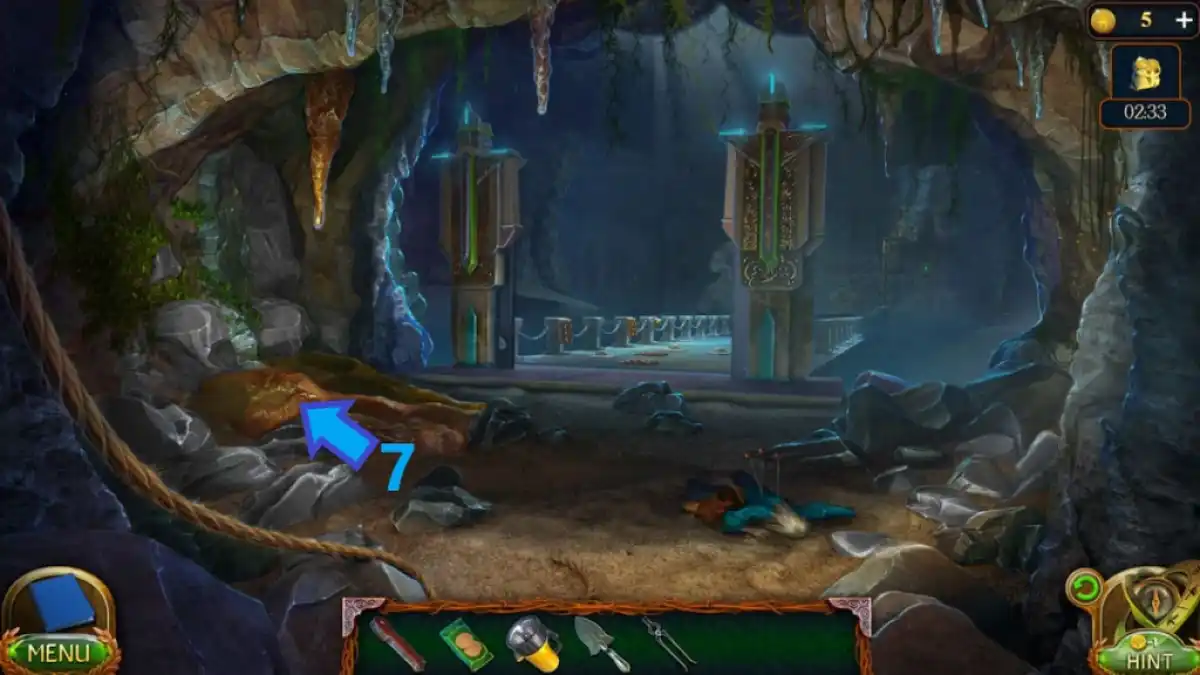
- Press the back button (6) twice to reach the bridge's other end.
- Use your blade to retrieve natural clay (7).
- Go across the bridge and climb the right flight of stairs (2).
- Place the natural clay onto the clay table (8) to make a clay bowl.
- Place the clay bowl into the oven (4) and close it.
- Open the oven and collect the baked bowl using blacksmith tongs.
- Climb the left flight of stairs (9) and place the baked bowl in the middle of the room.
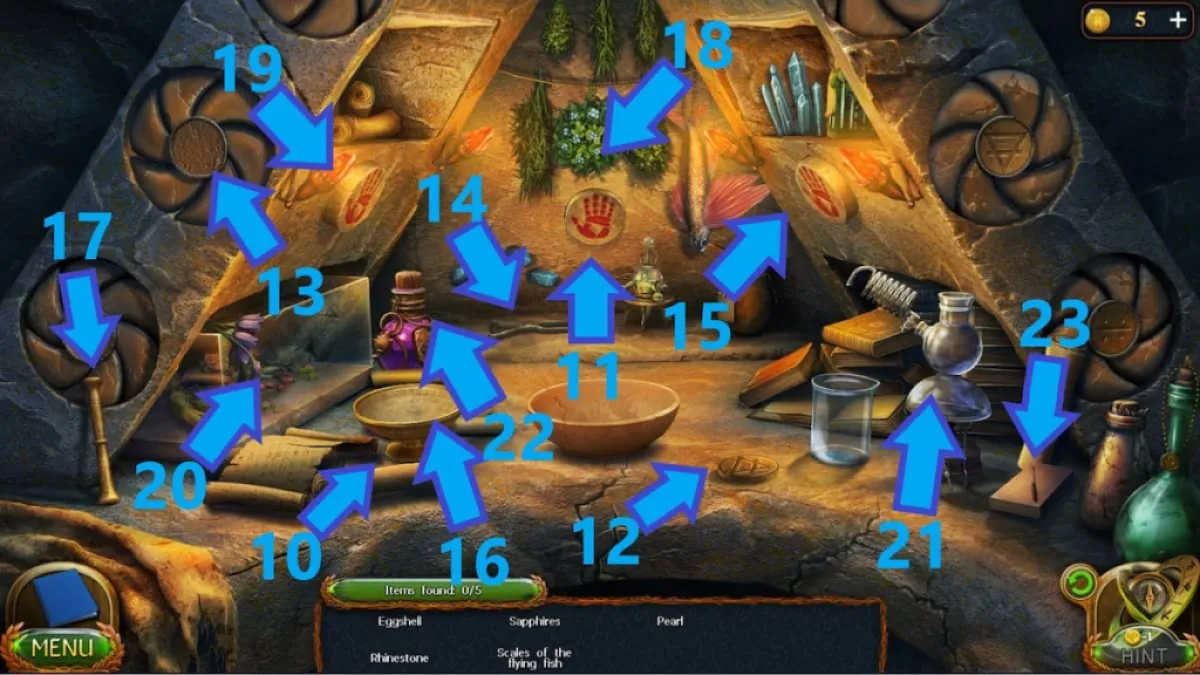
- Move the scrolls to collect the eggshells (10).
- Press the center hand imprint (11) and arrange the pieces to create a bird drawing.
- Use the rock below the bird to open the shell at the bottom and collect the pearl.
- Place the rune (12) into the empty slot (13).
- Press the center hand imprint (11) again and use the tongs (14) to scrape the flying fish.
- Collect the scales of the flying fish from the floor.
- Use the tongs to scrape the blue sapphires and collect them.
- Press the right hand imprint (15) twice to make the rhinestones fall out.
- Place all the ingredients into the golden bowl (16) and use the mortar (17) to grind them.
- Pour the ground ingredients into the baked bowl and take the bottle from the rune slot (13).
- Press the right hand imprint (15) again and take the moon bottle.
- Tap the mistletoe (18) and collect the mistletoe berries from the floor.
- Tap the left hand imprint (19) and take the fiery pear among the bottles.
- Take the beans from the lizard terrarium (20).
- Place the ingredients into the apparatus (21) and turn it on.
- Pour the resulting mixture into the baked bowl.
- Take the lizard skin and the petals of the bluebells from the terrarium (20) and press the center hand imprint (11).
- Take the phoenix feather in the bottom left and the spider cocoon above it.
- Press the middle hand imprint (11) again and take the mushroom from the top left.
- Pour the fuel (22) into the baked bowl and set it on fire using matches (23).
- Collect the potion of equality and forces.
- Approach the gate (24) and place the potion into the partition.
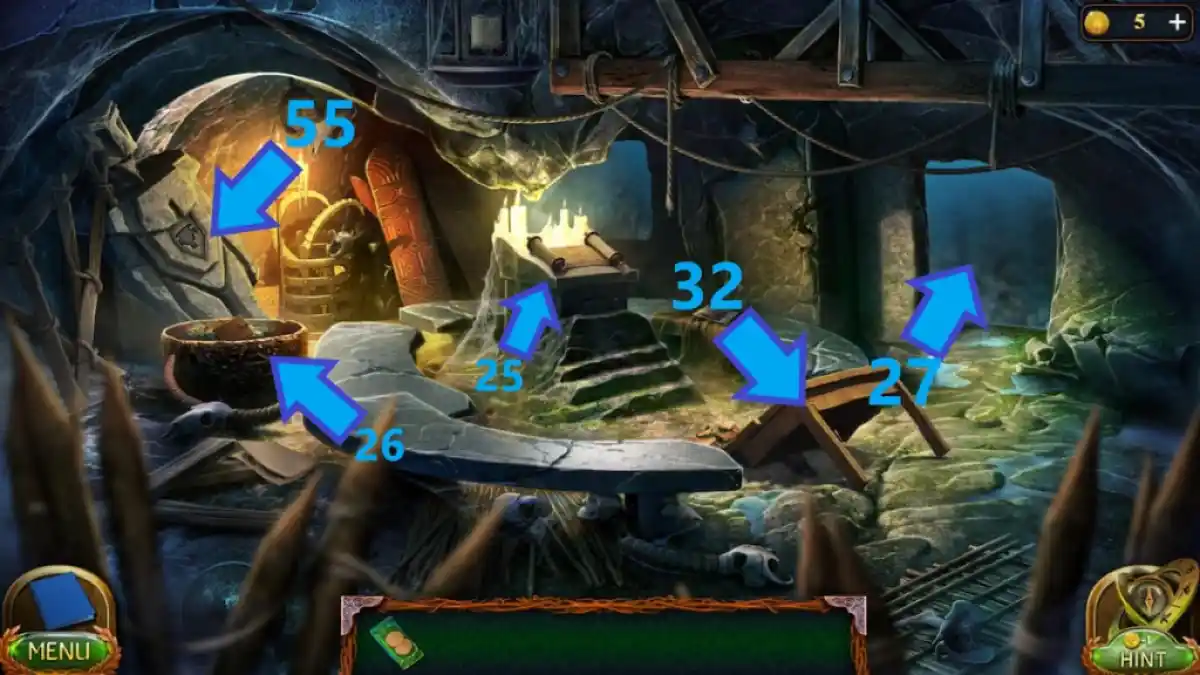
- Approach the scroll (25), read it and take the moon tile below it.
- Approach the cauldron (26), take the diary from the top and inspect the cauldron closer.
- Drag the bones from the top right to the bottom left and collect the uncovered second moon tile.
- Go through the door (27) and take the flashlight from the barrel (28).
- Take the key from the skeleton (29) and the book below the chest.
- Collect the damaged multi-tool (30) and use it to take the cork out of the barrel (31).
- Collect the blue barrel and use the damaged multi-tool to cut the net on the barrel (28).
- Collect the green barrel in the water and go back inside.
- Use the damaged multi-tool to cut the table (32) and collect the table cover.
- Combine the table cover with the blue barrel and the green barrel to create a raft.
- Go back through the door (27) and place the raft in the water.
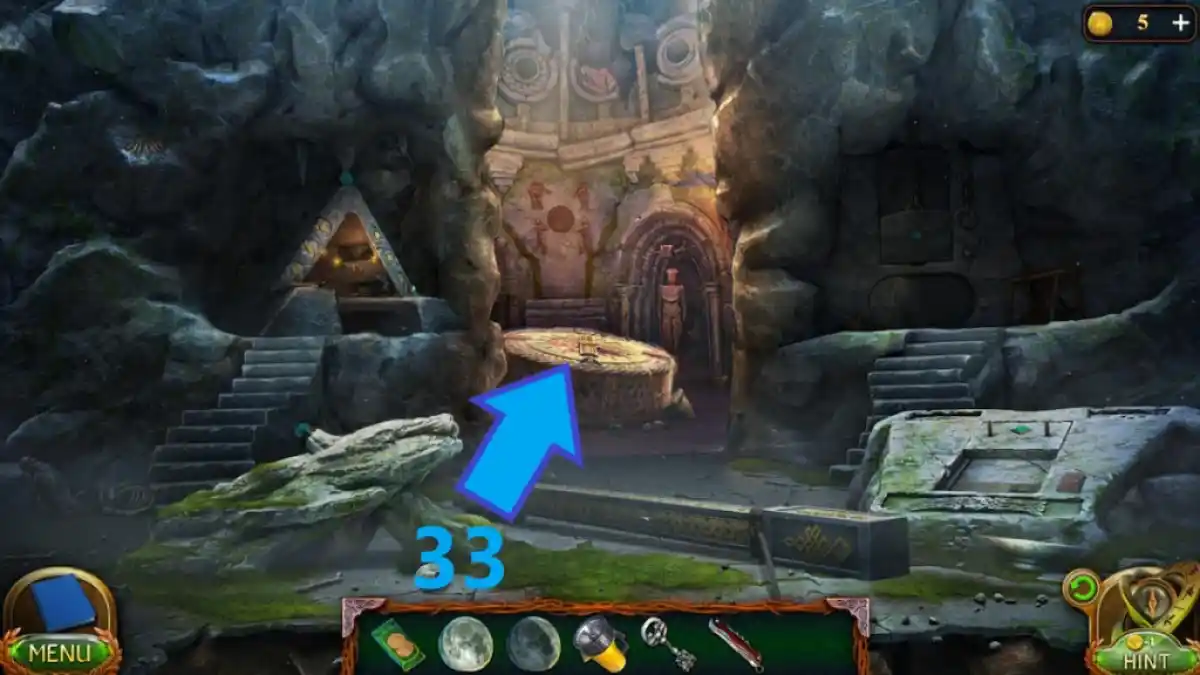
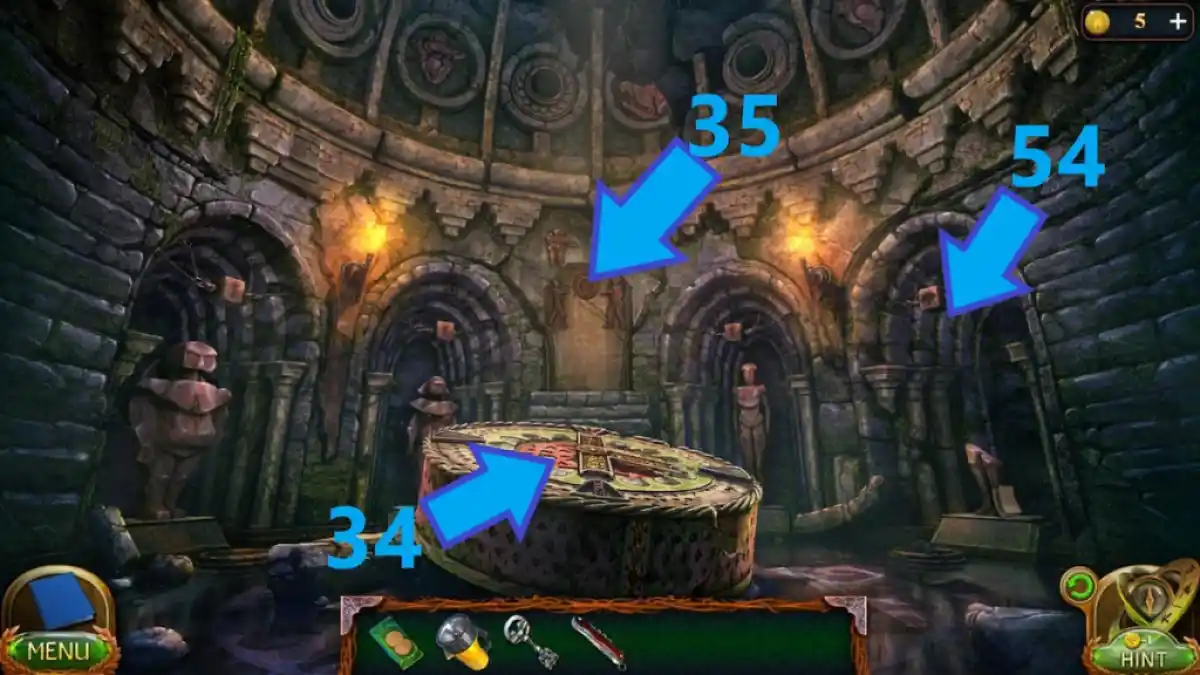
- Go through the broken gate (33) and approach the object in the middle (34).
- Collect the book in the top right and place the two moon tiles into the puzzle.
- Climb up the stairs (35), press the center button to open the door and enter.
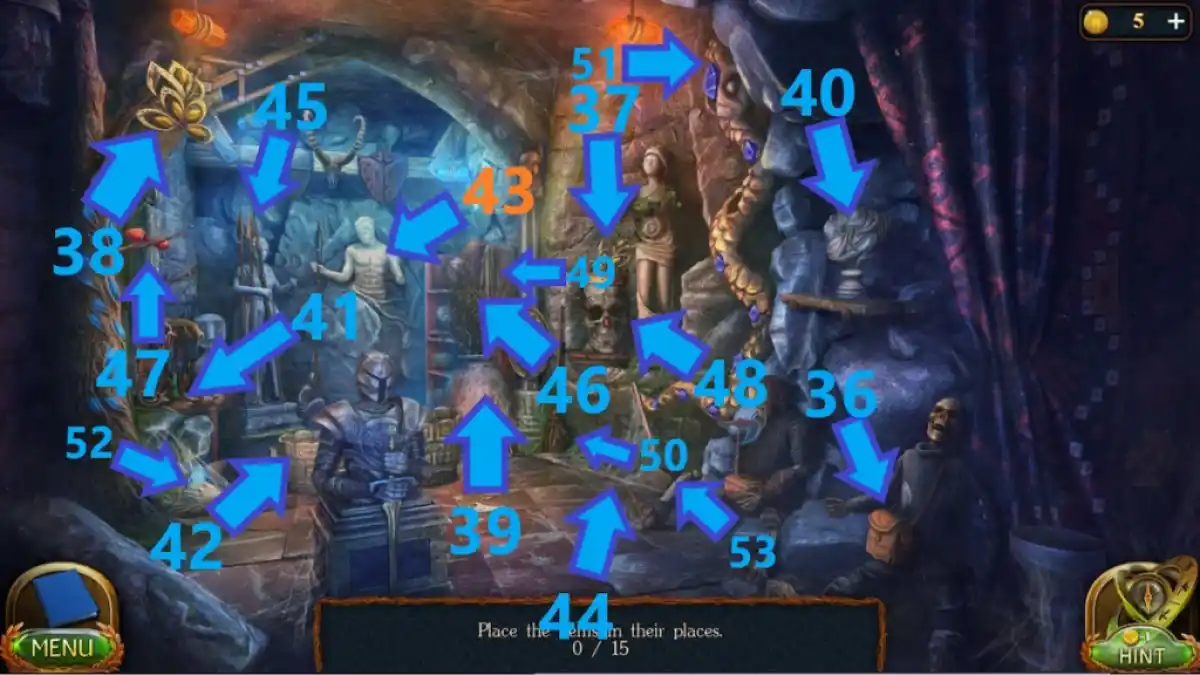
- Open the right skeleton's (36) satchel and place it into the chest in the left skeleton's lap.
- Place the gold leaves (37) into the gold plant (38).
- Knock over the bucket (39) and place the bust's head onto the bust (40).
- Approach the table (41) and place the horns, feathers, and teeth onto the statues on the table.
- Move the bucket on the left (42) and place the shield behind it onto the statue (43).
- Place the spear (44) among other spears (45)
- Approach the shelves (46), move and break the objects to retrieve three blue crystals.
- Solve the ceiling puzzle by moving the blocks in the following pattern: up, right, down x3, left, up, left, up, left, up, right, up, right, up, right, down, right, down, right, down, right, down, left, down.
- Place the orange gems (47) into the skull's eye sockets (48).
- Use the cloth (49) to wipe the mirror next to it.
- Use the broom (50) to wipe the woman statue.
- Place the blue gem (51) into the golden gem branch and place the arm (52) onto the woman statue.
- Move the lever (53) and collect the moon tile from the skeletons on the right.
- Approach the far right statue (54) and take the seal of Ul.
- Take the key to the top right of the object (34) and go back to the water.
- Use the key to open the chest in the water (29) and collect the moon tile inside it.
- Press the back button to reach the scroll room, and place the seal of Ul into the slot (55).
- Return to the moon tile puzzle and place the moon tile into the empty slot.
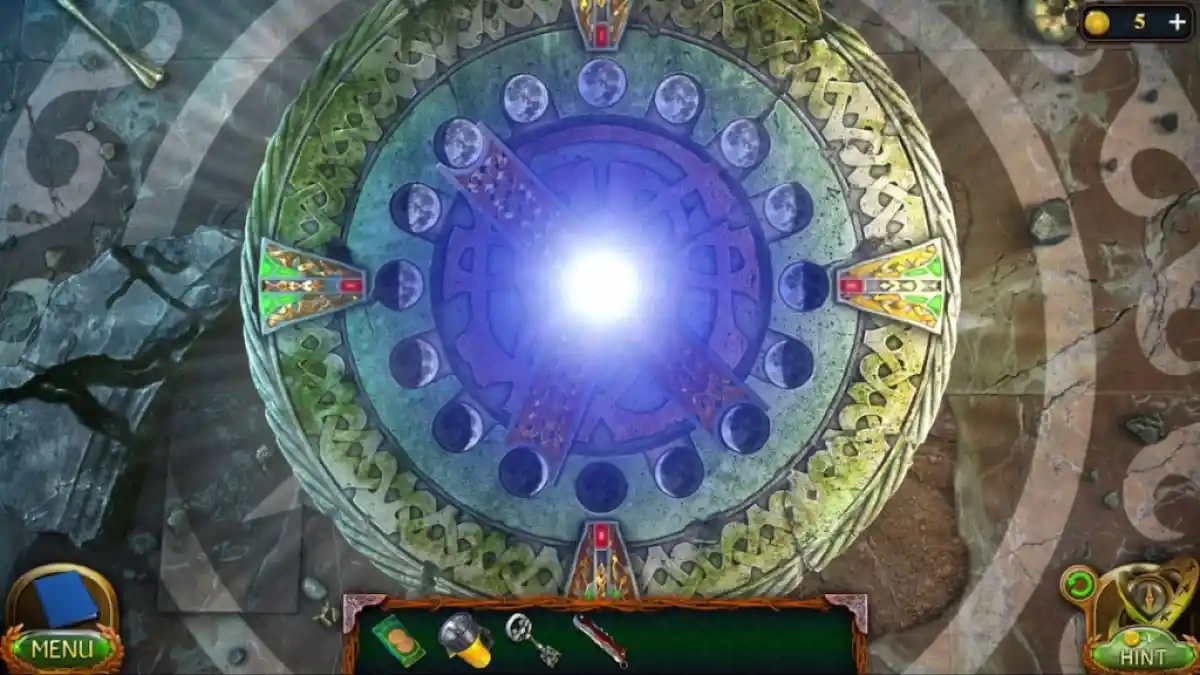
- Arrange the moon tiles to reflect the lunar phases (Image 10).
- Arrange the symbol cubes to match the floating symbols above the gods' statues.
- Take the spearhead from the far-right statue to teleport to Drak Square.
- Enter the house on the right, go through Maaron's cell and down the staircase.
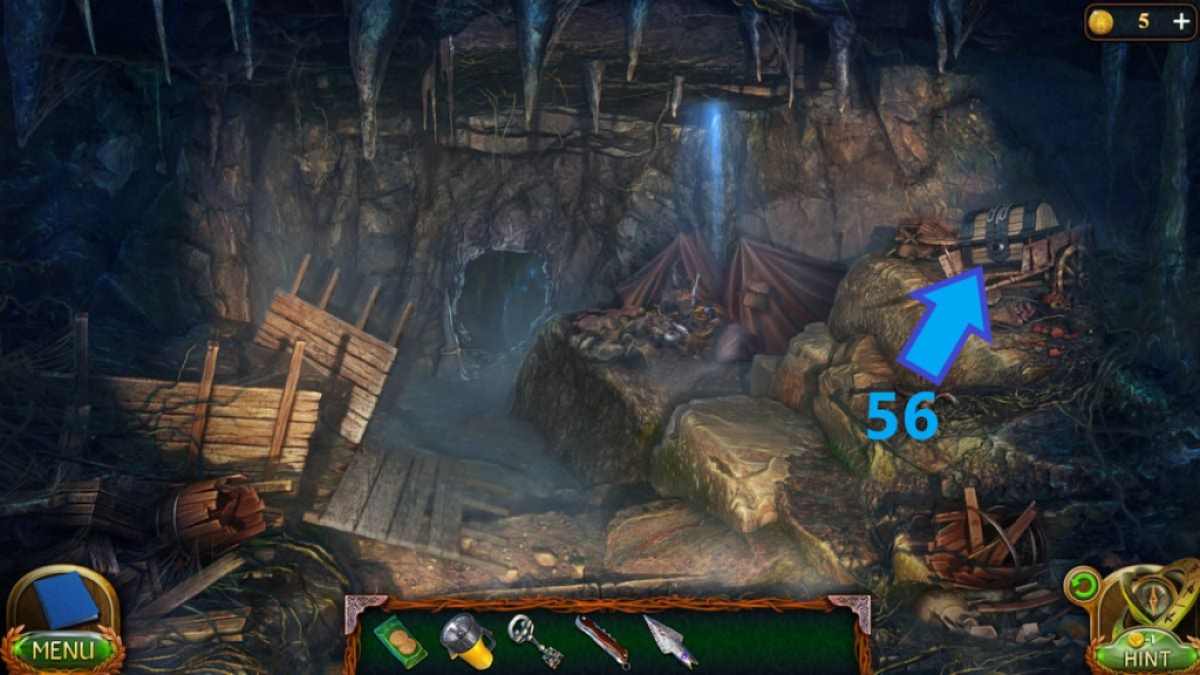
- Use the key to unlock the chest (56) and take the topper inside.
- Go back to Drak Square.
Task 14 - Mountain giants
Welcome the the village of the Giants! Alas, the village seems completely abandoned, but the marks are fresh and the clues indicate that something terrible has happened.
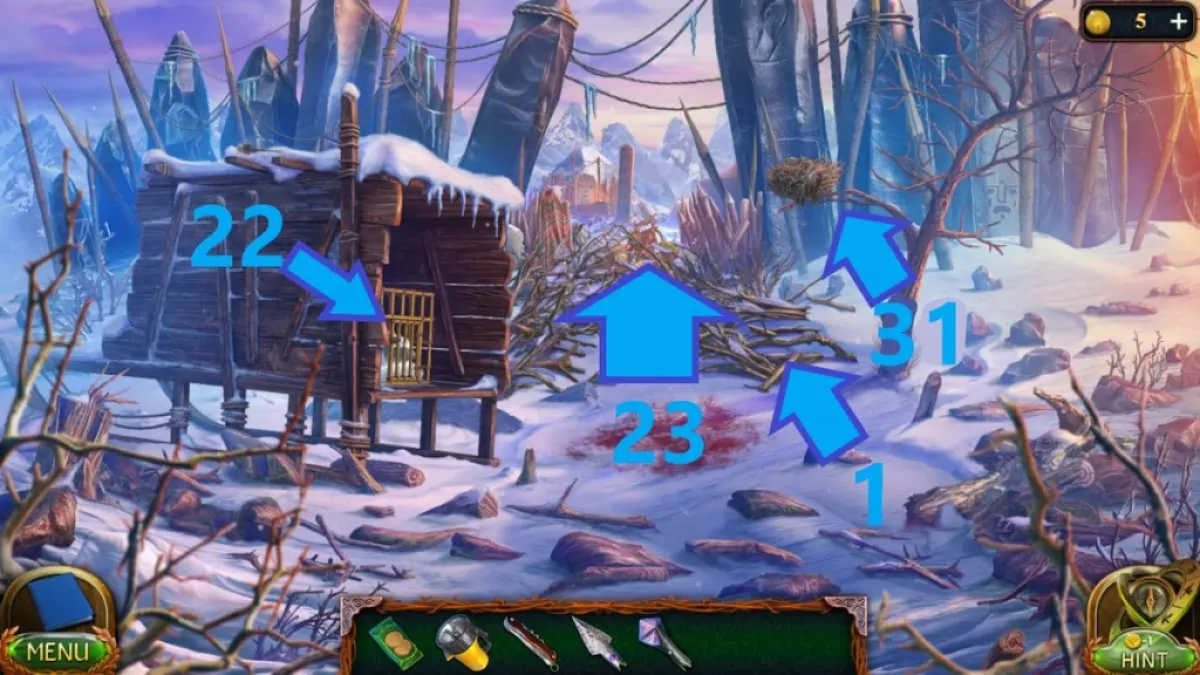
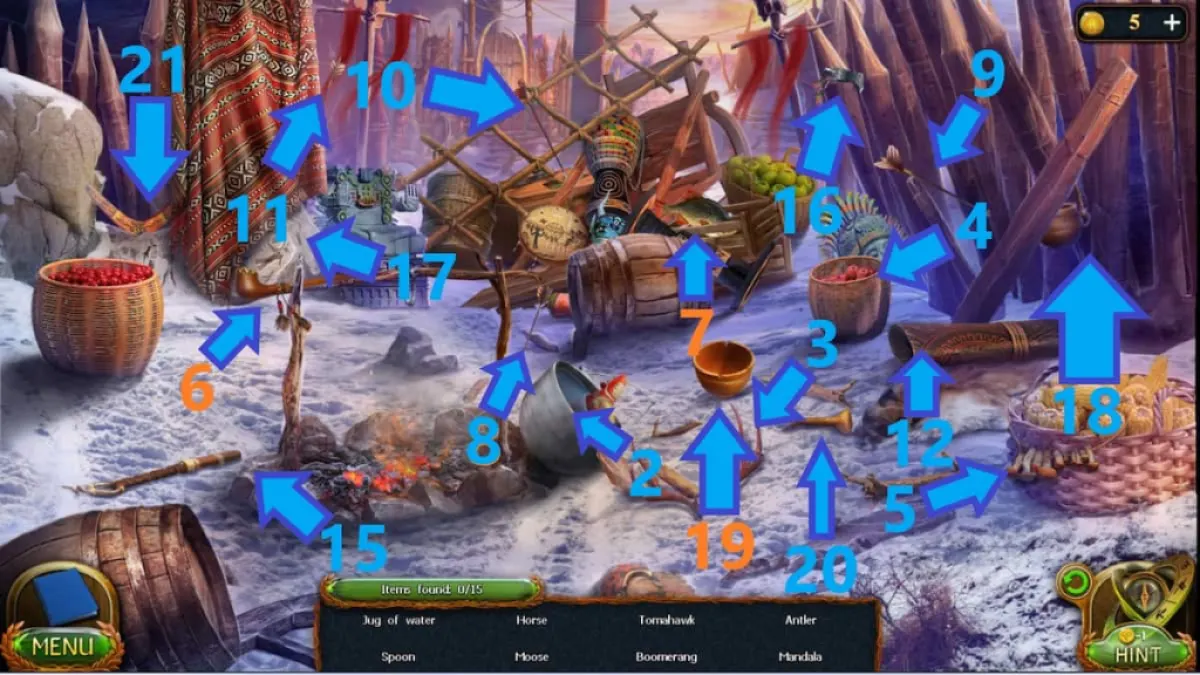
- Go right (1) and move the branches to begin the puzzle.
- Tap the couldron (2) and take the horse inside.
- Take the antlers (3), knock down the basket (4) and collect the spoon inside.
- Collect mushrooms (5)and the pipe (6).
- Move the debris and collect the fish (7).
- Place the arrows (8-11) into the quiver (12) and collect the quiver with arrows.
- Place the statue's head (13) onto the statue (14).
- Open the chest behind the debris and collect the beads inside.
- Place the three feathers onto the box, open it and collect the piece of fabric.
- Attach the handle (15) to the blade (16) and collect the tomahawk.
- Tap the moose behind the cloth (17) and place the aloe vera (18) into the mortar (19).
- Take the pestle (20) and squeeze the aloe vera in the mortar to get the aloe vera juice.
- Tap on the boomerang (21) to collect it and complete the puzzle.
- Open the cage (22), lure Fluffy out using cookies, and collect the horn.
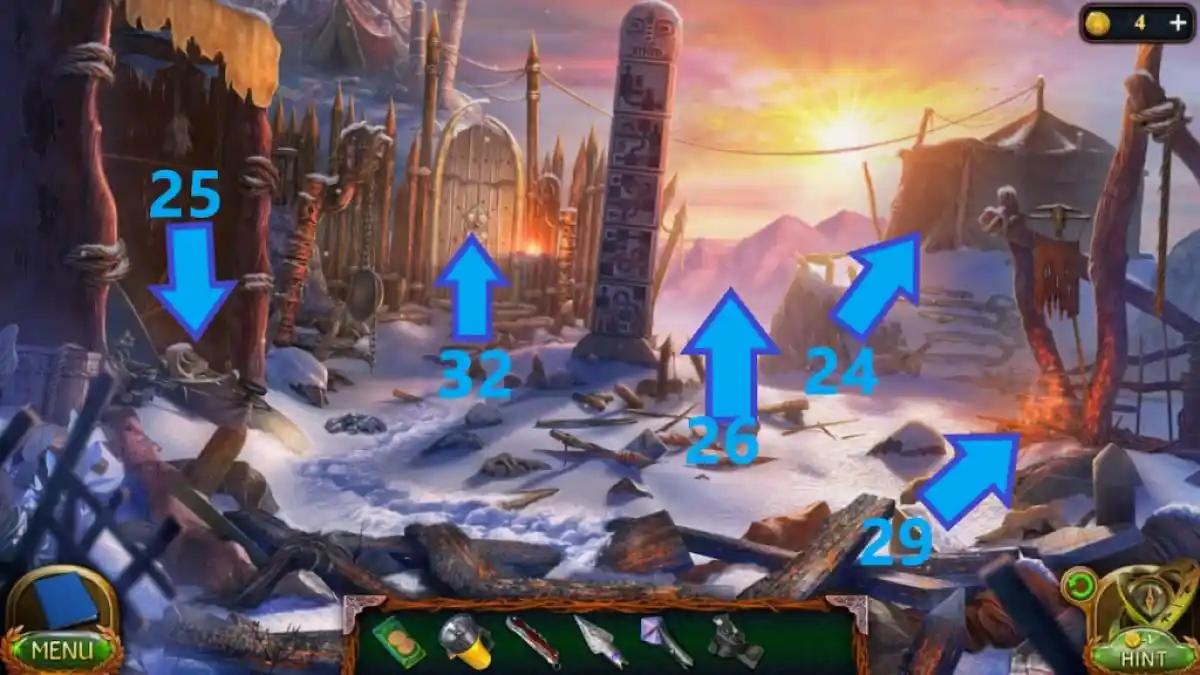
- Go forward (23) to the settlement and approach the tent (24).
- Move the debris, go back and approach the cauldron (25).
- Move the bones and take the wolf skull.
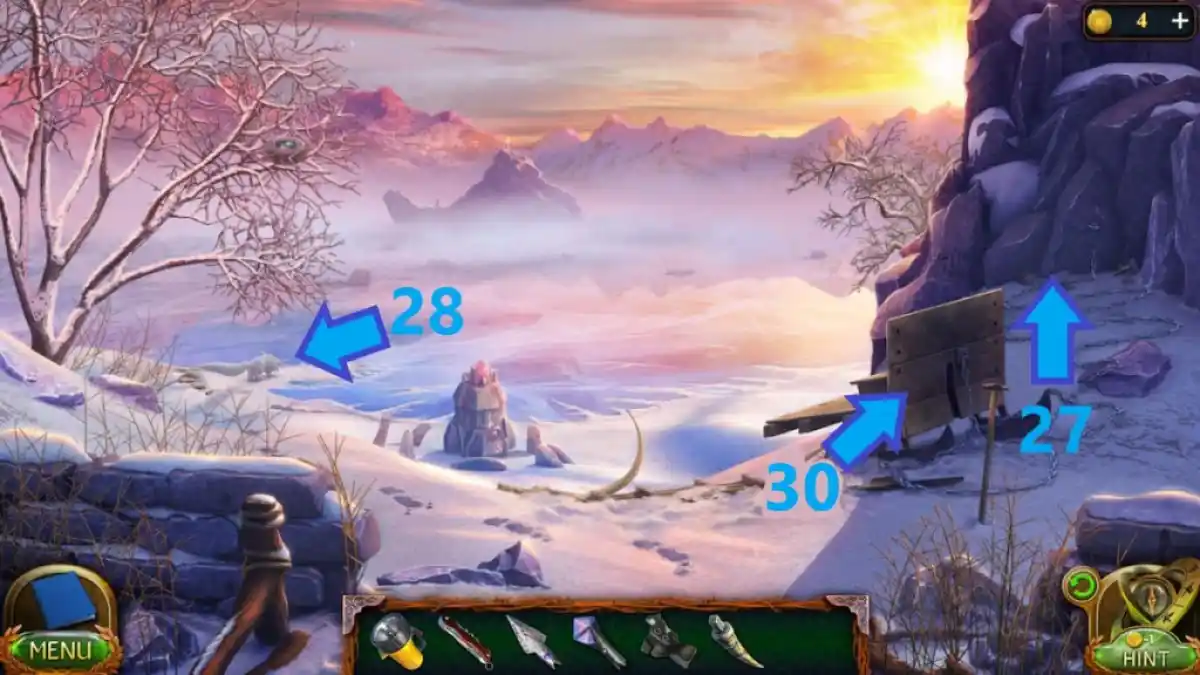
- Go forward (26) to reach the lake, approach the rock (27) and take the key.
- Approach Fluffy (28) and clear the snow to reveal a fishing net.
- Go back to the settlement, approach the tent (24) and unlock the chest using the key.
- Take the scoop and the drawing of sledges from inside the chest, and go to the bonfire (29).
- Use the scoop to collect embers and go back to the lake.
- Pour the scoop with embers onto the net (28) and collect the fish skull.
- Approach the broken sledges (30) and use the drawing of sledges to assemble it.
- Tap the sledges to push them downhill and collect the skull of snake from where the ledges stood.
- Go back to the cage and inspect the nest (31) to collect the eagle skull.
- Place the skulls into the gate (32) and enter.
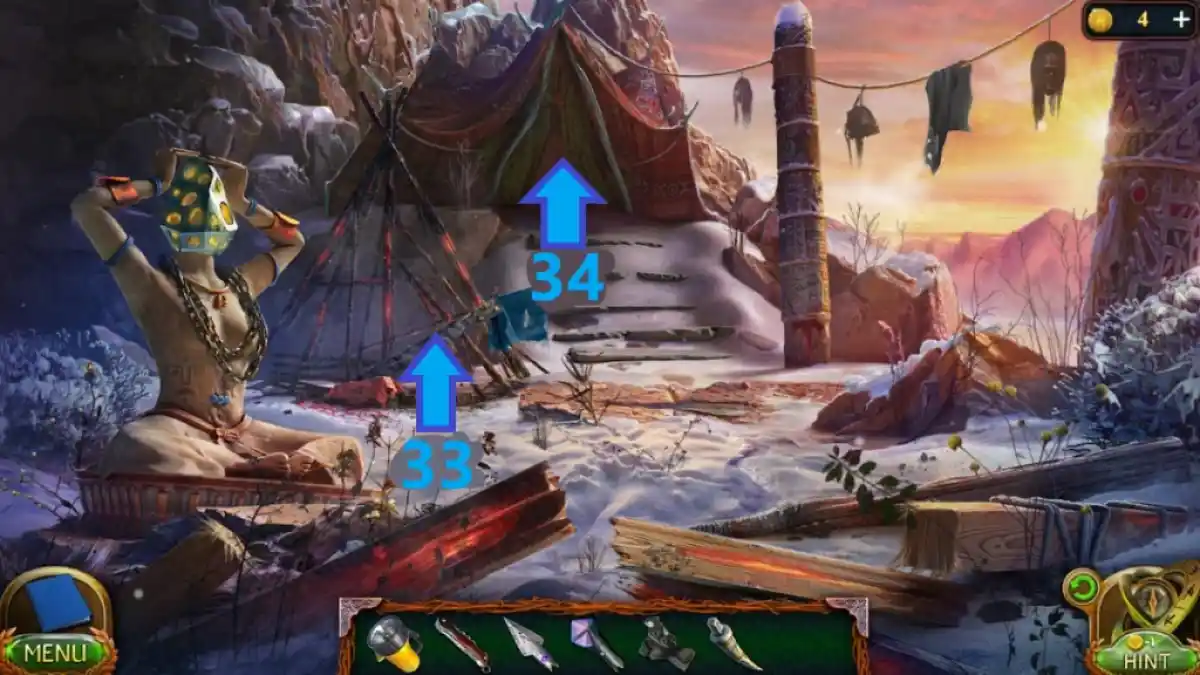
- Approach the tent poles (33) and collect the board with nails.
- Enter the tent (34).
Task 15 - Hidden island
The Giant shaman is no more. You were too late to save him, but he didn't die before giving you a clue to unlocking the stone entrance and finding the stone castle.
- Cover the giant and add the piece of cloth to the blanket (1).
- Open the oven (2) and collect the broken jar inside.
- Go back twice and place the board of nails onto the fire (3).
- Add the ice block to the fire to extinguish it, and collect giant's nails.
- Go to the lake, add the nails to the rock (4) and use the rocks to drive them into the rock.
- Tap on the sledges to get in and get across the lake.
- Approach the bones pile (5) and move them to collect the piece of bark.
- Go back in front of the deceased giant's tent and approach the statue (6).
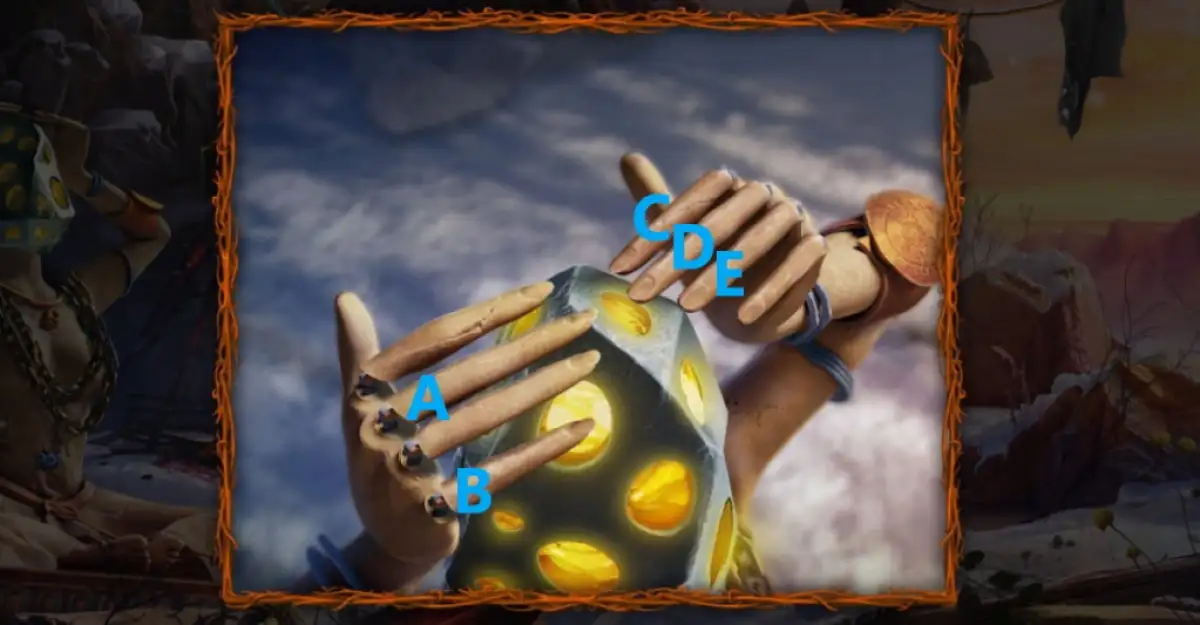
- Tap the fingers in the following sequence: A, B, C, D, E. (Image 6)
- Collect the shard of the sun and use your long stick to reach the piece of cloth (7).
- Add the piece of cloth to the giant's blanket and approach the stone entrance (8).
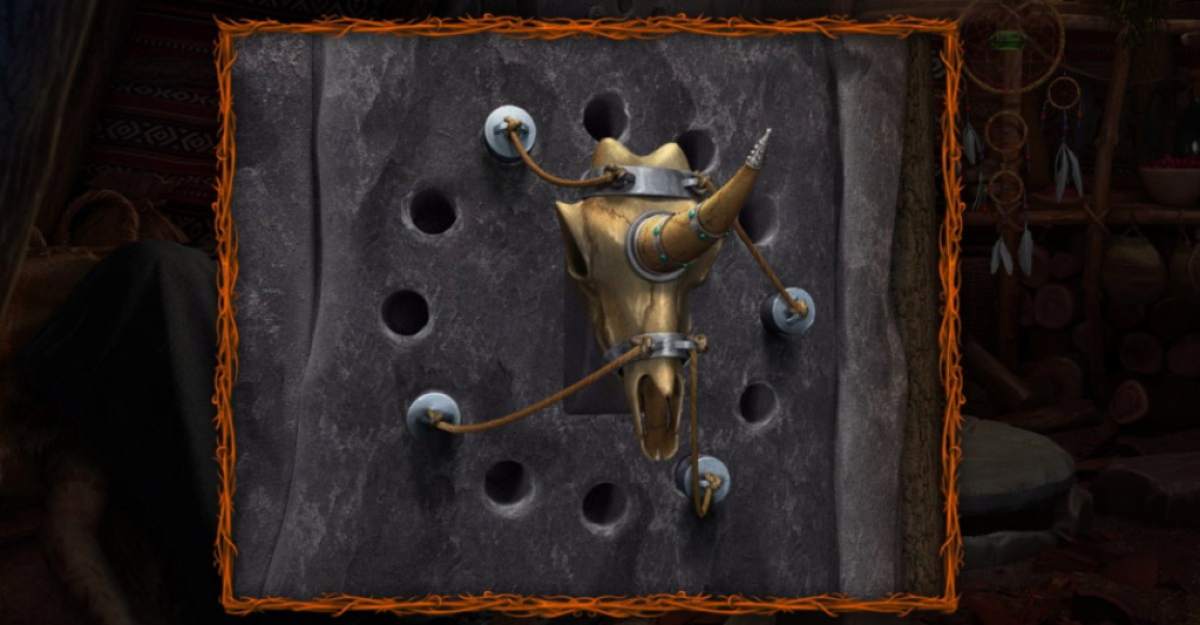
- Place the extensions into the correct holes (Image 7) and pull the skull to open the secret entrance.
- Enter and take the glove and the crystal from the table (9).
- Use the glove to replant the mandrake plant (10) and collect the key from the flower pot.
- Use the key to unlock the cupboard (11) and collect the rune from the bottom right drawer.
- Collect the eye and flies behind the bottles in the cupboard.
- Add flies to the flytrap on the table (9) and collect the second eye.
- Place both eyes on the box (12) and take the second rune inside.
- Place both runes (13) and take the flower figurine.
- Place the flower figurine into the slot (14) and play the memory game to receive the second crystal.
- Go to the door (15), place crystals into the slots to unlock it, and collect the tablet of knowledge.
- Go back to the lake and cross it again.
- Place the shard of the sun onto the monument (16) and turn the shard of the sun on top of the hill (17) to direct the sunlight into the sun tablet.
- Place the tablet of knowledge into the rock (18) and collect the piece of bark.
- Go back to the cage at the beginning and collect the giant's blood (19) using the broken jar.
- Collect the stone knife and go back to the lake.
- Pour the broken jar onto the statue (20) and go forward.
- Tap the second shard of the sun (17) to reach the next section.
Related: Homecoming A Young Kate Mystery Walkthrough (Vanishing Act Bonus Chapter)
Task 16 - Ul’s pole
Finally, you've reached the castle! In front of you are two entrances that hide two puzzles you must solve to receive the staff's topper and spearhead.
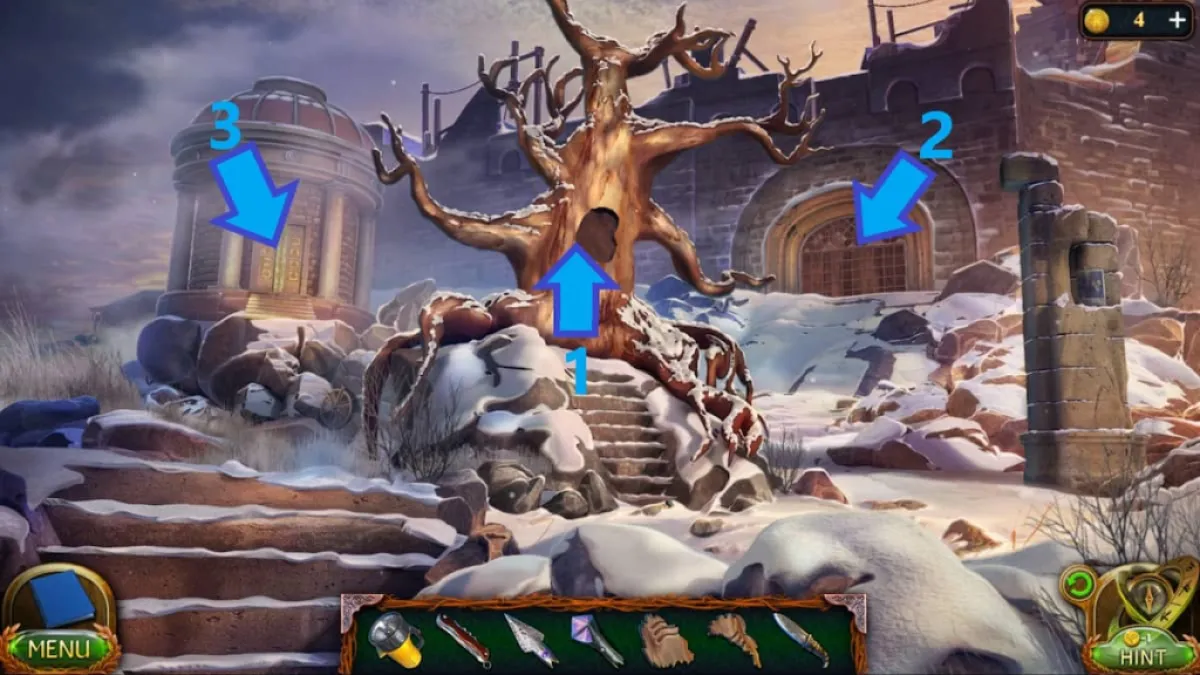
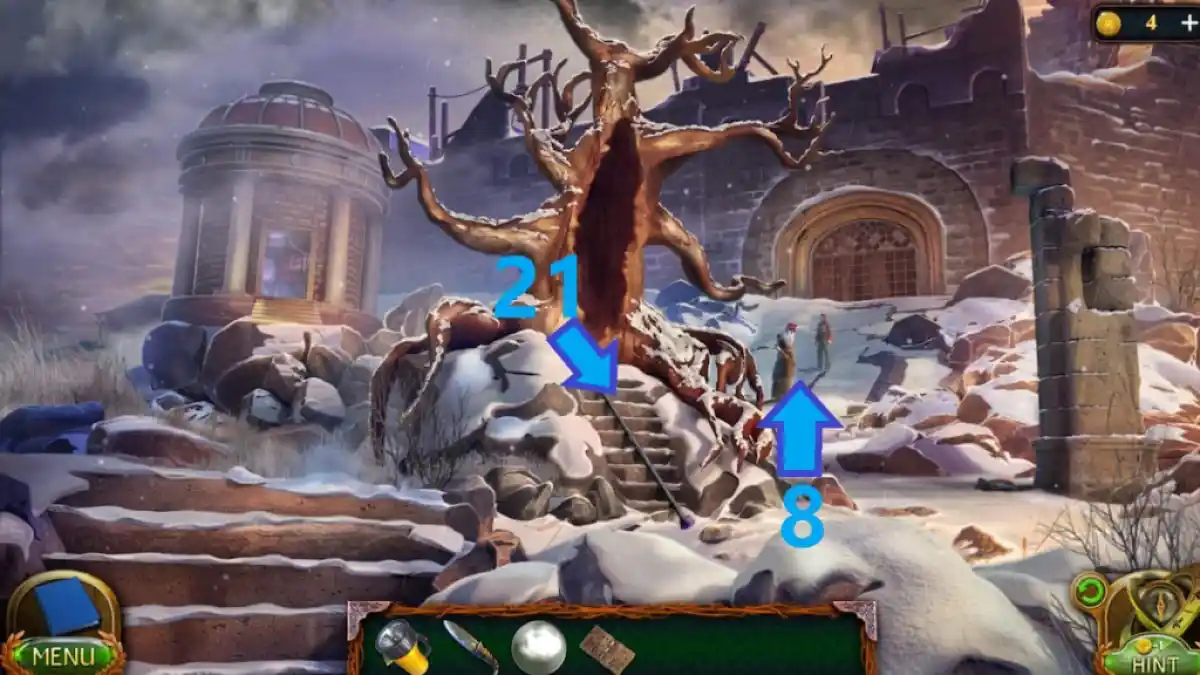
- Place both pieces of bark into the tree (1) and approach the castle (2).
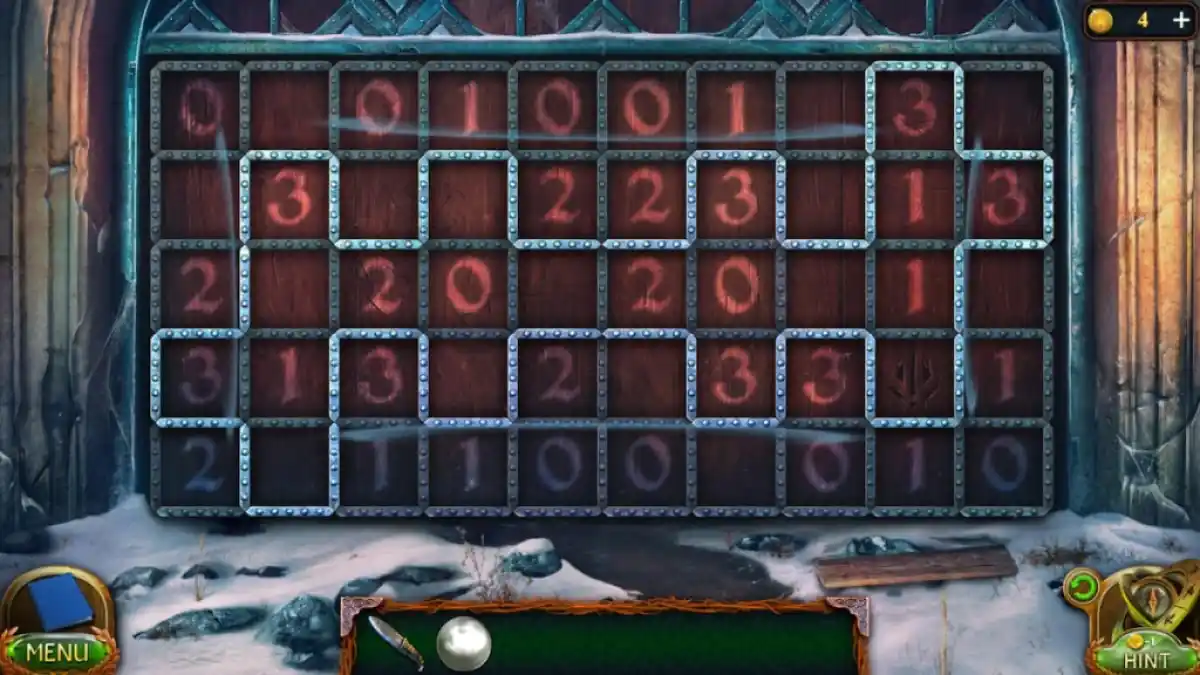
- Move the board from the gate and go to the small structure (3).
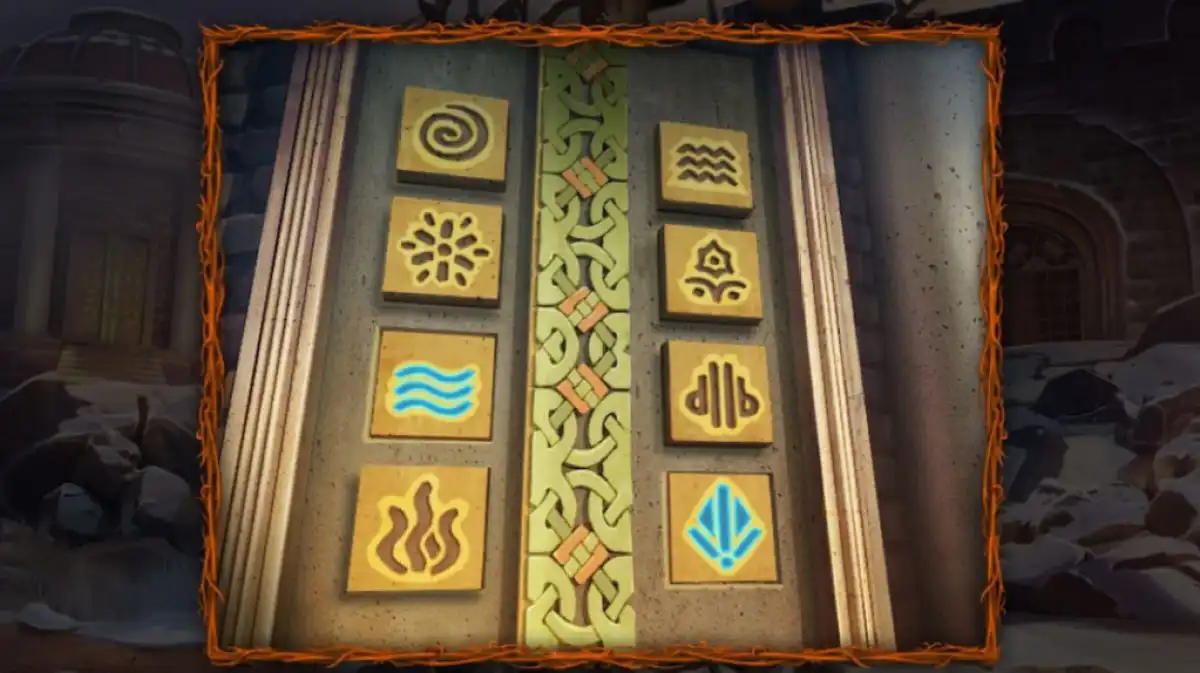
- Press the correct symbols (Image 2) and enter.
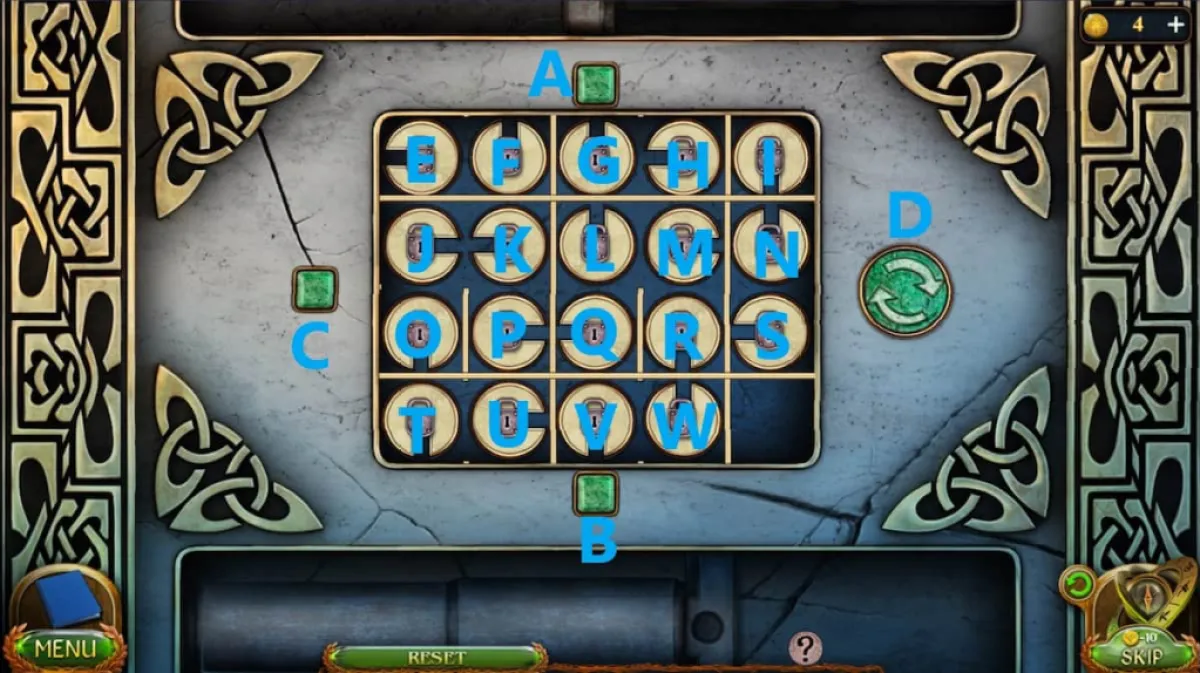
- Solve the puzzle (Image 3) by pressing buttons in the following sequence:
- Press buttons D and C.
- Move lockpad S down.
- Press B.
- Move lockpad R right.
- Press D.
- Move lockpad W up.
- Move lockpad R down.
- Press buttons C and D.
- Move lockpad M down.
- Move lockpad L right.
- Move lockpad Q up.
- Press buttons D and C.
- Move lockpad V up.
- Press button D twice.
- Move button U right.
- Press button D.
- Move lockpad P down.
- Press button D twice.
- Press buttons B and C.
- Drag lockpad K down.
- Press button D.
- Move lockpad J right.
- Press button D twice.
- Move lockpad O up.
- Press button C.
- Move lockpad T up.
- Move lockpad O down.
- Press button C.
- Move lockpad J down.
- Press buttons C and D.
- Drag lockpad E down.
- Deag lockpad F left.
- Press button A.
- Movel lockpad G left.
- Press buttons D, B, C and A.
- Move lockpad H left.
- Press buttons A, C, B and D.
- Move lockpad I left.
- press button D three times.
- Drag button N up.
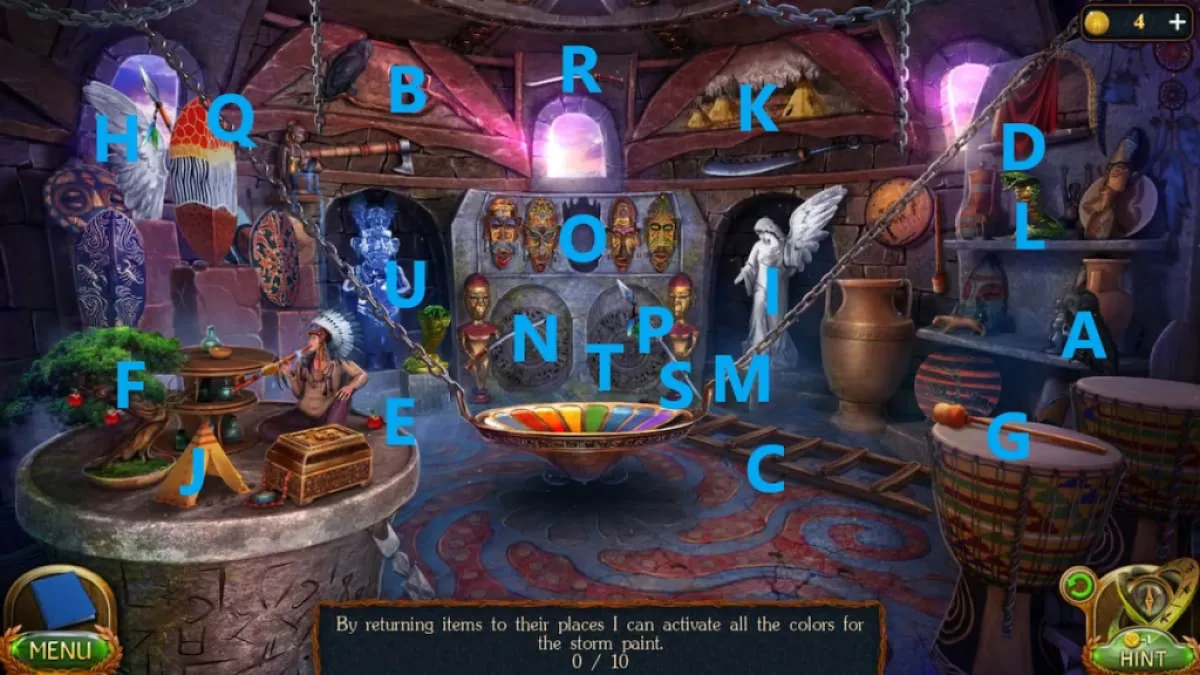
- Enter the structure and move the objects to their rightful places (image 4):
- Move the owl (A) to the slot (B).
- Place the ladder (C) to its place (D).
- Place the apple (E) on the tree (F).
- Place the eggs (B) into the nest inside, and the heart into the chest for the final egg.
- Take the drumstick from the centerpiece and place it onto the drum (G).
- Drag the wing (H) to the angel (I).
- Place the tent (J) above the sword (K).
- Place the snake (L) on the empty pedestal (M).
- Drag the mask to the central slot (O).
- Place the spear (P) behind the shield (Q).
- Place the sword (R) onto the right statue (S).
- Drag the axe (T) to the blue statue (U).
- Use the storm paint and the stone knife to paint the tree (1).
- Place the topper and the spearhead on the staff.
Task 17 - Jim’s demons
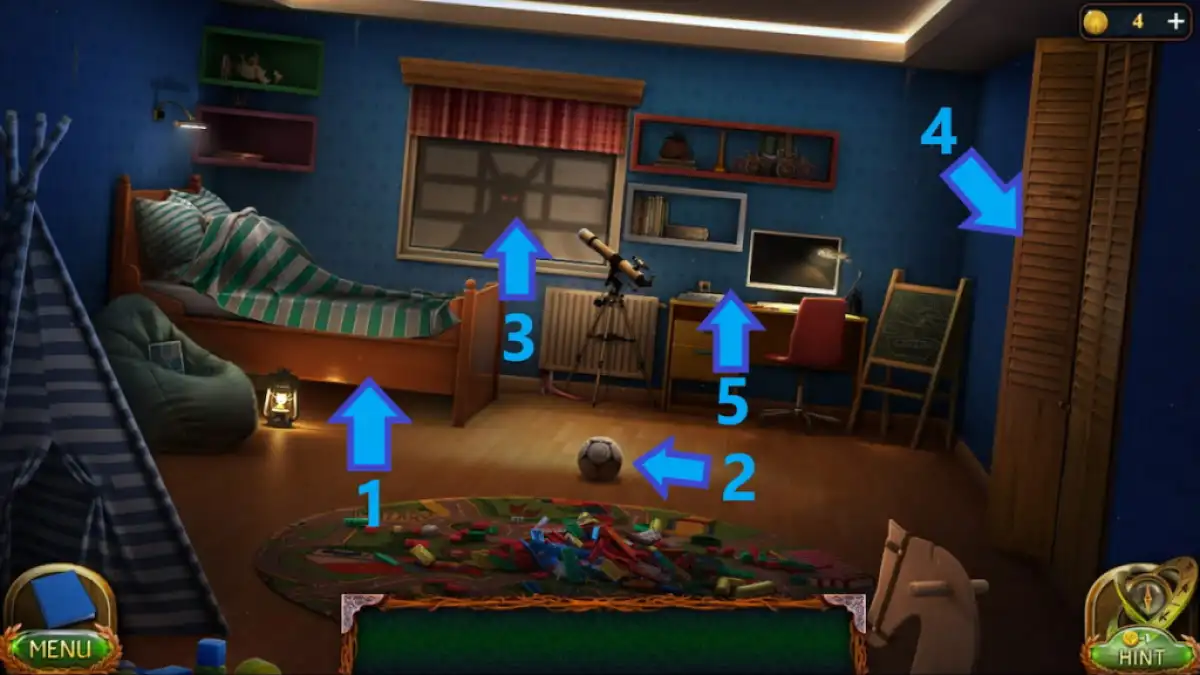
Dark magic teleported you again, and this time you find yourself in a children's room, with a dark entity staring back at you through the window. Get out of the house before it's too late!
- Check under the bed (1) and tap the ball (2).
- Remove the bed sheets and take the grab-it claw.
- Tap the window (3) and look down.
- Open the closet (4), move the clothes, and collect the ice hockey stick.
- Use the stick to react Jim's treasure box under the bed (1).
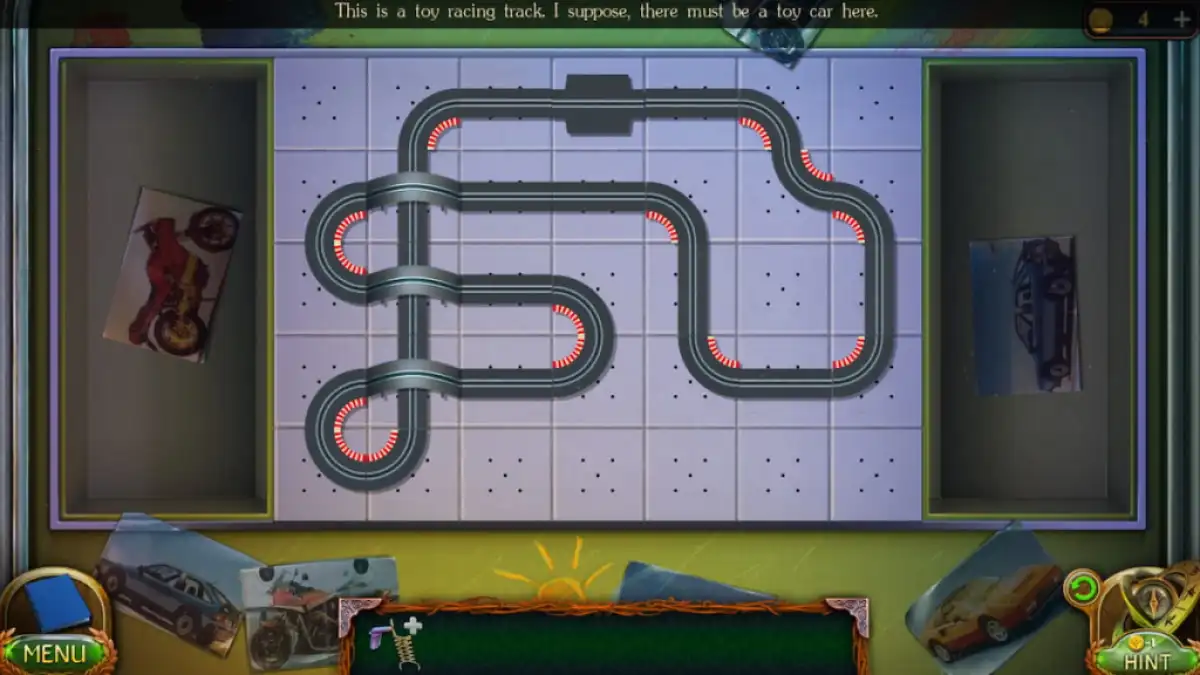
- Take the toy car from the desk (5) and go back to the treasure box.
- Assemble the toy car track and place the toy car on the track (Image 2).
- Collect the small key and use it to open the desk drawer (5).
- Collect the metal constructor and combine it with the grab-it claw.
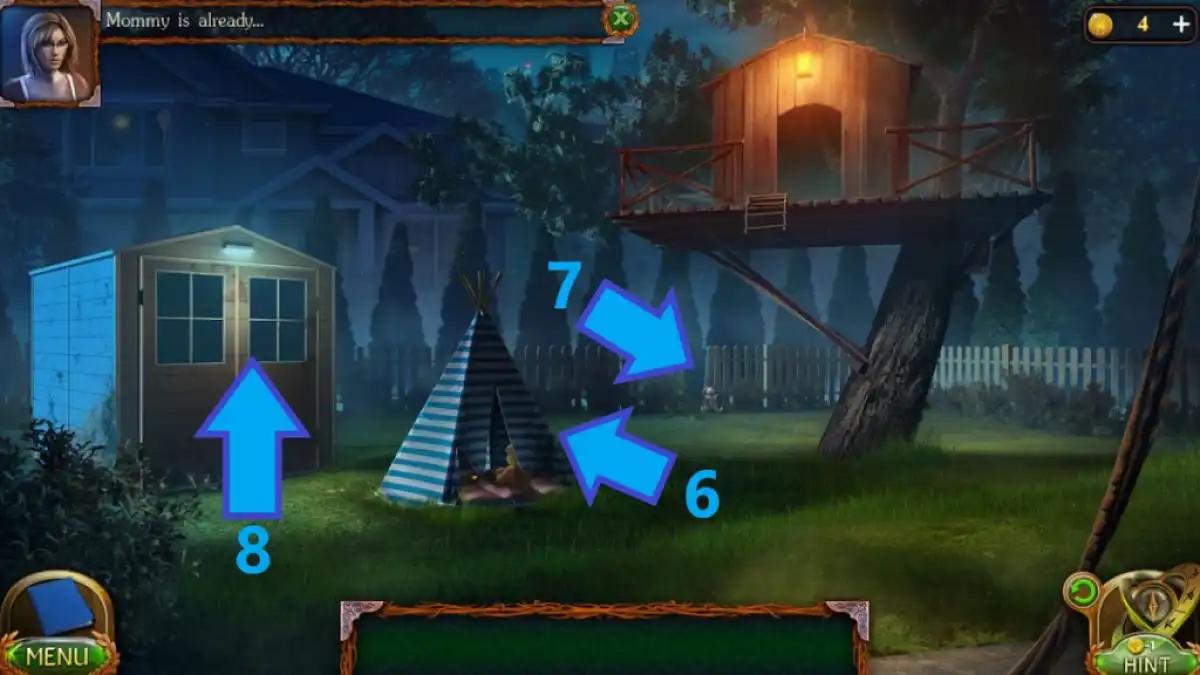
- Use the grab-it claw to make a rope on the window (3), and tie it to the radiator to go down.
- Open the tent (6) and collect the toy flashlight.
- Collect the toy clown and the toy hammer next to the fence (7).
- Take the batteries from the toy clown and put them into the toy flashlight.
- Use the toy hammer to break the lockpad on the shed (8) and use the toy flashlight to enter.
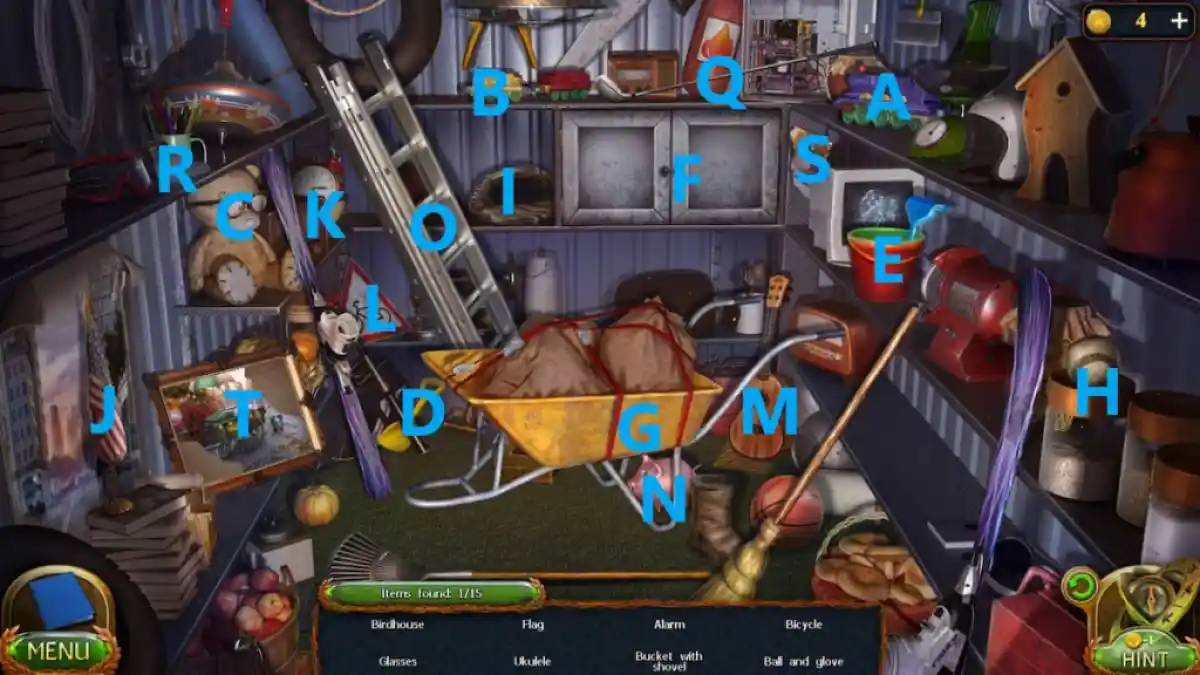
- Solve the puzzle by matching the items (Image 4):
- Add the locomotive (A) to the wagons (B) and collect the train.
- Tap the glasses (C).
- Place the toy rake (D) into the bucket (E) and collect it.
- Open the tool cabinet (F), place the wheel onto the wheelbarrow (G), and tap on it.
- Add the baseball (H) to the baseball glove (I) and collect it.
- Tap the flag (J), the clock (K) and the bicycle sign (L).
- Tap the ukulele (M), the piggy-bank and the ladder (O).
- Tap the birdhouse (P and the bat (Q).
- Add the picture pieces (R, S) to the picture (T) and collect it to receive a ladder.
- Place the ladder onto the tree house and climb up.
Task 18 - Ballista
Everything has led to this moment, and now you have a chance to destroy the Gate of the Worlds once and for all! Make your way into the castle and find the parts needed to reassemble the ballista.
- Take the stone knife (1) and the flashlight (2).
- Collect the damaged multi-tool (3) and the emerald next to Uri (4).
- Go back to the deceased giant's tent and use the multi-tool to collect the second emerald (5).
- Go back twice and approach the totem (6).
- Place the two emeralds onto the totem and solve the puzzle (Images 4-8) to get the power stone.
- Follow Fluffy to the stone (7) and use the multi-tool to collect the stencil.
- Return to the torn tree, give the stencil to Jim and the flashlight to Maaron (8).
- Solve the gate puzzle (Image 11) and enter the fortress.
- Raise the ladder (9) and climb up.
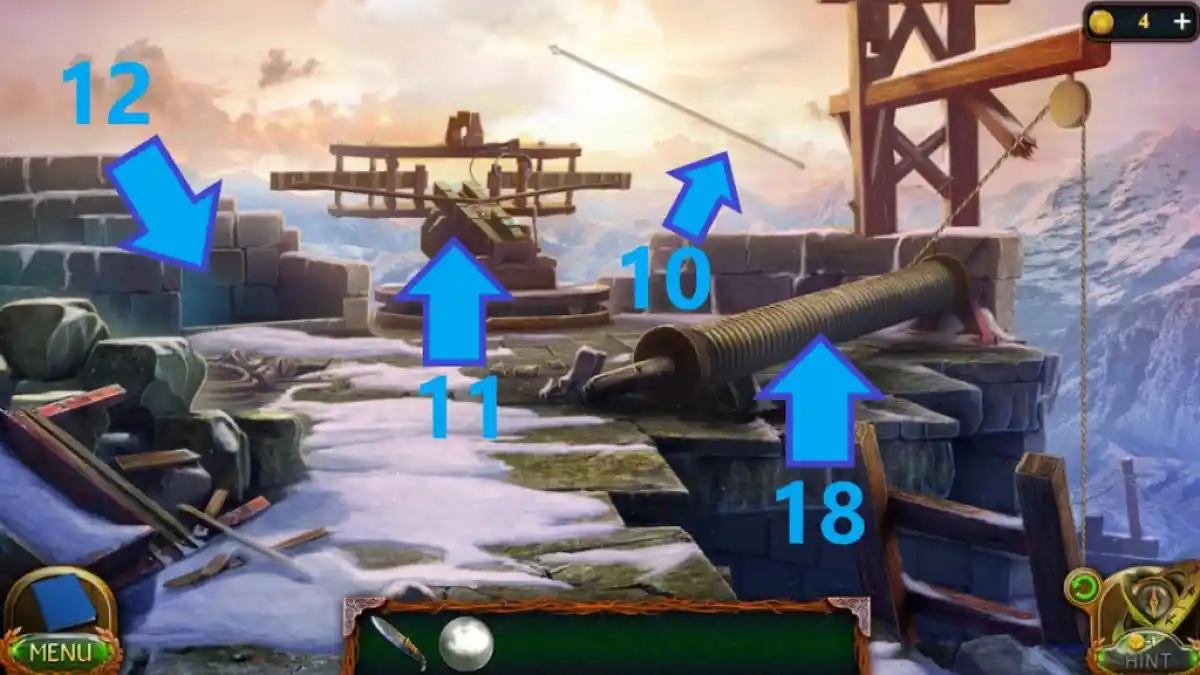
- Take the flagpole (10) and cock the ballista (11).
- Approach the wall (12), remove the block and take a bunch of keys.
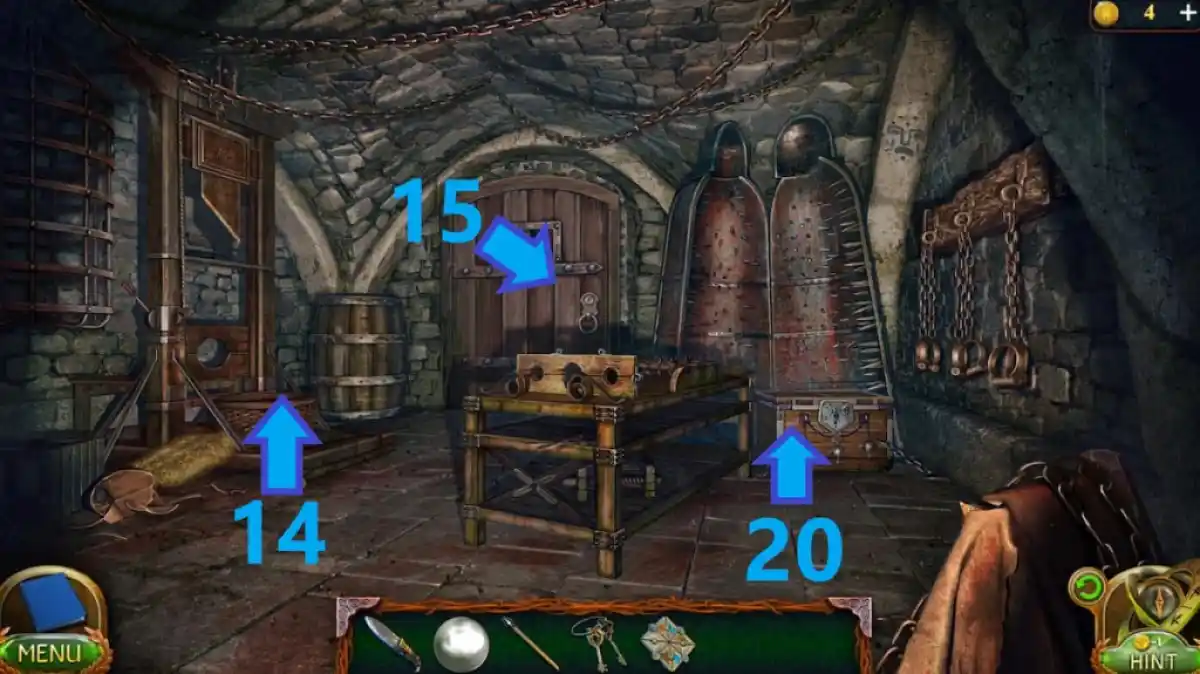
- Open the dungeon door (13) using keys and enter.
- Take the element of the sarcophagus from the head basket (14).
- Use the bunch of keys to unlock the door (15) and enter.
- Find 15 saws to receive a two-handed saw.
- Place the flagpole into the guillotine (14) and use the stone knife to sharpen the blade.
- Pull the lever to receive parts of the flagpole.
- Go back, approach the tower (16) and place the element of the sarcophagus into the open slot.
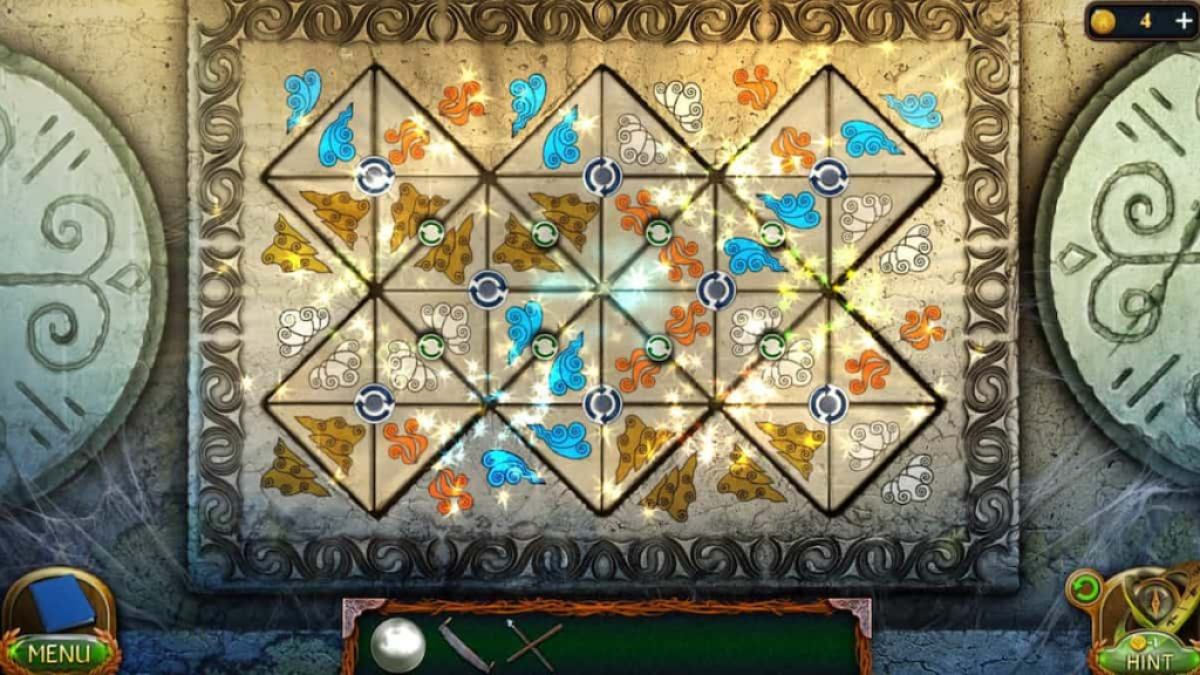
- Solve the sarcophagus puzzle (Image 15), collect the ballista instructions and a hammer.
- Go to the torture dungeon, use the hammer to break the wall and collect shackles.
- Exit the dungeon, use the saw to cut the lumber (17) and collect the x-shaped stand.
- Climb up to the ballista, and place the x-shaped stand, the parts of the flagpole, and the hammer on the wind rope (18).
- Climb down, take the end of the rope and the amulet of the giant from the body (19).
- Use the amulet of the giant to unlock the chest in the dungeon (20).
- Collect the monocular and go back to the tree.
- Tie the end of the rope to the staff (21) and go back to the ballista.
- Roll the wind rope (18) and place the staff onto the ballista.
- Solve the labyrinth and aim the monocular to the Gate of the Worlds.
- Give shackles and a hammer to Jim.
If you're looking for more adventure escape mystery games, check out On Thin Ice – Full Walkthrough & Solutions (Chapters 1-4) on Pro Game Guides.
