In this fourth game in the Darkness and Flame point-and-click series, Alice is once again on the trail of adventure. If you’re stuck anywhere in this puzzle RPG, read on for my complete walkthrough.
Darkness and Flame 4 walkthrough - All puzzle solutions
After being sucked through the mirror, you need to find out what is going on. Is it all a dream? Note that I won’t give directions throughout this guide (except the forest section, which isn’t available on the map). There’s a handy, fast travel map in the bottom right corner of the screen, which can take you to any currently available location.
Awakening
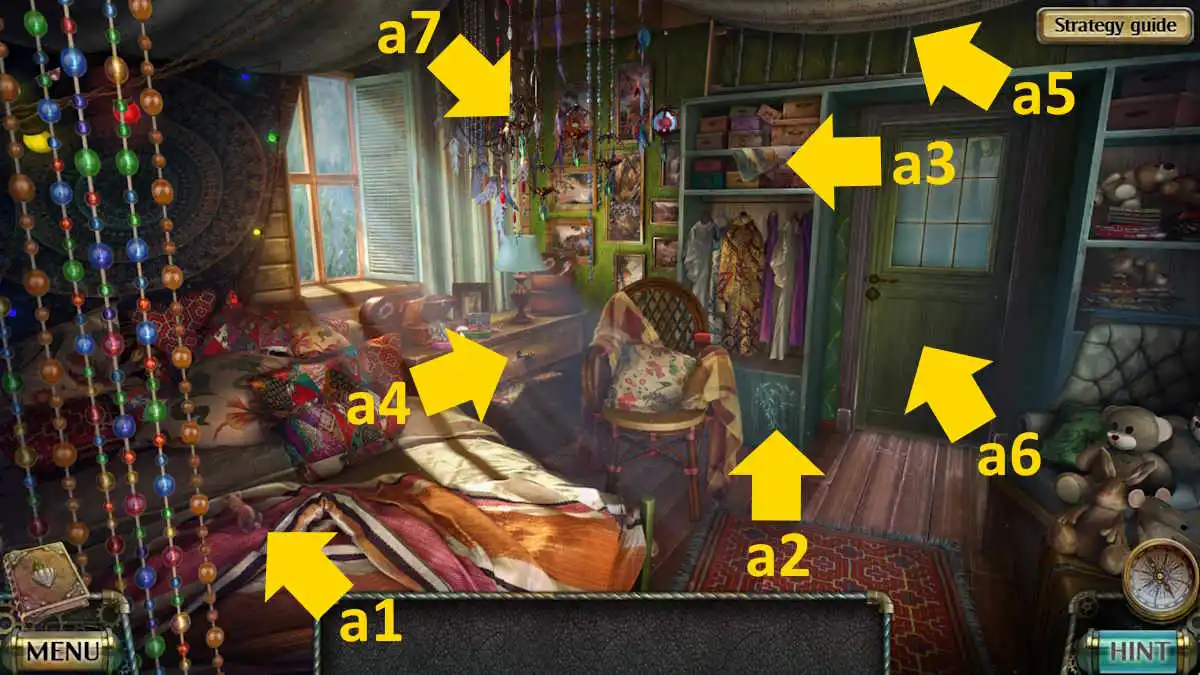
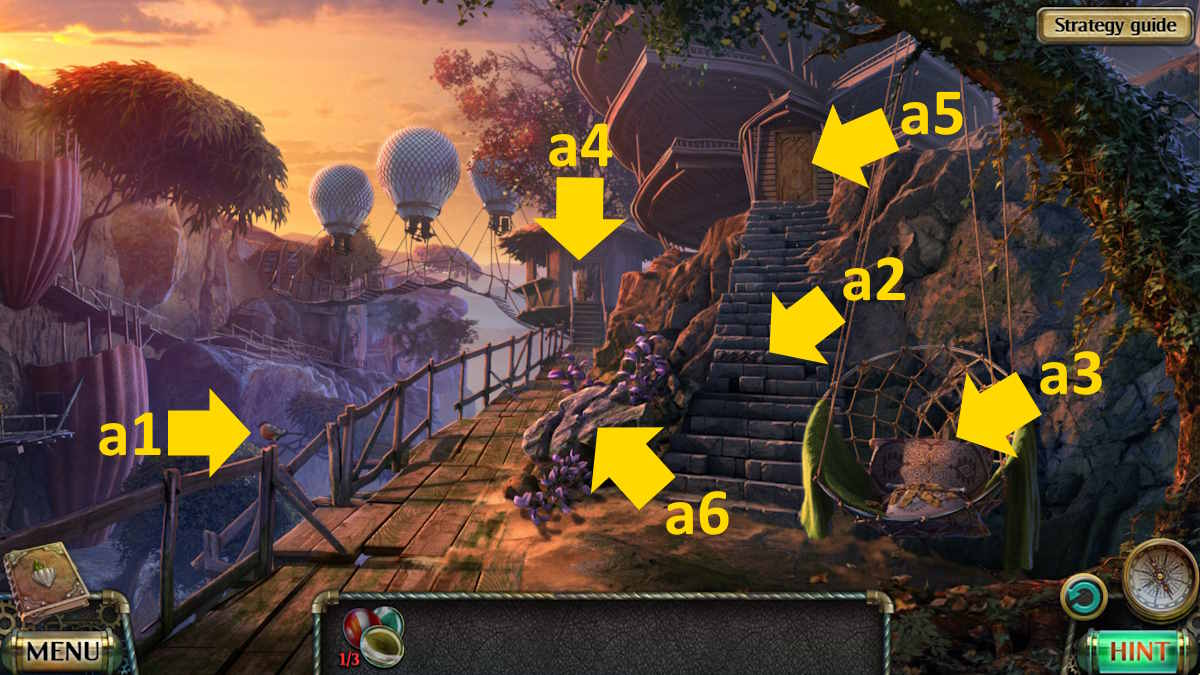
Take the Morphing Object from the bed (a1) and the Collectible from the wall (a2). Take the Poster from the shelves (a3), open the drawer (a4) to find a Hairpin, move the cushions on the bed (a1) to take the Ribbon, and grab the Ladder (a5).
Place the poster on the floor under the door, use the hairpin on the doorlock (a6) to push the key through, and then pull the poster to take the Broken Key. Reassemble the three key pieces by choosing the broken key in your inventory, then add the ribbon to finish making the Key. Now you can use the key in the door and turn it, then the handle, to open it and go through to the Corridor.

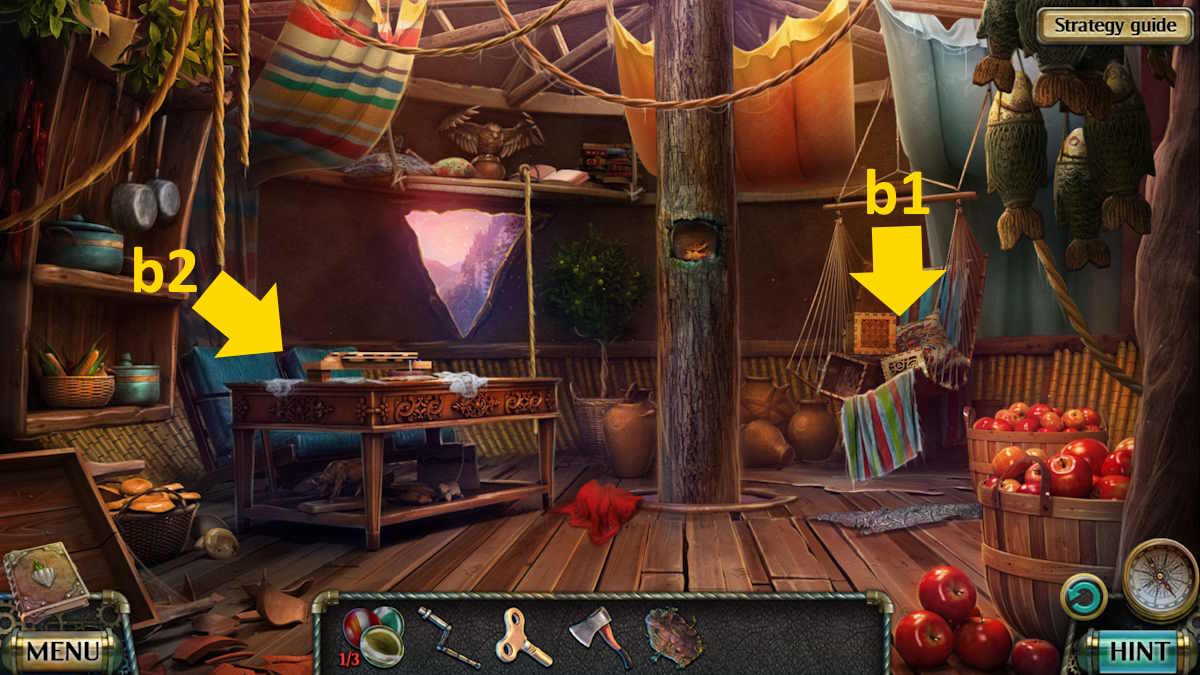
The Morphing Object is a picture on the wall (b1), and the Collectible is the butterfly on the wall (b2). Select the end of the corridor (b3) to start a hidden objects mini-game. You can’t fail these as everything you need is in the image. Just note that if something is in red text, you can’t see it yet. Once complete, you’ll receive the Parts Kit.
Select the kit in your inventory to put it together. Hover over each part until your mouse highlights one, then click it to add that part to the kit (also notice the blue shape, which gives you a hint to the next piece). Once complete, you’ll have a Bee.
Add the bee to the box on the sofa (b4) to start a movement puzzle. I’ve put the solution below. Once complete, take the Crystal.
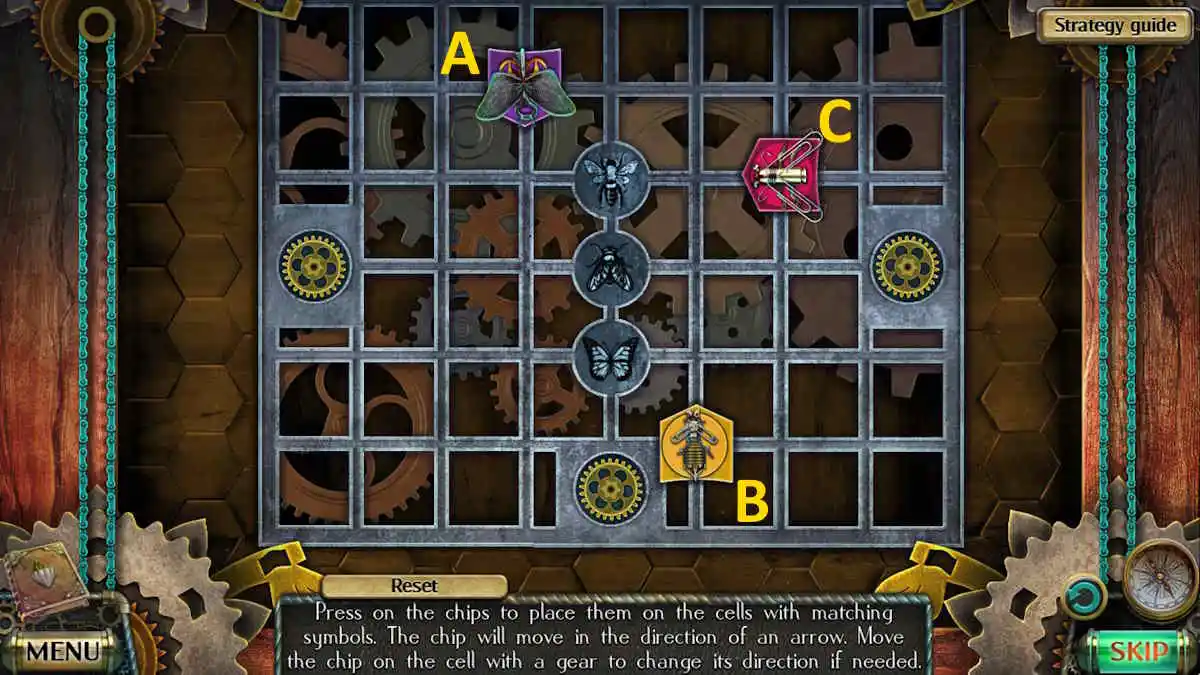
- Cx3
- A
- Cx5
- A
- C
- A
- Cx7
- Bx2
- C
- B
- C
Take the Tweezers and Matches from the pouches on the door (b5), which reveals the door handle. Open the door and note the lamps are broken. Remove the broken crystal from the first one, and use your crystal to replace it. You can now head through the door and speak to your mom (click your mom to begin).
Mom
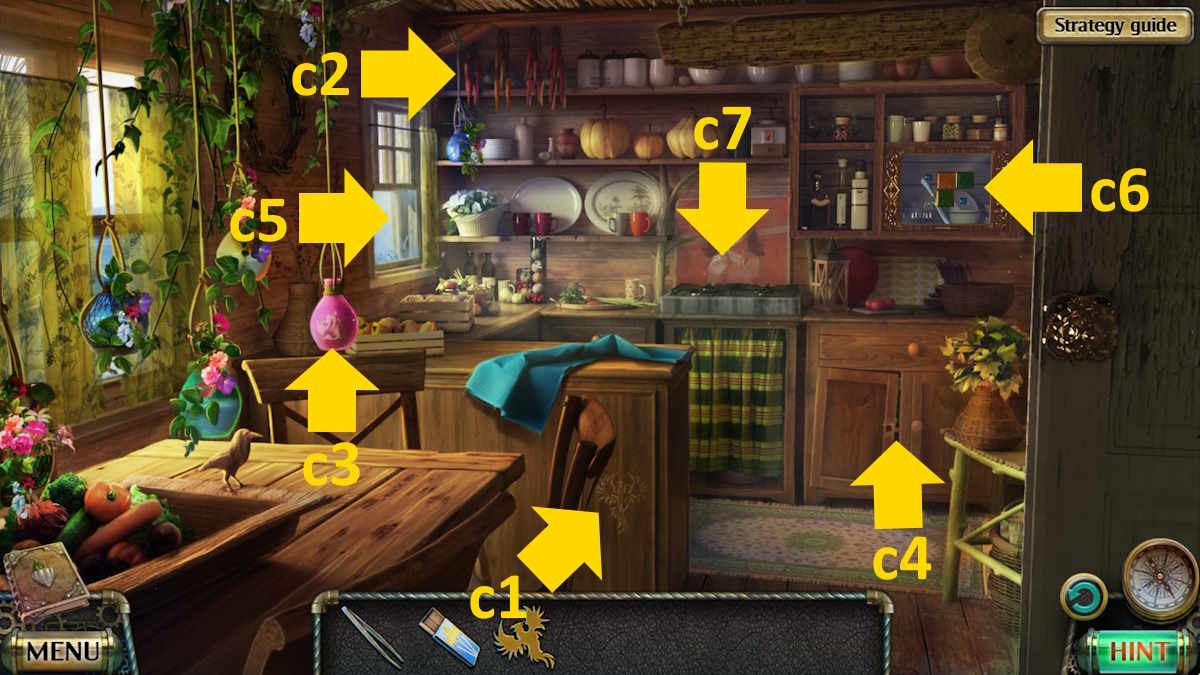
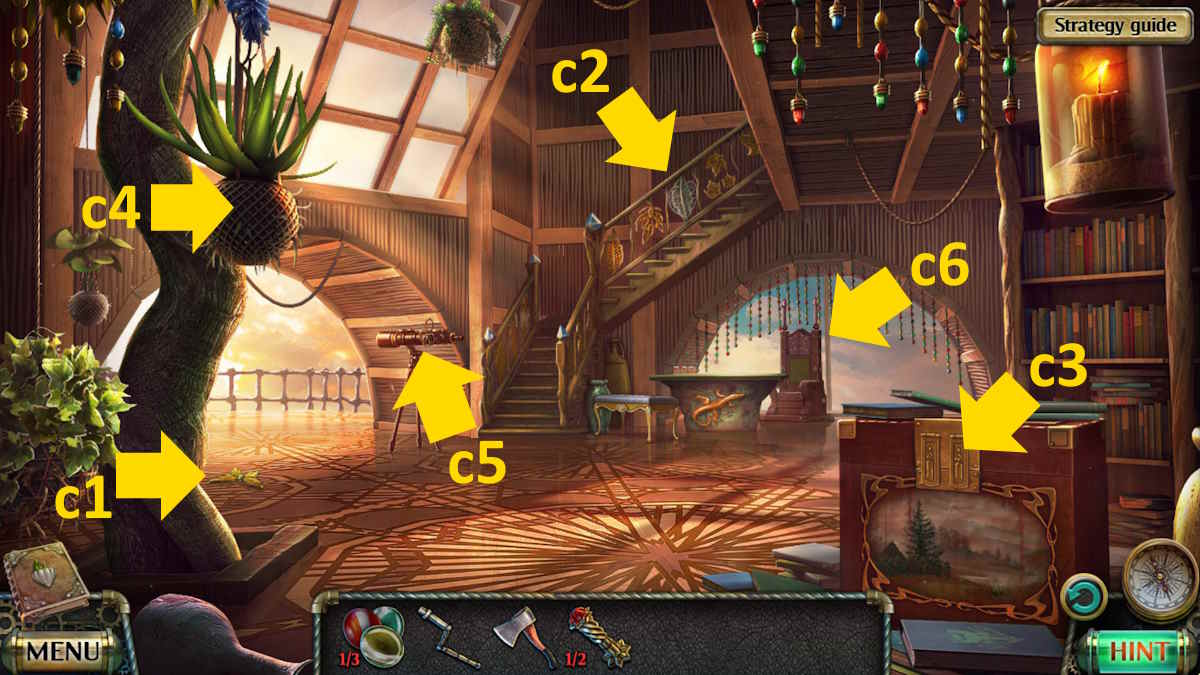
After the cutscene with your mom, you’ll receive a Key. Grab the Collectible from the wooden panel (c1) and the Morphing Object from the shelves (c2). Use the tweezers on the pink bulb (c3) to receive the musical Hint, and use the tweezers once more on the cupboard latch (c4) to open it and find a Spatula and a Ladle.
Look at the window (c5) and use the spatula to pry it open, taking the Spoon and Glass Sphere from the windowsill. Now move back to your bedroom and use the hint on the music box in the drawer (a4). Click the three notes that match the image on the hint, and the box will open. Take the Puzzle Piece and the Hint from the box.
Move back into the corridor and place the ladder under the animal trophy (b6). Now, you can click the trophy and use the spoon to gain a second Glass Sphere. Use the key on the door (b7) to find it broken.
Click the four latches in the close-up to remove the front panel, add the hint, and then click the silver knobs until they match the pattern on the hint. The door will now open, and you can go out to the Yard.
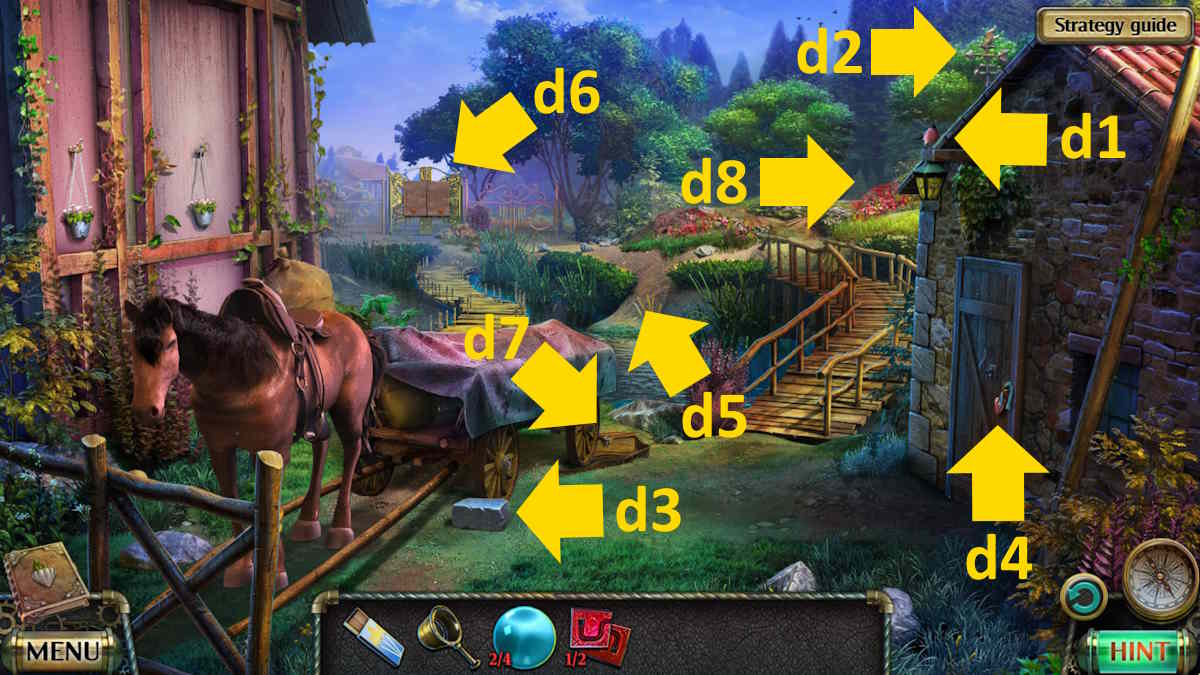
The Collectible is the bird on the lamp (d1), while the Morphing Object is on the shed roof (d2). Click the horse for a close-up and take the Brick (d3) blocking the cartwheel. Click the horse’s front legs to find it missing its horseshoes, and then its mane will find you. You also need a horse collar and bridle.
Select the shed door (d4) to find a Horseshoe and use the brick to break the padlock. Click the open door to look inside and take Hammer, Rake, and Horse Collar. Back outside, select the area by the water (d5) for a close-up, and use the rake in the water to dredge up a chest. Click it until all the moss is removed, and take the second Puzzle Piece to trigger a cutscene.
Memory Flashback
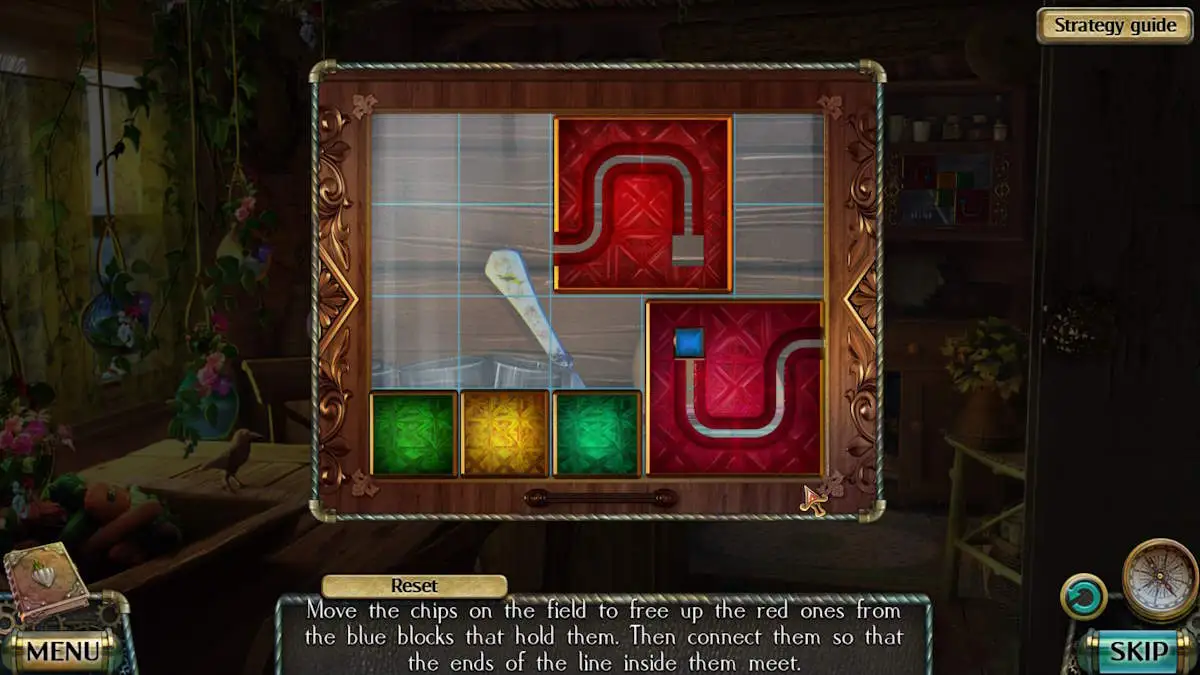
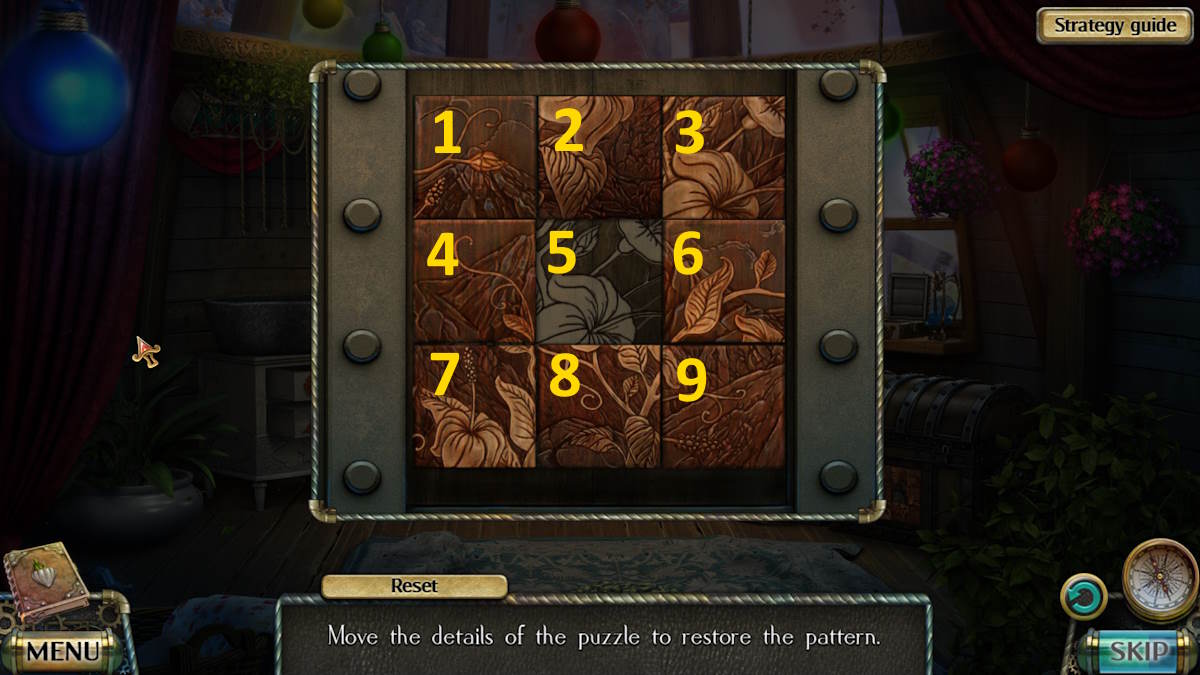
Click the gate (d6), move the rocks in the close-up to find the second Horseshoe, and then go back to the kitchen. Add the two puzzle pieces to the wall cupboard (c6) to start a movement puzzle. If you need a hint for this one, move the three small squares to the positions indicated above, then move the left red box to the position shown to free the first small blue square.
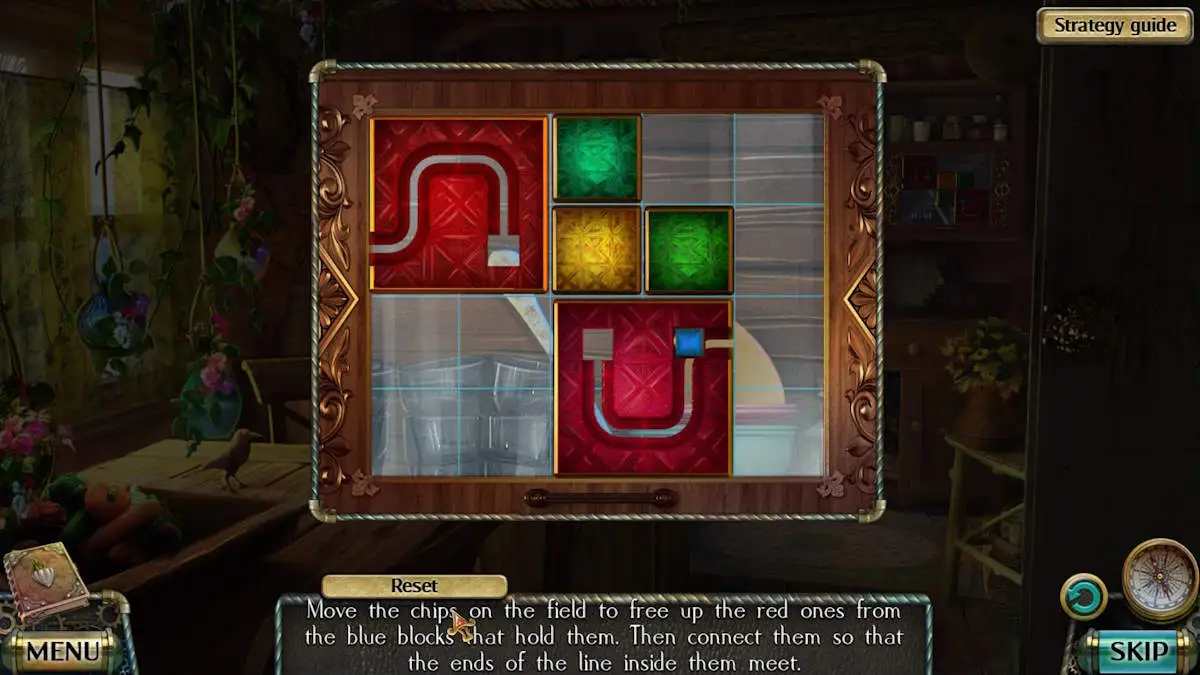
To free the second blue square, move the pieces to the positions above. Finally, slide the two red pieces so that the silver line in them joins up, and the cupboard will open. Take the Knife. Move into the corridor and use the knife to free the Bridle (b8).
Look in the shed in the yard (d4) and place the ladle under the red resin on the right side of the close-up. Now you can use the knife on the resin to free it from the wall, knocking it into the ladle to get a Ladle Full of Resin. Put the ladle on the stove in the kitchen (c7), click the right cooker button, use the matches to light the stove, and then take the Medallion from the ladle.
Select the horse, add the horseshoes, click the nails (on the floor in the close-up) to add them, and then use the hammer to secure them. Add the horse collar, then click the two poles on the floor in the same close-up to attach the cart. Then, add the bridle and the horse will move forward, giving you access to your bag (d7). Use your medallion to open it and take the Diary (it won’t appear in your inventory) and the Gate Handle.
Use the gate handle on the gate (d6) to start a movement puzzle. This one is tricky, as when you move a colored piece, it also moves on the other side of the puzzle. The solution is below if you’re stuck.
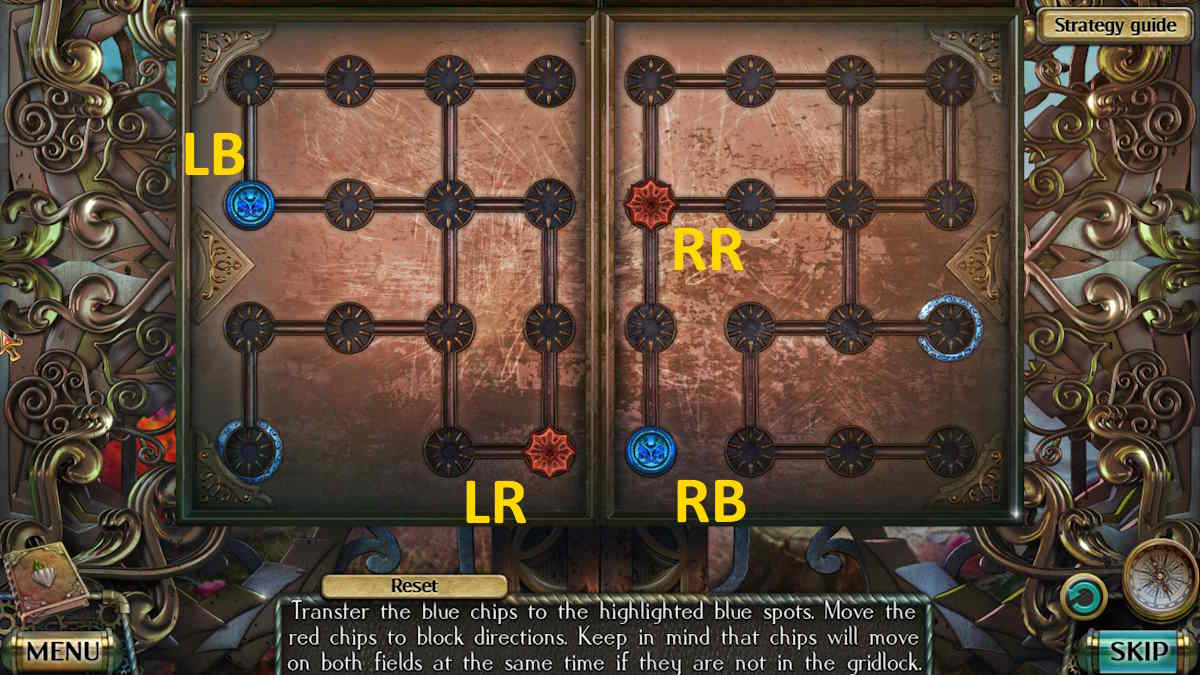
- LR up
- LB right
- LR down and then left
- LB down and then left
- RR up, then right, and then down
- RB up
- RR left
- LB down
- RR right and then up
- RB right, then down, then right
Once complete, the gage will open. Head through the gate to Colin’s yard.
Camilla
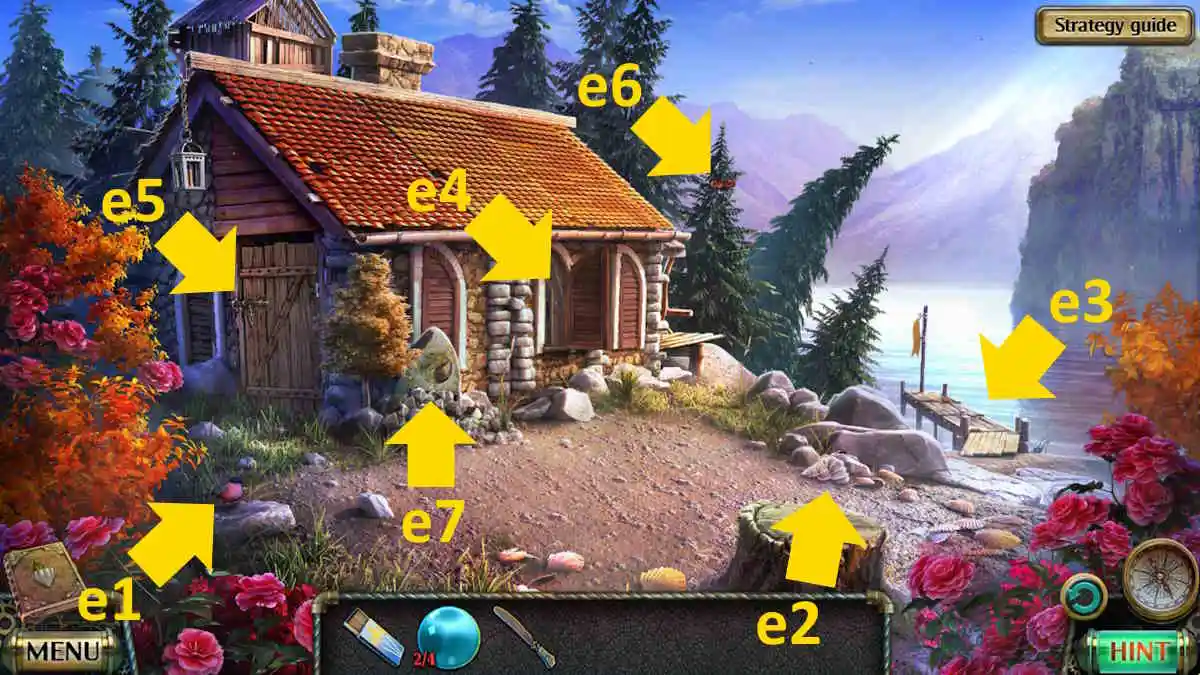
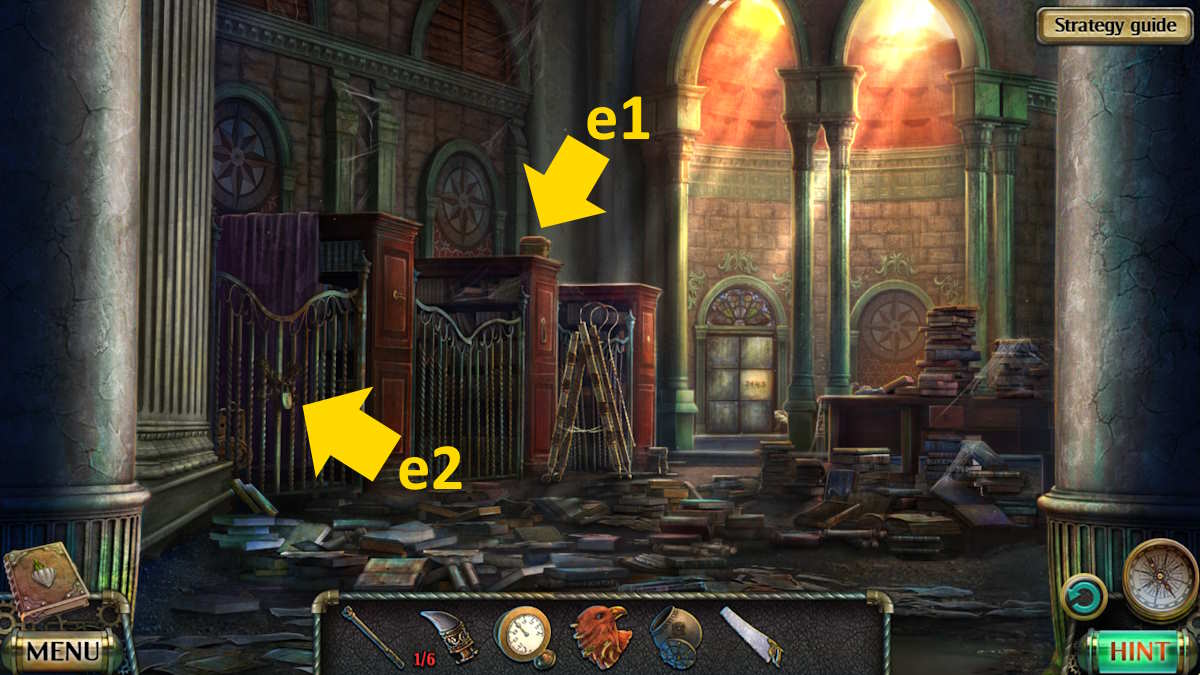
After a long cut scene, take the bird Collectible (e1) and the Morphing Object from above the treestump (e2). Get the Clay from the jetty (e3), then click the door (e4) to go inside Colin’s house.

The Collectible is on the roof beam (f1) and the Morphing Object is on the floor (f2). Take the Hook by the door (f3), then use the knife to open the metal cabinet (f4) and take the Lubricant (you’ll also get a Dull Knife back). Take the Bear Figurine from the music box (f5), and then head back outside to the yard.
Use the lubricant on the rusty door bolt (e5), taking the Hoe and the Ski from inside the shed. You can now use the ski in the jetty close-up (e3) to flip the diver helmet and take the Mousetrap from inside. Use the hook in the trees (e6) to take the Tied-up Package, and then open it in your inventory to find your second Bear Figurine and a Rag.
Head back into Colin’s house and add the bear figurines to the wall safe to open it and find Stain Remover. Take it to the yard next, use the rag and stain remover to clean the stone (e7), and use the clay on the pattern. This opens a drawer below, where you’ll find a Lever (you also take the Cast of the pattern).
Go back into the house and use the lever on the music box (f5), then turn the handle to start a pattern-matching puzzle. Once complete, it should look like the image above. Take the Key. Head back to your house, only to see your mum being kidnapped!
Kidnapping
Select the shed (d4), put the mousetrap on the floor, and use the grain sack already in the clock-up to bait the trap. Take the Mouse. Go into the corridor and use the mouse to make the cat chase it, allowing you to take a third Glass Sphere from the chair (b4). Go back to the yard and follow the kidnappers along the forest path (d8).
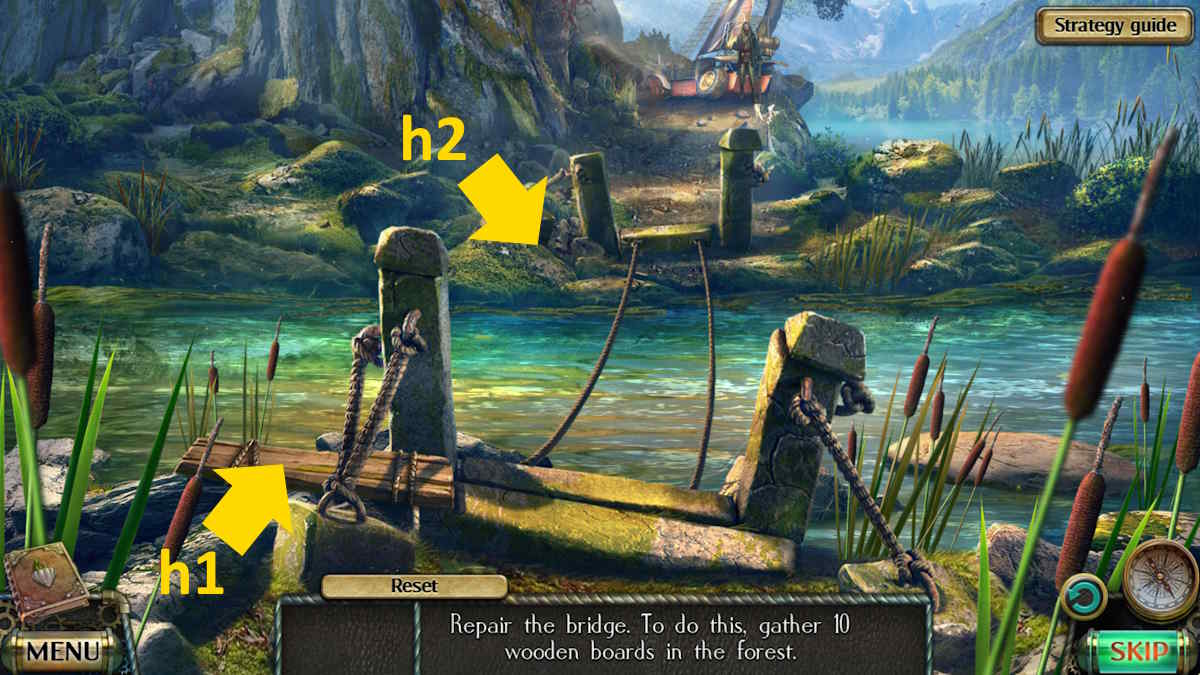
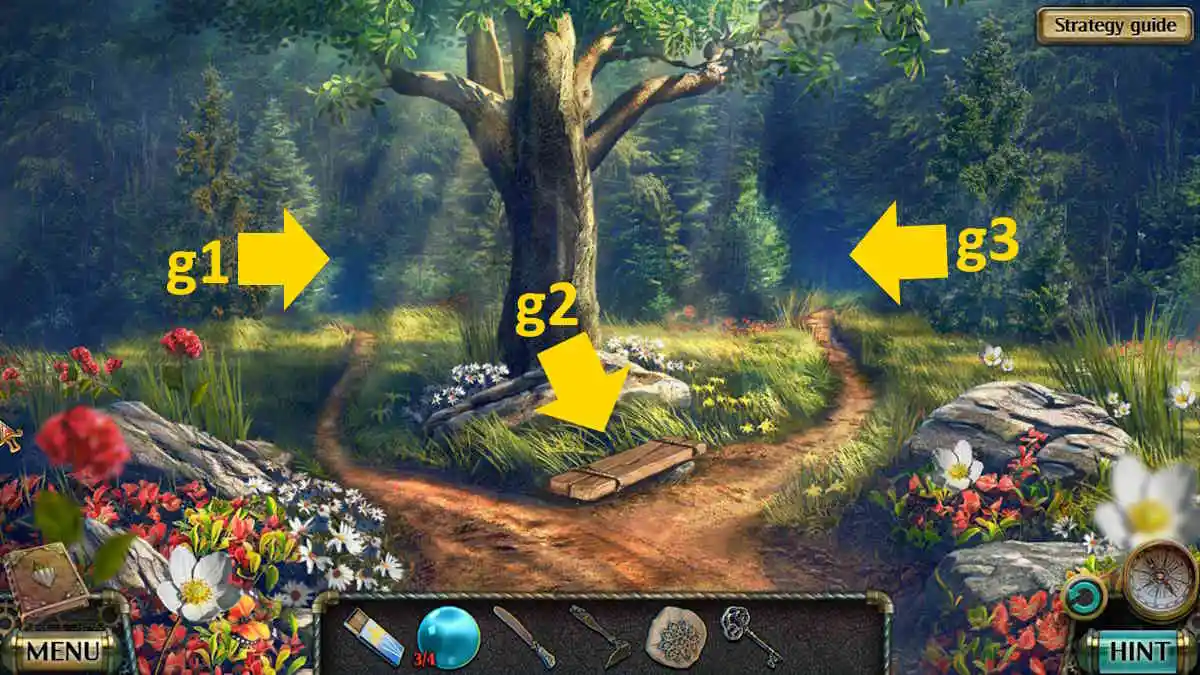
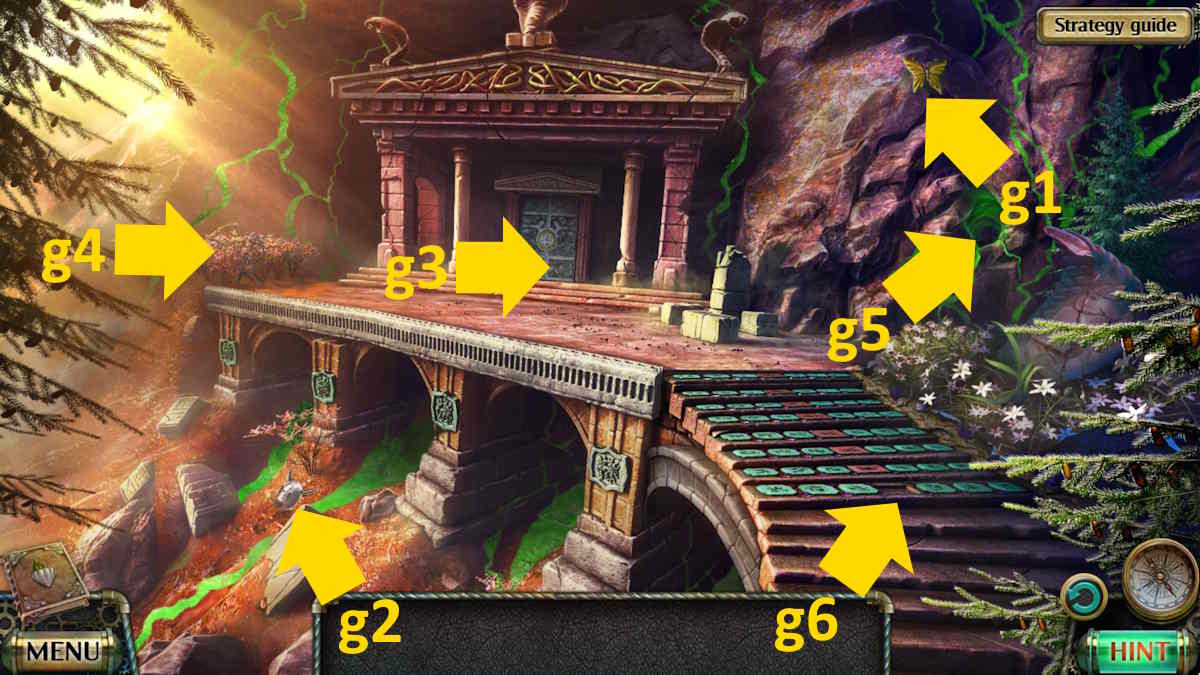
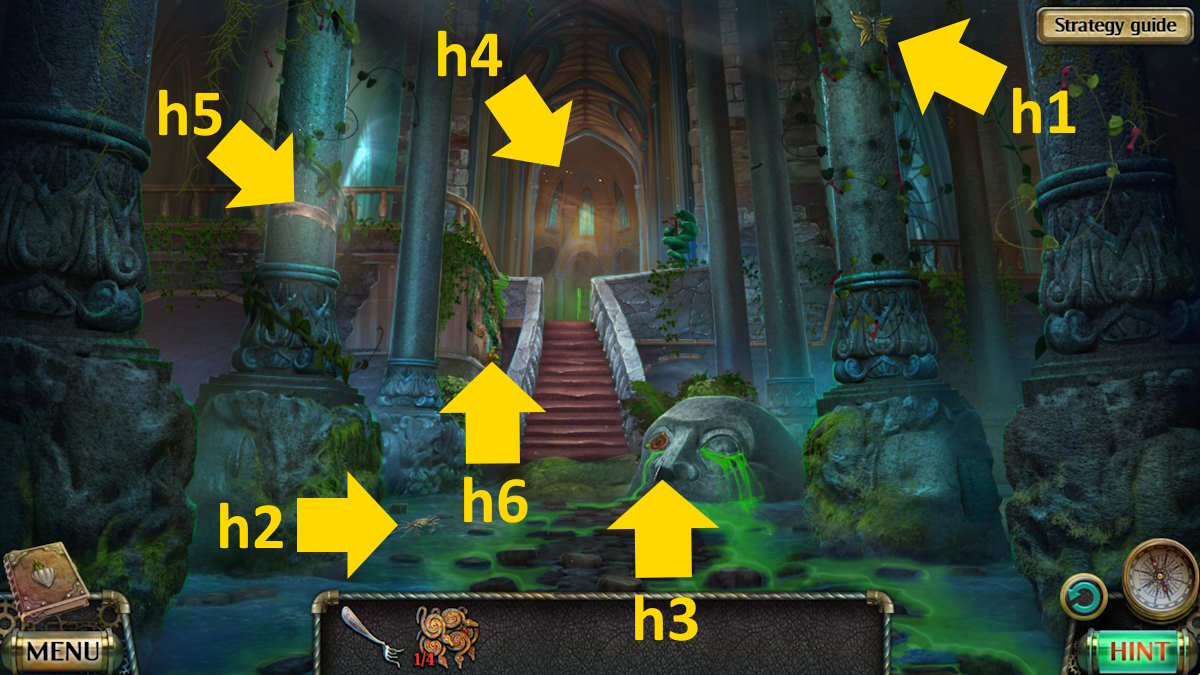
Once in the forest, take the left fork in the path (g1) to come to a broken bridge. You need 10 pieces of wood to fix it. Take the first Wooden Board from next to the bridge (h1), then move back to the entrance to the forest and take a second Wooden Board (g2).
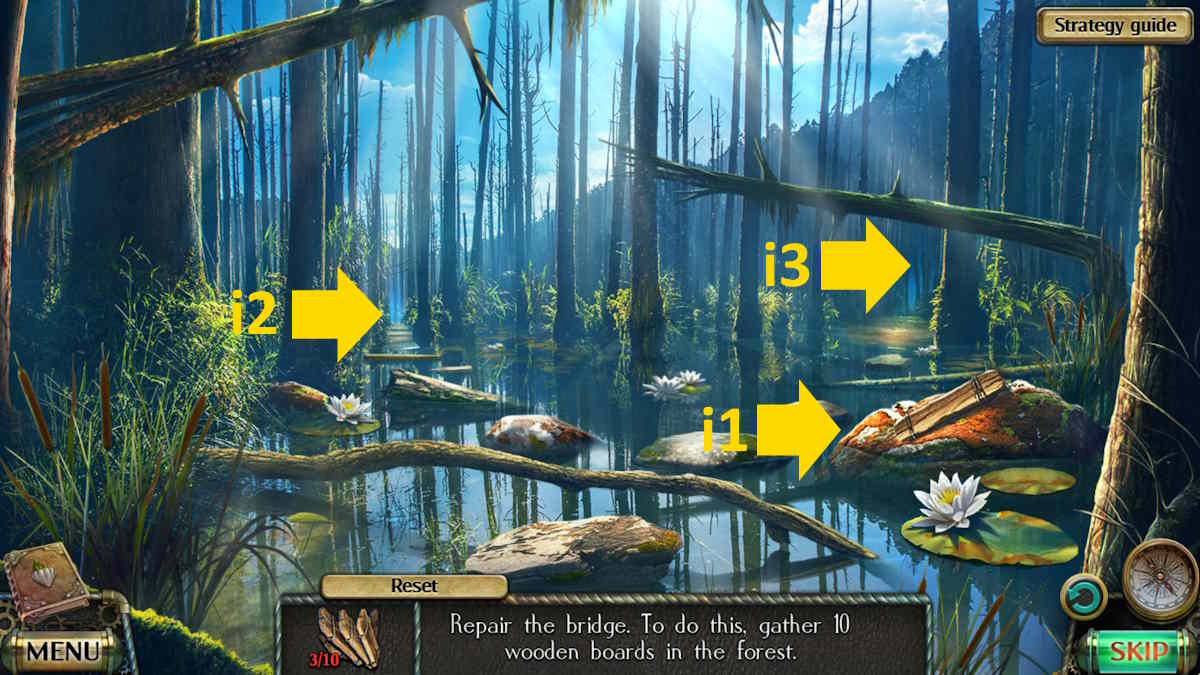
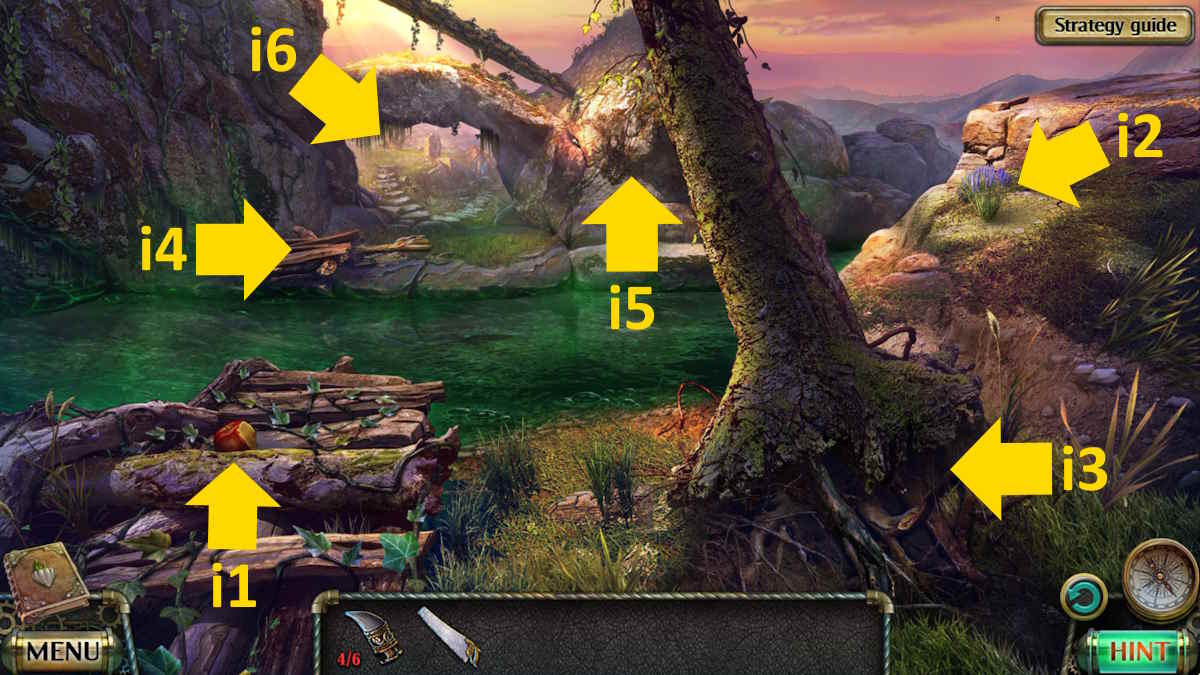
Take the right path here (g3) and take the third Wooden Board before continuing down the path. Clear the moss from the rock (i1) to find your fourth Wooden Board, then continue forward down the left path (i2).
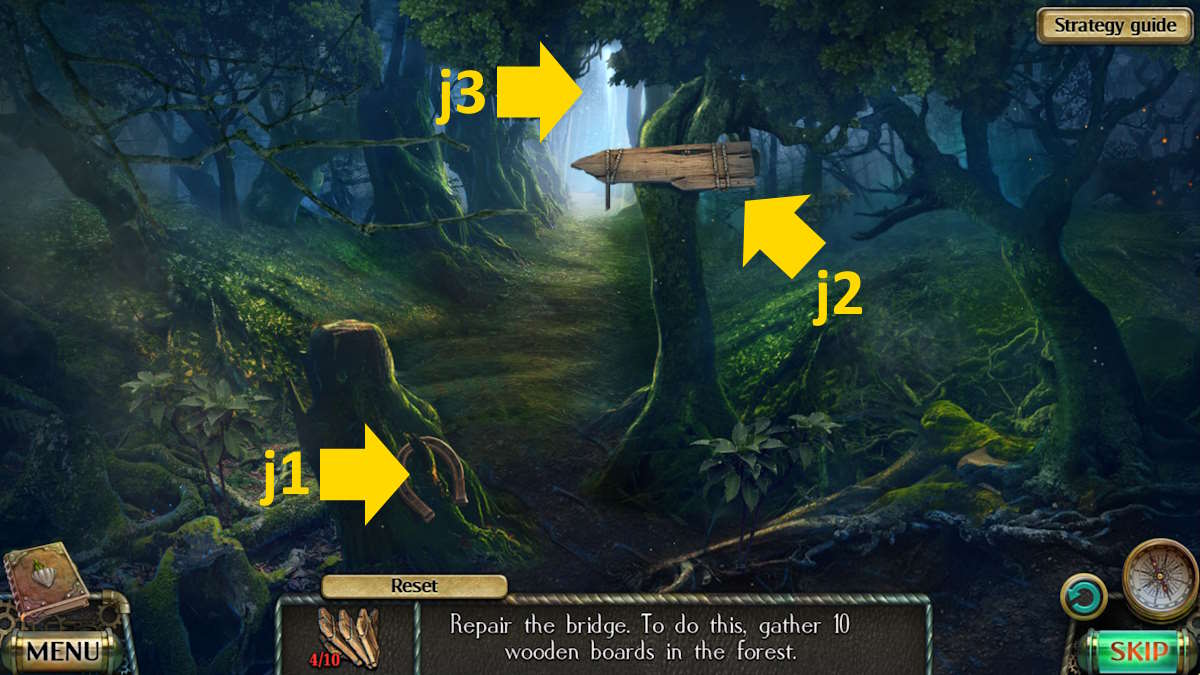
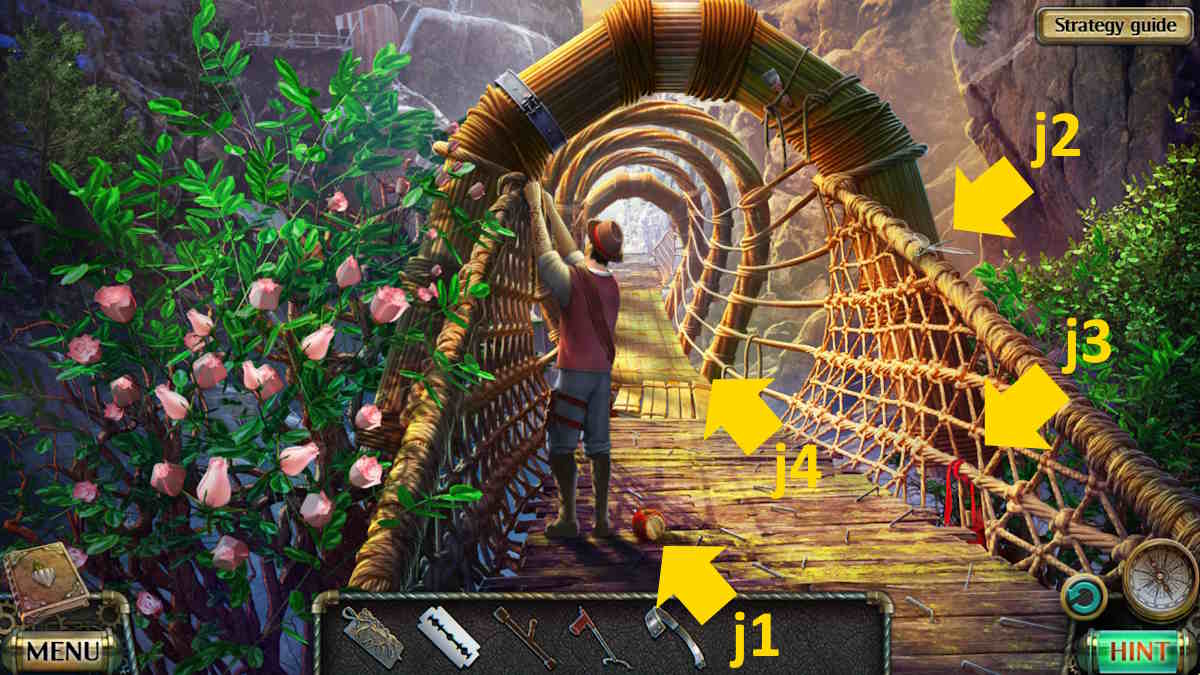
Use the Horseshoe (j1) to knock down a fifth Wooden Board (j2) and then continue forward (j3). Take the sixth Wooden Board from the tree in the middle here (k1), then go left once more (k2).
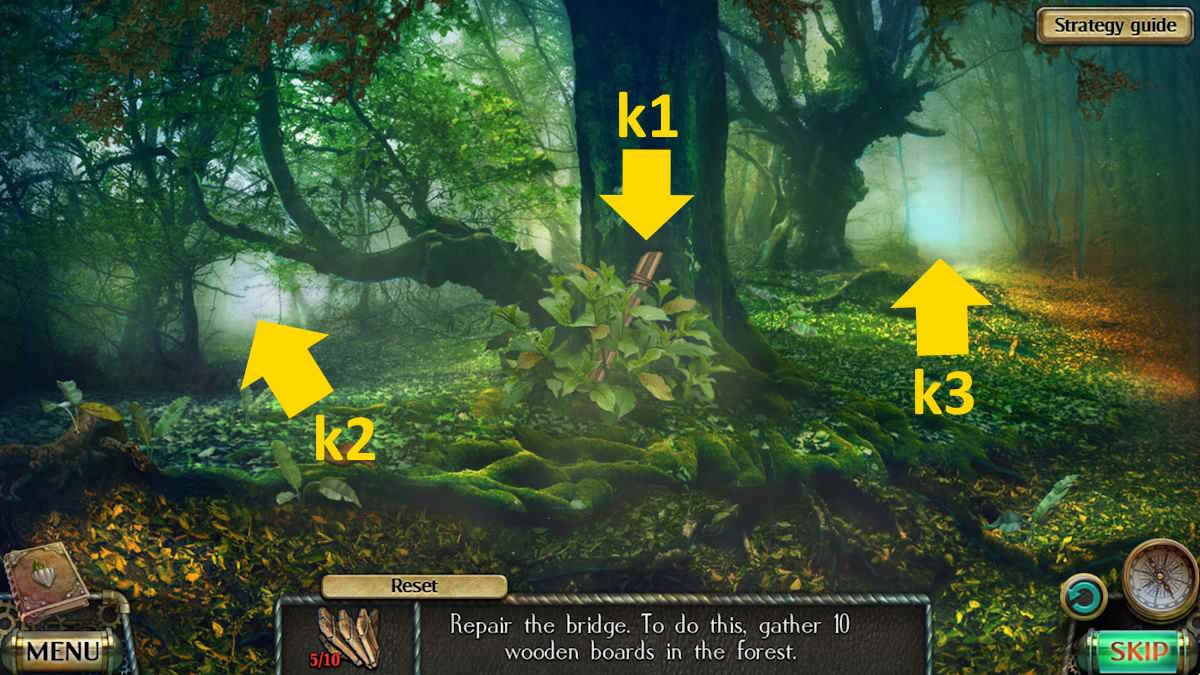
Use the piece of Slate (l1) to dig up your seventh Wooden Board (l2), then move back down the path and take the right fork (k3). Take the eighth Wooden Board from there, then move back three steps to the swampy scene and take the right fork (i3).

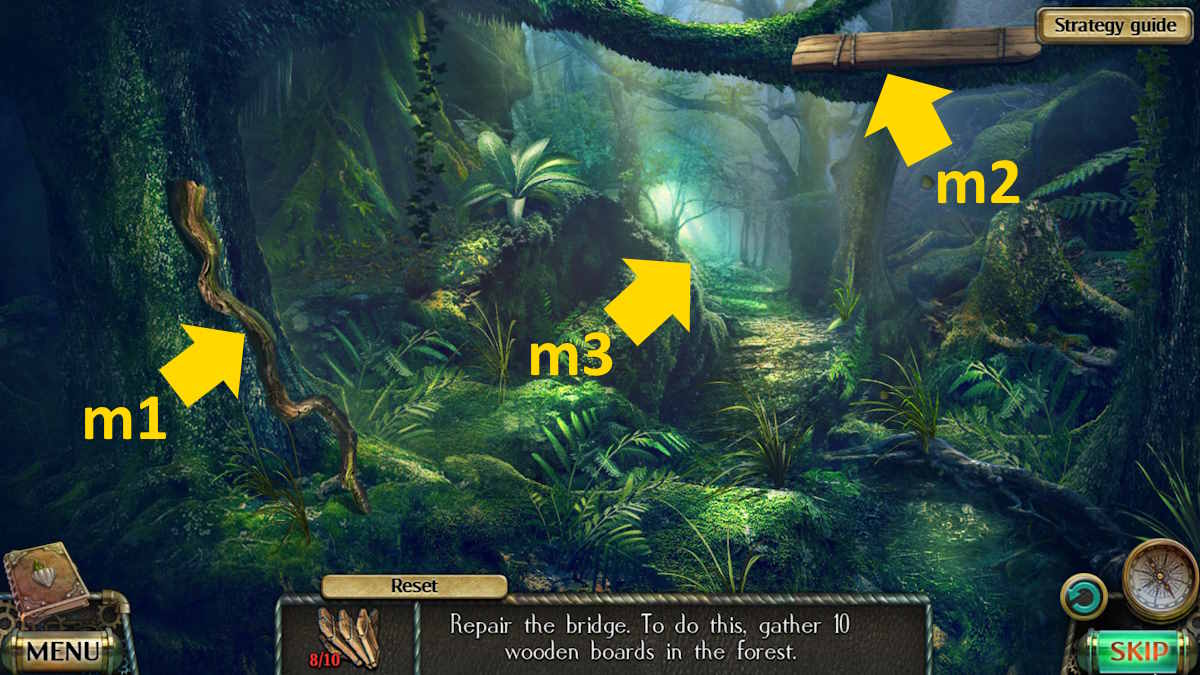
Use the Stick (m1) to knock down and collect your ninth Wooden Board, then continue down the path (m3). Take your final Wooden Board there, and return to the Forest (you can use the map again now). Add the boards to the bridge (h2) and continue to the road.
Fixing the vehicle

After a cutscene with the driver, you’ll receive a Wrench. You can spot the Collectible on the rock face (n1), while the Morphing Object is on the path (n2). Grab the Board (n3), Ship in a Bottle (n4), and then move the twigs (n5) to get your fourth Glass Sphere. In the same close-up, place the board on the rocks here to start a missing objects mini-game (n6). Once complete, take the Wheel.
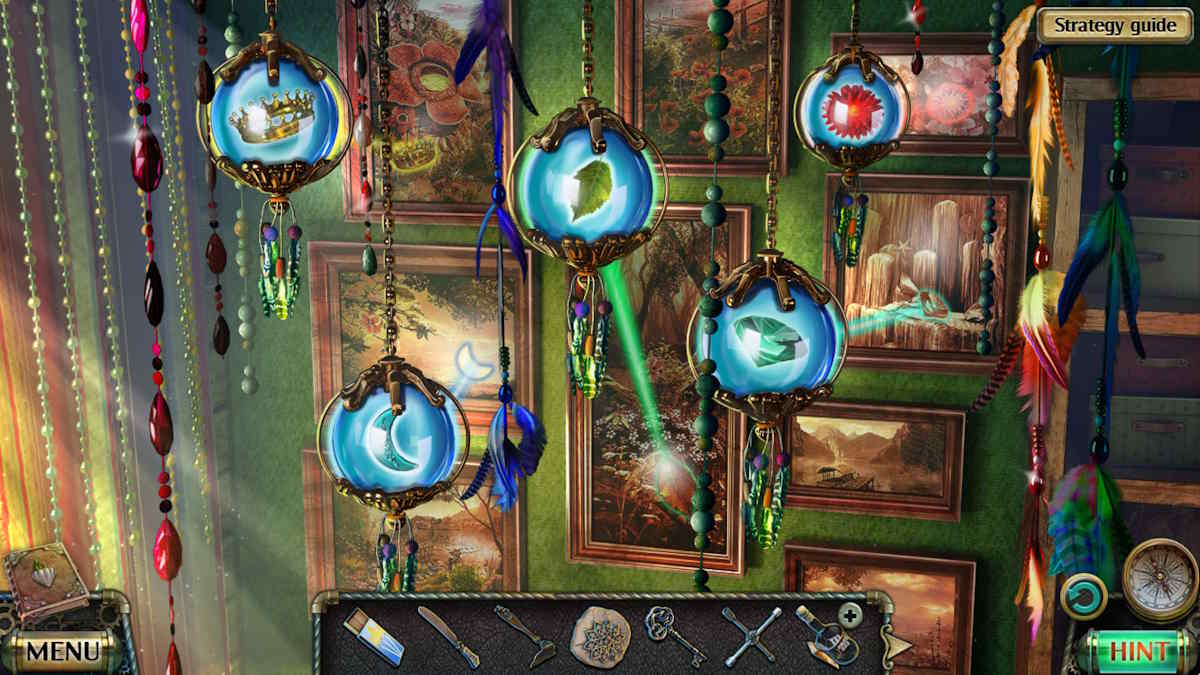
You now need to go right back to your bedroom and add the glass spheres to the hanging ornament (a7) to start a matching puzzle. If you’re stuck, note you click the top of each sphere and swap them around (you need to swap the two on the left with each other and the two on the right with each other). Note the highlighted images.
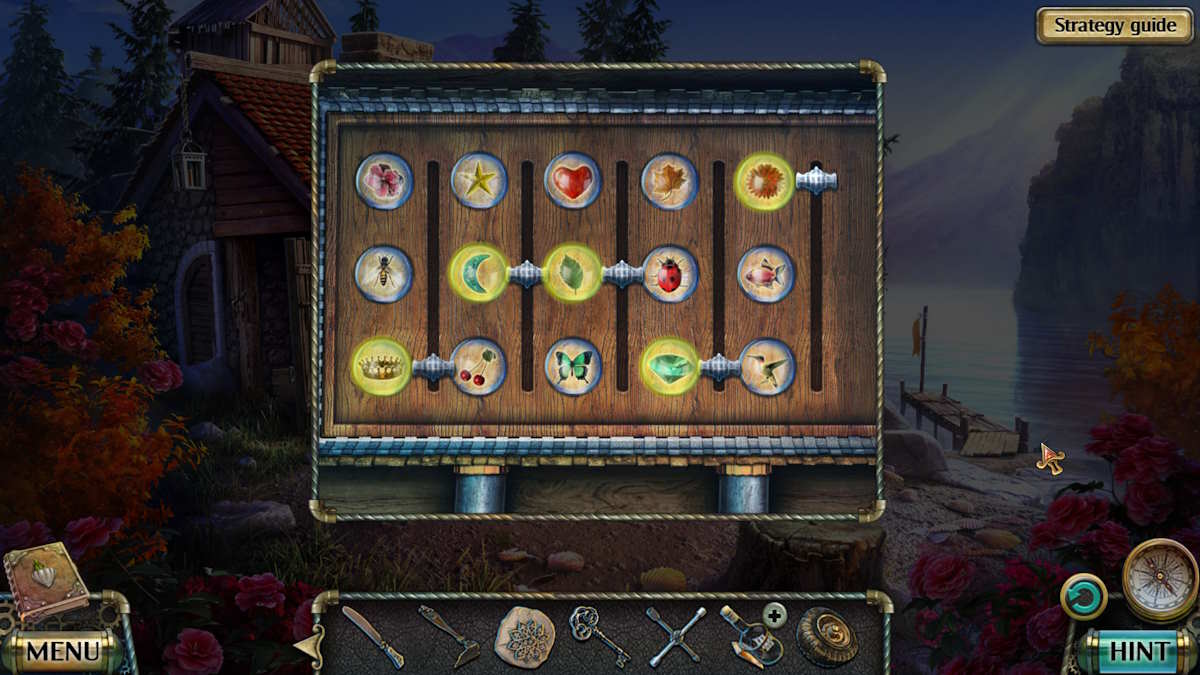
Go to Colin’s yard next, select the shed (e5), and click the puzzle box inside. Change the switches so that the images from the previous puzzle are highlighted (see the image if you’re stuck), and then take the Jack.
Return to the broken vehicle, use the jack to raise it, then click where the missing wheel should be (n7) for a close-up. Add the wheel, use the wrench to tighten it, and the vehicle will be fixed. When it is back upright, you’ll notice you can now access a trunk at the base of the tree (n8). Clear the leaves from the lock in the close-up, use the key to open the trunk, and take the Gardening Scissors from inside.
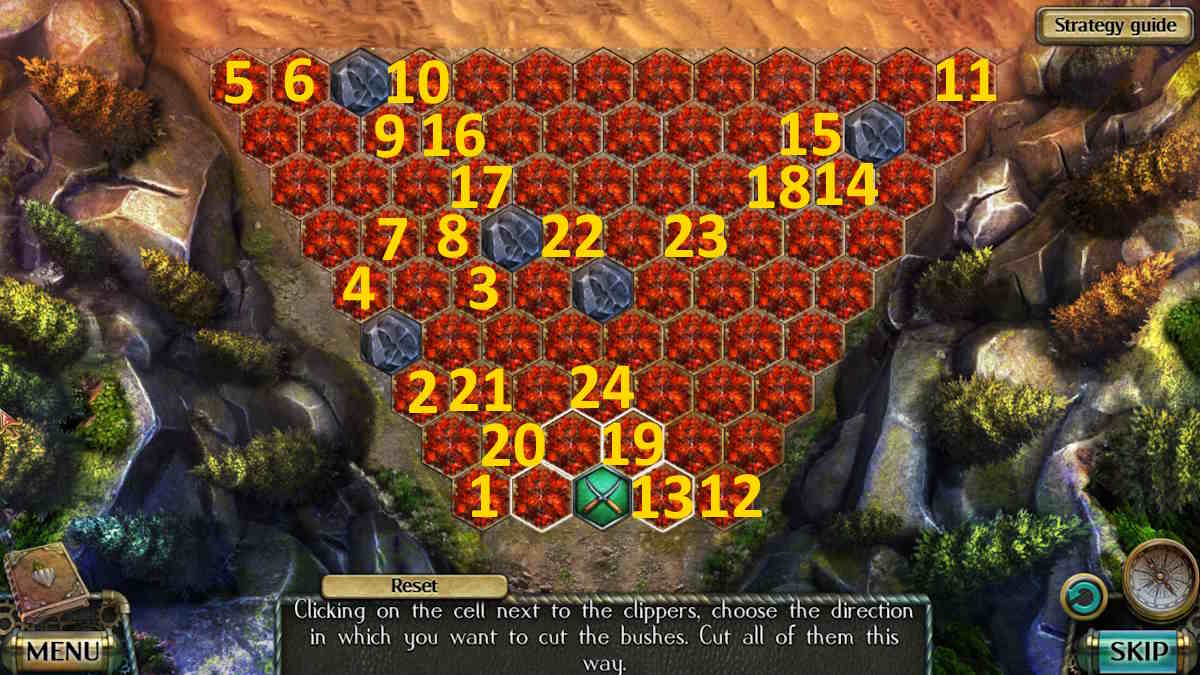
Use the scissors on the weeds blocking the road (n4) to start a puzzle. You need to clear all of the weeds to complete the puzzle. I’ve marked all spots to move to (each time in a straight line from the last marker) on the image above if you’re stuck (the last two are obvious). Once complete, enjoy the cutscene.
The foot of the mountain
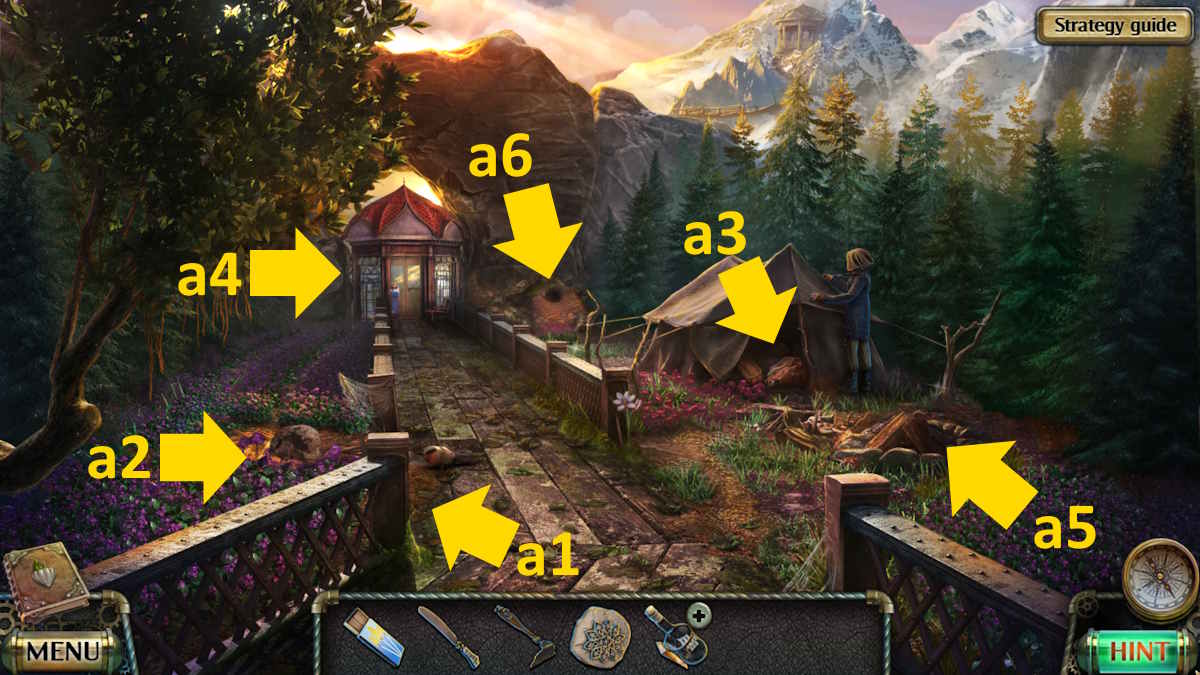
You’ll find the Morphing Object by a fence post (a1) and the Collectible bird right next to it. Use the hoe on the ground (a2) to find a Corkscrew, take a Grindstone from the backpack in the tent (a3), and take the Dry Leaves and Snips from the elevator (a4). Use your dull knife on the grindstone in your inventory to get a Knife
Add the leaves to the campfire (a5), use the matches to light it, and then place the cast in the fire. Once it is glowing, use the stick that’s on the ground in the close-up to knock the cast out of the fire. Pick up the Hardened Cast. Select the elevator (a4) once more, use the hardened cast as a key on the control mechanism inside, and then click the levers in the close-up to go up.
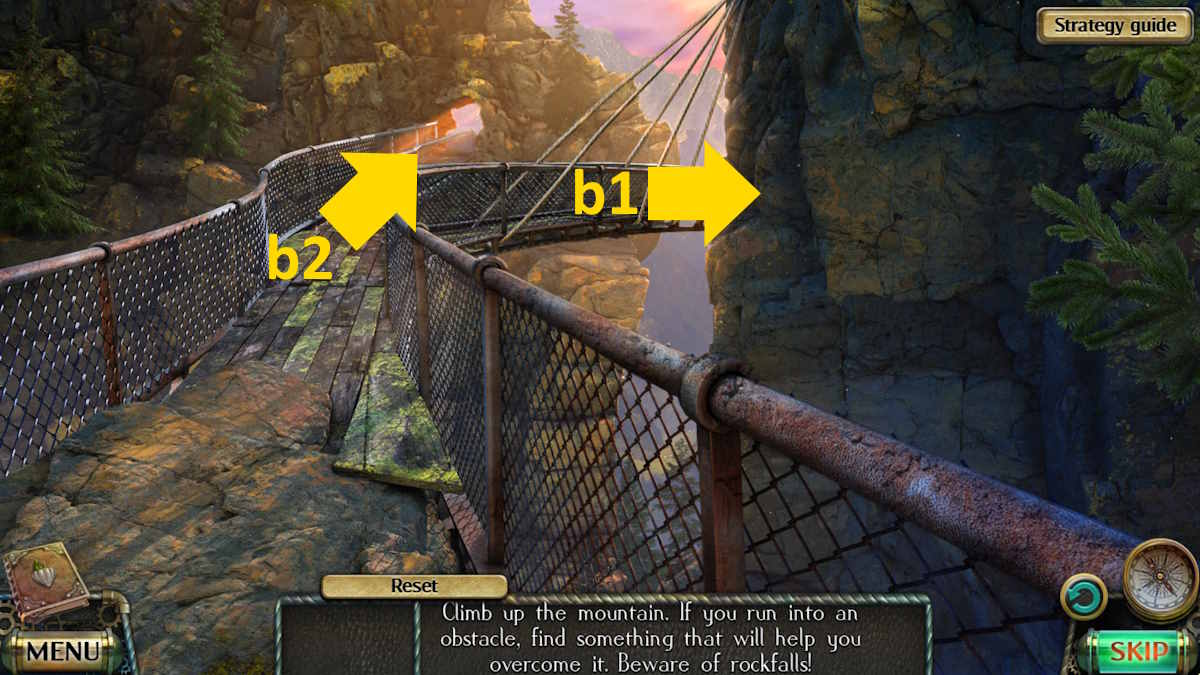
When you arrive at the top, you need to climb the mountain. As you click the various locations, don’t move forward when rocks are falling, or you’ll have to restart. Turn right (b1) and move through the next two screens to the end of this path. Pick up the Machete, and then head back to where the elevator drops you and take the forward path (b2).

Use the machete to clear your path on the next screen, then move forward to the stairs. Select the left of the screen (c1) to go up them and take the Board you find there. Go back down the stairs and click the right of the screen (c2) to move forward. Use the board on the next screen, then carry on along this path.
Go down until you get to the skeleton and take the Dynamite. Return to the first screen once more, then take the right path (b1) to where you got the machete and use the dynamite to clear the rockfall there. Head up the steps that clear and you’ll arrive at the Peak.
The snake temple

The Collectible is by the pillar (d1), while the Morphing Object is among the empty boxes (d2). Use the knife on the case (d3), take the Syringe, and then take the Sack from the blue box (d4) to reveal a clock-like puzzle.

Now move out the door (d5) to the entrance to the temple, only to find your way is blocked by snakes. For now, you can only grab the Collectible from the snow (e1), the Morphing Object from the slope (e2), and the Long Spear and the Medalion (using the snips) from the skeleton (e3).
Head back to the foot of the mountain for a cutscene, after which you’ll receive some Apples. Use the medallion to open the wooden box in the tent (a3) and take the Nail Puller and Magnet from inside. Use the corkscrew on the ship in a bottle in your inventory to remove the lid, and then use the magnet to retrieve the Part of Mechanism.
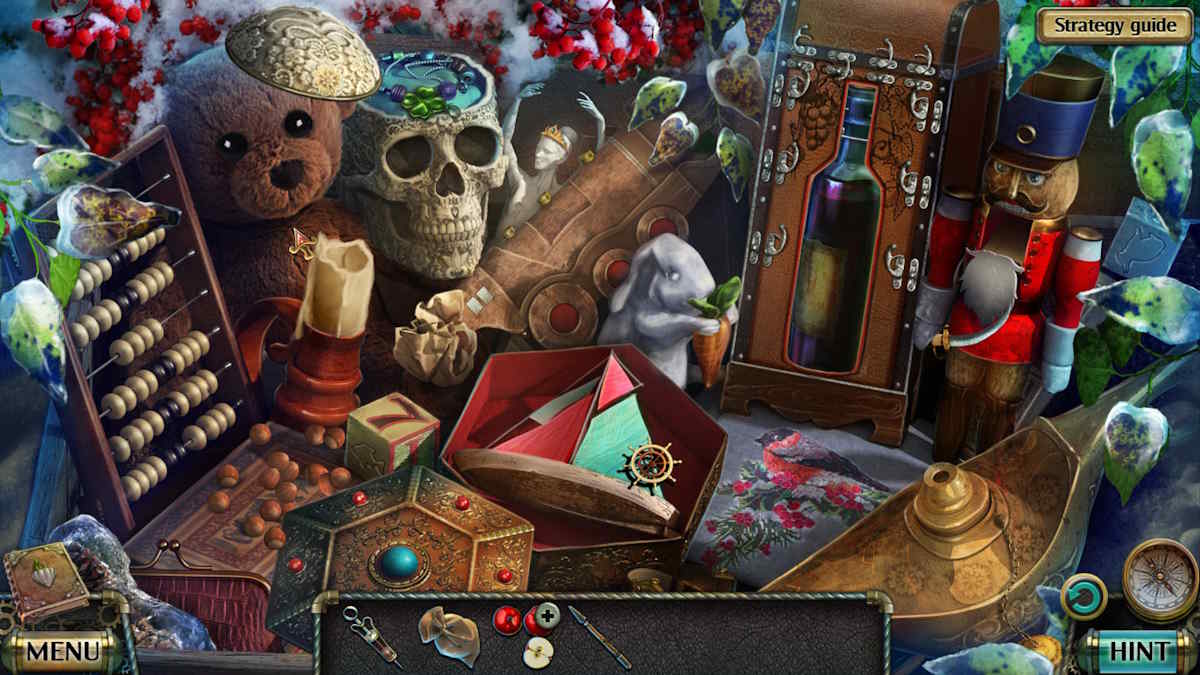
Move back up to the peak and use the nail puller to open the box (d6). This begins a placement puzzle, where you need to add all of the parts to their appropriate items. This one is quite tricky, but everything is on the screen, so you can’t fail. I’ve included a picture of the completed puzzle above for guidance.
On completion, you can take the Bottle of Wine from the image.
Select the apples in your inventory, add the wine, and then use the syringe to make an Apple for the Hedgehog. Return to the base of the mountain, use the apple to lure the hedgehog (a6), and then capture and take the Hedgehog with the sack.
Return to the peak and use the spear to remove some ice (d7) and reveal the Code (159). Use the part of the mechanism and the code on the circular device (d4) to be able to operate it. This looks tricky, but all you need to do is rotate counter-clockwise until the outer arrow is on 1, then clockwise to place the middle arrow on 5, and finally turn counter-clockwise so the middle arrow is facing 9. Once done, you’ll receive the Triangular Chip.
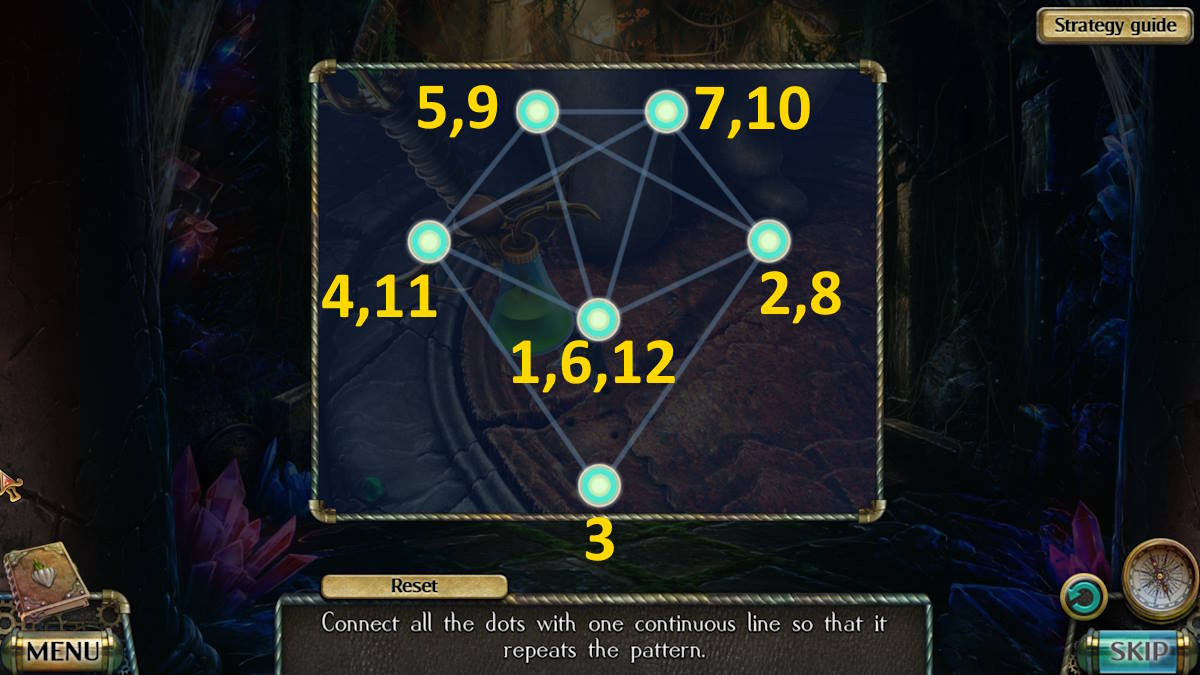
Head up to the temple and release the hedgehog on the snakes (e4) to clear them. Use the lever (e5) to raise the portcullis in front of the door, select the door (e6), and add the chip to start a jumping puzzle. You need to jump chips over other chips so that only one remains.
If you’re finding this puzzle tricky, here's the solution:
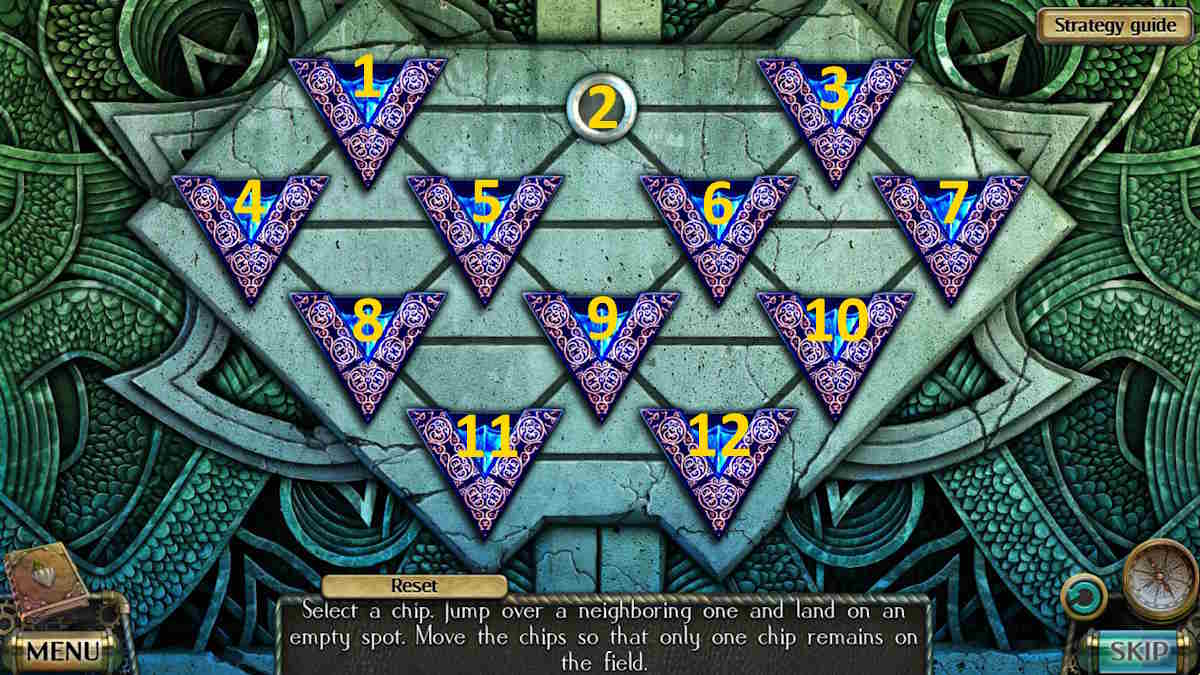
- 8-2, 7-5, 2-8, 12-5
- 1-9, 11-6, 4-11
- 3-9, 11-6, 10-2
Once complete, the doors to the temple will open and you can head inside. After the cut scene, you’ll arrive right back where you started the game. You’ve been tricked by an elaborate illusion!
The valley of the petrified
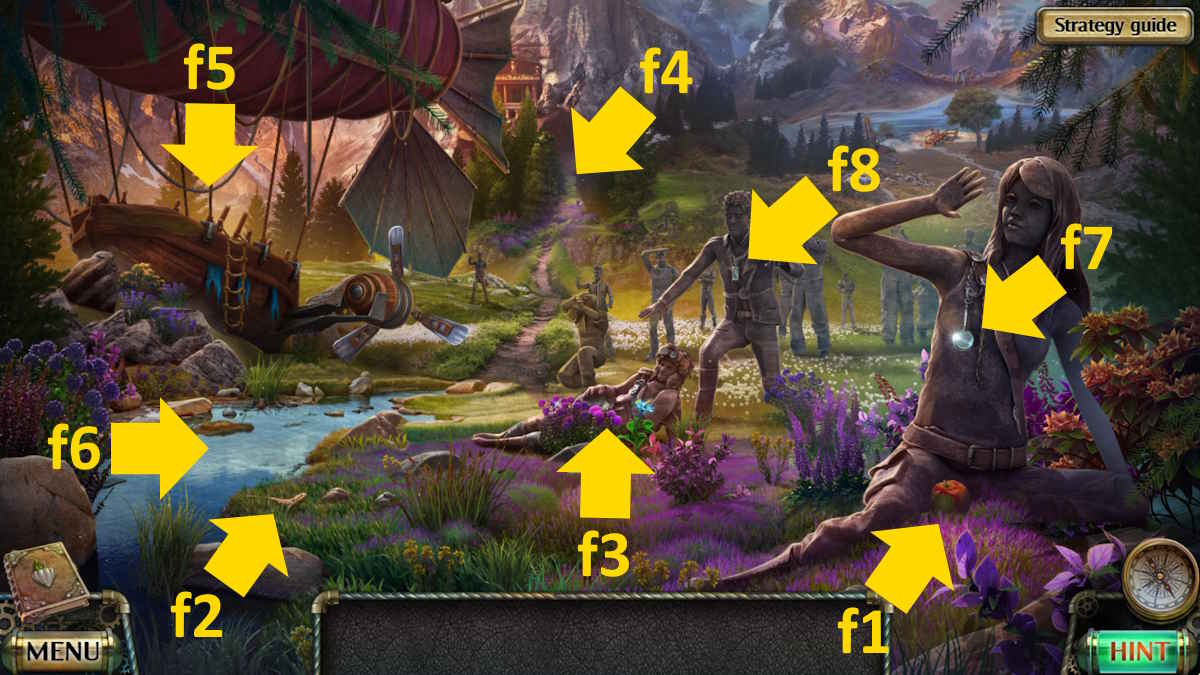
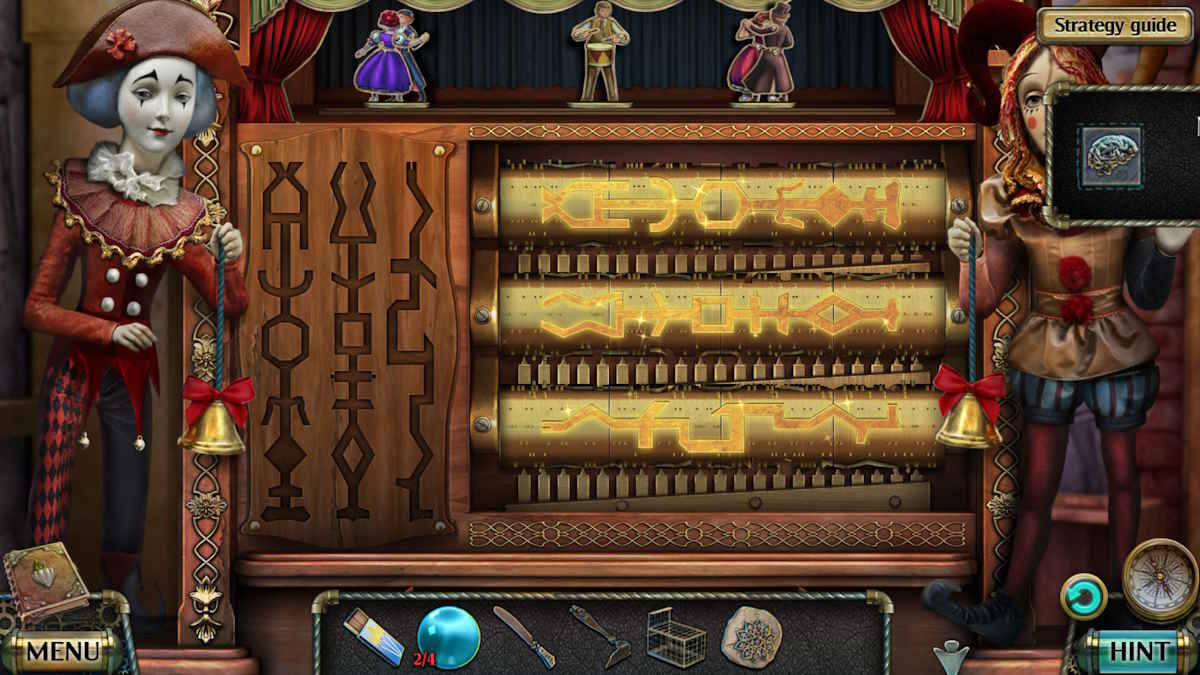
Take the Collectible from the statue on the right (f1) and the Morphing Object from next to the water (f2). Take the Grips from Farador (f3), and move the red flowers in the same close-up to find some Puzzle Pieces and a Hint. Note that bats are blocking your way forward through the forest (f4) before moving onto the zeppelin (f5).
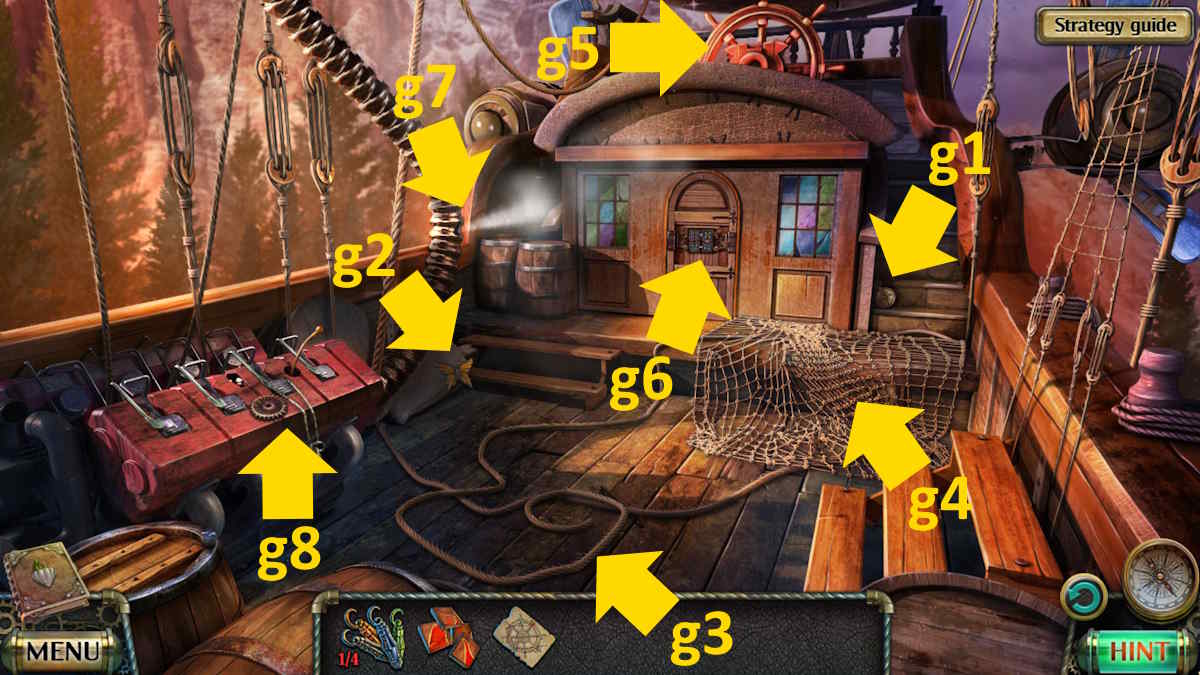
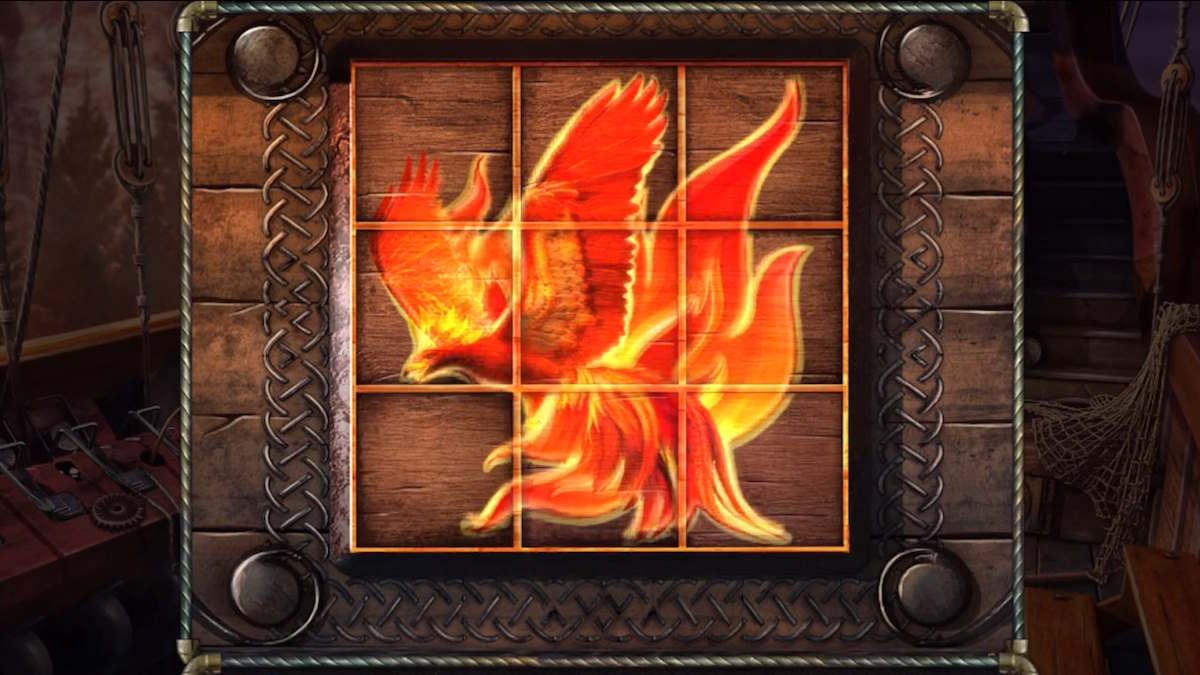
You’ll find the Morphing Object on the steps (g1) and the Collectible on the sack (g2). Take the Rope (g3), then move the net to reveal a sliding puzzle underneath (g4). Add your puzzle pieces and switch them to complete the picture (you can’t fail here, as you simply click pieces to swap them). Once complete (see below), take the Sieve and Clue from the hidden compartment.
Select the ship’s wheel (g5) for a close-up and take the Gears, then add the hint. Press the stones in the order indicated on the hint and the center of the wheel will open, allowing you to take the Pliers. Click the controls (g8) and take more Gears before heading back to the meadow.
Use the sieve in the water (f6) to find a Detail, use the pliers to retrieve the Magnifying Glass (f7) and Pendant (f8), and then return to the zeppelin. Select the doors (g6) and then add the clue and the detail to start a switching puzzle. The solution for this is below. Once complete, head into the cabin.

- W, E, X
- E, X
- N, S, X
- N, S, X twice
- S, X
- E, X twice
- E
The zeppelin’s cabin
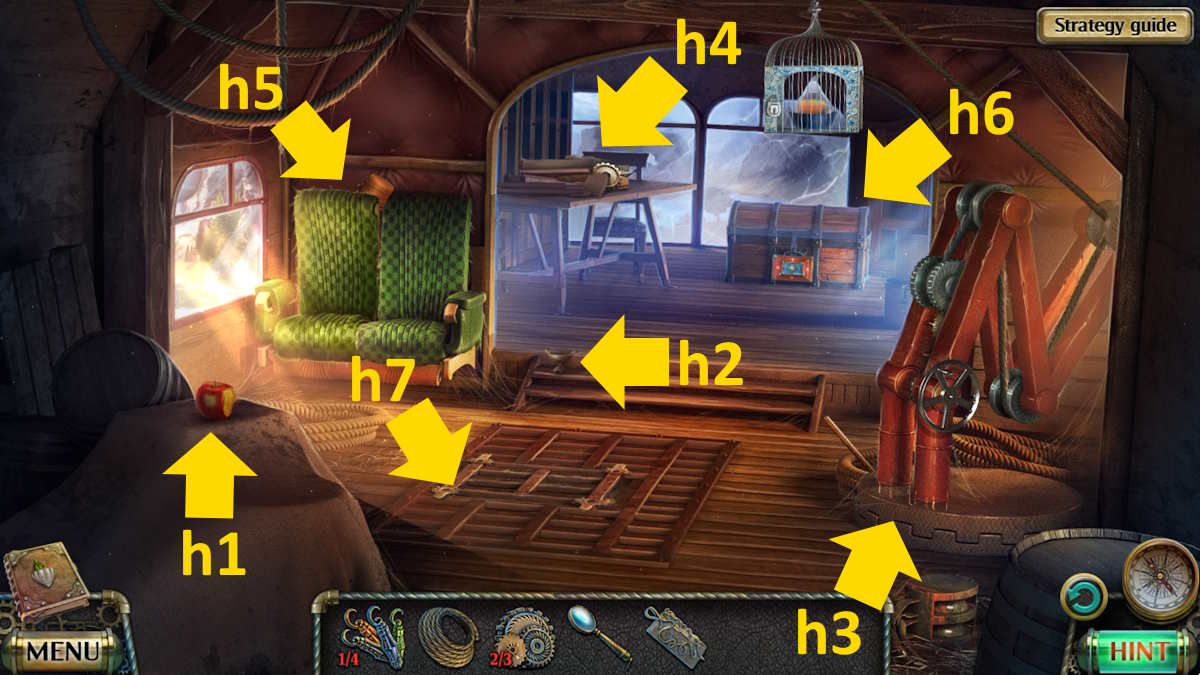
Grab the Collectible from the brown cover (h1), the Morphing Object from the steps (h2), the Rebar from the pulley system (h3), and the Razor Blade, Duct Tape, and final Gears from the table (h4). Add the gears to the pulley system (h3) and it will drop the cage.
Select the seats (h5), click the cushion for a close-up, and use the razor blade on the stitching to find an Ice Skate Blade (as you do), and then use the rebar on the back of the chair and take the Tube. Open the tube in your inventory to receive a second Grips.
Related: Vanishing Act walkthrough (Adventure Escape Mysteries)
Select the chest at the back of the cabin (h6) to start a button puzzle. For a simple answer to this one from a fresh reset, click the bottom button, then the left button, followed by the bottom one three more times. Take the Auger and the Wrench from the chest.
Head back out onto the deck and use the tape to fix the hole in the tube (g7). You can now operate the mechanism (g8), allowing you to take the Key. Back in the cabin, you can use the key to open the dropped cage, taking the Oil from inside. Return to the meadow, use the oil on Farador’s finger (f3), and take the Signet Ring.
Head back into the cabin once more and use the signet ring to open the book on the table (h4). This starts a coloring mini-game. This is slightly frustrating, as you have to do the colors in the correct order but remove all the sections that aren’t that color each time.
So, starting with red, click the red button, then click on every section except the lips and the two snakes’ mouths. Select blue next, deleting all the snake and face sections afterward. Now select green, clearing the face sections, but also the bottom-right snake section (if you don’t the yellow paint can’t flow in).
Now, add the yellow, clear the bottom right of the snake, and re-add the green to complete the image. Take the third of the Grips.
The frozen lake
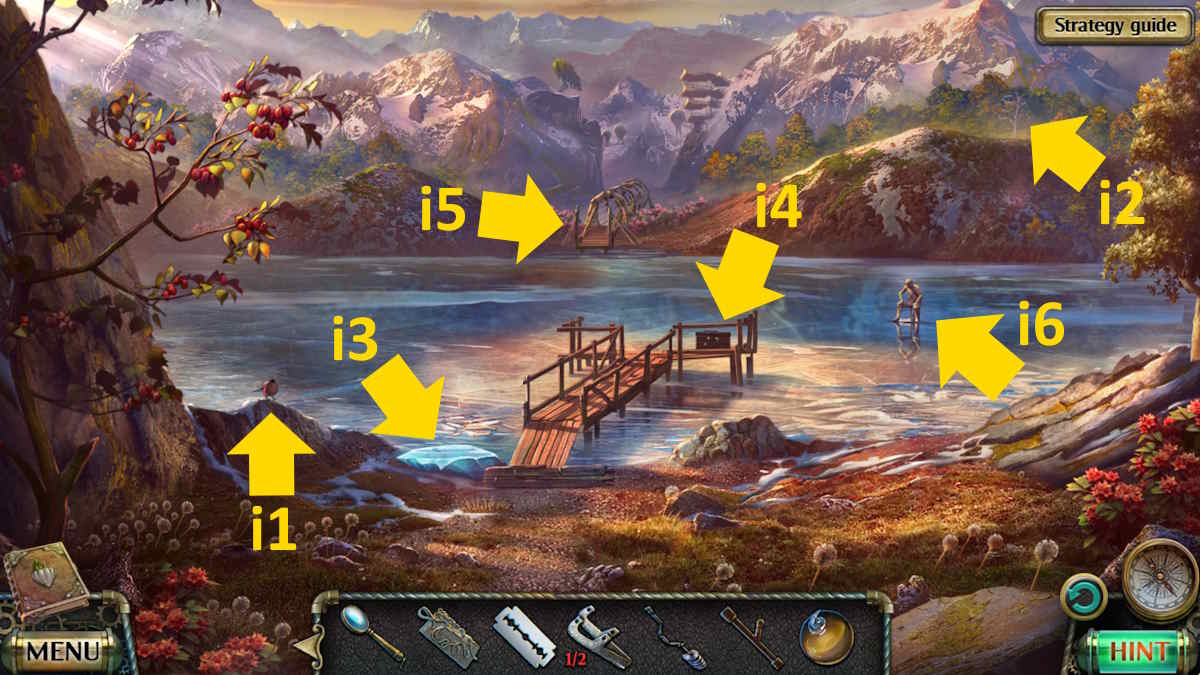
You’ll find the Collectible to the left of the pier (i1) and the Morphing Object on the far shore (i2). Select the ice (i3), pour on some oil, and use the magnifying glass to melt the ice and take the final one of the Grips you’re missing. Get a close-up of the pier (i4) and use the wrench to unhook the second Ice Skate Blade.
Go back into the cabin and use the grips to open the hold (h7), which starts coin finding mini-game. Once complete, take the Ice Skate Shoes. Select the shoes in your inventory, add the blades, and use the wrench to tighten them up and receive the Ice Skates. Head back to the frozen lake, select the skates, and click the other side of the lake (i5) to try and skate across.
After failing, use the auger on the ice by the frozen fisherman (i6) to find a clock Hand. Add the hand to the device on the pier (i4) to start a puzzle. You can’t fail here, as you just need to turn each dial until the images associated with it are in the holes of the hand.
These are as follows (from outside to in):
- Cat: Mouse, eye, leaf (orange)
- Bird: Nest, feather, wind (blue)
- Fish: Shell, fishing hook, water (blue)
When you’re done, you’ll receive the Grapple and Pick-up Tool. Select the grapple in your inventory and add the rope to get a Grappling Hook. Select the far side of the lake once more (i5), add the grappling hook in the close-up, use the auger on the ice here, then click the grappling hook to attach it to the auger and make a rope bridge across to the opposite shore. Click the device once more to move to the bridge then the settlement.
Toward the settlement
Click Roger on the bridge for a cutscene, after which you’ll receive a Clamp. Take the Collectible from the bridge (j1), and the Morphing Object from the ropes (j2), and then click Roger again and use the grappler to pull in your side of the bridge. Use the razor to cut the rope in the close-up that follows and take the Putty Knife. Finally, add the clamp and use the wrench to tighten it.
After Roger leaves, select the red ribbon (j3) and take the Scoop, Silver Key, and the Empty Bag. Now click the far side of the bridge (j4) to catch up with Roger. Click the wreckage of the steps to clear it, after which Roger will give you the Arboreal Key.
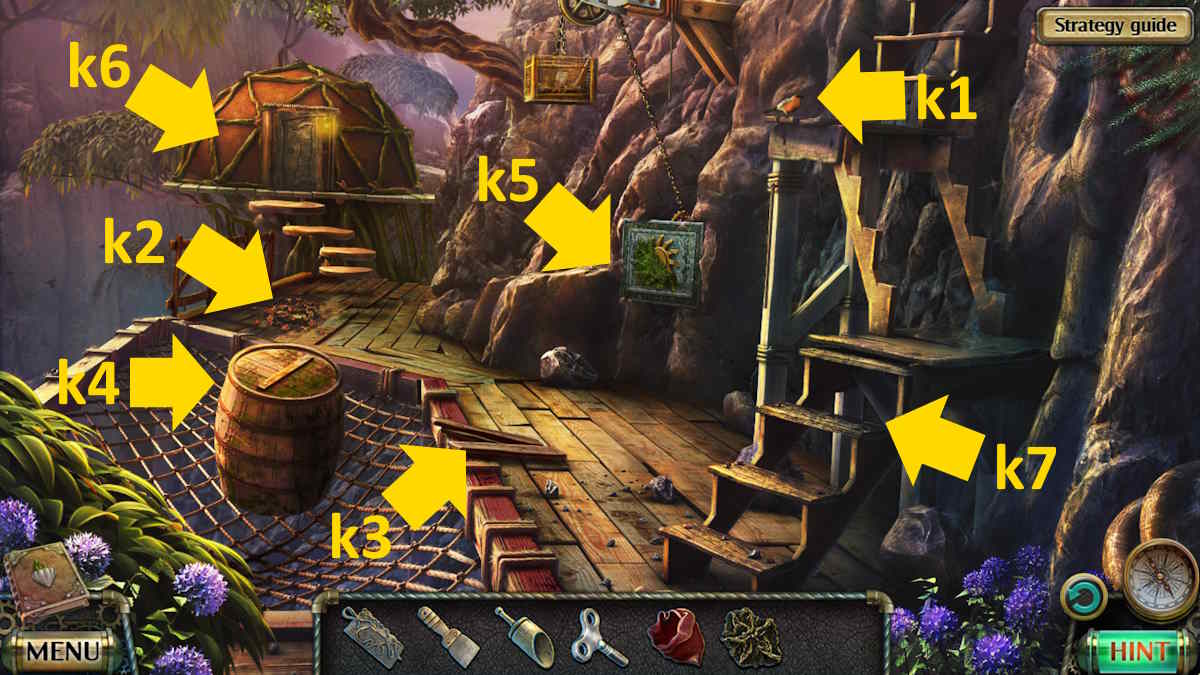
You’ll find the Collectible on the staircase (k1) and the Morphing Object on the boardwalk (k2). Take the Boards (k3), open the barrel (k4), add the sack, and then use the scoop to get a Bag of Grain while also finding a Lense.
Use the putty knife to clear the moss from the wall mechanism (k5), then add the pendant to trigger it and drop the cage above. Take the Hammer from the cage and then use the arboreal key to open the hut door (k6) and head inside.
Fixing the stairs

After taking the Collectible from the floor (l1) and the Morphing Object from under the table (l2), move the red cloth (l3) to reveal a bird’s nest. Use the grain to distract the birds and take the Curtain Wand. Select the hammock (l4) and use the silver key to open the silver box and get the Nails.
Select the carving next (l5) to start a bird-finding puzzle (keep clicking the image until you find them all; you can’t fail). On completion, take the Carved Key. Use the wand on the bookshelf (l6) to gain access to it, then use the carved key to open the book there and take the Set of Patterns. You can also select the table (l7) and add the set of patterns, but you need some yew wood to do more.
Go back outside, add the boards to the steps (k7), secure them with the nails, and use the hammer to complete the repairs. You now have access to the central part of the settlement.
Entering the town hall
The Collectible is on the fence (a1) and the Morphing Object is on the steps (a2). Take the Handle and the Golden Key from the chair (a3) and the Hatchet from the control hut in the distance (a4). In that same close-up, use the hatchet on the tree there to gain Yew Wood.
Head back down to Roger’s house and use the golden key on the gold box on the chair (b1) to open it and take a Lever. Now select the workbench (b2) and add the yew wood. Copy the pattern for the town hall yew key, tracing a single line. Start from the top outside dot, draw all around the outside, then go into the middle and draw the star. Once complete, take the Key to the Town Hall.
Use the key on the town hall door (a5) and then head inside. After the cut scene, you’ll find the Collectible on the floor (c1) and the Morphing Object on the staircase (c2), where you’ll also find a Bronze Key. Use the bronze key back in Roger’s house to open the final box (b1), taking a Lens and a Lever from inside.
Back in the town hall, use the levers to open the box (c3) and take the Valve. Return to the control hut (a4) and add the valve to the control mechanism to begin a pressure puzzle. To complete it, from a reset, turn the dials in the following order:
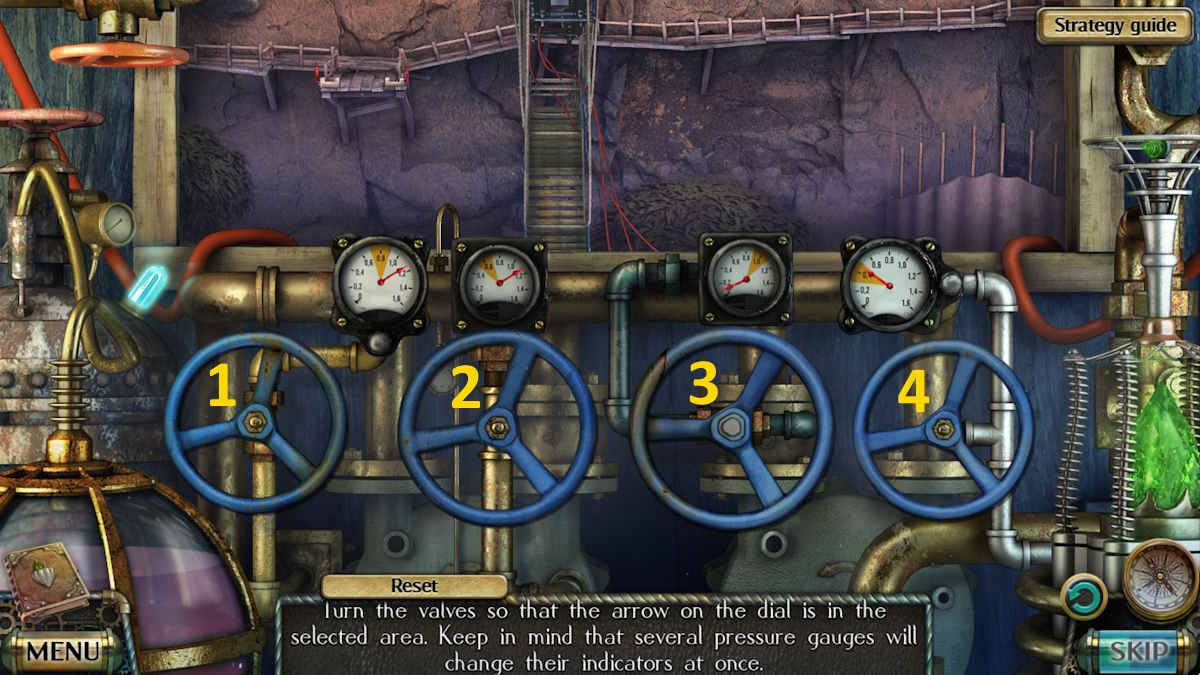
- 3, 2, 4, 1, 3

Once you arrive at the old part of the settlement, you’ll find the Collectible above the door (d1) and the Morphing Object on the floor outside the door (d2). Take a Belt from the tree (d3), and then use the hatchet on the tree to get a piece of Ash Wood. Use the belt to tie back the branches blocking the door (d4), then head back to Roger’s house.
Related: Lost Lands 5 Walkthrough
Awakening Albert
Place the ash wood on the desk and follow the pattern to make a Key for Albert’s House. I started on the center dot, did the left side of the pattern (inner part first), and then completed the right side to finish back in the middle. Take the Arboreal Key. Use the key to open Albert’s door (d4) and head inside.
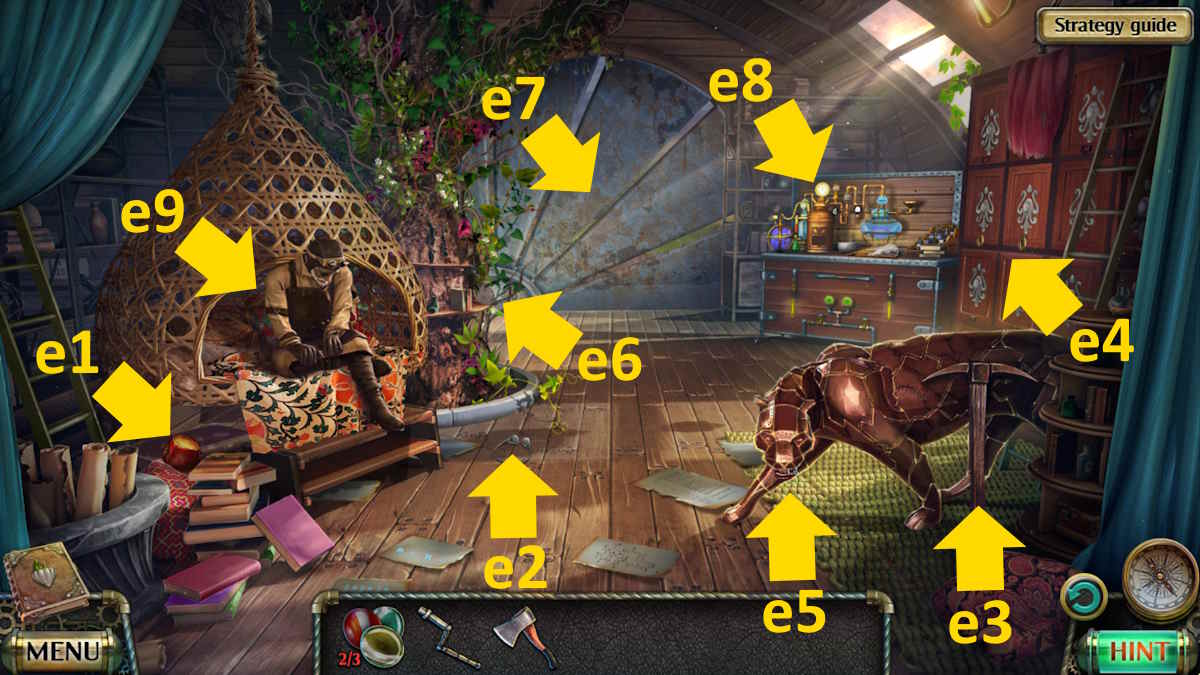
The Collectible is by the books on the left (e1) and the Morphing Object is in front of Albert’s chair (e2). Take the Pickaxe (e3), then open the top drawer (e4) to find a Screwdriver. Use it on the model (e5) to loosen the mouth and take the Key. Use your handle on the door device (e6) to open it, and take the Basket from outside (e7).
Use the key to open the remaining draws (e4) and take the Awakening Pollen Recipe, Empty Spray Bottle, Square Valve, Pot, Empty Jar, and Flask. Use the pot to gather some Poison From the River (e7), then take the Fan from the workbench (e8). You can also add the empty jar and poison to the recipe in your inventory to unclutter it.
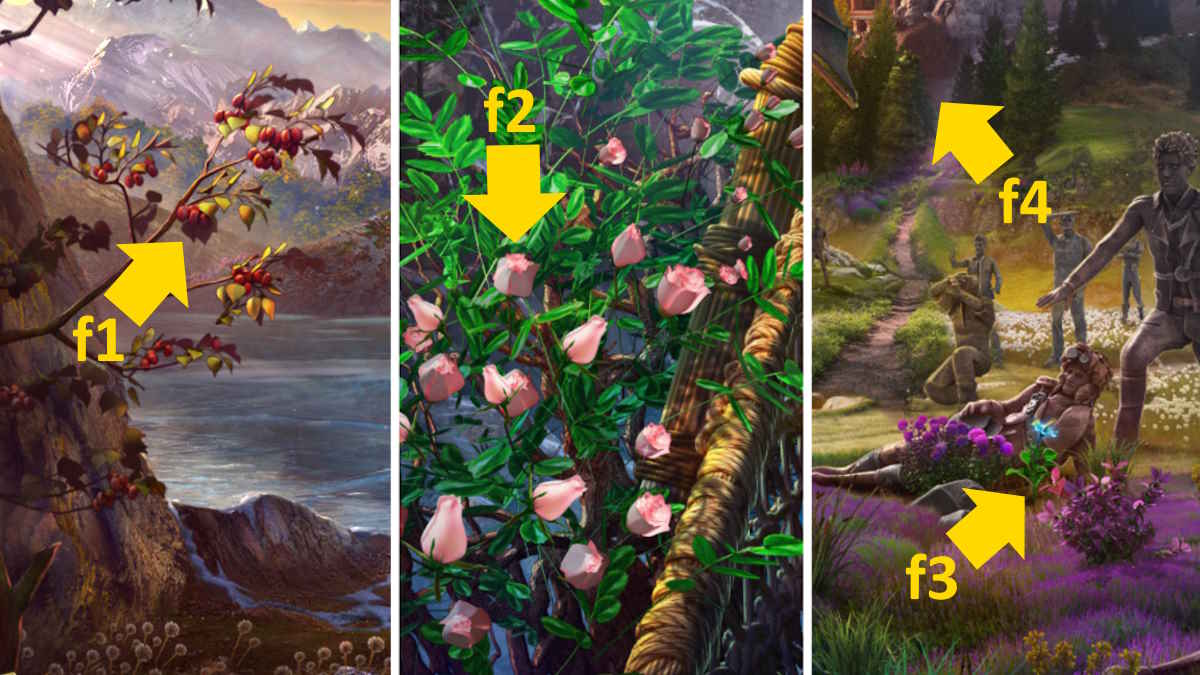
Collect the rest of the ingredients. Go to the frozen lake and use the basket to get the Red Berries (f1), then to the town hall and use the flask to get the Aloe Juice (c4). You can add both of these to the recipe too.
Collecting the ingredients
Now move to the central part of the settlement and use the pickaxe on the rocks (a6), use the hatchet to get some Amaranth Wood, and then go to Roger’s house and make the Key for the Plumber’s House using the amaranth wood. Take the Arboreal Key, go to the plumber’s house (d5), and head inside for a missing objects mini-game.
The ropes order (numbering them left to right) is 5, 4, 5, 1, 4, 5, 3, 1, 4, 5, 2, 3, 1, 4, 5. The shapes you need are as follows: middle-bottom, top right, and then top left.
To complete the sliding puzzle, use the image below. On completion, you’ll receive a Lever Arm.
- 2, 1, 4, 5, 6
- 3, 2, 5, 4, 7
- 8, 5, 6, 9
Add the lever arm to the tap (d6) and use the empty spray bottle in the water to get a Spray Bottle. Select the mobiles for a close-up (d7), add the valve, and use it to turn the mobiles. Now click the small house to start a mini-game. You can’t fail here because the items are highlighted as you move the mouse over them. Once complete, take the Reaping Hook from behind the door.
Finally, you can move to the bridge (f2), spray the flowers with water, and then use the reaping hook to collect the Red Rose. Finally, move to the meadow and use the reaping hook to gather a Somnolent Flower Bud (f3). Add both flowers to the recipe to receive the Basket With Ingredients, and return to Albert’s house.
Add the ingredients to the workbench (e8) and follow the instructions to make the pollen.
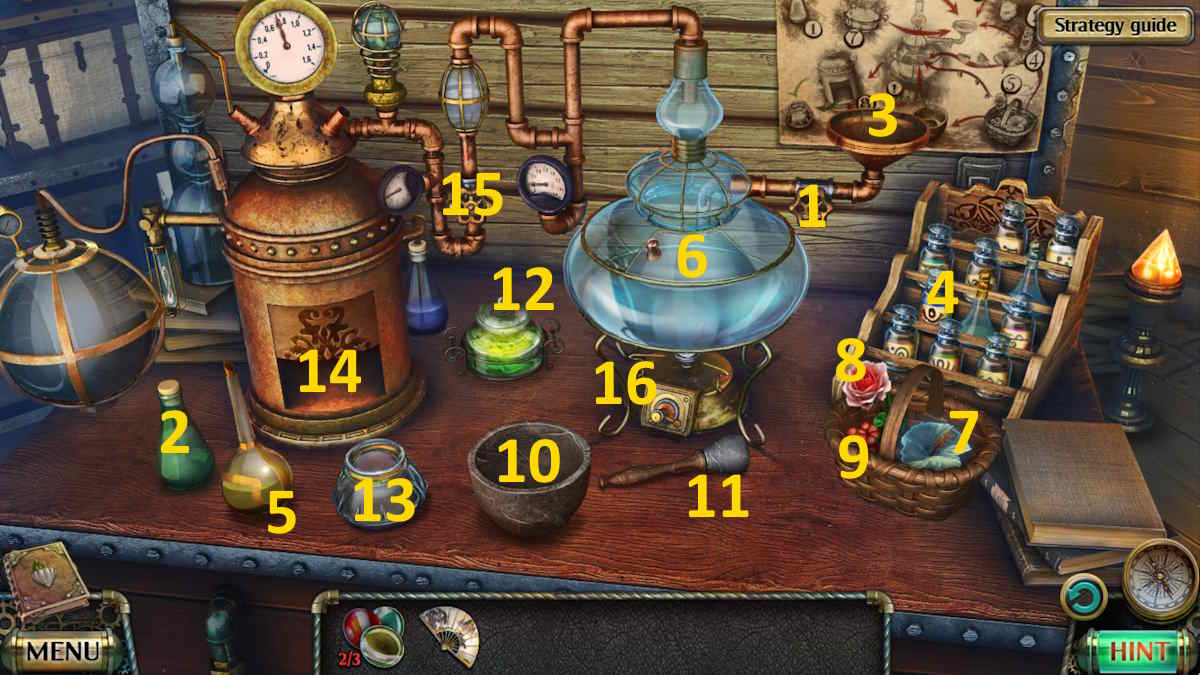
- Turn the gauge (1)
- Add 2 to 3, 4 to 3, and then 5 to 3
- Open the hatch (6), and add 7 followed by 8
- Place 9 in 10, use 11 on 10, then place 10 in 6
- Place 12 in 6, 13 in 14, and then shut 14
- Tuen 15, turn 1, close 6, and turn 16
- Take the Jar with Wake-up Pollen
Select Albert on his chair (e9), add the pollen, and then use the fan to wake up Albert.
Going to the gorgon’s temple
Now that Albert has moved, select his chair (e9) and move the cushions to find your third Lense. Go to the town hall, watch the cut scene, and receive the Cup Shaped Key. Add the lenses to the telescope (c5), and note the pattern (middle left, third from left on the top row, and bottom right). Select these buttons on the cabinet (c6) to open it.
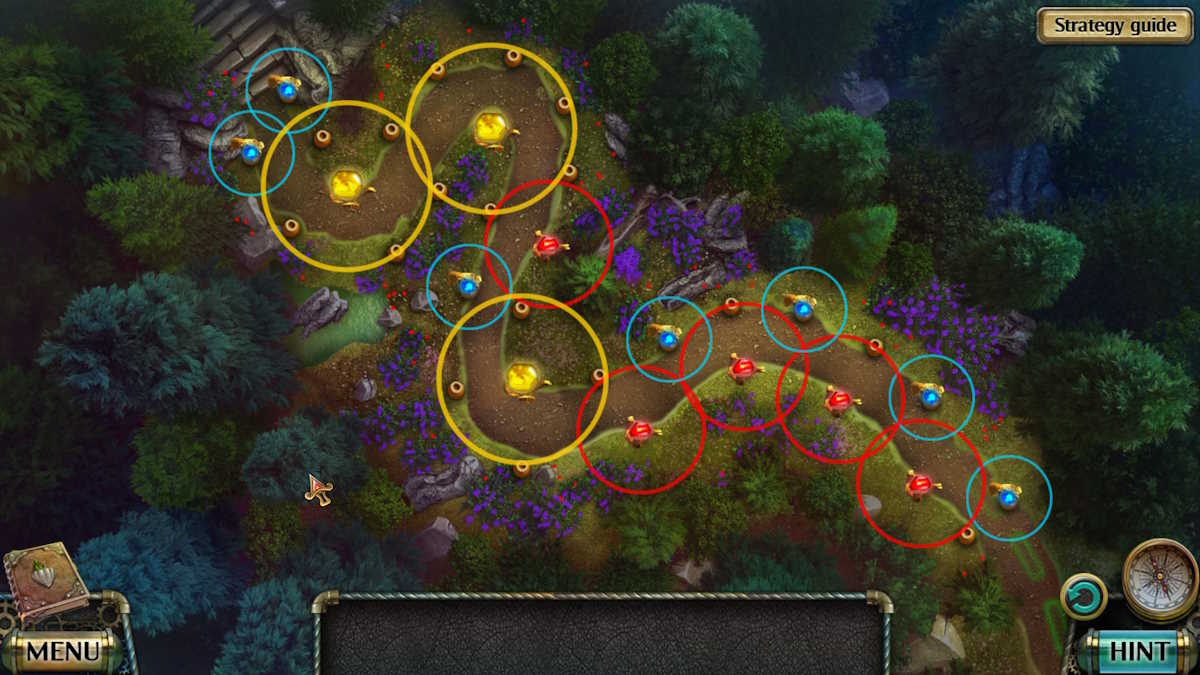
Add the key to the unseen door (c2) to start a missing objects minigame. Once complete, take the Crystals. Go to the meadow, select the crystals in your inventory, and click the path into the forest (f4) to start an illumination puzzle (see the solution above). Once complete, you’ll arrive at the snake temple.
The Collectible is on the cliff face (g1) and the Morphing Object is on the slope (g2). Examine the temple door (g3), remove the Twisted Fork, then select the bushes (g4) to find a Liana and a Snake Key. Use the liana to recover the Handle (g5), and use the handle to open the temple door. Head inside.
Get to the library
Take the Collectible from the pillar (h1), the Morphing Object from the floor (h2), and the Poker from the head close-up (h3). Move forward to the central hall (h4).
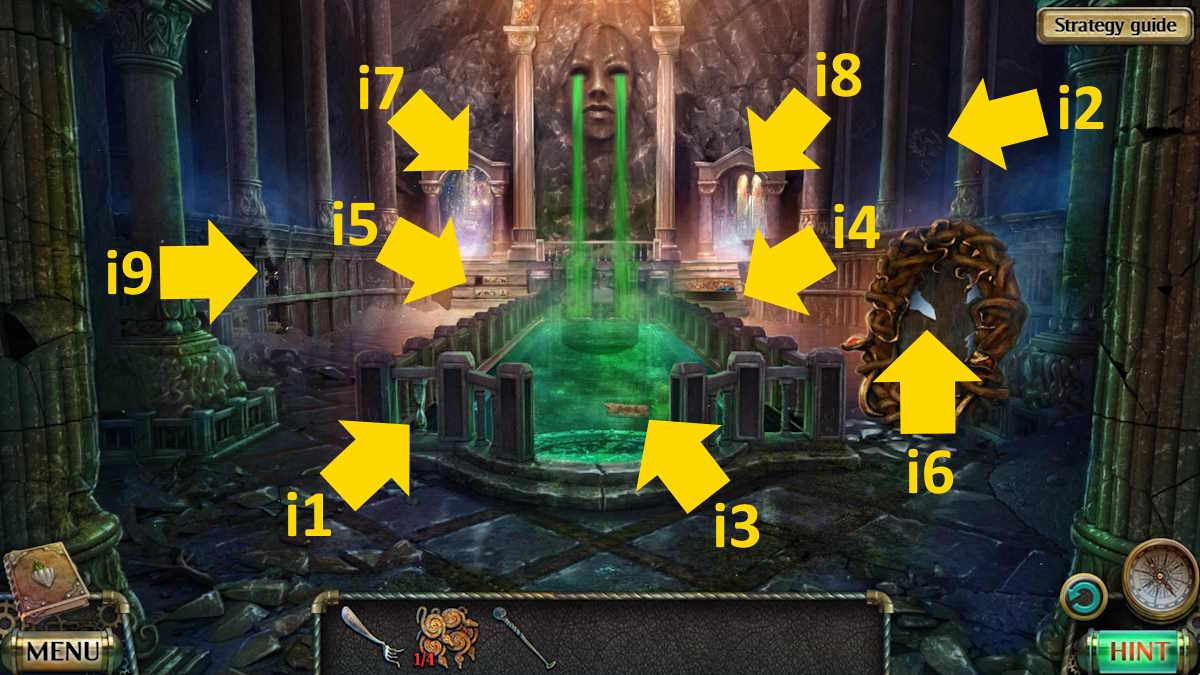
The Morphing Object is one of the stone struts (i1), while the Collectible is on the righthand wall (i2). Use the poker to retrieve the Tablet With Engraving (i3), take the Garden Glove (i4), use the fork to get the Forged Symbol (i5), take a Mirror Fragment (i6), and then head back to the foot of the temple.
Use the mirror fragment to collect the Strip of Fabric (h5), and then use the glove to remove the ivy (h6). Move back into the central hall and head into the room on the left (i7).
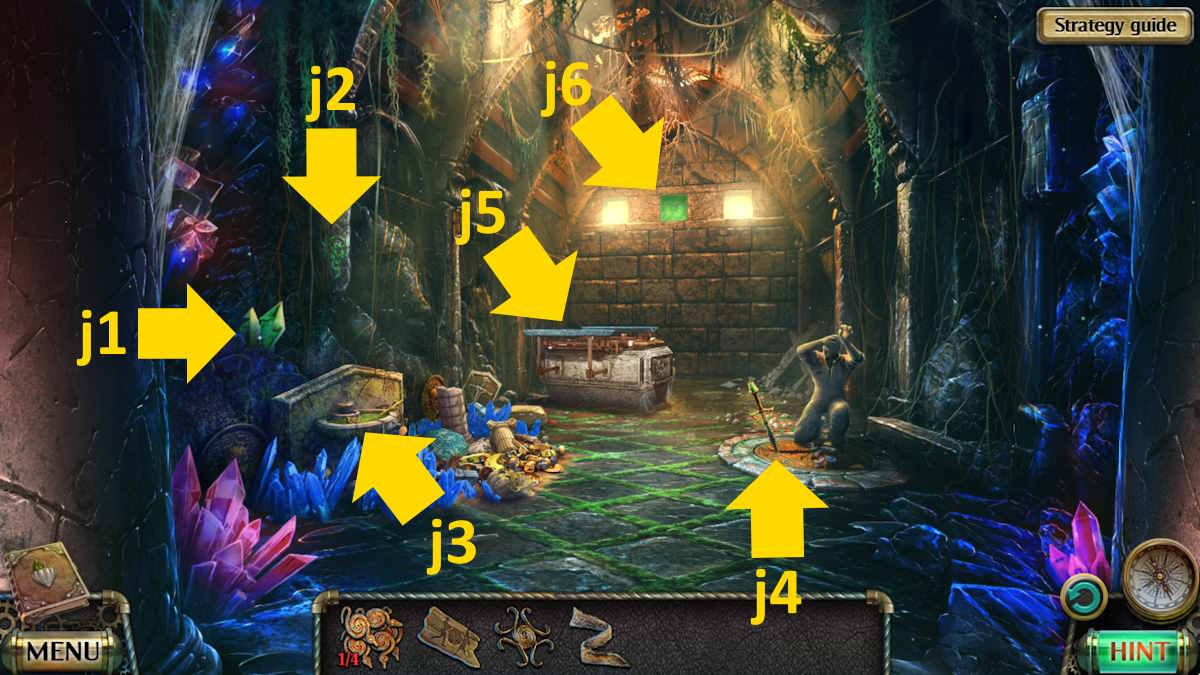
Take the Morphing Object on the left of the room (j1), and the Collectible on the wall just above it (j2), and then select the stash to start a symbol activation mini-game (j3). Once complete, take the Snake Key.
Select the sword (j4) to find a Solar Charm and some Stones, and then add the stones to the mechanism (j5) to find a Lever, a Metal Brush, and a button. Press the button to access the wall above (j6), where you can place the solar charm to find another Snake Key and a Puzzle Piece.
Back at the foot of the temple, use the brush to clear the moss (h6), then click the third clay circle from the left and take the Clay Key (this also opens a compartment in the pillar to the right of the head).
Head to the central hall and add the puzzle piece to the steps (i5) to start an odd-one-out puzzle. The animals to select are the second ones from the left in each row (the rabbit and the tortoise). This shuts off the flow of poison from the left eye.
Head through the righthand door (i8) into the abandoned library.
The abandoned library
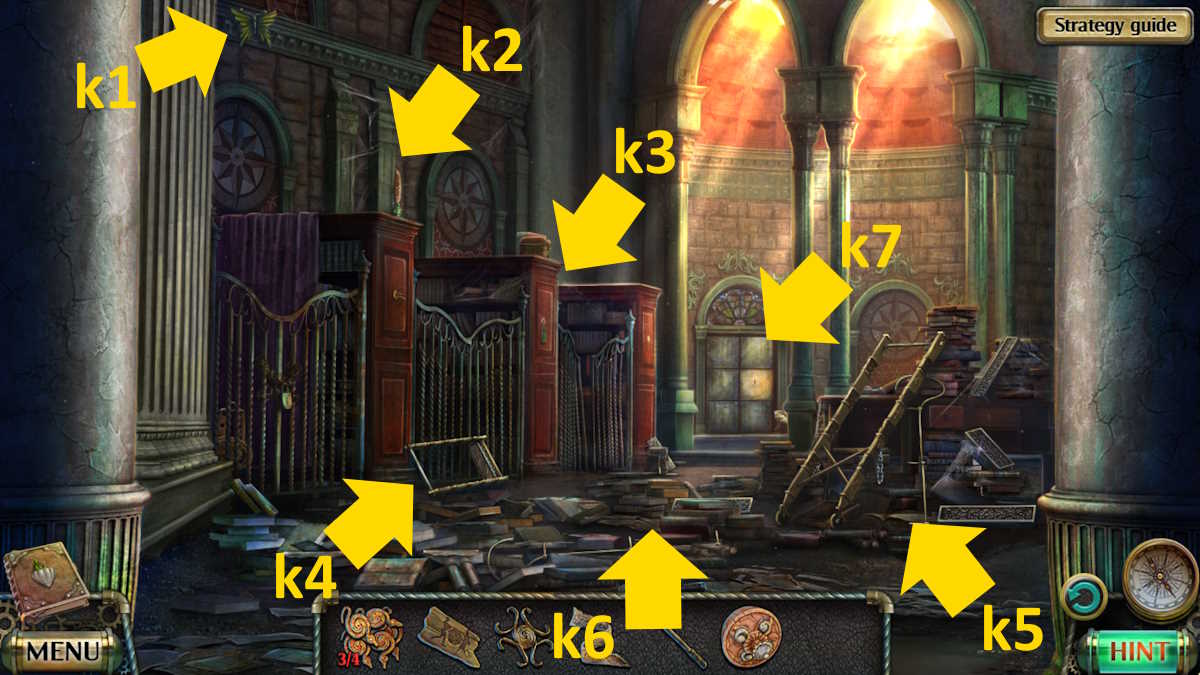
After collecting the Collectible (k1) and Morphing Object (k2), take the Disk With Pattern (k3), Ladder Part (k4), second Ladder Part, three Steps, and a Handle (k5), and two more Steps and a second Handle (k6). Once you have them all, put the Ladder together and use it to get the Plate With A Drawing (k3).
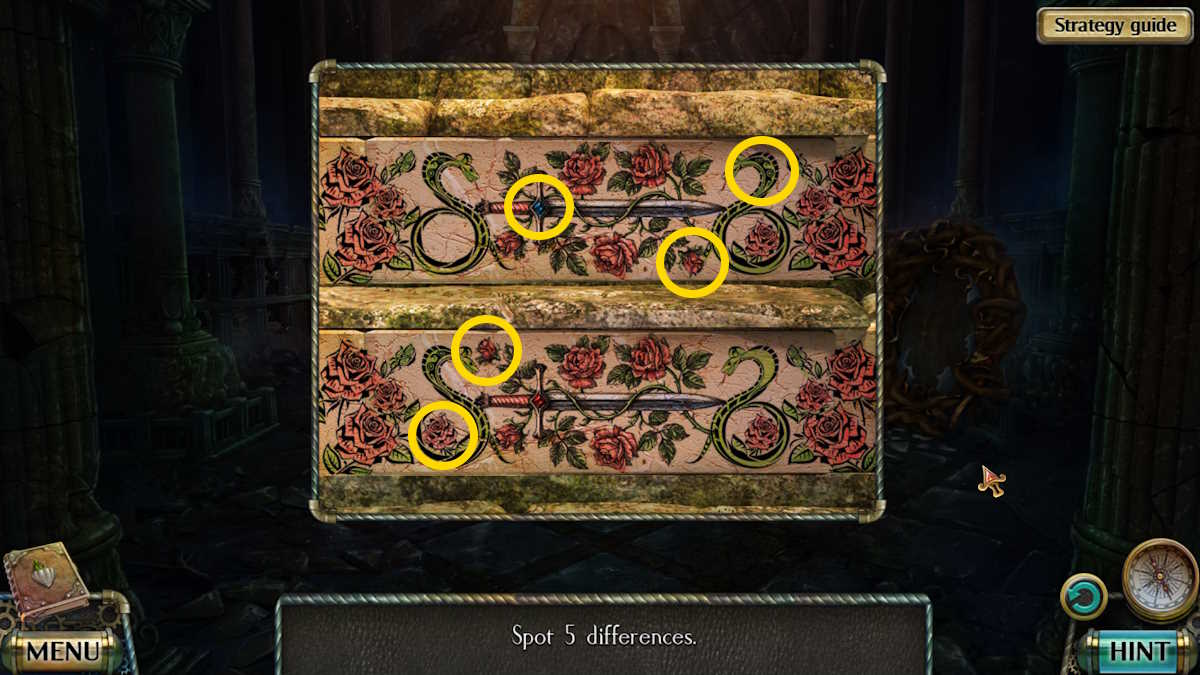
Go to the central hall and add the plate to the righthand stairs (i4). You need to spot five differences, which I’ve marked in the image above. Once complete, the second poison stream will stop. Note the symbol that has appeared on the eyes and forehead of the statue.
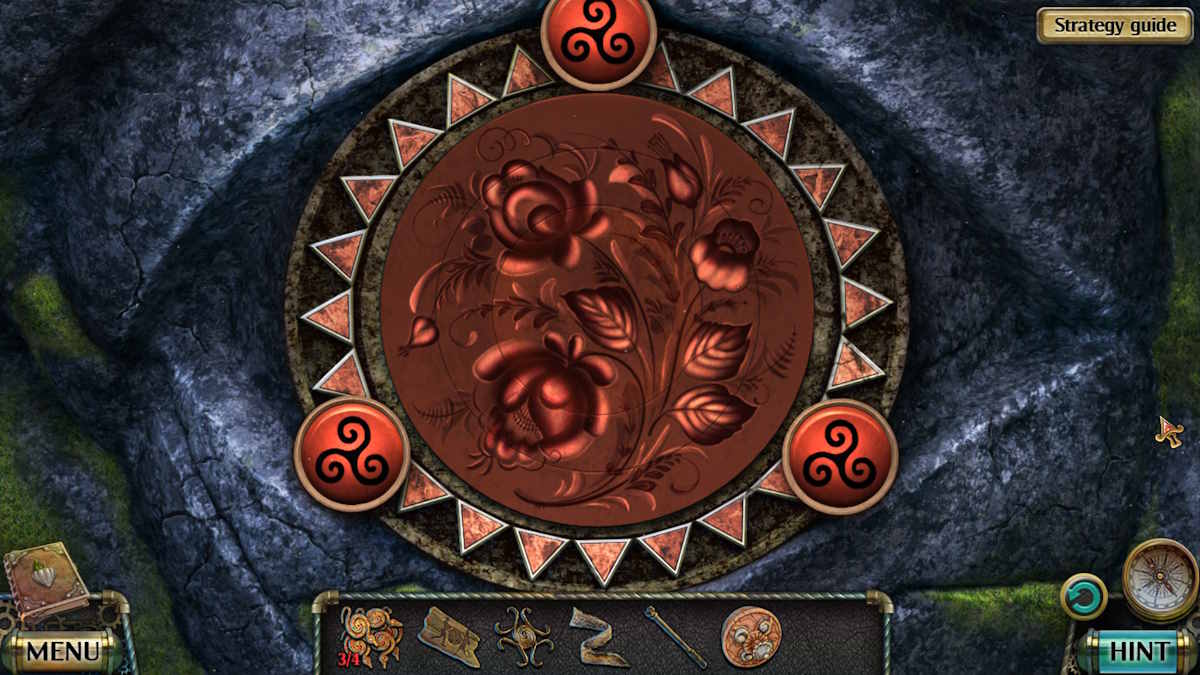
Return to the foot of the temple, select the head (h3), and add the disk to the middle of the puzzle device. Click each of the three outside circles until they’re red, as this is the symbol that matches the one you’ve just seen. Twist the circle parts to create a complete image (see above), after which you can take the Valve.
Use the valve on the pipes in the central hall (i9) to drain the poison from the pool. Select the pool (i3), take the Colored Tile, and then head outside the temple entrance and add it to the stairs (g6) to start a matching puzzle. Taking each row, select the following green tiles (numbering from left to right, ignoring the red central tile):
- 2 and 6
- 1 and 4
- 1 and 5
- 2 and 6
- 1 and 5
- 2 and 5
- 1 and 6
- 2 and 5
- 2 and 6
Once complete, take the final Snake Key. Go back to the central hall, select the empty pool once more (i3), and add the snake keys. The floor will open, allowing you to enter the spiral staircase.
The gorgon’s crypt
The Collectible is on the wall (l1) and the Morphing Object is on one of the red details (l2). Take the Mug from the far side of the stairs, then head down to the gorgon’s crypt.
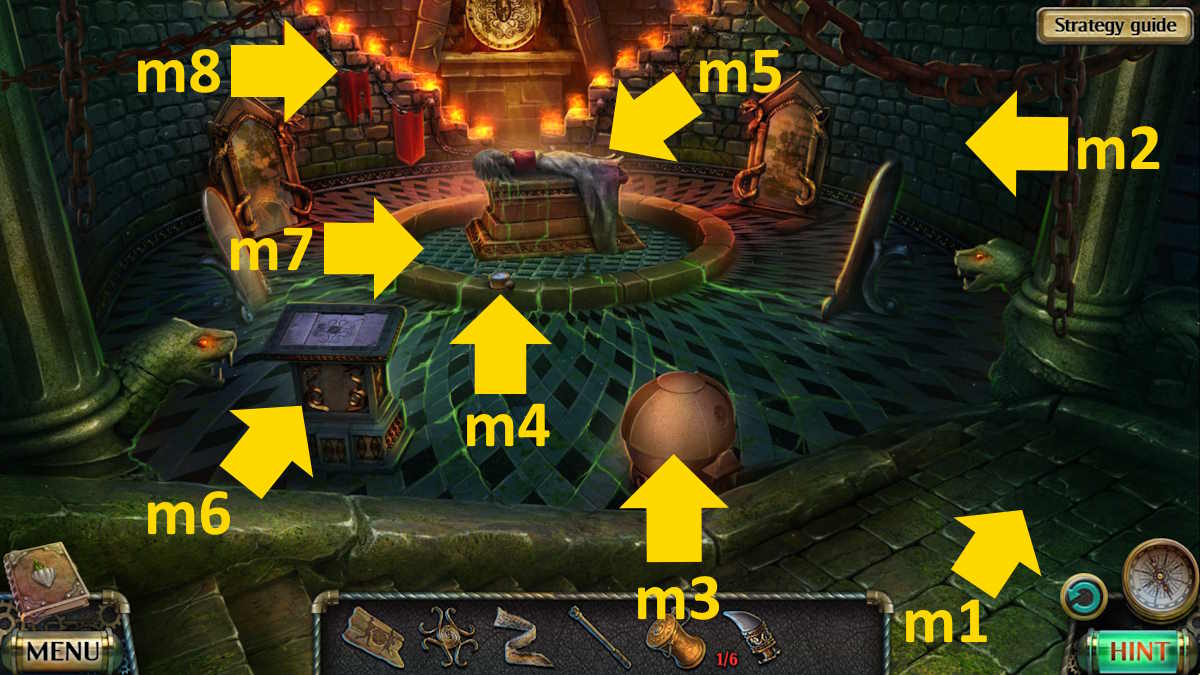
Take the Morphing Object from the floor (m1), the Collectible from the wall (m2), and a Fang from the clay bowl (m3) before adding the clay key to it for a cut scene. Take the Pressure Gauge (m4), a Rag from the sarcophagus (m5), then add the forge symbol to the altar (m6) to discover a bijous puzzle.
If you’re stuck on this, use this sequence (1-3 top row, 4 in the middle, and 5-7 bottom row) from a fresh reset to solve it.
- 4, 2, 3, 7, 6
- 4, 2, 3, 7, 6
- 4, 1, 5, 6, 4
You can now select the diorama (m7) to start an object placement mini-game. Once complete, take the Eagle Head Figurine and use the mug to get a Mug With Water. Use the mug of water on the fire (m8) to get a Mug of Boiling Water. Head back to the library now and use the mug to steam up the window (k7) to find a code (3145).
Finding the book about the gorgon

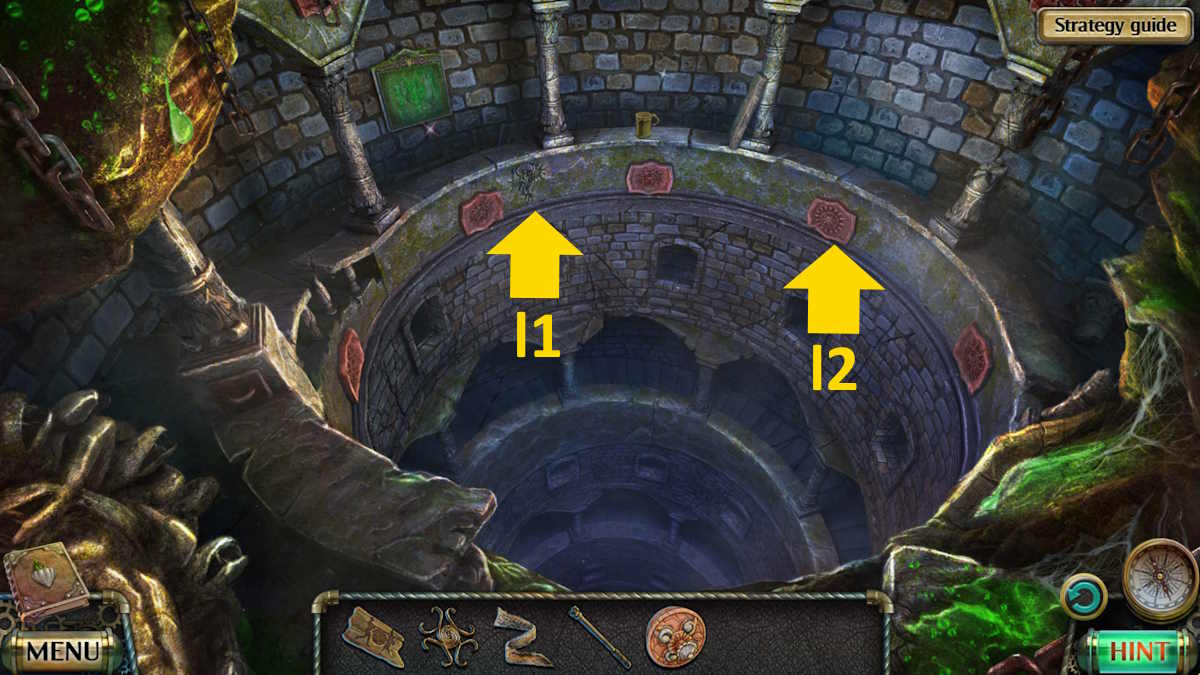
Move to the spiral staircase, use the rag to clean the wall hanging (a1), and add the wooden engraving. Once you’ve got it right, a room will open up (a2). Take the Tank, Hammer with a Chisel, and Saw from inside it.
Now go to the foot of the temple and use the hammer and chisel to get the Old Torch (b1). Open the torch in your inventory, remove the old ash from the end, and add your strip of fabric to make a Torch. Light the torch in the gorgon’s crypt (c1) to get a Burning Torch, which you can then use at the foot of the temple to scare off the scorpion (b2) and take the Bottle With Acid.
Head to the treasury next and use the acid on the rust (d1). I’ve included a picture of how to copy the pattern above. The acid will dissolve the rust now, allowing you to take the sword (Roger will take it for now). Note there is a second code in the hole you drew the sword from, 1523.
Move to the abandoned library next and select the case on top of the bookshelves (e1). Enter the two codes you have, setting 3145 on the top row and 1523 on the bottom row (it won’t work the other way around). The case will pop open, allowing you to take the Key. Use the key to open the padlock (e2), and take the Anchorage. Once you have it, click the room you just opened to start a missing objects minigame. Once you’re done, you’ll receive the Book About Gorgn, which triggers a cut scene.
While still in the temple, you can place the tank, anchorage, lever, and pressure gauge on the spiral staircase (a3). You can now assemble the device (I’ve pictured it above).
Related: Lost Lands 4 Walkthrough
Crossing the poisonous river

Return to Albert’s house for another cut scene, after which you’ll receive some Rope. You can use the rope at the back of Albert’s house (f1) to climb down to the pristine coast. But before you do, head to the town hall. Select the chair at the back of the room (g1) and add the eagle’s head to start a puzzle. You need to move the sliders so that the heads all drop onto the correct animals. I’ve included a solution below.
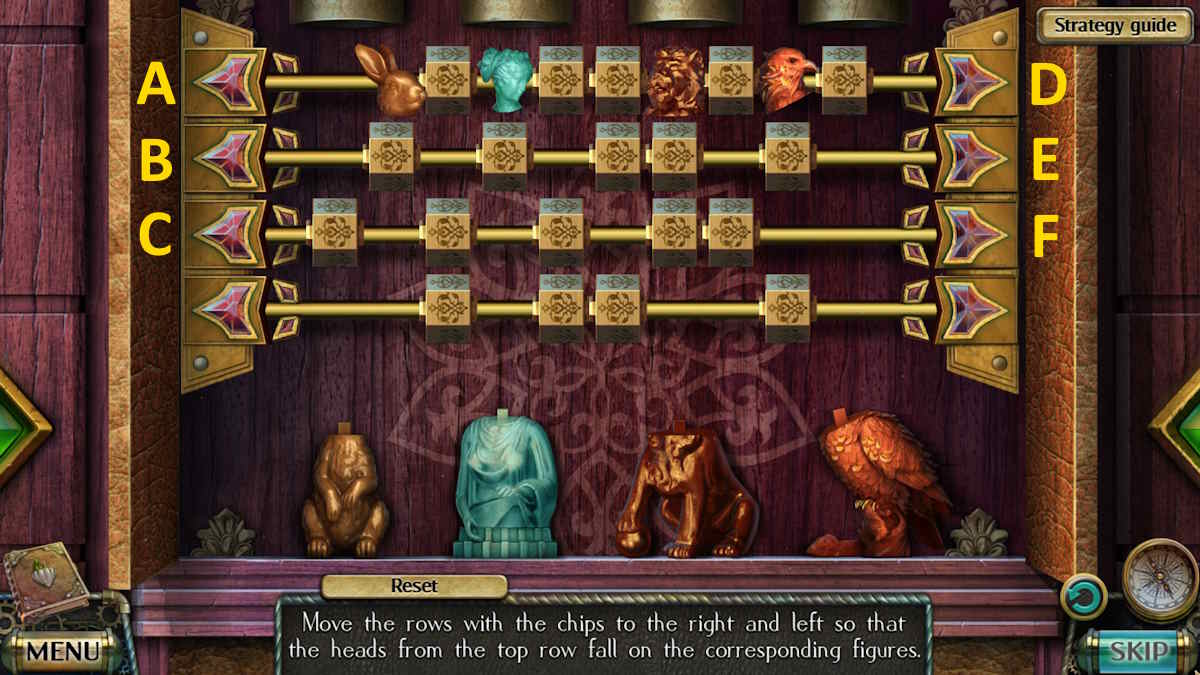
- A, F, D, E, F, C twice, F, B twice
Once done, you can collect two Fangs from the compartment behind the puzzle. Head to the pristine coast.

You’ll find the Collectible on the grass (h1), while the Morphing Object is by the tree stump (h2). Take the Fang in the anchor close-up (h3) before continuing down the path (h4) to the poisonous river.
Take the Collectible from the rotting branches (i1) and the Morphing Object from the bank on the right (i2). Use the saw to cut the tree root (i3), causing the tree to fall across the river. Now, you can click the skeleton (i4) on the far side and take the Skeleton Paw.
Use the claw in the crevice (i5) to dig out a Honey Spoon, and then continue forward (i6) to the entrance to the mine.
Entering the mine

After taking the Collectible from the grass (j1) and the Morphing Object on the path (j2), take the Garden Shovel (j3) and four Multicolored Chips from the path. They’re all in the same close-up but you have to root around a bit to find them. Also, take the Clippers by the mine entrance (j4), the Slingshot on the tree (j5), and then head back to the coast.
Use the saw to cut the tree roots (h5) and then the shovel to dig under the tree. Open the sack there to find a Swimming Mask. Now use the slingshot to knock down the bird’s nest (h6) to get a Brush, and the brush on the statue’s arm on the beach (h3) to raise a rock from the sea. Try to pick up the figurine on the rock (h7), but you’ll knock it into the water.
Put on your swimming mask and click the water in the close-up to start a missing object mini-game. This one is timed, but everything you need is there in the image, and you can reset the timer by restarting it (there are no tricky parts to it). Once done, you’ll find the Owl Figurine.
Use the clippers on the rock (h7) to take the Chain and then attach it to the anchor (h3), taking an Anchor With Chain. Now move back to the mine entrance and use the anchor to move part of the tree (j5), taking the final Multicolored Chip. Also, use the spoon to get a Spoon With Honey.
Select the control box next (j6) and add the figurine. When the box opens, add the chips to begin a movement puzzle. If you’re stuck on this one, here’s a solution (make sure to reset the puzzle first). Click the color and then the button on the right the set number of times.
- Purple x2
- Green x7
- Yellow x4
- Purple x7
- Orange x8
This pops open the door (j4), so you can now enter the mine.
Finding the mirrarrium
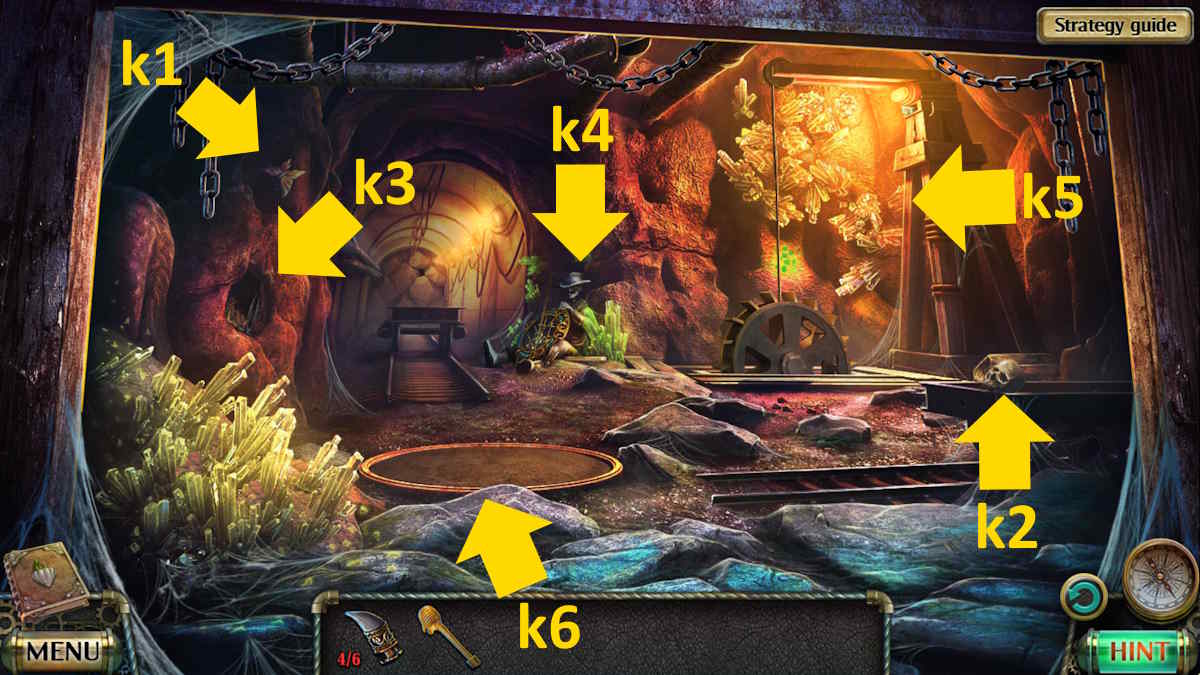
You can find the Collectible on the wall (k1) and the final Morphing Object on the cart (k2) Use the honey to attract the bugs (k3) so that you can take the Dental Forceps and your fifth Fang.
Return to the poisonous river and use the forceps on the skeleton (i4) to retrieve the final Fang and then head back into the mine. Select the shield (k4) and add the fangs to start a blocking mini-game. You need to remove the arrows in the exact right order by clicking the corresponding fangs, which I’ve marked in the image below. Once complete, you can take the Spear.

Select the pulley system (k5) next and use the small green stones in the close-up to knock the red button down a little bit. You can now use the spear to press the button, which opens up the hole (k6). Click the ladder in the hole to drop the ladder down, then click the hole once more to start a hidden objects mini-game. Once complete, you can take some Mirrarrium.
Enjoy the cut scene, after which you’ll get the Special Sword from Albert. Move back to the spiral staircase in the temple and add the Mirrarrium to the pot (a3). Congratulations! You’ve completed the main game.