
Whether for personal use or to promote yourself online, GFXs in Roblox can be a really eye-catching and fun form of imagery for audiences. Though creating one is a bit time-consuming and may seem intimidating, it's actually not too bad if you can allow yourself to work through a few trials and errors to secure your footing. In this guide, we'll walk through the basic steps you'll need to take to create a beginner's GFX in Roblox.
Necessary Softwares and Websites
Before we get started, it's important to make sure that you have all of the software listed below downloaded onto your computer and websites at the ready to have a smooth work process.
Exporting Your Character
The first step in this process is to export your Roblox avatar from Roblox itself. To do this, follow the steps below:
- Open Roblox Studio and open a Baseplate map.
- Once it fully loads, click the Play button in the Test section of the menu at the top of the screen.
- This will drop your character into the game that Roblox thinks you are building.
- Don't worry, the game part is completely irrelevant; it's just an easy way to export your character!
- From here, look on the right side of the screen for the Explorer menu.
- Inside of this menu, you should see the submenu titled Workspace next to a small earth icon.
- Click on this submenu to expand its options, and from the drop-downs, you should see your avatar's name.
- Right-click on this name and click Cut; this should remove your avatar's name from the submenu.
- Head back up to the main menu at the top of the screen and click Stop to stop the game's test
- Once the game has stopped running, right-click and select Paste anywhere on the game's map to re-add your character into the game, or press command V or control V.
- Now all you have to do is repeat steps four through seven, except instead of right-clicking and selecting Cut, and you'll want to click Export Selection.
- From here, your Finder or File Explorer should open and allow you to save your new character export.
- Save the file wherever it is easily accessible to you.
Working in Blender (Importing)
- Open Blender.
- Right-click on the cube that appears in the middle of the workspace and press Delete .
- Find the menu at the top of the screen and click File, then Import, then Wavefront (.obj).
- This will open your Finder or File Explorer inside of Blender.
- Locate the file that you just exported from Roblox Studios.
- It should be a (.obj) file!
- Before importing, look for the Geometry submenu on the right.
- Click on the submenu to expand it, and from the drop-downs, select the box next to Split By Group to checkmark it.
- Click Import OBJ.
Blender Controls
Before we continue, here are a few basic controls that will help you navigate Blender:
- Click in the scroll wheel and hold while moving the mouse to adjust the camera around your character
- Press (Shift+Scroll Wheel) while moving the mouse to move the window fully
- Scroll up and down on the mouse to zoom in and out
Related: Roblox to release site-wide age verification system in the near future
Working in Blender Cont. (Movement)
Now that your character has been imported and you've familiarized yourself with how to move around the program, it's time to move forward:
- Your newly imported character will look like a shadow of themself at the moment, but that's ok!
- In the top right corner of the creation plane window, you should see a three-colored cross-looking icon, just above that icon will be four circles that all say Viewport Shading when you hover over them.
- Click on the third circle, the one directly above the blue Z in the colorful cross.
- Your character should now have its color back and appear as normal.
- The next step is to begin moving your character around.
- To start, click and drag your mouse across your character so that all of it is selected.
- Find the Object button in the top left of the window.
- Look for Set Origin from the drop-down menu and hover over it until the next submenu appears.
- Click on Origin to Center of Mass (Volume).
- Now when you click on an individual body part and click on the Transform icon on the left side of the window, the tool's origin will be centered on the body part that you've selected.
- This will make it easier to tell which parts you are adjusting!
- To adjust a body part, click on it, and then use the origin tool to change its size, placement, rotation, and more.
- To practice alongside this guide, try to rotate both of your character's arms so that they reach above their head.
- To rotate an entire arm rather than just a section of the arm, click on the part that you want to rotate, press Shift, and then click on the other parts you want to include.
- Once you select the hand, forearm, and upper arm of your character, you will be able to fully manipulate the entire arm.
Working in Blender Cont. (Lighting)
These next steps are optional and all based on personal preference but will show you how to adjust the lighting within Blender and create the best look for your Roblox render
- Go back to the four circles in the top right of the creation plane window where we selected the third circle earlier.
- Now, you're going to want to select the fourth circle.
- This viewport will show you what your Roblox character will look like once it's rendered.
- Once the fourth circle is selected, navigate to the menu on the very right of the screen beyond the creation window.
- At the top of the menu, you should see the words Scene Collection.
- Scroll to the bottom of the menu and look for the Light option.
- Click the eyeball icon next to it to turn the light off.
- You should notice your avatar become much more shadowy.
- Locate and click the Shading section of the main menu at the top of the screen.
- This will open the full lighting area.
- Click the fourth circle once more to enter the render viewport.
- Look for a submenu at the bottom of the creation window where your character is floating. It is on the left side that should be currently selected as Object.
- Click on this submenu, and from the drop-down options, select World.
- You may not see a difference yet, and that's perfectly normal.
- All you have to do is move your mouse to the grid section below the creation window, click in the scroll wheel, and move your mouse down until you see two colorful menus with lines connecting them come into view.
- These menus should be titled Background and World Output.
- Next to the submenu that you just adjusted, look for and click the button that says Add.
- Hover your mouse to Texture, and then click Environment Texture.
- A new menu will be populated in the grid section below; click anywhere in the grid to place it.
- Click Open from inside the new Environmental Texture menu.
- Access your Blender program files and select the datafiles folder.
- From inside the folder, select Studio Lights, then World, then the forrest.exr file.
- This will add a pre-made lighting rig to your character.
- To bring the newly opened lighting to the front, click the dot next to Color on the Environmental Texture menu and then click the dot next to Surface on the World Output menu.
- A line should have been created that now links the two menus.
- Now that this lighting has been added to the render viewport, click the Layout section of the main menu to return to our original creation pane window.
- You'll notice that the forrest background has followed your character back to Layout. To hide this background locate and select the Render Properties option from the menu on the ride right of the screen.
- The icon for this option will look like the back of a camera and is between a tool icon and printer icon.
- From this submenu, locate the Film drop-down and check the box next to Transparent.
- This should hide the forrest background from our view.
- The last step is to turn back on the Light setting that we turned off in steps 3 through 5.
- Read through those steps again for a refresh!
- If you'd like to make any adjustments to the placement of the Light, you can drag and rotate it the same way that we moved the character's body parts in the section above.
Exporting From Blender
Finally, we can view and export our finished creation from Blender! The steps below will detail how to position your character for the final view and how to save it.
- Before we can save and export our Robloxian, we need to position the camera so that Blender knows what we want to capture as an image.
- On the right side of the screen, underneath the colorful cross, locate the option that says Toggle the camera view.
- The icon will be an old fashioned camera.
- A dotted square should now appear on your screen.
- Extend the camera view menu by locating the small arrow tab next to the Z in the colorful cross, clicking it, and dragging it to the left.
- Click the View tab that sits along the side of the extended menu and checkmark the box next to Lock Camera to View.
- This will allow you to use the controls we mentioned before to position your character inside the camera view square however you'd like.
- Adjust the square to your liking.
- Return to the main menu at the top of the screen and click the Render tab, then select Render Image from the drop-downs.
- A pop-up window should appear that shows a preview of your image.
- Click Image from the pop-up's menu and then select Save As.
- Name the new image whatever you'd like and save it in an easily accessible location on your computer.
- If you'd like to save the actual Blender file, close the image render pop-up, locate and click the File tab from the main menu at the top of the screen, select Save As from the submenu, and save the file wherever you'd like.
Creating a GFX in Canva
Now that our Roblox character is exported as an image in the position we want, we can create our actual graphic in Canva.
- Access the Canva website.
- Sign up or login into your existing account.
- Click the purple Create a design button in the top left corner.
- To practice along with this guide, click the custom size button at the bottom of the drop-down menu and input the dimensions 900 x 500.
- Click Create new design.
- This will take you to Canva's main design page.
- From this point forward, the creativity is completing up to you!
- If you're looking for a background to get you started, click the Elements option from the menu on the left side of the screen.
- Click Backgrounds at the top of the new menu.
- Scroll through the available options and select the background that you want.
- Some images will be free, while others are only available with the paid version of Canva.
- Drag and adjust the background you selected so that it fits the entire white canvas.
- Click the Uploads option below the Elements option from the menu on the left.
- Select the purple Upload media button from the top of the Uploads menu and locate the image of your Roblox character that you just saved from Blender.
- Select Open.
- Click on the image from the gallery below to insert it on top of your background.
- Adjust the image to fit however you'd like.
- If you want to add more designs to your graphic, return to the Elements option and select Graphics instead of Backgrounds.
- After you've added your desired graphics, click on the Text option below Uploads from the menu on the left.
- Here you can add a heading and subheading with the font of your choice.
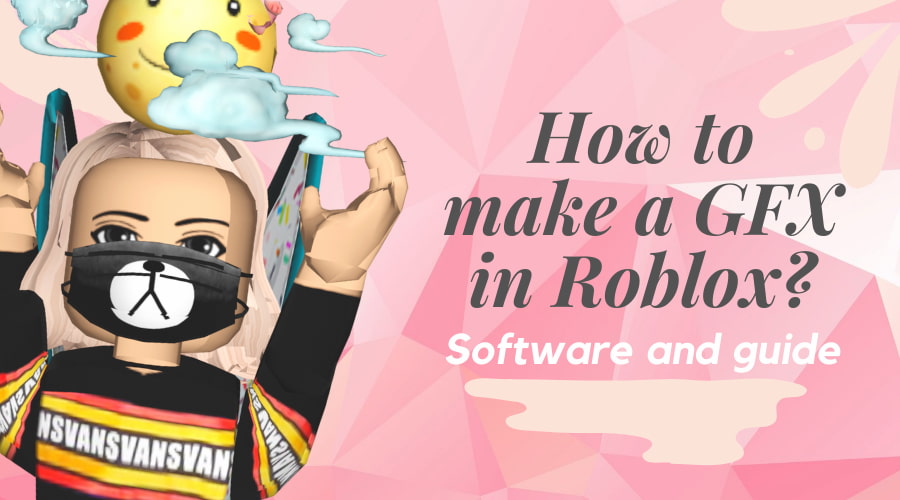
- For the practice of this guide, create a heading that says How to make a GFX in Roblox and a subheading that says Software and guide.
- Adjust the text to your liking and make any finishing touches on the overall image.
- Once you're finished, locate the grey Download button in the upper right-hand corner.
- If you'd like, you can change the file type from the default (.png) and adjust the size of the image.
- Press the purple Download button.
- Your finished GFX will be saved!
Related: Roblox Promo Codes List (September 2021) – Free Clothes & Items!
Finished product
Now that you've completed all of the steps above, you should have a finished product that looks similar to the one below! There are many ways to create a GFX in Roblox. We recommend checking out these helpful YouTube videos from Mxddsie and Rhett / Mankind for even more in-depth visual guides! This isn't the only way, or necessarily even the best way, but it's a good place to start for those who have never attempted something like this before.
For more Roblox guides and content from Pro Game Guides be sure to check back with the Roblox section of our website often!