
For the Seabound Soul Tall Tale, you have the option of pursuing two of the commendations in the Pirate Log that require you to find all the Hidden Journals and Ashen Artifacts. These Commendations are not required to complete the story, but the objects provide some additional insight into the Tall Tales. They can usually be found on the way as you complete the adventure, so why not find them?
Sea of Thieves | The Seabound Soul Tall Tale | Hidden Journal and Ashen Artifact Locations
Before we begin: If you were actually looking for guidance through another part of the main questline, you can find the links to those sections below!
- Sea of Thieves | The Seabound Soul Tall Tale | How to Find the Skull of Martha Jane
- Sea of Thieves | The Seabound Soul Tall Tale | How to Find the Skull of Randal Stone
- Sea of Thieves | The Seabound Soul Tall Tale | How to Find the Ancient Skull
We also have a few other important things to note about finding these objects. The first and most important thing to mention is that you can only obtain while the Seabound Soul Tall Tale is active. If you find them while it's not active, it will not count towards the Commendation awarded for finding them. Secondly, you do not need to find these in order. Although the only way to find the Journals without a guide is by using clues from the previous book, you can plan a faster route to collect them if you use this guide instead.
Related: How to Get Pirate Legend in Sea of Thieves - Pro Game Guides
There is a straightforward way to understand this guide. Below, you'll find that we've provided the islands on which you'll find these objects. You'll also find images that lead you to their general location and the landmarks you'll find them near. The list directly below is the entire list of islands where they're located.
- Hidden Journals
- Liar's Backbone
- Flintlock Peninsula
- Scorched Pass
- Shipwreck Bay
- Shiver Retreat
- Ashen Artifacts
- Cinder Islet
- Cursewater Shores
- Tri-Rock Isle
Journal Locations
Journal #1 - Mourning: Shipwreck Bay
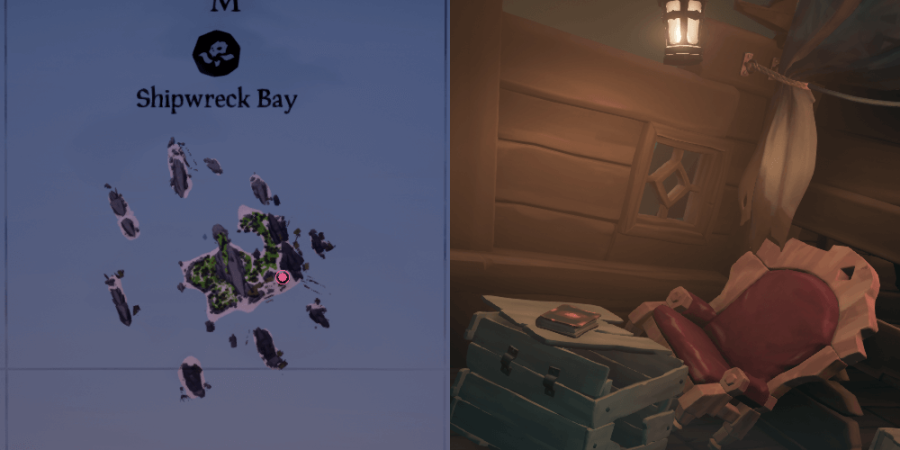
The first Journal is located in the same room as Sir Arther Pendragon's portrait! When you start the quest, you can turn around, and you'll find it sitting there on the desk on the other side of the room. This is possibly the easiest Journal to obtain in the whole game. When you read it, you'll see your next location: Shiver Retreat.
Journal #2 - Digging: Shiver Retreat
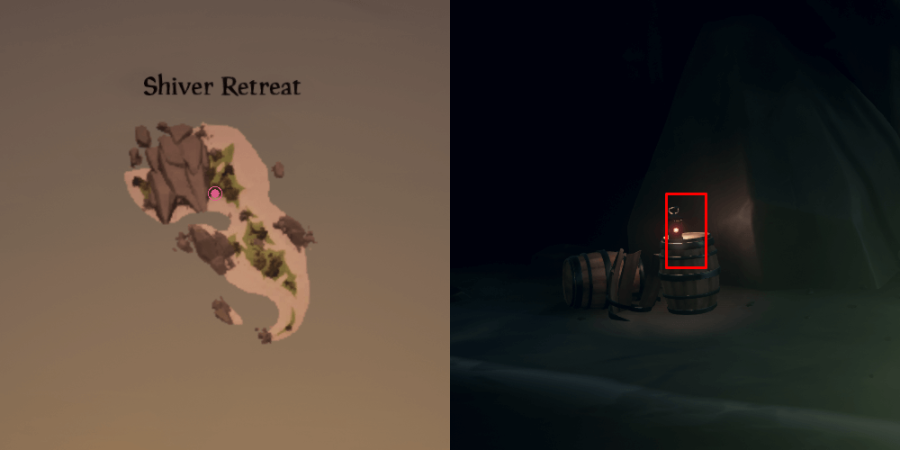
Shiver Retreat is a tiny island and doesn't require much searching to find the second Journal. You'll find a small bay (if you can call it that) in the middle of the island. Just north of that, at the base of a large rock formation, is a barrel with the Journal on top. Read this Journal for the third Journal's location: Liar's Backbone.
Journal #3 - Fighting: Liar's Backbone
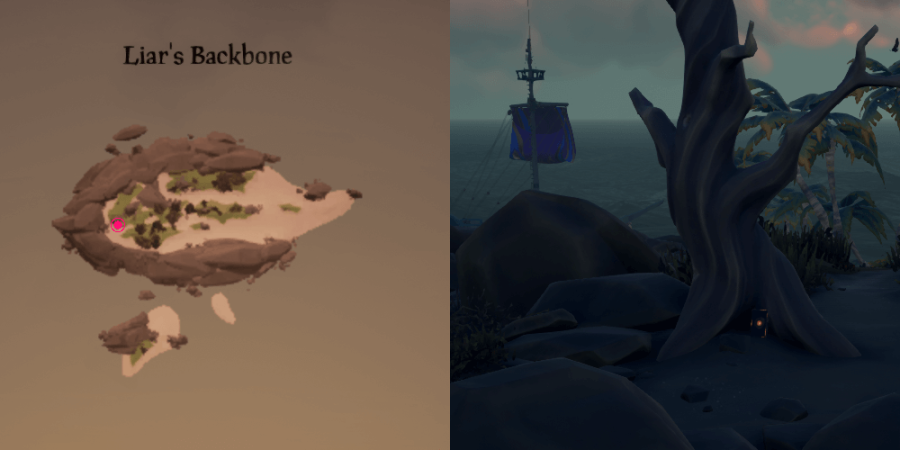
Liar's Backbone is another small island that doesn't require much searching. If you approach the island on the eastern beach, you'll find a ramp on the south side that goes to the cliff on the western half of the island. On this cliff is an old, decrepit tree. The Journal is at the base of that tree. Once you read this one, you'll know where you're headed next: Scorched Pass!
Journal #4 - Revenging: Scorched Pass
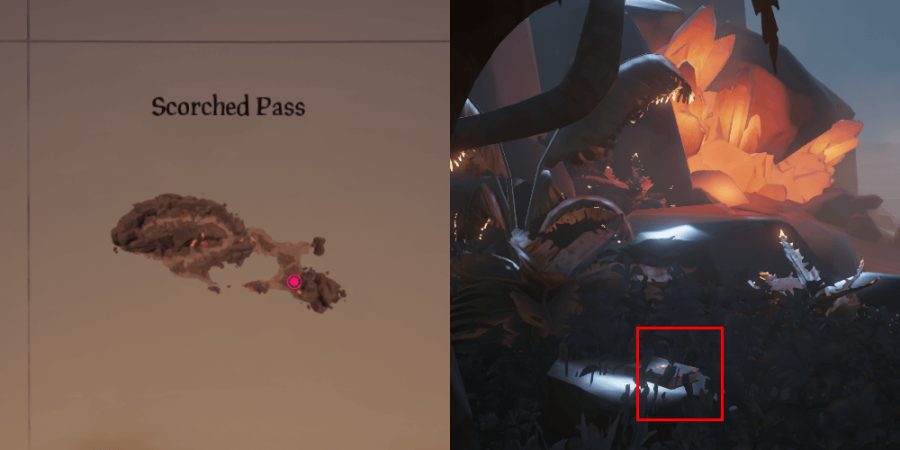
Another small island! Scorched Pass is far more treacherous than the other Journal islands. Watch your step when you are here, as there are geyser blasts of water everywhere. You'll find the Journal on the eastern side, near the base of a rock formation with orange crystals. This Journal is a bit more difficult to spot than the others. Use the image above to locate it more easily. Once you've found it, you'll have the location of the final Journal: Flintlock Peninsula.
Journal #5 - Departing: Flintlock Peninsula
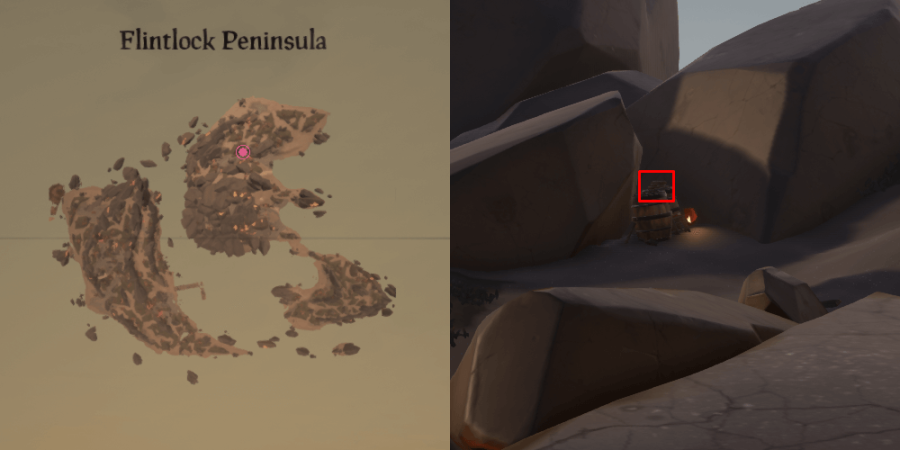
All good things must come to an end, and Flintlock Peninsula is now the first large island you'll need to explore. You'll find it in no time, though (with these instructions). On the northern edge of the island, you'll see the beacon on the tip of a rock formation. Approach this beacon and look South. You will see two barrels stacked up against a large rock. Go to these barrels, and you'll find the final Journal.
Related: How to Get Curses in Sea of Thieves - Pro Game Guides
Ashen Artifact Locations
If you paid attention to the second Journal, you'd notice it mentions the locations of the three Ashen Artifacts. These artifacts are all on small islands, and they're easier to find than the Journals since you use the Enchanted Lantern to light their location. When you find the right spot, the Lantern will illuminate the spirit of a skeleton burying the Artifact. Dig where these skeletons are to uncover the Artifacts.
Cinder Islet
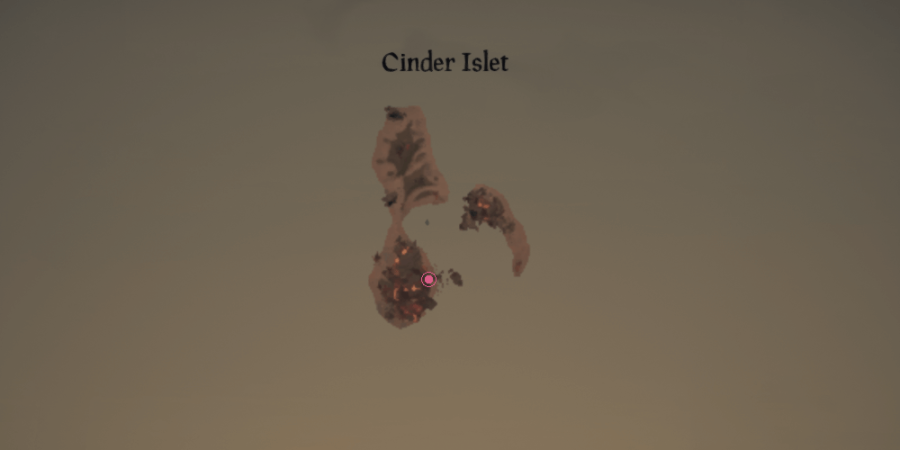
Since Cinder Islet is so small, it's difficult to explain exactly where the spirit skeleton will be found. If you walk along the outer edge of the island and keep your Lantern lit, you should easily find it. Look off the beach toward the inner part of the island, near some large rocks.
Cursewater Shores
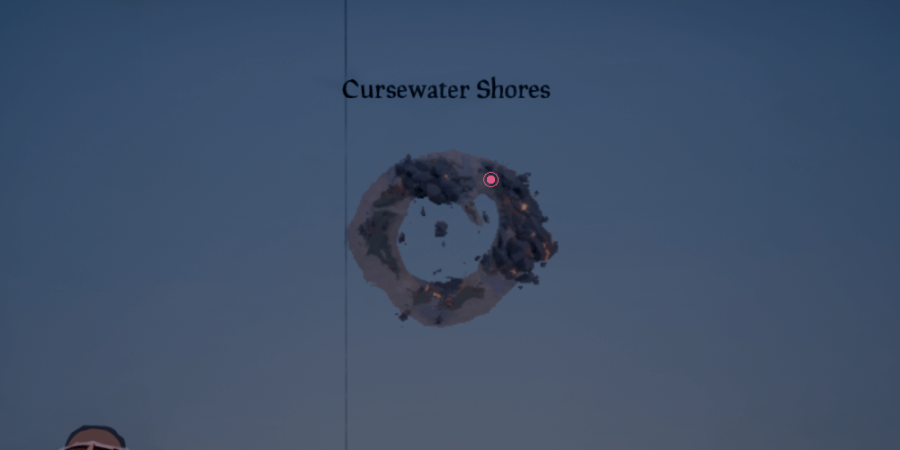
Watch your step on this island! This is one of these locations with a lot of bursting geysers. We recommend approaching this island from the Northwest side. You will find a large rock here. The spirit skeleton is on the other side of this rock, closer to the inner Northwest corner.
Tri-rock Isle

You will find a patch of sand between the two grassy areas in the center of the island. You should find the spirit skeleton burying the Artifact right in this bare patch of sand.
What's Next
When you have found all the Journals, you'll unlock the Commendation! The Ashen Artifacts also unlock their own Commendation. These are two of the seven Commendations you must achieve to truly complete the Seabound Soul Tall Tale and obtain the Legendary Commendation. There are several Commendations awarded along the way as you complete the main part of this Tall Tale for the first time. Besides those (and the one you just achieved), there is only one other Commendation you need to achieve, and it requires you to complete Seabound Soul three times. The adventure may be different every time, so feel free to use the guide again!
Did you find some Villainous Bounty Skulls on the way? Check out our guide on Where to Sell Them!