In the
previous section of this guide, we covered how to start the tall tale, find and solve Stitcher Jim's Hideout, and how to find Flameheart's Lair. In this section of the guide, we will explain the three different paths you can take room by room. We will tell you what traps to expect, as well as some helpful tips to make it through the entire Lair in one piece.
Sea of Thieves | Heart of Fire Tall Tale | Flameheart's Lair Three Paths Guide
Before we begin, this part of the guide helps you get through the three separate paths in Flameheart's Lair. If you still need to start it or are looking for help with Stitcher Jim's Hideout, you can find the link to that guide in the list below. Alternatively, if you are looking for help with the Chest of Rage or the Hidden Journal locations, you can also find those linked in the list below.
- Sea of Thieves | Heart of Fire Tall Tale | How to Find Stitcher Jim's Hideout and Flameheart's Lair
- Sea of Thieves | Heart of Fire Tall Tale | How to Escape With the Chest of Rage
- Sea of Thieves | Heart of Fire Tall Tale | Hidden Journal Locations
HIDDEN JOURNAL LOCATIONS: When you start this adventure, you might notice in your Pirate Log that one of the Commendations associated with it is for finding all the Hidden Journals. You must have the Heart of Fire Tall Tale active to find these Journals! This Tall Tale requires you to complete it three times to find all the Journals, so we strongly recommend starting on your first run-through!
The Main Room
If you followed along with the previous guide, you should be in Flameheart's Lair's main room, which has three doors marked with the symbols for King, Flame, and Heart. You must go through one of these paths to continue the Tall Tale, but you only need to finish that one rather than all three. Since getting through this part of the adventure ultimately depends on your fighting and jumping skills, we will simply provide the outline for each path. The list has the names for each path, all associated with the symbols/words marked.
- The Path of The Eternal King
- The Path of the Forsaken Flame
- The Path of the Burning Heart
To start one of the paths, you'll first have to open the door for it! Above each door, you will see monster skulls with twigs inside their open mouths. Inside the room, you'll also find several barrels packed with firebombs. Grab some! You'll need them.
Select which path you'd like to take, and throw one of the firebombs at the skull for that door. It will like the twigs in the mouth on fire, and the door will open! Each section below will provide the rooms in the order in which you must go through them.
The Path of the Eternal King
- Wall Flames: Flames will spout from both walls down the entire corridor. Take the traps one at a time, as you'll likely not make it through in one run. At the end, use the pulley to open the door.
- Skeleton Battle #1: You must fight through waves of skeletons to clear the room. Throw a firebomb at the monster skull to ignite the trap and cause spikes to come out of the ground to clear them quickly. Use the pulley to open the door.
- Floor Flames: Flames erupt from the floor in succession. You can walk through this room easily! Wait for the first flame trap to stop, then immediately begin walking toward the end of the hall. The flame traps in front of you will stop before you reach them, and the flame traps behind you won't hit you as long as you keep moving.
- Capstan Flames: Flames spout out of a rotating capstan. Wait for an opportune time, then walk around the capstan in between the flames.
- Hardcore Parkour: You need to skip across the stones in the pool of lava. Touching the lava means instant death! JOURNAL LOCATION: One of the journals is on the left side of the corridor. You can only access this Journal when you take this path, so we recommend getting it now! Check our Journal guide for help.
- Water Spikes: Swim through the tunnel, being careful to stop before the spike traps that jut out from the floor. Take each trap one at a time. Wait for the spikes to recede completely before going through the trap.
- Skeleton Battle #2: Another skeleton battle. The capstan in the middle of the room can be used as a trap to set the skeletons alight. To activate it, throw a firebomb at the monster skull hanging above.
- Swinging Spikes: Approach this area very carefully and be sure to time your actions correctly. You will have to jump over flames shooting out of the walls while also avoiding the swinging log spikes behind them!
- Side Jumps: These flames are attached to mechanisms that move them forward and backward. You must walk along each side of the wall and jump to the other side between these flame mechanisms.
- Timed Parkour: Use the pulley to make the rocks in the middle of the room rise. Hop across them quickly before they disappear into the lava below.
This will lead to the stone door at the end of this path and into the chamber. Scroll down to the bottom of the guide to see what to do next.
The Path of the Forsaken Flame
- Swinging Flames: Flames swing in jets above you. Wait for them to go to one side and shimmy along the opposite wall.
- Lava and Bombs: There will be a door that blocks your path. To make it rise, you must skip across the stones in the lava pool and throw a firebomb at the monster skull. When you set it ablaze, avoid the swinging spike that will now block your path back! Lift the pulley in front of you to open the next door.
- Skeleton Battle: You must battle waves of skeletons and clear the room. You can throw a firebomb at the monster skull to trigger a swinging log trap to kill several of them at once. JOURNAL LOCATION: You will find one of the Journals in the next corridor. You can only access this Journal when you take this path, so we recommend getting it now! Check our Journal guide for help.
- Fire Wheels: Boat-steering wheels are spinning on the walls with fire spitting out of them. Each wheel has a few notches that don't spit fire. Move through them, and take each wheel one at a time.
- Timed Spikes: Platforms are placed on each side of the corridor, and spikes will jut out of the ground in cycles. Jump between platforms when the spikes between them are completely receded.
- Spiked Ceiling: Use the pulley to lower the mast, then quickly run across it to jump over the gate. If you take too long, the mast could lift you into the spikes above. Avoid the geysers in the room to not be shot into the spikes.
- Cage Pulleys: Use the pulleys to move the caged skeletons near the skulls to light them. One of the caged skeletons must first be light by your lantern before using the pulley to move it.
- Tricky Capstan: In the center of the room, wait for the flames coming out of the walls to stop and immediately begin turning the capstan. Time it right so you can continue turning the capstan when the flames aren't blocking you. When the capstan is up, go through the door it raised to pull the lever it was blocking.
This will lead to the stone door at the end of this path and into the chamber. Scroll down to the bottom of the guide to see what to do next.
The Path of the Burning Heart
- Spinning Blades: Blades will spin beneath you between platforms. You will need to throw firebombs at two skulls to raise the door, one before the blades and one after. Wait for them to go through, then immediately jump to the next platform.
- Wheel Flames: Ship wheels will be spinning above you. Right as a row of flames goes to the middle of the corridor, run along the side to quickly avoid the next row of flames.
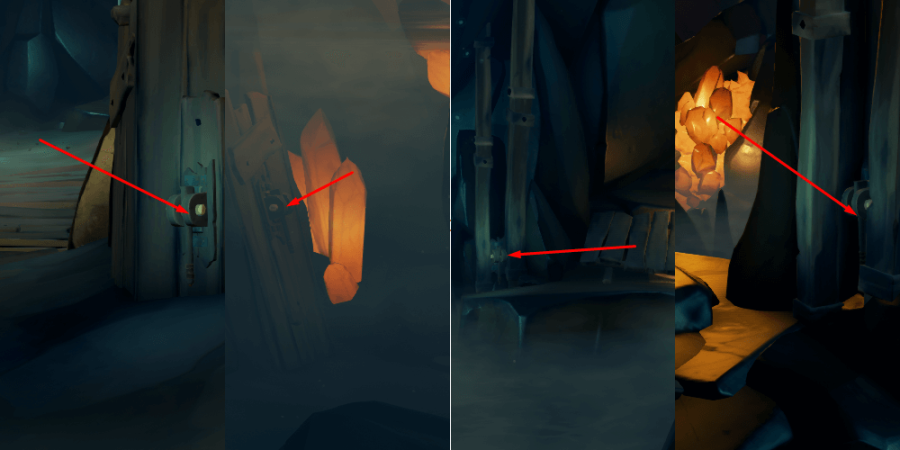
- Four Levers: Blades block your path to the next room and must be disengaged by four different levers. Look for the levers throughout the room. Use the image at the start of this section to help locate them.
- Flames and Spikes: Flames will shoot out of wheels above you again, but this time there is a row of spikes on the floor between them. Correctly time your run through to dodge the flames and jump over the spikes.
- Swinging Axe: An ax is swinging over lava. Wait for the ax to cycle through, and quickly dash and jump across the gap.
- Skeleton Battle: You must battle waves of skeletons and clear the room. You can throw a firebomb at the monster skull to trigger a fire trap and kill several of them at once.
- Fire Traps: Plan a path to run through the room before you use the pulley. Interact with the pulley to lift the door, then quickly make it across the room to make it through the door while avoiding the fire traps. The ramp on the right side of the room will give you a clear jump over the lava.
- Wall Spikes: Spikes will jut out of the wall all the way down this long corridor. Wait for the spikes to recede completely, then quickly dash to the safe section between either end of the corridor. Repeat until you reach the end. JOURNAL LOCATION: You will find one of the Journals in the second safe section of this corridor. You can only access this Journal when you take this path, so we recommend getting it now! Check our Journal guide for help.
This will lead to the stone door at the end of this path and into the chamber. Scroll down to the bottom of the guide to see what to do next.
What's Next
Now that you have completed the path you took, you will see more of the story for this Tall Tale. This will all be covered in the next guide section: How to Escape with the Chest of Rage!
Looking for the beacons on the islands? Use our guide for All Beacon Locations!