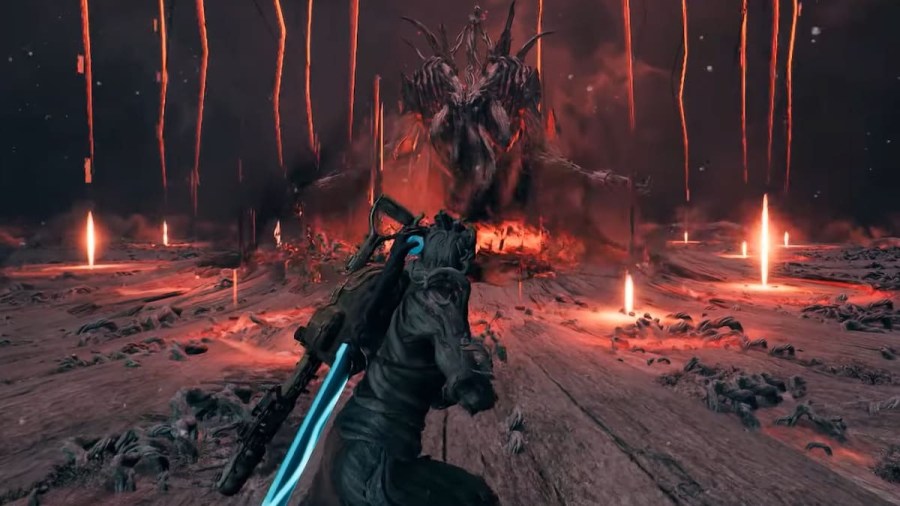
Annihilation is, by far, Remnant 2's most difficult and most unique boss encounter in the game. With that uniqueness comes a night-long struggle of trial and error, because this beast is quite the monster to deal with. Unlike other bosses throughout the game, Annihilation has more than just two phases. In fact, he takes the very concept of a boss phase and turns it on its head. If you're struggling to beat him, I don't blame you. Having bested this monstrosity on the hardest difficulty, I can give you everything you need to crush him. Here's how to defeat Annihilation on Nightmare difficulty.
How to kill Annihilation in Remnant 2
Despite the difficulty of the encounter, it isn't technically complex when it comes to mechanics. Most of the fight involves moving, rolling, and shooting like the rest of the bosses in Remnant 2. However, what makes Annihilation so difficult is the sheer volume of minor complexities the fight forces you to deal with at a moment's notice. The simplest way to contextualize this is to break down each phase.
Related: How to change Archetypes & use multiple Archetypes in Remnant 2
Annihilation - Phase One
Phase One begins the moment the fight starts. Annihilation flies down from the smoky sky and engages you by slashing down at you with his massive sword. This will happen every time the fight starts, so be sure to avoid it each time. From here on, there are a number of abilities you need to watch out for:
- Malware Wave - Annihilation will slam the ground with his massive claw, launching an area-wide shockwave that is likely to one-shot you. Dodge roll through it to avoid it.
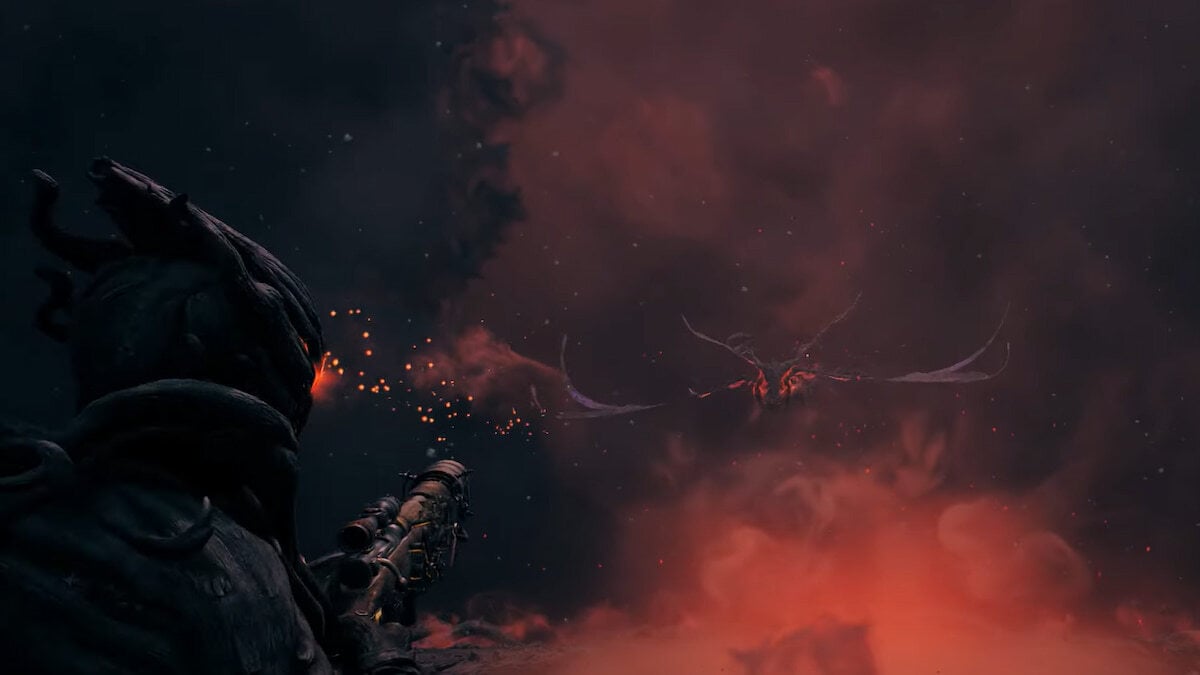
- Malware Orbs - Occasionally, Annihilation will spawn several red orbs in the sky. They need to be destroyed ASAP, or they will hone in on you after some time. It is nearly impossible to avoid them all due to the limitations of your dodge roll, which is why this is important. They appear like literal glitches moving around their general spawn location. Adjust your aim and shoot them out of the sky. He will not attack you until the orbs are launched or until they are all destroyed.
- Drag Swing - Annihilation will slam his sword into the arena and drag it toward you. After it gets close enough to you, he will swing the blade upward, returning to the sky. Time your dodge roll, and roll out of the way before it hits you. There is a pinging sound that works as an audible tell to inform you of when he will swing. He typically follows this move up with Malware Wave, so be ready.
- Malware Slam - Annihilation will fly high into the sky above you, then slam the ground near you with his sword. He often does this several times in a row. Time your dodge roll, and roll forward through each attack until he stops.
- Malware Lightning - Annihilation will drop red circles on the ground all over the arena. These don't deal any damage to you, but a bolt of red lightning will strike that area at some point in the near future. This seems to be totally random, so just avoid standing in circles as much as you can.
These are all the abilities Annihilation will use in Phase One. Keep shooting him until his health reaches zero, and then a cutscene will play which begins Phase Two.
Related: Should you pay tribute to the Red Prince in Remnant 2?

Annihilation - Phase Two
Phase Two is where the real fight begins. That's right: Phase One was the tutorial to get you used to dealing with his attacks. In Phase Two, the entire area will shift into what appears to be a retro-style arena. Nine red blocks separate the arena into three clear lanes. Think like a 3x3 grid. Each block also has a set of red vines that fold onto other blocks to impend your movement.
Annihilation will also appear completely different and remain stationary in front of the arena. Effectively, this is like fighting a second boss, because he has a brand new moveset that you need to remember.
- Malware Blocks - From the front of the arena, Annihilation will send a set of red blocks down all three lanes. There are two variants of this:
- Verticle - Blocks are stacked on top of each other and sent down the lanes. Avoid them by stepping out of the way of them.
- Horizontal - Blocks are stacked side-by-side and sent down the lanes. You must crouch to avoid begin struck by these.
- Malware Slash - Annihilation will strike the center, the leftmost side, or the right-most side of the arena. Moments after, he will drag his blade through the arena depending on where his initial strike landed. The exception to this is if he strikes the center, in which, he can decide to drag his blade in either direction. You must pay attention to which direction he is about to choose. Roll through the attack for all versions of it.
- Malware Pixilation - Annihilation will, occasionally, slam the arena dealing moderate damage to all within it. This is an extremely fast attack, but it can be avoided if you time your dodge roll.
- Malware Orb Storm - Annihilation will fill the arena will Malware Orbs. Just as before, these all need to be destroyed ASAP for the same reason. Doing so will stun the boss, allowing for free damage for a few seconds.
Related: Should you stop the hanged man burning in Remnant 2?
Annihilation - Phase Shifting
Beyond these abilities, there's one more core mechanic I want to bring up. Malware Phase is an ability that allows Annihilation to shift between his Phase One and Phase Two forms instantaneously. That is to say, he can shift Phases at will, even while attacking you. At one moment, you could be crouching to avoid the horizontal variant of Malware Block, and within the blink of an eye, be facing down a Phase One Malware Wave.
This shift is seamless, random, and typically without warning. There are no tells for when he is going to do this, so you have to be prepared to dance the way Annihilation wants at any given moment. To make matters worse, if Annihilation decides to switch phases during one of his attacks, the moment he shifts back to the previous phase, that attack will continue as if nothing happened at all. What this means is that you must remember what Annihilation was doing in the previous phase before he shifts, or you'll be killed when he shifts back. The only saving grace is that Annihilation takes about a second to continue his previous phase's attack, giving you a small window to adjust.
It will take some time before you can pull off everything I've stated here. As mentioned, Annhiliation is an incredibly difficult boss to learn. He is fast-paced, requires crazy reflexes, and even tests your short-term memory. However, if you can piece everything together, taking each phase one step at a time, you can squeeze out a victory in the final hour.
For more quality guides and useful information on Remnant 2, check out What to do with the Plain Ribbon in Remnant 2 right here on Pro Game Guides.