In the previous section of this guide, we covered How to Find the Morningstar Chest
. Now that you have found it, donned the uniform inside, and tricked a couple of NPCs in to give you information, you are ready to move on. In this part of the guide, we will cover how to obtain and decipher Graymarrow's Orders to locate Captain Douglas's Skull and the Chalice of Resurrection.
Sea of Thieves | Revenge of the Morningstar Tall Tale | Graymarrow's Orders Skull & Chalice Guide
Before we begin, you need to have obtained the Morningstar Chest to complete this portion of the guide. If you are looking to start the quest or find the Chest, you can find those in the links below. Alternatively, you can also use the appropriate link below to find the Hidden Journals for this Tall Tale.
- Sea of Thieves | Revenge of the Morningstar Tall Tale | How to Find the Morningstar Chest
- Sea of Thieves | Revenge of the Morningstar Tall Tale | Graymarrow's Orders Skull & Chalice Solutions
- Sea of Thieves | Revenge of the Morningstar Tall Tale | How to Find and Defeat Graymarrow
- Sea of Thieves | Revenge of the Morningstar Tall Tale | Hidden Journal Locations
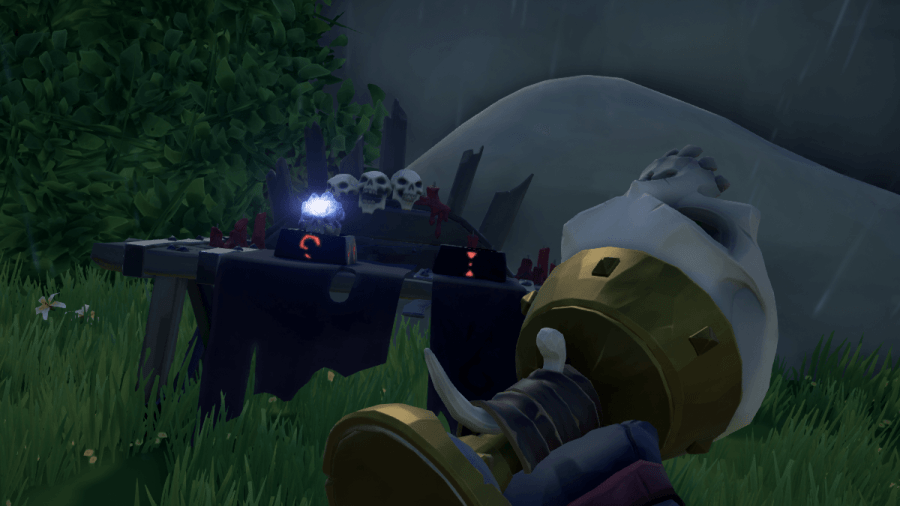
To find Douglas's Skull, you'll be headed to Cannon Cove. To find the Chalice of Resurrection, you will sail to Sunken Grove. Once you're at each island, go ahead and hop off your Ship and begin exploring. You will eventually run into a skeleton crew with a captain, all sitting down and talking. You must defeat these crews on each island to obtain Graymarrow's Orders.
Related: Sea of Thieves | Shroudbreaker Tall Tale | Where to find the Journal Locations - Pro Game Guides
Fighting these battles is easy, and you'll find the Skeleton Captains guarding them are not much tougher than any other Skeleton Captain. You can defeat both crews with just your sword by continuously disorienting them and stopping them from attacking you. The tricky part of this task comes next, once the Skeleton Captains have been defeated and drop Graymarrow's Orders.
We have split this guide into two parts. On this page, we provide you spoiler-free instructions on how to interpret the clues added to the Quest Book. The other page skips all that and gives you the exact dig spots of all the possible riddles, as well as videos to help you find them.
How to Decipher Graymarrow's Orders
Graymarrow has left some very creative instructions to locate Douglas's Skull. He utilizes very simple speak and hieroglyphics to disguise these instructions. When we say simple, we don't mean easy to understand. We mean hard to understand because of how basic it is. You'll need to tap into your caveman intelligence for this riddle.
The Hieroglyphics
The first part in interpreting Graymarrow's Orders is to decipher the Hieroglyphics. To do this, you need to flip back and forth between the Quest Book pages and compare the symbols with the words they mean. It appears that these symbols were written with skeleton handwriting and are, as such, sometimes difficult to distinguish. We recommend writing down each word as you find it since it can be hard to remember.
The Caveman Speak
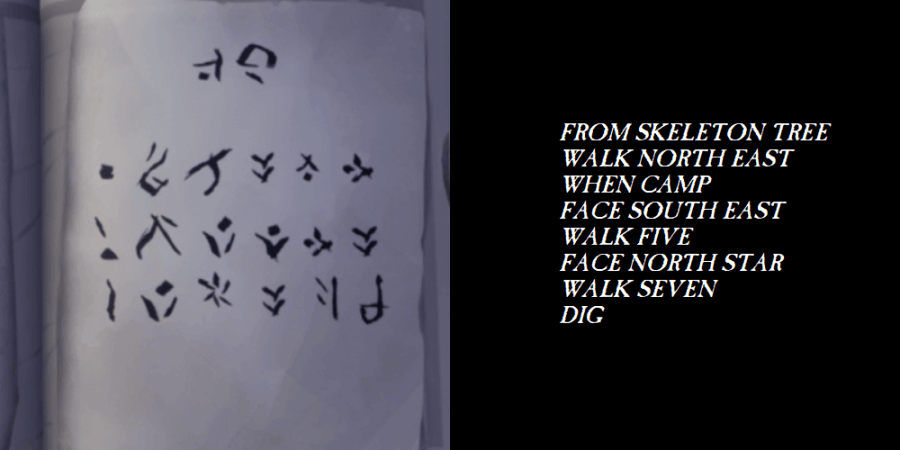
Assuming you've written them down or have memorized the passage, you will then need to determine what exactly it says. The passage will generally have phrases that don't make a lot of sense and seem to have many missing words. In the image above, you will see an example of one of these instructions deciphered.
It doesn't make a lot of sense unless you realize what it's trying to get you to do. Most of these instructions will start with the word From. This is essentially telling you that the location mentioned next will be your starting location on the island. You will need to continue exploring the island where you got these orders to find these starting locations.
Because it's difficult to explain how to understand direct speech like this, we have instead opted to provide you the interpretation of one of them, along with the end result. The list below explains each part of the instructions, step by step.
- From Skeleton Tree: This is telling you the starting point of these instructions. On the island, you will find a tree with a skeleton. In this situation, it will be a skeleton hanging from it. However, in other situations, it might be a painting or something else similar.
- Walk North East: Use your compass if you must, but you need to walk Northeast from the step previous.
- When Camp: This tells you that the next step will take place when you run into a camp as you walk from the previous step.
- Face South East: This means exactly what it says.
- Walk Five: This means you need to walk a number of steps equal to the number it says.
- Face North Star: Some of these mean exactly what they say but can still be tricky. Instead of saying Face Directly North or Face Directly South, the instructions will generally tell you to face a symbolic representation of these directions. This one is telling you to Face Directly North.
- Walk Seven: Walk seven steps.
- Dig: And dig!
As you can see, it's easiest to break the already simple speech into simple sections as well. Suddenly, the words will make a lot more sense! Here are a few hints to keep in mind as you're trying to interpret Graymarrow's Orders.
Related: How to Get Pirate Legend in Sea of Thieves - Pro Game Guides
- Be Precise: In other Tall Tales, you'll find the instructions have a loose interpretation. This does not apply to these instructions. You need to follow them exactly as they say.
- The Orders always start on the island you found them. If you picked them up from a Skeleton Captain on Cannon Cove, the orders will tell you where to dig on Cannon Cove. Same with the Orders on Sunken Grove.
- Think like a child. If you were three years old and wanted to leave someone instructions to find something, how would you do it? Follow these instructions in the same way you'd follow your three-year-old self's instructions.
If You're Stuck
As stated above, we also have a page that goes over the solutions of all the possible options for Graymarrow's Orders on both Cannon Cove and Sunken Grove. If you find that following the instructions are too difficult or don't make sense, you can use that guide to find the Dig Spots based on the instructions you have.
What's Next
Once you have obtained Douglas's Skull and the Chalice of Resurrection, you'll be ready to use them! There are several islands you might be headed to, all of which we'll cover in the next part of the guide: How to Find and Defeat Graymarrow!
Have you picked up a Reaper's Chest on your travels? Use our guide to see where to sell it!