
In the previous sections of this guide, we covered How to Find the Morningstar Chest
and the Guide and Solutions for Graymarrow's Orders. In this section of the guide, we will explain how to find Graymarrow's resting place. We're also going to explain how to use Captain Douglas's Skull and the Chalice of Resurrection to bring Graymarrow back and defeat him!
Sea of Thieves | Revenge of the Morningstar Tall Tale | How to Find and Defeat Graymarrow
If you are following the story, you'll undoubtedly feel a sense of vengeance against Graymarrow for his sudden ambush of Eli, Dinger, and Fontaine in the previous Tall Tale. However, before we begin quenching this thirst for revenge — to complete this section of the guide, you'll need to have obtained the Morningstar Chest, Captain Douglas's Skull, and the Chalice of Resurrection. If you haven't finished those three parts of the Tall Tale, you can find the links to them below. Alternatively, now would be the perfect moment to use our guide for the Hidden Journals, also listed below.
- Sea of Thieves | Revenge of the Morningstar Tall Tale | How to Find the Morningstar Chest
- Sea of Thieves | Revenge of the Morningstar Tall Tale | Graymarrow's Orders Skull & Chalice Guide
- Sea of Thieves | Revenge of the Morningstar Tall Tale | Graymarrow's Orders Skull & Chalice Solutions
- Sea of Thieves | Revenge of the Morningstar Tall Tale | Hidden Journal Locations
Now that you've obtained the Skull and the Chalice, it's time to decipher exactly where Graymarrow's final resting place is located. There are various islands that the game chooses from, so you'll need to learn how exactly to figure out which one it is.
Step One: Locate Graymarrow's Final Resting Place
For this part of the guide, you'll need to refer back to the Quest Book. After finding Graymarrow's Orders on each island, you'll see that, along with his code, a note from him will be added to the book. What you're looking for in these notes is when he mentions a single letter or a number.
Related: How to Get Curses in Sea of Thieves - Pro Game Guides
He will mention the single letter and the number in two separate notes, which means you'll have to obtain both of his Orders to get the whole puzzle. He will generally mention it in a form similar to one of the options in the list below.
- I shall take my rest at [letter] or [number].
- [letter] or [number] shall be my resting spot.
If you have completed the guide's previous section, you should already have both Graymarrow's Orders in your Quest Book. Take a look at his note and determine which letter and number he mentions. When you have them, you will likely realize that these are references to a map block on the Sea of Thieves map. Go to your Ship to determine which island you're headed to, and make sure you're stocked up for a land battle.
If you don't want to use your map, you can determine your destination from the list below. Just match your letter and number with the corresponding option.
- H6: Cannon Cove
- M4/M5: Old Faithful Isle
- Q3: Marauder's Arch
- F12: Wanderer's Refuge
- O11: The Crooked Masts
- R12/R13: Kraken's Fall
Step Two: Resurrect Graymarrow
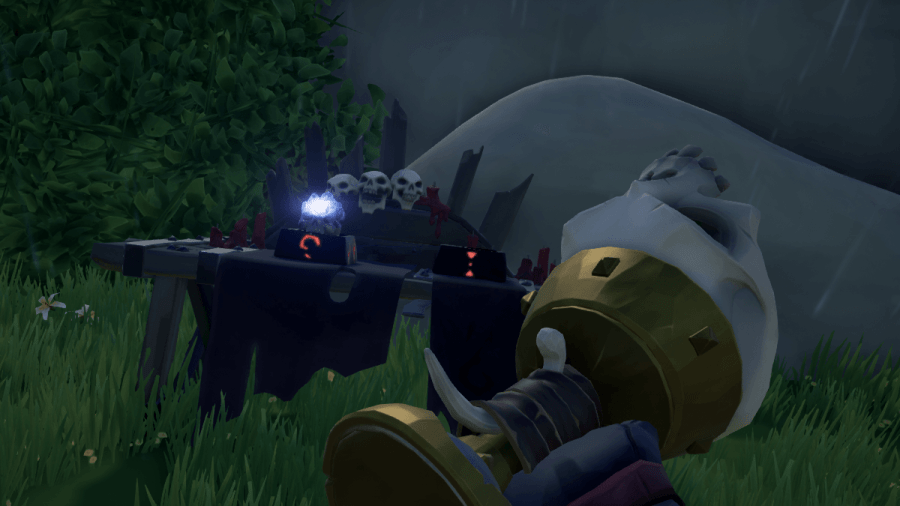
Once you have determined Graymarrow's Final Resting Place and have reached the island, it's time to resurrect him. On the island, you will be looking for the Ritual Altars like the one shown in the image above. Bring the Skull and the Chalice to the Altar and place them on their designated platforms. An in-game cutscene will occur, and Graymarrow will rise! If you are having trouble locating the Ritual Altars, you can use the guide and images below.
Before you resurrect him, we strongly recommend you read Step Three below. It provides helpful tips and suggestions to make the battle quick and easy.
Kraken's Fall Ritual Altar
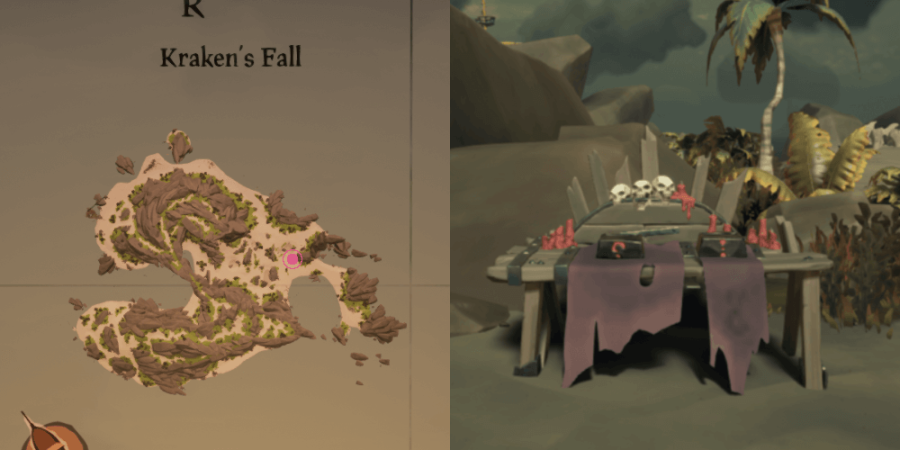
The Altar on Kraken's Fall is on the eastern side, slightly North of the center. You can find it next to a few small landmarks on the beach, at the base of a large rock formation.
Lone Cove Ritual Altar
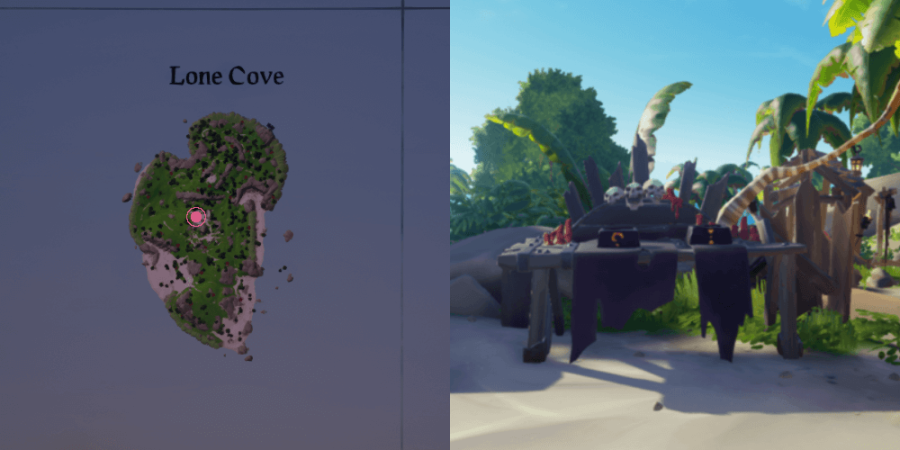
The Altar on Lone Cove is about the dead center of the island. You can find it next to a couple of ragged-looking graves.
Marauder's Arch Ritual Altar
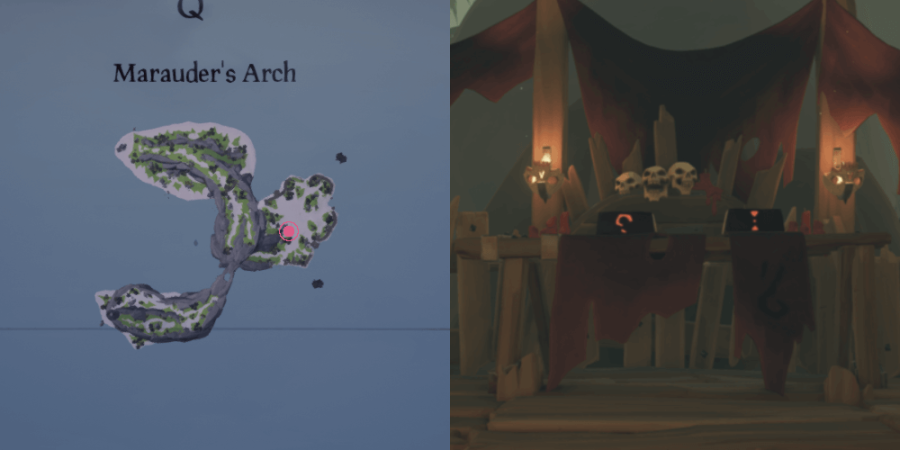
The Altar on Marauder's Arch is on the eastern beach. You will see a wooden structure that looks like a fort. You can find the Altar there.
Old Faithful Isle Ritual Altar
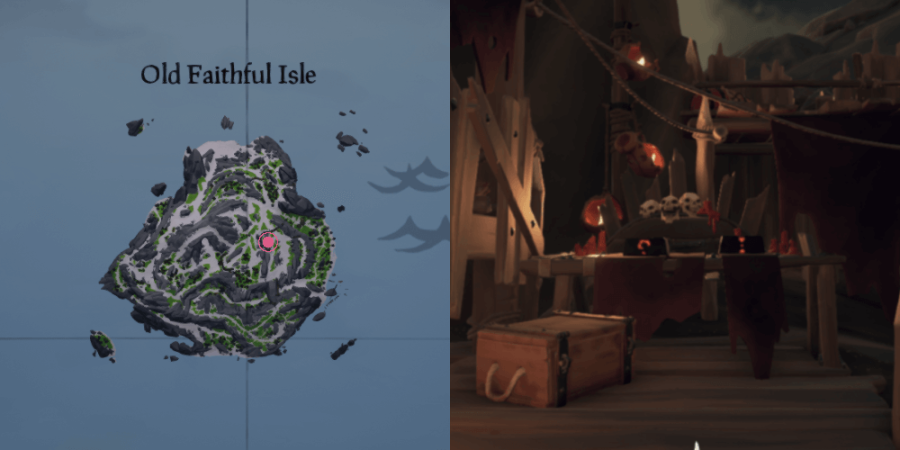
The Altar on Old Faithful Isle is on one of the upper levels, in a skeleton Fort. If you have done the Fate of the Morningstar Tall Tale, you will recognize this Skeleton Fort as the location where Eli was slain.
The Crooked Masts Ritual Altar
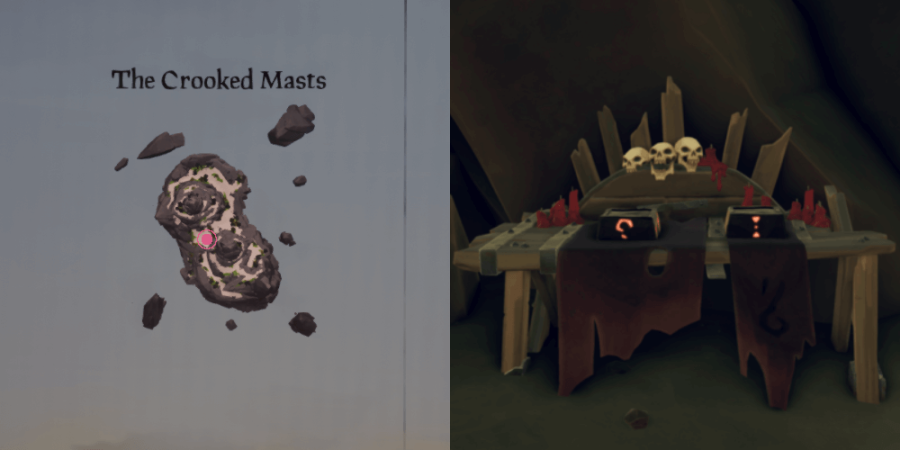
The Altar on The Crooked Masts is on the lowest level. You will find it on the western half of the stretch of land between the two spires.
Wanderer's Refuge Ritual Altar
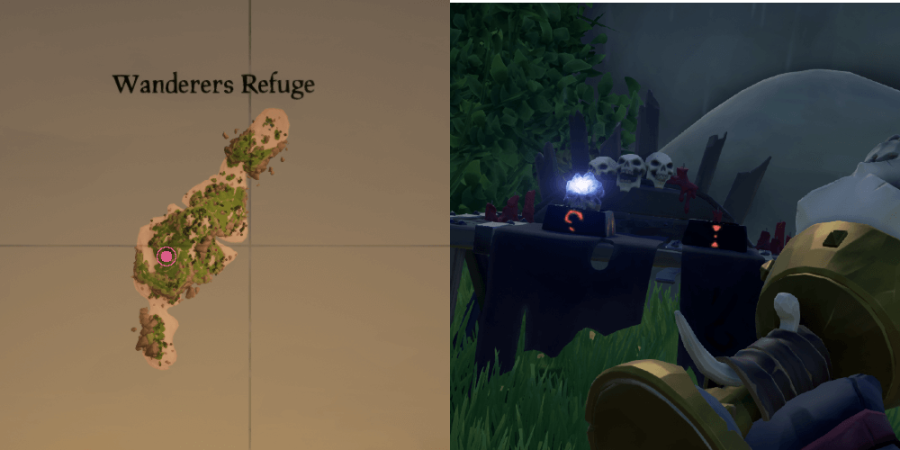
The Altar on Wanderer's Refuge is on the southern half of the island. You should have easy access to it if you park on the western shore and run up the hill.
Step Three: Defeat Graymarrow
The fight with Graymarrow bears a strong resemblance to the fight with Briggsy. He has a similar moveset and follows a similar pattern to her, and is just as annoying to defeat, if not more. You can find read below to see what kind of strategy he'll use, as well as what kind of strategy you should use.
Related: Where to Sell Villainous Bounty Skull in Sea of Thieves - Pro Game Guides
Graymarrow's Strategy
- Weapons: He switches between the Pistol, Blunderbuss, and Cutlass depending on his target's distance.
- Stomp attack: This is a high damage attack where he raises two chests and slams them together. All nearby players are knocked back into the air. The closer you are when he uses this attack, the more damage it does. You can receive fall damage when he uses this attack.
- Recruitments: Graymarrow will occasionally summon skeleton reinforcements to distract you from attacking him.
- Teleport: Graymarrow will pull out a skull and perform a spell. He then disappears into the ground and reappears shortly after in another spot close to the original.
Player Strategies and Tips
- Graymarrow's Health: Graymarrow's Health scales depending on what kind of ship you are using. If you approach him with a Sloop, his health will be significantly lower than it would if you approached him with a Galleon.
- Ship Cannons: The cannons on your Ship do significant damage if you can hit him! The teleportation power can make it hard sometimes. Still, if you keep firing cannonballs at him, you can make short work of this battle.
- Crew Management: Since it's easy to become overwhelmed by groups of skeletons, it's best to have one crewmember focusing on herding them. If you can have one of your crew herd them and another focus on killing the ranged skeletons, it's possible to finish this battle without ever taking damage.
- Quantity over Quality: As with most other bosses in this game, the difficulty doesn't lie in their skill set but rather their health. You will likely be fighting Graymarrow for a long time, performing the same tactics again and again.
Step Four: Return to Sandra

Once you defeat Graymarrow, he will drop an oh-so-popular Shroudbreaker Stone. Pick up the stone and take it to your Ship. Sail back to Dagger Tooth Outpost, and hand it over to Sandra at the Shipwright station. She will express gratitude and reveal a particular secret about herself that you might be surprised to learn!
What's Next
This completes this main questline for the Wild Rose Tall Tale. For completing it, you will receive the Revenge of the Morningstar Commendation! From here, you have several options. You can do the quest again, find the Hidden Journals, or move on to the next and final Tall Tale: Shores of Gold!
Want to see the hidden story behind Briggsy's past? Use our guide to find all the Legendary Storyteller Hidden Journals!