The sixth installment in the Sea of Thieves Tall Tale list is the Art of the Trickster, perhaps the most challenging Tall Tale thus far. We follow a savvy pirate called The Trickster, and you'll find he earned that title throughout this adventure. As you complete this quest, you'll find elaborate mechanisms, ingeniously placed treasure, and a growing resentment towards this malicious Trickster's engineering skills.
Sea of Thieves | Art of the Trickster Tall Tale | How to Find the Rum Bottle Spyglass
Before we begin, if you were looking for a specific section of the guide, you will find each major section listed below. This guide is broken up into four parts for ease of navigation.
- Sea of Thieves | Art of the Trickster Tall Tale | Trapmaker's Gunpowder Key Riddles Guide and Locations
- Sea of Thieves | Art of the Trickster Tall Tale | Sailor's Bounty Traps and Battle Guide
- Sea of Thieves | Art of the Trickster Tall Tale | Vault Locations and Battle Guide
- Sea of Thieves | Art of the Trickster Tall Tale | Hidden Journal Locations
HIDDEN JOURNAL LOCATIONS: When you start this adventure, you might notice in your Pirate Log that one of the Commendations associated with it is for finding all the Hidden Journals. You must have the Art of the Trickster Tall Tale active to find these Journals! As such, it is best to look for them along the way as you visit the islands in your iteration of the Tall Tale. Follow the link above to get the guide to locating these Hidden Journals.
In this section of the guide, we will cover how to start the Tall Tale and get the Rum Bottle Spyglass. This is an essential instrument for the next part of the guide since it reveals the locations of the riddles and the Gunpowder Key. However, the Rum Bottle Spyglass is itself a riddle! A rather clever one, at that. Let's get started with the adventure!
Related: Sea of Thieves | Wild Rose Tall Tale | Hidden Journal Locations - Pro Game Guides
Step One: Starting the Quest

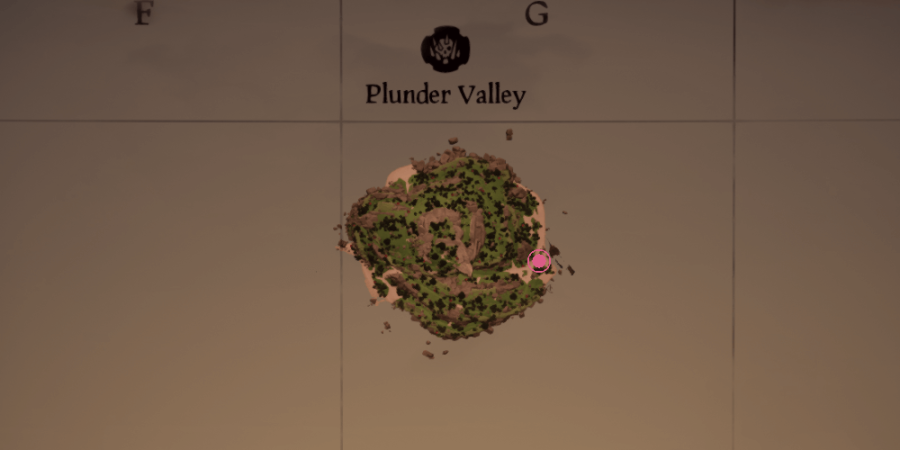
In the Pirate Log, it's mentioned that the start of this quest is on Plunder Valley. This is the first island you're headed to, and where you will find Salty, an undead parrot. When you arrive at Plunder Valley, park your Ship on the east side, and walk up to the beach located here.
You'll see where Salty is on the island in the image above, but you'll likely see Salty yourself while walking along the beach. Approach Salty, and you will see a book at his feet titled The Art of the Trickster. This is this Tall Tale's Quest Book. Interact with the Quest Book to start the Tall Tale. Listening to Salty from this point is optional but worth it. How often do you get to see an undead parrot in a game?
Now that you've started it, you'll have a riddle ready to solve! The best part about this quest is that you won't need to sail to and fro, trying to find treasure amongst a wide selection of islands. This time, you'll mostly be centered on exploring three, or at most, four islands. This even applies if you're looking for the Hidden Journals!
Step Two: The Rum Bottle Spyglass
We're going to forego disguising where you'll need to go to solve this riddle since it's mentioned in the book itself. After starting this Tall Tale, the first island you need to visit is (drum roll, please): Plunder Valley! That's right; you're already on the island you need to find the most essential item!
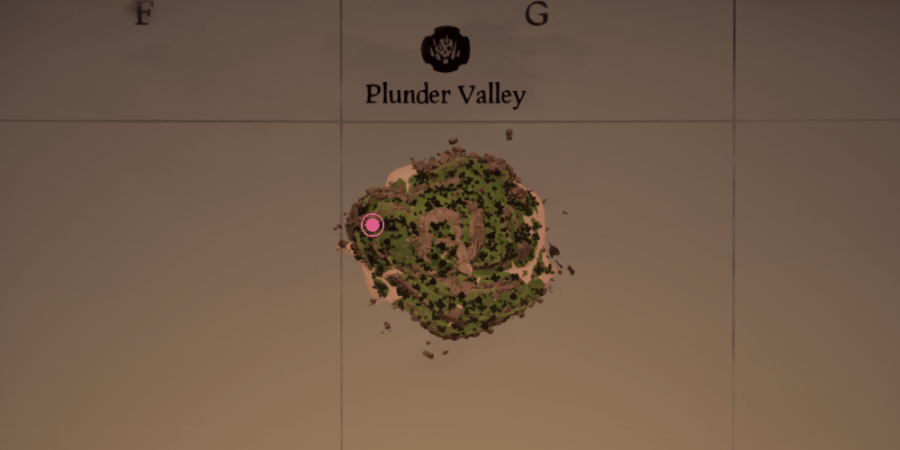
What's less obvious about this part of the quest is exactly where you need to go on Plunder Valley. The most telling part of the first riddle in the book is that you'll be seeking the cave of bones on Plunder Valley. Since this isn't a popular cave for quests or Tall Tales, you might not have even been there yet.

The image above shows the cave's location on the map, but it doesn't exactly tell you how to get there. For that, you'll need to follow these instructions. On the West side of the island is a ravine. If you walk through this ravine, you will see a large bird statue placed directly across from a cave on the other side. Use this cave entrance to enter the primary cave system and stick to the left. Eventually, you'll be taken to a room full of skeletons in precarious positions. This is the cave of bones!

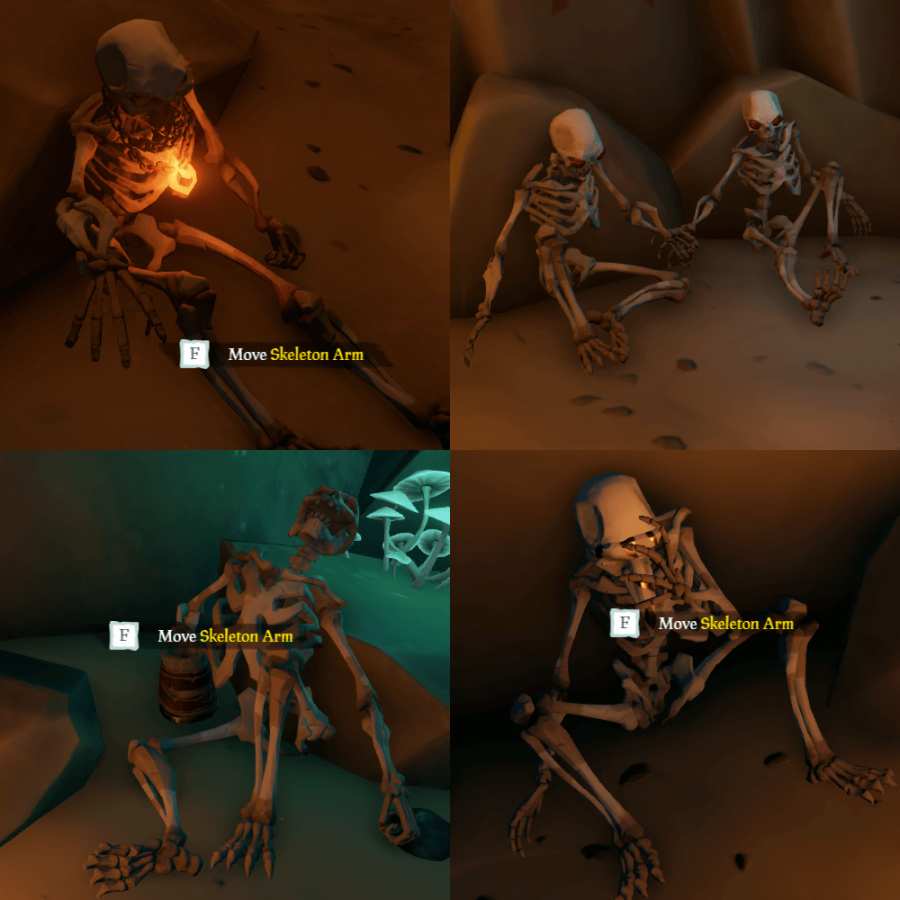
What you'll need to do from here is continue to follow along with the riddle. When you approach the various skeletons in this room, you'll see that, unlike other skeletal remains, you have the option to interact with these. Upon interacting with them, you'll see that their arms are adjusted to different positions.
In the image above, you will see how to position these arms. However, if the image is confusing, the list below notes each line of the riddle and instructs you how to adjust these skeletons to follow it.
- The forsaken captain points to fire and ash. This skeleton is near the entrance of the room. It is the only one that is holding out its arm and pointing. Adjust this skeleton's arm to point at the lit fire across the room, next to the thief.
- Hand in hand, two lovers face their destiny. These two skeletons are also near the entrance but on the opposite side of the wall. They are sitting next to each other, but their boney remains are sitting apart. You also might be able to recognize these skeletons by the roses that fill their eye sockets. For these, all you need to do is adjust both of their arms so that they end up holding each other's hands. Aww, young love.
- The Rum Runner laid her drink to rest. The Rum Runner is kiddie-corner to the two lovers. There is a firepit across the room with two skeletons, one of them holding a large mug against her mouth. Interact with this skeleton's arms to make it hold the drink at her side instead.
- The thief hides behind her mask of gold. The thief is right next to the Rum Runner, at the firepit. If you are struggling to figure out which one is the thief, you can also tell because it has gold plating in its skeleton and sits directly across from where the captain is (now) pointing. Its hands are formed in a specific position. If you interact with this skeleton's arms, it moves the hands up to cover the face.
Related: Where to Sell the Reapers Chest in Sea of Thieves - Pro Game Guides
Once you have set up all four of these skeletons appropriately, you'll hear a mechanism making noise. In the center of the room, a cage holding another skeleton will lower to be within reach. In this cage are the Trapmaker's first notes and the Rum Bottle Spyglass! Grab both of them, and you'll be provided additional information to continue the Tall Tale.
What's Next
From here, you will be instructed to visit one of two islands. If you're lucky, you'll need to stay on Plunder Valley. However, if it's not Plunder Valley, you don't have to go far to continue the quest. Discovery Ridge is the other possible option, which is a short sail Southwest. The next section of the guide covers what to do with the Rum Bottle Spyglass and find the Trapmaker's Gunpowder Key, so head there now!
While you're sailing, why not catch some fish? Use our guide on How to Catch and Sell Fish!
