Freddy Fazbear's Mega Pizzaplex might be familiar to you already through Security Breach, but we are going to have an entirely new experience with this DLC. Read through this FNAF Security Breack Ruin walkthrough guide to make sure you get all the collectibles and open secret areas!
Five Nights at Freddy's Full Walkthrough
Compared to the glow of Security Breach, Ruin is dark and eerie, more similar to the rest of the FNAF games. The open world is now more guided, and pathways are closed conveniently with rubble or obstacles. This is great, considering the original game felt too empty for something so big, and it was way too easy to get lost.
Related: How to get all Achievements and Trophies in Five Nights at Freddy’s Security Breach
Chapter 1 - Back at it again at the Pizzaplex
Start off the game with Cassie entering the ruined Pizzaplex. Climb down the ladder as she explains she got Gregory's call to meet him there. Now, we question this immediately. We know what happened to Gregory here, so why would he want to come back?
Turn to the right, and you'll see graffiti that says, 'Don't go in alone.' A little late for that. Head past the graffiti to find a flashlight the bot is holding out at the complimentary entry pass sign.
Now you can head through the security gates and into Glamrock Gifts. Climb up the stairs in the shop and watch out for the jumpscare bot that will blast an alarm for a second before deactivating again. Walk through the door at the end to see graffiti on the wall of a bunny. Vanny, is that you?
You'll hear Greggory's voice coming from the left. Go in that direction until you find the Roxy Talky. Through it, Greggory will tell you that something trapped him under Roxy Racers, so your goal is to make your way over there. Head inside the elevator and go up the ladders as the elevator crashes down.

Once you're up, you are going to crawl through the vents. Something always happens in vents in horror games, even in Security Breach. I'm waiting for Lil' Music Man to show up, but this time, we're just going to fall back to the floor in the kitchen. Before you start exploring, remember that Greggory killed Chica here.
Chica will jumpscare you but deactivate immediately after. Cassie will question what happened to her but won't get a response. We, however, do know it was Greggory and the trash compactor that happened to her. Keep on exploring until you reach a door with a strange mechanism. We need a Faz Wrench to open it. You'll find it in a red box next to the wet floor signs in the previous room.

You will be using the wrench to open many doors throughout the game. You need to set the levels in the tubes to be inside the blue areas. When you unlock the doors, head down the stairs and the hallways until you reach a big pipe you can climb into on the right. Monty will jumpscare you once you approach it and make you fall into water. This will trigger the opening credits and officially start off the game.
Monty's Gator Golf
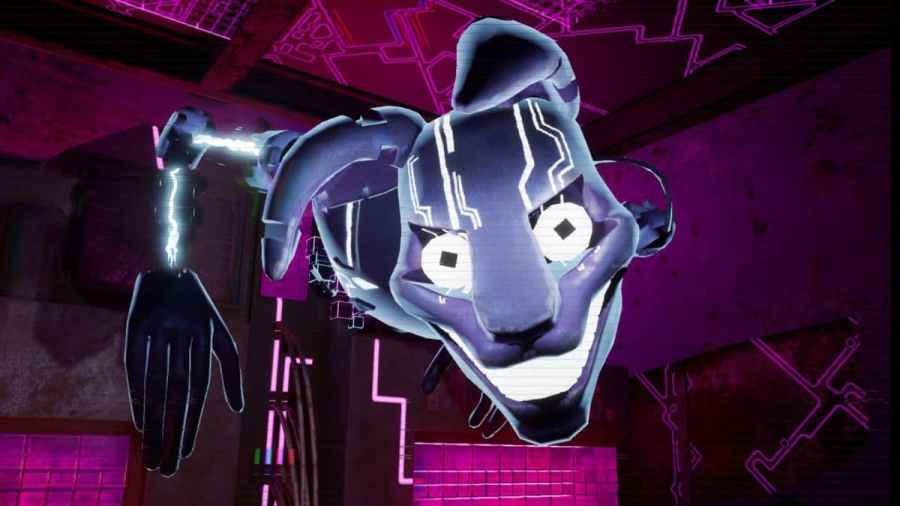
You'll end up falling through the pipes to Monty's Gator Golf. Sadly, we won't be playing any golf, at least not on the course. You'll see a flickering light. Follow it to crawl underneath the rubble, but watch out. Once you get out of the second crawl space, a Maskbot will jump at you to offer you a free mask.
You get a 'Security Mask,' which helps you see the AR world, find collectibles, solve puzzles, and turn off security nodes to get to Greggory. Cassie mentions how it doesn't look like Bonny, a former attraction at the Mega Pizzaplex. However, as players, we can easily recognize this as Vanny's mask from Security Breach.
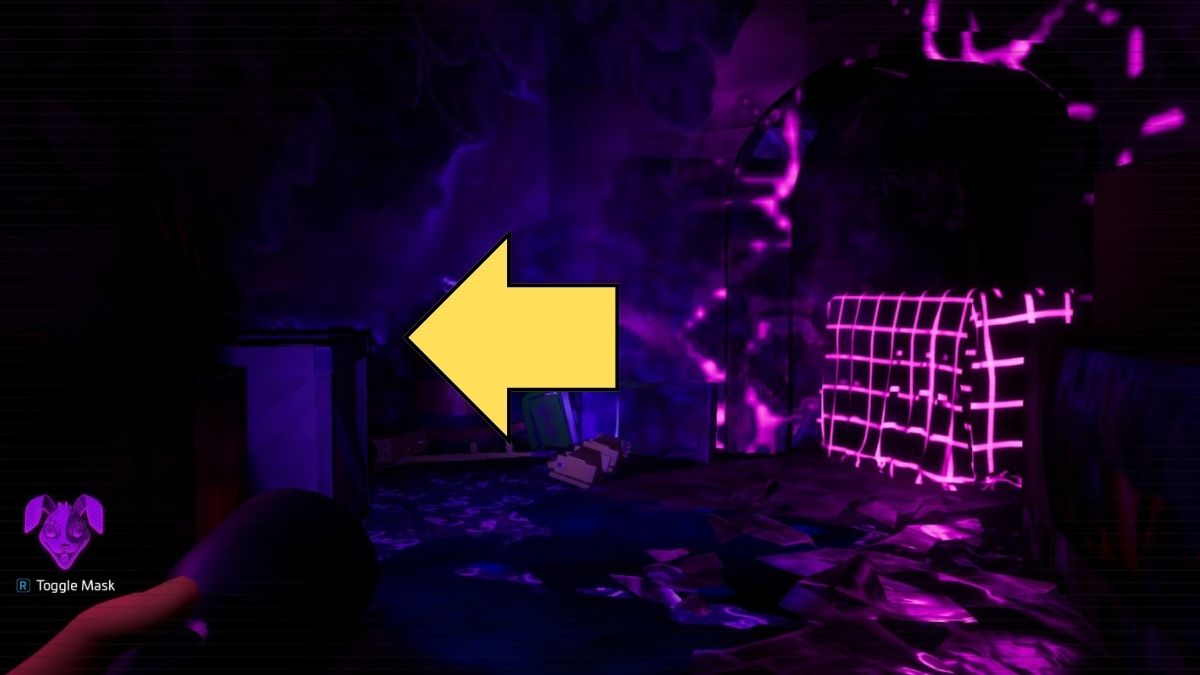
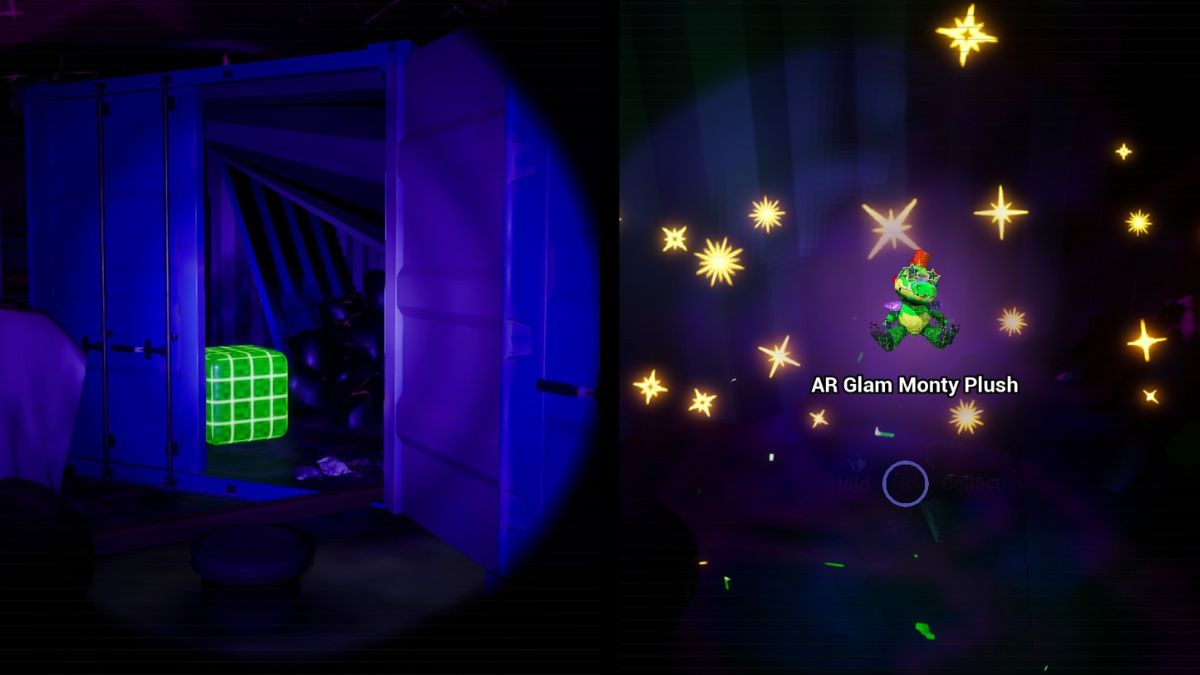
Once you put on the mask, you can walk through the obstacle, but don't do it just yet! Instead, turn to the left and head into the container. With the mask on, you'll find an AR Glam Monty Plush. Throughout the game, you'll find both AR and Normal Collectibles. You can see the AR collectibles only with the mask and the Normal collectibles only without the mask.
When you get through the obstacle, you'll have to unlock the door to the bathroom with the Faz Wrench. In the bathroom, you will find the first Caution bot. With the mask on, you can deactivate the simultaneously cute and creepy bots. You will unlock a secret area in the bowling alley when you deactivate all of them in the game.

Keep the mask on to get to the other bathroom. Go out the door to the left, and you'll see another opening on the right. Go through it to get the AR Bonnie Piñata collectible.

Monty Golf Security nodes
Head back outside and into the new area of Monty Golf. You'll see a Fazbear technician remote camera station, according to Helpi. You can use these stations across the map to check areas and keep an eye out for enemies.
Follow the yellow cable and Helpi cardboard cutouts pointing you in the right direction. Use the Mask to get up the stairs and past the bike blocking the way. Once the yellow cable goes into the wall, you can’t follow it anymore. Instead, go up the ramp and jump across the boxes to find an electrified door.
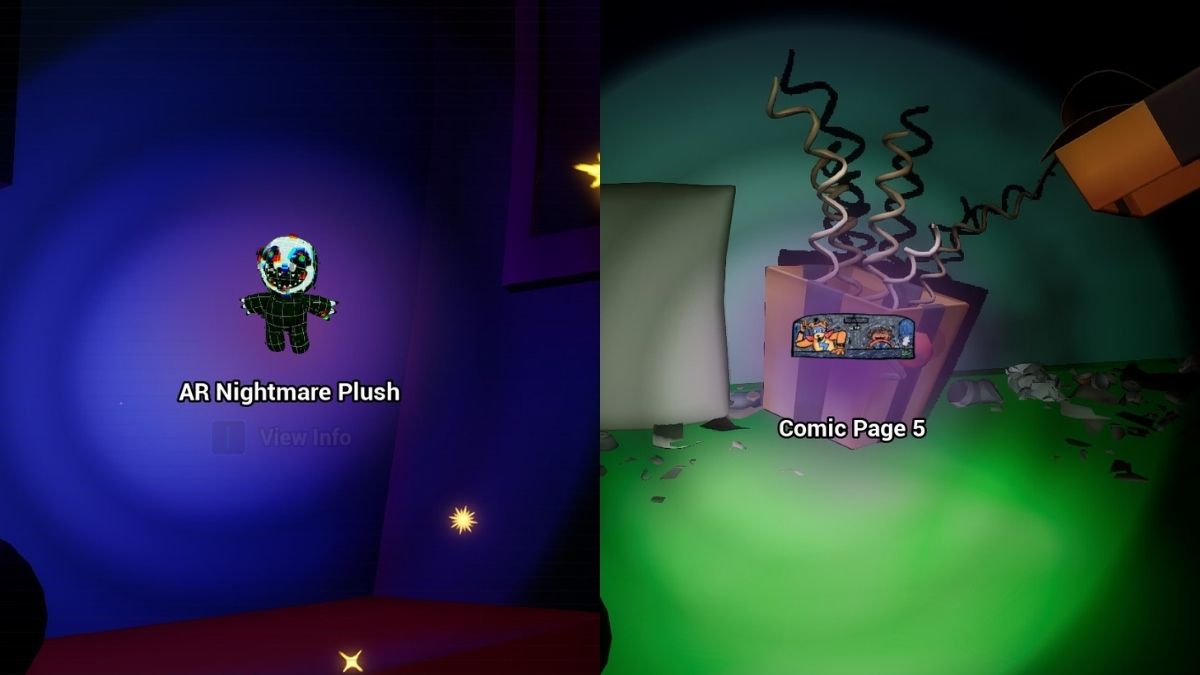
Before dealing with the door, head to the right with the Mask on to find an AR Nightmare Plush collectible. Take off the Mask to find a normal collectible, Comic Page 5 right next to it.
Next, head back and follow the glowy trail in the air to deactivate the electricity on the door. Climb up until you see a Bunny Security node. However, to deactivate it, you must first deactivate the child node.
Following the red glow in the ground coming from the Bunny node, you'll reach a red barrel. Deactivate it with your Faz Wrench and head back to the Security node. Connect the two holograms, and you'll deactivate your first Security node. Go to the left of it to find the AR Tragedy Mask before passing underneath the forklift.

Go along the path until you reach a crawl space, and once you see the camera station, put on the Mask. You'll see another node to the right. Helpi will, at this point, tell you that he is detecting an anomalous entity in the V.A.N.N.I. network. Honestly, everything about this situation is anomalous.
Helpi is warning you about Glitchtrap, who appears whenever you wear the mask for too long. He can't attack you himself, but he can summon other animatronics if he reaches you. He only exists in AR, so try to keep your mask off as much as possible while looking for the child nodes.
The first child node is a red barrel. You'll find another Caution bot that you should deactivate behind some logs to the left, behind the child node, like in the image below.

Put on the Mask and make sure Glitchtrap isn't around before deactivating a child node. Repeat the process with the other child node, a Monty cardboard cutout in the right corner. Once you're done with the child nodes, you can head back to the Security node to deactivate. Again, put on the mask and try to be as quick as possible.
You'll open a shutter and find another Security node hiding inside. The child nodes you need to find are one more red barrel behind the Mother node, a golf stick, and a plush, all three in this room. Once you deactivate all, go back to the Bunny node and complete the hologram puzzle to deactivate it. Get on the camera station and see the door is now open.
Head to the crawl space to the left, but Monty will attack you. The signal was actually leading him to us, but we dealt with it in time and didn't get caught by Glitchtrap. Climb up the ramp and head back to the door.
You'll find two Caution bots in this room, so deactivate them before you keep going and reach another Faz Wrench door. Go through the door to the left and find another Security node. One child node is a pizza, and the other is a golf ball on the table. Once you've dealt with them, deactivate the Bunny node.
Take off the Mask immediately to avoid Glitchtrap showing up. You've opened a door to the right, so head down until you reach a large room. You'll find one Security node on the walkway upstairs. The child nodes are a box on the other side of the walkway and a plush on the lower floor on top of a platform.
Big screen Anomaly
Go through the door to the left of the node and walk until you reach another vent. The camera station you find will be inactive in our reality but will be active in AR. On it, you will see an anomaly.
When you switch through screens, you will see something glowing, and you have to match it up to something in the real world on the cameras. Once you quarantine an anomaly, you will create a new path you can take in the real world.

This time, it's the case of a screen that is now gone. Go through the hole where the screen used to be and pass into the Daycare and chapter two.
Chapter 2 - The Eclipse Daycare
As soon as you jump through the screen, there is a Caution bot to the left, so deactivate it, then go to the right and down the hall; you'll run into inactive Endoskeletons on the way. I'm very happy they're inactive, as I both love and hate the Weeping Angel mechanic they have. Let's hope they stay that way.
Climb the boxes at the end and get into the daycare. This would be more fun if we weren't in a creepy Pizzeria. Head up the first castle tower to get the AR Moon Plush.

Head down the pathway to the right. You'll hear Moon laughing, so expect to get chased. As you keep going, Moon will try to grab you, but the light from your flashlight bothers him. This is a hint on how to deal with him. Jump down the slide and head to the right. Once you reach a bridge, first go to the left to find the AR Sun Mask collectible.

Climb up the bridge with the Mask on so you can go through the knocked-over shelf. Sun will grab you at this point, but he is friendly, begging you to reboot them to return to normal. While fighting off Moon, Sun will tell you that you need to turn on two generators and light up the area to disorient Moon.
We've done this in the base game, so it should be no issue for you. It’s also immensely easier in the DLC, as a lot of the extra areas are blocked off, and the game guides you on which way to go.
Lighting up the Daycare
Go to the left from where Sun grabbed you, and you'll find the AR Moon Pinata on the little desk. The Glitchtrap warning still stands; take off the mask as soon as you hear his sound cue.

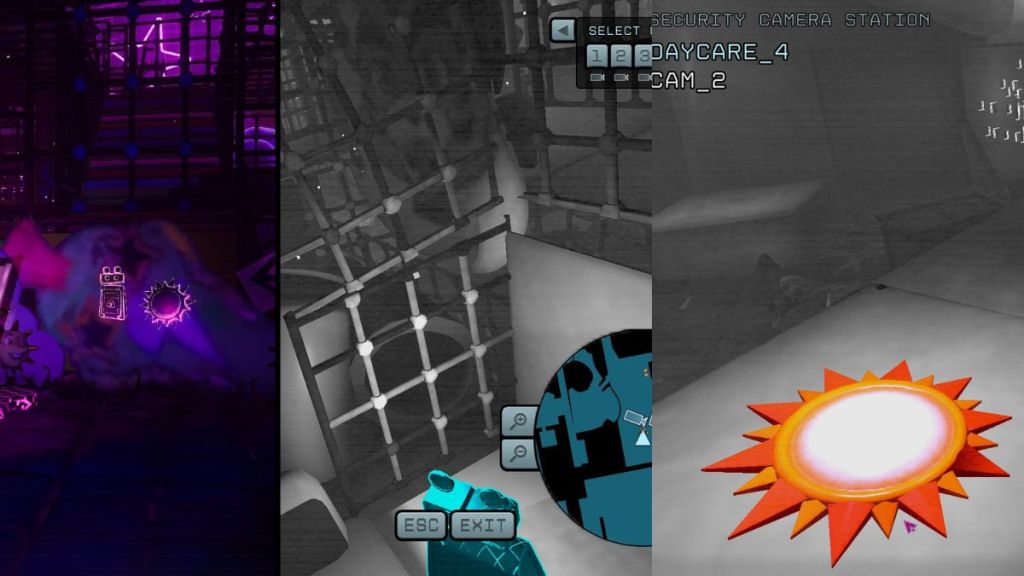
This area has a camera station, so get onto it to see where the generators are. You'll also find an AR camera station to the left, which you can use to quarantine anomalies. This time, you need to find the moon anomaly on camera five and the sun anomaly on camera three. Quarantine them in that exact order.

This will open the hole behind you that was covered by a cutout of Freddy's face. Go into it and head through the blue opening to the right. When you go through the obstacle in AR, it will look like you’ve reached a dead end. All you need to do is take off the mask to reveal a path in the real world. Keep walking until you reach the first generator you can turn on.
Once you turn on the generator, you'll see Moon across the area struggling with the lights—only one more to go. Drop down and go towards the security desk. You'll find an AR Sun Plush behind it.

Keep going past the desk until you reach a tunnel blocked off by a Monty cardboard cutout. There's an AR station right next to it. Use it to quarantine the Caution bot on camera five first and then the Sun sign on the floor of camera two.
Pass through the tunnel with the Mask on and head up. Like in the previous section, you’ll have to take off the mask to go through a dead end. On the top, you'll find the AR Golden Sun collectible.

Go the other way around the ramp to activate the second generator. The lights will affect Moon, and he will stop moving. It's time to get to him and reboot him. Jump down from the platform and see a Caution bot at the bottom. Deactivate it to make sure you can still get to the secret area.
Follow the arrows to get to Moon. Once you reach him, use your Faz Wrench to reboot them. You'll activate Eclipse, who is fretting over the mess of the place. He takes you outside the doors of the Daycare while he runs back inside to prepare for the children who will never come.
Outside the Theater
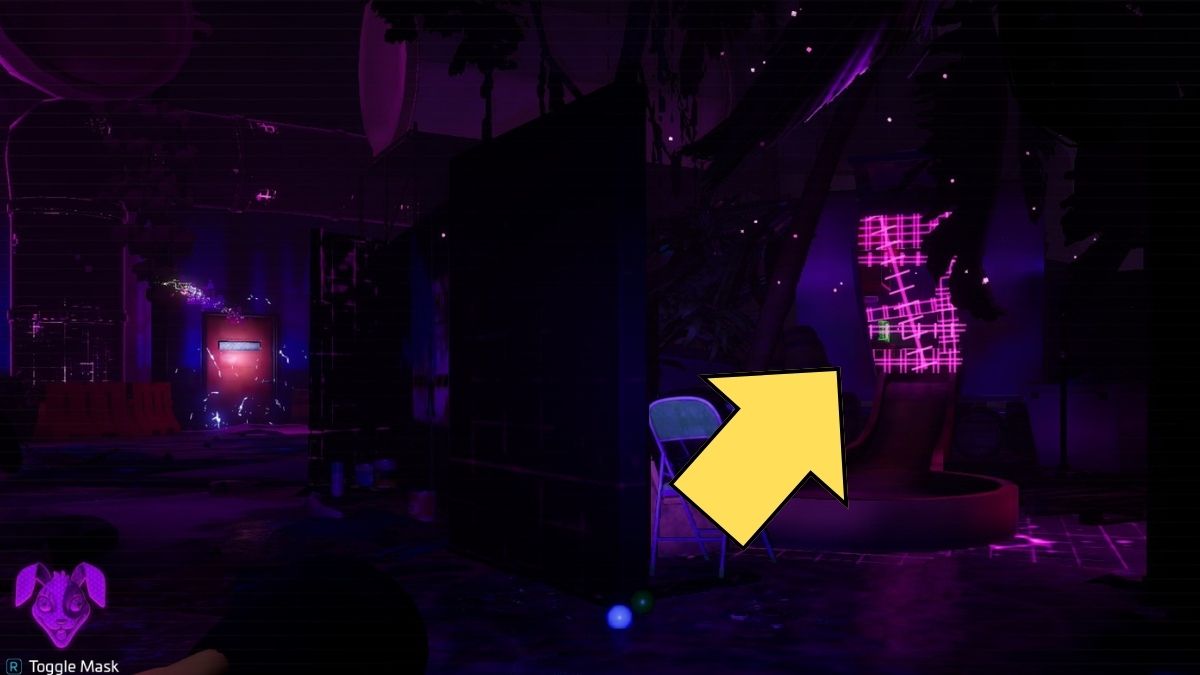
Once you have been shoved outside, first head into the Lucky Stars gift shop and behind the counter. You'll find the AR Comedy Mask collectible there. Also, grab the Caution bot behind the forklift while you are here. In this room, there is also a child node for a Security node that is down the hall.
First, use your Faz Wrench to lower the forklift, then deactivate the first node. Your next destination is the node back towards the Daycare entrance. Of course, this is the moment when the Endoskeletons start moving. I was expecting it, and I still got scared and killed. Make sure you don’t touch them even with the mask on, as that will also get you killed.
Deactivate the second child node down the hall to the right. As soon as you get it, put on the Mask and look at the Endoskeletons. This way, you are giving yourself time for Glitchtrap to respawn while keeping the skeletons immovable.
Once you are ready, put on the mask and make a run for it down the hall and to the right through the container. There are more Endoskeletons here, so you might have to back off and take off the mask for a period of time.
The last child node is at the end of this hallway. Keep looking at the Endoskeletons if your mask is off. If your mask is on, watch out for Glitchtrap appearing.
Freddy & Friends Adventure
Once you deactivate the Bunny node, you'll open the door to the theater. When you get inside the theater, go behind the forklift in the far left corner to find another Caution bot.
You can head back to the left and up the stairs until you reach a glitching Captain Foxy's Pirate Adventure poster. Put on the Mask and go through the poster to find the AR Golden Moon as well as another Caution bot through the pipe in the wall.

Once we've done with all the collectibles and secrets, we can go back down and put on the Mask. Instead of the Freddy and Friends adventure, the screen now shows Greggory being chased by Vanny, whom we recognize by the mask we are using.
Now, go to the AR station in front of the stage to quarantine anomalies. Grab the sun from camera six, the moon from camera four, and the Caution bot from camera two. You will summon a large Esoskeleton from the screen.

Climb the stage and jump into the Esoskeleton's mouth. I know this really doesn't sound like a good idea, but that's the way to go. Once you're down and panicking inside its stomach, take off the Mask, and you'll see you are in a vent.
Cassie jinxes herself immediately by saying she hopes it doesn't fall. So, of course, we fall into a gondola in Monty's Golf that's going nowhere, as the tracks are destroyed, making Cassie jump off onto the Catwalks.
Chapter 3 - Monty Abound
Greggory will now call Cassie on the Roxy Talky to explain that she can redirect the Gondolas to the Maintenance room. I'm sure this will be a quick and easy fix! Or I might have jinxed it just like Cassie. Let's find out. We need to deactivate the Security node and then use the track controller.
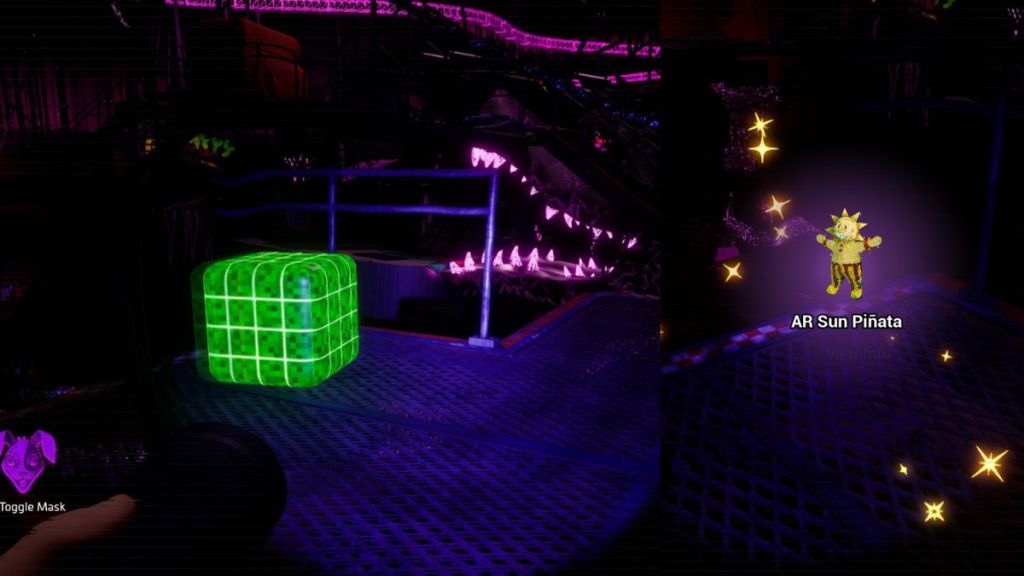
The catwalk is pretty destroyed, so we'll have to make our way through the debris. First, head past the Bunny Security node towards a Monty turret. Use it to shoot at the moving Monty target, and you'll lower the bridge. Cross the bridge and head down the right path first, where you'll find the AR Sun Piñata.
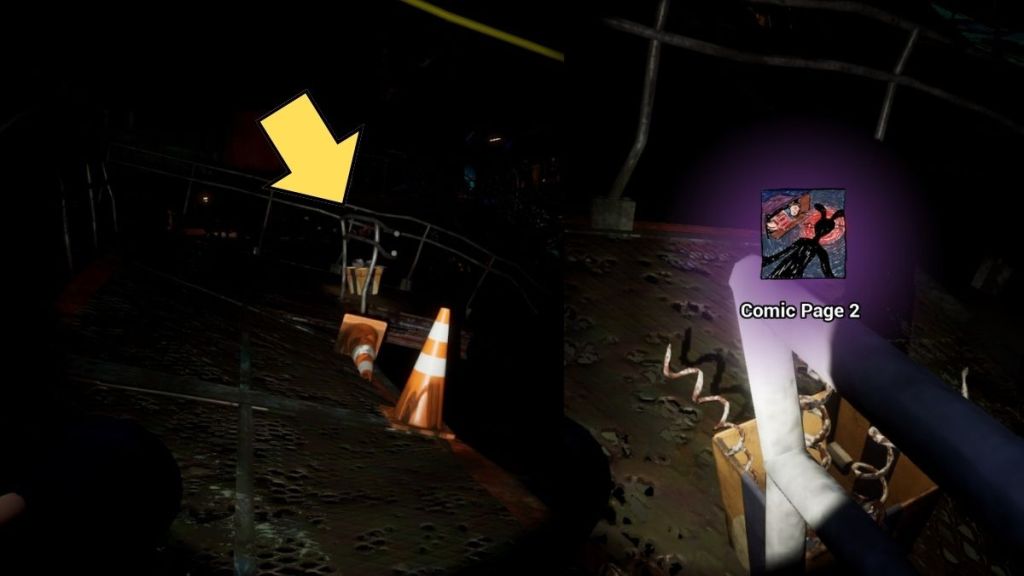
Glitchtrap will keep showing up in this area, so make sure to take off the Mask from time to time to stay safe. As you're going, you'll reach a slippery platform to the right, where you'll find Comic Page 2. Lean against the one railing next to it so you don't fall to your death (I totally didn't die like this twice).
Next, go the opposite way to the comic page. The first node is a Chica trashcan behind the camera station that you'll find on the way, and you can get to it with the Mask on. After you deactivate it, go back to the camera station and look for a Monty turret. Shoot at the three Monty targets across the way to knock down a bridge.
Cross it and walk through a glitched doorway in AR to teleport to a new area. As soon as you teleport, head left until you reach another camera station. The second child node is a Monty plush on the floor to the left of it.
Head back, and just to the left of the camera station, you will see a slippery platform that ends in death. However, if you put the mask on, you will see another teleport door. Go through it, and you'll find yourself in this weird AR world. Keep going forward, and once you notice a path between walls, go to the left and grab a Caution bot.
Head back and down the other way until you find another turret; this time, you have to shoot four moving Monty head targets. You will drop a bridge so you can get to the next area. Head left towards a chair at the end of the walkway, as that is the third node. Once you've dealt with it, go back the other way.
With the Mask on, you'll find another tunnel and a teleport. This will take you to a long walkway where Glitchtrap will show up and stand in your way. Helpi will take care of it and make the area safe. I'm not sure I trust that, but I'm sure I don't trust that. Keep running till the end of the walkway, where you will get into another teleport.
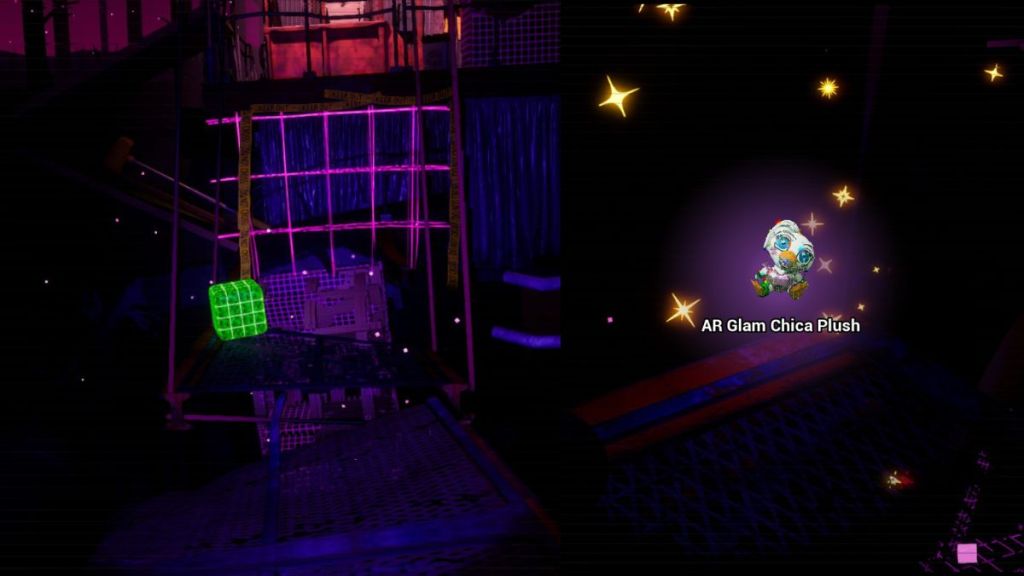
This teleport will take you to the last child node. Deactivate it, then turn to the right and grab the AR Glam Chica Plush. Right past it through a glitched wall, you will find a Caution bot.
Head up the platform until you reach a Faz Wrench panel for the track controller. With three wires, this one will be tricky, so play around with it until you get it right. Jump down from the platform and follow the path to the Security Node. Deactivate it by connecting the three sets of matching holograms.
This will activate the gondola. Turn back and climb up towards the track controller, where you can now enter a gondola. It will take you to the Maintenance room.
Maintenance room
First, head to the left, down the stairs, and into a room to grab a Caution bot. You can make your way back to the right. When you reach a staircase, put on the mask to find an AR Foxy Plush under them.

Bakery
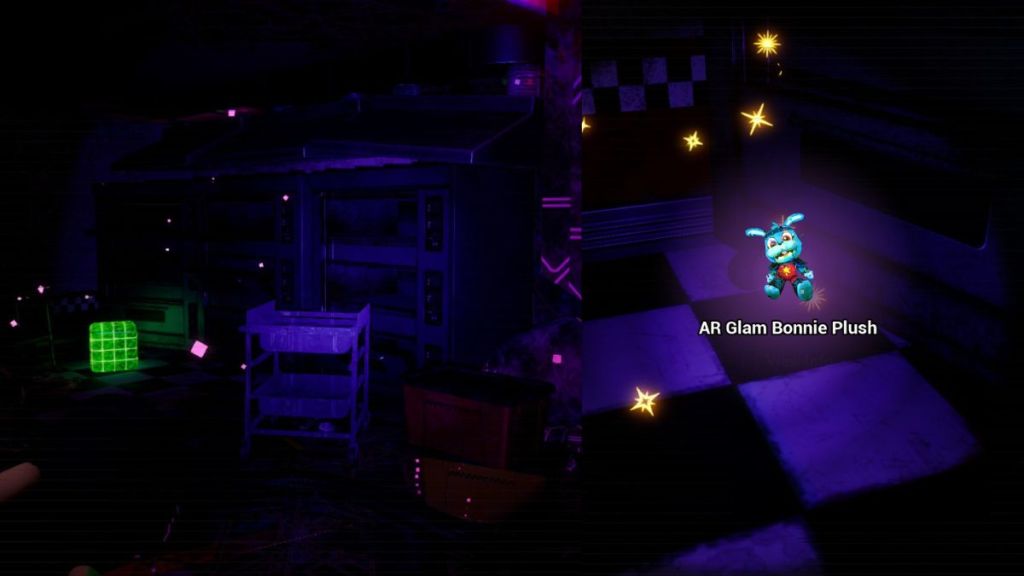
When you get into the bakery, go to the Faz Wrench activation panel on the machine down the path. Before doing anything to it, put on the mask to find an AR Glam Bonnie plush to the left of the machine. As you keep going, make sure to pick up the Caution Bot to the right.
Head up the ladder where Helpi points you to the bakery's second floor. Go down the path until you reach another Faz Wrench activation panel and do your thing on it. There is one more at the end of the second floor. With all three active, the conveyor will begin moving, and you’ll see Chica’s body go on it.
Chapter 4 - Cupcake or Death
Climb the boxes next to the machine to get on top of the belt yourself and jump into a new area. You’ll reach a dead end with a gate, so just put on the Mask to get through it. Passing through it, we will see Glitchtrap down below activating a jammer that prevents us from using the Mask. You'll have to turn it off.
Turn around from the hole and go towards a Faz Wrench panel. You’ll open another conveyor belt path, and you’ll see Chica still riding on a different one. You’ll get kicked off by a Cupcake, so go around the left side of the trash on the ground to find Comic Page 7.

Head down the path where you will see Chica getting up and start roaming. Keep going, carefully retreating if she stumbles in your path until you reach a camera station. Use it to call Chica on camera three so you can get past her. Wait until she moves away, then go forward.
Now, you have two paths, to the left and the right. If you want to fix Chica, head to the left first. You will end up in a bathroom. Go through the stalls to find Chica’s Feeding Frenzy. You will get Chica's voice box if you defeat 20 waves of enemies.
Once you have it, or you've given up on trying, head back out and down the other path. This will trigger a chase scene that will lead you to the kitchen. You will get blocked in, but the jammer is right here, which means you can turn it off and use the Mask again.
Don’t overdo it with the Mask, as Glitchtrap is very present. First, head over to where Chica was blocked away from you and put on the mask to find the AR Chica’s Lunchbox collectible.

Go to a big pink cupcake and put on the Mask to make it through its mouth. Once you do, go to the right to the bathroom and grab a Caution bot and the AR Foxy Mask. Head back outside, where you will see the Security node.
You’ll have to backtrack a bit to the kitchen to grab a trash can from behind the Inhibitor and a lollypop from the trash. The last one is the trash can in the bathroom (these nodes are very trash-themed). Once you deactivate them all, go back and deactivate the Security node, too, and open the door to the right.
In the hallways, you will find another Caution bot to deactivate. As you keep walking, you’ll reach a door blocked off by police tape. Use the Mask to pass through it (even though I feel like you could have ripped off the tape, too), and you’ll get to the server room.
Sever room Glitchtrap
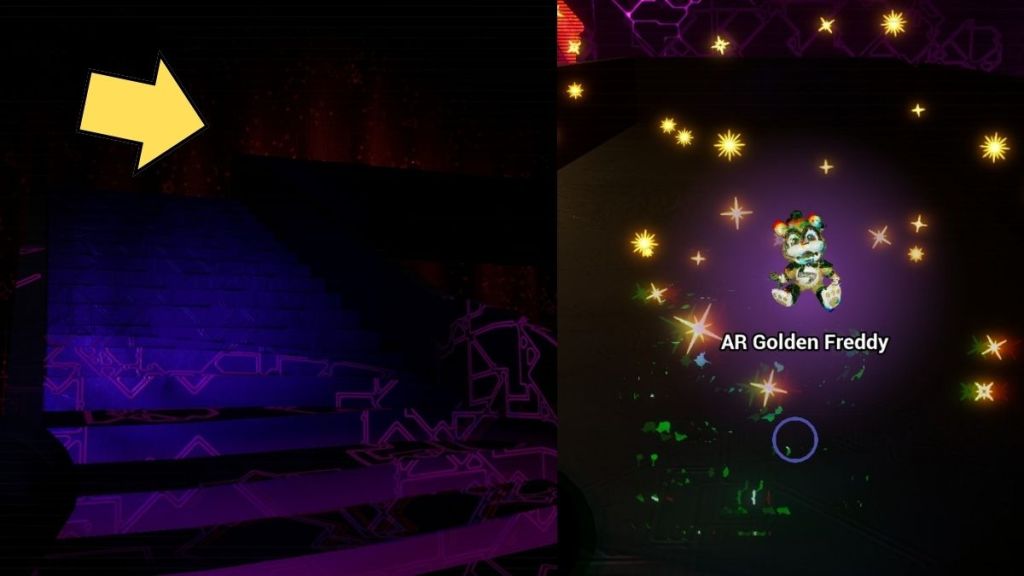
Make your way across the server room and into a new area. Here, you will find a Caution bot right under the waterfall and an AR Golden Freddy collectible upstairs above the bot. Go back down and keep going to the left until you reach an AR Camera station.
First, you need to quarantine the note on camera five, then the guitar on camera four, the star on camera three, and the lightning on camera two. Head down the path that opens up and through the door. Glitchtrap can get you here, and since you can’t take off the Mask, you’re in big danger.

You’ll have to head towards him to get to an AR camera station. For this one, quarantine the star on camera two, the lightning on camera three, and the guitar on camera four. You’ll open up a pathway right past Glitchtrap, so start running until you make it through the door. Here, you’ll finally be able to take off the Mask, and do so immediately.
Related: Who is Roxy in Five Nights at Freddy’s: Security Breach?

Chapter 5 - Glamrockers don't cry
Head down the hallway until you find the door to the Glamrock salon. Keep following this path until you reach a room with three doors. Go through the red door, and you’ll hear Roxy crying. She will hear you, and you’ll see she has no eyes after her encounter with Greggory.
Roxy will get distracted from sniffing you out by Greggory’s voice, which is understandable. If someone took my eyes, I’d also be trying to fight them. She will run out the red doors to find Greggory, but before you follow her, let's search around first.
Head to the left of the doors, where you will find both a Caution bot and an AR Glam Roxy Plush on a stage. You can head through the door to see Roxy running. This is a bit of a funny moment because she is just running in place, waiting for you to get through the door. I love her flair for the dramatic.

There’s a Security node with four child nodes you have to deactivate before you can follow her. One child node is a painting of Roxy. Deactivating it will, yet again, stop us from taking off our Mask, which means Glitchtrap is nearby and messing with the Inhibitor. You can find it to the right past the first node. Just make sure to drag away Glitchrap first to be able to run to it. Once you do, deactivate it and take off the Mask.
The second node is a mirror in front of Roxy’s cutout. When you put on the Mask, however, you’ll also see a cutout of Cassie herself right next to it. That’s super weird. Look behind the cutout without the Mask on to grab Comic Page 4.

If Glitchtrap gets you again with the Mask, head back to the Inhibitor quickly to turn it off. This time, go down the other path. You’ll find the third node, a giant pair of scissors right next to cutouts of Greggory and Cassie. Once you deactivate it, you’ll only see Cassie crying. It’s getting weirder and weirder.
Go through the next area to the left through the pipes and to the right to find an AR station. Here, you’ll also find two Caution bots next to two sets of staircases. Climb either of the stairs to grab an AR Golden Plushbaby.
You can use this area to juke Glitchtrap and give yourself time to quarantine the right symbols on the AR station. This time, you’ll do Roxy on camera five, Chica on camera three, the scissors on camera four, and the eyeball on camera six.

You will open the area to the right to deactivate the last child node. Once you do, you’ll see Chica walk past you. Follow her into the bathroom, but be careful as you approach her. If you have her voice box, now is the time to fix Chica. You’ll also find a Caution bot in the bathroom across from hers.
Head back out to the other door, where you can use a Faz Wrench. You’re back in Glamrock Salon, so just make your way through and deactivate the Security node.
Flooded area
Keep going further and further down until you reach flooded hallways. I haven’t been a fan of water levels ever since Amnesia, and this one isn’t going to be any more fun to go through with Monty roaming in the waters.
Related: How to save everyone in Killer Frequency Walkthrough Guide
You can cross the flooded area on platforms, but try not to fall into the water, as that will trigger Monty to head for you. You’ll still have a bit of time to save yourself from dying; just be quick to climb out of the water if you do fall in.
First, head to the left to the Faz Wrench panel. You’ll probably end up in the water, so try to see when Monty is further away so you have enough time to climb out. You’ll open a door to another flooded area, and you’ll have to keep jumping across platforms until you reach another locked door.
This time, however, you’ll have to stand in the water to solve it. Keep an eye on Monty and get in the water when you see him further away. This will have to be your fastest Faz Wrenching as of yet. When you activate the panel, you’ll open the door and the water, electrocuting Monty in it.
The doors will close behind you as you keep going through this new area. Get up the ladder and past the bots to get to Roxy Raceways. We’ve almost reached Greggory.
Chapter 6 - They Took My Eyes
As you keep going, you’ll reach a hole in the wall that you need to jump through and go up the stairs into the new room, where you will try to call Greggory, but with no response. First, go through the door to the left to grab a Caution bot and an AR Moon Mask.

Keep going until you get jumpscared by an Assistant bot. Crawl under the shelves until you reach a Faz Wrench panel. Activating it will lift the forklift and open up a new path for you. Roxy will be roaming in this area, so move slowly.
Roxy can’t see, but she can hear, so we’ll use that to draw her away through Camera stations. We can also use her to destroy obstacles in our way. First, get on the Camera station and draw Roxy to the area on Camera three. After she gets to the new area, use the intercom on Camera four to get her to break through the door.
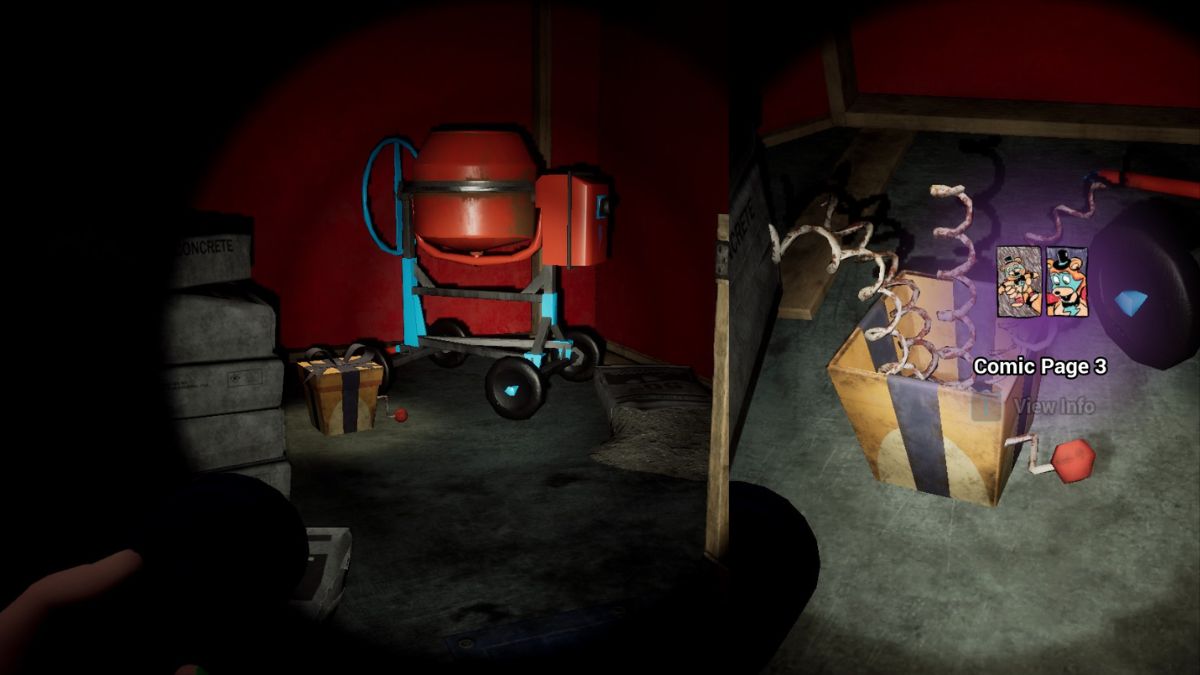
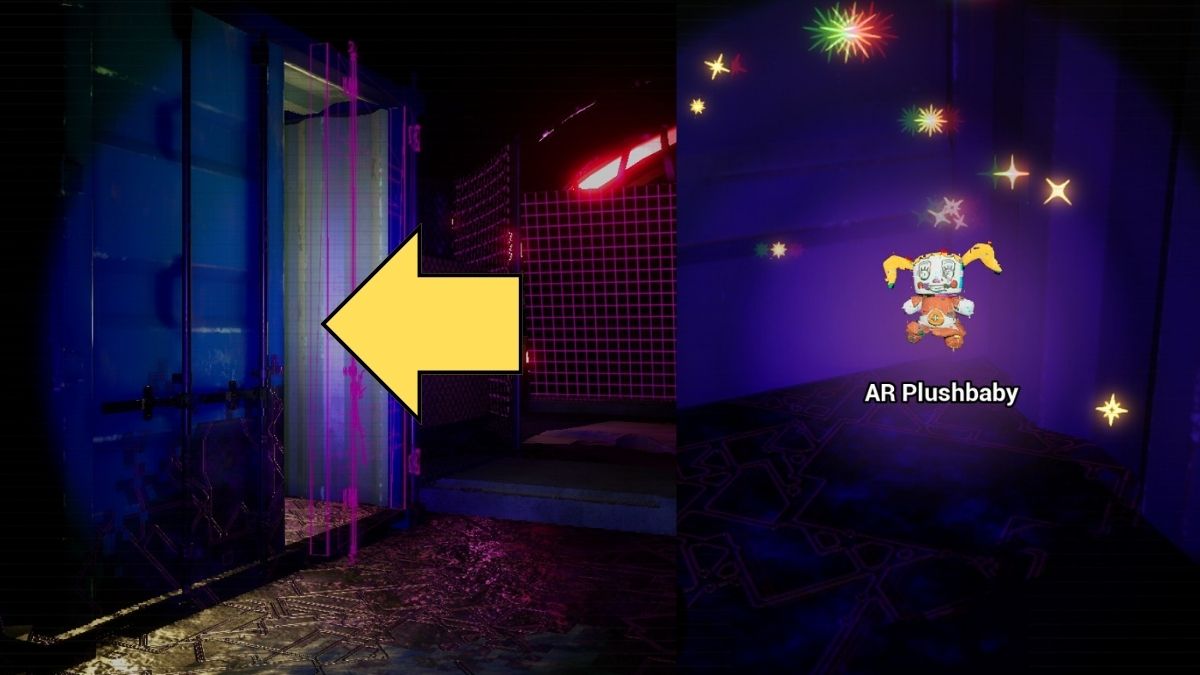
Once Roxy is in this area, go after her. When you go through the door, look to the left to find Comic Page 3. Keep going until you see something wrong in the air next to a container to the right. Put on the mask, and you’ll find an AR Plushbaby collectible inside.
Keep going until you reach an AR station. Use it to first draw Roxy to camera three, then four and finally five, leading her to break another door. If Glitchtrap appears, the same tactic goes. Take off the Mask and give him a bit of time to make sure he is gone before putting it back on.
Keep going after Roxy. You’ll see a Caution bot in the corner to the right when you go through the second door. Deactivate it and then keep following her.
You’ll get into a cutscene where a go-kart will race towards you. However, you do regain control as it gets closer, so shift right to avoid it. This is such a good trick, I got killed by waiting for the game to move me away.
Head to the right to another Faz Wrench panel. However, you won’t be able to go through the door as Roxy will grab you and start screaming at you to give her back her eyes. She will immediately drop you and apologize when you speak, meaning she is still somewhat aware and knows that you aren’t Greggory.
You’ll find a Caution bot in the room with the shelves next to the right wall. You’ll finally get a response from Greggory in this area. To get to him and the sinkhole under the Raceway, we will have to disable the nodes in Bonnie Bowl and Fazer Blast first.
Related: 20 First Person Horror Games To Play
Chapter 7 - Lil' Music Man Squad
Head through the green door and into a hallway with an open grate on the floor. Of course, jump down and make your way towards a ladder. Once you climb up, you’ll find yourself in an office. Here, you can deactivate a Caution bot right next to the couch and get the first Faz Token on the left side on top of the drawers.

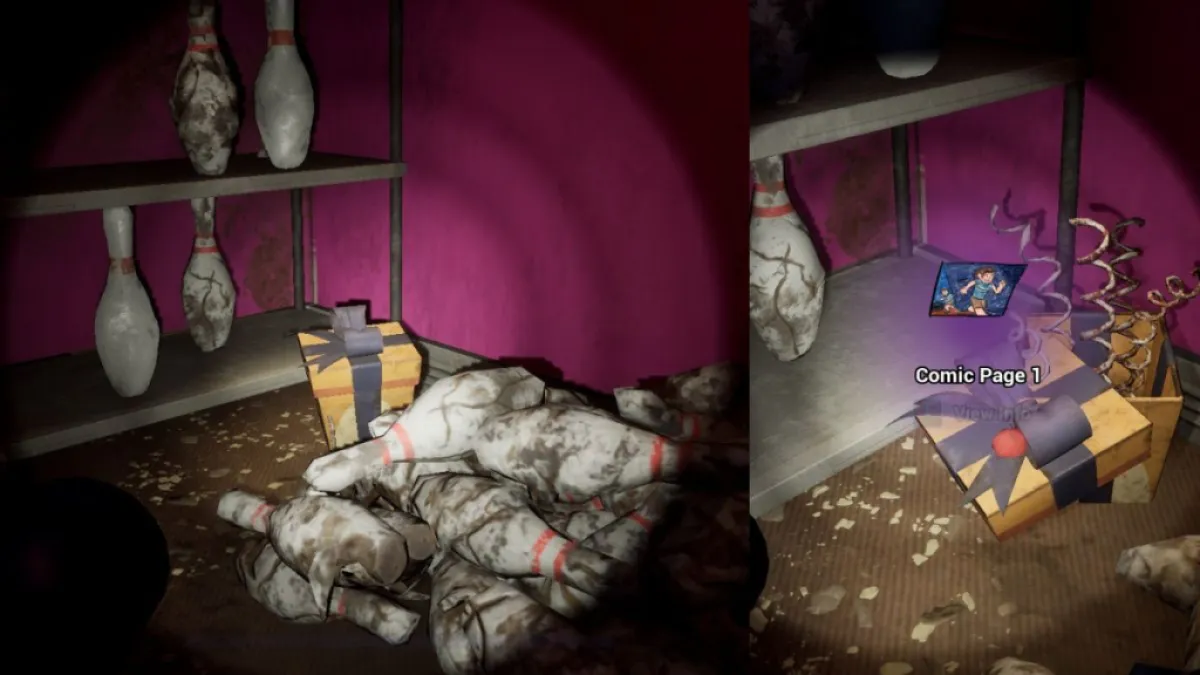
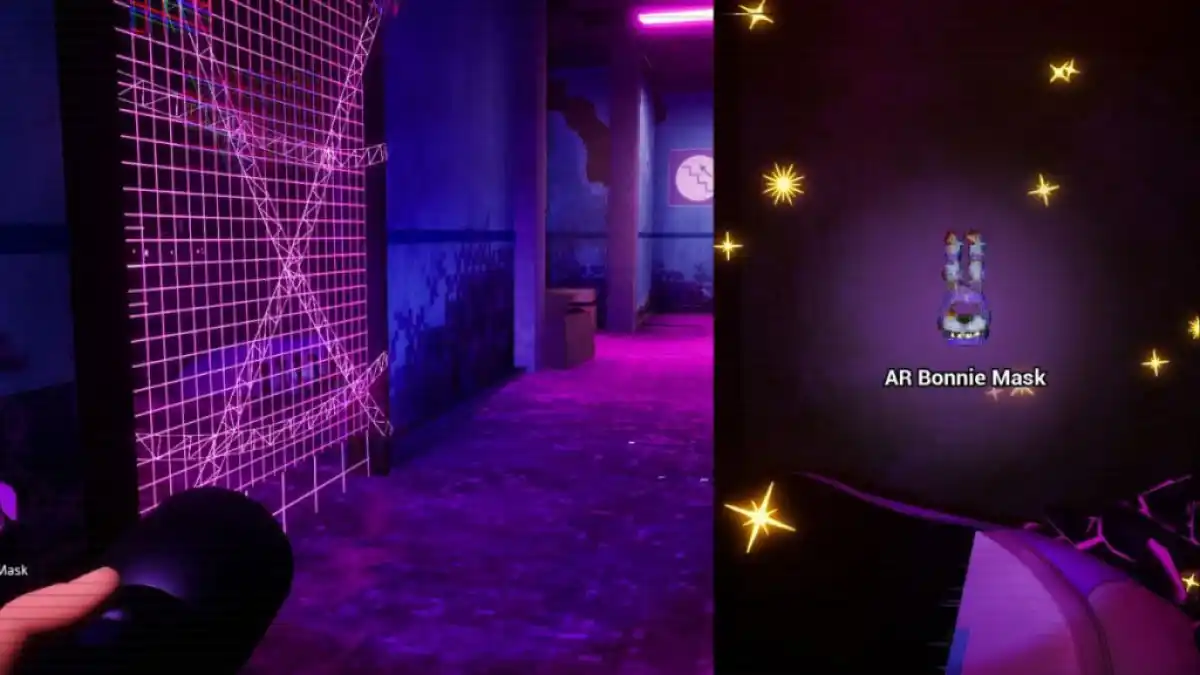
Make your way into the hallways until you reach a police tape door. Put on the Mask to get through like usual. You’ll find a Comic page 1 in one of the rooms. Go through the second glitched door next to grab the AR Bonnie Mask.
Head up the stairs and down the path until you reach Bonnie Bowl. You’ll see a Lil’ Music Man on some shelves (I can already tell something annoying is coming up).
Go to the left, and you’ll see a Security node next to the stage. We’ll have to avoid a hoard of Lil’ Music Men to get through this section. You can use Camera Stations to attract them to certain areas before heading that way.
They don't see you when you have the Mask on, but sometimes this mechanic will bug out. Hopefully, it works for you on your first try, and you don’t have to get frustrated like I did.
Once you get through the obstacle, head to the right to the women’s bathroom and get the AR Golden Foxy.

You'll head to the bowling area next and get on the AR Camera Station. Use the intercom on camera three or four to move the animatronic hoard away. Go to where they were in front of the men's bathroom and grab the first node in the shape of a giant shoe.
Make your way back and head to the left until you find a door with a Faz Wrench panel. Unlock it to reach the Arcade zone. Once inside, go to the center of the room to disable the Inhibitor. Once you've done that, go to the left corner to find a Caution bot.
At the entrance is an AR Camera station, which you can use to draw the Music Men away from the node. Press the intercom on camera one and then make your way to the node while avoiding touching the animatronics. You’ll find a node in the shape of a giant cone.
Once you've deactivated it, go underneath the shutter. There’s an Inhibitor right in front of you, but it’s guarded by many Music men. Head to the right, where you will find a Caution bot in front of some lockers. Remember him, as you can't grab him just yet.
Related: Machinarium Walkthrough
Open the door to the shutter on the other side and then head back to the Camera station. Use it to summon Little Music Men to camera three towards the shutter. You should get off the station immediately and run the same way to be ahead of them.
As they make their way, you can loop through the door and return to the Inhibitor that isn't guarded by Little Music Men. But watch out for the ones you dragged to the door previously.
Just slowly enter the room and put on the Mask; you should be good. Deactivate the Inhibitor and the bowling ball child node right next to it. Now you can grab the Caution bot, too. Just keep wearing the Mask so that the animatronics don't notice you.
Head back out the door and to the right. You'll see another Caution bot down the hall to grab. You'll also find the AR Golden Bonnie collectible in this corner, so grab them both.

Make your way down to the right bowling alley section to get the last child node, a bowling pin. There are a lot of Lil' Music Men right in front of the node and the AR Camera, so approach slowly and with a Mask on. Give it a few seconds without the Mask to make sure Glitchtrap won't show up, and then go.
Use the AR Camera station to drag the animatronics first to camera two and camera three, just in case. Finally, disable the last node.
A secret area will open if you have collected all Caution bots, along with the one in the far right corner of the bowling alley. Here, you'll be able to find the last four bots along with the AR Plushbaby.
Once you are done, head back to the Security node. Again, Glitchtrap will show up, so get to areas where there are no Lil' Music Men to take off the Mask and reset him. After you deactivate the Security node, head through the curtains on the stage next to it and turn off the jammer on the way.
Related: The Visitor walkthrough
Chapter 8 - Fazer Blast
Keep going until you reach a room with a poster; you'll find a vent behind it in AR. Cassie shares my sentiment of hating vents, but she has to do what she has to do. In we go and slide into a new area where we get the possible confirmation that the Princess Quest ending is the true ending of Security Sreach. You'll see an overturned Princess Quest arcade game with a sword through it in AR and a light on it in normal mode, indicating that the game has been beaten.
Travel through so many vents to drop into Fazer Blast. You'll see a rocket ship in front of you. First, go past it to the left to grab the AR Glam Freddy Plush. Turn around and go through the ship in AR and through a teleporter to reach the Bunny Security node.

Only two nodes are in this area, and they aren't difficult to find. However, the difficult thing is Glitchtrap since you can't take off the Mask. There is no jammer here to turn off, so you'll have to run him around.
You will find an AR Foxy Lunchbox collectible behind the menu node. Once you deactivate both nodes, head to the Security node and then go through the teleporter. You'll find the jammer right in front of you, so deactivate it to move on.

Freddy or Not
Take off the Mask to get through the crawlspace, and you'll encounter Freddy lying on a pile of trash. Don't rejoice, as sadly, Freddy isn't quite the same. Despite the cheer in Cassie's voice, he will start chasing you.
As soon as the cutscene ends, start running. Make sure you don't use up your sprint fully, as it will take longer to recharge that way. Stop just before you use it up and keep walking until it recharges. You'll lose him for a little bit, but he'll show up in front of you with an Inhibitor between you. When the cutscene ends, run to the jammer, turn it off, and quickly put the Mask on.
Unlike all the other animatronics that you could see with the Mask on, but they weren't attacking you, Freddy disappears altogether. That doesn't mean he is gone, though. Go the way he came and through a door. You'll find the Comic Page 6 here. Quickly pick it up and head to the vents.

I have been so annoyed by dealing with Lil' Music Men in the bowling alley, so of course, they decided to throw one last Lil' Music Man at me in the vent. The same tactic applies here when using sprint. As soon as you drop down from the vent, you are safe.
Make sure to check behind the shelves to the right in the room to find the second Faz Token. After you've grabbed it, head into the next vent. I know we all have trauma at this point, but you are safe in this one. Once you reach the next hallway, use the Mask to reveal an opening in the wall and the AR Freddy Lunchbox collectible.

Chapter 9 - Heartbreak
Keep going until Greggory calls you and tells you that you need to deactivate Roxy to save him. Honestly, I would have left then and there, but Cassie is better than me, so she will still try to save the supposed Greggory. Go through several rooms until you reach one with the Freddy Charging station on the wall to the left. Put on the Mask to find the AR Bonnie Lunchbox.

Keep going until you reach Roxy, trapped underneath a forklift. Prepare to have your heart broken by an animatronic that remembers your favorite cake. Sadly, leaving Roxy alive isn't a possible ending, so we are forced to use the Faz Wrench on her.
Once you've deactivated her, head to the left and through a door. You have officially deactivated all the nodes, so you can go down toward Greggory. Keep going through the new area until you reach an elevator. Make your way down to the sounds of Cassie crying. Honestly, I feel the same, Cassie.
Related: All Characters in Five Nights at Freddy’s Security Breach
Saving Greggory
You'll reach an underground cave system filled with water. As you make your way across to the opening, don't miss the third Faz Token you can find on a rock to the left. Head to the right to grab the fourth Faz Token hidden behind a stone pillar before going back and walking through the opening. You'll find the fifth Faz Token in the next area with the shelves in the far right corner.
Once you've grabbed it, head through the door to the left, and you'll see the sixth Faz Token lit up from the ceiling. Collect it and head left. You'll run into a Candy Cadet that will start telling you a creepy story. If you've collected enough Faz Tokens, you'll get to hear the entirety of it. However, the cadet will use up your tokens, so if you want to have them in your inventory, you will have to replay the chapter.
You'll find the last Faz token in the area past Candy Cadet. Head down the stairs into the room to the right, where you can grab it. Go to the left until you reach one room with the last normal collectible, Comic Page 8.

Open the Faz Wrench door and head down the stairs. Follow the green light to a crawlspace where you will finally reach Greggory. Or is it Greggory? Let's find out. Put on the Mask and use the computer to the right to deactivate Security Protocols. This will cause Glitchtrap to appear, but he has chased you down for the last time.
Activate the forklift with the Faz Wrench, which will slam into the wall. As you enter through the hole, you'll realize that it wasn't Greggory calling you (who could have known), but a mimic trapped by the security program we deactivated. Whoops!
In all her glory, Roxy will attempt to stop the Mimic from killing you, but she is only buying you time to run. At this moment, the real Greggory (or is it?) will get through to you on the Roxy Talky.
As he gives you instructions on which way to run, Greggory will explain that he has been trying to reach Cassie all night to stop her. Since he failed, the only way to stop this now is by dropping the elevator and quite possibly killing Cassie. This is only one of the several possible endings for Ruin that you can get.
For more horror game guides, check out the Slender the Arrival walkthrough on Pro Game Guides.