Since I love puzzles, I was delighted to see Lost Lands 9 has more of those challenging twists and turns, much like Lost Lands 8, to work through. We have a full guide to help you complete the Lost Lands 9 walkthrough below!
The Lost Lands 9 is a unique story about a boy, Folly, who goes on an epic adventure, experimenting with a crystal creation and uncovering an ancient dungeon that could lead to the treasure. This game is very long and filled with puzzles, so I have split it into multiple parts to help you work through it. Ready to continue on to the next parts? Take a look at them all listed below:
Keep reading below to start working through Chapter 1, Part 1, all the way up to Folly's sudden discovery!
Lost Lands 9 Full Walkthrough Guide - Chapter 1
Village

After a brief intro, you'll start in the school yard where Folly wants to check out his shelter rather than go to school. Follow these steps to pick up all the items and use them as necessary to progress:
- A1. Water trough - Iron Flower
- A2. Sign post - Screwdriver Shaft and Stick
- A3. Bee hive
- (Collectible) Campsite - Manuscript Page 1/8
- (Collectible) Rocks behind Sign Post - Book 1/7
- (Morphing Object) Hill 1/45
Use the Stick in your Inventory to toss to the bee hive hanging in the tree on the right side of the screen, and this will distract the bees from the hive toward the hog, making the hog run away with them and giving you a free path onward. Click on the pathway to the right to continue to the canyon.
Canyon
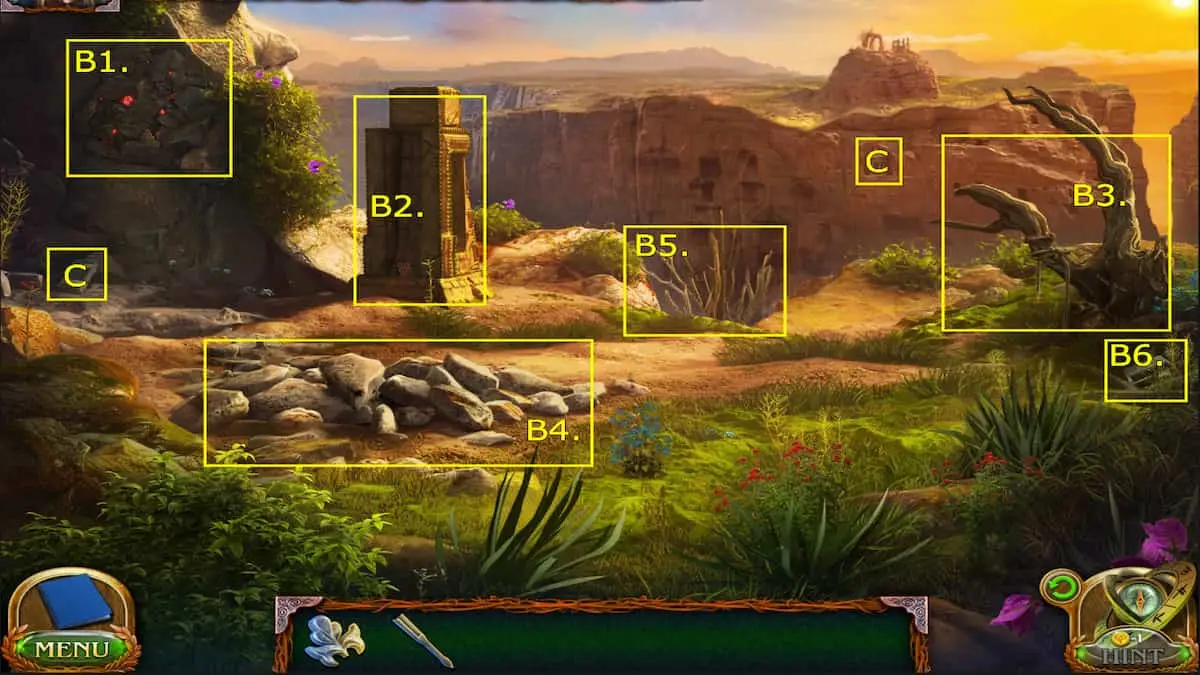
Folly continues down the path toward his shelter, but he'll need to get his grappling equipment to descend down the canyons. Here's where to find the pieces to the honeycomb chest and retrieve his equipment:
- B1. Cliffside vein - Wooden Honeycomb
- B2. Pillar - Wooden Honeycomb
- B3. Tree with broken rope - Wooden Honeycomb
- B4. Pile of rocks
- B5. Sticks - tear the sticks out of the way
- B6. Below the tree with broken rope - Ascender
- (Collectible) Cliffside - Book 2/7
- (Morphing Object) Ruins 2/45
Pressing on the Sticks on the cliff's edge will break them off and automatically set them on the ground. Click on the pile of rocks and uncover a chest. This chest is where you'll insert the missing Honeycomb pieces. Select the recovered pieces from your inventory and then press on the chest to automatically slot them.
How to unlock the Honeycomb chest
To fully unlock the chest, you'll need to fill all the holes in the top using the little diamond chains within each lock. The number of diamonds shown in each lock equals the number of holes they can fill. Click on a lock to show available spaces you can place a diamond in, then click any of those holes to place a diamond. If the holes are in a row, you can click on the farthest one, and the chain will cross over all of them, slotting a diamond into each.
You must maneuver them around until a diamond is in each slot. (Keep in mind that there are random chest puzzles here, and yours might not be the same as mine.) You can use the picture above to help you place them like I did.
Once you open the chest, you can grab the Roll of rope and the Shelter Key. Then, select the tree with the broken rope on the right side and use the roll of rope to replace it. Now, you can select the rope, attach the Ascender to it, and propel down to the next area.
Shelter Entrance

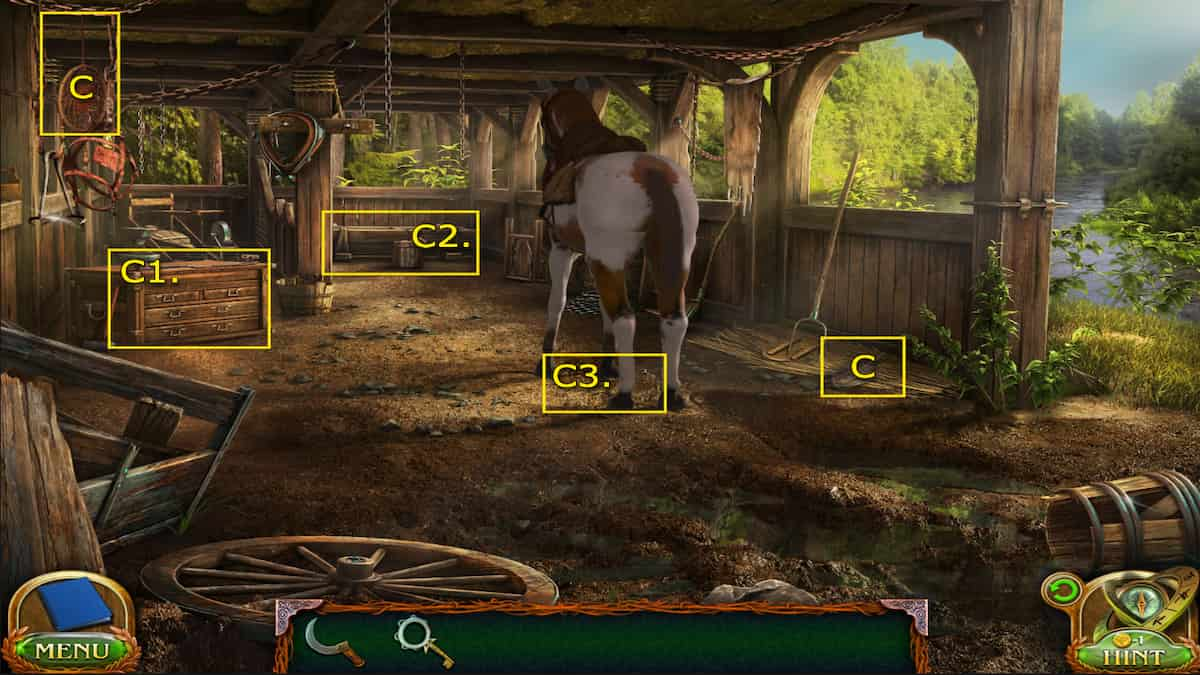
You've reached the entrance to the shelter below the canyons, but Folly's missing the key to enter. Investigate this Fallen Traveler and figure out how to retrieve your key:
- C1. Fallen body - Traveler's Key
- C2. Statue double-headed snake puzzle
- C3. Shelter door
- C4. Planks covering a drawing
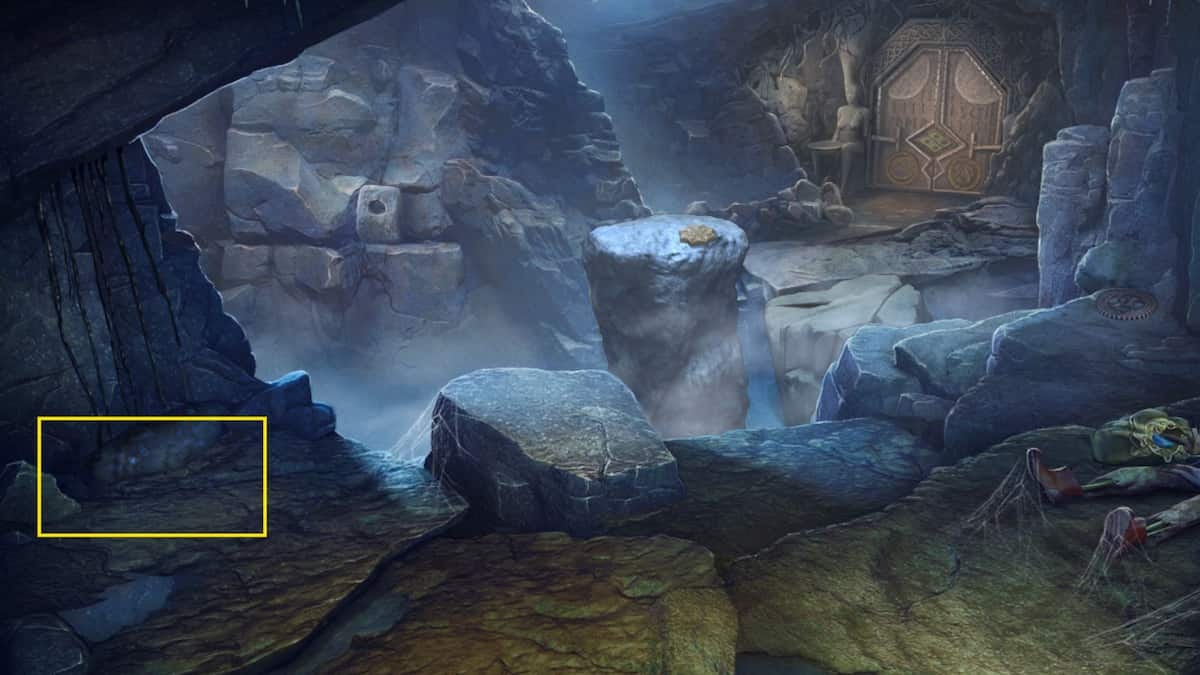
- C5. Blue gem vein
- (Collectible) Rocks above the double-headed snake puzzle - Gear 1/8
- (Morphings Objects) In the grass below double-headed snake puzzle - 3/45
Once you retrieve the key from the body, look around at the surrounding area, make a note of the Shelter door and planks (which you can interact with later), and then start working on the double-headed snake puzzle.
How to solve the snake puzzle
Just like the honeycomb chest, the double-headed snake puzzle will also be random for each person. The goal of this puzzle is to move the snakes left and right until each snake head is in its own column. If the head is not lined up with any other head, the eye will glow to let you know you have it right. Check out the picture of my puzzle ahead to see how to place them correctly.
Once you complete the puzzle, you can retrieve a note explaining the key to the shelter has now been moved, and you can collect the Screwdriver Handle. Click on the Screwdriver Handle in your inventory and combine it with the Screwdriver Shaft to create a functional Screwdriver. Now, press the green back arrow on the bottom right of the screen to return to the Village (starting area). Once there, press on the left pathway to move to the Schoolyard.
Schoolyard
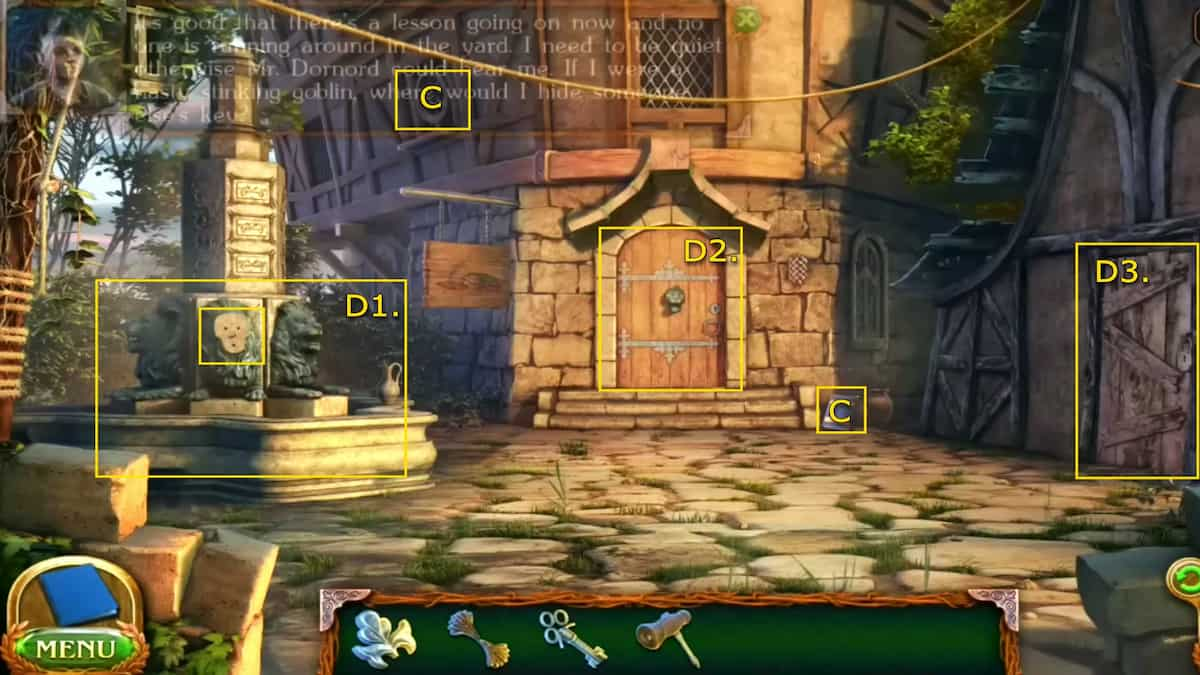
With the new information we just got from the letter in the double-headed snake puzzle and with the Traveler's Key, we can head to the School Yard, where the Shelter Key could be hidden. Here's what to do:
- D1. Lion fountain - Iron Flower
- D2. School door - Lion Mask
- D3. Barn door
- (Collectible) To the right of the school door - Book 3/7
- (Morphings Objects) School window 4/45
To get the Lion Mask off the school door, you'll need to use your Screwdriver to pry it off. Select the Screwdriver from your Inventory, then click on the Lion Mask. Then, you can head to the lion fountain and put the mask on the statue. This will open up some pipes behind it, but the professor will first catch you. The Professor will give you the Barn Key and instruct you to fix the fountain. Use the Key to enter the barn.
School Barn
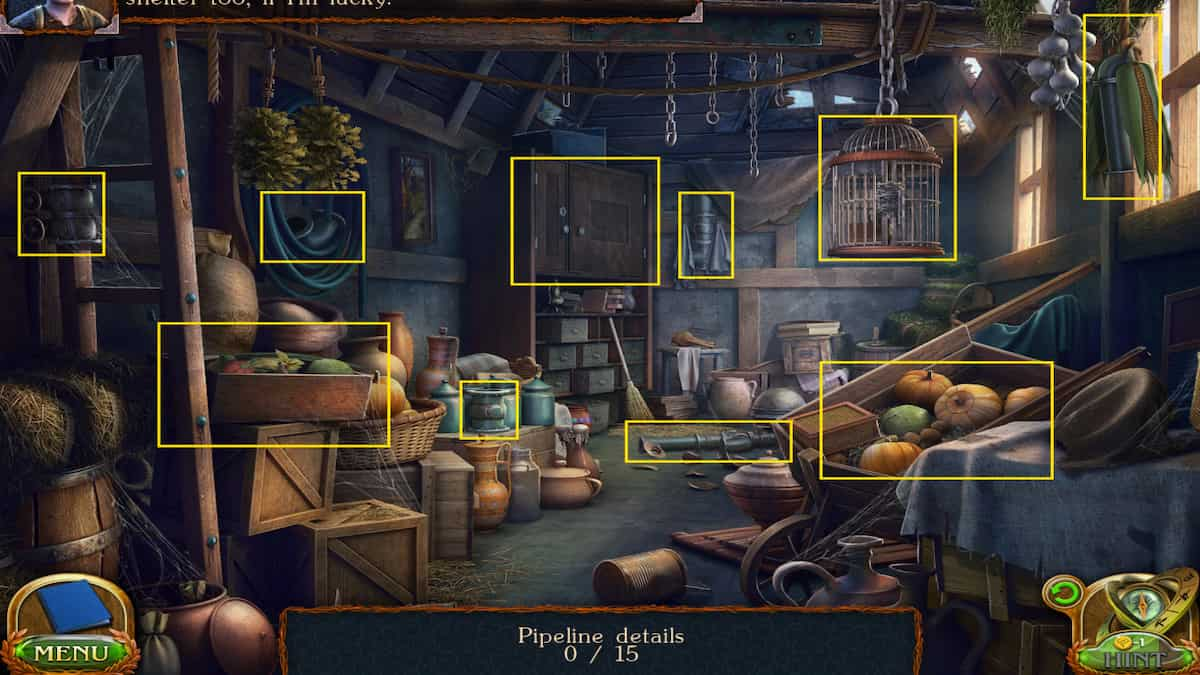
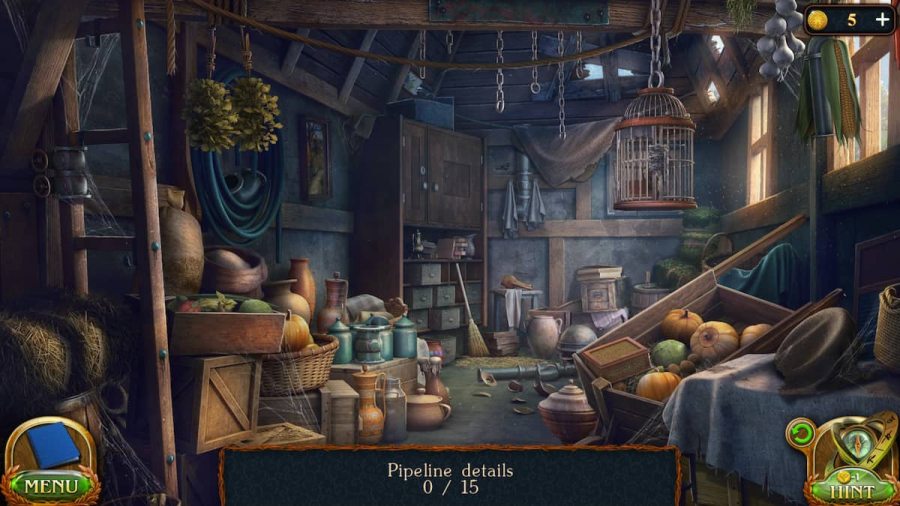
In the barn, you'll need to find all the pipeline details hidden in the mess. There are 15 total, and here's where to get all of them:
- Pipeline detail 1 - On the ladder on the left side of the screen
- Pipeline detail 2 - On the floor toward the back of the barn
- Pipeline detail 3 - On the hose hanging on the left wall
- Pipeline details 4 & 5 - Vegetable crates on the left side of the barn
- Pipeline details 6, 7, & 8 - In the locked cupboard in the left corner (The first one is on the shelf, and the second must be unlocked from the safe. Find the key in the lower right book stack, open the cabinet with the key, grab pipe in the lower shelf of the cabinet, and grab the crank from within. Now you can open the safe and grab the last pipe piece)
- Pipeline detail 9 - Hanging on the back wall slightly beneath cloth
- Pipeline details 10 & 11 - On hanging birdcage (First one is behind on blue cloth, second is inside the cage beneath the book )
- Pipeline detail 12 & 13 - Vegetable crate on the right side of the barn ( One directly to the right of the crate and the second inside the pumpkin at the top )
- Pipeline detail 14 - Hanging with the ear of corn on the window on the right side of the barn
- Pipeline detail 15 - On crate with pitchers on the left side of the barn
With all the pipeline details, you will return to the Schoolyard and can interact with the lion fountain. Select the pipelines you collected from the barn in your Inventory and then place them in the statue. This will automatically repair it. To retrieve the Shelter Key at the top of the fountain, you'll need to complete the pipe puzzle.
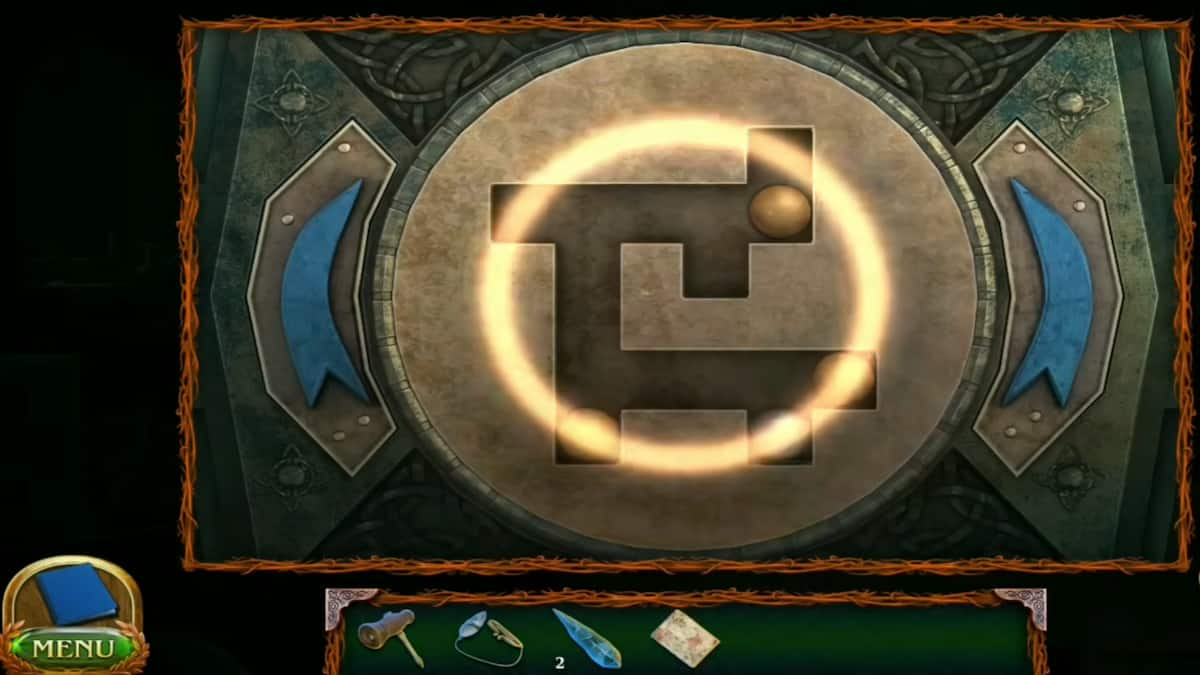
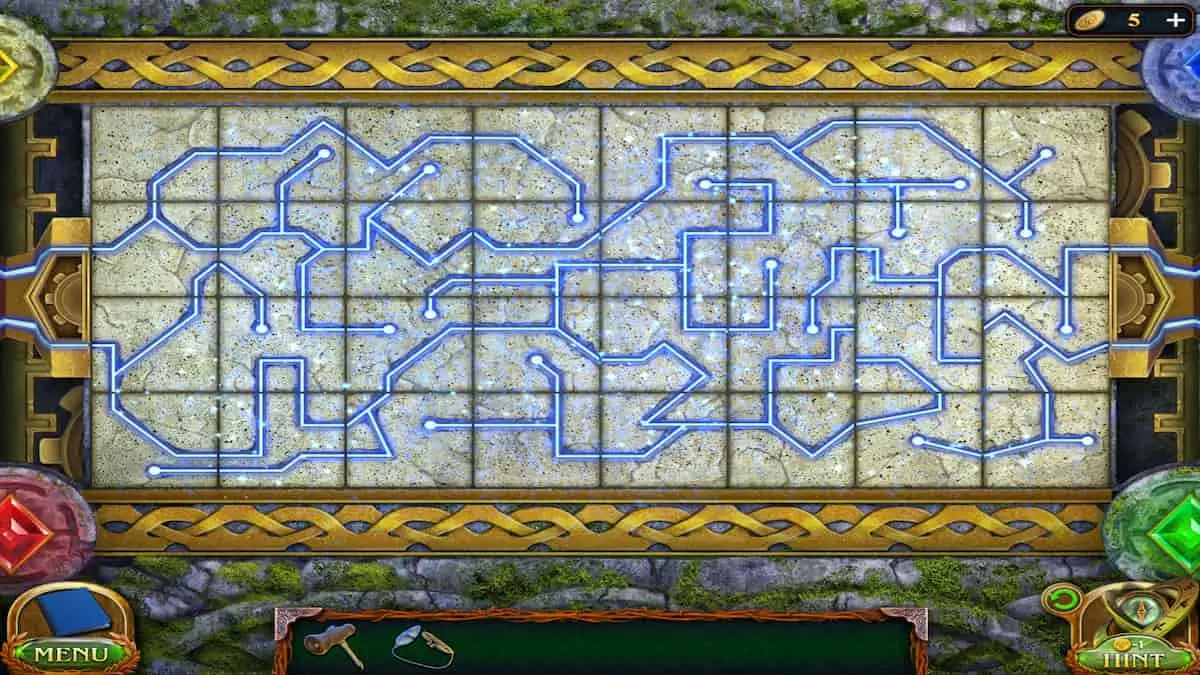
How to solve the pipe puzzles
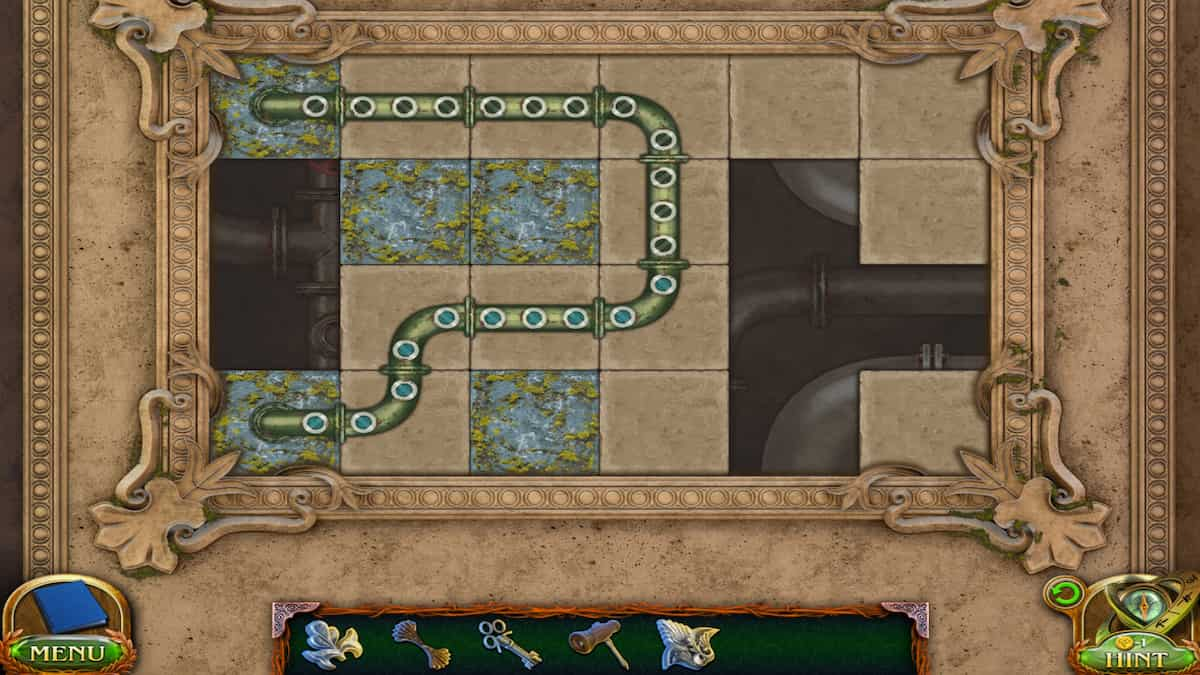
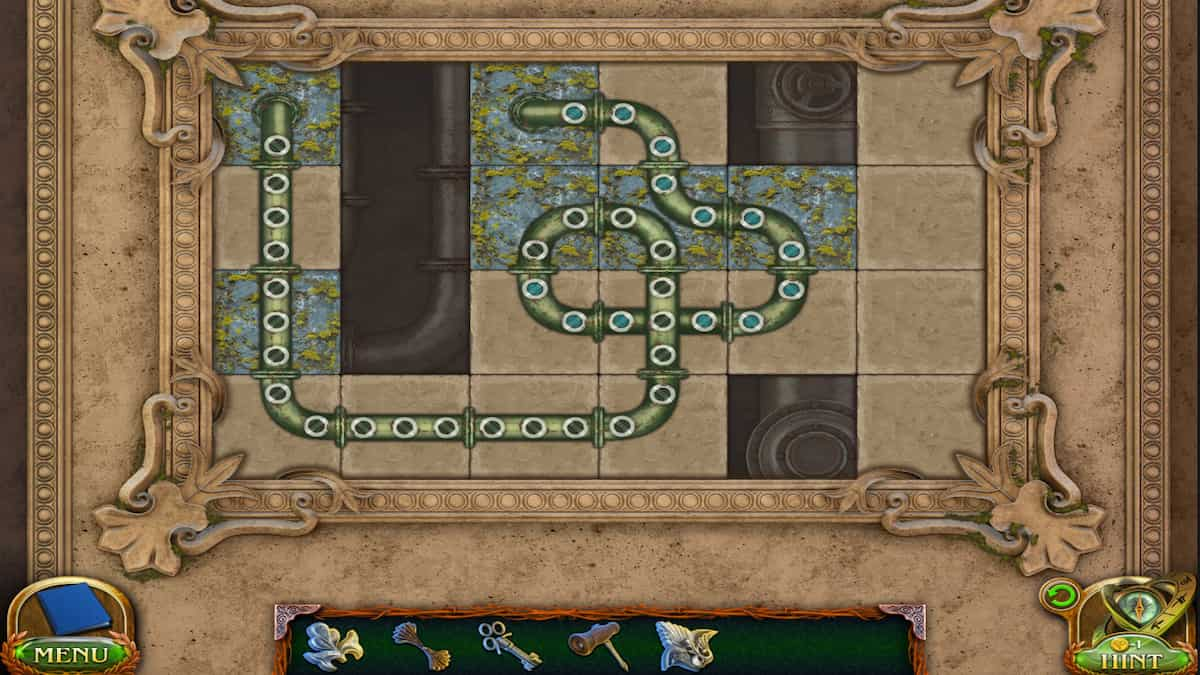
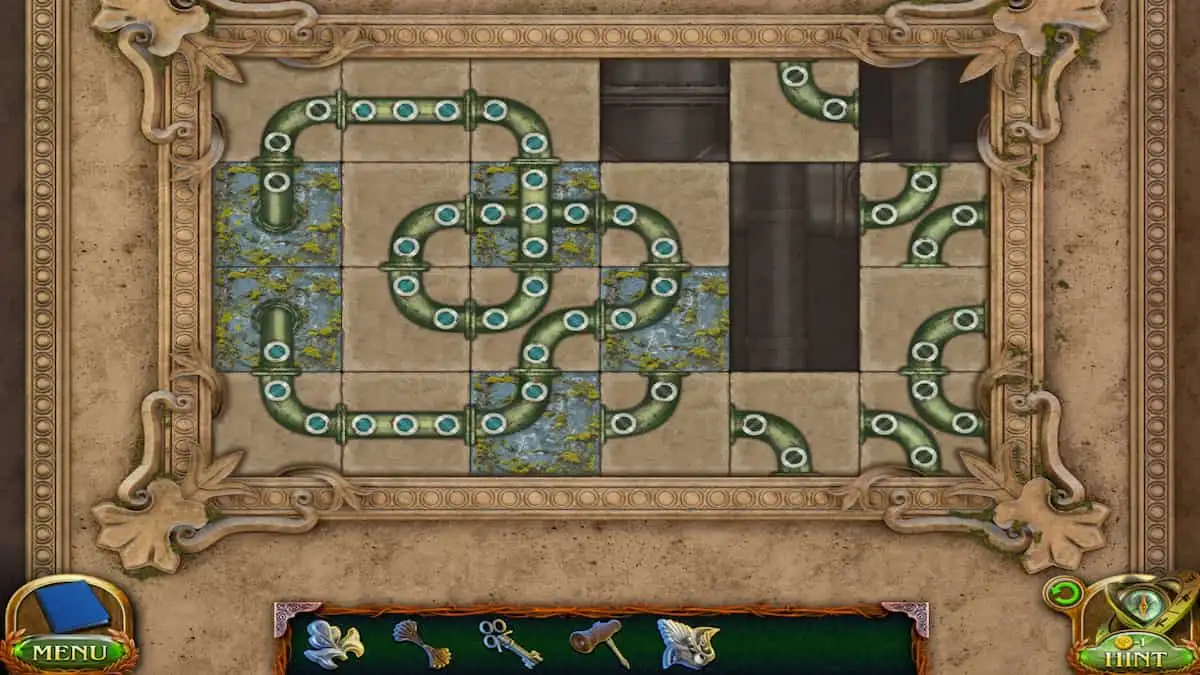
There are three total pipe puzzles on the statue, and they are just like regular sliding tile puzzles. Your goal is to connect all the fixed pipes together using your sliding pipes. Fixed pipes are the ones that you can't slide on the mossy stone tiles. You'll need to slide pieces around, moving them out of the way occasionally so you can slide the right pieces in. The puzzles will get more complicated as you go through them. Take a look at my three solved puzzles above!
Once you fix the fountain pipes, the Shelter Key will fall off the top of the fountain into the drain. Interact with the drain and use the Screwdriver to collect it from the drain. Once you collect it, you will automatically be returned to the Village, and you can continue back through the Canyon and to the Shelter Entrance.
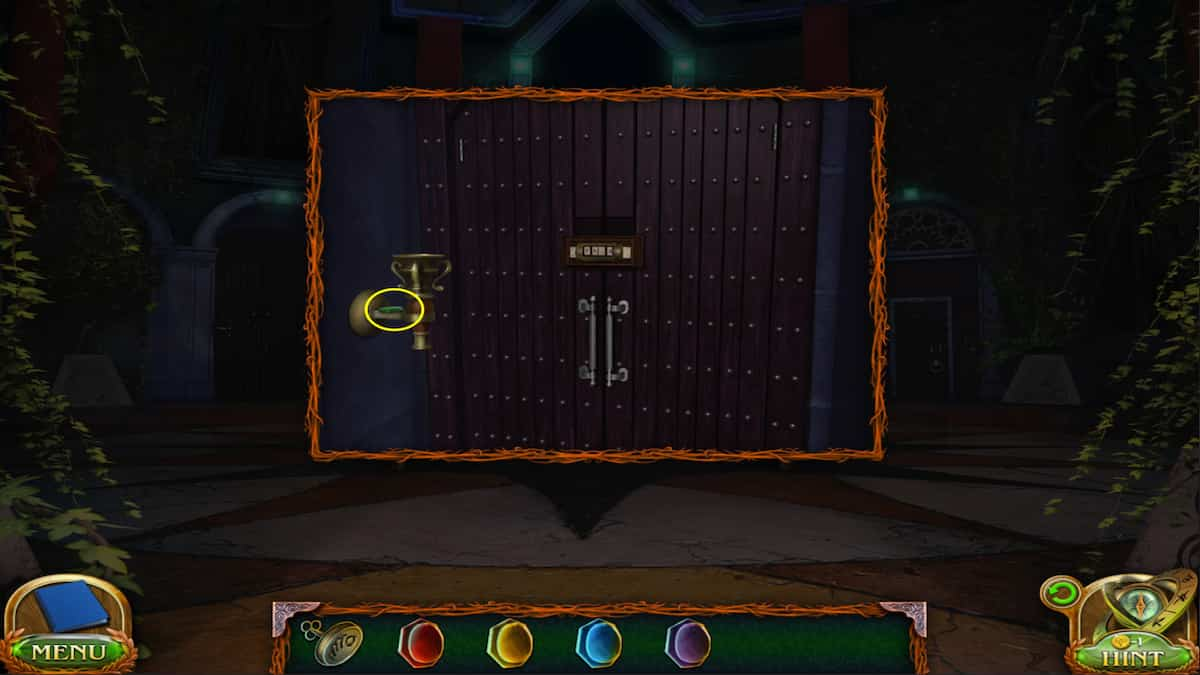
Now, at the Shelter Entrance, interact with the door on the left side of the screen and use the two Shelter Keys to open it. Use the bronze key first and then the silver key in order to enter.
Related: Haunted Hunt Walkthrough, Chapter 4 – Adventure Escape Mysteries
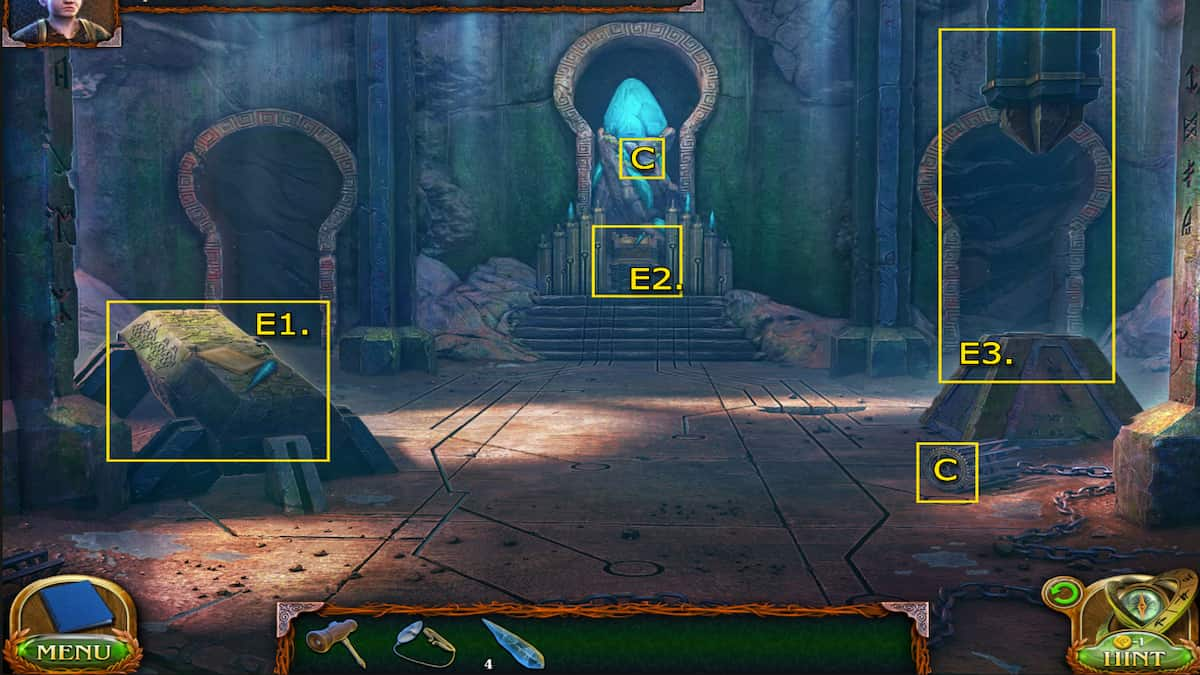
Shelter
Now that we finally made it to the Shelter, Folly can begin his fun experiments, but we'll need to gather up all the ingredients and fix up his equipment.
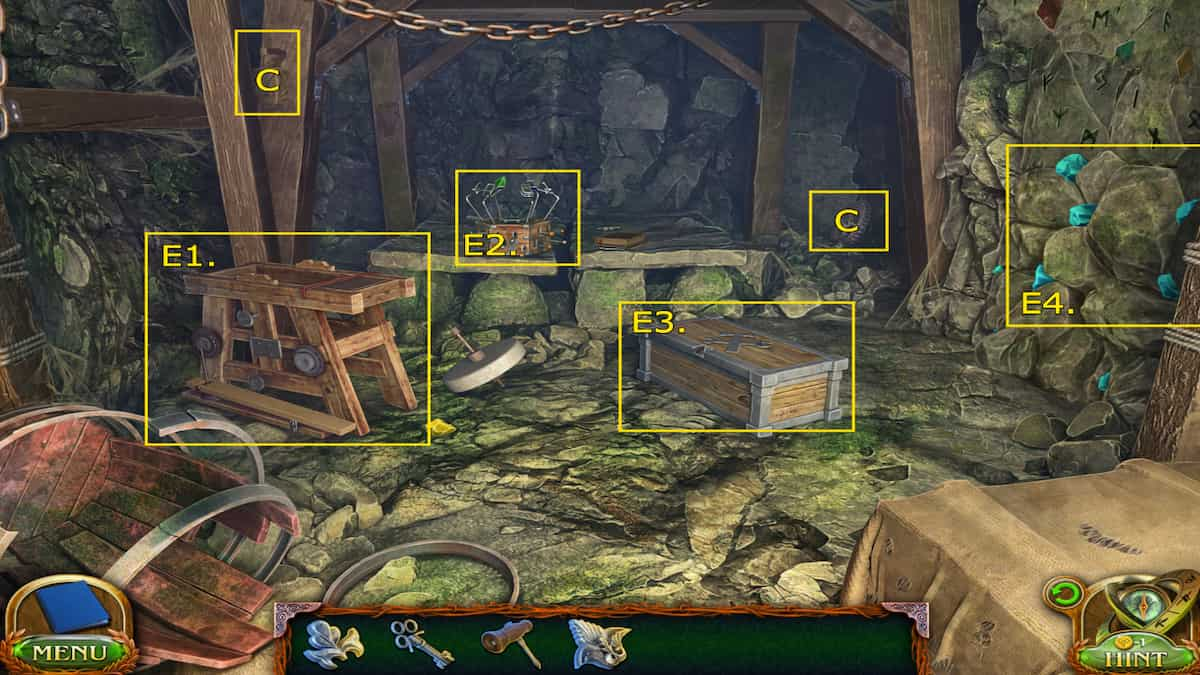
- E1. Grindstone
- E2. Gemstone Clamps - Toolset Key and Iron Flower
- E3. Toolset Chest - Gear Transmitter and Hammer
- E4. Turquoise gem vein
- (Collectible) In the back right corner - Gear 2/8
- (Collectible) In the Toolset Chest - Manuscript Page 2/8
- (Morphing Objects) Mirror and lantern hanging on the post on the left side of the screen 5/45
First, interact with the Grindstone and place the stone back on the bench. Then, grab the red elastic band and place it in the right spot on the gears on the side of the bench. Then, look at the Gemstone Clamps on the makeshift desk to find your Toolset Chest key. You can use it to unlock the chest and collect the Gear Transmitter. Return to the Grindstone and place the Transmitter on the bench.
How to solve the Gear Transmitter puzzle
The Gear Transmitter is another sliding puzzle, just like the pipes, but a bit easier. Your goal is to get all the tiles with gears on them lined up with the gears on the Transmitter. To do this, you must move all the tiles around and find which gear tiles fit into the slots against the main gears. You're going to want the following tiles in these spots (use the picture above to help you visualize):
- Long skinny gear tile - Top
- Rectangle gear tile - Right
- Square gear tile - Left
- Short skinny gear tile - Bottom
Once you have gears placed in the right spots, the Grindstone will begin to work, but you're still missing one last item. You need something to grease it up. We're going to need to head back to the Village to get something. Press the green back arrow to backtrack to the Village.
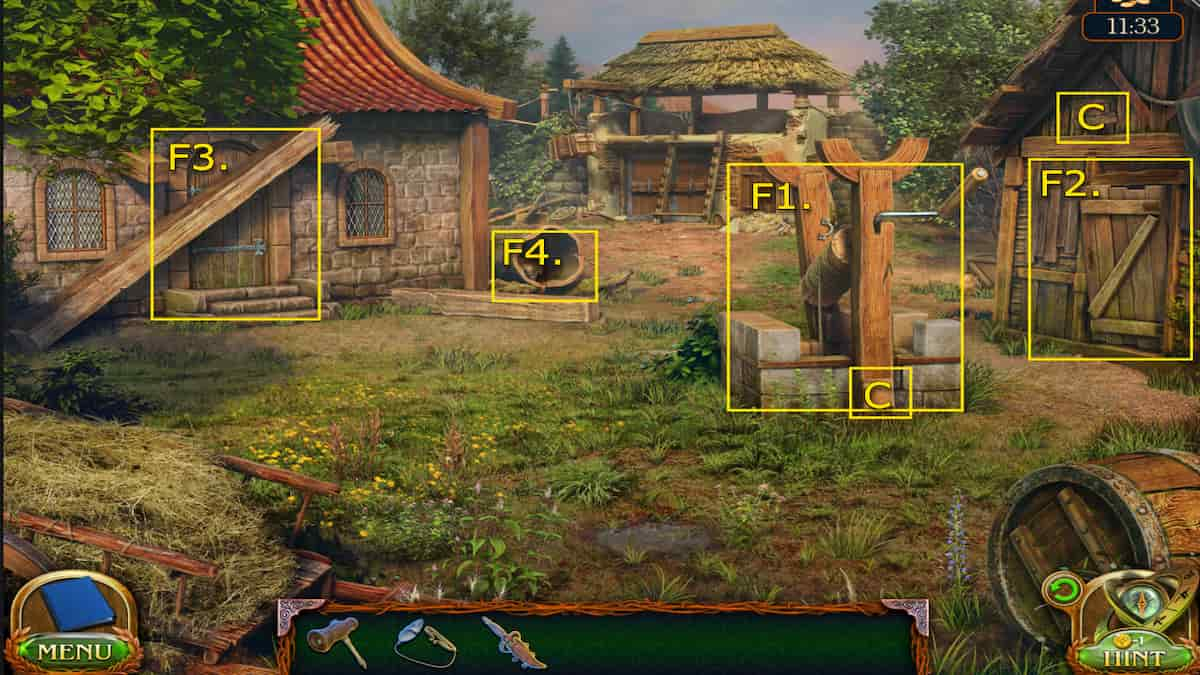
Village (Campsite)

- F1. Locked Satchel - Flint and Meat
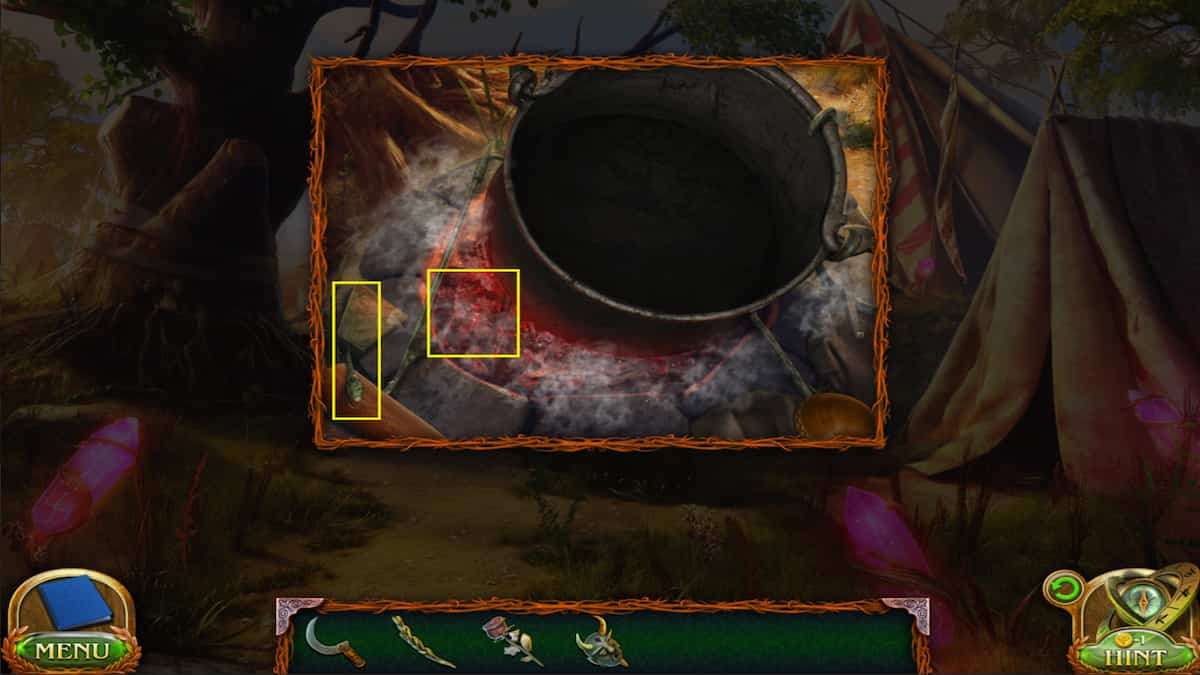
- F2. Cauldron pot
- F3. Fire pit
- F4. Empty Cup
At the Village, interact with the campsite, like we did at the start. However, this time, we can use the Traveler's Key to open up the locked satchel. You will find a piece of flint and meat. The meat is perfect for creating a bit of grease.
How to start the fire and make grease
Press on the meat to add it to the pot. Now, you're going to need to start up a fire by gathering some Brushwood. Thankfully, we know where we can find some. You can just head back to the canyon by pressing on the pathway to the right and then clicking on the brushwood pile we removed from the cliff's edge earlier to collect some. Then, return to the campsite and add the brushwood to the fire pit. Once you have it set up, take your Flint from your Inventory and click on the brushwood to try to light it. Unfortunately, we can't seem to get the fire going yet; you need a catalyst.
Head back to the Canyon on the right path and climb down the ropes to the Shelter Entrance. On the Fallen Traveler's body, grab the flask of alcohol. With the flask of alcohol, we can return to the campsite again, apply the alcohol to the brushwood, and try our Flint again. Now, the fire will start and cook our meat, creating fatty grease. Grab the Empty Cup from beside the satchel and click on the pot with it to pour the grease in. Make sure you take your cup of fat.
Shelter (Experiment)
Now, you can head back to the Shelter and apply your cup of fat to the Grindstone to grease the gears. With the Grindstone working correctly, we can use it to cut down some gemstones and add them to our gem clamps. Our gem collection is missing, so here's where to find all the Gem Nuggets.
Where to find all Gem Nuggets

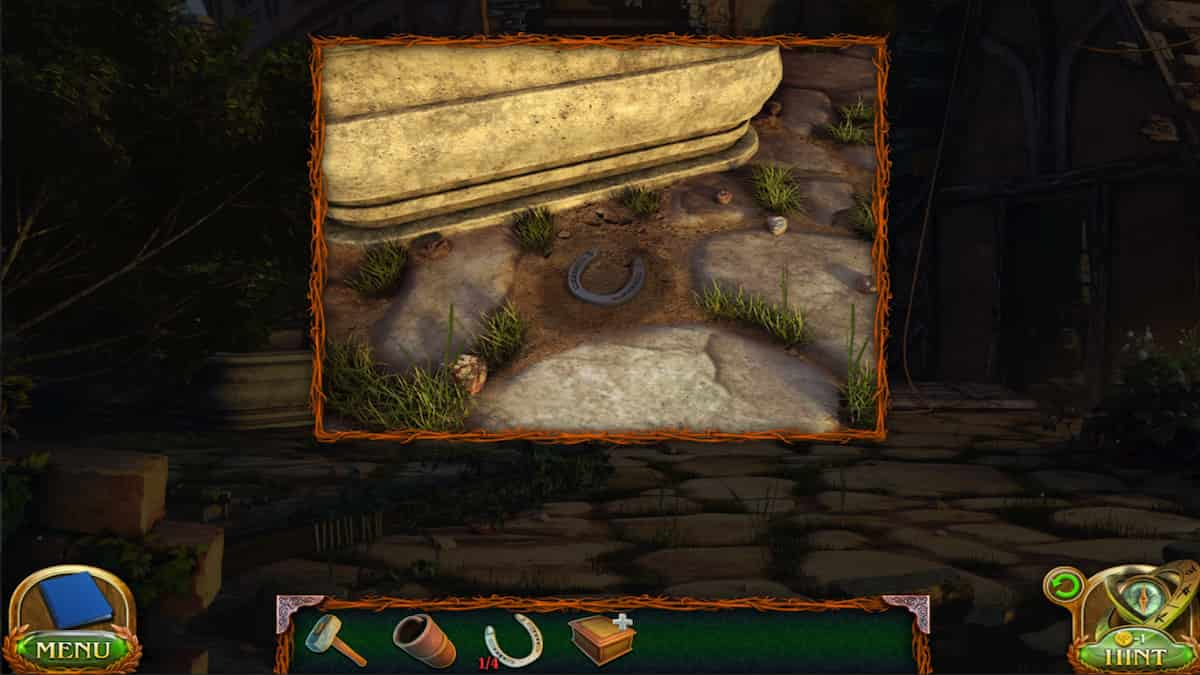
Interact with the little shrine next to the campsite in the Village. You now have three Iron Flowers you can place into it. Select them from your Inventory and click on the empty slots to insert them. Once you do, you can grab the Gem Nugget (1/4) from the center.

Head back to the canyon and interact with the red vein on the cliffside. Use your Hammer to break away a cluster of it and gain Gem Nugget (2/4).

At the Shelter Entrance, interact with the blue vein on the rocks behind the Fallen Traveler. Use your Hammer to break away a piece of it and acquire Gem Nugget (3/4).

In the Shelter, interact with the light blue crystal clusters on the right wall. Use your Hammer to break some free and collect your last Gem Nugget (4/4).
Once you find all the Gem Nuggets, return to the Grindstone. Select the Gem Nuggets from your Inventory and place them with the yellow gem on the ground. Click on the Grindstone to start it up, and then select gems and then the Grindstone to turn them into Crystals.
With the Crystals, go back to the clamps and place them inside. This will initiate a short cutscene and then reveal a crack in the ancient inscriptions.
Inspect the new crack in the inscriptions on the wall. You can use your Hammer to chip away the rocks and reveal a pattern puzzle.
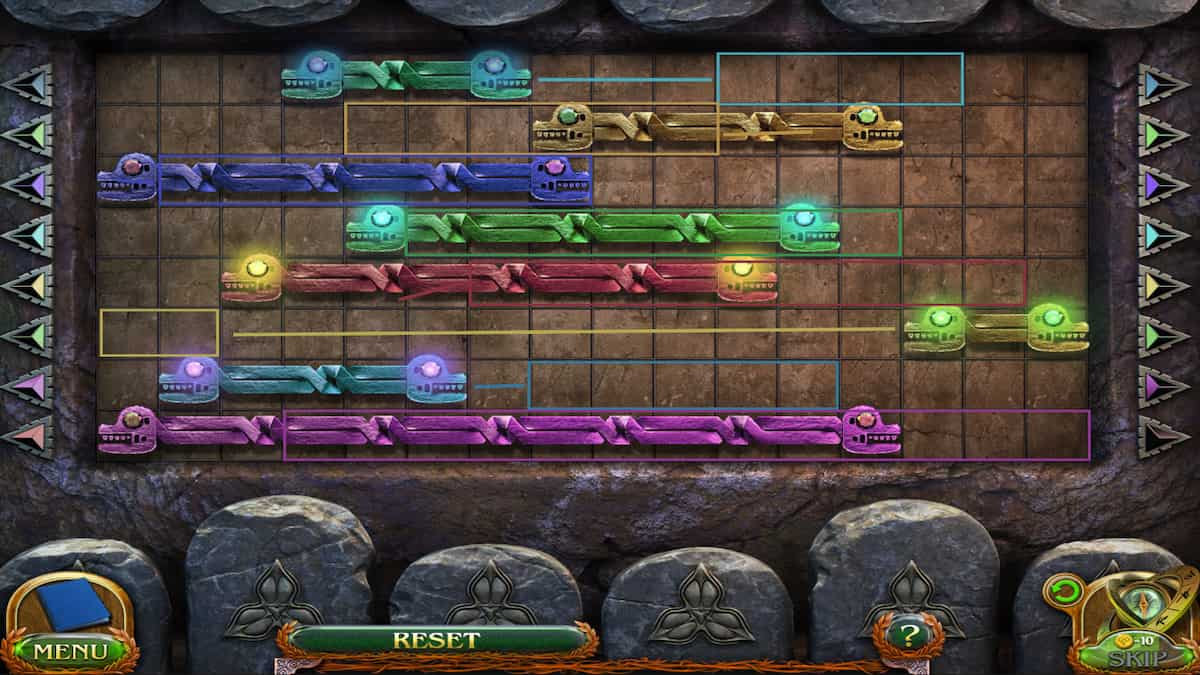
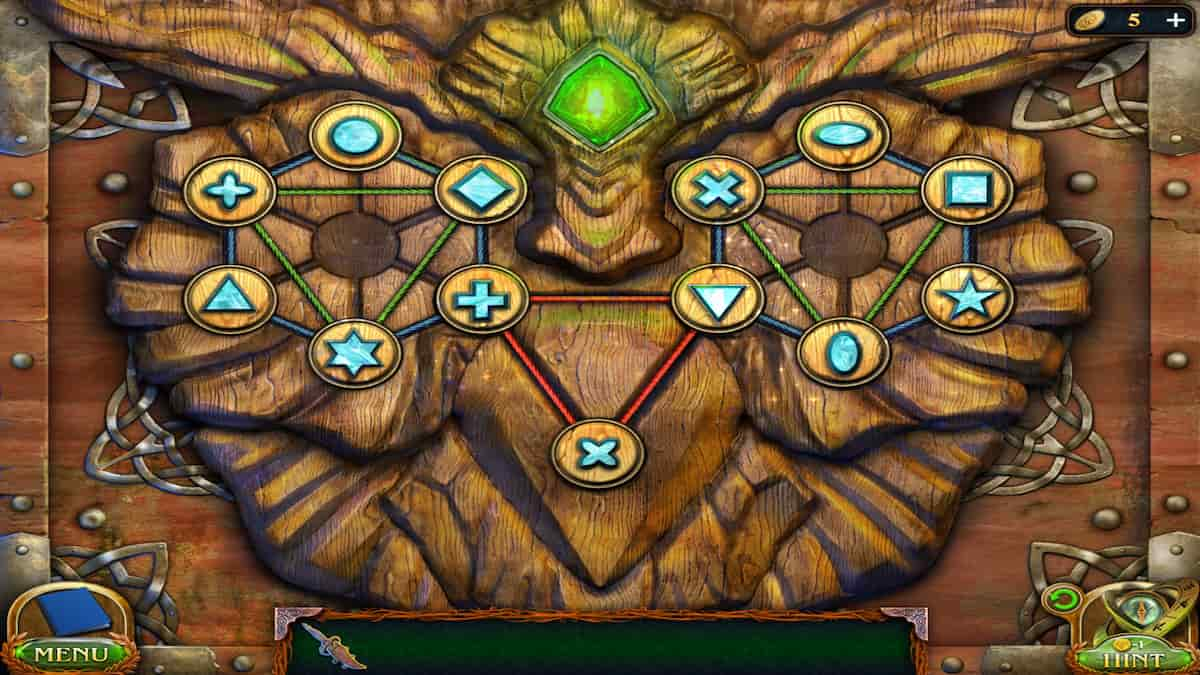
How to open the secret entrance to the Dungeon
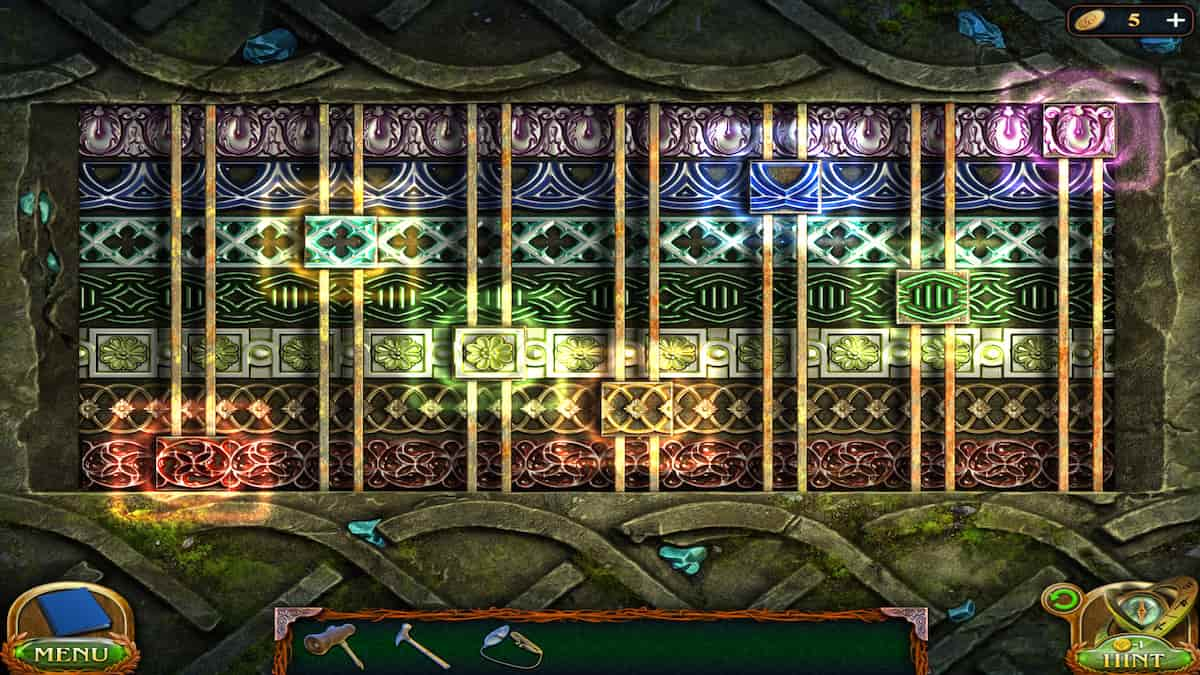
The goal of this puzzle is to get all the colored tile patterns in their matching color line. Some of the tiles are connected to other tiles, meaning when you move it up or down, other tiles will also move, occasionally in the opposite direction.
There are a few different ways you can complete this puzzle, but here's the order I moved them:
- Move red to green
- Move pink to green
- Move red back to green
- Move blue to blue
- Move turquoise to blue
- Move yellow to orange
- Move blue back to blue
- Move orange to orange
- Move turquoise to blue
- Move green to blue
- Move blue back to blue once more
- Then, move green to green
Once you complete the puzzle, the secret entrance will open up and allow you to enter.
Dungeon
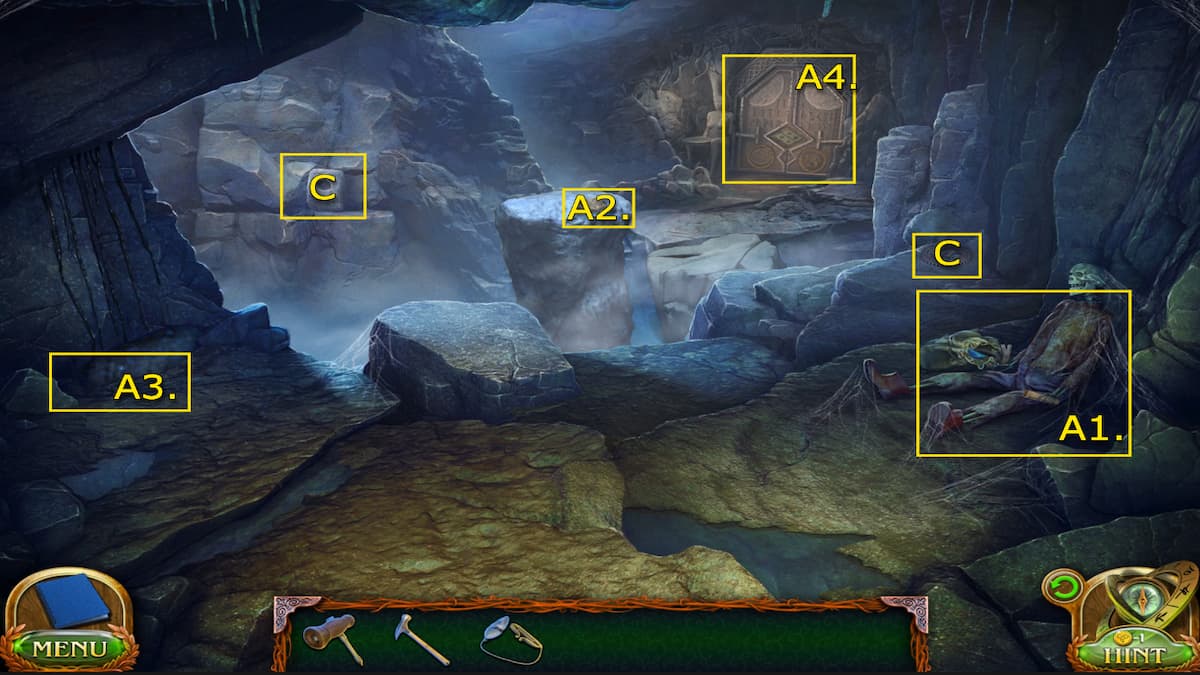
There is a lot more to see inside this dungeon. Take note of all items, even if you can't quite interact with them right now. They will all be important in the following parts.
- A1. Skeleton - Crystal candle and Pry bar
- A2. Ancient Seal
- A3. Black oil puddle
- A4. Glyph Door
- (Collectible) In the further right corner, past the skeleton - Gear 3/8
- (Morphing Object) Stone on the further stone wall on the left 6/45
Dungeon (Glyph Door)
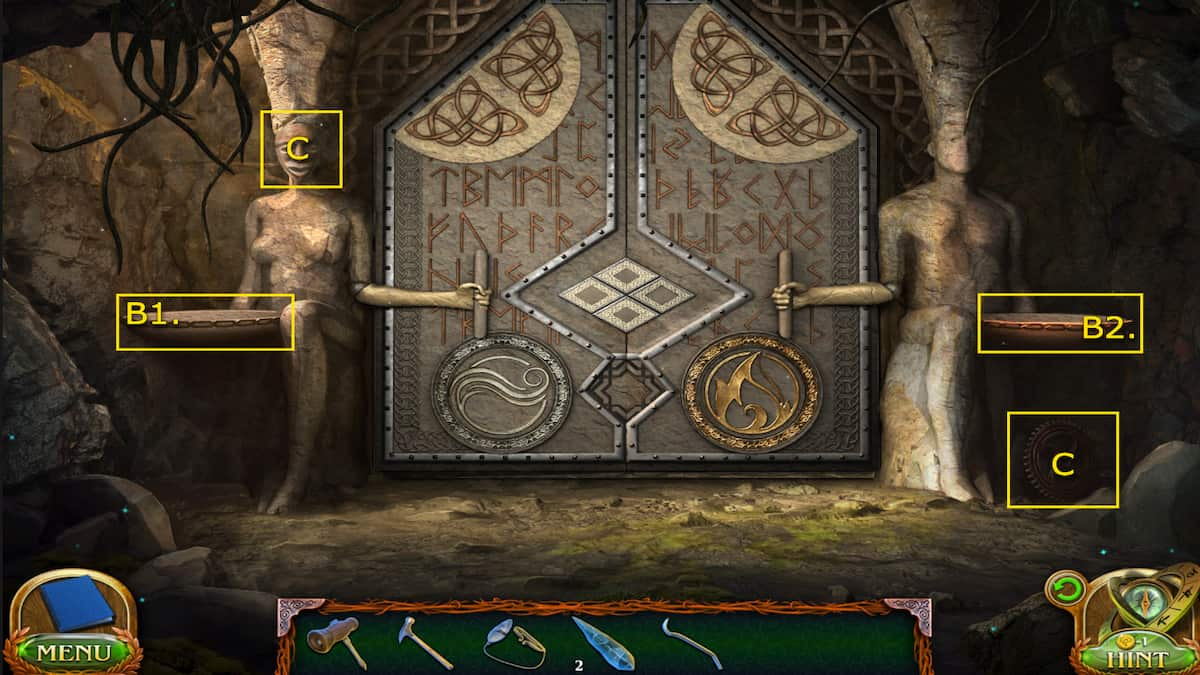
- B1. Left statue basin - Crystal candle
- B2. Right statue basin
- (Morphing Object) Left statue's face 7/45
- (Collectible) Beside the right statue - Gear 4/8
Now that you've looked around here and collected the Pry bar return to the Shelter Entrance. You can use the Pry bar to pull down the planks covering a drawing. Make sure to collect a Board once you do. Then, head back into the Dungeon to use the board to cross over to the Ancient Seal. This will, unfortunately, make the pillar fall and break the path to the door. Pick up the board again and try to use it to cross the door. It is too short of reach, so you'll need more.
How to make a bridge to the Dungeon door
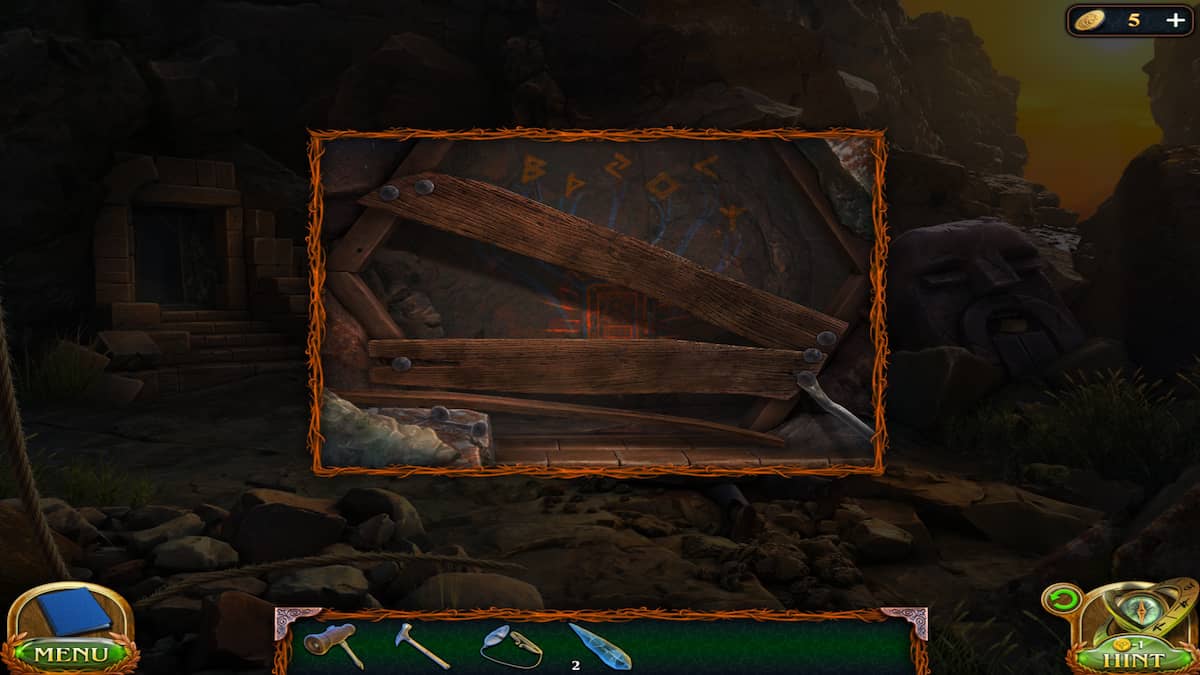
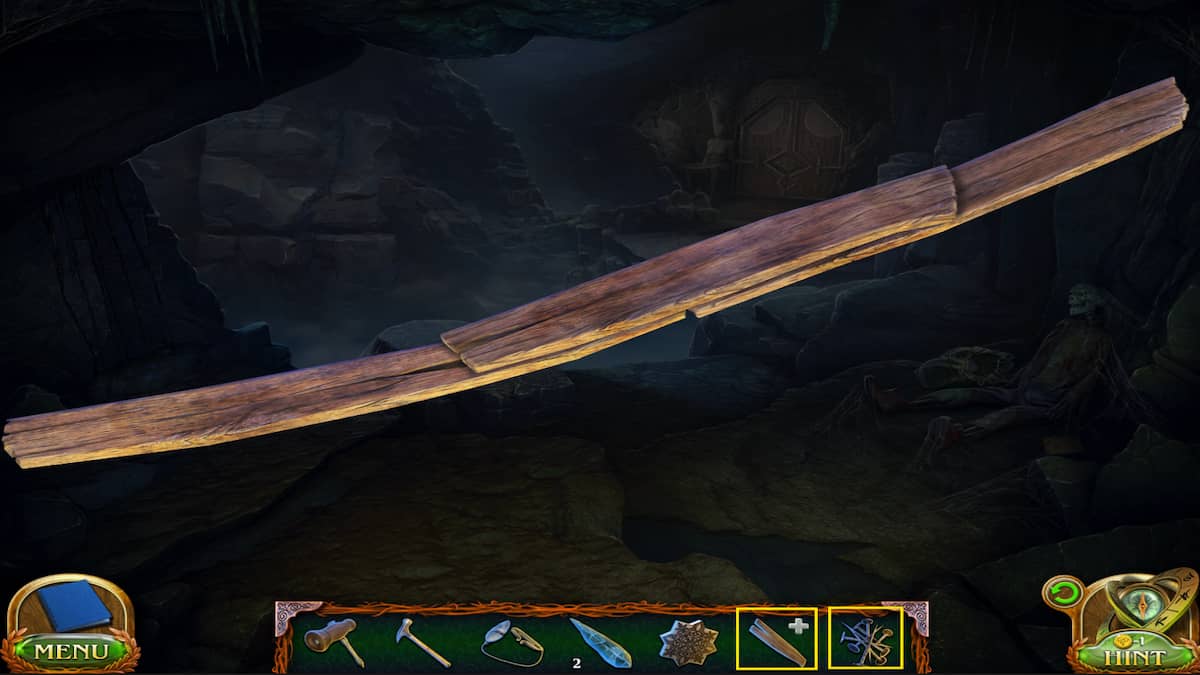
Head back to the Shelter Entrance, grab more boards, and the Nails in front of the drawing. Then, select your first board from your Inventory and add the other boards to it. Then, put the nails in. Use your Hammer to secure them all and finish your Self-made bridge.
Now, you can place the Self-made bridge across the gap to reach the Dungeon door again. You've made it to the door, but you're still missing the two elements required to open it: fire and water.
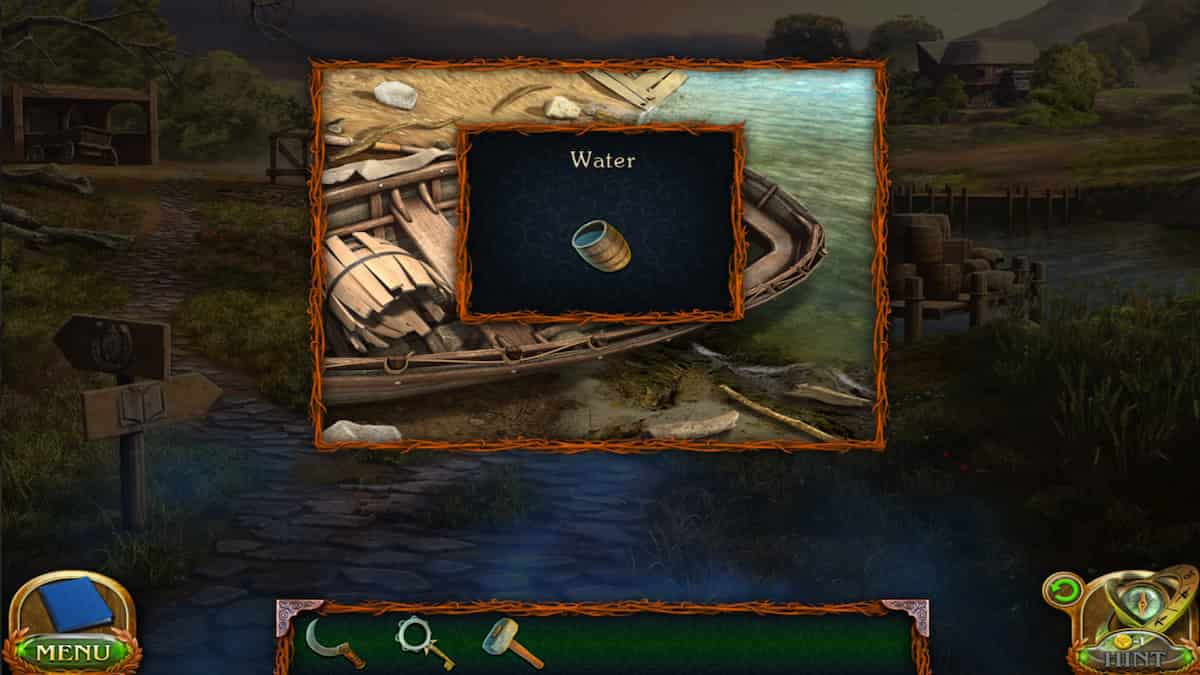
Where to get fire and water
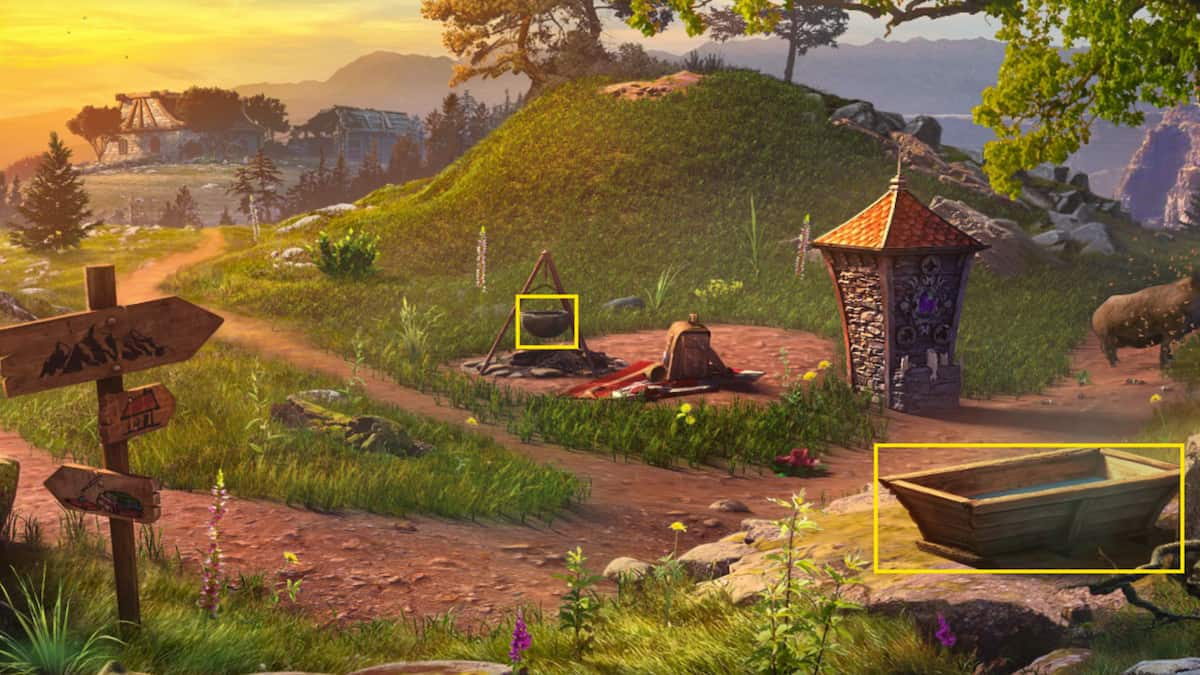
Return to the Village again and grab the Cauldron/pot from the campsite. Then, we interacted with the water trough where we found the Iron Flower earlier. Place the pot down beside the trough, then select the trough and pour some water into the pot. Now you can grab your Cauldron of water.
Return to the Dungeon door and pour the water from the cauldron into the left statue basin. This will give you your empty pot back.
With the empty pot, head to the bubbling oil on the left side of the Dungeon cave. Scoop up some black oil into the cauldron. You can pour your hot liquid into the right statue basin at the Dungeon door. Then, you can grab your Flint from your Inventory and start a fire.
How to unlock the Dungeon glyph door
Now that you have the two elements in the basin on either side of the Dungeon door, you can place the Ancient Seal within the grooves at the bottom. This will allow you to interact with the Glyph puzzle in the center of the door. You can backtrack and look at the Treasure Hunter's note near the skeleton for some clues. Here's how to solve it:
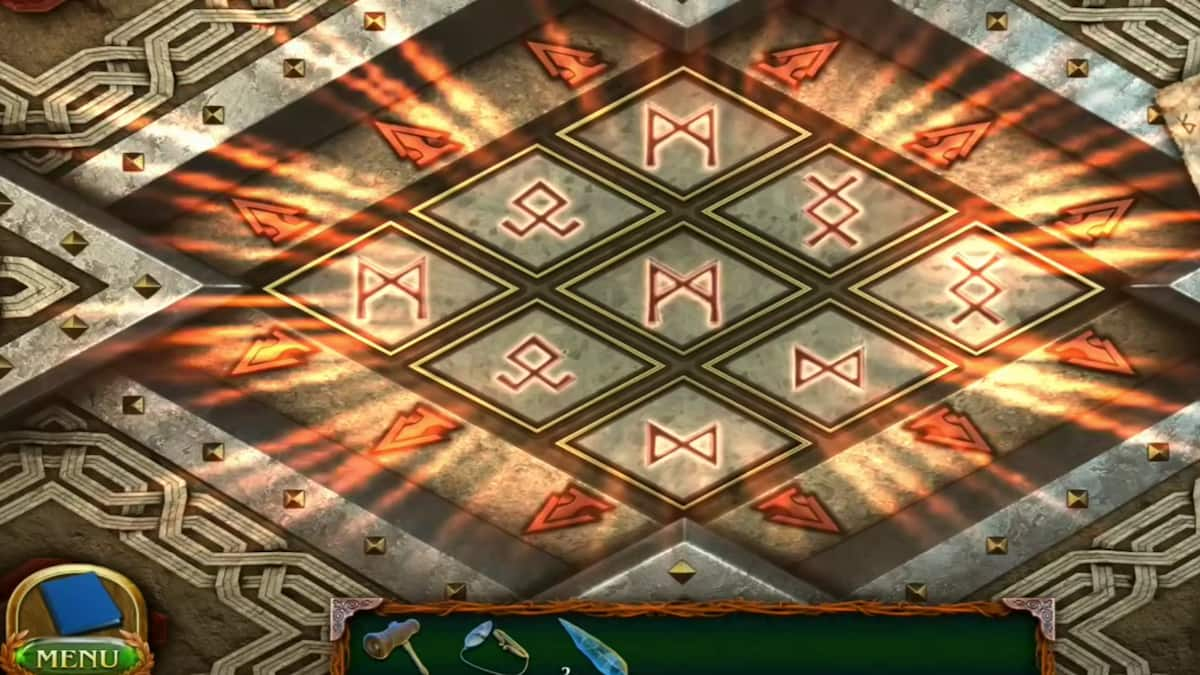
This puzzle will place the glyphs in a random starting position for everyone, but you can click your Treasure Hunter's note from your Inventory and place it in the corner of the screen so you can keep checking it. The note will tell you exactly where to place each glyph on the board, so all you need to do is match the glyphs with the note.
Press the arrows around the glyphs to spin the row of glyphs up and down and left and right until you get the correct glyphs in the spots shown on the note. There's a few different ways to get this proper layout, but here's how the order I did it:
- Middle row - right x1
- Right row - up x1
- Middle row - right x2
- Bottom row - right x3
- Left row - down x1
- Bottom row - right x2
- Middle row - down x1
- Left row - left x1
- Middle row - up x1
- Left row - up x1
- Bottom row - left x2
- Left row - up x1
- Bottom row - left x1
When the glyphs are in the right spots, the Dungeon door will open and allow you to open the next area.
Related: Lost Lands 8 – Bonus Chapter Walkthrough & Solutions
Dungeon City
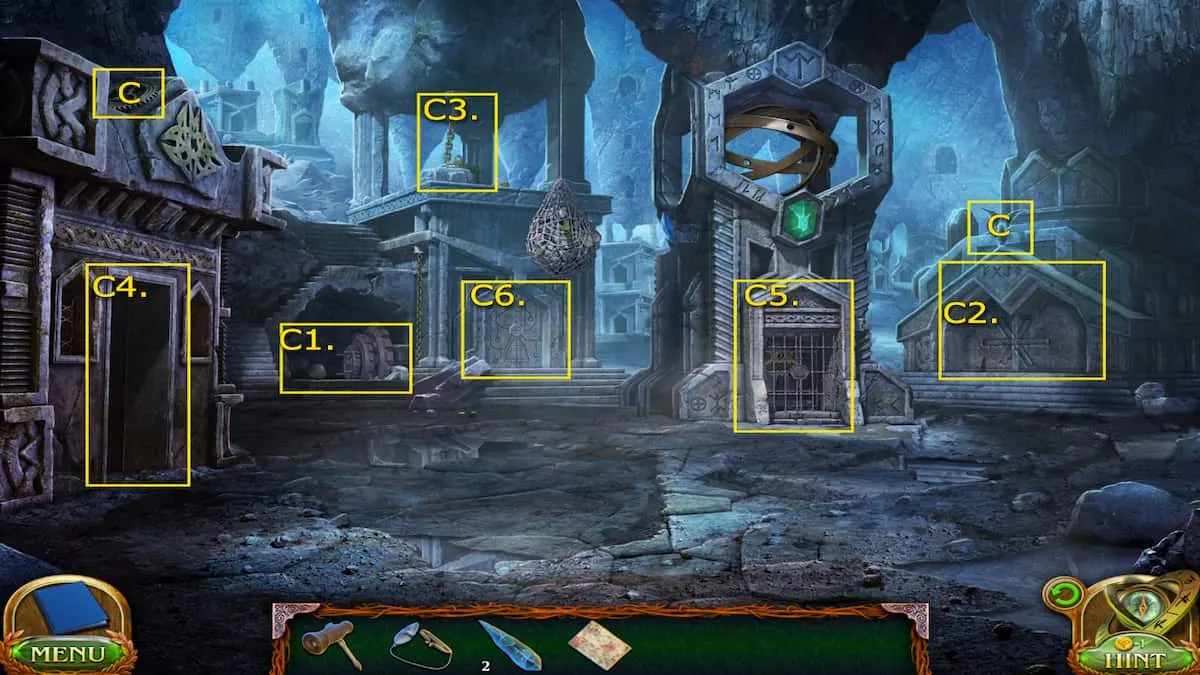
Once you open the Dungeon door, you will be able to enter the hidden city within. You'll have a minute to look around before a cutscene cues showing Folly's sister has followed him there and joins him on his adventure.
- C1. Gear Mechanic - Crystal Candle
- C2. Doorway with glyphs - Shaft Lock
- C3. Bell - Broken connector, Crystal Candle, and Hourglass Figurine
- C4. Forge door
- C5. Hourglass gate
- C6. Bell door
- (Collectible) On the top of the building on the left side - Gear 5/8
- (Morphing Objects) On top of the doorway on the right side - Angel statue 8/45
Find the Shaft Lock on the doorway with the glyphs on the right side of the city. Then, investigate the large gear mechanic in the opposite corner and use the Shaft Lock to fix the broken piece. Just to the left of it you can move a rock and collect another Crystal Candle. Grab the Broken connector from the bell hanging in the tower in the back left side of the city, and then enter the doorway of the stone house directly to the left to enter the Forge.
Dungeon Forge
There aren't too many objects you can interact with in the Forge right away, but you can use it to repair the Broken connector you grabbed from the bell. Select the Connector from your Inventory and place it on the desk in the back right.
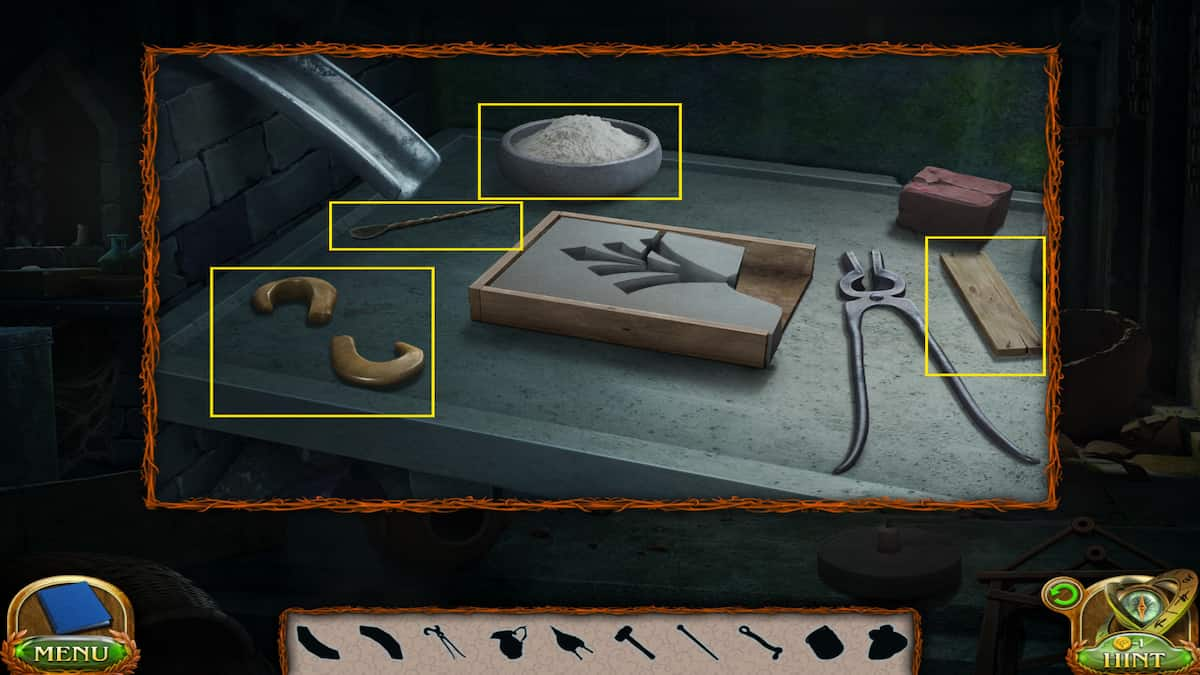
Where to find all Forge items
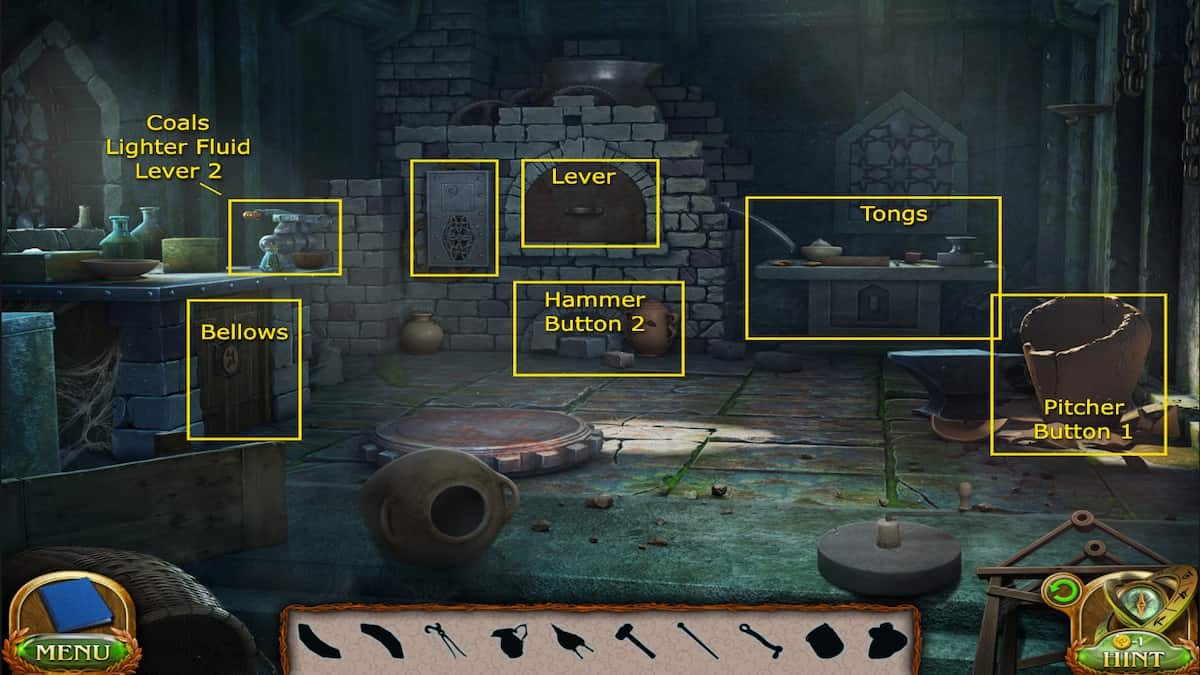
To repair the Broken connector you will need to use all the items on the repair station in the correct order. The icons at the bottom show you everything you need to find and use, but not all of them are right on the table. Here's where to get them all:
- Pitcher of water: Next to the anvil on the right side of the Forge in large vase. Pitcher is in basket above.
- Button: On the floor beside the basket where the Pitcher is found
- Lever: In forge oven
- Hammer: Underneath the Forge oven after removing bricks
- Button 2: Underneath the Forge oven using brick to smash the pot
- Coals: Near the vise on table to the left side of the Forge
- Lighter Fluid: On the vise table (Open the box and see instructions. Use the bowl of mixture on test tubes, grab bottle of liquid from the box and use on the test tubes, and then place corks back in them to collect it)
- Bellows: By placing the two buttons in locked cabinet and completing the ball puzzle
- Lever 2: Use the first lever we found in oven on the vise to loosen it and grab the second lever
- Tongs with Molded Connector: The last icon is only filled with the tongs and connector after you've poured your liquid fire into the mold. (Tongs are right on the table and can be used to lift the connector and move it to the next spot)
How to solve the Forge ball puzzle
To open the cabinet on the left side of the Forge and collect the Bellows, you'll need to solve a quick little ball puzzle. To begin, place the two buttons you find hidden around the Forge on either side. Then, you can begin to solve the puzzle by using the buttons to rotate it to the left and right, moving the balls as you do, attempting to reach the pressure point on the top. Here's how I did it:
- Left Button x2
- Right Button
- Left Button x2
- Right Button x3
- Left Button x1
- Right Button x1
- Left Button x1
How to repair the Broken connector
Once you have everything you need to make the new Connector, you can get started with the forging process. There is a lot that goes into making this new piece. It's not too difficult, but you will need to perform the steps in the right order, so here's how:
- Use needle to pry out the old mold
- Repair your wooden frame using wooden board
- Pour in powder mixture into the frame
- Pour water from your Pitcher of water into the frame
- Mix the mixture using the needle
- Place Broken connector into the frame
- Place Coals in the Forge oven
- Place Bellows underneath the Forge oven where we found the hammer
- Place Lever 2 on the gear box beside the Forge oven
- Douse Coals with the Lighter Fluid
- Use the Bellows to provide air for your fire
- Crank the box beside the oven to pour liquid fire into the mold
- Use pliers on the repair station to lift the new connector out of the mold
- Place the Molded connector in the vase of water beside the anvil
- Hammer it on the anvil finish your Connector
When the Connector has been repaired, you will automatically move back to the Dungeon City. From there, you can interact with the Bell and place your new Connector. Now, your goal is to ring the bell. First, use the Gear Mechanic to lift the bell, and grab the Crystal candle and Hourglass Figurine underneath it.
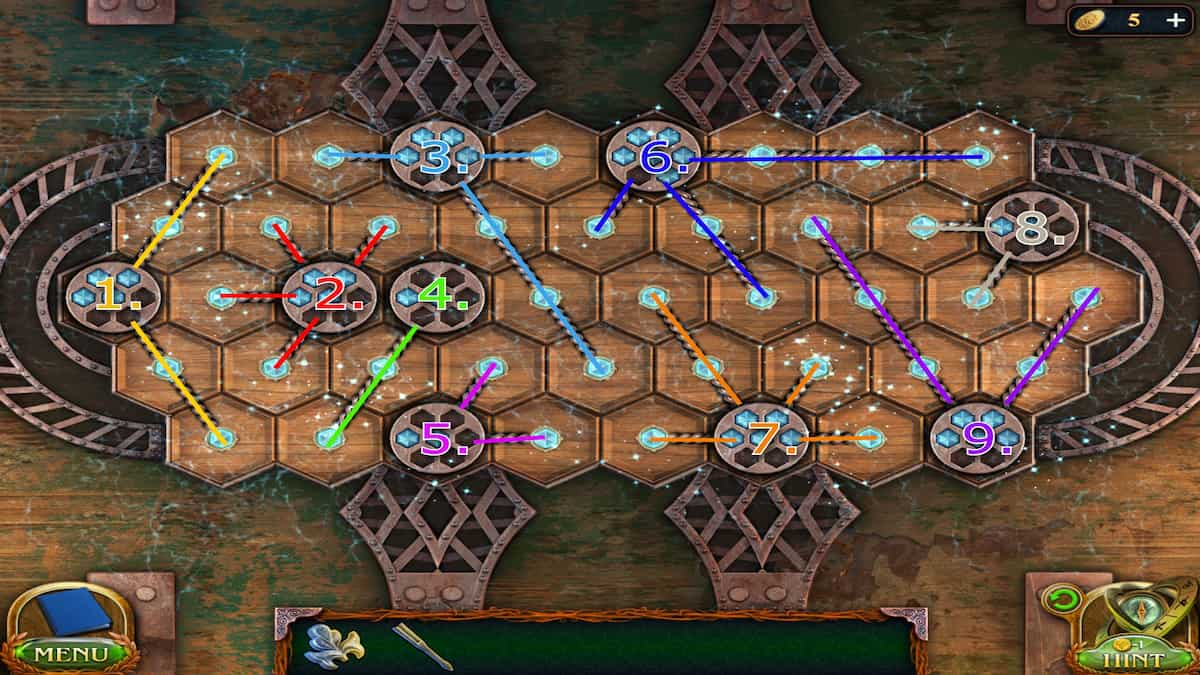
How to solve the hourglass gate puzzle

Now that you have the Hourglass Figurine, head to the locked gate with the missing Hourglass piece in the City. Place your Hourglass Figurine in the open slot, and the gate will open. You can begin completing this puzzle.
This puzzle requires you to form all the octagon pieces together by lining up the purple lines on the edges of them. It doesn't matter where you place them on the board as long as they are all joined together with the frame properly aligned all the way around. There are a few different puzzles you can get here, so it isn't a guarantee it will be the same as mine. I found it easiest to place the corner pieces in first and then work my way toward the center. Take a look at the picture above for reference.
Once you complete this puzzle, the bell will begin ringing, and you can interact with the bell door beneath the bell tower.
How to open the bell tower door
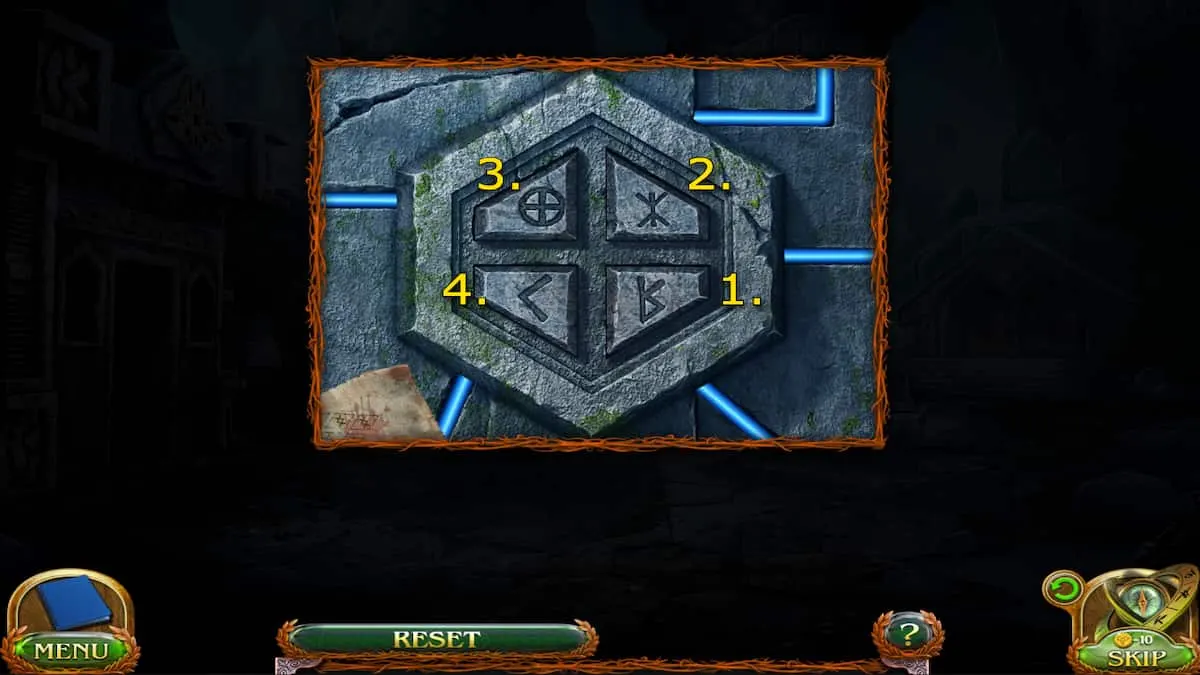
There are more glyph buttons on the bell tower door. Luckily, we still have the Treasure hunter's note from earlier that we can place on the side of the buttons to help us out. The note will tell us exactly what sequence to type in from the four glyphs located on the top left side of the note. Here's what you'll need to press: upside down R, double-sided fork, crosshair, and left arrow. The gate will open, and you can enter the Sarcophagus Room.
Sarcophagus Room
We've found the room with the Sarcophagus, potentially holding the rumored long-lost treasure. We'll have to find a way to open it.
- E1. Sarcophagus - Crystal candle, Manuscript 3/8
- E2. Altar - Crystal candle
- E3. Right Pillar - Crystal candle
- (Collectible) Fallen cage and chain on the right side - Gear 6/8
- (Morphing Objects) Chain and vine on the center crystal 9/45
In this room, we can work toward opening the Sarcophagus and seeing what's hidden inside. To do that, we must interact with the altar at the front of the room. Locate the last few missing Crystal candles from around the room, and then begin following the rituals shown in the book on the altar.
How to open the Sarcophagus
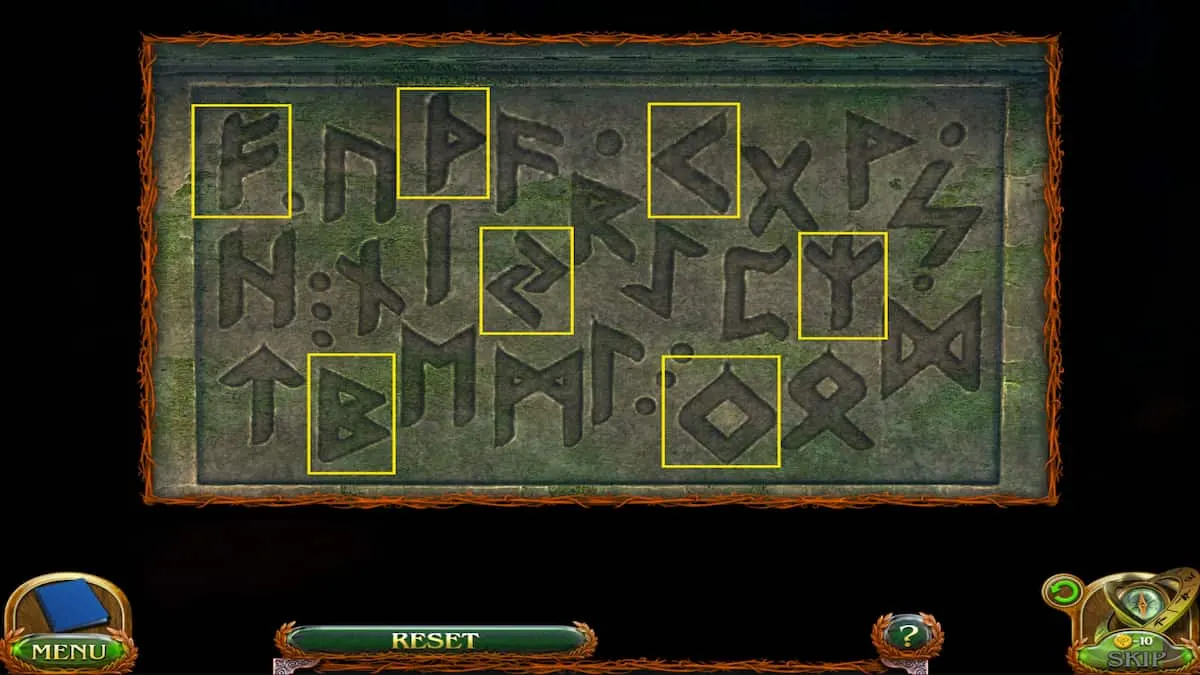
To begin this puzzle open the Sarcophagus, interact with the altar, and place all the candles into the candlesticks around it. This will open the altar and give you the Quill. You can now interact with the glyphs on the altar. Using the Quill, you'll need to select the correct glyphs in the right order. This order is shown to us back on the painted wall at the Shelter Entrance, which we tore the planks from earlier.
If you aren't sure what the painting showed earlier, these are the glyphs you'll need to sketch:
- F
- B
- P
- Two arrows
- Diamond
- Left Arrow
- Fork
This powered up the Sarcophagus, so now we can complete the puzzle on it and hopefully open it.
How to solve the Sarcophagus puzzle
The puzzle is not too difficult but can take a bit of time. The goal is to rotate each tile until all the lines are powered. The tiles might look a bit different for you, but I would suggest working from the left to the right, turning all the tiles until you get them all lit up to the middle, and continuing over to the other side. You may have to backtrack and rotate tiles again as you get further. Remember, all lines must be lit up, so even if they are dead-end tracks, they still need power. Use the picture above to help figure it out.
Once all the tiles are lit up, you will open the Sarcophagus, triggering a cutscene where Folly retrieves the Dagger from inside, and he and his sister flee the cave together. You'll arrive back in the Village and continue to the left toward your home.
Home - Yard
It appears there was some kind of storm that blew through your home yard. Things are left scattered and damaged, and Folly and his sister must make sure their mother is okay.
- F1. Well - End of the rope
- F2. Shed
- F3. House door
- F4. Dog in log
- (Collectible) Against the well post - Book 4/7
- (Morphing Objects) Shed window/board 10/45
Use your Screwdriver on the Well to fix the broken piece and place the bar on properly again. Then, look further into the well and use your Dagger to cut the rope from the snag. You will receive the End of the rope. With the end of the rope, tie the beam blocking the house door. You can try the wench on the well, but we will be unable to move it right now. Open the shed door and uncover all the tools; you might need these later. Then, continue to the Backyard by clicking on the barn.
Home - Backyard
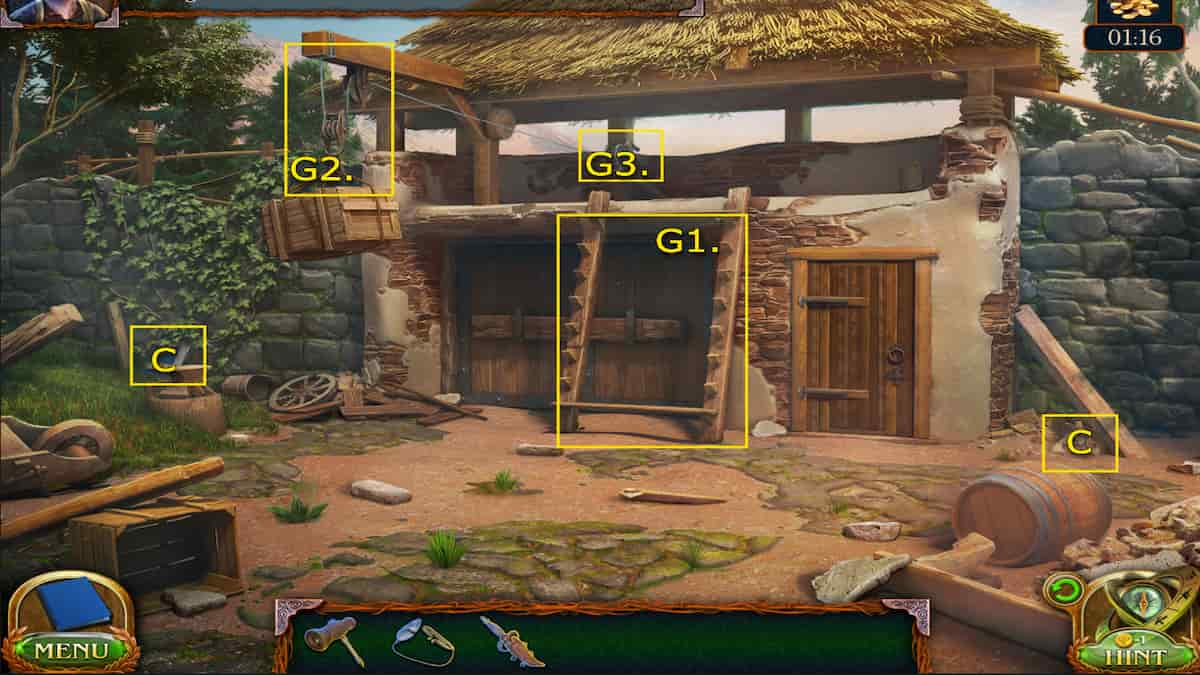
- G1. Ladder
- G2. Multipull
- G3. Reel
- (Collectible) Behind the vines on the stone wall to the left - Book 5/7
- (Morphing Objects) Stones on the right side of the house 11/45
We'll need the hook and cable to help remove the beam from the house door. Interact with the broken ladder at the front of the barn and click on the planks beside it to collect them in a pile. Now, we can work on repairing the ladder.
How to repair the barn ladder

To repair the barn ladder, place the planks together to form steps. The planks are all different sizes, so you'll need to place the sizes together until they align and form a step. You can do this several different ways depending on where you choose to place the planks. What I did was place all the long planks first, starting the longest at the bottom and working my way up. Once the long pieces are in, you can go back through and find the small sizes that fit in the gaps.
Once the ladder is repaired, you can reach the reel of the multipull. However, the cable is caught so you'll need to head back to the Yard and collect the Wire Cutters tool from the shed we uncovered earlier. Now, use the Wire Cutters on the reel to cut the cable. Interact with the fallen hook off the ground and pick up the Power multipull.
We can now rig the Power multipull up to the beam blocking the house door. Head back to the Yard and use the Dagger to cut the rope on the beam. Then place the Power multipull hook onto the beam and reconnect the rope. Now, we can use the wench on the Well again to pull the beam down and unblock the house. Unfortunately, we still need a key to get inside.
Where to find the house door key

Funnily enough, to get the key we're going to need to make the dog move out of the log beside the house. To do this, we'll need some food for him. Head back to the Village and grab the Grilled meat we cooked up in part 1. Place the meat at the end of the log and the dog will crawl out. He'll drop his Collar for you.
Select the Collar from Inventory, and then use the Screwdriver on it to unscrew the secret house key from it. Now, you can unlock the house and continue inside.
Home - Interior
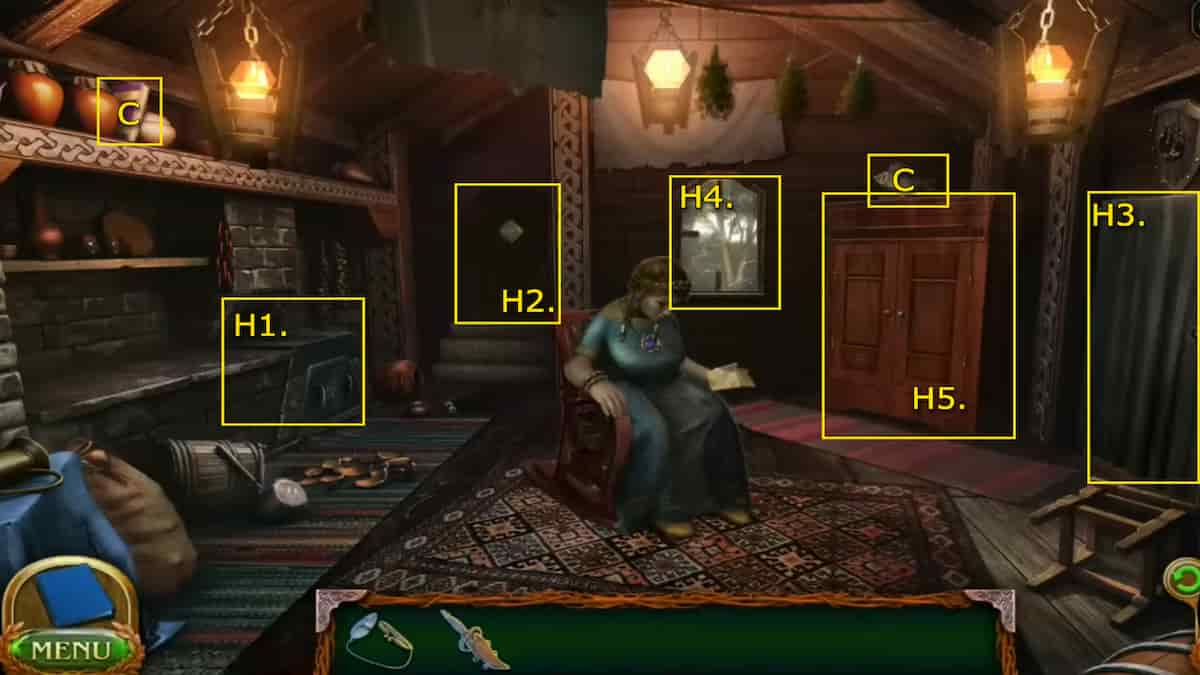
Folly and his sister will find their mother inside, but she is ill and the mystery still remains. We will need to figure out what happened here and cure her.
- H1. Back door
- H2. Oven
- H3. Door to Kitchen
- H4. Shattered window
- H5. Cabinet
- (Collectible) On the shelf on the top left of the house - Book 6/7
- (Morphing Objects) Fish/Bird statue on cabinet 12/45
Once you enter the house, interact with the unconscious mother in the chair to see a brief cutscene. You will retrieve a note from her with the instructions on how to make her medicine. Look at the oven to see where you will prepare the medicine, but you'll need all the ingredients and the proper kindling. Continue to the right, behind the curtain, to enter the Kitchen.
Where to find all the medicine ingredients
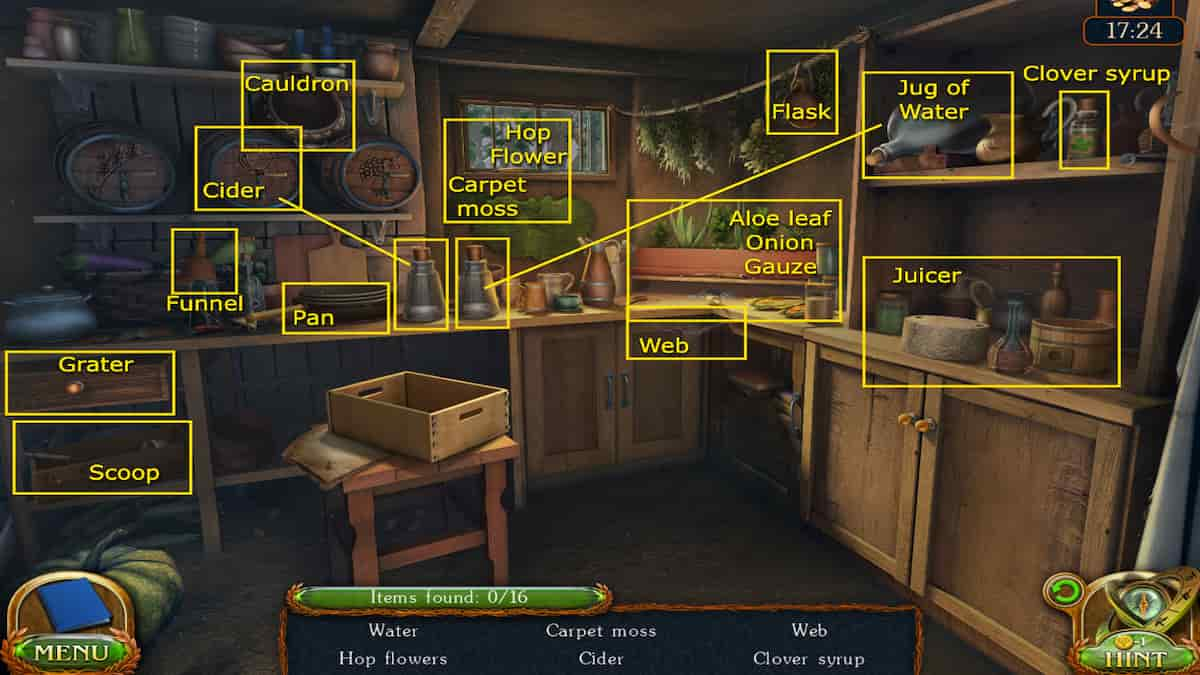
The kitchen has all the ingredients you need to make the medicine, but you'll need to find them all in this cluttered space. Check the note in your Inventory to help you figure out what you need (once you do it will be displayed at the bottom of the screen).
There are 16 ingredients in total. Here's where to get them all:
- Water - Select vial on the counter and then the jug on the top right shelf
- Clover syrup - On the right shelf near the water jug
- Cider - Select other vial from the counter and then the barrel with apple symbol
- Carpet Moss - Take the tool from the window sill and cut off a piece of the moss
- Hop Flowers - Open the window and grab a flower from the vines
- Web - From the corner counter
- Cauldron - On top of the barrels
- Pan - On the left counter behind the crate
- Aloe leaf- From the herb garden on the corner counter, use the knife to cut a piece off
- Onion - From the herb garden in the corner counter, middle plant
- Grater - In the drawer on the far left side
- Scoop - Underneath the drawer where the Grater was
- Funnel - On a bottle on the left counter
- Flask - Hanging on the rope above the herbs
- Gauze - Underneath the herb garden, remove beans from it
- Juicer - On the bottom shelf below the water jug (Needs to be reassembled)
How to reassemble the Juicer
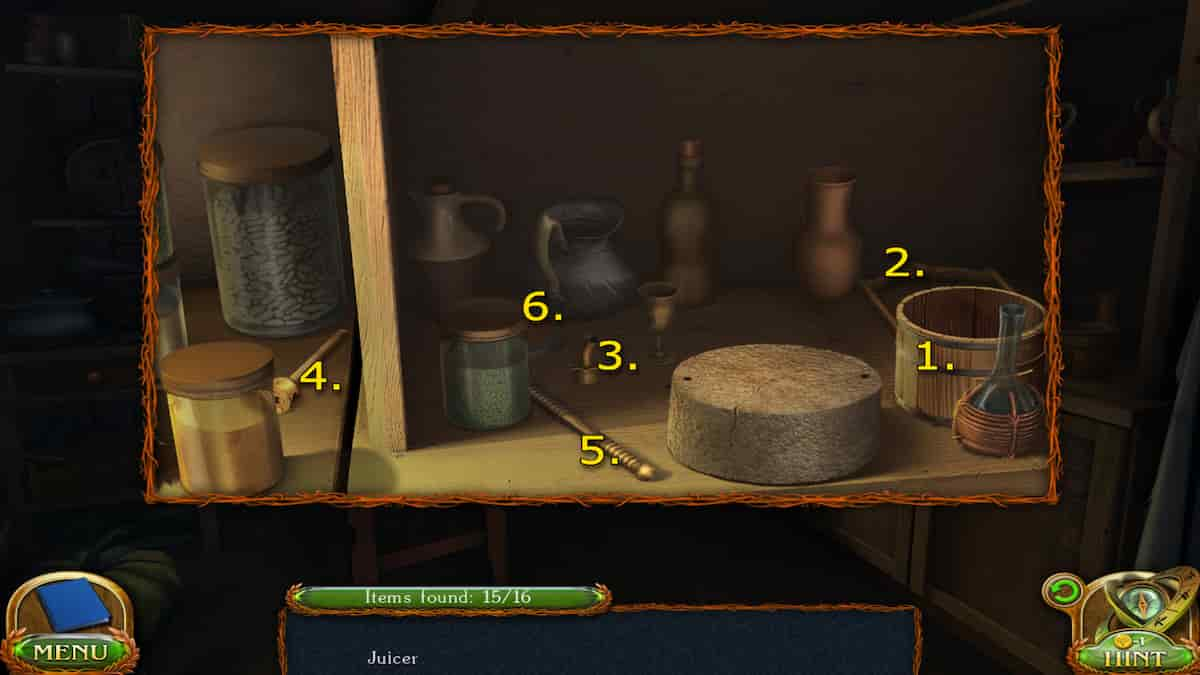
The Juicer is the only object that you will need to reassemble in order to collect it. It is on the lower shelf below the water jug on the right side of the kitchen. You can find most the pieces scattered around it. Here's how to put it back together:
- Place the wooden bucket on the circular stone
- Attach the handle (in the back right) to the stone piece around the bucket
- Put in the spout (back left) on the front of the bucket
- Place rod 1 (left cubby) into the top of the handle
- Place rod 2 (directly to the left) through the other rod
- Put the top of the bucket (behind the jar directly to the left) on the bottom of the vertical rod
Now you can collect your reassembled Juicer. You'll have all the ingredients you need now to start the medicine, but you'll still need to start a fire in the oven. Unfortunately, to chop up some wood for the kindling, you'll need to get into the Garden. To do this, you'll need to create another way through.
Head back out into the Yard and collect the Axe from the Shed. Then, head back into the house and interact with the shattered window. Use the Axe to break out all the glass and allow you to climb through.
Home - Garden

- I1. Dead tree
- I2. Flower spot
- (Collectible) On the wheelbarrow on the top right side - Book 7/7
- (Morphing Objects) Squirrel/owl on the top left branch 13/45
Use the Axe on the Dead tree to chop it down onto the stump. Once it's cut down, use the Axe again on the fallen pieces atop the stump to get Firewood.
Now that you have your Firewood, you can head back into the house and use it to start a fire in the oven. Place the Firewood inside the oven, then use your Flint to create a fire. Then, place the Set of ingredients on the counter beside the oven to start making the medicine
How to make the medicine
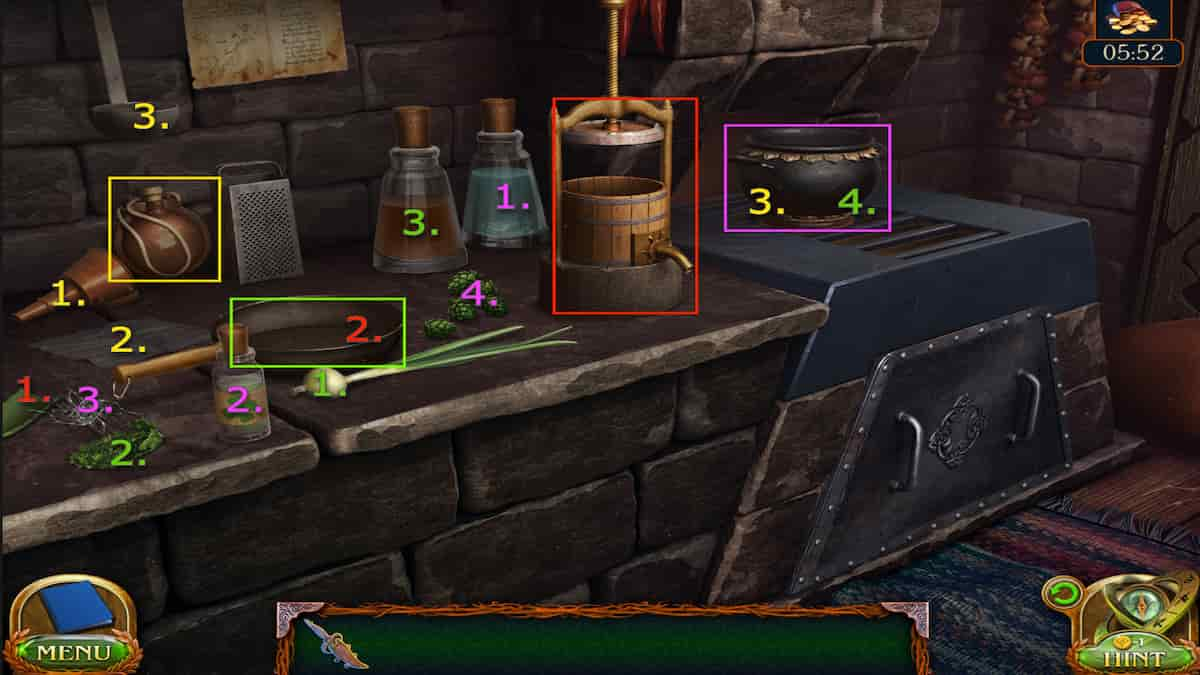
You have everything you need to get started on that medicine. The instructions from your mother are hanging on the back left side; you can look at it as much as you like to help you out. You'll need to add items in the right order. Here's how:
- Cauldron
- Pour the Water vial into the Cauldron on the stovetop
- Add the Clover Syrup into the Cauldron
- Add the Web into the Cauldron
- Add the Hop Flower to the Cauldron
- Juicer
- Juice the Aloe Leaf (beside the web) using the Juicer
- Squeeze the juice into the Pan
- Pan
- Grate the Onion on the Grater at the back of the counter and add to the Pan
- Place the Moss into the Pan with the grated onion
- Pour the Cider vial into the Pan
- Add all pan ingredients into the Cauldron
- Flask
- Click on the Flask to retrieve it and then add the Funnel into the Flask
- Place the Gauze over the Funnel
- Grab the Scoop (hanging beside the instructions) and pour the contents of the Cauldron into the Flask through the Funnel
You have finished the medicine and can now give it to the mother in the chair. Select it from your Inventory and click on the mother to initiate another quick cutscene. The mother will give you the Cabinet key. Use it on the cabinet in the back right corner where you will find a shape puzzle.
How to solve the cabinet shape puzzle
The goal of this puzzle is to make sure none of the ropes are overlapping by moving the shapes around to their correct slots. Clicking on a shape will move it to the only open slot or highlight the slot options if there is more than one. The shape of the slots will show you where each piece needs to go. Keep moving them around to get them in each of their corresponding slots and untangle the ropes. Use the image above to help you figure out where to put them all.
Once the shapes are in all the correct slots and the ropes form three different colored triangles, the cabinet box will open, and you can grab the Family seal and the Gate key. Head back to the Backyard where the Barn is and use the Gate key to unlock it. You can continue through the Cliffside.
Cliffside
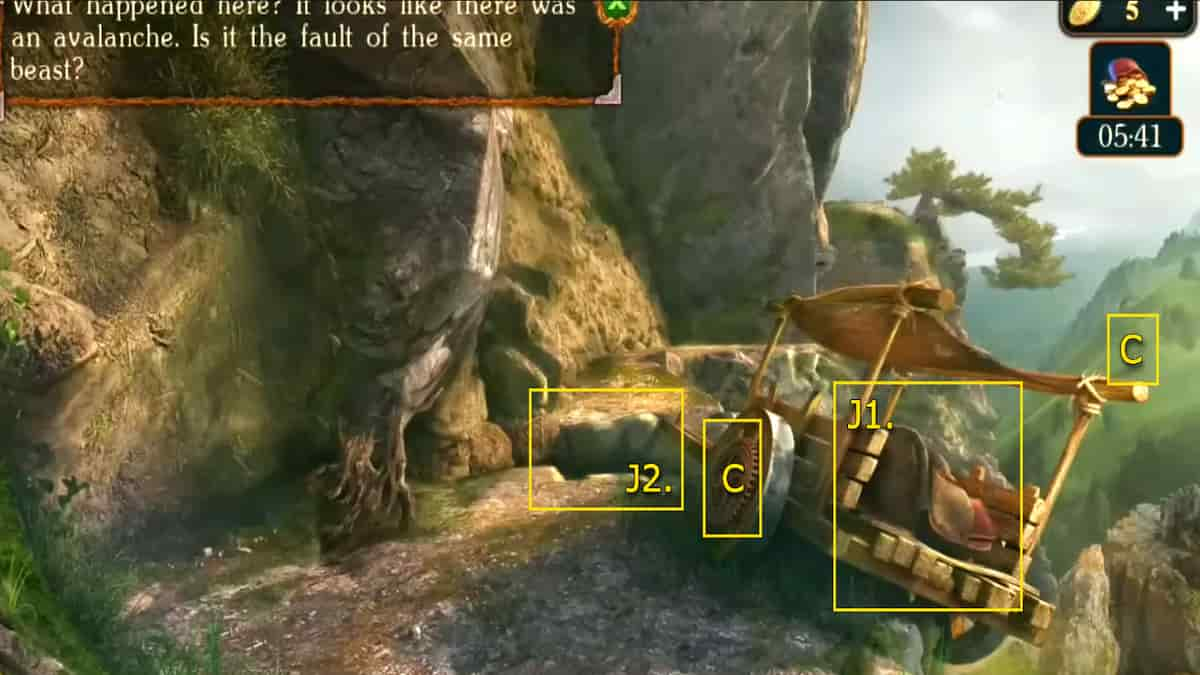
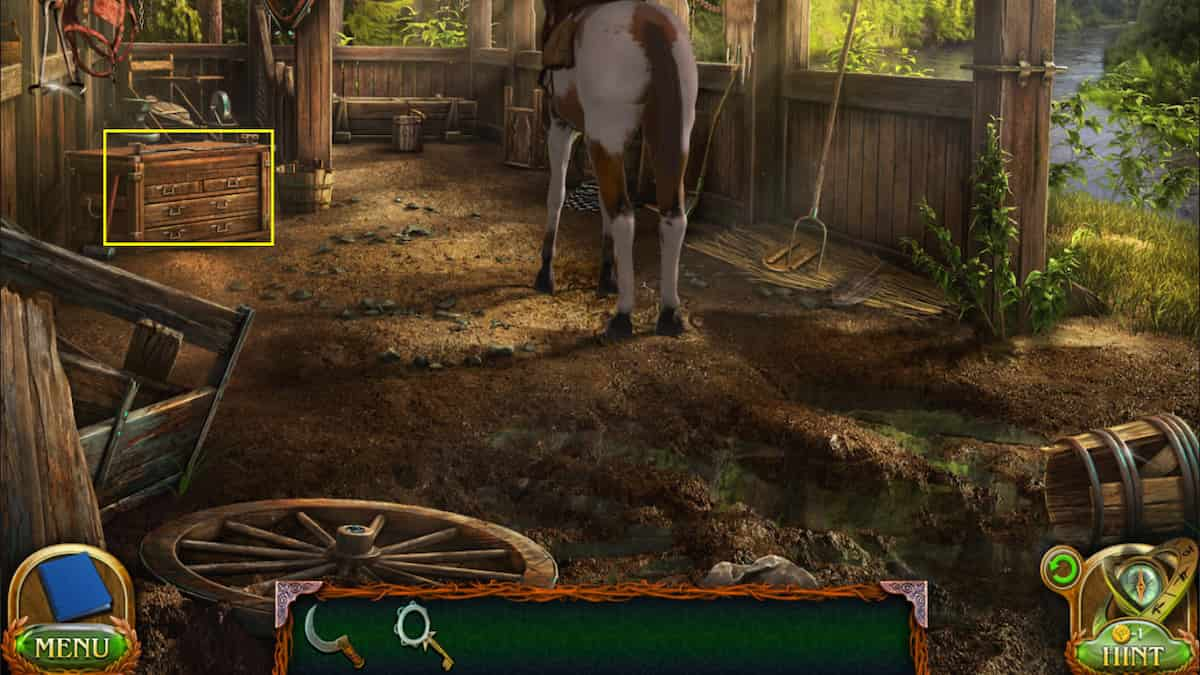
- J1. Wagon - Patterned Chip
- J2. Chest stuck in the ground
- (Collectible) On the wagon wheel - Gear 7/8
- (Morphing Objects) Tree in the background on the far left 14/45
You'll find an abandoned wagon hanging on the side of the cliff. Investigate the objects in the wagon to retrieve the Patterned Chip. Then, look at the gap in the path to see a chest stuck in the ground. You'll need something to grab onto it.
Return to the Yard and grab the Shovel from the Shed and the Leash from the log where the dog was lying before. Head back to the chest and use the Leash to hook onto the handle so it's secure. Then, use the Shovel to dig out the chest.
How to unlock the symbol chest
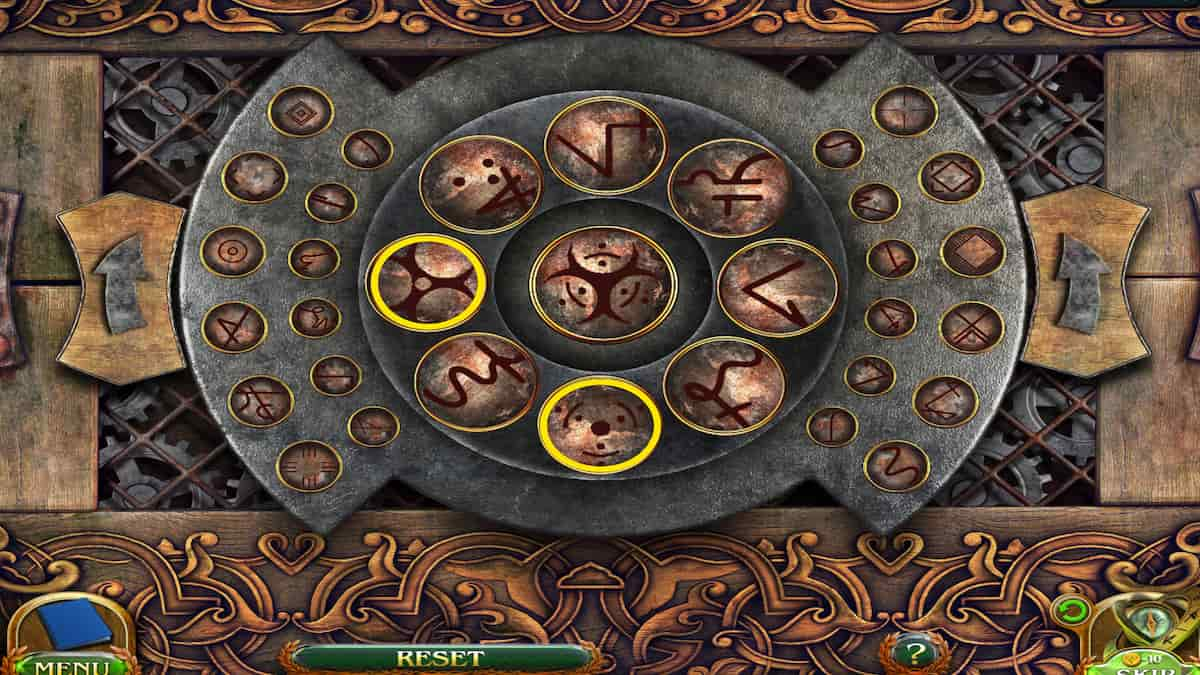
Image by Pro Game Guides 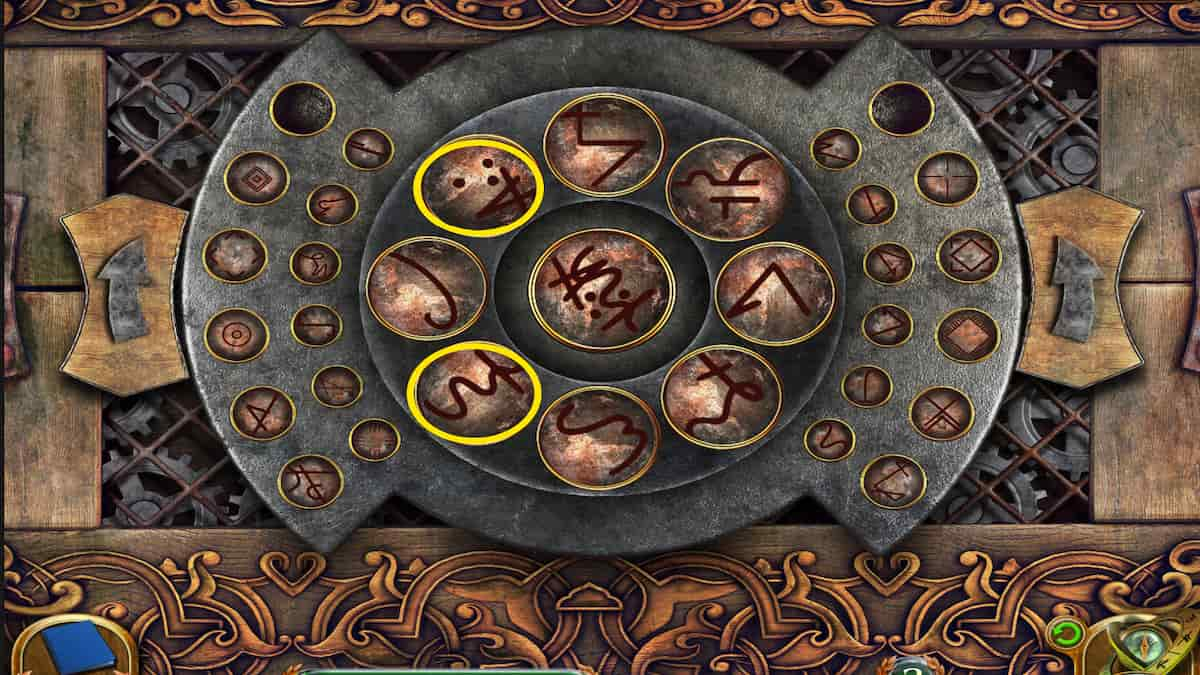
Image by Pro Game Guides 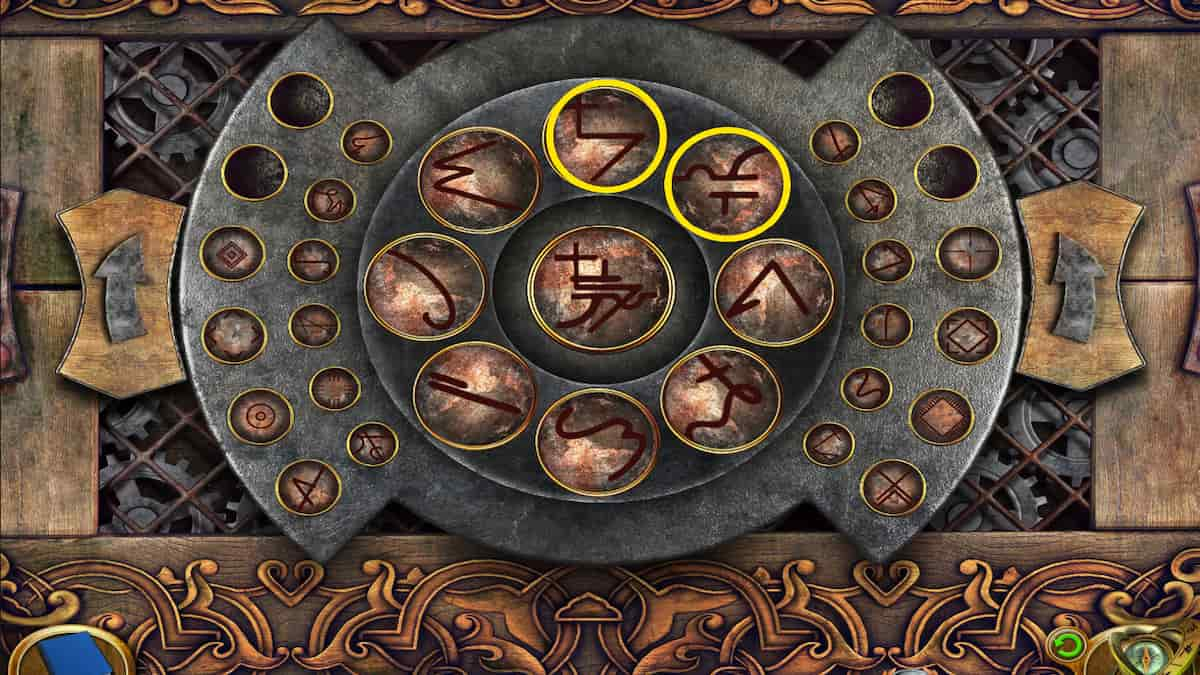
Image by Pro Game Guides 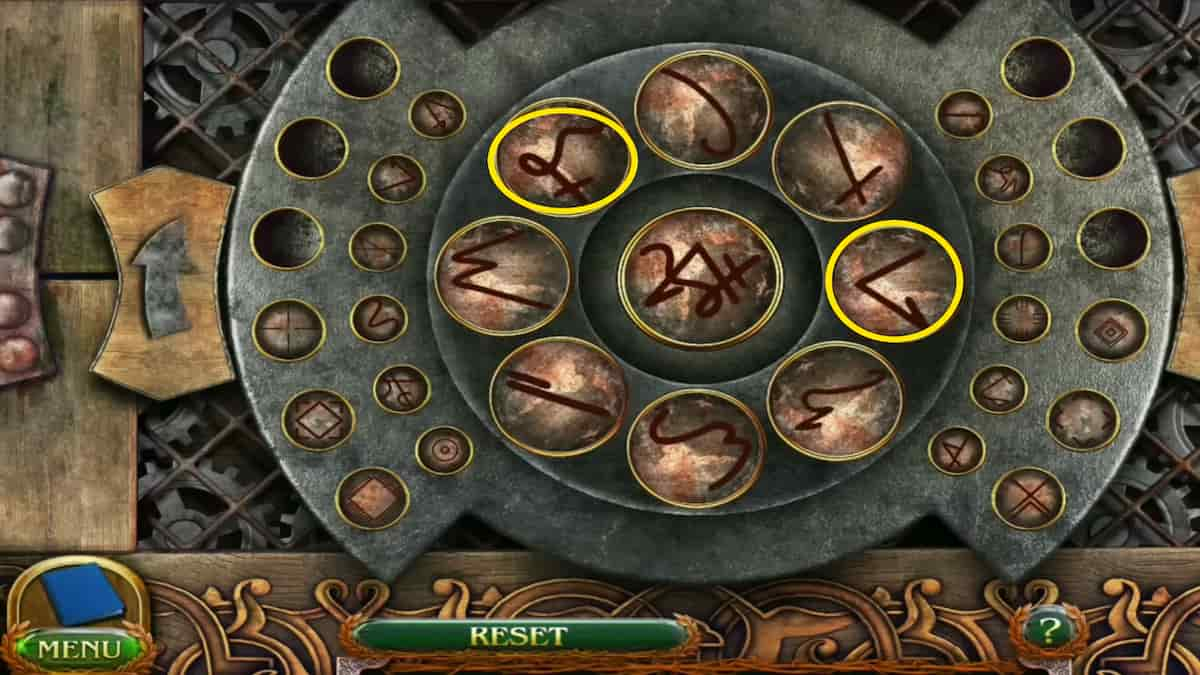
Image by Pro Game Guides 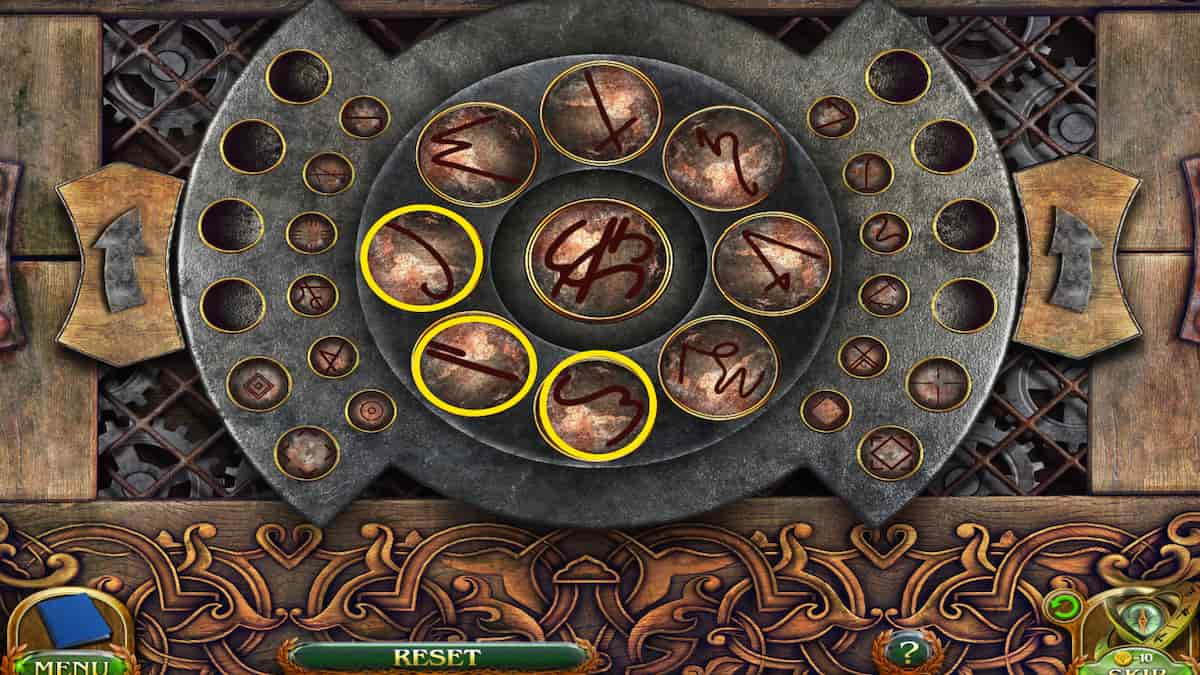
Image by Pro Game Guides 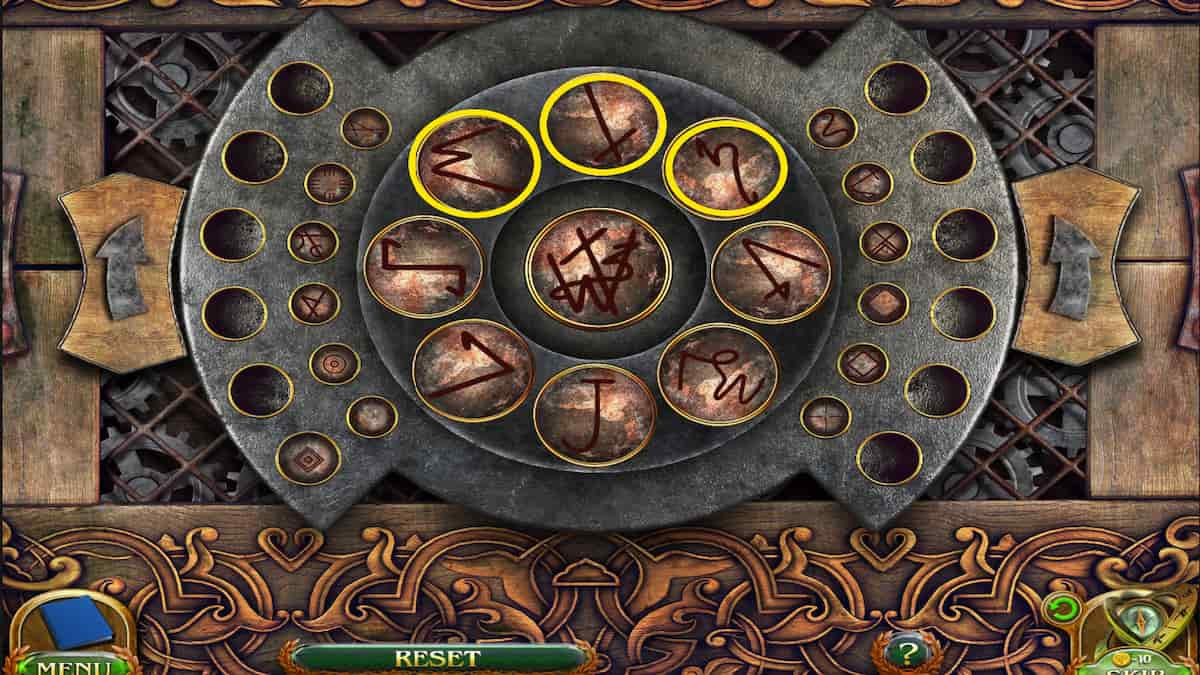
Image by Pro Game Guides 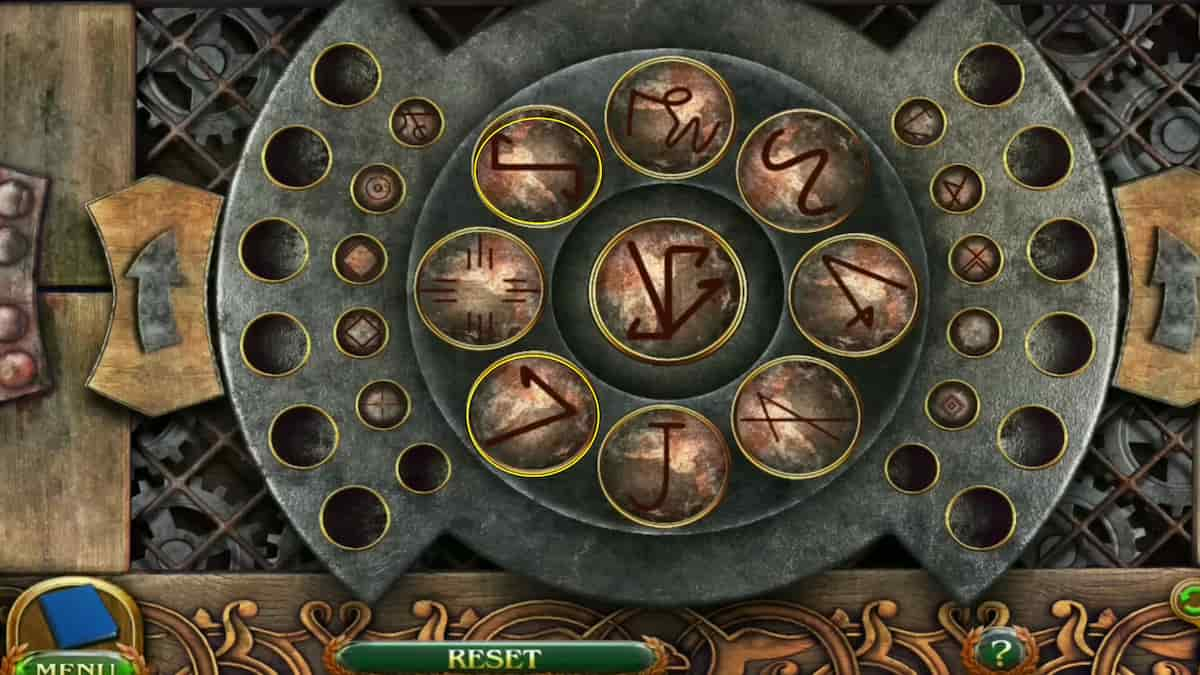
Image by Pro Game Guides 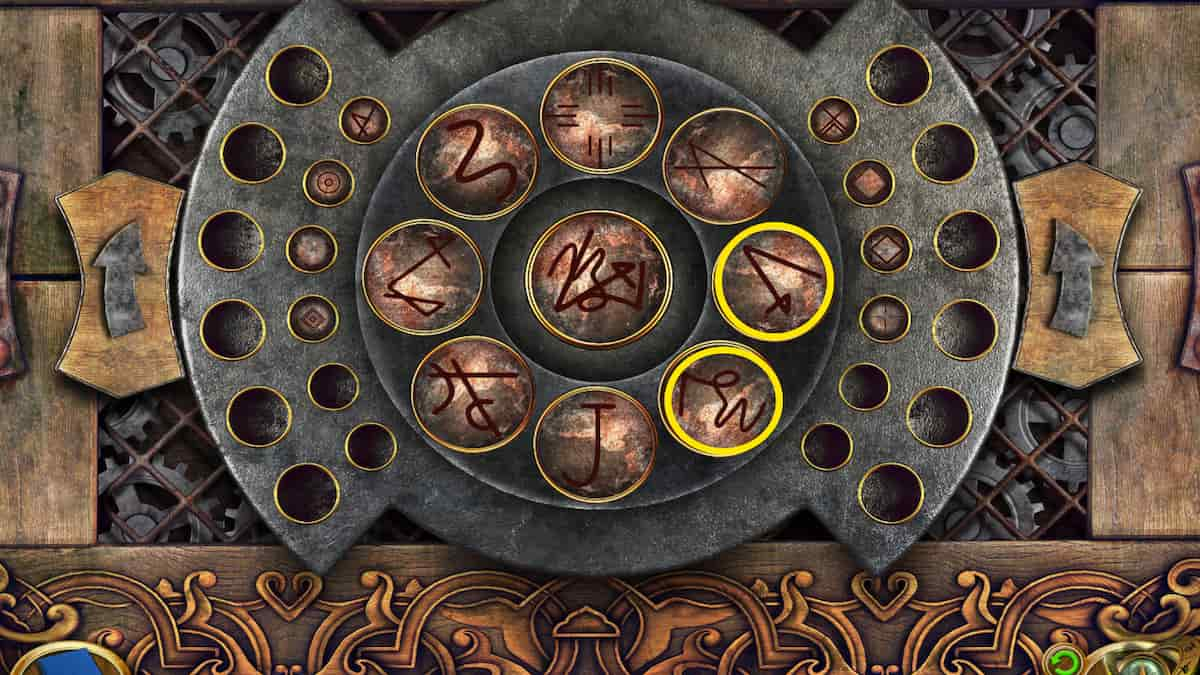
Image by Pro Game Guides 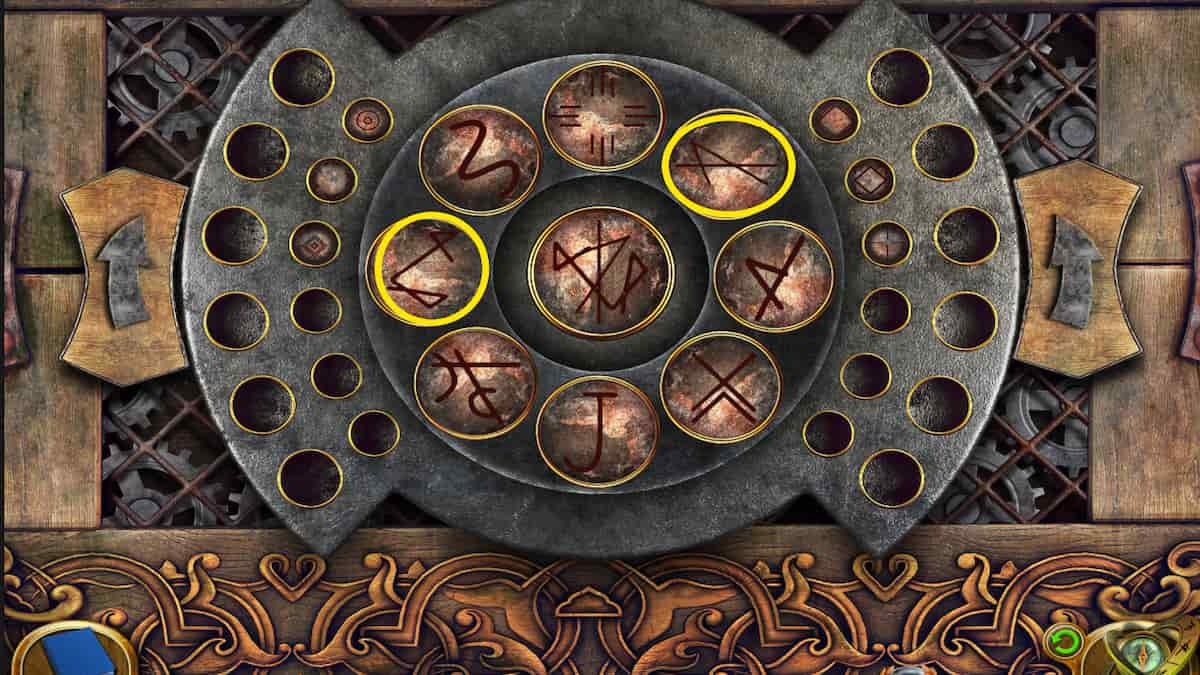
Image by Pro Game Guides 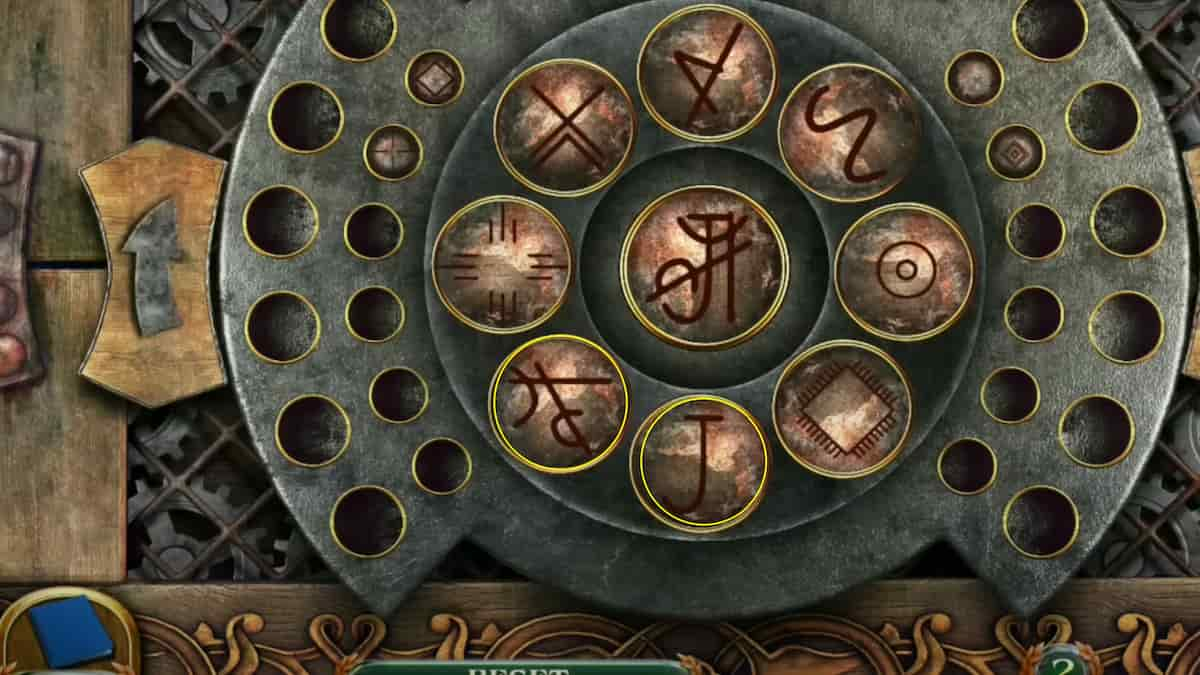
Image by Pro Game Guides 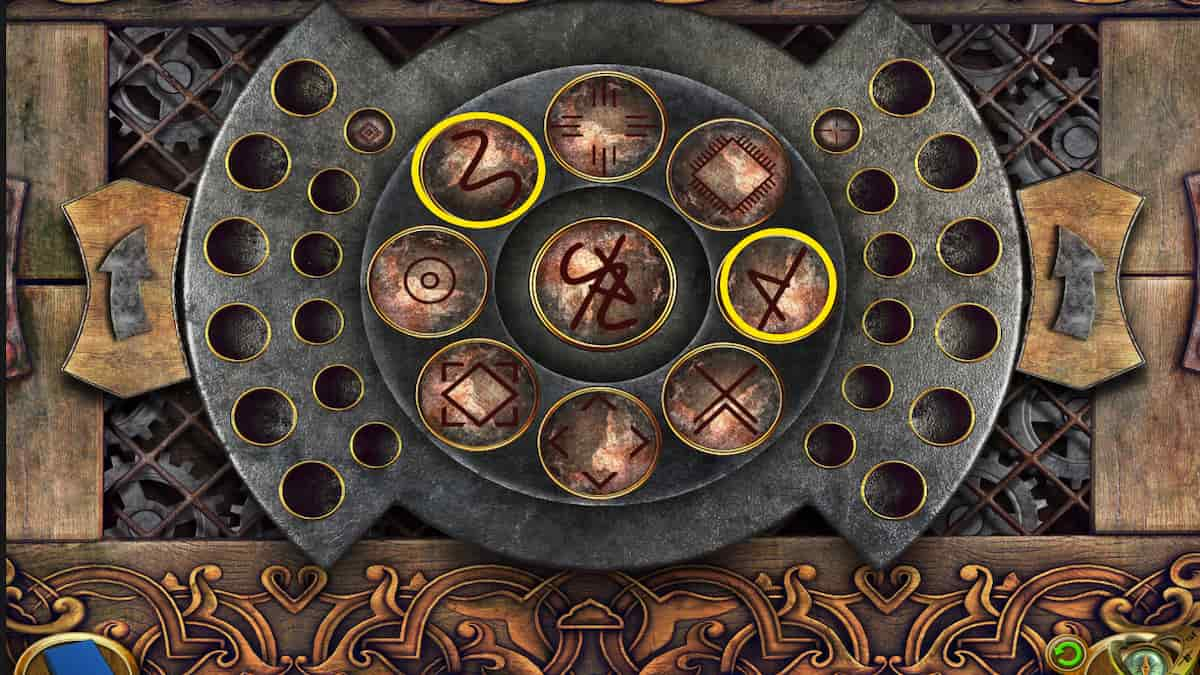
Image by Pro Game Guides 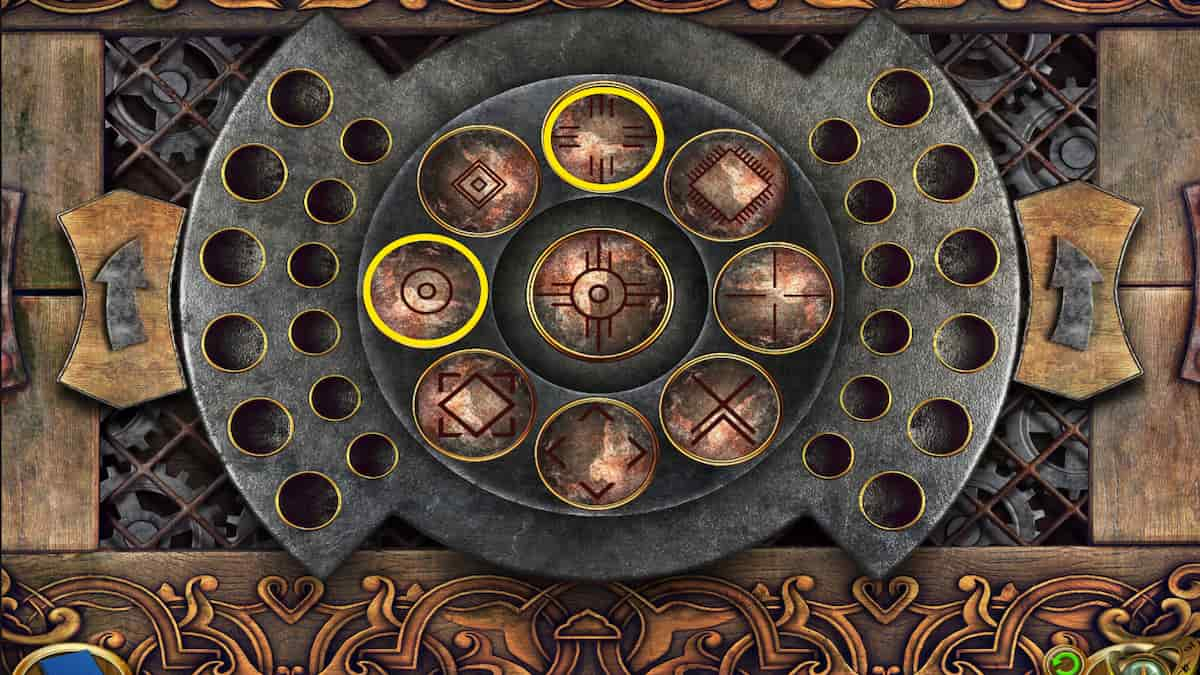
Image by Pro Game Guides 
Image by Pro Game Guides 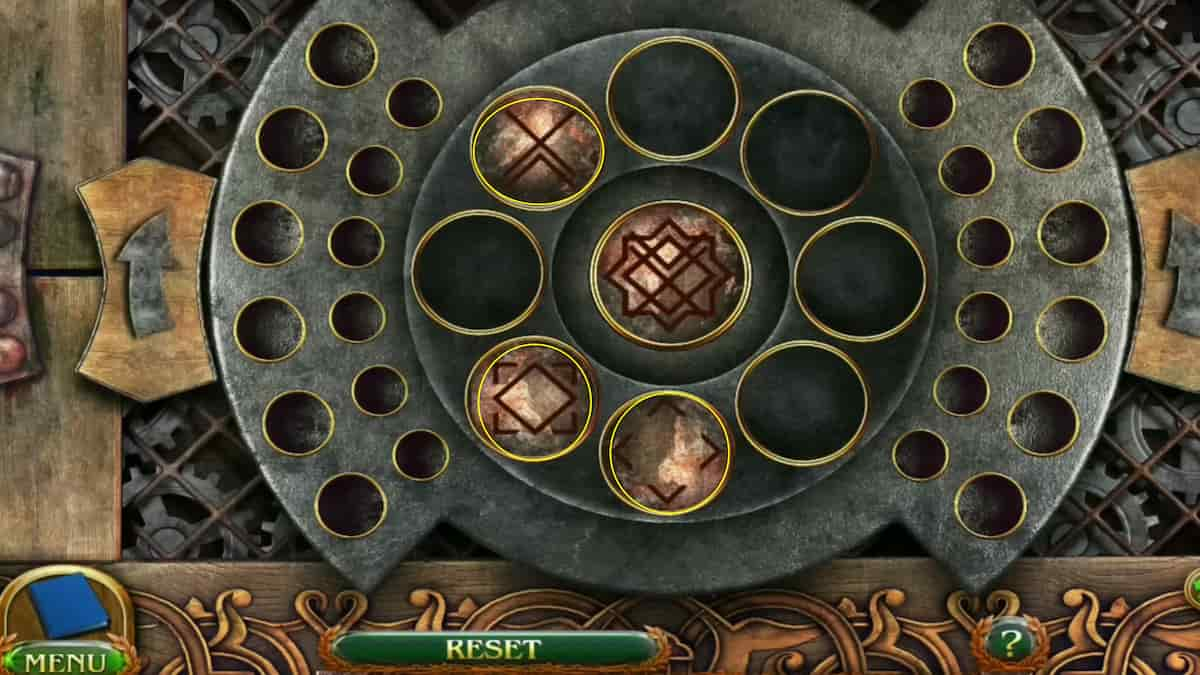
Image by Pro Game Guides
Now that you have the chest, place the Patterned Chip in the top of it to begin completing the puzzle and opening it fully. The goal is to recreate the symbol shown in the center by rotating the symbols on the outer ring around it. Not all of them will be used every time. Just rotate the ones that match and then select the symbols that go together to progress.
There will be several different main symbols to recreate (until all the symbols around the outer rims are gone) and here are the symbols you'll need to use to complete each one:
- Symbol 1: The cross and the crosshair with dots
- Symbol 2: A with dots and a squiggly line with a cross
- Symbol 3: Gate with a curve and cross with a seven
- Symbol 4: Cross with a loop and mountain
- Symbol 5: M with a tail, two parallel lines, and a cane
- Symbol 6: W, slanted cross, and z with a tail
- Symbol 7: Slanted S and upside down 7
- Symbol 8: M with a loop and slanted V with a loop
- Symbol 9: A on its side and 4 with a tail,
- Symbol 10: Crossing P and Y and J
- Symbol 11: Slanted P and squiggly line
- Symbol 12: Target and lines
- Symbol 13: Diamond target, diamond with lines, and crosshairs
- Symbol 14: Diamond in a box, diamond outer lines and x with an up arrow
When the chest is unlocked, you can grab the Fast Time potion from inside and then continue down the path along the cliffside.
Family Crypt

Folly's come to his family's crypt seeking answers locked inside. We'll need to complete one last puzzle to unlock it.
- K1. Crypt
- K2. Grave 1
- K3. Grave 2
- K4. Grave 3
- K5. Grave 4
- (Collectible) On the right side of the crypt - Gear 8/8
- (Morphing Objects) Gravestone on the left side 15/45
Check out the Crypt to see the symbols shown on the top of it. It will prompt you to 'honor' the lost loved ones. To do this, we'll need to have some flowers to place on the graves.
How to plant flowers for the gravestones
Return to the Yard and grab the Hoe from the Shed. Go to the Backyard and look at the bags of flower seeds that dropped from the multipull earlier.
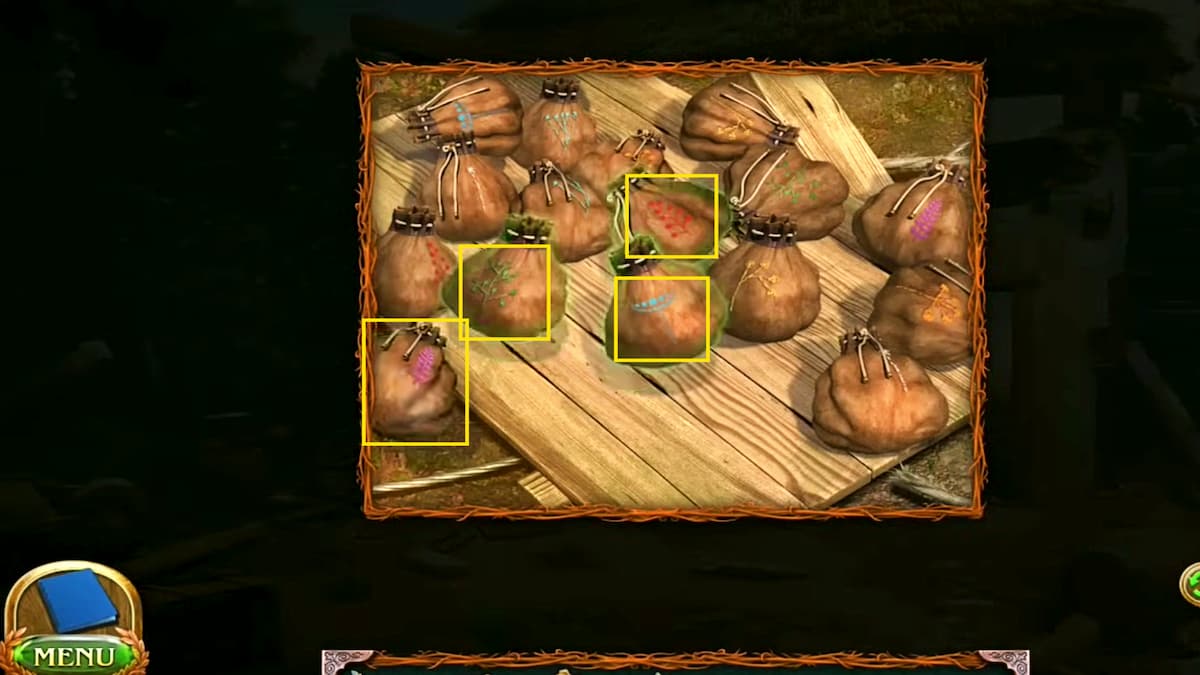
You'll need to grab the correct seeds by matching the symbols on the bags to the symbols on the Crypt. These are the ones you'll need:
- Purple frond
- Green tree
- Blue crescent vine
- Red bulb vine
With the seeds, head to the Garden and look at the flower spot on the ground in the back left corner. Clear the weeds and then use the Hoe to dig up the ground. Now grab your flower seeds and plant them in the ground.
You'll need water for your flowers, so head to the Schoolyard and look at the fountain. Grab the pitcher on the fountain and scoop up some water. Select your Jug of water and add the Fast Time Potion. Then, return to your Garden flower spot and pour the Enchanted water on the ground. Now, grab the flowers using your Dagger and return to the gravestones.
Where to place the flowers on the gravestones
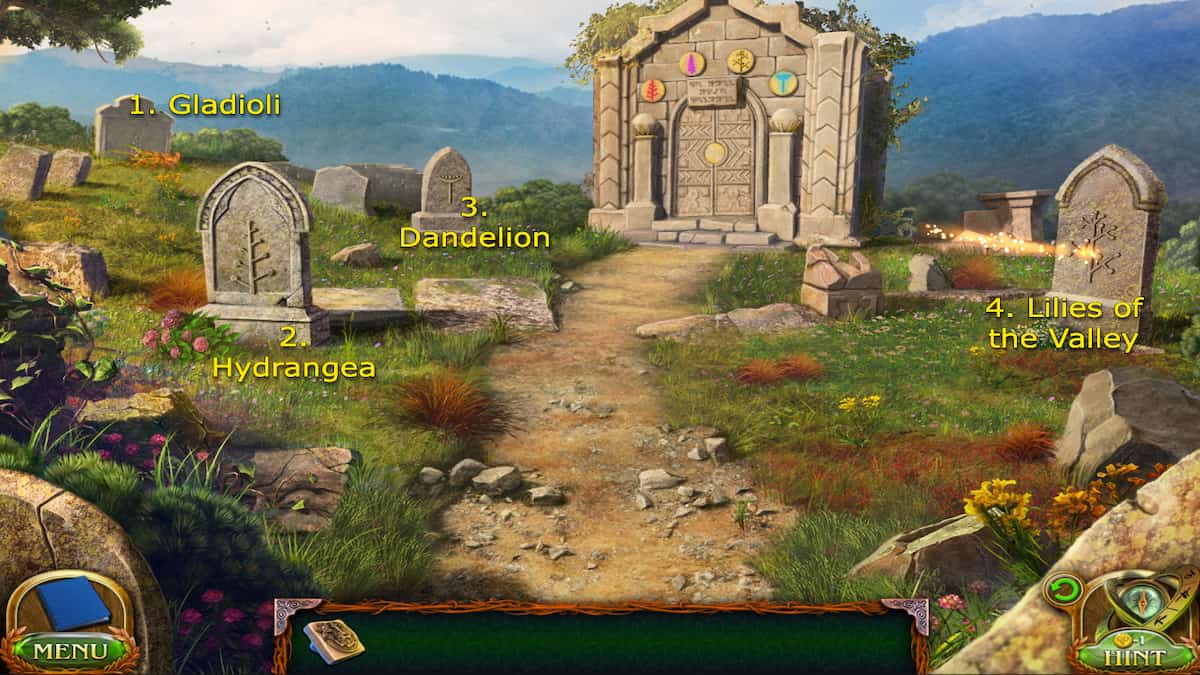
Now that you have the flowers, you're going to need to place them on the proper gravestones. Use the pictures above and the list here to help you place them:
- Grave 1 - Gladioli
- Grave 2 - Hydrangea
- Grave 3 - Dandelions
- Grave 4 - Lilies of the Valley
When all the flowers are placed, you can look at the Crypt door and add the Family Seal into the open slot. Enter the Crypt to complete the last puzzle of Chapter 1.
How to solve the Crypt puzzle
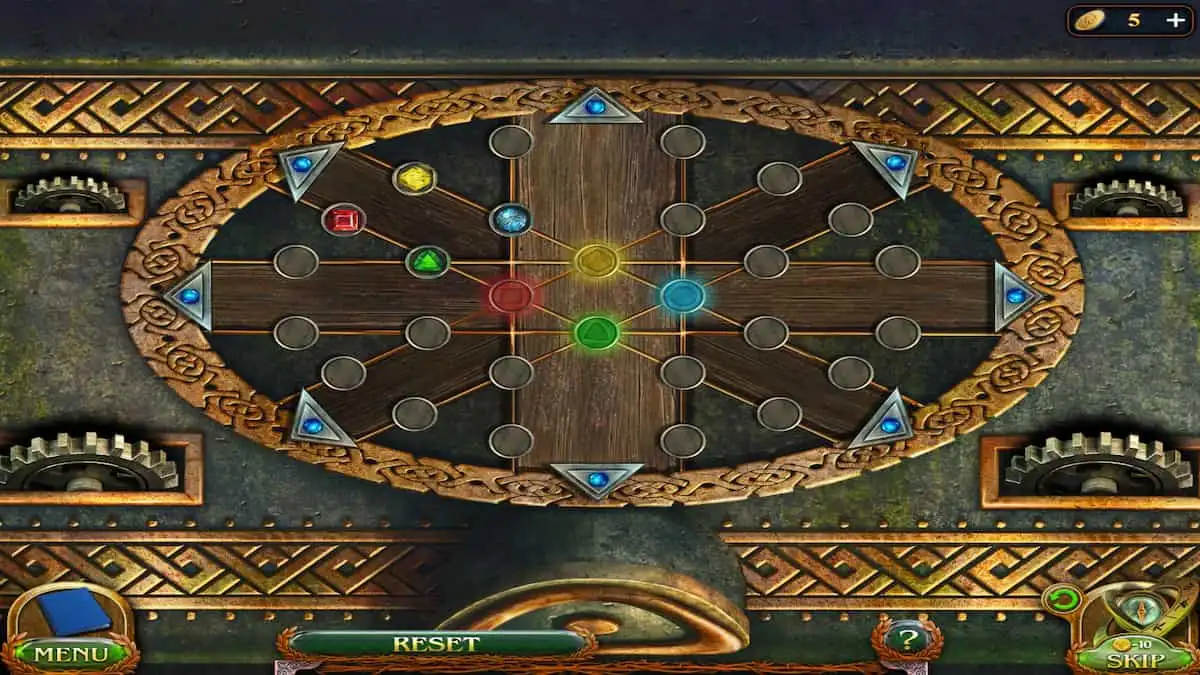
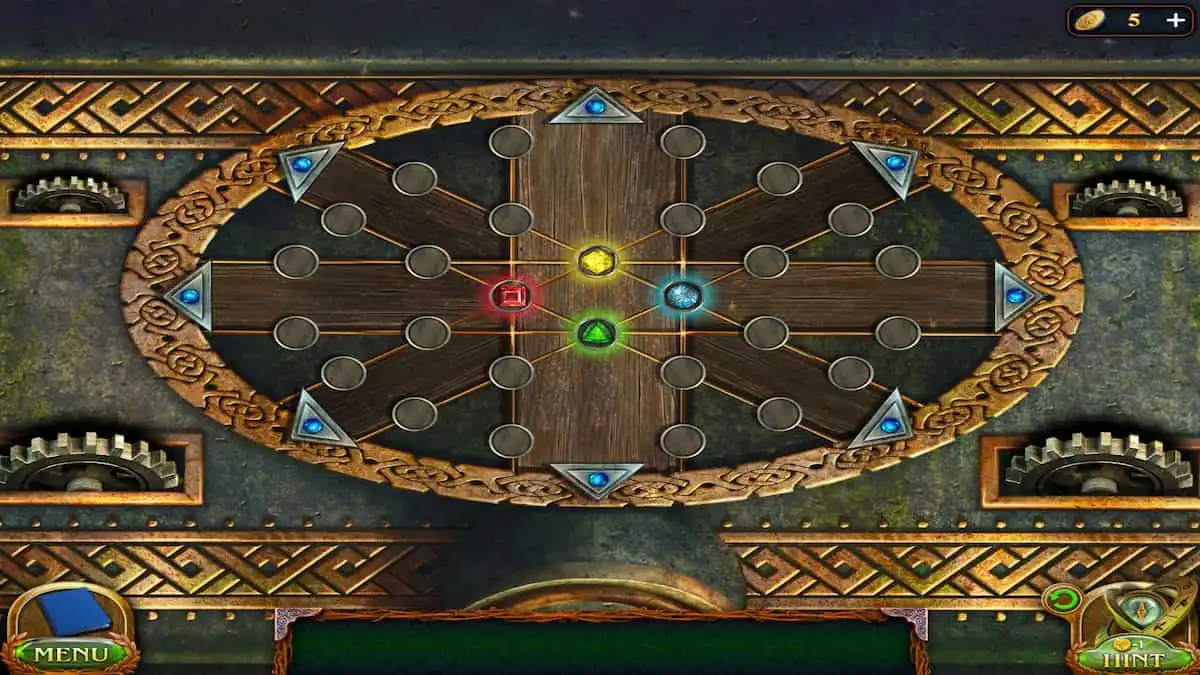
The goal of this puzzle is to move the gemstones across the rods using the arrows on the sides until they all fit into their proper slots. This may take a few minutes since you will have to keep moving them until you get them lined up correctly. The best way to line them up is to form them into a square shape first and then move them all together to the center. Try to look for every possible path you can move on the rods. If pieces are blocking one direction, move down another that leads to the same spot. Use the pictures above for reference.
Once you finish this puzzle, you'll be able to collect the weapon from the top of the Crypt and successfully finish Chapter 1.
Lost Lands 9 Chapter 2 Walkthrough
In this chapter of Lost Lands 9, we play as the mysterious magician, Maaron, who appeared at the end of Chapter 1, ultimately saving Folly from the Entity. We learn more about the background of the world and whether or not it was a coincidence that the magician showed up when he did.
Academy Courtyard
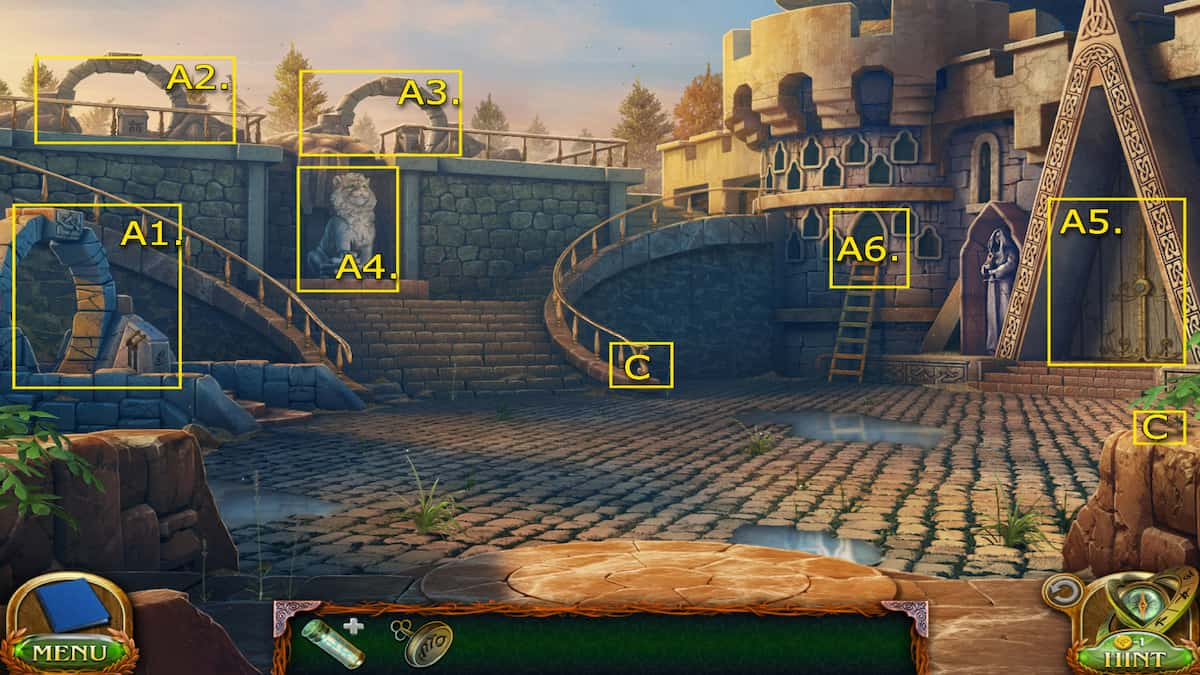
We start in the Academy Courtyard, where Maaron has been summoned on his day off. He'll need to check if he has any mail. Ensure you check out all the objects you can in this area:
- A1. Portal rune stone pedestal 1
- A2. Portal rune stone pedestal 2
- A3. Portal rune stone pedestal 3
- A4. Lion statue - Cryptex
- A5. Academy door
- A6. Owl Tower
- (Collectible) On the far right stone wall - Rune stone 1/8
- (Morphing Objects) Behind the right stair railing 16/45
In this location, we'll want to approach the Lion statue, which will give us a Cryptex. This will be our first puzzle to solve in Chapter 2. Select the Cryptex from your Inventory and begin working on solving the puzzle to unlock it.
How to solve the Cryptex puzzle
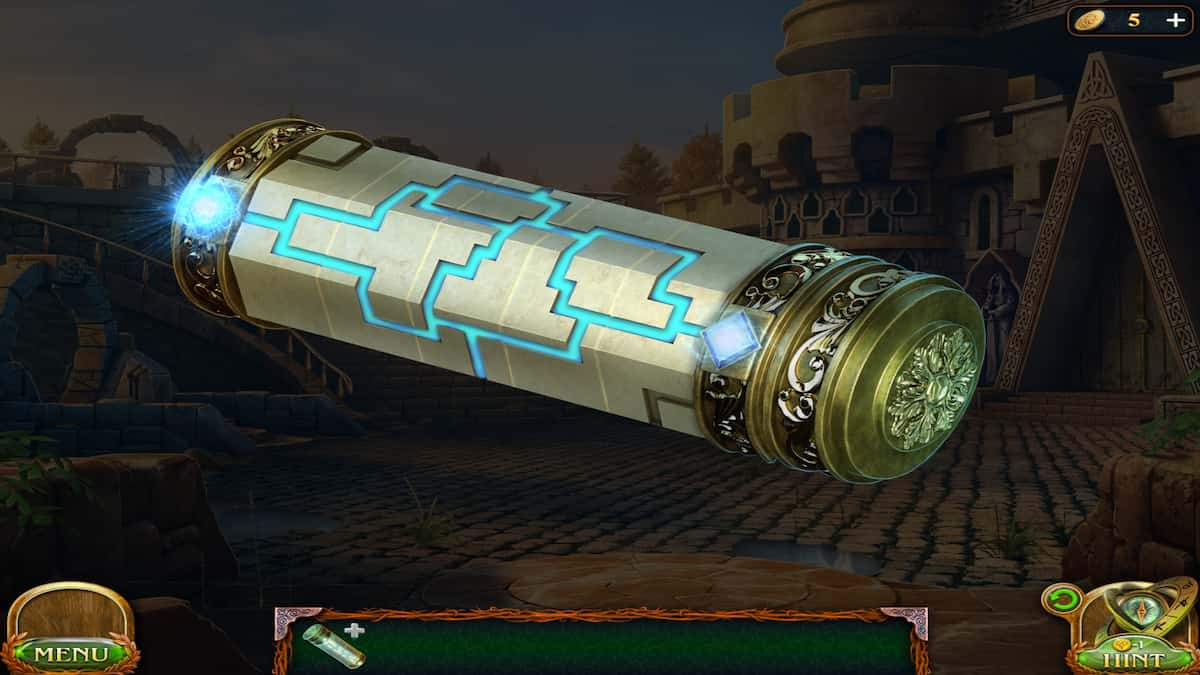
The goal of this puzzle is to connect the left gemstone to the right gemstone by rotating each section of the tube until a path is lit up across. This isn't too difficult to figure out, but it will take time to rotate them to the proper positions. I actually found it easier to work from right to left, lining up all the lines until it reached the gemstone and lit up. Use the picture above to help you solve it.
Once you solve the puzzle, the Cryptex will open up and allow you to collect your Personal Signet and a letter from the Academy Administration. With the Personal Signet, you can approach the Academy door and place it in the slot to proceed.
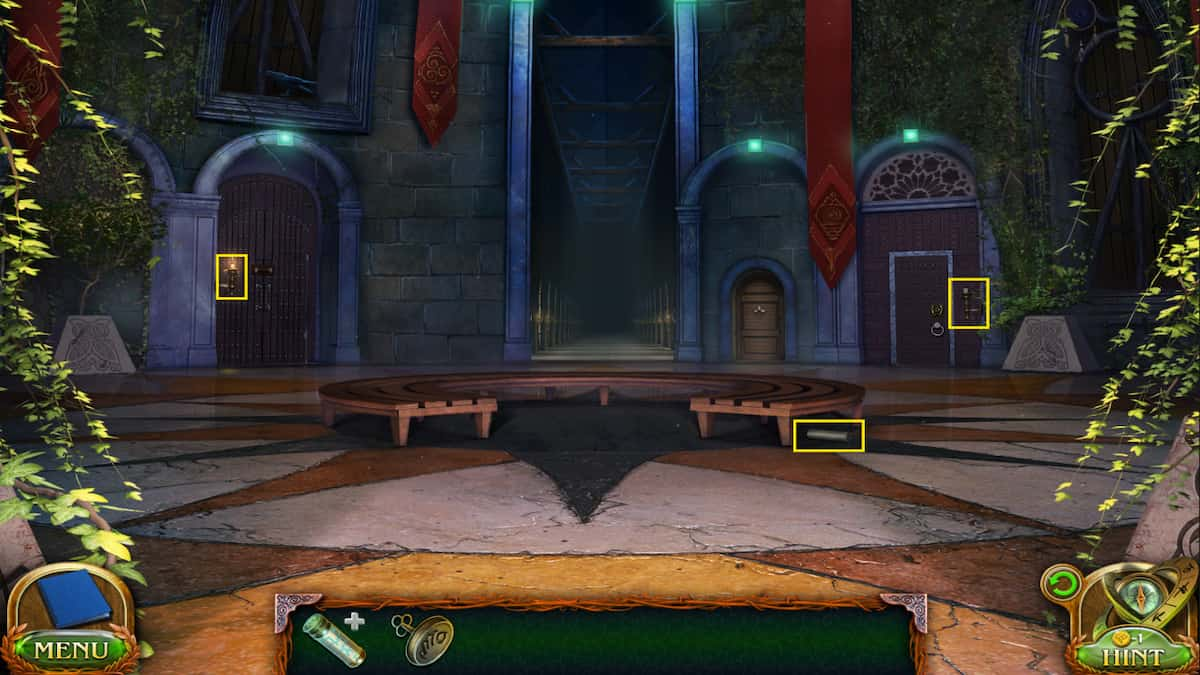
Academy Halls
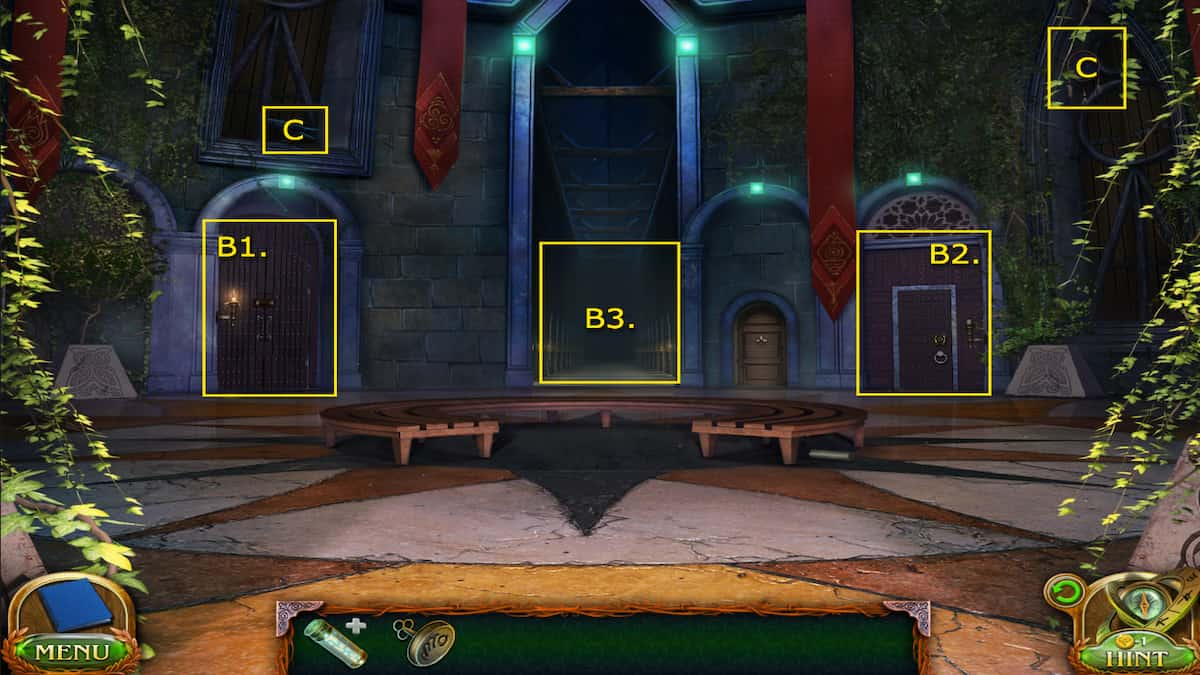
- B1. Lab door
- B2. Library door
- B3. Dark corridor
- (Collectible) Hanging in a window on the far right - Dreamcatcher 1/7
- (Morphing Objects) On the top left window sill - Crow 17/45
In this area, you will come to several locked doors and you'll need to pick up a few hidden candles around to light up the dark space. First, head further down the corridor into the darker area, then backtrack and start picking up candles.
Where to find all the candles
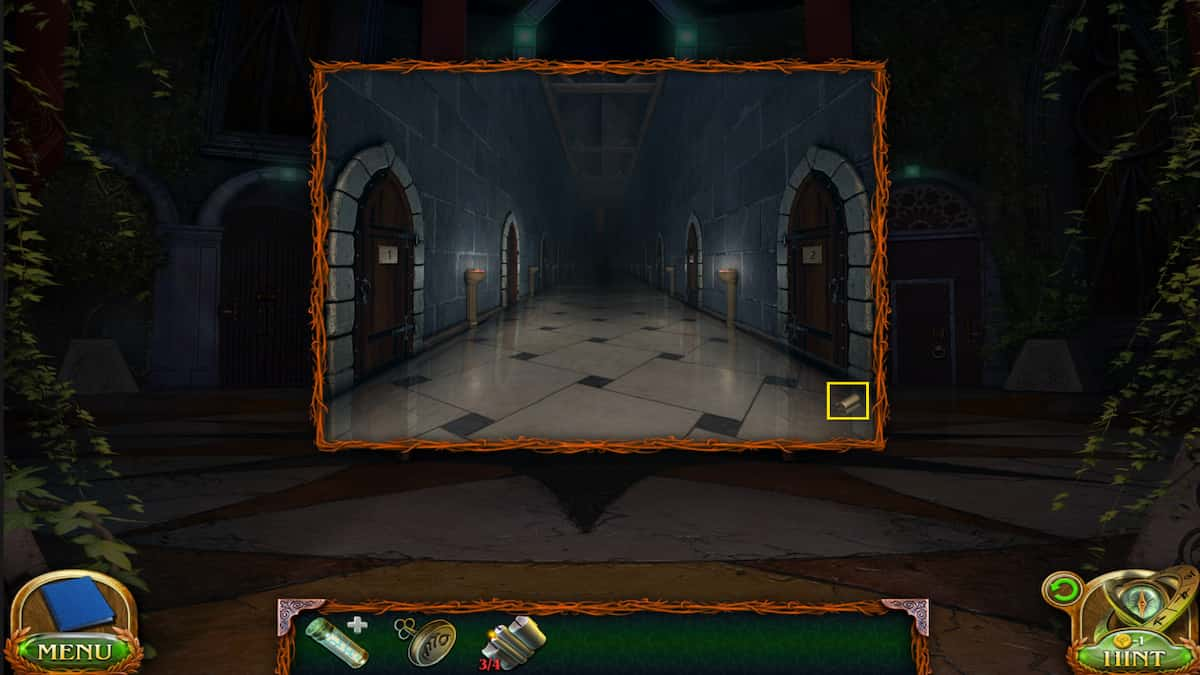
There are four candles you'll need in total to place on the candlesticks at the end of the dark hall. They are scattered around the area. Here's where to find them:
- Candle 1 - Under the bench in the main entrance
- Candle 2 - Next to the library door
- Candle 3 - Beside the lab door
- Candle 4 - Further down the corridor on the floor to the right
Once you have all the candles, head to the end of the dark corridor and place them in the candlestick holders on either side. Now you should be able to see the door at the end of the hall, where you'll need to solve another puzzle to enter.
How to solve the rainbow glass door puzzle
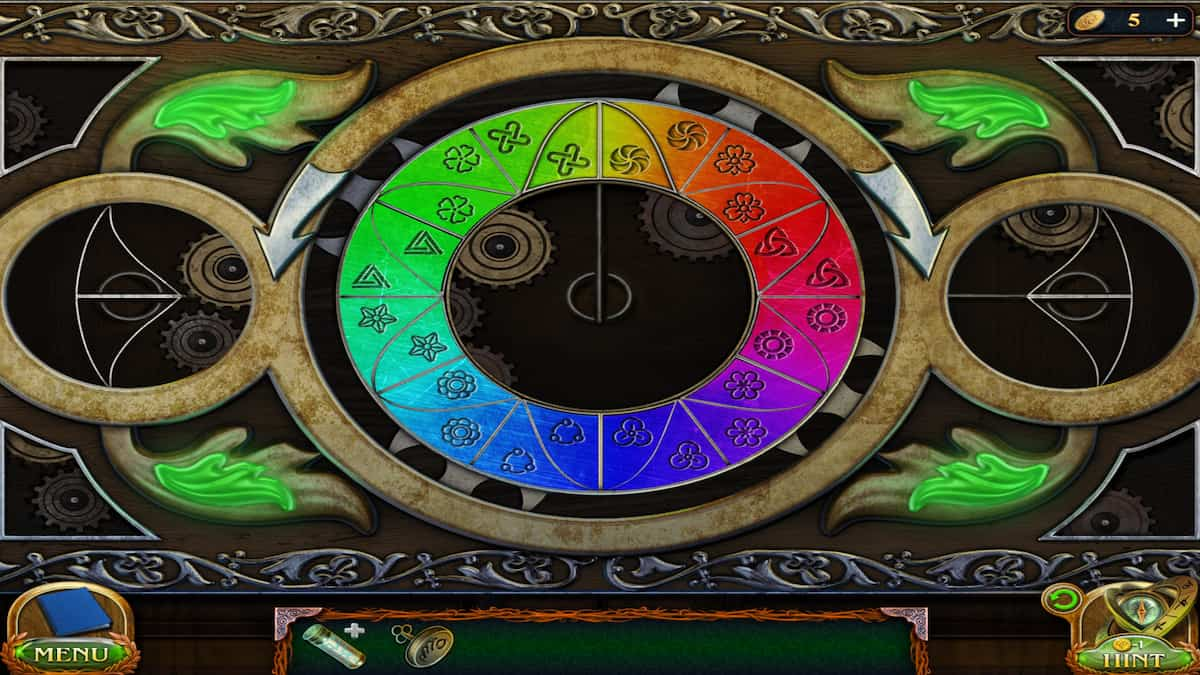
In this puzzle, we will be adding in different chips of glass into the center circle to finish a colorful picture. There are two different types of chips that we will be adding: rounded chips and pointed chips. Each round chip and pointed chip must be added so that the symbols adjacent to each other match. For example, round chip flower symbols must be next to pointed chip flower symbols. Use the picture above for reference.
When this puzzle has been solved, you can enter the Office and speak to our teacher, Cassandra, who will inform us what our quest will be.
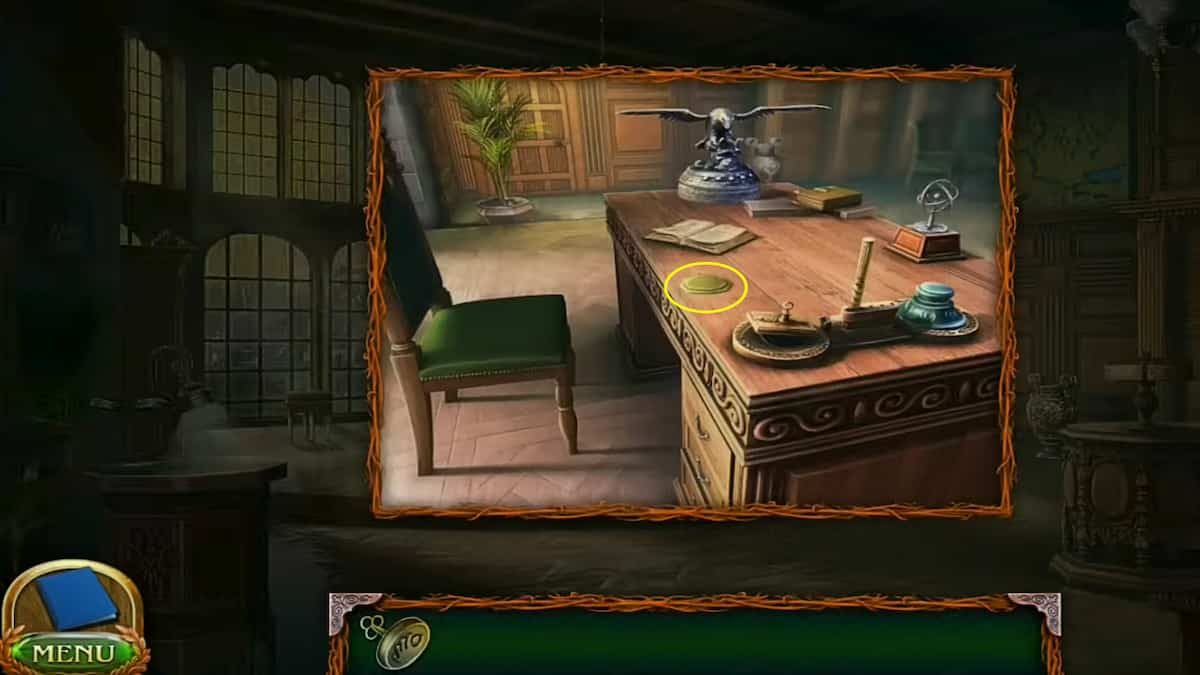
Academy Office
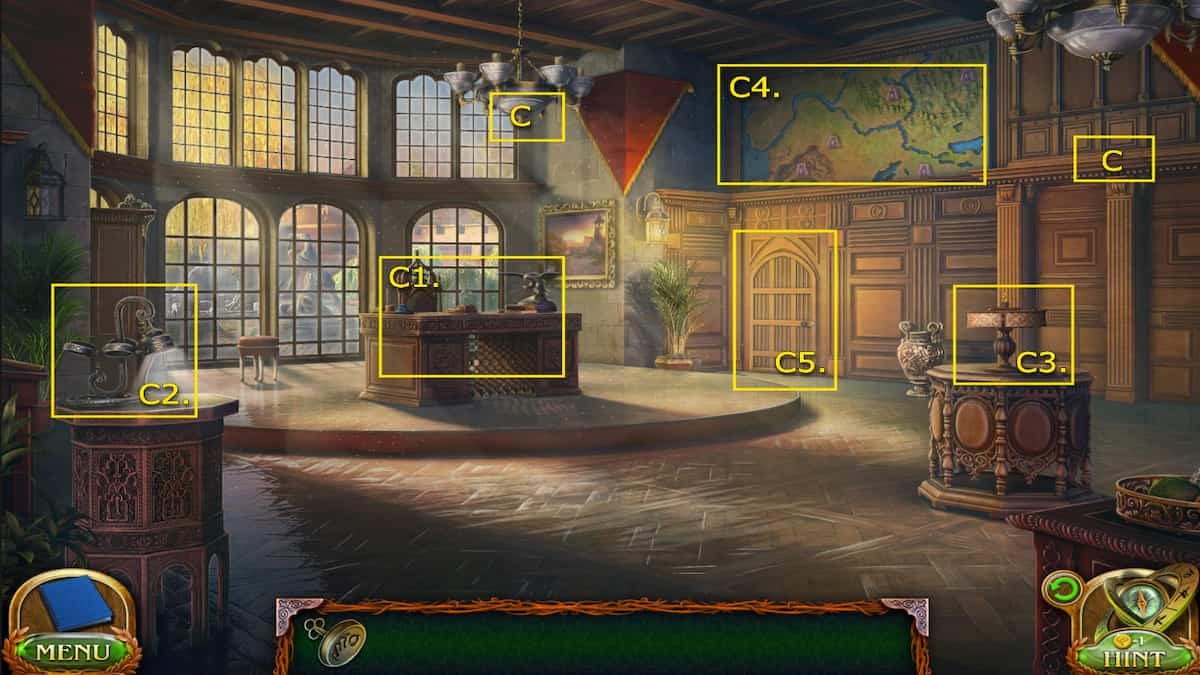
- C1. Desk - Yellow light filter, Bird statue
- C2. Filter Lamp
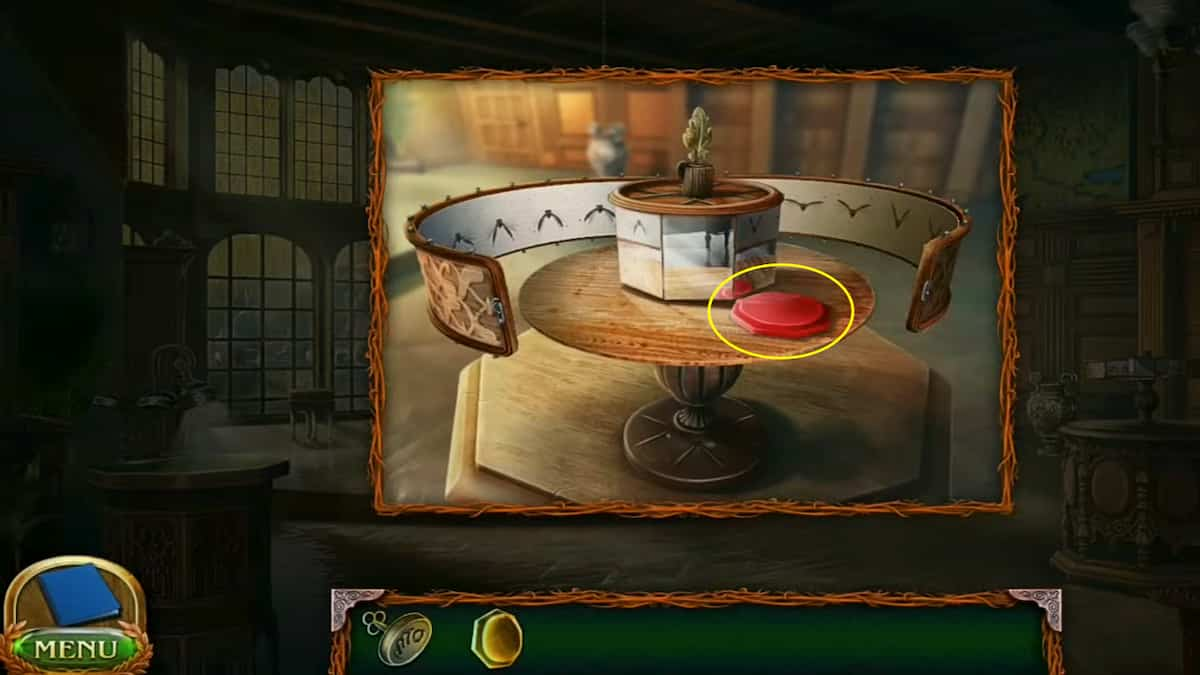
- C3. Bird Lamp - Red light filter, Animation tape
- C4. Map
- C5. Locked door
- (Collectible) Hanging on chandelier above the desk - Dreamcatcher 2/7
- (Morphing Objects) On the pillars on the top right wall - Bowl/crown 18/45
First, check on the desk for the first light filter you'll need and investigate the strange bird statue. We need some kind of clue on how to move the wings of the statue. Head over to the Bird lamp on the right side of the room and spin it around. Once you spin it once, you can open it and collect second light filter and the Animation tape. This tape has a clue on the position of the bird wings, but we won't be able to see it without placing it under the Filter lamp, which will require us to first find all the colored glass filters.
Where to find all the light filters
You'll need to collect all the light filters to place in the filter lamp and use to look at the Animation tape. There are two right in the office which we have already seen. We may have spotted the others earlier but can now collect them.
Here are where all five of them are:
- Yellow light filter - on the desk in the Office
- Red light filter - in the bird lamp
- Green light filter - on the candlestick holder near the lab door
- Blue light filter - next to the lion statue
- Violet light filter - in the owl tower
With all the light filters, head back to the Filter lamp and place the filters in it. Ensure you place the Animation tape on the table top below it. Then, click on the lamp to rotate it and switch filters. It will display numbers on the Animation tape beside each picture. It would be hard to switch through filter and memorize the number with each picture, so we'll need to collect some ink and a quill to mark them down on the tape.
Where to get ink and a quill

First, head outside to the Courtyard and peak into the owl tower to grab a feather from the ground. Check out the feather in your Inventory first. It will need to be sharpened. Then, head back to the Office and look on the desk to grab the Inkwell and Stationary blade on the right end. Use the Stationary blade on the feather to turn it into a Quill.
Now you can take these items to the Filter lamp. Set the Inkwell beside the Animation tape, and then add your Quill to it. You can begin rotating through each light filter, using the Quill to mark the numbers on the tape. Once you have all the numbers written down, grab your Storyboard.
How to solve the Bird statue puzzle
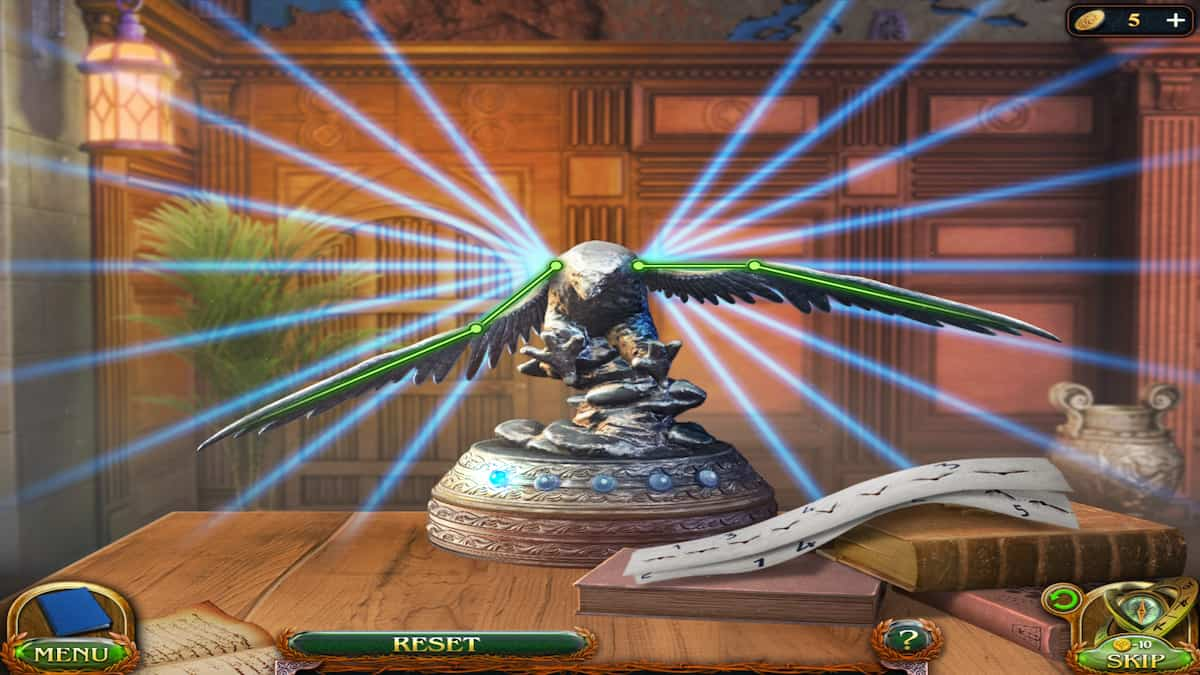
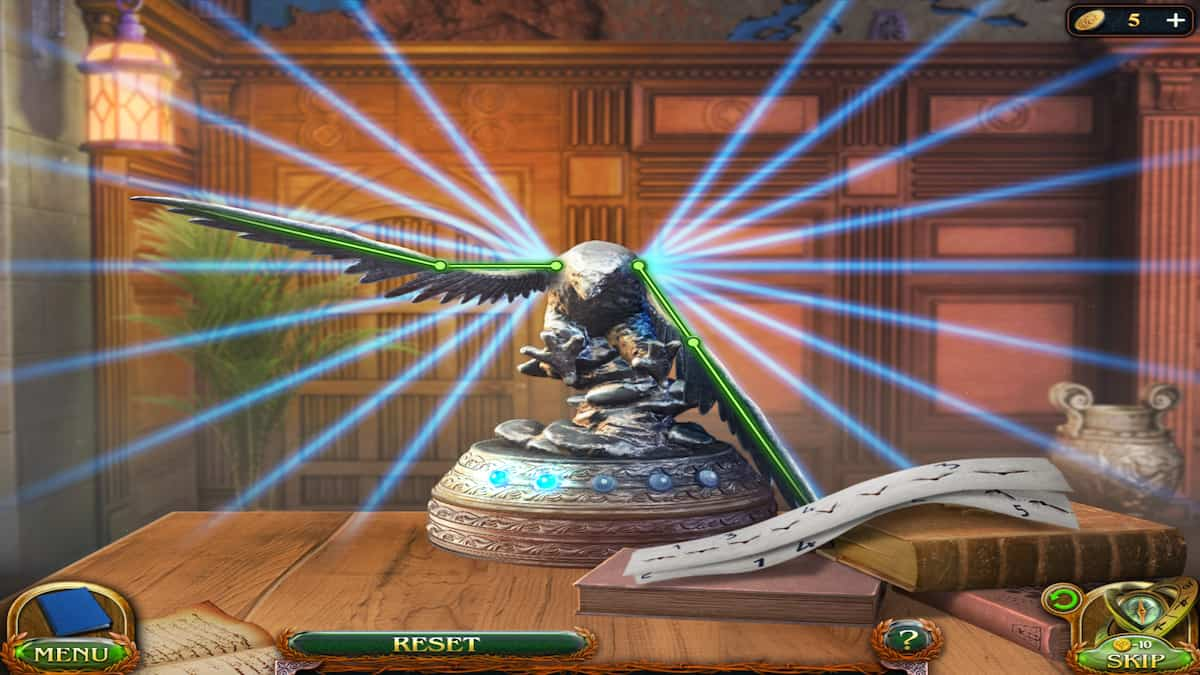
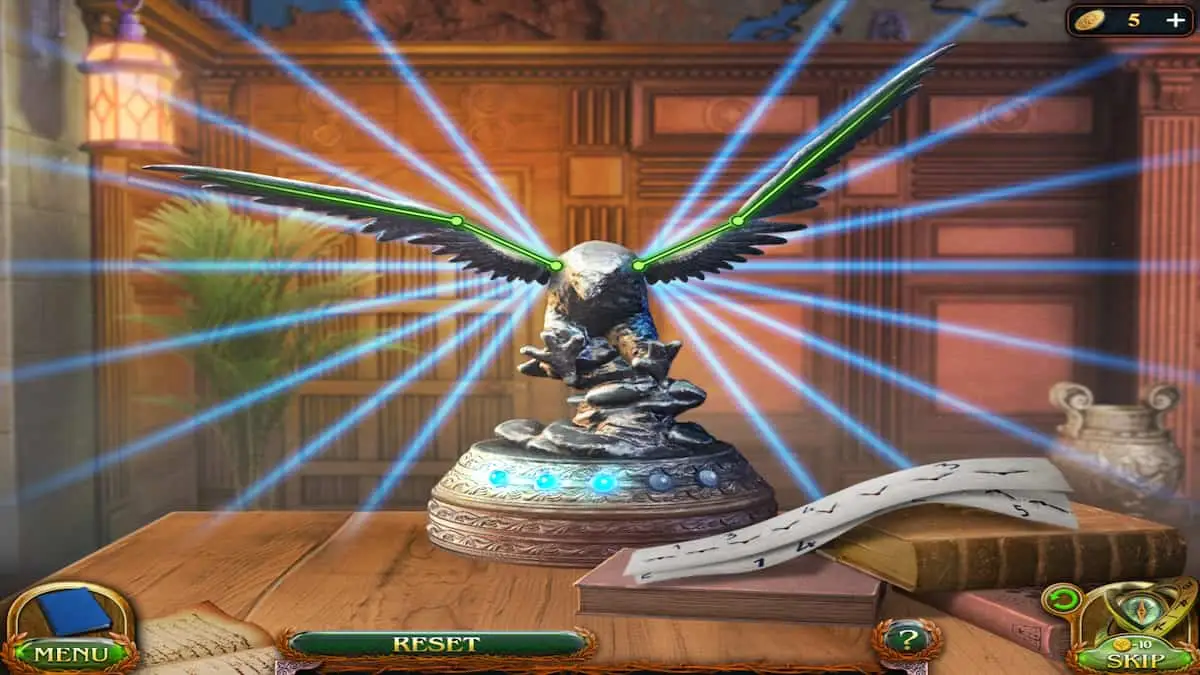
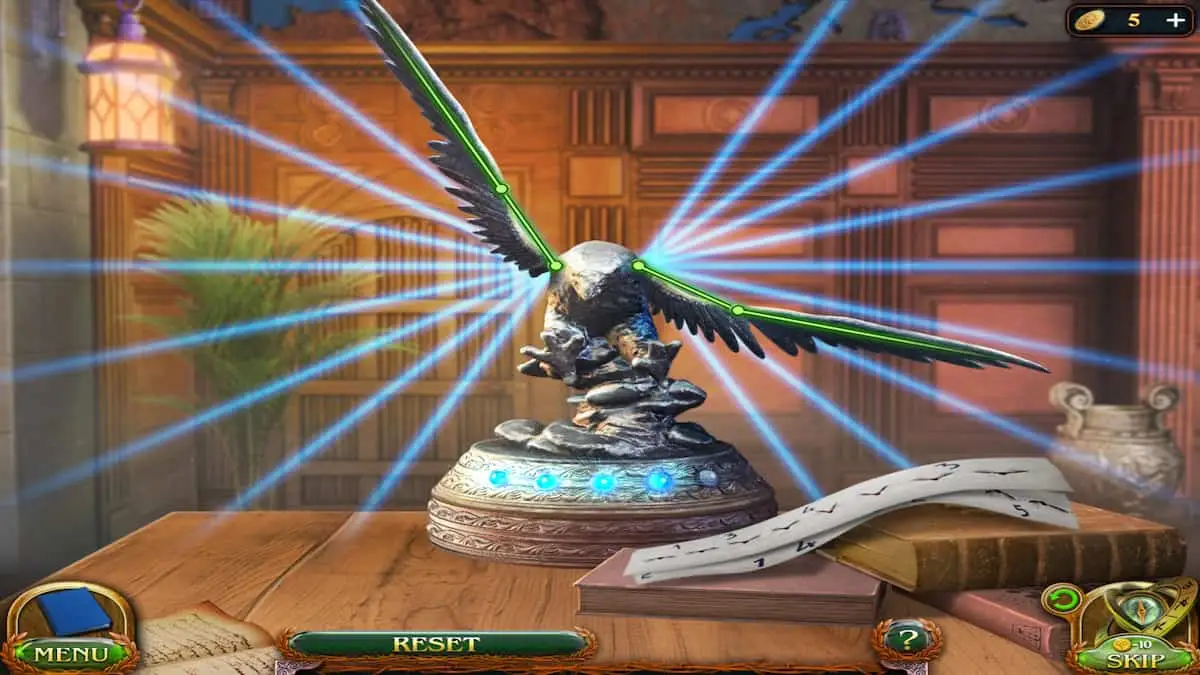

With your Storyboard now made, return to the desk and investigate the Bird statue once more. You can place your Storyboard beside the bird, and look at it see what order you need to turn each wing. This will allow you to start working on the puzzle. Move the wings according to the Storyboard to by clicking on each one. Dragging a wing will allow you to change its rotation position.
The bottom circles on the Bird statue will light up when you successfully complete a step. Here's how:
- 1 - left wing on three lines up from the bottom (rotated up), right wing on middle line (rotated down)
- 2 - left wing on middle line (rotated up), right wing on first line from the bottom (rotated straight)
- 3 - left wing three lines down from the top (rotated down), right wing three lines down from the top (rotated up)
- 4 - left wing on the very top line (rotated straight), right wing three lines up from the bottom (rotated up)
- 5 - left wing on the very bottom line (rotated straight), right wing three lines from the bottom (rotated down)
Once you finish all these steps, the drawer to the desk will open up and allow you to retrieve the Tracing paper with symbols and Library key. Take the Tracing paper over the map on the wall and use it to figure out what each portal goes to. You're going to want to try and remember the symbol beside the Druids hill. Now we can head to the library and use the key to get inside.
Academy Library
- D1. Table - Manuscript 4/8
- D2. Archive gate
- D3. Book sections
- (Collectible) Hanging on the wall on the right side of the room - Dreamcatcher
- (Morphing Objects) Ladder/chair in the back corner 19/45
You won't be able to do too much in the main room of the library right away. You can head down the right hall to see all the library sections, but first we can figure out how to unlock the gate.
How to unlock the gate in the library
Interact with the gate in the main library room to see a padlock requiring three symbols. We can find the symbols right around the area. There are three total. Here's where to get them:
- Symbol 1: Underneath the books on table
- Symbol 2: Scratched on the table on the right side
- Symbol 3: On the pillar beside the scratched table
The above symbols can be put into the padlock, as shown in the image above, to unlock the gate. Then you can enter the Archive room.
Where to find all the Library archive items

When in the Archive, you'll need to collect several items to help get the rune stones. The items are shown at the bottom of the screen as shadows, but here's where you can find each one and use them correctly:
- Mop - Leaning next to the ladder and cat on the left side
- Door handle - on the desk beside casket box
- Continent - On top of the bookshelf (Use the Mop to pull it down)
- Envelope knife - In the globe (Use the Continent to open it)
- Ball of thread - In the globe with Envelope knife
- Key - In the loose board of the glass case (Use Envelope knife to pry open)
- Crystal Star - In the bird cage (Use the Key to unlock the drawer)
- Element of the combination lock - In the cabinet at the top of the ladder (Use Ball of thread to get cat away and then use Door handle to open)
- Glass eye - In the Crystal Star book on the desk (Place Crystal Star in the book cover and then complete puzzle as shown below to open)
- Metal feather - In the casket box on the desk (Use Combination element and complete the puzzle as shown below to open)
How to open the crystal star book
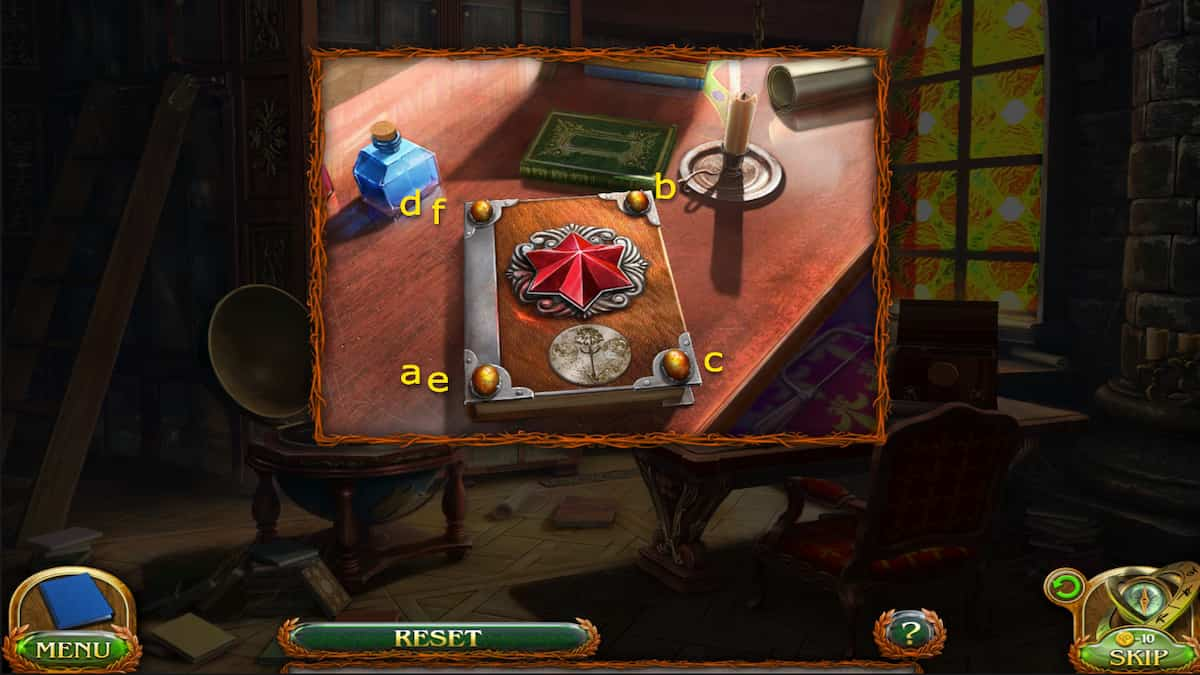
To open the book on the desk using the Crystal star, we need to watch the lights around the edges and repeat the pattern they light up in the correct order. Here's the order you'll need:
- a. Top right
- b. Bottom left
- c. Bottom right
- d. Top left
- e. Bottom left
- f. Top left
How to open element casket box

Opening the box is fairly simple once you know what you're doing. All you need to do is recreate one pattern picture across all three combination elements. There are a few different patterns that can show: a fish, a leaf, a feather, or eyeglass. However, only one pattern will be able to spread across all elements and that is the feather. Check the image above to help you recreate it.
Once you have the Metal feather and the Gold eye, we have what we need to open the glass case and retrieve a rune stone. Place them in the missing slots on the owl and it will open. Then you can grab the rune stone you need that matches the symbol we saw on the map. Thankfully, the one you need is on the top right and the first pedestal and it is the only one we can grab.
With the rune stone, head back to the Courtyard and approach the Portal pedestal 3, on the top right side above the Lion statue (it should match the symbol on the rune stone), and place the rune stone inside. Now, you'll need to complete another puzzle to open the portal.
How to complete the portal puzzle

As you can see, this puzzle has multiple different colored discs and smaller discs with the same colors. The goal is to move the smaller discs across the straight rods until they fit into their correct spots on the large discs. However, once you switch out two small discs, the all the small discs will spin counter-clockwise. This means, you'll need to figure out where you can switch them so they end up in the right spots.
The puzzle might start out differently for you, but here's how I did it:
- Red to Red
- Purple to Red
- Yellow to Red
- Light blue to Red
- Red to Green
- Red to Purple
With all the discs in the right place, the portal will open and you can press on it to step through to the Druids land.
Druids Waterfall
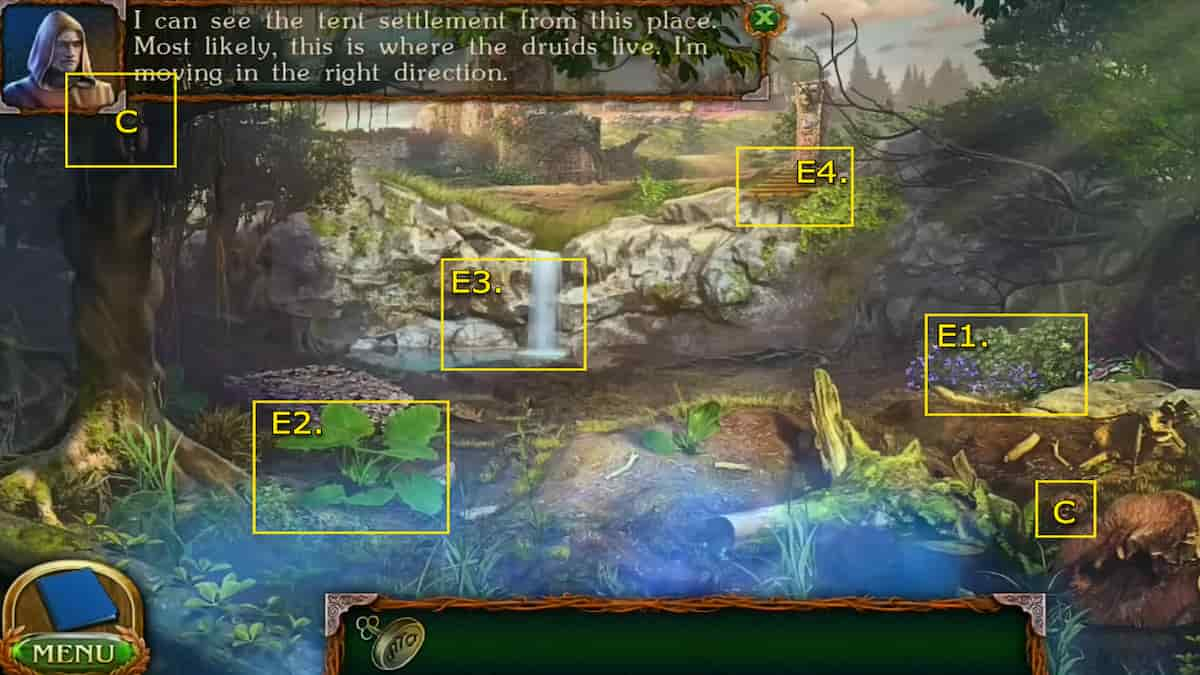
- E1. Purple plants - Sickle
- E2. Bush
- E3. Waterfall - Shaft
- E4. Ramp
- (Collectible) Hanging in the tree on the far left side - Dreamcatcher 4/7
- (Morphing Objects) Mushrooms on the ground near the log on the right side 20/45
Check beneath the plants on the right side of the area to find a Sickle hidden underneath the leaves. Look closer at the Waterfall to find a broken shovel behind the stream and retrieve the Shaft. Look up at the edge of the hill to see what could be used as a ramp. Use the Shaft to pull it down and continue forward.
Druids Abandoned Castle
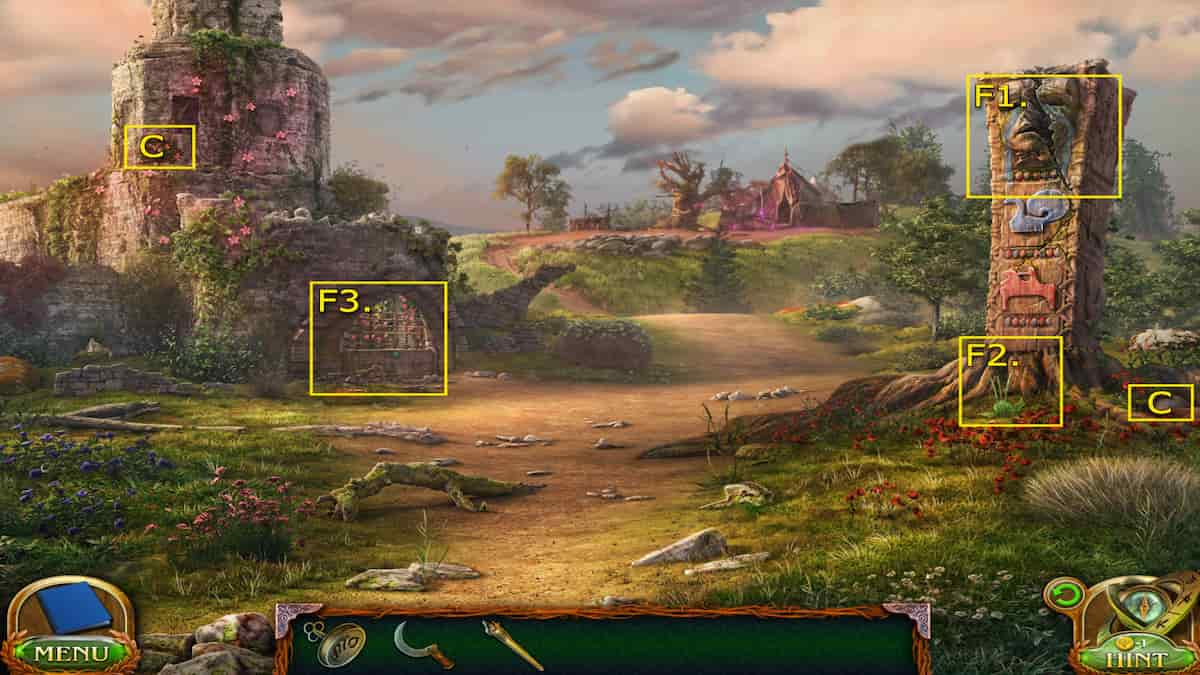
- F1. Idol
- F2. Idol plant
- F3. Castle gate - Firefly ivy
- (Collectible) On the right of the Idol - Rune stone 2/8
- (Morphing Objects) Vines on the left side of the castle tower 21/45
You won't be able to do much here right away but take a good look around so you know where everything for when we return. Then, approach the Castle gate and work on completing the puzzle to enter.
How to open the Castle gate
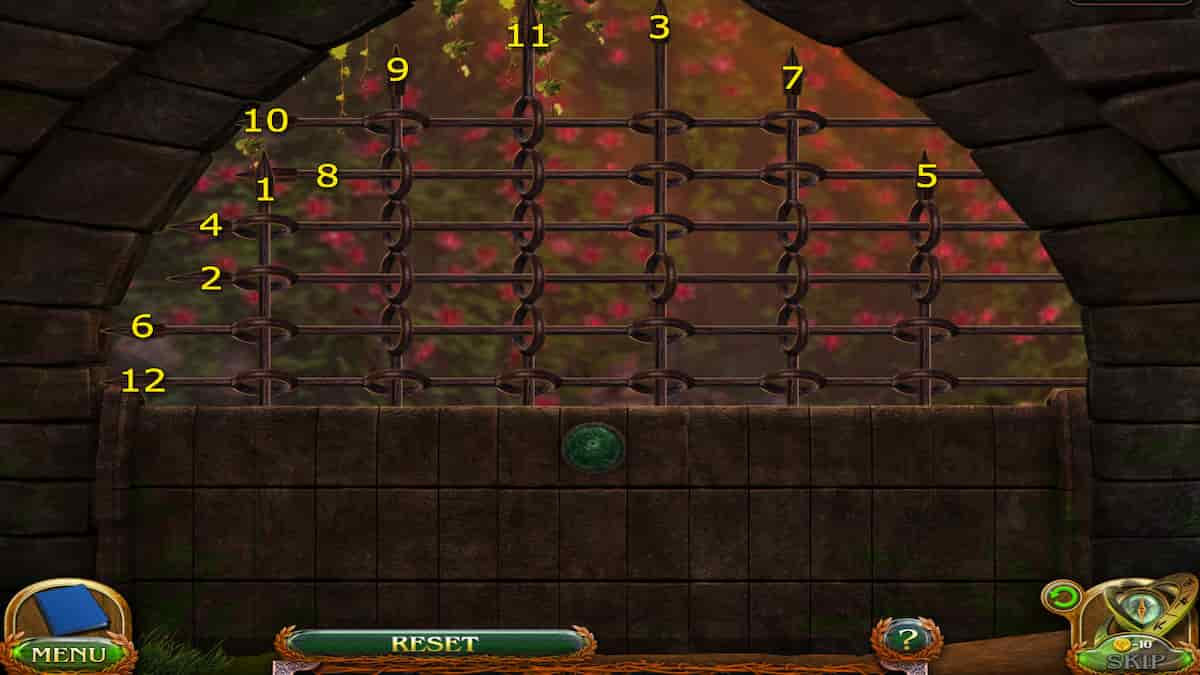
To unlock the gate, you need to pull the rods out one by one until there is a clear opening. However, you'll need to do it in the right order otherwise the rods will go back up. The trick to figuring out the order is looking at which rods are crossing and which ones are not. If the rod has a clear exit without tugging on other rods, then it's the right pick. Check the image above for the correct order to pull them and get through.
After opening the Castle gate, you'll have access to the Firefly ivy growing there, but you won't need this right now. For now, head toward the camp shown in the distance.
Druids Settlement
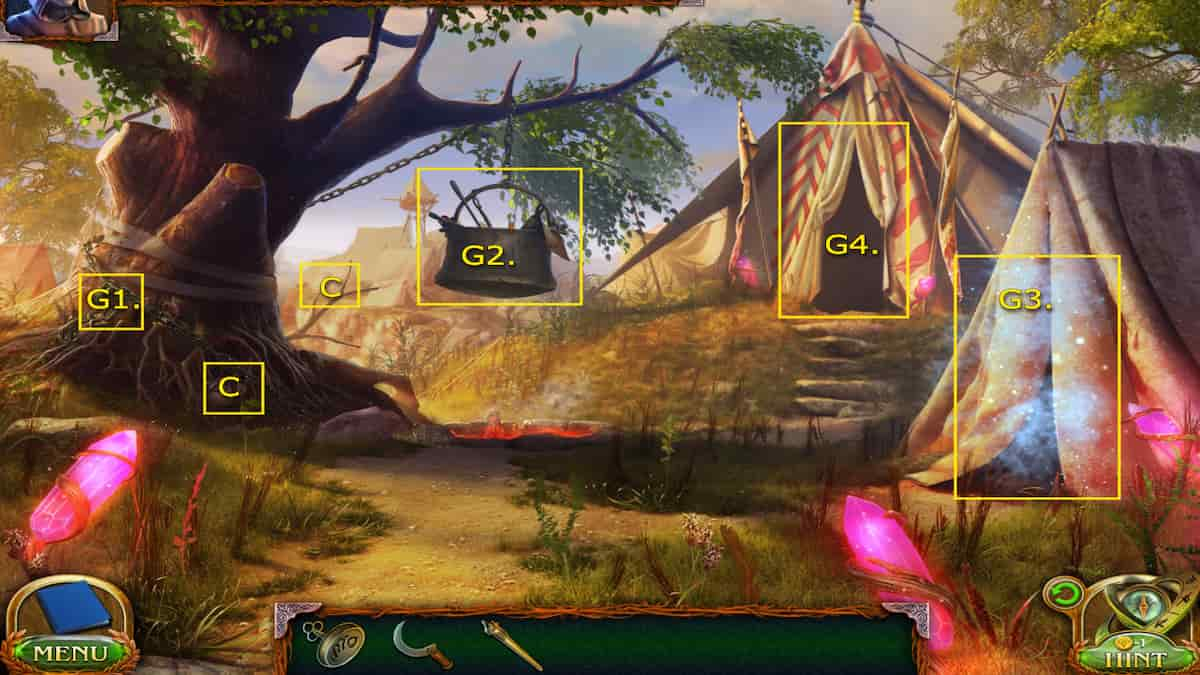
- G1. Lock and chain
- G2. Pot of utensils
- G3. Protected tent
- G4. Druid tent
- (Collectible) On the base of the tree on the left side - Rune stone 3/8
- (Morphing Objects) Tent on the hill behind the tree on the left side 22/45
There isn't much to do in this area right away but familiarize yourself with everything here. Then, approach the tent in the distance and speak to the person inside.
Druids Tent
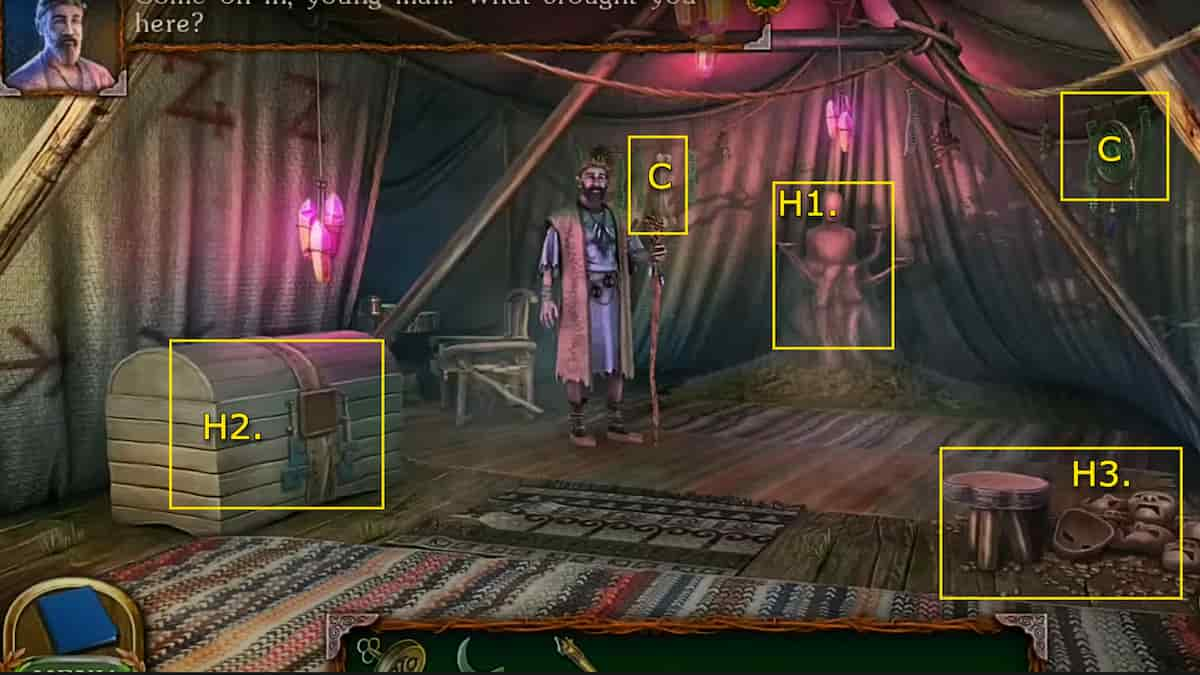
- H1. Sacred altar
- H2. Chest
- H3. Masks
- (Collectible) Hanging on the tent beam on the far right side - Dreamcatcher 5/7
- (Morphing Objects) Hanging bone/plant behind the Druid leader 23/45
After speaking to the Druid leader, you will receive the Spell formula, used to get rid of the protective barrier around the other tent. You can look around this tent first, and then head back to enter the other tent.
Head to the protected tent and then use the Spell formula from your inventory to begin the puzzle to break the barrier.
How to break the protective barrier on the Druid tent
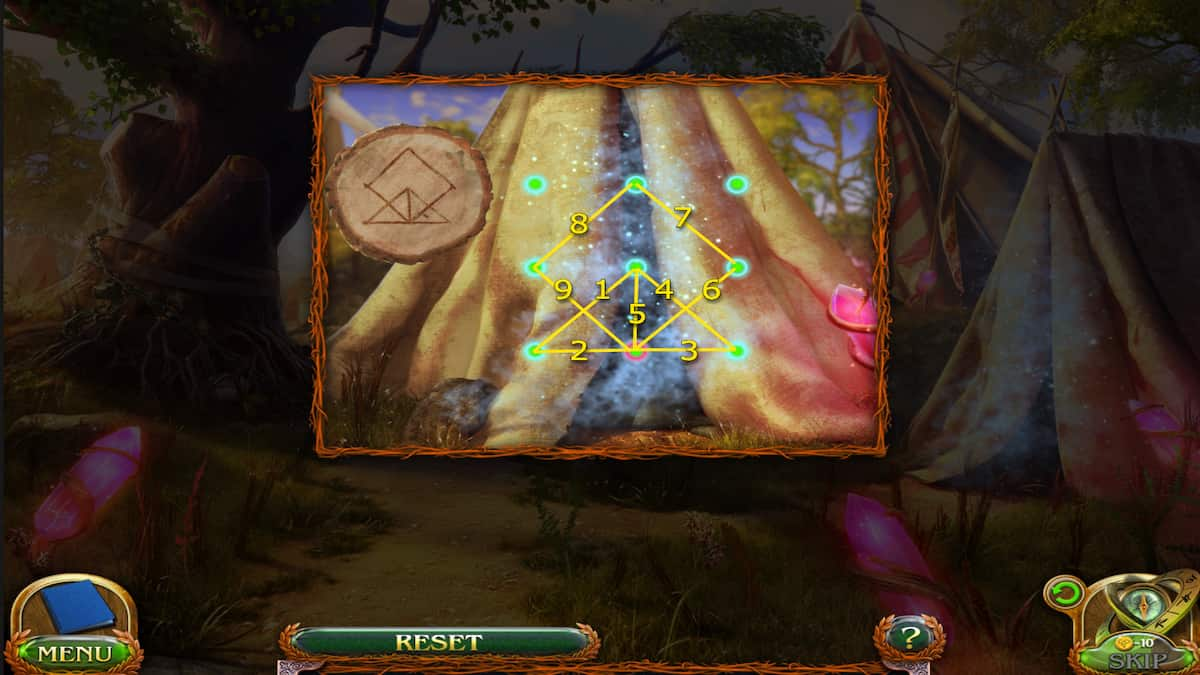
This puzzle is pretty fun. All you need to do is recreate the pattern shown on the log beside the dots by drawing consistently in one continuous line until the dots connect and form the pattern. To draw, press on a dot and then click on the next dot where you want to draw a line. I started from the middle and worked my way out to create the pattern. Check the image above for reference.
With the barrier destroyed, you can enter the tent to find the sick dwarf.
Druids Sick Tent
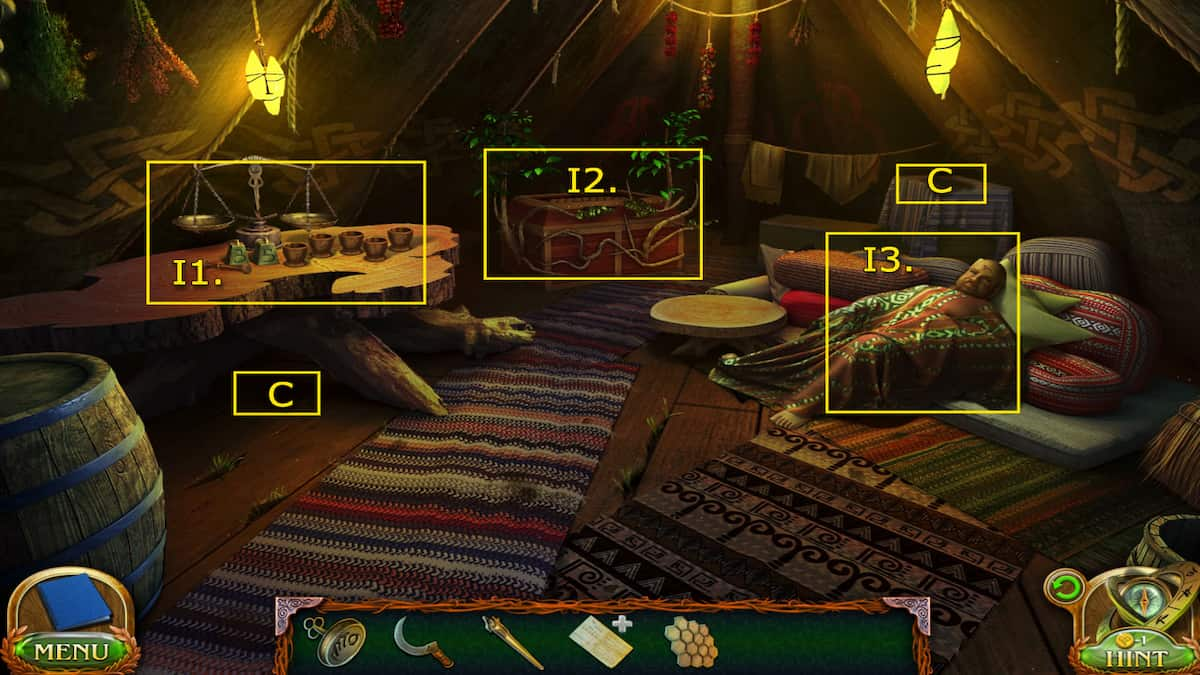
- I1. Scales desk - Ointment recipe, Piece of the puzzle
- I2. Tree chest - Chain key, Bandage, Manuscript 5/8
- I3. Sick dwarf
- (Collectible) Underneath the Scales desk - Rune stone 4/8
- (Morphing Objects) - Bottle on the stand behind the sick dwarf 24/45
Collect the recipe for ointment on the desk where the Scales are. This will help us collect everything we need to start helping the dwarf. Investigate the chest covered in tree branches and place the missing puzzle piece in it.
How to open the tree chest
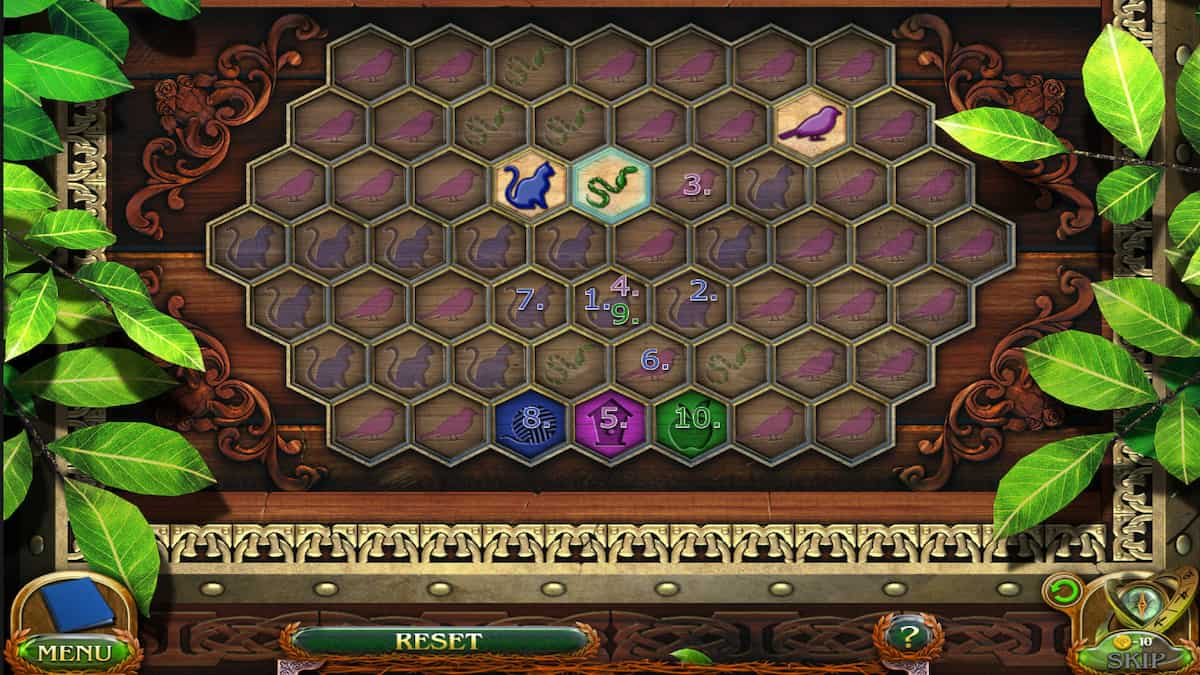
This puzzle is a bit tricky and it requires you to move all the pieces across the board into their correct spaces: the cat to the ball of yarn, the worm to the apple, and the bird to the birdhouse. However, the pieces can only move on the spaces that match them and will leave behind a trail of a different piece. The cat leaves behind a worm, the bird leaves behind a cat, and the worm leaves behind a bird. You'll have to be strategic about where you move them and create a proper path to fit them all in their homes. Check the image above for help on how to get there ( follow the numbered order, moving the piece matching the colored number).
Once you open the chest you can grab the item from inside: a bandage, the key to the chain, and a Manuscript page. Now, you'll want to start collecting all the items you'll need to make the ointment.
Where to get all ointment ingredients and items
Screenshot by Pro Game Guides 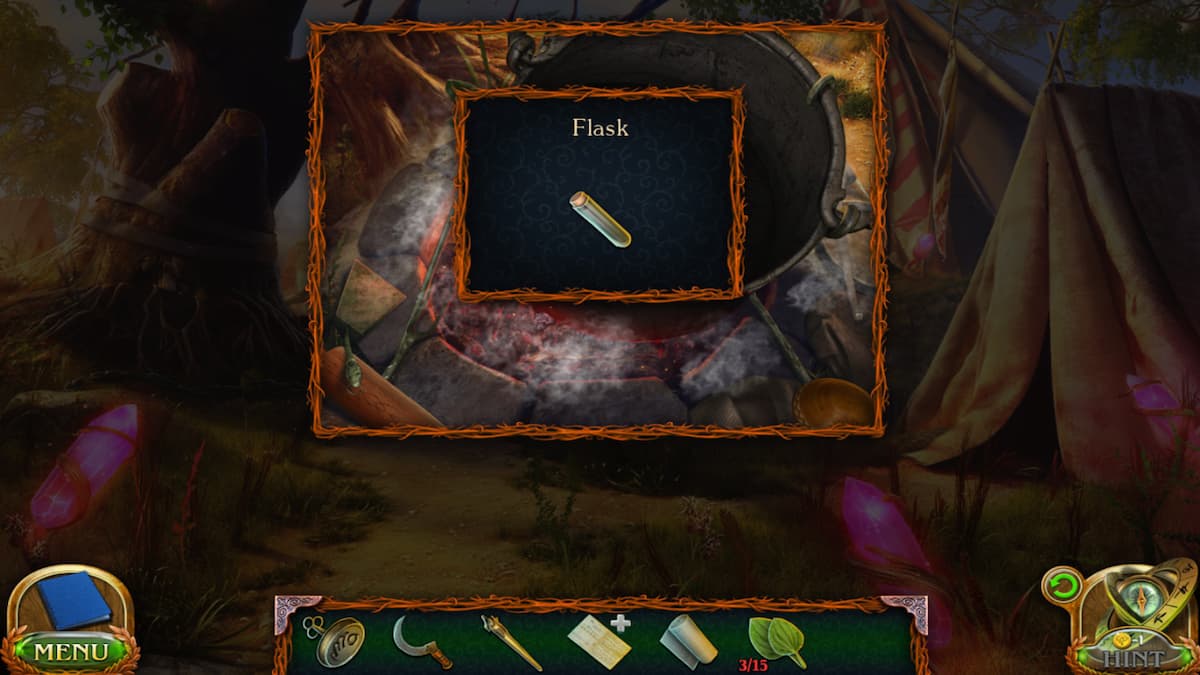
Screenshot by Pro Game Guides 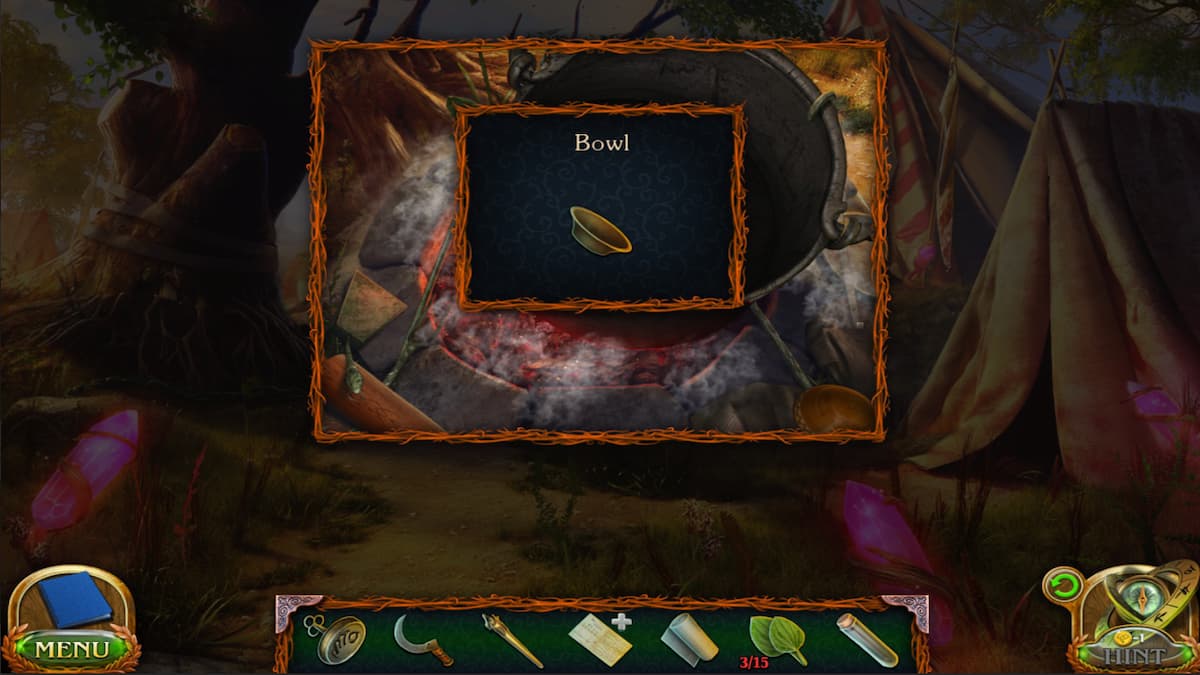
Screenshot by Pro Game Guides 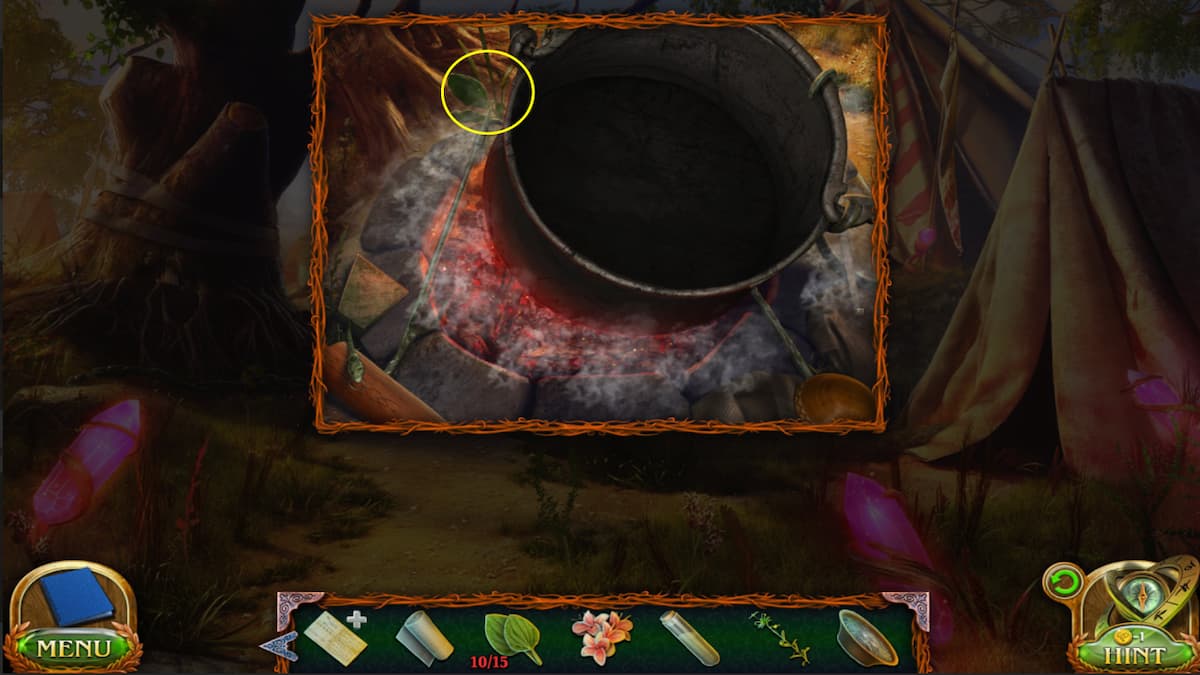
Image by Pro Game Guides 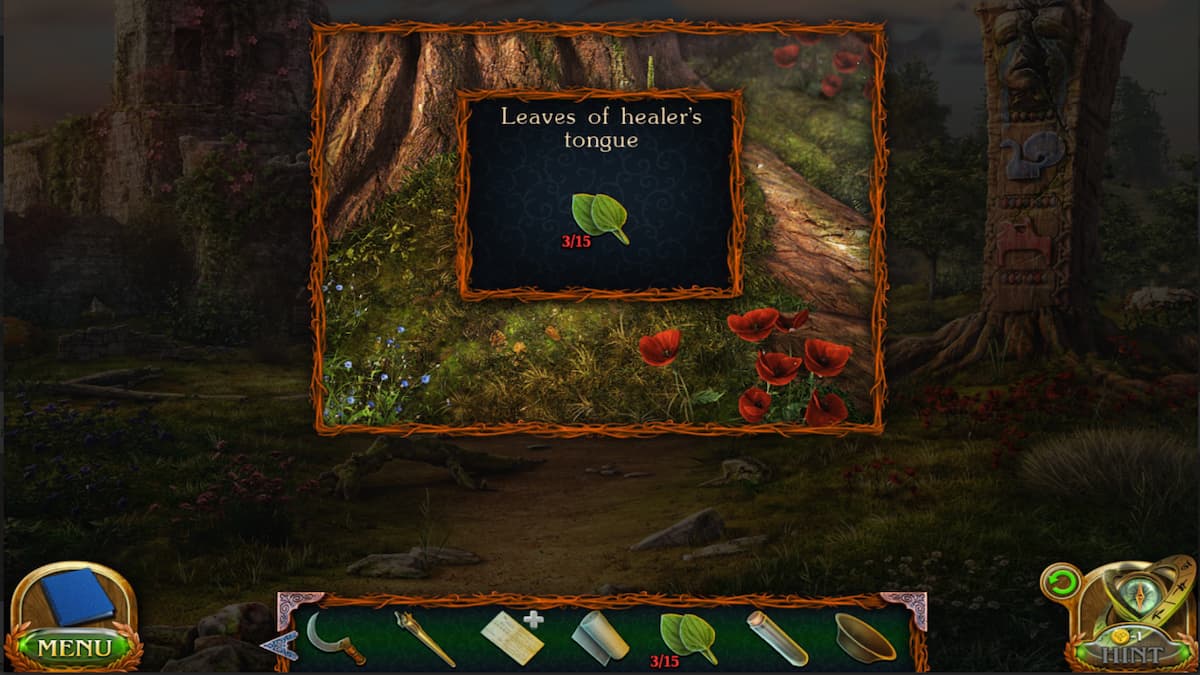
Screenshot by Pro Game Guides 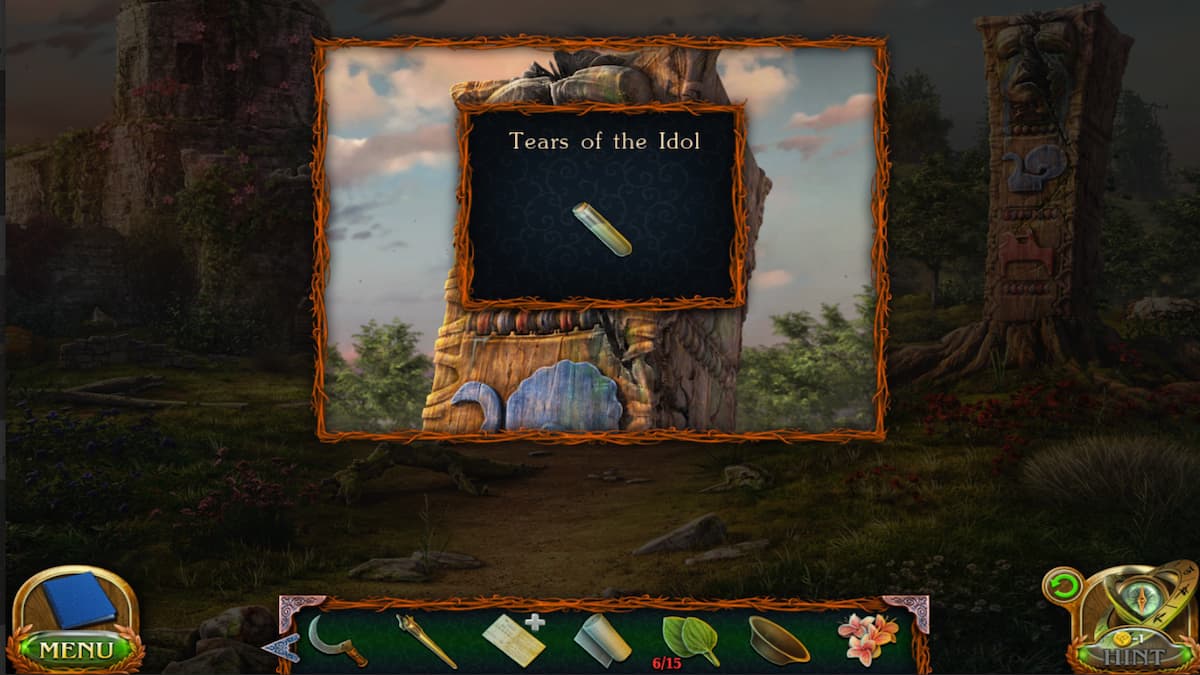
Screenshot by Pro Game Guides 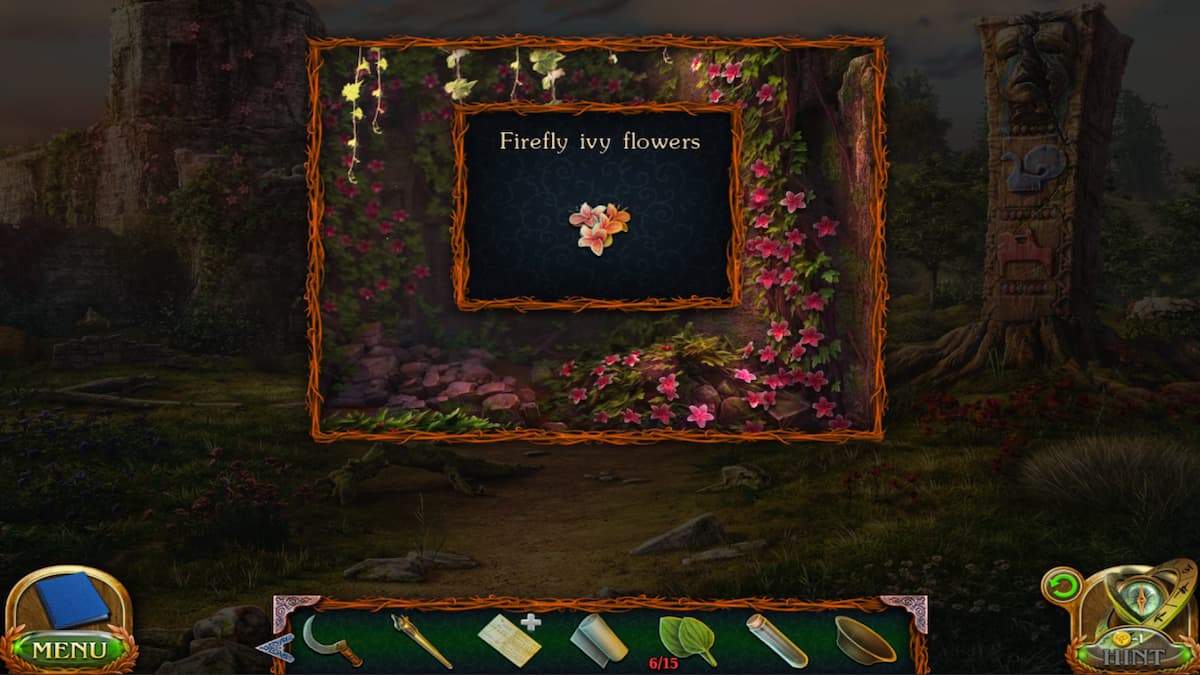
Screenshot by Pro Game Guides 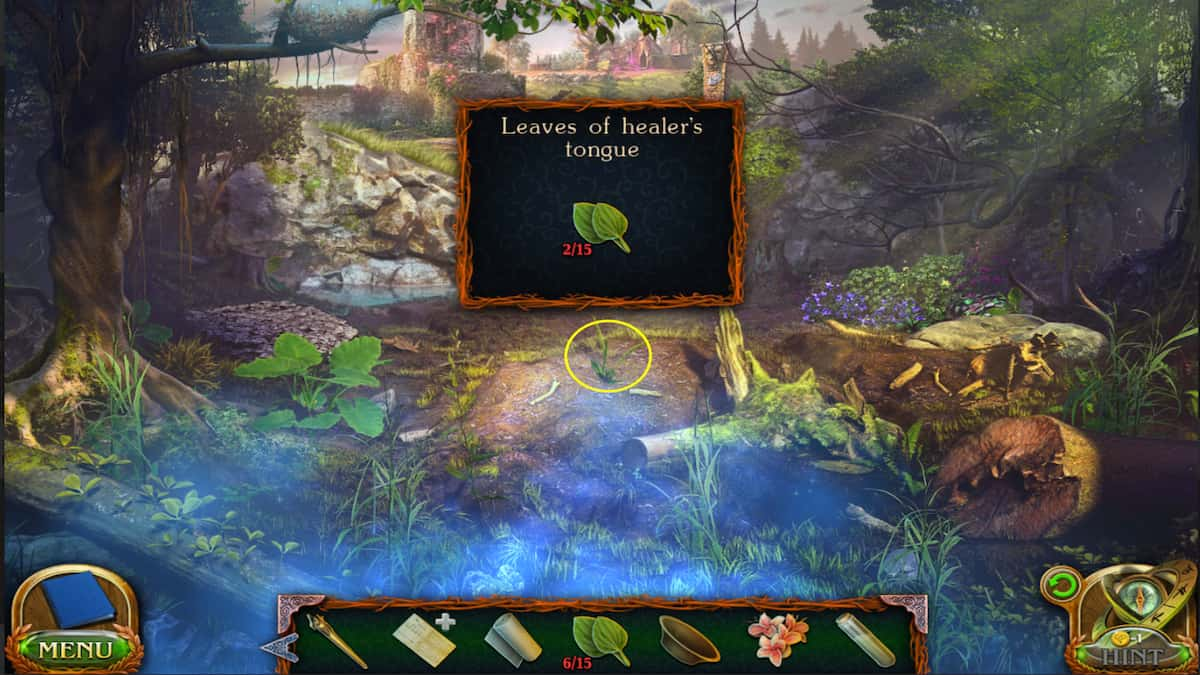
Image by Pro Game Guides 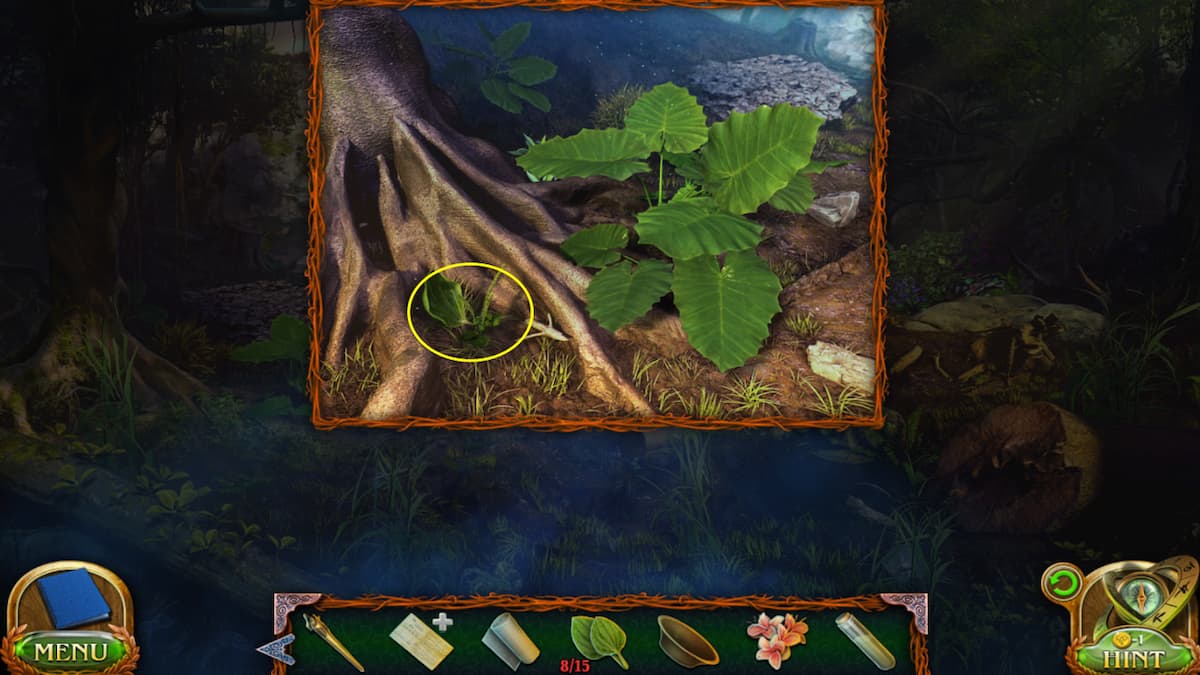
Image by Pro Game Guides 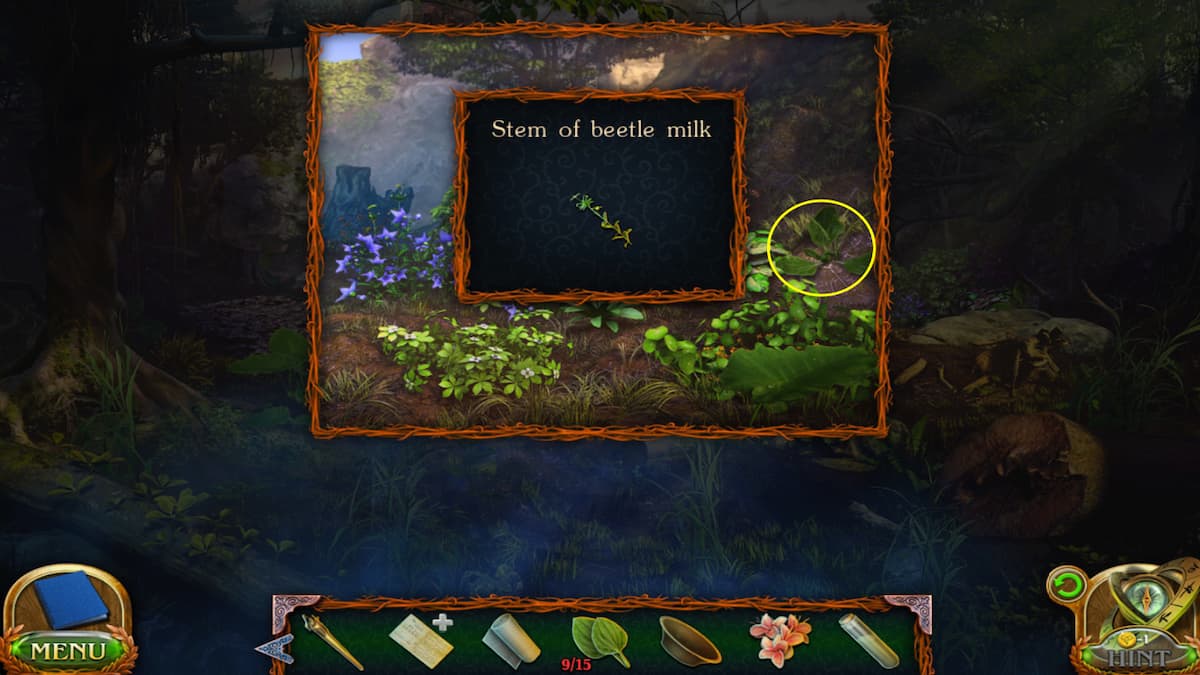
Image by Pro Game Guides 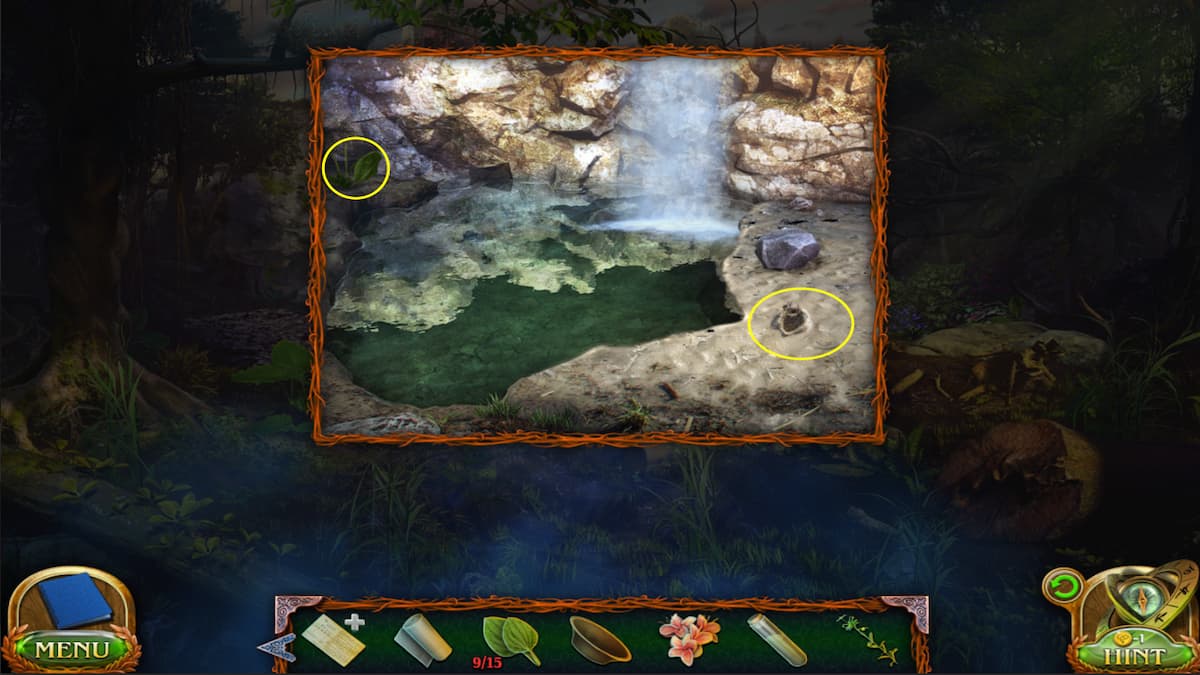
Image by Pro Game Guides 
Image by Pro Game Guides 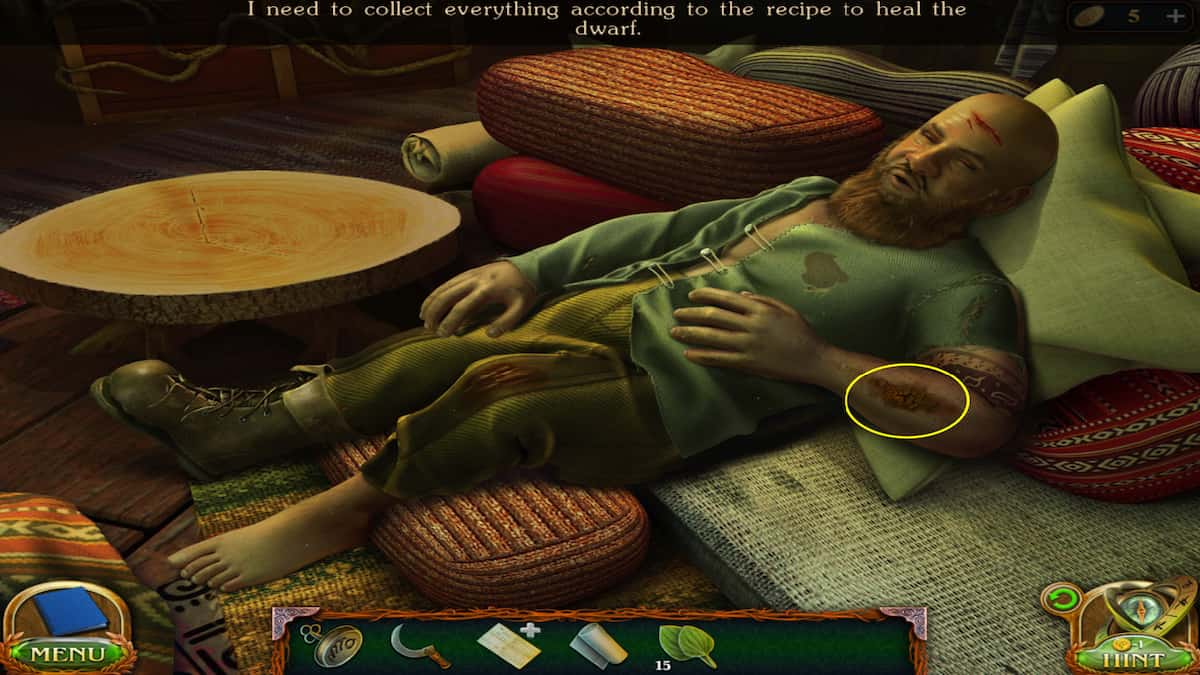
Image by Pro Game Guides
You can use the recipe page to help figure out everything we need for the ointment. As you find items, open the page and place the item on it to checkmark them off the list. Here's where to get everything you need:
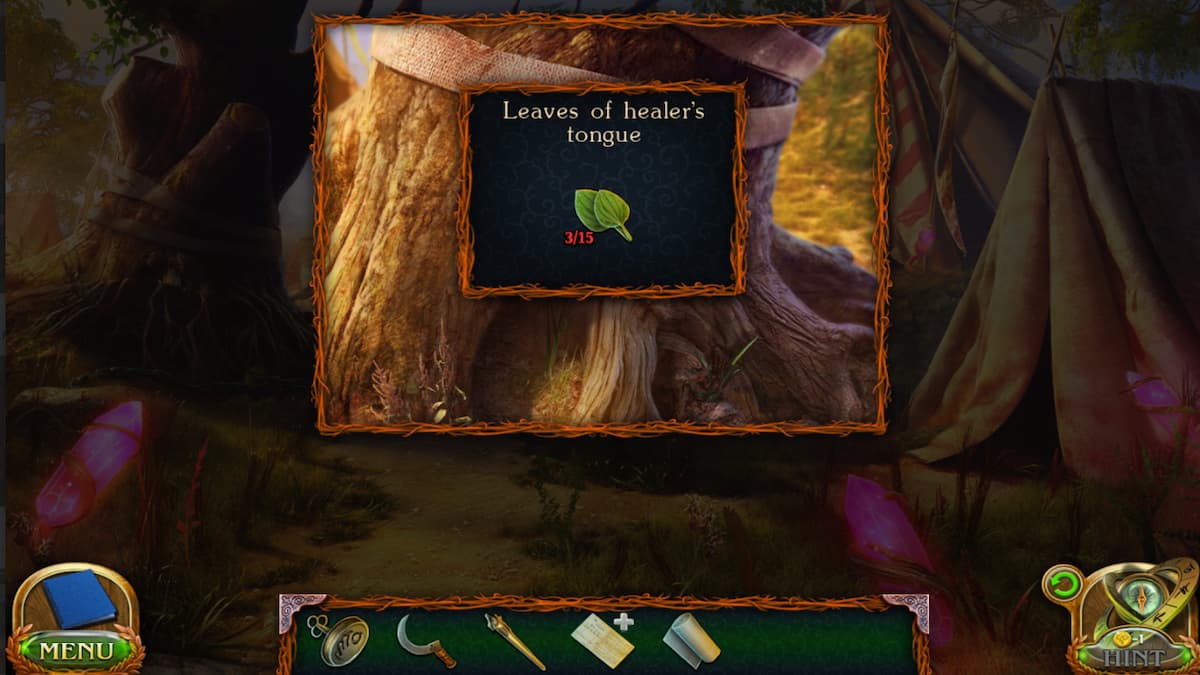
- Leaves of Healer's Tongue x3 - On tree where the chain lock was (After unlocking the chain)
- Flask - Cauldron of utensils hanging in Druid Settlement (Use the Chain key to drop down the cauldron of tools. )
- Bowl - Cauldron of utensils with the Flask
- Leaves of Healer's Tongue x2 - Next to the Cauldron on the top left side
- Leaves of Healer's Tongue x3 - Underneath the Idol at the Abandoned Castle
- Tears of the Idol - On the Idol face at the Abandoned Castle (Use the flask to collect them)
- Firefly ivy flowers - In the Abandoned Castle (where we previously unlocked the gate)
- Leaves of the Healer's Tongue x2 - At the Waterfall near mossy log
- Leaves of Healer's Tongue x1 - At Waterfall beside the Bush on the left side
- Stem of beetle milk - Near purple flowers at the Waterfall
- Leaves of Healer's Tongue x3 - Near the purple flowers with the Stem of beetle milk
- Leaves of Healer's Tongue x1 - Next to the Waterfall basin on the left side
- River silt - At the Waterfall (Move the rock out of the way and then scoop some using the Bowl)
- Pollen of the forest fairy - In the tree on the left side at the Waterfall (Use the Shaft to shake them up a bit and then grab the pollen from the leaf of the Bush below)
- Blood of the victim - On the dwarf's arm (Use the Sickle to scrap off dried blood)
Once you have everything, they will turn into the Set of ingredients in your Inventory. You can bring them over to the Scales desk in the sick tent to begin forming them into the ointment. Place them on the desk to get started.
How to make healing ointment
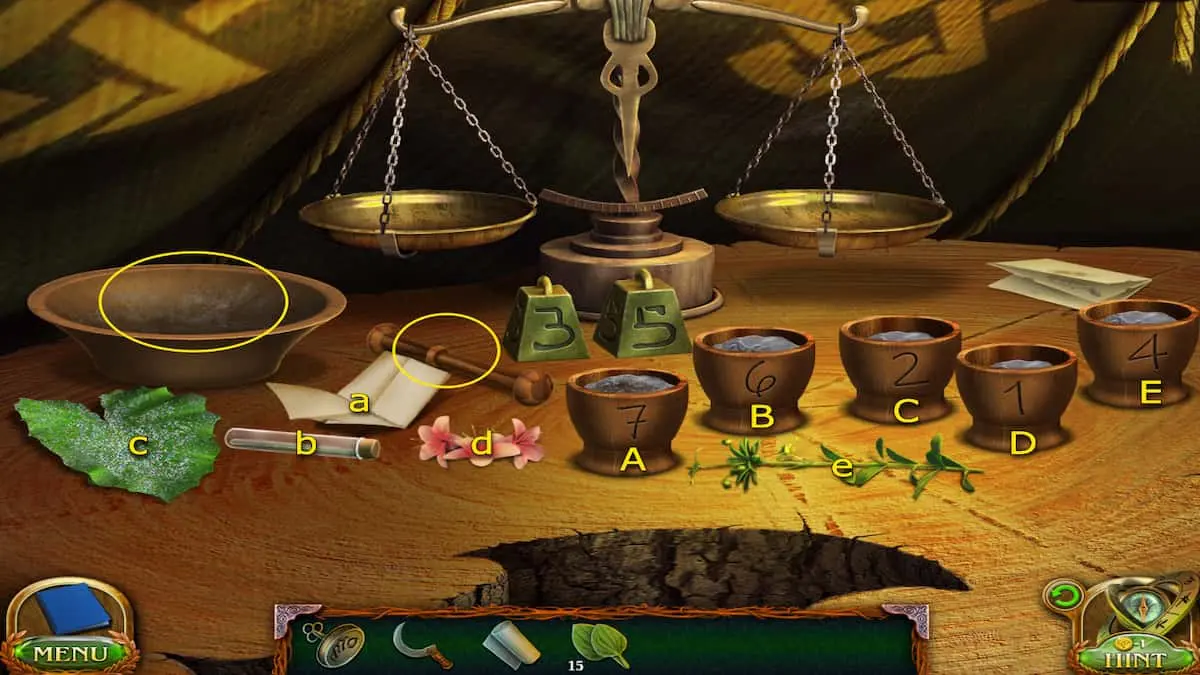
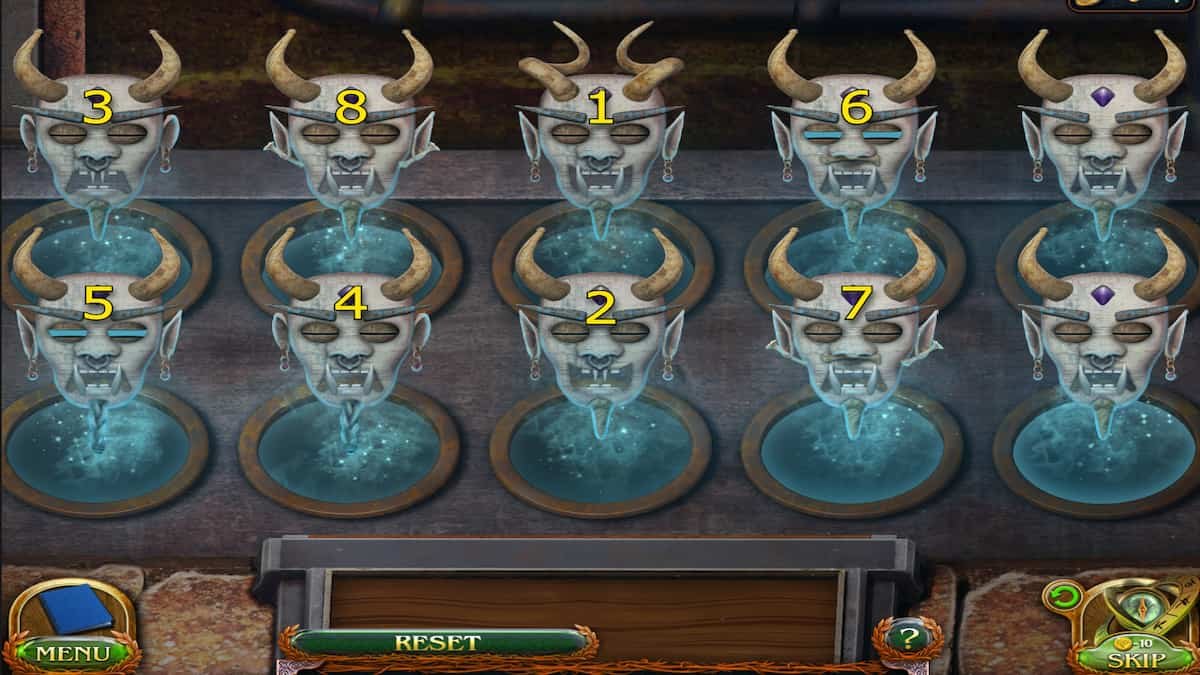
We can use the recipe page to help us create the ointment as well. Interact with it at the top right of the Scales desk for help. To measure all the ingredients for each cup evenly, you'll need to use the scale to weigh them. The numbers on the weights and cups should equal the same on each side to have a balanced mix. You can't use empty cups to balance; only cups with Silt in them. Here's how to do it:
- Place cup 2 on the right side with weight 3, place weight 5 on the left side and then pour the Silt into cup 2
- Place cup 2 on the left side with weight 5, place cup 7 on the right side and then pour the Silt into cup 7
- Place cup 2 and cup 7 on the right side, place cup 4 and weight 5 on the left side and pour Silt into cup 4
- Place cup 4 and weight 5 on the left side, place cup 6 and weight 4 on the right side and pour Silt into cup 6
- Place cup 6 on the left side, place cup 1 and weight 5 on the right side and pour Silt into cup 1
Now that you have all the Silt measured out into the cups, we can add the other ingredients.
- Add Blood of the victim into cup 7
- Add Tears of the idol into cup 6
- Add Pollen of forest fairy into cup 2
- Add Firefly ivy into cup 1
- Add Beetle milk juice into cup 4
- Use the Stir stick to stir each cup
- Add all the cups into the Bowl
- Stir the content of the Bowl with the Stir stick
When that last step has been completed, click on the Bowl to acquire your ointment. Head over to the dwarf to apply it. Place the Bowl, Bandages, and Tongue of the Healer leaves on the table beside him. Now, you can begin to treat the wounds. There are 15 of them total.
How to treat all the dwarf's wounds
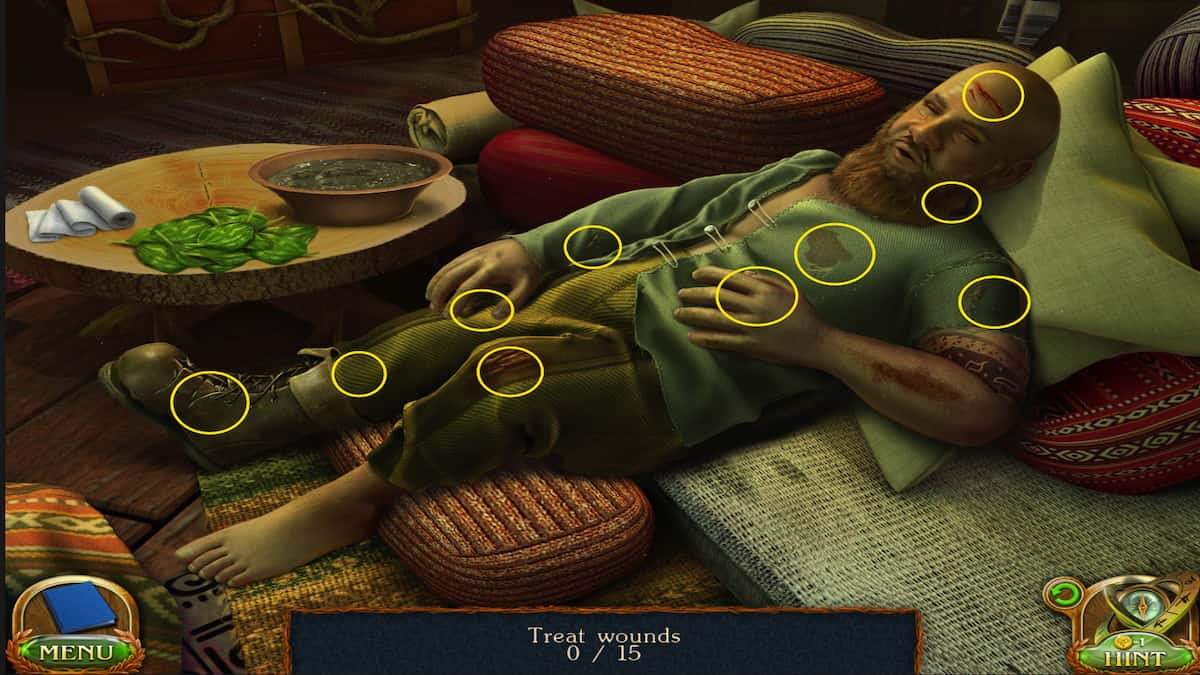
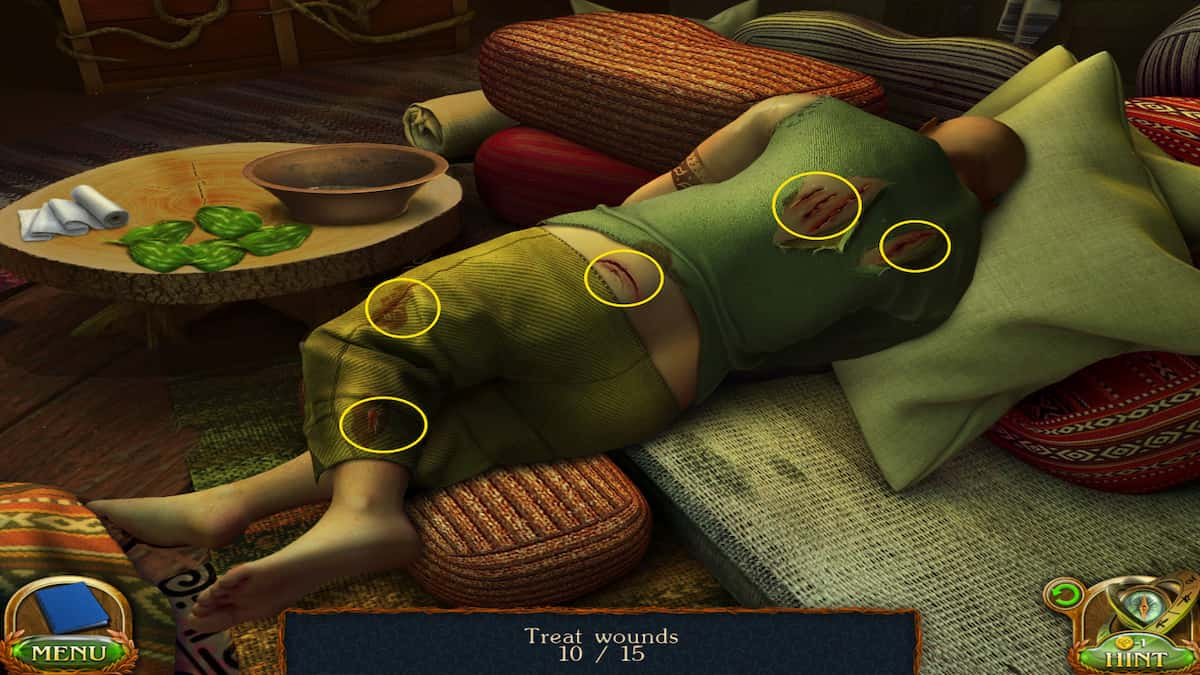
- Wound 1 - Forehead
- Wound 2 - Neck (Turn his head)
- Wound 3 - Right wrist (Lift his arm)
- Wound 4 - Left bicep (Lift his sleeve)
- Wound 5 - Chest (Open his shirt)
- Wound 6 - Belly (Below chest wound)
- Wound 7 - Left knee (Open pant leg)
- Wound 8 - Right thigh (Open pant leg)
- Wound 9 - Right ankle (Remove boot)
- Wound 10 - Right foot
- Wound 11 - Left back (Turn him over and open shirt)
- Wound 12 - Mid back (Open shirt)
- Wound 13 - Lower left back (Lift shirt)
- Wound 14 - Left leg (Lift pant leg)
- Wound 15 - Left thigh (Open pant leg)
Once all the wounds have been treated, a short cutscene will be triggered where you attempt to speak to the dwarf to figure out what happened. Unfortunately, he is in a state of shock and can't get any words out. You'll need to use a Telepathy spell. This will require a bit more research, so we're going to need to head back to the Academy. Hit the green arrow back until you're at the Academy, then continue to the Library.
Where to find a book about Telepathy in Library sections
In the Library, we're going to need to find the right book that will help us out with Telepathy. All the books are sorted into specific sections. Head through the sections area on the lower right side of the Library. Looking at the pulpit at the front of the Library will show you all the section categories. We need Spells, which is section 5. However, you're going to want to instead memorize the symbol beside it.
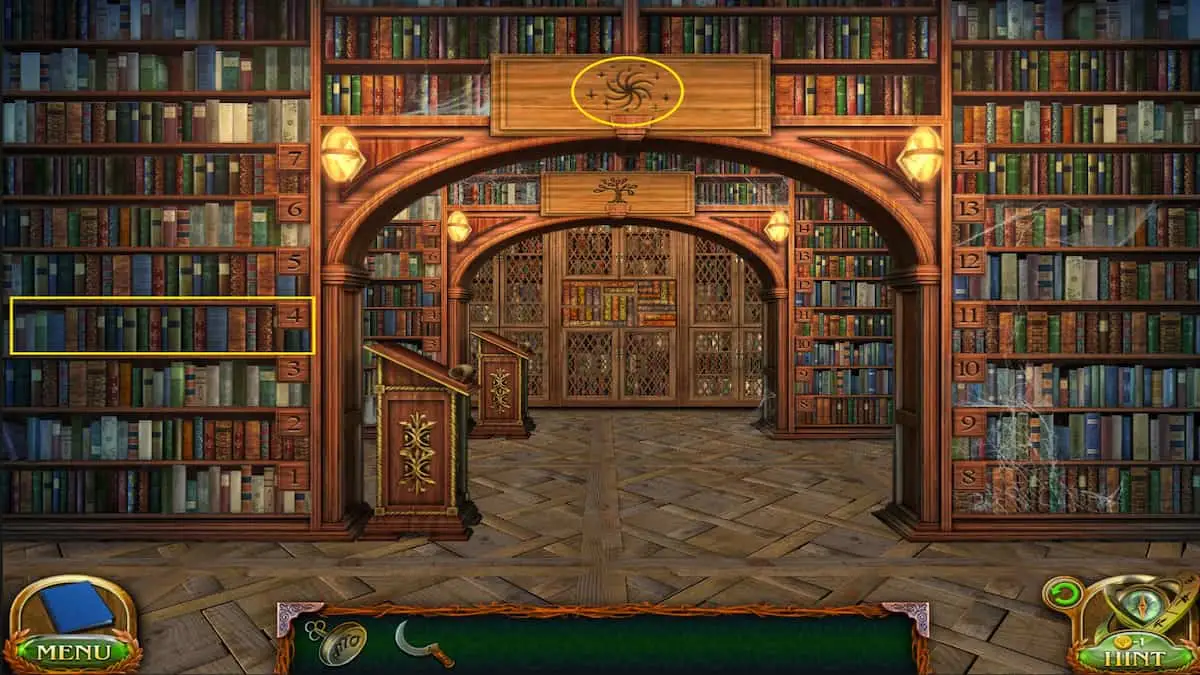
Continue down the Library sections corridor to see each section. Keep heading forward until you see the Spells symbol overhead, as shown in the image above. Now, look at the scroll on the pulpit on the left side to see each Spell category. The Telekinesis and telepathy category will be underlined. It is section 4 of the Spells. Click on the number 4 on the left side of the archway and then click on the books to find the one that we need.
We can make a Talking Mask to talk to the dwarf, but we'll need a few items. Before we head back to the Settlement, we can use the notes on the Telepathy book to open the Lab in the Academy.
How to unlock the Lab door

The notes on the Telepathy book told us the code to the Lab door. We'll need to input those exact symbols into the padlock to unlock it. You can check back and forth if you happen to forget or take a look at the image above to see which symbols you need.
Academy Lab
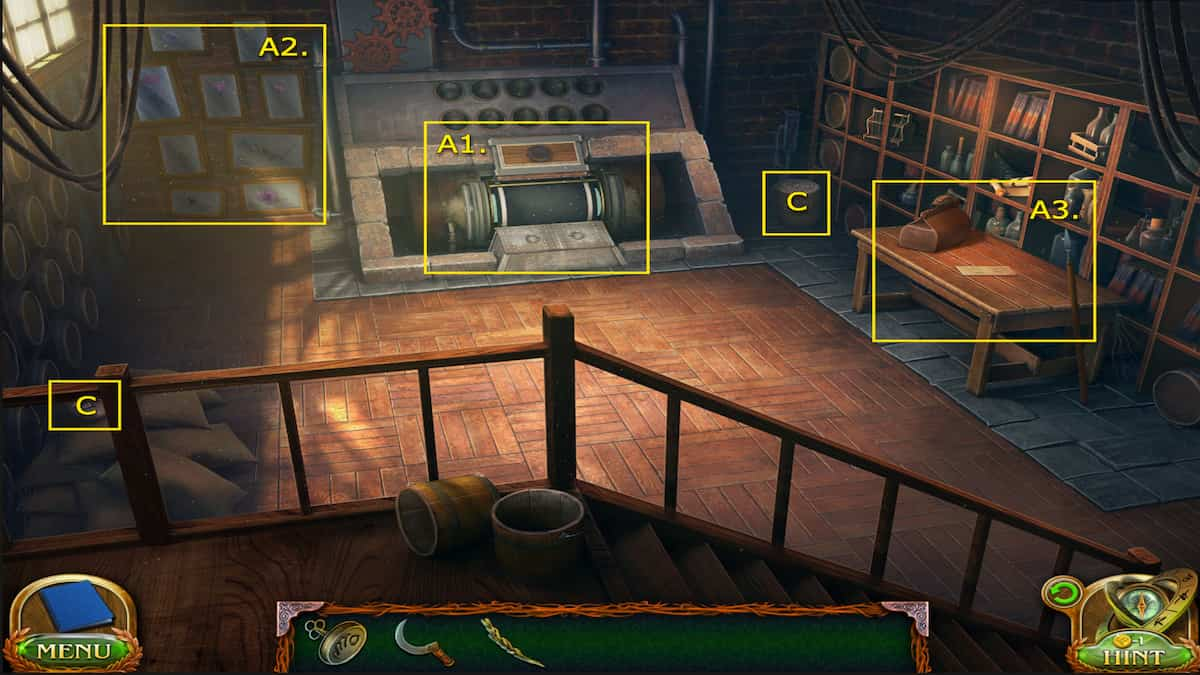
- A1. Generator
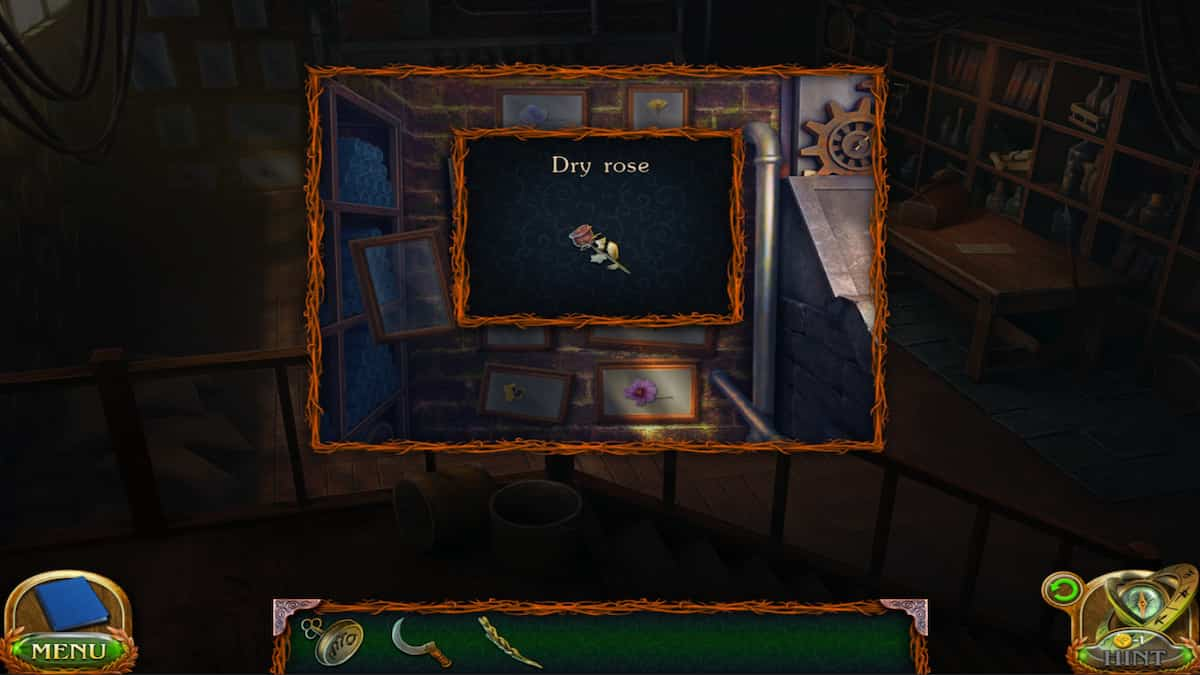
- A2. Herbarium pictures - Dry Rose
- A3. Desk - Manuscript 6/8
- (Collectible) On top of the sacks in the bottom left side - Rune stone 5/8
- (Morphing Objects) Basket/Sack in the top right corner 25/45
In the Academy Lab, we can acquire a Dry Rose for our Talking Mask ritual by interacting with the Herbarium pictures on the left wall. The Generator at the center of the room we can open using our Personal Signet. We will come back to that chute later. We can also complete a bit of an experiment with the Bottomless bag. Look on the desk on the right side and you can begin this little puzzle.
How to solve the Bottomless Bag puzzle
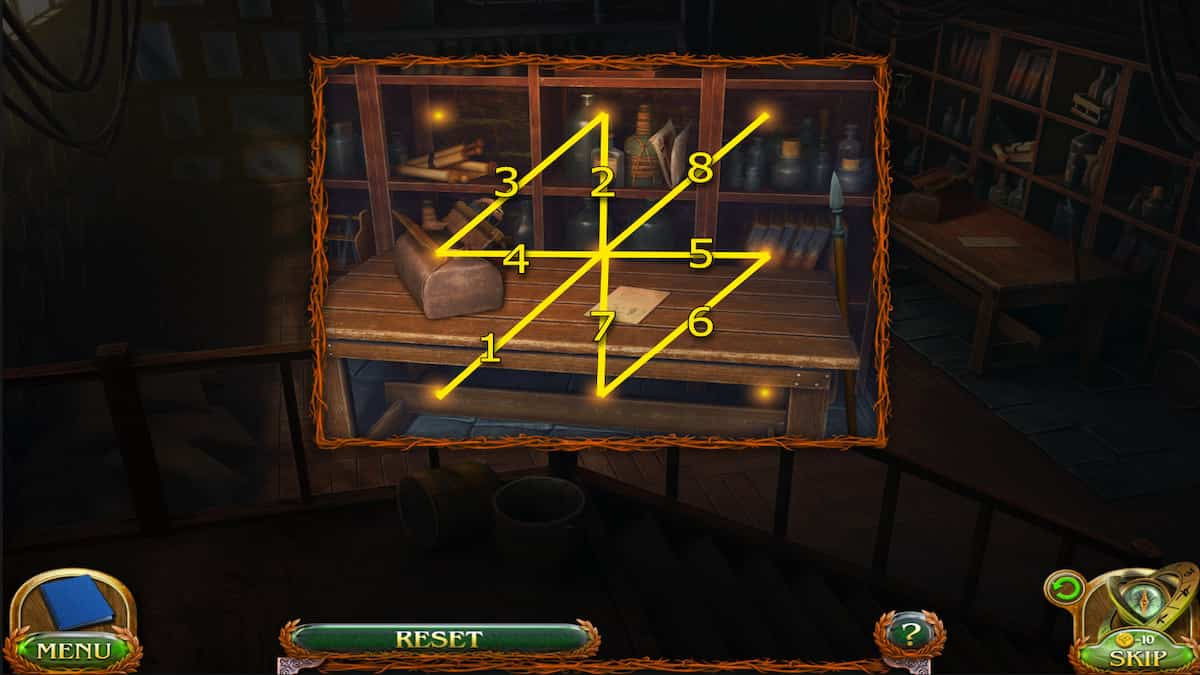
To solve this puzzle, you'll need to draw in one consistent line a symbol given to us on the note. Only one will make the bag deep enough to fit the spear. You can draw a symbol and then test the depth of the bag by selecting the spear on the right side. Take a look at the image above to draw the symbol you need (Keep in mind it can be random for each person, so it might not be the same one for you). Then, grab the spear and place it inside to finish the puzzle to collect the Bottomless Bag.
With these items, we can head back to the Druid Settlement to work on completing our ritual for the Talking Mask. Head back through the Portal and to the Druid Tent.
Where to get items for Talking Mask

You're going to need three different herbs for the ritual, a mask, and an altar. All of these are right in the Druid tent.
- Mint - In the locked chest on the left side of the tent
- Hot coals - Underneath the Cauldron in the Druid Settlement (Use the shovel beside it to scoop some up)
- Dry Chamomile - In the vase on the table in the Academy Library
- Dry Rose - In the Academy Lab in the Herbarium pictures
- Ritual Mask - From the Academy Lab Generator (Collect the Blank masks from the Druid tent into the Bottomless Bag, then place them in the Generator chute and complete the puzzle shown below)
How to unlock the puzzle piece chest
This is probably one of the simpler puzzles to figure out. Basically, it works just like a regular puzzle, placing the pieces together into their all fit into one united shape. If you're struggling, take a look at the image above for some help on where to place each one. Once the chest is open, you can grab the Mint that is inside.
Once we have those ingredients, we need to take the Blank Masks from the Druid tent to the Generator to enhance them. Use the Bottomless Bag to store them and head back to the Academy Lab. Drop the Blank Masks into the Generator chute and complete the puzzle.
How to complete the Blank masks puzzle
This puzzle requires a keen eye. The goal is pick out all the masks with unique elements, meaning the ones that don't look like all the rest, until one desired mask remains. Take a look at the images above to help see which masks you need to pick out. Keep in mind that the masks may be in different positions for you, but they will be in the same order, so really look at the details. Once only two masks are left, they will combine into the Ritual Mask.
Now that we have everything we need for the Talking Mask, we can return to the Altar in the Druid Tent and carry out the ritual.
How to solve the Talking Mask ritual puzzle
With your ingredients, head to the Altar at the back of the Druid Tent. Place the Ritual Mask on the face, all three herbs into the bowls, and then use the Hot coals to light them. Then, you'll need to complete the puzzle by tracing a beam across all the lines. Like the other drawing puzzles, it must be one continuous line. Check the image above for reference.
Once the pattern is drawn, take the Talking Mask from the face of the statue and now we can take it back to the sick dwarf in the Sick Tent. Once you place the mask on the dwarf there will be another quick cutscene as Maaron uses the mask to hear the dwarf's testimony of what happened. The dwarf will tell us of Trilly Valley where Folly lives and give us the School key to go and investigate.
How to open a portal to Trilly Valley
Just like how we got to the Druid Settlement, we can use a Portal to get to Trilly Valley. Head back to the Academy Office and check the map with the tracing paper to see which symbol matches Trilly Valley. Then, head back to the Library Archive and retrieve the matching rune stone from the glass case (once again, it will be the only stone you can pick up so it will be easy to find).
With the rune stone, head to the Courtyard and look at Portal pedestal 1. This should have the matching symbol on it. Place the rune stone in the pedestal and you will have to complete a puzzle to open the portal.
How to solve the Trilly Valley portal puzzle
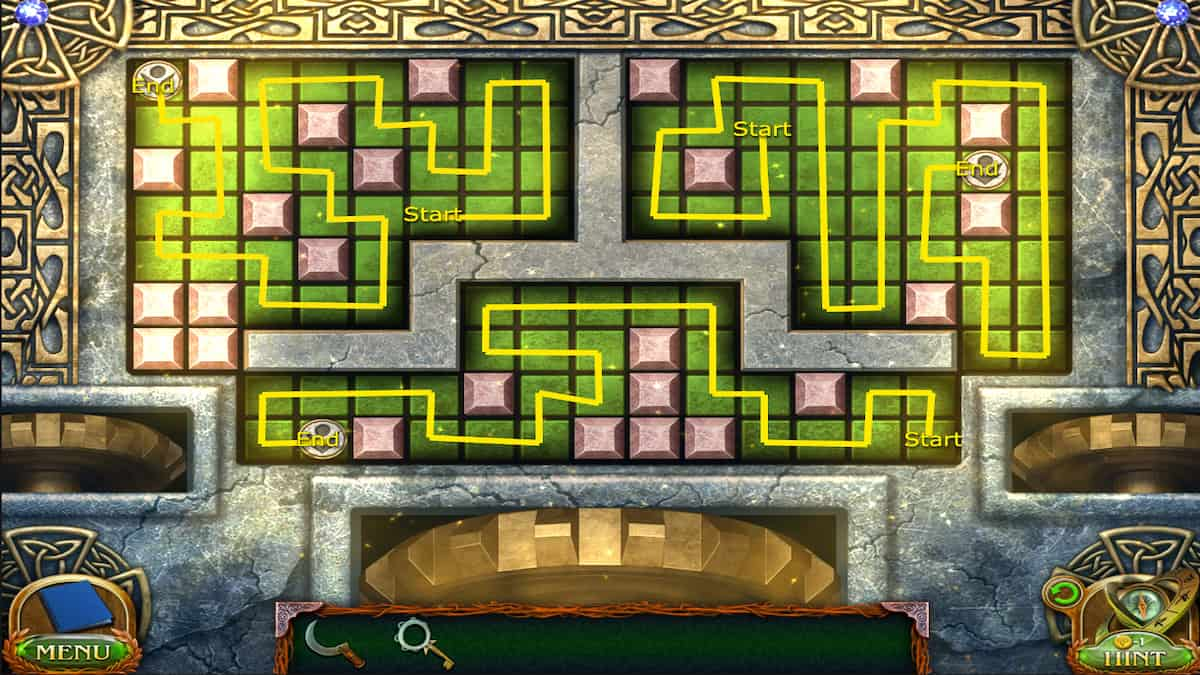
The goal of this puzzle is to move each chip across their individual boards until all the tiles are filled up with green. You can't backtrack so must find a continuous path though. Check the image above to see how I solved it. Once the puzzle is solved, the portal will open and you can head to Trilly Valley.
Trilly Valley River
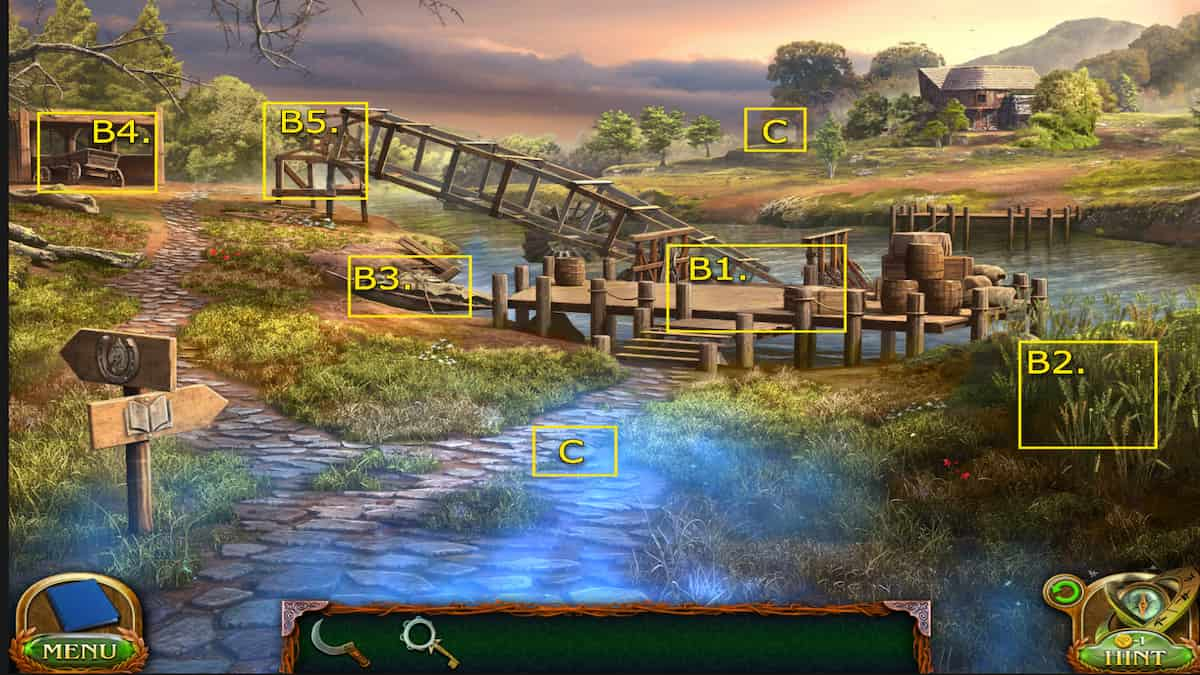
- B1. Ferry dock
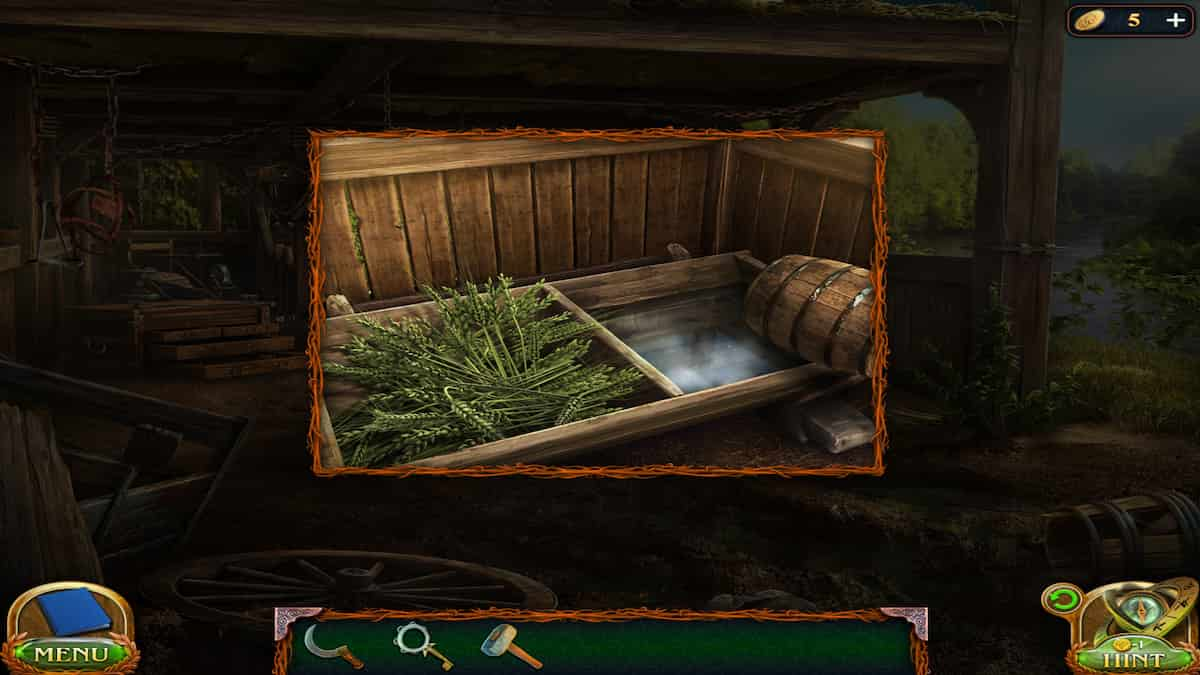
- B2. Oat plants
- B3. Covered boat
- B4. Stable
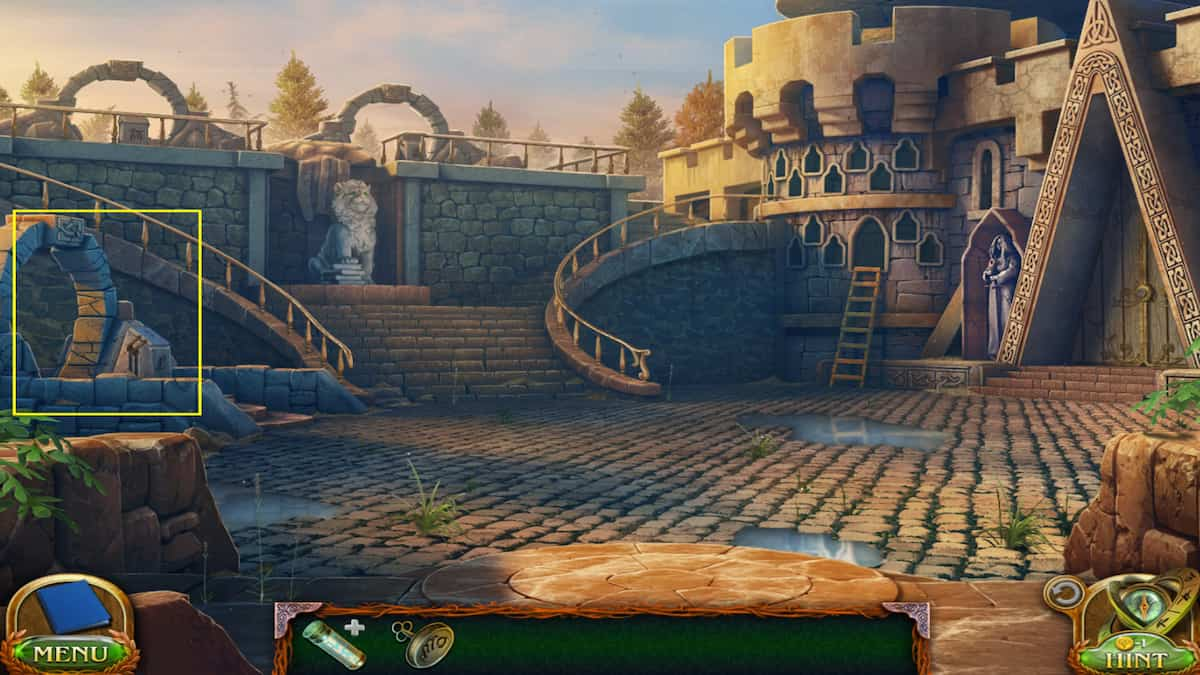
- B5. Fallen windmill
- (Collectible) On the path at the center of the area - Rune stone 6/8
- (Morphing Obects) Shed/ruins in the distance just to the left of the house 26/45
A fallen windmill blocks the ferry from being able to cross to the other side of the river. We will need to find the right tools to sort it out. Check out the covered boat just beyond the dock and use your Sickle to cut the cover off. We will be able to come back to this later. Continue forward to the Stable.
Trilly Valley Stable
- C1. Chest of drawers - Hammer, Set of tools
- C2. Trough
- C3. Horse Hooves - Key
- (Collectible) Hanging on the left side of the stable - Dreamcatcher 6/7
- (Morphing Objects) Tool on the right side of the stable 27/45
We need to collect tools to help us move the Fallen windmill. However, the chest of drawers has a compartment requiring a key. If you look at the Horse hooves, the key is on the ground below it. We'll need to get the horse to move out of the way to retrieve the key.
How to make the horse move

To get the horse to move and grab our key, we will need to fill it's trough with water and oats. There are a few steps required to do this. Here's how:
- Water - Grab the hammer from beside the chest and use it to open the barrel in the boat we uncovered by the dock. Then barrel can be used to scoop up the water from the river.
- Oats - Check out the spot of plants growing on the right side of the dock and use your Sickle to cut some down.
- Place the water and oats into the trough
Once you do this, the horse will move out of the way and you can grab the key. Take the key to the chest of drawers and use it to unlock the top. Now you can grab the Set of tools. With the Set of tools, head to the Fallen windmill and use them to start the removal process.
How to remove the fallen windmill

The goal is remove each plank of the windmill so we can move it out of the way. You'll need to select each plank in the right order to successfully complete this. The best way to do this is to look for any piece that is on the very top, not being blocked by any others. If it's being blocked, it will turn red when you click on it. Take a look at the image above for help.
When enough boards have been removed, the windmill will fall into the water. However, it's still blocking our path. We will need something to push it away. Head back to the Stable and grab the Pitchfork leaning against the right side. Then, use the Pitchfork to push the windmill down the stream. Now you'll have access across the river by pressing the crank to your left.
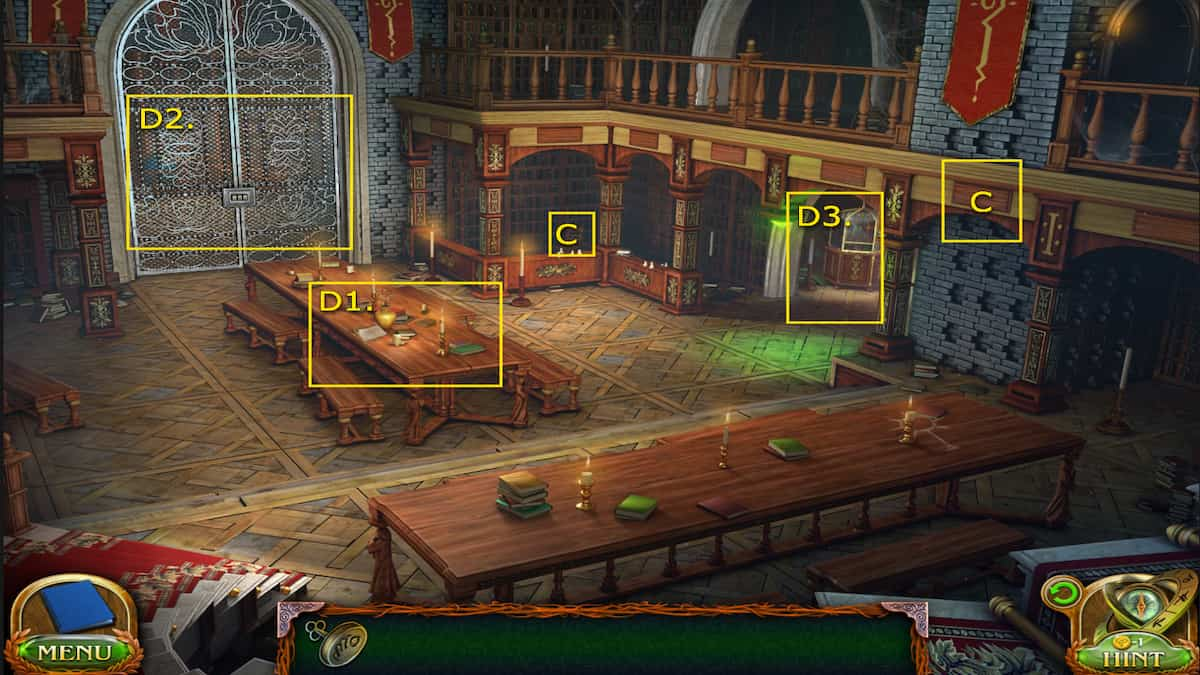
Trilly Valley Schoolyard
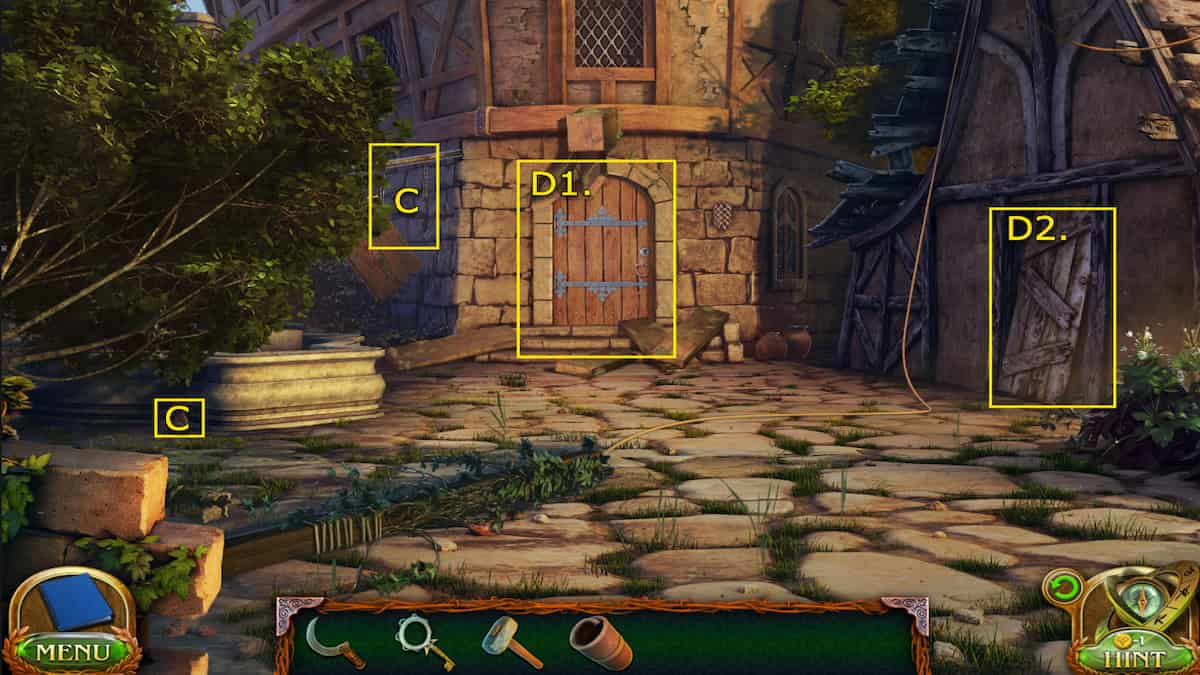
- D1. School door
- D2. Barn door
- (Collectible) Hanging on the post on the left side of the school - Dreamcatcher 7/7
- (Morphing Objects) Toy/bucket beside the fountain on the left side of the screen 28/45
Once you get to the Schoolyard, there isn't much else to look out at. You can head right to the School door (after getting your collectibles) and use the School key to unlock it. Unfortunately, the door is being caught against something inside. We will have to find a way to climb up through the gap instead. The school Barn has plenty of boxes we can use to stack up, but we'll need to collect them all.
Where to collect all the boxes in School Barn

We will only have a small gap view into the Barn but it's all we need to locate the boxes. There are 10 of them total. Use the image above and the list to help find them.
- Box 1 - Directly to the right of the door
- Box 2, 3, 4, 5 - Underneath the tarp to the left of the door
- Boxes 6, 7, 8 - Behind the haystack
- Box 9 - To the right of the fallen haystack
- Box 10 - At the top next to the vases and pitchers
Once you have all the boxes, it will automatically stack them for you and allow you to climb up into the school.
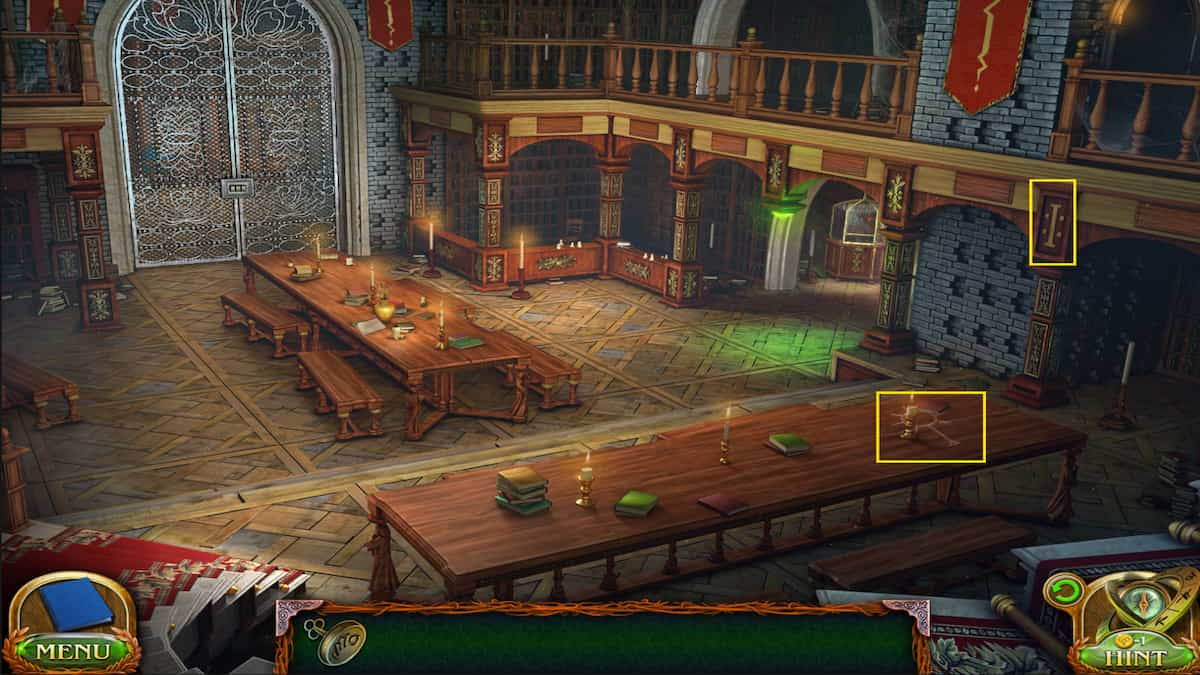
Trilly Valley School
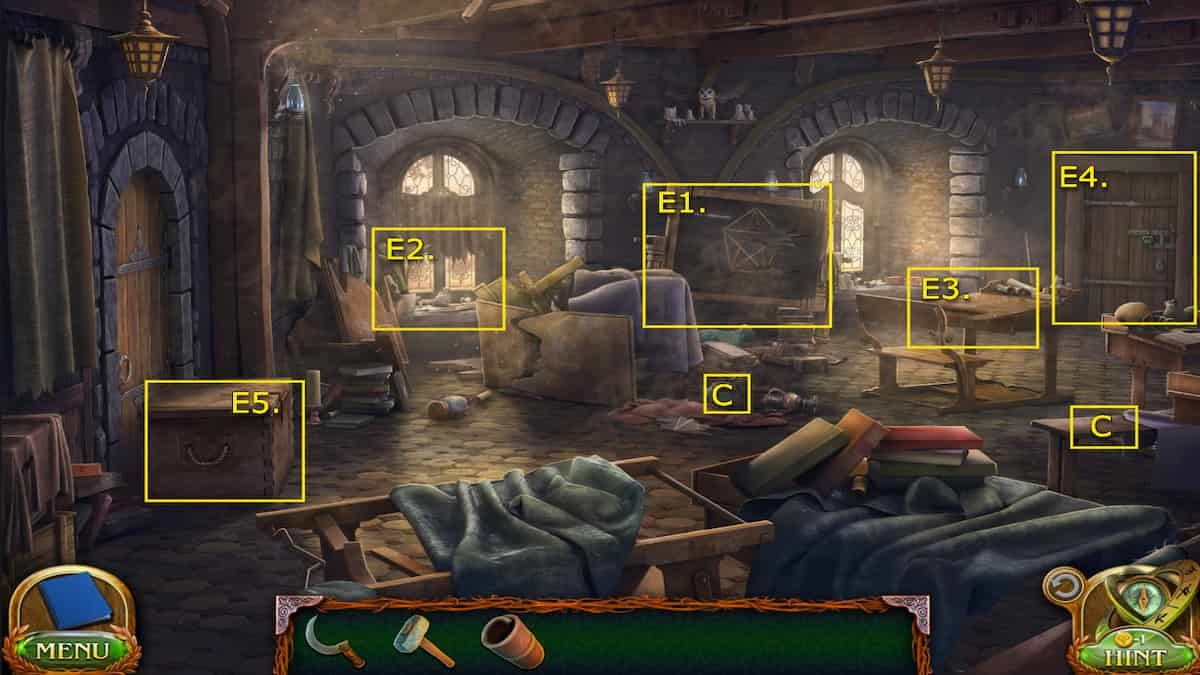
- E1. Chalkboard
- E2. Window
- E3. Desk
- E4. Locked door
- E5. Movable chest
- (Collectible) On the bench on the right side - Rune stone 7/8
- (Morphing Objects) Pot on the floor in the center of the room 29/45
In the School, you can first move the chest blocking the front door, allowing easy entry or exit. Then, notice the locked door on the right side. We will need to complete the problem on the Chalkboard to get the code.
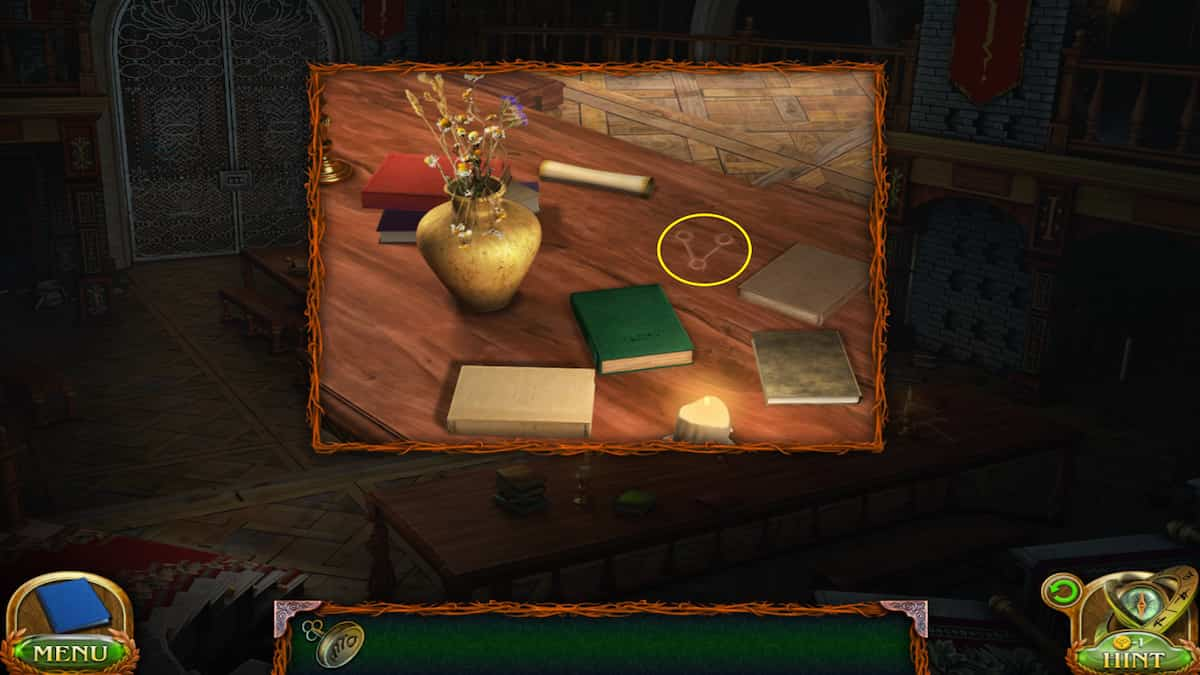
Where to find the Chalkboard pieces
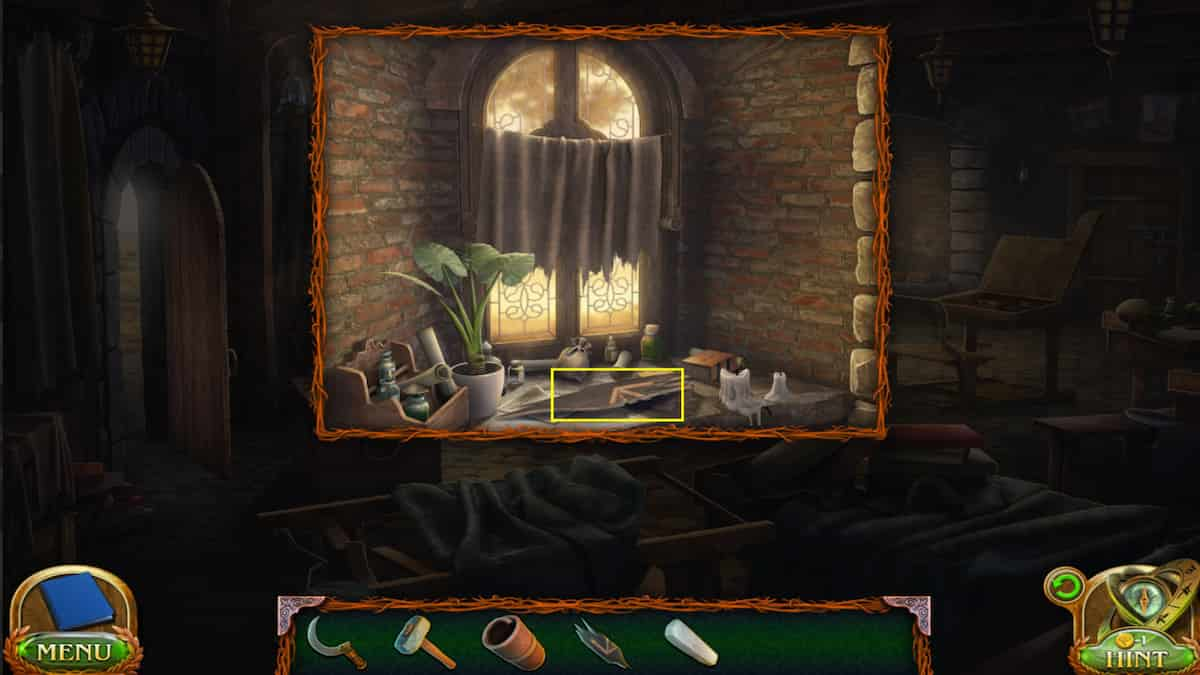
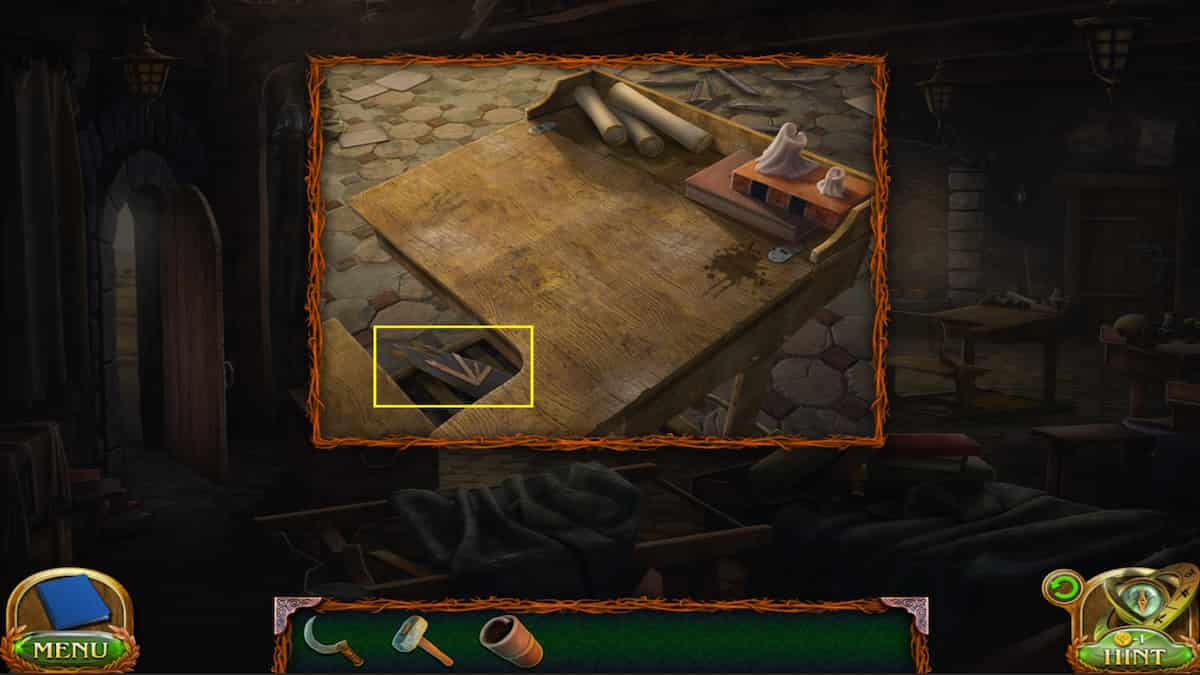
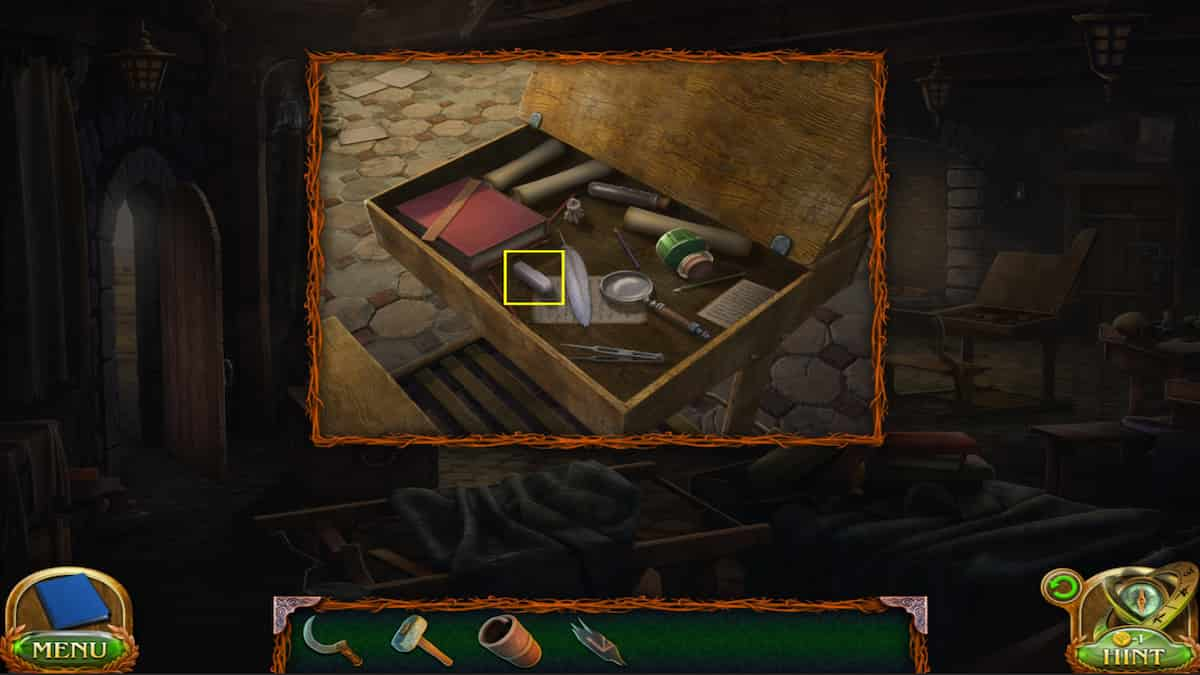

We're going to need to repair the Chalkboard to get the code we need. The missing pieces are hidden around the room, along with the piece of chalk. Here's where to get them:
- Missing piece 1 - In the window
- Missing piece 2 - On the desk on the right side of the school
- Chalk - Inside the desk where we found the missing piece
- Missing piece 3 - On the floor near where we found the morphing object
Once you have all the missing pieces and chalk, bring them to the board and place them down. Then you can begin solving the puzzle.
How to solve the Chalkboard puzzle

The goal of this puzzle is to count all the triangles that make up the pentagon. To do that, use the chalk to trace all the lines that make up a triangle. Once you trace one, it will add the number to the count and erase the chalk so it doesn't get in your way. If you trace one that was already counted it won't add a number. It's hard to show in an image where to find all triangles, so keep tracing until you get 35 of them total.
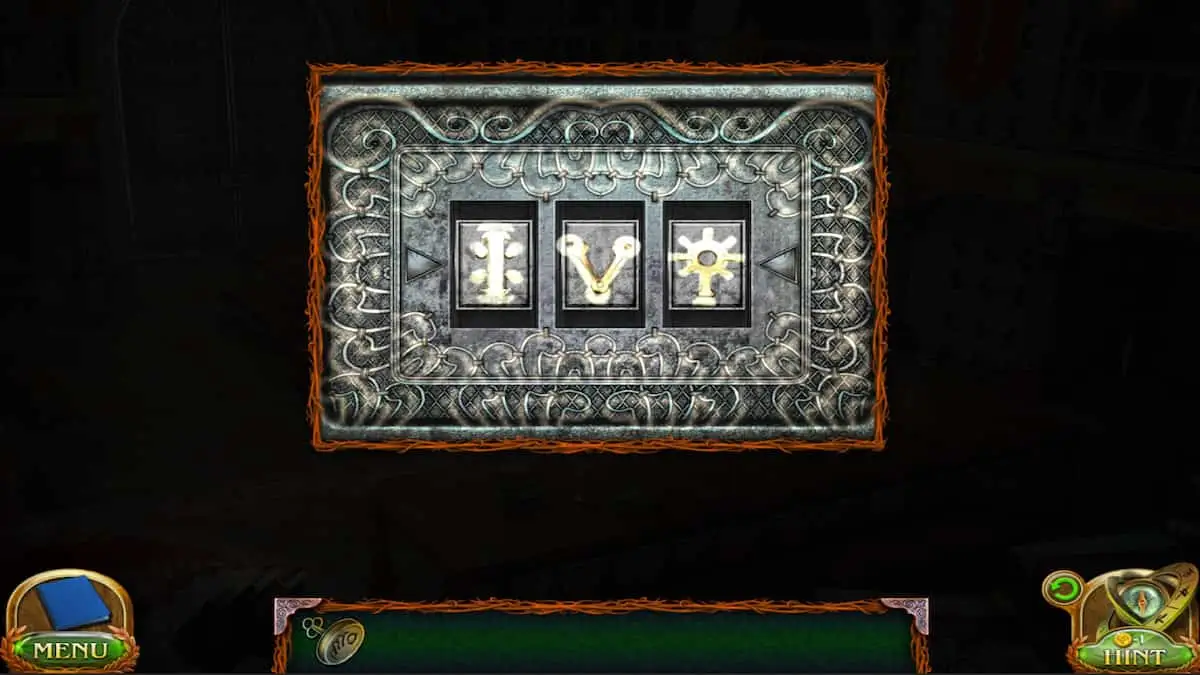
How to unlock the door in the school

With the number of traingles we got, 35, we can enter the code into the door lock. Although it requires three numbers, the code is as follows: 035
Once you open the door, there will be another brief cutscene. The beast ran off into the hills but we'll need a transport to chase after him. Thankfully, we know the perfect transport for job, the horse in the Stables. To ride the horse, we'll need to shod it first.
How to put horseshoes on the horse
To begin preparing the horse to ride, we'll first need to gather all the items and tools. First, grab the Casket box from the storage room on the ride side of the school we unlocked with the code. There will be a paper inside letting you know where one of the horseshoes is. Then you can begin your search.
Where to find all horseshoes items
- Horseshoe 1 - Underneath the bricks by the fountain in the Schoolyard
- Horseshoe 2 - In the covered boat we uncovered earlier
- Horseshoe 3 - In the stable sign near the dock (Use the Set of tools to get it loose)
- Horseshoe 4 - Near the Oat plants
- Nails - In the chest of drawers
Once you have everything, head over to the horse and interact with its hoof. Place down your Nails and Horseshoes beside the stump. First, use your Sickle to clean out the horses' hoof. Then, select your Hammer and use it to nail on the horseshoes. Now the horse is ready to ride! Head back to the School and follow through the gap of the wall after the Beast.
Trilly Valley Mine Camp
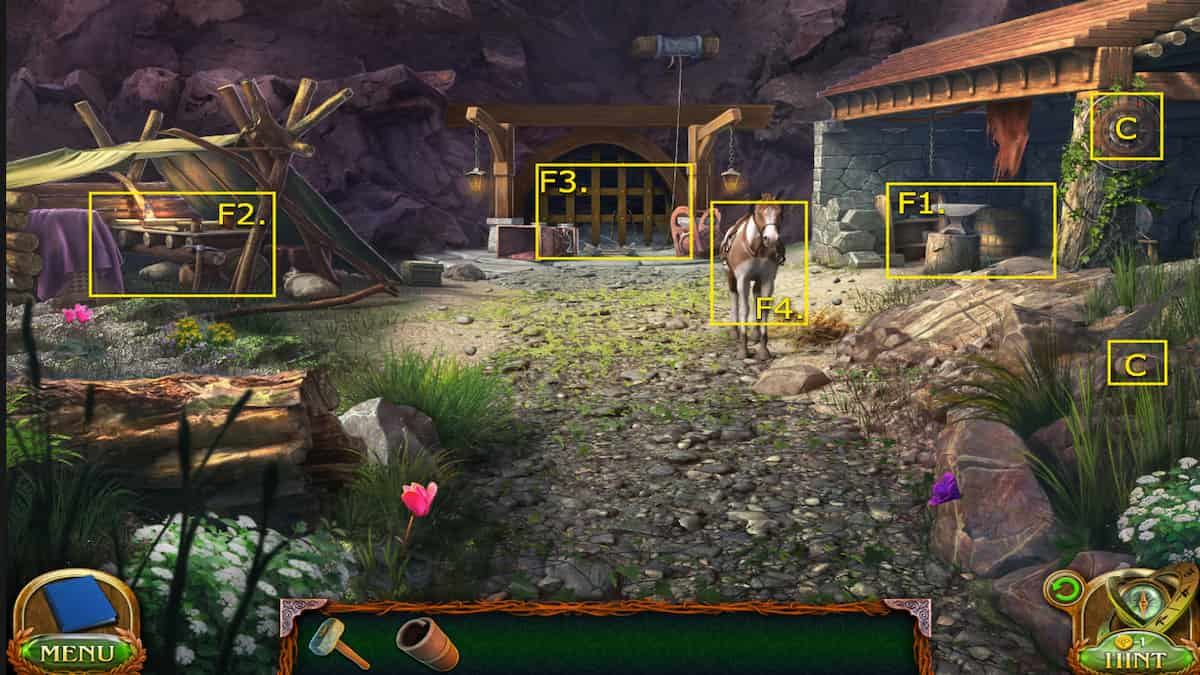
- F1. Anvil
- F2. Camp - Climber's reminder note
- F3. Tunnel gate - End of the rope
- F4. Horse
- (Collectible) On the rocks to the right - Rune stone 8/8
- (Morphing Objects) Ship helm/shield hanging on the post near the anvil 30/45
To continue our chase after the beast we'll need to first find a way to raise the tunnel gate. Thankfully, the horse can help us do that.
How to open the tunnel gate

We can use the horse to help us open the tunnel gate, but it's going to require some items to help tie the rope to the saddle.
- Grab the End of the rope from beside the Tunnel gate
- Take it to the Anvil and place it on it.
- Grab the metal bracket from above the Anvil
- Hammer the bracket around the rope
- Grab the nuts and bolts from the Camp table
- Place the but and bolt into the metal bracket
- Use the Tool set to tighten the bolt in
You'll receive the Rope loop. Now you can take it over to the horse and tie it around the saddle. This will open up the Tunnel gate and allow you to enter.
Where to find all the Climber's kit item
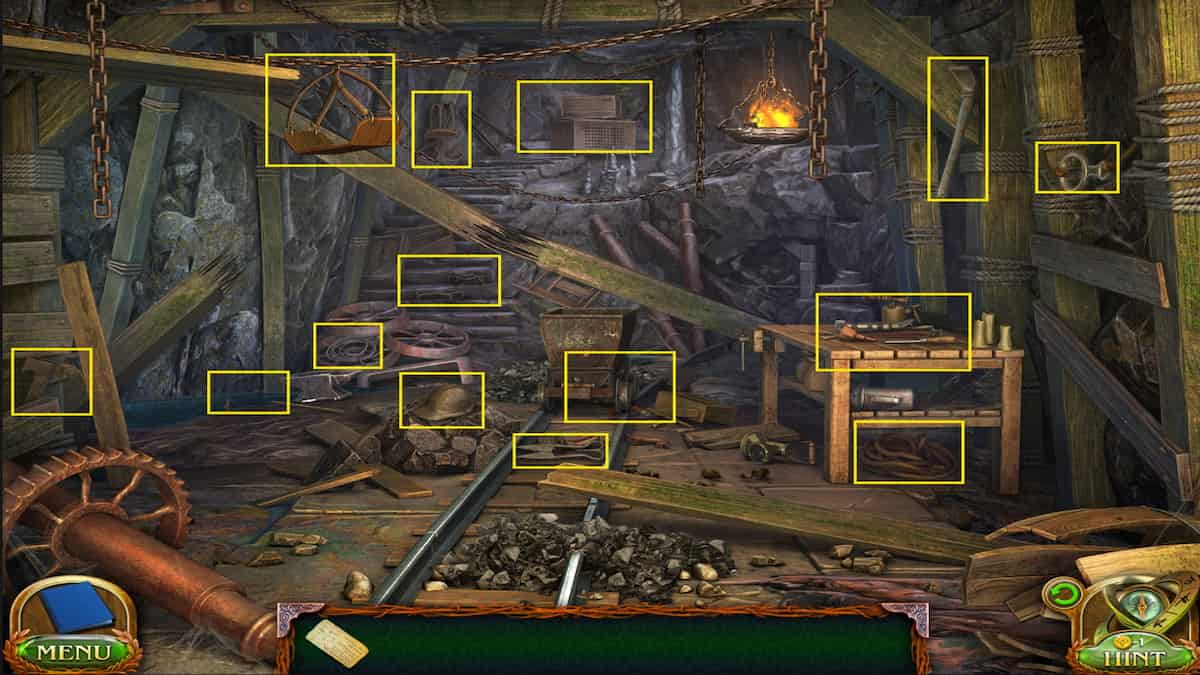
In the mine shaft, you'll find everything you need for climbing equipment. You can use the Climber's reminder note to help you know exactly what you need. Place the note on the bench on the right to get started. There are 15 items in total and here's where to find them:
- Carabiner - On the crates at the top of the stairs
- Ascender - In the bench after solving the puzzle (See below)
- Rope - Underneath the bench
- Loops - Under the mine cart (Attach the mine handle and push it out of the way)
- Safety straps - Hanging near the top of the stairs
- Crampons - Stuck in the wall above the bench
- Ice ax - Above the wheels toward the bottom of the stairs
- Helmet - On the pile of rocks in the center of the area
- Fingerless gloves - In the crates at the top of the stairs (Dig out the crowbar to the left of the crates and use it to pry them open)
- Seat - Hanging on the beams on the top left
- Block roller - On the bench near the Climber's Reminder note
- Figure 8 - On the top right side connected to tight knots (Use the shears on the ground to cut them loose)
- Rock hook - In the water near the anvil (Connect the spearhead to the shaft and use it fish it out)
- Climber's hammer - Behind the gear directly to the left side
- Cable - In the crate at the bottom of the stairs
How to solve the mining bench puzzle

This is another sliding puzzle like the ones we saw in Chapter 1. The goal is to slide the pieces around until it forms a pattern. It's not too difficult to figure out but it can take some maneuvering to get the pieces in the right spots. See the image above for reference.
Once you have all the climbing equipment, you can begin your climb to the top of the hill. Select your Climber equipment for your Inventory and press on the hill to begin.
How to climb the hill
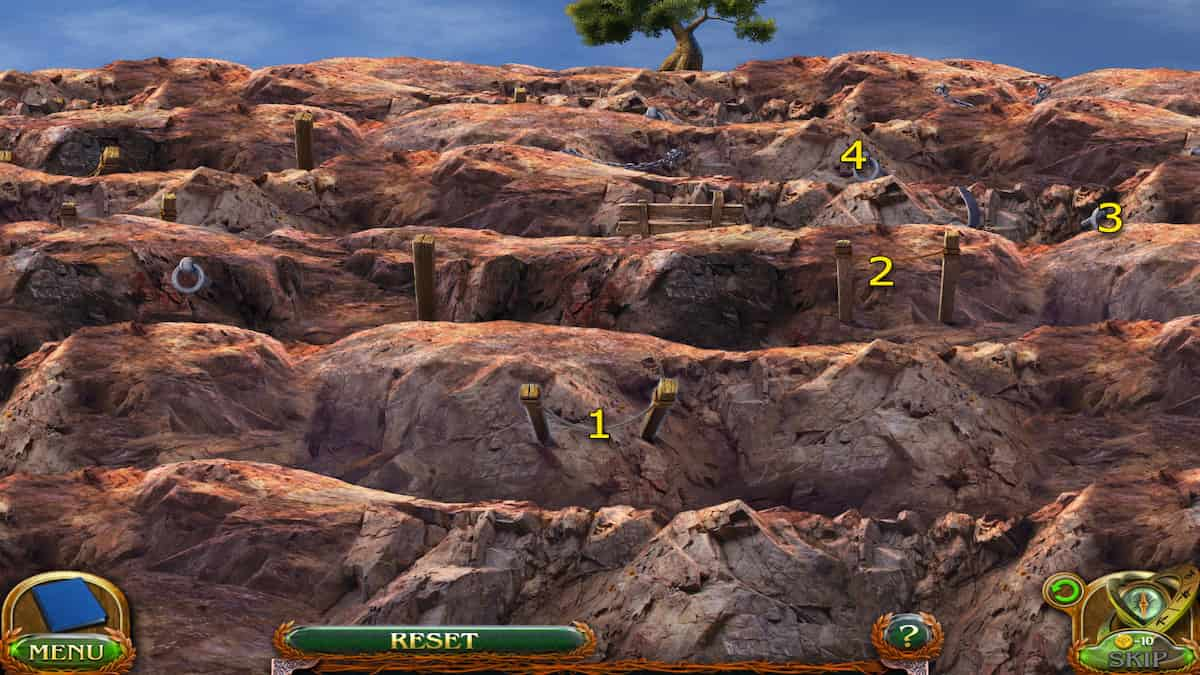
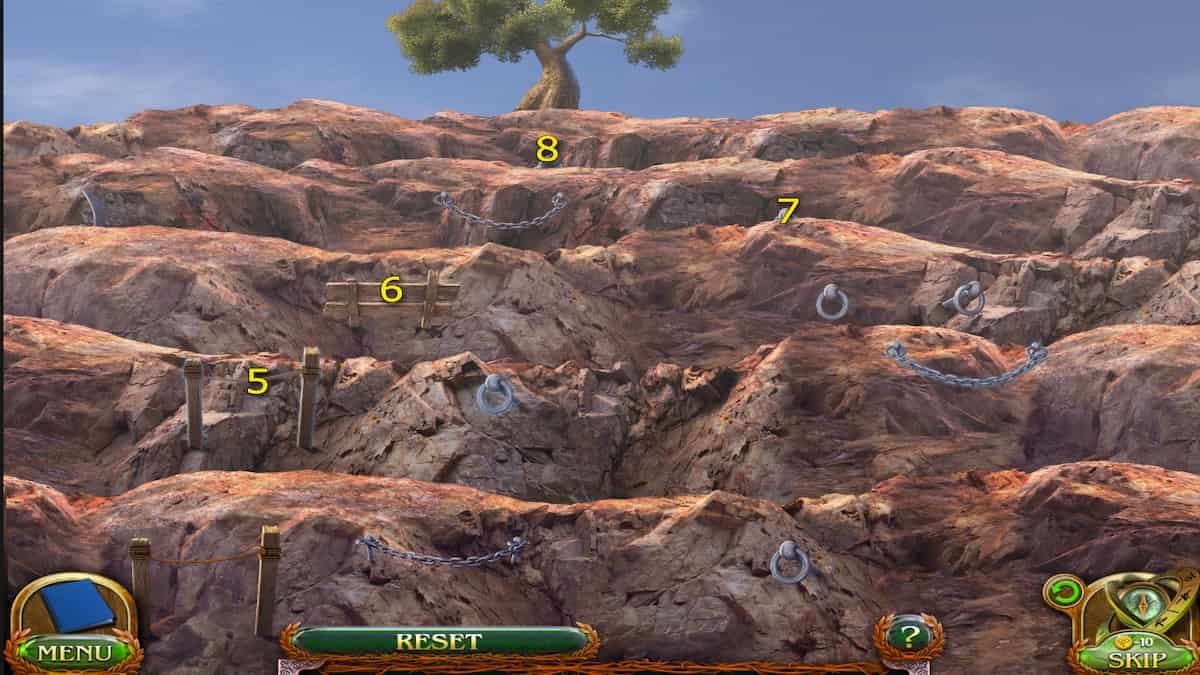
To climb up the hill you need to select the supports in order to get to the top. Some of them aren't secure and will make you start over again if you press on them. Check out the images above to help you reach the top.
Once you reach the top you have successfully completed Chapter 2! Maaron makes it just in time to save Folly from the Entity, as we saw from Folly's perspective in Chapter 1. In Chapter 3 we will see how Maaron and Folly can work together to stop the Entity from hurting anyone else.
Lost Lands 9 Chapter 3 Walkthrough
Maaron was tasked with helping out a Druid Settlement that was attacked by some 'beast,' however, fate had allowed him to arrive at perfect timing to Trilly Valley and save Folly from the same strange Entity. In this chapter, we will finally get some answers and put a stop to the Entity's terror.
Mine Shaft
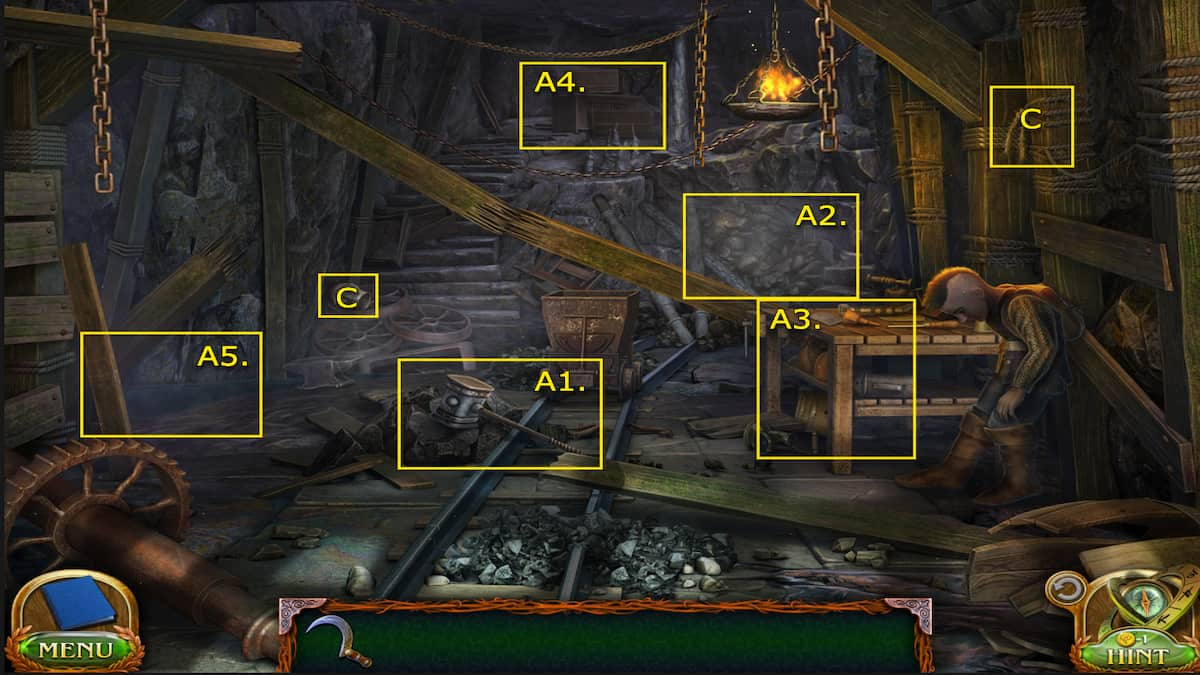
We begin the story in the mine shaft, where Folly and Maaron took shelter against the Entity but found themselves trapped after gate slammed shut behind them. We'll need to find a way out.
- A1. Folnur's hammer
- A2. Rubble
- A3. Mine bench - Mug, Keg of gunpowder
- A4. Crates - Cord
- A5. Spring Water
- (Collectible) On the wheel at the bottom of the stairs - Suit of armor 1/8
- (Morphing Objects) Rope tied on the post above Folly 31/45
First, pick up Folnur's hammer in the middle of the area on the ground. He's too weak to carry it himself anyways. Then, check out the Rubble on the far side of the mine, past the mine cart. This might be a way we can get out, but we're going to need to clear it out. Look at the Mine bench next to Folly and move the objects on the bottom shelf until you can retrieve the Mug. Then, collect the moved objects to get a Keg of gunpowder.
You can use your Mug to scoop up some Spring water and give it to Folly. Be sure to interact with him first before giving him the Mug of water. This will initiate a short cutscene between Folly and Maaron. Folly will tell you to find explosives to clear the rubble. Thankfully, we already have the Keg of gunpowder. Approach the Rubble, place the gunpowder and then the Cord inside of it. Now you can conjure some fire to light it.
How to light the Keg of gunpowder
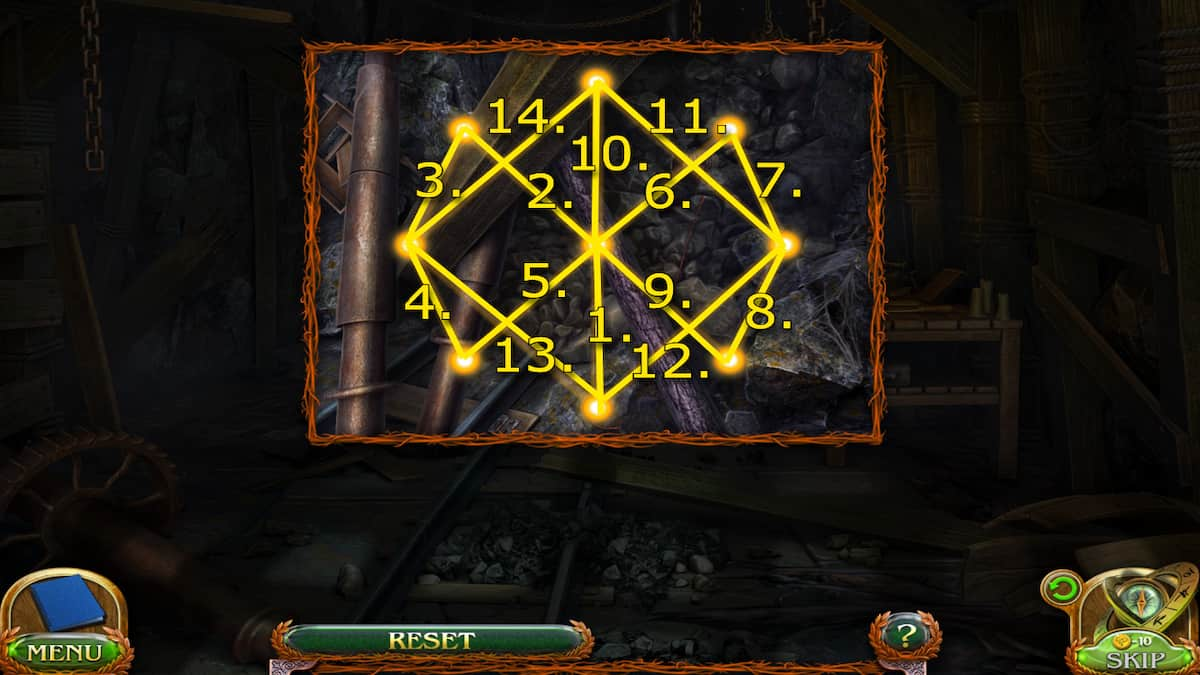
This is another puzzle where you'll need to draw a beam across the pattern in one continuous line. This means you're going to need to start on side and work your way all the way around without crossing or backtracking any lines. Take a look at the image above to help you complete it.
Once you complete the pattern, the keg will light, and the explosion will clear the path through. You will come to a spot where the tracks are damaged. Use Folnur's hammer to move them back into place. Now, you'll have to navigate your way out using the mine cart.
How to escape the mine in the mine cart
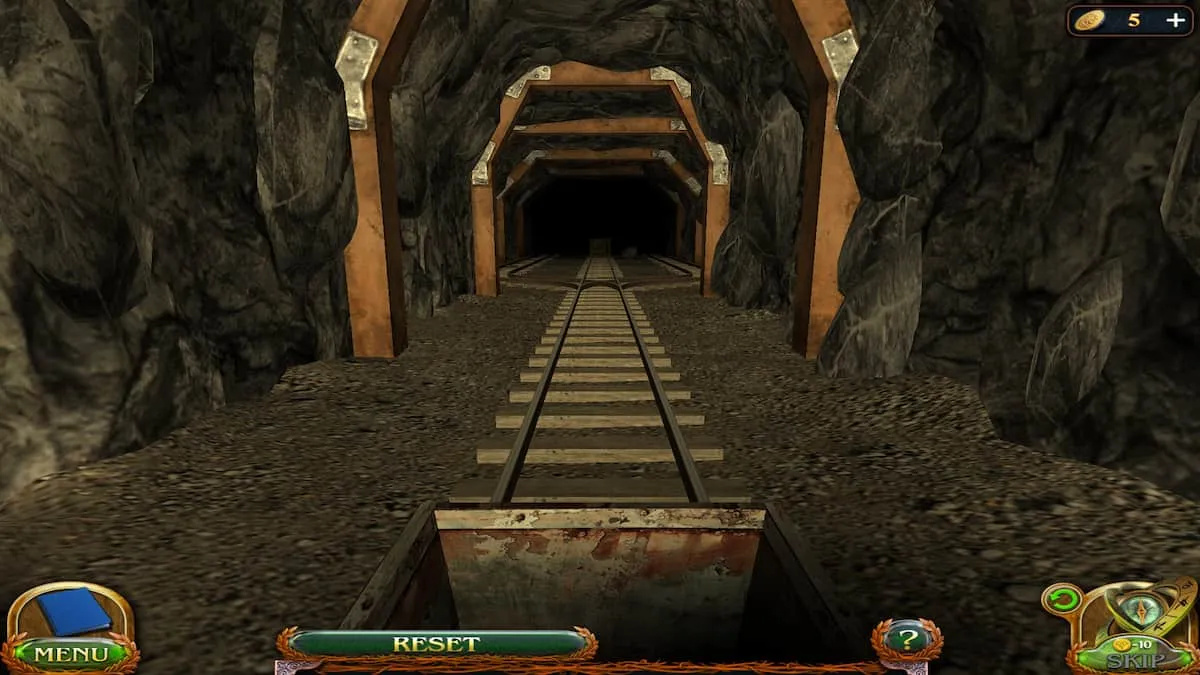
To escape the mine shaft, you'll need to find your way through using the mine cart. Once you start, the mine cart will continue moving forward non-stop, and you must use the arrows to change direction. The goal is avoid all the obstacles and make it out. Here's what directions you'll need to move:
- Right
- Straight
- Left
- Straight
- Left
- Left
- Straight
- Right
- Left
- Left
- Right
- Right
Once you make that last right, you'll see the light in the distance indicating you've made it to the outside.
Castle
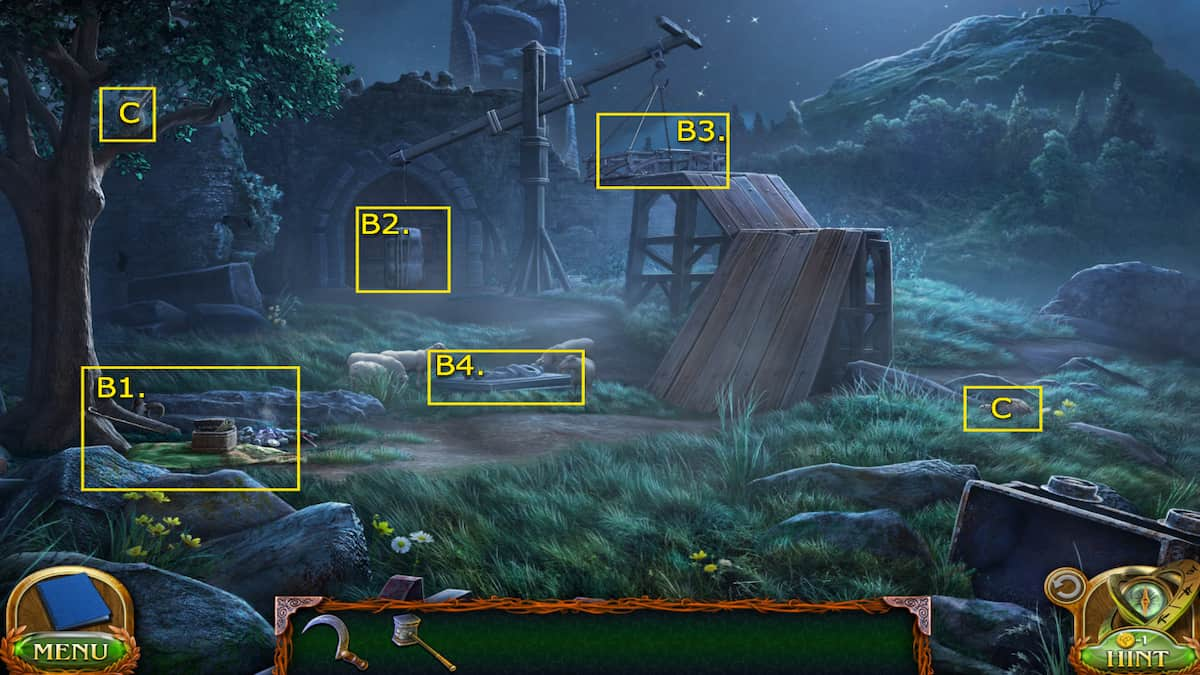
- B1. Campsite - Broken flag, Castle gate detail 1, Sausage
- B2. Castle gate
- B3. Counterweight platform - Piece of the puzzle 1
- B4. Knight grave - Castle gate detail 4 (Herd sheep first)
- (Collectible) On the path beside the ramps on the right - Wood animal 1/8
- (Morphing Objects) Bird/owl on the tree on the left side 32/45
We can potentially reach the portal to take us back to the Academy, but the gate is blocked. We'll need to find a way to open the castle gate, by loading the sheep into the counterweight platform and lifting the rock out of the way. Investigate the campsite nearby to retrieve several useful items: broken flag, castle gate detail, and sausage. Check out the platform to open the gate and pick up the puzzle piece. Now, continue up the hill toward the forest to find the lost sheep.
Castle Woods
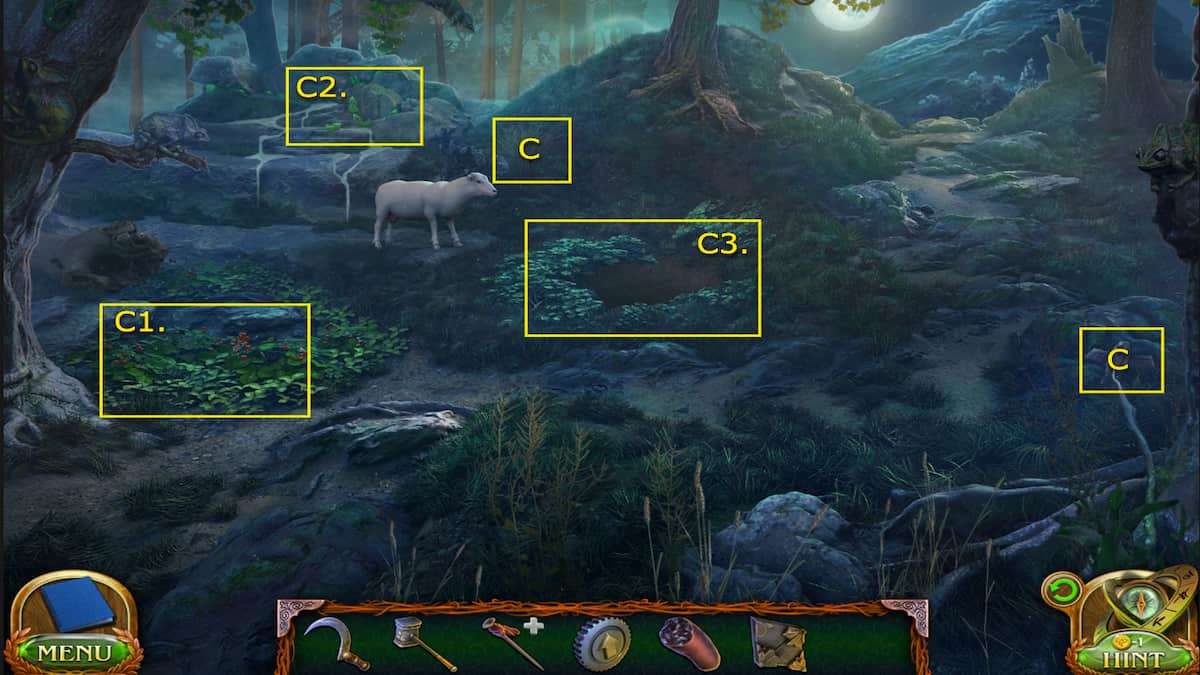
- C1. Strawberry plants - Piece of the puzzle 2
- C2. Spring Water
- C3. Ditch
- (Collectible) On the rock directly to the right - Wooden animal 2/7
- (Morphing Objects) Grass right above the sheep 33/45
We found one of the missing sheep, but we can't herd it back just yet. Check out the strawberry plants and collect the second piece of the puzzle. The sheep dog is stuck in the ditch and we must find a way to help him out.
How to save the dog from the ditch
Head back to the Portal Tower and grab the Shepherd's staff from the Campsite. Then, use it to scoop up the dog from the ditch. The dog is safe but it's a bit shy. Use the Sausage to lure it toward us and then we can collect another Castle gate detail 3 from its harness. Now continue up the hill to the next area.
Castle Hill
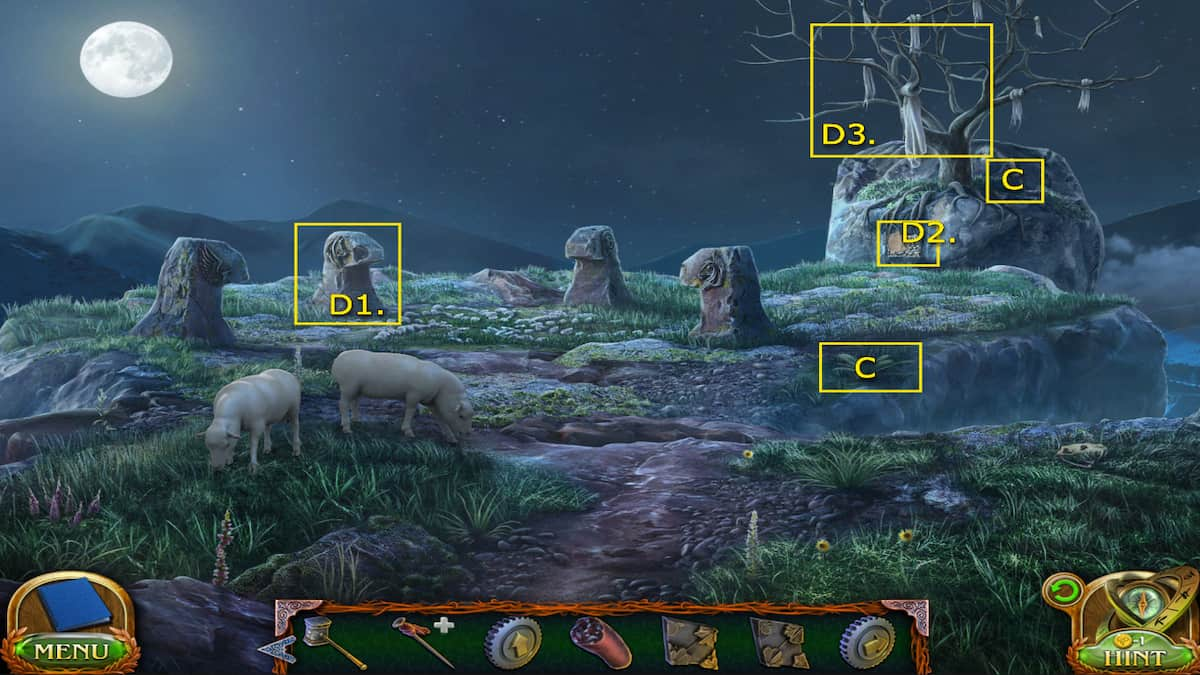
- D1. Wolf ritual stone - Castle gate detail 2
- D2. Puzzle board - Manuscript page 7/8
- D3. Tree with cloths
- (Collectible) Beside the tree - Suit of armor 2/8
- (Morphing Objects) Stump at the edge of the cliff on the right side 34/45
On the hill we've located two more of the missing sheep. Investigate the puzzle board underneath the tree and place the two pieces of the puzzle we've collected into the slots. Now we can work on solving this put together puzzle.
How to solve the patterned tree puzzle

In this puzzle, our goal is restore the pattern by rotating the pieces. This is fairly simple; you just need to click on the piece to rotate it. Check the edges of the puzzle to see if you have it in the right spot. If the edges match the grey pattern then it's correct. Check the image above to help you recreate it.
When the puzzle is completed, the tree will lower, allowing you to get closer and grab a new piece of fabric that is hanging in the branches. Use the Sickle to cut it loose. Before we can place it on the flagpole, we'll need to dye it red.
How to dye the fabric red

Head back to the Campsite and grab the Empty basket where we found the sausage. We can use the basket to collect the strawberries from the woods area. Now interact with the flagpole and fabric and use the Ripe strawberries on the fabric. We'll shake the fabric up in the basket real good and then have a red piece of fabric to replace on the flagpole. Now we can begin herding the lost sheep back.
How to herd the sheep

Start on the hill and select the red flag from your Inventory to wave it in the air. Repeat this again in the woods to herd the solo sheep. Then, back at the Portal Tower, head up to the Counterweight platform and drop the red flag inside and use Folnur's hammer to stake it into the beam.
All the sheep will move up to the platform, minus one. Investigate the last sheep and you'll notice its leg is caught in the grave. Use the Shepherd's staff to wedge the cover off and allow it to join the other sheep. With all the sheep in the weight platform ( and a butterfly) the Castle gate will be cleared. Ensure you grab the Castle gate detail 4 from the knight grave and then continue toward the castle.
How to open the castle gate
To open the gate, you'll need to place all the Castle gate detail pieces we've collected along the way. These are all the locations where they're hidden:
- Campsite
- The wolf ritual stone on the hill
- On the dog's harness
- In the knight grave
Once you place all of them in gate, you can begin solving the puzzle to unlock it.

The goal of this puzzle is to clear the center rectangle by pushing the copper bars out of the using the metal bar. Use the arrows to move the pieces up, down, right, and left. You can only move the metal bar against copper bars, meaning you'll need to plan your moves wisely. Here's how:
- Right x2
- Up x2
- Left x1
- Down x3
- Right x1
- Down x1
- Left x2
- Up x3
- Left x1
- Down x3
- Left x1
- Up x4
- Right x4
All of the center rectangle should be uncovered and you can now you can continue through the open gate.
Castle Ruins
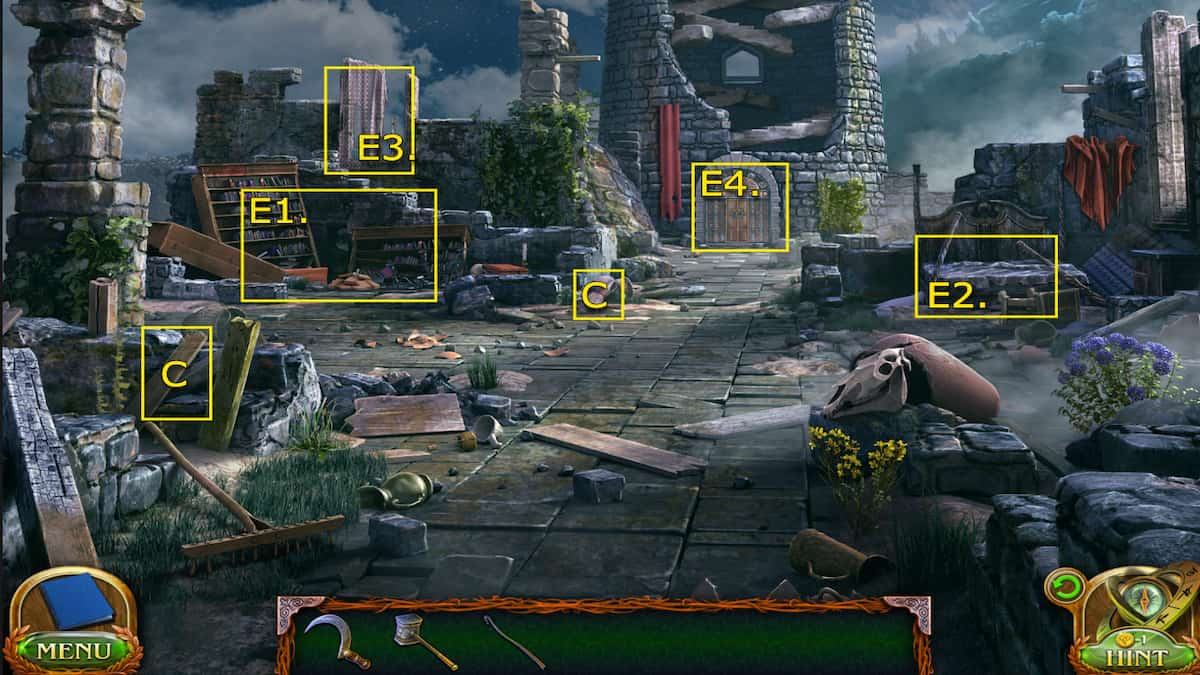
- E1. Bookcase - Glass prism
- E2. Bed - Embroidery hoop
E3. Window with curtain - Glass prism 2 - E4. Tower gate
- (Collectible) On the right side of the wall near the bookcases - Suit of armor 3/8
- (Morphing Objects) Wood plank on the left side behind the rake 35/45
First, check out the bookcases to grab the Glass prism. Then, on the bed across from it, you can collect the Embroidery hoop. Now you can continue to the tower gate where you'll complete a puzzle using the Embroidery hoop.
How to solve the tower gate embroidery puzzle

The goal of this puzzle is to replicate the embroidery by sliding the pattern pieces around until they are in the correct positions. This works just like the other sliding puzzles we've done in the past. You'll need to slide the pieces around, getting them out of the way as necessary, until they are all in the right spots as shown in the image above.
Once you have replicated the embroidery, the gate will open and you can continue forward toward the portal.
We've made it to the portal but unfortunately we won't be able to explore this area until we get rid of the fly swarms.
How to clear the fly swarms
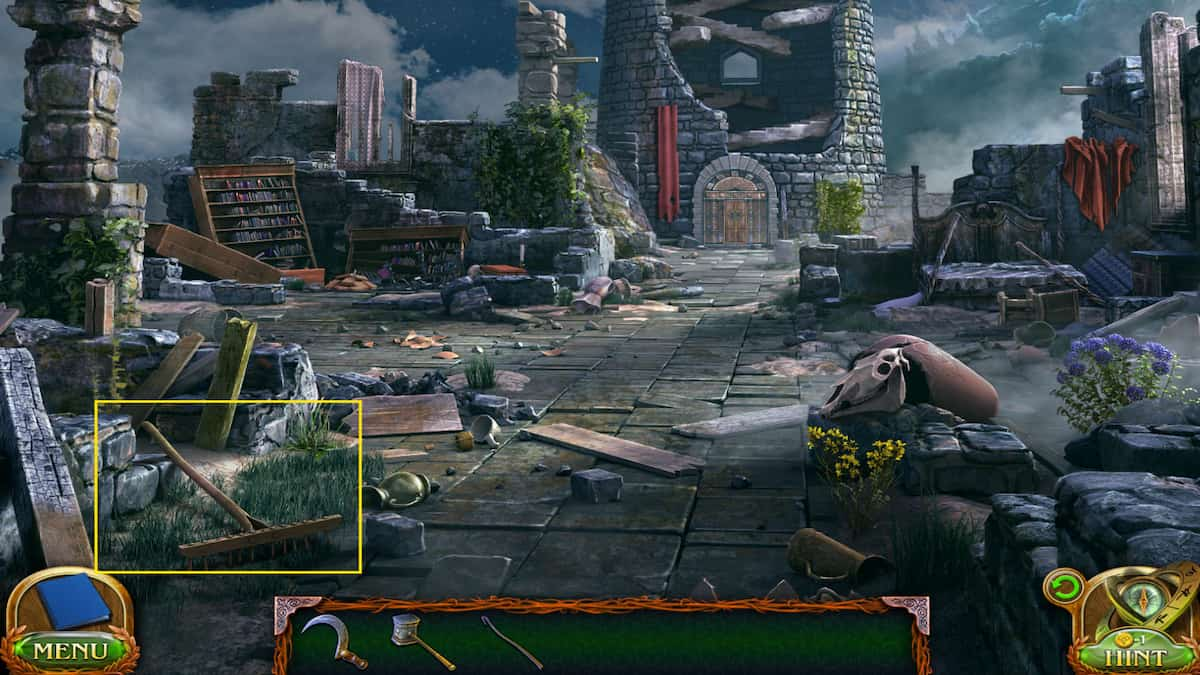
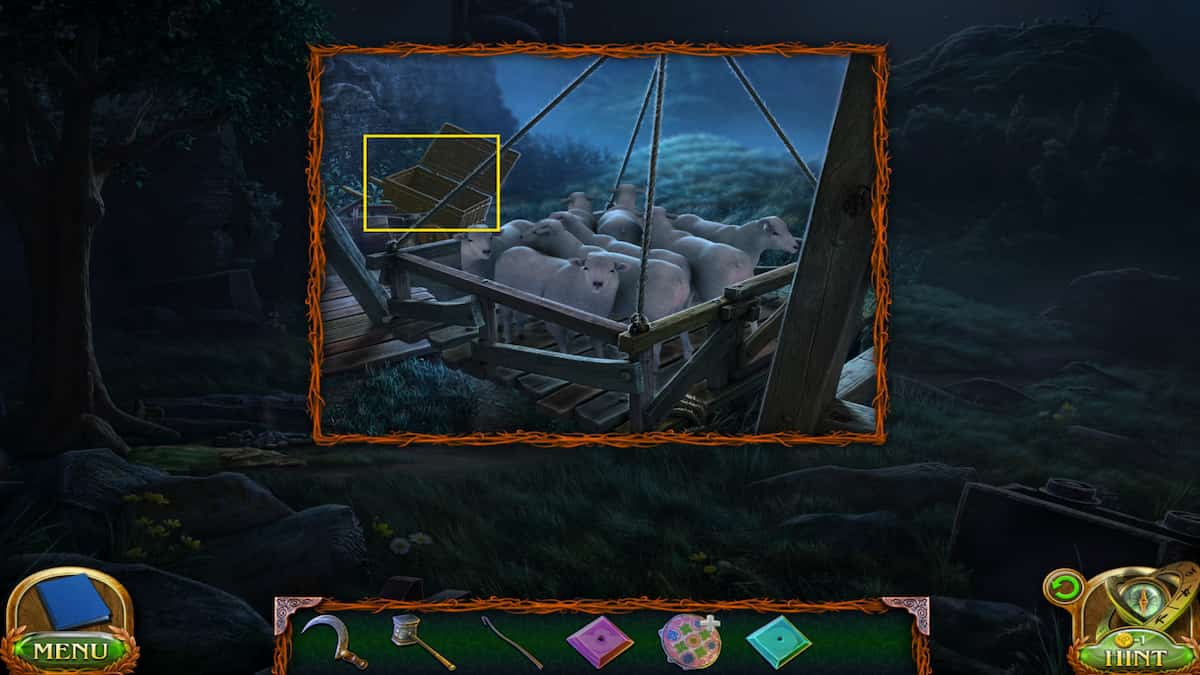
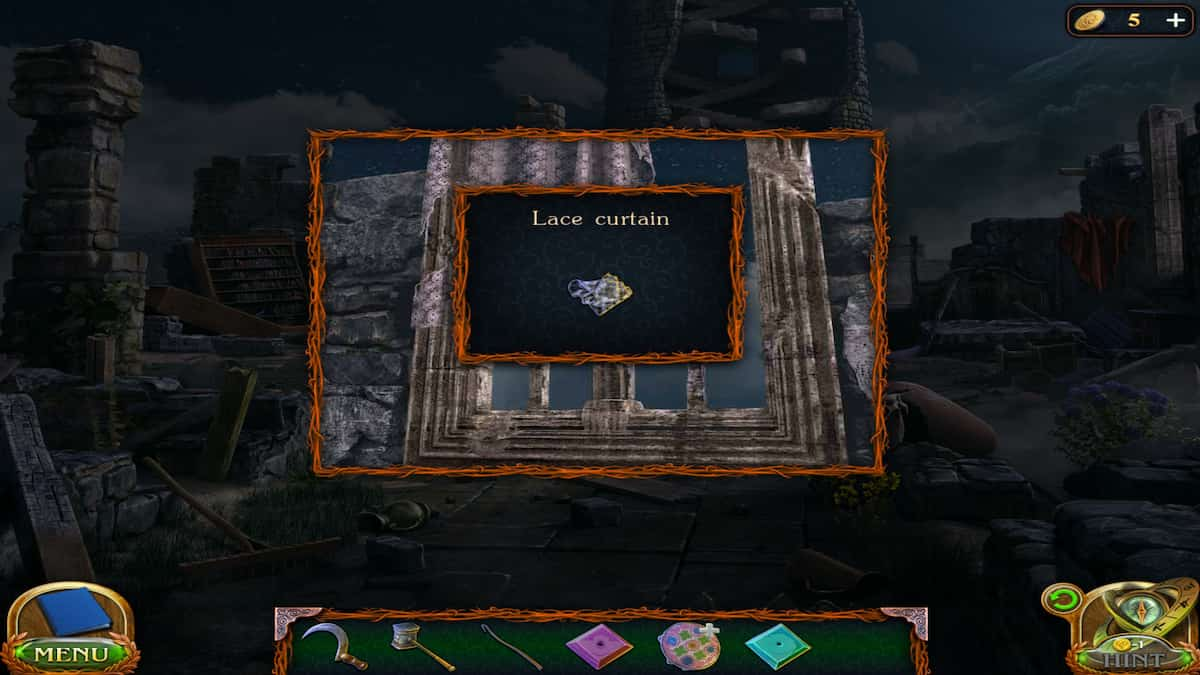
To clear out the swarm of flies at the Tower portal, we'll need to collect a few different objects. Remember all the chameleons in the wooded area? They can help us get rid of all those pesky flies, but we'll also need to get rid of the bird skeletons. Here's what we'll need to do:
- Grab the Rake from the Castle ruins and use it to sweep away the bones.
- Select a chameleon in the Woods (you will be prompted that you need something to carry them in)
- Head to the castle gate and investigate the sheep on the platform. Behind them will be a Cart on wheels that you can grab.
- Select your embroidery in your Inventory and take out the fabric.
- Collect lace material from the window with a curtain in the Castle ruins with your Sickle.
- Place the lace material into your embroidery hoop, then use your Sickle to cut off the excess fabric.
- Then place the Shepherd's staff into the hoop, tied with the extra fabric to make a Net.
- Now head back to the Woods, place the cart down, and then use the Net to collect the chameleons.
Where to find all the chameleons
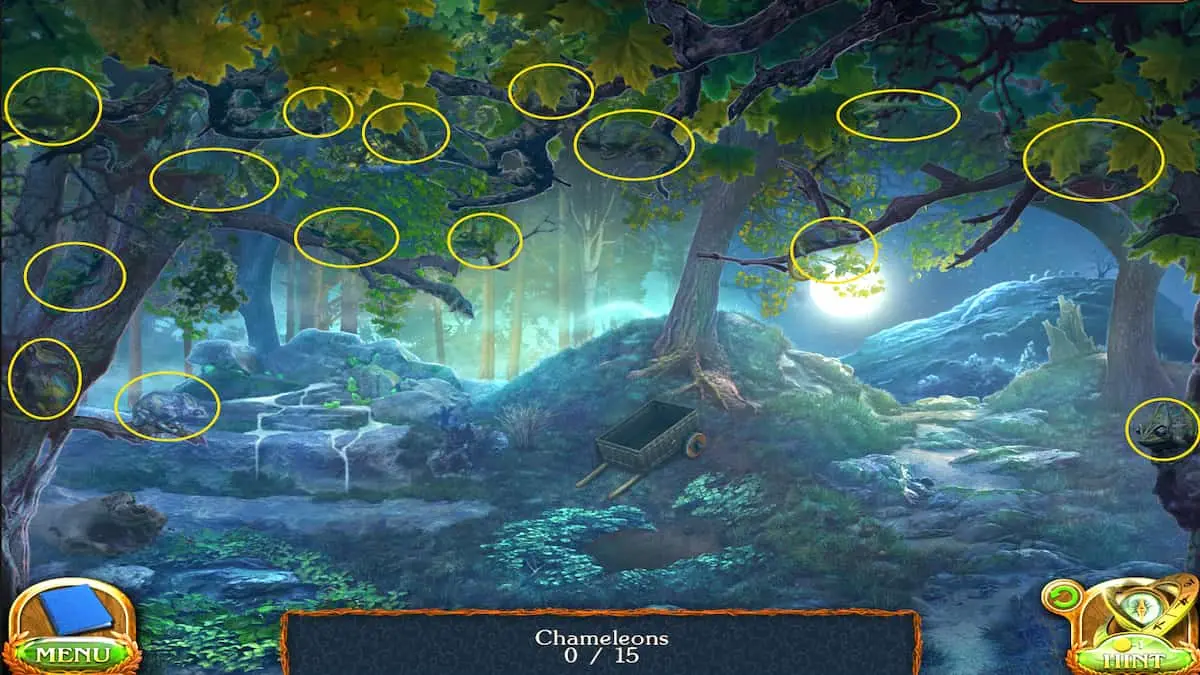
You'll need to find all 15 chameleons in the woods. This is difficult to do since they blend in perfectly to the dark surrounding, but use the image above to help you find each one.
Once you get all 15, collect your box on wheels and head back to the tower. You can place them down to clear up the fly swarms.
Castle Tower Portal
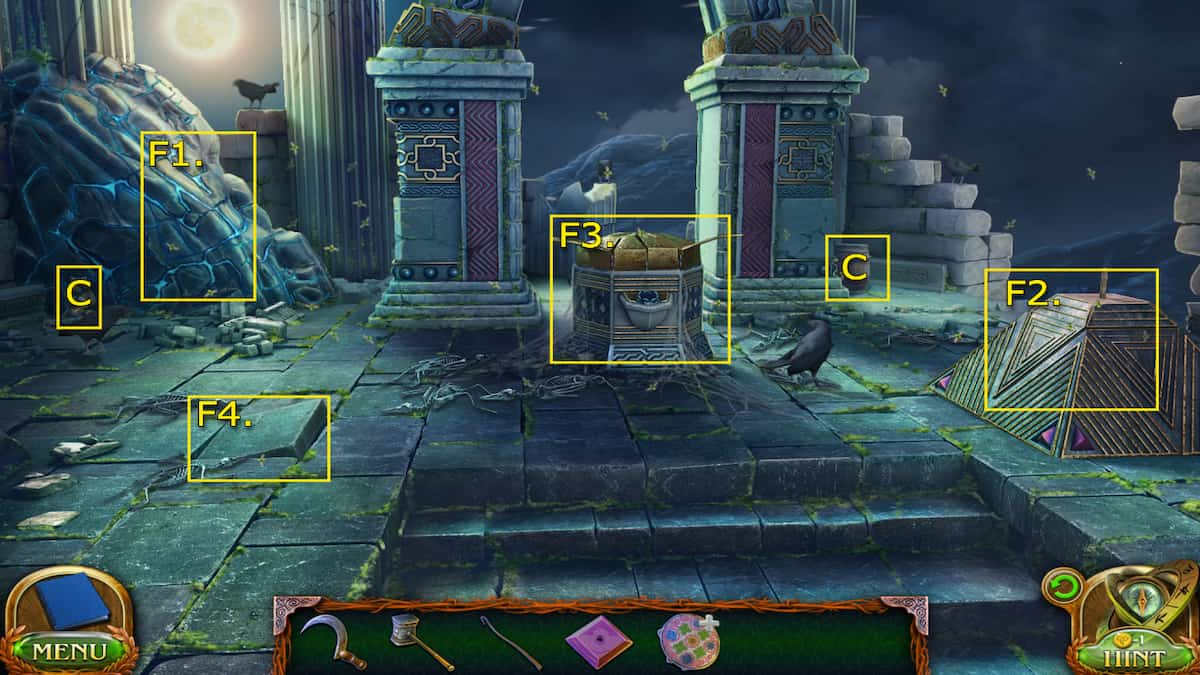
- F1. Stone deposit
- F2. Pyramid
- F3. Portal pedestal
- F4. Loose stone
- (Collectible) Against the stone vein - Wooden animal 3/7
- (Morphing Objects) Barrel/pot on the right side of the portal 36/45
Now that the flies are gone we can explore this area a bit more. There are a few different objects we can explore here but we'll need some more items to use on them. First, investigate the pyramid on the right side. This is where our Glass prisms come into play, but we'll need to collect them all to finish the piece.
Where to get all the Glass Prisms
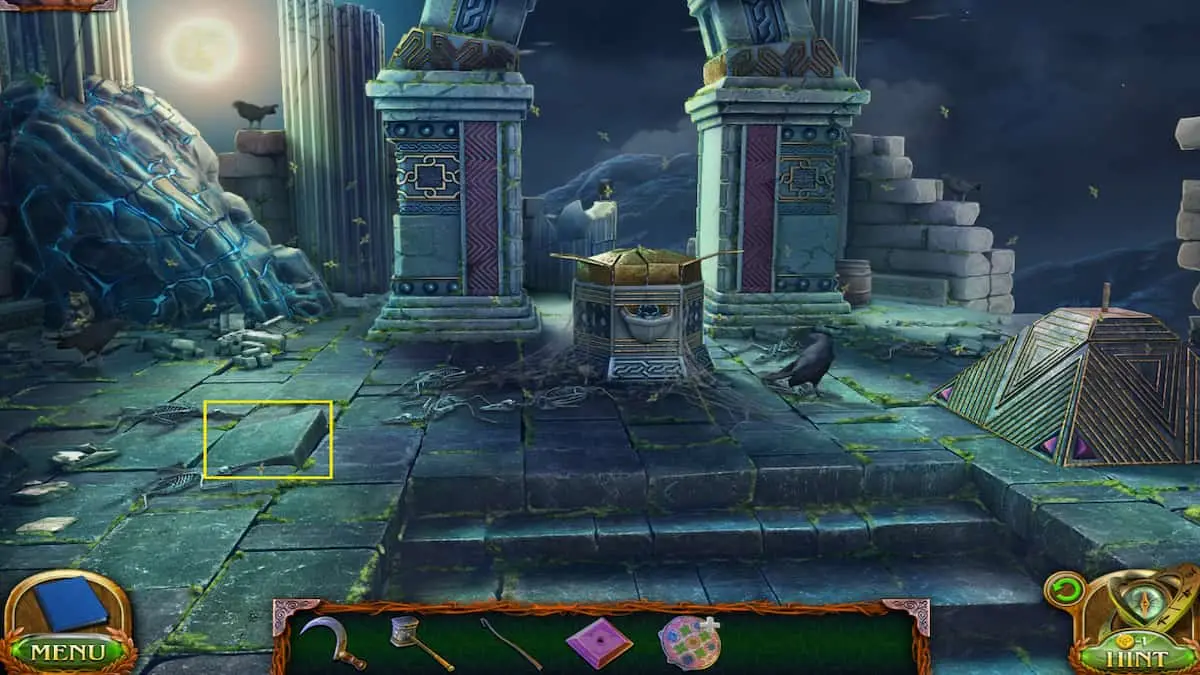
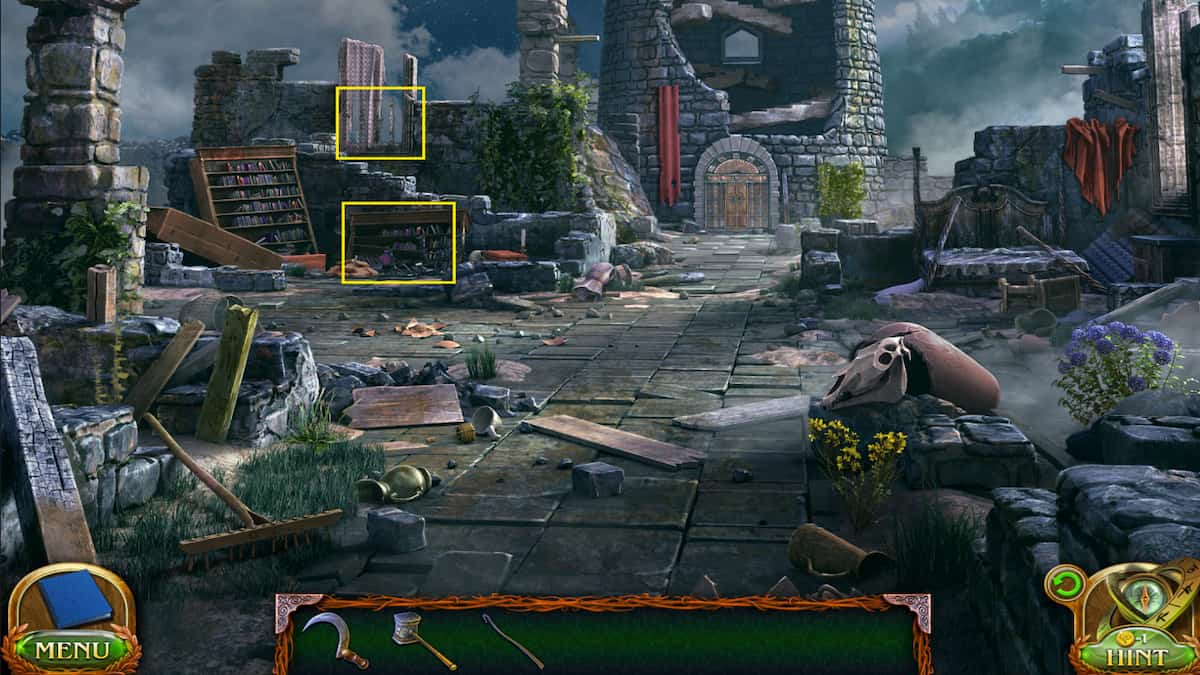
To finish the pyramid we'll need to collect all the glass prisms. Luckily, the last piece is right near the pyramid. We've found the other two along the way, but in case you've missed them, here's where to find them all:
- Glass prism 1 - In the bookcase of the Castle ruins
- Glass prism 2 - In the window with the curtain in the Castle ruins
- Glass prism 3 - Under the loose stone near the portal
With all of them, you can place them on the pyramid which will then open a compartment with the portal runestone. Now we can work on opening the portal!
How to open the castle tower portal

The goal of this puzzle is to land the green pyramids on the blue cells simultaneously. They will always move in the same direction unless blocked by something. However, they cannot step on any red cells, or the puzzle will reset. You'll have to find the right path to get them to land simultaneously. Use the image above to help get there.
Once both pieces land on the blue cell together, the portal will open up and you can enter through to the Academy.
Academy Backyard
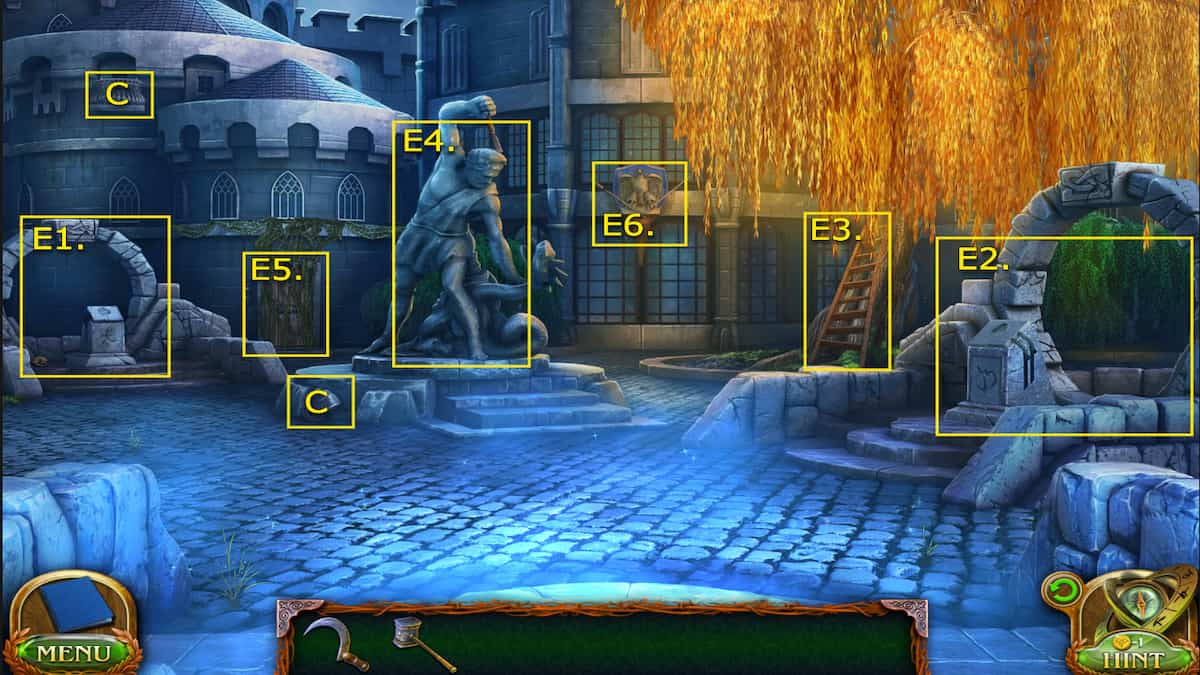
- E1. Portal pedestal 1
- E2. Portal pedestal 2
- E3. Ladder in tree
- E4. Statue - Chisel
- E5. Academy Office backdoor
- E6. Coat of arms - Spears
- (Collectible) Near the statue at the center of the yard - Suit of armor 3/8
- (Morphing Objects) Balcony on the exterior wall behind the portal on the left side 37/45
Here in the backyard of the Academy, there is a locked door to the Academy Office. However, Maaron could be in trouble for being on the grounds at night. They will have to find a different way through. There is a secret passageway under the yard statue, but we must find a way to open it.
Grab the Chisel from the statue's hand and use it on the ladder and Folnur's Hammer to pry it loose. Then, move the ladder over to the Coat of Arms and collect the Spears. Put the Spears in the statue's hand by combining the two together, and the passageway will open.
Academy Library (Return)
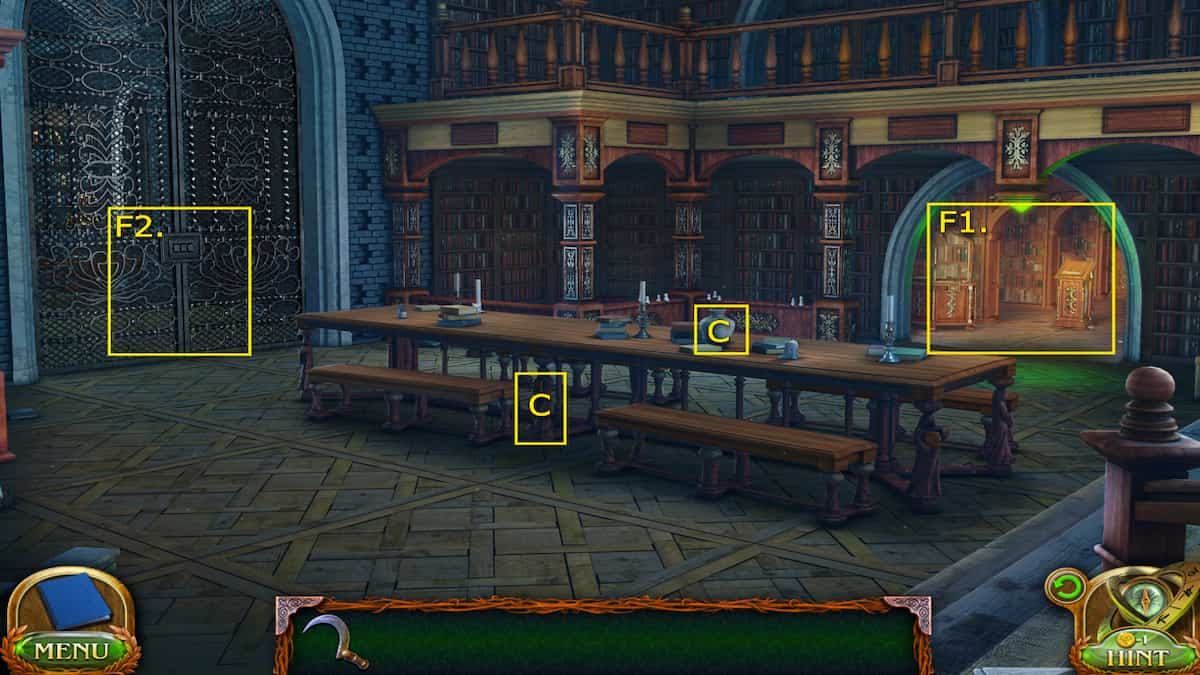
- F1. Library book sections
- F2. Library Archive
- (Collectible) On the table leg - Wooden animal 4/7
- (Morphing Objects) Pitcher/vase on the table 38/45
We're looking for another book, so we'll want to head straight through to the book sections again, after grabbing our collectibles to track down the book we need.
Where to find the Spirits and deities book
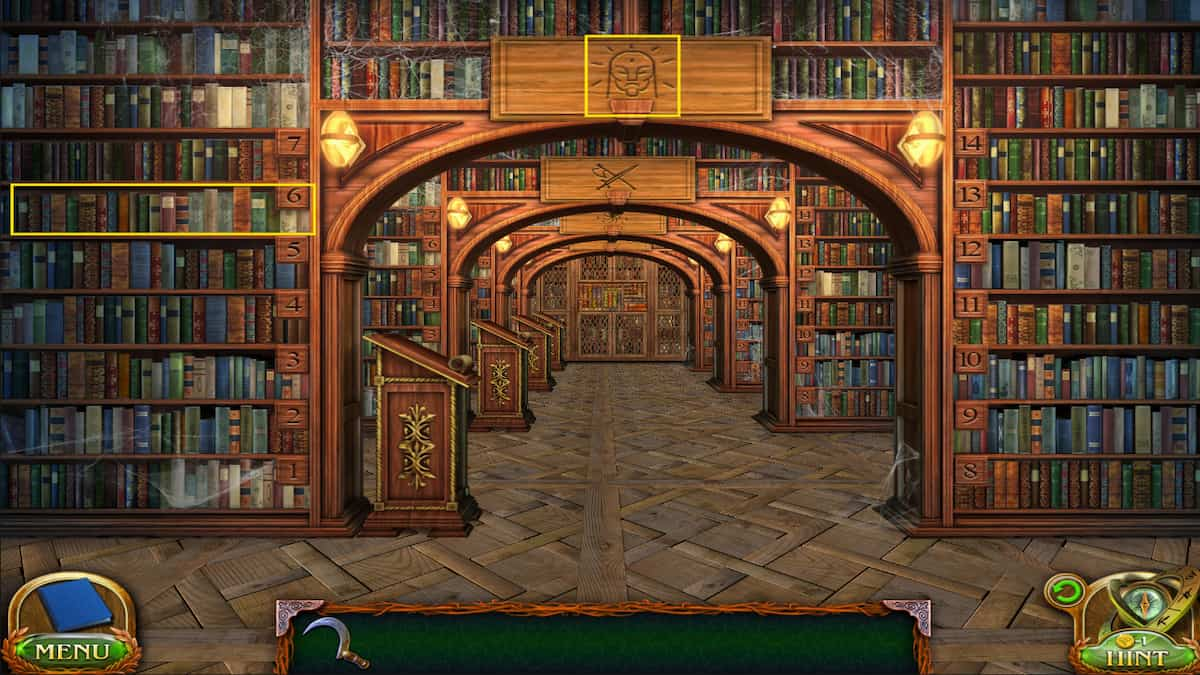
Just like how we tracked down the book before, we can use the scroll at the entrance of the book sections to see what zone has the books we need. The Spirits and Deities collection is located in the third row, matching the symbol of the masked face on the scroll as well. Then, looking at the scroll in this area will show us the Formless creatures in section 6.
After the brief cutscene, Folly and Maaron will now need to open yet another portal to take them to the Canyons, where we'll be heading back to Folly's lair. We'll need to inspect the map in the Office to help us figure out which portal to open, but the keys to the backdoor are in the Archive, so head through the Library Archive gate.
Library Archive (Return)

- G1. Rune stone cabinet
- G2. Open box - Spotting glass
- (Collectible) On the pillar directly to the right - Wooden animal 5/7
- (Morphing Objects) Letter on the right corner of the desk - 39/45
You can look for the key in a few different spots, but only a few spots will be essential to your mission. Interact with the open box on the desk, and you'll find the Spotting glass. We can enchant it to help us get inside the locked office door, but we'll need to find another book.
Where to find the potions book
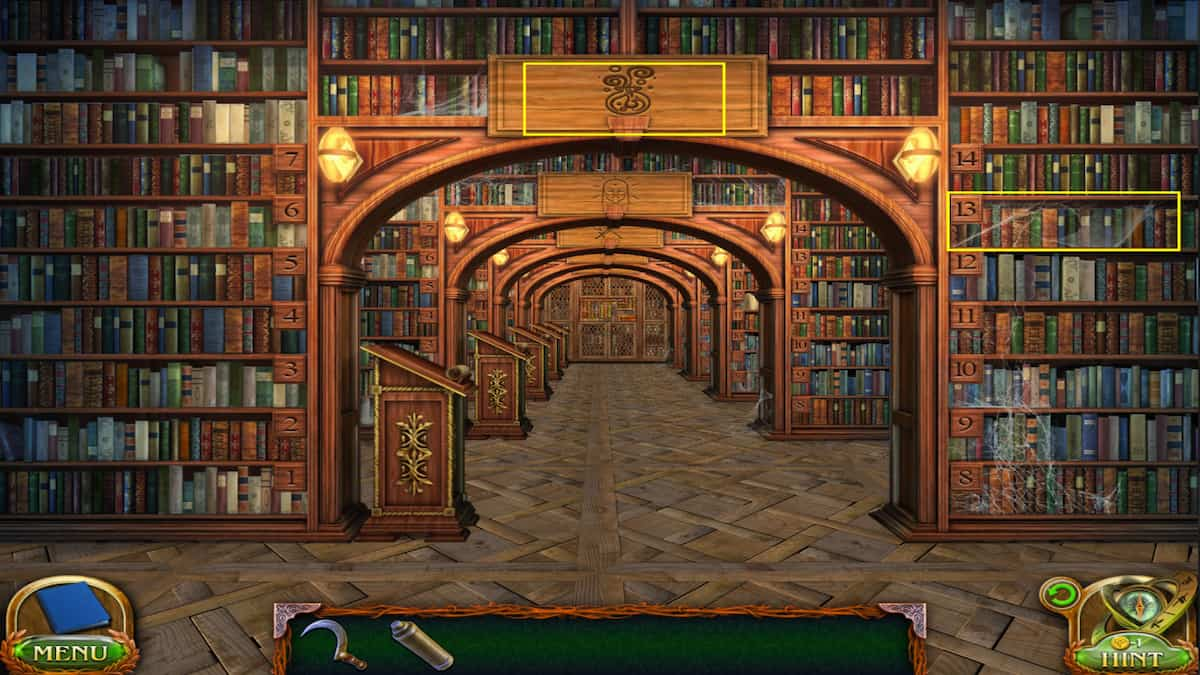
Once again, we will return to the library book section, check the scroll at the front pulpit, and see that Alchemy is row 2 with a fitting symbol of a potion beside it. In row 2, we can check the scroll here to see the Booster potions in section 13. We can grab the Book of Potions to help us create the enchantments we need. We can create the potions at Maaron's hideout at the end of the library sections corridor.
How to solve Maaron's hideout library door puzzle
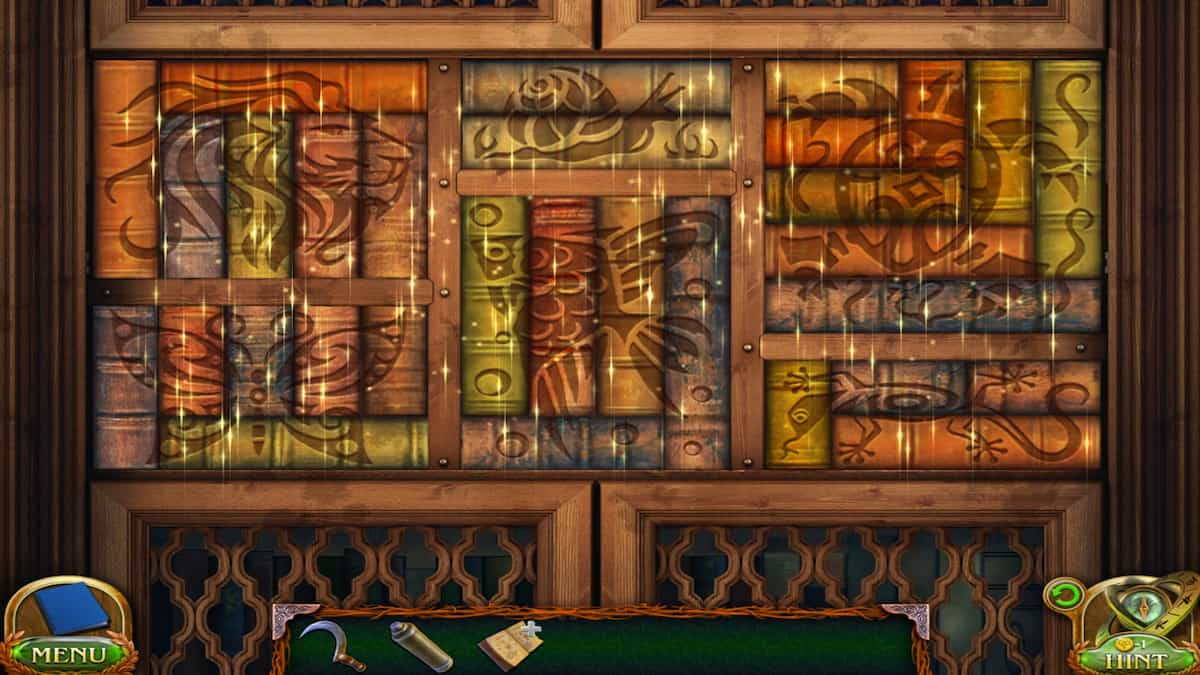
To solve this puzzle, we must recreate the patterns across all the books. Colors don't matter, but we can only move books to the same size and rotation spots. Use the image above to help you find all the right spots for each pattern piece. Then, head on through to Maaron's hideout.
Maaron's Hideout
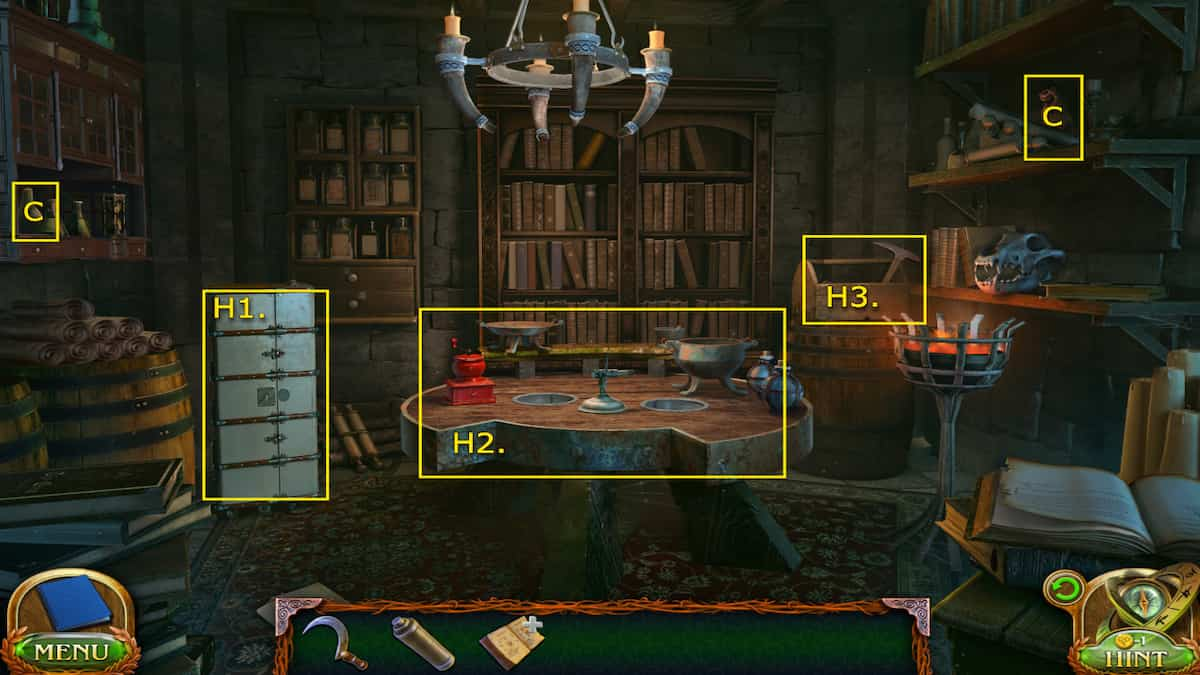
- H1. Chest cabinet
- H2. Potion table - Empty bottles
- H3. Tool crate - Mini pickaxe and Cabinet key
- (Collectible) On the shelf on the top right side - Wooden animal 6/7
- (Morphing Objects) Potion in the cabinet on the top left side 40/45
Before we can start making potions, we'll need to gather some tools that will help us gather the ingredients we need. Check out the potion table in the center to grab the empty bottles there. Then, look in the little tool crate behind it and grab the mini pickaxe and Cabinet key. Use the key to unlock the Chest cabinet; it will have some of the ingredients we need for the potions. Now we can start collecting them.
How to brew the enchantment potions
Where to get all the potion ingredients
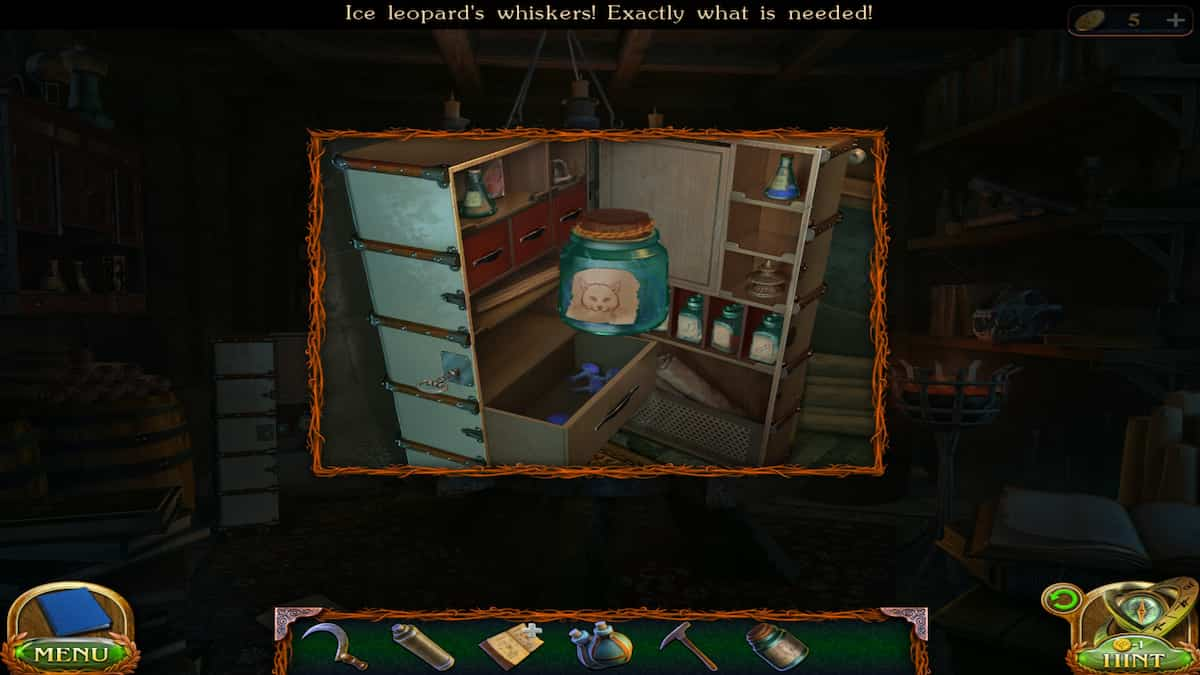
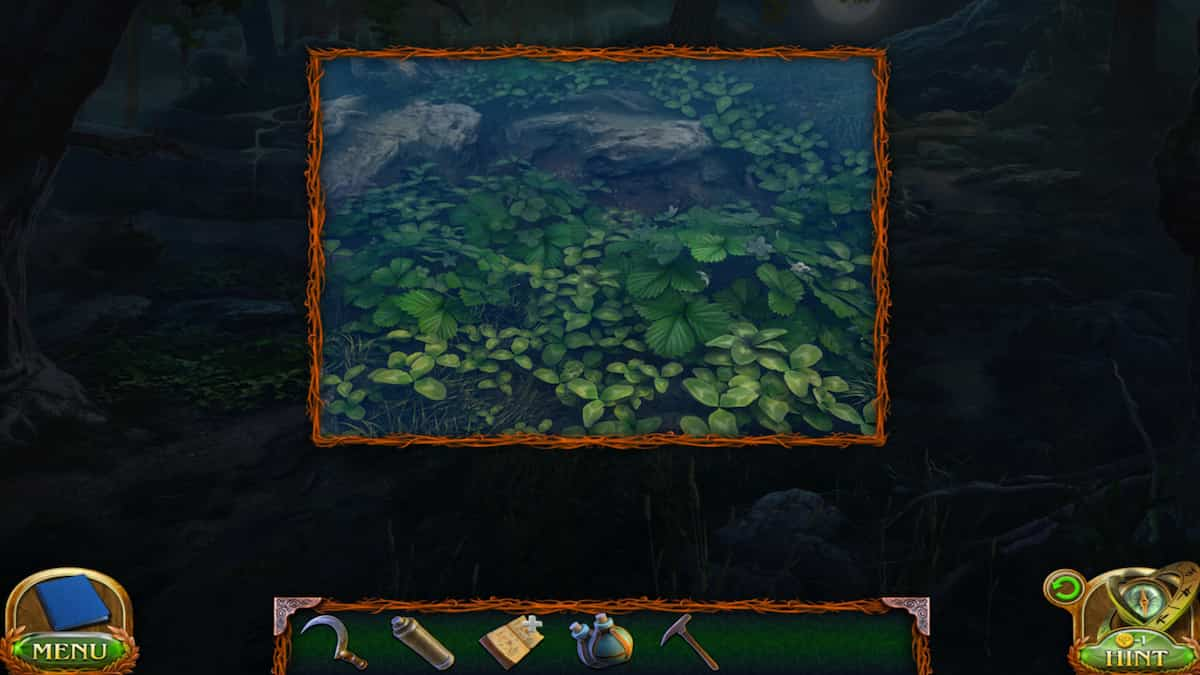
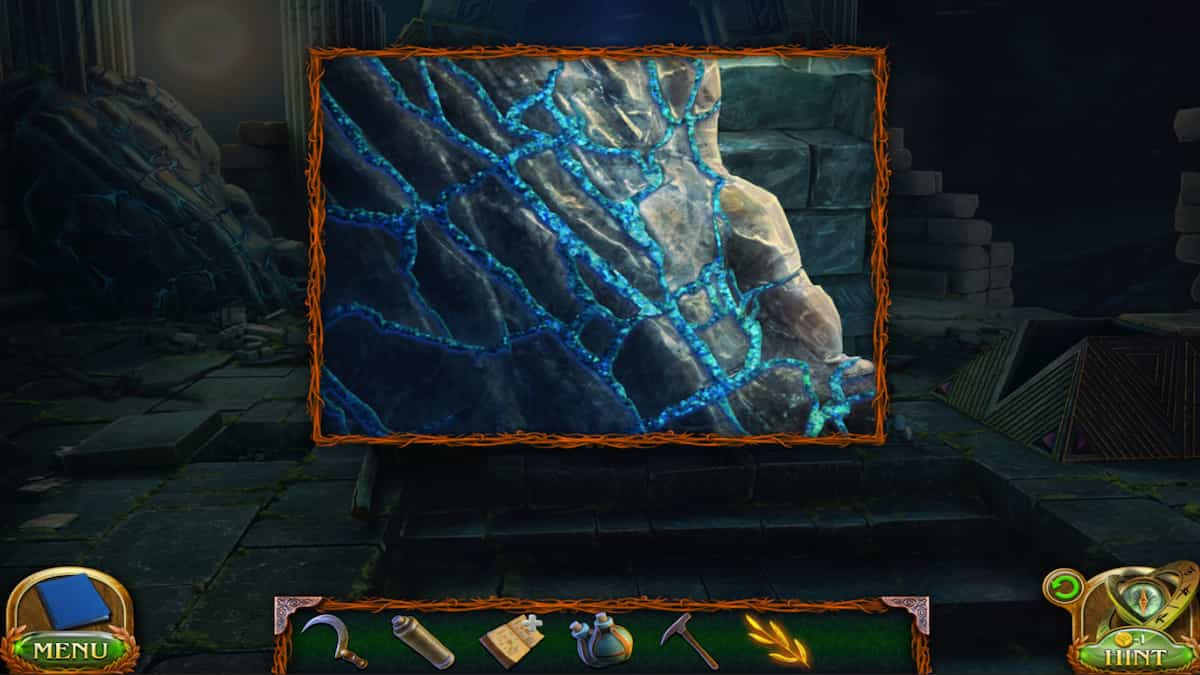
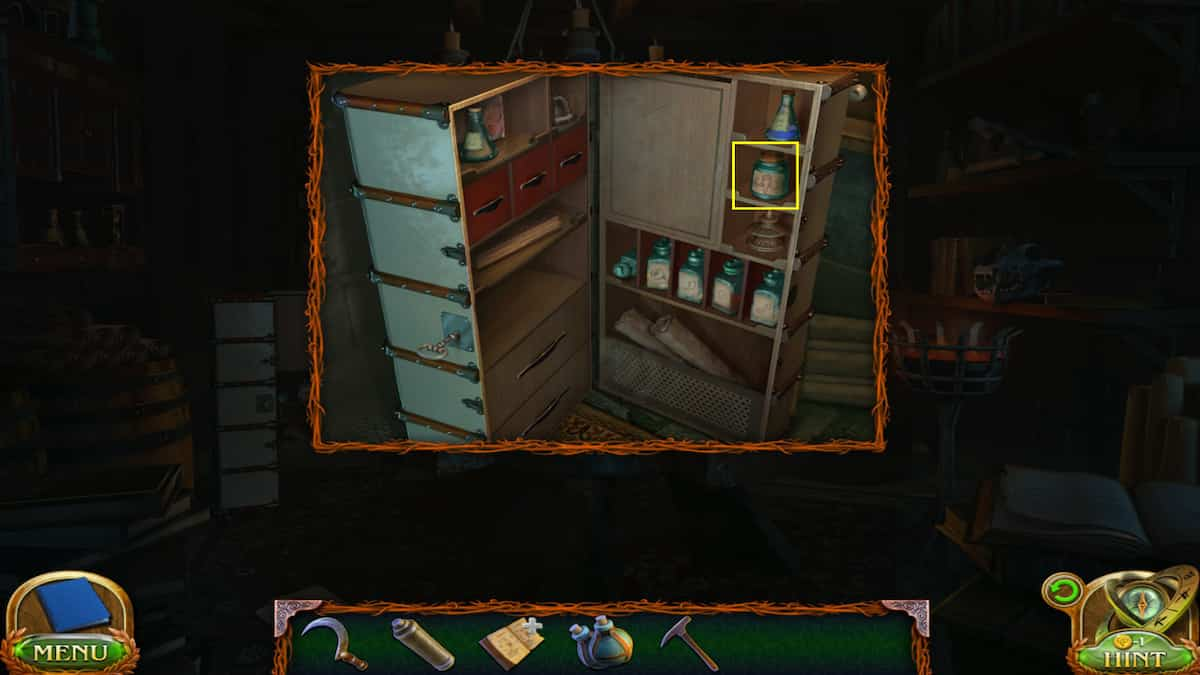

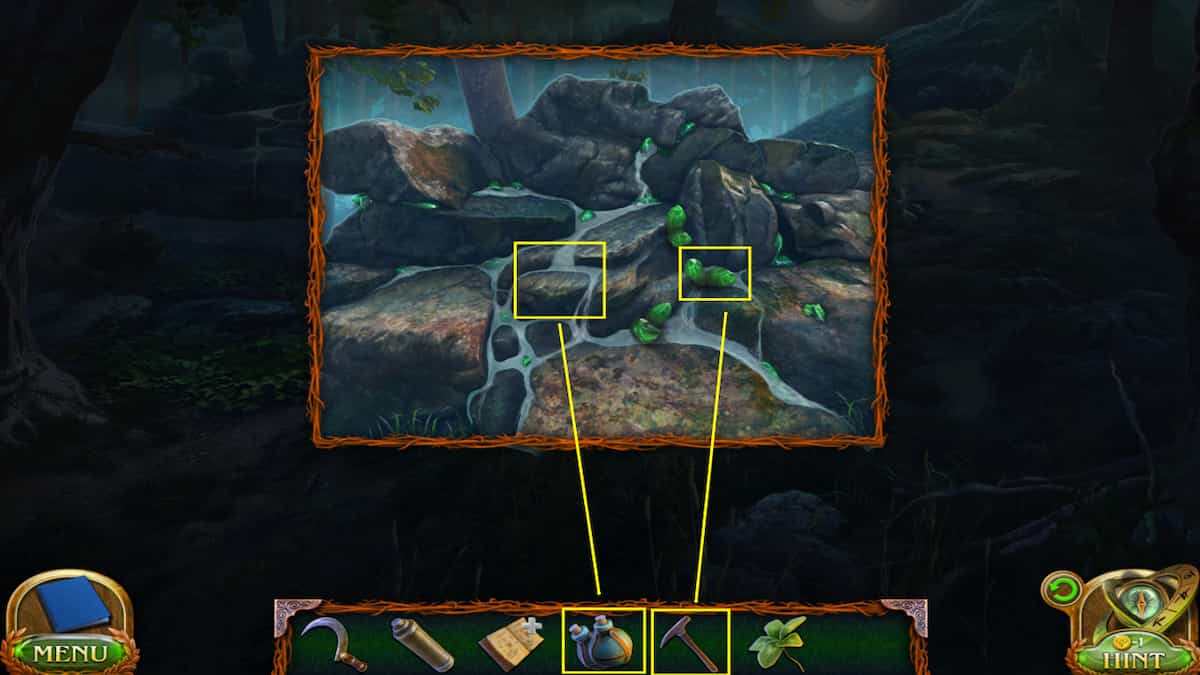
We can use the Book of Potions to help us find all the ingredients we need for both potions. These ingredients will be spread around many of the locations we were in before. Take a look at the image above and the list below to help locate them. You can put the found ingredients on the book to check items off the list.
Cat's Intuition potion
- Spring water - At the Castle Woods, where we saved the dog (Use the Empty Bottles)
- Ice leopard's whiskers - In the chest cabinet drawer
- Five-leaf cover - At the Castle Woods
- Veconium crystals - At the Castle Woods, same spot where you get Spring water (Use Mini pickaxe)
Elephant's Memory potion
- Spring water - At the Castle Woods (Collected at the same time as the other Spring water)
- Fossilized mammoth's brain - In the chest cabinet cubby
- Sunny willow leaves - In the Academy Backyard tree (Move the ladder back to grab the leaves)
- Paleritic coal - At the Castle Tower Portal in the blue vein (Use the Mini pickaxe)
Once you have all those items and place them in your Potions book to check them off, they will turn into the Set of ingredients in your Inventory. Now, you can take those to the Potion table in Maaron's Hideout.
How to light the crystal flames on the Potions table

After placing the Set of ingredients on the Potion table, you can begin working on your potions. The first step will be lighting a fire. You'll need to restore the pattern in the three colored lights by moving them around the dots provided. If you look closely at the background, you will see the correct pattern shown. The goal is to line up all the lines to match it. They can't cross over each other. Check the image above for reference. When the flames are lit, you can begin creating the potions.
How to make Cat's Intuition potion

This potion is shown on the left page of the Potion's book, which you can check for guidance at any time. Here's how to make it, step-by-step:
- 1. Place the Cauldron on the green flame
- 2. Add the Ice leopard's whiskers to the Plate
- 3. Use the Flame torch on the whiskers plate
- 4. Add Spring water to the Cauldron
- 5. Add Five-leaf clover to the Cauldron
- 6. Add the burnt whiskers to the Cauldron
- 7. Pour the Cauldron's contents into the empty bottle
How to make the Elephant's Memory potion
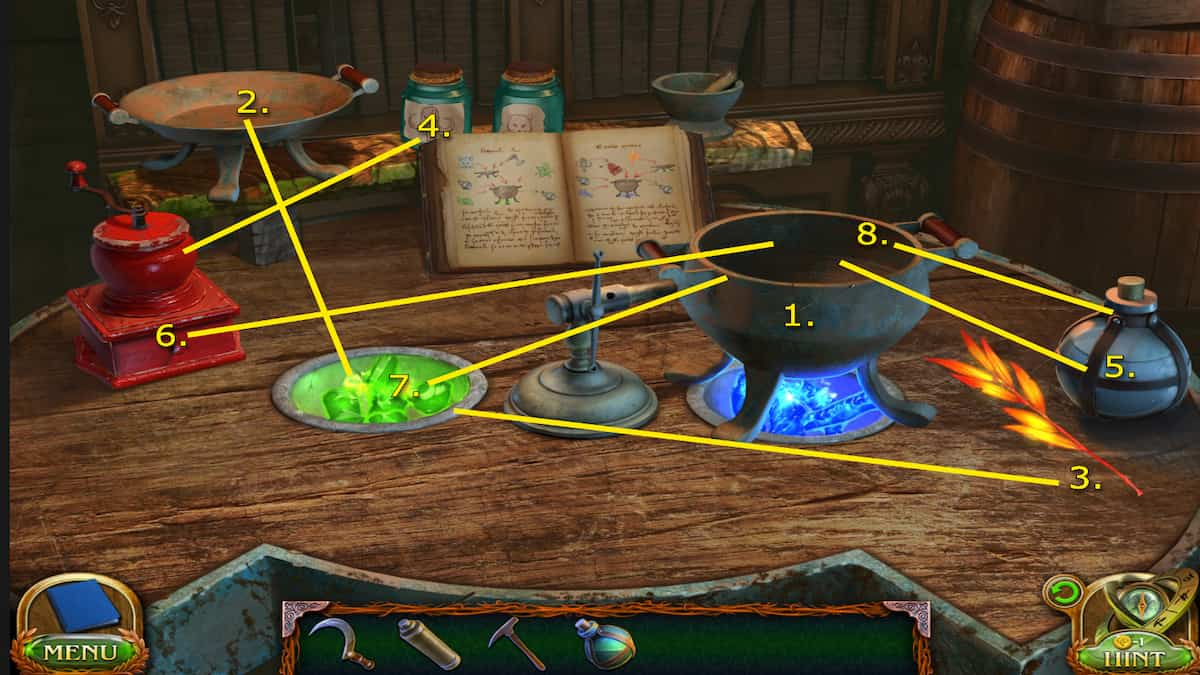
This potion is shown on the right page of the Potion's book and will use up the rest of the ingredients we haven't yet used. Here are the step-by-step instructions:
- 1. Place the Cauldron on the blue flame
- 2. Place the Plate on the green flame
- 3. Place the Sunny willow leaves onto the Plate
- 4. Add the Fossilized mammoth's brain into the Grinder
- 5. Pour Spring water into the Cauldron
- 6. Add Fossilized mammoth brain dust to the Cauldron
- 7. Add burnt Sunny willow leaves to the Cauldron
- 8. Pour the Cauldron's contents into the empty bottle
Now that we have both potions made, we can head back to the Office door in the Academy Backyard. Once interacting with the lock symbols on the door, use the Elephant's Memory potion to memorize all the symbols. Then, head back to the Library Archive.
Where to find all the Office door keys

In the Library Archive, use the Cat's Intuition potion to start looking for all the keys you need. They will all light up on the screen after taking the potion (as shown in the image above.) Each one will require a bit more to obtain, though.
How to get the book office key
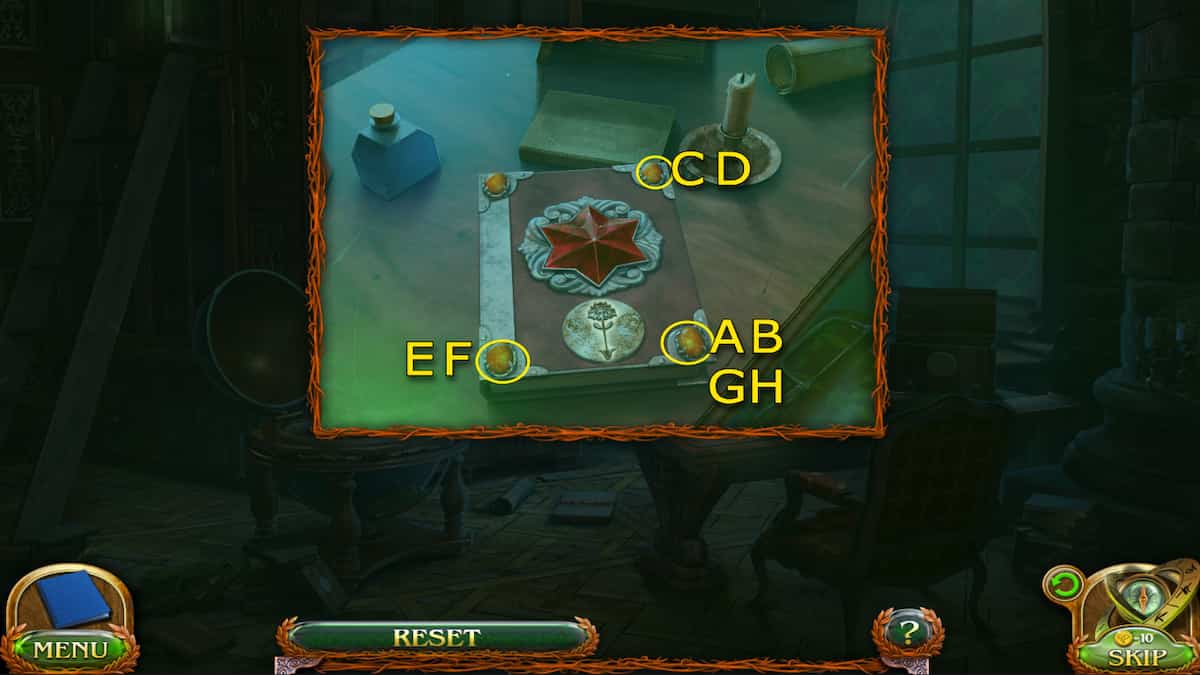
Just like the puzzle we completed in the book before, we will have to do it again to get the key. Watch the order the lights flash and then repeat it. Check the image above for help (remember it could be different for you since it's random).
How to get the bird cage office key
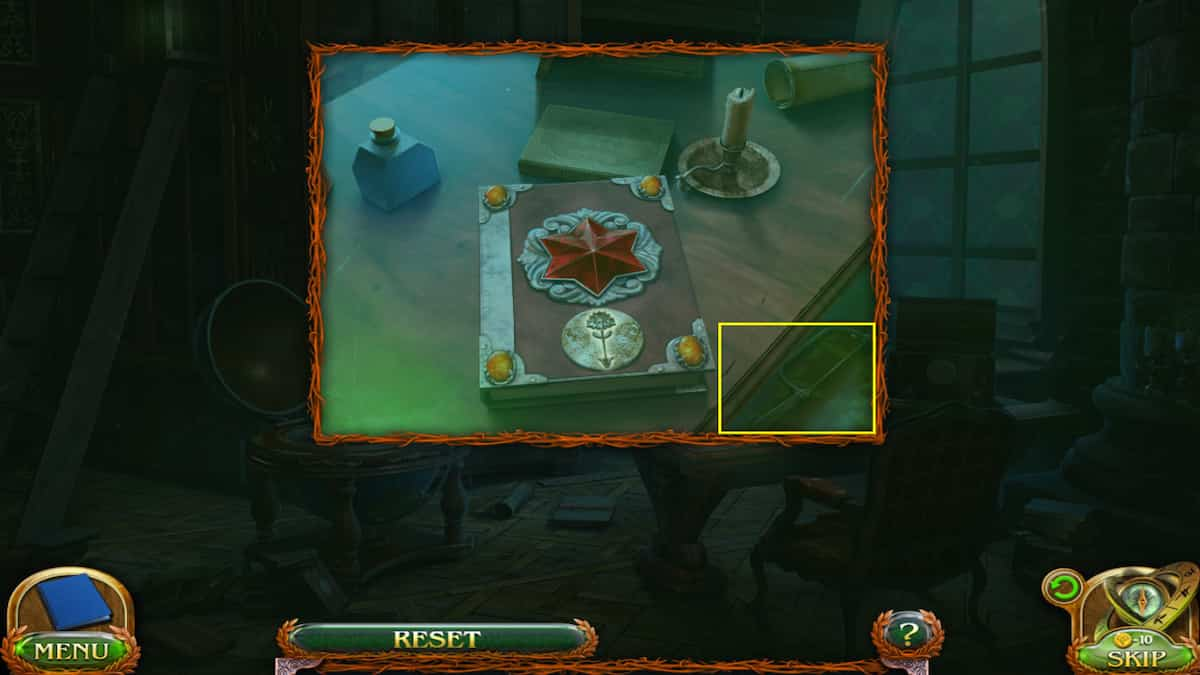
To get the bird key, which happens to be the bird statue's head, you'll need a way to get through the bars. You can just head back to the book where you got the first key and grab the Fretsaw located on the bottom right of the desk. Use the saw to cut through the bars and grab the second key.
How to get the cabinet office key

The last key is located in a box in the top cabinet. To open the box, we'll need to fix the broken figurine on the lid. The figurine is a horse, so we'll need a horse head. Check in the open globe, and you'll find the missing piece. Return to the box and place it on the horse's body, and it will open up.
How to unlock the Office back door
With all three keys, you can return to the Office door and use them in the correct slots to unlock the door. Bird key in the red slot, Spiral key in the yellow slot, and Flower key in the blue slot.

Now, you'll need to solve the puzzle to get the door unlocked. We need to change the symbols to the correct icons; we saw a brief hint of this earlier. Click on the buttons to cycle through the symbols. Here's what they need to be:
- Flower key: Bird
- Spiral key: Tree
- Bird key: Question mark
When you have the symbols in the right spots, the door will unlock and you can continue through to the utility room.
Where to find all the items in the Academy Utility Room
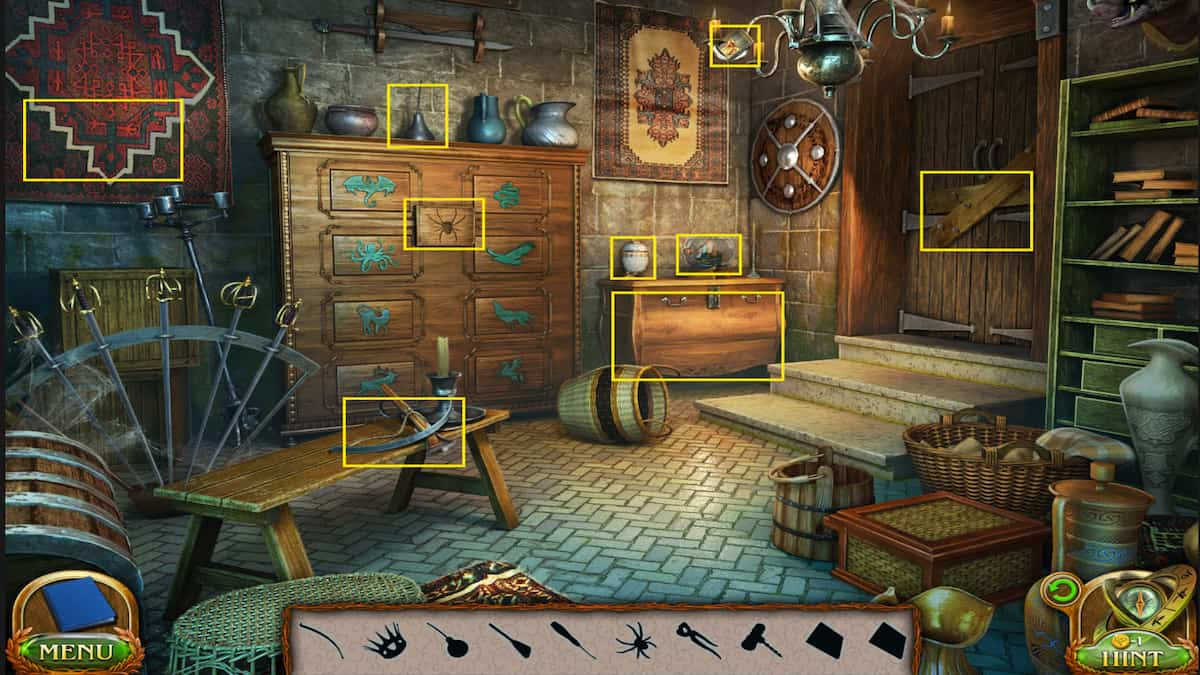
In the Utility Room, there will be several items you need to find to help you continue through to the Office. Some items require others to be obtained; here's how to get them all:
- Crossbow limb - On the bench
- Oiler - On the animal cabinet
- Crown - In the loose brick behind the left tapestry (Use the Crossbow limb to wedge out the brick and then use Broom to dust off cobweb)
- Broom - In the chest cabinet near the door (Use the Oiler to open it)
- Picklock - In the ship bottle (Use the Corkscrew to open it)
- Spider figurine - In the loose brick behind the left tapestry (With Crown)
- Pincers - In the chest cabinet near the door (With the Broom)
- Corkscrew - In the animal cabinet (Place the two chips and complete the puzzle shown below)
- Chip 1 - On the candelabra (Use the sword to knock it down)
- Chip 2 - In the egg vase on the chest cabinet (Place the Crown on the top to open it)
How to solve the animal cabinet puzzle in the Utility Room

This is a simple puzzle that requires swapping out the pieces until they're in the right spots to restore the pattern. It's a hog's face, so it should be pretty quick to figure out where they need to go. Use the image above for reference.
Once you find all the items you need and use them accordingly, you should be left with the Pincers and the Picklock. Use the Pincers to pull the nails out of the boards covering the Office door, and then use the Picklock to unlock it.
Academy Office (Return)
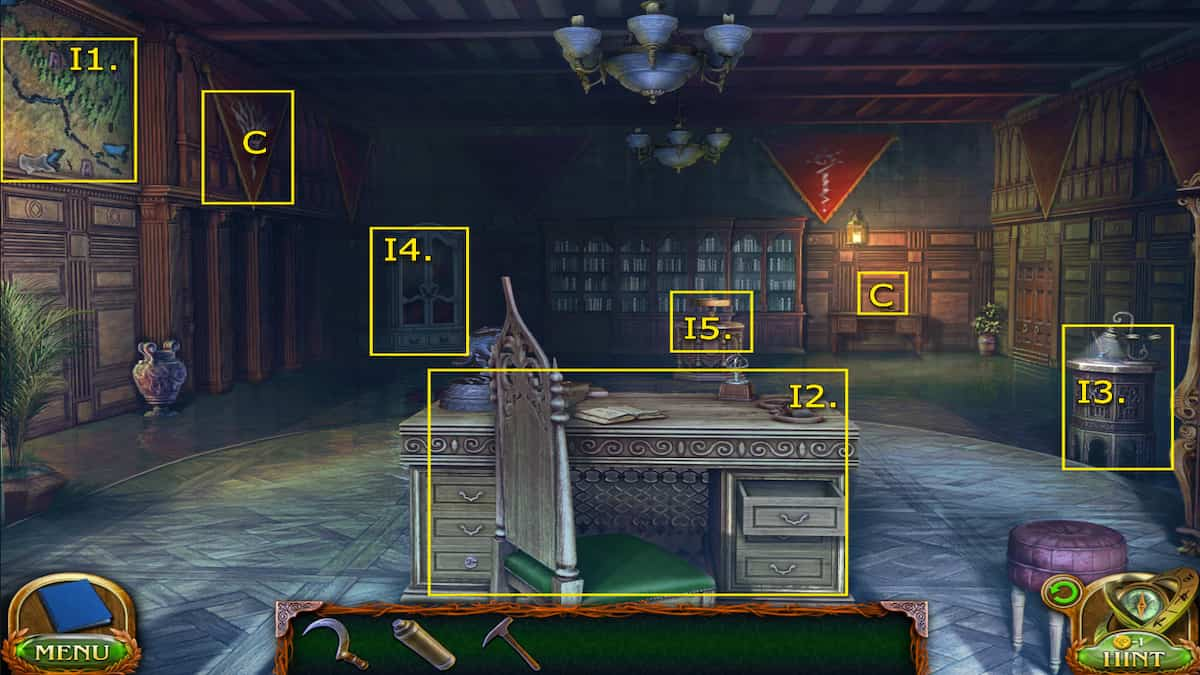
- I1. Map
- I2. Desk - Pattern element x2
- I3. Filter lamp - Pattern element and Quill
- I4. Wardrobe - Rune hyperstone
- I5. Rotating lamp - Pattern element
- (Collectible) On the stand in the back right corner - Wooden animal 7/7
- (Morphing Objects) Banner on the top left side of the wall 41/45
Unfortunately, the map is faded on the symbol we need to get to the Canyon; we'll have to find a way to fix it. There are several different items we can interact with in the office that will give us what we need.
First, check the Wardrobe in the back left corner. It's too dark to see anything. Grab the Filter lamp on the table on the right side of the room. Use the lamp to light up the Wardrobe. It's missing several pieces of the front leaves pattern, and we'll need to find them.
Where to find all the Wardrobe leaf pattern elements
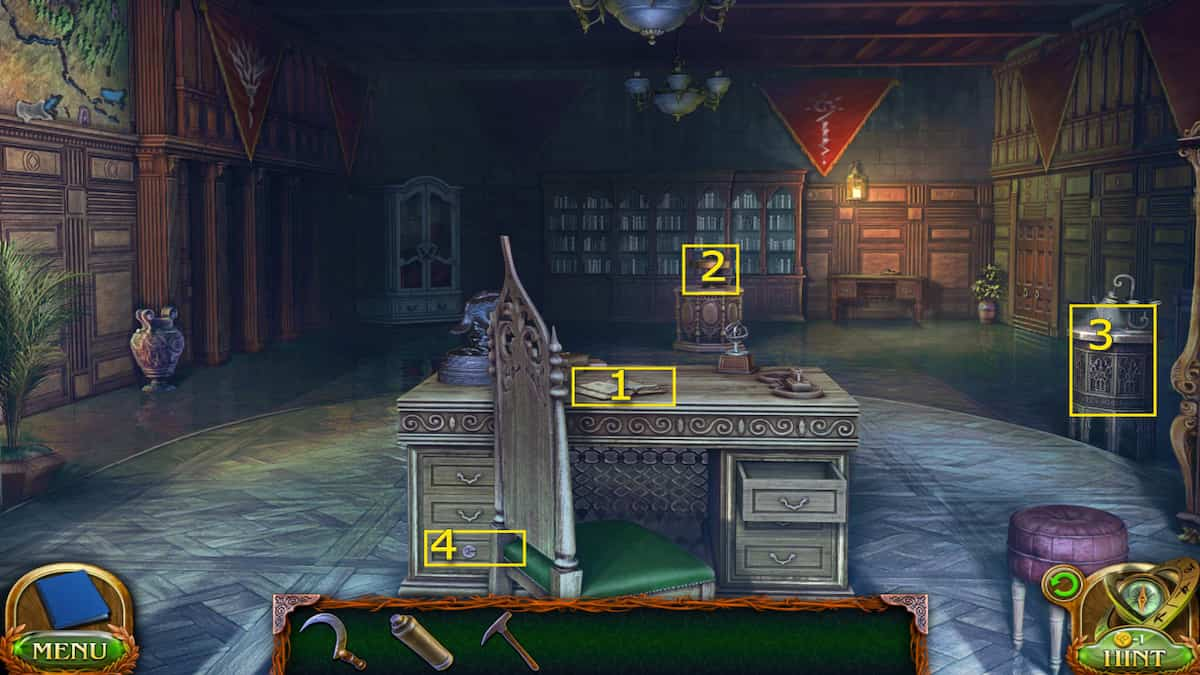
- Pattern element 1 - On the second page of the book on the desk
- Pattern element 2 - In the Rotating lamp on the far table (Use first pattern element piece to loosen it)
- Pattern element 3 - In the Filter lamp table (Use the second pattern element piece to open it)
- Pattern element 4 - In the locked desk drawer (Use the third pattern element piece to unlock it)
With all four, select Pattern element four from your Inventory and combine them all together. Then, place them in the Wardrobe.
How to solve the Wardrobe figurine puzzle
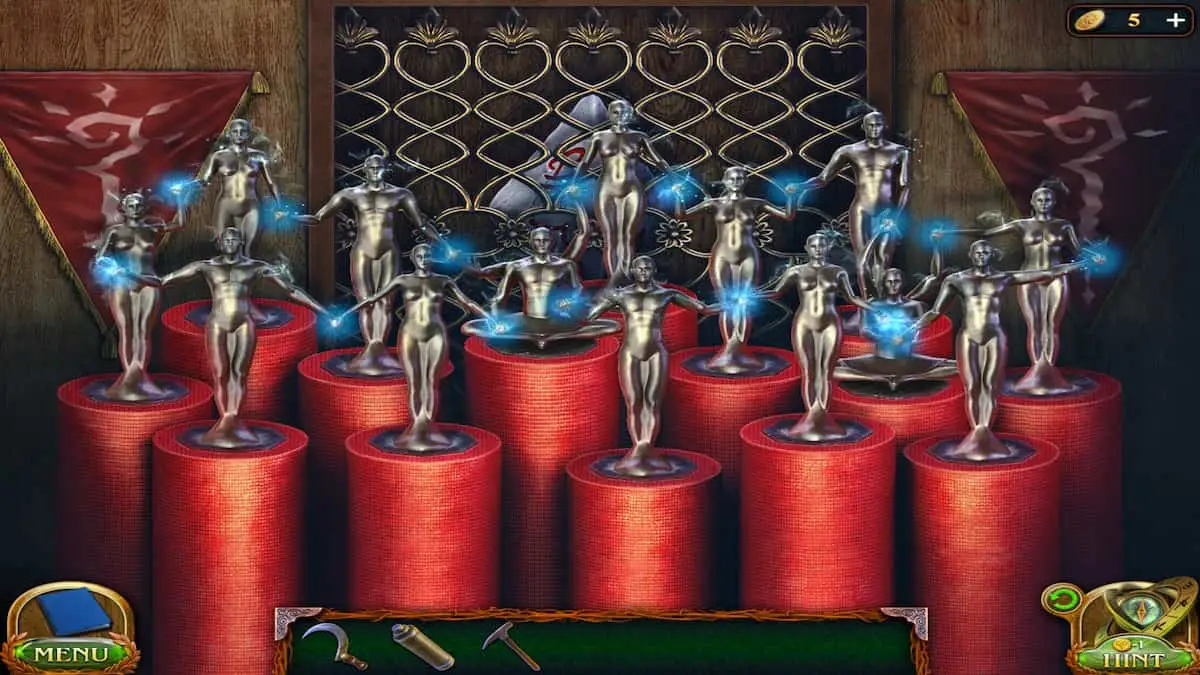
The goal of this puzzle is to rearrange all the figurines so that they all join hands. Press on a figurine and then on the spot where you want to move it to rearrange it. The hands will light up if they are joining correctly. Take a look at the image above for help. When they are in the correct spots, you can grab the hyperstone from behind them.
How to fix the faded map symbol

To fix the faded symbol, bring the Rune hyperstone to the map and place it on top of it. Then, grab the Quill from the Filter lamp table and place it with it. The goal of this quick little puzzle is to use the process of elimination to figure out which symbol is missing. Use the quill to mark the symbols you can currently see on the map that match the hyperstone. You can rotate the hyperstone by pressing on it and mark the symbols by pressing on them. Once all of them have been circled, find the one that still needs to be matched and then draw it on the faded symbol near the Canyons.
Now, we can head to the glass case in the Archives, retrieve the rune stone that matches the map, and use it to open the portal we need.
Continuing from where we left off, we now have to acquire the rune stone for the Canyons, matching the symbol we just uncovered from the map in the Office. Just like all the rest, head to the Library Archive, and it will be the only stone you can grab from the glass case.
Once you have it, you can just head to the Academy Backyard and over to Portal pedestal two, on the area's right side. It will have the matching symbol to the rune stone on it. Place the rune stone into the pedestal and then you'll have another puzzle to solve.
How to open the Canyons portal

This puzzle takes some time to get the hang of, but once you get going, you will solve it in no time. The goal is to match the patterns shown on the left side by cycling through the rows on the right side with the arrows pointing up, down, right and left. Instead of getting overwhelmed trying to pinpoint each shape into the exact spot, focus on moving the shapes to the correct rows first and then rotating them into their exact spots (e.g. The top left row vertically will be square, circle, triangle, horizontally it's square, circle, triangle). You can click on the grey circles to lock a row and only move three at a time instead of the whole row of six. It's a bit like a rubik's cube. Check the image above for reference.
Once you complete the puzzle, the portal will open, but only for a second. It will need more power. Place the hyperstone into the bottom of the pedestal. Now, you can continue on through.
Canyons Portal
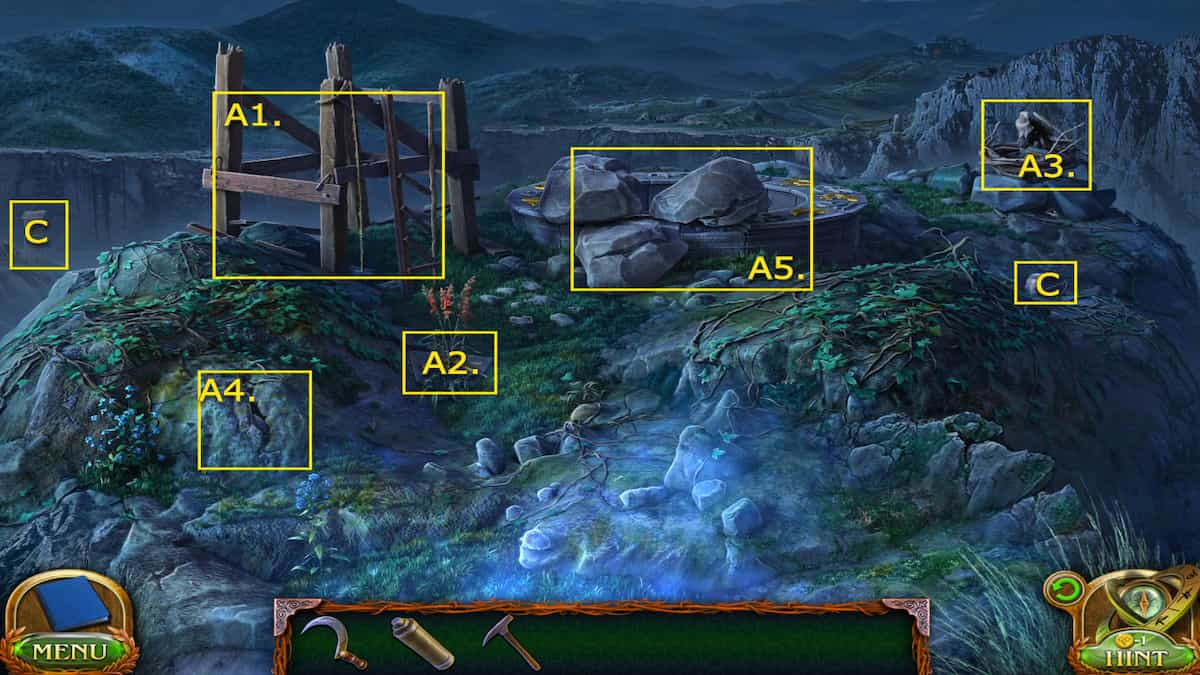
- A1. Destroyed observation tower
- A2. Well tile 1
- A3. Bird nest - Well tile 2
- A4. Crack in the ground - Projection crystal
- A5. Well
- (Collectible) Below the bird nest - Suit of armor 5/8
- (Morphing Objects) Tower in the distance on the right side 42/45
In this area, the main objective is to find a way to the dungeon. We can do that by using the Well here, but we will need to locate the missing tiles and complete the puzzle. First, check out the crack in the ground and use your Mini pickaxe to break it open and retrieve the Projection crystal. Then, collect the first Well tile piece on the ground near the broken observation tower. The other well tile is being guarded by the baby vulture, and we'll need to find a way to get rid of it.
How to drive away the vulture

We need to find a way to get the vulture to leave the nest so we can grab the second well tile. To do this, we'll need to head back to the Castle Tower Portal and collect a dead crow. Since vultures like eating dead things, we can throw the dead crow over the edge so the vulture will fly out of the nest to retrieve it. Now we can grab the second tile piece.
How to open the Well

Now, we can take the two tiles over to the Well and place them in the missing slots. To activate the Well, we need to press only the right symbols. As Folly suggested, you can use your Seeing Scope to view the village in the distance. As you do, certain symbols will be lit up on the hillsides. These are the symbols you'll need to press. There are three in total. Check out the image above to see what symbols you'll need to press.
Dungeon City
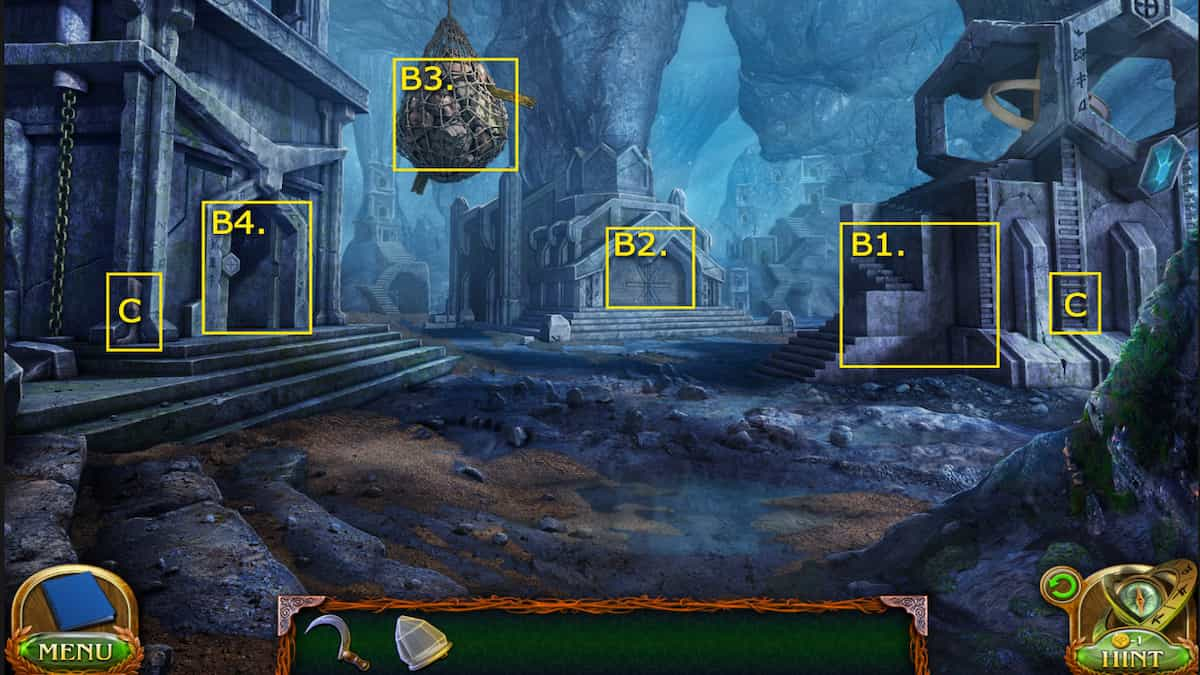
- B1. Tower stairs
- B2. Museum building
- B3. Hanging net - Pattern block
- B4. Temple door
- (Collectible) Against the temple on the left side - Suit of armor 6/8
- (Morphings Objects) Ladder on the tower on the right side 43/45
In the Dungeon City, there are a few objects of interest. The main objective will be finishing the stairs up to the tower. To do that, we will need to locate the two blocks missing.
How to get reach the hanging net

The first brick is hidden inside the hanging net in the City. We'll need to find a way to cut it down by making a long tool. To do this, we'll need to head back to the Canyons Portal and grab some items.
Interact with the Destroyed observation tower and use your Sickle to cut down a piece of rope and then grab the Long pole leaning against the right side. You can combine the Long Pole, a piece of rope, and the Sickle to make an Elongated Sickle. Now, you can reach the hanging net and cut it down to retrieve your missing step.
To get the other missing block, you'll need to head into the Temple through the door to the left.
Dungeon Temple
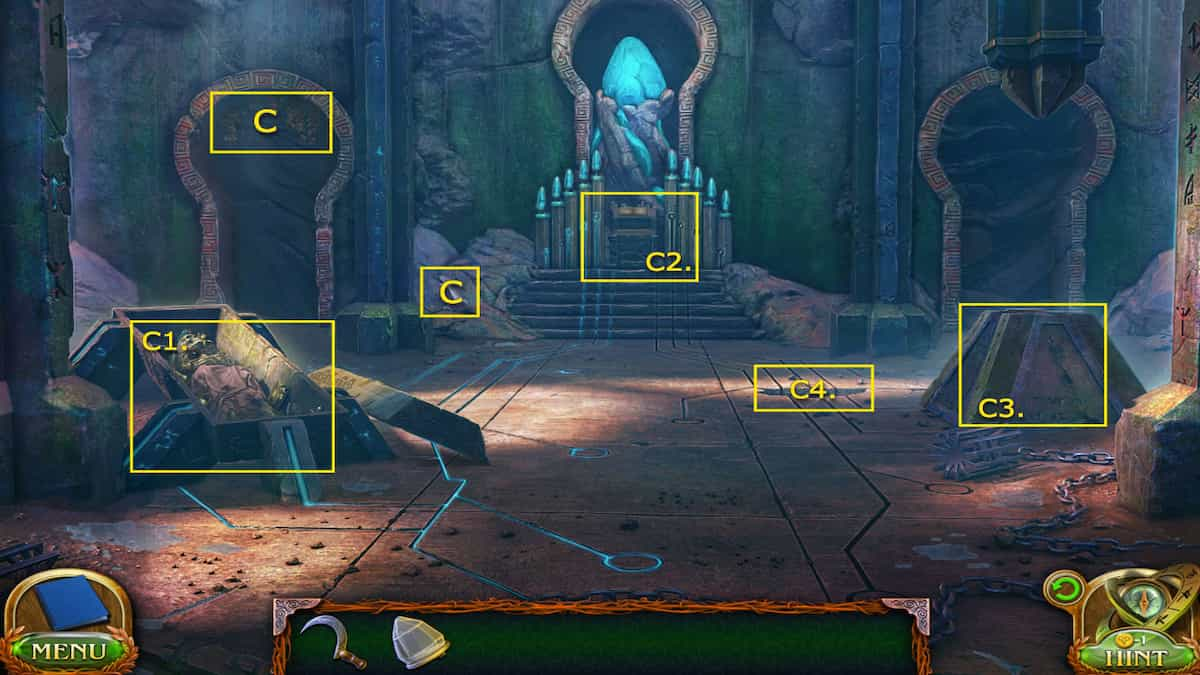
- C1. Sarcophagus - Pattern block and Oigela's medallion
- C2. Prayer altar
- C3. Main generator
- C4. Missing floor piece
- (Collectible) On the left side of the stairs - Suit of armor 7/8
- (Morphing Objects) Vines hanging in the left archway 44/45
Here, we can gather the first pattern block for the missing stairs on the tower by looking at the Sarcophagus. You can also take a look at the Prayer altar, where we'll most likely have to write up another prayer in the future. Then, head back to the City where we can place the two missing block steps.
How to fix the tower steps

This puzzle aims to extend the stairs so they are all equal in length. However, to do so, you'll need to press on the stair connected to the other stair to change the size. You can tell which ones are connected by looking at the groove lines on the stone leading to each one. You'll need to press them in the right order to do make them all the same size. The puzzle can start out random for everyone, so yours may be a bit different, but here's how I did it (the list shows what block to press and how many times):
- Block 7 x2
- Block 5 x1
- Block 6 x2
- Block 3 x1
- Block 1 x1
- Block 5 x1
- Block 3 x2
- Block 6 x1
- Block 2 x3
- Block 7 x3
- Block 4 x3
- Block 6 x2
- Block 2 x1
- Block 1 x1
- Block 5 x1
- Block 3 x1
Once the steps are all equal, we can head up to the top of the tower. Folly will stop the rings from spinning for us. Then, we can grab the Manuscript 8/8 and work on completing the rings puzzle.
How to solve the tower rings puzzle

The goal of this puzzle is to move the rings into the correct positions. This will resemble the ring pattern we saw on the Museum door. The outer ring should wrap around the other two, which are turned into an X position until all the holes overlap. It should look something like what's pictured above.
Once the rings in the correct positions, the door to the Museum will open up, and allow you continue through it.
Dungeon Museum
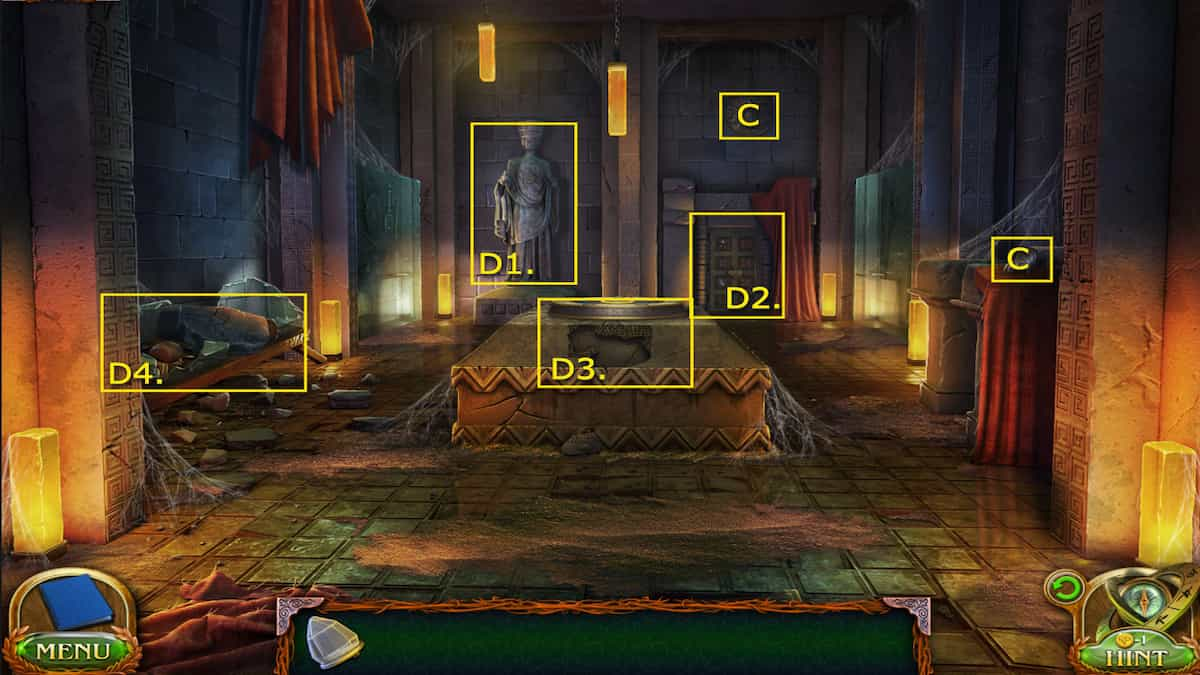
- D1. Statue
- D2. Door
- D3. Crystal podium
- D4. Shattered display case - Shard of text
- (Collectible) On the pillar on the right wall - Suit of armor 7/8
- (Morphing Objects) Shield/lion head on the wall above the far door 45/45
This room has a few more intriguing objects to investigate, including a crystal podium and a statue with familiar-looking symbols. First, investigate the shattered display case to collect a Shard of text. Then, look at the statue and click on the symbol buttons until they all light up. Then, you can interact with the Crystal podium. It will need a few things to be powered up: three missing text shards and the center crystal. First, let's head to the temple and repair the generator using the symbols we uncovered on the statue.
How to power the main generator

To start the generator, we will have to find a way to power it up. Using the symbols we found on the statue in the Museum, we can write another prayer on the Prayer altar in the Temple room. Check the image above to see what symbols to press on the Prayer altar.
Once you complete the prayer, the floor will begin to light up, but a piece of the floor is missing, and it can't reach the generator. Head back out to the City and check in the pile of rubble that fell from the hanging net. You can retrieve the Part of the stone floor. Return to the Temple and place it down in the missing floor spot. The generator will be powered up. Ensure you also check out the Sarcophagus again to grab the amulet of the skeleton.
Now, we can head back to the Museum to finish the crystal puzzle.
How to power up the Crystal podium
You can place the Projection Crystal we found earlier in the center of the Crystal podium. However, it will need power before we continue placing the crystals. To do this, we'll need to fix the text on the front of the podium.
Where to find all the text shards
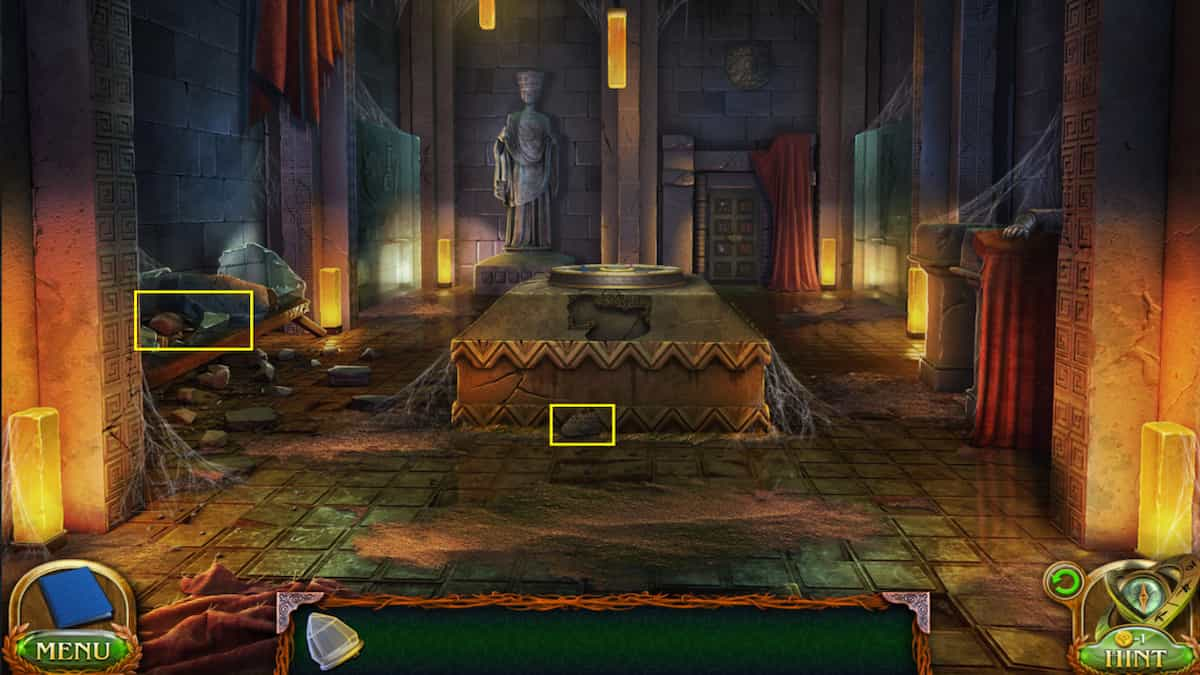
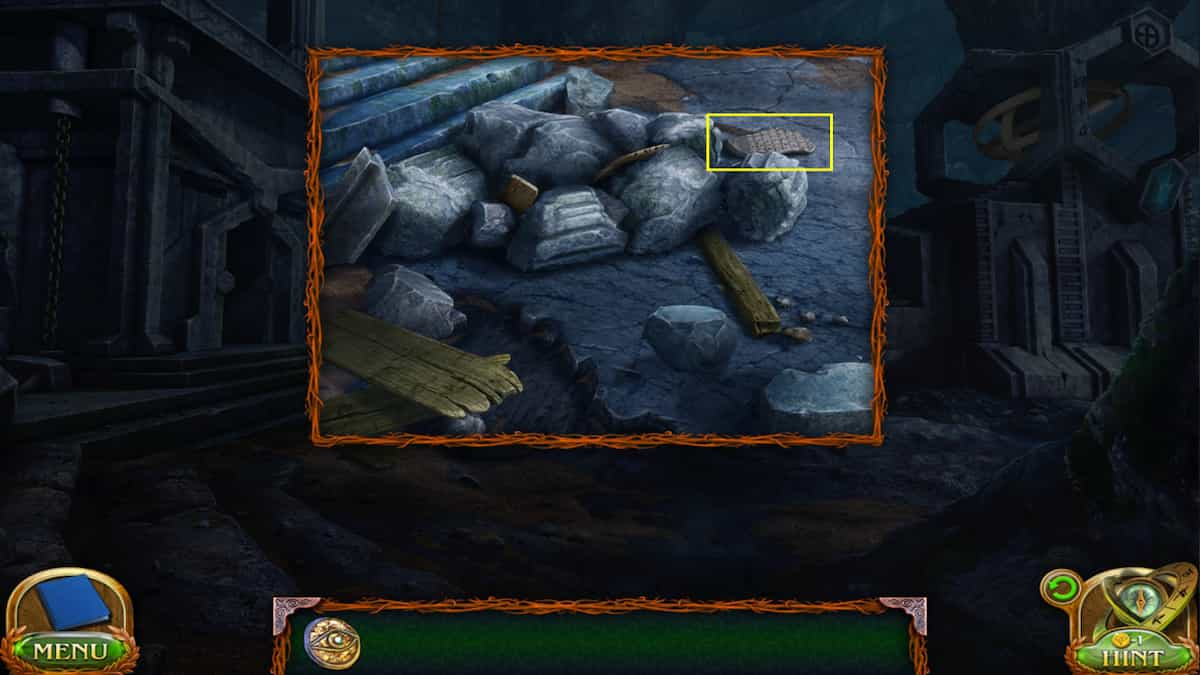
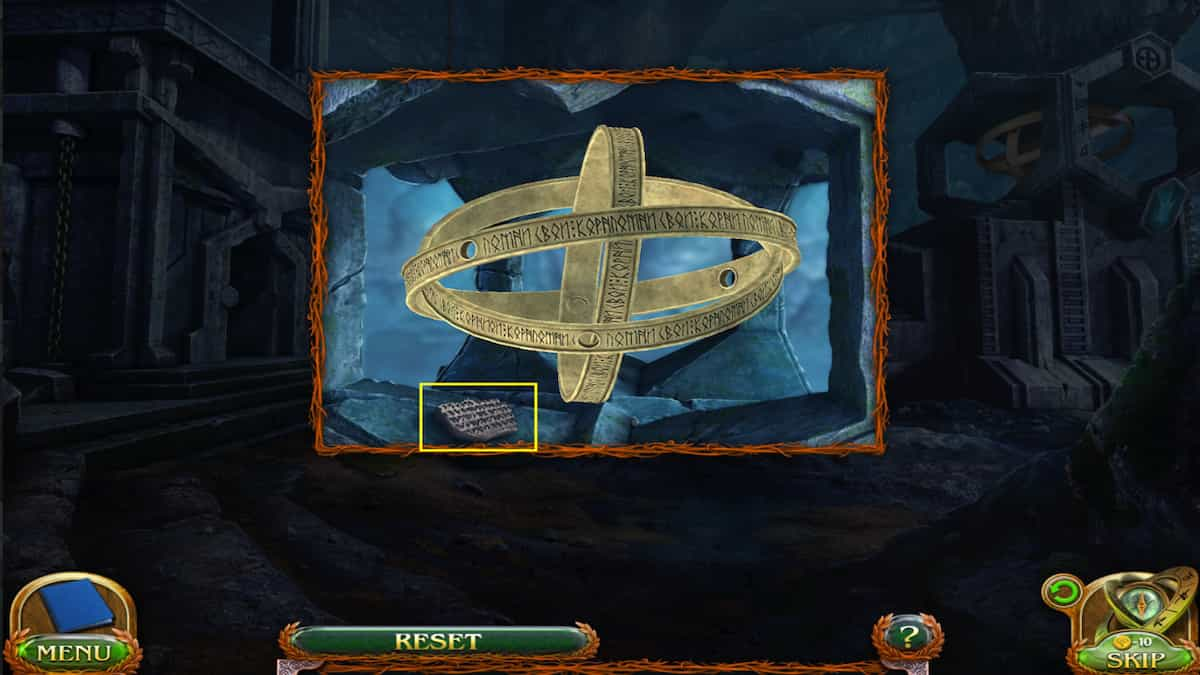
- Text shard 1 - At the bottom of the podium (You can't pick this one up)
- Text shard 2 - In the shattered display case
- Text shard 3 - In the pile of rubble that fell from the Hanging net
- Text shard 4 - Near the tower rings
Once you place all the text shards into the podium, you can press the diamond button below them to power up the crystal. Now you'll need to place all the other crystals into their proper positions.

The goal is to place them in the right spots so that their rays will bounce off the others. Each color crystal has a different trajectory, so be sure to place them in the proper spots so that they all connect. Check the image above to see where to place each crystal.
- Pink - Top Left
- Green - Middle Left
- Orange - Bottom Left
- Yellow - Top Middle
- Blue - Top Right
- Red - Middle Right
- Cyan - Bottom Right
After the brief cutscene, Folly and Maaron can start preparing their plan to defeat the Entity or Demon. Folly will need to create a trap. To begin, we'll need to find a way to open the locked door in the Museum. Check the book in the Shattered display case again; this time, we can turn the page and pick up the Book about the Soul Catcher. This book will have all the plans we need to create a trap and the code to the locked door.
How to unlock door in the Museum
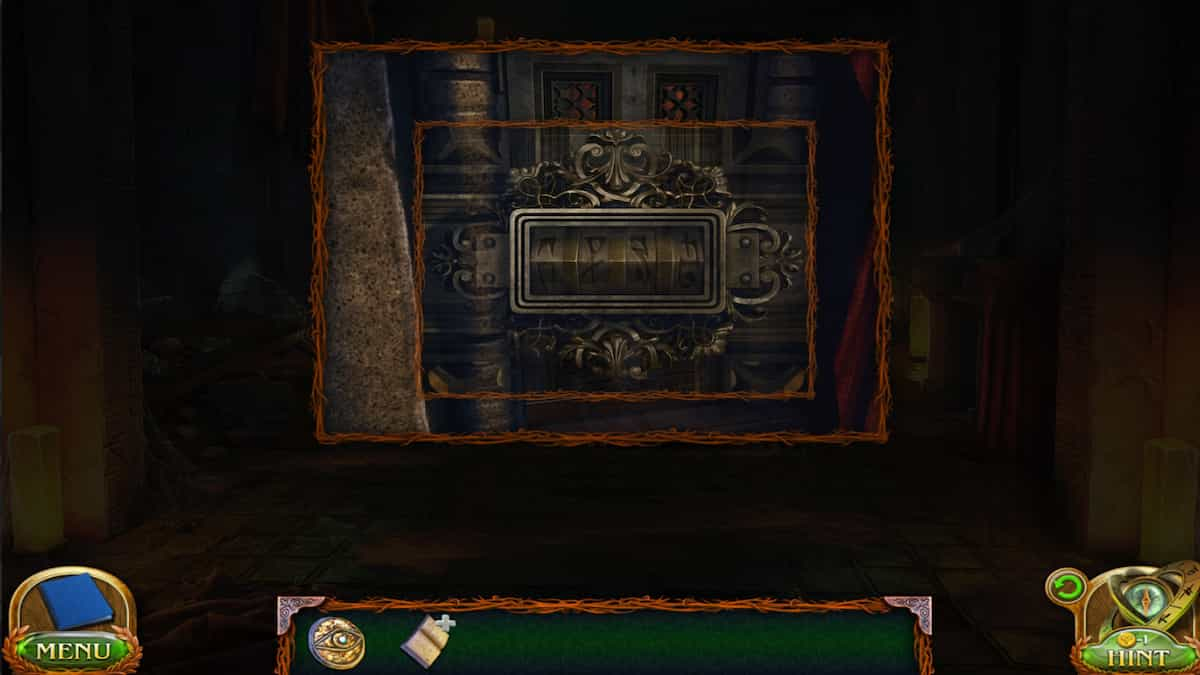
The code to the locked door is scribbled at the bottom of the Book about the Soul Catcher. They are four bizarre-looking symbols. To remember, I thought of them as this: F, P, backward E, backward S. You can check the image above to see them exactly.
Where to find all the trap items
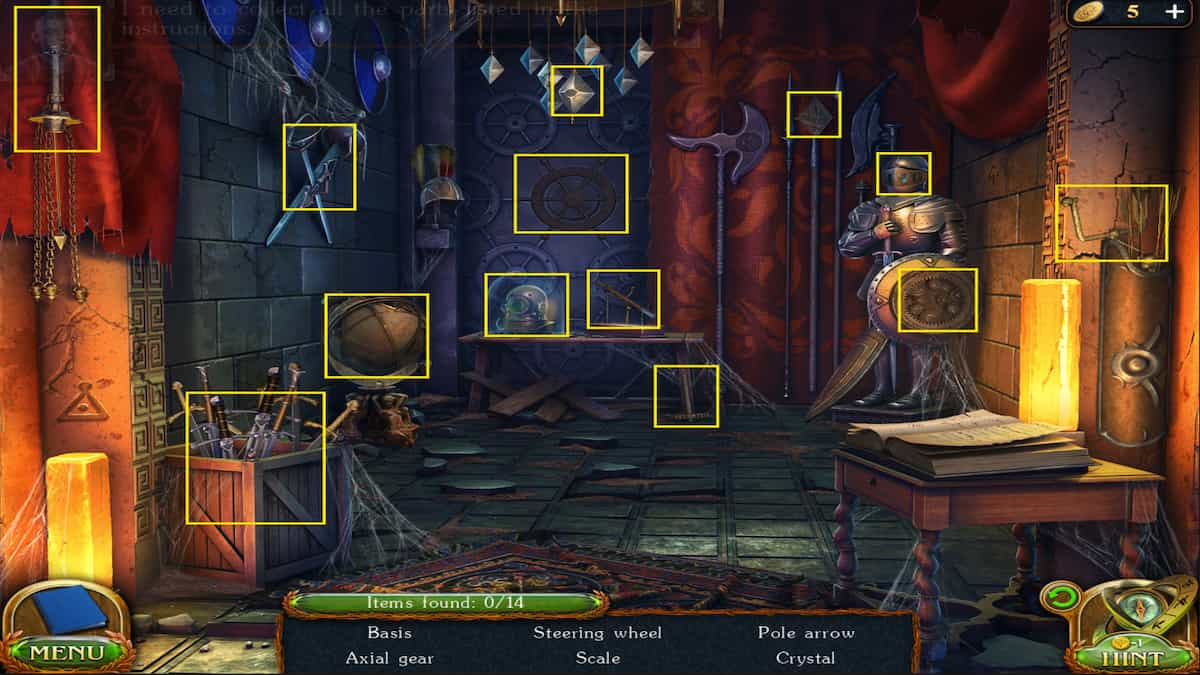
Once the door is unlocked, we can continue through to this storage room and collect everything we need for our trap. The items will be listed at the bottom; there are 14 in total. Here's where to find them all:
- Basis - In the Suit of armor's shield
- Axial gear - Leaning on the table in the back
- Steering wheel - Hanging on the far wall
- Scale - In the globe (Place the piece on the right side of it on top to open it up)
- Pole arrow - Hanging on the crossed swords on the left wall
- Crystal - In the suit of armor's helmet (Use the mace next to it to hit it open)
- Prism bracket - In the crate of swords on the left side
- Prism - Hanging on the chandelier (Press the spot where the Steering wheel was hanging)
- Pendulum - Hanging with the chains on the left wall
- Mirror bracket - In the arrow sheath on the right wall
- Mirror - On the spear in the back right
- Flask - Covering the diving helmet
- Lens bracket - On the table beside the diving helmet, holding the axe up (Spin the second arrow head on the table toward the right to loosen the stand and grab the bracket)
- Lens - On the diving helmet (Solve the puzzle by inputting the right symbols shown below)
How to solve the diving helmet puzzle
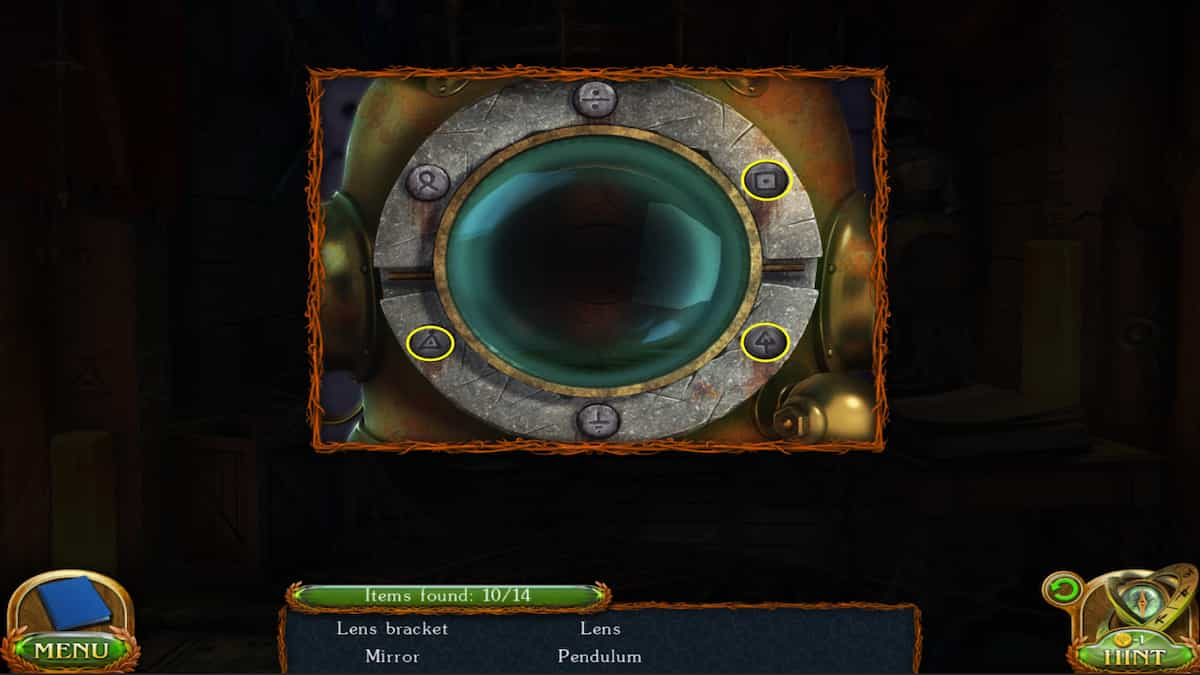
To solve this puzzle, we'll need to press the buttons around the outer ring of the helmet that match the symbols we see written around the room. They are as follows: Square, triangle, and the triangle with a tail. Then you can collect the Lens.
After collecting all the items, they will turn into the Parts kit in your Inventory. Maaron will then return with the Talking Mask. Now, we'll need to put our trap together following the instructions in the Book about the Soul Catcher.
How to assemble the trap
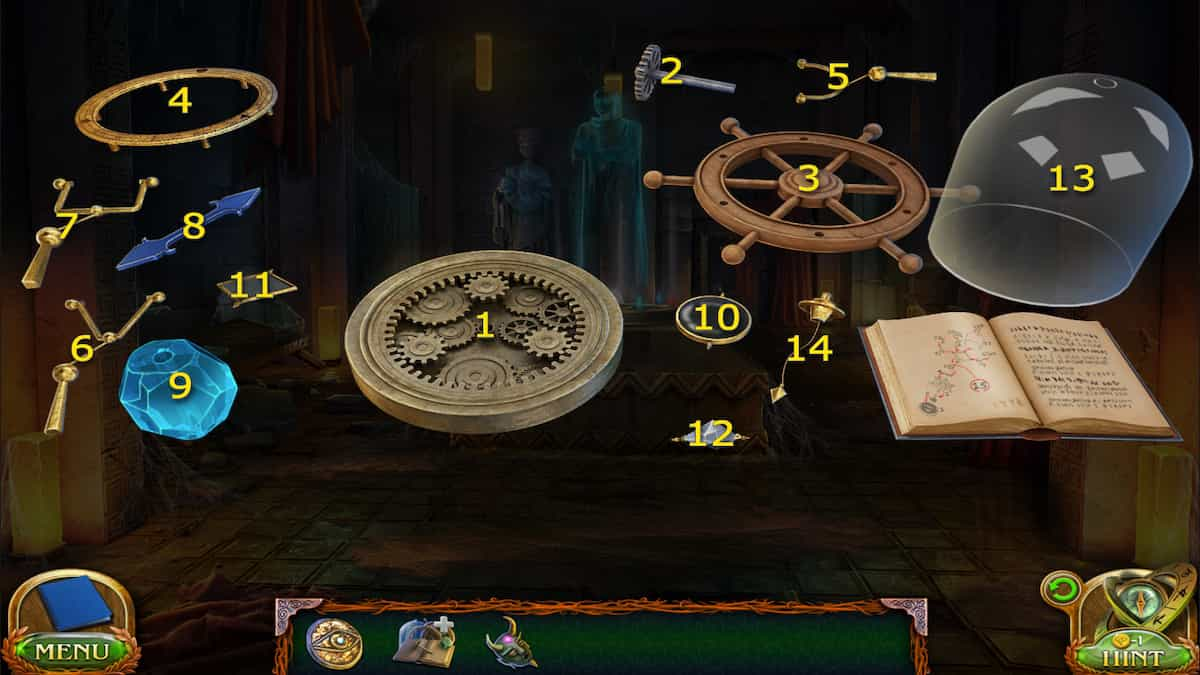
Assembling the trap is easy. You can keep checking the book for step-by-step instructions on how to place the pieces together. All of them are going on top of the bottom gear, so it really is just the order in which you're placing them that counts. Take a look at the image above for some extra help.
Once you have it assembled, we'll need to power it up. Take it with you to the generator we powered up a little bit ago and place it beside it. Take off the glass cover and place the crystal into the mana source. When it's charged, it will go back into the trap, and you can place the cover back over and pick it up.
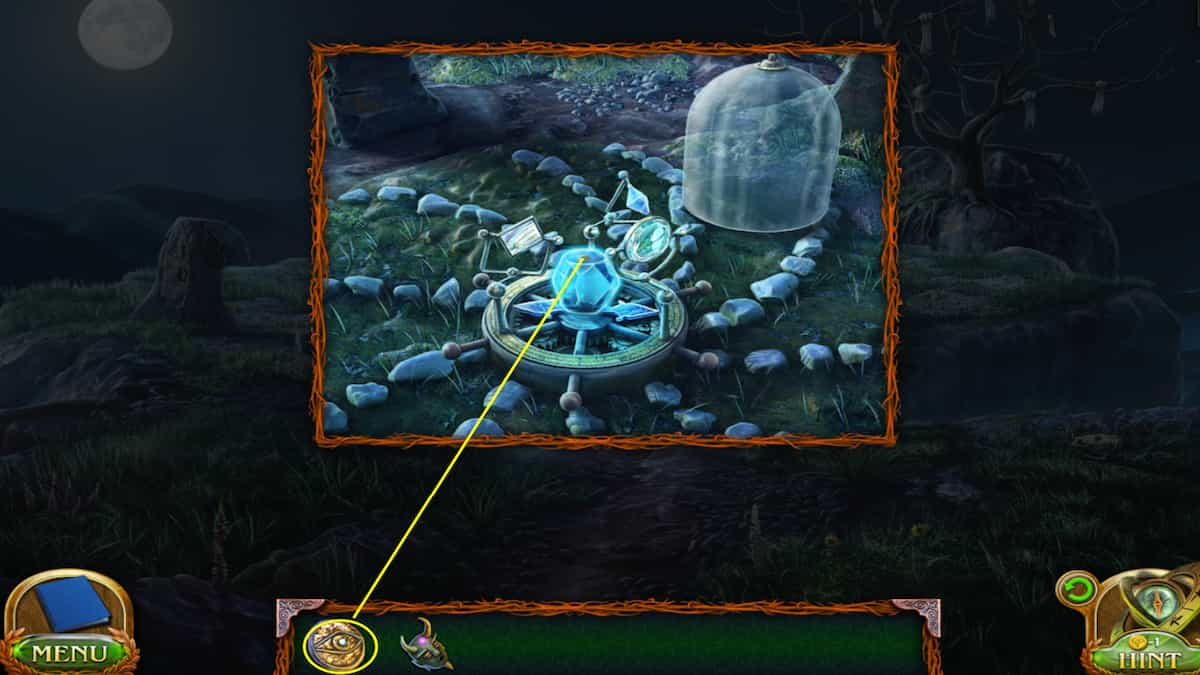
With the trap charged, Maaron will announce that's time to go to the 'sacred peak' to put the trap to use. The 'sacred peak' is Castle Hill, where we completed the puzzle in the tree and collected the sheep. Head there and place the trap in the center of the four animal pillars. Then, lift the cover and place the Oigela's medallion onto it. Adjust the lenses so the light reflects off the crystal, then place the top back on.
The dark cloud will appear behind the trap. Now, it's time to use the Talking Mask to communicate with it. Select it from your Inventory and click on the cloud. After speaking to the Entity, we will see that it isn't as evil as we assumed. We will now have to perform a ritual to help it lay to rest by collecting the skulls to place on the four animal pillars.
Where to find the animal skulls
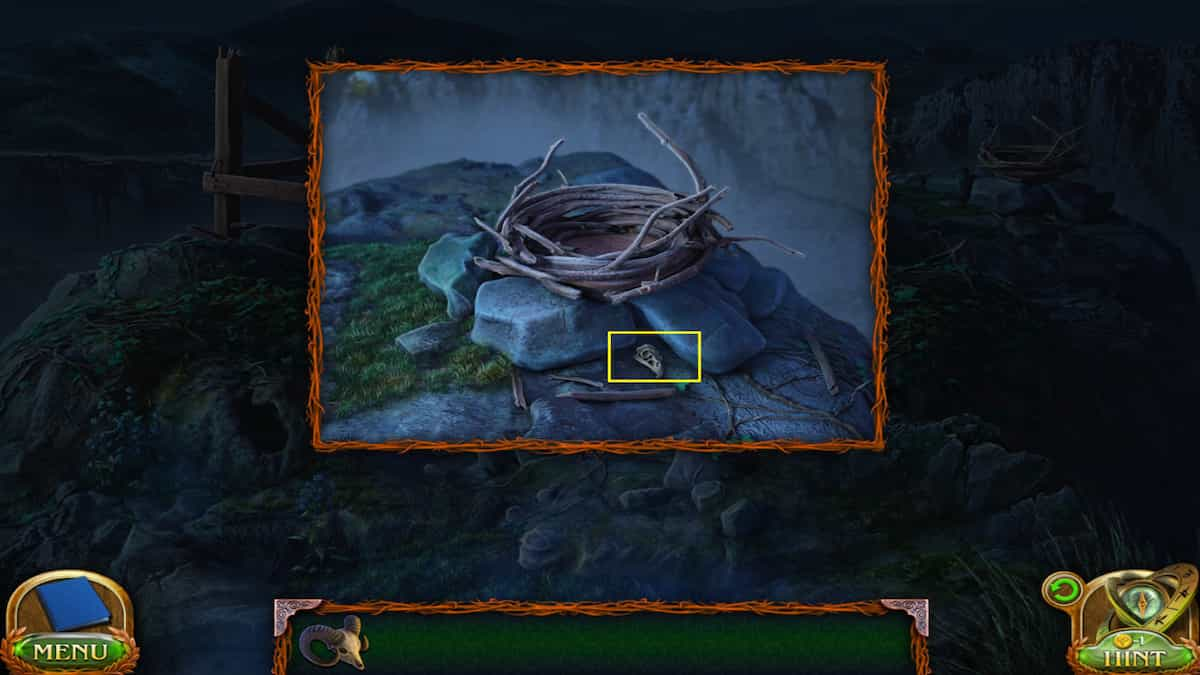
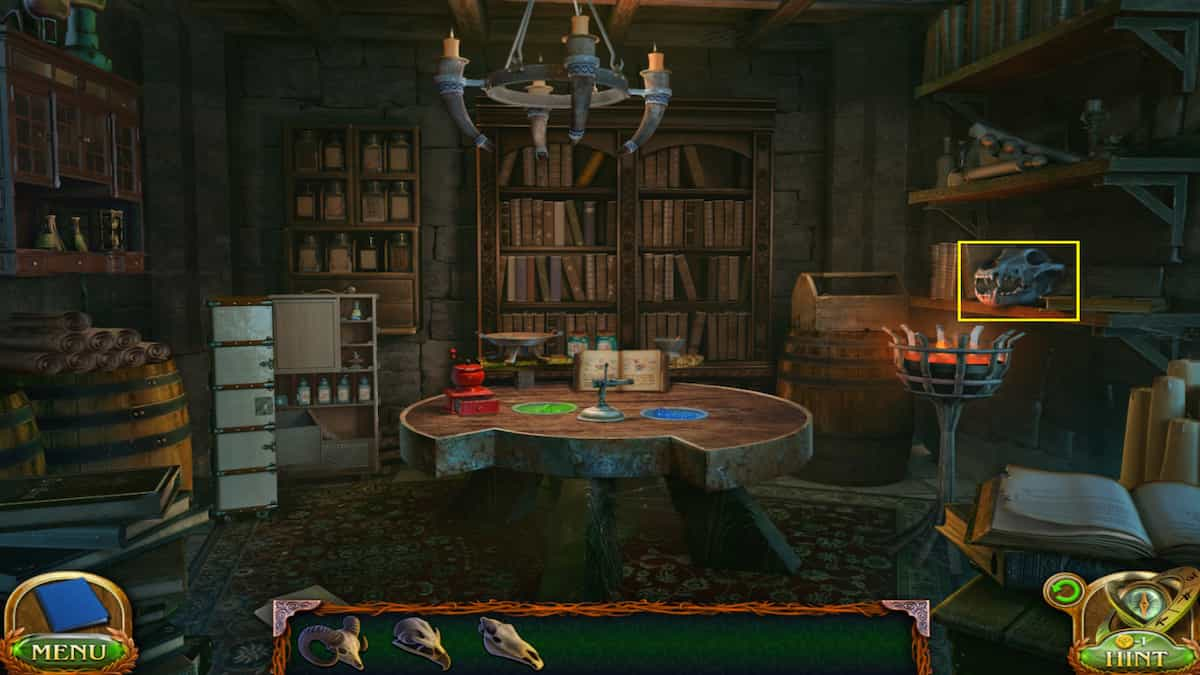
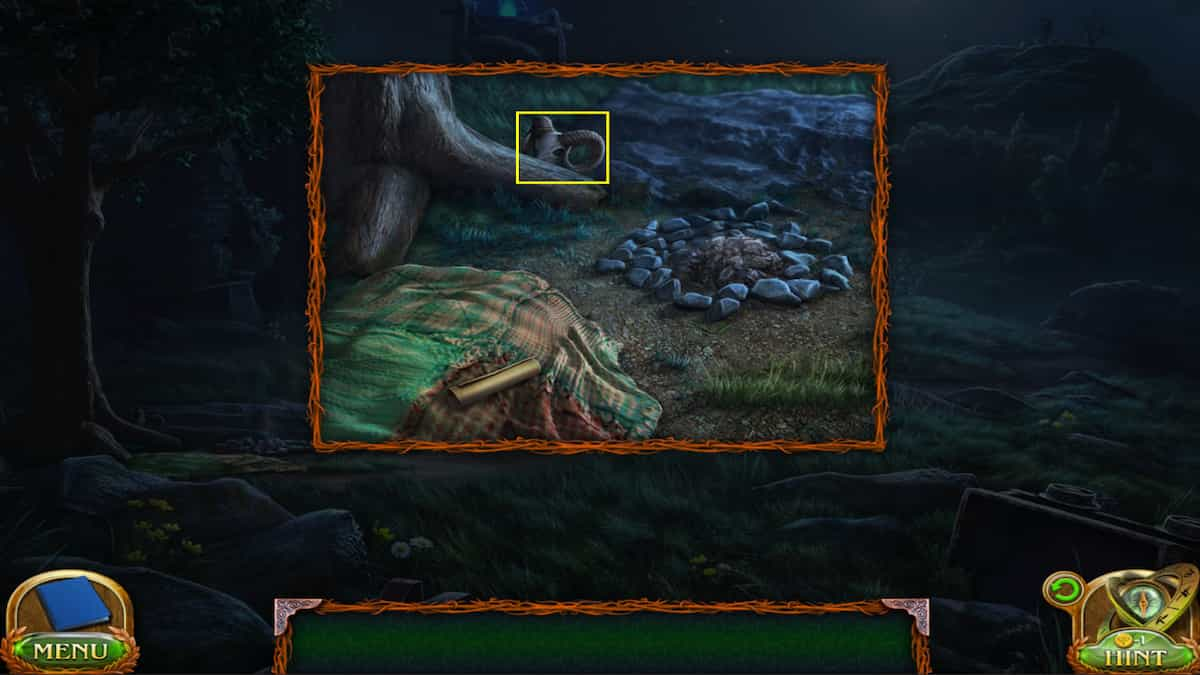
We've come across a few skulls during our journey, so now it's time to backtrack and collect them all for the ritual. Here's where to find the right ones:
- Eagle - At the Canyons Portal near the vulture nest
- Wolf - In Maaron's Hideout
- Ram - At the Castle campsite
- Horse - At the Castle Ruins
When you have all the skulls, you can head back and place them on all the matching pillars. Then you'll have a puzzle to solve to offer up prayers.
How to solve the animal ritual puzzle
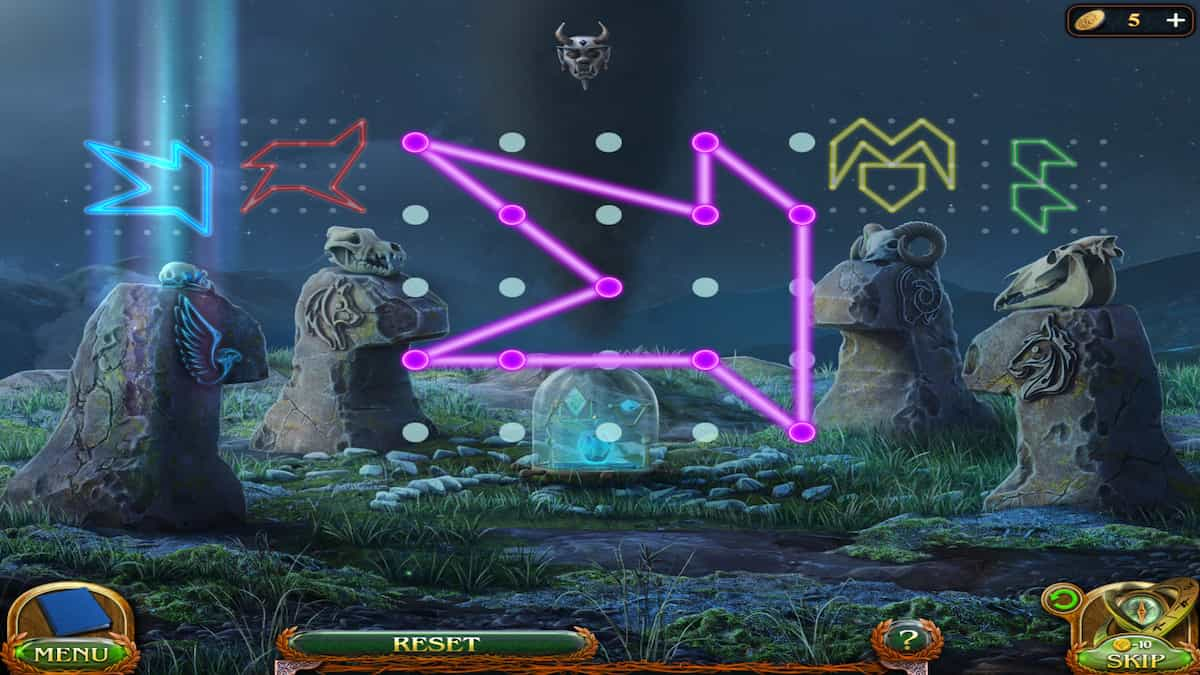
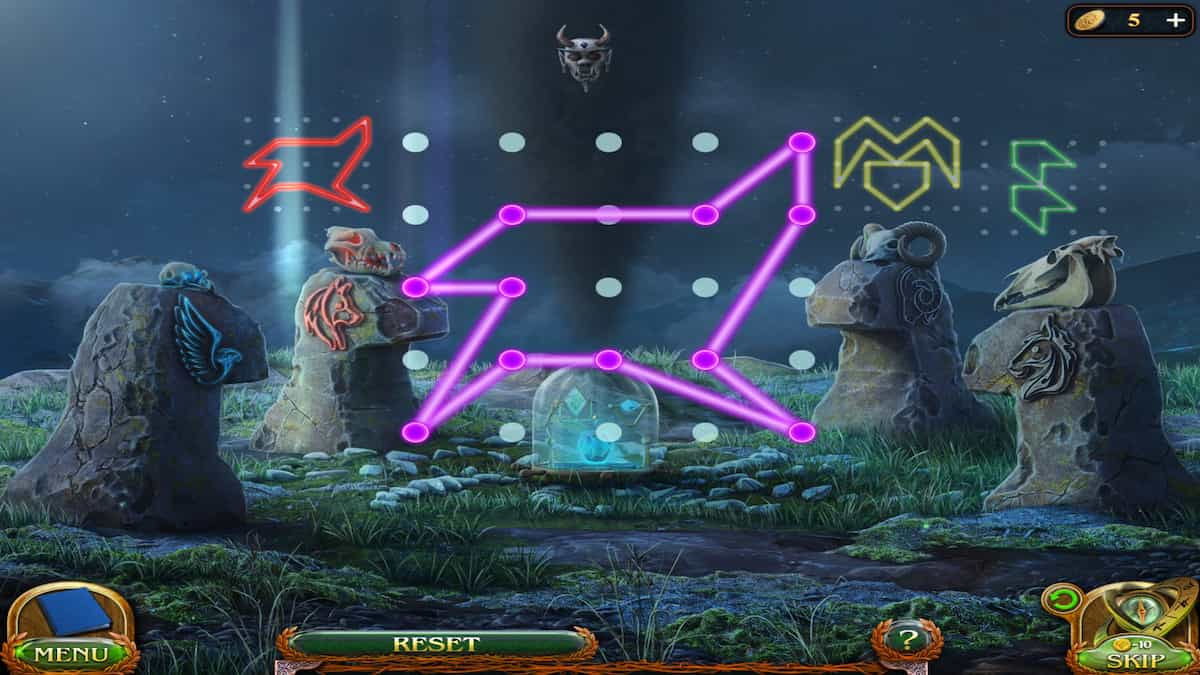
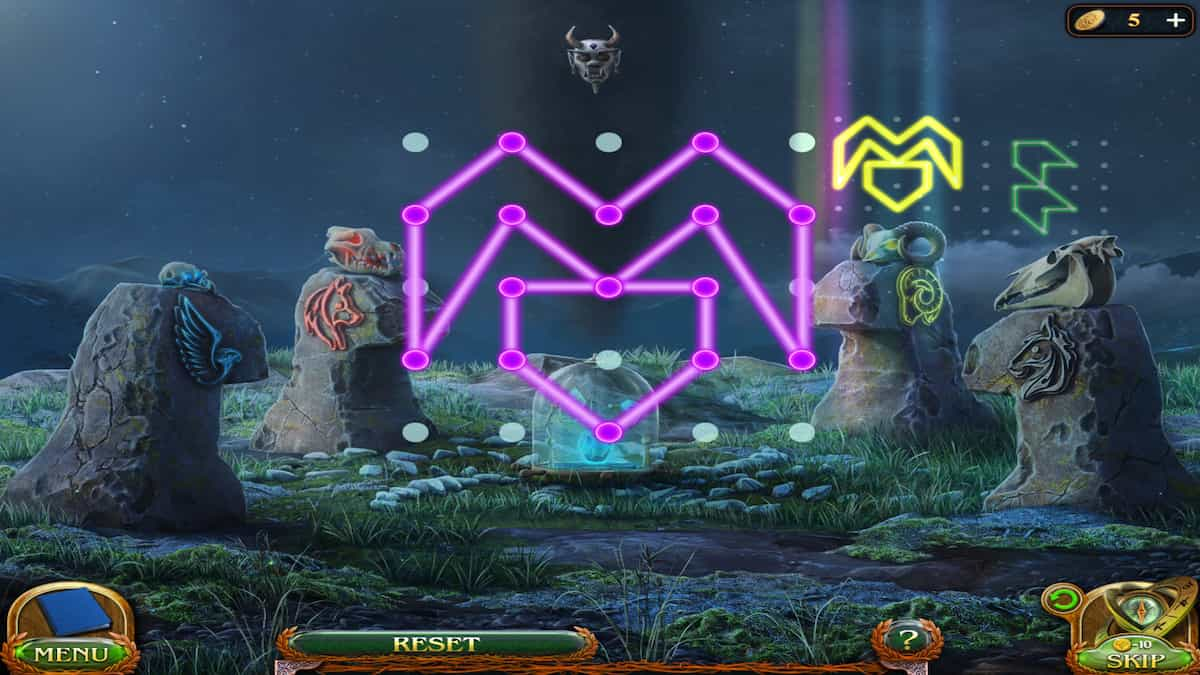
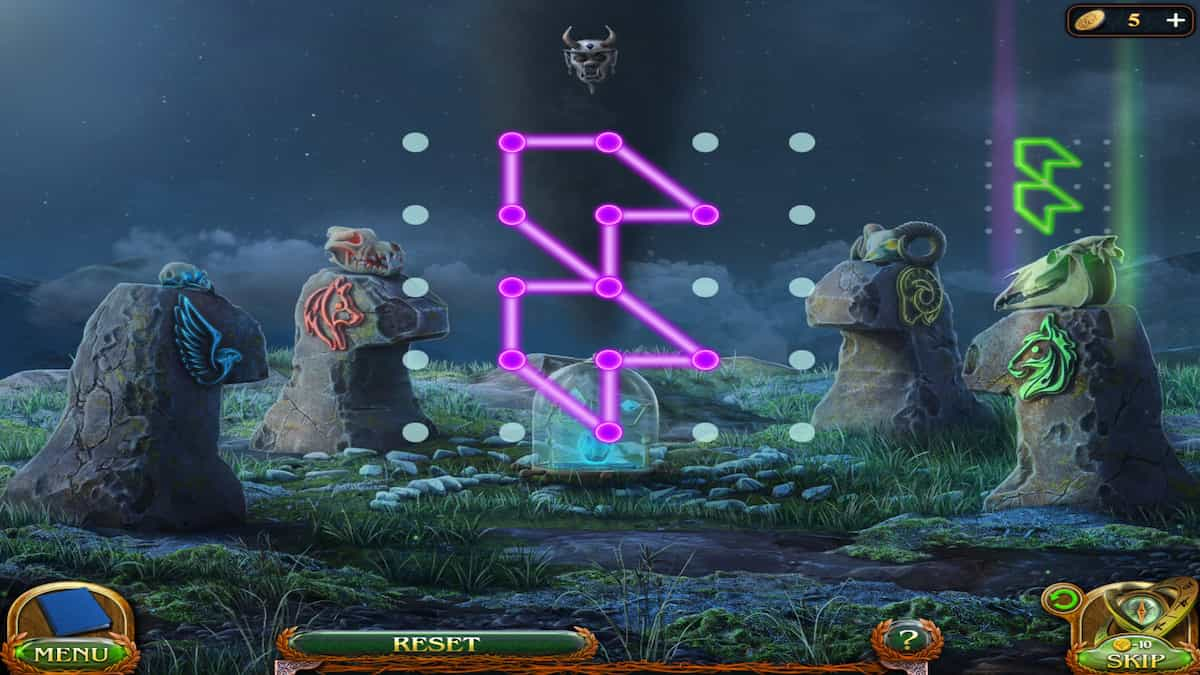
To solve the animal ritual, you need to drag the lines across the dots to recreate the four pictures shown at the top. This is easier than it seems; just don't get caught up on the lines and instead focus on what dots they are on. Check out all the pictures above for reference.
Once you solve this puzzle, you've come to the end of the game! Maaron and Folly successfully laid the Entity to rest, preventing any more harm from being done and being peaceful about it. They also made new friends with each other along the way, and a pretty good team.
Congrats on finishing the whole Lost Lands 9 adventure! Hopefully, this guide helped you make it through as easy and fun as possible! Thanks for following along.
Looking for more puzzle game walkthroughs? Check out Haunted Hunt Walkthrough – Adventure Escape Mysteries or Lost Lands 6 Walkthrough – Mistakes of the Past!