Looking to take your first steps into the Ruby Life Pools, but unsure how to go about it? Well, look no further. You've come to the right place, as we've delved into this dungeon countless times already, even on Mythic, and can show you the ropes. Here's everything you need to know about Ruby Life Pools in World of Warcraft Dragonflight.
How to do the Ruby Life Pools Dungeon in WoW Dragonflight
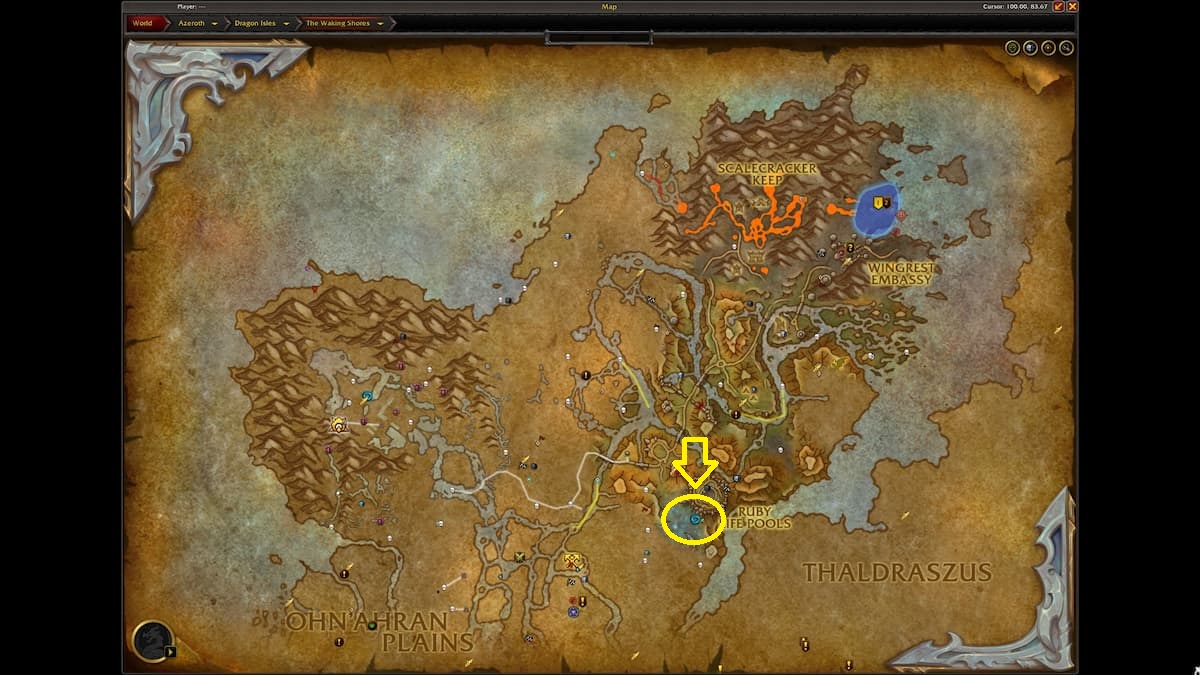
The entrance to the Ruby Life Pools is located in the southeastern portion of the Waking Shore. Look for a little blue swirly on the map. If you have your Dragonflying maxed, it should be extremely easy to reach. Ruby Life Pools is a 5-man dungeon, so be prepared before you enter.
Once inside, you'll be confronted with a giant earth elemental that you'll have to get through before continuing. Avoid the elemental's AOE slams and ground quakes, or you'll take big damage from it. Everyone needs to look out for these, as they can wipe your group instantly. Once it's down, continue around the corner and engage and defeat the Primalist forces in your way.
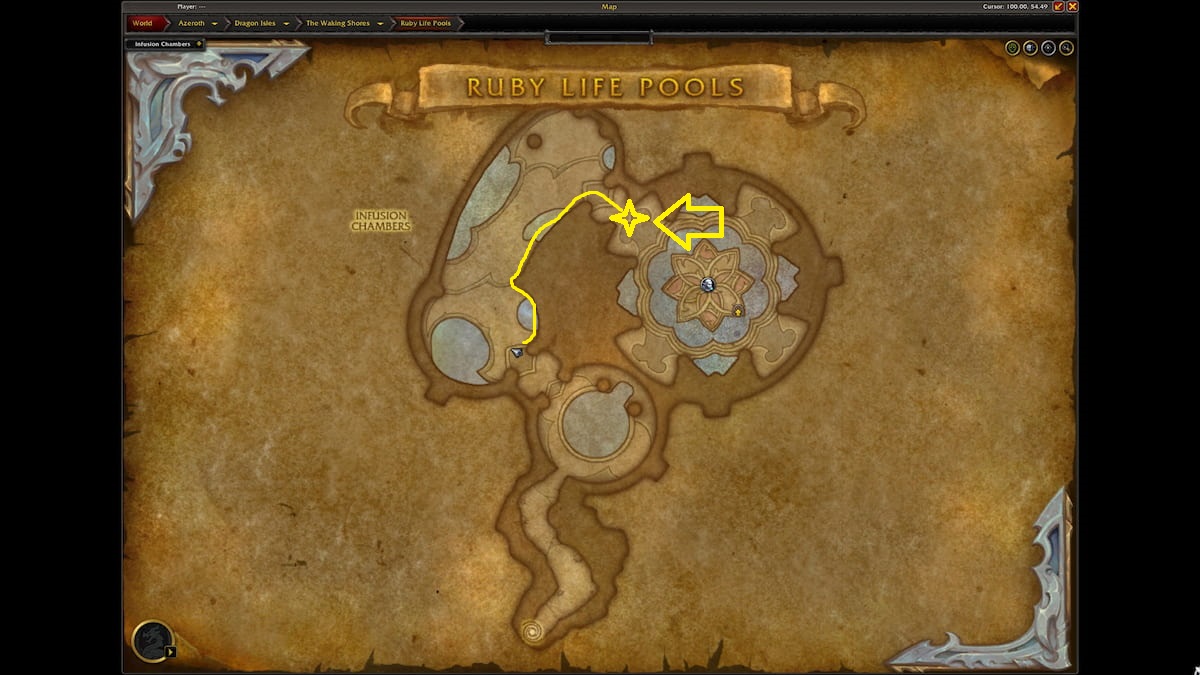
Once you've defeated them, your party will find itself within the core of the Infusion Chambers. Primalist forces and eggs line the room. Stay on the rightmost wall of the egg room and engage the Primalists protecting the eggs. While doing so, avoid touching the eggs at all cost. A bump will cause them to hatch, adding to the enemies you need to clear and possibly wiping your group. Interrupt the Primalist casting shields to make this process easier. Our recommended route is shown below:
When you reach the end, a mini-boss will be waiting for you. Have your tank engage and pull Defier Draghar into the next room just before the first real boss. Defier Draghar has a fixate ability that knocks a random target back after dealing some damage and a powerful blade flurry that will deal high damage to your tank. Once he is down, move into the next room and get ready for the first boss.
The first boss of Ruby Life Pools is Melidrussa Chillworn. She is the leader of the Primalist, assaulting the pools, so it's your job to bring her down. She has a few important abilities to be aware of:
- Chillstorm - Marks a player with a debuff that causes them to drop an AOE(Area of Effect) suction that pulls in others close to it and deals damage to them. The best way to deal with this is to have the marked player move away from the rest of the party.
- Hailbombs - Melidrussa will summon large globes of hail from above the battle, leaving blue swirls on the ground to indicate where they will land. Move out of these or take massive damage.
Melidurssa Chillworn will use these two abilities until the fight is over, but on occasion, she will also use a third ability called Awaken Whelps. Like the ones from earlier in the dungeon, Eggs surround the boss area. When Melidrussa casts Awaken Whelps, a group of them will pop open after a few seconds and swarm the party. It is the tank's job to pick these up and the DPS's job to cleave them down. Repeat this process a few times, and Melidurssa will go down easy. Her loot table is following:
- Chillworn's Infusion Staff - Caster Weapon
- Subjugator's Chilling Grips - Leather Hands
- Egg Tender's Leggings - Mail Legs
- Scaleguard's Stalwart Greatboots - Plate Feet
- Ruby Whelp Shell - DPS Trinket
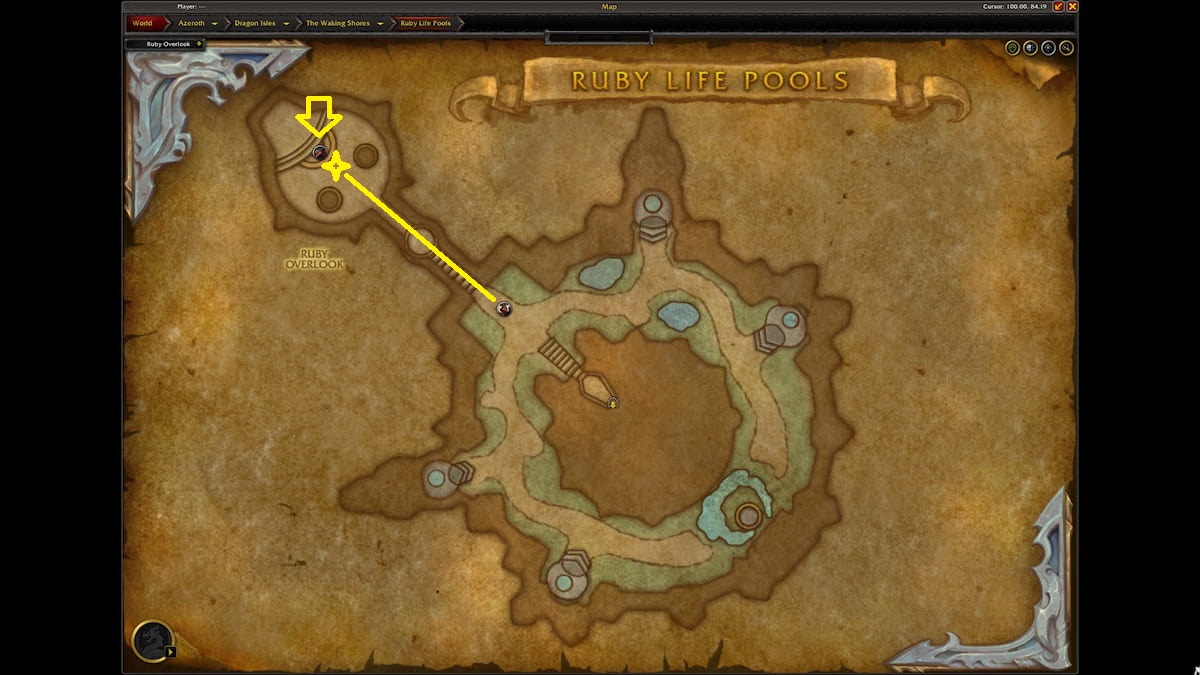
With Melidrussa Chillworn down, a group of red drakes will come from above to bring your party to the surface. Click on one of the drakes and you'll find yourself in the Ruby Overlook, where the second boss Kokia Blazehoof is waiting. Before engaging her, you'll first need to clear out the Primalist forces shielding her from harm.
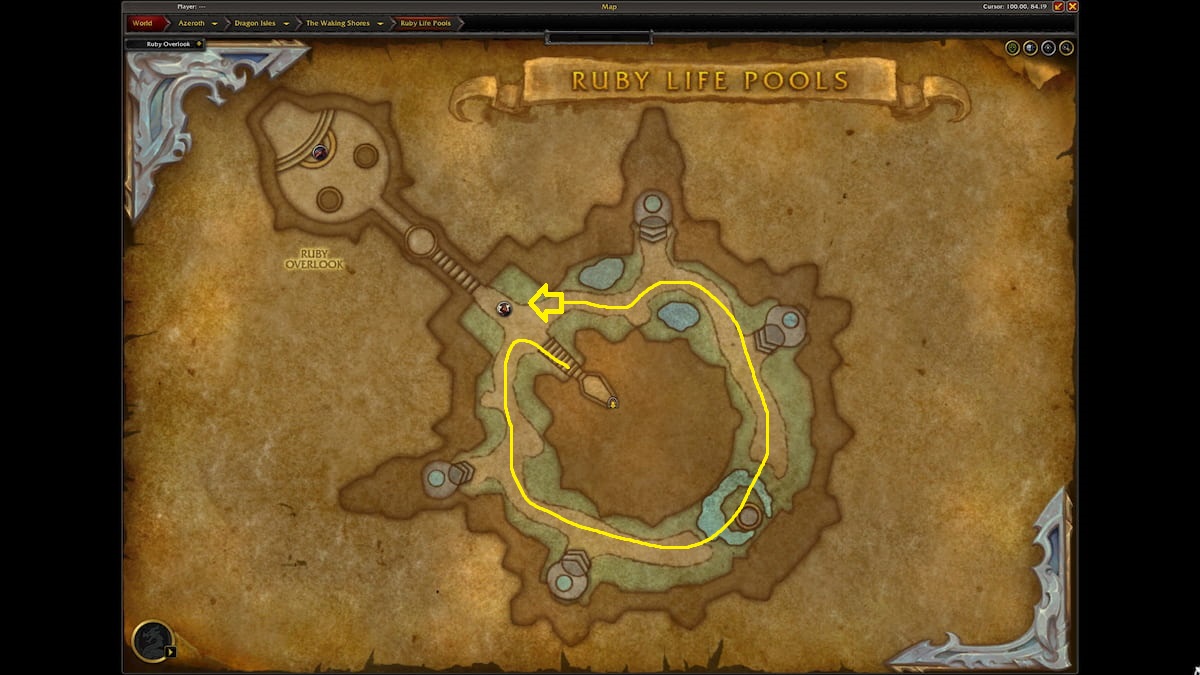
To breach Kokia's shielding, you'll need to kill the four main groups of Primalists positioned around the Ruby Overlook. Each of the main groups has a huge fire element, so it is easy to tell which groups should be brought down. Plus, the Overlook is one giant circle, so they are difficult to miss. Check out our recommended route below:
Many of the Primalist surrounding the Overlook cast Cinderbolt and Flame Dance. Cinderbolt is an ability that randomly targets a party member and hits with a hefty burst of damage. You'll want to interrupt these as much as possible to reduce party damage overall. On the other hand, Flame Dance is an ability that cannot be interrupted. However, you can inflict CC(Crowd Control) on the caster to prevent it. Flame Dance does a big burst of damage to your entire party, so prevention is ideal. The giant Fire Elementals will also cast uninterruptable flame novas that need to be healed.
Once you've felled the four fire elementals, it's time to deal with the summoner herself. Kokia Blazehoof is a fight about positioning due to the nature of her abilities:
- Molten Boulder - Hurls a high-damage boulder toward a target player. If the boulder hits any player directly, it explodes for massive damage and stuns the player. Avoid this at all cost!
- Searing Blows - Dealing high damage to the tank target and applies a DoT(Damage over Time) effect that must be healed through.
Related: How to Participate in the Community Feast in WoW Dragonflight
Once Kokia has reached 100 energy, viewable by looking under her portrait, she will cast her most dangerous ability, Burnout, which summons a large fire elemental similar to the ones prior to the fight. These also cast a big flame wave that deals party-wide damage, but they must be healed through. Once Burnout-summoned elementals die, they leave a massive patch of flame on the ground that must be avoided. The Tank should always pull Kokia away from these patches so that there is space for the party to move around. Repeat this process a few times, and Kokia will be felled. Here is her loot table:
- Havoc Crusher - Melee-DPS Mace, One-handed
- Kokia's Burnout Rod - Caster, Off-hand
- Blazebound Lieutenant's Helm - Mail Head
- Fireproof Drape - Back
- Invader's Firestorm Chestguard - Leather Chest
- Blazebinder's Hoof - Trinket
With Kokia dead, it's time to finish off the Primalist Forces. Head to the Ruby Overlook's main area from the stairs leading down from where Kokia was and fight through the remaining Primalist Forces there. Some of the Primalist within these last few groups cast uninterruptable, uncontrollable AOEs, so kill these groups quickly so that the healer is not overwhelmed with damage. The very last group you encounter will have a Primalist mini-boss that does not move. This enemy casts an ability called Tempest Shield. Have your DPS burn down the health of this shield before the mini-boss is finished casting, or your party will wipe.
Push through to the end where the final boss, Kyrakka and Erkhart Stormvein await, a duo of bosses that work off each other's abilities. Speaking of which, each boss has their own set, so let's start with Kyrakka, the dragon in the encounter:
- Infernocore - Inflicts a damaging, stacking fire dot to a target that explodes after three seconds. Upon exploding, it leaves a pool of lava on the ground for each stack of the debuff. To deal with this, bring these to the outskirts of the arena before the explosion.
- Roaring Firebreath - During the fight, Kyrakka will hover or land and begin spewing a massive gout of fire at a random player. Avoid this at all costs, as it deals massive damage.
When the encounter begins, Kyrakka will take to the air and use her abilities throughout the fight. Your party will first need to engage Erkhart Stormvein, who remains grounded. His abilities are more about disruption and control, a contrast to Kyrakka's:
- Winds of Change - Inflicts a small amount of nature damage but pushes players and Kyrakka's flame pools in a specific direction. Run against the current to counter this.
- Cloudburst - Deals a small amount of nature damage to all players in the party but disrupts spellcasting. Simply do not cast when this ability is about to go off.
- Stormslam - Deals moderate damage to the tank. It can be healed through easily.
Both Kyrakka and Erkhart Stormvein will use their abilities in rapid succession, repeating until Erkhart is near death. Kyrakka will descend from the skies and engage the party directly when this happens. She will need to be picked up immediately or she will kill a party member. Erkhart will also jump onto Kyrakka's back but can still be targeted separately from her. Kill Erkhart first so that his mechanics end. Then, take down Kyrakka to finish the Ruby Life Pool dungeon. As the last set of bosses in the dungeon, they have the largest loot table:
- Titan Training Matrix II - Crafting Upgrade Material
- Backdraft Cleaver - Two-Handed Axe
- Skyinferno Rondel - Melee DPS, Dagger
- Dark Rider's Stecktarge - Shield
- Crown of Roaring Storms - Leather Head
- Breastplate of Soaring Terror - Plate Chest
- Galerattle Gauntlets - Mail Hands
- Sky Saddle Cord - Cloth Waist
- Wind Soarer's Breeches - Cloth Legs
- Kyrakka's Searing Embers - Trinket
For more guides and information relating to World of Warcraft Dragonflight, check out our guide on WoW Dragonflight – The Storm’s Fury event, Explained right here on Pro Game Guides.