
The Golden Apple Archipelago is back for Genshin Impact's Summertime Odyssey event, which runs from July 15, 2022, to August 24, 2022. Various characters will have personalized Domains (also called Mirage) that you can clear once to loot a ton of Chests and learn more about their lore. Mona's Mirage is the The Ancient Azure Stars, which is divided into two parts: the required quest segment and the optional Mirage exploration. In this guide, we'll walk you through all the puzzles required to complete the Event World Quest.
How to unlock The Ancient Azure Stars Event World Quest and Domain in Genshin Impact
You can unlock The Ancient Azure Stars Event Quest after completing the following:
- The Golden Apple Vacation Returns!
- As the Courtyard in Spring Once Appeared (all three Parts of the Mirage)
- Blazin' Trails! (Event Quest only, the Mirage is optional)
- Immernachtreich Apokalypse (all three Parts of the Mirage)
After completing Immernachtreich Apokalypse, you'll get a prompt to change the in-game time to 6:00-24:00 the next day, which will automatically start The Ancient Azure Stars. Mona's Mirage is structured the same as Xinyan's—the quest segment covered in this guide is required, while the second part of the Mirage exploration is optional.
All puzzle solutions and Chest locations in The Ancient Azure Stars Event World Quest
In this Mirage, you need to solve various Astral puzzles that involve rotating Star Guides and attacking them to form lines that connect them to each other, forming the image of a constellation.
Explore the mirage

Upon entering the Mirage, interact with the three glowing Investigate spots (two on the right, one on the left) to pick up three Asterism Shards. Once that's done, interact with the Starshadow Lamp that the arrow is pointing to. You need to copy the image in front of the Starshadow Lamp using Asterism Shards—reference the image above for which Shards to slot into the top and bottom of the Lamp.
Solve the Astral puzzle #1
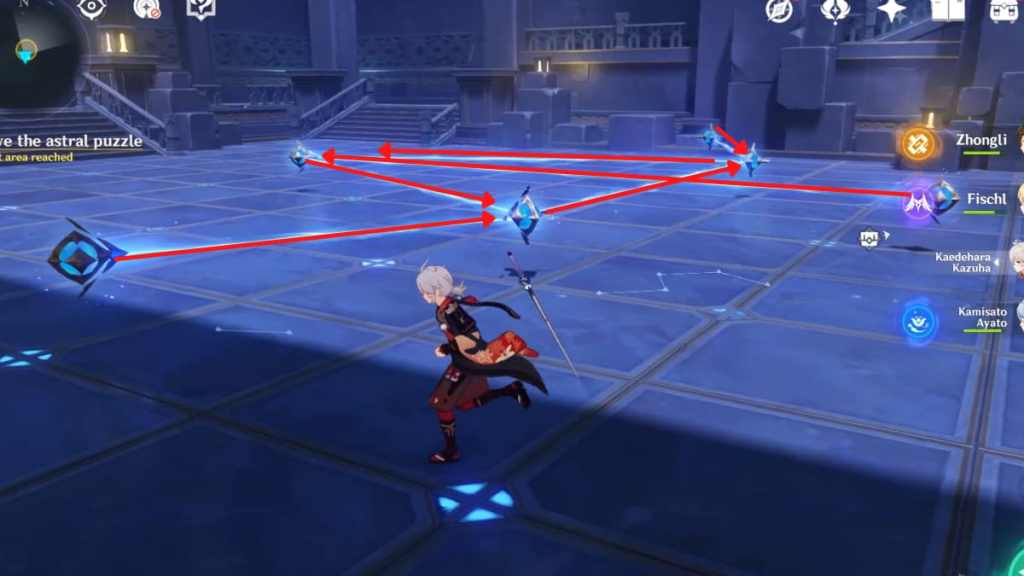
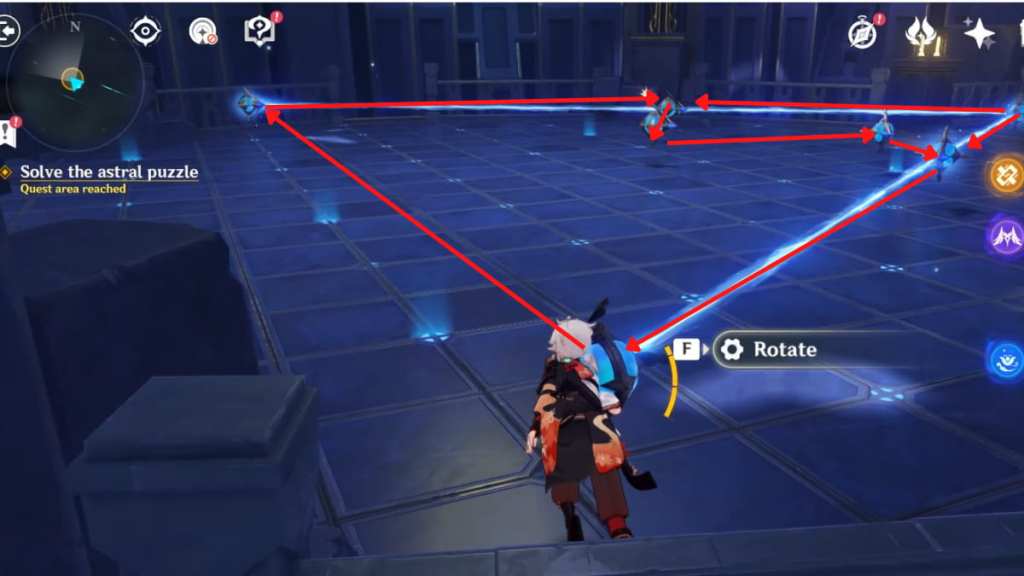
Once that's done, the barrier in front of the Starshadow Lamp will disperse. Enter the room to find an Astral puzzle. Assuming that the right side is the back of the room, reference the image above for the rotation of the Star Guides required to solve the puzzle.
Follow the strange star
After that, an Exquisite Chest will spawn. Loot the Chest to get an Asterism Shard. A floating star will also appear. Follow it and jump into the water. You'll be transported into another room—keep following the star.
Challenge of the Starry Sky
In this segment, all you need to do is avoid the shooting stars for one minute. You can take up to 30 hits without consequence. Once that's done, exit the door to return to Minacious Isle.
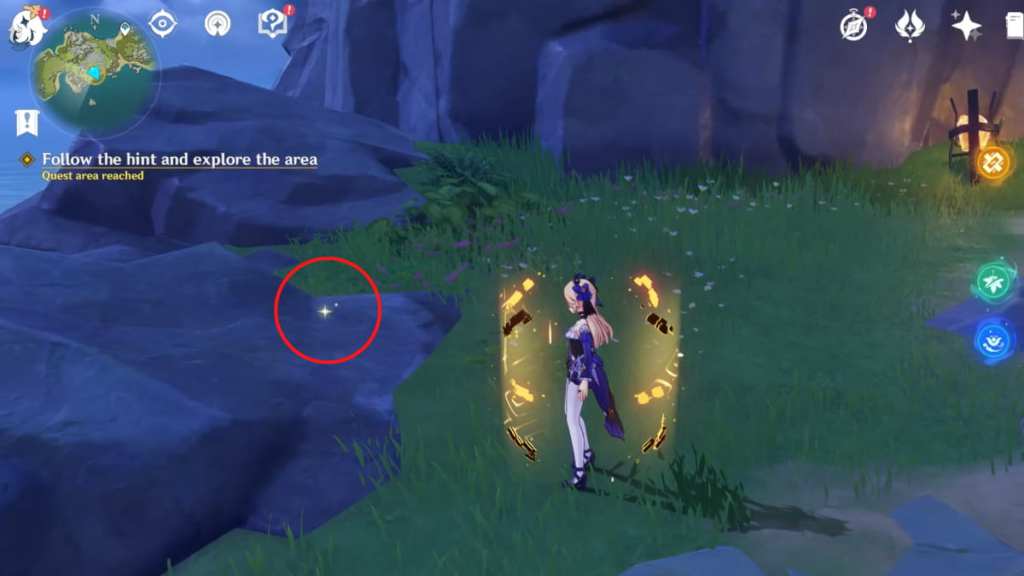
Follow the hint and explore the area #1
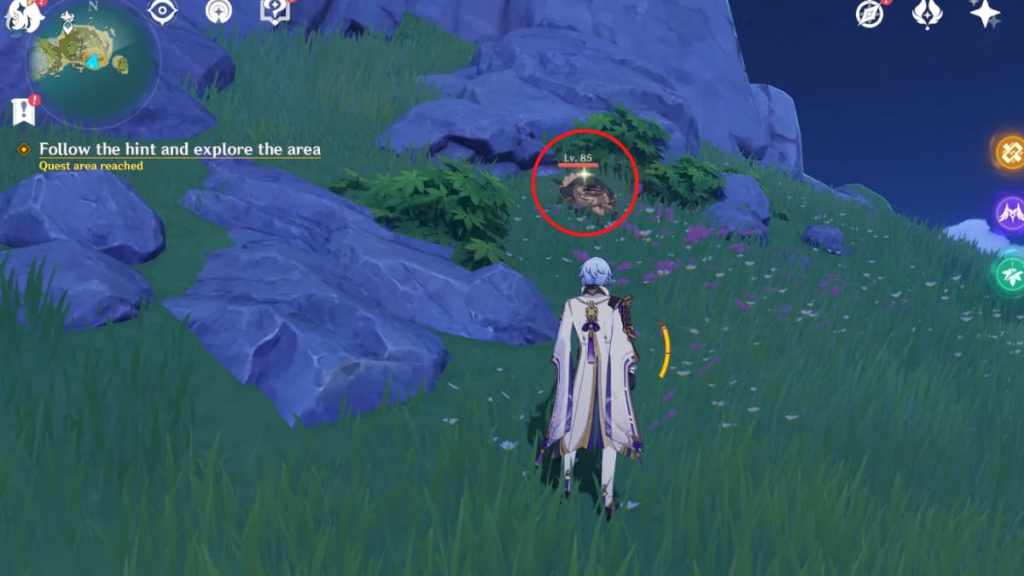
Head to the highlighted area in the mini-map. You can find the exact location you're looking for by referencing the image above. There, you'll find a Hilichurl digging in front of a glowing Investigate spot, which you need to interact with to pick up an Asterism Shard. Once that's done, head back to the Temple of Star Latitudes through the Waypoint on the island.
Return to the mirage and use the shard #1
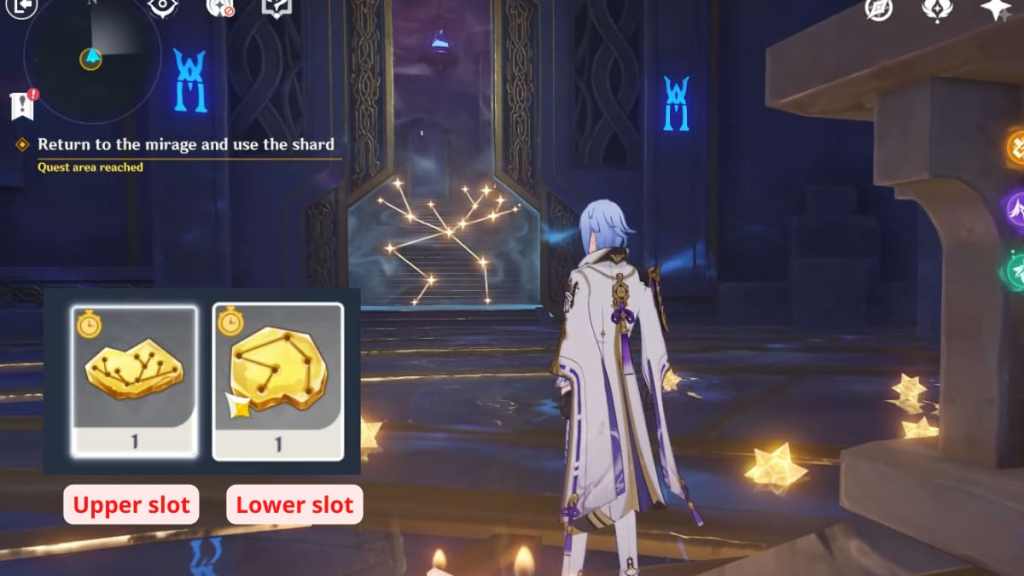
Interact with the Starshadow Lamp facing north, or find the door with the constellation that looks like a deer to find its corresponding Lamp. Place the two Asterism Shards specified in the image above to break the barrier and create a pathway leading further in.
Solve the Astral puzzle #2
Interact with the glowing star on the wall on the left side of the room. A floating star will fly to the ceiling, revealing the reference image for the puzzle. Assuming that the right side is the back of the room, reference the image above for the rotation of the Star Guides required to solve the puzzle.
After that, an Exquisite Chest will spawn. Loot the Chest to get an Asterism Shard. A floating star will also appear. Follow it and jump into the water. You'll be transported into another space—keep following the star until you're out of the Mirage.
Follow the hint and explore the area #2
Head to the highlighted area in the mini-map. You can find the exact location you're looking for by referencing the image above. There's a Pressure Plate puzzle in the area that you can ignore. Instead, pay attention to the glowing Investigate spot and interact with it to pick up an Asterism Shard. After that, head back to the Temple of Star Latitudes.
Related: How to solve the three Precious Chest puzzle under the Broken Isle in Genshin Impact
Return to the mirage and use the shard #2
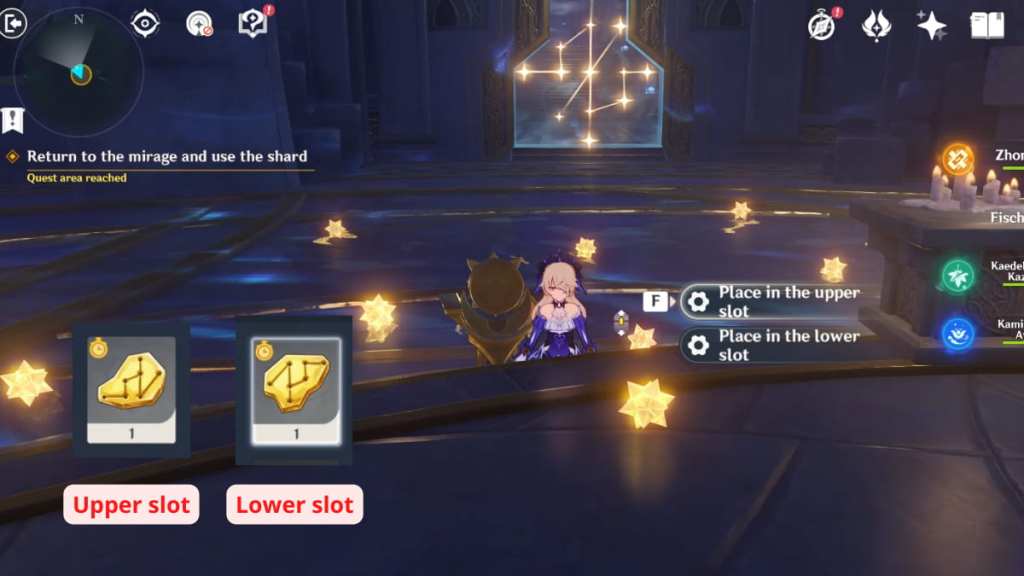
Now that you're back in the Mirage, find the Starshadow Lamp facing the barrier with the same constellation as the image above. Then interact with the Starshadow Lamp and reference the image above for the exact Asterism Shards to place in the upper and lower slots. Once that's done, the barrier will disperse, and you can enter to solve another Astral puzzle.
Solve the Astral puzzle #3
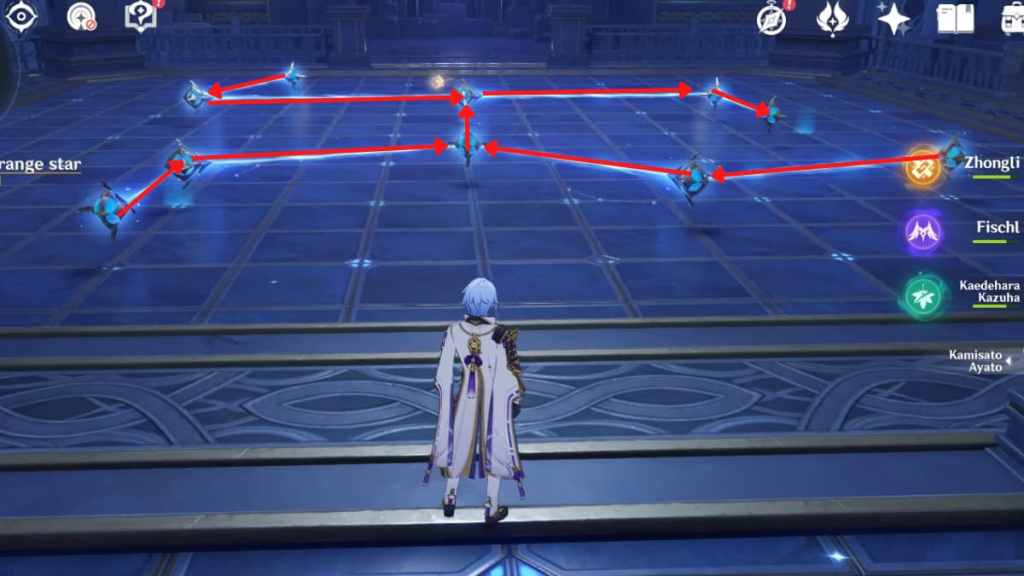
Reference the image above for the rotation of the Star Guides required to solve the puzzle. Once you've rotated all the Star Guides correctly, an Exquisite Chest will spawn. Loot the Chest to get an Asterism Shard. Another floating star will appear—follow it to the entrance of the Mirage.
Open the fourth door
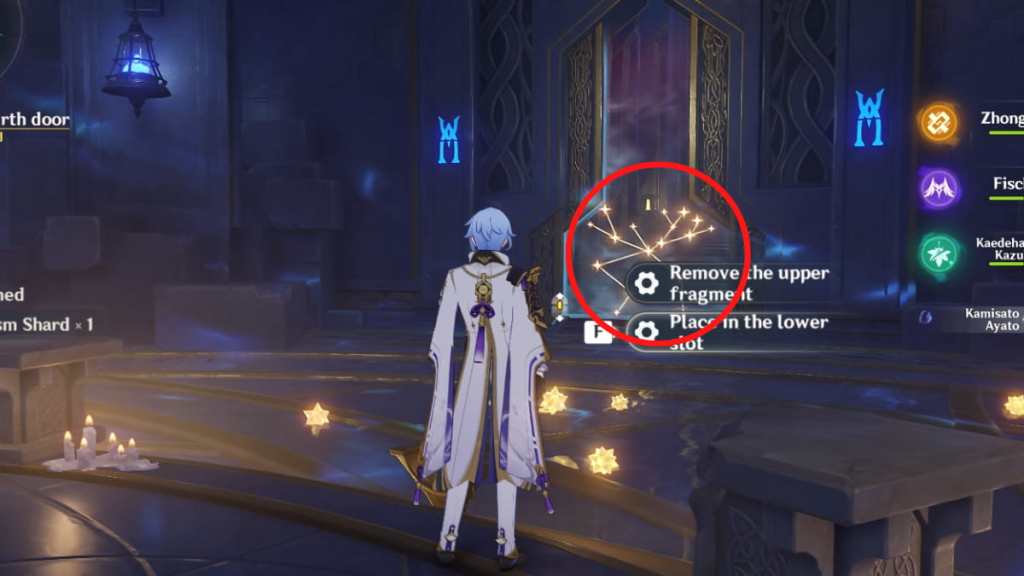
Go to the Starshadow Lamp facing the pattern circled in the image above. Since you have previously opened up this barrier, look up to find the same pattern above the door. You need to remove the lower fragment from this Starshadow Lamp.
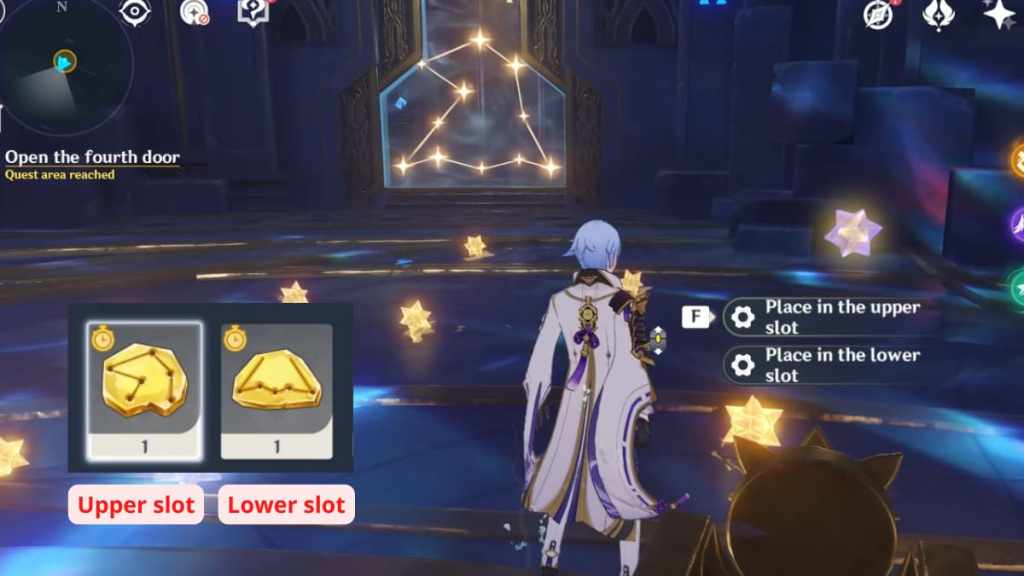
Once that's done, find the Starshadow Lamp facing the constellation in the image above, then place the corresponding Asterism Shards on its upper and lower slots. Like before, the barrier will disperse, allowing you to enter the room beyond it.
Solve the Astral puzzle #4
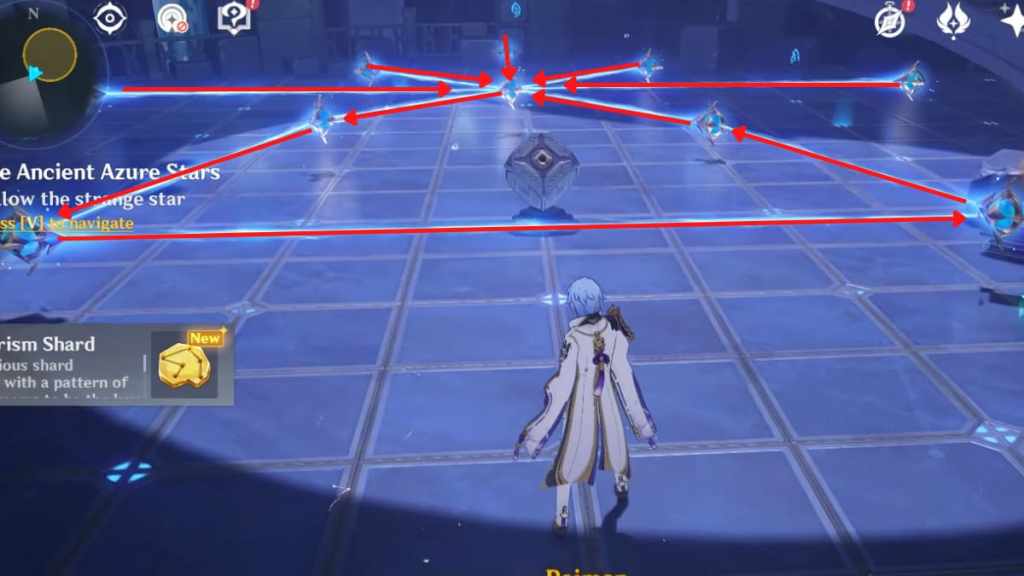
Interact with the mechanism at the center of the room to see the constellation you need to copy in the ceiling. Reference the image above for the rotation of the Star Guides required to solve the puzzle. After that, an Exquisite Chest will spawn. Loot the Chest to get an Asterism Shard. A floating star will also appear. Follow it and enter the door to the underwater space. You'll find yourself in Mona's house, where you need to interact with the ornament in her room to proceed.
Follow the star to the destination
Make sure to keep your eyes peeled and pay attention to the floating star, as it won't wait for you and will go through walls. If you lose the star and find yourself at a dead end, just try going through some of the walls—the correct wall will let you through.
Seize destiny
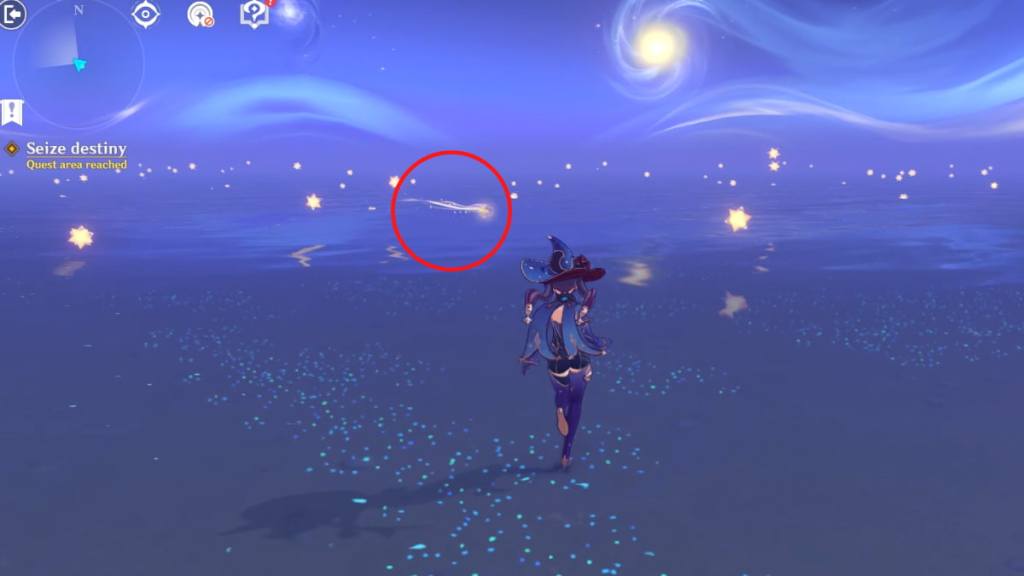
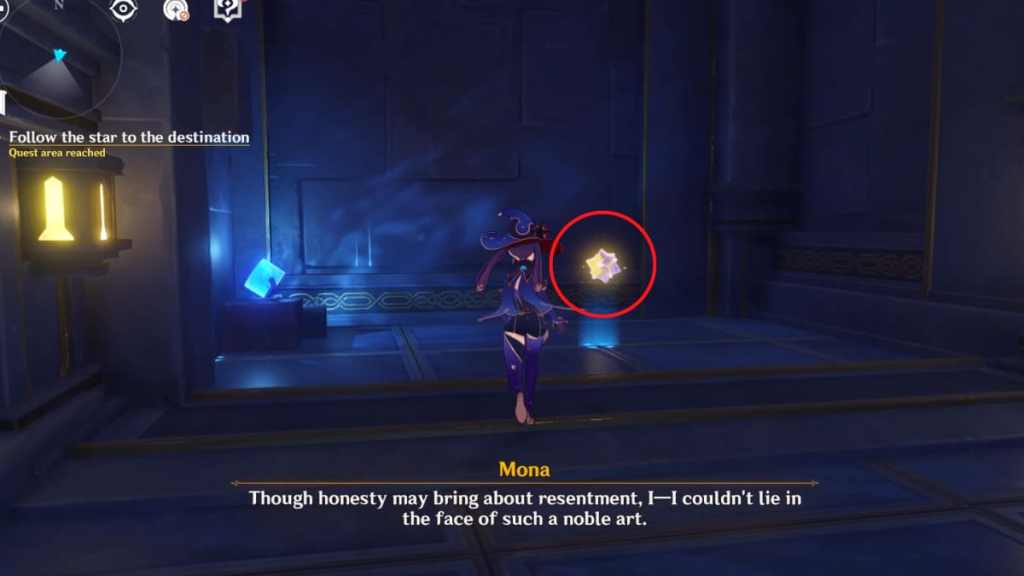
This segment is a little tricky. You'll be in a sea of stars and need to find the floating star. The floating star is the only star that moves. It also has a tail behind it, so keep your eyes peeled and look carefully. Once you find the floating star, chase after it and capture it by interacting.
This marks the end of Mona's World Quest, but you can re-enter the Mirage by heading to the Temple of Star Latitudes in the Minacious Isle and selecting The Ancient Azure Stars under Phantasmal Tales. There are 15 more Chests and one Phantasmal Conch that can be discovered inside the Mirage!
Other Genshin Impact The Ancient Azure Stars Mirage guides
If you need help with upcoming puzzles, check out the guides below to help you out. We highly recommend doing them in order.
- How to solve the Astral puzzles & Pressure Plate puzzle in The Ancient Azure Stars first room in Genshin Impact
- How to solve the invisible bridge & water Ascension puzzle in The Ancient Azure Stars second room in Genshin Impact
- How to solve all water reflection puzzles in The Ancient Azure Stars third room in Genshin Impact
- How to solve all Astral puzzles in The Ancient Azure Stars fourth room in Genshin Impact
- How to solve the Luxurious Chest Pressure Plate puzzle in The Ancient Azure Stars final room in Genshin Impact
Check out our guide on Where to find the hidden Phantasmal Conch (Misplaced Conch 2) in Broken Isle in Genshin Impact to get Fischl's free skin!